

Page 1

Page |
1
www.day
6outdoors.com
Page 2

Page |
2
www.day
6outdoors.com
Introduction
Thank you for purchasing the Day6 PlotWatcher Pro Game Surveillance System.
This camera continues the
tradition of technological
breakthrough started by
the original PlotWatcher
Time
-
Lapse HD video camera. Mounted at your
potential
hunting locations, it records HD video of all the activity that happens
in the days before you hunt, so you will know precisely when and where to
hunt.
Images are captured and stored as video frames, typically every 5 or 10
seconds, from dawn until d
usk, creating a time
-
compressed HD video of each
day’s activity.
The video file for each day can then be reviewed in just a few
minutes using the included GameFinder video player software.
The Game Surveillance innovation will dramatically increase
your effectiveness
as a hunter. Because you will know when and where to hunt, and have an
accurate record of recent activity, your choices will enable you to see more
animals, minimize wasted hunts, and better understand your chances for a true
trophy.
The PlotWatcher Pro breaks through battery life limitations by recording up to
120 days of activity onto an SDHC memory card.
This is 20 times more video
frames than the original PlotWatcher, and 40 to 100
times
more frames than
trail camera
s.
The PlotWatcher Pro includes a large, easy to read LCD status screen that tells
you exactly what you need to know about the camera and allows you to take a
preview picture for aiming.
It also includes 3 slide switches for the main
settings, making i
t quick and easy to setup.
Page 3

Page |
3
www.day
6outdoors.com
The PlotWatcher Pro gives you more flexibility, with time intervals as short as 1
second or as long as 60 minutes.
You also have the option of
us
ing
interchangeable Day6 accessory lenses
for greater zoom o
r wide angle
capabilities. These are
available at
the
www.day6outdoors.com
website
.
Thank you for putting your confidence in Day 6 Outdoor
s
with your purchase of
the PlotWatcher Pro.
We’re excited about
what this time
-
lapse camera can do
for you
and
we’d love
to hear from you. Please register your PlotWatcher Pro
at
www
.day6outdoors.com
,
and as always, let us know what you think!
“Thank You” from your team at Day 6 Outdoors
!
Page 4

Page |
4
www.day
6outdoors.com
Contents
Introduction
................................
................................
..............................
2
Package Contents
................................
................................
......................
5
What You Will Need
................................
................................
..................
5Camera Quick Start
................................
................................
...................
6
Checking Your First Video
................................
................................
.........
7
GameFinder Software
................................
................................
...............
8
PC Installation
................................
................................
.......................
8
Apple Computer Installation
................................
................................
.9Using the GameFinder Software
................................
...........................
9
Mounting the PlotWatcher Pro
................................
...............................
12
Collecting Video
................................
................................
......................
12
Preview Image for Aiming
................................
................................
.......
13
User Interface
................................
................................
.........................
14
Screen
–
Based Setting Pages
................................
................................
...16Light Based
................................
................................
.....................
17
Time Based
................................
................................
.....................
17
Always On
................................
................................
.......................
17
Mid
-
day Skip Options
................................
................................
.........
18
None
................................
................................
...............................
18
10am
–
2pm
................................
................................
....................
18
Custom
................................
................................
...........................
18
Interval Options
................................
................................
..................
19
5 Sec
................................
................................
...............................
19
10 Sec
................................
................................
.............................
19
Custom
................................
................................
...........................
19
Start Delay
................................
................................
..........................
20
Display Preferences
................................
................................
............
21
Setting Time and Date
................................
................................
........
21
About TLV Files
................................
................................
........................
22
Batteries
................................
................................
................................
..23Memory Cards
................................
................................
.........................
24
Using External Power
................................
................................
..............
25
Specifications:
................................
................................
.........................
29
Page 5

Page |
5
www.day
6outdoors.com
Package Contents
PlotWatcher Pro Camera Unit
User Manual
Tree Strap
Installation CD
What
You
Will
Need
4 or 8 AA batteries
PlotWatcher
Pro
supports two banks of
f
our
batteries. You can fill
one or both.
Alkaline
s
are
recommended
if average daily
temperatures are above freezing.
Lithium
s
are
recommended
if
average daily temperatures are below freezing.
Rechargeable NiMh
batteries
(Low
Self
-
Discharge type) can be used in
the same temperature
range as
alkalines
.
However,
we recommend
gaining experience with alkaline
s
first, as a benchmark, because of the
wide variety of energy capacity, self
-
discharge behavior, and
temperature sensitivity of rechargeable batteries. Visit
www.day
6outdoors.com for specific recommendations.
SD
or SD
HC
Memory
Card
Supports
from 1
Gbupto 32
Gb
memory card
.
8
Gb or larger
recommended.
Memory Card Reader
Note that
m
emory cards
of 4
GB
or greater
are SD
-
High Capacity
(
) and require readers that are SDHC compatible.
PC or
MAC
Computer
For PC
:
Windows XP
(Service
P
ack3)
, Vista, or Windows 7.
For Mac: 10.4.7 or later Operating System (Intel based versions)
Page 6
Page |
6
www.day
6outdoors.com
Camera Quick Start
1.
Unpack your Pl
otWatcher Pro and remove all protective film.
2.
Insert 4 or 8 AA batteries into the upper, lower, or both compartments.
Do not mix battery types in a given compartment.
3.
Insert your SDHC memory card into the memory card slot
.4.Put the setting switches into the upper positions as shown
below.
Start/Stop: Light Based
Midday Skip: None
Interval: 5
Seconds
Page 7

Page |
7
www.day
6outdoors.com
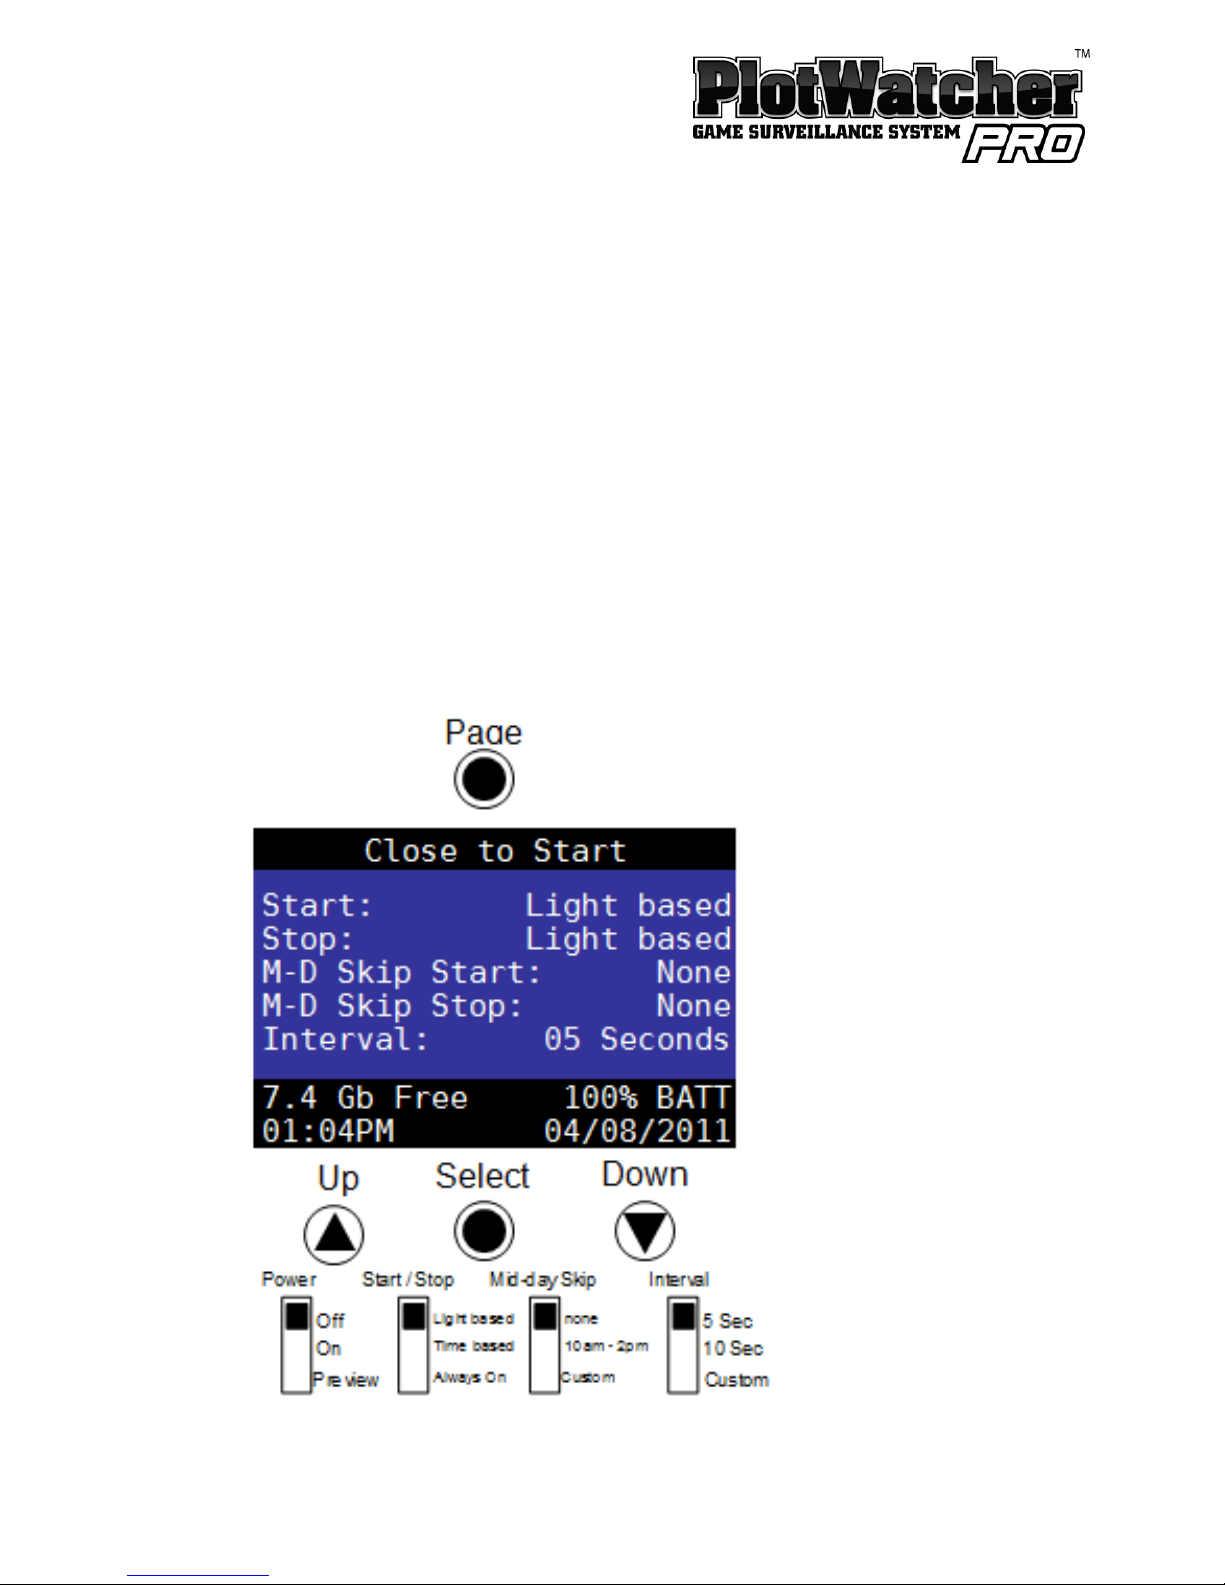
Camera Interface:
Status Screen, Navigation Buttons
, and Selector Switches
5.
Power
on the camera by sliding the
Power
switch to the center position.
6. Set the
Time and Date
.
Press the PAGE button to step through the settings pages to “Set Time
and Date
.”Press the SELECT button to step through the fields o
n the page.
Use
the
UP and DOWN buttons to change values.
After setting the
Time
and Date
, press PAGE until you return to the
s
tatus
screen.
7. That’s it!
It’s a good idea to take some test vi
deo before putting the camera
in the field,
to
ensure
everything is working correctly.
With the camera ON,
shut and latch the door and aim the camera at a well illuminated scene to
collect some
time
-
lapse video!
Checking Your First
Video
1. Install the GameFinder software which is on the included CD. (See next
section,
GameFinder Software,
for detailed install instructions
.
)
2. View the test video
.A.Open the camera, wait for the status to display, and then
power
it off.
B.Remove the
m
emory
card
and place it into your PC or MAC computer.
C.
View the files on the
memory
card
:If“Autoplay” opens in Windows,
choose “Open folder to view files.”
Otherwise, use
“
My Computer
”to
click
on the drive letter.
On an Apple computer, you can use “Finder”
to navigate to your memory card.
D.
Double click on the
DCIM
folder, and then the
100D6OPR
sub f
older.
Page 8

Page |
8
www.day
6outdoors.com
E.
You should then see the file name of the sample video
.Double click
on
this file. This
will launch the GameFinder
time
-
lapse video player
software.
3. When
you
finish
watching the test video, delete the test video files from
the
memory c
ard and return it to the PlotWatcher camera.
N
ote
: You generally will not want to copy your
Time
-
Lapse Videos to your
computer because they are so large. They should play
directly from the
memory
card. You c
an save any individual pictures or short video snippets you
wish to keep to your hard drive with the
Export
feature
inside
the
FILE
button.
Special
n
ote for Apple
users: After deleting files on a
memory
card, you must
then “empty the tr
ash” folder to actually free the space on the
memory
card.
GameFinder Software
PC Installation
1. Insert the PlotWatcher TLV CD into your computer.
2. If Windows does not auto
-
open the CD to reveal the “
GameFinder_Setup
”
icon, then browse to the
CD drive using “My Computer.” Once you see
“
GameFinder_Setup
” in the Explorer window, proceed to the next step.
3. Double Click on “
GameFinder_Setup
” to start the setup program.
4. Click NEXT for each of the steps of the GameFinder Installer Wizard.
5. Installation is complete.
The GameFinder video player software is installed
under “All Programs” in the “Day6” folder, and a shortcut is also placed on
the desktop.
Page 9
Page |
9
www.day
6outdoors.com
Appl
e
Computer
Installation
1. Insert the PlotWatcher TLV CD into your Apple computer
.
2. Double click on the
GameFinderDisk
file
package
to
mount the disk image
onto the desktop
.
3. Drag the GameFinder program into the Applications folder
.4.Double
-
Click on the
GameFinder
program in th
e
Applications
folder to verify
that it has been installed.
Using the GameFinder Software
Page 10

Page |
10
www.day
6outdoors.com
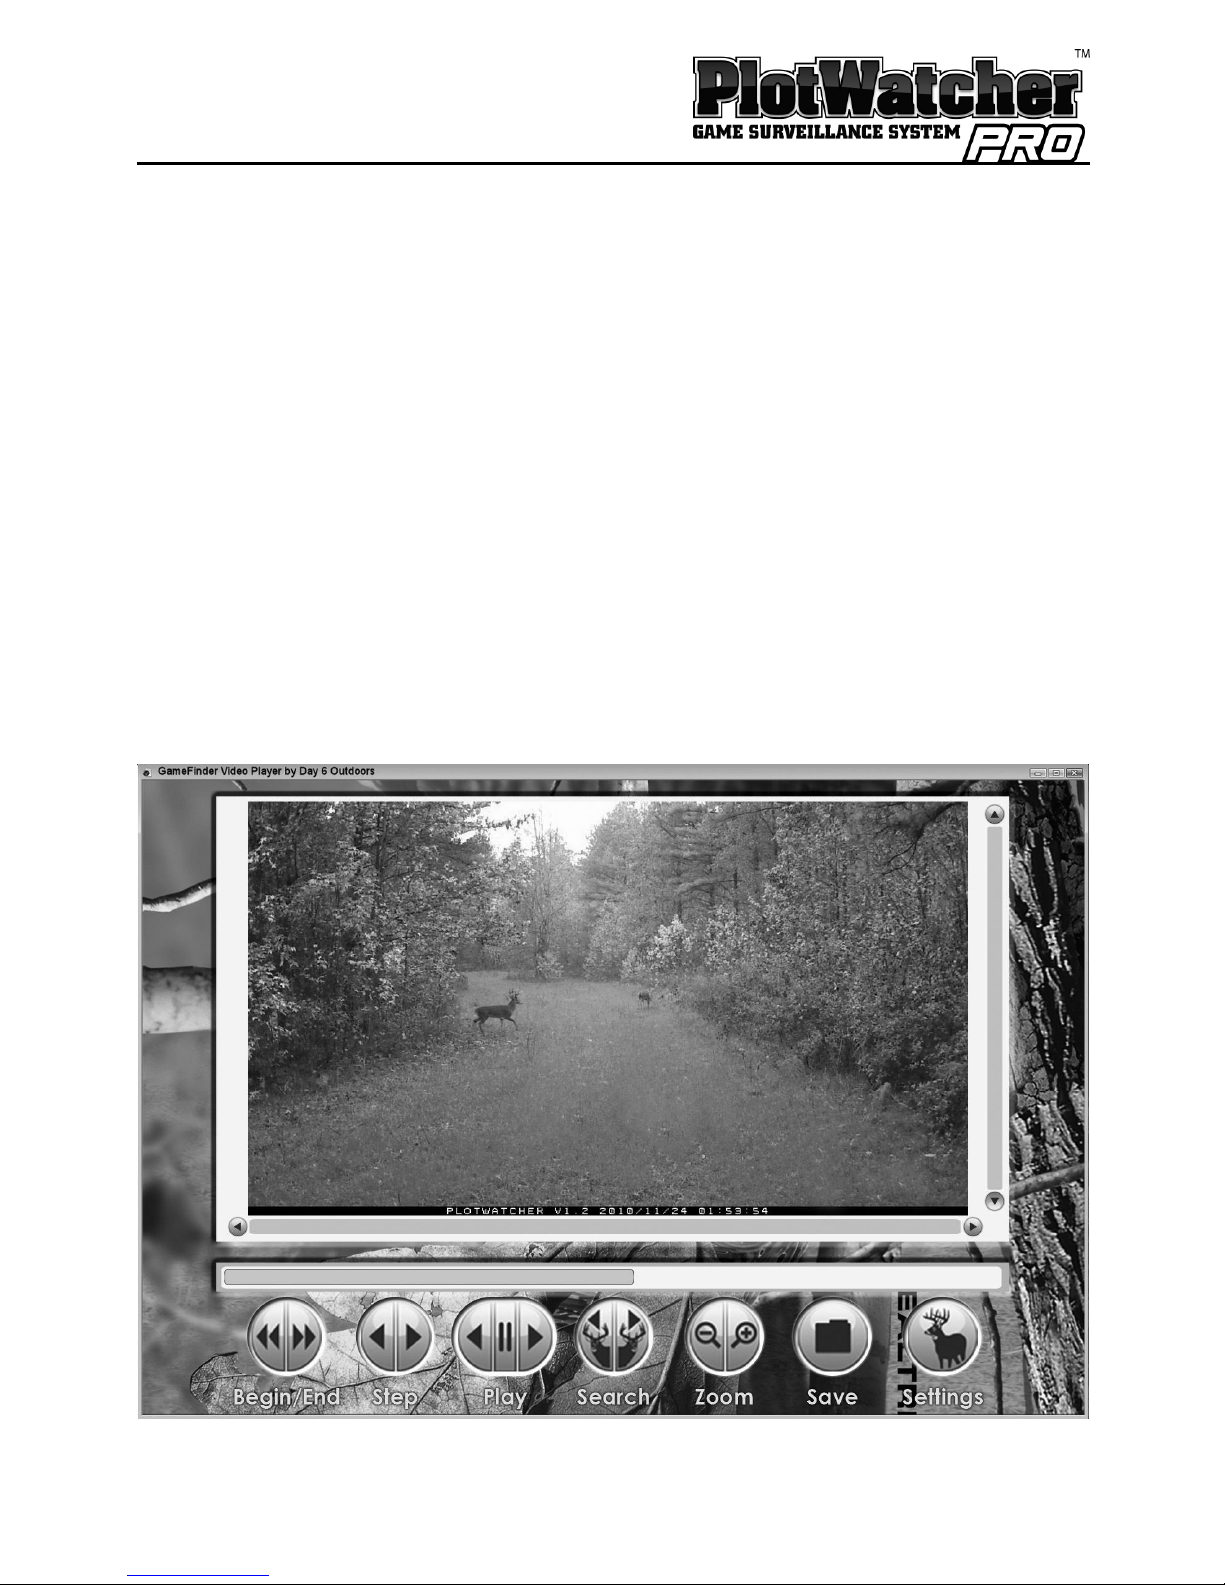
The GameFinder player
is an easy, fast, and fun way to view
time
-
lapse video
files.
To open a file, navigate to the
\
DCIM
\
100D6OPR
folder on your
memory
c
ard
and double click on the file of interest. You will see one file per day when not
using Mid
-
day
S
kip, or two
files per day when using
the
Mid
-
day
S
kip feature.
Note that files are named based on the camera date on which they were
created.
The quickest and easiest way to get an overview of a
time
-
lapse video file is to
use your mouse to drag the “Positio
n Arrow” across the play bar (this is the
triangular indicator with the frame number displayed in it). This will preview,
in a very short time, what is contained in the file. You can drag to the right to
move forward in time, or to the left to move back
ward in time.
When you see an interesting portion of the file, stop dragging the Position
Arrow and use the scroll wheel on your mouse to move forward or backward
one frame at a time. If you don’t have a scroll wheel on your mouse, you can
use the arr
ow keys or just click on the back or forward STEP button.
To see every single picture, and ensure you do not miss any frames, you can
play the file like a traditional video. Just click on the back or forward PLAY
button to begin. Clicking again will sp
eed up the play, up to 5x by clicking
several times. (After 3x, some frames may be skipped). At any point if you
see something of interest, click on the video screen or scroll the mouse wheel
to pause the video and enter step/scroll mode.
SEARCH will
cause GameFinder to search in the direction of interest (forward or
backward) for motion and will move the “Position Arrow” to the frame in the
video file where movement is detected. A vertical line is drawn on the play
bar at each point where movement
is detected. If the search feature is too
sensitive, and you are finding shadows or trees that are moving, use the
SETTINGS button to limit the region of the field of view that is searched,
and/
or
Page 11

Page |
11
www.day
6outdoors.com
limit the sensitivity. The settings for the motion searc
h can be found under the
SETTINGS button.
On the FILE button, you can choose to export a single video frame as a JPEG
image, or a sequence of 50, 100, or 200 video frames as a short TLV file (best
resolution) or a compressed WMV file (best for
You
Tube
®
uploads).
For additional tips
,tocheck for the most recent updates
,
and to get the latest
information on
the
GameFinder player, visit
www.day6outdoors.com
.
Page 12

Page |
12
www.day
6outdoors.com
Mounting the PlotWatcher Pro
A
tree
strap
is included for mounting your
Plot
W
atcher
Pro
to a tree. The strap
should be snug, but not too tight. The larger the tree you choose, the less
wind sway you will have in your
time
-
lapse video. It is sometimes helpful to
use a small stick between the top of the camera and the tree to adjust the
angle of the camera. Many game camera mounting accessories that work with
the
PlotWatcher Pro are available, such as tripods,
stakes, and adjustable tree
-
mount devices. If you wish to use a mounting accessory, select one that uses
¼-20 thread to mount into the base of the camera.
If theft is a concern, note that you can place
the PlotWatcher
Pro
high into
a
tree, generally out of sight, because it does not rely on motion triggering. You
can also use a padlock on the access door of your PlotWatcher, and
/orasecurity cable such as the Masterlock Python brand
can be passed
through the
housing to secure
your camera to a tree.
Check
www.day6outdoors.com
for
these and other
PlotWatcher
Pro accessories.
Collecting Video
To start your camera, insert your
memory
card, slide the POWER switch to
ON,
and wait for the status screen to display. Select your preferred settings with
the slide switches, and/or the screen
-
based settings pages. (See “User
Interface” section for more details.) When the camera says “Close to Start” in
the top line of th
e status display, you can shut and latch the door to being
capturing
time
-
lapse video.
Page 13

Page |
13
www.day
6outdoors.com
Preview Image for Aiming
To inspect the aim of the camera, slide the POWER switch from ON to
PREVIEW. You will see the following screen:
Close the door and
hold
it
shut for 5 seconds while an image is taken. Then
open the door to preview your image on the screen. Adjust the aim if
necessary, and close the door again for 5 seconds to take another image.
Repeat until you are satisfied with the aim. Then
slide the POWER switch back
to ON before proceeding to capture
time
-
lapse video by closing and latching
the door.
Page 14

Page |
14
www.day
6outdoors.com
User Interface
When you
power
on your PlotWatcher Pro, you will notice the Day6 logo and a
version number
displays
while the came
ra is starting. The
s
tatus
p
age
screen
indicates
the settings
of the camera.
Status page screen
The top line of the
status page
indic
ates that the camera is ready to begin,
(“Close to Start”) and instructs you to close the camera to start operation. A
small door switch is located just below the “Interval” switch that automatically
senses the door closing and begins the
time
-laps
evideo recording. The
camera will stop recording to the current file when the camera is opened, and
will begin a new file when it is closed again.
Page 15

Page |
15
www.day
6outdoors.com
If the camera is not ready to record, the
status
line will give one of the
following messa
ges:
Message
Condition
Start on
MM/DD/YYYY
Camera is waiting on a user specified
“start delay” to expire, and will begin
recording on the date shown.
Skip until
HH:MM
AM/PM
Camera is in a Mid
-
day
Skip
period and
indicates t
he time of day it will restart
recording.
Start at Dawn
Camera is in “Light Based” mode and has
detected that it is too dark to operate
.
Start at
HH:MM AM/PM
Camera is in “Time Based” mode and is
not currently schedule to run.
Disk Full
–
Cannot S
tart
Shown when the camera initializes with
less than 0.1 Gb of free space.
The bottom two lines of the
status page
show the amount of remai
ni
ng storage
(7.4 Gb Free in the example) on your
memory
card, the proportion of battery
lif
e remaining in the active battery bank, and the time and date.
Note that
when the storage space falls to 0.1 Gb, the oldest
TLV
file,(even if it is the only
one)
,
will be deleted, and a new file created.
Page 16

Page |
16
www.day
6outdoors.com
Screen
–
Based Setting Pages
The screen
-based setting pages are where you can set the
t
ime and
d
ate,
special features, and custom setting values.
P
ress PAGE button to cycle to the next page
.
Press SELECT button to cycle to the next field on a page
.
Press UP or DOWN button to change v
alues in a field.
Page 17

Page |
17
www.day
6outdoors.com
Start / Stop Options
Light Based
In “Light
based
” start
/stop mode, the camera will come on as soon as there is
enough light for
an image
to be captured
, and will cut off when there is no
longer enough light
to do so
. During
darkness
, the camera is in “
night mode”
and takes a picture every 5 minutes to determine if it is bright enough to
resume capturing time
-
lapse video.
Time Based
In “Time
based
” start/stop mode, you
specify the specific time you want the
camera to
power
on and
power
of
f. These
are set on the screen
-
based setting
s
page
shown
at right
:
Always On
”A
lways On”
mode is typically used
in security situations where continuous
monitoring is desired, and some
external
form of light will be available, such as
pa
rking lots, office
s
, etc.
Note that operation at night will
deplete
the batteries
slightly more quickly because of longer exposures during the image capture.
Page 18

Page |
18
www.day
6outdoors.com
Mid
-
day Skip Options
None
The camera will run for dawn
until
dusk (in Light ba
sed mode) or from Start
Time
until
Stop Time (in Time based mode).
10am
–
2pm
The camera will shut down from 10am until 2pm
in the middle of the day to
conserve batteries and storage space. A separate file is created after the Mid
-
day
Skip
peri
od, with an incremented ending letter
in the file name to
differentiate it
. For example, on April 8, 2011, 110408AA.TLV
would
be the file
name
for
the file created that
morning, and 1100408AB.TLV
would be the file
name for the file created that
afternoon
.
Custom
The camera will shut down from a
user
-
specified OFF time until a
user
-
specified
ON time to conserve batteries and storage space. These are set on the screen
-
based settings page shown below
:
Page 19

Page |
19
www.day
6outdoors.com
Int
erval Options
5 Sec
The interval between video frames will be 5 seconds. This is a good setting for
small areas where the game may pass
through
the field of view more quickly
than
in
larger areas. This will consume more memory storage space and
batte
ry power than the 10 second setting, with a 12 hour video file using .8 to
1.2 Gb, depending on scene detail. See Specifications for more detail.
10 Sec
The interval between video frames will be 10 seconds. This is a good setting
for larger areas where
the game will not
pass through
the field of view quickly.
This will consume less storage space and battery power than 5 second interval,
with a 12 hour video file using .4 to .6 Gb, depending on scene detail. See
Specifications for more detail.
Custom
The interval between frames can be selected from the following values:
1 sec, 2 sec, 3 sec, 5 sec, 10 sec, 20 sec, 30 sec,
1 min, 3 min, 5 min, 10 min, 20 min, 30 min, 60 min
.
These are set on the screen
-
based
settings page shown
at right
:
Custom Interval
Settings
Picture
Interval
03 Seconds
Page 20

Page |
20
www.day
6outdoors.com
Start Delay
If you are departing from a hunting site for an extended period of time, you
may want to schedule your PlotWatcher
Pro
to begin capturing video only 1
or
2 weeks before you return
in order
to conserve me
mory storage space and
batteries. This can be easily done by specifying the # of days of Start Delay, up
to 45 days into the future. The calculated start date will then be shown on the
screen based settings page, as well as on the main status page.
Page 21

Page |
21
www.day
6outdoors.com
Display Preferences
The display preferences are selected on
the following screen
-
based settings page:
Time formats are
:
AM/PM
24Hr
Date formats are
:
MM/DD/
YYYY
DD-Mmm
-
YY,
DD/MM/YYYY
YYYY/MM/DD
The “
Site
” field
is an 8 character string that
you
can
use to
identify
the
site
where you are placing your PlotWatcher Pro.
You can change each letter by
using the “Up
” and “Down” bu
ttons to scroll through the alphabet. Once you
find the letter you are looking for, move to the next letter by pressing the
“Select” button.
Setting Time and Date
Time and Date are set on the following screen
-
based settings page:
Preferences
Time: AM/PM
Date: MM/DD/YYYY
(04/08/2011)
Site: CAMERA 1
AM/PM
Page 22

Page |
22
www.day
6outdoors.com
About TLV
Files
The PlotWatcher Pro normally records one video file per day. When using
the
Mid
-
day
Skip
feature
, it records two files per day
–
one before the skip period
and a second afterw
ards.
Anytime the camera door is opened, the current file will be closed, and a new
one
will be
created. The new file will have an incremented “letter code” (last
two characters) as described in the naming convention below.
If the
memory
card runs
low on storage space (0.1 Gb or less), the current file
will be closed, the oldest file deleted, and a new file begun.
The files are stored on the
memory
card, in the
“\DCIM
\
100D6OPR
\”folder.
The files are named according to date: YYMMDDAA.TLV
,where YY = Year, MM
= Month, DD = Date, and AA is a “
letter code
” that
is incremented in a
sequence (AA, AB, AC, etc
.
) when multiple files are created on the same date.
An example of an actual file name would be 110408AA.TLV.
TLV
files utilize the industry standard AVI format. The TLV files can be played
in Windows
Media
Player
, Apple QuickTime player, and most video editors if
opened
manually
. In some cases, it may be necessary to rename the file to end
in *.AVI.
Page 23

Page |
23
www.day
6outdoors.com
Batteries
We recommend
that
you
begin
with 8 AA alkaline batteries, unless the daily
average temperatures are below freezing, or the night time lows are below 20
⁰
F /-6⁰C. In that case, you should
use
8
lithium
AA
batteries, which work
particularly well in cold weather. You may wish to transition to rechargeable
Low
Self
-
Discharge NiMh batteries after you have benchmarked the operating
life in your preferred mode, on regular
alkaline
batteries.
The PlotW
atcher Pro utilizes two battery banks: an upper bank of 4 batteries,
and a lower bank of 4 batteries. You can populate one or both banks with
batteries. Battery types should not be mixed in a given bank. The camera will
always operate on the bank wit
h the higher voltage. In practice, this means
they will fall off in voltage equally, as the camera automatically switches back
and forth between the higher of the two banks. However, if you load used
batteries into one bank, and new batteries in anothe
r, then the new batteries
will be used until they reach the level of the used batteries.
The Battery % indicator on the main status page registers 100% for anything
above 6 volts, and 0% for anything below 4 volts, and a proportional
percentage for any vo
ltage in between. This is based on the voltage
characteristics of
alkaline
batteries, so keep this in mind if you are using a
different type.
Different types of batteries have different voltage
characteristics. Four new alkaline batter
ies are 4 x 1.6v = 6.4 volts. Four new
lithium batteries are 4 x 1.8v = 7.2 volts. Four new, fully charged NiMh
batteries are 4 x 1.25v = 5 volts. NiMh rechargeable batteries may show 50%
battery when first installed, yet operate for many days at th
at level. Lithium
batteries may show 100% for most of their life, and then fall rapidly.
Page 24

Page |
24
www.day
6outdoors.com
After you have used the camera a few times with
alkaline
or
lithium
batteries,
you will have a good benchmark on battery life and might want to
consider
rechargeable
NiMh batteries as an alternative. Their tolerance for low
temperature is similar to alkaline batteries (av
erage
temp
erature
above
freezing, lows above 20
⁰
F /-6⁰C) but they can save you money over time.
Look for the newer “Low
Self
-
Discharge” NiMh batteries, sometimes referred
to as “pre
-
charged,” because the ordinary NiMh batteries lose their charge
over time, even when not being used.
Y
ou can expect to get about 50% to 70%
of the runtime you would get with
alkaline
batteries, but with the very long
battery life of
the
PlotWatcher Pro, they can be an effective, economical
choice.
Memory Cards
We recommend you start out with a
new 8, 16, or 32 GB SDHC
memory
card
.
You might prefer to purchase two cards so that you can swap them in the field.
Note that many older computers have SD card readers that will not read the
higher capacity SDHC cards. (Cards from 2
Gb to 32Gb
are
typically
SDHC
.)If
your computer will not read the SDHC cards, you can obtain an
SDHC card
reader
that will enable
you
to
read SDHC cards on any computer with a USB
port.
These
SDHC card
readers are typically available on the
Accessories
section of the
www.day6outdoors.com
website.
If you are not starting with a brand new SDHC card, we recommend that you
ensure
all
other fi
les have been deleted from the card.
A large number of files,
such as music collections or photo collections will take up space and also cause
the PlotWatcher to take more time to read
from
and write
to
the disk,
thus
reducing battery life.
SanDisk i
s a widely available and reliable brand of SDHC memory card. You
may check the Frequently Asked Questions (FAQ) at
www.day6outdoors.com
Page 25

Page |
25
www.day
6outdoors.com
to see if we have found particularly good or bad performance with any cer
tain
brand of card.
NOTE: Your SDHC must be formatted with FAT32, and all cards of
32Gb
or less
usually come with this format.
Windows 7 will not format using FAT32
, so do
not reformat your SDHC cards with Windows 7. If you use Windows 7, and
h
ave a need to reformat your card, you will need a
third
-
party utility software.
See the FAQ at
www.day6outdoors.com
for more information, including the
possibility of using 64Gb and 128Gb SDXC cards formatt
ed with FAT32.
Using External Power
The PlotWatcher Pro has exceptionally long battery life
-
up to 120 days when
using both battery banks and capturing 8 hours per day on a 10 second interval.
Service time will be shorter with shorter ti
me intervals or more hours of video
per day. If you wish to extend the operating time, or eliminate the reliance
upon AA batteries, you may use the external power port.
The
external
power
port
in the
PlotWatcher
Pro is 12v, w
ith the
center
pin
positive and the outer shell negative polarity. It uses a 5.5mm x 2.1mm
connector DC power plug common to many trail cameras accessory devices,
such as cables with clips, solar devices, battery packs, etc.
Be sure the pl
ug fits
securely into the receptacle to avoid moisture entering the camera. If your
plug is not large enough to fit securely, you may want to enlarge the diameter
with tape.
See
www.day6outdoors.com
for
compatible devices and accessory
cables.
Note that although the PlotWatcher Pro internally operates on 6 volts, the
external power port utilizes nominal 12 volts (10v
–
15v) because this is the
most widely available voltage for external power sources. E
xamples include
sealed lead
-
acid (SLA) batteries, deep cycle RV/Marine batteries, and solar
panel accessories.
Page 26

Page |
26
www.day
6outdoors.com
If you wish to use a solar panel accessory, be sure it is a 12v model
.It is a good
idea to
select one that has an integrat
ed battery
or a battery charging circuit
connected to an external battery which is connected to the PlotWatcher Pro.
If your solar panel is not used in conjunction with an integrated or external
battery, it can still prolong the life of your camera by p
roviding the operating
power during sunlight hours
.The internal batteries will be automatically
selected to power the camera when the output of the solar panel is not
present.
Note that the Battery % indicator will show 100% as long as the exte
rnal
battery power is above 10v. It will not be an accurate indicator of the life
remaining in the external power supply.
Page 27

Page |
27
www.day
6outdoors.com
Specifications
:
Image Detector:
720P HD
Video (
1280 x 720)
File Format:
AVI format with TLV extension
Per Fram
e Storage
:
100k
–
200k (depending on scene detail)
Batteries:
Dual
banks
of (4) AA each
Operating Temperature:
-
20 F to 110 F
External Power Voltage
:
10v
–
15v
External Power Connector
:
5.5mm x 2.1mm DC Power Plug
Storage Media
:
SD or
SDHC
Memo
ry Card (
2–32 Gb
)
Accessory Lenses
:
Zoom and Wide Angle
Image
Intervals:
1, 2, 3, 5, 10, 20, 30
seconds
1, 3, 5, 10, 20, 30, 60 minutes
Display
:
2.7” TFT LCD
Start/Stop Modes
:
Light
-
based
,
Time
-
based
,
Always On
Mounting Options
:¼-
20 threads
for tripod (not included)
,
tree strap
Features
:
Preview for Aim
,
Mid
-
day
Skip
,&Start Delay
Image Embedded Data
:
Camera Name, Temperature,
&
Moon Phase
Page 28
Page |
28
www.day
6outdoors.com
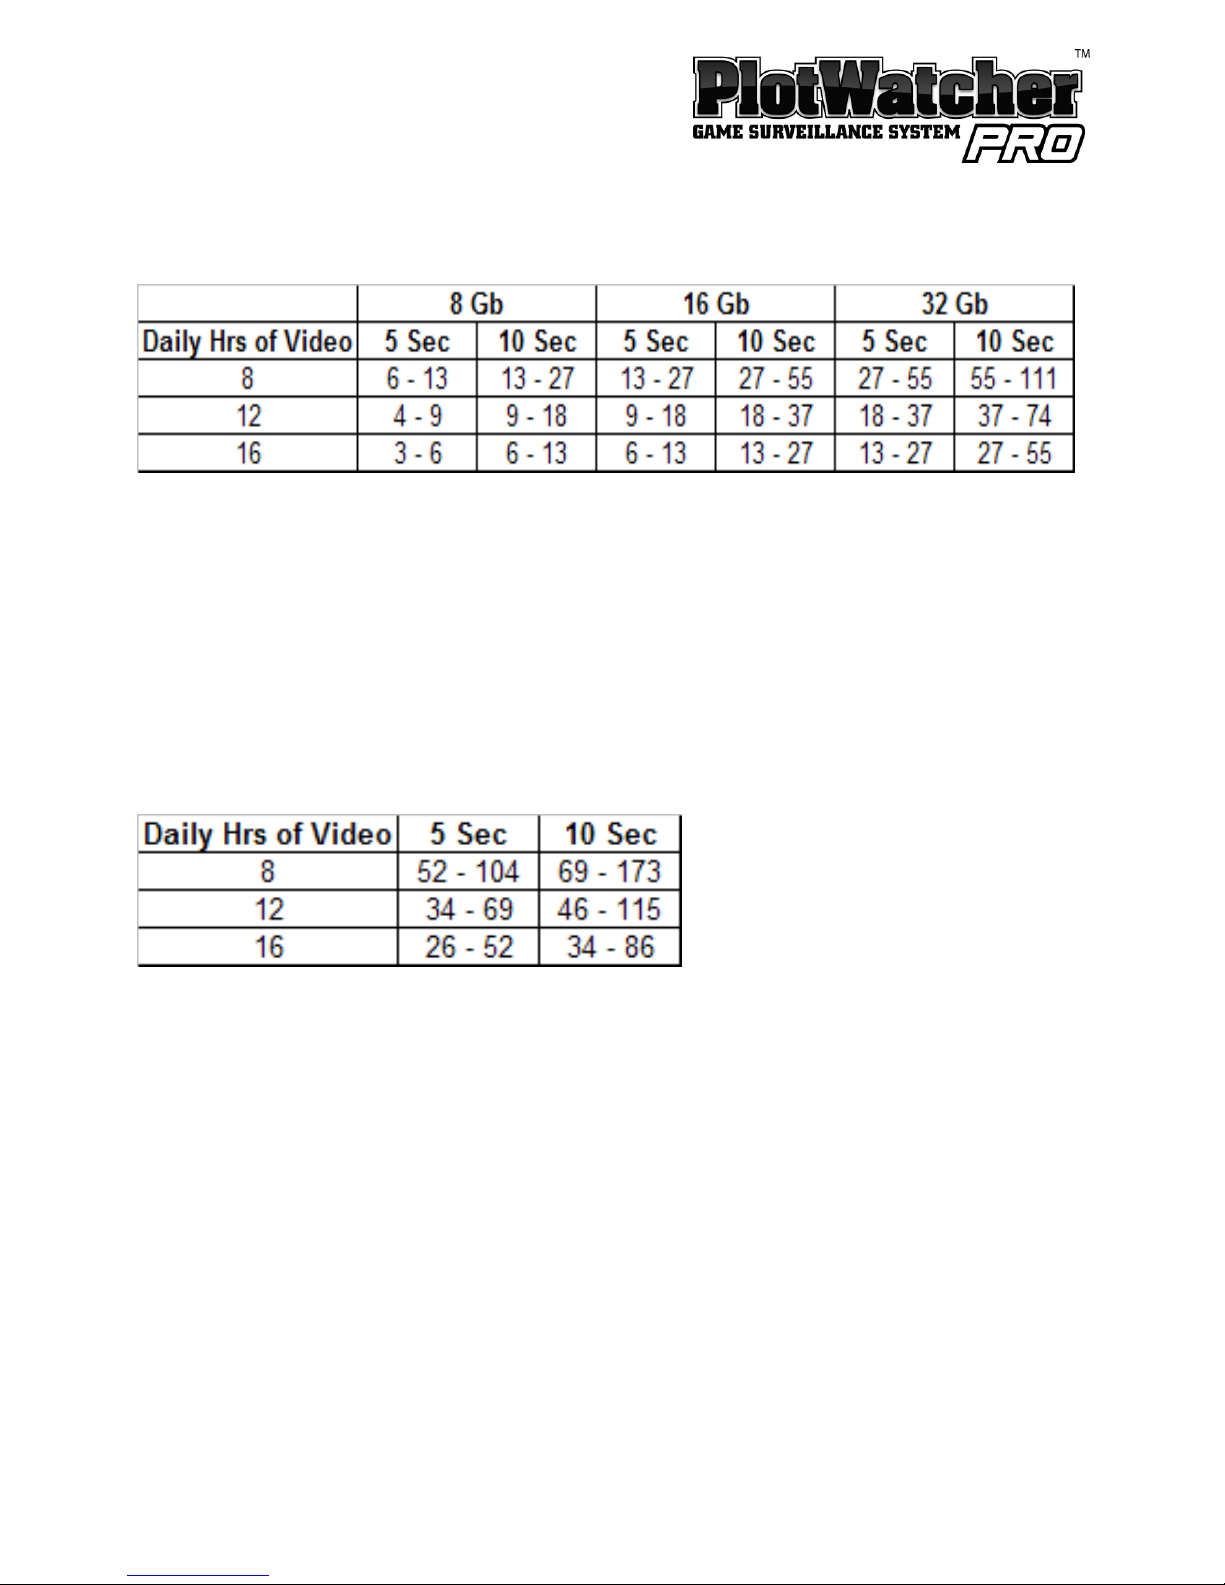
Typica
l
Memory
Card Capacity, expressed in DAYS
The camera will not stop recording when the card is full, but will delete
the oldest file and resum
e recording.
The range of days expected varies with the per frame storage size, which
is affected by scen
e detail.
Actual experience could be above or below these guideline ranges
.
Typical battery life, expressed in DAYS
For 8 Alkaline batteries in
non
-
freezing conditions, or 8 Lithium batteries in
freezing conditions.
Actual experience could be abov
e or below these guidelines, due to
variable
s
such as SDHC card efficiency,
scene
detail (larger file sizes
consume more power
), temperature, battery quality, average level of
illumination, etc.
 Loading...