

Page 1

DriveRight
®
Fleet Management Software
Getting Started Guide
CarChip
DriveRight
Drivers
Vehicles
®
Product # 8186
®
Page 2

Product Number: 8186
Davis Instruments Part Number: 7395.313 Rev. H (10/26/07)
DriveRight Fleet Management Software Getting Started Guide
© Davis Instruments Corp. 2007. All rights reserved.
This product complies with the essential protection requirements of the EC
EMC Directive 89/336/EC.
DriveRight is a registered trademark of Davis Instruments Corp. Windows is a
trademark of Microsoft Corporation.
3465 Diablo Avenue, Hayward, CA 94545-2778 U.S.A.
510-732-9229 • Fax: 510-732-9188
E-mail: info@davisnet.com • www.davisnet.com
Page 3

Table of Contents
DriveRight FMS Features. . . . . . . . . . . . . . . . . . . . . . . . . . . . . . . . . . . . . . . 1
Package Contents . . . . . . . . . . . . . . . . . . . . . . . . . . . . . . . . . . . . . . . . . . . . . 2
System Requirements . . . . . . . . . . . . . . . . . . . . . . . . . . . . . . . . . . . . . . . . . . 2
Optional Requirements . . . . . . . . . . . . . . . . . . . . . . . . . . . . . . . . . . . . . . . . . 2
Additional DriveRight FMS Documentation . . . . . . . . . . . . . . . . . . . . . . . . 2
Connecting DriveRight to Your PC. . . . . . . . . . . . . . . . . . . . . . . . . . . . . . . . . . . 3
Connecting CarChip to Your PC . . . . . . . . . . . . . . . . . . . . . . . . . . . . . . . . . . . . . 4
Before You Install the Software . . . . . . . . . . . . . . . . . . . . . . . . . . . . . . . . . . . . . 4
Installing DriveRight FMS Software. . . . . . . . . . . . . . . . . . . . . . . . . . . . . . . . . . 5
Manually Installing SmartCard Desktop Reader Drivers. . . . . . . . . . . . . . . 7
Removing PC/SC Drivers for SmartCard Desktop Reader . . . . . . . . . . . . . 9
Installing Drivers for Wireless Download Accessories . . . . . . . . . . . . . . . . 13
Before You Run the Software . . . . . . . . . . . . . . . . . . . . . . . . . . . . . . . . . . . . . . . 17
Key Concepts: DriveRights, CarChips, Vehicles & Drivers . . . . . . . . . . . . 17
Planning for Initial Software Use . . . . . . . . . . . . . . . . . . . . . . . . . . . . . . . . . 18
First Time Running the Software. . . . . . . . . . . . . . . . . . . . . . . . . . . . . . . . . . . . . 18
Initial Program Configuration. . . . . . . . . . . . . . . . . . . . . . . . . . . . . . . . . . . . 18
Software Setup . . . . . . . . . . . . . . . . . . . . . . . . . . . . . . . . . . . . . . . . . . . . . . . 19
Default DriveRight Settings Wizard. . . . . . . . . . . . . . . . . . . . . . . . . . . . . . . 21
Default CarChip Settings . . . . . . . . . . . . . . . . . . . . . . . . . . . . . . . . . . . . . . . 21
Considerations for Using CarChip and DriveRight Together . . . . . . . . . . . 21
Testing the Communications Port . . . . . . . . . . . . . . . . . . . . . . . . . . . . . . . . 22
Building Your Database. . . . . . . . . . . . . . . . . . . . . . . . . . . . . . . . . . . . . . . . . . . . 23
Downloading Data . . . . . . . . . . . . . . . . . . . . . . . . . . . . . . . . . . . . . . . . . . . . . . . . 24
Calibrating DriveRight Devices. . . . . . . . . . . . . . . . . . . . . . . . . . . . . . . . . . . . . . 24
Additional Software Topics . . . . . . . . . . . . . . . . . . . . . . . . . . . . . . . . . . . . . . . . . 25
Backup and Restore . . . . . . . . . . . . . . . . . . . . . . . . . . . . . . . . . . . . . . . . . . . 25
Reporting . . . . . . . . . . . . . . . . . . . . . . . . . . . . . . . . . . . . . . . . . . . . . . . . . . . 25
Importing Data from DriveRight 2.x . . . . . . . . . . . . . . . . . . . . . . . . . . . . . . 25
Contacting Davis Technical Support . . . . . . . . . . . . . . . . . . . . . . . . . . . . . . . . . . 27
i
Page 4

ii
Page 5

Introduction
The DriveRight Fleet Management Software (FMS) package allows you to
store, view and manipulate DriveRight data on your PC. More specifically,
FMS provides tools for sorting, tracking, analyzing and printing data, and
viewing and printing reports for a number of individual DriveRight and
CarChip devices.
This guide is intended to get you up and running with DriveRight FMS in the
shortest time possible.
DriveRight FMS Features
• Supports the following devices: CarChip Fleet Pro, CarChip Fleet,
DriveRight 600
• Supports wireless download, which allows multiple DriveRight devices
and CarChip Fleet Pro devices to be wirelessly downloaded at one time.
• Supports the SmartCard System, which allows a DriveRight device to be
downloaded without disconnecting it from a vehicle. The SmartCard
System can also be used to upload information from FMS to a DriveRight
or multiple DriveRights.
• Supports the optional Palm Download Kit, which allows a DriveRight
device to be downloaded without disconnecting it from the vehicle.
• Automatic backup option allows the user to define the number of months of
data kept in the active database.
• A location field in the database facilitates “rolling up” data, making it
possible to manage data from many locations in one database.
• FTP support simplifies uploading data to higher levels in the organization
while preserving location information.
• Sophisticated reporting on driver safety and vehicle usage.
• Works with a variety of popular SQL relational databases: MS Access,
MySQL, MSDE, MS SQL Server, and Oracle. Installation of MS Access is
integrated into DriveRight FMS — No extra software or licenses are
required.
• Password security for data access and program functions.
• Exports GPS data to Microsoft MapPoint software.
• Wizard for adding DriveRight and CarChip devices to the database.
E, 600, Trip 500AL, Trip 130AL, and Trip Computer.
1
Page 6

Package Contents
Before installing the software on your PC, make sure your package includes
the following items:
• DriveRight download cable — A black interface cable to connect a
DriveRight device to your PC.
• DB9 connector — A 9-pin connector with modular “telephone” plugs to
connect to a serial port in your PC.
• CarChip download cable — A USB cable for CarChip Fleet Pro.
• DriveRight FMS software CD — The CD contains the DriveRight FMS
software as well as special CarChip software to view engine performance.
System Requirements
DriveRight FMS requires the following:
• Computer running Windows 98 SE, ME, NT 4.0, 2000, XP or Vista.
• 32 MB memory (64 MB recommended).
• VGA/SVGA monitor (800 x 600 or higher recommended).
Optional Requirements
• MS Excel required to view reports in Excel.
• MS Excel and MS Outlook required to email reports.
• MS MapPoint required to map GPS data.
Additional DriveRight FMS Documentation
Refer to the following sources for additional information:
• DriveRight FMS Online Help System
• DriveRight FMS User’s Manual, located in the User’s Manual.pdf file in the
FMS program folder and on the CD.
• DriveRight FMS Database Selection Guide
2
Page 7
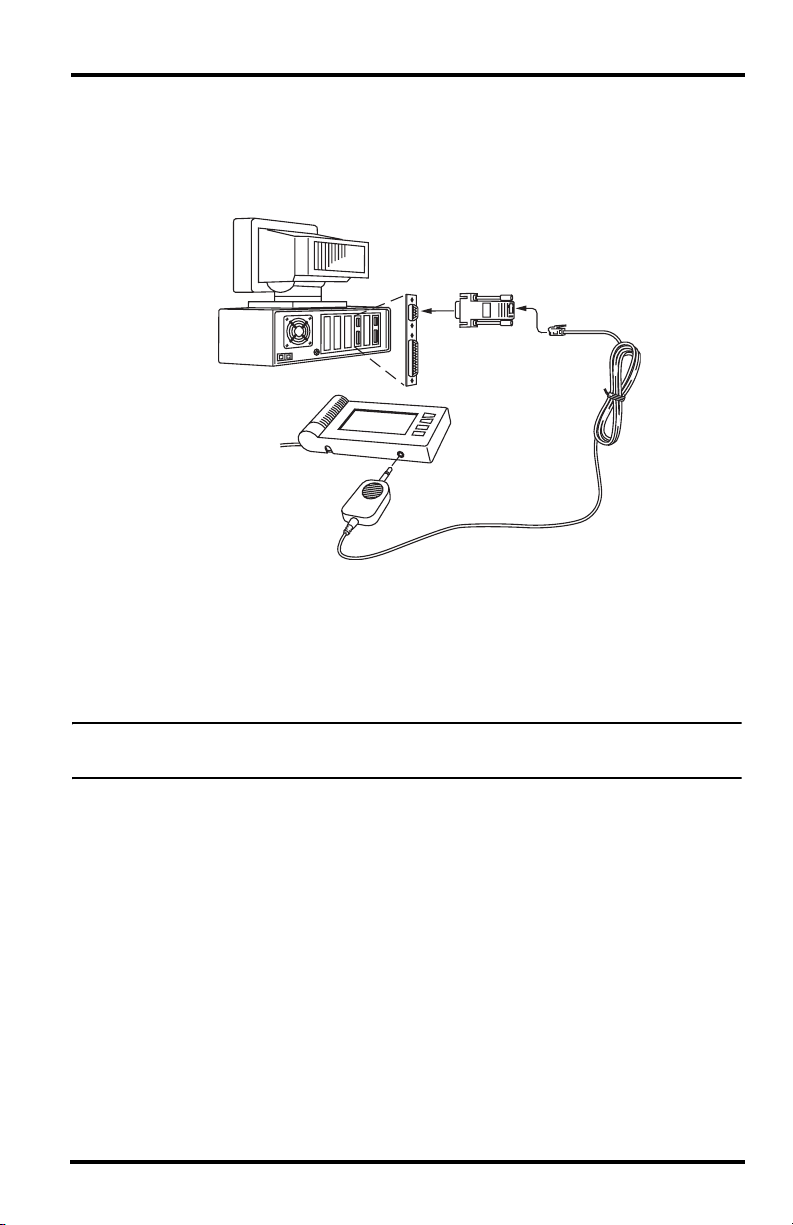
Connecting DriveRight to Your PC
Connect the DriveRight device to a serial port on your PC using the hardware
and cable as shown below.
Windows PC
COM
Port
DriveRight
Console
DB9
(9-Pin)
Molded One-Piece
Download Cable
1. Connect the DB9 connector to a serial port on your computer.
2. Connect the free end of the cable to the DriveRight device.
After you have installed DriveRight FMS, be sure to test communications between the DriveRight device and the computer. Refer to page 22 for instructions.
Note: For computers with USB ports only, use the USB-to-Serial Cable (# 8434) to connect the
DB9 connector to the computer.
3
Page 8
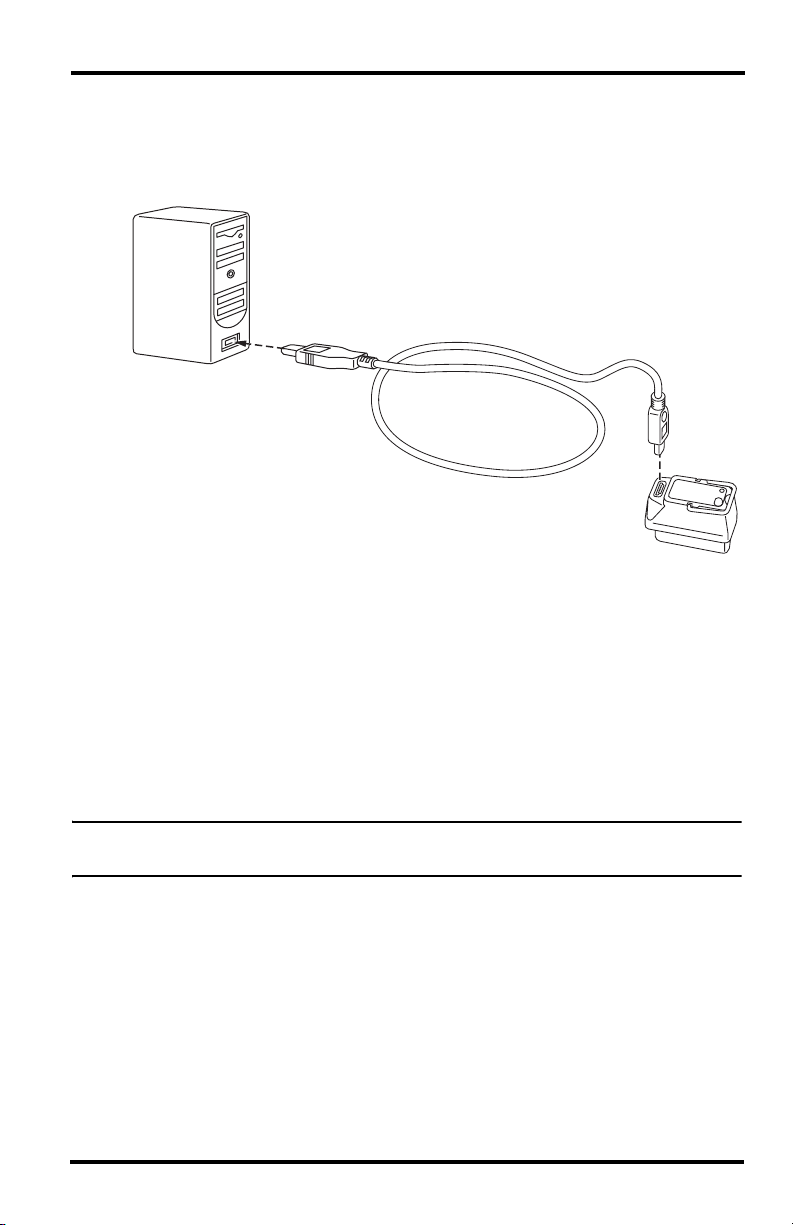
Connecting CarChip to Your PC
Connect the CarChip to a USB port on your PC using the hardware and cable
as shown below.
USB Cable
4' (1.2 m)
USB Port
CarChip Fleet Pro
Data Logger
1. Connect the USB connector to a free USB port on your computer.
2. Connect the free end of the download cable to the CarChip.
After you have installed DriveRight FMS, be sure to test communications between the CarChip and the computer. Refer to page 22 for instructions.
Before You Install the Software
Before you run DriveRight FMS for the first time, you must first decide which
database to use with FMS. Here are some basic considerations for selecting
your database:
Note: Please refer to the DriveRight Fleet Management Software Database Selection Guide for
information on selecting and installing a database for use with DriveRight FMS.
• MS Access and MSDE are recommended for single-user installations with a
fleet of no more than five vehicles. MS Access is included with FMS and
requires no additional purchase or setup to use. If using MSDE, MSDE2000
is required to run FMS 3.7 or later and needs to be installed and configured
separately before installing FMS software.
• Either MySQL, MS SQL Server, or Oracle should be used for installations
with multiple users, larger fleets, or for installations with multiple vehicles
logging GPS data.
• To use MySQL, MS SQL Server, or Oracle, you must purchase the software
and install it before running FMS for the first time.
4
Page 9
Installing DriveRight FMS Software
The following installation was completed in a Windows XP operating system.
The process may vary depending on your operating system and the installation
type. If you are upgrading from a previous version of FMS, for example, the
Destination Folder dialog box may not display because a destination has
already been created in a previous installation. The installation below
describes a full installation. If this is an upgrade, follow the instructions that
apply to the dialog boxes that display.
Note: If you are using a SmartCard Desktop Reader, do not plug it into your computer before
you install FMS. This ensures that an incorrect version of the reader won’t be installed on
the computer before the software is installed.
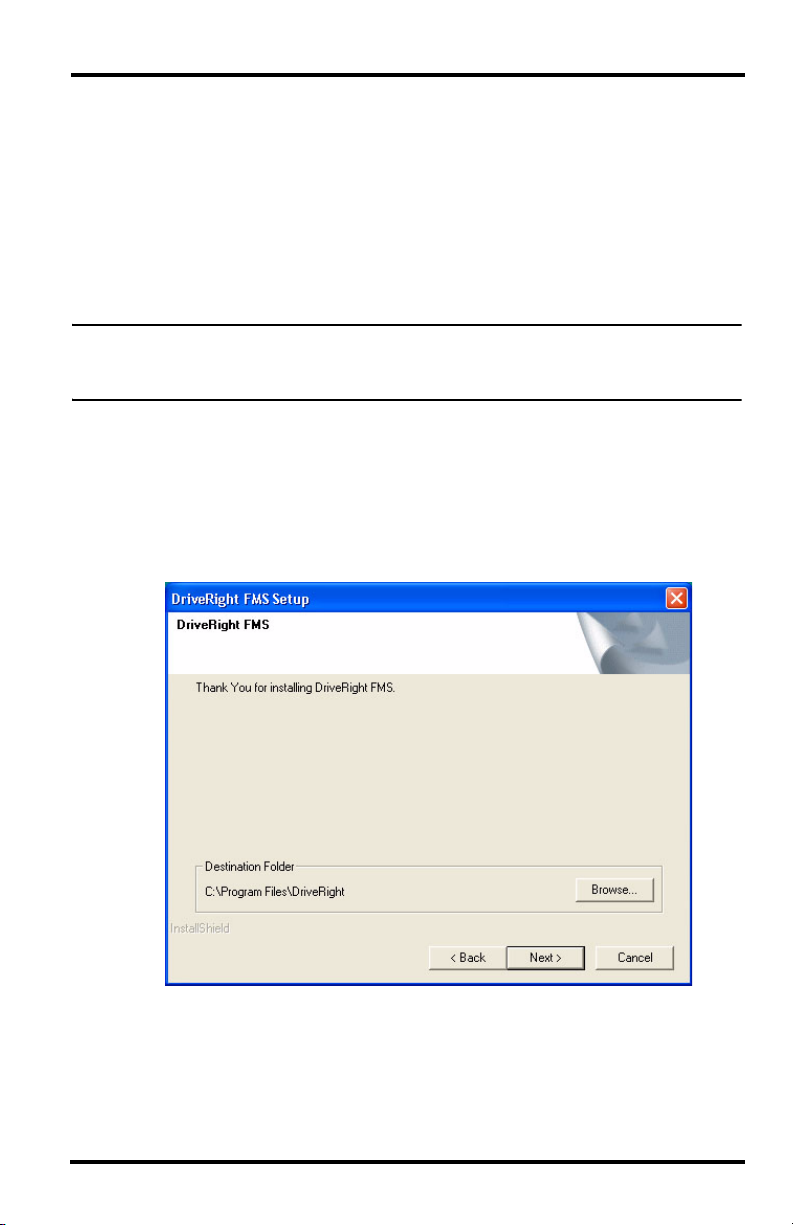
1. Insert the CD. If the install program does not appear automatically, run Setup.exe from the CD.
2. Click Next in the Initial Setup dialog box.
3. Read the license agreement and click Ye s in the License Agreement dialog box.
4. The Destination Folder dialog box displays.
5. Select a directory or destination folder for storing DriveRight FMS or accept the default destination folder and click Next.
5
Page 10
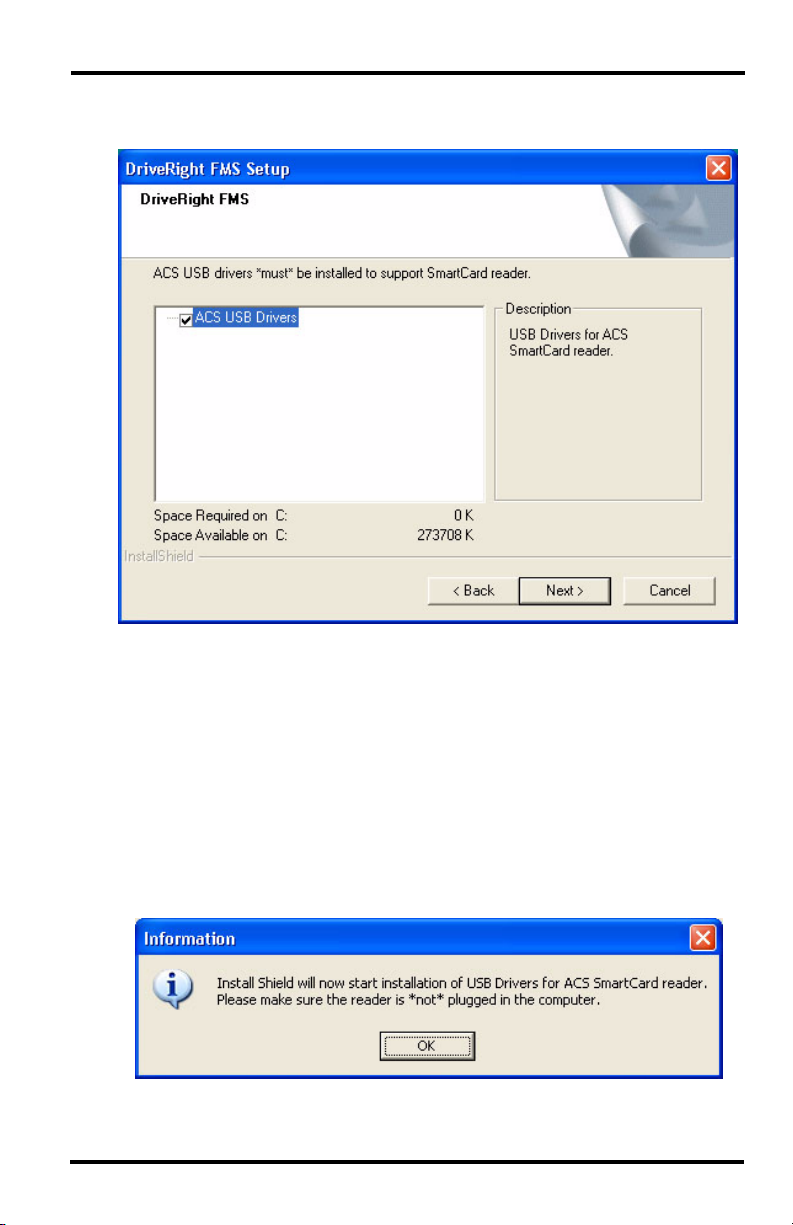
The USB Drivers for ACS SmartCard Reader dialog box displays.
6. If using a SmartCard Desktop Reader in conjunction with FMS, keep the ACS SmartCard Reader Driver checked and click Next.
The SmartCard Desktop Reader needs to be available in order to install the corresponding USB driver. Only plug in the SmartCard Reader when prompted by the installation.
If you do not have the SmartCard Desktop Reader at this time or have installed the driver before, deselect the driver and click Next.
The DriveRight FMS Installation Progress dialog box displays.
If you have selected the ACS USB Driver to install, the Information dialog box displays, alerting you that the driver is being installed.
7. Make sure the SmartCard reader is not connected to your computer and click OK.
6
Page 11

Follow the dialog boxes for installing the SmartCard Desktop Reader driver. See “Manually Installing SmartCard Desktop Reader Drivers” below for manually installing the drivers.
See “Removing PC/SC Drivers for SmartCard Desktop Reader” on page 9, if the PC/SC driver was previously installed.
8. FMS installation has completed. Click Finish to exit the DriveRight Setup.
Manually Installing SmartCard Desktop Reader Drivers
The USB drivers must be installed for the SmartCard Desktop Reader to properly communicate with DriveRight FMS. This can be done during DriveRight
FMS installation or at any time a SmartCard Desktop Reader is present for set
up. A SmartCard Desktop Reader must be available, so it can be configured
during driver installation.
Use the following instructions to install the SmartCard Desktop Reader drivers
manually:
Note: The following installation was completed on a Windows XP operating system. The pro-
cess may vary depending on your operating system.
1. Navigate to the DriveRight directory via Microsoft Windows Explorer or some other means. A list of subfolders displays.
2. Open the SmartCard USB Driver folder.
3. Double-click ACS Setup.exe. The Installation Wizard starts.
Note: Unplug the SmartCard Desktop Reader before starting the process.
4. Click Install. The Information dialog box displays, alerting you that the driver is being installed.
5. Plug in the SmartCard Desktop Reader to an available USB Port and click OK. A Found New Hardware dialog box should display through your operating system.
7
Page 12

If the dialog box does not display, check the connection between the
hardware and your computer, or see your operating system’s documentation
for more information. If the dialog box still does not display, contact Davis
Technical Support for help with this problem.
6. Click the No, not this time field and click Next.
Note: It is important that you do not allow your operating system to automatically check the web
for drivers because it could install versions of drivers that may have compatibility issues
with the accessory or FMS.
8
Page 13

The second dialog box displays.
7. Click Install the software Automatically and click Next. The new drivers install automatically.
8. Click Finish once the installation is complete.
See “Removing PC/SC Drivers for SmartCard Desktop Reader” below if the PC/SC driver was previously installed.
Removing PC/SC Drivers for SmartCard Desktop Reader
There are two sets of ACS SmartCard Desktop Reader drivers available for
use with the SmartCard Desktop Reader: The PC/SC Driver and the ACS Proprietary Driver. FMS uses the Proprietary Driver to communicate with the
SmartCard Desktop Reader. Since the PC/SC Driver and the Proprietary
Driver are not compatible, the PC/SC driver must be uninstalled.
The PC/SC Driver may install automatically if the SmartCard Desktop Reader
was installed before DriveRight FMS. To avoid this, do not plug in the SmartCard Desktop Reader before DriveRight FMS has been installed.
Note: The following instructions are based on procedures needed on a Windows XP operating
system. The process may vary depending on your operating system.
9
Page 14

To verify if the PC/SC SmartCard Driver was installed:
1. In Windows XP, open the Control Panel.
2. Double-click System. The System Properties dialog box displays.
3. Click the Hardware tab and then click Device Manager. The Device Manager dialog box displays.
If the PC/SC driver has been installed, the ACR38 SmartCard Reader driver is displayed under the Smart card readers list. This driver will not appear anywhere in DriveRight FMS if it has been installed.
To uninstall the PC/SC driver:
Note: The SmartCard Desktop Reader must be plugged in before the driver can be removed.
10
Page 15

1. In Windows Explorer or similar browser window, navigate to the
DriveRight directory or the DriveRight FMS installation CD and the folder
SmartCard USB Drivers.
2. Double-click ACS Setup.exe to run the ACS Driver setup program. The Information dialog box displays if the driver was previously installed.
11
Page 16

3. Click OK. The ACR38 Proprietary Driver Installation Wizard dialog box displays.
4. Click Uninstall to remove the driver. When the program finishes removing the driver, the Confirm dialog box displays.
Note: If you are uninstalling the PC/SC driver as part of the DriveRight FMS installation pro-
cess, do not restart your computer at this time. The FMS installation process must finish
before the computer can be restarted. Once the FMS installation process has completed,
you should restart your computer. You must then manually install the ACS SmartCard
Desktop Reader Driver. See “Manually Installing SmartCard Desktop Reader Drivers” on
page 7 for detailed instructions on installing the correct reader driver.
5. If you are removing the PC/SC driver as part of the DriveRight FMS installation, click No.
12
Page 17

If you are removing the PC/SC driver manually, unplug the SmartCard Reader from the computer and click Ye s.
After your computer restarts, install the SmartCard Proprietary Driver. See “Manually Installing SmartCard Desktop Reader Drivers” on page 7 for more information.
Once the installation is complete, ACR38 USB Smart Card Reader
(Proprietary Mode) should display in the Device Manager under the
Universal Serial Bus Controllers list.
FMS can now properly recognize the SmartCard Desktop Reader and it displays in the SmartCard Reader Setup dialog box.
Installing Drivers for Wireless Download Accessories
The Base Station for Wireless Download System (# 8130) and Configuration
Cable for Wireless On-Board Module (# 8131) are used in conjunction with
the Wireless On-Board Module (# 8129 for DriveRight, # 8251 for CarChip
Fleet Pro) to wirelessly transmit data from a DriveRight 600 or 600
E or
CarChip Fleet Pro to a computer. The Base Station and Configuration Cable
connect to a computer via a USB port. USB drivers must be installed for the
13
Page 18

Base Station and Configuration Cable to properly communicate with
DriveRight FMS.
Note: The following installation was completed on a Windows XP operating system. The pro-
cess may vary depending on operating system. The only way to find the correct drivers
for the Wireless Download System is to install or upgrade to FMS 3.8 first. The necessary
driver files are kept in the FTDI Drivers folder in the DriveRight Directory after the software is installed.
1. Plug the Base Station or Configuration Cable into an available USB Port.
A Found New Hardware dialog box should display
If the dialog box does not display, check the connection between the hardware and your computer, or see your operating system’s documentation for
more information. If the dialog box still does not display, contact Davis
Technical Support for help with this problem.
2. Click the No, not this time field and click Next.
Note: It is important that you do not allow your operating system to automatically check the web
for drivers because it could install versions of drivers that may have compatibility issues
with the accessory or FMS.
14
Page 19

The second dialog box displays.
3. Click Install from a list or specific location and click Next. The Please choose your search and installation options dialog box displays.
15
Page 20

4. Click Search for the best driver in these locations and select the Include this location in the search check box.
5. Click Browse.
6. Navigate to the DriveRight directory. A list of subfolders displays.
When DriveRight FMS is installed, the drivers for the wireless devices are
stored under the DriveRight directory so that they can be installed any time
a Base Station or On-Board Module is added. The wireless device driver is
located in the FTDI Drivers subfolder.
7. Select the FTDI Drivers folder and click OK.
Note: Install the driver only once, even if installing both products. The driver works seamlessly
with both.
8. Once the installation is complete, click Finish.
16
Page 21

Before You Run the Software
There are software concepts you should become familiar with, and some initial
planning considerations to think about.
Key Concepts: DriveRights, CarChips, Vehicles & Drivers
Your database is a collection of related tables (relational database) that contain
information about your fleet (drivers, vehicles, DriveRights, CarChips,
addresses, etc.). For example, information about a driver in your fleet will be
stored in a single row in the Drivers table. Each column (or field) in a row
stores an attribute about a given driver.
Depending on your application, some tables in the database may be more
important than others, but the following tables are of key importance: the
Company Locations table, the DriveRights table, the CarChips table, the
Drivers table, the Vehicles table, and the Trips table.
• Every record in the database includes the company location. You can only
view records from one location at a time.
• The DriveRights table contains settings and calibration information about
each DriveRight.
• The CarChips table contains settings information about each CarChip.
• The Vehicles table and Drivers table contain information related to your
vehicles and drivers respectively.
• The Trips table contains driving information for each trip.
• View a table by selecting it in the Database Menu.
17
Page 22

Planning for Initial Software Use
The software allows for several layers of classification, and for different
degrees of detail in accounting for driver and vehicle information. We
recommend thinking about the following items so that you can tailor FMS to
your needs.
• Define Location (Required) — Define multiple locations, keeping in mind
that you can only manage data one location at a time. All operations like
database browsing and reporting are displayed with respect to the current
location. Multiple locations can be organized and managed, via tools like
the Corporate Structure dialog box.
• Define Fleets (Optional) — Track separate groups of vehicles at the same
location by assigning these groups of vehicles to different fleets. Fleets can
be created when you first set up your database or can be added at any time.
• Define Driver Groups (Optional) — Track separate groups of drivers at
the same location, by assigning these groups of drivers to driver groups.
Driver groups can be set up when you first create your database or can be
added at any time.
• Define Trip Addresses (Optional) — Create a list of trip addresses for
frequently visited clients, delivery points, or other routine destinations.
• Password Protection (Optional) — Protect all or parts of the data from
unauthorized viewing and alteration. DriveRight FMS password protection
allows you to define each individual user’s level of access to the data. If no
users are defined then all users will have complete access to all software
functions and to the data.
First Time Running the Software
To start the program, double-click the shortcut icon on the desktop or select
DriveRight Software from the Start menu.
Note: This manual uses the notation “Select File->Import->Fleets…” for menu commands.
The first part of the notation (“File”) represents the menu name, the second part (“Import”)
the sub-menu name (where applicable), and the final part (“Fleets”) the command name.
Initial Program Configuration
The first time you run DriveRight FMS, you will be required to perform the
following steps to register and configure the software.
1. Enter your 8-digit registration number.
A dialog box will prompt you for your 8-digit registration number. You can find the registration number on the software registration card and on the cover of this manual.
18
Page 23

2. Refer to the DriveRight Fleet Management Software Database Selection Guide for additional program configuration instructions.
Software Setup
After you have finished the initial program configuration, you will want to
check the program preferences and enter the default DriveRight device
settings, and test the DriveRight device communications.
Note: Please refer to the DriveRight FMS Online Help System for more information.
Use the following steps to set DriveRight FMS preferences:
1. Set unit preferences by selecting Setup->Preferences->Units. The dialog box that displays contains the following options:
• Unit Mode — Specify the distance and speed units that FMS uses.
• Date Mode — Specify the date format you want FMS to use. All dates
entered in FMS must follow the chosen format.
• Time Mode — Specify the time format used in the software
(AM-PM or 24 hour clock).
2. Select Setup->Preferences->Backup Options. The Backup Options dialog box is displayed. Check the Keep ___ months of records active in database after every backup box and determine the number of months of data to be retained in the active database.
Note: Refer to the Active Database Size Recommendations section in the DriveRight Fleet
Management Software Database Selection Guide or to the same section in the
DriveRight FMS Online Help System for backup option recommendations.
3. Select Setup->Preferences->Download Options. The Download Options dialog box displays, containing the following options:
• Synchronize time and date after every download — This option
resets the DriveRight or CarChip to the system time and date after each
download. If you select this option, be sure to verify the system time and
date regularly to ensure accuracy.
Note: If you choose this option, all DriveRight devices including remote units downloaded
through host mode or units downloaded using the Wireless Download System will be
reset to the computer’s time and date, even if the remote DriveRight is in a different time
zone. Also, all CarChip devices will be reset to the system time and date.
19
Page 24

• Use DriveRight ID Code as Trip Address ID or Driver ID
(DriveRight 500, 600 and 600
E) — You may specify a Driver ID using
the code on the DriveRight. If only one driver uses a vehicle, the code
may be used as a Trip Address ID. To specify an ID for each trip
address, select Database->Trip Addresses.
At the beginning of each trip, specify the Trip Address ID in the
DriveRight device. When downloading a DriveRight device,
DriveRight FMS interprets each ID as the destination of a trip.
• Include last __ hours of speed — determine number of hours of speed
data recorded by the CarChip that the FMS software keeps. By design,
CarChip accumulates speed sample records according to the frequency
set in the CarChip Device Settings dialog box. This speed sampling
can be as frequent as every second. Frequent speed sampling can take
up large amounts of database space.
To save database space, the default setting of one hour is used, saving
the last hour of speed interval data that gets displayed in the CarChip
Parameter Logs database table. Select this check box and enter the
number of hours of Speed Interval logging data you want to keep. This
setting can be changed to log all speed samples, log any number of
hours of samples (from one to 96 hours), or not to save any samples
from the downloaded CarChip.
As long as the CarChip is not cleared after download, all the speed
sample data still exists in the CarChip’s memory. If this data is needed,
the CarChip can be downloaded again with this setting changed to
include more speed samples. This data can also be seen in detail by
downloading the CarChip information into the retail CarChip Software
included on the FMS software disk.
20
Page 25

Default DriveRight Settings Wizard
Select Setup->Default DriveRight Settings->Setup Wizard to edit the
default DriveRight settings.
You can edit defaults for the following DriveRight settings:
• Unit Settings — Select the date, time and unit modes.
• Safety Settings — Enter the speed, acceleration and deceleration limits.
• Timer Settings — Enter the trip stop time and driver log out time.
• Alarm Settings — Select the alarm mode and options.
• Security Settings — Enter the security code and select security options.
Default CarChip Settings
You can edit the default CarChip settings using the Default CarChip Settings
command in the Setup Menu.
You can edit the following CarChip default settings:
• Hard braking Thresholds
• Acceleration Thresholds
• Speed Bands
• Engine Data Parameters
• GPS Logging Settings — Used with CarChip Fleet Pro (# 8246)
• CarChip Alarm Settings — Used with CarChip Fleet with Alarm (# 8245)
and CarChip Fleet Pro (# 8246)
• CarChip LED Settings
Considerations for Using CarChip and DriveRight Together
• If both CarChip and DriveRight devices are installed in the same vehicle,
you will need to create two entries for the driver and two entries for the
vehicle in the DriveRight FMS database. Otherwise you will see duplicate
trip data in your DriveRight FMS reports.
• If you are using both CarChip and DriveRight devices, make sure both
types of devices use the same safety settings.
• Speed Band 3 in the CarChip Settings dialog box should match Speed
Limit in the DriveRight Settings dialog box.
• Hard Braking in the CarChip Settings dialog box should match Decel
Limit in DriveRight Settings dialog box.
• Hard Acceleration in the CarChip Settings dialog box should match
Accel Limit in the DriveRight Settings dialog box.
21
Page 26

Testing the Communications Port
Select Setup->Communications Port to select the COM port used to connect
to a DriveRight or CarChip.
1. Select Communications Port - DriveRight to select and test the
communications port for a DriveRight device or select Communications
Port - Carchip to select and test the communications port for a CarChip.
The software supports USB and multiple COM ports.
Communication Port Settings for CarChip
Communication Port Settings for DriveRight
2. Select Auto Detect in the dialog box to automatically detect the port a DriveRight or CarChip is connected to and to verify communication.
Note: When using Auto Detect with a DriveRight, be sure the device is connected to the
computer and is active, with data showing on the LCD screen. If the screen is blank,
press MODE on the DriveRight device to activate it.
Note: Be sure to close any application that may be using the serial port, such as the CarChip
software or Palm Hotsync Manager, before attempting to communicate with DriveRight.
22
Page 27

Building Your Database
To build up your DriveRight FMS database, we recommend adding drivers
first, then adding vehicles, and finally adding DriveRights and/or CarChips.
Note: Refer to the DriveRight FMS Online Help for more information about building your
database. If you are importing data from an earlier version of DriveRight software, please
see “Importing Data from DriveRight 2.x” on page 25.
1. Add Drivers — Add drivers to your database using the Add New command
in the Drivers browse window: Select Database->Drivers->Add New.
2. Add Vehicles — Add vehicles to your database using the Add New com-
mand in the Vehicles browse window: Select Database->Vehicles->Add
New. When you add a vehicle, you will need to select a default driver for it
from the list of drivers. If you do not have a default driver to assign to this
vehicle, select Unknown Driver.
3. Add New DriveRights —Add DriveRight devices to your database.
4. Select DriveRight->Add New DriveRight. When you add a DriveRight, you will need to select the default vehicle for it from the list of vehicles. If you do not have a default vehicle to assign to this DriveRight, select Unknown Vehicle.
Note: If you are using GPS with your DriveRight 600, activate the GPS module using the GPS
Settings command: Select DriveRight->DriveRight Settings->Setup GPS.
5. Add New CarChips — Add CarChip devices to your database. CarChips
must be assigned to either a vehicle or a driver.
23
Page 28

Downloading Data
You will be ready to download data into DriveRight FMS once the software
has been configured, the data connection to the computer has been established,
and the CarChip or DriveRight has been added to the database.
To download data:
1. Connect the CarChip or DriveRight to the computer.
Note: The DriveRight device must be active (LCD screen display on) to download data. Press
MODE on the device if the LCD is blank.
2. Click DriveRight->Download to download a
DriveRight device or click CarChip->Download
Download
DriveRight Icon
to download CarChip. You can also download
using the DriveRight and CarChip icons on the
toolbar.
Download
CarChip Icon
To download data wirelessly:
1. Click Wireless->Start Manual Download or select the wireless download icon on the toolbar.
Note: You must have all the products in the Wireless Download System (# 8127 or # 8251, and
# 8129, # 8130, # 8131) available to download DriveRight 600, 600
Pro data wirelessly to DriveRight FMS. See the DriveRight FMS Online Help or the GPS/
Wireless System Installation Manual for more information.
Note: The optional DriveRight Palm Download Kit (# 8181) allows you to transfer data from a
DriveRight device to a Palm PDA, then download the data from the Palm into DriveRight
FMS. The SmartCard system (# 8105, 8108, 8112) allows you to transfer data from a
DriveRight to a computer through a SmartCard.
Wireless
Download
Icon
E, or CarChip Fleet
Calibrating DriveRight Devices
A DriveRight device must be properly calibrated to accurately record trip
information. The DriveRight User’s Guide includes information on calibrating
a DriveRight device in the vehicle. You can also calibrate a DriveRight device
using FMS if you have some basic information about the vehicle.
Note: CarChips receive vehicle speed from the OBDII computer and do not require calibration.
24
Page 29

Additional Software Topics
Once you begin collecting data, you can use DriveRight FMS to record, report,
filter, export and import DriveRight data. The following topics provide a brief
overview of some FMS features. Be sure to review the documentation listed
on page 2 for a complete description of FMS features and commands.
Backup and Restore
Use File->Backup to create backups of your DriveRight FMS data. Use
Preferences->Backup Options to limit the amount of data remaining in your
active database after a backup. We recommend monthly backups, limiting the
number of months in the active database.
Reporting
The reporting tools are perhaps the most valuable aspect of DriveRight FMS
for vehicle managers and administrators. You can track and compare drivers
and vehicles by location and see critical information at a glance. The Driver
Safety Score report provides a powerful tool for monitoring your drivers’ performance. Use FMS exception reports to quickly highlight instances of excessive speed, hard braking, and hard acceleration.
Importing Data from DriveRight 2.x
A separate conversion utility, OldToNew, has been included with the
DriveRight FMS software to allow the conversion of existing DriveRight 2.x
database files for use with DriveRight FMS.
• This conversion process can take a fairly long time, depending on the size
of your 2.x database.
• Only data in the active database of the 2.x software will be converted.
• This conversion utility can only be used with databases created by
DriveRight versions 2.04, 2.05, 2.06 or 2.6. If you are using an earlier
version of the DriveRight software you must first upgrade to one of the
supported versions.
Use the following procedure to convert your existing DriveRight database for
use with a current version DriveRight FMS:
1. Install and run the newest version of DriveRight FMS before you convert your data to the new format.
2. Verify the current location in DriveRight FMS by selecting Setup->Current Location.
This location information will be associated with all 2.x data when converted into the new database format.
3. To import data to a new location, select Database->Company Locations, then click Add New button in the Company Locations database table.
25
Page 30

4. Go to Startup->Programs->DriveRight and run OldToNew.
5. To import data, select the location from the drop down list.
6. Click Browse to select the old Borland tables directory. By default it is C:\Program Files\DriveRight Software\tables.
7. Click Convert to start the conversion.
After the data is converted you will see a success message. At this point all of your 2.x data has been converted into the new DriveRight FMS database format.
Note: The conversion process may take a long time depending on the size of your 2.x
database. While you can interrupt the conversion at any time by clicking the stop button,
this is not recommended.
8. Be sure to check the data conversion by opening FMS and viewing various tables using the Database Menu.
26
Page 31

Contacting Davis Technical Support
If you have questions about the software, or encounter problems installing or
using the software, please contact Davis Technical Support. Most questions
can be answered on the phone.
Note: Sorry, we are unable to accept collect calls.
(510) 732-7814 – Monday through Friday, 7:00 a.m. to 5:30 p.m. Pacific
Time.
(510) 670-0589 – Fax to Technical Support.
support@davisnet.com – E-mail to Technical Support.
info@davisnet.com – E-mail to Davis Instruments.
www.davisnet.com – Product documentation is available on the DriveRight
Support section of our website. Watch for FAQs and other updates.
27
Page 32

Notes:
28
 Loading...