

Page 1
Replacement Wind Vane (7904, 7906L & 7906)
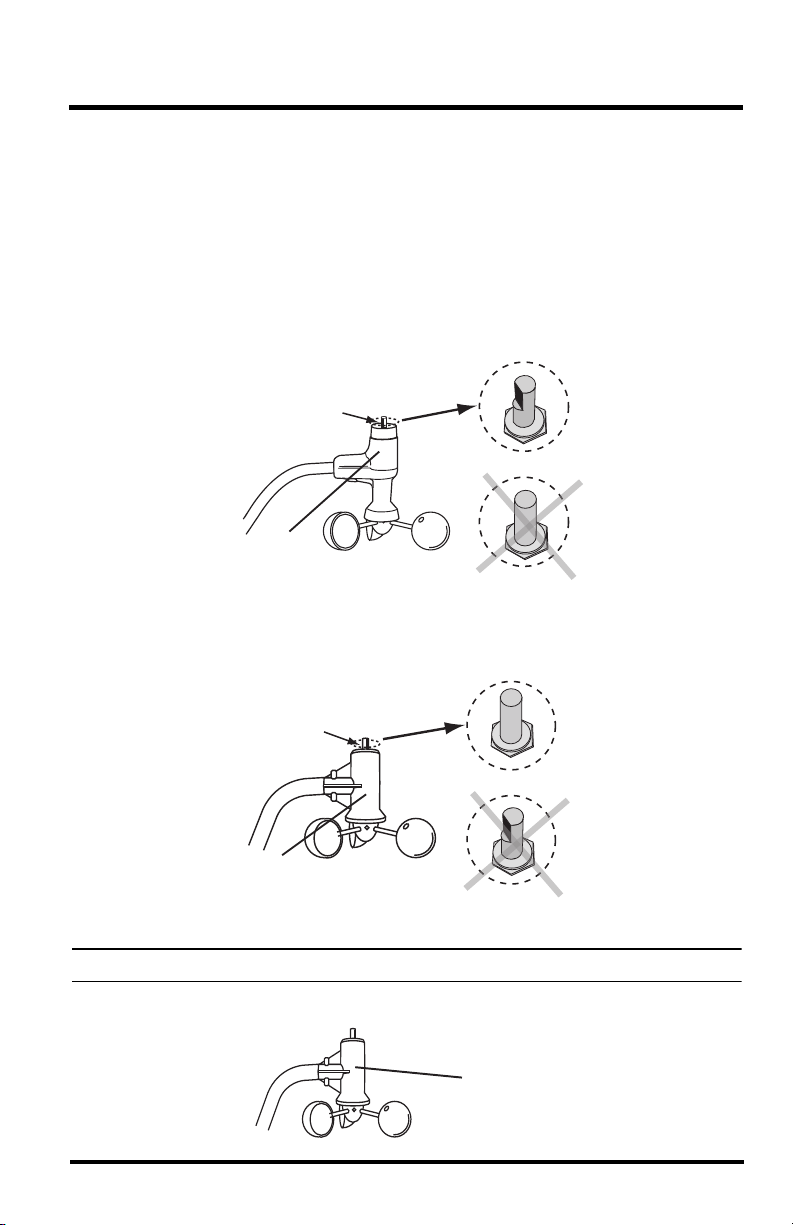
Is this the correct vane for your system?
The newest Davis anemometer has a D-shaped (in cross section) shaft on the
anemometer head. Older anemometers have a round (in cross section) shaft. You
must make sure that the replacement vane fits the shaft on your existing
anemometer head.
7906L or 7906: This vane is for use on a D-shaped wind vane shaft.
Wind Vane Shaft
(D-shaped)
Right
Wrong
Anemometer
Head
7904: This vane is for use on a round wind vane shaft.
Wind Vane Shaft
(round)
Right
Wrong
Anemometer
Head
Note: If your anemometer looks like the one illustrated below, the shaft is round.
Anemometer
Head
(round shaft)
1
Page 2
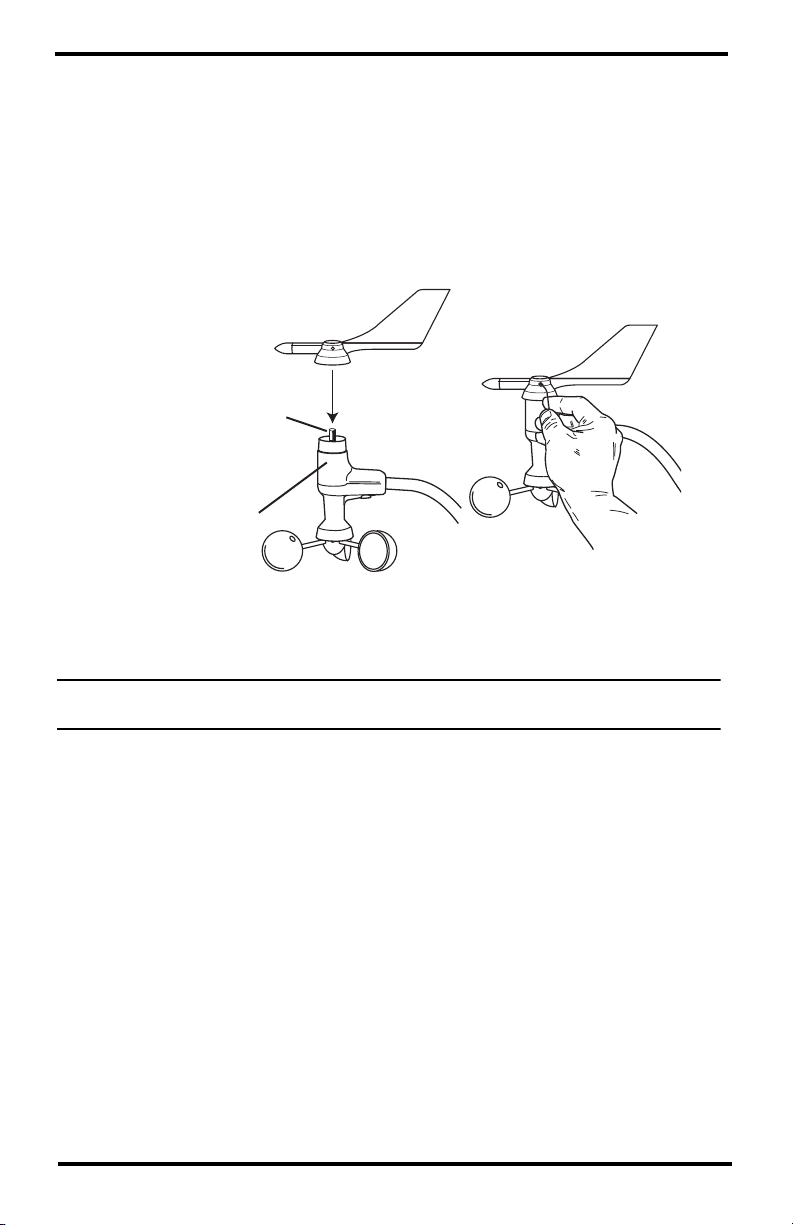
Install the new vane: 7906L or 7906, for D-Shaped Shaft
1. Remove the old vane by loosening the set screw with 0.05”Allen wrench.
2. Replace the new vane on the shaft. It will only go on one way and will be
automatically correctly calibrated for wind direction when the anemometer is
installed with arm pointing north.
Wind Vane
Wind Vane Shaft
(D-Shaped)
Anemometer
Head
3. Remount your anemometer so that the arm is pointing true north.
Tighten set
screw with
Allen wrench
Note: If you cannot mount the anemometer with the arm pointed north, you will need to calibrate the
2
wind direction on your console. See your Vantage Pro2 Console User’s Manual for instructions.
Page 3

Install the new vane: 7904, for Round Shaft
1. You will need your console to make sure the vane is installed for accurate wind
direction. It should be showing wind in degrees inside the compass rose. (Push
the WIND button until it does.)
2. Remove the old vane by loosening the set screw with a 0.05”Allen wrench.
3. Locate the wind vane shaft extending from the top of the anemometer head.
4. Look at your console as you slowly turn the wind vane shaft with your fingers.
Stop when the console reads 180°.
WIND
W
N
NW
NE
WIND
N
NE
NW
E
W
S
SESW
Last 24 hrshrEvery 1
S
Vertical Scale: X10
TEMP OUT
E
TEMP IN
SESW
DAILY RAIN
F
F
in
STATION NO.1
HUM OUT
HUM IN
pm
BAROMETER
HEAT INDEX
RAIN YEAR
hPa
F
in
5. Making sure the shaft does not turn (and the console continues to show 180°),
lower the vane onto the shaft so that the “bullet” nose is pointing back directly
over the arm.
Wind Vane
Wind Vane Shaft
(round)
Tighten set
screw with
Anemometer
Allen wrench
Head
6. Tighten the set screw with the Allen wrench.
7. Remount your anemometer so that the arm is pointed true north.
Note: If you cannot mount the anemometer with the arm pointed north, you will need to calibrate the
wind direction on your console. See your Vantage Pro2 Console User Manual for instructions.
3
Page 4

Contacting Davis Technical Support
For questions about installing or operating your replacement wind vane,
please contact Davis Technical Support. We’ll be glad to help.
Online www.davisnet.com
See the Weather Support section for copies of user
manuals, product specifications, application notes,
software updates, and more.
E-mail support@davisnet.com
Telephone (510) 732-7814
Monday - Friday, 7:00 a.m. - 5:30 p.m. Pacific Time.
Note: Please do not return your unit for repair without prior authorization.
Replacement Wind Vane, round shaft, product number 7904
Replacement Wind Vane, D-shaft, product number 7906, 7906L
Document Number: 07395.329 Rev. A, May 24, 2013
Vantage Pro® and Vantage Pro2™are trademarks of Davis Instruments Corp.,
Hayward, CA.
© Davis Instruments Corp. 2013. All rights reserved.
Information in this document subject to change without notice. Davis Instruments Quality
Management System is ISO 9001 certified.
®
3465 Diablo Avenue, Hayward, CA 94545-2778 U.S.A.
510-732-9229 • Fax: 510-732-9188
E-mail: info@davisnet.com • www.davisnet.com
 Loading...