


Table of Contents
1: Get started . . . . . . . . . . . . . . . . . . . . . . 3
1. Standard package contents . . . . . . . . . . . 3
2. Phone specification . . . . . . . . . . . . . . . . . 3
3. Phone description . . . . . . . . . . . . . . . . . . 4
4. Installing & removing the battery . . . . . . . 5
5. Charging the battery . . . . . . . . . . . . . . . . 6
6. Powering the C yber phone on & off . . . . 7
7. Display indicators & icons . . . . . . . . . . . . 8
8. Shortcut menu . . . . . . . . . . . . . . . . . . . . . 9
9. Main Menu ic ons . . . . . . . . . . . . . . . . . . . 10
2: Configuring your phone. . . . . . . . 11
1. Important information you should
know first . . . . . . . . . . . . . . . . . . . . . . . . . 11
2. Connecti n g your phone to an AP . . . . . . .13
3. Connecti ng your phone to an SIP . . . . . . 14
3: Basic call functions . . . . . . . . . . . . 15
1. Making a IP to IP call (via direct IP) . . . . .15
2. Making a SIP to SIP call (via SIP server). 16
3. M aki n g a c all (vi a S IP s er v er t o lan dl i n e
or GSM mobile phone) . . . . . . . . . . . . . . 17
4. Speed dial . . . . . . . . . . . . . . . . . . . . . . . . 18
5. Answering a call . . . . . . . . . . . . . . . . . . . 18
6. Mute/Un-mute a call . . . . . . . . . . . . . . . . .18
7. Hold . . . . . . . . . . . . . . . . . . . . . . . . . . . . .18
8. New calls . . . . . . . . . . . . . . . . . . . . . . . . .18
9. Rejectin g a call . . . . . . . . . . . . . . . . . . . . 19
10. Silencing the inc oming ring tone . . . . . . . 19
11. Call waiting . . . . . . . . . . . . . . . . . . . . . . . 19
12. Conferenc e call . . . . . . . . . . . . . . . . . . . . 19
4: Menu . . . . . . . . . . . . . . . . . . . . . . . . . . . 20
i Messages . . . . . . . . . . . . . . . . . . . . . . 20
1) Keypad legends. . . . . . . . . . . . . . . . .21
2) Create . . . . . . . . . . . . . . . . . . . . . . . .22
3) Inbox . . . . . . . . . . . . . . . . . . . . . . . . .23
4) Outbox . . . . . . . . . . . . . . . . . . . . . . . 25
5) Chat . . . . . . . . . . . . . . . . . . . . . . . . . 26
ii Contacts . . . . . . . . . . . . . . . . . . . . . . . 27
1) Add . . . . . . . . . . . . . . . . . . . . . . . . . .28
2) Edit . . . . . . . . . . . . . . . . . . . . . . . . . . 28
3) Delete . . . . . . . . . . . . . . . . . . . . . . . .29
4) View Entry . . . . . . . . . . . . . . . . . . . . 29
5) Speed Dial . . . . . . . . . . . . . . . . . . . . 29
iii Call Log . . . . . . . . . . . . . . . . . . . . . . . 30
1) Missed calls . . . . . . . . . . . . . . . . . . . 31
2) Incoming calls. . . . . . . . . . . . . . . . . . 31
3) Outgoing c alls . . . . . . . . . . . . . . . . . .31
1

iv Settings . . . . . . . . . . . . . . . . . . . . . . . 32
1) Clock . . . . . . . . . . . . . . . . . . . . 34
2) Wallpaper . . . . . . . . . . . . . . . . . 36
3) Ring tones . . . . . . . . . . . . . . . . 36
4) Message tones . . . . . . . . . . . . . 37
5) Ring Volume . . . . . . . . . . . . . . . 37
6) Receiver volume . . . . . . . . . . . 37
7) Alert mode . . . . . . . . . . . . . . . . 38
8) Message View . . . . . . . . . . . . . 38
9) Brightness . . . . . . . . . . . . . . . . 38
10) Key backlight . . . . . . . . . . . . . 39
11) Auto key lock . . . . . . . . . . . . . .39
12) Key tone . . . . . . . . . . . . . . . . . 39
13) DTMF tone . . . . . . . . . . . . . . . 39
14) Screen Banner . . . . . . . . . . . . 40
15) Factory reset . . . . . . . . . . . . . . 40
16) Software upgrad e . . . . . . . . . . 41
5. We b configur ator . . . . . . . . . . . . . . 57
6. Glossary . . . . . . . . . . . . . . . . . . . . 67
7. Health and safety information . . . 68
8. FCC Declaration . . . . . . . . . . . . . . .71
v: Configurati o n . . . . . . . . . . . . . . . . . . . . . . . 45
vi: Information . . . . . . . . . . . . . . . . . . . . . . . . 56
2
1) SIP settings . . . . . . . . . . . . . . . . 46
2) IP settings. . . . . . . . . . . . . . . . . 49
3) WLAN settings . . . . . . . . . . . . . .52
1) SIP information . . . . . . . . . . . . . 56
2) IP information . . . . . . . . . . . . . . 56
3) WLAN information. . . . . . . . . . . 56
4) General information . . . . . . . . . 56
1. Get Started
1: Standard Package Contents
Get Started
2: Phone Spe c ific a tions
The CYBERPHONE is a 802.11b/ g VoIP
WiFi SIP Phone.
Pleas e c hec k c aref ull y i f you have th e item s men ti one d
below:
1: W iFi Phone x 01
2: USB Charger x 01
3: USB Cable x 01
4. Battery x 01
5. User’s Manual x 01
6. Lanyard Strap
*Actual contents may vary .
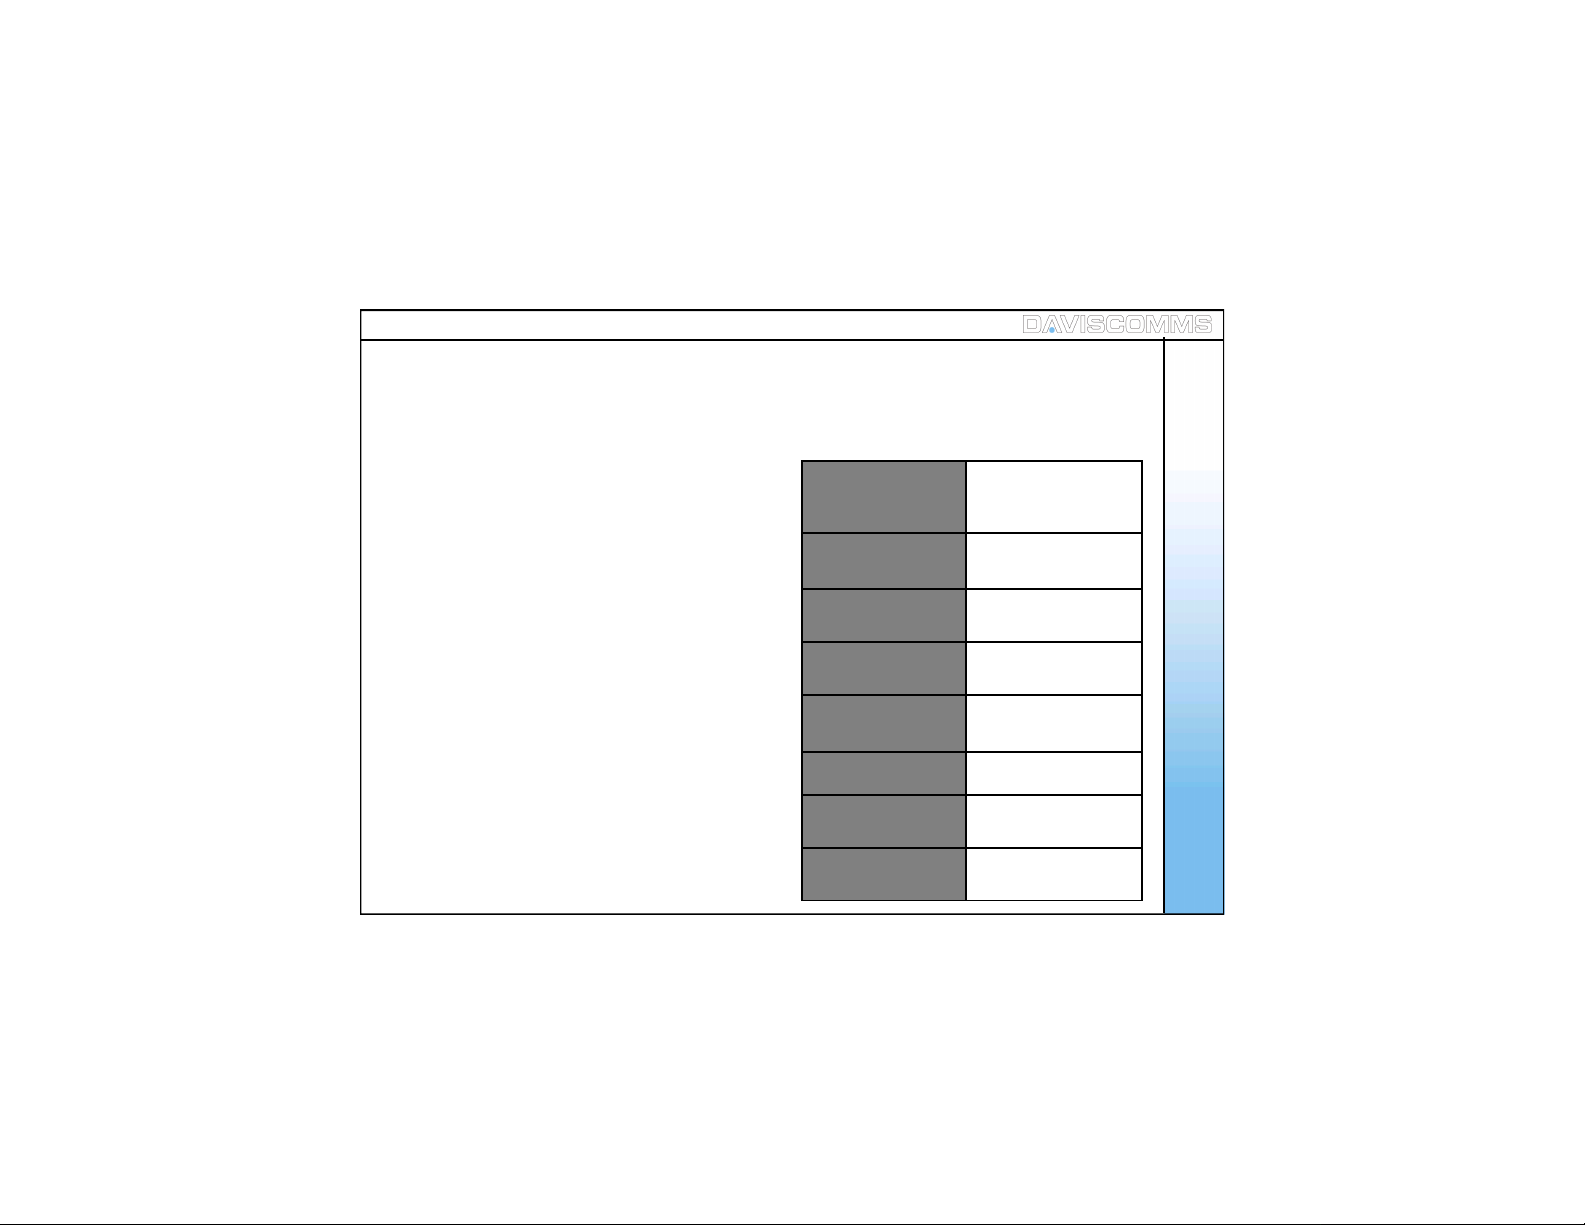
Dimensions:
Weight:
Battery:
Charger Input:
Charger Weight: 50g
Charging Time: 3 hours
Standby T ime:
Talking Time:
96(L) x 65(W) x
16(H) Dimension in
mm.
65g (without battery)
80g (with battery)
650 mAh Li-ion,
3.7v
100-240v – 50-60H z
0.2A
48 hours depending
on the network
2 hours dependin g
on the network
3
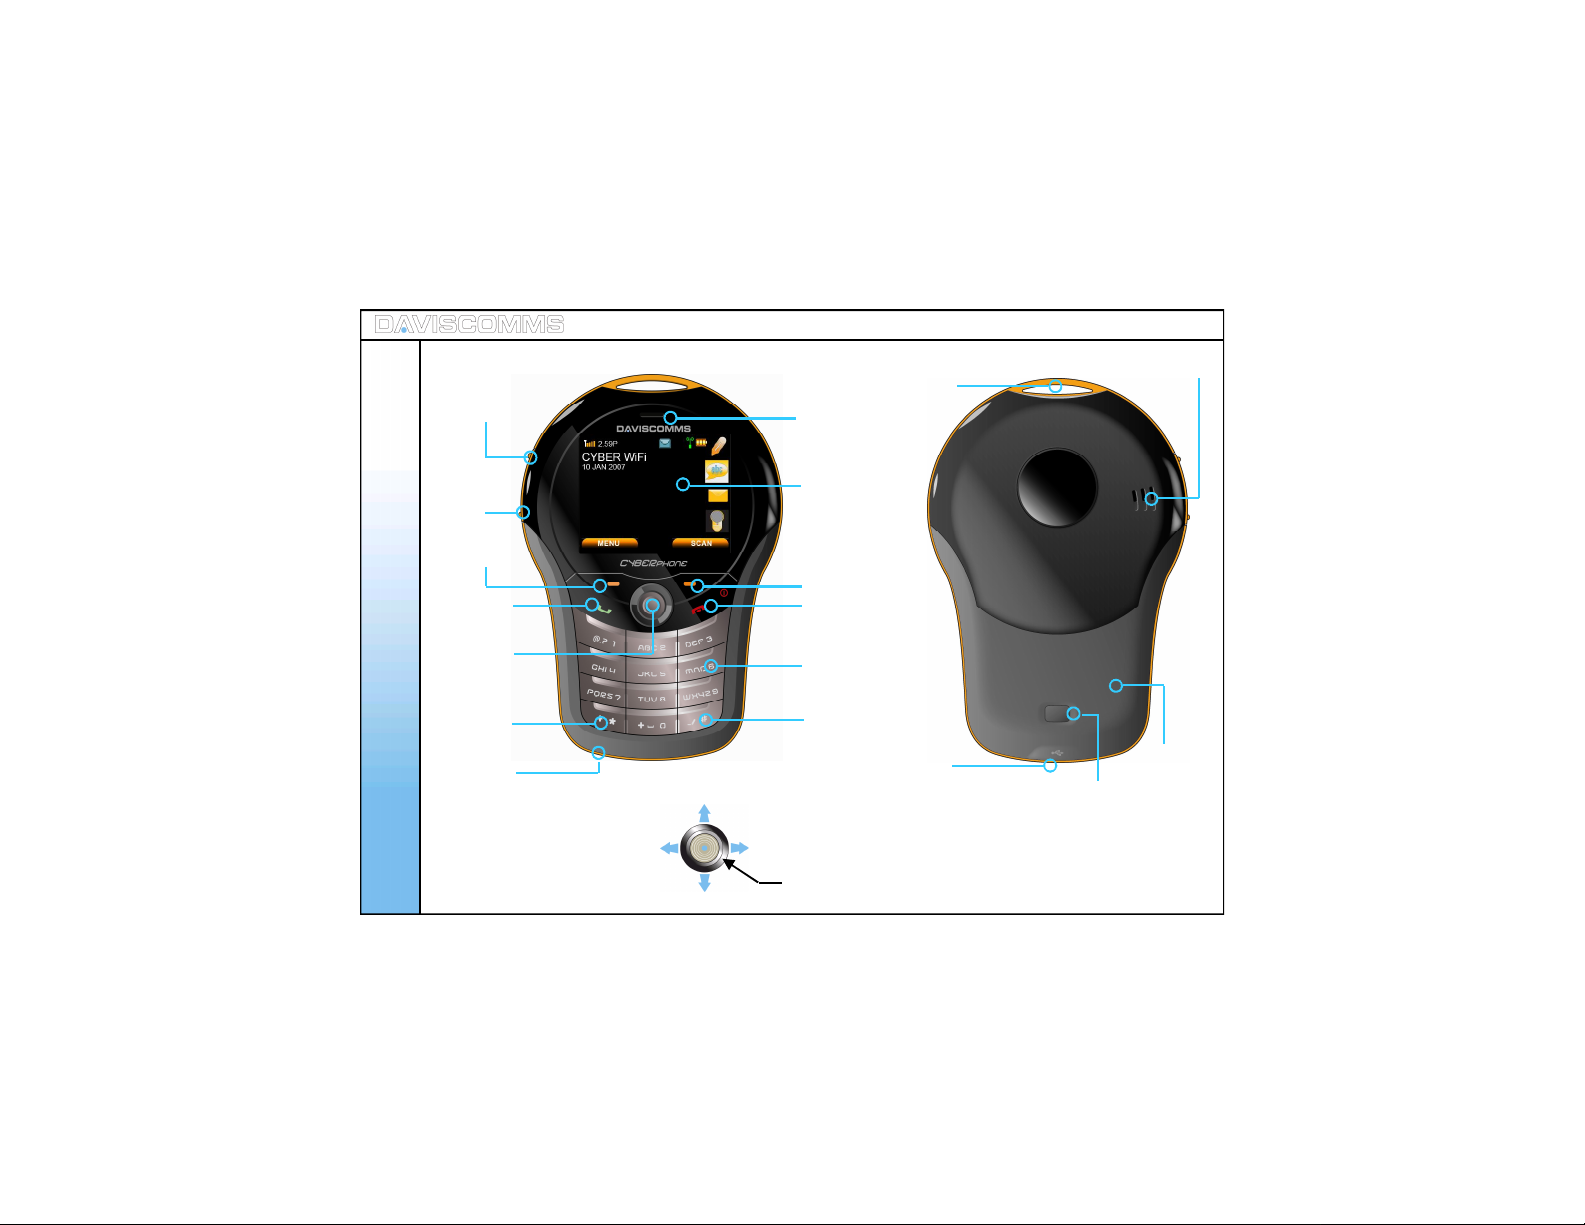
3: Phone Description
Volume up
key
Earpiece
Loop for
Lanyard
Speaker
hole
Get Started
Volume
down
key
Left soft
key
Talk / Ca ll
key
5 Way
joystick
Silent mode
key
Mic
5-Way Joystick
Scroll left for s ystem info
4
Push down to scroll on the side bar menus
OLED screen
Right Soft Key
End / Power key
Number keys
Switch input method
key / keypad lock.
USB Port
1
Push up to scroll on the side bar menus
In the idle screen, scroll joystick right for shortcut menus
3
4
5 – Push down to select an option
2
Battery cover
door release
button
Battery
cover door
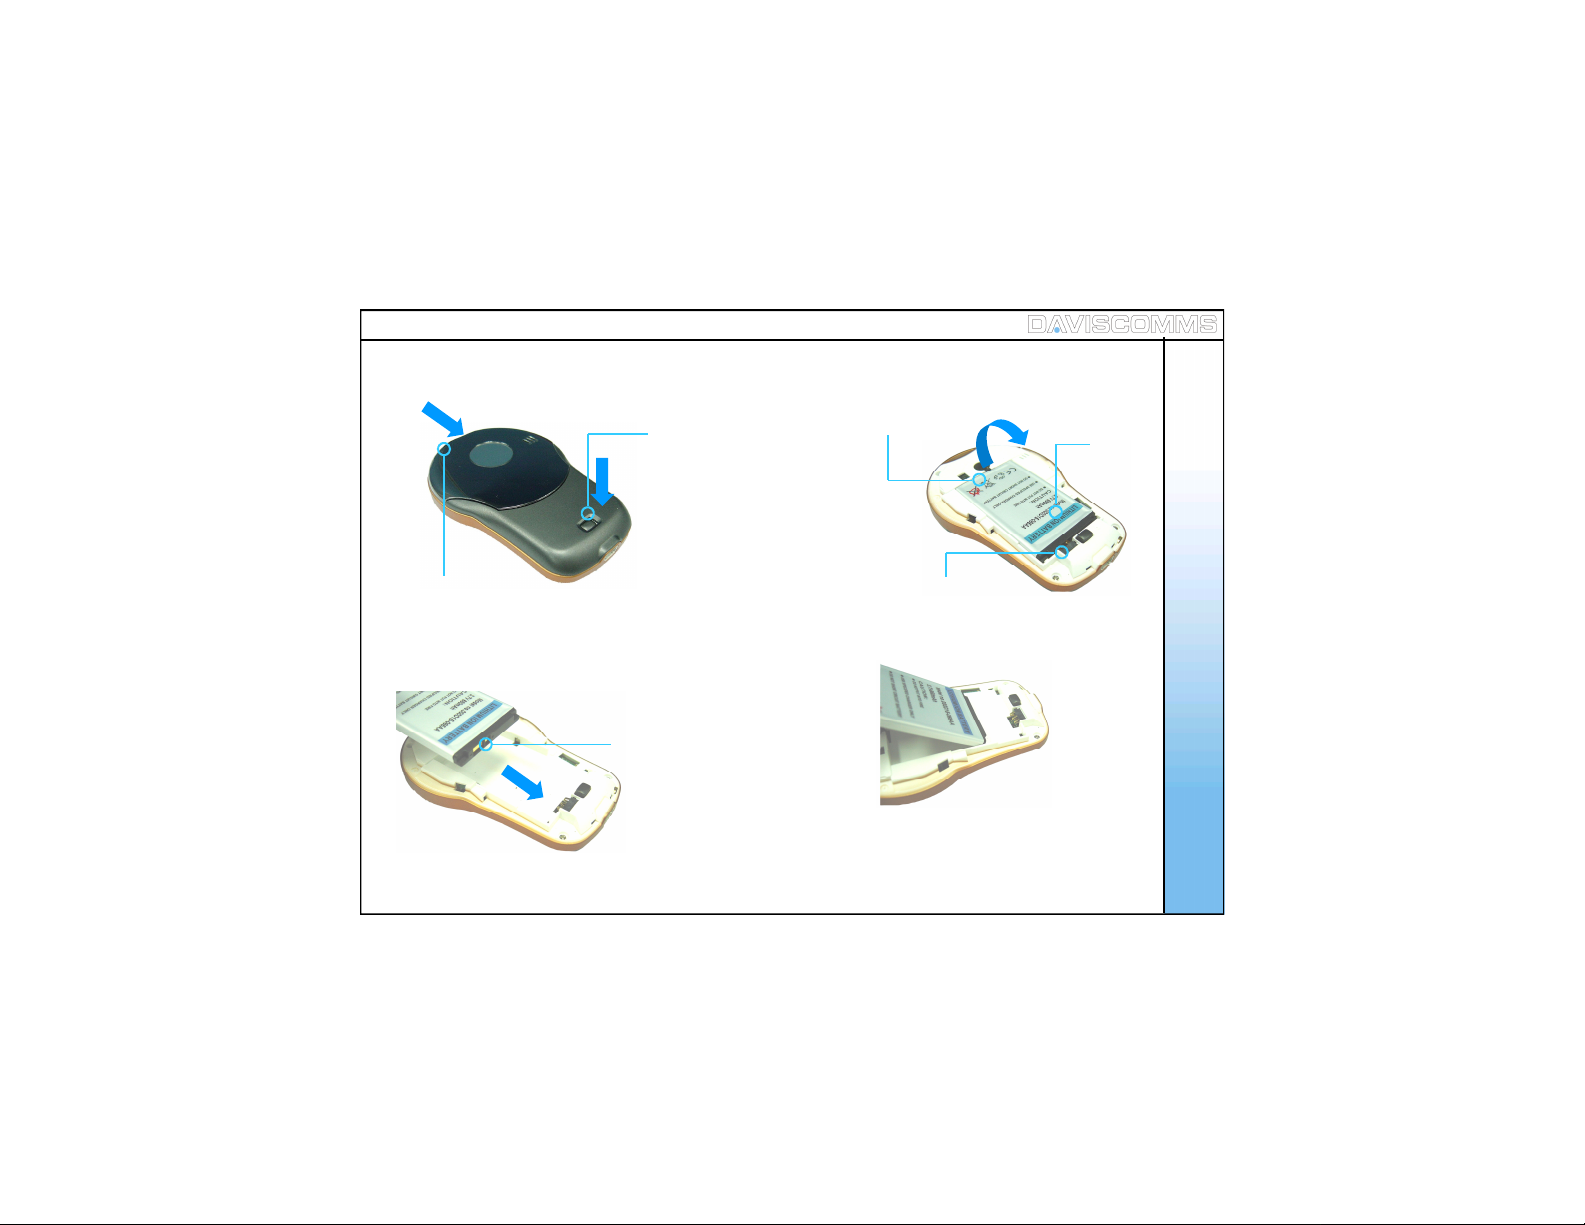
4: Installing and Removing the battery
1. Push and hold the
battery door button down.
3. To remove, lift the
batt ery ou t
from here
Get Started
Batt ery
2. W hile the button is
pushed down, push from
the top and slide the
batt ery door c over out war ds.
4. T o ins tal l the b att er y ,
ensu re t hat t he cont ac t
points are aligned.
*Please refer to page.69 for more informati on on your batter y.
Contact point
5. Insert the direction shown
in the diagram FIRST .
Re- attac h the bat ter y d oor.
5
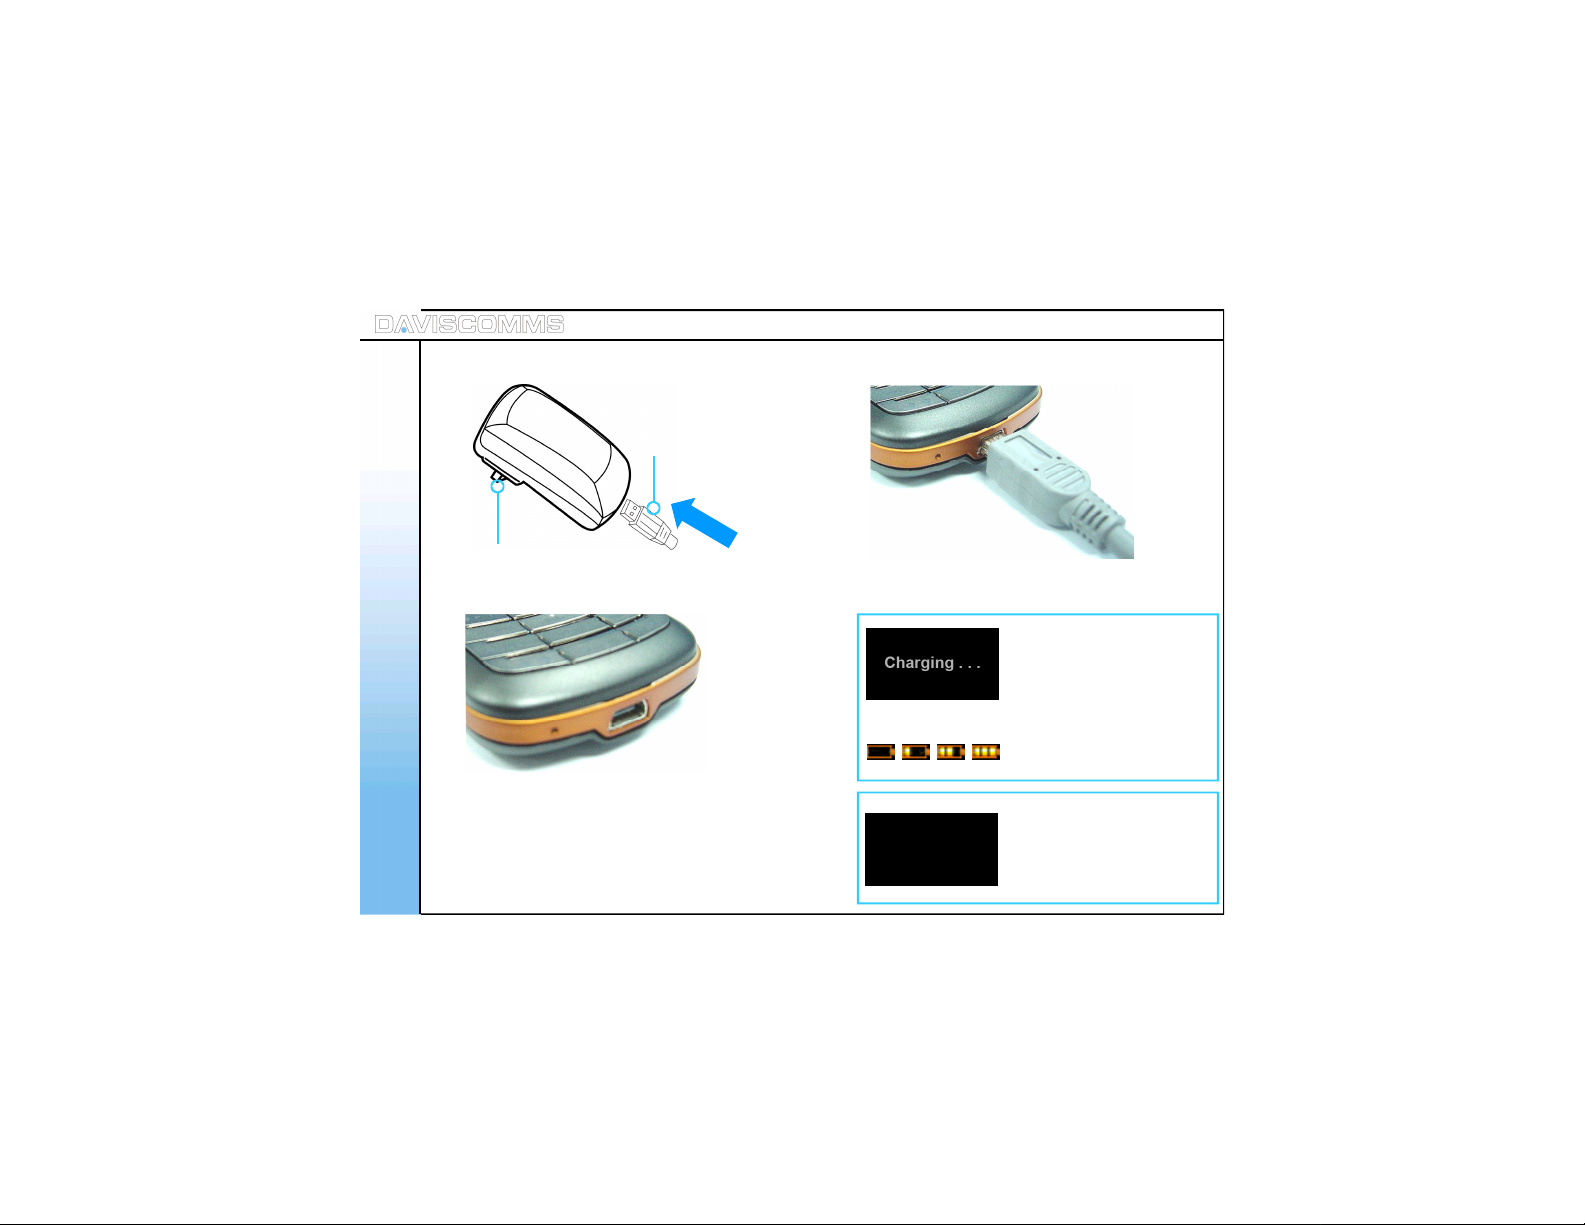
5: Charging the battery
Get Started
2. Insert the charger into
your wal l pow er out let .
3. Loc at e th e US B por t at
the bottom of your phone.
Note: You need to charge the battery for 8 hours
6
for its first time use.
1. Plug the USB cable into
the c har ger or t o a
computer USB port.
4. Plug the other end of the USB cable in and turn
on the main power to begin charging
With the phone turned
on/off, this Screen will
appear when the phone
is charging.
OR
This icon will scroll on the
idle screen if its tur ned on.
Charging Completed
Th is s c reen wil l ap p ear
when the phone’s batter y
charging is complet ed.
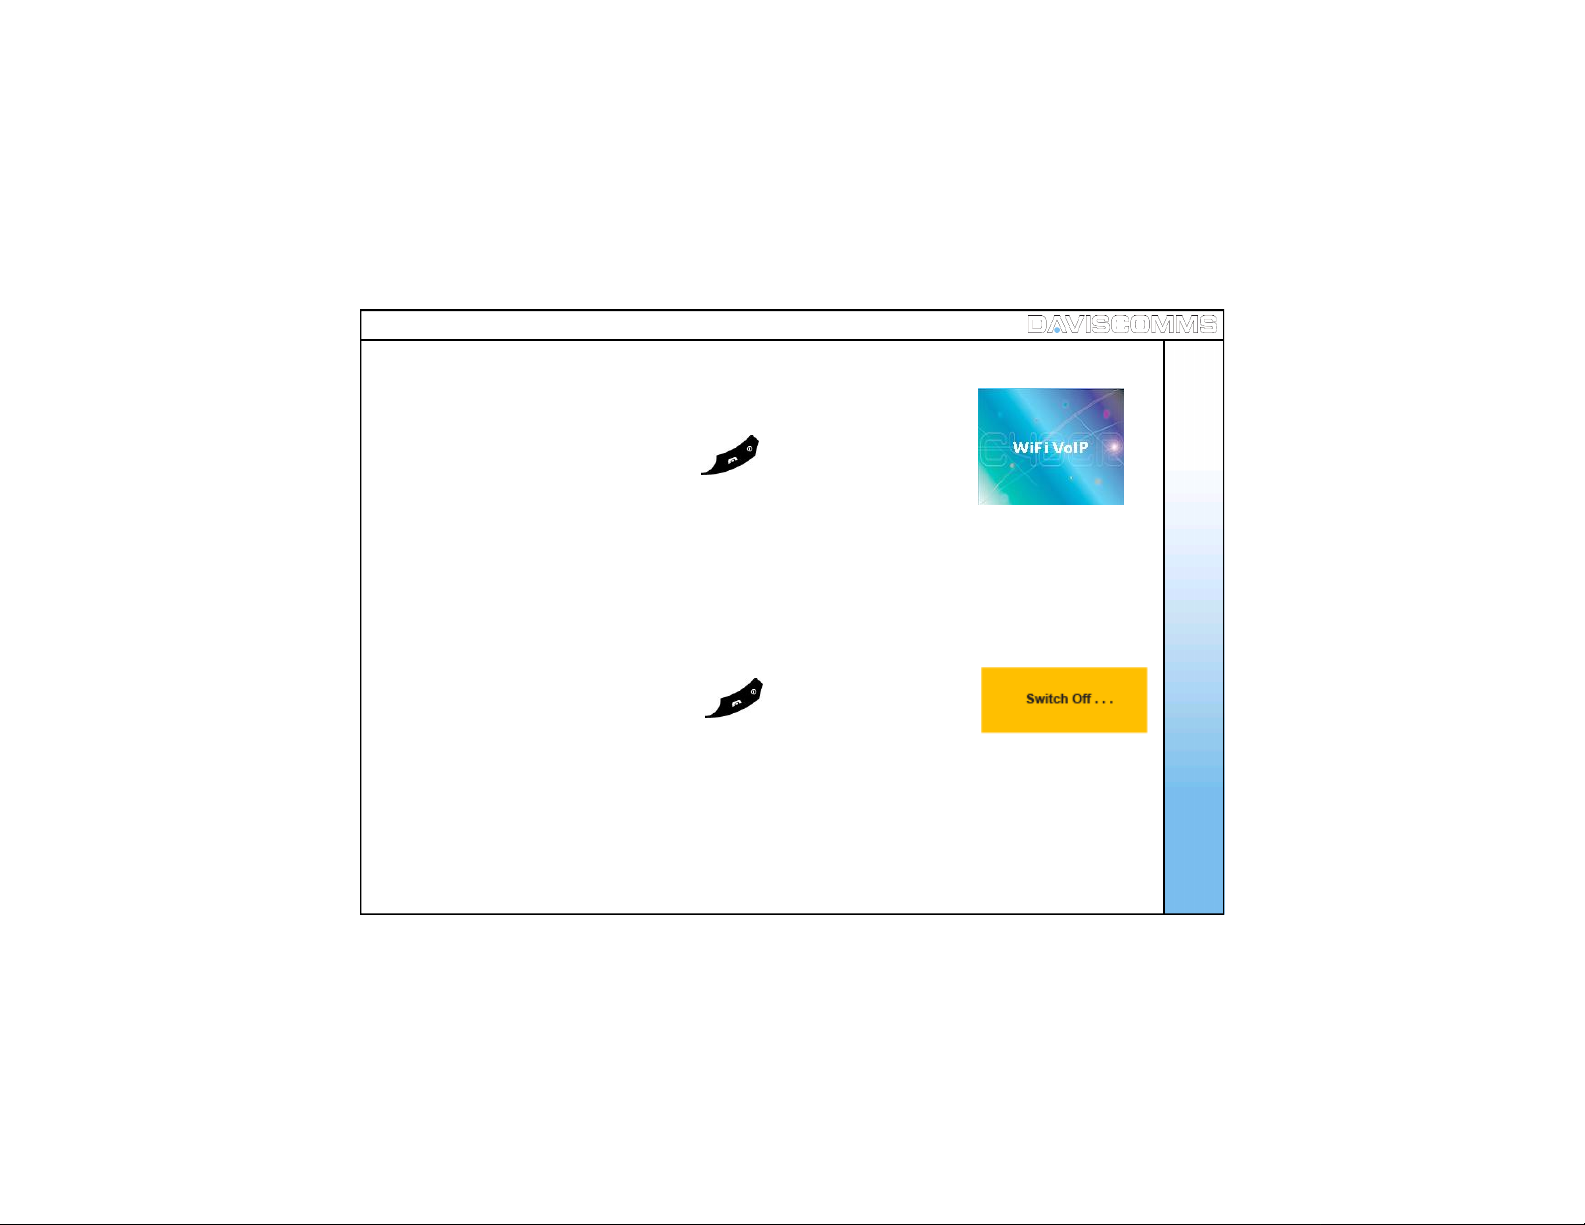
6: Powering the Cyber phone on a nd off
- To Power ON
Press an d hol d th e ( en d /of f key ic on ) for 5 seconds, r el e ase
Get Started
and the power up window will be shown.
- To Power OFF
Press an d hol d th e ( en d /of f key ic on ) for 3 seconds, r el e ase
and the power down window will be shown.
1.0.02
Fig.1 Pow er up win d ow
Fig.2 Pow er d ow n win dow
7

7: Display indicators and icons
Idle Screen
Get Started
Received signal strength from WiFi
access point.
2.59P
Time display
Call mute (Un-mute, Mute)
Keypad lock
To lock, press and hold for 1 second.
To unlock, press and hold for 1 second.
Message Inbox (new, read, s ent, not sent)
Alert type (r i ng, ri ng and vibrate, silent,
vibrate only)
WiFi connectivity status (refer to pg.12)
(Weak Strong)
Th e roles of th e sof t keys var y dep end in g on t he
function you are using. The keys just below
selects the functions desired when pressed.
NOTE: If you are disconnect ed from the signal,
8
the right soft key will automatically change
to the “SCAN” selection.
Battery level indicator
Write Message
Chat Icon
Message Icon
Recent Calls Icon
Soft key function indicators
(Weak Strong)

8. Shortcut M enu
Shortcut menu allows a quick access to the configuration setting menu of your phone.
Sit e S c an
SIP Registration
Reload IP
Restart WLAN
Web Configurator
: Allows you to sc an and join the list of APs available in your network LAN
: Allows you t o act ivat e or r ec onn ec t your S IP ac cou nt on the Cyb er W i Fi phone
: Thi s fu nc ti on all ows you t o req u est an IP ad dr es s f r om a D HC P ser ver
: This f unc t ion res tar ts t he ph one ’s wi rel es s con nec t io n to th e A P.
: This function allows you to configure your phone s ettings using a web browser.
Get Started
System Info
Sys tem i nf o provi des a sum mar y of the conn ect io n d etai ls your phon e to t he netw or k A P.
W LAN : Displ ays t he nam e of t he AP you are c onn ect ed to.
IP address : Displays the IP address ass igned to the phone.
Us er Name : Dis pl ays t he U s er n ame us ed f or S IP c onn ec ti o n.
Proxy Server : Dis plays t he I P addr es s of t he pr oxy ser ver t he ph one is c onn ect e d to.
Outbound proxy : Dis plays t he out bo un d prox y ad dr ess of the S IP s erver t he ph one
is con nec t e d t o.
BACK
9
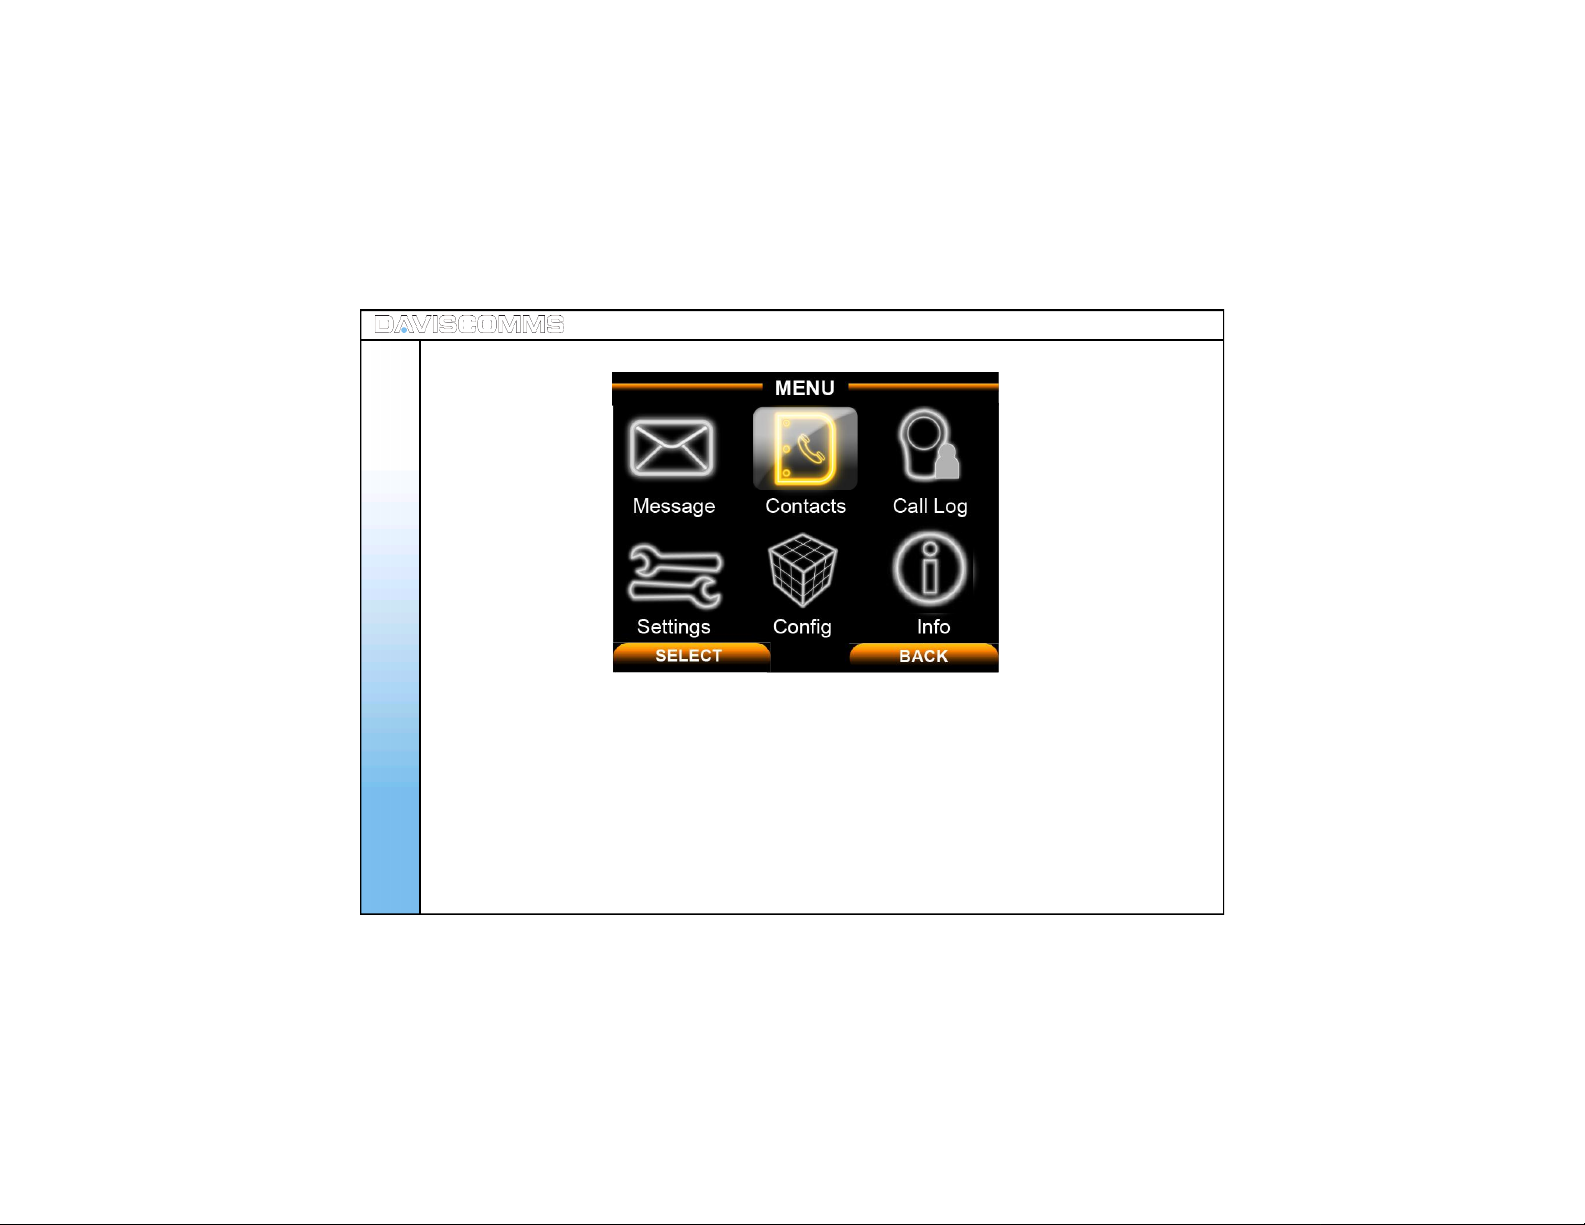
9: Main Menu Ic ons
Get Started
Individual icons will illuminate when selected. Navigate your way around the icons by moving the
joyst ic k. Pres s th e joyst ic k d own to sel ect the app lic a ti on.
Message: Us e the mess ag es menu to s end and rec eiv e s hor t mes sag es .
Contacts: S tor e and f ind f r om a lis t of c ont ac ts s tor ed in you r con t act l is t.
Call Log: View s the c all s you h ave dial ed, rec ei ved , or m is sed
Settings: Settings menu provides you with various setting options to customize the phone to your
Config: Use this menu to configure the SIP, IP and W LAN settings.
Info: Use this menu to check the information of your SIP, IP, W LAN and General settings.
10
pref ere nc es an d need s. You c an also r eset the s ettin g t o their defau lt value s.

2. Configuring your phone
1: Importa nt infor ma tion you should know firs t
- Possible ways of communicating using the CYBERPHONE.
- IP to IP call
- SIP to SIP call
Note: You will need to subsc ribe with a SIP service provider to make a SIP call.
For reference please ref er to www.daviscomms.com.sg
- Requirements in order to establish a communication on the CYBERPHONE.
- The phone must be associated to an AP in order to communicat e to other W iFi phones.
Configuring Your Phone
Note: - Do take note that there are some network s ecurity protocols installed on the LAN which you
wish to connect to.
- Some require registering the M AC address of the CYBERPHO NE in order to allow acces s to
the AP of the network. Under suc h circumstanc es, you should seek ass istance from your
network administra tor to register the MAC address of the phone to the serv er to gain acces s to the
network’s AP.
- Encryption
- Connecting the CYB ERPHON E to wireless LAN area may require an
encryption passw ord. You will need this passw ord to gain access to the network in order to
associate to the AP you are connectin g to.
- Most standard netw ork us es WEP-64 encry ption protoc ol. You would need to consult y our network
administrator if the network uses other settings.
11

- SIP Server connection
- A SIP connect ion allows you to communicate to another SIP user via a W iFi phone without having
the h ass le to rem emb er t he f ull l engt h of th e IP add res s nu mb er.
Note: - Before y ou can connect to a SIP server, it is necessary that y ou obtain a SIP ac count. You can
- Connectivity Status
Configuring Your Phone
also obtain a paid SIP account which provides you communicat ion to a mobile phone number (GSM )
or a landline number (PSTN).
For reference please refer to www.daviscomms.com.sg
- T he con nec t iv it y st atu s of your CYBERPHONE must be gr een in or der for you r p hon e t o make cal ls.
Belo w is the i ll us trat i on of the c onn ec ti vi ty s tat us of you r CYBERPHONE.
Red – Not c onn ec te d t o an A P.
Amber – It is connected to an AP but no IP is being assigned .
Gr een – Connec t ed t o an A P and IP i s bein g as si gn ed .
12
2: Connecting your phone to an A P
Auto Connecting to an AP
Before you proceed to making a call, you will first need the CYBER PHONE to connect to an AP.
Your phone will automatica lly detec t and connec t to your pre-configure d AP on the first power up.
Manually setting up the phone to connect to an AP in your LAN network
Step .1 - From t he idl e sc reen, sel ect > MENU > CONFIG > WLAN > SSID >SCAN within your area, a list
of avail a b l e A P’ s wi ll ap p ear > s c roll an d s elec t th e AP you wis h to c onn ect t o, selec t > VIEW
> Select the AP you like to join.
Step.2 - In the same W LAN settings menu, select > ENCRYPTION >
scroll and select > WEP-64. ( Please refer to pg.10, on encryptio n. )
Step.3 - In the W EP-64 screen, select >OPEN SYSTEM> ( Please c onf i rm t hi s
setting with your Network Administrat or. ) and select > KEY 1.
Step.4 - Input the password encrypt ion of the AP set by your network administrat or > w hen don e, s elec t >
OK > in the W LAN Settings menu, select ACTIVATE by pressing the left soft key .
Note:-
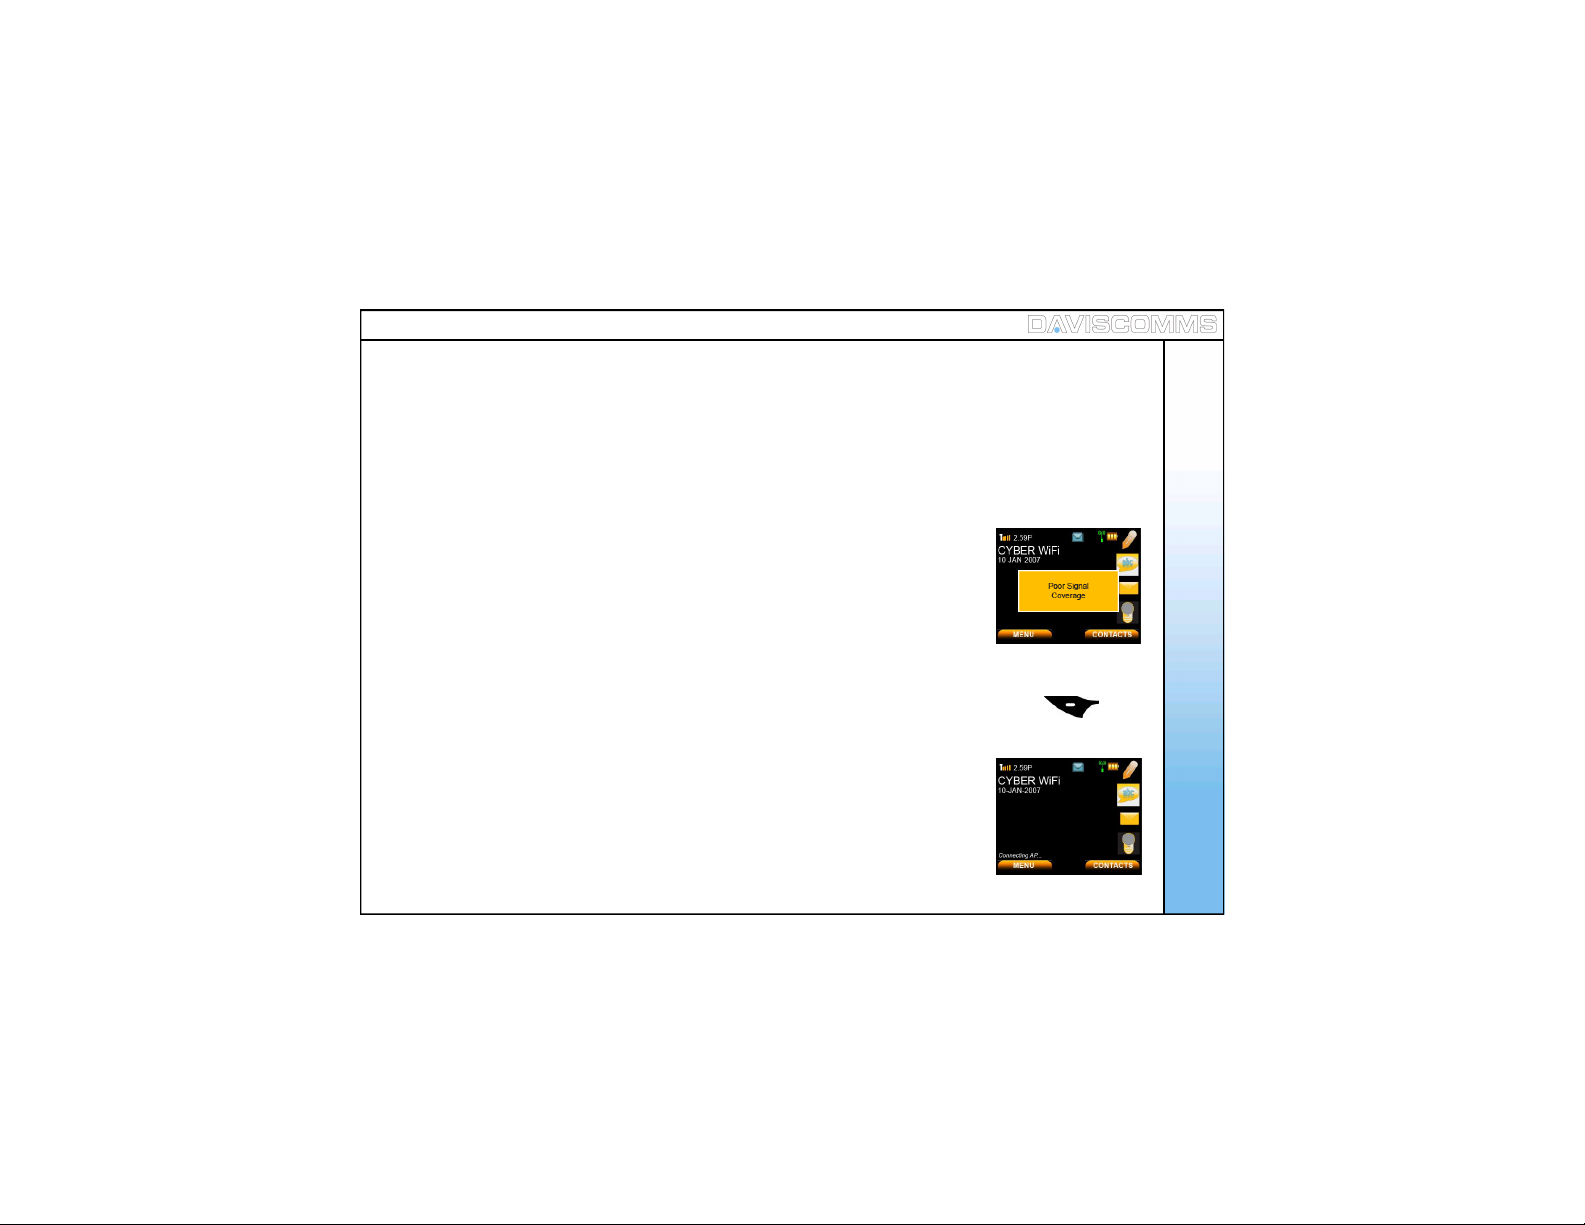
1.) Wait for the connectivity status bar to turn green. The main screen will display “Connecting AP….
” followed by “Connecting IP….” to complete the connection the to the network If the connecting AP disappears
and connectivity is still red, retry. If you still have problems, consult your IT administrator for the network details.
2.) Incase of WEAK SIG NAL, there will be an alert tone & display showing
Step.5 – Onc e your phone c onnectivity s tatus turns green
You shou ld be abl e to mak e a c all via d ir ect I P to IP .
Fig.3 Poor Signal Coverag e
Screen
Fig.4 C alling Screen
Configuring Your Phone
13

3: Connecting your phone to an SIP
Configuring Your Phone
14
Note: - Before you proceed to making a call, you will first need to set up the CYBERPHONE to
Step .1 - From t he idl e sc reen, sel ect > MENU > CONFIG > SIP > USER NAME > input your user name
Step .2 - I n the s ame S IP s etti ngs men u, selec t > PASSWORD > input your password according to your
Step .3 - I n the s ame S IP s etti ngs men u, selec t > PROXY SERVER > IP ADDRESS > key in t he ad dr ess
Step .4 - In the Pr oxy S erver sett ing s men u, selec t > ST AT US > and sel ect > ENABLE.
Step .5 - G o bac k to th e SI P set tin gs men u, sel ect > OUTBOUND PROXY > IP ADDRESS > key in the
Step.6 - In the Outbound Proxy settings menu, select > STATU S > and selec t > ENABLE.
Step .7 - G o bac k to th e SI P set tin gs men u, sel ect > ACTIVATE by pressing the left soft key .
Note: - After ac tivating, a “Registering SIP…” display w ill be appear at the Idle screen.
Step .8 - You ar e now read y to mak e a SI P to SI P cal l via S IP s erver .
register to a SIP serv er connec tion.
For reference please refer to www.daviscomms.com.sg
acc ordi n g to your SIP ac cou nt detai ls and s elect > OK.
SIP ac cou nt det ails and sel ect > OK.
of your S IP s er ver, f or ex amp l e, > SIPprovider.org and s elec t > OK.
OPTIONS HANDFREE
IP add r ess of your S IP s er ver, f or exa mp l e, > SIPprovider.org and s elect > OK.
The “Not Registered” sign will disappear on the idle sc reen to indicate that your
CYBERPH ONE is connec ted to your SIP s erv er account.
3. Basic Call Functions
1: Making an IP to IP call (via direct IP)
For eg:- 1234567@191.166.123.203
Basic C all Func tions
These figures are define d
by the recipient’s us er name
These figures refer s to recipients
FIXED IP number
In the SIP settings.
Note: P leas e mak e s ur e to dis abl e t he SI P set tin gs bef or e maki ng an I P to IP
cal l. T o do so, p leas e f oll ow t he s t eps b elo w:
Disabling SIP - Go to MENU > CONFIG > SIP > PROXY SERVER > STATUS >
select DISABLE > select BACK > OUTBOUND PROXY > STATUS >
select DISABLE > select BACK > ACTIVATE by pressing the left soft
key .
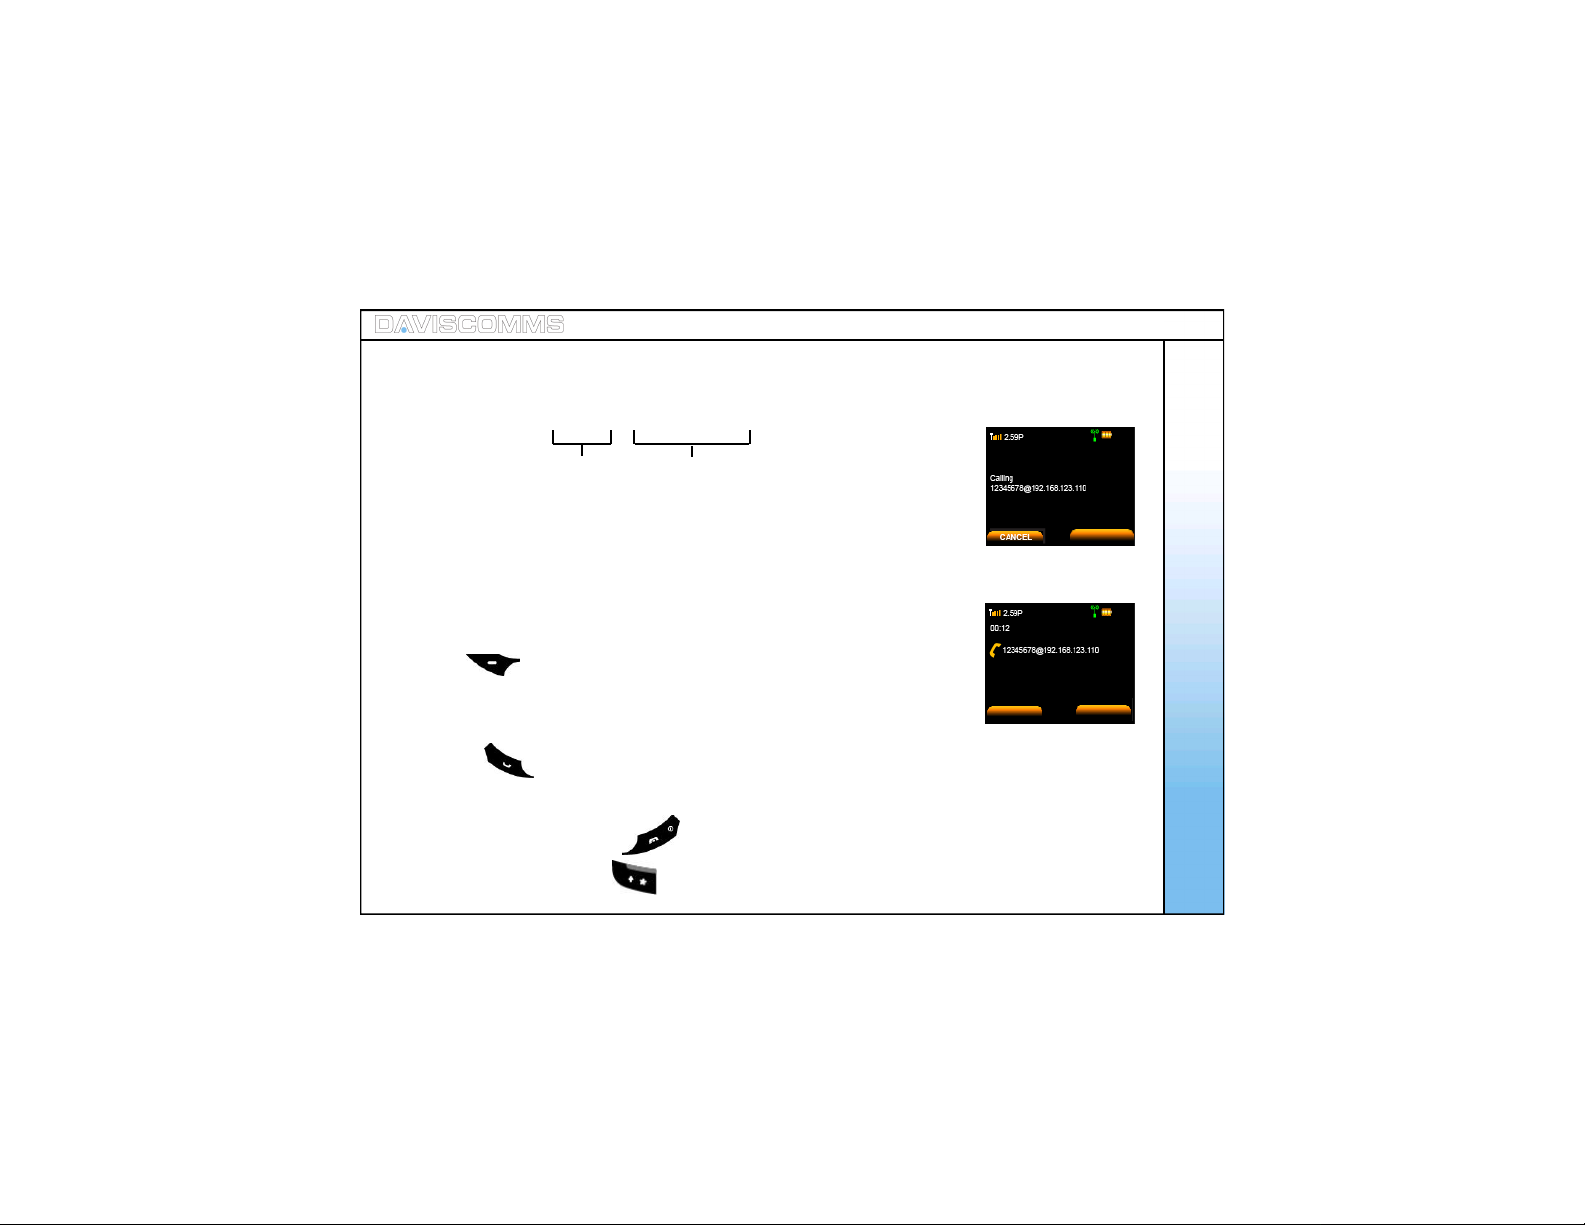
Step.1 - In the idle screen, key in the number, f or eg:-
1234567@191.166.123.203
Step.2 - Pr ess and “calling 1234567@191.1 66. 1 23 .20 3” will be displayed.
Step.3 - W hen the call is connected, c all timer will be displayed.
Step.4 - T o end the call, press the key.
Note: “@ ” is keyed by pressing key twice.
Fig.5 C alling Screen
OPTIONS
Fig.6 C all timer screen
SPEAKER
SPEAKER
15
2: Making a SIP to SIP call (via SIP server)
Note: A user can only call to the other part y via the same SIP provider. Please refer to your SIP
provider’s agreemen t if you are contacting another pers on of another SIP provider acc ount.
Do make sure that your SIP settings are activate d. (Refer to Pg.14)
For eg:- 31080240
Basic C all Func tions
These figures will be the other parties SIP
phone number y ou wish to dial.
Step.1 - Key in the SIP contact number
Step.2 - Press and “calling 310802 40 will be displayed.
Step.3 - W hen the call is connected, c all timer will be displayed.
Step.4 - T o end the call, press the key.
16
OPTIONS HANDFREE
3: Making a call ( via SIP server to Landline / GSM Mobile Phone)
Note: You can only call a Landline / GSM Mobile phone line depending on your SIP Server acc ount
services.
For reference please ref er to www.daviscomms.com.sg
Do make sure that your SIP settings are activate d. (Refer to Pg.14)
Note: For eg:- 65 62100123
Basic C all Func tions
Country code
Step.1 - Key in the number, for eg:- 656210 0123
Step.2 - Pr ess and “c alling 6562100 12 3” will be displayed.
Step.3 - W hen the call is connected, c all timer will be displayed.
Step.4 - T o end the call, press the key.
Land line number
or mobile number
17
4: Speed dial
- Ref er to pag e. 29 f or the s ett ing up of sp eed dial .
- During standby mode, pres s and hold the preset key for 1 second to display
the name and phone number, press left soft key to call.
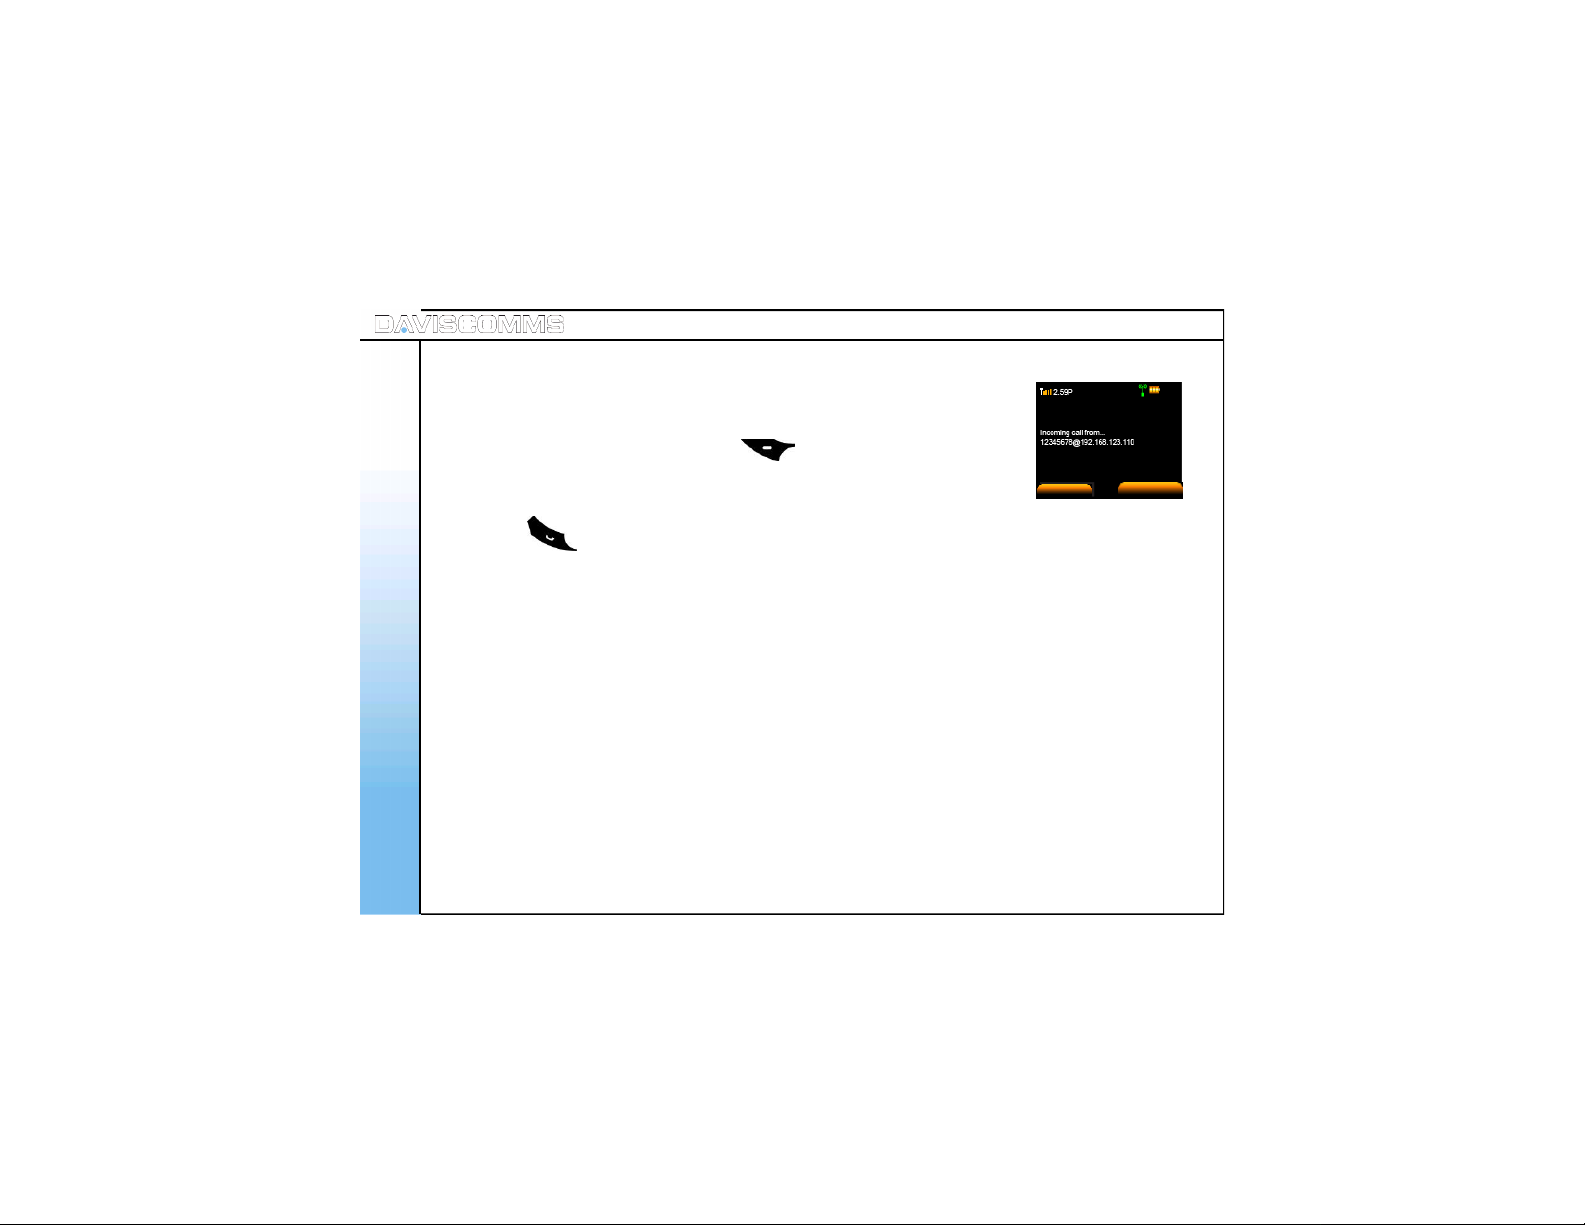
5: Answering a call
- Press the key to answer inc oming c alls. C all timer will be dis played.
Basic C all Func tions
6: Mute/Un-mute a Call
- During a call is answered, click on options> scroll to mute and click select.
To un-m ut e th e c all, c li ck on opti on s> s cr oll t o mut e an d cl ic k selec t .
7: Hold
During a call you can put the other party to hold by clicking on options> s croll to Hold and clic k select.
8: New C a lls
New cal ls all ows you to conn ect to anot h er user whil e havi ng one conv ers at io ns act ive at the s ame t ime.
To creat e a new c all , c l ic k on opt i ons d ur ing a c all > s c rol l to N ew c all > cli ck s elec t> K ey in nu mb er or
sel ect Con tac t s > cl ic k Call
18
SILENT
Fig.7 Incoming call screen
SPEAKER
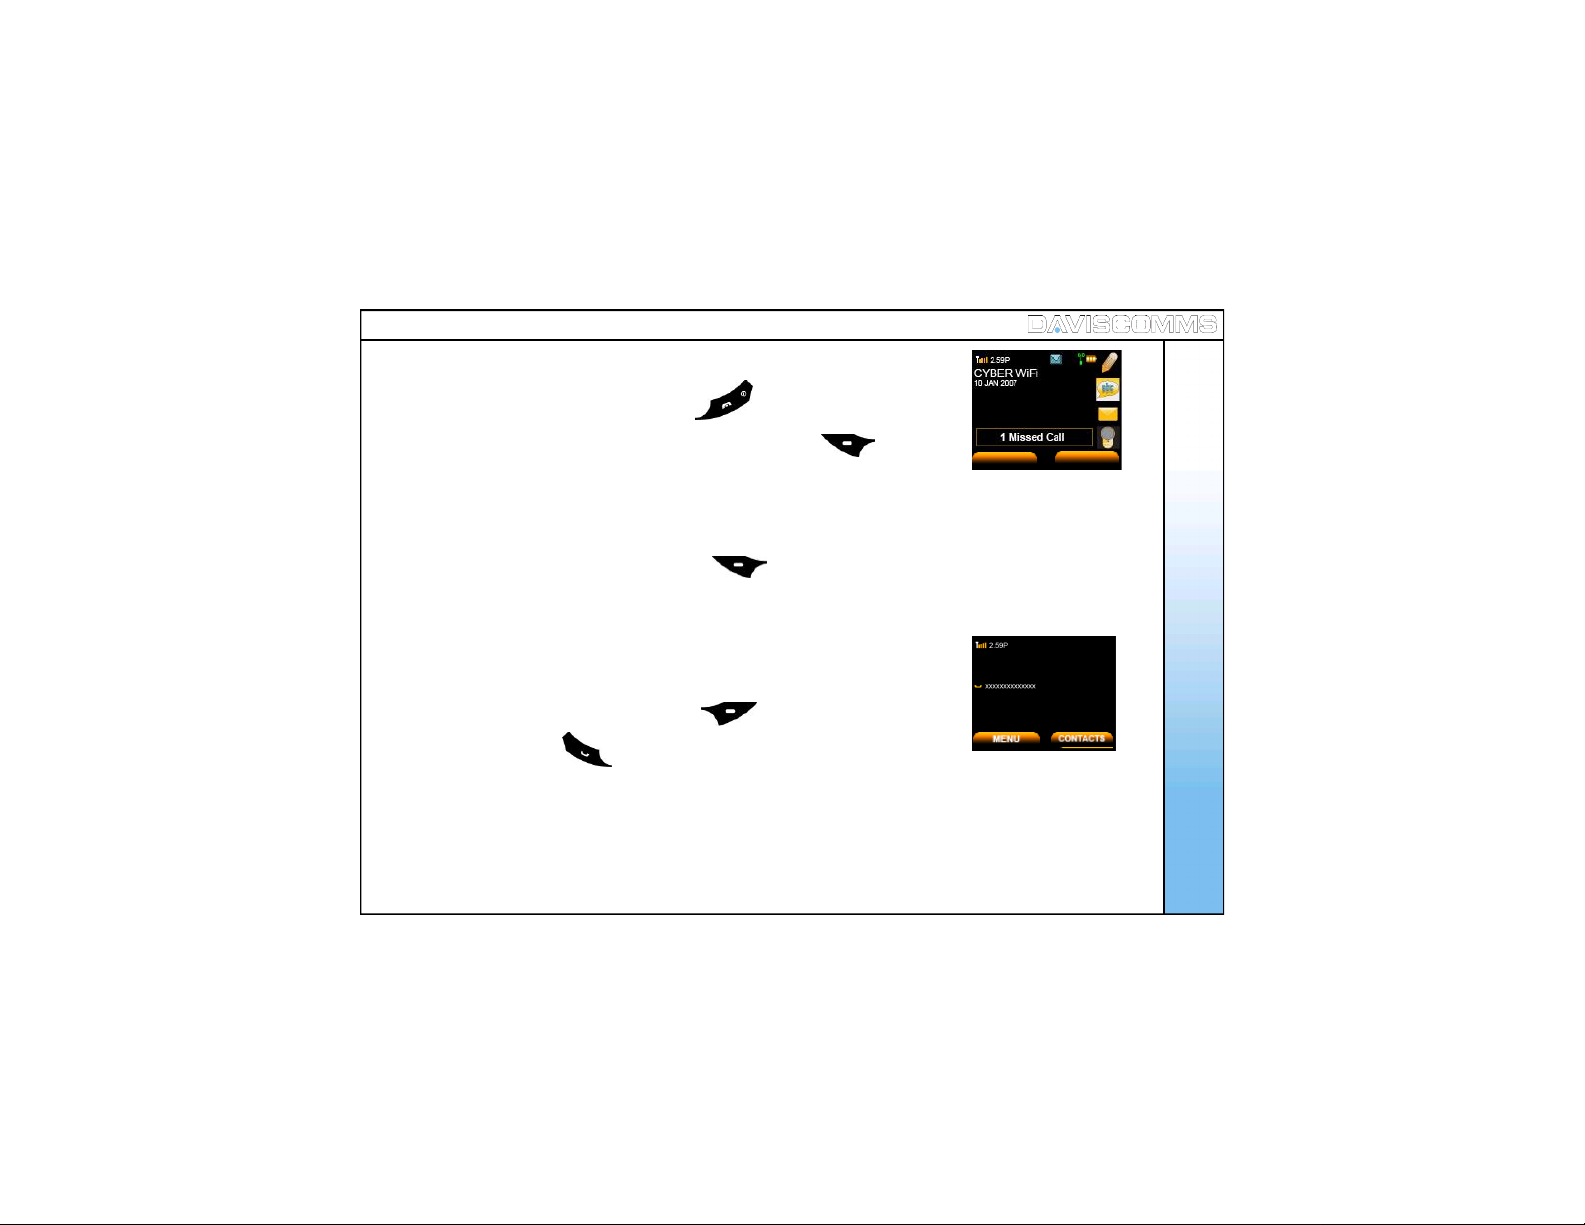
9: Rejecting a call
- When there is an incoming call, press the key to reject the call.
Basic C all Func tions
- Number of missed calls will be displayed. Press the left soft key to
view the missed call.
10: Silencing the incom ing ring tone
- When there is a incoming call, press the left soft key > select SILENT.
11: Ca ll wa iting
- W h en anot h er c all c omes in du ri ng a cal l, it wil l gi ve a wai tin g t one.
- To reject the incoming c all, press the left soft key > select REJECT.
- To answer, press the .
12: Conference Call
During a call, click on OPTIONS during a call > s croll to NEW CALL > click SELECT >
key in a ph one n umb er or s elec t CONTACTS > click CALL > when third party answers,
click OPTIONS > and select a phone number.
VIEW EXIT
Fig.8 M issed call screen
Fig.9 Hold call screen
19

4. Menu
Menu – ( i ) Messages
Create All ows you to c reat e mes sa ges and s end it to an oth er par ty.
Inbox and Outbox All ows to you view, edit and del et e th e mes sag es.
Menu - Message
20
- R ead All ows you to read t he mes s ages .
- Reply All ows you t o reply the mes sag es you r ead.
- Forward Al lows you to for ward the mes sag e you read t o anoth er part y.
- D elet e All ows you t o delet e t he mess ag e you s elec t.
- Delete All All ows you to dele te all mes sag es .
Chat All ows you to cr eate a chat s ess ion wit h anot he r r eci pie nt.
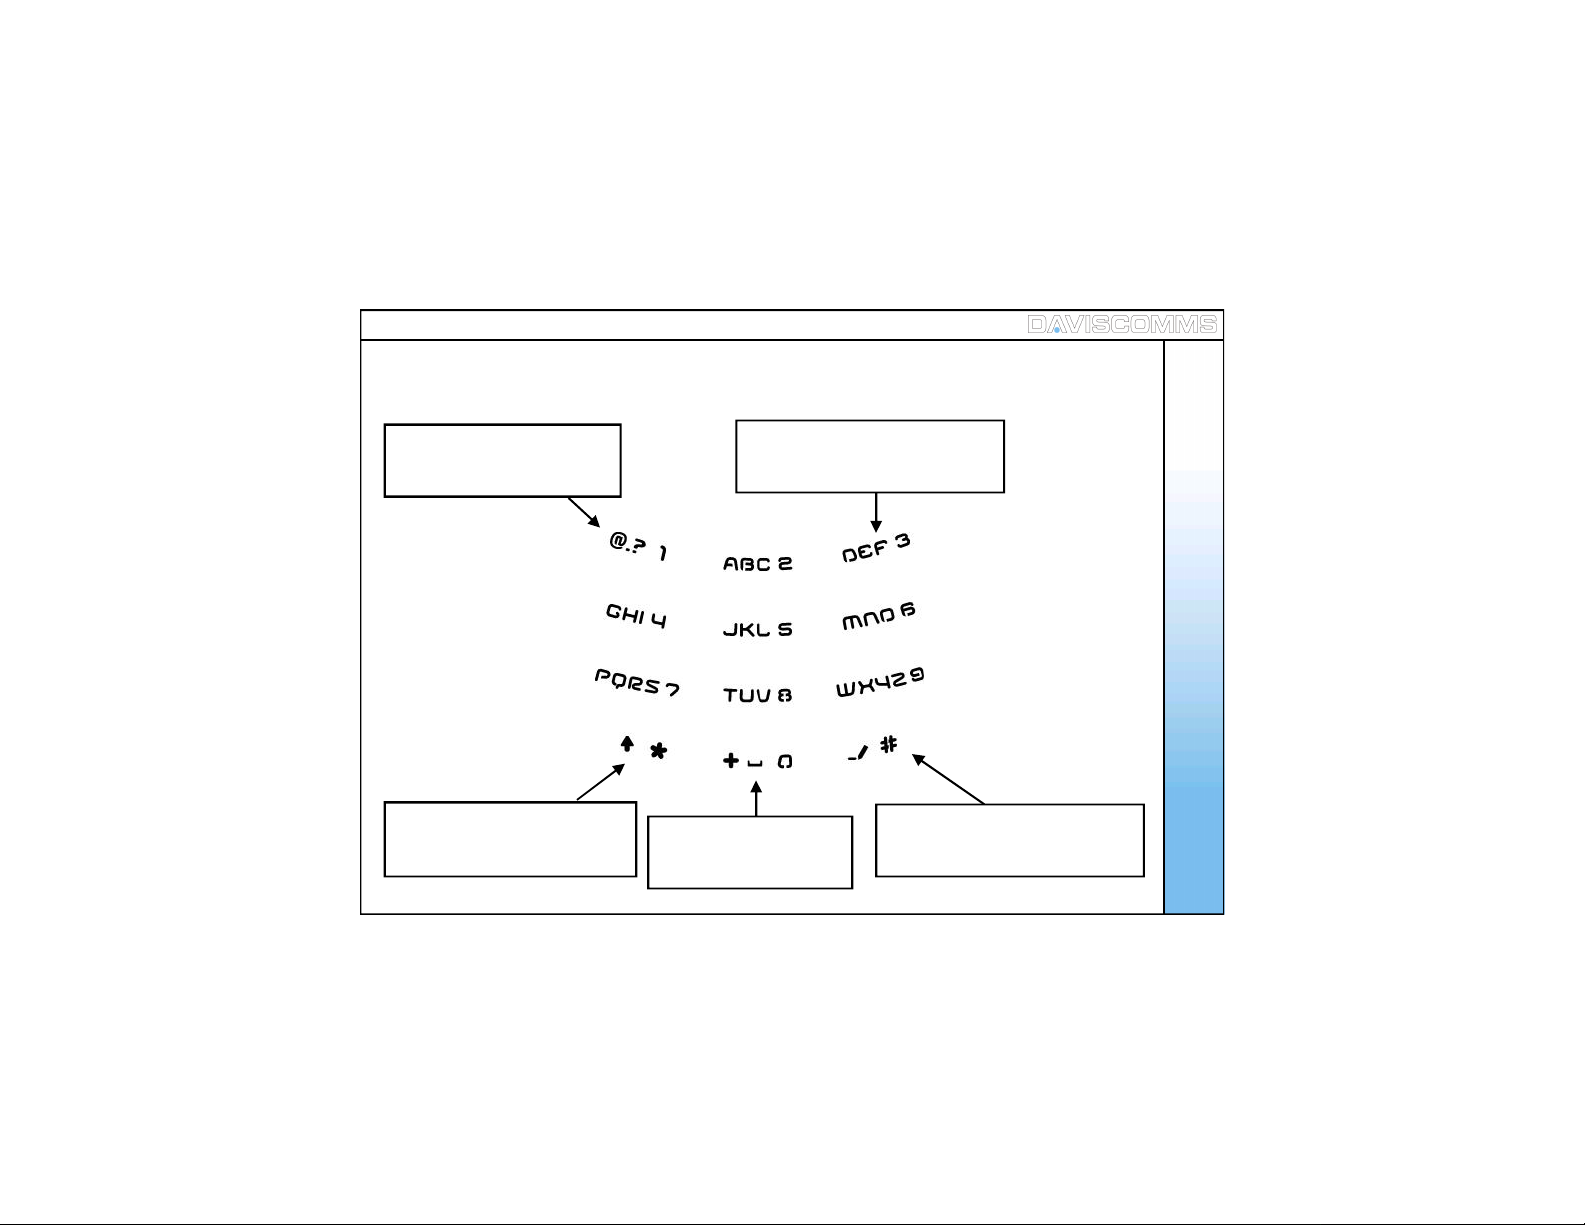
( 1 ) Keypa d Legends
Menu - Message
Press repeated ly to sc roll
through various punctuat ions.
Press repeated ly to sc roll
between ( . @ : )
Hold to display the s ymbol table
Press repeatedly to sc roll through
the correspondin g letters.
Press once for SPACE
and LONG PRES S
for “+”
Press once to c hange betw een
ABC (uppercase), abc (lowercase)
and 123 (numeric)
21
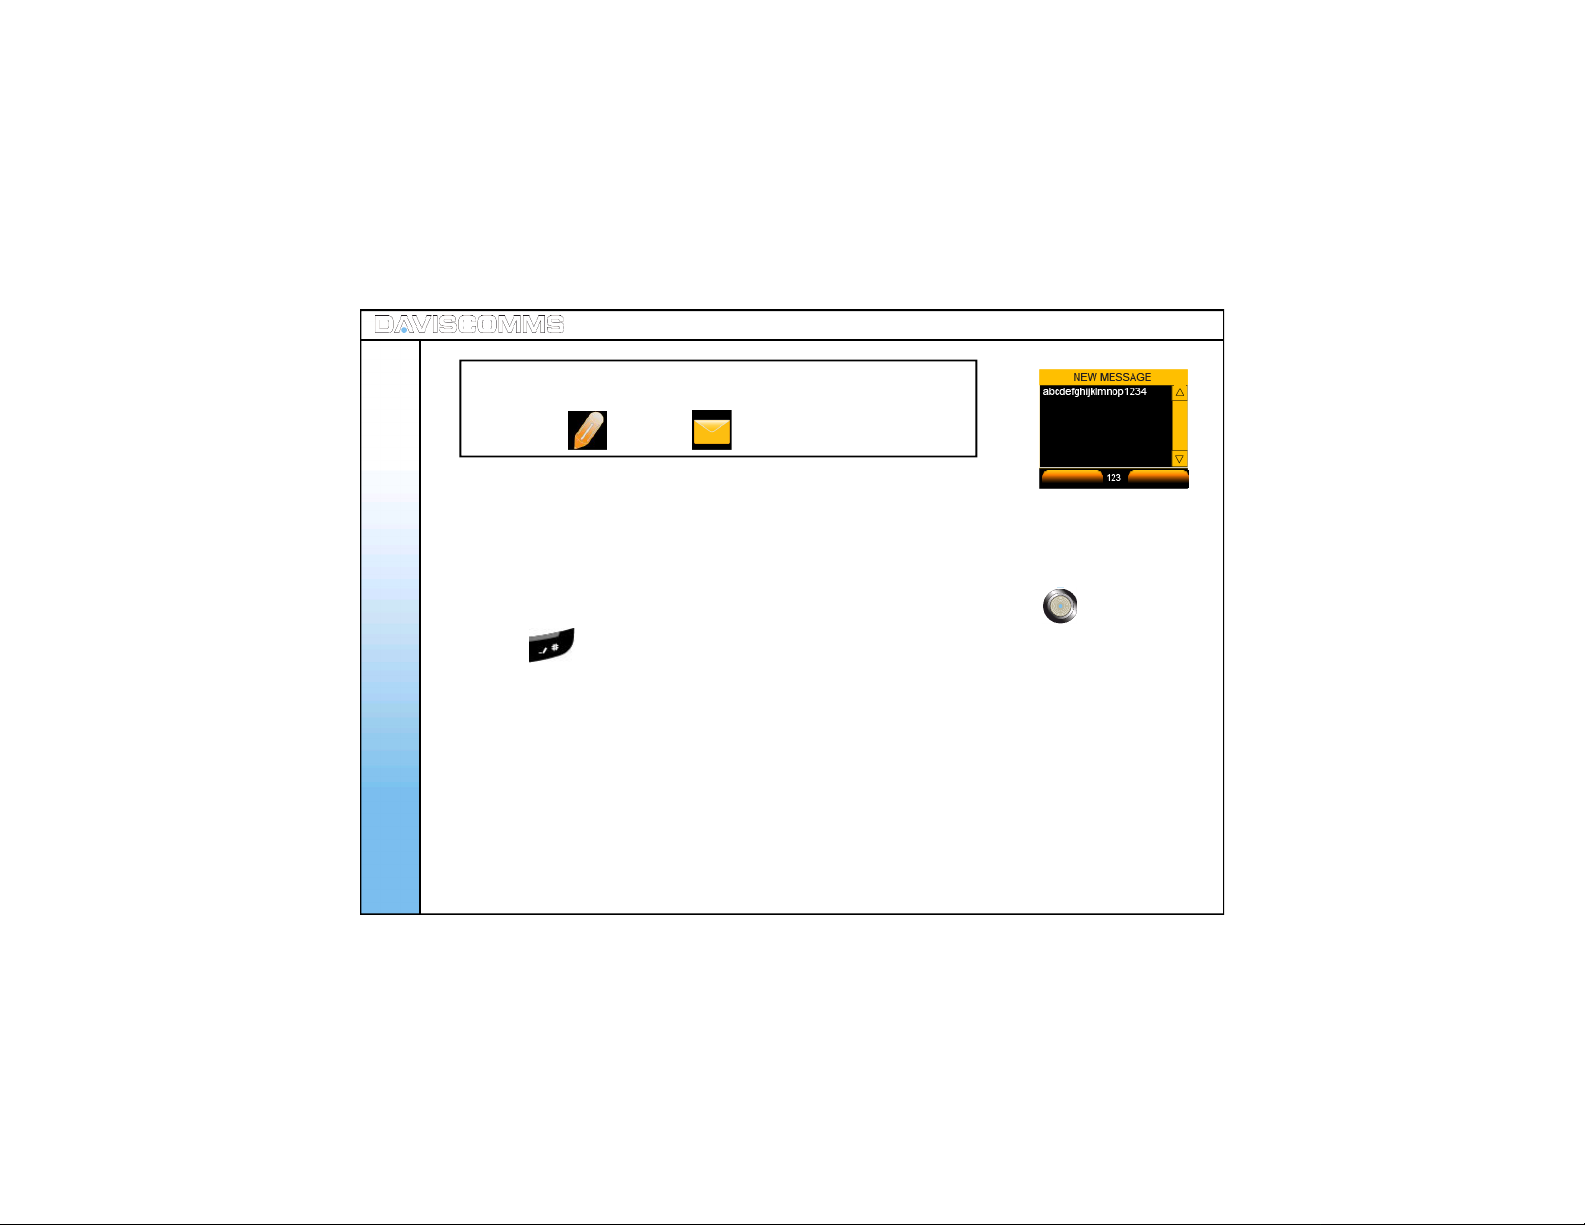
Tip:
You can create new mess ages or check your mes sage inbox by
selecting the icon or the icon at the idle s c reen.
22
( 2 ) Create
- Select MENU > MESSAGES >CREATE > typ e the mes sag e > select OK >
Menu - Message
key in a phone number and select > OK. OR select CONTACTS t o pi c k an
existing contact in your phoneb ook and send.
Note: You can also select MES SAGES fr om the idle screen by sc rolling up or
down with the joystick and s electing it by pressing the center of the joy stick.
Press the key to switch the text mode between “ABC”, “abc” and “123”.
- ABC – Uppercase
- abc – Lowercase
- 123 – Numeric
OK
Fig.10 Write Message Screen
BACK

( 3 ) Inbox
- Select MENU > MESSAGE > INBOX.
Note: You w ill be notified if there is a new message in your inbox from the idle sc reen
by spotting the icon at the top of the idle s c reen.
Note: M essages in the Inbox c an be viewed. The arrangement of messages is
latest (TOP) to earliest (BOTTOM )
Menu - Message
These are the following menus found when you access the INBOX.
Inbox: Read
- From the M ESSAGES menu > Sel ec t INBOX > Selec t the mes sag e you wan t to
read > pres s th e c enter of t he j oys t ic k to ope n the m es s age t o read.
Inbox: Reply
- From the M ESSAGES menu > select INBOX>selec t th e mess age yo u want to
reply > OPTIO NS > REPLY.
Inbox: Forwar d
- From the M ESSAGES menu > select INBOX>selec t th e mess age yo u want to
forward > OPTIONS > FORWARD.
YES NO
Fig.11 Delete M essage S creen
23

24
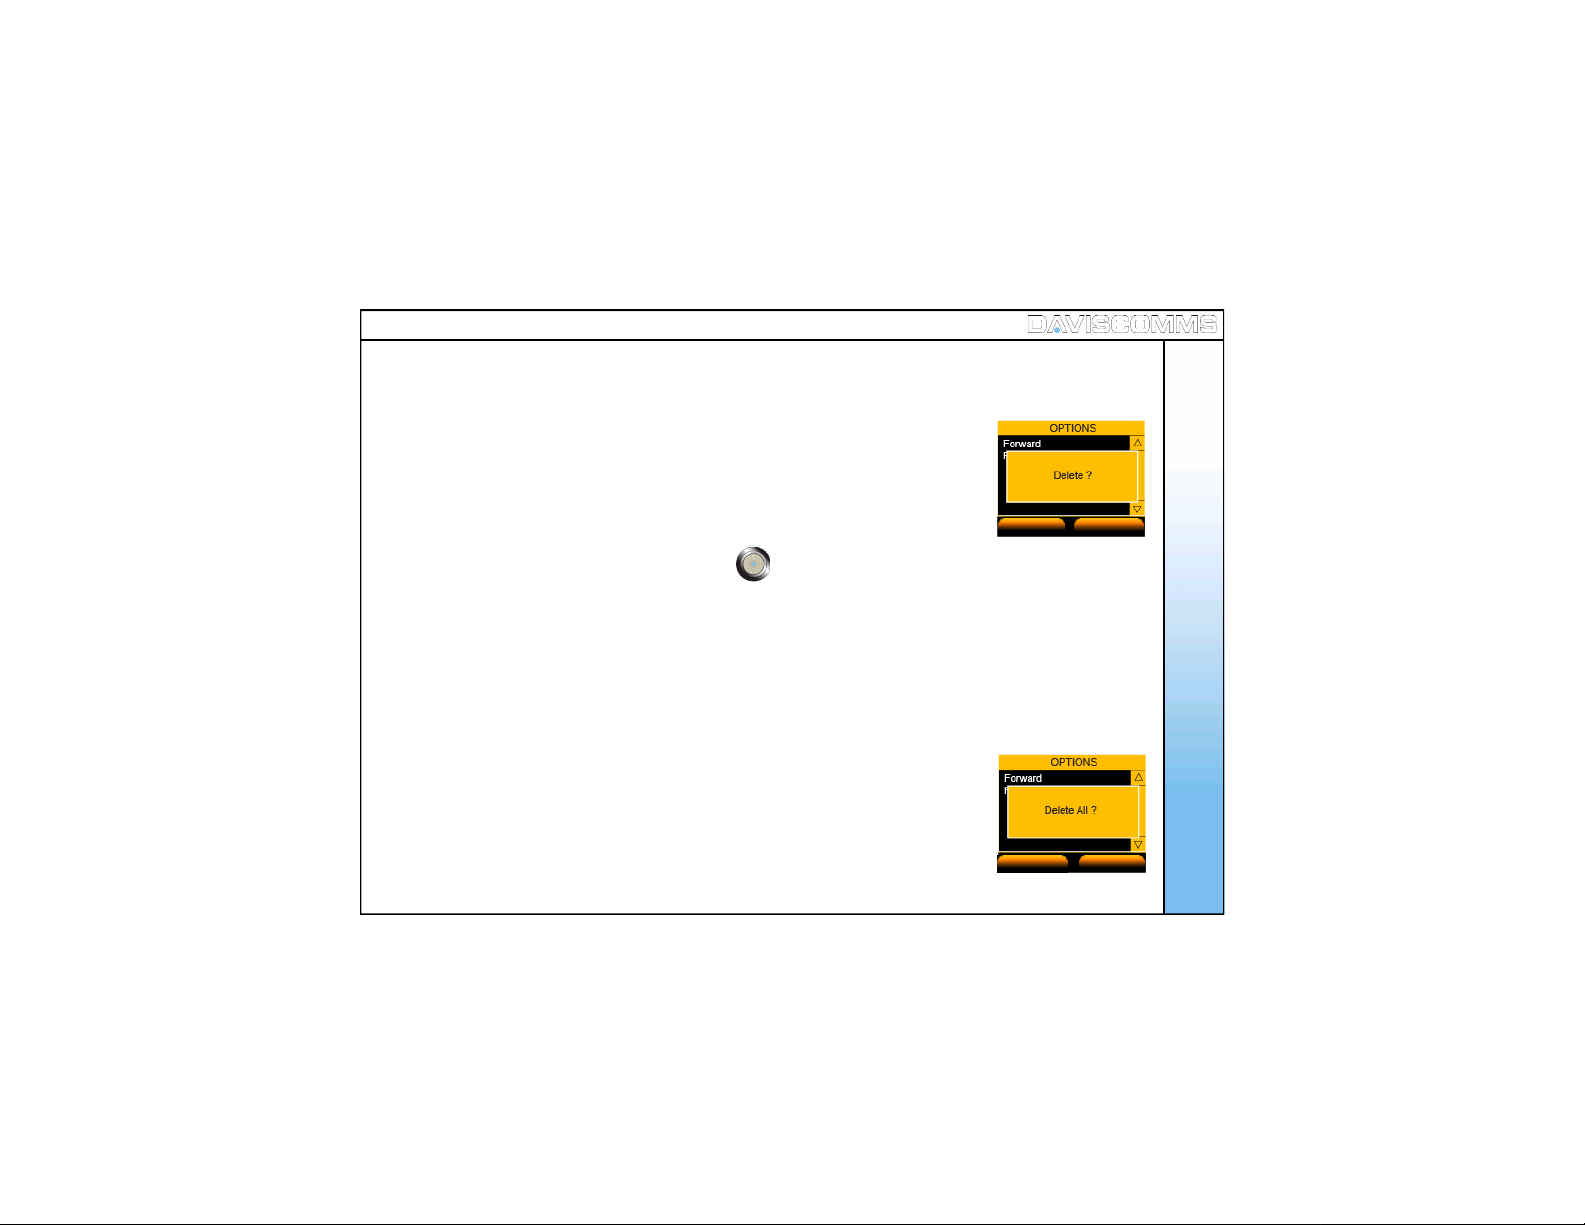
Inbox: Dele te
- From the M ESSAGES menu > select INBOX>selec t th e mess age you
want to del et e > OPTIO NS > DELETE > select YES to c on f ir m or NO to
canc el .
Inbox: Dele te All
- From the M ESSAGES menu > select INBOX > OPTIONS > DELETE ALL
Menu - Message
> select YES to c on f ir m or NO to canc el .
Note: All messages w ill be deleted permane ntly.
YES NO
Fig.12 D el ete All Message Screen
( 4 ) Outbox
- Select MENU > MESSAGE > OUTBOX >
Note: M essages in the Inbox c an be viewed. The arrangement of messages is
latest (TOP) to earliest (BOTTOM ).
Outbox: Read
- From the M ESSAGES menu > Sel ec t OUTBOX > Selec t the m ess age you
want to rea d > press the c en t er of t h e j oys t i ck to r ead th e mes s ag e .
Outbox: Forwar d
- From the M ESSAGES menu > select OUTBOX > selec t t he mes sag e you
want to f orwar d > OPTIONS > FORWARD.
Outbox: Dele te
- From the M ESSAGES menu > select OUTBOX > selec t t he mess age you wan t to
delete > OPTIONS > DELETE > select YES to c onf i rm or NO to c anc el .
Outbox: Dele te All
- From the M ESSAGES menu > select OUTBOX > OPTIONS >
DELETE ALL > select YES to conf ir m or NO to can c el.
Note: All messages w ill be deleted permane ntly.
YES NO
Fig.13 Delete M essage S creen
YES NO
Fig.14 D el ete All Message Screen
Menu - Message
25

( 5 ) Chat
Note: The chat s ession c an function on a IP to IP connection
or a SIP to SIP connection .
Please check with y our SIP provider if their serv ice support
messaging capability.
- Sel ec t MENU > MESSAGES > CHAT
Menu - Message
- Enter the phone number of the recipient which you want the CHAT
session to be associat ed with.
- C ont act s c an be r etri ev ed fr om the p hon eb oo k. Sel ect OK.
- For e.g:- INVITIN G 12345678 @ xxx.xxx.xx x.xx x will be displaye d
in the screen.
- Once the chat request has been accepted by the recipient, chat session
can t ake pl ace.
Note: “YO U” Indicates the message you have rec eived.
“ I “ indicated the mes sage you hav e s ent.
MENU CONTACTS
Fig.15 Ban ner Screen -Chat
CANCEL
Fig.16 Ch at Session In vitation Screen
26
SEND
Fig.17 Ch at Screen
CLEAR
Menu – ( ii ) Contacts
Add Allows you to add a new c ont act int o your cont act li st.
Edit Allows to you edit the contact which is stored in your contact lis t.
Delet e All ows you t o delet e a con tact per man en tl y f rom your cont act li st.
Speed Dial Al lows you t o set a part ic ula r c ont act t o a num eric k ey on your key pa d.
Adding a Contact
fr om Idl e S c reen Al lows you to ad d a new c ont act di rec tl y fr om the i dle sc reen.
Menu - Contacts
27

( 1 ) Add
To add f r om Con t ac t s :
- Sel ec t MENU > CONTACTS > OP TION > ADD > ( Input name ) > OK
( Input Phone Number ) > OK.
To add f r om C all Log :
- Sel ec t Call Log > sel ect ei ther Missed Calls, Incoming Calls or Outgoing Calls
> highlight the number, select OPTION > SAVE > ( Enter name ) > APPLY .
Menu - Contacts
To add f rom I dl e S c reen :
From t he id le s c reen, key in th e numb er of t he CONTACT > clickSAVE > Input the
name of th e Contact > Click OK once done.
Note: “R eplace existing entry ?” will be displaye d if there is an existing contac t.
Fig.18 C ONTAC T Selected
28
Note: You c an also s elect Rec ent Calls fr om the idle s creen by s c rolling
up or down with the joystick and s electing it by press ing the center of the
joystick .
( 2 ) Edit
- Select CONTACTS > selec t t he pers on you want to edit > OPTION > EDIT >
enter name > OK>enter number > OK. t o c on f ir m .
Fig.19 CA LL LO G Sel ected
MENU
Fig.20 Id l e Screen – Call Log
CONTACTS
( 3 ) Delete
- Select CONTACTS > selec t t he pers on you want to del ete > OPTION > DELETE > select YES to
dele te or NO t o can cel .
( 4 ) View Entry
- Sel ec t CONTACT > s elect a contact from the list > push joystick button down to VIEW.
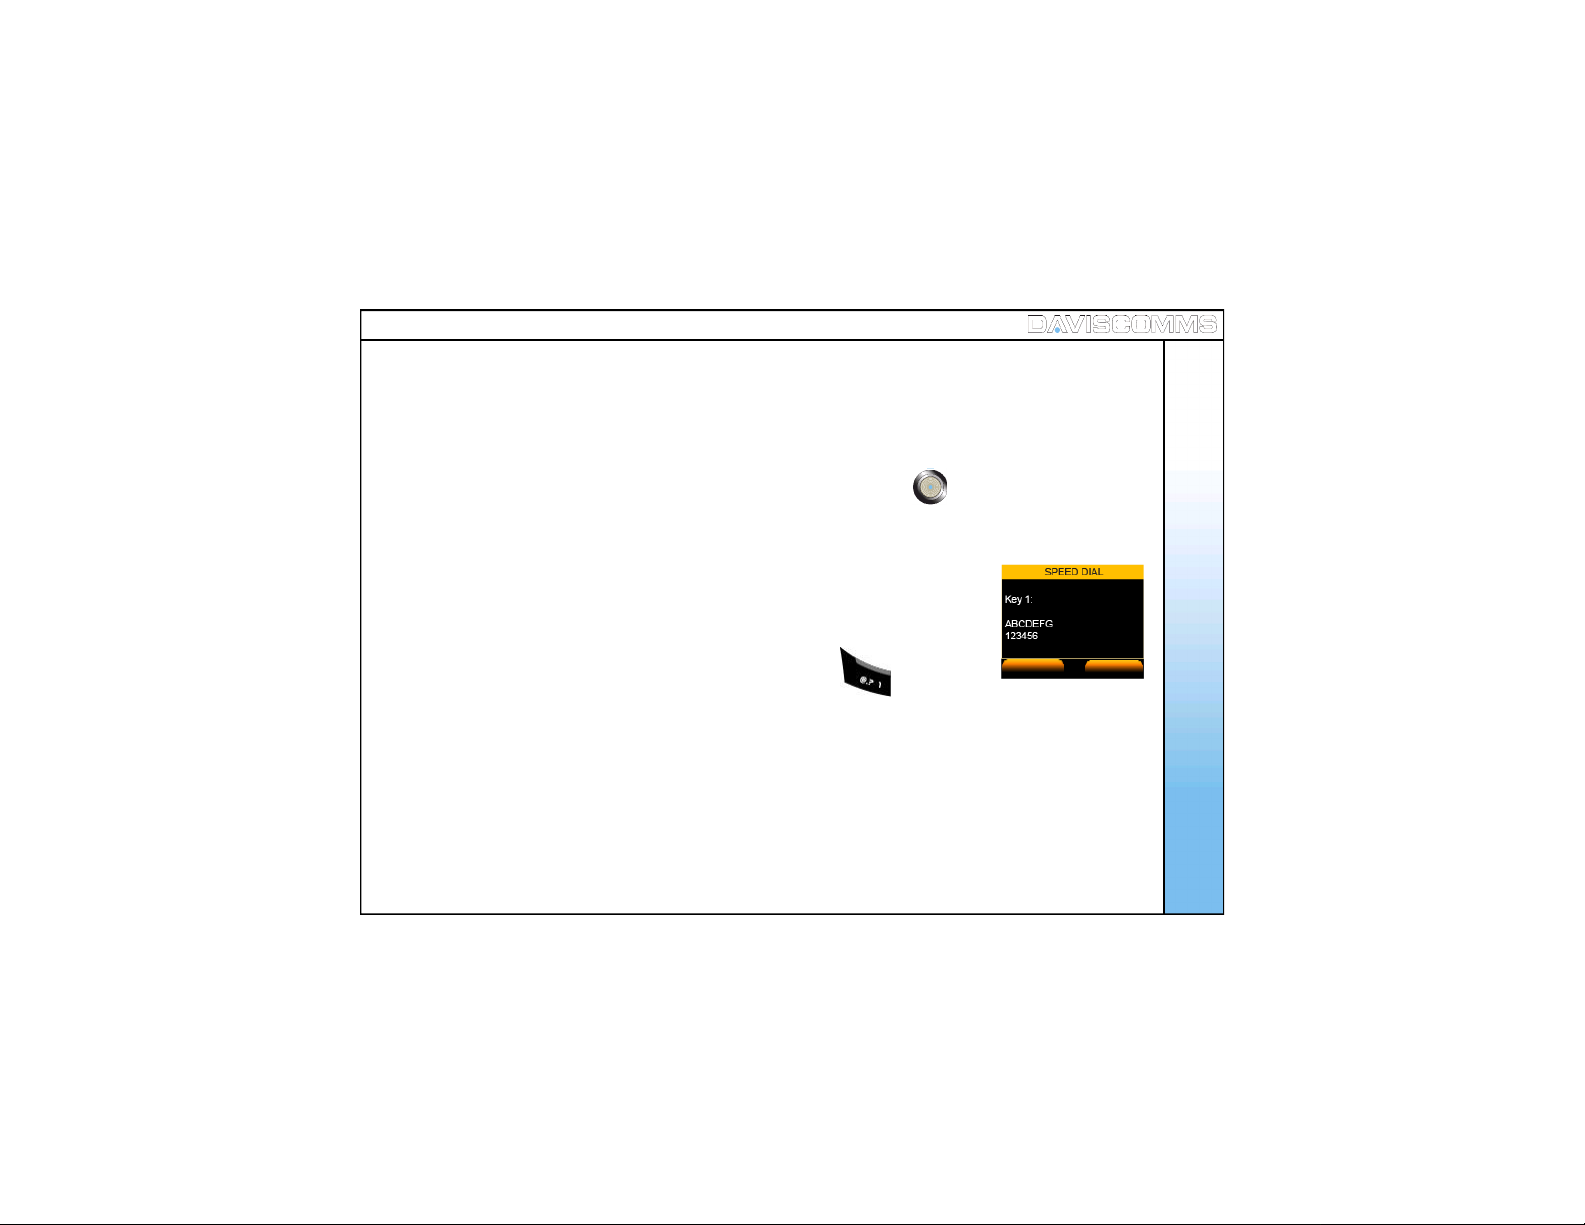
( 5 ) Speed Dial
- Select CONTACTS > selec t a cont ac t f rom t he li st > OPTION > SPEED DIAL
> SET.
- T o Uns et, sc rol l to the Key num ber and pr ess UNSET.
- If you have a contact under key.1, in the idle s creen, hold the key and it
will dial the contact which you have assigned it with.
SET
Fig.21 Sp eed Dial Screen
Menu - Contacts
BACK
29

Menu – ( iii ) Ca ll Log
30
Missed Calls
Incoming Calls
Outgoing Calls
Menu – Call Log
Recent Calls
Rec ent C alls
Shows you t he li st of the n umb ers you have call ed, rec eiv ed or
missed picking up their call. Selectin g the particular c ontact allows
you to s ave th e par tic ul ar c ont ac t i n your l ist , delet e or del ete all
contacts.
Shows you the su mmar y list of the you r outg oi ng , ans wer ed
or missed calls.

( 1 ) Missed Calls
- Select M ENU > CALL LOG > MISSED CALLS.
To Save, D elet e or D elet e All , sel ect an ent ry and s elec t OPTIONS.
Menu – Call Log
Note: M issed call list will appear from latest (t op) to earliest (bottom).
( 2 ) Incoming C a lls
- Sel ec t MENU > CALL LOG > INCOMING CALLS.
To Save, D elet e or D elet e All , sel ect an ent ry and s elec t OPTIONS.
Note: Incom ing call list will appear from latest (top) to earliest (bottom).
( 3 ) Outgoing Ca lls
- Select M ENU > CALL LOG > OUTGOING CALLS.
To Save, D elet e or D elet e All , sel ect an ent ry and s elec t OPTIONS.
Note: Outgoin g call list will appear from latest (top) to earliest (bottom).
Fig.22 Call Log Selected
OPTION
Fig.23 M issed Cal l Screen
BACK
31

Menu – ( iv ) Settings
Clo ck All ows you ch ang e t he ti me, d ate and its f ormat s.
- Set Time Allows you to set the time which will be displayed on the idle screen
- Set Date Allows you to set the date which will be displayed on the idle screen.
Menu - Settings
- T i me F or m at Allow you to s et th e ti me f orm at to be 1 2 or 24 h ours .
- D ate For mat A llow s you to s et the d ate f or mat to DD /M M/Y Y or MM /DD /Y Y.
W all paper All ows you to ch ang e th e wallp ap er in the i dle s cr een.
Ring Tones All ows you to c hang e t he in comi ng cal l rin g tones .
Mess age T ones All ows you to ch ange the al ert t ones f or incom in g m ess ages .
Ring Volume Allows you to set the ring volume f rom low to high.
Rec eiver volum e All ows you to s et th e volu me of you r r ec eive r fr om low t o hig h.
Aler t Mod e All ows you to set your aler t t o Silen t, Vib rat e, M elod y an d Mel ody and V ibr ate.
Mess age V iew All ows you to view mes sag e li st bas ed on con tact s or mess ag e i tsel f
32
Brightness A llow s you t o view m ess age lis t base d on c ont act s or mes s age it self
Key Backlight All ows you to s et t he k eyp a d li ght to s tay O ff , af ter 10 , 20 or 30 s ec on ds .
Aut o Key Loc k All ows you set t he A uto K ey L ock f eat ur e t o off , 30s ecs , 1 min and 2m ins .
Key T one All ows you t urn t he k ey ton e O n or Of f when t he keys ar e pr ess ed .
DTMF Tone Allows you to set the DTMF tone to inbound or outboun d.
Sc reen B anner Allows you t o type in a bann er mes sag e in th e idl e sc reen .
Menu - Settings
Fac tory Res et A ll ows you to s et the en tir e p hon e b ack to its or igin al f act ory set tin gs . T he
phone will power off automatically.
Software upgrade: A llows you t o updat e t he ph one’ s s of twar e of th e phon e to opt imi ze its
performance
33
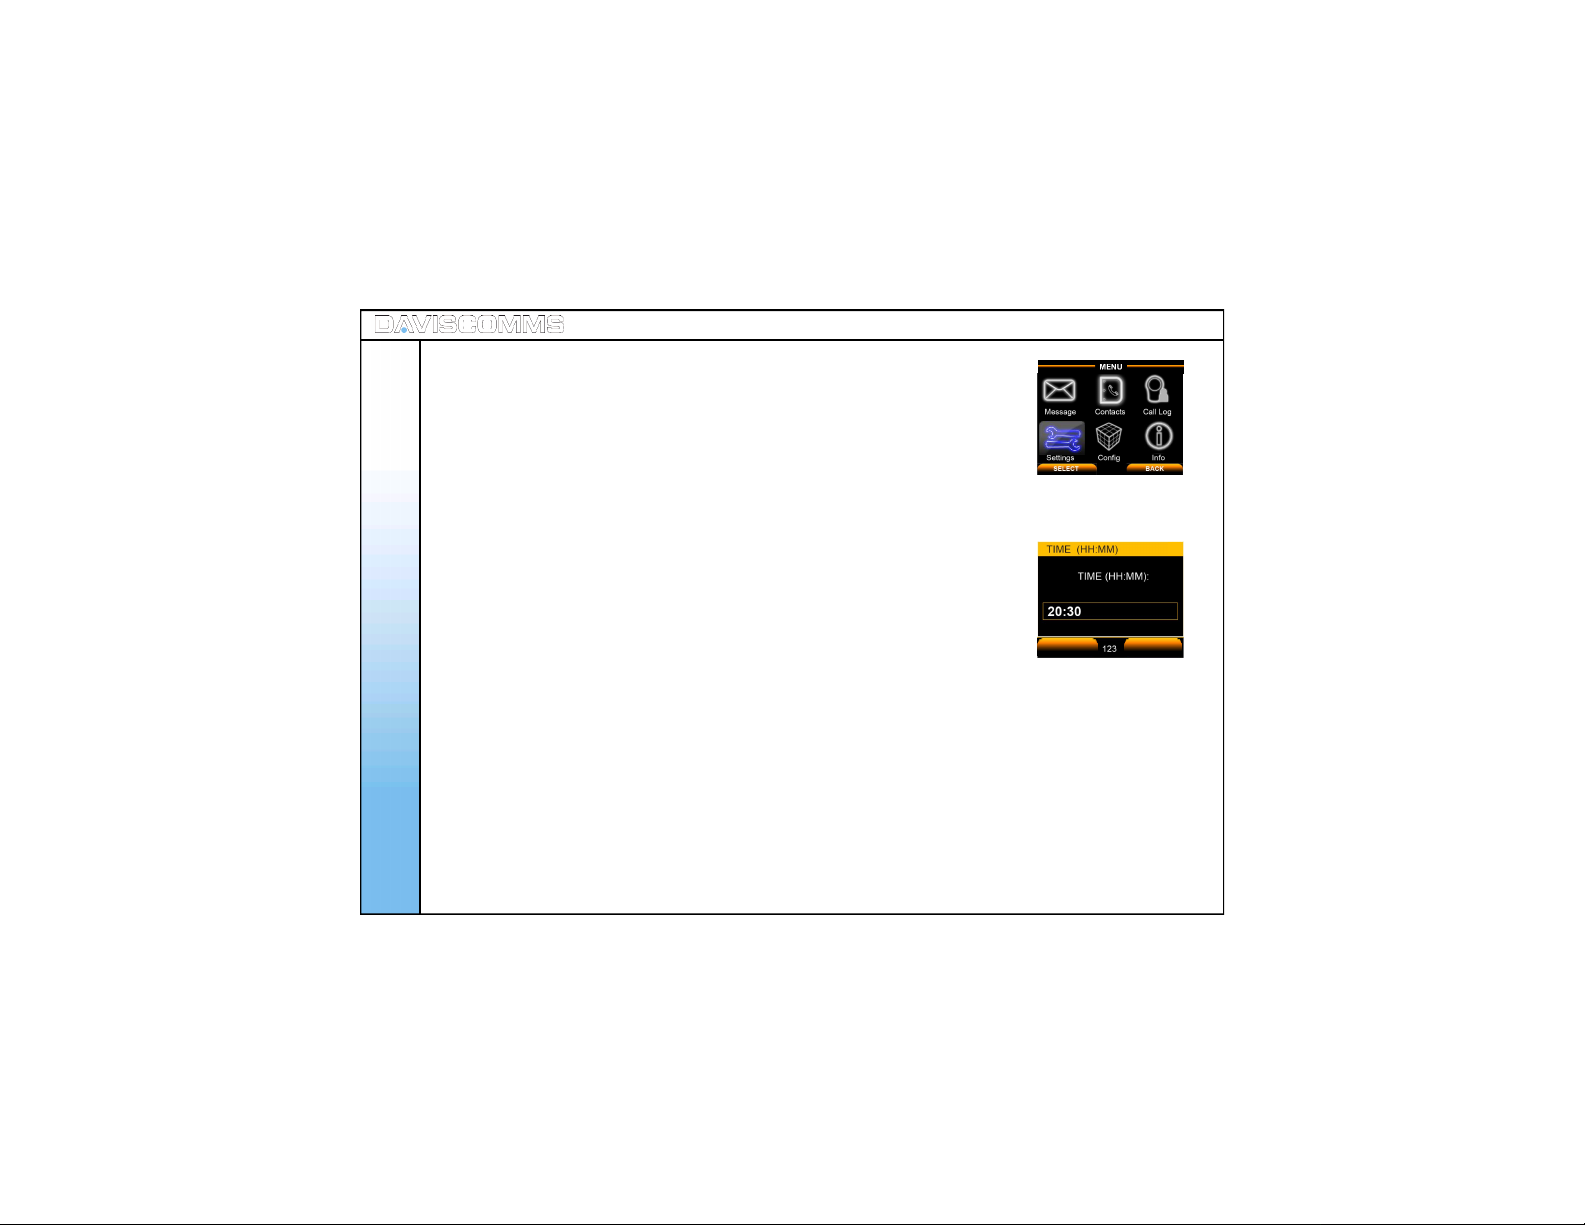
( 1 ) Clock
Clock: Set Time
Format: HH/MM = HOUR/MINUTE
34
- Select M ENU > SETTINGS > CLOCK > SET TIM E > key in the current
Menu - Settings
tim e.
Fig.24 Settin g Sel ected
OK
Fig.25 T ime Setting Screen
BACK
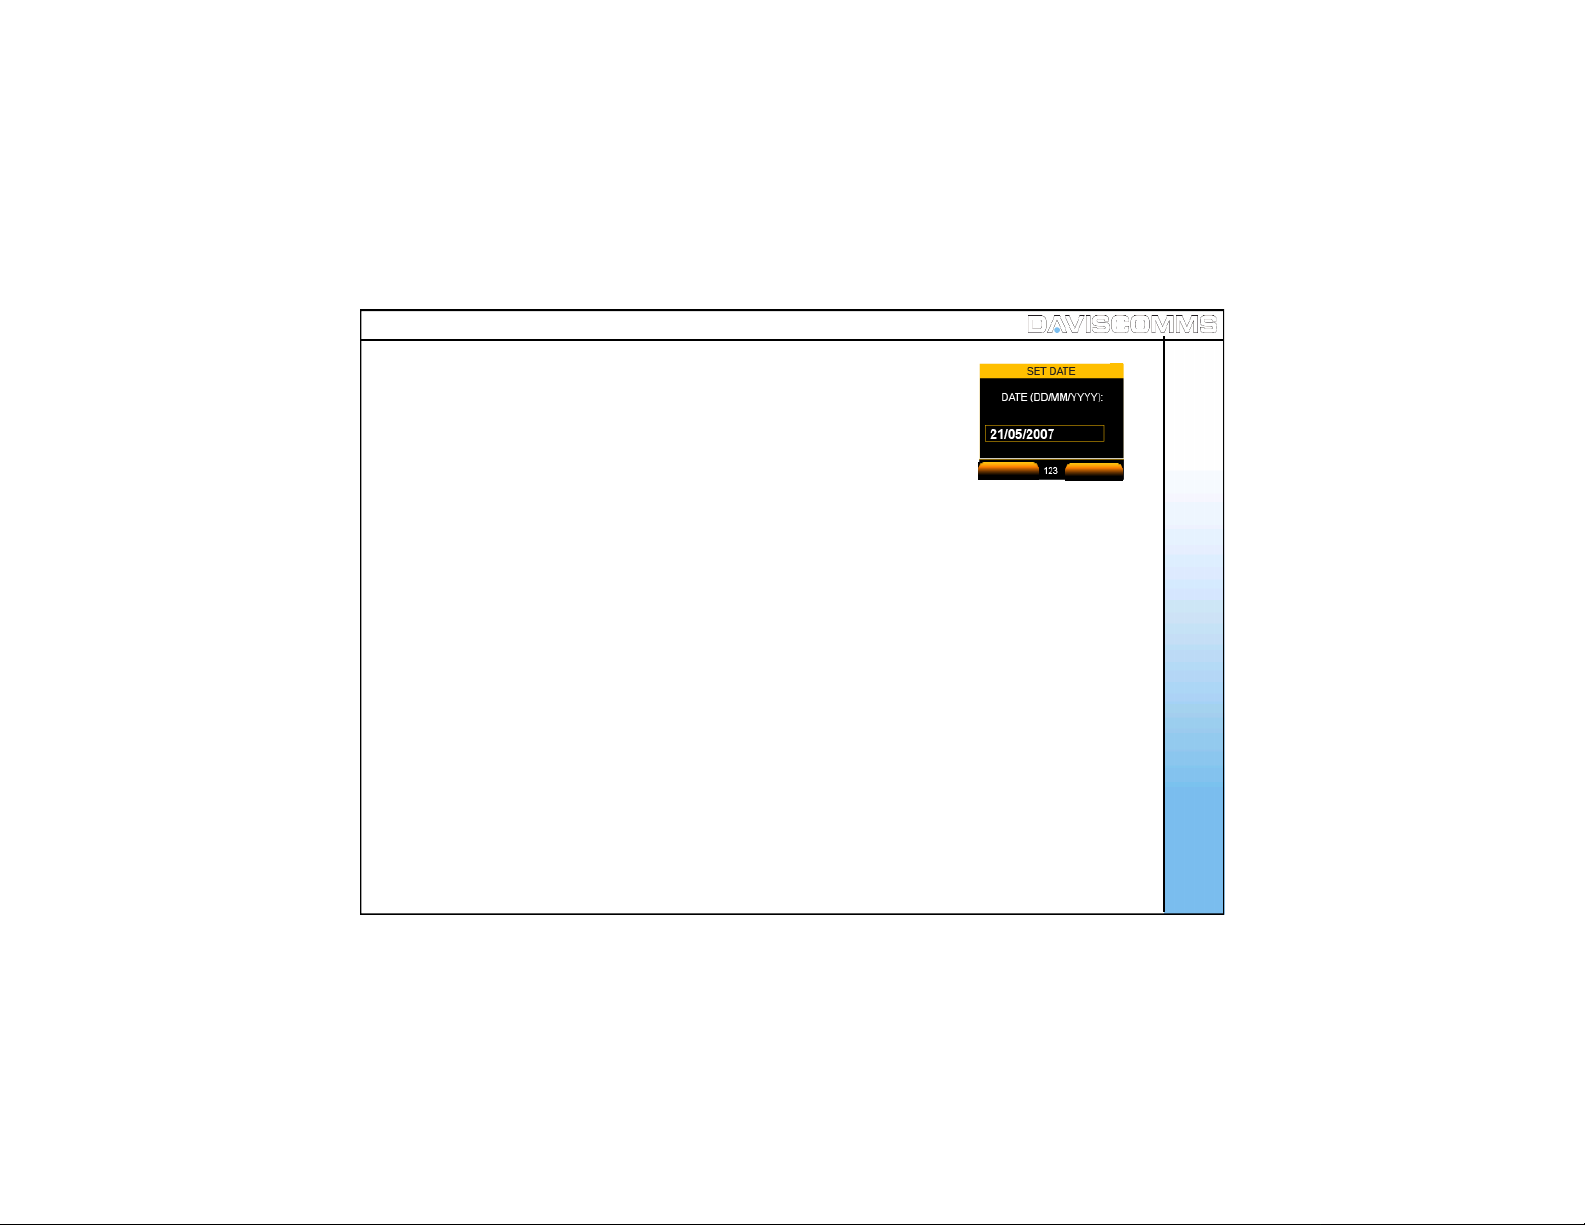
Clock: Set Date
Format: DD/MM/YYYY = DAY / MONTH / YEAR
- Select M ENU > SETTINGS > CLOCK > SET DATE and key in the current
date
OK
Fig.26 Date S ettin g Screen
BACK
Menu - Settings
35

Clock: Time Format
- Select MENU > SETTINGS > CLOCK > TIME FORMAT > s elec t ei th er
12 Hour or 24 Hour an d c hoos e SELECT.
Clock: Date Format
- Sel ec t MENU > SETTINGS > CLOCK > DATE FORMAT > s elec t ei th er
DD / MM / YY or MM / DD / YY an d ch oose SELECT.
Menu - Settings
( 2 ) Wallpaper
- Sel ect M ENU > SETTINGS > WALLPAPER > s elect th e wall pa per s of your
preference by scrolling the joystick in any direction, and choose SELECT.
( 3 ) Ring Tones
- Sel ec t M E NU > SETTING S > RING TONE S > s elec t the r in g ton e of you r
preference by scrolling the joystic k up or down , a preview of the ring
tone you choose will be played. Choose SELECT to set.
36
SELECT
Fig.27 T ime Format Sett in g Screen
SELECT
Fig.28 Date Format Setting Screen
SELECT
Fig.29 R in g Tone Setting Screen
BACK
BACK
BACK

( 4 ) Message Tones
- Select M ENU > SETTINGS > MESSAGE TONES > selec t th e rin g ton e of your
pref erence b y s c r oll in g t he j oyst i c k up or d own , a pr evi e w of th e m es s ag e
Menu - Settings
tone you choose will be played. Choose SELECT to set.
( 5 ) Ring Volum e
- Select M ENU > SETTINGS > RING VOLUM E > incr eas e or dec reas e t he
volu me b y sc roll ing either d irec ti on of t he joys tic k > choos e SELECT to set.
( 6 ) Receiver Volume
- Select M ENU > SETTINGS > RECEIVER VOLUME > inc rease or decrease the
volu me b y sc roll ing either d irec ti on of t he joys tic k > choos e SELECT to set.
SELECT
Fig.30 Messag e T on e S etting Screen
SELECT
Fig.31 R ing Volume Setting Screen
SELECT
Fig.32 Receiver V ol ume Setting Screen
BACK
BACK
BACK
37

( 7 ) Alert Mode
- Select MENU > SETTINGS > ALERT MODE > s elec t th e aler t mod e of your
preference by scrolling the joystick up or down , choose SELECT to set.
Note: The following alert icons will appear on the idle screen depending on your selection.
Menu - Settings
Ring Only:
Vibrate Only:
Ring and Vibrate:
Silent:
( 8 ) Message View
- Sel ec t M ENU > SETTINGS > M ESSAGE VIEW > to view message through
Search name or Mes sage itself. choose SELECT to set.
( 9 ) Brightness
- Select M ENU > SETTINGS > BRIGHTNESS > selec t t he int ensi ty of
your preferenc e by scrolling the joystick up or down ,
38
choose SELECT to set.
SELECT
Fig.33 Alert Mod e Settin g Screen
Fig.34 Messag e V iew Screen
SELECT
Fig.35 Key Back lig h t Settin g Screen
BACK
BACK

( 10 ) Key Backlight
- Select M ENU > SETTINGS > KEY BACKLIGHT > selec t th e backl igh t t imer of
your preferenc e by sc rolling the joystick up or down , choose SELECT
Menu - Settings
to set.
( 11 ) Auto Key Lock
- Select MENU > SETTINGS > AUT O KEY LOCK > selec t the key loc k ti mer of
your preferenc e by s crolling the joystick up or down .
Choose SELECT to set.
( 12 ) Key Tone
- Select MENU > SETTING S > KEY TONE > select ON or OFF>
choose SELECT to set.
( 13 ) DTMF Tone
- Sel ect MENU > SETTIN GS > DTMF TONE > select INBAND,
OUTBAND (Sip Info) or OUTBAND (RFC 2833) > choose SELECT to set.
Note: DTM F (Dual Tone Multiple Frequency )
Fig.36 Key Back lig h t Settin g Screen
SELECT
Fig.37 Key Lock Settin g Screen
Fig.38 DT M F ton e setting
BACK
39

( 14 ) Screen Banner
- Select M ENU > SETTINGS > SCREEN BANNER > key in your mes sag e,
> c hoos e OK to set.
Note: You can input up to a maximum of 12 Characters .
Menu - Settings
( 15 ) Factory Reset
- Select MENU > SETTINGS > FACTORY RESET > choose YES to reset ,
or NO to c anc el.
Note: The phone will reboot and turn off.
40
Fig.39 Ban n er M essag e at Id l e Screen
APPLY
Fig.40 Bann er M essage
OK
Fig.41 Factory Reset Screen
CLEAR
BACK

( 16 ) Software Upgrade
Software Upgrade - TFTP Server
Note: Dur ing the Software upgrading , in your computer, make sure that under CONTROL PANEL >
NETWO RK C ONNE CT IO N, the Local Ar ea Connectio n of the CYBER PHON E is present.
Please also take note of the IP address at the s tartup sc reen You should only start your
TFTP program after this.
Menu - Settings
Important: Do not disconnect the phone from the PC while it is in firmware upgrading progress.
Doing so will permanently damage the phone.
- T o upgr ade t o the lat es t s of twar e, key in the s ervi c e pr ovi der ’s I P addr ess and
the software will be upgraded. To do so:
Step :1 - Insert US B cab le to th e phon e
Step:2 - In the CYBERPHONE, go to > MENU > SETTINGS > SOFTWARE UPGRADE > TFTP SERVER >
key in th e I P addr es s f or e.g :- > 192.168. 1. 2 > OK > windows XP should prompt you for installation
of the USB driver.
Note: The IP address you enter in the TFT P serv er is the address w here y ou wish to download the
image file from.
Step:3 - Install the driver using “athenac902.s ys” which is provided on the DAVISCOMMS websit e at:
www.daviscomms.com.sg
Step:4 - In your computer, under CONTROL PANEL > NETWORK CONNECTIONS, a new
Local Area Connection should appear.
41

42
Step :5 - Conf igu re the new Loc al Ar ea C onnec ti on and s et th e IP sett ing s t o the fol lowi ng :
Menu - Settings
Step:6 – Downloa d and install TFT P program f rom http://tftp32.jounin.net/tftp32_download.html

Step:7 - After installatio n, set the settings of the TFTP program to be:
Menu - Settings
Step:8 - On the CYBERPHONE, in the FIRMWARE UPGRADE menu, choose
the appropriate software part (upgrad e firmware, upgrade web config
or upgrade bootloader) you want to upgrade. Once you choose an option,
the phone will start to download the f ile.
Fig.42 Image Dow nloadin g Screen
43
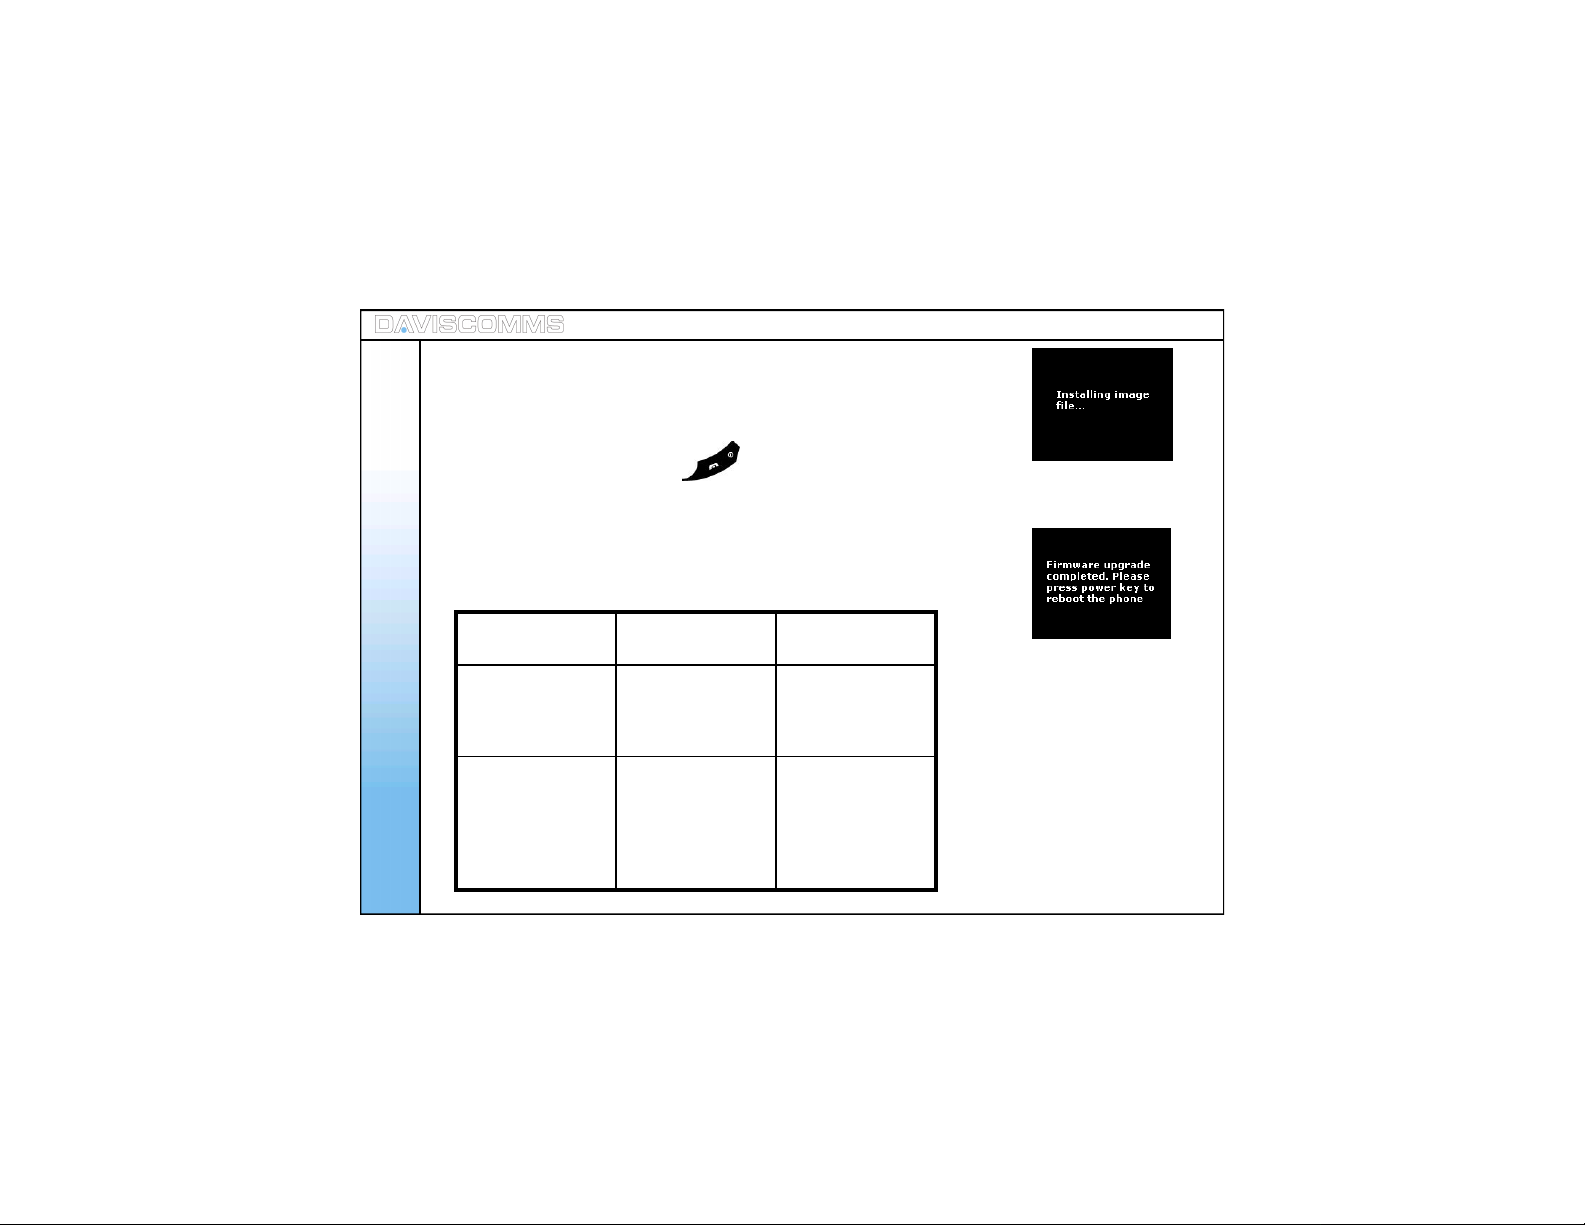
Step:9 - After downloadi ng the f ile, the phone will install the required file.
Step:10 - W hen the phone has suc cessfully installed the file, the phone will
display a screen to inform you that the firmware upgrade is completed.
Step:11 - Pr ess and hold the Power key for 3 seconds and release. The
Menu - Settings
new firmware should have been installed.
Note: If there is an error during the firmware upgrading , an error screen will
appear. If the error screen appears at Step 8, shut down the phone
and restart it, then, go through the entire steps again.
Upgrading
section
Firmware
Upg rad e, W eb
conf i g and Boot
load er
Firmware
Upg rad e, W eb
conf i g and Boot
load er
Error responses
from phone
Error! Please
pres s pow er key
to reboot the
phon e.
Checksum Error!
Pleas e s end t he
phon e for
servicing.
Steps to proceed
Pres s p ower key
to shut down the
phone and repeat
steps
Fir mwar e has
been corrupted.
Send to s ervic e
cent re f or
tec hnic al
assistance.
44
Fig.43 Image Installing Screen
Fig.44 Upgrade Completed Screen
Fig.43 Ph one Error Resp onse T ab le
Menu – ( v ) Configuration
The Session Initiation Protocol (SIP) is an application-l ayer c ontrol (signaling) protocol f or creating,
modif yin g, and t ermi nat in g s ess ions with on e or mor e part ici pan ts .
Dis play N ame A llow s you to key i n the us er n ame f or dis pla y pu rpos es .
Us er Name A ll ows you t o key in t he us er nam e of you S IP acc ou nt.
Passwords All ows you t o key in t he pas sw ord of you r SIP ac cou nt .
Menu - Configuration
Proxy Server Allows you to r equ est a ser ver whic h s ervi c es the r equ est s of it s cli ents by
makin g r eques ts to other ser vers .
- IP Address Allows you to key in the IP Address of your SIP provider.
- Status All ows you to ena bl e or di sabl e t he pr oxy s erver
- R egi st ra ti o n T i me Al lows you t o key in a tim e f or the p rox y ser ver to r e-r egis t er i ts elf ag ain .
Outbound Proxy Allow you to make/rec eive call when the phone is behind NAT firewall.
STUN Server Allow you to make/receive call when the phone is behind NAT firewall.
SIP Keep Alive Allow you to maintain SIP server c onnection when the phone
is behind NAT f irewall.
Aud io C odec Allows you t o sel ect th e pref err e d c odec to be u sed for th e c all ses s ion
45
( 1 ) SIP Settings
Note: To change the settings, pres s the center
of the joystick. To activate, press the left soft key .
Note: You hav e to configure both SIP Proxy Serv er settings and O utbound Proxy
server settings. Please refer to your SIP serv ice provider for your acc ount
details. For reference please refer to www.daviscomms.com.sg
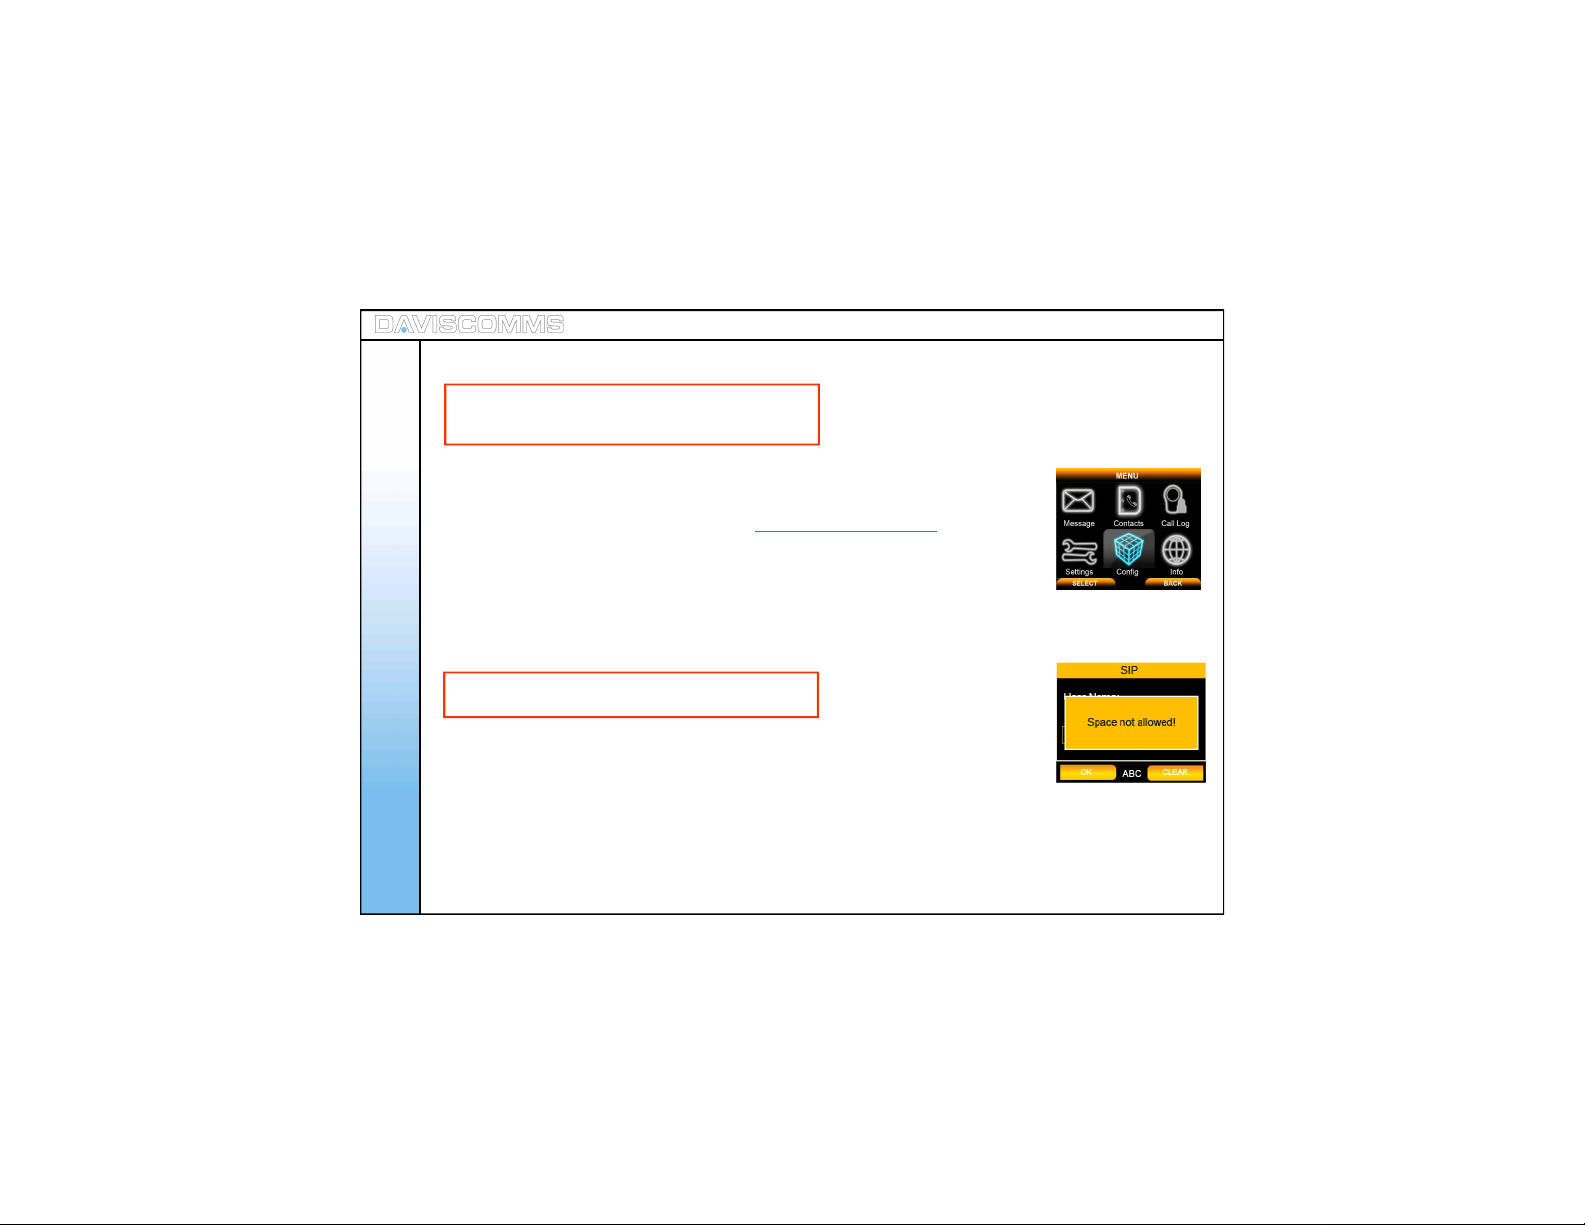
Step .1 - Select MENU > CONFIG >SIP SETTINGS > DISPLAY NAME > for eg: -
Menu - Configuration
Step .2 - I n the s ame S IP s etti ngs men u, selec t > USER NAME > for eg : -
Note: Spac e are NO T allowed in USER NAM E
key in User > select O K.
key in Cyber > select OK.
Fig.45 Con fig S elected
46
Step .3 - I n the s ame S IP s etti ngs men u, selec t > PASSWORDS > f or eg: - key in
XXXXXXXX > select OK.
Step.4 - In the same SIP settings menu > PROXY SERVER > IP ADDRESS >
for eg :- key in 202.155.1 30.68 > select OK.
Fig.46 Spacing Error Screen

Step .5 - In the Pr oxy S erver menu > STATUS > select ENABLE.
Menu - Configuration
Step.6 – In Proxy Server menu > REGISTRATION TIME > for eg : -
key in 3600 > select OK.
Step.7 - In the same SIP settings menu > OUTBOUND PROXY > IP ADDRESS >
for eg :- key in 192.168.2. 1 > select OK.
APPLY
Fig.47 IP A d d ress Screen
Note: The outbo und prox y s erver is the address and port that y our phone uses to c onnect to a SIP
server, where there may be NAT routers that do not support the SIP protoco l. If y our SIP Service
Provider gave you an outbound proxy server address and port, then enter them here.
Step.8 - In OUTBOUND PROXY menu > STATUS > for eg : -
choose ENABLE an d sel ect i t.
Note: This has to be enabled in order to make a SIP call.
Step.9 - In the same SIP settings menu > STUN SERVER > IP ADDRESS >
for eg: - key in stun.fwdnett.net > select OK.
Step.10 - In the ST UN SERVER menu > STATUS > for eg: - choos e ENABLE
and s elect it .
CLEAR
47
Step.11 - In the same SIP settings menu > SIP KEEP ALIVE >
Note: This is to overcome the NAT barrier so that the phone is
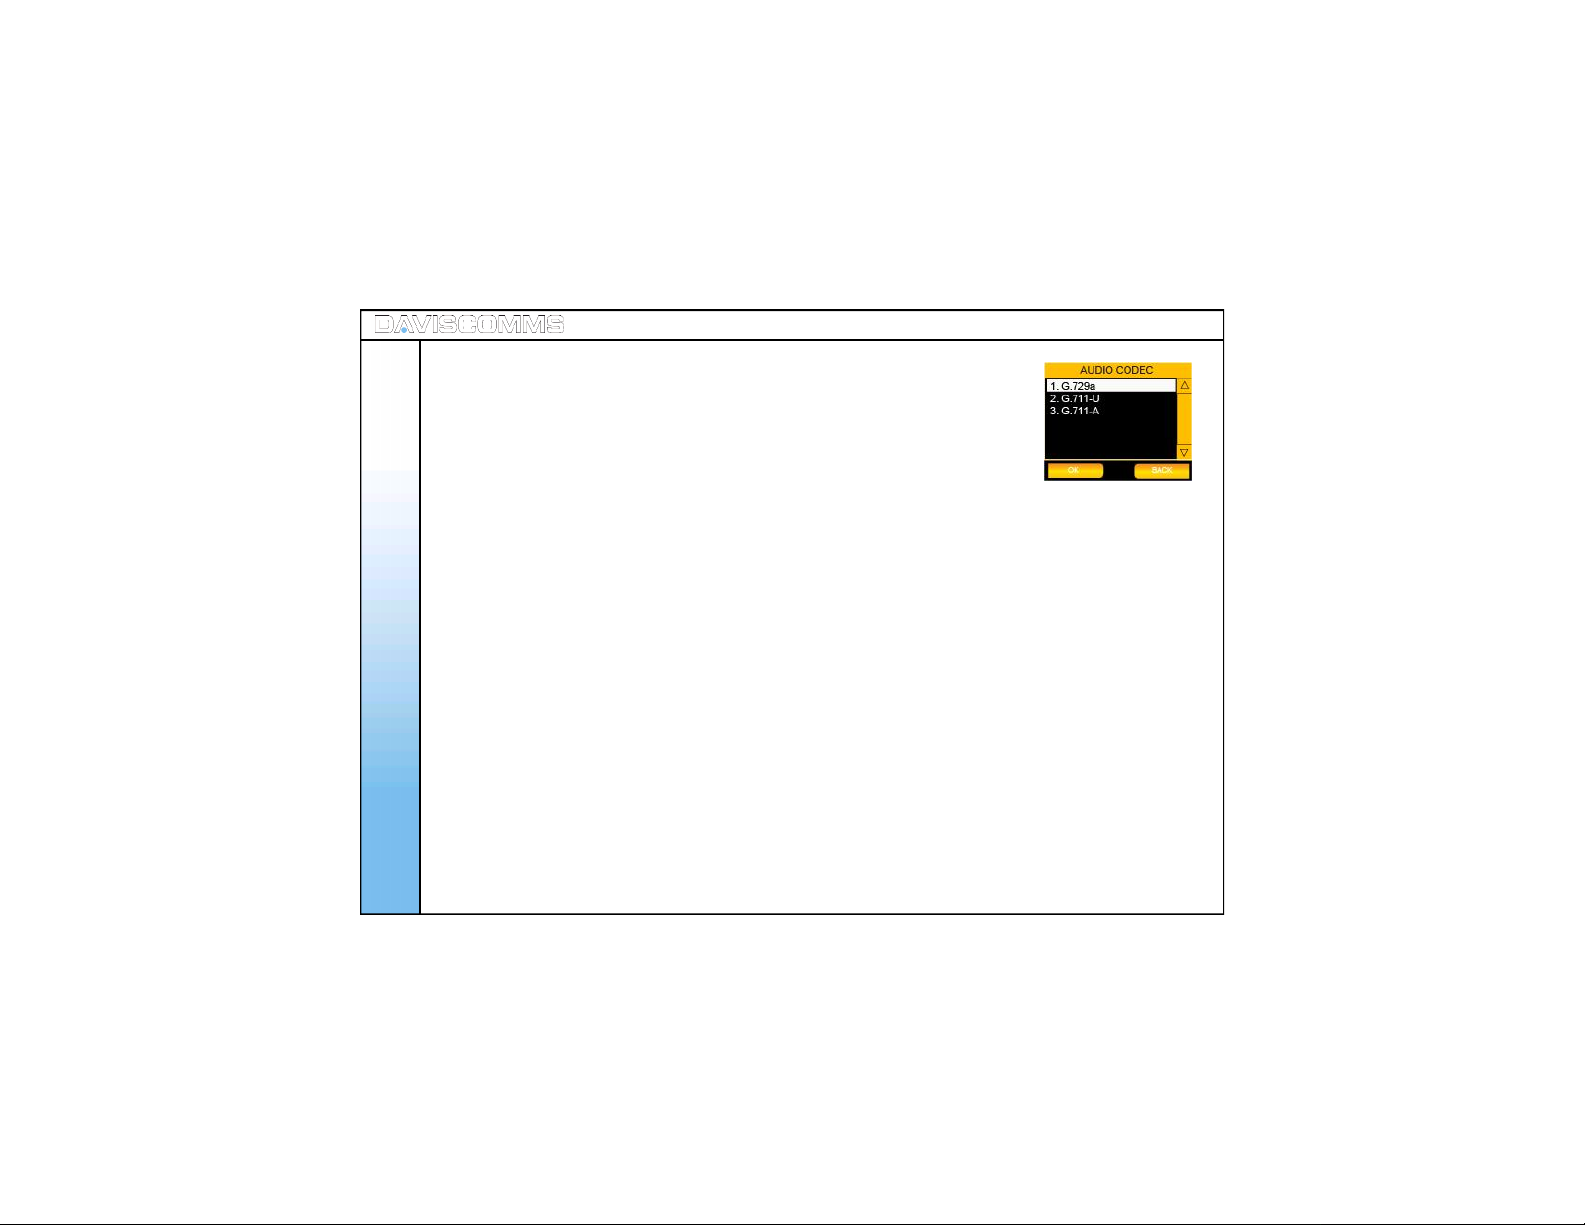
Step.12 - Return to SIP SETTINGS menu > AUDIO CODEC > f or eg: -
Step.13 – Af ter the configuration, s elect > ACTIVATE.
Menu - Configuration
Note: This is a program capable of performing encoding
Note: S T U N = Si mpl e T r ans ver sal of U D P (U s er Dat ag r a m P rot ocol)
TIP: Enter either the IP addres s of your SIP s erver or the URL domain name as given to y ou by your
Key in the SIP KEEP ALIVE time for eg:- 20Seconds
and c hoos e ENABLE and s elec t i t.
contactab le by a previously contacted external party .
choos e G71 1-A an d sel ect i t.
and decoding a voice package.
through NATs (Network Address Translators).
Internet Telephony Service Provider.
48
Fig.48 A ud io Cod ec Screen

( 2 ) IP Settings
Int ern et Prot oc ol ( IP) i s a data- ori en t ed pr otoc o l u sed for c omm uni c ati n g d ata acr oss a
packet-switched networ k.
Menu - Configuration
DHCP DHCP ( Dynamic Host Control Protocol ) is a set of rules used by communic ations
devic es s uc h as a comput er , r out er or n etw ork adap t er to allow th e devic e to
requ es t an d obt ai n an I P addr es s f r om a ser ver wh ic h h as a l is t of addr es s es
available for assignment.
Fixed IP Setup
- IP Address Allows you to key in your f ixed IP Address of a network.
- S ubnet Mask All ows yo u t o key in an ad dr ess c ode w hic h det er mi ne s t he s ize of the n etwor k .
- D efaul t G atew ay All ows yo u t o key in an ad dr ess wh ic h f orwar ds in tern et t raf f ic f rom your loc al
area network.
- Primary DNS Allows you to key in the IP Address of your DNS, which can be obtained from
your network administr ator.
- Secondary DNS All ows yo u t o key in a sec ond ar y D NS .
49

( 2 ) IP Settings
IP Settings: DHCP Settings
Step .1 - Select ME NU > CONFIG > IP SETTINGS > DHCP > select ENABLE.
IP Settings: Fixed IP Settings
50
Note: W ith this option you have to manually enter an IP address, s ubnet mas k
and gateway IP address. These are given to you by the network
Menu - Configuration
administrator.
Follow the procedure below to do this.On ly when the DHCP
is disabled, c an the IP option be available.“Not available while DHCP
is enabled” will be displayed if DHCP is enabled.
Step .1 - Select MENU > CONFIG >IP SETTINGS > DHCP > select DISABLE.
Step.2 - In IP SETTING S menu >FIXED IP SETUP > IP ADDRESS > for eg: -
key in 192.168.12 3.204 > select OK.
Step.3 - In FIXED IP SETUP menu > SUBNET MASK > for eg:-
key in 255.255.25 5.0 > select OK.
Step.4 - In FIXED IP menu >DEFAULT GATEWAY >f or eg: -
key in 192.168.12 3.254 > select OK.
ACTIVATE
Fig.49 DH C P Notice Screen
OK CLEAR
Fig.50 Sub n et Mask Screen
BACK

Step.5 - In FIXED IP menu >PRIMARY DNS > f or eg:-
key in 165.21.83. 88 > select OK.
Menu - Configuration
Step.6 - In FIXED IP menu > SECONDARY DNS > f or eg: -
key in 165.21.100 .88 > select OK.
OK
Fig.51 D NS Input Screen
CLEAR
51

( 3 ) WLAN Settings
W LA N is a wireles s loc al ar ea net wor k, wh ic h is t he li nk ing of two or more per ip h er als w ith ou t us in g wi res .
W LAN utilizes spread-sp ectrum or OFDM Modulation techn ology based on radio waves to enable
communication between devices in a limited area, also known as the basic service set. This
gives us ers t he mobi lit y t o move arou nd wit hin a broad cov era ge are a and st ill be con nec t ed to the
netw ork .
SSID All ows you t o key in A P name man ua ll y or s can th e AP li st f oun d on
Menu - Configuration
Encryption A llows you to ch oos e th e typ e of en cr ypt io n of th e AP you wis h to ass oc iat e wit h.
your network
52
Transmit Rate Transmit rate is the data exchang e between the AP and the client. Auto
(rec omm en d ed) ad apt s to th e tran sf er rat e t o the c urr ent AP in you r ar ea .
Aut o Roam Al lows you to set you r ph one to roam t o oth er pr ofi les when you are
disconnected from your current profile.

Step .1 - Select MENU > CONFIG >WLAN > SSID > SCAN and a l is t of avai l ab l e
AP’s will be displayed > select > VIEW on the s elec t ed
AP you wi s h t o con n ec t> SELECT> OK.
Menu - Configuration
Step.2 - In the same W LAN settings menu > ENCRYPTION > s elec t t he su itab le
security setting. For eg: -
None
WEP-64 *
WEP-128
WEP-TKIP
WEP-AES
Note: Choos e the ty pe of encryption and key with referenc e
from your IT administr ator.
ACTIVATE
Fig.52 WLAN Scan n in g Screen
VIEW
Fig.53 A P List Screen
SELECT
Fig.54 Key Save Screen
BACK
BACK
BACK
53

Step .3 - Aft er sel ect in g a sec uri ty key typ e > Select Open s yst em
> choose KEY 1 > enter the KEY > click OK..
Note: If the KEY you have input is too short, a warning mes sage
will appear.
WLAN: Transmit Rate
- In the same W LAN settings menu > TRANSMIT RATE > for eg: select AUTO.
Menu - Configuration
54
OK CLEAR
Fig.55 Warning Screen

WLAN: Auto Roam
To Aut o R oam on a SP P rof i le
- Go t o > MENU > CONFIG > WLAN > AUTO ROAM > AP PROFILE >
select a SSID (edit a SSID account) > OPTIONS > JOIN.
To Edit a SSID Profile
- In th e same A uto R oam s etti ngs menu > AP PROFILE > select a SSID > OPTIONS
>EDIT>key in a SSID > select a security
setting.
To Dele t e a SS I D P rof i l e
- In th e same Aut o Roam sett ing s m enu > AP PROFILE > select a SSID >OPTIONS
> DELETE.
To Dele t e al l S SI D P r of il es
- In th e same Aut o Roam sett ing s m enu > AP PROFILE > select a SSID > OPTIONS
> DELETE.
To enab le Au to Roam
- In th e same Aut o Roam sett ing s m enu > STATUS > select ENABLE.
OPTIONS
Fig.56 A uto Roam S creen
BACK
Menu - Configuration
55

Menu – ( vi ) Information
Information s ection provides the relevant information of the SIP, IP, WLAN
and General s ettings.
( 1 ) SIP Information
- Select MENU > INFO > select SIP and choos e SELECT to view its information.
Menu - Information
( 2 ) IP Inform ation
- Select M E NU > INFO > select IP to view your cu rren t con nec ti on det ails .
( 3 ) WLAN Information
- Sel ect MENU > INFO > select WLAN and c hoos e SELECT to view its information.
( 4 ) General Information
- Sel ec t MENU > INFO > select GENERAL and ch oos e SELECT to view its information.
56
Fig.57 Info S elected
BACK
Fig.58 IP Infor m ation Screen

5. Web Configurator
The Web configurator is a special shortcut f unction of the phone where it allows the user to update or edit the
phon es sett ing s vi a a web br ows er on t heir P C.
Step 1 - Left click on the joystick to System info and retrieve IP address
assign to the Cyber phone.
Step 2 - Right click on joystick > scroll and select > WEB CONFIGURATOR.
Web Configur ator
Step 3 - Open a web browser in your PC and key in the IP address found on your
Cyber phone from step 1 e.g. http://1 92. 168.1 23.1 14
57

58
Step 4 - Enter “user” in User Name and key in “1234” as Password. Clic k Ok.
Web Configur ator
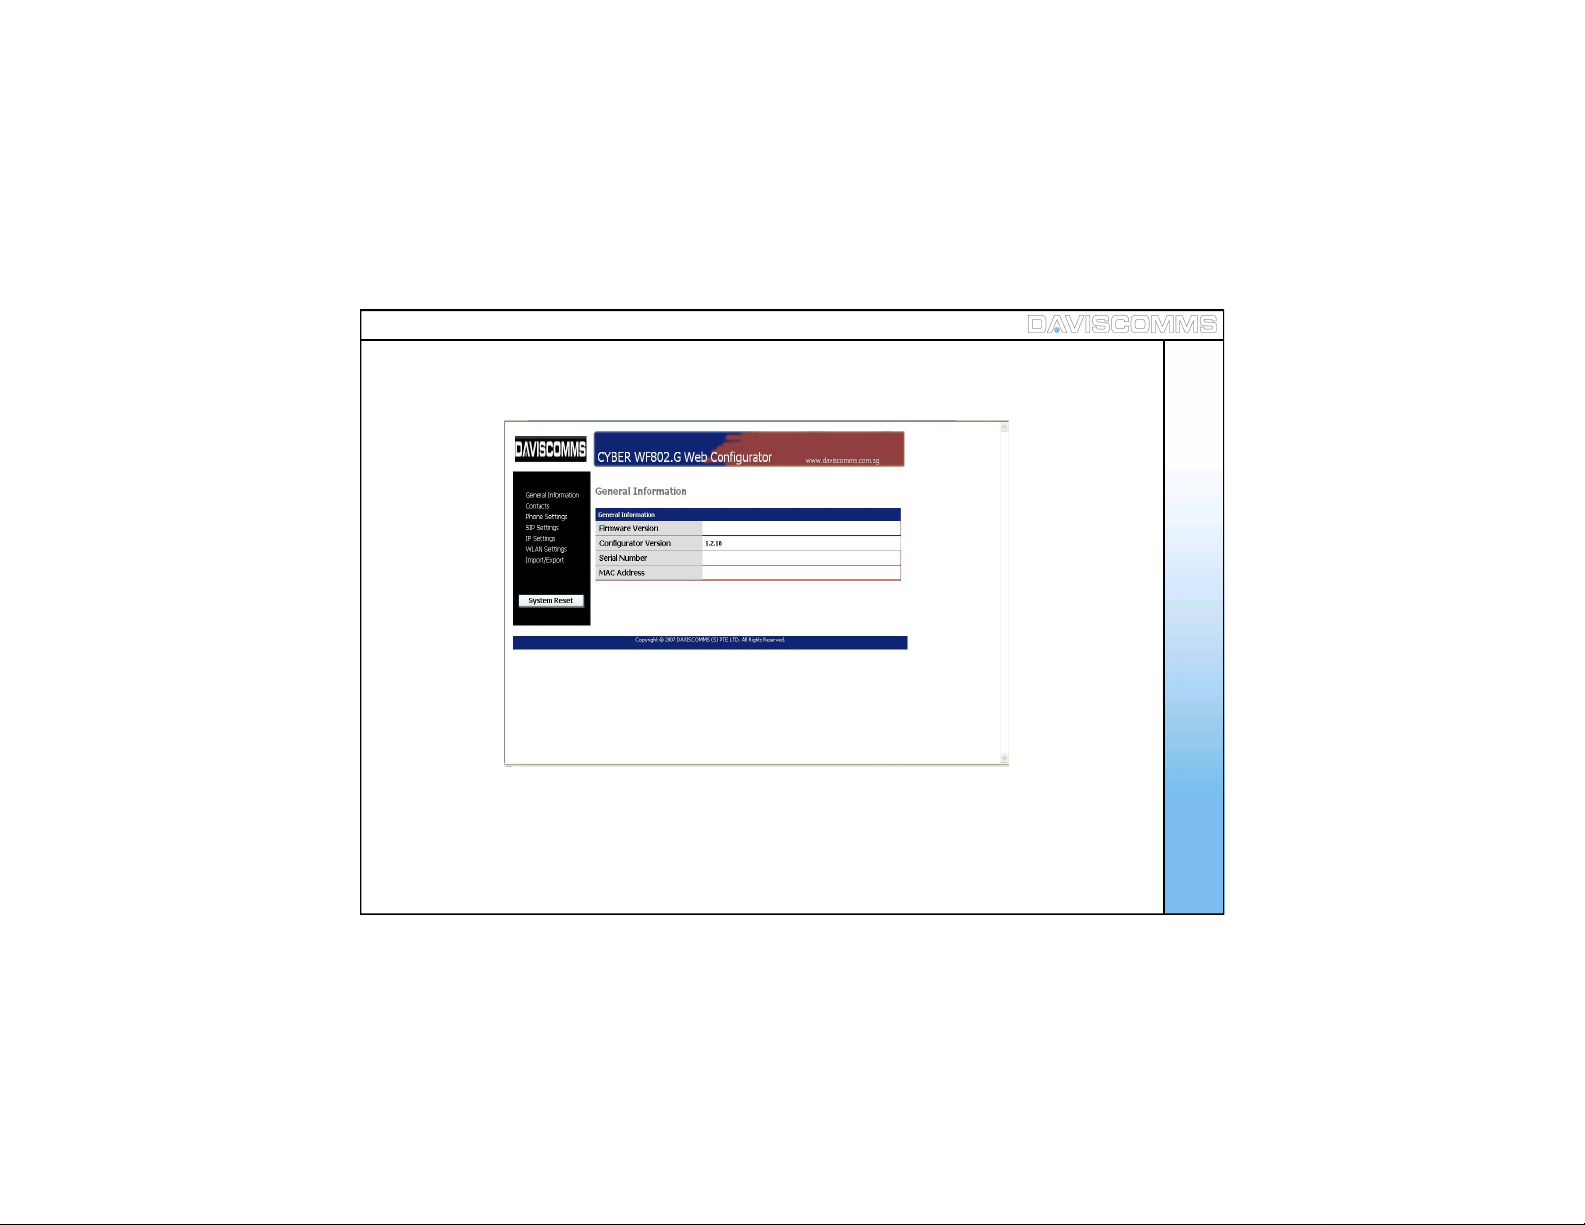
Step 5 - Your web browser will display the page as shown below under General Information
Web Configur ator
59
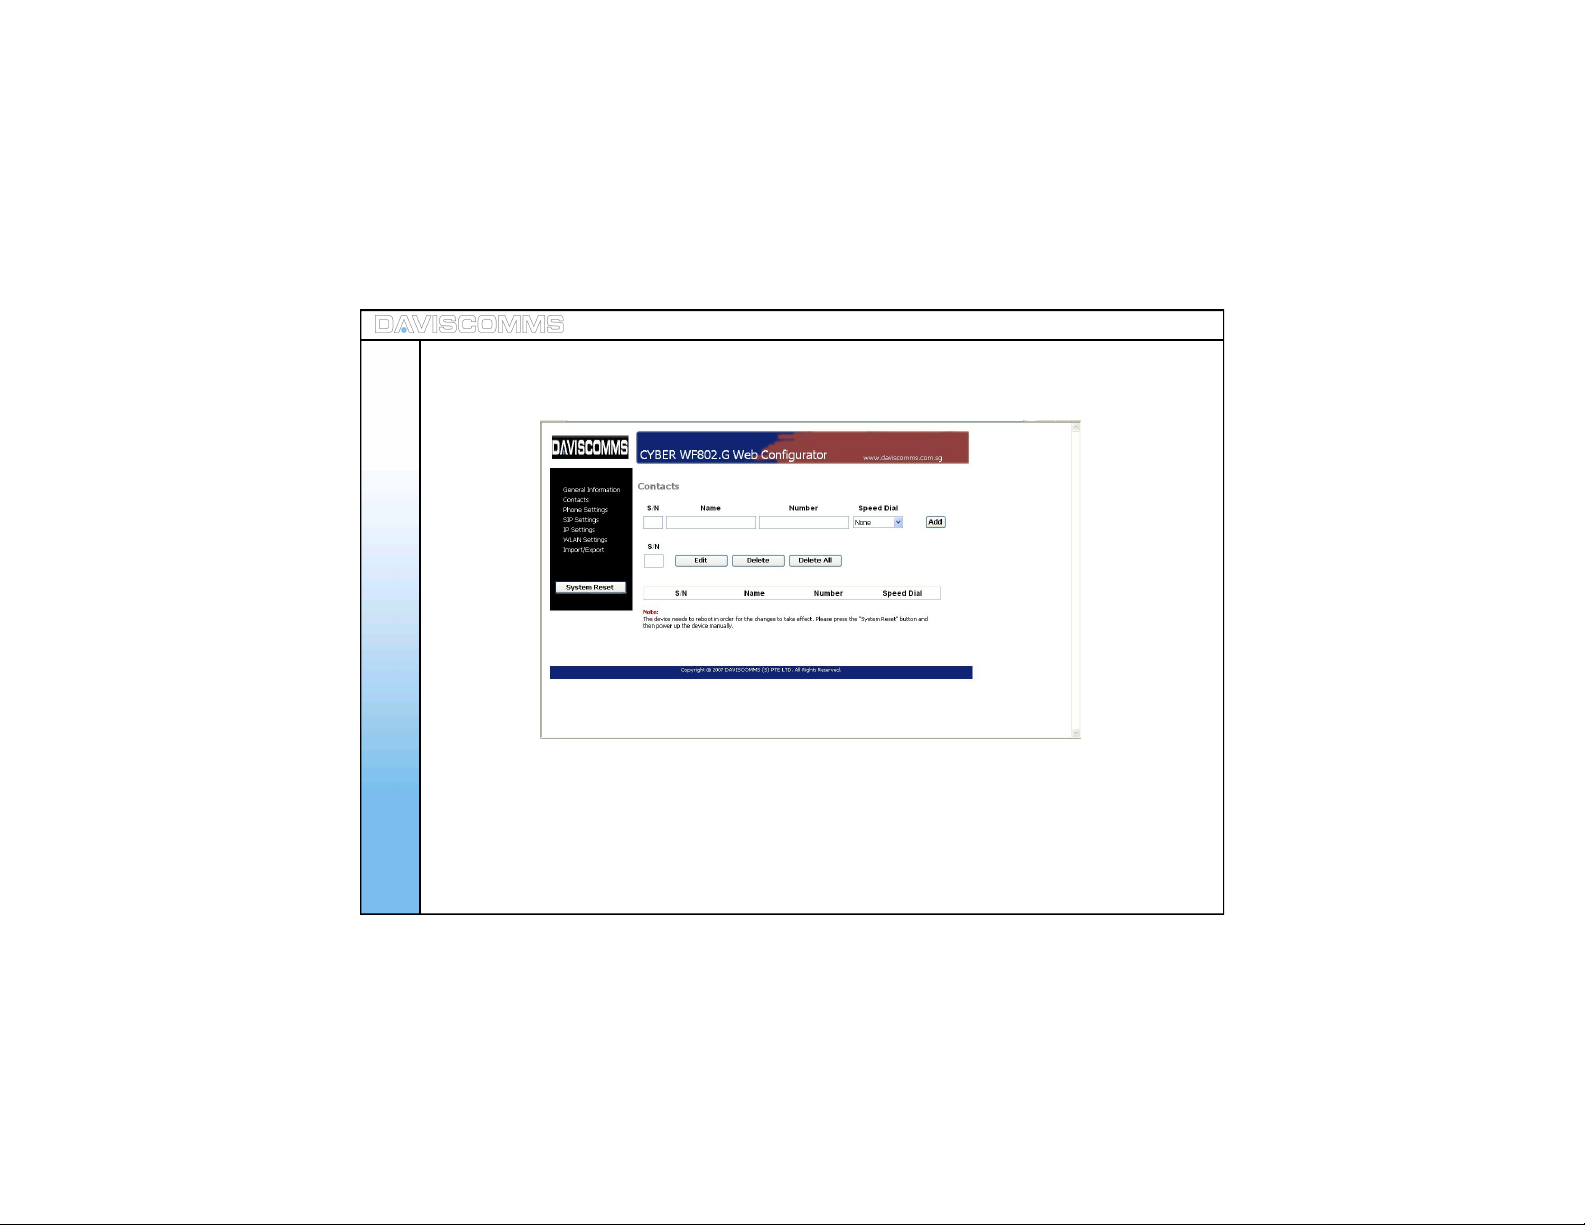
Step 6 - Under general information it contains software details of your phone. Your web browser will display
the page as shown below under Contacts.
Web Configur ator
This page allows you to view/add/edit/ delet e a contact to/from your phone.
60

Step 7 - Your web browser will display the page as shown below under Phone Settings.
This page allows you to configure the phone settings
Web Configur ator
61

62
Step 8 - Your web browser will display the page as shown below under SIP Settings .
Web Configur ator
Th is page allo ws you t o con f igu re your SI P acc oun t set tin gs to t he ph one , to regi st er to a SI P serv er.

Step 9 - Your web browser will display the page as shown below under IP Settings.
Th is page all ows you to c onf i gur e a f ixed I P set tin g or s et a DC H P sett in g t o aut oma t ic al ly as si gn an IP
addr ess f or t he ph one t o con n ect t o the A P of th e L AN .
Web Configur ator
63

64
Step 10 - Your web browser will display the page as shown below under W LAN Settings.
Web Configur ator
Th is page allo ws you to s et th e AP det ail s you req uir e the p hone to c onn ect to.

Step 11 - Your web browser will display the page as shown below under IMPO RT / EXPORT
Web Configur ator
Step 12 -C lick on System Reset once you have finalized the settings to complete the web configur ation
procedure
65

Step 13 - After clicking OK to reset the page will display as shown below
Web Configur ator
After the progress has completed, the program will trigger your phone to switch off automatically.
66
Step 14 - Turn on your phone again to connect to the AP of your LAN.
Your phone will connect according to the settings you have configur ed in web configur ation.

6. Glossary
AP (Access Point) - A device that connects wireless communication devices together to form a wireless network.
SIP (Session InitiationProtocol) - A application-layer control protocol for creating, modifying, and terminating sessions with
one or more participants. These sessions include internet telephone calls, multimedia distribution and multimedia conferences.
DNS (Domain NameServer) - T he IP address of your ISP’s s erver, which translates the names of websites into IP address es .
Encryption- Encoding data transmitted in a network.
Firmware - The programming code that runs a networking device.
Gateway - A device that interconnects networks with different, incompatible communications protocols.
IP (Internet Protocol) A protocol used to send data over a network.
IP Address - The address used to i dentify a computer or device on a network.
ISP (Internet Service Provider) - A company that provides acc ess to the internet.
MAC (Media Access Control) - The unique address that a manufacturer assigns to each networking device.
OutboundProxy Server - A proxy that recei ves requests from a cl ient, even though it may not be the server resolved by the
request - URI.
ROAMING - The ability to take a wi reless device fr om the range of one access to another without l osing the connection.
SSID (Service Set IDentifier) - Your wireless network’s name.
STUN Server - Simple Traversal of UDP (User Datagram Protocol) through NATs (Network Address Translators) is a network
protocol allowing a client behind a NAT to find out its public address, the type of NAT it is behind and the internet side port
associated by the NAT with a particular local port. This information is used to set up a communication between two hosts that
are both behind NAT routers.
Subnet Mask - An address code that determines the size of the network.
WEP (Wired Equivalent Privacy) - A m ethod of encrypting networ k data tr ansmitted on a wireless network for greater securi ty.
WLAN (Wir el es s Local Area Network) - A group of computers and associated devices that communicate with each other
wirelessly.
Glossary
67

7. Health an d Safety Information
Read these simple guidelines . Fail ure to comply may be
dangerous or illegal.
SWITCH ON SAFELY Do not switch the
phone on when wireless phone use is
prohibited or when it may cause interference
or danger.
ROAD SAFETY COMES FIRST Ob ey all
loc al laws . Al ways fr ee your h ands to oper at e
the vehicle while driving. Your first consideration
while driving should be road safety.
INTERFERENCE A ll wirel es s ph on es m ay
Health and Safety Information
68
be subject to interfere nce. Switch the phone off
near medical equipment.
SWITCH OFF IN HOSPITALS Follow all restric tions.
Switch the phone off near medical equipment.
SWITCH OFF IN AIRCRAFT Follow any restrictions .
W ir eles s devic es can caus e in ter f er en c e in airc raf t .
SWITCH OFF WHEN REFUELLING Do not use
the phone at a refueling point. Do not use near
fu el or chemic als .
QUALIFIED SERVICE
Only qualified personnel may
install or repair this product.
WATER-RESISTANCE
Your phone is not water-r esista nt.
Keep it dry.
ENHANCEM E NT AND BAT TE RIES
Use only approved enhancemen ts
and b att eri es . Do not con nec t
incompatible products .

Road Safety
- Your wireless phone gives you the powerful ability to communicate by voice, anywhere and
anyti me . Bu t an impor ta nt res pons ib ili ty acc ompa ni es the ben ef its of wir eles s p hon es, one t hat
every user must uphold.
Health and Safety Information
- W hen driving a car, driving is your first responsibility. W hen using your wireless phone while
driving, follow local regulations in the country or region you are in.
Hearing Aids
- Some d igi tal wir eles s ph ones may int erf ere wit h some h eari ng aids . In t he event of s uch
interferenc e, you may wish to consult your hearing aid manufacturer to discuss alternati ves.
Potentially Explosive Environments
- Switch off your phone when in any area with a potenti ally explosiv e atmosphere, and obey all
signs and instructions. Sparks in such areas c ould cause an explosion or fire resulting in bodily
injury or even death.
- Ar eas wit h a poten ti all y exp los iv e at mos ph er e ar e often bu t not alw ays cl earl y mark ed. T hey
include the areas below decks on boats, chemical transfer or storage facilities, vehicles using
liquefied petroleum gas, such as propane or butane, areas where the air contains chemicals or
particles, such as grain, dust or metal powders, and any other area where you would normally
be advised to turn off your vehicle engine.
69

Precautions when using batteries
- Never us e a ch arg er or bat ter y th at i s dama ge d in any wa y.
- U se the b att er y only f or it s int end e d pur pos e.
- Storing the battery above 45 degrees Celsius (113 degree Fahrenheit) is not recommen ded.
- Bat ter y ch argi ng t ime dep en ds on the rem ain in g bat ter y c harg e, t he type of batt er y, and the c harg er
used. The battery can be charged and dis charged hundr eds of times, but will graduall y wear out.
W hen the operation time is notic eably shorter than normal, it is time to buy a new battery.
- Use only approved batteri es, and recharge your battery only with approve d chargers. Disc onnect
the c harg er f rom th e pow er sou rc e wh en i t is not i n us e. Do not leav e t he b att er y c onn ect e d t o a
char ger for mor e th an a week, s inc e over char gin g m ay sh orte n i ts lif e.
- E xtrem e t emper at ur es wil l aff ect t he ch argi ng capac it y of you r bat ter y: it may r equi re c ooli ng or
Health and Safety Information
70
warming first.
- Do not lea ve th e batt er y i n hot or c old p lac es b eca us e t he c apac it y and li fet ime of th e batt er y wi ll b e
redu ced . T r y to keep t he bat ter y at room temp er at ur e. A phon e w ith a hot or col d bat ter y may not
work temporaril y, even when the battery is fully charged.
- Do not s hor t c ir cui t th e batt er y. Ac c iden ta l s hor t c ir cu iti ng c an oc cu r when a met all ic obj ec t l ike a
coin, clip or pen may cause a direct connection between the positive and negative terminals of the
batt ery ( meta l s tr ips on t he bat t ery ). F or exam pl e, do n ot c arry a spar e bat ter y in a poc ket or bag
where ther e may b e metal objec ts . Sh ort c irc uit ing t he batt eri es may cau se d amag e t o the batt er y.
- Dis pose of used batteries in accordanc e with local regulatio ns. Always rec ycle. Do not dispose
of bat t eri es i n a f ir e.
8. FCC Declaration
This device complies with part 15 of the FCC Rules. Operati on is subject to the following two conditions :
(1) This device may not cause harmful interfer enc e, and
(2) this device must accept any interference received, including interferenc e that may cause
undesired operation.
Note: This equipment has been tested and found to comply with the limits for a Class B digital device,
pur su ant to par t 15 of th e FC C Rul es. Th ese limi ts ar e des ig ne d to pr ovid e reas on a bl e p rot ect io n
against harmful interf erence in a residential ins tallation. This equipment generates, uses and can
radiate radio frequenc y energy and, if not installed and us ed in accordance with the instructions,
may cause harmful interfer ence to radio communications . However, there is no guarante e that
interferenc e will not occur in a particular installatio n. If this equipment does cause harmful interf erenc e
to radio or television reception, which can be determined by turning the equipment off and on, the user
is enco ur ag e d t o try to c orr ect th e int erf er en c e b y one or m ore of th e fol low in g measu r es :-- R eor i en t or
relocate the receiving antenna.--I ncreas e the separation betwee n the equipment and receiver.--Con nect
the equipment into an outlet on a circuit different from that to which the receiver is connected.--C onsult
the dealer or an experienced radio/TV technici an for help.
FCC Declaration
71
 Loading...