

Base Unit - BU10
Wrist Tag - WT10

Table of Contents
1: General Information……………………………………………… 1
1.1 Standard Package Contents…………………………………….. 1
1.2 Display Indicators and Icons…………………………………….. 1
1.3 Summary of Tag and Base LED and Alert …………………….. 2
1.4 Wrist T ag Features……………………………………………….. 3
1.5 Base Features…………………………………………………….. 3
2: Getting Started…………………………………………………… 4
2.1 Installing and Removing the Battery on the Wrist Tag……... 4
2.2 Attaching and Detaching the Wrist Tag……………………… .. 5
2.3 Installing and Removing the Batteries on the Base Unit……... 6
2.4 Switching On/Off………………………………………………….. 7
2.5 Register Tag to Base (Association Mode)……………………... 8
3: General Functions……………………………………………….. 9
3.1 Keypad Lock………………………………………………………. 9
3.2 Main Menu………………………………………………………… 10
3.3 Viewing the Tag…………………………………………………... 10
3.4 Finding the Tag…………………………………………………… 11
3.5 Renaming the Tag………………………………………………... 11
3.6 Unregistering the Tag……………………………………………. 12
3.7 Return to Base……………………………………………………. 12
3.8 Tag Power Saver………………………………………….………. 13
3.9 Setting Comfort Zone ……………………………………………..14
4: Understanding the Monitoring Mode…………………………. 15
4.1 Main Screen (Monitoring Mode)………………………………… 15
5: Understanding the Find Mode…………………………………. 16
5.1 Find Mode Screen………………………………………..……..… 16
6: Alerts……………………………………………………………….. 17
6.1 Panic Alert…………………………………………………………. 17
6.2 Outside Comfort Zone Alert……………………………………… 18
6.3 Out of Range (OOR) Alert……………………………………….. 19
6.4 Tag Low Battery Alert……………………………………………. 20
6.5 Base Low Battery Alert…………………………………………… 21
6.6 Flat Battery Alert………………………………………….……..… 21
7: Advance Settings for Base………………………….…………. 22
7.1 Tag Alert…………………………………………………………… 22
7.2 Base Alert………………………………………………………….. 23
7.3 RF Channel………………………………………………………... 24
8: Trouble Shoo ting Guide………………………………………….25
Support Informatio n…………………………………………………... 26
Product Guarantee……………………………………………………. 27
FCC Statement…………………………………………………………..28
Content PageContent Page
1: General Information
1.1 Standard Package Conten t s
Package Contents:
1: Wrist T ag with Wrist Strap X 1
2: Base Unit x 1
3: Spare Latch Key (to unlock Wrist Tag) X 1
4: CR 2032 Coin Cell Battery X 1
5: AAA Alkaline Batter y X 2
6: User’s Manual X 1
Welcome
Welcome to Iseeka, a simple and innovative way to monitor your children.
Please take a few minutes to familiarise y ourself with the system. You will
find all of the components to be extremely easy to operate. When you have
become familiar with their operation, we suggest that you practice with the
units by playing a game of hide-n-seek.
If you have questions please call us at 0844 543 63 63
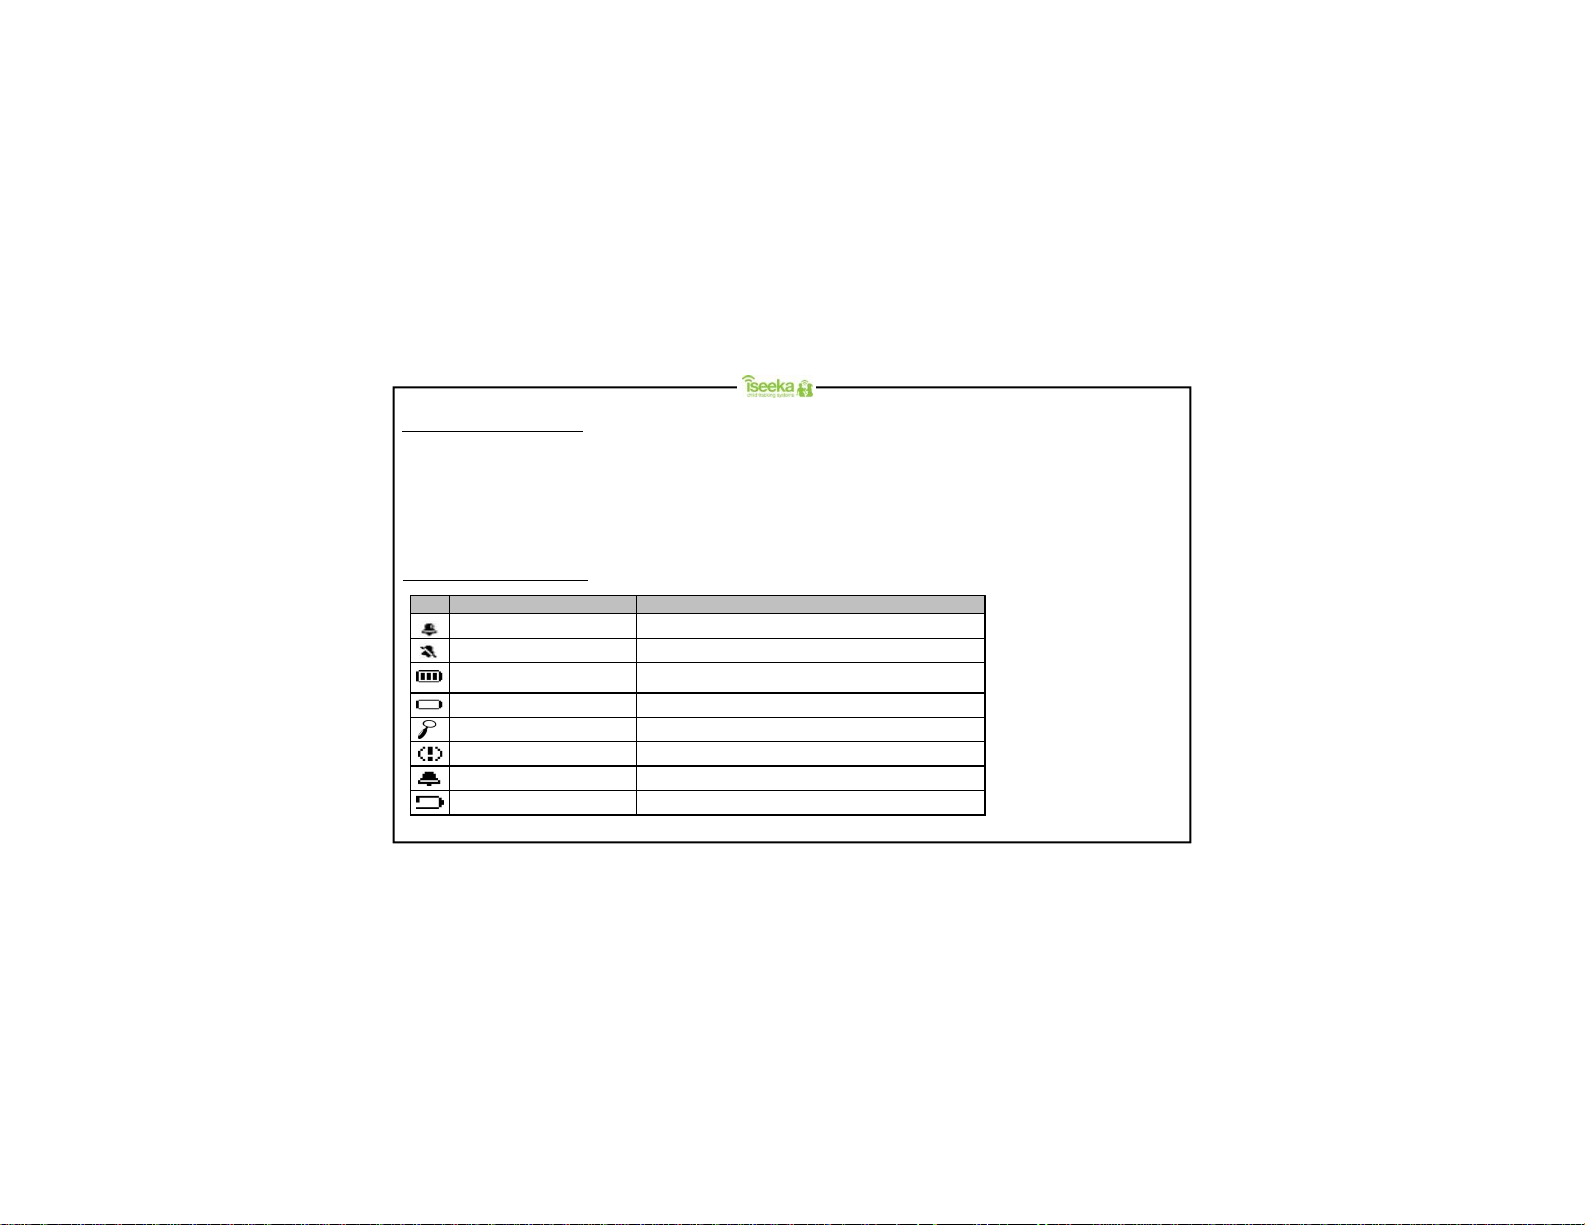
1.2 Display Indicato rs and Icons
Icon Description Remark
Comfort zone alert enabled icon
Comfort zone alert disabled icon
Battery gauge
(3 bars, 2 bars, 1 bar)
Search Icon Displays in Register Tag, Unregister Tag and Tag Power Saver Screen
Tag Panic Alert I con
Tag Comfort Zone Alert Icon
Displays in Main Screen and Find Mode Screen
Displays in Main Screen and Find Mode Screen
Displays in Main Screen and Find Mode Screen
Displays in Main Screen and Find Mode Screen Low battery indicator
Displays in View Tag Screen
Displays in View Tag Screen
Displays in View Tag Screen Tag Low Battery Alert Icon
Page 1

every second
distance / direction
Blinks once every 1 second
1.3 Summary of Tag and Base LED and Alert
Association Mode
Monitoring Mode
Blinks once every 15 sec 2 chirps 2 chirps No alert No alert
Outside Comfort Zone
Return to base
Blinks once every 2 sec
Tag Low battery
Tag Gone Battery Shutdown
Panic Button
Find Mode
Out of Range
Idle Mode
Sleep Mode
Base Battery Low
Base Gone Battery Shutdown
LED Cont inuously on No alert No alert NA NA
Blinks once when
panic signal is sent
Blinks every 0.5 sec
for 15 mins
Blink once every 30 sec No alert No alert No alert No alert
Tag Base
Alert
Normal Silent
No alert No alert No alert No alert
1 chirp every
second
1chirp every
second
No alert
No alert No alert No alert
3 chirps No alert
1 chirp every
second
1 chirp every
second
1 chirp every
2 seconds for
5 minutes
No alert
No alert
No alert
1 chirp
(with vibration)
3 chirps
(with vibration)
1 chirp
(with vibration)
every second
Ascending &
descending beeps
dependant on the
from the Tag.
1 chirp
(with vibration)
every second
SilentNormalLED
3 short vibrations
1 short vibration
3 short vibrations
No alert
3 short vibrations
LED off No alert No alert No alert No alert
NA NA NA
3 chirps (without
vibration)
1 short vibration
Page 2
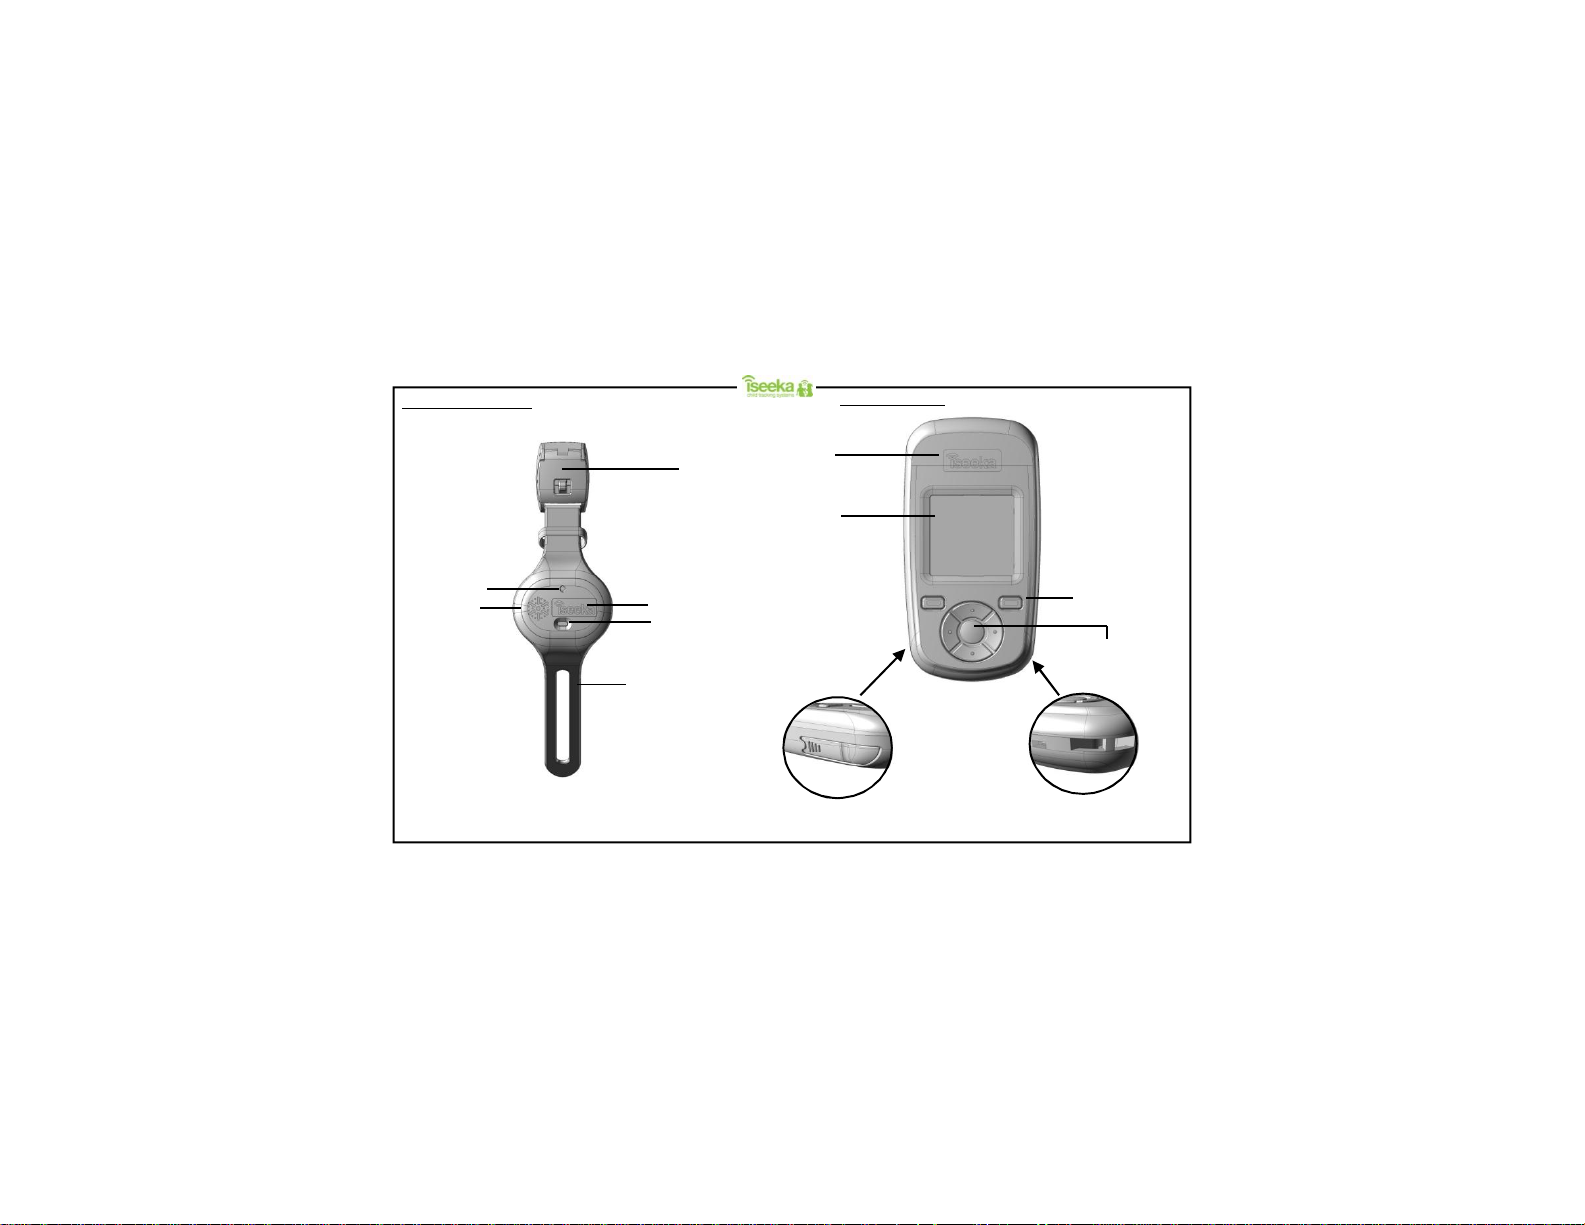
1.4 Wrist Tag Features
1.5 Base Features
Alert LED (red)
Speaker
Hole
Strap Lock
Logo
Press to activate
panic mode
Rubber Strap
Logo
1.5” LCD
On the bottom left: Latch Key
2 x Soft Keys
Multi-directional keypad.
On the bottom right: Lanyard Loop
Page 3
2: Getting Star te d
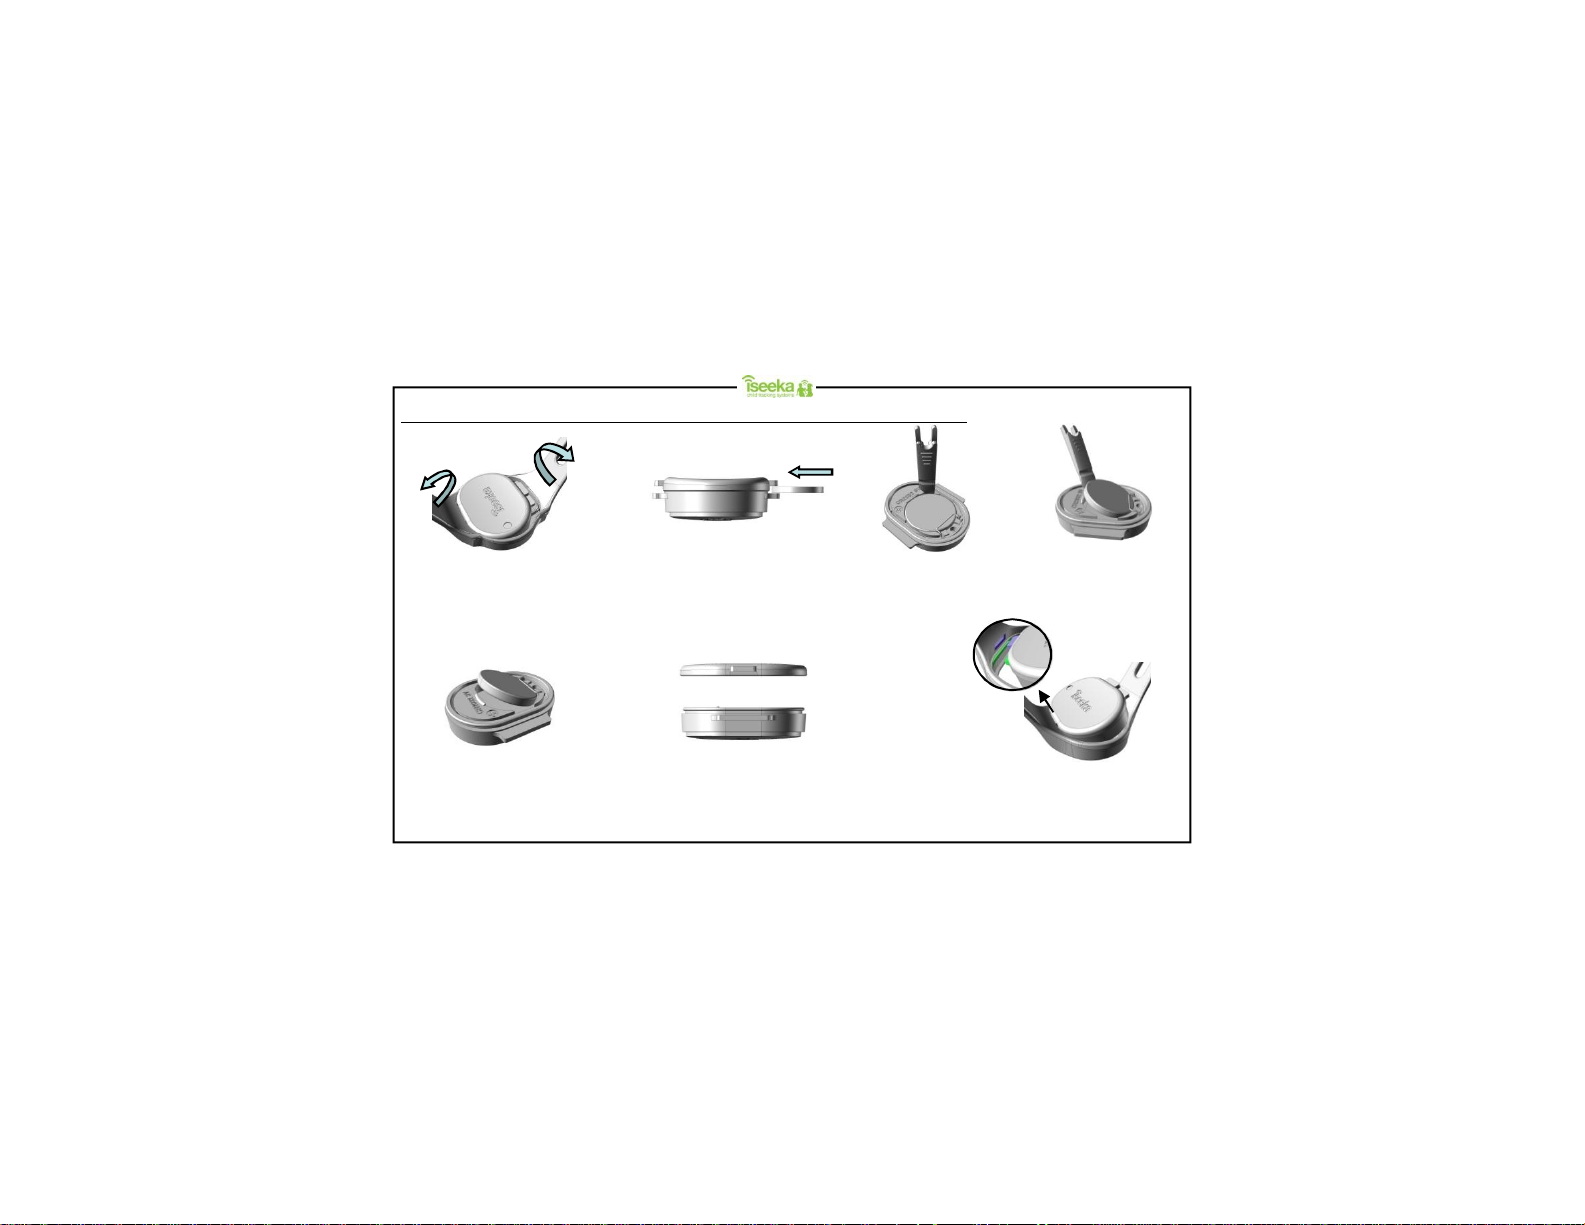
2.1 Installing and Removing the Battery on the Wrist Tag (battery’s positive polarity faces upwards)
To remove the battery
Step 1:
Stretch and pull the rubber strap apart
and eject the tag out by pushing it from
To install the battery
bar as shown and ensure that the
the bottom.
Step 1:
To insert the battery, slide the
battery under the contact spring
rubber seal is in place.
Step 2:
With a coin, slot it in between the
housing flaps and twist to remove the
battery door.
Step 2:
Click the two housings together until
you hear a snap. Ensure that it is
properly closed in all directions.
Step 3:
Use the pointededge of the latch key
and insert it into the slot (as shown in
the figure in Step 3) and lift.
Step 3:
Align the flange of the tag to the wrist strap’s rubber
groove and slide one side in first. Next, stretch the
rubber strap and slide the other end of the tag into
the other rubber groove.
Step 4:
The battery will be lifted out
of its compartment.
Page 4
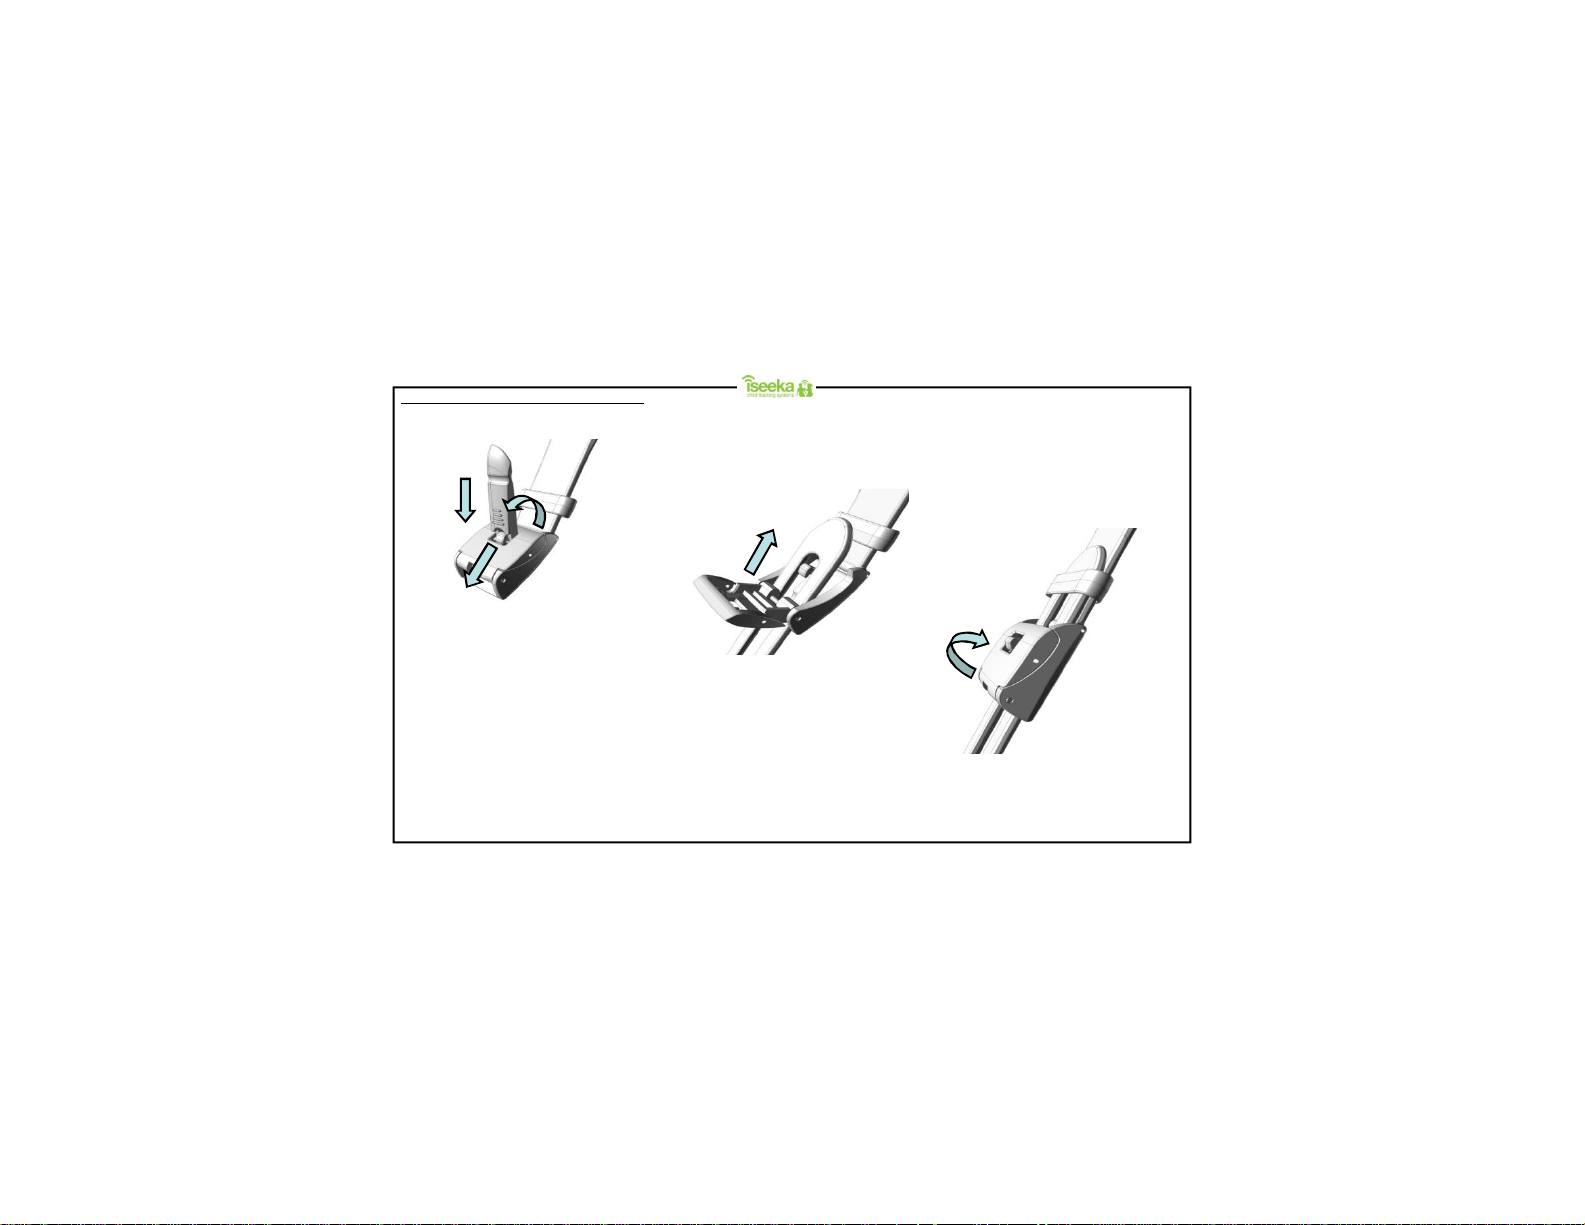
2.2 Attaching and Detaching the Wrist Tag
1
3
2
Step 1:
With the latch key (located on the
bottom left of the handheld unit), insert
the key into the latch as shown, using
the forked edge push the metal pin
forward and lift the door open.
Step 2:
Slide the other end of the rubber strap
through the latch.
Step 3:
With the desired length, flip the latch
back until it locks in place.
Page 5
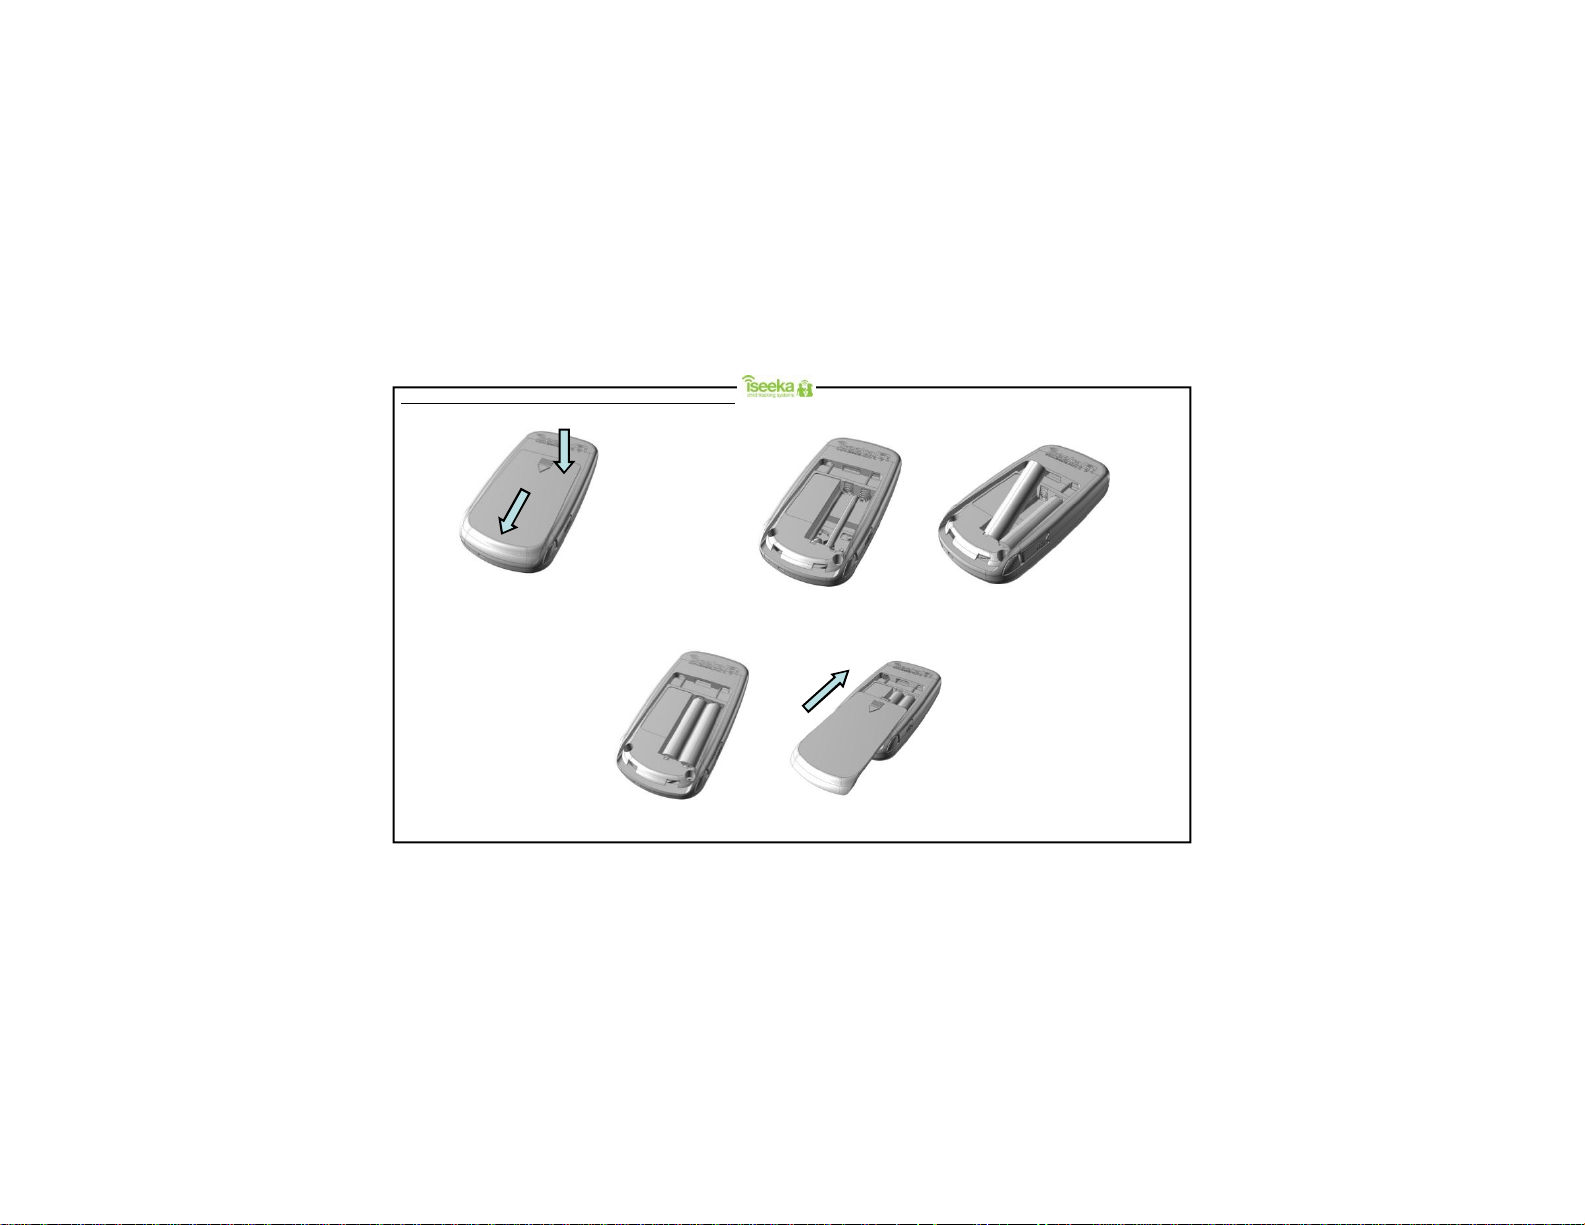
2.3 Installing and Removing the Batteries on the Base Unit
Following the directions on the casing
Step 1:
Push the battery door down where the
arrow indicator is then slide outwards to
remove the battery door.
Once the batteries are firmly placed, slide the battery door until it clicks in place.
Step 2:
firmly insert 2 X AAA batteries.
Step 3:
Page 6
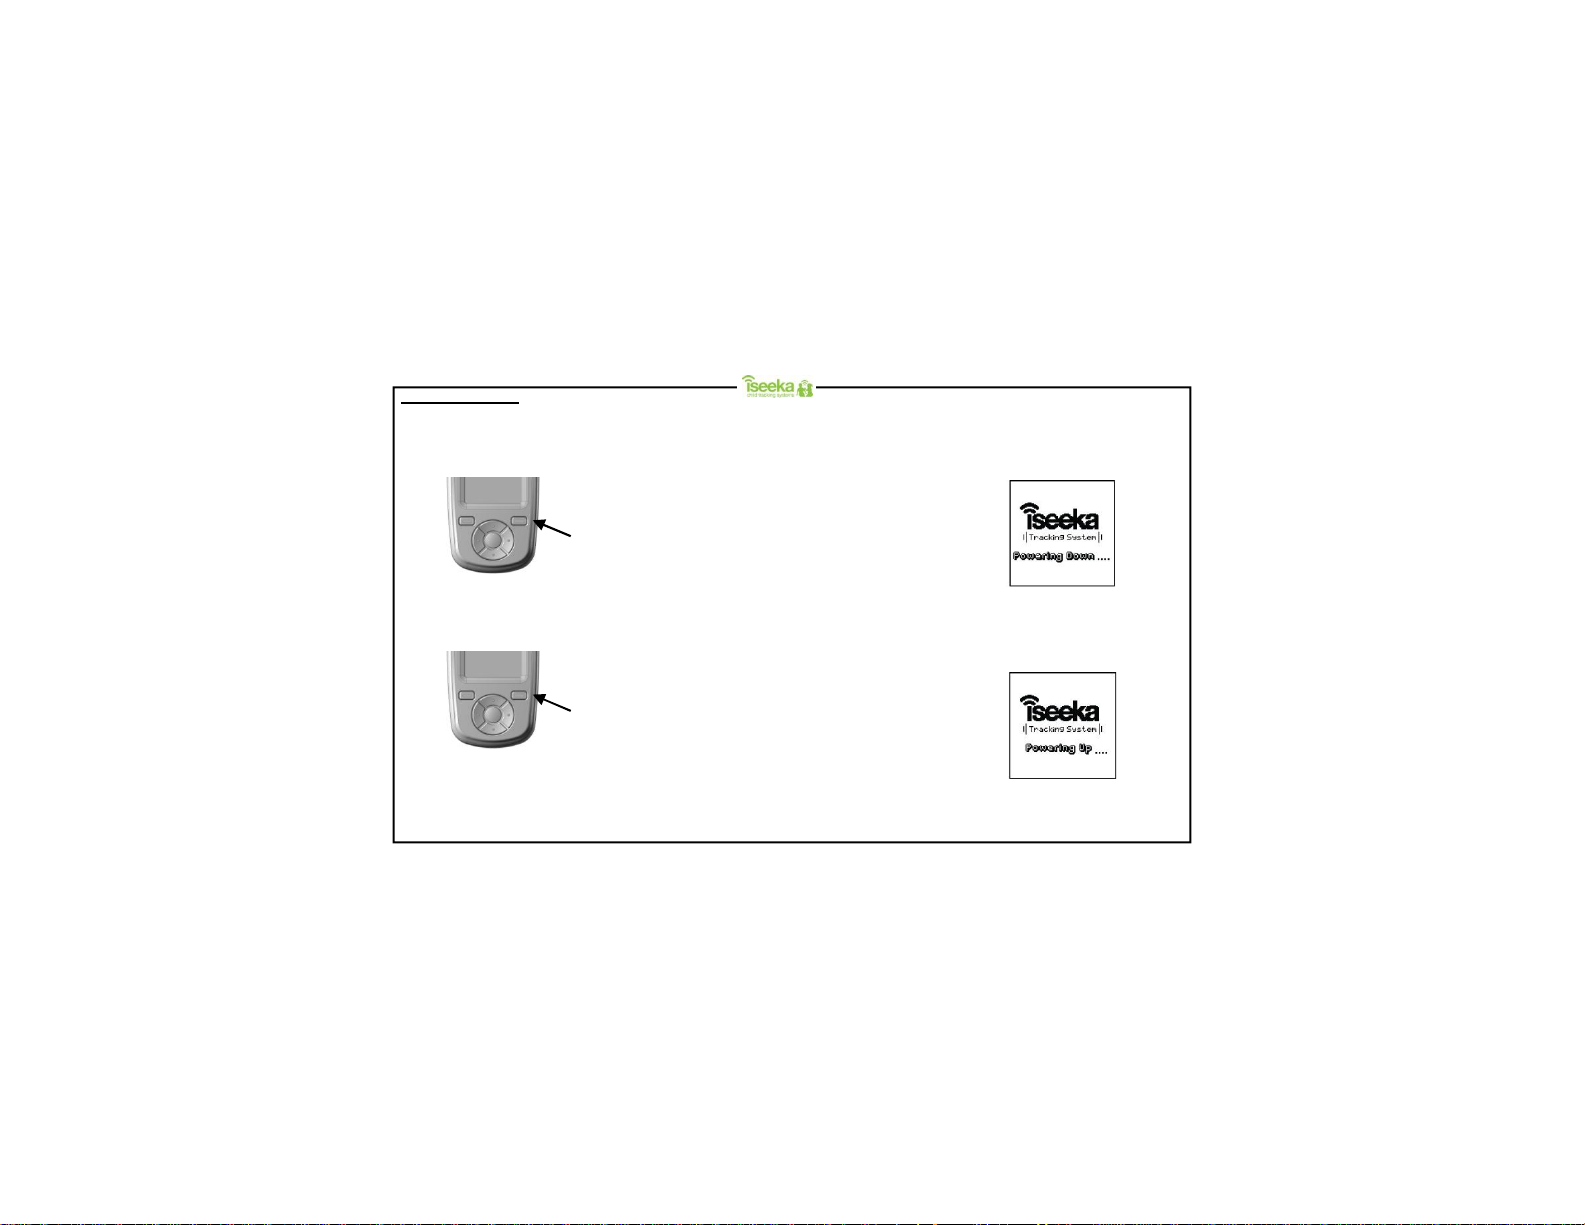
2.4 Switching On/Of f
The Base will turn on when new batteries are inserted.
To turn off the Base:
The base will stop communicating to the Tag/Tags and display the power down screen before it turns off.
Press and hold the key for 2
seconds in the main screen
(Monitoring Mode).
To turn on the Base:
Upon power up, the Base will emit a chirp and display the power up screen. Thereafter, the screen will enter monitoring mode.
Power Down Screen
Power Up Screen
Press and hold the key
for 2 seconds
when the screen is off.
Page 7

2.5 Register Tag to Base (Association Mode)
Step 1: Insert battery into the Base.
First Screen (without association)
If the Base has not been associated with any Tag, it will display the following screen for 5 seconds
after it is powered up.
Step 2: Select Yesto enter association mode to register Tags. Alternativ ely , you can register the Tag from the
Main Menu > select Register Tag.
Or
SelectNo to return to the main screen.
Step 3: Insert battery into the Tag.
Register Tag Menu
New Tags are stored in a first-in first-out or der and corresponds to Tag 1 to Tag 16 in the memory.
Step 4: After the Tag is successfully associated with the Base, it would emit an alert (2 chirps).
Step 5: Select Done to r eturn to the main screen and start monitoring the T ag on the Base.
Note: 1. The Tag can only associatewith the Base unit when it is within 6 Metres of the Base.
2. The Tag cannot be monitored until it is associated with a Base.
3. Tags need to be re-associated every time a battery is replaced.
4. The Base does not need to be re-associated with the Tag/Tags when batteries are replaced.
First Scr een
Page 8

3: General Functions
3.1 Keypad Lock
You can lock or unlock the keypad. The Base will unlock the keypad automatically in the event of panic alert, comfort zone alert and out of range
alert.
To Lock the Keypad:
Press and hold the key for
1 second in the main screen
(Monitoring Mode).
To Unlock the Keypad:
Step 1: Select Unlock.
Step 2: Select OK immediately to unlock the Keypad.
Keypad Unlocked Confirmation Screen
The Base will display a message for 2 seconds for you to confirm that the keypad is
unlocked by selecting OK.
Page 9

3.2 Main Menu
You can access following sections from the main menu:
• View Tag
• Find Tag
• Rename T ag
• Register Tag
• Unregister Tag
• Comfort Zone
• Return to Base
• Tag Power Saver
• Advance Settings
Main Menu Screen
The user has the option to select any of the menu items.
Or
Select Back to return to the main screen.
3.3 Viewing the Tag
You can view and clear the alert status of individual or all of the Tags. This includes the alert status for low battery, panic button and tags outside
the comfort zone.
Step 1: From the Main Menu > Select View Tag.
Step 2: Select the specific Tag thatyou want to clear the alert status of and press .
Or
SelectAll to clear the alert status of all the associated Tags.
Step 3: Select Back to return to the main menu.
t
Note: The alert status of individual Tag(s) will be cleared when the Base battery is replaced.
Page 10

3.4 Finding the Tag
You will be able to select a single Tag and locate it.
Step 1: From the Main Menu > Select Find Tag
Step 2: Select the Tag which you would like to locate and enter find mode (Go to Find Mode Screen).
Or
SelectBack to return to the main menu without making any changes.
3.5 Renaming the Tag
After the T ags have been associated with the Base, you can edit the names of each Tag (3-8 alphanumeric characters).
Step 1: From the Main Menu > selectRename Tag.
Step 2: Select the specific T ag to edit the name. You can press to request the Tag to emit an alert and identify it.
Or
SelectBack to return to the previous screen.
Step 3: Edit the name of the Tag (3-8 alphanumeric characters).
Select and to change the letters or numbers.
Select and to move the cursor left and right.
Select to switch between ABC,abc and123 Mode.
Step 4: Select OK to confirm the name of the Tag and return to the previous screen.
Step 5: Once the Tag is successfully r enamed, the Tag will alert(2 chirps).
Step 6: Select Back to return to the main menu.
Page 11

3.6 Unregistering th e Tag
You can disassociate / unregister all Tags from the Base.
Step 1: From the Main Menu > selectUnregister Tag.
Step 2: Select Yesto confirm your option to unregister all the Tags.
Or
SelectNo to return to the previous screen.
Unregister All Tags Screen
Display shows the name of Tag/Tags found that can be unregistered.
Step 3: Select Done to stop searching for Tag/Tags; unregister all tags and return to the main screen.
Note: Please ensure that Tags which are out of range are properly unregistered by removing the battery.
3.7 Return to Base
You can send an alert using the Base to one or all Tags to 'Return to Base'.
This will cause the selected Tags to alarm (1 chirp every second), indicating to the Tag wearer that the Base is requesting attention.
This alert will stop when the Tag returns to within 6 Metres of the Base.
Return to B ase Menu
Step 1: From the Main Menu > selectReturn to Base
Step 2: Select the specific Tag thatyou want to send an alert to and press .
Or
SelectAll to send return to base alert to all the associated Tags.
Step 3: Select Back to return to the main menu.
Page 12

3.8 Tag Power Saver
You can place all Tags into sleep mode to conserve the Tag battery life when they are not in-use for a period of time.
Step 1: From the Main Menu > Select Tag Power Saver.
Step 2: Select Yesto confirm to proceed to place all tags into sleep mode.
Or
SelectNo to return to previous screen without making any changes.
Tag Power Saver Screen
Display shows the names of the Tag/Tags found, that have been set to sleep mode.
Step 3: Select Done to stop searching for Tag/Tags and return to the main screen.
Note: Please note that Tags which are out of range are not set to sleep mode by the Base.
To wake the Tag from sleep mode.
Press the panic button on the Tag when the Base is in Monitoring Mode (the tag will appear on the screen).
Page 13

3.9 Setting Comfort Zone
You will be able to set a level that represents a comfort zone (in distance) for all Tags or individual Tags. The Base will monitor the comfort
zone for the Tags in monitoring mode.
From the Main Menu> selectComfort Zone.
The following option for comfort zone settings are supported:
All Tags: To set a comfort zone for all Tags.
Individual Tag: To set a different comfort zone for each individual Tag.
Comfort Zone Screen
The comfort zone range is represented by 10 divisions. This ranges from approx 50 Metres to up to ¼ Mile with a clear line of sight.
The default range is at division 9.
To set Comfort Zone for all Tags
Step 1: From the Comfort Zone Menu > selectAll Tags to set a comfort zone for all Tags.
Step 2: Set a level for the comfort zone for all Tags by pressing and to move the line up and down
and select OK to confirm the settings and return to the main screen
Or
SelectBack to return to previous screen without making any changes.
To set Comfort Zone for an individual Tag
Step 1: From the Comfort Zone Menu > selectIndividual Tag to set a comfort zone for each individual Tag.
Step 2: Select the specific Tag thatyou want to set the comfort zone for and press .
Step 3: Set a level for the comfort zone by pressing and to move the line up and down
Or
SelectBack to return to previous screen without making any changes.
Step 4: Select OK to confirm the settings and retur n to the comfort zone (individual tag) menu to set a comfort
zone level for another Tag.
Step 5: Select Done to save the settings of the individual Tag/Tags and return to the main menu.
Note: The Tag Alertsetting (Normal Alert) on the Base would specify if the Tag will sound an alarm when it is outside the Comfort Zone.
Page 14

4: Understanding the Monitoring Mode
When the Base is turned on, it will automatically enter monitoring mode (Maximum 16 Tags).
During monitoring mode, the Base will search for all associated Tags, and indicate their approximate distance on the screen.
Main Screen (No Asso ciation)
This is the main screen in which the Base is not associated with any Tag.
Distance of Tag away from the Base
N: Near
M: Middle
F: Far
SelectMenu to displayMain Menu.
4.1 Main Screen (Monitoring Mode)
When the Tags are associated with the Base, it will be displayed on the main screen when it is powered up.
Tags will be assigned an individual lane to move up and down according to their distance away from the base (full distance: ¼ Mile).
User will be able to set a level that represents a comfort zone (in distance) for all Tags via the comfort zone menu. (See Comfort Zone)
Select Menu to displayMain Menu.
Select Alert to enable or disable the outside comfort zone alert for all associated Tags.
(Comfor t zone line will only appear if the optionAll Tags is chosen in comfort z on e m en u )
Select and to navigate between Tags.
Example:
Select to dis play Find Mode to locate highlighted Tag.
Comfort Zone for All Tags selected
Select and to move comfort zone line up and down.
Comfort Zone for indiv idual Tag selected
Select and to go to comfort zone menu.
Note: In Monitoring Mode, you may notice that a Tag has disappeared. This could be due to environmental conditions. You should be able to find
the Tag again by rotating through a 360 degree angle as long as it is within range.
Page 15

5: Understanding the Find Mode
When using the find mode, the base will only search for one Tag and stop monitoring the rest of the associated Tags.
The Tag name will be shown at the bottom of the screen.
The screen shows how close the Base is to the Tag with audible beeps. When the Base is getting nearer to the Tag, it will indicate a stronger
signal level and generate faster audible beeps.
Select Mute to mute the audible sound. Select Unmute to resume the audible sound.
Or
Select Exit to return to the main screen and exit find mode.
5.1 Find Mode Screen
Distance of Tag away
from the Base
N: Near
M: Middle
F: Far
Middle and Far Range Near Range
Signal level of Tag
Higher number and larger signal level
: Shorter distance between Tag and Base
Lower numberand smaller signal level
: Further distance between Tag and Base
To Find Tag
Hold the Base and sweep it in a circle to find the direction and move toward the direction that gives the strongest signal level and fastest audible
beeps.
Page 16

6: Alerts
6.1 Panic Alert
When the panic button of any Tag is pressed, the Tag and the Base will send out apanic alert.
The Base will also display a message to indicate which Tag activated the alert. Any key pressed on the Base will stop the panic alert in the Tag.
The Tag panic alert is:
• 1 chirp every second under normal mode.
• No alert under silent mode.
The Base panic alert is:
• 1 chirp (with vibration) every second under normal mode.
• 3 short vibration under silent mode.
Monitoring Mode:
The Base will display a message and send out apanic alert.
The Tag which sent out the alert will blink on the screen.
Select Mute to silent the alert on the Base. (Only applicable in normal mode)
Select Exit to dismiss the alert and return to the main screen without locating the Tag.
Select and to navigate to the blinking Tag.
Select to mute the alert and go to find mode to locate the Tag.
Find Mode:
The Base will stop the find mode alert temporarily, emit alert (2 chirps), display a message for 2 seconds and
then rever t to find mode operation.
Page 17

6.2 Outside Comfort Zone Alert
The Base will sound an alarm when Tag/T ags are out of the predetermined comfort zone.
The Tag comfort zone alert is:
• 1 chirp every second under normal mode.
• No alert under silent mode.
The Base comfort zone alert is:
• 1 chirp (with vibration) every second under normal mode
• 3 short vibrations under silent mode.
Monitoring Mode:
This message and the alert will be dismissed if the Tag is back in the comfort zone.
Select Mute to silent the alert on the Base. (Only applicable in normal mode)
Select Exit to dismiss the alertand return to the main screen.
Select and to navigate to the Tag.
Select to request the Tag to emit aReturn to Base alert.
Find Mode:
The Base will stop the find mode alert temporarily, emit alert (2 chirps), display a message for 2 seconds and
then rever t to find mode operation.
Page 18

6.3 Out of Range (OOR) Alert
When the Tag is out of range, it will send out an alert.
The Tag out of range alert is:
• 1 chirp every 2 seconds for 5 minutes under normal mode.
• No alert under silent mode.
The Tag out of range alert on the Base is:
• 1 chirp (with vibration) every second under normal mode.
• 3 short vibrations under silent mode
Monitoring Mode:
The Base will emitan alert and display message until the Tag is within range again.
Select Mute to silent the alert on the Base. (Only applicable in normal mode)
Select Exit to dismiss the alertand return to the main screen.
Find Mode:
The Base will stop the find mode alert temporarily, emit alert (2 chirps), display a message for 2 seconds
and then rever t to find mode operation.
Page 19

6.4 Tag Low Battery Alert
When the Tag’s battery goes too low, it will sound Low Battery Alert.
The Base will display a message to indicate which Tag‘s battery is low.
The Tag low battery alert is:
• 3 chirps under normal mode
• No alert under silent mode.
The Tag low battery alert on the Base is:
• 3 chirps (with vibration) under normal mode.
• 1 short vibration under silent mode.
Monitoring Mode:
The Base will display a message for 2 seconds and then rever t to monitoring mode
operation.
Find Mode:
The Base will stop the find mode alert temporarily, emit alert (2 chirps), display a message for 2 seconds and
then rever t to find mode operation.
Note: Tags need to be re-associated ever y time a battery is replaced.
Page 20

6.5 Base Low Battery Alert
When the Base battery level falls too low, the Base will sound alow battery alert and turn on a low battery indicator message to indicate that
the battery is low. T he Base will now operate with only audio for normal alert and without audible beeps in find modeto locate the Tag, and turn
off the backlight on the Base.
The Base low battery alert is:
• 3 chirps (without vibration) under normal mode.
• 1 short vibration under silent mode.
Monitoring Mode:
The Base will turn on the low battery indication, display a message for 2 seconds and then revert to monitoring
mode operation.
Find Mode:
The Base will turn on the low battery indication, display a message for 2 seconds and then revert to find mode
operation.
6.6 Flat Battery Alert
Once the battery level goes too low, the Base will emit the Flat battery alert, a message will be displayed for 2 seconds and then the Base will shut
down, showing a blank screen.
The Base flat battery alert is:
• 3 chirps (without vibration) under normal mode.
• 1 short vibration under silent mode.
Flat Battery Shut dow n
Note: The Base does not need to be re-associated with the Tag/Tags when batteries are replaced.
Page 21

7: Advance Settings for Base
From the Main Menu> selectAdvance Settings
Advance Settings Menu
The user can edit Tag alert, Base alert and RF Channel (Operating channel) via this menu.
SelectBack to retur n to the main menu.
7.1 Tag Alert
The following alerts settings for the Tag are supported:
Silent Mode: Tag never beeps.
Normal Mode: Tag will beep inAssociation Mode, Find Mode, outside theComfort Zone, out of range,
Step 1: From Advance Settings Menu > select Tag Alert.
Step 2: Select the Tag alert mode you prefer, and select OK.
panic button, tag low battery and return to base.
SelectBack to return to previous screen.
Or
SelectBack to return to previous screen.
Page 22

7.2 Base Alert
User can specify how the Base generates an alert.
The following alert settings for the Base are supported:
Silent Mode: Vibrate Only.
Normal Mode: Audible and Vibrate.
Step 1: From Advance Settings Menu > select Base Alert.
SelectBack to return to previous screen.
Step 2: Select the Tag alert mode you prefer, and select OK.
Or
SelectBack to return to previous screen.
Page 23

7.3 RF Channel
Occasionally, due to external interference, it may be necessary to switch the channel of operation for the Tag(s)
and the Base.
Step 1: From Advance Settings Menu > Select RF C hannel .
Step 2: Select Yesto proceed to change the channel.
Or
SelectNo to return to previous screen without any changes made.
Note: Tags need to be re-associated to the Base after a new channel is selected.
Step 3: Select the channel (Channel 1 to 3) which you prefer by pressing and and select OK to confirm.
Or
SelectBack to return to previous screen without any changes.
Step 4: Select Done to stop searching for Tag/Tags; unregister all tags and return to the main screen.
Note: Once a new channel is entered, the Base will proceed to unregister from all Tags and return to the
main screen (no association).
Ensure that T ags which are out of range are properly unregistered by remov ing the battery.
Page 24

8 Trouble Shooting Guide
Q1: My Wrist Tag does not appear on the register tag menu.
A1: Press the panic button on the Tag when the Base is in the register tag menu.
Q2: My Wrist Tag does not appear on my monitoring screen but I have successfully registered it on the register tag menu.
A2: Press the panic button on the Tag when the Base is in the main screen (monitoring mode).
Q3: My Wrist Tag LED is ON permanently instead by blinking.
A3: The Wrist Tag is on low battery mode. Change the battery and re-associate to the Base.
Q4: The Tag disappe ar ed on my monitoring s cr ee n.
A4: T his could be due to environmental conditions. You should be able to find the Tag again by rotating through a 360 degree angle.
Page 25

Support Information
For any support or enquiry, please contact us at our helpline (0844 543 63 63) between 9:00am to 5:30pm from Monday to Friday.
To purchase additional merchandise please visit us at www.iseeka.com
Iseeka Products are not designed to deter or prevent kidnappings, abductions, runaways or missing persons. Product quality, reliability and
accuracy may be affected by environmental or physical conditions in the area where products are being used. Environmental or physical
conditions which may affect the quality, accuracy or reliability of products include, but are not limited to, walls, floors, ceilings, metal structures,
vehicles, partitions, furniture, windows, motors, bodies of water or other wireless electronic devices, lighting and atmospheric conditions.
Iseeka can operate up to a distance of a quarter mile range based on a clear line of sight. The Tag is designed to be waterproofof up to 1 m for a
duration of 30 minutes based on the Ingress Protection rating 7(standard).
Full warranty information is available at www.iseeka.com/warranty
The information in this user guide is for information only and is subject to change without notice. Whilst reasonable effortshave been made in the
preparation of these instructions to ensure its accuracy, Iseeka Ltd assumes no liability resulting from errors or omissions in this user guide, or the
information contained herein.
Iseeka Ltd, reserv es the right to make changes to the product design without reservation and without notification to its users.
or call 0844 543 63 63
.
Page 26

Iseeka Product Guarant ee
Note:
Nothing in this express warranty affects the statutory right available to the consumer. Iseeka (the Company) WARRANTS to the user that if the
Base unit or Wrist-Tag ar e or become defective and the defect results from faulty materials and or workmanship and not in any way from accident,
misuse or mishandling by the user, the company shall, at its sole option, repair or replace such defective products or part thereof free of charge on
the following basis:-
1, In the case of components and of workmanship – for a period of 12 months from the date of purchase by the user.
The customers dated bill of sale shall be evidence of the date of purchase. This warranty shall be null and void if the products are tampered with,
misused or abused, or if the serial numbers are defaced or removed.
IMPORTANT NOTICE
To obtain serv ice under this guarantee, you are advised to use the following contact details for Iseeka limited:
Head Office: Iseeka Limited,
Telephone: 0844 543 63 63
Email: sales@iseeka.com
This product has been designed in the UK and Manufactured in Malaysia for Iseeka Ltd in compliance with ISO 9001:2000 Certification.
Units 3 / 4 Priory Tec Park,
Saxon Way, Hessle,
Hull, HU13 9PB
www.iseeka.com
FCC ID for Base Unit : VDQBU10
FCC ID for Wrist Tag : VDQWT10
Page 27

FCC Statement
This device complies with part 15 of the FCC Rules. Operation is subject to the following two conditions:
(1) This device may not cause harmful interference, and
(2) this device must accept any interference received, including interference that may cause
undesired oper ation.
This equipment has been tested and found to comply with Part 15 of the FCC rules.
Operation is subject to the condition that this device does not cause harmful interference.
This equipment generates, uses, and can radiate radio frequency energy and, if not installed
and used in accordance with this User Guide, may cause harmful interference to radio
communications. There is no guarantee that interference will not occur in a particular
installation. If this equipment does cause harmful interference to radio or television reception,
the user is encouraged to consult the dealer or an experienced radio/TV technician for help.
Page 28
 Loading...