

Page 1
¨
Online Help
Printable Version
TM
For CarChip, CarChip E/X,
& CarChip E/X with Alarm
8210, 8211, 8220, 8221, & 8225
i
Page 2

CarChip Online Help Printable Version
Product Numbers: 8210, 8211, 8220, 8221, 8225
Part Number: 7395.064
CarChip Online Help Printable Version
(July 16, 2004)
Copyright © 2004 Davis Instruments Corp. All rights reserved.
3465 Diablo Avenue, Hayward, CA 94545-2778
510-732-9229 • Fax: 510-732-9188
E-mail: info@davisnet.com • www.davisnet.com
ii
Page 3

Table Of Contents
Table Of Contents
Welcome to CarChip.......................................................................................................................1
Welcome to CarChip!...................................................................................................................1
Getting Started ........................................................................................................................2
How CarChip Works..................................................................................................................2
CarChip Installation ..................................................................................................................2
Installing CarChip in your Car ....................................................................................................3
Installing CarChip Software .......................................................................................................4
Connecting CarChip to a Computer .............................................................................................4
Example File ............................................................................................................................5
Walkthrough Setup...................................................................................................................6
Downloading CarChip Data ........................................................................................................7
Unidentified Vehicle/Driver ID ....................................................................................................8
Assign Drivers..........................................................................................................................9
View Menu Commands..............................................................................................................9
Exporting Data.......................................................................................................................10
File Menu Commands..............................................................................................................10
Tool Bar ................................................................................................................................ 10
Navigation Buttons .................................................................................................................11
Shortcuts & Navigation Aids.....................................................................................................12
Right Click Copy As................................................................................................................. 12
Copy Plot As ..........................................................................................................................13
Right Click Menu Options.........................................................................................................13
Right Click Save As.................................................................................................................13
Save Plot As .......................................................................................................................... 14
Using CarChip Help.................................................................................................................14
Menu Commands.................................................................................................................... 15
File Menu Commands..............................................................................................................16
Setup Menu Commands .......................................................................................................... 16
CarChip Menu Commands........................................................................................................ 28
View Menu Commands............................................................................................................ 35
Help Menu Commands ............................................................................................................56
More Information Menu...........................................................................................................57
CarChip User's Guide ..............................................................................................................57
CarChip Specifications............................................................................................................. 57
Incompatible Vehicle List.........................................................................................................59
One Year Limited Warranty......................................................................................................59
Safety Notice ......................................................................................................................... 59
Contacting Davis Instruments ..................................................................................................60
Index ......................................................................................................................................... 61
iii
Page 4

Page 5

Welcome to CarChip
Welcome to CarChip!
Click on one of the following topics to find out more information on using the CarChip system:
Getting Started Topics
Use the following topics to start using your CarChip d evice and software:
How CarChip Works
CarChip Installation
Example File
Walkthrough Setup
Downloading CarChip Data
Viewing Data
Exporting Data
Printing
Tool Bar
Using CarChip Help
Menu Commands
Use the following topics to learn more about th e menus available in the CarChip software:
File Menu Commands
Setup Menu Commands
CarChip Menu Comm ands
View Menu Commands
Help Menu Commands
More Information
CarChip User's Guide
CarChip Specifications
Incompatible Vehicle List
One Year Limited Warranty
Contacting Davis Instruments
July 16, 2004
1
Page 6

CarChip Online Help Printable Version
Getting Started
Use the following topics to start using your CarChip d evice and software:
How CarChip Works
CarChip Installation
Example File
Walkthrough Setup
Downloading CarChip Data
Viewing Data
Exporting Data
Using the File Menu
Printing
Tool Bar
Using CarChip Help
How CarChip Works
The CarChip plugs into the OBDII port in many 1996 or newer cars or trucks to record trip and
performance data. This data is then downloaded into your PC computer, providing a detailed look at how
the vehicle was driven, including trip start and end times, vehicle speeds, rates of acceleration and
braking, and also any OBDII trouble codes detected during the trip. The CarChip software displays vehicle
data in summary, plot or table format, and can also be exported to Microsoft Excel for further analysis.
The more powerful CarChip E/X logs additional engine and vehicle data parameters, including an accident
log which records 20 seconds of vehicle speed history prior to every sudden stop.
Use CarChip (products 8210, 8211) for:
• Troubleshooting your car - Records trouble codes and displays freeze frames of sensor readings.
• Logging your car's performance - Records acceleration, deceleration, and speed.
• Recording trip information - Records dates, starts and stops, and distance.
• Clearing your car's check engine light - Checks your car's sensors and turns off the check
engine light.
Use CarChip E/X (products 8220, 8221) for:
• Engine performance data logging - Log up to 4 of 23 available data parameters.
• Creating an Accident Log for every hard and extreme stop.
Use CarChip E/X with Alarm (product 8225) for:
• Announcing to driver when speed, braking, and acceleration thresholds have been
exceeded- Gives off an audible alarm when thresholds have been broken.
CarChip Installation
The following help topics show you how to connect CarChip to your car, to your computer, and how to
install the CarChip software. This information is also included in the CarChip packaging.
Connecting the CarChip to a Car
Connecting the CarChip to a Computer
Installing CarChip Software
2
Page 7
Welcome to CarChip
Installing CarChip in your Car
Follow these steps to install the CarChip data logger in your car.
1. Find the OBDII port on your car.
The OBDII port is located within 3 feet of the steer ing wheel, usually near the general area indicated by
the dotted line in the following illustration. The port should be easily accessible to a person in the driver's
seat.
Note: Use the Davis Instruments' CarChip web site to locate the OBDII connection on your car.
2. Check the following areas for the OBDII port:
Under the Dash Behind a small access panel in the dash
In front of the passenger seat In or around the center con sole
Behind the ash tray
3. Plug the CarChip data logger into the OBDII connector.
3
Page 8

CarChip Online Help Printable Version
4. Check to make sure the data logger indicator light is blinking. This verifies CarChip was properly
inserted into the OBDII port and is communicating with your vehicle.
Note: The indicator light blinks continuously when the CarChip is initially connected to a vehicle, before
the vehicle has started. Unless the indicator has been enabled via the software, blinking stops once the
vehicle has started and the CarChip has established communications with the OBDII computer.
Installing CarChip Software
Follow the steps provided below to install the CarChip software. Detailed instructions on how to use the
CarChip software are provided in the software help file "CarChip.chm" included with the installation CD.
CarChip software is compatible with computers running Windows™ 95, 98, ME, NT 4.0, 2000 or XP.
1. Place the CarChip software CD in your CD ROM drive.
2. The install program should start automatically. If the insta ll program does not start, select Run from
the Start menu, type D:\SETUP (or the correct letter for your CD ROM drive), and click OK to begin
the installation.
3. Follow the on-screen prompts to complete the installation.
Connecting CarChip to a Computer
The CarChip data logger connects to your computer using a USB connection (for product 8211, 8221,
8225) or serial port connection (for products 8210, 8220).
Note: A special serial port to USB adapter can be purchased from the Davis company web site if you
have purchased a CarChip product with a serial port connection (8210, 8220) and your computer requires
a USB connection.
Note: The CarChip data logger does not have to maintain a constant connection with your computer. The
CarChip can be connected and disconnected at any time the CarChip software is not downloading
information from the CarChip data logger.
To connect the CarChip data logger to your computer using a USB connector:
1. Locate a free USB port on the front or back of your computer and insert the USB connector of the
download cable into the USB port.
2. Plug the microminiature connector into the port on the CarChip data logger.
4
Page 9
Welcome to CarChip
To connect the CarChip data logger to your computer using a serial port:
1. Locate a free serial port on the back of your computer and insert the 9-pin connector of the
download cable into the port.
2. Plug the power adapter cable into the power jack on the 9-pin connector.
3. Plug the power supply into an AC outlet.
4. Plug the 8-pin microminiature connector into the port on the CarChip data logger.
Example File
Sample data is automatically loaded and displayed in the CarChip software when the software it installed
and opened for the first time. Use the sample data to view the functionality that exists in the CarChip
software.
To display the example data:
5
Page 10
CarChip Online Help Printable Version
1. The Example File dialog box displays when the CarChip software is first opened. This dialog box
displays an alert that a file with sample data will be opened and displayed. Click OK to open the
sample data file.
The sample data file, Example.car, is located in your CarChip software directory and can also be manually
opened.
To manually open the example file:
1. Select Open in the File Menu. The Browse dialog box displays.
2. Select the Example.car file in the CarChip program directory. The CarChip program directory is
located in the directory where you installed the CarChip Software. In this example, the directory is
C:\Program Files\CarChip.
3. Click Open to load the example file into the software. Click Cancel to exit the dialog box without
opening the file.
Walkthrough Setup
The CarChip software includes a CarChip walkthrough that steps you through the process of configuring
your CarChip data logger and CarChip software configurations. After installing the CarChip software on
your computer and opening the program, the Walkthrough dialog box automat ically displays. By clicking
OK, the walkthrough process begins. You can set up and configure your CarChip data logger and software
by separately selecting all of the necessary setup options from the Setup menu. A Walkthrough command
is included in the Setup menu so that you can access the walkthrough at any time.
Note: The CarChip data logger does not have to be connected to your computer to use the Walkthrough
Setup command. When the CarChip data logger is connected, more Setup menu commands display
during the walkthrough process.
By selecting the walkthrough process, the software displays a series of dialog boxes listed below. At each
step in the walkthrough process, confirmation boxes are provided to perform or skip the next step in the
walkthrough. To continue, click OK. To skip a step and move to the next step, click Skip. To cancel the
entire walkthrough process, click Cancel.
Walkthrough Sequence
The dialog boxes included in the Walkthrough for your CarChip vary depending on the CarChip data logger
model you have and if your CarChip is connected to your computer.
CarChip/Choose Other Parameters - Set vehicle data parameters that the CarChip records. You can
select up to four different parameters in addition to vehicle speed to record.
Note: This dialog box displays only for CarChip models E/X or higher.
Parameter Thresholds - Set thresholds for parameters monitored in the Summary Log view.
Note: This dialog box displays only for CarChip models E/X or higher.
Communication Port Settings - Select the COM port that your data logger is connected to.
6
Page 11
Welcome to CarChip
Note: The Serial Port Setting s dialog box does not display in the Walkthrough if a CarChip data logger
has been automatically detected.
Plots - Select the options for displaying plots and graphs.
Select Units - Select the unit s of measure that the data and information are displayed in.
Driver ID - Add, delete, or e dit the list of drivers using the CarChip data logger.
Vehicle ID – Add, delete, or edit the list of vehicles using the CarChip data logger.
CarChip ID - Edit the CarChip data logger names.
Anomalous Vehicles - Specify the vehicle using the CarChip data logger. Some vehicles have special
OBDII communication properties. By selecting a vehicle name from the list, you are configuring the
CarChip data logger to adjust to that vehicle's unique communication features.
Miscellaneous - Select an option for clearing your CarChip's memory.
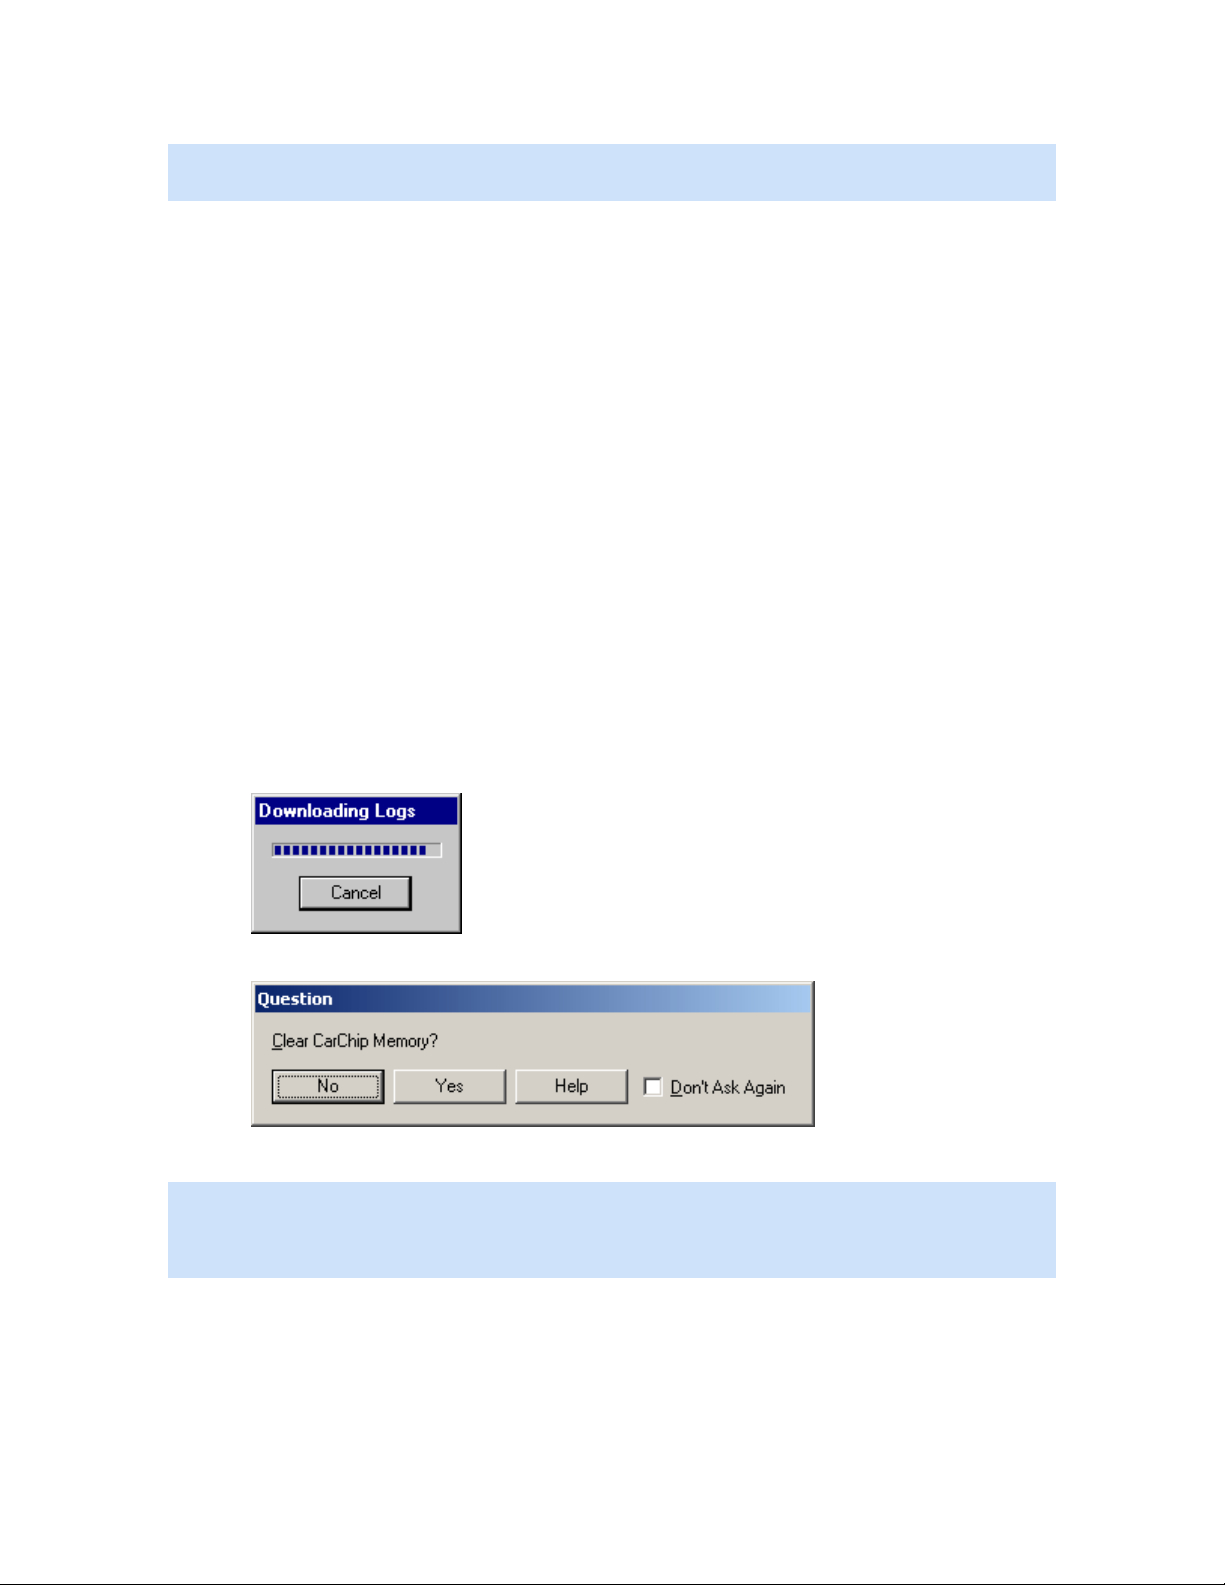
Downloading CarChip Data
Once you have connected your CarChip data logger to your computer, you are ready to download data
from any of the CarChip models.
To download data:
1. Click the Download CarChip icon or select Download CarChip Data from the CarChip menu.
In some instances, the Warning Clock Setup dialog box displays. When data is downloaded, the
software automatically compares the internal clock on the CarChip against the clock on your
computer. Click OK to continue or check Synchronize Clocks to set the CarChip data logger's
internal clock to your computer's clock.
The Downloading Logs status dialog box displays. Click Cancel to abort the download before it is
finished. The Downloading Logs dialog box closes when the download is complete.
2. The Question dialog box displays. The Question dialog box asks if you want to delete the current
CarChip memory.
3. Click No to keep the current data in the CarChip device, or click Yes to clear the CarChip memory.
Note: This dialog box contains a Don't Ask Again check box. By checking this option and clicking Yes,
the CarChip's memory is automatically cleared after every download. By clicking No, the CarChip's
memory is never cleared after download. To change your CarChip memory clearing options, see Memory
Clearing Options.
The Unidentified Vehicle/Driver dialog box displays. See Unidentified Vehicle/Driver ID for more
information on this dialog box.
Once you have finished associating vehicles and driv ers to the downloaded trip data, the Activity Log
Summary view automatically displays the downloaded data once the download is completed.
7
Page 12
CarChip Online Help Printable Version
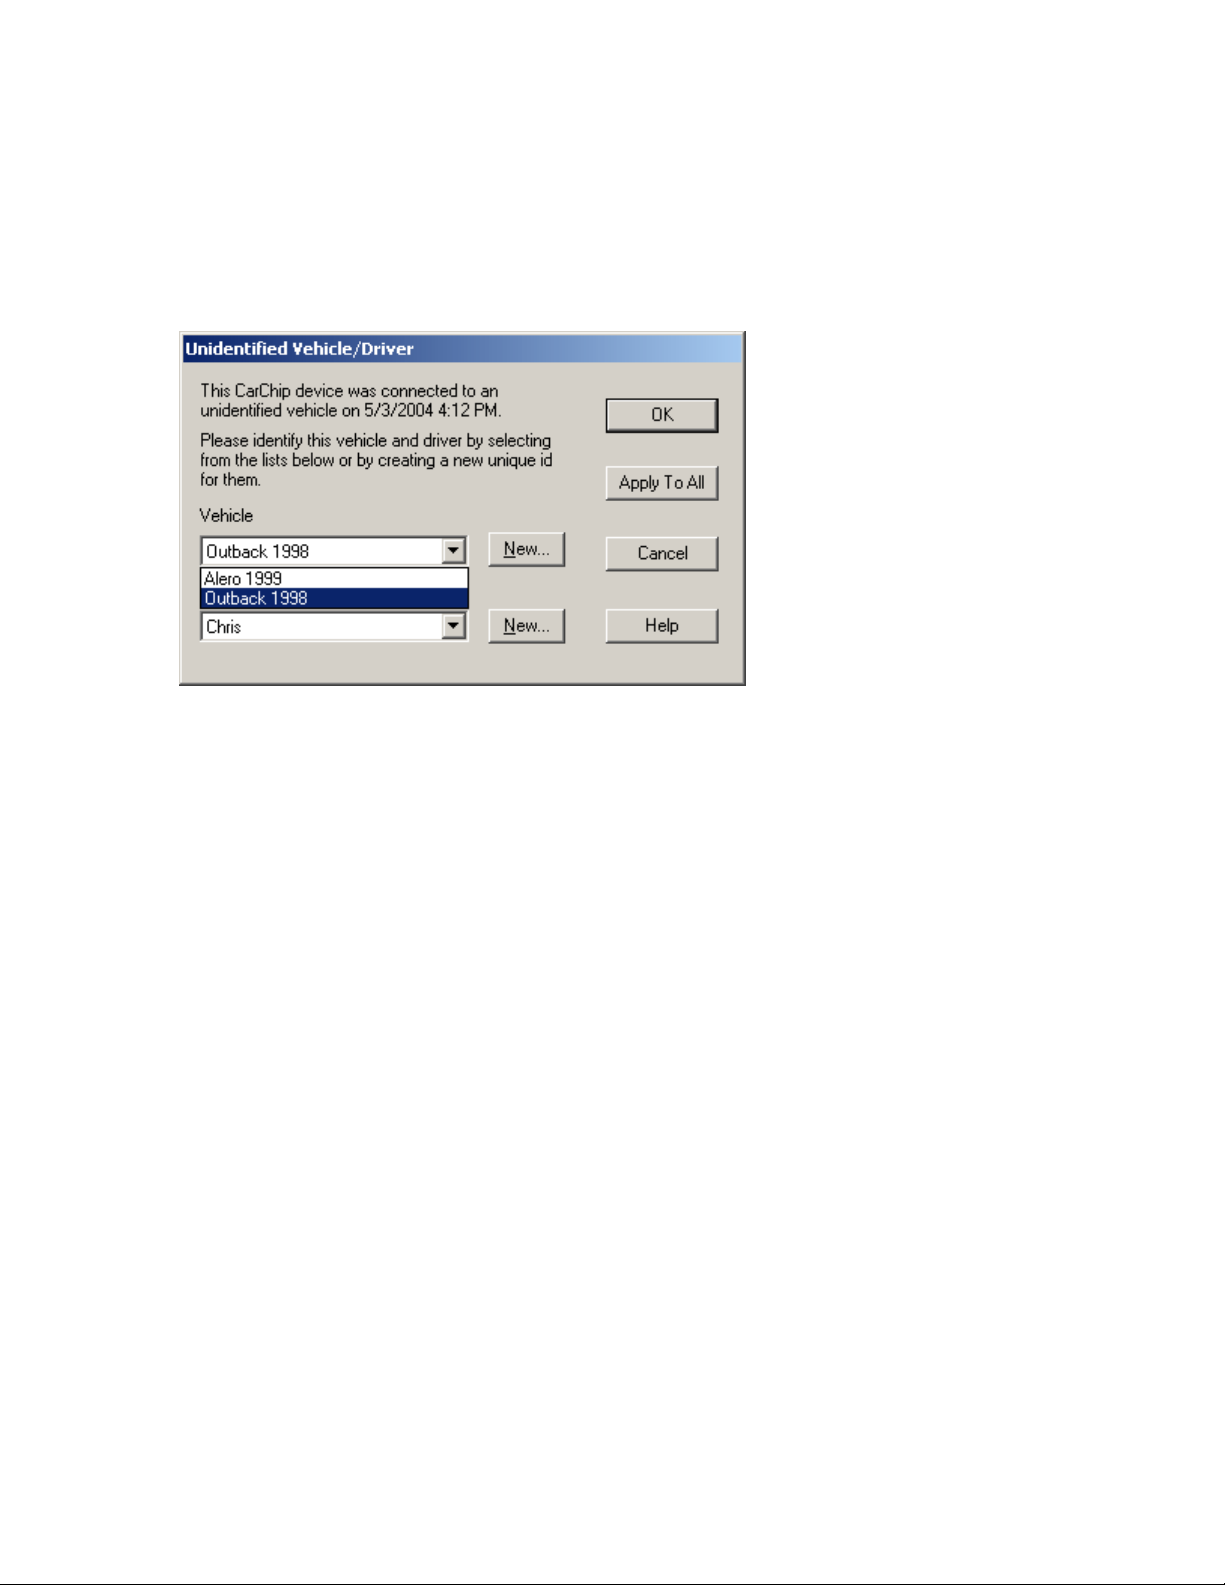
Unidentified Vehicle/Driver ID
The Unidentified Vehicle/Driver ID dialog box displays once data has been downloaded from the
CarChip data logger, prompting you to select the vehicles and drivers associated every trip that was
recorded. The CarChip device is capable of being connected to multiple vehicles. Every time the CarChip is
connected to a vehicle, a connection event is recorded. The Unidentified Vehicle/Driver ID dialog box
displays for every connection event that has been made on the CarChip device, with the date and time the
connection occurred. From this dialog box, select the drivers and vehicles associated with every event.
To select a vehicle and driver associated with each connection event:
1. Select the vehicle name from the Vehicle box.
If no vehicle exists, or if the vehicle that is associated with the event is not listed, see Creating a
New Vehicle.
To create a new vehicle to associate with each connection event:
1. Click New next to the Vehicle box.
The New Vehicle Dialog Box displays.
2. Enter a unique vehicle name or the vehicle's VIN number in the VIN box.
3. Enter a unique vehicle name in the Name box and click OK.
You do not have to enter a name in the name box. Click OK if you want the information
displayed in the VIN box to display in the Name box.
The new vehicle information displays in the Vehicle box.
2. Select a driver name from the Driver box.
If no driver exists, or if the driver that is associated with the event is not listed, see Creating a New
Driver.
To create a new driver to associate with each connection event :
1. Click New next to the Driver box.
The New Driver Dialog Box displays.
2. Enter a unique driver name or ID in the ID box.
3. Enter a name in the Name box and click OK.
You do not have to enter a name in the name box. Click OK if you want the information
displayed in the ID box to display in the Name box.
The new driver information displays in the Driver box.
3. Click OK to associate the selected vehicle and driver with the connection event.
8
Page 13
Welcome to CarChip
If the driver and vehicle are associated with all the connection events stored on the CarChip, select
Apply To All.
Once all connection events have been associated wit h a vehicle and driver, the dialog box closes and
the summary report for the Activity Log displays.
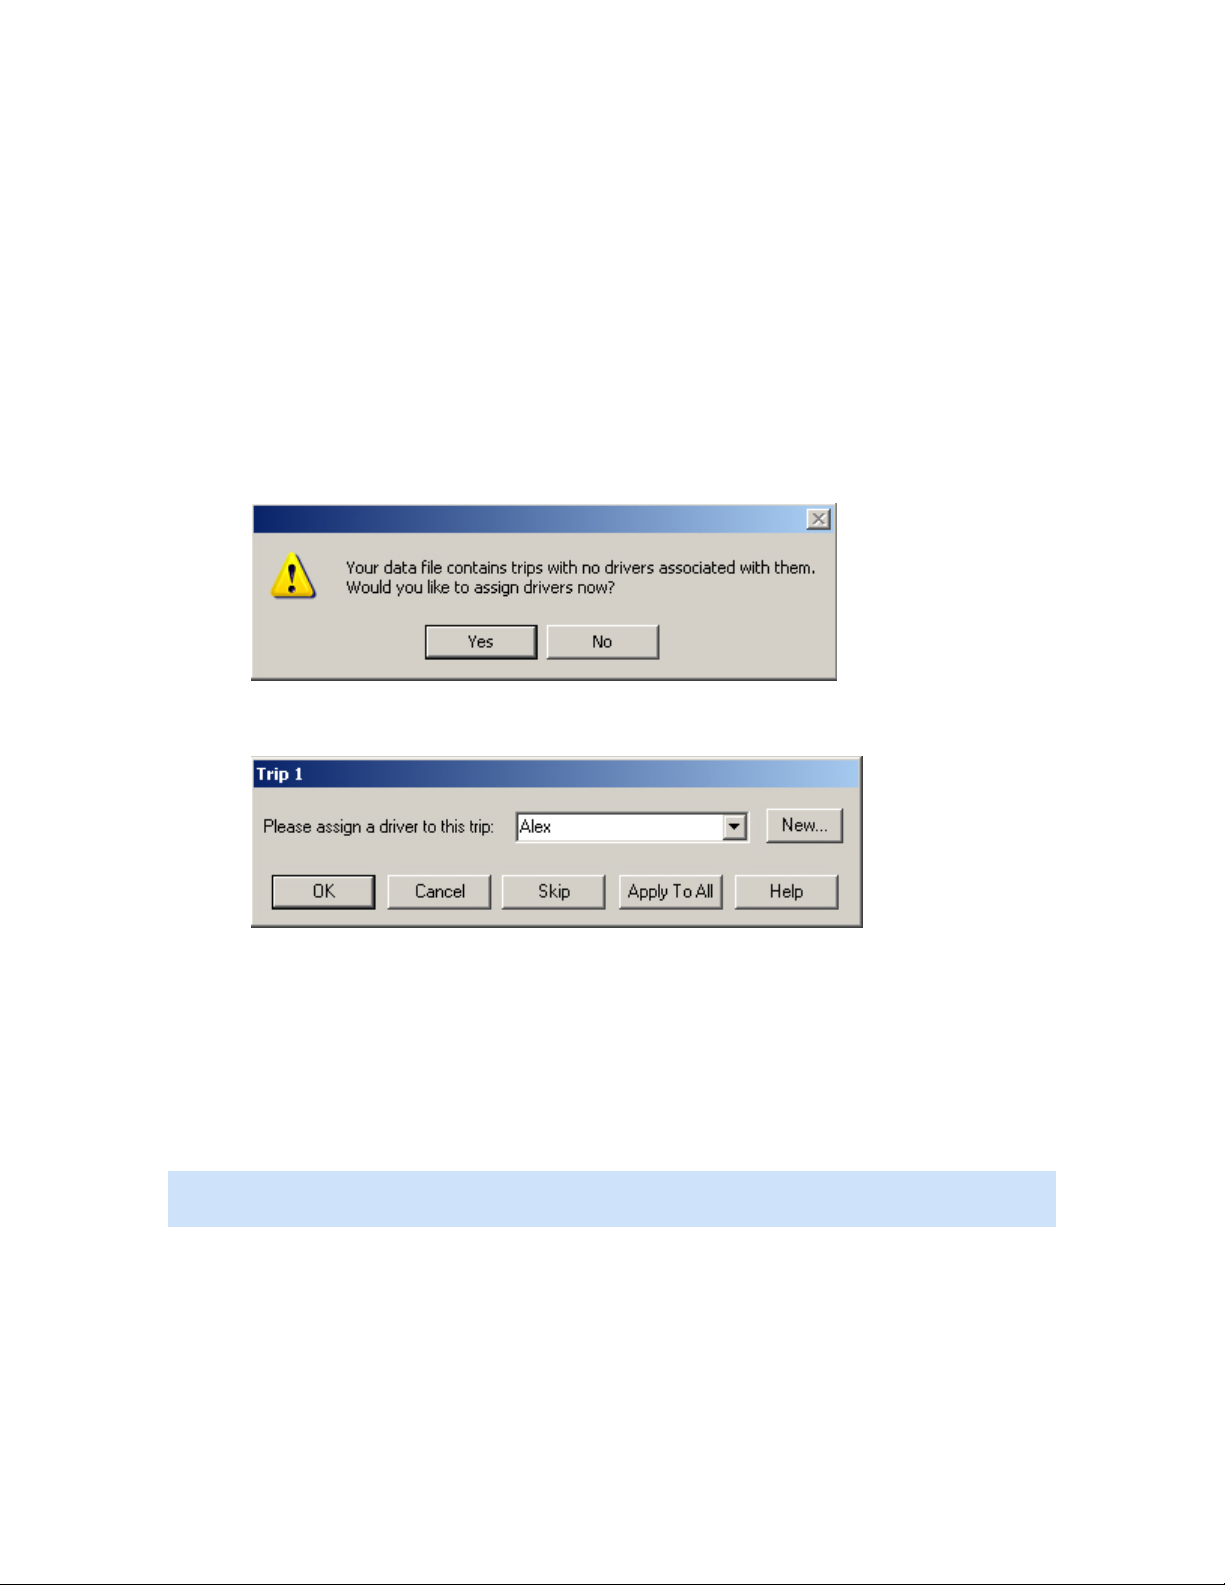
Assign Drivers
The Assign Drivers dialog box displays if a CarChip file from a previous version of the CarChip software
(CarChip 1.3 or earlier) has been added. This dialog prompts you to assign drivers associated with every
trip that was recorded. The Assign Drivers dialog box displays for every trip present in th e CarChip file.
From this dialog box, select the drivers associated with every trip.
To Assign Drivers:
1. Open a .car file from an earlier version of the CarChip Software.
The Assign Drivers Now? dialog box displays.
2. Click Yes to assign drivers to trip information.
The Assign Drivers dialog box displays.
3. Select a driver name from the Driver drop down box, or click New to assign a new driver to the trip
or trips.
4. Click OK to associate the driver to the displayed trip. Click Skip to skip assigning a driver to the
displayed trip. Click Apply to All to associat e the selected driver to all the trips.
View Menu Commands
The View menu commands allow you to view Trip Log, Activity Log, Accident Log, Vehicle Trouble Log and
Summary Log information.
Note: The Accident and Summary Log menu commands are only available for CarChip data logger model
E/X or higher.
Use the following topics to learn more about each lo g view:
CarChip Home Page
Trip Log
Activity Log
Accident Log
Trouble Log
Summary Log
9
Page 14
CarChip Online Help Printable Version
Exporting Data
You can export logged data from the Trip, Activity, Accident, and Tro uble Log views using the menu that
displays when you right-click on a log report. There are several options and formats available for
exporting data. The available options are:
• Information displayed in any of the Log Views can be exported by either saving to a file or copying
to the clipboard. Copying to a clipboard allows you to paste the information directly into other
applications.
• Trip, Activity, Accident, and Trouble summary, report, and table views can be exported as ei ther a
text file or a data file.
• Plot views can be exported as a metafile (vector graphic format), bit-mapped graphics file, or as
data.
Data files are tab delimited text files that can be imported into a spreadsheet.
File Menu Commands
With the options in the File menu you can save your uploaded CarChip data, open previously saved data,
and print your data.
• New - Closes existing CarChip data and the corresponding file so that new CarChip data can be
downloaded and displayed.
• Open - Opens an existing CarChip data file.
• Save - Saves the CarChip data currently displayed in the software. The data is saved in specially
formatted CarChip file called a .car file.
• Save As - Lets you specify a new file name when you save CarChip data.
• Properties - Displays information about the data file currently loaded in the CarChip software. This
command is only available when you are viewing data loaded from a file or that has been
downloaded from the CarChip data logger and saved.
• Print Setup - Allows you to select a printer and configure printer options.
• Print Preview - Shows how the current log or data display would look like in a printed document.
• Print - Prints the currently displayed window.
• Exit - Closes the CarChip software.
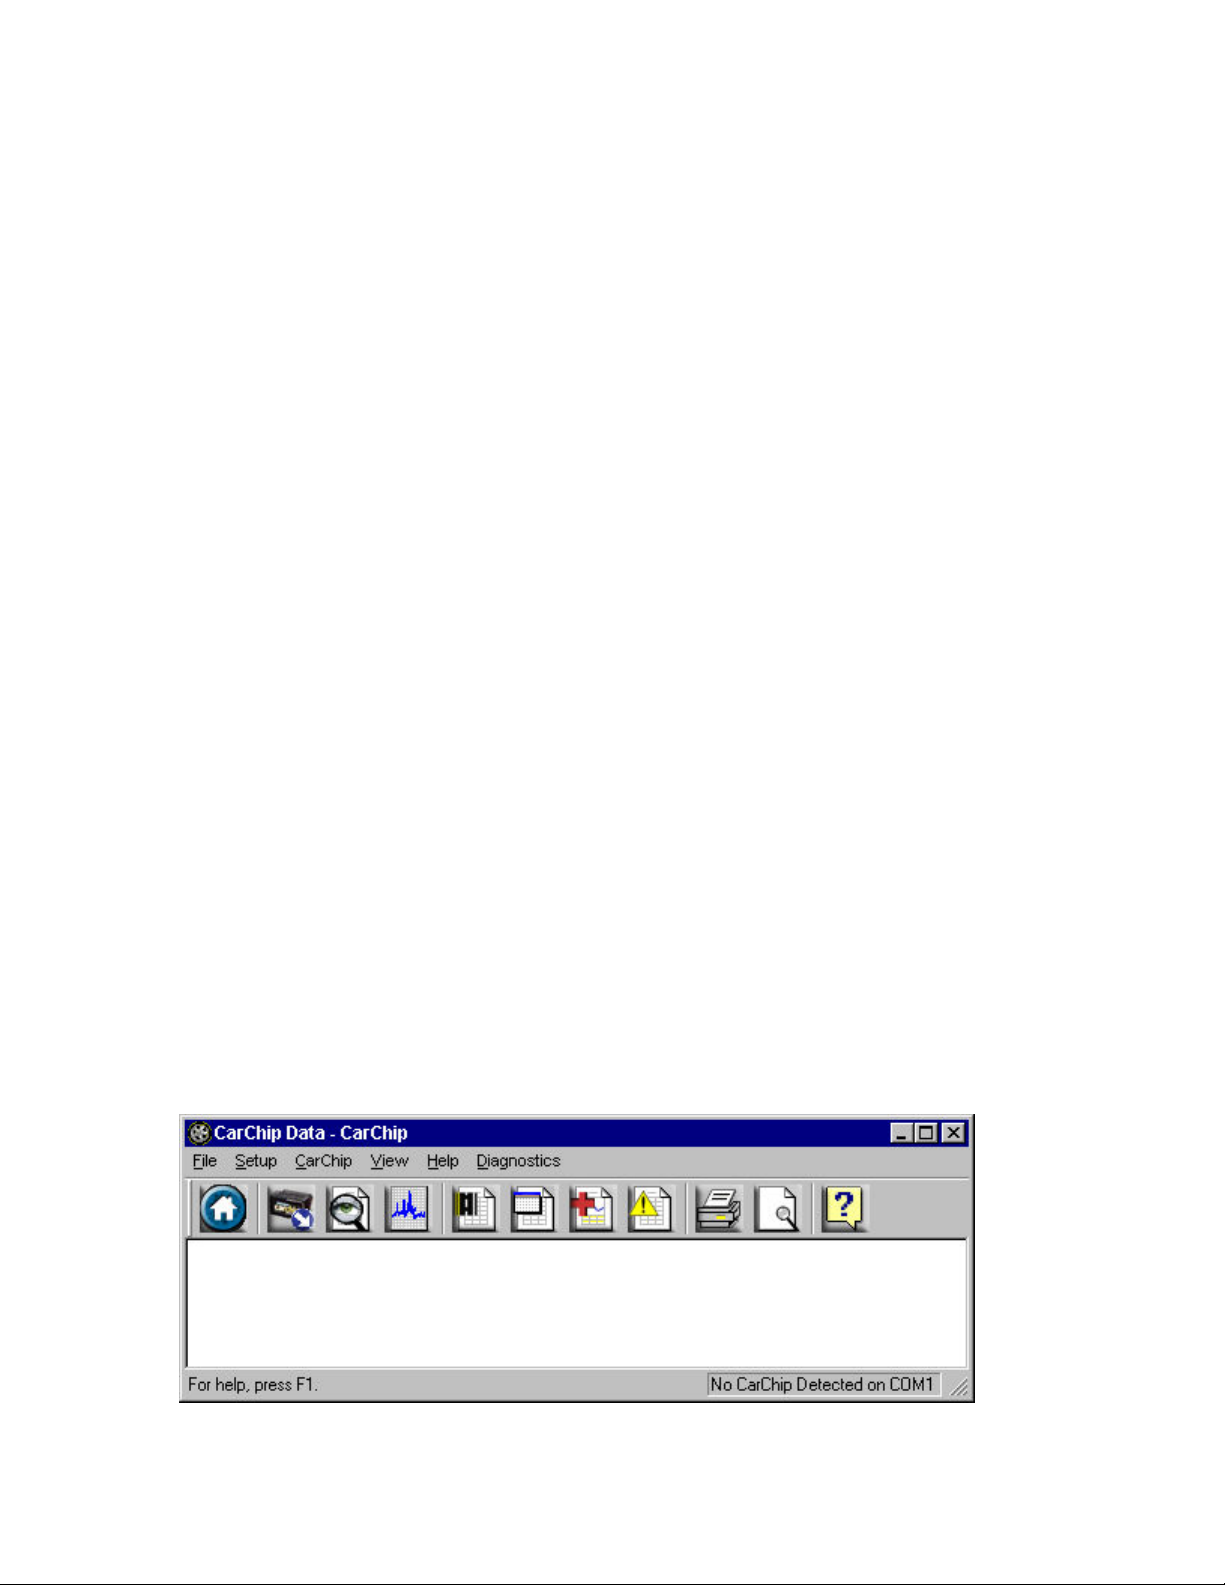
Tool Bar
The Tool Bar provides a quick way to access CarChip software commands.
10
Page 15
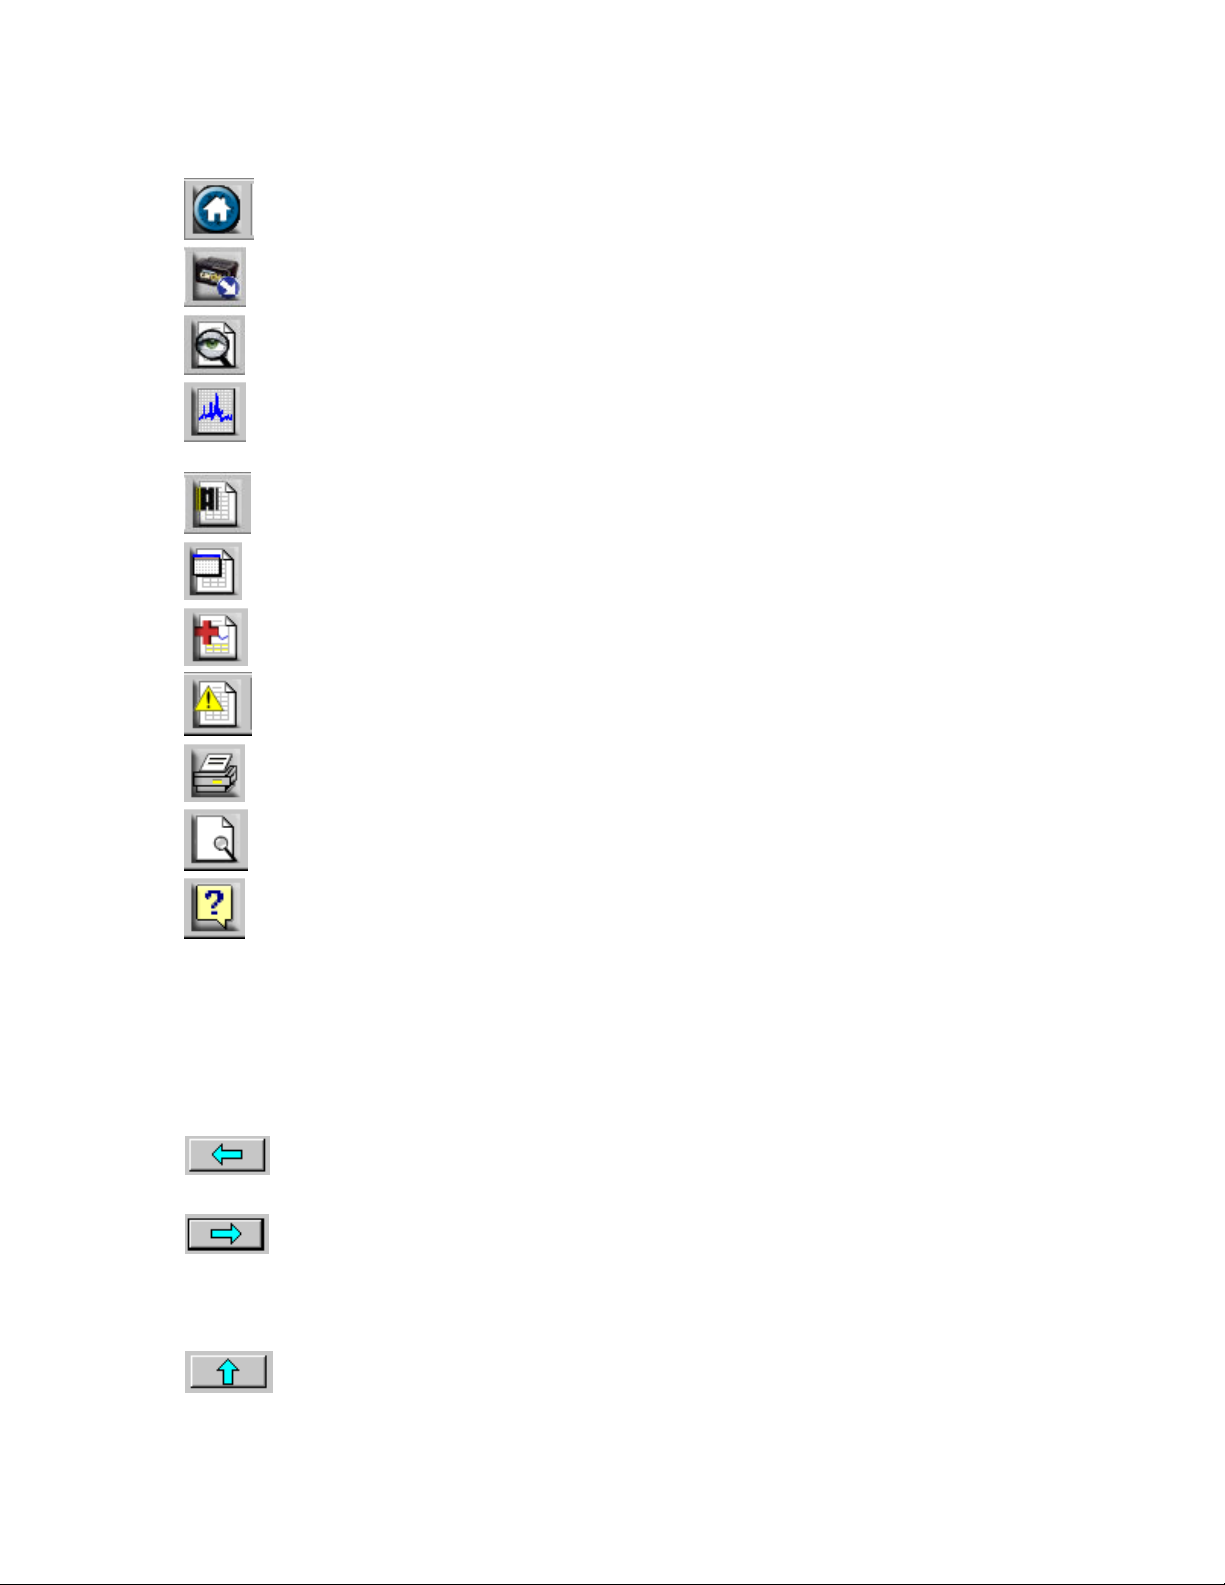
Toolbar Icons
Home - Displays the CarChip Home Page, containing vehicle and driver summary information.
Download - Downloads data from the CarChip data logger.
Trip Log Report View - Selects the last Trip Log Report View.
Trip Log Plot View - Se lects the last Trip Log Plot View.
Trip Logs - Displays the Trip Log Summary page.
Activity Logs - Displays the Activity Log Summary page.
Accident Logs - Displays the Accident Log Summary page.
Welcome to CarChip
Trouble Logs - Displays the Trouble Log Summary page.
Print - Prints the current open displayed page.
Print Preview - Previews the current open page.
Help - Opens the CarChip Help file.
Navigation Buttons
Trip Log Navigation Buttons
Use the left and right arrow navigation buttons to select records in the Trip Log View:
Use the up and down arrow navigation buttons to select plots in the Trip Log Plot View:
Back - Click the left arrow button to display the previous trip record.
Forward - Click the right arrow button to display t he next trip record.
Up - Click the up arrow button scroll up to the next plot.
11
Page 16

CarChip Online Help Printable Version
Accident Log Navigation Buttons
Use the left and right arrow navigation buttons to select records in the Accident Log View:
Down - Click the down arrow button to scroll down to the next plot.
Back - Click the left arrow button to display the previous accident record.
Forward - Click the right arrow button to display the next accid ent record.
Shortcuts & Navigation Aids
The following keyboard shortcuts and navigational aids can help you move quickly through the logged data
views. These shortcuts work when viewing any log record. Use these shortcut keys to:
Down cursor key - Move to next report.
Up cursor key - Move to the previous report.
These apply to the buttons labeled "Report, Plot, and Table" when viewing individual reports in the trip
and accident log. Use these shortcut keys to:
Left cursor key - Select button to the left of current selection.
Right cursor key - Select button to the right of the current selection.
These apply to any log view that will not completely fit on one screen. Use these shortcut keys to:
Page up key - scrolls up the screen .
Page down key - scrolls down the screen.
The following buttons are navigation aids that are only available in Trip Log View and Accident Log View
Plots. Use these buttons to:
Back - Display the previous trip or accident record.
Forward - This command displays the next trip or accident record
The following buttons are navigation aids that are only available in Trip Log View Plots. Use these buttons
to:
Up - Scrolls up to the next plot.
Down - Scrolls down to the next plot.
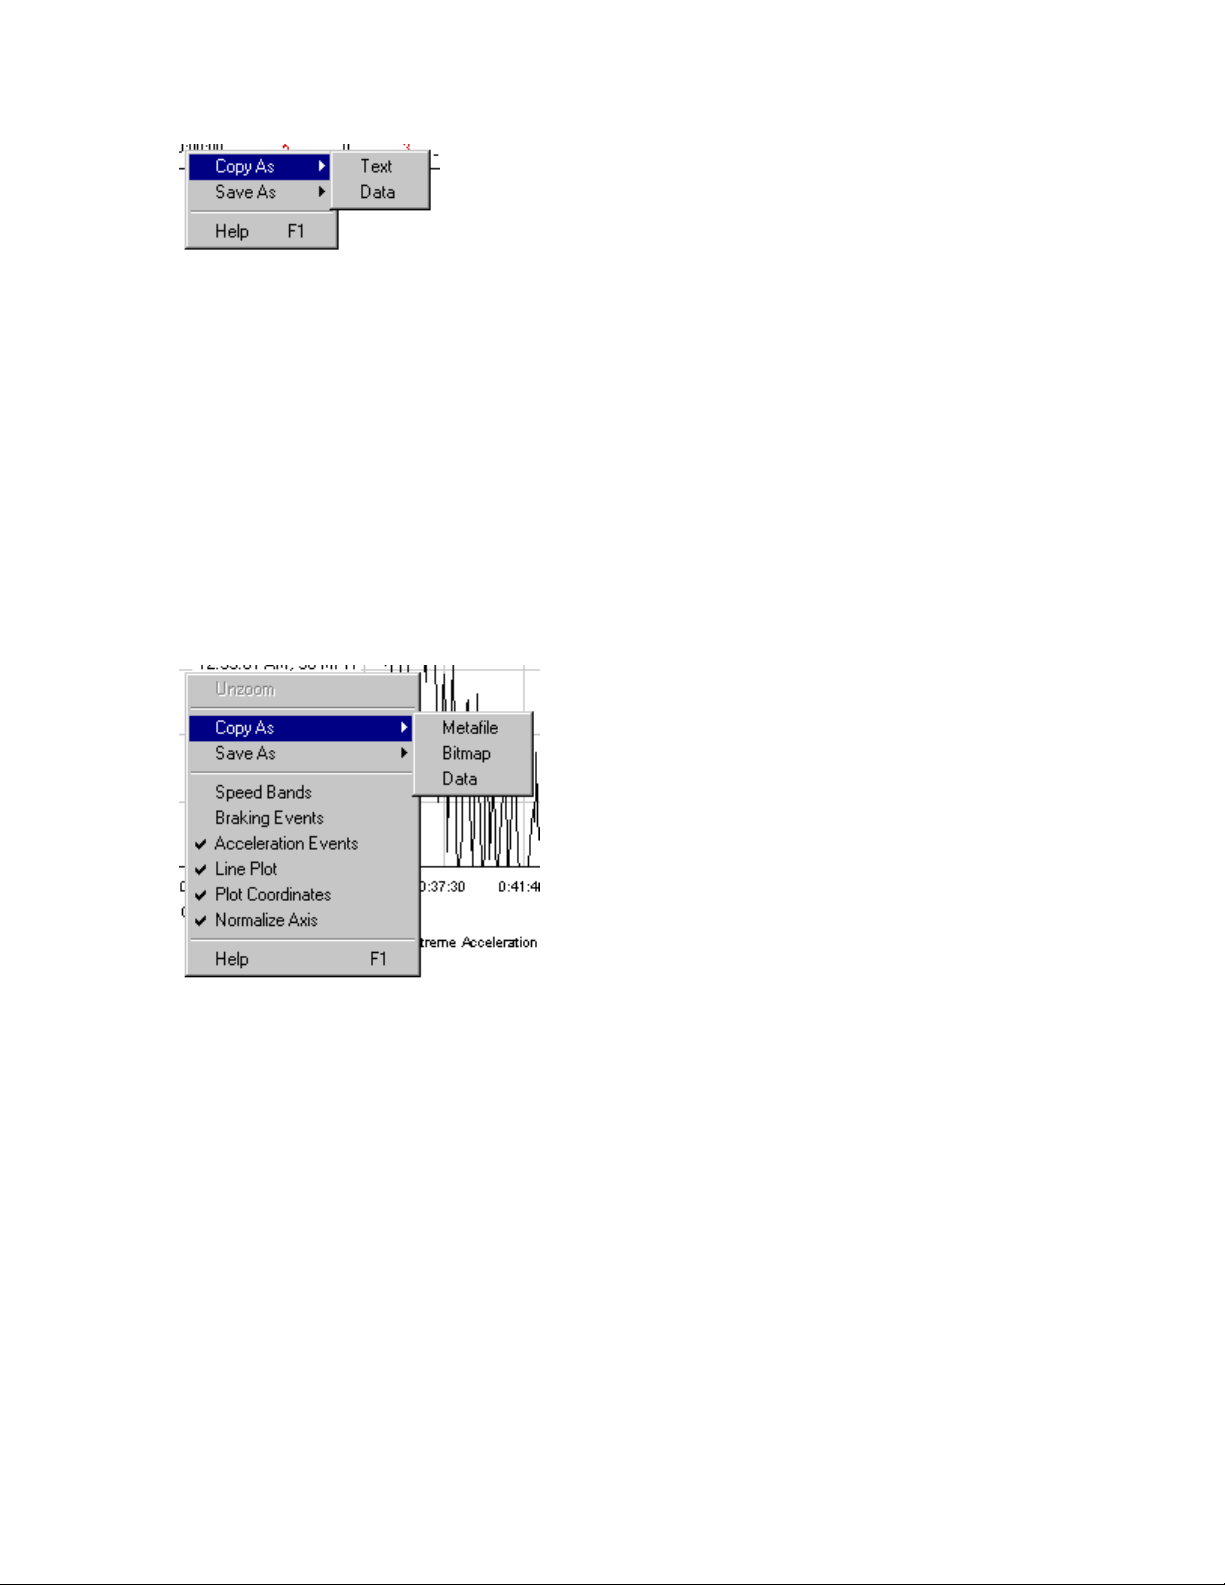
Right Click Copy As
The Copy As command available in the Right-Click menu for the Summary, Record, and Table Views
offers two file formats for copying the displayed information: text and data.
12
Page 17
Welcome to CarChip
• Copy As > Text - Pastes the displayed information as text in another application.
• Copy As > Data - Paste the displayed information as tab delimited text in a spreadsheet program.
Copy Plot As
The Copy As command in the Plot View right-click menu offers three options for copying the displayed
information: metafile, bitmap, and data. The Copied information can then be pasted directly into another
application.
• Use the Copy As > Metafile option if you want to paste the plot into another application as a vector
graphics file.
• Use the Copy As > Bitmap option if you want to paste the plot into another application as bitmapped
paint file.
• Use the Copy As > Data option if you want to paste the plot data as tab delimited text into a
spreadsheet program.
Right Click Menu Options
The following Right-Click menu options are available when viewing log summaries, individual records,
and table views:
Copy As
Save As
Help F1
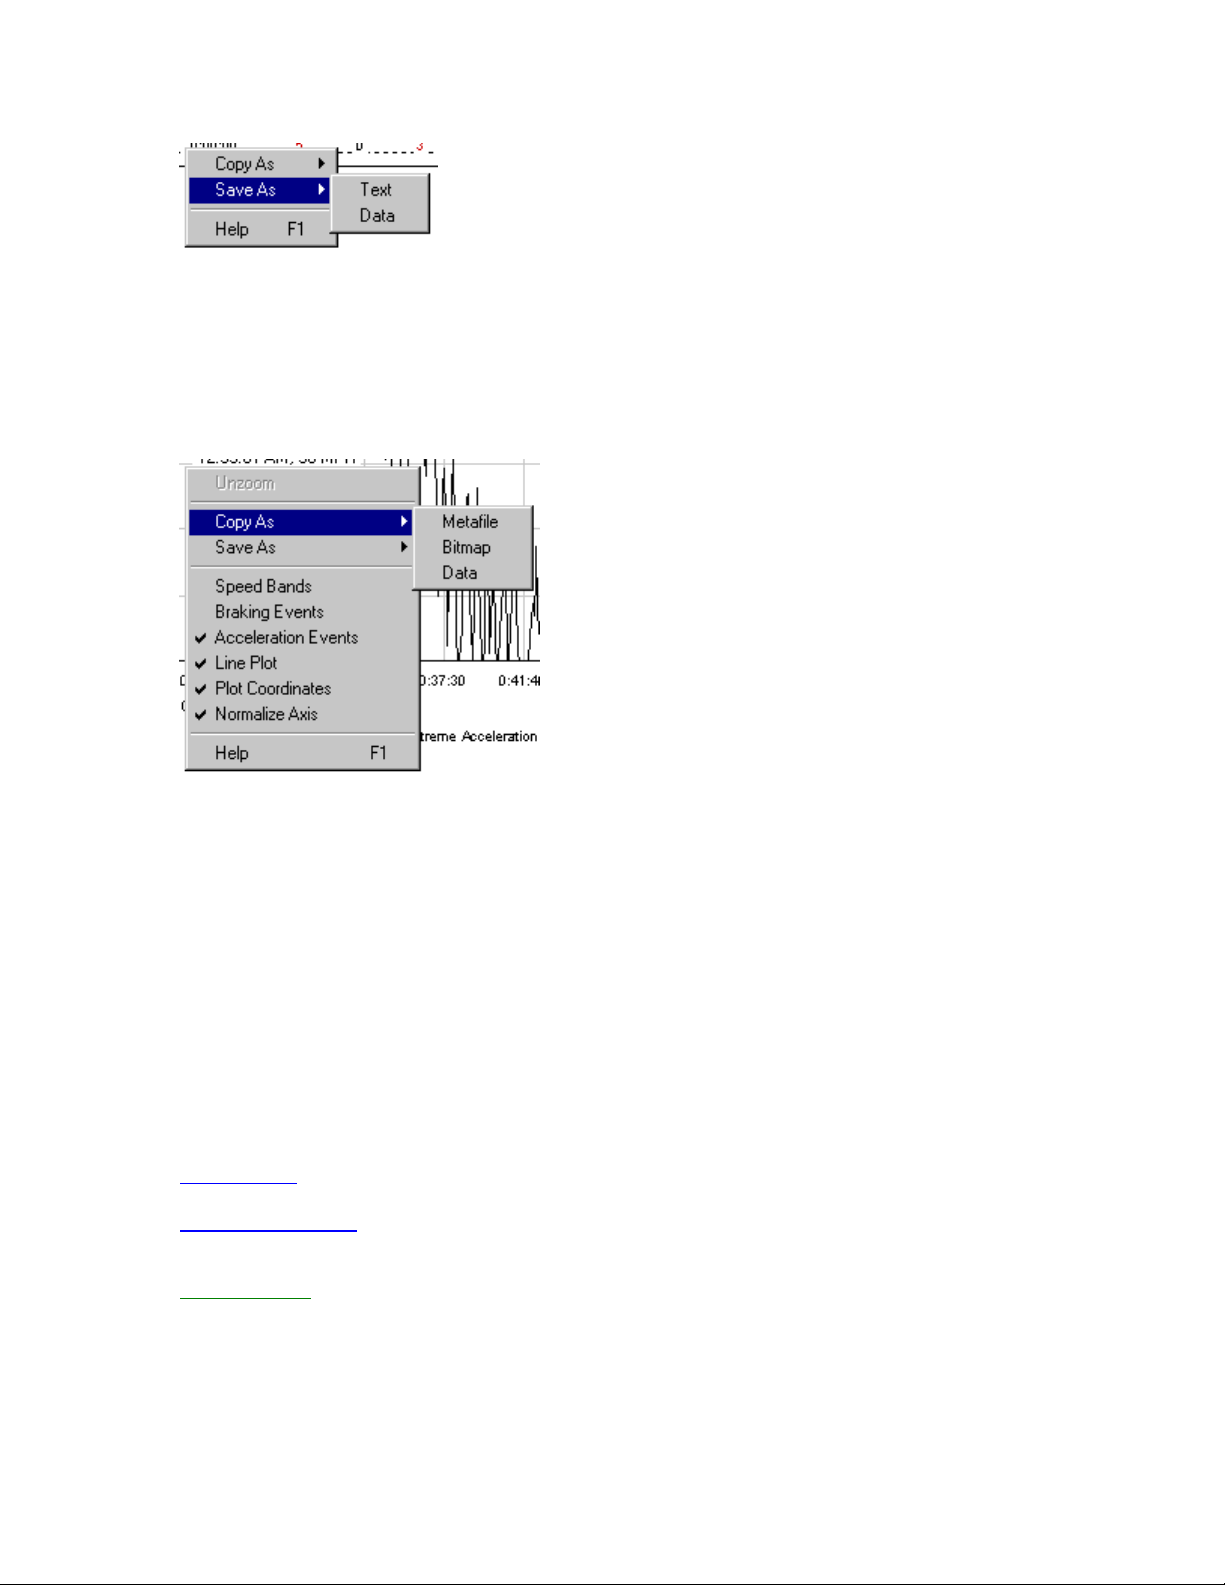
Right Click Save As
The Save As command available in the Right-Click menu for the Summary, Record, and Table Views
offers two file formats for saving the displayed information: text and data.
13
Page 18
CarChip Online Help Printable Version
• Save As > Text - Pastes the displayed information as text in another application.
• Save As > Data - Paste the displayed information as tab delimited text in a spreadsheet program.
Save Plot As
The Save As command available in the Right-Click menu for the Plot View offers three file format
options for saving the displayed information: Metafile, Bitmap and Data.
• Save As > Metafile - Saves the plot as a vector graphics ".emf" file.
• Save As > Bitmap - Saves the plot as b itmapped paint ".bmp" file.
• Save As > Data - Saves the plot data as a tab delimited text ".txt" file for use in a spreadsheet
program.
Using CarChip Help
Here is some information on getting started and using CarChip Help:
Context-Sensitive Help
• Tool Bar Help Button - Opens the help topic for the active CarChip window.
• Dialog Box Help Button - Opens the help topic for that dialog box.
• F1 Key - Opens the help topic for the active dialog box or the active CarChip window.
CarChip Hyperlink Conventions
Blue Underline
topic in the window.
Bold blue Underline
topic, web page, or documents in the program directory. Open this link in a new window that uses your
default web browser.
Green Underline
current help topic window.
Using Windows HTML Help
If you have Internet Explorer installed on your computer, CarChip Help opens in the Microsoft HTML Help
viewer. If you don't have Internet Explorer, it opens your default browser.
: indicates link to CarChip help topic. When selected, the new topic replaces the previous
: indicates link outside of CarC hip Help to information such as an external help
: indicates drop-down text or illustrations that display below the drop-down link in the
To learn more information about using the Microsoft HTML Help Viewer, click the following links.
14
Page 19
Resizing the HTML Help viewer
To: Do this
Welcome to CarChip
To minimize the window Click Minimize to shrink the viewer so it is displayed in the button bar on
To maximize the window Click Maximize to maximize the window so it occupies the entire desktop
To restore the viewer to
its default size
To manually resize the
viewer
Opening and closing the left-hand panes
the bottom of the Windows Desktop . Right-click this button and select
Restore to display the viewer.
area.
Click Restore to restore the viewer to it's default size.
Place the pointer over the edge of the viewer so it turns into a line with
arrows on each end . Press the left mouse button and drag up, down, left
or right. The viewer is resized after you release the mouse button.
To: Do this
Close the left-hand tabs from view Click Hide
Open the left-hand tabs Click Show
Using the navigation buttons
To: Do this
Display the previous
topic going
backwards in your
topic selection
sequence.
Click Back
Display the next
topic going forward
in your topic
selection sequence.
Using the Options menu
The Options button opens a menu with selections for hiding the left-hand tabs, going back and forward,
stopping a topic or Web page from loading, refreshing the information displayed in the window, printing,
and turning search highlighting on or off. You can also access Internet options from this menu.
Click
Forward
Menu Commands
Click on a topic below to view help for a particular menu:
File Menu
Setup Menu
CarChip Menu
View Menu
Help Menu
15
Page 20

CarChip Online Help Printable Version
File Menu Commands
With the options in the File menu you can save your uploaded CarChip data, open previously saved data,
and print your data.
• New - Closes existing CarChip data and the corresponding file so that new CarChip data can be
downloaded and displayed.
• Open - Opens an existing CarChip data file.
• Save - Saves the CarChip data currently displayed in the software. The data is saved in specially
formatted CarChip file called a .car file.
• Save As - Lets you specify a new file name when you save CarChip data.
• Properties - Displays information about the data file currently loaded in the CarChip software. This
command is only available when you are viewing data loaded from a file or that has been
downloaded from the CarChip data logger and saved.
• Print Setup - Allows you to select a printer and configure printer options.
• Print Preview - Shows how the current log or data display would look like in a printed document.
• Print - Prints the currently displayed window.
• Exit - Closes the CarChip software.
Setup Menu Commands
The Setup menu commands configure various aspects of the CarChip software, including how the data is
displayed and the connection between CarChip data logger and the CarChip software. The Setup menu
commands are:
Walkthrough Setup - Displays all the setup dialog boxes needed to configure your CarChip software and
CarChip data logger connection.
Communication Port - Lets you manually select the serial or USB port connection the CarChip data
logger uses to send information to your computer.
Plots - Contains options for displaying plots and graphs.
Units - Lets you select the unit systems used to display data measurements. You can also create your
own customized unit system.
Parameter Thresholds - Lets you create thresho lds for certain parameters of your vehicle's performance
that the CarChip data logger monitors.
Note: This command is only available for CarChip E/X models or higher.
Fuel Entry - Lets you enter fuel usage for each vehicle associated with the CarChip software.
Driver ID - Displays all of th e drivers connected with the CarChip data logger.
Vehicle ID - Displays all of the vehicles associated with the CarChip data logger.
CarChip ID - Displays information about the CarChips that have been connected with the CarChip
software.
Miscellaneous - Lets you configure the options for clearing the CarChip data logger's memory.
Import Log File - Lets you select an existing file you want to import into the CarChip software.
Walkthrough Setup
The CarChip software includes a CarChip walkthrough that steps you through the process of configuring
your CarChip data logger and CarChip software configurations. After installing the CarChip software on
your computer and opening the program, the Walkthrough dialog box automat ically displays. By clicking
OK, the walkthrough process begins. You can set up and configure your CarChip data logger and software
by separately selecting all of the necessary setup options from the Setup menu. A Walkthrough command
is included in the Setup menu so that you can access the walkthrough at any time.
16
Page 21

Welcome to CarChip
Note: The CarChip data logger does not have to be connected to your computer to use the Walkthrough
Setup command. When the CarChip data logger is connected, more Setup menu commands display
during the walkthrough process.
By selecting the walkthrough process, the software displays a series of dialog boxes listed below. At each
step in the walkthrough process, confirmation boxes are provided to perform or skip the next step in the
walkthrough. To continue, click OK. To skip a step and move to the next step, click Skip. To cancel the
entire walkthrough process, click Cancel.
Walkthrough Sequence
The dialog boxes included in the Walkthrough for your CarChip vary depending on the CarChip data logger
model you have and if your CarChip is connected to your computer.
CarChip/Choose Other Parameters - Set vehicle data parameters that the CarChip records. You can
select up to four different parameters in addition to vehicle speed to record.
Note: This dialog box displays only for CarChip models E/X or higher.
Parameter Thresholds - Set thresholds for parameters monitored in the Summary Log view.
Note: This dialog box displays only for CarChip models E/X or higher.
Communication Port Settings - Select the COM port that your data logger is connected to.
Note: The Serial Port Setting s dialog box does not display in the Walkthrough if a CarChip data logger
has been automatically detected.
Plots - Select the options for displaying plots and graphs.
Select Units - Select the unit s of measure that the data and information are displayed in.
Driver ID - Add, delete, or e dit the list of drivers using the CarChip data logger.
Vehicle ID – Add, delete, or edit the list of vehicles using the CarChip data logger.
CarChip ID - Edit the CarChip data logger names.
Anomalous Vehicles - Specify the vehicle using the CarChip data logger. Some vehicles have special
OBDII communication properties. By selecting a vehicle name from the list, you are configuring the
CarChip data logger to adjust to that vehicle's unique communication features.
Miscellaneous - Select an option for clearing your CarChip's memory.
Anomalous Vehicles
The Anomalous Vehicles dialog box lets you configure your CarChip data logger to meet any unique
specifications present on the ODBII po rt of your vehicle. This dialog box displays as part of the
Walkthrough Setup. This dialog box also displays if a vehicle from the Anomalous Vehicle list has been
detected by the CarChip data logger once the CarChip is connected to the software.
To select your vehicle:
1. Click OK on the Special OBDII Communication Properties dialog box from the Walkthrough
Setup. The Anomalous Vehicle dialog box displays.
2. Click the radio button next to the Anomalous Vehicle list if your vehicle is present in the list and
select the vehicle name, or click Miscellaneous/Other if your vehicle is not present on the list.
3. Click OK to save the anomalous vehicle information, or click Cancel to exit the dialog box
without saving the information.
Communications Port
The Communications Port dialog box lets you manually sele ct the port connection that is used to
communicate with your CarChip data logger. This command can be accessed from the Walkthrough Setup
or the Setup menu.
Note: If your CarChip data logger has been connected to a serial port or USB port and has been detected
by the CarChip Software, this dialog box does not display in the walkthrough process.
17
Page 22

CarChip Online Help Printable Version
To select the communications port connection manually:
1. Select Communications Port from the Setup menu. The Setup / Communications Port dialog box
displays.
2. Select one of the listed ports or enter the name of the desired port.
Select USB if the CarChip is connected to a USB port. Select one of the available COM ports if the
CarChip is connected to a Serial or COM port, or type in the name of the COM port if it is not on the
available list.
3. Click OK to save the new port selection, or click Cancel to exit th e dialog box and retain the
previous port selection.
Plots
Use the Plots dialog box to configure your Trip View and Accident View plot options.
To configure the plot display options:
1. Select Plots from the Setup menu, select this option during the Walkthrough Setup process, or click
the Options button when a Trip Log view or Accident Log view is displayed. The Setup / Plots
dialog box displays.
2. Check the box next to each plot option to turn it on. A checked box indicates the option is turned
on. De-select a box to turn a plot option off. Multiple options can be turned on or off at a time. The
plot options are:
• Draw Speed Bands - Displays your selected speed band settings in the plot.
• Draw Braking Events - Marks braking events that exceed your preset braking thresholds.
• Draw Acceleration Events - Displays acceleration events that exceed your preset acceleration
thresholds.
18
Page 23

Welcome to CarChip
• Draw Plots usin g Lines Rather than Areas - Displays a line graph of the measured data. Turning
this option off turns the area under the measured data black in the plot.
• Draw Plot Coordinates Only When Ctrl Key is Pressed - Display the cursor's plot coordinates
only when the Control key is pressed. The plot coordinates are the elapsed time of the trip and the
data value associated with that time. If not check ed, the cursor's coordinates on the plot are
displayed continuously when the cursor is within the plot area.
• Normalize vertical axes to ___ MPH / KPH - Set the upper limit of the vehicle speed plot to the
speed of your choice. You can change the speed used to normalize the a xes by highlighting the
current speed setting with your cursor and then entering the new speed. If not checked, the upper
limit of the vertical axes will be the maximum speed achieved by the vehicle during the current trip.
3. Click OK to save the new plot options. Click Cancel to exit the dialog box and retain the previous
plot options.
Draw Acceleration Events
The Draw Acceleration Events check box in the Setup / Plots dialog box displays any hard and
extreme acceleration events in the Trip Log Plot view
accelerations are set in the Set Acceleration Thresholds
If the Draw Acceleration Events box is selected from the Setup / Plots dialog box, the acceleration
events are represented by blue vertical lines. A hard acceleration event is a dotted blue vertical line. An
extreme acceleration event is a solid blue vertical line.
To display acceleration events in the plots:
1. Select Plots from the Setup menu. The Setup / Plots
when selected. The thresholds for hard and extreme
dialog box.
dialog box displays.
2. Click the Draw Acceleration Events check box to toggle the function on and off. A check indicates
that the Draw Acceleration Events function has been enabled.
3. Click OK to save the new plot setup. Click Cancel to exit the dialog box and reta in the previous plot
setup. Click Apply to make the change without exiting the dialog box.
Draw Braking Events
The Draw Braking Events check box in the Setup / Plots dialog box displays any hard and extreme
braking events in the Trip Log Plot view when selected. The thresholds for hard and extreme braking are
set in the Set Braking Thresholds dialog box.
If the Draw Braking Events box is selected from the Setup / Plots dialog box, the braking ev ents are
represented by red vertical lines. A hard braking event is a dotted red vertical line. An extreme braking
event is a solid red vertical line.
To display acceleration events in the plots:
1. Select Plots from the Setup menu. The Setup / Plots dialog box displays.
19
Page 24

CarChip Online Help Printable Version
2. Click the Draw Braking Events check box to toggle the function on and off. A check indicates that
the Draw Braking Events function has been enabled .
3. Click OK to save the new plot setup. Click Cancel to exit the dialog box and reta in the previous plot
setup. Click Apply to make the change without exiting the dialog box.
Draw Plots As Lines
The Draw Plots As Lines check box in the Setup / Plots dialog box displays the trip and plot
information in lines in the Trip Log Plot view when selected.
If the Draw Plots As Lines box is selected from the Setup / Plots dialog box, the plot information is
displayed as a black line. If the Draw Plots As Lines box is toggled off, the area under the plot line is
filled black.
To display lines in the plots:
1. Select Plots from the Setup menu. The Setup / Plots dialog box displays.
2. Click the Draw Plots Using Lines Rather Than Areas check box to toggle the function on and off.
A check indicates that the Draw Plots Using Lines function has been enabled.
3. Click OK to save the new plot setup. Click Cancel to exit the dialog box and reta in the previous plot
setup. Click Apply to make the change without exiting the dialog box.
Draw Speed Bands
The Draw Speed Bands check box in the Setup / Plots dialog box displays the speed limitations set in
Set Speed Bands dialog box in the plots displayed in the Trip Log Plot view.
By selecting this option in the Setup/Plots dialog box, the speed bands are drawn in the plot. These
speed bands are represented in the plot by horizontal dotted lines. The two intermediate speed bands are
black dotted lines. The maximum speed band is a red dotted line.
To display speed bands in the plots:
1. Select Plots from the Setup menu. The Setup / Plots dialog box displays.
20
Page 25

Welcome to CarChip
2. Click on the Draw Speed Bands check box to toggle the function on and off. A check indicates that
the Draw Speed Bands function has been enabled.
3. Click OK to save the new plot setup. Click Cancel to exit the dialog box and reta in the previous plot
setup. Click Apply to make the change without exiting the dialog box.
Units of Measure
You can select the units of measure used by CarChip software to display the CarChip data . You can even
create custom unit systems.
Three Unit Systems are included with the CarChip software:
• U.S. - Displays measurements and units based on the U.S. measurement system.
• Metric - Displays measurements a n d units based on the metric system.
• S.I. - Displays measurements based on the International System of Units.
To select a measurement system:
1. Select Units from the Setup menu.
The Setup / Units
dialog box displays.
2. Select the desired unit system from the Unit System drop-down box.
The new unit system selection displays. To see the unit used for every unit type in the selected
system, click a unit type name from th e Unit Type drop-down box. The unit of measure for the
selected unit type displays in the Unit dialog box.
3. Click OK when you are satisfied with the unit system selection.
To create a custom measurement system:
You can define a custom unit system for CarChip if you have specialized units-of-measure requirements.
1. Select Units from the Setup menu. The Setup / Units dialog box displays.
2. Click New on the Setup / Units dialog box. The New Unit System dialog box displays.
21
Page 26

CarChip Online Help Printable Version
3. Type the name of the new unit system in the Name box.
4. Select the unit system the new customized measurement system uses as a template from the
5. Click OK to add the new unit system, or click Cancel to exit the dialog box without making any
6. Select a unit type whose value you want to change from the Unit Type drop down box. The
7. Select the unit you want and click OK to save and display your unit changes. Click Cancel to exit
To rename a custom unit system:
Based On drop down box.
changes. The Setup / Units dialog box displays with the customized unit system.
available units for the unit type display in Unit drop down box.
the Units dialog box without saving your changes.
1. Select Units from the Setup menu. The Setup / Units dialog box displays.
2. Select the custom unit system that you want to rename.
3. Click Rename on the Setup / Units dialog box. The Rename Unit System dialog box displays.
4. Type the new name for the custom unit system in the Name box.
5. Click OK to rename the custom unit system, or click Cancel to exit the dialog box without making
any changes. The Setup / Units dialog box displays with the new custom unit name.
To delete a custom unit system:
You can delete any custom unit system you have defined for CarChip. The standard unit systems cannot
be deleted.
1. Select Units from the Setup menu. The Setup / Units dialog box displays.
2. Use the drop-down list to select the custom unit system you want to delete.
3. Click Delete on the Setup / Units dialog box. The Delete Unit System dialog box displays.
4. Click Yes to delete the selected unit system, or click No to cancel the command.
Parameter Thresholds
Use the Parameter Thresholds dialog box to set monitors on your vehicle's activities.
Note: This dialog box in the Setup Menu is for advanced CarChip data logger models, E/X for higher. The
dialog box can be accessed from the Setup menu for basic CarChip models, but any parameter changes
made are not recorded by the basic CarChip model.
22
Page 27

Welcome to CarChip
The Parameter Thresholds dialog box allows you to set thresholds for multiple areas of your vehicle.
The information that is downloaded from the data logger based on these selected thresholds displays in
the Summary Log view in the View menu.
To set parameter thresholds:
1. Select Parameter Thresholds from the Setup Menu. The Parameter Thresholds dialog box
displays.
2. Set the maximum threshold for each parameter.
The maximum threshold is the value that a vehicl e can safely work under for each parameter. The
thresholds should be set based on your vehicle's specifications. Consult your vehicle's owner's
manual for safe limitations of these parameters. See Vehicle Data Parameters for the list of data
parameters to can monitor.
3. Click OK to save your parameter threshold changes, click Cancel to exit the dialog box without
saving your changes or click Default to display the default parameter threshold values.
Fuel Entry
The Fuel Entry dialog box lets you enter information about fuel entry and costs for every vehicle you have
added to the CarChip software. Every fuel entry is used to calculate the price you pay per mile for fuel and
is displayed in the CarChip Home Page and Vehicle Summary View.
To add a fuel entry:
1. Select Fuel Entry from the Setup menu. The Fuel Entry dialog box displays.
23
Page 28

CarChip Online Help Printable Version
2. Select the vehicle from the Vehicle box.
3. Select the date the fuel was purchased from the Date box.
4. Enter the amount of fuel purchased in gallons in the Amount box.
5. Enter the price paid for the fuel purchase in the Bill box.
6. Click OK to close the Fuel Entry dialog box without saving the fuel entry information, or click Add
Entry to add the fuel entry.
Note: The fuel entry information is based on the U.S. system of measurement and on U.S. currency. The
measurement units displayed in this dialog box do not change when another measurement system is
selected from the Units dialog box.
Driver ID
The Driver ID dialog box lets you configure the drivers that have logged trips on the CarChip data logger.
You can add, delete, and edit Driver IDs. The Driver IDs are used to associate a driver with trip
information.
To view all the Driver IDs:
1. Select Driver ID from the Setup Menu.
The Driver ID dialog box displays with a list of the available Driver IDs.
2. Scroll the list of Driver IDs using the scroll bar.
To create a new driver, from the Driver ID dialog box:
1. Click Add.
The New Driver dialog box displays.
24
Page 29

Welcome to CarChip
2. Enter a unique driver name or ID in the ID box.
3. Enter a name in the Name box and click OK.
You do not have to enter a name in the name box. Click OK if you want the information displayed in
the ID box to display in the Name box. The new driver information displays in the Driver ID table.
4. Click OK to add the Driver ID, or click Cancel to ex it the Driver ID dialog box without saving
changes.
To delete an existing driver, from the Driver ID dialog box:
1. Select a driver name from the Driver ID table.
2. Click Delete. The selected driver ID is deleted from the list.
3. Click OK to delete the Driver ID, or click Cancel to exit the Driver ID dialog box without saving
changes.
To edit existing driver information, from the Driver ID dialog box:
1. Double-click the Name field for the driver name you want to change.
The selected driver name is highlighted.
2. Edit the driver name.
3. Click OK to accept the changes to the Driv er ID, or click Cancel to exit the Driver ID dialog box
without saving changes.
Note: You can not edit the ID field for the Driver IDs. If you would like to change the Driver ID of an
existing driver, delete the driver ID and add a new driver ID.
Vehicle ID
The Vehicle ID dialog box lets you configure the vehicles that the CarChip data logger has been
connected to. You can add, delete, and edit Vehicle IDs. The Vehicle IDs are used to associate a vehicle
with trip information.
To view all the Vehicle ID's:
1. Select Vehicle ID from the Setup Menu.
The Vehicle ID dialog box displays with a list of the available Vehicle IDs.
2. Scroll the list of Vehicle IDs using the scroll bar.
To create a new vehicle:
1. Click Add from the Vehicle ID dialog box.
The New Vehicle dialog box displays.
25
Page 30

CarChip Online Help Printable Version
2. Enter a unique vehicle name or the vehicle's VIN number in the VIN box.
3. Enter a unique vehicle name in the Name box and click OK.
You do not have to enter a name in the name box. Click OK if you want the information displayed in
the VIN box to display in the Name box. The new vehicle information displays in the Vehicle ID
table.
4. Click OK to add the Vehicle ID, or click Cancel to exit the Vehicle ID dialog box without saving
changes.
To delete an existing vehicle:
1. Select a vehicle name from the Vehicle ID table from the Vehicle ID dialog box.
2. Click Delete. The selected vehicle ID is deleted from the table.
3. Click OK to delete the Vehicle ID, or click Cancel to exit the Vehicle ID dialog box without saving
changes.
To edit existing vehicle information:
1. Double-click the Name field f rom the Vehicle ID dialog box,
The selected vehicle name is highlighted.
2. Edit the vehicle name.
3. Click OK to accept the changes to the vehic le ID, or click Cancel to exit the Vehicle ID dialog box
without saving changes.
Note: You can not edit the VIN field for the Vehicle ID's. If you would like to change the Vehicle ID of an
existing driver, delete the driver ID and add a new driver ID.
CarChip ID
The CarChip ID dialog box displays information about the CarChip data logger or loggers you are usin g,
including serial numbers, the CarChip data loggers with data that the CarChip software is currently using,
and the CarChip name. Use the CarChip ID dialog box to enter, edit, or delete a CarChip data logger
name.
To view all the CarChip IDs:
1. Select CarChip ID from the Setup Menu.
The Setup / CarChip ID dialog box displays with a list of the available CarChip IDs.
2. Scroll the list of CarChip IDs using the scroll bar.
To edit existing CarChip information:
26
Page 31

Welcome to CarChip
1. Double-click the Name field for a CarChip data logger from the CarChip ID dialog box.
The selected CarChip name is highlighted.
2. Edit the CarChip name.
3. Click OK to accept the changes to the Driv er ID, or click Cancel to exit the Driver ID dialog box
without saving changes.
Miscellaneous
The Miscellaneous dialog box lets you configure the memory clearing options for the C arChip data
logger.
To configure the CarChip memory clear options:
1. Select Miscellaneous from the Setup menu. The Setup / Miscellaneous dialog box displays.
2. Select one of the following options from the drop-down box:
• Always - The CarChip data logger memory is automatically cleared after each download.
• Never - The CarChip's memory is not cleared after every download and you will not be prompted if
you want to clear the memory. Use the Clear CarChip Memory command from the CarChip menu
to clear the memory manually.
• Ask - The software asks you after each download if you want to clear the CarChip data logger
memory.
3. Click OK to save the selected memory clearing option. Click Cancel to exit the dialog box and retain
the previous selection. Click Apply to make the change without exiting the Miscellaneous dialog
box.
Miscellaneous Command: Clear Memory Box
The Clear Memory box in the Miscellaneous dialog box contains memory clearing options for the CarChip
data logger.
To configure the CarChip memory clear options:
1. Select Miscellaneous from the Setup menu. The Setup / Miscellaneous dialog box displays.
2. Select one of the following options from the drop-down box:
• Always - The CarChip data logger memory is automatically cleared after each download .
• Never - The CarChip's memory is not cleared after every download. Use the Clear CarChip
Memory command from the CarChip menu to clear the memory manually.
• Ask - The software asks after each download if you want to clear the CarChip data logger
memory.
3. Click OK to save the selected memory clearing option. Click Cancel to exit the dialog box and retain
the previous selection. Click Apply to make the change without exiting the Miscellaneous dialog
box.
27
Page 32

CarChip Online Help Printable Version
Clear CarChip Memory?
The Question \ Clear Car Chip Memory dia log box displays after every download if, the Ask option is the
current memory clearing option selected from the Miscellaneous dialog box from the Setup menu.
To Clear the CarChip data logger's memory:
1. Click Yes.
To keep the current data on the CarChip data logger:
1. Click No.
To hide this dialog box in future downloads:
1. Click Don't Ask Again and your desired memory clearing option.
Note: This dialog box contains a Don't Ask Again check box. By Checking this option and clicking Yes,
the CarChip's memory is automatically cleared after every download. By clicking No, the CarChip's
memory is never cleared after download. To change your CarChip memory clearing options, see Clear
Memory.
Import Log File
When you download information from your CarChip data logger to your computer, a log.txt file is created
from the data. This file is over-written each time you download information from your CarChip data logger
and will always contain data from your last download.
To import the log file:
1. Select Import Log File from the Setup menu. The Open Logs dialog box displays.
2. Navigate to the folder containing a Log.txt file, select the file, then click Open. The log file is
imported into the software.
3. View the data or save it as a CarChip (.car) data file.
CarChip Menu Commands
The CarChip menu commands control operations affecting the CarChip data logger.
Note: The data logger must be connected to your computer to access any of these commands.
28
Page 33

Welcome to CarChip
The commands that display in this menu depend on the CarChip data logger model. The CarChip menu
commands are:
Download CarChip Data - Lets you download data from the CarChip data logger to your computer.
Display CarChip Memory - Displays t he available memory available on your CarChip data logger.
Clear CarChip Memory - Lets you clear the CarChip memory.
Enable CarChip LED - Controls the modes of operation for your CarChip LED.
Reset Check Engine Light - Configures your CarChip to turn off the Check Engine Light in your vehicle.
Note: This command is only available for CarChip E/X (product 8220, 8221) and CarChip E/X Alarm
(product 8225) models.
Enable CarChip Alarm - Controls the modes of operation for your CarChip Alarm.
Note: This command is only available for the CarChip E/X Alarm (product 8225) model.
Enable CarChip VIN Mode - Configures your CarChip to retrieve vehicle's unique VIN number when it is
connected to a car.
Note: This command is only available for newer CarChip models (products 8211, 8221 and 8225)
Set Speed Bands - Lets you set speed thresholds so you can monitor your speed.
Set Braking Thresholds - Lets you configure the deceleration rates that determine hard and extreme
breaking in your vehicle.
Set Acceleration Thresholds - Lets you configure the acceleration rates that determine hard and
extreme acceleration in your vehicle.
Set Clock - Lets you set the CarChip data logger's internal clock to your computer's clock.
Choose Other Parameters - Lets you configure parameters regarding your
Downloading CarChip Data
Once you have connected your CarChip data logger to your computer, you are ready to download data
from any of the CarChip models.
To download data:
1. Click the Download CarChip icon or select Download CarChip Data from the CarChip menu.
In some instances, the Warning Clock Setup dialog box displays. When data is downloaded, the
software automatically compares the internal clock on the CarChip against the clock on your
computer. Click OK to continue or check Synchronize Clocks to set the CarChip data logger's
internal clock to your computer's clock.
The Downloading Logs status dialog box displays. Click Cancel to abort the download before it is
finished. The Downloading Logs dialog box closes when the download is complete.
2. The Question dialog box displays. The Question dialog box asks if you want to delete the current
CarChip memory.
29
Page 34

CarChip Online Help Printable Version
3. Click No to keep the current data in the CarChip device, or click Yes to clear the CarChip memory.
Note: This dialog box contains a Don't Ask Again check box. By Checking this option and clicking Yes,
the CarChip's memory is automatically cleared after every download. By clicking No, the CarChip's
memory is never cleared after download. To change your CarChip memory clearing options, see Memory
Clearing Options.
The Unidentified Vehicle/Driver dialog box displays. See Unidentified Vehicle/Driver ID for more
information on this dialog box.
Once you have finished associating vehicles and driv ers to the downloaded trip data, the Activity Log
Summary view automatically displays the downloaded data once the download is completed.
Display CarChip Memory
The Display CarChip Memory dialog box displays how much memory is currently be used by the CarChip
data logger.
Note: This command is only available when a CarChip data logger is connected to your computer.
To display CarChip memory information:
1. Select Display CarChip Memory from the CarChip menu. The Display CarChip Memory dialog box
displays the following information
Used - The memory occupied by data.
Free - The amount of memory available for data.
Total - The total amount of memory available on the data logger.
2. Click OK to close the dialog box.
Clear CarChip Memory
The Clear CarChip Memory dialog box lets clear the CarChip data logger 's memory.
To clear CarChip memory:
1. Select Clear CarChip Memory from the CarChip menu. The Clear CarChip Memory dialog box
displays.
2. Click Yes to clear the CarChip data logger memory. Click No to exit the dialog without clearing the
data logger memory.
Enable CarChip LED
The Enable CarChip LED command on the CarChip menu toggles the CarChip LED between Diagnostic
Mode and Disabled Mode. When a check box displays next the Enable CarChip LED command, the
Diagnostic Mode is in use on the CarChip data logger. If a check box does not display, the CarChip data
Logger LED is in Disabled Mode.
To toggle between the CarChip LED modes:
30
Page 35

Welcome to CarChip
1. Select Enable CarChip LED from the CarChip menu.
The CarChip software takes a moment to initialize the LED setting. The CarChip LED is no w in
Diagnostic Mode.
2. Select Enable CarChip LED a second time.
The CarChip software take a moment to initialize the LED setting. The CarChip LED is now in
Disabled Mode.
To view CarChip LED status:
1. View Enable CarChip LED from the CarChip menu.
If a check displays next to the command, Diagnostic Mode is currently in use on your CarChip. If a
check does not display, Disabled Mode is currently in use.
CarChip LED Modes
The CarChip can be toggled between two LED Modes: Diagnostic and Disabled.
Diagnostic Mode
Diagnostic Mode enables the LED in the following manner:
Self-test Mode - Displays three ra pid blinks, indicating the initial hardware self-test was completed
successfully.
Communications Mode - Displays two rapid blinks per second until the CarChip successfully begins to
communicate with a vehicle.
Data Mode - Displays one blink per second while the CarChip is communicating with a vehicle.
Sleep Mode - Does not display any blinks.
PC Mode - Displays one blink per second whenever CarChip is connected to a PC. LED is 100% ON when
downloading to a PC.
Disabled Mode
When the CarChip LED is disabled only the Self-test and PC modes are active.
Self-test Mode - Displays three ra pid blinks indicates the initial hardware self-test was co mpleted
successfully.
PC Mode - Displays one blink per second whenever CarChip is connected to a PC. LED is 100% ON when
downloading to a PC.
Reset Check Engine Light
The Reset Check Engine Light command enables your CarChip data logger to turn off the Check Engine
light in your vehicle the next time the CarChip data logger is connected to your vehicle.
Note: If the condition that caused the check engine light to appear has not been corrected, the light
reappears the next time the car detects the condition.
To turn the Reset Check Engine Light comma nd on and off:
1. Select Reset Check Engine Light from the CarChip menu.
The CarChip software takes a moment to initialize the setting. The Reset Check Engine Light is now
turned on.
2. Select Reset Check Engine Light a second time.
The CarChip software take a moment to initialize the setting. The Reset Check Engine Light is now
turned off.
To view Reset Check Engine Light status:
1. View the Reset Check Engine Light command from the CarChip menu.
If a check displays next to the command, the command is turned on. If a check does not display,
the command has been turned off.
31
Page 36

CarChip Online Help Printable Version
Enable CarChip Alarm
The Enable CarChip Alarm command displays on the CarChip menu only when a CarChip E/X with Alarm
(product 8225) is connected to your computer and has an established a connection with the CarChip
software. The CarChip E/X with Alarm emits an audible alarm in your vehicle when speed band
thresholds, acceleration and braking thresholds have been exceeded.
The Enable Alarm command toggles the CarChip Alarm on and off. When a check box displays next to the
Enable Alarm command, the alarm on the CarChip data logger is turned on. If a check box does not
display, the CarChip data Logger Alarm has been turned off.
To toggle the CarChip Alarm on and off:
1. Select Enable Alarm from the CarChip menu.
The CarChip software takes a moment to initialize the Alarm setting. The CarChip Alarm is now on.
2. Select Enable Alarm a second time.
The CarChip software take a moment to initialize the Alarm setting. The CarChip Alarm is now off.
To view CarChip Alarm Status:
1. View Enable Alarm from the CarChip menu.
If a check displays next to the command, the CarChip alarm is turned on and in use. If a check does
not display, the CarChip alarm is turned off.
Enable CarChip VIN Mode
The Enable CarChip VIN mode command on the CarChip menu toggles the VIN reading function on the
CarChip data logger on and off. When the CarChip VIN mode is turned on, the CarChip data logger reads
the unique VIN number associated with the vehicle the next time the CarChip data logger is connected to
the vehicle. When the trip information is later downloaded, the VIN number is associated with trips taken,
and displays in the Trip Log Report View. When the CarChip VIN mode is turned off, the VIN number is
not recorded and does not display in association with trip information.
Caution: With VIN Mode enabled, the CarChip records the VIN number from the vehicle if the vehicle
supports that feature. If the VIN number does not display the next time the CarChip has been connected
to your vehicle, do not enable the CarChip VIN Mode, since asking for data the vehicle does not support
can cause undesirable side effects.
The Enable VIN Mode command toggles the VIN mode on and off. When a check box displays next to the
Enable VIN Mode command, the VIN recording capabilities on the CarChip data logger are turned on. If a
check box does not display, the CarChip data logger alarm has been turned off.
Note: The Enable VIN Mode command is only available for products 8211, 8221, and 8225.
To toggle the CarChip VIN Mode on and off:
1. Select Enable VIN Mode from the CarChip menu.
The CarChip software takes a moment to initialize the VIN setting. The CarChip VIN mode is now on
and will record the VIN information on a vehicle the next time it is connected to a vehicle.
2. Select Enable VIN Mode a second time.
The CarChip software take a moment to initialize the VIN setting. The CarChip VIN mode is now off.
To view CarChip VIN status:
1. View Enable VIN Mode from the CarChip menu.
If a check displays next to the command, the CarChip VIN Mode has been enabled on the CarChip
data logger. If a check does not display, the CarChip VIN Mode is turned off.
Set Speed Bands
Use the Set Speed Bands dialog box to enter the threshold speeds for the CarChip data logger. The
threshold speeds help you identify how much time is spent in each speed band. The time spent in each
band shows up on the Trip Report and is displayed as horizontal dotted lines in the Trip Speed Plot.
To set speed bands:
32
Page 37

Welcome to CarChip
1. Select Set Speed Bands... from the CarChip menu. The CarChip / Set Speed Bands dialog box
displays.
2. Enter the maximum threshold speed for each of the first three speed bands. The fourth speed band
consists of all speeds greater than the last threshold, or click Default to use the software default
threshold settings. The default speed thresholds are: 45, 60, and 75 mph (US); 72, 97, and 121 kph
(Metric); and 20.1, 26.8 and 33.5 m/s (S.I.).
3. Click OK to save the new speed band settings. Click Cancel to exit the dialog box without saving
changes to the settings.
Note: The speed threshold displaying in the fourth speed band is also the threshold that triggers the
audible alarm on the CarChip E/X with Alarm (product 8225) model. When this speed band is exceeded in
a vehicle, the alarm sounds until the vehicle is no longer over the speed band threshold. See Enable
CarChip Alarm for more information on using the CarChip Alarm feature.
Set Braking Thresholds
Use the Set Braking Thresholds dialog box to enter the rates of deceleration that define hard braking
and extreme braking. Accident Logs are created based on the thresholds set in this dialog box.
To set braking thresholds:
1. Select Set Braking Thresholds from the CarChip menu. The CarChip / Set Braking Thresholds
dialog box displays.
2. Enter your desired hard and extreme braking thresholds or click Default to use the software default
threshold settings. The default braking thresholds are: 0.28 and 0.48 G (US & Metric) and 2.8 and
4.7 m/s
3. Click OK to save the new settings. Click Cancel to exit the dialog box and retain the previous
settings.
2
(S.I.).
Note: Note: The extreme braking threshold is a lso t he threshold that triggers the audible alarm on the
CarChip E/X with Alarm (product 8225) model. When this breaking threshold is exceeded in a vehicle, the
alarm sounds until the vehicle is no longer exceeding the braking threshold. See Enable CarChip Alarm for
more information on using the CarChip Alarm feature.
Set Acceleration Thresholds
33
Page 38

CarChip Online Help Printable Version
Use the Set Accelerations Thresholds dialog box to enter the rates of acceleration that define hard
acceleration and extreme acceleration. These thr esholds help you monitor how hard the vehicle is being
accelerated. Any time the car's acceleration exceeds these set limits, the event is logged in the Trip
Report.
To set acceleration thresholds:
1. Select Set Acceleration Thresholds... from the CarChip menu. The CarChip / Set Acceleration
Thresholds dialog box displays.
2. Enter your desired hard and extreme acceleration thresholds or click Default to use the software
default threshold settings. The Default acceleration thresholds are: 0.28 and 0.48 G (US & Metric)
and 2.8 and 4.7 m/s
3. Click OK to save the new settings. Click Cancel to exit the dialog box and retain the previous
settings.
2
(S.I.).
Note: The extreme acceleration threshold is also the threshold that triggers the audible alarm on the
CarChip E/X with Alarm (product 8225) model. When this acceleration threshold is exceeded in a vehicle,
the alarm sounds until the vehicle is no longer exceeding the threshold. See Enable CarChip Alarm for
more information on using the CarChip Alarm feature.
Set Clock
The Set Clock dialog box lets you set the CarChip data logger's internal clock to match your computer's
clock.
To set the CarChip's internal clock:
1. Select Set Clock from the CarChip menu. The CarChip / Set Clock dialog box displays.
2. Click Yes to set the clock on the CarChip to match the clock on your computer, or click No to exit
the dialog box and retain the CarChip's previous clock settings.
Choose Other Parameters
Use the Choose Other Parameters dialog box to select up to four additional vehicle data parameters to
be logged in addition to vehicle speed.
To choose other parameters:
1. Select Choose Other Parameters... from the CarChip menu. The CarChip / Choose Other
Parameters dialog box displays.
34
Page 39

Welcome to CarChip
2. Use the drop down list to select up to four additional vehicle data parameters.
3. For each parameter, select a sampling interval.
4. Click OK to save the parameter settings, or click Cancel to exit the dialog box and retain the
previous settings.
Note: A parameter can not be logged more than once. Please review your parameter selections and
remove any duplicate selections.
View Menu Commands
The View menu commands allow you to view Trip Log, Activity Log, Accident Log, Vehicle Trouble Log and
Summary Log information.
Note: The Accident and Summary Log menu commands are only available for CarChip data logger model
E/X or higher.
Use the following topics to learn more about each lo g view:
CarChip Home Page
Trip Log
Activity Log
Accident Log
Trouble Log
Summary Log
CarChip Home Page
The CarChip Home Page displays summary information about the CarChip data loggers, vehicle IDs, and
driver IDs listed in the CarChip software. From the Home Page you can access the monthly vehicle and
driver summaries as well as deta iled monthly summaries for every vehicle and driver listed in the home
page.
To view the Home Page:
1. Click on the Home icon or select Home from the View menu. The Home Page view displays with a
summary of usage for every CarChip data logger associated with the CarChip software and a
monthly summary of vehicle and driver information.
The CarChip Home Page contains the following information:
CarChip Table
The CarChip table contains information about the CarChip data logger(s) associated with the CarChip
software. The information displayed in this table is:
35
Page 40

CarChip Online Help Printable Version
Table Row: Description:
CarChip Displays the CarChip data logger serial number or unique name.
Last Downloaded Displays the date the CarChip data was last downloaded.
Vehicle Displays the vehicles that have been associated with connection events
Driver Displays the drivers that have been associated with conne ction events to
Monthly Summary
The Monthly summary displays vehicle and driver statistics available for the current month. To display
vehicle information for other months, click Previous or Next.
Vehicle Summary
The Vehicle Summary table contains vehicle information for the current month. The informat ion displayed
in this table is:
Table Row: Description:
Vehicle Displays the VIN number or unique name for the vehicle. Contains a
Distance Displays the total distance the vehicle was driven wit h the CarChip data
High Speed Displays the highest speed the vehicle logged for the selected month.
Overall MPG Displays the average miles per gallon for the vehicle for the selected
Price/Mile Lists the price per mile it costs to fuel the vehicle for the selected month.
to the CarChip data logger. If there is more than one vehicle associated
with the CarChip, the word Multiple displays.
the CarChip data logger. If there is more than one driver associated with
the CarChip, the word Multiple displays.
hyperlink for displaying detailed information about the vehicle.
logger connected to the vehicle for the selected month.
month. The Overall MPG for your vehicle is determined by the
information you enter in the Fuel Entry dialog box.
The Price/Mile for your vehicle is determined by the information you enter
in the Fuel Entry dialog box.
Note: The Overall MPG and Price/Mile fields are based on the U.S. system of measurement and on U.S.
currency. These units do not change if you select another system of measurement from the Units dialog
box.
Driver Summary
The Driver Summary table contains driver information for the current month. The information displayed in
this table is:
Table Row: Description:
Driver Displays the unique name for the driver. Contains a hyperlink for
Distance Displays the total distance the driver drove with the CarChip data logger
High Speed Displays the highest speed the driver logged for the selected month.
Acceleration Rate Displays the average of all the hard and extreme accelerations recorded
Deceleration Rate Displays the average of all the hard and extreme decelerations recorded
Top Speed Band Displays the total time the driver spent driving over the top speed band
displaying detailed information about the driver.
connected to the vehicle for the selected month.
for the selected month. The average is calculated by adding all th e hard
and extreme acceleration events and dividing them by distance traveled.
for the selected month. The average is calculated by adding all th e hard
and extreme deceleration events and dividing them by distance traveled.
36
Page 41

Welcome to CarChip
limit for the selected month.
Note: The Acceleration Rate and De celeration Rate fields are based on the G-force measure type. These
units do not change if you select another system of measurement from the Units dialog box.
Home Page Driver Summary View
The Home Page Driver Summary view displays when you select a Driver hyperlink from the Driver
Summary table in the CarChip Home page. The Driver Summary displays detailed information about the
selected driver for the select month displayed on the CarChip Home page.
The Driver Summary contains the following information:
Driver Summary Table
The Driver Summary table contains driver statistics for selected time intervals. The information displayed
in this table is:
Table Row: Description:
Time Interval Displays the periods of time that cover the driver
Distance Displays the total distance the driver covered with
High Speed
Acceleration Rate Displays the average of all the hard and extreme
Deceleration Rate Displays the average of all the hard and extreme
Top Speed Band Displays the total time the driver spent drivin g
statistics. The time intervals are:
This Month
Last Month
Last 3 Months
Last 6 Months
Last 12 Months
the CarChip data logger connected to the vehicle.
Displays the highest speed that was recorded for
the driver for the time interval.
accelerations recorded for the driver during the
displayed time periods.
decelerations recorded for the driver during the
displayed time periods.
over the top speed band limit during the displayed
time periods.
Note: The Acceleration Rate and De celeration Rate fields are based on the G-force measure type. These
units do not change if you select another system of measurement from the Units dialog box. You are
responsible for your conversions.
Home Page Vehicle Summary View
The Home Page Vehicle Summary page displays when you select a Vehicle Hyperlink from the Vehicle
Summary table in the CarChip Home page. The Vehicle Summary displays detailed information about the
selected vehicle for the month displayed in the CarChip Home page.
The Vehicle Summary contains the following information:
Vehicle Use Overview Table
The Vehicle Use Overview table contains vehicle usage statistics for selected time intervals. The
information displayed in this table is:
Table Row: Description:
Time Interval Displays the periods of time that cover the vehicle
37
Page 42

CarChip Online Help Printable Version
statistics. The time intervals are:
This Month
Last Month
Last 3 Months
Last 6 Months
Last 12 Months
Distance Displays the total distance the vehicle was driven
High Speed
MPG Displays the average miles per gallon for the
Price/Mile Lists the price per mile it costs to fuel the vehicle
Note: The MPG and Price/Mile fields are based on the U.S. syste m of m easurement and on U.S. currency.
These units do not change if you select another system of measurement from the Units dialog box. You
are responsible for your conversions.
with the CarChip data logger connected to the
vehicle.
Displays the highest speed the vehicle logged for
the time interval.
vehicle for the time interval. The MPG for your
vehicle is determined by the information you enter
in the Fuel Entry dialog box.
for the time interval. The Price/Mile for your
vehicle is determined by the information you enter
in the Fuel Entry dialog box.
Parameter Summaries
The Parameters summary displays available parameter statistics for you car based on the time intervals
displayed in the Vehicle Use Overview table. The information displayed in these tables are:
Table Row: Description:
Parameter Displays the name of the parameter that was
Threshold Displays the maximum threshold value set for the
Time Over Thresh (Threshold) Displays the total time the vehicle spent over the
Time Under Thresh (Threshold) Displays the total time the vehicle spent under the
High Above Threshold Displays the highest value recorded above the
Low Below Threshold Displays the lowest value recorded below the
monitored for the time period.
selected parameter for the time period being
displayed.
maximum threshold.
maximum threshold.
threshold, if any exists for the time period being
displayed.
threshold.
Trip Log Views
The Trip Log Views allow you to look at the vehicle data recorded by your CarChip. Select a topic below to
learn more about the Trip Log Summary, Trip Log Report View, Trip Log Plot View, and the Trip Log T able
View.
Trip Log Summary
Trip Log Report View
Trip Log Plot View
Trip Log Table View
38
Page 43

Welcome to CarChip
Trip Log Plot View
The Accident Log Plot View displays line graphs of all the available trip data.
Note: The trip data that displays in the plot view depends on CarChip data logger model. The basic
CarChip plots only the vehicle speed. The CarChip E/X or higher model plots the data for any additional
parameters you have selected.
To view the Trip Log Plots:
1. Click on the Trip Log View icon or select Trip Log from the View menu. The Trip Log Summary
view displays.
2. Click on the Trip Log drop-down box to display a list of all the trips recorded in the Trip Log. The
drop-down list box always begins with the Summary view, with each recorded trip listed in order
below the Summary.
3. Select one of the Trips records listed in the drop-down list by placing the cursor over it to highlight
the stop, then clicking with the left mouse button. You can also select trip records by using the up
and down cursor keys to move up and down the list, then pressing Enter when you have
highlighted the desired stop.
The Trip Log Report view displays.
4. Use the Right or Left cursor key to select the Plot view of the record, or click the Plot button. The
Trip Log Plot view displays.
39
Page 44

CarChip Online Help Printable Version
5. Click the Left Arrow button or press the Up cursor key to display the previous Trip Log record.
6. Click the Right Arrow button or press the Down cursor key to display the next Trip Lo g record.
7. Use the Left and Right cursor keys to select the Report or Table views of the record.
8. Click the Down Arrow button to display the next plot available for the selected trip.
9. Click the Up Arrow button to display the previous plot for the selected trip, or use the scroll bar to
display the different plot views.
10. Click Comments to either view or edit a comment for the current record.
11. Click Options to change the Accident Log Plot View setup options.
Trip Log Plot View Mouse Commands
The following mouse commands are available in Trip Log Plot view:
Left Button Commands:
The following commands are available using the Left Mouse button:
Zoom
Right-Click Menu Commands:
The Right-Click Menu commands are available in the Trip Log Plot view :
40
Page 45

Welcome to CarChip
• Unzoom
• Copy As
• Save As
• Speed Bands - Select to include horizontal lines indicating speed band settings.
• Braking Events - Select to draw vertical lines indicating braking events that exceed a braking
threshold.
• Acceleration Events - Select to include vertical lines indicating acceleration events that exceed an
acceleration threshold.
• Line Plot - Select to draw plots using plain lines. If not selected the area under the lines is filled in
with black.
• Plot Coordinates - Select to display the cursor coordinates inside the plot view window.
• Normalize Axes - Select to use the same upper speed range for all Speed Plots. The upper end of
the speed range is set in the Setup / Plots dialog box. Click the Options button in the plot window
to change the upper speed range.
• Help F1
Trip Log Table View
The Trip Log Table view displays the all the values, including vehicle speed and any other selected
parameters, that were sampled by the CarChip data logger through the d uration of the trip.
Note: The trip data that displays in the table view depends on CarChip data logger model. The basic
CarChip displays only the vehicle speed in the table view. The CarChip E/X or higher model displays the
data for any additional parameters that have been selected.
To view the Trip Log Table:
Click the Trip Log View icon or Select Trip Log from the View menu. The Trip Log Summary view
displays.
1. Click on the Trip Log drop-down box to display a list of all trips recorded in the Trip Log. The dropdown list box always begins with the Summary view, with each recorded trip listed in order below
the Summary.
41
Page 46

CarChip Online Help Printable Version
2. Select one of the trip records listed in the drop-down list by placing the cursor over it to highlight
the stop, then clicking with the left mouse button. You can also select trip records by using the Up
and Down cursor keys to move up and down the list, then pressing Enter when you have
highlighted the desired stop. The Trip Log Report view displays.
3. Use the Right or Left cursor key to select the Table view of the record, or click the Table button.
The Trip Log Table view displays.
4. Click on the Right Arrow button or press the Down cursor key to display the new Trip Log record.
5. Click on the Left Arrow button or press the Up cursor key to display the previous Trip Log record.
6. Use the Right and Left cursor keys to select the Plot and Report views of the record, or, just click
the Plot or Report button.
7. Click on Comments to either view or edit a comment for the current record.
8. Click on Options to change the Trip Log Plot View setup options.
42
Page 47

Welcome to CarChip
Trip Log Report
The Trip Log Report view displays expanded summary trip information for each trip recorded on the
CarChip data logger.
To view the Trip Log Report:
1. Click on the Trip Log View icon or select Trip Log from the View menu. The Trip Log Summary
view displays.
2. Click on the Trip Log drop-down box to display a list of all trips recorded in the Trip Log. The dropdown list box always begins with the Summary view, with each recorded trip listed in order below
the Summary.
3. Select one of the trip records listed in the drop-down box by clicking enter once you have selected
the desired trip. You can also scroll through trip records by using the Up and Down cursor keys.
The Trip Log Report view displays.
43
Page 48

CarChip Online Help Printable Version
4. Click on the Right Arrow button or press the Down cursor key to display the next Trip Log report.
5. Click on the Left Arrow button or press the Up cursor key to display the previous Trip Log report.
6. Use the Left and Right cursor keys to select the Plot or Table views of the record.
7. Click on Comments to either view or edit a comment for the current record.
8. Click on Options to change the Accident Log Plot View setup options.
9. Click on Comments to either view or edit a comment for the current record.
10. Click on Options to change the Trip Log Plot View setup options.
Trip Log Summary
The Trip Log Summary view displays basic trip information.
To view the Trip Log Summary:
1. Click on the Trip Log View icon or select Trip Log from the View menu. The Trip Log Summary
view displays.
44
Page 49

Welcome to CarChip
Activity Log View
The Activity Log View displays all the activity events recorded by your CarChip. Select a topic below to
learn more about the Activity Log Summary and the Activity Log Event View.
Activity Log Summary
Activity Lo g Event View
Activity Log Event View
The Activity Log Event view displays the activity information including any comments.
To view am Activity Log Event:
1. Click on the Activity Log View icon or select Activity Log from the View menu. The Activity Log
Summary view displays.
2. Click on the Activity Log drop-down box to display a list of all events recorded in the Activity Log.
The drop-down list box displays the Summary view when the Activity Log is displayed, with each
recorded event listed in order below the Summary.
3. Select one of the event records listed in the drop-down list by placing the cursor over it to highlight
the event, then clicking with the left mouse button. Also, use the Up and Down cursor keys in the
drop down box to display each event.
The selected Activity Log Event view displays.
45
Page 50

CarChip Online Help Printable Version
4. Click Comments to either view or edit a comment for the current record.
The Accident Log Plot View displays a line graph of the vehicle speed data recorded during the 20 seconds
prior to the stop.
Activity Log Summary View
The Activity Log Summary displays all the activities recorded for the currently loaded CarChip database.
To view the Activity Log Summary:
1. Click the Activity Log View icon or select Activity Log from the View menu. The Activity Log
Summary view displays.
Accident Log Views
The Accident Log Views allow you to look at the accident data collected by your CarChip. CarChip defines
an accident as a stop in which the rate of deceleration exceeds either the hard braking or the extreme
braking thresholds.
Select a topic below to learn more about the Accident Log Summary, Accident Log Report View, Accident
Log Plot View, and the Accident Log Table View.
Accident Log Summary
Accident Log Report View
Accident Log Plot View
Accident Log Table View
Accident Log Plot View
The Accident Log Plot View displays a line graph of the vehicle speed data recorded during the 20 seconds
prior to the stop.
To view the Accident Log Plots:
1. Click on the Accident Log View icon or select Accident Log from the View menu. The Accident Log
Summary view displays.
2. Click on the Accident Log drop-down box to display a list of all stops recorded in the Accident Log.
The drop-down list box always begins with the Summary view, with each recorded stop listed in
order below the Summary.
46
Page 51

Welcome to CarChip
3. Select one of the stop records listed in the drop-down list by placing the cursor over it to highlight
the stop, then clicking with the left mouse button. You can also select stop records by using the up
and down cursor keys to move up and down the list, then pressing Enter when you have
highlighted the desired stop.
The Accident Log Report view displays.
4. Use the Right or Left cursor key to select the Plot view of the record, or click the Plot button. The
Accident Log Plot view displays.
5. Click the Left Arrow button or press the Up cursor key to display the previous Accident Log record.
6. Click the Right Arrow button or press the Down cursor key to display the next Accident Log
record.
7. Use the Left and Right cursor keys to select the Report or Table views of the record.
8. Click Comments to either view or edit a comment for the current record.
9. Click Options to change the Accident Log Plot View setup options.
47
Page 52

CarChip Online Help Printable Version
Accident Log Plot View Mouse Commands
The following mouse commands are available in Accident Log Plots.
Left Button Commands:
• Zoom
Right-Click Menu:
• Unzoom
• Copy As
• Save As
• Line Plot
Select to draw plots using plain lines. If not selected the area under t he lines will be filled in.
• Plot Coordinates
Select to display the cursor coordinates inside the plot view window.
• Normalize Axes
Select to use the same upper speed range for all Speed Plots.
The upper end of the speed range is set in the Setup / Plots dialog box - Click Options button in plot
window.
• Help F1
Accident Log Report View
The Accident Log Report view displays the vehicle sp eed for the 20 seconds prior to a stop sudden enough
to register as either a hard braking event or an extreme braking event.
To view the Accident Log Report:
1. Click on the Accident Log View icon or select Accident Log from the View menu. The Accident Log
Summary view displays.
2. Click on the Accident Log drop-down box to display a list of all stops recorded in the Accident Log.
The drop-down list box always begins with the Summary view, with each recorded stop listed in
order below the Summary.
48
Page 53

Welcome to CarChip
3. Select one of the stop records listed in the drop-down box by placing the cursor over it to highlight
the stop, then clicking with the left mouse button. You can also scroll through stop records by using
the Up and Down cursor keys.
The screen displays the Accident Log Report view which displays the vehicle speed for each of the
20 seconds prior to the stop.
To display the next Accident Log record, click on the Right Arrow button or press the Down cursor
key.
To display the previous Accident Log record, click on the Left Arrow button or press the Up cursor
key.
4. Use the Left and Right cursor keys to select the Plot or Table views of the record.
5. Click on Comments to either view or edit a comment for the current record.
6. Click on Options to change the Accident Log Plot View setup options.
Accident Log Summary View
The Accident Log Summary view displays the date and time, the CarChip ID, and the maximum speed
recorded for each stop in the Accident Log.
To view the Accident Log Summary:
1. Click on the Accident Log View icon or select Accident Log from the View menu. The Accident Log
Summary view displays.
49
Page 54

CarChip Online Help Printable Version
2. Click on the Accident Log drop-down box to display a list of all stops recorded in the Accident
Log. The drop-down box always begins with the Summary view, with each recorded stop listed in
order below the Summary. From the Summary View you can click on the Summary drop-down
list box to display a list of all stops recorded in the Accident Log.
3. Select a stop record by placing the cursor over it to highlight the stop, then clicking with the left
mouse button. You can also scroll through stop records using the Up and Down cursor keys or
using the wheel on your mouse.
4. The selected record is displayed in the Accident Log Report view.
Accident Log Table View
The Accident Log Table view displays the vehicle speed over the 20 seconds prior to the stop.
To view the Accident Log Table:
1. Click the Accident Log View icon or select Accident Log from the View menu. The Accident Log
Summary view displays.
2. Click on the Accident Log drop-down box to display a list of all stops recorded in the Accident Log.
The drop-down list box always begins with the Summary view, with each recorded stop listed in
order below the Summary.
50
Page 55

Welcome to CarChip
3. Select one of the stop records listed in the drop-down list by placing the cursor over it to highlight
the stop, then clicking with the left mouse button. You can also select stop records by using the Up
and Down cursor keys to move up and down the list, then pressing Enter when you have
highlighted the desired stop. The Accident Log record view displays.
4. Use the Right or Left cursor key to select the Table view of the record, or click the Table button.
The Accident Log Table view displays.
5. Click on the Right Arrow button or press the Down cursor key to display the new Accident Log
record.
6. Click on the Left Arrow button or press the Up cursor key to display the previous Accident Log
record.
7. Use the Right and Left cursor keys to select the Plot and Report views of the record, or, just
click the Plot or Report button.
51
Page 56

CarChip Online Help Printable Version
Trouble Log View
The Trouble Log View displays all the internal vehicle problems detec ted by your CarChip. Select a topic
below to learn more about the Trouble Log Summary and the Trouble Log Problem View.
Trouble Log Summary
Trouble Log Event View
Trouble Log Problem View
The Trouble Log Problem View displays any problems detected wi th the vehicle or vehicles the CarChip
data logger has been connected with. Any problem that is detected includes a trouble code and a brief
description.
To view the Trouble Log Problem View:
1. Click the Trouble Log View icon or select Trouble Log from the View menu. The Trouble Log
Summary displays.
2. Click the Trouble Log drop-down list box to display a list of all problems recorded in the Trouble
Log. The drop-down list box always begins with the Summary view, with each detected problem
listed in order below the Summary.
3. Select one of the problem records listed in the drop-down list by placing the cursor over it to
highlight the event, then clicking with the left mouse button. You can also scroll through the
Problem records by using the Up and Down cursor keys.
The Trouble Log Problem view displays. The Problem View includes a "freeze frame" snapshot of the
vehicle data at the time the problem was detec ted.
52
Page 57

Welcome to CarChip
4. Select Comments to either view or edit the comments for the problem.
Trouble Log Summary View
The Trouble Log Summary displays a summary of all the problems and trouble codes that were logged
while the CarChip data logger was connected to a vehicle or vehicles.
To view the Trouble Log Summary:
1. Click the Trouble Log View icon or select Trouble Log from the View menu. The Trouble Log
Summary view displays.
53
Page 58

CarChip Online Help Printable Version
2. Click on the Trouble Log drop-down list box to display a list of all problems recorded in the
Trouble Log. The drop-down list box always begins with the Summary view, with each detected problem
listed in order below the Summary.
3. Select one of the Trouble Log records from the drop-down list by placing the cursor over the
record and clicking the left mouse button. You can also scroll through the records by using the Up
and Down cursor keys.
The Trouble Log Problem view displays.
Summary Log
The Summary Log displays the vehicle parameter data recorded by the CarChip data logger for every
trip. View the summary log available for each trip, go directly to a summary log, or delete all summary
logs from this dialog box.
Note: This menu command is only available for CarChip Models E/X or higher.
To view the Summary Log:
1. Select Summary Log from the View Menu. The Summary Log dialog box displays.
54
Page 59

Welcome to CarChip
The Summary Log contains the following fields and boxes:
Field Description
Record Displays the number of summary records that currently exist in the
Driver Displays the unique name for the driver.
Vehicle Displays the VIN number or unique name for the vehicle.
CarChip Displays the CarChip data logger serial number or unique name.
Start Time Displays the trip's start time.
End Time Displays the trip's end time.
Duration Displays the trip's duration.
Distance Displays the to tal distance of the trip.
Avg. Speed Displays the average speed.
Max Speed Displays the maximum speed, or highest speed that wa s recorded during
Parameter Name Displays the name of the parameter that was selected for monitoring.
Threshold Displays the maximum threshold value for the parameter.
Max Value Above
Threshold
Time Above Threshold Displays the total time the vehicle spent over the threshold value.
Min Value Below
Threshold
Time Below Threshold Displays the total time the vehicle spent under the threshold value.
OK Click to close the summary log view.
Delete All Click to delete all the records present in the summary log.
Go To Click to display a specific record number.
summary log
the trip.
Displays the value the CarChip recorded that was over the set threshold
value.
Displays the value the CarChip recorded that was the lowest value under the
set threshold.
55
Page 60

CarChip Online Help Printable Version
Previous Click to view the previous record.
Next Click to view the next record.
Help Click to receive context sensitive help for this dialog box.
2. Click OK to close the Summary Log dialog box.
To Delete all records:
1. Click Delete All. All the available records are deleted.
2. Click OK to close the Summary Log dialog box.
Note: Deleting all the records displayed in the Summary Log may impact the information displayed in the
CarChip Home Page and corresponding pages. Review the statistics and data displayed in these pages
before deleting all the summary log information.
Comments
The Comments dialog box provides functionality for adding comments to each individual trip, activity,
accident, or trouble record.
To display or edit the comments for a record:
1. Display the trip, activity, accident or trouble record that requires a comment. Use the drop down
box containing all the records for the current log view to display the record.
2. Select the Comments button when the record displays. The Comments dialog box displays.
3. Enter new comments or edit existing comments.
4. Click OK to save the comments or click Cancel to exit the dialog box without saving the comment
changes.
Help Menu Commands
Help Menu Commands
The CarChip Help menu lets you access the CarChip Help and CarChip Version Information. The Help
menu contains the following:
• CarChip Help - Opens the CarChip Help window. See Using CarChip Help for more information
about using the Help window.
• About CarChip - Displays version information for the CarChip hardware and software.
To display the CarChip Help Window:
1. Select CarChip Help from the Help menu or click Help from the toolbar. The Help windo w displays.
To display the About CarChip Window:
1. Select About CarChip from the Help menu. The About CarChip window displays.
2. Click the window to close it and re-display the CarChip software.
56
Page 61

Welcome to CarChip
More Information Menu
Click on a topic below to view help for a particular menu:
CarChip User's Guide
CarChip Specifications
Incompatible Vehicle List
One Year Limited Warranty
Contacting Davis Instruments
CarChip User's Guide
A printable version of the online help is pro vided in the Adobe Acrobat file carchip.pdf located on the
CarChip software CD. The manual is also provided as a short cut on the Start Menu.
CarChip Specifications
General
Operating Temperature -40° to +185°F (-40° to +85°C)
Primary Power, Connected to Vehicle 12 VDC
Primary Power, Connect to Computer 9 VDC, AC-Power Adapter Provided
Backup Power Internal battery, 10-15 year life in normal use
Memory 128K for CarChip, 512K for CarChip E/X
Memory Storage 75 hours for CarChip, 300 hours for CarChipE/X)
Time & Date Accurate to +/- 2 seconds per day
Vehicle Interface 16-pin OBDII connector
Computer Interface Serial, DB9
Computer Cable Length 5’ (1.5m)
Indicator Lamp LED, pulses to indicate unit status
Dimensions 1.8" wide x 1 " tall x 1.25" deep" (46 mm x 25.4 mm x 32
Weight 0.9 oz. (2.55g)
OBDII Compatibility
Supported Protocols J1850-41.6, J1850-10.4, ISO9141, KWP2000 (ISO 14230)
CarChip Compatible Vehicles:
US-Market Most domestic and import vehicles, 1996 or later.
European-Market Some 1996 and later vehicles and most 2000 and later vehicles
Elsewhere Undetermined. Some 1996 and later vehicles that are
Incompatible Protocols * CAN (Controller Area Network - ISO 11898)
Incompatible US Market Vehicles * See the Incompatible Vehicle List
* As of publication date.
Software Requirements
mm)
compliant with the supported protocols listed above.
compliant with the supported protocols may be CarChip
Compatible.
57
Page 62

CarChip Online Help Printable Version
Operating System Windows 95, 98, ME, NT 4.0, 2000, XP
Disk Space 5 MB free disk space
Display Windows-compatible VGA minimum
Data Display
Trip Log Summary View Start date and time, duration, distance, max speed, time in top speed
Trip Log Report View Vehicle ID, CarChip data logger ID, start time, end time, duration, time
Trip Log Plot View Line graph for vehicle speed. CarChip E/X includes line graphs for up to
Trip Log Table View Elapsed time for trip and speed every 5 seconds. Up to four other
Activity Log Summary View Date and time, CarChip ID, description
Activity Log Event View Date and time, CarChip ID, description, commen ts
Accident Log Summary
View (CarChip E/X only)
Accident Log Stop View
(CarChip E/X only)
Accident Log Plot View
(CarChip E/X only
Accident Log Table View
(CarChip E/X only)
Trouble Log Summary View Date and time, vehicle ID, trouble code, problem description
Trouble Log Problem View Date and time, vehicle ID, CarChip ID, trouble code, problem
Data Options
Supported Unit Systems U.S., Metric, S.I., custom
Vehicle Speed Sampling Interval 5 seconds
Other Parameters Sampling Intervals
(E/X only)
Vehicle Speed Bands 4, user configurable, use to identify typical vs atypical
Calculated Data Hard and extreme braking, hard and extreme acceleration
Data Parameters for CarChip and CarChip E/X
Parameter Range* Resolution*
Vehicle Speed 0 to 158 mph, 0 to 255 kph, 0 to 70
Trip Distance Traveled 0 to 10,000 miles, 0 to 16,000 km 0.1 m, 0.1 km
Acceleration/Deceleration 0 to 3 G, 0 to 30 m/sec2 0.03 G, 0.3 m/sec2
band, number of hard braking events, number of extreme braking
events, number of hard acceleration events, number of extreme
acceleration events, vehicle ID
spent at idle, time spent in first speed ba nd, time spent in second speed
band, time spent in third speed band, time spent in fourth speed band,
distance, average speed, maximum speed, number of hard braking
events, number of extreme braking events, number of hard acceleration
events, number of extreme acceleration events, list of logged
parameters (speed only for CarChip, up to 5 parameters for CarChip
E/X), comments
four additional parameters
parameters every 5, 10, 20, 30 or 60 seconds for CarChip E/X only
Date and time, CarChip ID, maximum speed in log
Date and time, CarChip ID, maximum speed in log, comments
Date and time, line graph of vehicle speed for 20 seconds prior to stop.
Vehicle speed for each of the 20 seconds prior to the stop.
description, comments, OBDII freeze frame info (parameters included in
freeze frame vary from car to car)
5, 10, 20, 30, or 60 seconds
vehicle operation
m/s
0.6 mph, 1 kph, 0.3
m/s
58
Page 63

Welcome to CarChip
Threshold
*Range and resolution of sensor measurements only. Accuracy is dependent on the accuracy of the
vehicle’s sensors.
Data Parameters for CarChip E/X Only
Parameter Range* Resolution*
Engine Speed 0 to 16,384 rpm 1 rpm
Throttle Position 0 to 100% 0.1%
Coolant Temperature -40° to +420°F, -40° to +215°C 2°F, 1°C
Engine Load 0 to 100% 0.1%
Air Flow Rate 0 to 8714 lb/min, 0 to 655.35
Intake Air Temperature -40° to +420°F, -40° to +215°C 2°F, 1°C
Intake Manifold Pressure 0 to 75 in. hg., 0 to 255 kPaA 0.3 in. hg., 1 kPaA
Fuel Pressure 0 to 110 psiG, 0 to 765 kPaG 0.5 psiG, 3 kPaG
O2 Sensor Voltage (B1-2, S1-4, 8
total)
Ignition Timing Advance -64° to 63.5° 0.5°
Short Term Fuel Trim -100% to 99.22% 0.8%
Long Term Fuel Trim -100% to 99.22% 0.8%
Battery Voltage 6 to 16 VDC 0.1 VDC
*Range and resolution of sensor measurements only. Accuracy is dependent on the accuracy of the
vehicle’s sensors.
gm/sec
0 to 1.275 V 0.005 V
0.1 lb/min, 0.01
gm/sec
Incompatible Vehicle List
Davis Instruments keeps an updated listing of all the US market vehicles that are currently not com patible
with the CarChip. See the CarChip Compatibility List for more information.
One Year Limited Warranty
We warrant our products to be free of defects in material and workmanship for one year from the date of
original purchase. While we make every effort to carefully manufacture our products to the highest
standards of quality, occasionally parts may be found to be missing, defective, or damaged.
If you have a defective part, return the product to us, shipping charges prepaid. Include proof of purchase
and a written explanation of the trouble. During the warranty period, we will, at our option, either repair
or replace the product free of charge.
This warranty does not cover damage due to improper installation or use, negligence, accident, or
unauthorized service, or incidental or consequential damages beyond Da vis products themselves. Implied
warranties are limited in duration to the life of the limited warranty.
Some states do not allow limitations on how long an implied warranty lasts, or the exclusion or limitation
of incidental or consequential damages, so the above limitations may not apply to you. This warranty
gives you specific legal rights. You may have other rights, which vary from state to state and country to
country.
Safety Notice
CarChip has been carefully designed and tested to comply with OBDII protocols J1850-41.6, J1850-10.4,
ISO 9141, and KWP2000 (ISO14320), which are used on most cars and light trucks sold in the USA,
59
Page 64

CarChip Online Help Printable Version
model-year 1996 or later. However, some vehicle models are not in full compliance with these protocols.
In addition, the computer control systems on any given vehicle may b e malfunctioning or out of spec, as
may be the sensors used by these systems.
Before installing CarChip, be sure to review the list of known vehicle exclusions and anomalies on our
website at www.carchip.com, where you’ll also find the latest software and firmware downloads. For more
information on OBDII issues and anomal ies in general, we recommend The Equipment and Tool Institute’s
website at www.etools.org.
While our testing and the experience of thousands of CarChip users have shown the unit to be safe and
reliable, there is an inherent risk in adding any aftermarket product that may potentially affect the
operation or drivability of your vehicle. Should you be concerned about the operation of your vehicle at
any time while using CarChip, you should pull over, off the roadway, immediately or as soon as it is safe
to do so. Remove CarChip from the OBDII port and consult a licensed mechanic or automobile service
center.
Report any issues or concerns to our Technical Support Dept. at (510) 732 7814 or
support@davisnet.com. We are open Monday through Friday, 7:00 a.m. to 5:30 p.m. Pacific Time. We
maintain an active database of the feedback we receive, and your comments can help us cont inuously
improve the product.
Contacting Davis Instruments
Please contact Davis Technical Support if you have questions about your CarChip, or encounter problems
installing or operating the CarChip.
Note: Do not return items to the facto ry for repair without prior authorization.
Phone
(510) 732-7814 – Monday – Friday, 7:00 A.M. – 5:30 P.M. Pacific Time
(510) 670-0589 – Technical Support Fax
Email
support@davisnet.com – Technical Support email
info@davisnet.com – Davis Instruments General email
Web
www.davisnet.com – Copies of User Manuals are available on the “Support” page. Watch for FAQs and
other updates. Subscribe to the e-newslette r.
Mail
Davis Instruments
3465 Diablo Avenue
Hayward, CA 94545
USA
60
Page 65

Index
A
About CarChip ............................................56
Accident Log Plot View.................................4 6
Accident Log Report View....................... 46, 48
Accident Log Summary View ........................49
Accident Log Table View ........................ 46, 50
Accident Log Views......................................46
Activity Log Event View................................45
Activity Log Summary View..........................46
Activity Log View ........................................45
Advanced CarChip................................. 39, 41
Alarm........................................................32
Anomalous Vehicles.....................................17
Assign Drivers ..............................................9
B
Bands........................................................20
Basic CarChip ....................................... 39, 41
Bitmapped file ............................................10
C
Cancel.......................................................56
CarChip ..........................................2, 3, 4, 57
CarChip E/X .................................................2
CarChip Help ........................................ 14, 56
CarChip ID........................................... 26, 49
CarChip menu ............................................32
Choose Other Parameters dialog ...................34
Clear CarChip Memory........................... 27, 28
Commands............................................. 1, 15
Comments .................................................56
Communications Port ..................................17
Contacting Davis Instruments.......................60
Copy As............................................... 12, 13
D
Data..........................................................10
Date..........................................................34
Davis Instruments.......................................60
Davis Technical Support...............................60
Default ................................................ 32, 33
Diablo Avenue ............................................60
Display CarChip Memory..............................30
Documentation ...........................................60
Don't Ask Again ..........................................28
Download............................................... 7, 29
Draw Acceleration Events ............................19
Draw Braking Events...................................19
Draw Plots As Lines..................................... 20
Draw Plots Using Lines Rather Than Areas .....20
Draw Speed ............................................... 20
Draw Speed Bands...................................... 20
Driver ID ............................................8, 9, 24
Driver Summary Page ................................. 37
E
Edit........................................................... 52
Email
Technical Support .................................... 60
Email ........................................................ 60
Enable CarChip Alarm.................................. 32
Enable VIN Mode ........................................32
E-newsletter ..............................................60
Event ........................................................ 45
Example File ................................................5
Exit......................................................10, 16
Exporting data............................................ 10
Extreme Braking.........................................33
Extreme Braking Threshold .......................... 46
F
F1 key Help................................................ 5 6
FAQs.........................................................60
Fax Technical Support .................................60
File menu ............................10, 16, 44, 46, 53
Fuel Entry..................................................23
G
G 33
Getting Started ............................................1
H
Hard Braking.........................................33, 46
Hayward California...................................... 60
Help.....................................................14, 56
Help Menu Commands ................................. 56
Home..........................................................1
Home Page ...........................................35, 37
Home Page Summary.................................. 35
I
I.S. Unit System.........................................21
ID........................................................24, 25
Import Log File...........................................28
61
Page 66

CarChip Online Help Printable Version
Info@davisnet.com .....................................60
K
Keyboard Shortcuts.....................................12
Kph..................................................... 18, 32
L
Log Views ..................................................10
M
M/s2 .........................................................33
Manuals.....................................................60
Menu Commands .................................. 10, 16
Metafile .....................................................10
Metric Unit System................................ 21, 33
Miscellaneous .............................................27
More Information........................................59
MPH ..........................................................18
N
New .........................10, 16, 24, 25, 44, 46, 53
New Unit System ........................................21
P
Parameter Thresholds..................................22
Plot View ............................................. 39, 46
Print.................................................... 10, 16
Print Preview........................................ 10, 16
Print Setup........................................... 10, 16
Problem.....................................................52
Properties ............................................ 10, 16
R
Related Topics............................................21
Report......................12, 39, 41, 43, 46, 48, 50
Report button.............................................50
Reset Check Engine Light.............................31
Right Click Options................12, 13, 14, 40, 48
S
S.I. System Unit ................................... 21, 33
Save ................................................... 10, 16
Save As .................................... 10, 13, 14, 16
See Also . 20, 28, 33, 39, 41, 43, 44, 45, 46, 48,
49, 50, 52, 53, 56
Set Acceleration Thresholds..........................33
Set Braking Thresholds................................33
Set Date and Time ......................................34
Set Speed Bands .................................. 32, 34
Setup Menu Commands .... 6, 16, 17, 18, 21, 22,
23, 24, 25, 26, 27, 28
Setup Plots ................................................18
Setup Walkthrough ............................6, 16, 17
Setup/Units dialog ...................................... 21
Speed Bands.........................................32, 48
spreadsheet data........................10, 13, 40, 48
Subscribe
e-newsletter............................................60
Subscribe ..................................................60
Summary ........... 39, 41 , 4 3, 45, 46, 48, 50, 52
Summary Log View..................................... 54
Summary, Report ....................................... 10
Support.....................................................60
Support@davisnet.com................................ 60
T
Table ............................ 10, 12, 41, 43, 48, 50
Table button ..............................................41
Technical Support
E-mail .................................................... 60
Fax ........................................................ 60
Technical Support....................................... 60
Time .........................................................34
Trip Log
view.........................................................9
Trip Log.......................................................9
Trip Log..................................................... 39
Trip Log..................................................... 41
Trip Log..................................................... 43
Trip Log Plot ..............................................39
Trip Log Report ............................... 39, 41, 43
Trip Log Summary ................38, 39, 41, 43, 44
Trip Log Table ............................................41
Trip Speed Plot...........................................32
Trouble Log Problem View............................ 52
Trouble Log Summary............................52, 53
Trouble Log View........................................ 52
U
U. S. Unit System .......................................33
Unidentified Vehicle / Driver...........................8
Unit System
Select.....................................................21
Unit System............................................... 21
Units-of-measure........................................21
User Manuals ............................................. 60
V
Vehicle ID.............................................. 8, 25
Vehicle Summary Page................................37
Vehicle Trouble Log.......................................9
62
Page 67

Index
View
Accident Log Plots ....................................46
Accident Log Report .................................48
Accident Log Summary .............................49
Accident Log Table ...................................50
Activity Log Event ....................................45
Activity Log Summary...............................46
Trip Log ....................................................9
Trip Log Plots...........................................39
Trip Log Report........................................43
Trip Log Summary....................................44
Trip Log Table..........................................41
Trouble Log Summary...............................53
View............................................................9
View..........................................................39
View..........................................................41
View .........................................................43
View .........................................................44
View .........................................................45
View .........................................................46
View .........................................................46
View .........................................................48
View .........................................................49
View .........................................................50
View .........................................................53
View .........................................................54
View Menu Commands ............................ 9, 54
VIN Mode ..................................................32
W
Walkthrough .....................................6, 16, 17
Welcome .....................................................1
Www.davisnet.com .....................................60
63
 Loading...