

Page 1

DriveRight® Fleet Management Software
Database Selection Guide
Use this guide to help you select the right database to use with your
DriveRight Fleet Management Software (FMS), and to help you perform any
required database installation procedures before you run DriveRight FMS for
the first time. DriveRight FMS supports the following databases:
• Single-User Databases:
• MS Access (Microsoft Access, all required software included)
• MSDE 2000 (Microsoft Desktop/Data Engine) (not supported in the
Windows Vista operating system)
• Multi-User Databases:
•MySQL
• MS SQL Server (Microsoft SQL Server)
•Oracle
When you first run DriveRight FMS, you will be required to select a database
to use with the software. Each of the supported databases for DriveRight FMS
have their advantages and disadvantages. First, we’ll look at the selection
considerations for each of the supported database types. Later in this
document we present the installation procedure for each of the databases.
Selection Considerations: Single-User
Review the following considerations for each database and then select the best
database for your situation.
MS Access Considerations
Of the supported databases, MS Access is the easiest to install and use.
• There is no additional software to buy if you use MS Access. DriveRight
FMS automatically installs all the necessary components when you first run
the program.
• MS Access does have limitations to the number of users connected simultaneously to the database, the size of the database, and reliability of the database.
• MS Access is only recommended for installations that have one user.
• Maximum database size for MS Access is 2 gigabytes.
• MS Access is only recommended for small fleets of five vehicles or less.
Be aware that if you are logging GPS and vehicle speed data, the database
size increases very rapidly since GPS and vehicle speed data is logged
much more frequently than data from the DriveRight console. In such
cases, if you decide to go with MS Access database, it is advised to backup
your data at least once a month.
1
Page 2

MSDE Considerations
MSDE stands for Microsoft Desktop/Data Engine, which is a scaled down version of the SQL Server. It is a basic database with Client/Server architecture
from Microsoft.
• MSDE works well with a maximum of five simultaneous connections.
• MSDE is also recommended for single-user installations since DriveRight
FMS software maintains more than one connection to the database server.
• In contrast to MS Access, MSDE runs as a Windows server. If your computer has performance issues, we recommend MS Access instead of MSDE.
Note: In our database performance tests, MS Access performed better than MSDE.
Active Database Size Recommendations
The recommendations displayed in the table below are based on tests and
calculations made with these assumptions:
• 10 trips per day per vehicle.
• Trip duration is 1 hour (10 hours driving time per day per vehicle).
• GPS data logged every 10 seconds.
Scenario
No GPS
MSDE
with GPS
MS
Access
with GPS
Number
of
Vehicles
25 Up to 1 year
50
100
5 Up to 1 month
10 Up to 1 month
Active Data
stored in
Database
Up to 9
months
Up to 6
months
Remarks and Recommendations
Backup data once a month for application
performance. Using backup options, you
can set a maximum of 1 year of data in the
active database.
Backup data once a month for application
performance. Using backup options, you
can set a maximum of 9 months of data in
the active database.
Backup data once a month for application
performance. Using backup options, you
can set a maximum of 6 months of data in
the active database.
Backup data once a month for application
performance. Using backup options you
can set a maximum of 1 month of data in
the active database.
Backup data once a month for application
performance. Using the backup options,
you can set a maximum of 1 month of data
in the active database.
2
Page 3

Note: If your fleet size exceeds the scenarios shown on the previous page, we recommend that
you use a multi-user database. For multi-user databases, theoretically there is no fleet
size limit. We recommend that you back up data once a month, keeping only the amount
of data required for reporting purposes in the active database, typically 3-6 months.
Scenario
Multi-User
Database
with/with-
out GPS
Number
of
Vehicles
Unlimited 3-6 months
Active Data
stored in
Database
Remarks and Recommendations
Backup data every month without GPS or
once a week with GPS. Using the backup
options, you can set a maximum of 6
months data in the active database.
Selection Considerations: Multi-User
Davis recommends using either MySQL, MS SQL Server, or Oracle if more
than one user will be accessing the data at a time, if the fleet has more than
five vehicles, or if you are logging GPS data for more than one vehicle.
MySQL, MS SQL Server & Oracle Considerations
MySQL, Oracle and MS SQL Server database servers are very powerful databases, which can support large amounts of data and multiple simultaneous
connections with good performance.
• Of these three powerful databases, MySQL is the most economical server. It
is by far the easiest to set up and maintain and is also the only multi-user
database used by DriveRight FMS that does not require the support of a
database administrator. We strongly recommend MySQL for customers
with large fleets and potentially large databases that do not already have a
license for MS SQL Server or for Oracle.
• In the case of MySQL, most of the maintenance commands will be integrated through the DriveRight FMS software in the future, to eliminate any
administrative overhead.
• MS SQL Server is a powerful database server from Microsoft. It is also
easy to setup, but MS SQL Server is more expensive than MySQL.
• If you decide to go with MS SQL Server or Oracle, it is assumed that you
have IT personnel who have knowledge to maintain these database servers.
• Though Oracle is a common database server among large applications, it is
both expensive and difficult to maintain.
• In order to connect to an Oracle server with DriveRight FMS running on
multiple machines, Oracle Client software must be installed on each
machine. Each installation of Oracle Client software must be individually
licensed.
3
Page 4
Multi-User Database Server Setup
Follow this sequence when setting up a multi-user database for DriveRight
FMS:
1. Server Installation.
2. Client Installation.
3. Database Configuration.
Multi-User Database Client Setup
Follow this sequence when installing DriveRight FMS on a user’s computer:
1. Client Installation.
2. Database Connection.
MS Access Installation
Of all the databases, MS Access is the easiest to setup. DriveRight FMS automatically installs all the required components for this database.
Server Installation
Not applicable. The server is automatically installed if it is selected during
DriveRight FMS initial configuration.
Database Configuration
Not applicable. The database is automatically configured if it is selected during DriveRight FMS initial configuration.
Database Connection
Please refer to the “DriveRight Fleet Management Software Getting Started
Guide” for DriveRight FMS installation and configuration instructions:
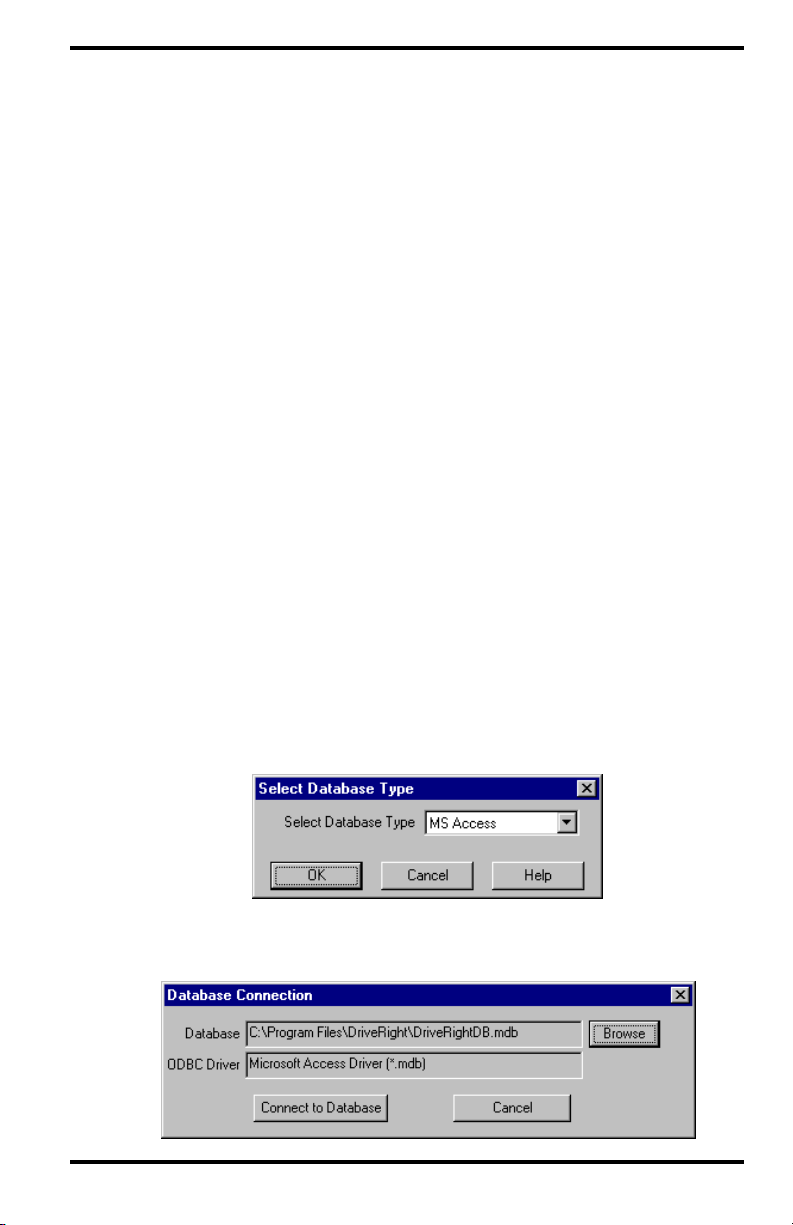
1. When you run DriveRight FMS, the Select Database Type dialog box
displays. Select MS Access and click OK.
A dialog box is displayed with the path in which the database will be created. This defaults to the DriveRight FMS install directory.
4
Page 5
2. If you want to change the directory used for the MS Access database, click
Browse and select the desired directory.
3. To finish the database connection, click Connect to Database. DriveRight
FMS creates a new database if the database doesn’t exist, or it connects to
the specified database if the database already exists.
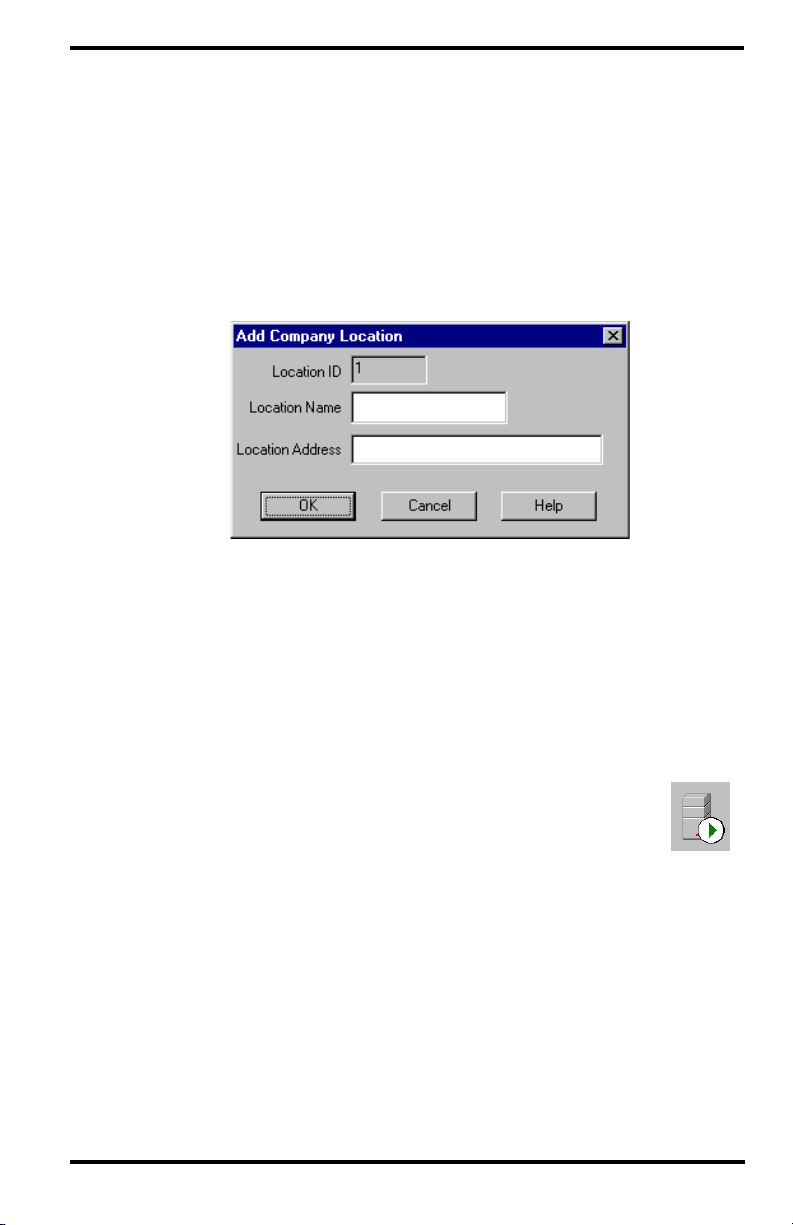
4. If the database is empty when you connect, you are prompted to enter the
location name and address to be associated with all data at your location.
After entering the location name and address, click OK and the FMS
software will start. We recommend that only one user at a time access the
MS Access database.
MSDE Installation
The Microsoft SQL Server 2000 Desktop Engine (also known as MSDE 2000)
is another database option. If using the MSDE Server, MSDE 2000 is required
for FMS 3.7 or later.
Server Installation
1. Please refer to Microsoft MSDE installation documentation for
instructions on installing and configuring your MSDE database.
2. Make sure the MSDE Server is running. To do this go to:
Start->All Programs->Startup->Service Manager. Press
Start/Conti nue, the green arrow icon to start MSDE. When
MSDE is running, you will see the green indicator in the
MSDE icon on the task bar.
Database Configuration
Not applicable. Automatically configured when MSDE is selected during
DriveRight FMS initial configuration.
5
Page 6
Database Connection
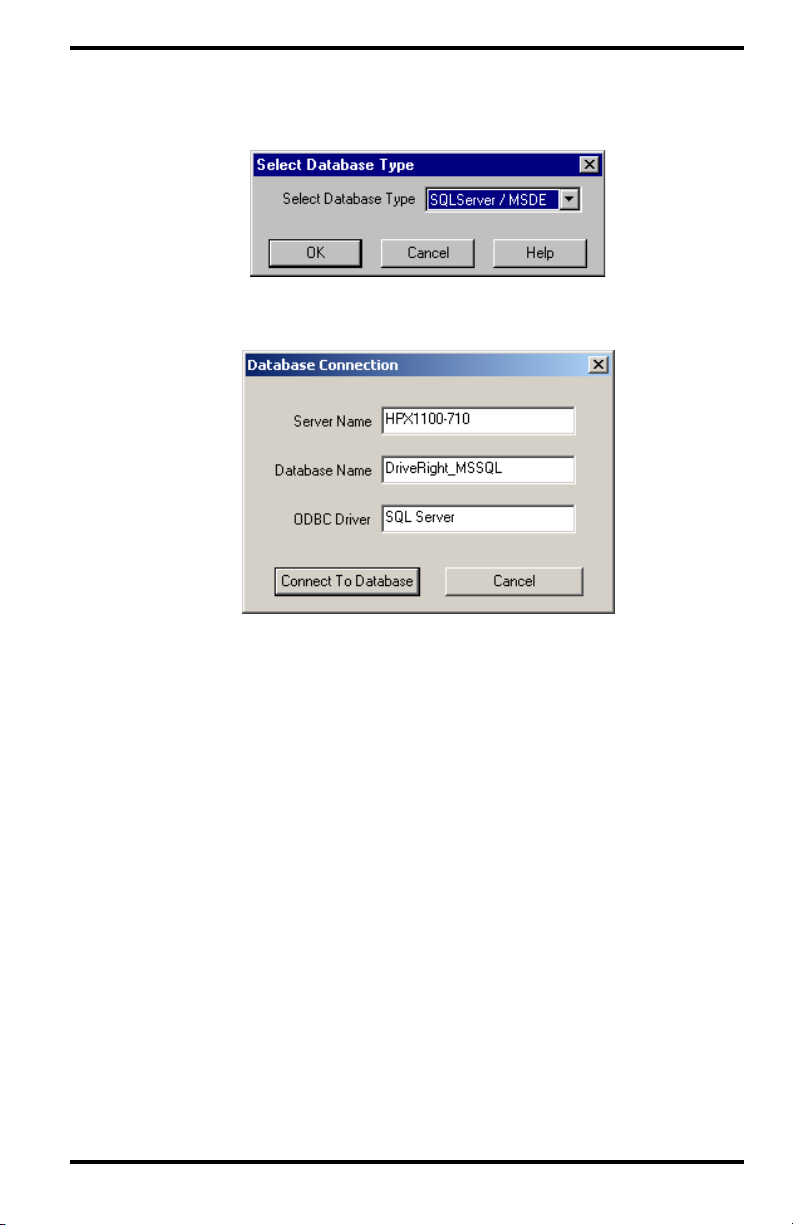
1. When you run DriveRight FMS, the Select Database Type dialog box
displays. Select SQLServer / MSDE and Click OK.
2. The Database Connection dialog box displays with the following fields
after selecting MSDE as your database:
The Database Connection dialog box displays the following fields:
• Server Name — Defaults to the local machine name. You may need to
change this if you do not use the local machine name.
• Database Name — Defaults to DriveRight_MSSQL but can be
changed to any other database running on the server.
• ODBC Driver — This will not need to be changed in most installations.
If version 2.5 of the SQL Server driver is installed (unlikely), then you
will need to edit it to look like {SQL Server}.
3. If the database is empty when you connect, you are prompted to enter the
location name and address to be associated with all the data at your
location.
6
Page 7

4. After entering the location name and address, click OK and the DriveRight
software will start.
5. It should be noted that the MSDE database server is optimized for a
maximum of 5 simultaneous connections. Considering the fact that the
DriveRight FMS software may keep more than one connection alive, it is
advisable to limit the number of users to one at a time.
MySQL Installation
MySQL is a database server developed by a company named 'MySQL AB' as
an Open Source Project. It is considered fast, stable, and is easy to setup compared to database servers like Oracle. Also, it is by far the least expensive
multi-user database server for use with the DriveRight FMS. For medium to
large fleets, we strongly recommend MySQL server, especially if you do not
already have a license for either Oracle or MS SQL server.
Server Installation
1. If you don’t already have a license for MySQL, you need to buy one from
MySQL AB. MySQL Classic version is adequate for all DriveRight FMS
applications.
2. Install MySQL Server. During installation of MySQL server, setting user
names and passwords is optional.
3. You need to make sure MySQL is running first. To do this go to Startup-
>Settings->Control Panel->Administrative Tools->Services. You will see a
service name titled MySQL. If it is not running, select it and right click to
start it.
Client Installation
1. The client software, MySQL Connector/ODBC 2.50 or later, must be
installed on all computers that will be running DriveRight FMS.
Note: MySQLConnector/ODBC3.51.21 is required for running DriveRight FMS on a Windows
Vista operating system.
7
Page 8
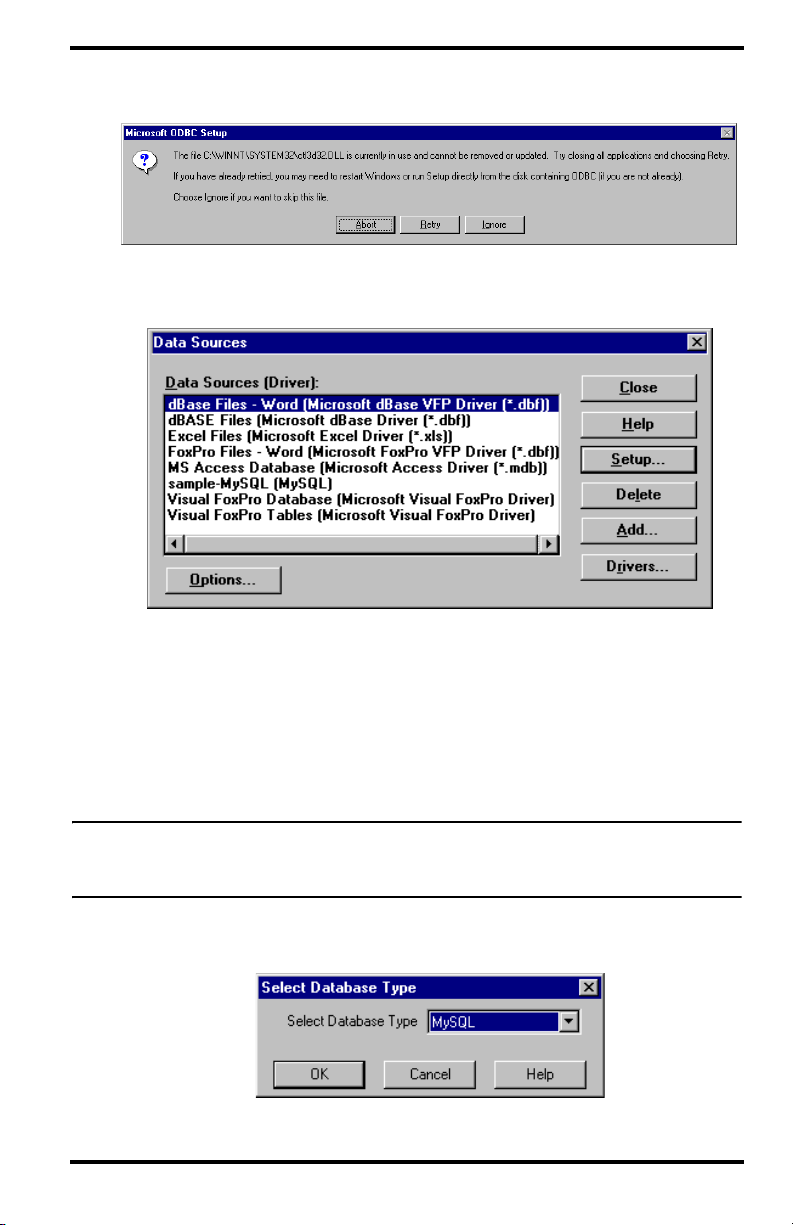
2. During the installation of the MySQL Connector/ODBC 2.50, the
Microsoft ODBC Setup dialog box displays. Click Ignore.
3. Click Close in the Data Sources dialog box. You are finished installing the
client software.
Database Configuration
1. With MySQL running, install and run the DriveRight FMS on the same
machine as the database server. This is only required for database
configuration. After the database is configured, remove DriveRight FMS
from the server. When the database configuration is complete, you will be
able to connect to the MySQL server from any PC on the local area
network.
Note: If you are running MySQL on a non-Windows server, you need to manually execute the
SQL scripts that configure your database with the necessary database tables manually.
The scripts are located in the “mySQL_TablesCreation.sql” file on the install CD.
2. When you run the DriveRight FMS, the Select Database Type dialog box
displays. Select MySQL, and Click OK.
8
Page 9

3. Click Connect to Database in the Database Connection dialog box.
4. If the database is empty when you connect, you are prompted to enter the
location name and address to be associated with all the data at your
location. After entering the location name and address, click Add and the
DriveRight software will start.
Database Connection on User’s Computer
1. When you run DriveRight FMS for the first time, the Database Type
Selection dialog box displays. Select MySQL and click OK.
2. The Database Connection dialog box displays. Enter the machine name
of MySQL Server in the Machine Name text box. Contact your system
administrator for the MySQL machine name.
9
Page 10

3. Click Connect to Database to finish the database connection.
MS SQL Server Installation
MSDE and MS SQL Server are compatible databases developed by Microsoft.
MSDE is a single-user database while MS SQL Server is a multi-user, server
based database. MS SQL Server also requires the services of a database
administrator to install and maintain.
Server Installation
1. If you don’t already have a license for MS SQL Server, buy one from
Microsoft.
2. Install MS SQL Server.
3. Run MS SQL Server. Go to: Start->Programs->Microsoft SQL
Server->Service Manager. Press the green arrow “Start/Continue” button to start MS SQL Server. When the server is running, a green indicator in the MS SQL Server icon displays on
the task bar.
Client Installation
Not applicable.
Database Configuration
The MS SQL server can be configured two ways, on the server itself or from a
user’s computer.
Note: The server can also be configured without installing DriveRight FMS on the server, by
running the DBConfig_DriveRight_MSSQL.bat file. See “Appendix A: Configuring MS
SQL Server Database Manually” on page 17.
10
Page 11

To Configure the Database on the Server:
1. With MS SQL Server running, install and run DriveRight FMS on the
same machine as the database server. This is only required for the database
configuration. After the database is configured you can uninstall the
DriveRight FMS from the server. When the database configuration is
complete, you will be able to connect to the MS SQL Server from any PC
on the local area network.
2. When you run the DriveRight FMS for the first time, the Select Database
Type dialog box displays. Select SQL Server / MSDE and Click OK.
3. When DriveRight FMS is run for the first time, the Database Connection
dialog box displays after selecting SQL Server / MSDE as your database.
The Database Connection dialog box displays the following fields:
• Server Name — Defaults to the local machine name. You may need to
change this if you do not use the local machine name.
• Database Name — Defaults to DriveRight_MSSQL but can be
changed to any other database running on the server.
• ODBC Driver — This will not need to be changed in most installations.
If version 2.5 of the SQL Server driver is installed (unlikely), then you
will need to edit it to look like {SQL Server}.
4. Once you have entered the pertinent information, click Connect to Data-
base. DriveRight FMS launches and connects to the database.
11
Page 12

5. If the database is empty when you connect, you will be prompted to enter
the location name and address to be associated with all the data at your
location. After entering the location name and address, click Add and
DriveRight FMS will start.
6. Once the software has been configured on the MSDE/SQL Server, give
permissions to users to connect from multiple machines. This depends on
how your SQL Server is setup. A simple approach would be to grant permissions to all Windows users to connect. In this case, the Windows Login/
Password is used to authenticate. This can be setup by running SQL Server
Enterprise Manager, going to Security->Logins and adding either individual users or domain users.
7. From this point on, anyone who installs DriveRight FMS needs to enter the
MS SQL Server machine name in the Machine Name edit box in the
Database Connection dialog box. Contact your database administrator for
the MS SQL Server machine name.
To Configure the Database on a User’s Computer:
1. When you run DriveRight FMS for the first time, the Database Type
Selection dialog box displays. Select SQL Server / MSDE and click OK.
12
Page 13

The Database Connection dialog box displays:
The Database Connection dialog box displays the following fields:
• Server Name — Defaults to the local machine name. You may need to
change this if you do not use the local machine name.
• Database Name — Defaults to DriveRight_MSSQL but can be
changed to any other database running on the server.
• ODBC Driver — This will not need to be changed in most installations.
If version 2.5 of the SQL Server driver is installed (unlikely), then you
will need to edit it to look like {SQL Server}.
2. Once the information is entered, click Connect to Database. DriveRight
FMS software launches and connects to the database.
Oracle Installation
Since Oracle server installation and administration are complicated, you will
require an Oracle database administrator to use Oracle with DriveRight FMS.
Server Installation
1. If you don’t already have a license for Oracle server, buy one from Oracle.
2. The DriveRight FMS software has been tested with the Oracle9i server and
with Oracle9i client. Since the DriveRight FMS software executes only the
standard SQL statements, the software should work with previous or later
versions of Oracle server and client.
3. Create the database DRight with SID, using the Database Configuration
Assistant.
4. Create a Net Service Name called DRight, with the SID created in Step 3.
5. Create a user name and password for DriveRight FMS users to connect to
Oracle server.
Client Installation
The Oracle client must be installed on all computers running DriveRight FMS.
Please check with your Oracle database administrator for client licensing.
13
Page 14

Note: If you are running DriveRight FMS on a Windows Vista operating system, please contact
your database administrator or Oracle for Oracle Client with Windows Vista support.
The following steps are for installing Oracle Client 9i. If you install a different
version of Oracle Client, some steps may vary.
Note: Please follow these steps carefully and in the sequence in which they are written. Oracle
installation is a time consuming process, and if you go wrong at some place you may
have to reinstall the whole Oracle Client again.
Oracle Client 9i Installation:
1. Locate and run the Oracle Client CD. Click autorun.exe. The Oracle9i
Client installation screen displays.
2. Click Install/Deinstall Products. The Welcome dialog box displays.
3. Click Installed Products. If the dialog box says you have no installed
products, go to step 4. If an older version exists, a dialog box pops up with
the details. Remove these before installing 9i. The dialog box displays the
installed products as a tree structure. Expand the tree to display the check
boxes. Expand and check all the shown items, and click Remove. Wait
until every thing is uninstalled.
4. Now you are ready to install 9i Client. Click Next. In the Next dialog box,
click Next. This step takes a few seconds.
5. In the Installation Types dialog box, select Administrator and click
Next.
6. In the Summary dialog box, click Install.
7. If the installation is successful, the Oracle Net Configuration Assistant
displays. This creates the Net Service Name, which is used during the creation of the DSN. Select No, I will create net service names… and click
Next.
8. Select Oracle8i or later… and click Next.
9. Enter the Service Name as DRight and click Next.
10. Select TCP and click Next.
11. Enter your Oracle server IP address as the Host Name and click Next.
Contact your database administrator for the Oracle server IP address. If
this step takes more than 10 minutes, please skip the remaining steps and
See “Creating Listener and Net Service Name Manually” on page 15.
12. Click Yes, perform a test and then click Next.
13. You will most likely see a success message. Click Change Login and
change both user name and password to the user name and password given
by your system administrator. Go back and click Next, it performs a test
connection with the new user name and password.
14. Leave Net Service Name as it is and click Next.
14
Page 15

15. When you are prompted to configure another Net Service Name, select No
and click Next. Then click Finish.
16. Click Exit. The Oracle 9i client installation is finished. See “Creating and
Configuring Oracle DSN” on page 16 for the next steps in the process.
Creating Listener and Net Service Name Manually
If you are in this section, you had problems creating a service name while creating Oracle Client. If everything worked fine in the previous section move on
to the next section.
1. First close the present Oracle Client Installation dialog box. A message
may display that states that some things are not installed correctly. Use the
following steps to correct the process.
2. Go to Programs->Oracle-OraHome90->Configuration and Migration
Tools->Net Manager.
3. Expand the directory to Local->Listeners. If LISTENER is displayed, a lis-
tener was created during the 9i Client installation. If so, see step 5 below.
4. Click on Listeners, and then click the '+' icon on the left side if LISTENER
is not displayed. Leave the name as ‘LISTENER'. Then click Add
Address and leave the defaults alone.
5. Click Add Address again, and select Protocol as IPC from the Protocol
drop down box. Enter the key as ‘EXTPROC0’ (The last character is a
zero, and the character before C is capital letter O).
6. Expand Service Naming. If you see a child node, with a name similar to
dright.davisnet.com, continue on to Step 9.
7. Click Service Naming and then click the ‘+’ icon. Add Net Service Name
as ‘DRight’. Click Next twice. In the Host Name, enter the Oracle server
IP address. Click Next to continue.
8. Select Oracle8i or later, and enter DRight in the text box. Click Next.
9. Click Tes t. If this step fails, please contact your database administrator. If
this step succeeds, click Change Login and change both the user name and
password to the user name and password provided by your database
administrator.
10. Click OK and click Tes t again. Then close the dialog box.
11. Click Finish.
12. Expand Service Naming, select the child node which looks similar to:
(DRight.your_company_name.com). Check for the parameters. Host
Name should be the IP address of your Oracle server.
13. Close Net Manager, and click Save when it prompts you. See “Creating
and Configuring Oracle DSN” on page 16 for the next steps in the process.
15
Page 16

Creating and Configuring Oracle DSN
1. Go to Start->Settings->Control Panel.
2. Double click Administrative Tools, and select Data Sources.
3. In the Data Sources dialog box, select the System DSN tab.
4. Click Add, and in the list of drivers select Oracle in OraHome90 (located
almost at the bottom of the list) and click Finish.
5. In Data Source Name, enter DriveRightOracle. In TNS Service Name,
select DRIGHT. Enter the user name and password provided by your database administer and click OK. The Connection Successful dialog box displays. If the Connection Successful dialog box does not display, check for
any spelling mistakes and try again.
6. Click OK. The Data Source Name displays in the list of System Data
Sources.
Database Configuration
1. With the Oracle server running, install and run DriveRight FMS on the
same machine. This is only required for database configuration. After the
database is configured you will be able to connect to the Oracle Server
from any PC on the local area network.
Note: The server can also be configured without installing DriveRight FMS on the server by
running the DBConfig_DriveRight_Oracle.bat file. See “Appendix B: Configuring Oracle
Database Manually” on page 18 for more information.
2. When you run DriveRight FMS for the first time, the Database Type
Selection dialog box displays. Select Oracle and click OK.
3. The Database Connection dialog box displays.
4. Enter the user name and password created in step 4 of the Server
Installation procedure.
5. Click Connect to Database to finish or click Cancel to exit.
16
Page 17

6. If the database is empty when you connect, you are prompted to enter the
location name and address to be associated with all the data at your
location. After entering the location name and address, click OK and the
DriveRight FMS starts.
Database Connection on the User’s Computer
1. When you run DriveRight FMS for the first time, the Database Type
Selection dialog box displays. Select Oracle and Click OK.
2. The Database Connection dialog box displays:
3. Enter the user name and password provided by the database administrator.
4. Click Connect to Database to finish or click Cancel to exit.
Appendix A: Configuring MS SQL Server Database Manually
If a direct configuration of the database files on the MS SQL server can not be
permitted, the database can be configured manually by using the following
instructions. The OSQL command utility should be installed to run the script.
1. Go to Start->Run.
2. Type cmd and click OK. The DOS command window displays.
17
Page 18

3. Change the directory by entering the following in the command line:
cd C:\Program Files\DriveRight
4. Enter the following in the command line:
DriveRight_DBConfig_MSSQL.bat YourServerName YourDatabaseName
YourServerName and YourDatabaseName should be replaced with your
SQL server host name and database name (DriveRight_MSSQL)
respectively. These parameters are used to connect to the MS SQL Server
database.
5. Wait for the script to finish running and open the
DriveRight_DBConfig_MSSQL.log file in the directory C:\Program
Files\DriveRight to check if any errors occurred while the script ran.
Report any errors to Davis Instruments.
Appendix B: Configuring Oracle Database Manually
If a direct configuration of the database files on the Oracle server can not be
permitted, the database can be configured manually by using the following
instructions. The SQLPlus command utility should be installed to run the
script.
1. Go to Start->Run.
2. Type cmd and click OK. The DOS command window displays.
3. Change the directory by entering the following in the command line:
cd C:\Program Files\DriveRight
4. Enter the following in the command line:
DriveRight_DBConfig_Oracle.bat YourUserName YourPassword
YourServiceName
You r Us e rN a me , YourPassword, and YourServiceName should be replaced
with your Oracle user name, your password and your TNS service name
(DRight.your_company_name.com) respectively. These parameters are
used to connect to the Oracle database.
18
Page 19

5. Wait for the script to finish and open DriveRight_DBConfig_Oracle.log
file under the C:\Program Files\DriveRight directory to check for any
errors. Report errors to Davis Instruments.
Contacting Davis Technical Support
If you have questions about DriveRight FMS, or encounter problems installing
or using the software, please contact Davis Technical Support. Most questions
can be answered while you're on the phone.
Sorry, we are unable to accept collect calls.
(510) 732-7814 – Monday through Friday, 7:00 a.m. to 5:30 p.m. Pacific
Time.
(510) 670-0589 – Fax to Technical Support.
support@davisnet.com – E-mail to Technical Support.
info@davisnet.com – E-mail to Davis Instruments.
www.davisnet.com – Product documentation is available on the DriveRight
Support section of our website. Watch for FAQs and other updates.
19
Page 20

Notes:
20
Page 21

Notes:
21
Page 22

Notes:
22
Page 23

Notes:
23
Page 24

Product Number: 8186 Part Number: 7395.195
DriveRight® Fleet Management Software Database Selection Guide Rev. G Manual (10/26/07)
This product complies with the essential protection requirements of the EC EMC Directive 89/336/EC.
Copyright © 2007 Davis Instruments Corp. All rights reserved.
3465 Diablo Avenue, Hayward, CA 94545-2778 U.S.A.
510-732-9229 • Fax: 510-732-9188
E-mail: info@davisnet.com • www.davisnet.com
 Loading...