

Page 1
U
SER’S
130AL
G
UIDE
Product # 8146GD, 8146HD
Page 2

Product Numbers: 8146GD, 8146HD
Davis Instruments Part Number: 7395-056
DriveRight
®
Rev. B Manual (8/13/98)
Controlled Online: Davis Instruments:DriveRight:Manuals:DriveRight 130AL
This product complies with the essential protection requirements of the EC EMC Directive 89/
336/EC.
© Davis Instruments Corp. 1995. All rights reserved.
DriveRight is a registered trademark of Davis Instruments Corp., Hayward, CA.
Page 3

T
ABLE OF CONTENTS
I
NTRODUCTION
. . . . . . . . . . . . . . . . . . . . . . . . . . . . . . . . . . . . . . 2
A Word About Safe Use . . . . . . . . . . . . . . . . . . . . . . . . . . . . . . . . . . . . . 2
About This Manual. . . . . . . . . . . . . . . . . . . . . . . . . . . . . . . . . . . . . . . . . 2
O
PTIONAL ACCESSORIES
U
SING THE DAVIS DRIVERIGHT
. . . . . . . . . . . . . . . . . . . . . . . . . . . . . . . . 2
130AL . . . . . . . . . . . . . . . . . . . . . 3
The Data Screens . . . . . . . . . . . . . . . . . . . . . . . . . . . . . . . . . . . . . . . . . . 3
The Settings Screens . . . . . . . . . . . . . . . . . . . . . . . . . . . . . . . . . . . . . . . . 4
The Buttons . . . . . . . . . . . . . . . . . . . . . . . . . . . . . . . . . . . . . . . . . . . . . . 5
Entering Settings . . . . . . . . . . . . . . . . . . . . . . . . . . . . . . . . . . . . . . . . . . . 7
C
ALIBRATING THE DRIVERIGHT
130AL. . . . . . . . . . . . . . . . . . . . . . 8
Calibration Using the Speedometer . . . . . . . . . . . . . . . . . . . . . . . . . . . . . 8
Calibration Using The Odometer . . . . . . . . . . . . . . . . . . . . . . . . . . . . . 10
SING THE DATA SCREENS
U
. . . . . . . . . . . . . . . . . . . . . . . . . . . . . 11
Current Readings Screen . . . . . . . . . . . . . . . . . . . . . . . . . . . . . . . . . . . . 11
Speed/Distance Log Screen . . . . . . . . . . . . . . . . . . . . . . . . . . . . . . . . . . 13
Acceleration/Deceleration Log Screen . . . . . . . . . . . . . . . . . . . . . . . . . . 15
Driving Time Log Screen . . . . . . . . . . . . . . . . . . . . . . . . . . . . . . . . . . . 16
Limits Screen. . . . . . . . . . . . . . . . . . . . . . . . . . . . . . . . . . . . . . . . . . . . . 17
ETTINGS
S
CREENS
S
. . . . . . . . . . . . . . . . . . . . . . . . . . . . . . . . . . 17
Last Correct Code Screen . . . . . . . . . . . . . . . . . . . . . . . . . . . . . . . . . . . 17
Code Entry Screen . . . . . . . . . . . . . . . . . . . . . . . . . . . . . . . . . . . . . . . . 18
Clear All Log Data Screen . . . . . . . . . . . . . . . . . . . . . . . . . . . . . . . . . . . 19
Alarm On/Off Screen . . . . . . . . . . . . . . . . . . . . . . . . . . . . . . . . . . . . . . 20
Limit Entry Screen . . . . . . . . . . . . . . . . . . . . . . . . . . . . . . . . . . . . . . . . 21
Calibration Screen. . . . . . . . . . . . . . . . . . . . . . . . . . . . . . . . . . . . . . . . . 22
Set Time Screen . . . . . . . . . . . . . . . . . . . . . . . . . . . . . . . . . . . . . . . . . . 22
Set Date Screen . . . . . . . . . . . . . . . . . . . . . . . . . . . . . . . . . . . . . . . . . . . 23
Set Year Screen . . . . . . . . . . . . . . . . . . . . . . . . . . . . . . . . . . . . . . . . . . . 23
ISCELLANEOUS
M
NFORMATION
I
. . . . . . . . . . . . . . . . . . . . . . . . . . 24
Tamper Protection . . . . . . . . . . . . . . . . . . . . . . . . . . . . . . . . . . . . . . . . 24
Battery Operation . . . . . . . . . . . . . . . . . . . . . . . . . . . . . . . . . . . . . . . . . 25
Display Lamp . . . . . . . . . . . . . . . . . . . . . . . . . . . . . . . . . . . . . . . . . . . . 26
Restarting the DriveRight 130AL . . . . . . . . . . . . . . . . . . . . . . . . . . . . . 26
ROUBLESHOOTING
T
T
ECHNICAL
W
ARRANTY
S
PECIFICATIONS
& R
G
EPAIR
UIDE
. . . . . . . . . . . . . . . . . . . . . . . . . . . . . 26
. . . . . . . . . . . . . . . . . . . . . . . . . . . . 29
I
NFORMATION
. . . . . . . . . . . . . . . . . . . . . . 30
One Year Limited Warranty . . . . . . . . . . . . . . . . . . . . . . . . . . . . . . . . . 30
Questions? Call Davis Customer Service. . . . . . . . . . . . . . . . . . . . . . . . 30
Page 1
Page 4

NTRODUCTION
I
Congratulations on purchasing the Davis DriveRight 130AL! The DriveRight
130AL uses advanced microprocessor technology to record and track driver and
vehicle performance. You may set your own limits for speed, acceleration, and
deceleration. An alarm will sound whenever the limits are exceeded. Data is
logged for 130 days so you can review the information at a later date. The DriveRight 130AL even maintains an accident log which gives you a look at the vehicle’s speed information just prior to an accident.
The DriveRight 130AL also features many security features to ensure the integrity
of the data. A password code prevents unauthorized clearing of data or changing of
limits. A tamper indicator appears any time power is removed from the unit and
remains on the display until the correct password is re-entered. All data stored in
the log is protected in “non-volatile” memory which means that it cannot be lost
even if the power is removed and the wires cut!
NOTE:
This manual explains the operation of the DriveRight 130AL. For infor-
mation on installing and mounting the unit, consult the Installation Guide.
A Word About Safe Use
It goes without saying that you should never attempt to set or calibrate the
DriveRight 130AL while you are driving. Safe driving requires extreme attentiveness. The manipulation of the DriveRight 130AL while driving may result in
dangerous distraction. Stop the vehicle first, then, if necessary, recruit someone
to help you.
If you allow others to use your vehicle, always warn them about the DriveRight
130AL’s alarms. If they exceed a set limit, causing an alarm to sound, they may be
startled by the noise or they may get distracted while trying to trace the source of
the noise. In either case, this may become a safety concern, so warn them in
advance.
About This Manual
This manual begins with a brief explanation of the various screens which display
the information collected by the DriveRight 130AL and a description of the
unit’s four-button interface. Following this overview of the unit, each of the
screens are explained in detail. The components of each screen are described and
every function associated with that screen detailed. Finally, this manual explains
the use of the password for data security, and the operation of the unit on battery power.
O
PTIONAL ACCESSORIES
The following accessories, designed for use with the DriveRight 130AL, are
available from your dealer or may be ordered directly from Davis.
Page 2
Page 5
• Second Car Kit:
To use the DriveRight 130AL in more than one vehicle,
order a Second Car Kit for each extra vehicle or new vehicle. The Second Car
Kit provides all the hardware necessary to install a sensor on another vehicle so
you may simply move the DriveRight 130AL display unit between the vehicles.
• DriveRight 130AL Software Kit:
Dramatically expand the power of the
DriveRight 130AL by downloading data to your computer through a standard
serial port. Store, graph, sort, query, and print data collected by the DriveRight
130AL for a look at long-term driving tendencies.
U
SING THE DAVIS DRIVERIGHT
130AL
The sections below offer a basic description of the DriveRight 130AL. Detailed
instructions appear in later sections.
NOTE:
Please do not enter a password until you familiarize yourself with the use of
DriveRight 130AL. The default password (0000) allows access to all screens
and disables the tamper feature. See “Code Entry Screen” on page 18 and
“Tamper Protection” on page 24 for password instructions.
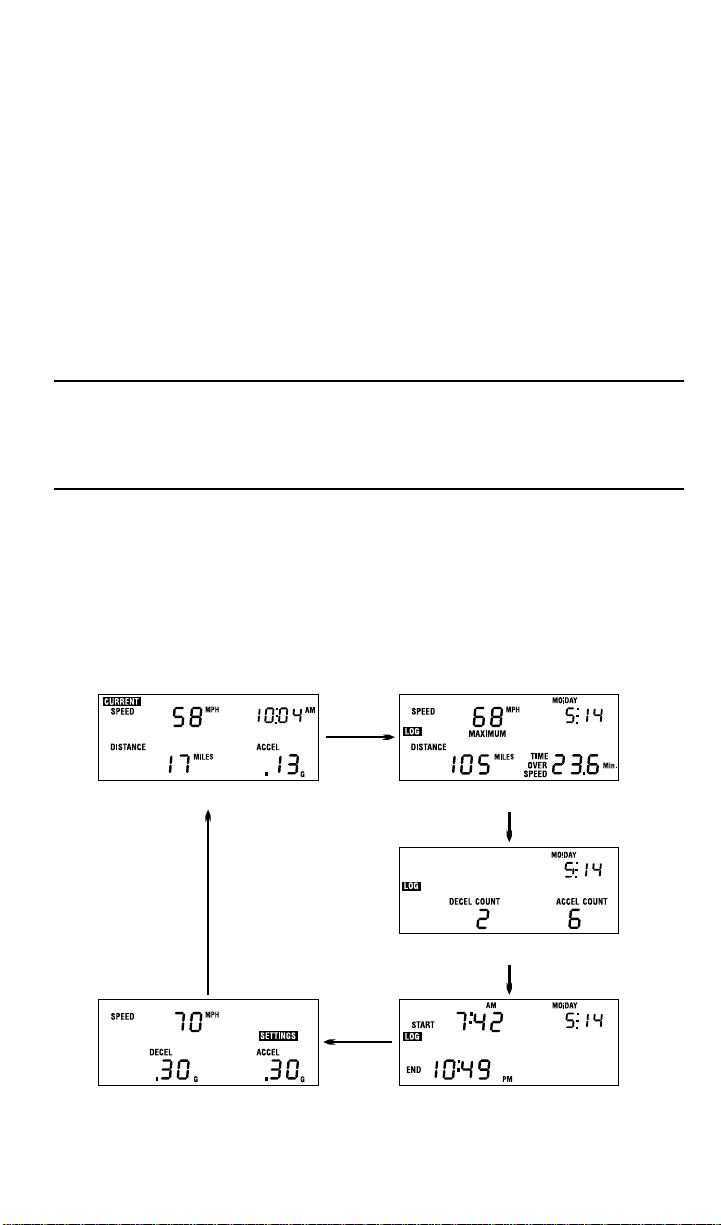
The Data Screens
All of the information monitored and displayed by the DriveRight 130AL can be
obtained by viewing the group of five “data screens.” To cycle through the available
data screens, press
MODE
. Every time you press
MODE
, the DriveRight 130AL
switches to the next screen in the cycle, as shown below:
Data Screens
Current Readings Screen
Speed / Distance Log Screen
Limits Screen
Acceleration / Deceleration Log Screen
Driving Time Log Screen
Page 3
Page 6
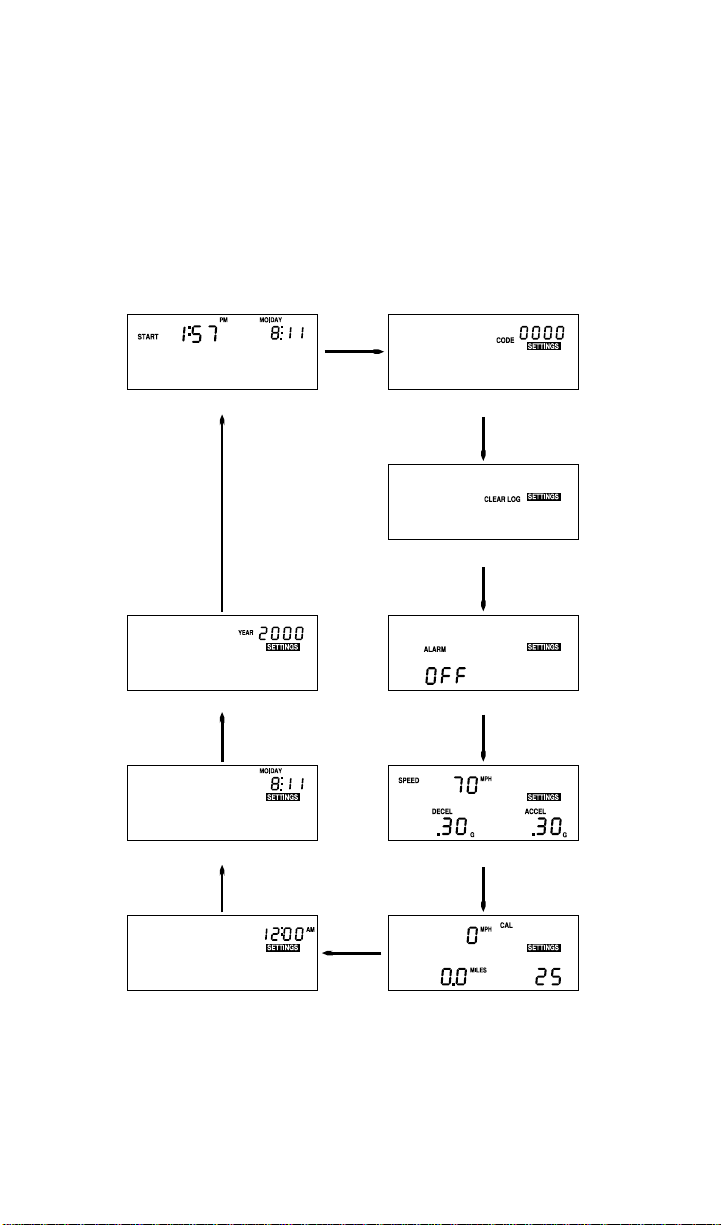
The Settings Screens
The “settings screens” allow you to perform a variety of DriveRight 130AL functions such as entering limits, time, date, and code, clearing data, and turning
alarms on and off. To access the group of nine settings screens from any of the
data screens (or vice versa), press and hold
and the first settings screen appears. Once viewing the settings screens, press
MODE
MODE
below:
MODE
down until the unit beeps
to cycle through the available settings screens. Every time you press
, the DriveRight 130AL switches to the next screen in the cycle, as shown
Settings Screens
Last Correct Code Screen
Data Entry Screen
Code Entry Screen
Clear All Log Data Screen
Alarm On / Off ScreenYear Entry Screen
Limit Settings Entry Screen
Page 4
Time Entry Screen
Calibration Screen
Page 7
The Buttons
The Davis DriveRight 130AL utilizes a four-button interface. In general, each button has one “primary” function, though each button also performs some extra
functions when necessary. A brief description of each button and a list of its functions is included below to get you started and to act as a reference.
:
Scrolls forward through the available digits, days, or display units when data
"+"
entry is necessary.
Screen
Any Screen Where
Data Entry is
Possible
Any Log Screen
Current Readings Toggles the display lamp on and off.
NOTE:
Pressing and holding down
When a digit is flashing, "+" scrolls forward (that is, 1, 2, 3, 4,
etc.) through the available entries for that digit. When a
display segment is flashing (for example, “MPH” or “km/h”),
"+" toggles between the available display units for that
function.
Scrolls forward (that is, Sunday, Monday, Tuesday, etc.)
through up to 130 days of data in the log. The log is cyclical,
which means that when you reach the first day in the log,
pressing "+" again takes you to the last day in the log.
Button Function
+
increases the rate at which the numbers or
"+"
dates scroll forward.
:
Scrolls backward through the available digits, days, or display units when
"-"
data entry is necessary.
Screen
Any Screen Where
Data Entry is
Possible
Log Screens
Current Readings Toggles the display lamp on and off.
When a digit is flashing, "-" scrolls backward (that is, 9, 8, 7,
6, etc.) through the available entries for that digit. When a
display segment is flashing (for example “MPH” or “km/h”),
"-" toggles between the available display units for that
function.
Scrolls backward (that is, Saturday, Friday, Thursday, etc.)
through up to 130 days of data in the log. The log is cyclical,
which means that when you reach the last day in the log,
pressing "-" again takes you to the first day in the log.
Button Function
-
NOTE:
Pressing and holding down
dates scroll backward.
"-"
increases the rate at which the numbers or
Page 5
Page 8
SET/CLEAR
When entering data, pressing and then releasing the
:
SET/CLEAR
button accepts the entry for the currently flashing digit or display segment
and moves you to the next available digit or display segment so you may
enter data there. In addition, from many screens, pressing
SET/CLEAR
holding it down will clear the data related to that screen.
Screen
Any Screen Where
Data Entry is
Possible
Log Screens
Current Readings
MODE
:
Pressing and releasing
the display. Pressing
SET/CLEAR
Press and Release: When a digit or segment is flashing,
pressing and releasing SET/CLEAR accepts the current entry
for that digit/segment and moves you to the next available
digit/segment.
Press and Release : Toggles the time/date display between the
date of the logged data and the time at which the maximum
for that date was recorded.
Press and Hold : Clears all logged data. (Note that you must
enter the correct code to execute this function.)
Press and Release : Toggles the time/date display between the
time and the date.
Press and Hold : Resets the distance register to zero.
MODE
changes the screen which appears on
MODE
and holding it down for three seconds (until
Button Function
the unit beeps) toggles between the group of data screens and the group of
settings screens.
Screen
Any Data Screen
Any Settings
Screen
When Unit is in
“Sleep Mode”
Press and Release: Cycles to the next data screen.
Press and Hold : Switches to the settings screens.
Press and Release : Cycles to the next settings screen.
Press and Hold : Switches to the data screens.
Press and Release : Returns the unit to normal operation. See
“Battery Operation” on page 25 for a description of sleep
mode.
MODE
Button Function
and
Page 6
Page 9
.
Entering Settings
You should familiarize yourself with the procedure for entering settings into the
DriveRight 130AL, since you will need to utilize this procedure often when using
the unit.
NOTE:
The instructions below demonstrate the settings entry procedure by showing
you how to set the time. The instructions assume that you have not yet entered a
code (see “Code Entry Screen” on page 18).
.
.
1. If necessary, press and hold
2. If necessary, press and release
down to access the settings screens.
MODE
MODE
until the set time screen appears.
You will be able to tell if a particular screen accepts data entry because one of the
digits or a display segment (for example, MPH or km/h) will be flashing. In this
case, the AM, PM, or 24HR segment will be flashing.
Flashing Segment
AM
SETTINGS
"+"
3. Press
Each time you press
"-"
or
to toggle between the PM, AM, and 24HR segments.
"+"
"-"
or
, the display segment changes. Changing the display segment changes the format in which the time appears (12 hour or 24
hour) and selects between AM and PM.
4. When the desired segment appears, press
SET/CLEAR
The display segment stops flashing and the first digit begins flashing.
5. Press
Each time you press
You may also hold
"+"
or
to increment the first digit.
"-"
or
"+"
"+"
, the digit increments one number up or down.
"-"
"-"
or
down to scroll quickly through available digits.
(Note that, for the first digit in the time, only 0, 1, and 2 are valid entries.)
NOTE:
Make sure the time you enter is in the correct format (12 hour or 24 hour).
6. When the desired number appears, press
SET/CLEAR
The next digit begins flashing.
7. Repeat this procedure until all digits have been correctly set.
It makes no difference which digit you enter first. If you enter a digit incorrectly,
accidentally skip past a digit, or only want to change certain digits, simply press
and release
8. When finished entering the time, press
SET/CLEAR
until the desired digit begins to flash.
MODE
This sets the time and moves you to the set date screen.
Page 7
Page 10
ALIBRATING THE DRIVERIGHT
C
130AL
You must calibrate the unit before it will report the correct speed and acceleration.
Calibration adjusts the unit to work properly with your vehicle’s differential and tire
size.
NOTE:
You should calibrate the unit whenever you change tires.
Calibrating the unit may be accomplished in one of two ways: using either the
odometer or the speedometer as the basis for calibration. When calibrating the
DriveRight,
always
begin by obtaining a rough calibration of the unit using the
speedometer. Even if you plan to calibrate the unit using the odometer,
brate using the speedometer. Otherwise, the uncalibrated distance reading may
differ from your odometer reading so much that it will take too long to make the
numbers match.
Calibration Using the Speedometer
In order to calibrate using the speedometer, you must drive steadily at 25 MPH
(40 km/h) and press a button on the DriveRight 130AL. The DriveRight
130AL bases its calibration on the speed of the vehicle at the moment of calibration which it assumes to be 25 MPH (40 km/h).
NOTE:
Because of the nature of this calibration procedure, we strongly recommend
that it be performed by two people: one to drive the vehicle and one to operate the DriveRight 130AL.
first
cali-
1. If necessary, press and hold
screens.
2. If necessary, press and release
appears.
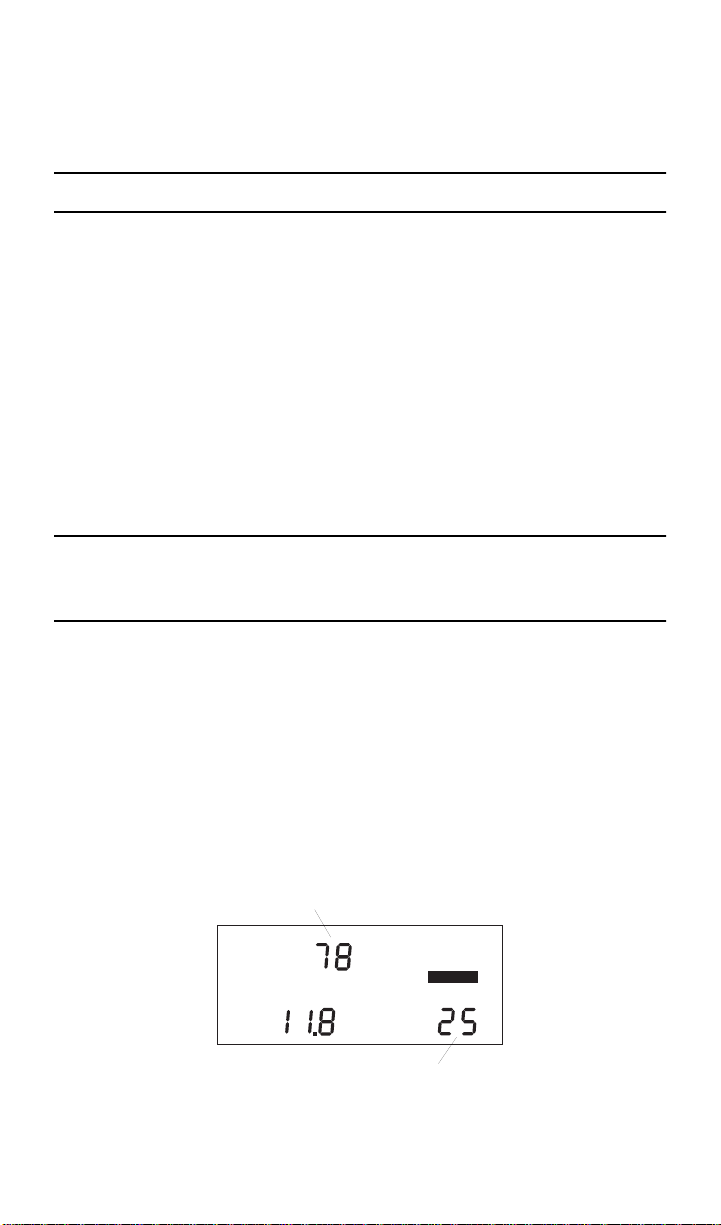
The calibration speed (25 or 40) appears at the bottom right of the display.
The uncalibrated speed reading appears at the top of the display, along with
the unit of measure (MPH or km/h). Note that until you calibrate the DriveRight 130AL this speed reading will be inaccurate. The distance, which
appears in the lower left of the display, is not necessary for this calibration
procedure.
Uncalibrated Speed Reading
DISTANCE
Page 8
MODE
down to access the settings
until the Calibration screen
MODE
CAL
MPH
SETTINGS
MILES
Calibration Speed
Page 11

3. Drive the vehicle until you reach 25 MPH (40 km/h) and keep the vehicle steady at that speed.
4. Once the vehicle is moving at the calibration speed, press and hold
SET/CLEAR
The word CAL appears in the top right of the display when you press
CLEAR
.
down.
SPEED
DISTANCE
Calibration Mode
CAL
MPH
MILES
SET/
SETTINGS
5. Continue to hold
SET/CLEAR
down until the unit beeps and the word
dONE appears on the display.
This indicates that the unit has finished calibrating. The speed reading at the
top of the display will also change so that it reads much closer to your speedometer’s reading.
Calibration Completed
CAL
SPEED
DISTANCE
MPH
SETTINGS
MILES
6. Once the calibration is complete, drive the vehicle and compare the
vehicle’s speedometer to the DriveRight 130AL’s speed display.
Be aware that the DriveRight 130AL responds to changes in speed faster than
most vehicles’ speedometers. To accurately compare, you must drive steadily at a
speed for a short time.
7. If necessary, “fine tune” the calibration by pressing
"+"
or "-".
Each time you press "+" or "-", the DriveRight 130AL speed reading adjusts up
or down. Depending on the speed of the vehicle and the calibration, you may or
may not see a change in the speed reading in the calibration screen each time
you press the button.
NOTE:Pressing and holding "+" or "-" down increases the rate at which the
DriveRight 130AL adjusts the speed reading.
Page 9
Page 12

8. Continue to Press "+" or "-" until the DriveRight agrees with your
vehicle’s speedometer at a variety of speeds.
9. When finished calibrating, press and hold
return to the data screen.
MODE down until you
DO NOT PRESS AND HOLD SET/CLEAR in an effort to save the finetuned calibration! If you press and hold
SET/CLEAR, the unit completely
resets the calibration number. When you finish fine-tuning, press
exit the calibration screen. All information will be automatically saved.
Calibration Using The Odometer
In order to calibrate using the odometer, you must measure the distance you drive
on your vehicle’s odometer and compare that to the distance recorded by the
DriveRight 130AL. Then adjust the DriveRight 130AL until it reads the same distance as the vehicle. Depending on how far you drive in order to calibrate the unit,
this can result in an extremely accurate calibration.
We recommend that you drive a minimum of 20 miles when calibrating the unit.
NOTE:Your vehicle’s speedometer and odometer may not be perfectly linked. If they
differ and you calibrate your DriveRight 130AL using the vehicle’s odometer, you may notice a discrepancy between the DriveRight 130AL’s speed
readings and the vehicle’s speedometer.
1. Obtain a rough calibration, using the speedometer as described in
“Calibration Using the Speedometer” on page 8.
2. After obtaining a rough calibration, reset your vehicle’s trip meter to
zero or make a note of the odometer reading.
3. Make a note of the distance travelled reading displayed in the Current Readings screen.
4. Drive your vehicle for at least 20 miles (32 km).
The further you drive, the more accurate your calibration.
5. When you finish driving, determine how many miles/kilometers the
DriveRight recorded by subtracting the distance travelled reading
you noted prior to driving the vehicle (step 3)to the miles/kilometers displayed when you finished.
6. Compare your vehicle’s trip meter reading to the distance travelled
reading on the DriveRight 130AL.
At this point, what you will need to do is increase or decrease the distance
measured by the DriveRight 130AL until it agrees with your vehicle’s odometer reading. This is accomplished from the calibration screen.
MODE to
Page 10
Page 13

7. If necessary, press and hold MODE down to access the settings screens.
8. If necessary, press and release
MODE until the calibration screen
appears.
The distance travelled appears at the lower left of the display. Note that until
you calibrate the DriveRight 130AL this distance reading will be inaccurate.
The vehicle speed and calibration speed, which appear on the display as well, are
not necessary for this calibration procedure
CAL
SPEED
DISTANCE
Uncalibrated Distance Reading
MPH
SETTINGS
MILES
9. Press "+" or "-" until the number of Miles or Km shown matches the
number of Miles or Km recorded by your vehicle.
Note that, depending on how many miles you drove, you may need to press "+"
"-" more than once before you see a change in the distance register.
or
NOTE:Pressing and holding "+" or "-" down increases the rate at which the
DriveRight 130AL adjusts the distance reading.
10.When finished calibrating, press and hold MODE down until you
return to the current readings screen.
DO NOT PRESS AND HOLD SET/CLEAR in an effort to save the finetuned calibration! If you press and hold
resets the calibration number. When you finish fine-tuning, press
SET/CLEAR, the unit completely
MODE to exit
the calibration screen. All information will be automatically saved.
USING THE DATA SCREENS
The sections below describe the components of each of the five data screens as well
as describing what DriveRight 130AL functions you may perform from each
screen. To switch to the next data screen, press
settings screens, press and hold
MODE down.
Current Readings Screen
The current readings screen displays the current speed and acceleration or deceleration, distance travelled, and the time or date.
Current Speed
CURRENT
SPEED
DISTANCE
Total Distance
Travelled During Day
MPH
MILES
MODE. To switch to the group of
Time/Date
PM
ACCEL
G
Current
Acceleration
Page 11
Page 14

• Current Speed: The current speed of the vehicle in MPH or km/h.
NOTE:If comparing the DriveRight 130AL’s speed reading to your vehicle’s
speedometer, be aware that the DriveRight 130AL responds to changes
in speed faster than most vehicles’ speedometers. To accurately compare,
you must drive steadily at a speed for a short time.
• Time/Date: The time or date (only one appears on the display at a time).
• Distance Travelled: The total distance travelled during the current day
(from 12:00 am to 11:59 pm) in Miles or Km. This register may be cleared
at any time during the day to track trip mileage. However, it also clears automatically at midnight every day.
• Current Acceleration/Deceleration: The current Acceleration/
Deceleration in G’s. (G is the unit of measure for acceleration/deceleration
and is equal to the gravitational constant which is the acceleration of an
object when falling to earth in a vacuum.) Deceleration is represented by a
negative number.
NOTE:1G is approximately equal to an acceleration of 22 MPH per second
(35 km/h per second)
You may perform the following functions from the current readings screen:
• Toggle between time and date: To toggle the time/date display
between the time and date, press SET/CLEAR. Each time you press SET/
CLEAR, the unit switches from displaying the time to displaying the date,
or vice versa.
• Clear distance register: To reset the distance register to zero, press and
hold down SET/CLEAR. After a few seconds, the unit will reset the distance to zero (“0000”).
NOTE:This does not clear the distance in the log.
• Turn display lamp on and off: To turn the unit’s display lamp on,
press "+". To turn the unit’s display lamp off, press "+" again, or press "-".
NOTE:The display lamp does not work when the unit is operating on battery
power (see “Battery Operation” on page 25).
Page 12
Page 15

Speed/Distance Log Screen
At the start of each new day, the DriveRight 130AL saves the previous day’s data to
the log. Up to 130 days worth of information may exist in the log at any one time.
For each day in the log, the speed/distance log screen displays the maximum speed,
total distance, and the amount of time spent driving faster than the set speed limit.
Maximum Speed
on Date Shown
SPEED
LOG
DISTANCE
Total Distance
Travelled During Day
MAXIMUM
Date of
Logged Data
km/h
TIME
Km
OVER
SPEED
Amount of Time Over
Speed Limit Setting
DAY .MO
Min.
• Maximum Speed: The maximum speed recorded during the day in MPH
or km/h.
NOTE:Excessive mechanical vibrations at low speeds can cause erroneous read-
ings. Have your installation checked if you have this problem.
• Date of Logged Data/Time of Maximum Speed: The register in the
upper right of the display can show either the date on which the data appearing
in the display was recorded
or the time at which the maximum speed was
recorded.
• Total Distance Travelled: The total distance travelled during the day in
Miles or Km.
• Amount of Time Over Set Speed Limit: The total amount of time in
which the speed of the vehicle exceeded the set speed limit. This register will
allow you to tell if the vehicle was driven consistently above your set limit for
speed or if the vehicle briefly “popped” over the set speed limit. The time in
this register appears in either seconds, minutes, or hours.
You may perform the following functions from the speed/distance log screen:
• Scroll through the days in the log: Up to 130 days worth of informa-
tion may exist in the log at any time. To move forward through the days, press
"+". To move backward, press "-". Each time you press "+" or "-", the unit dis-
plays the next/previous day in the log. The Date display in the upper right
shows the date on which the data was recorded.
Page 13
Page 16

• Show the time at which the maximum speed was recorded:
To display the time at which the maximum speed was recorded, press SET/
CLEAR. The time appears in place of the date. To return to the date, press
SET/CLEAR again.
Time Maximum
Speed Recorded
SPEED
LOG
DISTANCE
MAXIMUM
km/h
TIME
Km
OVER
SPEED
PM
Min.
• Erase an individual day from the log: You may erase a day from the
log following the procedure below.
NOTE:This procedure erases all data for the day, not just the data displayed on
the speed distance log screen.
1. From the speed/distance log screen, press "+" or "-" until the
desired day appears.
2. Press and hold down
SET/CLEAR until the unit beeps and the
code entry screen appears.
You must enter the correct code in order to clear a day in the log. See
“Code Entry Screen” on page 18 for details on using and entering codes.
Code Setting
CODE
SETTINGS
3. Use "+" and "-" to enter the correct code.
4. After the code is entered correctly, press
MODE.
Once you press MODE (assuming the code is correct), the DriveRight
130AL clears the data for the displayed day and returns you to the speed/
distance log screen.
NOTE:You may erase every day in the log at once from the clear all log data screen
(see “Clear All Log Data Screen” on page 19).
Page 14
Page 17

Acceleration/Deceleration Log Screen
At the start of each new day, the DriveRight 130AL saves the previous day’s data to
the log. Up to 130 days worth of information may exist in the log at any one time.
For each day in the log, the acceleration/deceleration log screen displays the maximum acceleration and the number of times the set acceleration and deceleration
limits were exceeded.
Date of
Logged Data
MO DAY
LOG
DECEL
COUNT
ACCEL
COUNT
# of Times Deceleration
Limit Setting Exceeded
# of Times Acceleration
Limit Setting Exceeded
NOTE:Excessive mechanical vibrations at low speeds can cause erroneous read-
ings. Have your installation checked if you have this problem.
• Number of Times Set Acceleration/Deceleration Limit
Exceeded:
These registers show the number of times the acceleration or
deceleration of the vehicle exceeded the acceleration or deceleration limits you
set. Each time the acceleration or deceleration crosses the limit threshold
another count is recorded. However, until the vehicle’s acceleration drops
below the set limit no new counts will be recorded.
For example, if the set acceleration limit is 0.35 G, and the vehicle accelerates
at 0.36 G, the DriveRight 130AL would record a single count. If the vehicle
continues to accelerate at 0.36 G (or more), no new counts will be recorded. If
the vehicle’s acceleration drops to 0.35 G (or less) and then returns to 0.36 G
(or more) the DriveRight 130AL will record another count.
You may perform the following functions from the acceleration/deceleration log
screen:
• Scroll through the days in the log: Up to 130 days worth of informa-
tion may exist in the log at any time. To move forward through the days, press
"+". To move backward, press "-". Each time you press "+" or "-", the unit dis-
plays the next/previous day in the log. The Date display in the upper right
shows the date on which the data was recorded.
• Erase an individual day from the log: You may erase a day from the log
following the procedure described in “Erase an individual day from the log” on
page 14.
Page 15
Page 18

Driving Time Log Screen
At the start of each new day, the DriveRight 130AL saves the previous day’s data
to the log. Up to 130 days worth of information may exist in the log at any one
time. For each day in the log, the driving time log screen displays the first and
last time the car moved and the total time the vehicle was in motion.
!st Time Vehicle
Moved on Date
Shown
START
LOG
AM
Date of
Logged Data
MO DAY
ND
Last Time Vehicle
Moved on Date
Shown
PM
• First Time Vehicle Moved: The time at which the vehicle first moved
during the day.
NOTE:If the vehicle is being driven at midnight, this register will show
12:00 AM.
• Last Time Vehicle Moved: The time at which the vehicle last moved
during the day in 12 or 24 hour format.
NOTE:If the vehicle is being driven at midnight, this register will show
11:59 PM.
• Date: The date on which the data appearing in the display was recorded
You may perform the following functions from the driving time log screen:
• Scroll through the days in the log: Up to 130 days worth of infor-
mation may exist in the log at any time. To move forward through the days,
press "+". To move backward, press "-". Each time you press "+" or "-", the
unit displays the next/previous day in the log. The Date display in the upper
right shows the date on which the data was recorded.
• Erase an individual day from the log: You may erase a day from the
log following the procedure described in “Erase an individual day from the
log” on page 14.
Page 16
Page 19

Limits Screen
The DriveRight 130AL allows you to enter your own personal limits for speed,
acceleration, and deceleration. You may view the set limits for speed, acceleration,
and deceleration on the limits screen.
NOTE:For information on entering limits, see “Limit Entry Screen” on page 21.
Speed Limit
SPEED
DECEL
Deceleration
Limit
MPH
SETTINGS
ACCEL
G
Acceleration
Limit
G
SETTINGS SCREENS
The sections below describe the components of each of the nine settings screens as
well as describing what DriveRight 130AL functions you may perform from that
screen. To access the group of settings screens, press and hold down
switch to the next settings screen, press and release
of data screens, press and hold
NOTE:Many of the settings screens require or allow you to enter settings (for example,
MODE down.
MODE. To return to the group
code, time, date, limits, etc.). For instructions on entering settings, see “Entering Settings” on page 7.
Last Correct Code Screen
The DriveRight 130AL records the date and time that a correct code was last
entered. This screen allows you to detect if someone learns the code and uses it to
access the settings screens or simply to determine the last time you entered the correct code.
Time of Last Correct
Code Entry
PM MO DAY
MODE. To
Date of Last Correct
Code Entry
Page 17
Page 20

Code Entry Screen
The DriveRight 130AL uses a four-digit code to protect logged data and limit
settings from unauthorized tampering. Until the correct code is entered from
this screen, you may not advance to or use any further settings screens. If someone enters an incorrect code, the tamper indicator appears. For more information on tamper detection, see “Miscellaneous Information” on page 24.
NOTE:If you do not wish to use a code in operating the DriveRight 130AL, simply
set the code to "0000"(the default code). When the code entry screen appears,
simply press
MODE to enter "0000"as the correct code. Using “0000” as the
code also disables the tamper feature.
Code Setting
CODE
SETTINGS
To move past the code entry screen, enter your code as described below.
1. From the code entry screen, use "+" and "-" to enter the correct
code.
2. When the correct code is entered, press
MODE.
If the entered code is correct, the clear all log data screen appears. If the
entered code is not correct, the word NO appears on the display. You may
attempt to enter the correct code five times before the unit returns you to the
current readings screen and activates the tamper indicator.
Invalid Code Indicator
Page 18
NO
TAMPER
Tamper Indicator
CODE
SETTINGS
Page 21

• Enter a code/Change your code: You may enter a code or change your
code from the code entry screen. To enter a code for the first time, follow this
procedure. When told to enter your current code, simply enter the default
code: 0000.
NOTE:Whenever you enter a new code, make sure you write it down and file it.
1. From the code entry screen, use "+" and "-" to enter your current
code.
2. When the correct code is entered, press and hold down
CLEAR
.
SET/
CHG (change) appears in the display to indicate that you may now enter a
new code.
CODE
SETTINGS
Change Code Mode
3. Use "+" and "-" to enter a new code.
4. When the new code is entered, press
MODE.
The unit saves the new code. The clear all log data screen appears.
NOTE:If you need to check the code you just entered, simply press MODE until you
return to the code entry screen. Once entered, the correct code appears on this screen
until you return to the group of data screens.
Clear All Log Data Screen
The clear all log data screen allows you to perform a “total clear” function which
erases all data for every day in your log at once.
CLEAR LOG
1. Press and hold down SET/CLEAR.
SETTINGS
The word CLR (clear) appears in the display to indicate that the unit is preparing to clear all log data. To protect against accidental clearing of data, you must
press and hold down
SET/CLEAR for 3 seconds before the unit clears data.
CLEAR LOG
Clearing Mode Indicator
SETTINGS
Page 19
Page 22

2. Continue to hold down SET/CLEAR until the unit beeps.
When the unit beeps, the word dONE appears in the display to indicate the
unit has cleared all data in the log.
CLEAR LOG
SETTINGS
Clearing Completed Indicator
Alarm On/Off Screen
The alarm on/off screen lets you turn the DriveRight 130AL’s audible alarm on
and off.
ALARM
Alarm Status Indicator (On/Off)
SETTINGS
To toggle the alarm between on and off, press any key except MODE. The word
ON or OFF appears in the display to indicate the alarm status.
The DriveRight 130AL’s alarm is triggered whenever speed, acceleration, or deceleration exceed the limits you have set (see “Limit Entry Screen” on page 21) for
the appropriate function. The unit will beep whenever an alarm is triggered. In
addition, the word ALARM and the name of the function whose limit is being
exceeded blinks on and off in the display. In the illustration below, alarms for both
acceleration and speed have been triggered.
Flashing Speed and Acceleration
Alarm Indicators
AM
ACCEL
SPEED
S ART
T
LOG
ALARM
ND
PM
Flashing Alarm Indicator
OTAL
T
TIME
MO DA Y
Min.
If the speed alarm is triggered, the DriveRight 130AL will beep until the vehicle
speed drops below the set speed limit. If the acceleration and/or deceleration alarm
is triggered, the unit will beep until the vehicle acceleration/deceleration drops
below the set limit or for three seconds whichever is longer. That is, the unit will
beep for a minimum of three seconds any time the acceleration or deceleration
alarm is triggered.
Page 20
Page 23

Limit Entry Screen
The limit entry screen allows you to set limits for speed, acceleration, and deceleration.
You may also change the unit of measure in which speed is displayed (MPH or km/h).
Speed Limit
SPEED
DECEL
Deceleration
Limit
MPH
SETTINGS
ACCEL
G
Acceleration
Limit
G
You may perform the following functions from the limit settings entry screen:
• Enter/Change a Limit: Press and release SET/CLEAR until one of the
digits in the desired register (Speed, Acceleration, Deceleration) is flashing.
Then use "+" and "-" to enter a new limit.
NOTE:Each register contains three digits, the first of which does not appear unless
your set speed limit is 100 or above or your set acceleration and deceleration limit is 1.00 or above. The third digit will appear as you enter a new
limit. The maximum limit settings are as follows: Speed 255, Acceleration
and Deceleration 2.55.
The table below translates “G’s” into the number of seconds it takes for a car to
go from 0 to 60 MPH (0 to 100 km/h). Use this table to help you decide on an
appropriate acceleration or deceleration limit setting.
0 to 60 MPH
G’s
0 to 100 km/h
0.05 54.7 s 0.40 6.8 s 0.75 3.6 s
0.10 27.3 s 0.45 6.1 s 0.80 3.4 s
0.15 18.2 s 0.50 5.5 s 0.85 3.2 s
0.20 13.7 s 0.55 5.0 s 0.90 3.0 s
0.25 10.9 s 0.60 4.6 s 0.95 2.9 s
0.30 9.1 s 0.65 4.2 s 1.00 2.7 s
0.35 7.8 s 0.70 3.9 s
0 to 60 MPH
G’s
0 to 100 km/h
0 to 60 MPH
G’s
0 to 100 km/h
• Change the Unit of Measure for Speed: You may select either MPH
or km/h.
1. Press and release SET/CLEAR until the display segment (MPH or
km/h) is flashing.
2. Press
"+" to switch from MPH to km/h or vice versa.
Each time you press "+", the unit toggles between MPH and km/h.
Page 21
Page 24

3. When the desired unit of measure appears in the display, press
SET/CLEAR.
The speed will display in the appropriate unit of measure. Note that the
unit will not automatically convert the speed limit setting from MPH to
km/h or vice versa. You must enter an appropriate setting for the new
unit of measure yourself.
NOTE:Distance appears in the “same” unit of measure as speed. That is, if speed is
shown in Miles per Hour, distance appears in Miles. If speed is shown in Kilometers per Hour, distance appears in Kilometers.
Calibration Screen
The calibration screen allows you to calibrate the DriveRight 130AL for use
with your vehicle. See “Calibrating the DriveRight 130AL” on page 8 for
instructions on calibrating the DriveRight 130AL.
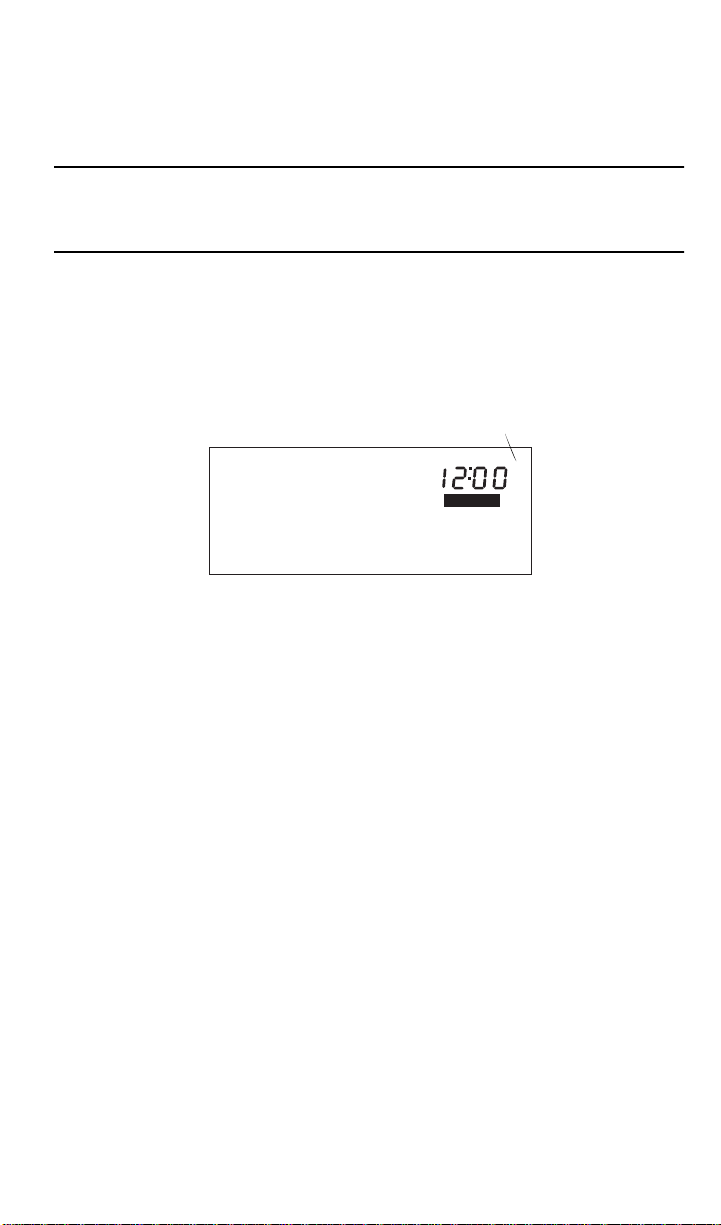
Set Time Screen
The set time screen allows you to set the time on the DriveRight 130AL and to
select the format (12 hour or 24 hour) in which you want time displayed.
Time Format
AM
SETTINGS
You may perform the following functions from the set time screen:
• Set the time: Use "+" and "-" to set the time.
NOTE:If you are displaying time in the 12 hour format, remember to choose
either AM or PM. To do this, follow the same procedure as if you were
changing the format of the time display, as explained below.
• Change the time format: You may select either 12 hour or 24 hour
format.
1. Press and release SET/CLEAR until the PM, AM, or 24HR seg-
ment is flashing.
2. Press
"+" to switch between the three possible options: PM,
AM, and 24HR or vice versa.
Each time you press "+", the unit toggles between options in the following order: PM, AM, 24HR.
3. When the desired option appears in the display, press SET/
CLEAR
.
The time will display in the appropriate format. Note that the unit will
not automatically convert the time from 12 hour to 24 hour or vice
versa. You must enter the time in the new format yourself.
Page 22
Page 25

Set Date Screen
The set date screen allows you to set the date on the DriveRight 130AL and to
select the format (Day.Month or Month:Day) in which you want the date displayed.
Date Format
DAY.MO
SETTINGS
You may perform the following functions from the set time screen:
• Set the date: Use "+" and "-" to set the date.
• Change the date format: You may select either Day.Month or
Month:Day format.
1. Press and release SET/CLEAR until the Day.Mo or Mo:Day seg-
ment is flashing.
2. Press
"+" to switch from Day.Mo to Mo:Day, or vice versa.
Each time you press "+", the unit toggles between Day.Mo and Mo:Day. At
the same time, the displayed date automatically changes into the appropriate format.
3. When the desired format appears in the display, press SET/
CLEAR
.
Set Year Screen
The set year screen allows you to enter the correct year. This is not essential to unit
operation, however, if you enter the correct year, the unit will automatically adjust
for leap years.
YEAR
SETTINGS
Use "+" and "-" to enter the correct year in the available register.
Page 23
Page 26

MISCELLANEOUS INFORMATION
Tamper Protection
The DriveRight 130AL will alert you if anyone attempts to tamper with the
unit, provided that you have entered a code other than 0000. If anyone disconnects power from the unit or if an incorrect code is entered five times, the DriveRight 130AL automatically records the time at which the tampering occurred.
The word TAMPER appears on all screens until a correct code is entered.
CURRENT
SPEED
km/h
AM
DISTANCE
TAMPER
Flashing Tamper Indicator
Km
ACCEL
G
If you press and hold down MODE to access the settings screens, the tamper time
screen appears. This screen shows the time and date the tampering occurred. Note
that the unit only records the first time tampering occurred. Any subsequent
attempts to tamper with the unit are not recorded until the tamper segment is
cleared by entering the correct code.
Date Tampering Occurred
MO DA Y
TAMPER
PM
Time Tampering Occurred
Once the tamper segment appears, it remains on the display until you correctly
enter your code. To clear the tamper segment, press MODE until the code entry
screen appears and enter your code (see “Code Entry Screen” on page 18).
If all power is removed from the unit (including the battery) the DriveRight
130AL will show the half-hour prior to the time power was removed. For example,
if power was removed at 2:37, the DriveRight 130AL would record 2:30. If power
was removed at 4:25, the DriveRight 130AL would record 3:30.
NOTE:All data in the log is stored in “non-volatile” memory which means that
even if power is removed, this data will not be lost.
Page 24
Page 27

Battery Operation
The DriveRight 130AL is designed to be taken out of your vehicle so the data may
be reviewed anywhere. If you disconnect the unit from its power source (the vehicle) it will automatically switch to battery power. The word BAT appear in the
lower left corner of all screens to indicate that you are running on battery power.
CURRENT
SPEED
MPH
MO DA Y
DISTANCE
BAT
Battery Power Indicator
MILES
ACCEL
G
NOTE:If you notice that the LCD is fading when running on battery power, it means
your battery power is low. You should replace your battery as soon as possible.
To install a new battery, insert the battery as shown below.
Installing the Battery
When operating under battery power, the unit will undergo a few changes in operation in order to conserve battery power:
• If you go more than 5 minutes without pressing a button, the
unit enters “sleep mode”:
In sleep mode, all but the most essential unit
functions (that is, time and date) are shut down. The display will go blank and
no data will be recorded during the time when the unit is “asleep.”
NOTE:The unit will never go into sleep mode when connected to your vehicle’s
battery.
To “wake up” the unit, press MODE. Note that you must press MODE to
wake the unit up. Simply reconnecting the unit to your car’s battery will not
wake it up to begin recording data. You must press MODE.
Page 25
Page 28

If the unit is in sleep mode for an entire day (from midnight to midnight)
no data for that day will be written into the log. For example, if the unit is
not in sleep mode for some portion of April 18 and April 20, but is in sleep
mode for all of April 19, the log will only contain data for April 18 and April
20. In this case, when viewing April 18, pressing "+" would cause April 20
to appear on the display, not April 19 as you might expect.
• The unit cannot record data: This is self-evident if the unit is discon-
nected from the vehicle. However, you should be aware that if you do not
power the DriveRight 130AL from your car’s battery, it will not record any
data.
• The display lamp is disabled: You cannot turn on the unit’s display
lamp.
• The unit’s beeps are extremely faint: The beeps which accompany
actions will be extremely quiet.
Display Lamp
In order to read the DriveRight 130AL at night, use the display lamp. To toggle
the display lamp on and off, press
"+" or "-" when viewing the current readings
screen. Be aware that the display lamp does not work when the unit is operating
on battery power.
NOTE:The display lamp automatically shuts itself off after 10 minutes if the vehi-
cle is stopped.
Restarting the DriveRight 130AL
If DriveRight 130AL display “locks up,” you may restart the DriveRight 130AL
by pressing and releasing
MODE and "+" at the same time. No log data, set-
tings, or code information is lost when you restart the unit.
NOTE:The tamper indicator will appear if you restart the unit in this way, pro-
vided you have entered a code other than 0000.
TROUBLESHOOTING GUIDE
While the DriveRight 130AL is designed to provide years of trouble-free operation, occasional problems may arise. If you are having a problem with your unit,
please check the following guide before calling the factory. You will be able to
solve many of the problems yourself. If, after checking this guide, you are still
unable to solve the problem, please call the factory at 1-510-732-7814 for further instructions. Please do not return your unit for repair without prior authorization.
NOTE:We will be glad to answer any questions you may have regarding the opera-
tion of the Drive-Right unit itself. We cannot, however, answer any questions relating to the installation of the unit in your vehicle.
Page 26
Page 29

• I can't turn my lamps off.
Make sure you are in the current readings screen when you hit "+" or "-". (See
“Current Readings Screen” on page 11.)
• The lamps come on momentarily when I plug the unit in.
This is normal.
• When operating on batter power, the LCD segments are faint.
Battery power is low. Replace the battery. (See “Battery Operation” on page 25.)
• The BAT segment is on when the unit is plugged in.
The unit is not getting primary power. Check the fuse in the power line.
• My buzzer is faint or not audible when the unit is operating on
battery power.
This is normal.
• The display is blank even when plugged into the vehicle.
It is possible that the unit was in sleep mode (see “Battery Operation” on
page 25) when you connected it to the car. Press MODE to “wake” the unit up.
If this does not solve the problem, or if the unit goes into sleep mode when
connected, consult the troubleshooting section in the Installation Guide.
• My DriveRight 130AL and my speedometer do not agree.
From the calibration screen, use the "+" and "-" keys to fine adjust the speed.
NOTE: The DriveRight 130AL responds to changes in speed faster than most
speedometers.
• My speed is intermittently reading zero while driving.
This could be one of two things. First, make sure the speed sensor is within 3/
8”- 5/8” (10-16 mm) of the magnet. If it is, make sure the installed speed sen-
sor protrudes at least Ω” from the bracket.
• My speed reads zero while driving.
There could be a number of things wrong. Make sure the DriveRight 130AL is
plugged in. Make sure the DriveRight 130AL is calibrated. Make sure the
speed sensor is within 3/8”-5/8” (10-16 mm) of the magnet. Make sure the
unit is not running on battery power (see “Battery Operation” on page 25). If
it is check the fuse in the power line. If all of this fails to solve the problem,
consult the trouble shooting section of your Installation Guide.
• The speed reading on the DriveRight 130AL agrees with my
vehicle’s speedometer, but the distance reading on the DriveRight 130AL and my odometer differ (or vice versa).
First of all, make sure you follow the DriveRight 130AL calibration instructions (see “Calibrating the DriveRight 130AL” on page 8) carefully. If you
have calibrated correctly and the difference between the DriveRight 130AL’s
reading and the vehicle’s reading is more than 1%, the error lies in the link
between your vehicle’s odometer and speedometer.
Page 27
Page 30

• The DriveRight 130AL seems to be recording erroneous readings at low speeds.
Excessive mechanical vibrations at low speeds can cause erroneous readings.
Have your installation checked if you have this problem.
• The display is black or all the segments appear to be on.
The display was left in direct sunlight. The display will return when it cools
down. Even though the display is black, the DriveRight 130AL continues to
record data.
• The tamper light won't go off.
Enter your code. (See “Tamper Protection” on page 24).
• I’ve forgotten my secret code.
Ship the unit back to us with a check for $25.00 and a note explaining the
situation. We will return the unit to you with the code set to 0000.
Page 28
Page 31

TECHNICAL SPECIFICATIONS
Displays current speed in MPH or km/h.
Records maximum speed for each day.
Speed
Acceleration
and
Deceleration
Distance
Time & Date
Sensor Type
Records # of minutes speed exceeded set limit for each day.
Sounds audible alarm when speed exceeds specified limit.
Displays visual alarm message when speed exceeds specified limit.
Accuracy ±1%.
Displays current acceleration in g’s (an acceleration of 22 MPH/sec. or 35 km/h/sec.).
Records number of times acceleration exceeded specified limit each day.
Records number of times deceleration exceeded specified limit each day.
Sounds audible alarm when acceleration or deceleration exceeds specified limit.
Displays visual alarm message when acceleration or deceleration exceeds specified
limits.
Accuracy ±5%.
Displays total distance travelled during current day in miles or kilometers.
Records total distance travelled during each day in miles or kilometers.
Accuracy ±1%.
Displays current date.
Displays current time in 12- or 24-hour format.
Records first time vehicle moved during each day.
Records last time vehicle moved during each day.
Records time and date of maximum speed.
Accuracy ±2 seconds/day.
Rugged reed switch sensor with magnet for mounting on vehicle driveshaft (rear
wheel drive) or CV joint (front wheel drive).
Lamp
Primary
Power
Secondary
Power
Security
Temperature
Size
Display
Mounting
Options
A CCESSORIES
DriveRight
130AL
Software Kit
Second Car
Kit
Illuminated display.
Your vehicle’s 12-volt battery.
3-volt CR123 lithium battery (included) allows display unit to be removed from car.
Battery operating time is approximately 260 hours (four months non-operating) when
it is disconnected from vehicle.
Owner-specified 4-digit password protects settings and data.
Tamper indicator message appears if unit is disconnected.
Tamper screen shows time and date unit was disconnected.
Operating range -4˚ F to 185˚ F (-20˚C to 85˚C).
5.25” x 2.25” x 0.86” (132 mm x 57 mm x 22 mm).
LCD display size: 3.20” x 1.30” (81 mm x 33 mm).
Visor clip for mounting on visor or door pockets.
Double-sided tape for mounting on dashboard and other surfaces.
Velcro with pressure-sensitive adhesive for mounting on dashboard and other surfaces.
Mounting bracket with right angle adapter for special mounting needs.
For IBM compatible computers. Prints, graphs, and tracks data downloaded from
DriveRight 130AL. Comes with hardware and software necessary to install on your
computer.
Includes sensor and installation hardware. Allows Davis DriveRight 130AL display unit
to be used with an additional vehicle.
Page 29
Page 32

WARRANTY & REPAIR INFORMATION
One Year Limited Warranty
We warrant our products to be free of defects in material and workmanship for one
year from date of original purchase. We make every effort to carefully manufacture
our products to the highest standards of quality. Occasionally, however, parts may
be missing, defective, or damaged.
If you have a defective part, please call 1-510-732-7814 for authorization before
returning the item for repair or replacement. Upon receiving authorization, return
the product to us, shipping charges prepaid. Include proof of purchase and a written
explanation of the problem. During the warranty period, we will, at our option,
either repair or replace the product free of charge.
This warranty does not cover damage due to improper installation or use, negligence,
accident, unauthorized service, or the incidental or consequential damages beyond
the Davis products themselves. Implied warranties are limited in duration to the life
of this limited warranty. Some states do not allow limitations on how long an implied
warranty lasts, or the exclusion or limitation of incidental and consequential damages, so the above limitations may not apply to you. This warranty gives you specific
legal rights. You may have other rights, which vary from state to state.
Questions? Call Davis Customer Service.
If you have any questions about our products, please call our Customer Service
staff at 1-510-732-7814. We'll be glad to help. Most questions can be answered
while you're on the phone. We cannot answer any questions regarding the installation of the DriveRight 130AL in any vehicle. Sorry, we are unable to accept collect
calls.
FCC PART 15 CLASS B REGISTRATION WARNING
This equipment has been tested and found to comply with the limits for a Class B digital device, pursuant to
Part 15 of the FCC Rules. These limits are designed to provide reasonable protection against harmful interference in a residential installation. This equipment generates, uses, and can radiate radio frequency energy and,
if not installed and used in accordance with the instructions, may cause harmful interference to radio communications.
However, there is no guarantee that interference will not occur in a particular installation. If this equipment
does cause harmful interference to radio or television reception, which can be determined by turning the
equipment on and off, the user is encouraged to try to correct the interference by one or more of the following measures:
Reorient or relocate the receiving antenna.
Increase the separation between the equipment and receiver.
Connect the equipment into an outlet on a circuit different from that to which the receiver is connected.
Consult the dealer or an experienced radio/TV technician for help.
Changes or modifications not expressly approved in writing by Davis Instruments may void the user's authority to operate this equipment.
3465 Diablo Avenue, Hayward, CA 94545-2778
510-732-9229 • Fax: 510-732-9118
E-mail: info@davisnet.com • www.davisnet.com/driveright
 Loading...