

Page 1
da Vinci
da Vinci Jr. 2.0 Mix 3D Printer
Jr.2.0 Mix
July 2016
da Vinci
User Manual
Jr. 2.0 Mix
P 1
Page 2
da Vinci
The purpose of this user manual is to help users understand and use the da Vinci Jr. 2.0 Mix 3D printer correctly. It contains
the operating instructions, maintenance information and application skills of the da Vinci Jr. 2.0 Mix 3D printer. To learn
more about the latest news of the da Vinci Jr. 2.0 Mix 3D printer, please contact local dealers or visit the ofcial website of
XYZprinting: http://www.xyzprinting.com
Jr.2.0 Mix
July 2016
Trademarks
All trademarks and registered trademarks are the property of their respective owners.
Print History
New editions of this manual incorporate new and changed material different from previous editions. Minor corrections and
updates may be incorporated into reprints of the current edition without releasing additional announcements or documentation regarding the updated version. The User Manual is for user reference only. If you need to obtain the latest information,
you are welcomed to visit the XYZprinting website: www.xyzprinting.com
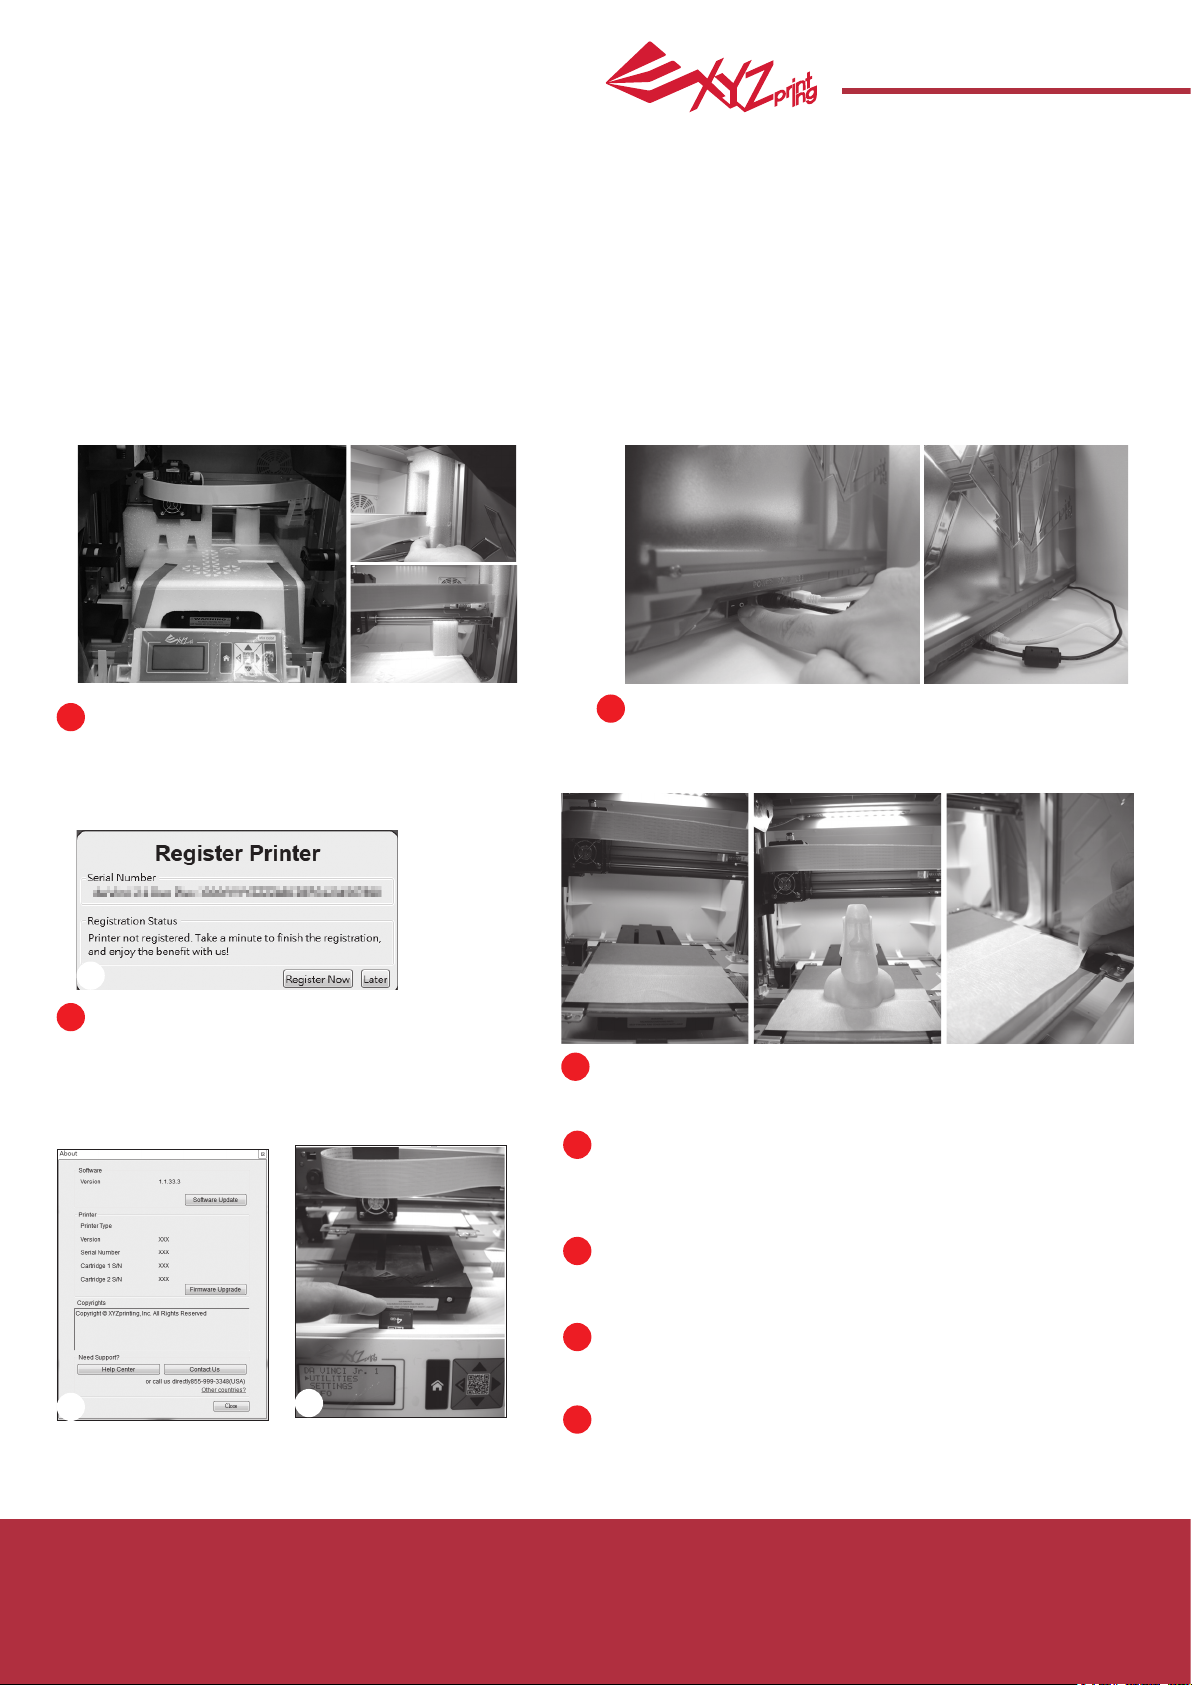
Before using this printer, please first remove
1
the xed materials from the printing module and
printing bed. Switching on the printer's power
without removing these fixed materials may
damage the machine.
3
Registration via XYZware before your rst print
3
is strongly recommended. When registered with
XYZprinting, you will receive latest technical
supports and updates. To register, simply click
"Register Now" to begin.
Before launching XYZware, connect the PC to with printer
2
using the USB cable. For a better user
experience, it is strongly advised to follow the proper
procedure for using the product.
Before you start printing, please afx the bed tape on the print
4
bed. The bed tape may be removed after printing is complete. (Bed
tape can be reused.)
You may use XYZware to initiate manual updates to the printer
5
rmware and software. When using the printer for the rst time,
we recommend connecting to the Internet and performing manual
update once to obtain the latest resources.
The optimal room temperature for printing is 15-26 ◦C (60-78 ◦F).
6
Printing quality may be affected if room temperature is higher or
lower.
If you need more detailed technical support and program
7
resources, visit the website:
http://support.xyzprinting.com/global_en/Support
5
8
Before operating the printer, insert the SD card in the SD card port
8
to make sure that the printing program is able to run properly.
Please carefully read the contents of the product
instruction manual before using this product.
P 2
Page 3
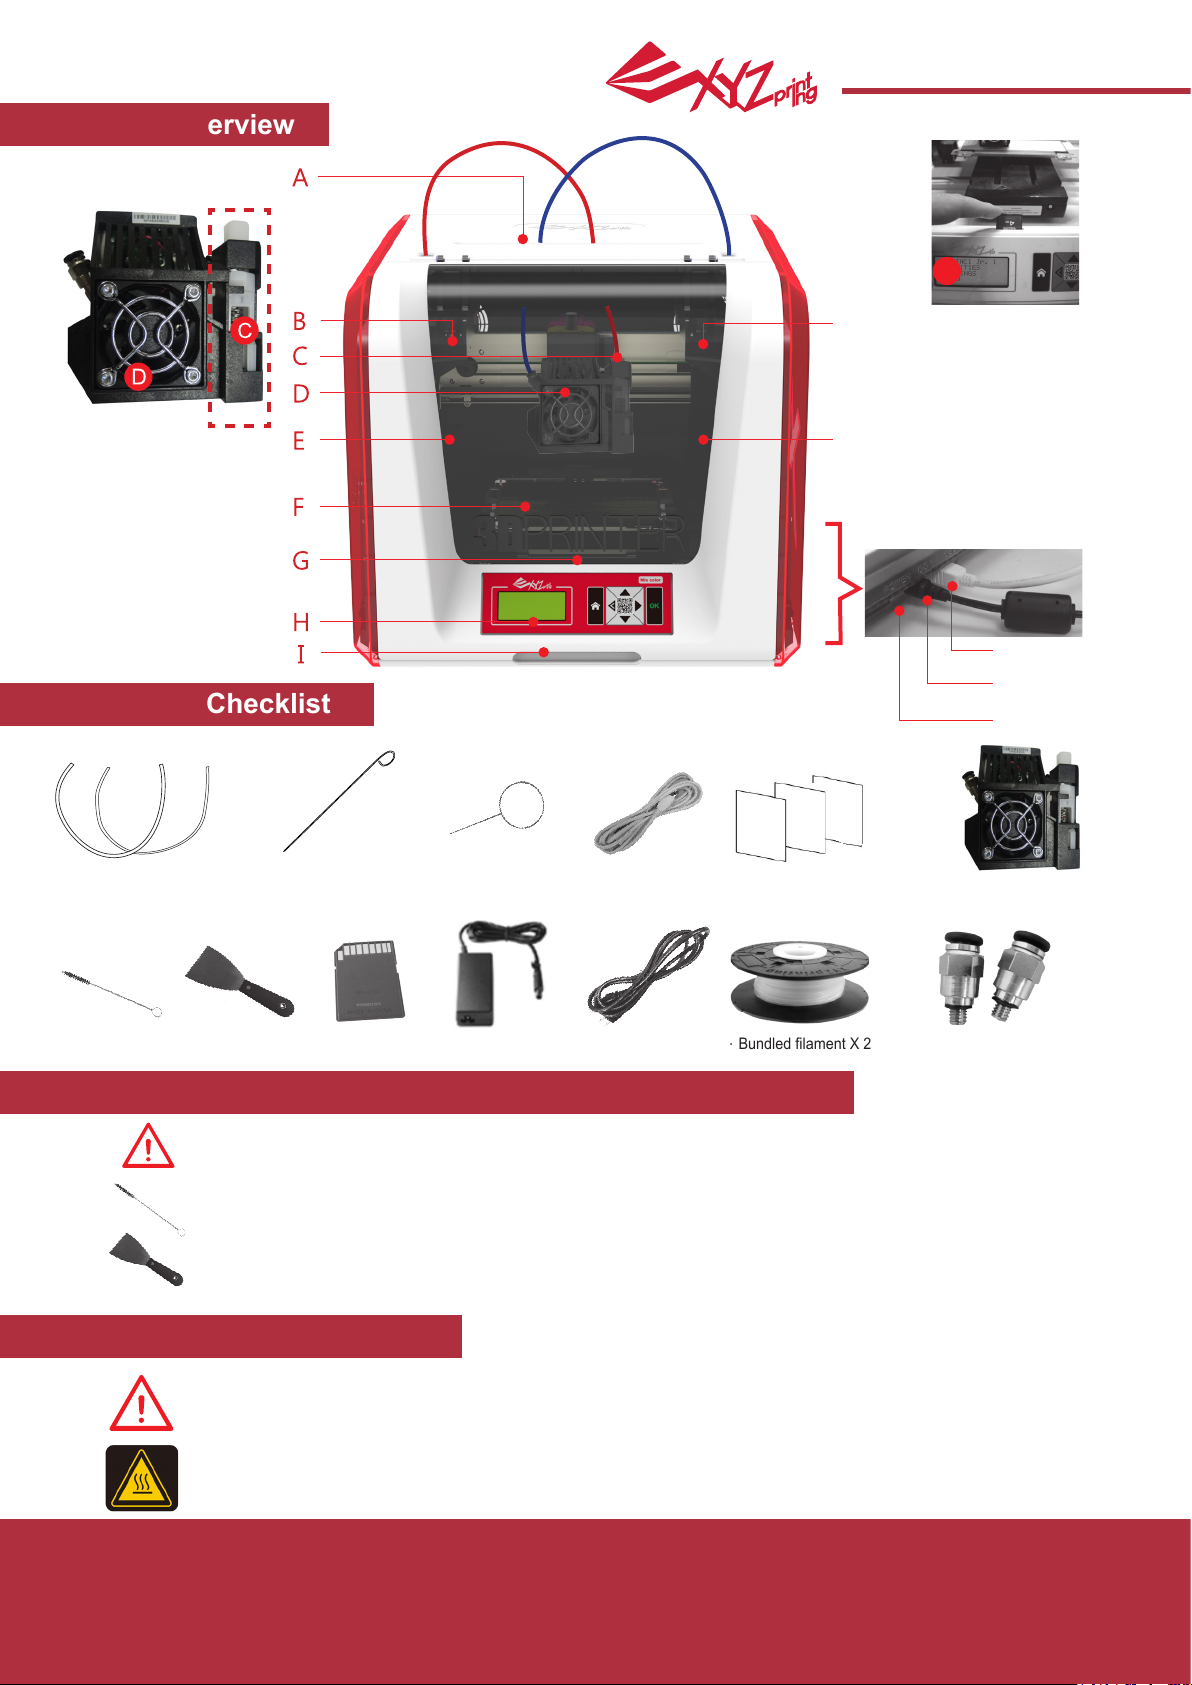
Product Overview
A: Filament movement area
B: Feed module 1
C: Detector
D: Extruder
E: Filament 1
da Vinci
Jr.2.0 Mix
G
G: SD card port
J
(Storage format: FAT32
Systems are compatible with SDHC
cards up to 32GB in size.)
H: Control and display panel
K
I: Front cover
J:Feed module 2
K:Filament 2
July 2016
F: Print bed
Accessory Checklist
Guide tube X 2
.
Cleaning Brush
.
Feeding Path
.
Cleaning Wire x2
Scraper
.
SD Card
.
Cleaning Wire x 5
.
Power Adapter
.
USB Wire
.
Power Cord .Bundled lament X 2
.
Bed Tape X 3pcs
.
Important Safety Instruction for Use of Maintenance Tools
• The maintenance tools provided should be only handled by an adult. Please keep the tools away
from children.
• Store the gear cleaning brush properly. This tool shall only be used to clean the specied parts of
the machine and to prevent damage to the machine should not be used to clean other areas.
USB Port
Power Connector
Power Switch
Extruder
.
Feeding Tube Grip X2
.
• The scraper is used to remove the object from the print bed when printing has nished. The bed tape
is reusable and it can be replaced when it has worn out.
Important Safety Instruction
• Do not place the printer in humid or dusty environment such as bathrooms and high trafc areas.
• Do not place the printer on a rickety surface and/or inclined position. Printer may fall down/or
tumble and it may cause serious injury.
• Please keep the front door closed during printing to avoid injury.
• Do not touch the interior of the printer while printing. As it may be hot and include moving parts.
Product Overview
P 3
Page 4
da Vinci
Jr.2.0 Mix
July 2016
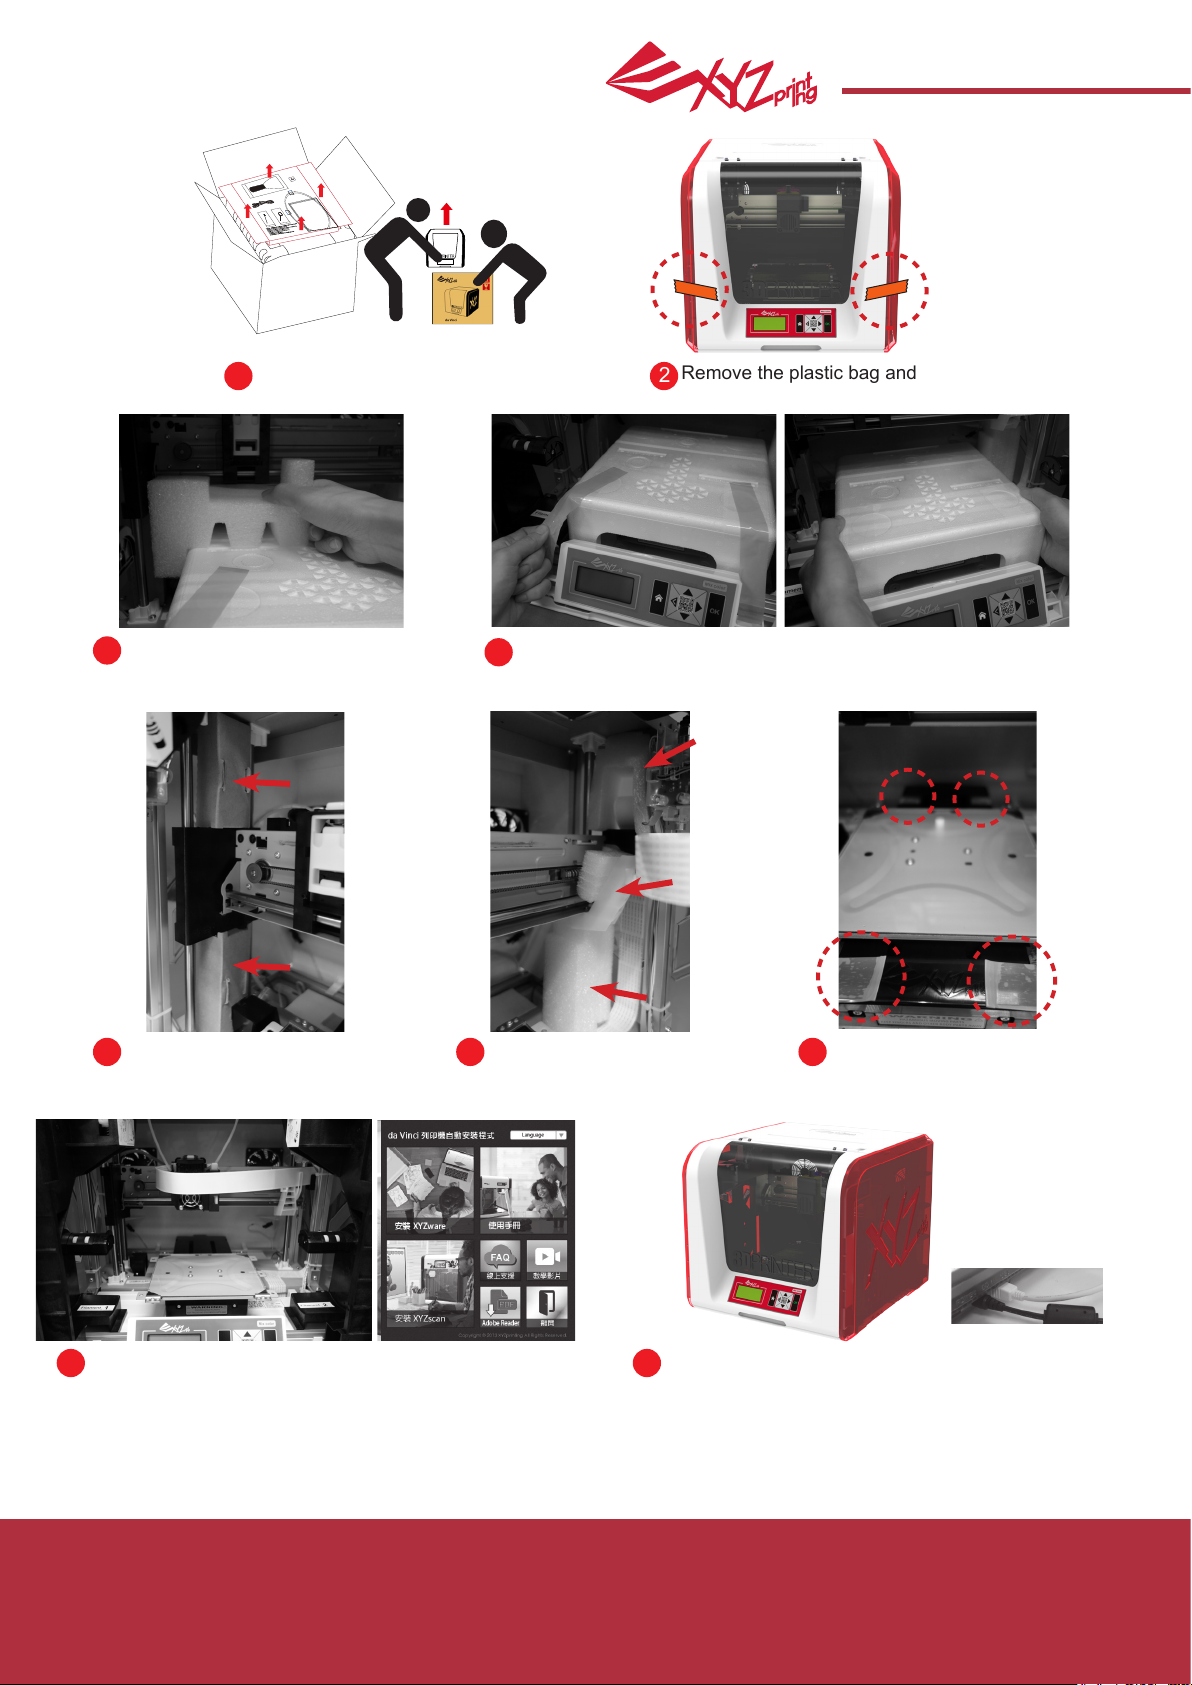
Open the box and remove the
1
accessories and cushions.
Remove all xing tape and the
3
cushion between print bed and
extruder module.
Remove the plastic bag and
2
the tape.
Remove the securing styrofoam and xing tape on the print
4
bed.
Be sure to remove the
paper cardboard on the left side.
Refer to page 5 to install the filament guide tube and
8
extruder, and then insert the SD card that came with
the printer into your computer or download the latest
XYZware from the official Website and install it on the
computer.
Note: please use the original power adapter and power cord along with the printer in order to
prevent product damage or safety hazards caused by differences in voltage specications.
Be sure to remove the xing
6
cushion on the right side.
9
Be sure to remove the xing
75
tape at the back and front of
the print bed.
Use the USB cable to connect the printer to your
PC. Connect the power cord to the printer then
turn on the power switch.
Unpacking the Product
P 4
Page 5

da Vinci
Jr.2.0 Mix
July 2016
Note: Please follow these steps and ensure that the guide tube and extruder are properly
installed before starating the "LOAD FILAMENT" function. Failure to install the guide tube will
disrupt lament feed.
Install the Filament Guide Tube and Extruder
Insert the filament guide tube into the feed module tube
1
port and nish two sides installation.
Connect the lament guide tube to the extruder
3
Insert the guide tube into feed module 1 and 2.
Make sure it goes all the way down, as shown in the
the illustration.
Reminder: When installing the lament guide tubes, please attach
them in an intersecting way as shown below. Turn on the power once
the installation process is complete.
Take the at cable out from the right side of the
2
printer and connect it to the extruder.
Install the extruder
4
Align the extruder with the bracket and press the
extruder to attach it to the socket.
Feed
module 1
Feed
module 2
Installing the Accessories
P 5
Page 6
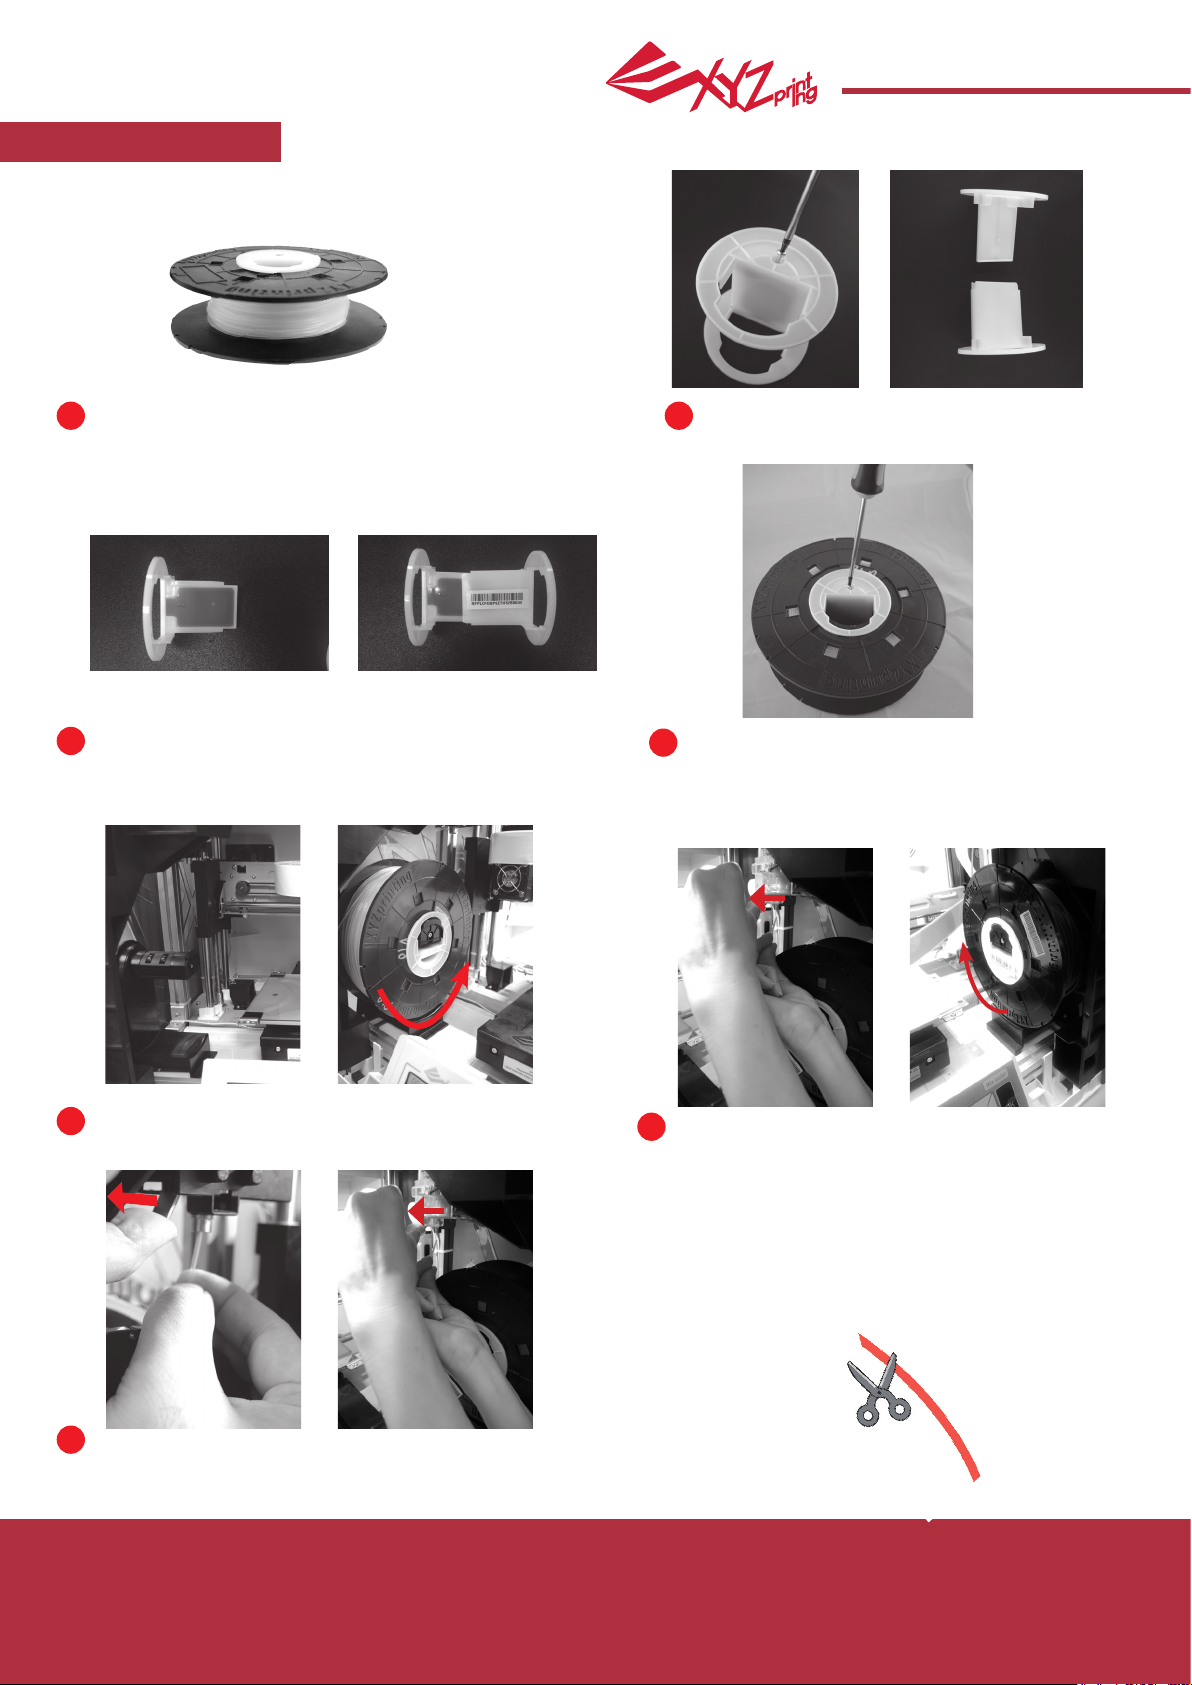
Chang Spool
da Vinci
Jr.2.0 Mix
July 2016
First retrieve the lament spool to install the lament
1
spool axle ring.
Install the sensor chip. Please pay attention to the position
3
of the installation holes on the chip.
2
Take out and separate the lament spool
axle ring into its two components.
Insert the lament spool axle ring components to
4
either side of the lament spool, and use a phillips
screwdriver to tighten and secure the rings to the
axle to complete the installation of the lament
spool axle rings.
Place the assembled lament spool (with the spool axle
5
ring) on the lament holder on the left side of the printer.
Open the release arm and push the lament all the way to the top
7
so that the front end of the lament is completely inserted into the
feed module. Make sure that the lament is past the motor and that
you can see it in the lament guide tube.
Load Filament
Pull out a section of the lament and insert it into
6
the feed port.
Caution: Pay attention to the direction the
lament is being pulled out and ensure that
the lament spool axle is rotating smoothly.
Note : Before pushing the lament into the
guide hole, please cut the tip of the lament
off at a 45°
P 6
Page 7
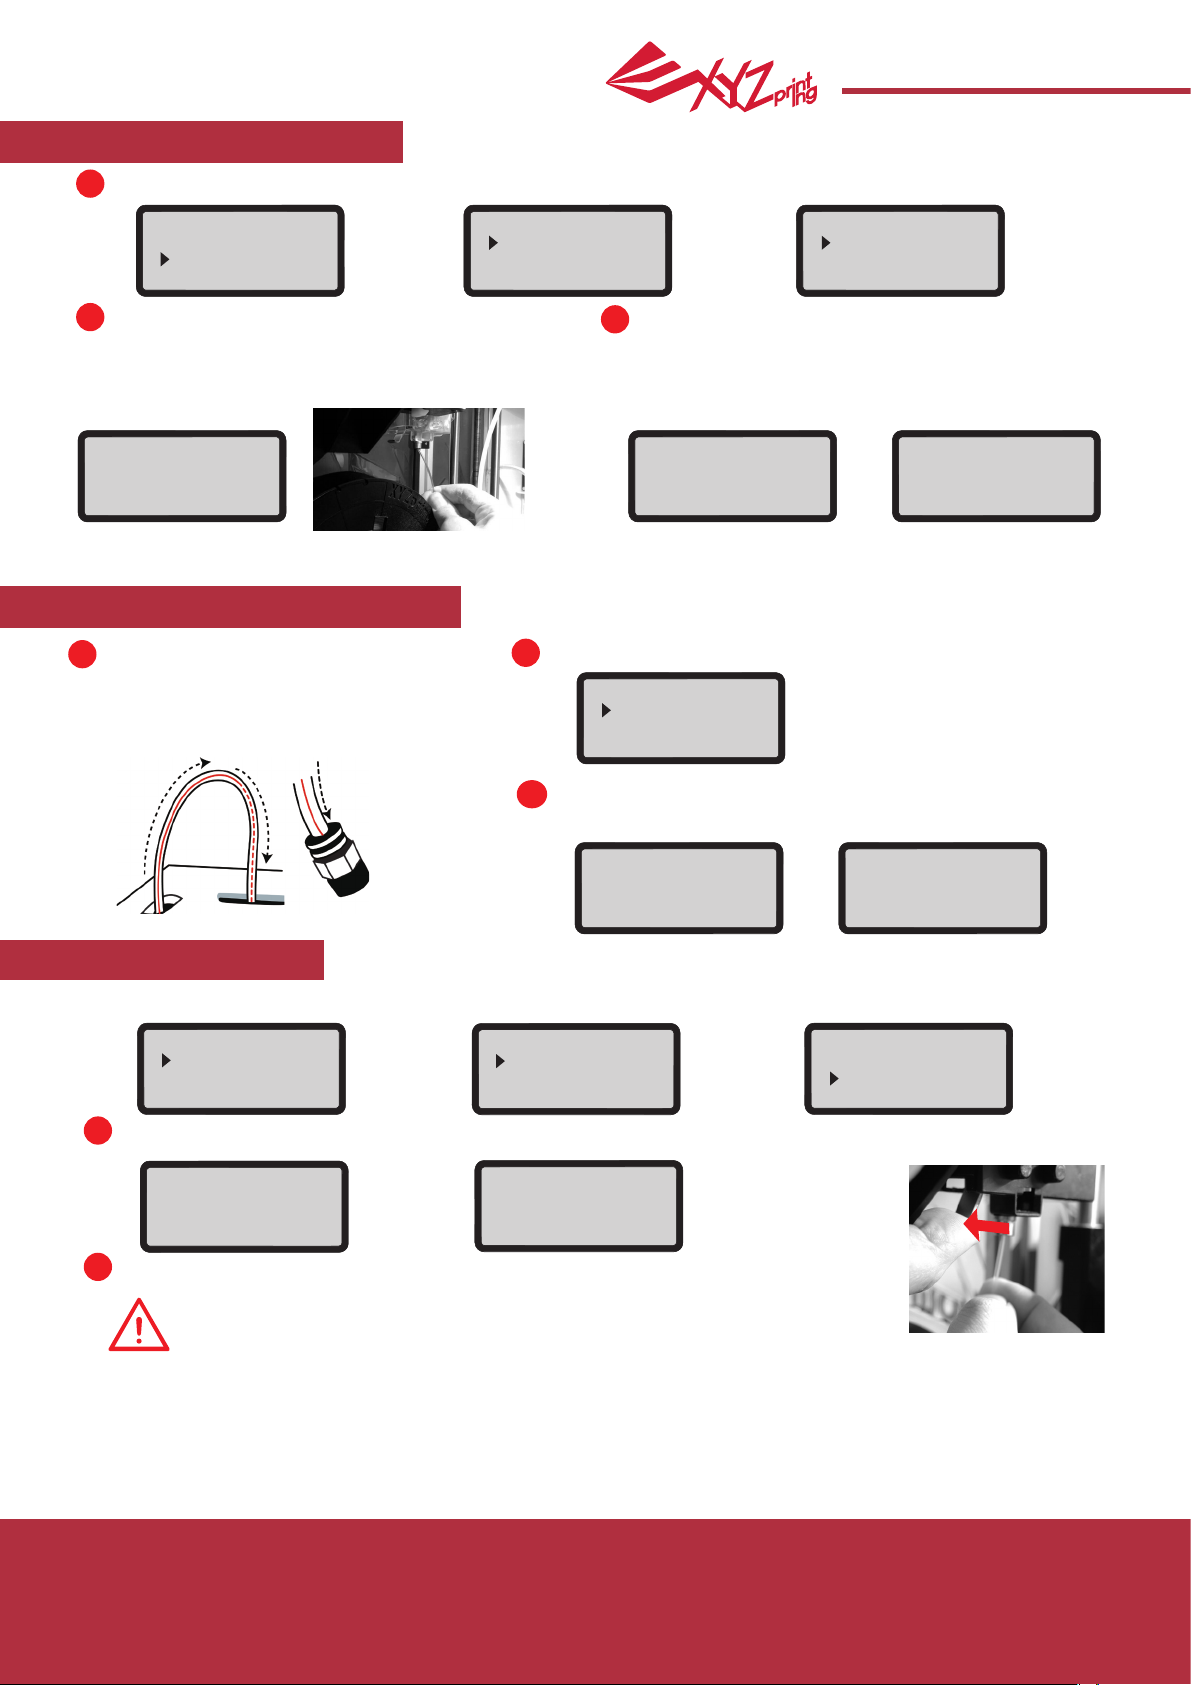
Auto-loading Filament
Select "UTILITIES" > "CHANGE SPOOL" > "LOAD FILAMENT".
1
da Vinci
Jr.2.0 Mix
July 2016
Jr. Mix
BUILD (SD CARD)
UTILITIES
SETTINGS
Wait for the screen to show
2
"INSERT FILAMENT", and insert the lament
into the filament hole. The printer will
automatically feed the lament to the extruder
module via the guide tube.
INSERT FILAMENT
[ OK ] TO CONTINUE
UTILITIES
CHANGE SPOOL
HOME AXES
JOG MODE
CHANGE SPOOL
LOAD FILAMENT
UNLOAD FILAMENT
After installing both laments, press "OK" to continue. Wait
3
for the extruder to heat up and load the lament.
Check if the nozzle is extruding lament and press "OK" to
go back to the main menu.
LOADING
PLEASE WAIT
[ OK ] STOP LOADING
DOES FILAMENT
COME OUT NOZZLE
[ OK ] TO FINISH
[
] TO RETRY
<
Please ensure both laments are inserted, the printer cannot start with only one lament. If the printer cannot load the lament
successfully,please reboot the printer and try again.
Manual Loading Filament
Please insert the two laments through the
1
lament hole, making sure that the lament
passes through the guide tube and meets
with the extruder module. Next, use the
control panel to load the lament.
Select " LOAD FILAMENT" on the printer.
2
CHANGE SPOOL
LOAD FILAMENT
UNLOAD FILAMENT
Wait for the extruder to heat up and load lament. Check if the nozzle
3
extrudes lament and press "OK" to go back to main menu.
LOADING
PLEASE WAIT
[ OK ] STOP LOADING
Unload Filament
First unload both laments using the control panel on the printer…
Jr. Mix
BUILD (SD CARD)
UTILITIES
SETTINGS
1
Select "UTILITIES" > "CHANGE SPOOL" > "UNLOAD FILAMENT".
LOAD FILAMENT
EXTRUDER HEATING
TEMPERATURE 210∘C
PLEASE WAIT
Wait for the extruder to heat up and unload lament. Press "OK" and pull out the lament.
2
When nishing "UNLOAD FILAMENT"
First open the release arm and then pull out the remaining lament .
Arrange it properly for later use.
Note: Always implement the "UNLOAD FILAMENT" function when replacing
the Spool in order to ensure proper removal of the lament. Cutting
lament too closely to the Extruder Module may result in residual
lament blocking and causing damage to your Extruder Module.
UTILITIES
CHANGE SPOOL
HOME AXES
JOG MODE
UNLOADING
PLEASE WAIT
[ OK ] TO RETURN
DOES FILAMENT
COME OUT NOZZLE
[ OK ] TO FINISH
[
] TO RETRY
<
CHANGE SPOOL
LOAD FILAMENT
UNLOAD FILAMENT
Unload Filament
P 7
Page 8

da Vinci
Jr.2.0 Mix
July 2016
About the da Vinci junior series 3D printer
The da Vinci junior series 3D printer (da Vinci Jr.) is a brand new product from XYZprinting that is dedicated to the 3D
printer market. Its intricate and colorful exterior as well as its high resolution printing specications are set to make it
the new favorite for families and home hobbyists. Whether you're creating an enjoyable learning playground to inspire
your children's creativity or unleashing your innovative ideas and quickly generate prototypes for your products.
Present creativity
To learn more about presenting your
creativity, please visit the Gallery section
of XYZprinting's ofcial website.
Product features
• Environmentally friendly 3D printer that satises the WEEE recycling requirements, and utilizes the environmentally friendly PLA
laments for printing.
• Satises electrical appliance safety specications of the EU and many other countries, making it the best home-based 3D printer
for the entire family.
• Detachable SD card that allows you to store 3D model les that you have created and edited for easy printing.
(Please export .stl les into .3w format via XYZware before printing.)
• A gallery of 3D objects is available for download after free registration.
• Amazing power saving design with a maximum power consumption of 75W, offering low power usage even for extended use.
• Weighs only 12 kg, and can be easily integrated in any household and family settings.
• Smart temperature control designs. Cooling fans within the machine is able to adjust and optimize printing temperature to
improve product quality.
Introduction
P 8
Page 9

da Vinci
Jr.2.0 Mix
July 2016
Button instructions
After switching on the printer's power, the user may use the display panel at the front of the printer to understand its
status and usage data. The functional buttons on the right allow the user to perform the relevant operations.
Button Functions
Up
Down
Left
Right
OK
HOME
Direction Up
Direction Down
Back to previous menu / Reduce the adjustment value
Forward to submenu / Increase the adjustment value
OK; conrm selection/settings
Home Button, return to main menu
Function Description
UTILITIES Printer adjustment / Change lament / Sample printing
SETTINGS The parameters of printer
INFO The rmware and printer statistical information
MONITOR MODE Monitor of extruder and print bed working temperature and printing progress
DA VINCI Jr. Mix
BUILD FROM CARD
UTILITIES
SETTINGS
Functions
P 9
Page 10

da Vinci
Jr.2.0 Mix
July 2016
Home Menu
UTILITIES
Top Menu Sub Menu
CHANGE SPOOL
HOME AXES
JOG MODE
BUILD FROM CARD
CALIBRATE
CLEAN NOZZLE
LOAD FILAMENT
UNLOAD FILAMENT
Page
P6
P7
P7
P11
P11
P11
P12
P13
SETTINGS
INFO
Z OFFSET
BUZZER
LANGUAGE
ENERGY SAVE
AUTO LEVEL
RESTORE DEFAULT
STATISTICS
SYSTEM VERSION
P14
P15
P15
P15
P15
P15
P16
P16
SPOOL STATS
HELP
MONITOR MODE
The map above shows the functions your may access with the control panel on the printer.
For detailed descriptions of each function, please refer to their respective pages in this user manual.
Maps of Functions
P16
P16
P16
P 10
Page 11

da Vinci
Jr.2.0 Mix
HOME AXES
“HOME AXES” moves the extruder to the lower left corner, The "Y-AXIS" print bed will move to the back.
To home axes:
home axes
are you sure
NO
YES
Select “YES” to proceed.
JOG MODE
“JOG MODE” is used to manually move the extruder and the print bed.
To move the extruder:
July 2016
jog mode
x-axis
y-axis
z-axis
1.Select “X-AXIS” (to move right
and left) and "Z-AXIS" (to move up and down).
Execute "Home Axes" function rst to move
2.Select desired increment of travel with and
buttons, and press (or hold) or button for desired
direction to move the extruder.
x-axis ok exit
▲
- ■
001mM
010mm
020mm
▲
+
"Z-AXIS". “Y-AXIS” (to move print bed
backwards and forwards).
BUILD FROM CARD
1 sample models are built into the printer. You may begin your rst 3D prints with the samples.
To print a sample:
build FROM CARD
demo
1.Select a sample to print
2.Put the bed tape on the print bed.
DEMO
start building
no
yes
3.Select "YES" to start printing
4.Remove the printed object when the printing has
finished and the print bed has descended.The bed
tape is reusable and it can be replaced when it's worn.
UTILITIES
P 11
Page 12

da Vinci
Jr.2.0 Mix
July 2016
CALIBRATE
Calibration is enabled for this new extruder module. Please update printer rmware via XYZware before using the
new extruder.
1. Active print bed calibration by selecting “UTILITIES”>”CALIBRATE”>”YES” on the screen.
2. Press the detection head on the right side of the print head according to the instruction of screen message, followed
by pressing OK.
PRESS SWITCH (A)
NEXT TO EXTRUDER
[OK] TO CONTINUE
3. Wait for detecting.
4-1A. If "CALIB COMPLETED" is shown for the
detection result, and "AUTO-LEVELING
IS DISABLED NOW" is shown on the screen, it indicates
good platform levelness. Press "OK" to exit and print.
CALIB COMPLETED
AUTO-LEVELING
IS DISABLED NOW
[OK] TO RETURN
4-2A. If the detecting result is shown as “FAIL”, press
"OK" to go to next page, and press "OK" again to exit.
CALIB FAILED
AUTO-LEVELING
[OK] TO CONTINUE
PLEASE CONTACT
CUSTOMER SERVICE
FOR LEVEL ISSUE
[OK] TO RETURN
4-1B. If you see "AUTO-LEVELING
IS ENABLED NOW", this indicates that the print bed is slightly
unleveled. The printer will adjust the conguration based on
the detecting result automatically while "AUTO LEVEL" is
enabled. The printing mode helps to improve printing quality
with slower printing speed. You may switch off the function
under "Settings".
CALIB COMPLETED
AUTO-LEVELING
IS ENABLED NOW
[OK] TO RETURN
4-2B. And check the detecting result by going to “INFO”>
”LEVELING INFO”. Contact customer service for the issue
and provide the details of leveling information.
A 0317 0320 0313
B 0318 0323 0308
C 0312 0300 0440
[OK] TO RETURN
Note:
1.The dirt on the detection pin and the top of Extruder module will inuence detection result. Make sure that
the dirt is cleaned before calibration.
2.If the residues is on the top of the Extruder module, the detection result will be shown as follows. Clean
the dirt before recalibration.
A 0000 0000 0000
B 0000 0000 0000
C 0000 0000 0000
[OK] TO RETURN
3. The printer may enable or disable auto-level based on the result of calibration. You may switch off
the function manually under "Settings".
CALIBRATE
P 12
Page 13

da Vinci
Note: The machine can be turned off only when the cooling fan of the print head stops running after
the print is completed. Turning off the power directly may clog the print head.
References:
Please refer to
UTILITIES>CLEAN NOZZLE
to remove the blocks out of the print head.
This section describes how to clean the feed module. After heavy use of printer, if feeding of material becomes difcult or impossible, please follow these steps.
Jr.2.0 Mix
July 2016
Preparation of Tools
B. Screwdriver (T10) for standard cleaning procedureA. Cleaning brush that comes with the printer
A. Quick Cleaning
Use the “UNLOAD FILAMENT” function to loosen and
1
remove the lament.
B. Standard Cleaning
Use the screwdriver to remove the screw and open the
1
top cover.
2
Use the cleaning brush to scrub the feed gear back
and forth to remove the chips of lament out of the
gear. Replace the wire after the cleaning is completed.
2
Press the black rubber xer on top of hole and pull
the guide tube out.
3
Use the cleaning brush to scrub the gear; after removing residues of
lament on the gear, you can insert the guide tube and put the cover
back and then enjoy printing again.
UTILITIES
P 13
Page 14

da Vinci
Jr.2.0 Mix
July 2016
CLEAN NOZZLE
Over time, carbon deposits or lament dust buildup in the nozzle may decrease its performance. It is advised to clean the nozzle
after every time of printing. Also, if the print bed calibration shows “ERR” or if there is any residue on your prints, you may want
to try to clean the nozzle.
For more detailed cleaning methods, please visit Support / FAQ page on website.
A.Feeding Path Cleaning Pin B.Cleaner Wire
To clean the nozzle:
CLEAN NOZZLE
ARE YOU SURE ?
NO
YES
1.Select "YES" to begin. 4.Select "OK" to return.2.Wait until the extruder heats up and
moves to the front, and the screen
shows “READY FOR CLEAN”
If the cleaning cycle does not unclog the extruder, try cleaning the feeding path by following the steps below.
1.Unload lament correctly (refer to “UNLOAD FILAMENT”).
2.Move the extruder and the print bed to the home position by using the HOME AXES function.
3.Activate “UNLOAD FILAMENT” again and wait until the extruder heats up to 150℃. (Care should be taken during the operation to
avoid potential burn injuries.)
4.Press the white button
at the back of the
extruder to release it.
5.Lightly press the spring around
the feed hole and remove the
lament guide tube (do not
disconnect the white at cable)
3.Hold the cleaning wire with the
pliers, and carefully pass the wire
through the nozzle openning.
6.Insert the two leaning pins into the
two feeding paths all the way down at
the same time and “oss” the inside of
the nozzle to pull the residue out.
CLEAN NOZZLE
READY FOR CLEAN
[ OK ] TO RETURN
7.After cleaning the feeding
path, reinstall the guide tube
to the top of the extruder and
install the extruder to the
bracket.
Z OFFSET (adjust the printer module)
The user may use the Z OFFSET function to adjust the gap between the printing nozzle and the printing bed.
Caution: This printer has already been tested and adjusted to the optimal gap between the printing nozzle and printing bed before
shipping. We recommend recording the original settings before carrying out any adjustments.
If the lament comes out from the nozzle, but doesn’t come out for the rst layer while printing, please adjust Z-OFFSET.
Z OFFSET settings adjustment
1.The recommended distance between the nozzle and print bed
(with bed tape securely fastened) is 0.3mm.
This should allow two sheets of copy paper to be drawn out
smoothly but six sheets of copy paper cannot be passed.
+ [ ^ ]
Z OFFSET 0.1 mm
─ [ v ]
[OK] TO SAVE
2.Increase/decrease the value based on a scale of 0.05mm.
Increasing the value will increase the gap between the print module and print bed by 0.05mm
Decreasing the value will also decrease the gap between the print module and print bed by 0.05mm
UTILITIES
P 14
Page 15

da Vinci
Jr.2.0 Mix
July 2016
BUZZER
When the buzzer is turned on, the printer will output an audible signal when a button is pressed, print job is finished, or issue is
detected.
Buzzer is turned on by default. To switch off the buzzer:
buzzer on
off
on
Select “OFF” and press “OK” to change the setting.
LANGUAGE
You may switch the display language on the printer between English and Japanese.
The default lanague is English. To switch to Japanese:
language en
english
ニホンゴ
Select “
ニホンゴ
"and press “OK” to change the setting.
ENERGY SAVE
LED luminaires are installed in the printing chamber. To save energy consumed, the lighting will go off after idling for 3 minutes (shown
as 03M on the display) by default.
To select a longer time interval:
energy save off
off
03m
06m
Select “06M” (for auto off after 6 minutes) or “OFF” (for never turn off the LED) and press “OK” to change the setting.
AUTO LEVEL
The printer will adjust the configuration based on the detecting result automatically while "AUTO LEVEL" is enabled. The printing
mode helps to improve printing quality with slower printing speed. You may switch off the function if necessary.
To change the setting of auto-level:
AUTO LEVEL [ON]
OFF
ON
Simply select “OFF” and press “OK” to change the setting.
RESTORE DEFAULT
All settings can be reset to factory default with a few clicks.
To reset all settings at once:
restore default
are you sure
no
yes
Simply select “YES” and press “OK” to reset.
SETTINGS
P 15
Page 16

da Vinci
Jr.2.0 Mix
July 2016
STATISTICS
In “STATISTICS”, you can check the accumulated print time and last print time.
statisti cs
lifetime 00006h
last time 00h34m
ok to return
SYSTEM VERSION
Firmware version is shown here. For stable printing performance, it is advised to keep the rmware up to date. To
check for rmware updates, please go to XYZscan/XYZware.
system version
1.1.j
ok to return
SPOOL STATS
“SPOOL STATISTICS” provides the information on cartridge level (see REMAINING), and the capacity, color and
material of the lament. Press to read the second page.
SPOOL stats
remaining 059m
CAPaCiTY 240m
DOWN NEXT PAGE
color black
moterial PLA
ok to return
HELP
The URL to XYZprinting website can be found here. You may go to the website for the latest information, product
documents, tutorial video and more.
HELP
WWW.XYZPRINTING.COM
OK TO RETURN
MONITOR MODE
"MONITOR MODE" shows the temperature of the extruder. See below for the working temperature for the parts in
different modes.
MONITOR MODE
EXTRUDER 046 C
OK TO RETURN
INFO
P 16
Page 17

da Vinci
Jr.2.0 Mix
July 2016
PRINTING
This is the unique multicolor function mode of da Vinci Jr. 2.0 Mix. You can choose from "Multicolor Mode" and "Blending
Mode". First, open the XYZware software and then select the printer da Vinci Jr. 2.0 Mix in the settings.
Click "Import" to browse and select the model le to be printed. After loading the le, you can adjust the size,
printing position and angle of the object.
Multicolor Mode
Mixer Mode
- Split color blocks according to the height. Each block
contains single color or a set of gradation color blocks.
- Set different colors for models from different le sources.
These are the
monochromatic colors and
colors toned in different
proportion by the software.
Printing two objects
together is available.
To print the model in multiple colors at one time, please check the
"Enable Blending Zone" box.
To print the model in
monochromatic color scheme,
please uncheck the box.
Once the Palette function is enabled, the machine will build
lament separation walls and the
printable area will be
14 x 15 x 15 cm (W x D x H).
Add a color node
Object color height
(Add a color node according
to the height of the object.)
This is the color in which the
object will be printed
After setting up the model at the desired size, location and placement, you can also adjust the printing preferences, such
as print speed and layer height by clicking the “Export” icon. Click the “Export” button to slice the le.
When the model is sliced, click on the “Print” button to send the le for printing.
Color Suggestion:
Mixer / Multi-Color Mode
Suggestion Use both spools as clear lament
limitations Strongly recommend NOT to use un-clear lament like black, white, blue, and neon green to print.
Using opaque color laments to blend will overlay the light ones and affect the gradation and multicolor
effect.
Opaque Color Black, White, Blue, Neon Green
Printing
P 17
P 17
Page 18

da Vinci
Jr.2.0 Mix
July 2016
Wireless printing
This chapter introduces how to carry out the setting correctly and to operate the wireless printing function. To understand if your
product is designed with wireless printing function, please refer to the table below.
●da Vinci 1.1 Plus ●da Vinci Jr. 1.0w ●da Vinci Jr. 1.0 3-in-1 ●da Vinci Jr. 2.0 Mix
Pre-setting preparation
1. The network printing function is mainly provided for the Intranet. Please set the printer and the computer in same network domain,
i.e. connecting to the same Wireless Access Point.
2. Before connecting the printer, adjust the set value of the connected Wireless Access Point. For details of setting method, please
refer to the Production Operation Manual or the information provided by the original factory.
3. The Channel Width that can be used by the wireless printing function is 20MHz. Please refer to the Operation Manual compiled
by the original factory for the Wireless Access Point to understand the adjusting method.
4. Please maintain the wireless network function in open status.
5. This machine can suppor t the following connection safety mode. When setting the printer in online status, it is required to input the
Public Key related information.
●WEP ●WPA ●WPA2
(This image is for reference only)
Start the setting
1. Please make sure the connection between computer and printer properly. After completing the connection,
activate the XYZware.
2. Click on the printer monitoring function to open the printer-related information and then click “My Printer” >
"Use Wi-Fi” to access the Wireless Printing Set page.
Wi-Fi Printing
P 18
Page 19

da Vinci
3. Please enter the printer name and then press “SCAN” to scroll down the menu for obtaining the exact Wireless Access
Point related information. The description sample will use XYZprinting as the name of Wireless Access Point.
After obtaining the desired information, enter the Public Key password and then press “Use Wi-Fi” and XYZware will
update the online setting value of printer through USB connecting wire.
Note: Please naming printer and Wireless Access Point in English.
Note: If the printer cannot complete the connection with the Access Point within 90 seconds, then XYZware will discontinue the detection. In this case, please check the operation steps and the network are set correctly.
Note: For the password of Public Key, please refer to the information indicated on the Wireless Access Point setting page,
and the length of the password will vary.
Jr.2.0 Mix
July 2016
4. After completing the printing, please press the “X” key at upper right corner to leave.
To reset the wireless network connection, press “STOP WIRELESS NETWORK/CHANGE SETTING" function keys to
clear the value set before.
INFO>WIFI(SSID) INFO>IP ADDRESS
XYZware secures the IP address of the printer and
the connection is successful.
5. Remove the USB connecting wire and then restart XYZware and the machine is ready for online printing again.
At this time, conrm the connection is completed through
the information displayed on the printer.
The monitoring function of printer can be used to conrm the
online status and the IP information of the connected printer.
Note: After restarting the printer, IP information will be erased. Please setting again.
Note: The performance of wireless network may be affected due to various environment and power of machine. For
detailed information, please contact the wireless equipment provider or refer to the original factory’s manual. XYZprinting cannot provide tested data for specic equipment.
Wi-Fi Printing
P 19
Page 20

da Vinci Junior 2.0 Mix 3D Printer
da Vinci
Jr.2.0 Mix
July 2016
Model Name
Dimensions
Weight
Display
Language
Connection method
Print Technology
Build Volume
Print resolution
Print module
Nozzle diameter
Filament diameter
Files supported
Operating system
Hardware
requirement
da Vinci Junior 2.0 Mix 3D Printer
16.54 x 16.93 x 14.96 inches (420 x 430 x 380 mm
26.46 lbs (12kg)
2.6” FSTN LCM
Multi language
USB Wire / SD Card / WiFi
FFF (Fused Filament Fabrication)
5.9 x 5.9 x 5.9 inches (15 x15x15cm
200 - 400 microns
Dual Feed / Single Nozzle
0.4 mm
1.75 mm
.stl , XYZ Format(.3w)
Windows 7 - 8 above (for PC)
Mac OSX 10.9 64-bit above (for Mac)
X86 32/64-bit compatible PCs with 4GB+ DRAM (for PC)
X86 64-bit compatible Macs with 4GB+ DRAM (for Mac)
)
)
Environmentally friendly materials-PLA
PLA laments are made using polymerized lactic acid, which is
extracted from corn, sugarcane or other sugar-containing crops,
and is regarded as the most environmentally friendly 3D printing
material. Unwanted PLA printed objects can be simply discarded
in the soil where it will naturally decompose.
PLA materials printed at low temperatures are not only suitable for
family settings, its bright texture also makes it a favorite amongst our
clients. You may observe the characteristics of PLA during printing.
• Despite their harmlessness, PLA placed in an environment or water bath exceeding 50 oC (122 oF) will soften and deform.
• Hence, overly humid areas are not suitable storage environments for PLA. We recommend properly sealing and
stashing away unused PLA laments.
• A sugary smell is often generated when printing with PLA laments, giving yet another attractive feature.
Specications
P 20
Page 21

da Vinci
The troubleshooting instruction may guide you to x the problem. If any error persists, please contact customer service.
When an error occurs, please refer to the service code shown on the printer and/or in the software, and check the
suggestions below for troubleshooting.
Technical Support
Website: http://support.xyzprinting.com
Email: US - supportus@xyzprinting.com
EU - supporteu@xyzprinting.com
Other regions - support@xyzprinting.com
Jr.2.0 Mix
July 2016
Service Code
0 0 1 4
0 0 3 0
0 0 3 1
0 0 3 2
0 0 5 0
0 0 5 1
0 0 5 2
0 0 5 4
0 0 5 7
Symptom
Extruder 1 heating problem
X-axis movement abnormalities
Y-axis movement abnormalities
Z-axis movement abnormalities
Internal communication error
Internal communication error
Extruder storage error
Extruder not support
Unable to detect extruder
Action
Check connections, reboot the printer.
Check motor/sensor connections.Check sensor position.
Check motor/sensor connections.Check sensor position.
Check motor/sensor connections.Check sensor position.
Reboot the printer.
Reboot the printer.
Replace the extruder.
Replace the extruder
Please reinstall the extruder and reconnect the at cable,
then restart the printer.
Note:
Please retain all original packaging material when shipping your product for warranty
purposes. Shipping without original packaging materials may cause product damaged during
the shipment and may cause chargeable service fees.
Support Details
P 21
Page 22

da Vinci
Other Information
Jr.2.0 Mix
July 2016
1. This product is guaranteed for specic period from the purchase date against any breakdown within the scope of
proper and reasonable usage of their product as dened by XYZ printing.
Presentation of warranty card with the product will ensure free service and repair of inherent faults in the product
within the warranty period. However, the following items are separate and dealt with under conditions of other
related warranty services:
● Printing modules / printing platforms / motor modules
● Attached consumables (including housing, packing materials, power cords, USB cables, coil consumables, user
manuals and software CD's): no warranty is given.
2. To protect your right and interests, please request that the dealer ll in the product information and purchase date
on the product warranty card, and also make sure that they afx their ofcial seal.
3. Please keep this warranty card in a safe place because if it is lost or destroyed a new one will not be issued.
Make sure to present the card if you require any repairs, service or maintenance to the product during the
warranty period.
4. XYZprinting may levy charges under any of the following circumstances:
● Man-made damages: In the case of damage to the product caused by incorrect use, wrong installation,
abnormal wear, physical damage or deformation caused by falls or blows, burnt circuits resulting from actions
form the user, broken or bent interface or pins or any other physical damage to the product caused by misuse.
● Incompatibility issues: anything unconnected with product malfunctions such as conict with electronic
equipment, expectation of use, noise of operation, speed, discomfort or heat.
● Damage caused by force Majeure (such as lightning strike, re, earthquake, oods, civil disturbance or war or
any other event beyond human control).
● Any request of warranty service after expiration of the warranty period.
If you need warranty service, please contact the original dealer or send a ticket via XYZprinting website. If you
need more information about our warranty services, please log in to www.xyzprinting.com, select "support (product
support)" where you will nd complete details of all the warranty conditions.
Federal Communications Commission (FCC) Statement
You are cautioned that changes or modications not expressly approved by the part responsible for compliance could void the user’s
authority to operate the equipment.
This equipment has been tested and found to comply with the limits for a Class B digital device, pursuant to part 15 of the FCC rules.
These limits are designed to provide reasonable protection against harmful interference in a residential installation. This equipment
generates, uses and can radiate radio frequency energy and, if not installed and used in accordance with the instructions, may
cause harmful interference to radio communications. However, there is no guarantee that interference will not occur in a particular
installation. If this equipment does cause harmful interference to radio or television reception, which can be determined by turning the
equipment off and on, the user is encouraged to try to correct the interference by one or more of the following measures:
● Reorient or relocate the receiving antenna.
● Increase the separation between the equipment and receiver.
● Connect the equipment into an outlet on a circuit different from that to which the receiver is connected.
● Consult the dealer or an experienced radio/TV technician for help.
XYZprinting is not responsible for any radio or television interference caused by using other than recommended cables and
connectors or by unauthorized changes or modications to this equipment. Unauthorized changes or modications could void the
user's authority to operate the equipment.
This device complies with Part 15 of the FCC Rules. Operation is subject to the following two conditions: (1) this device may not
cause harmful interference, and (2) this device must accept any interference received, including interference that may cause
undesired operation.
This device complies with FCC radiation exposure limits set forth for an uncontrolled environment and it also complies with Part 15 of
the FCC RF Rules. This equipment must be installed and operated in accordance with provided instructions and the antenna(s) used
for this transmitter must be installed to provide a separation distance of at least 20 cm from all persons and must not be co-located
or operating in conjunction with any other antenna or transmitter. End-users and installers must be provided with antenna installation
instructions and consider removing the no-collocation statement.
Term of Service
P 22
Page 23

da Vinci
Jr.2.0 Mix
July 2016
Warning
● Do not let children operate this device without adult supervision. Electric shock hazard. Moving pars can cause serious
injury.
● Do not place the printer on an unbalanced or unstable surface. Printer may fall or tumble causing harm and/or injury.
Printer may fall or tumble causing harm and/or injury.
● Do not place any objects on top of the printer. Liquids and objects that fall into the printer can lead to printer damage or
safety risks.
● Do not use ammable chemicals or alcohol wipes to clean this device.
● Do not disassemble or replace the printer cover with none XYZprinter covers.
● Do not touch heated surfaces during or after operation. Heated surfaces can cause severe burns.
● Insert and secure the power cord rmly for proper usage and to avoid potential electricity and re dangers.
● Do not attempt to service the printer beyond the instructions specied in this document. In the case of irrecoverable
problem, contact XYZprinting service center or your sales representative.
Warning!
P 23
 Loading...