

Page 1

Full Size Bed Conversion Kit (4399) Assembly Instructions
Traverses de conversion (4399) Instructions d’assemblage
Congratulations on purchasing an MDB Family product. This product will provide many years of service
if you adhere to the following guidelines for assembly, maintenance, and operation. This product is
for residential use only. Any institutional use is strictly prohibited.
Please be sure to follow the instructions for proper assembly. Use a Phillips head screwdriver for assembling
the product in addition to the Allen wrench included in the hardware box. Do not use power screwdrivers. All of our products are made from natural woods. Please understand that natural woods have color variations which are the result of nature and not defects in workmanship.
DO NOT SUBSTITUTE PARTS. ALL MODELS HAVE THE SAME QUANTITY OF PARTS AND HARDWARE. YOUR MODEL MAY LOOK DIFFERENT FROM THE ONE ILLUSTRATED DUE TO STYLISTIC VARIATIONS.
Nous vous félicitons de votre achat d’un produit MDB Family. Ce produit vous procurera des années de
service si vous suivez les directives ci-dessous pour l’assemblage, l’entretien et l’utilisation. Ce produit
est destiné uniquement à une utilisation résidentielle. Toute utilisation dans une institution est strictement interdite.
Prenez soin de suivre les instructions pour réaliser correctement l’assemblage. Utilisez un tournevis cruciforme pour l’assemblage, en plus de la clé hexagonale incluse dans la boîte de quincaillerie.
N’utilisez pas un tournevis électrique. Tous nos produits sont fabriqués en bois naturel. Il faut comprendre que le bois présente des variations de couleur attribuables à la nature et non à un défaut de fabrication.
NE PAS UTILISER DES PIÈCES DE SUBSTITUTION. TOUS LES MODÈLES ONT LE MÊME
NOMBRE DE PIÈCES ET D’ACCESSOIRES DE MONTAGE. VOTRE MODÈLE PEUT DIFFÉRER DE
CELUI ILLUSTRÉ EN RAISON DE VARIATIONS STYLISTIQUES.
PARTS • PIÈCES
C. Full Size Bed
A. Left Rail
A. Traverse de
gauche
B. Right Rail
B. Traverse de
droite
Front Right Leg
C. Pied avant droit du
lit pleine dimension
D. Dresser Rear Leg
D. Pied arrière du
bureau
HARDWARE • ACCESSOIRES DE MONTAGE
H1.
3/4” Wood
Screw (10)
H1. Vis à bois de
1,9 cm (
revised 10NOV2016
3/4 po) (10)
H2. 3/4” Allen head bolt (4)
H2. Boulon Allen de 1,9 cm
(
3/4 po) (4)
H3. Left bracket
H3. Bride gauche
H4. Right bracket
H4. Bride droite
page 1
Page 2
Tools Needed
(not included)
Outils requis
(non inclus)
H5. 3”
Allen Head Bolt (4)
H5.
Boulon Allen de
7,6 cm (3 po)
(4)
H6. Barrel nut (4)
H6. Écrou cylindrique (4)
H7. Allen wrench
H7. Clef Allen
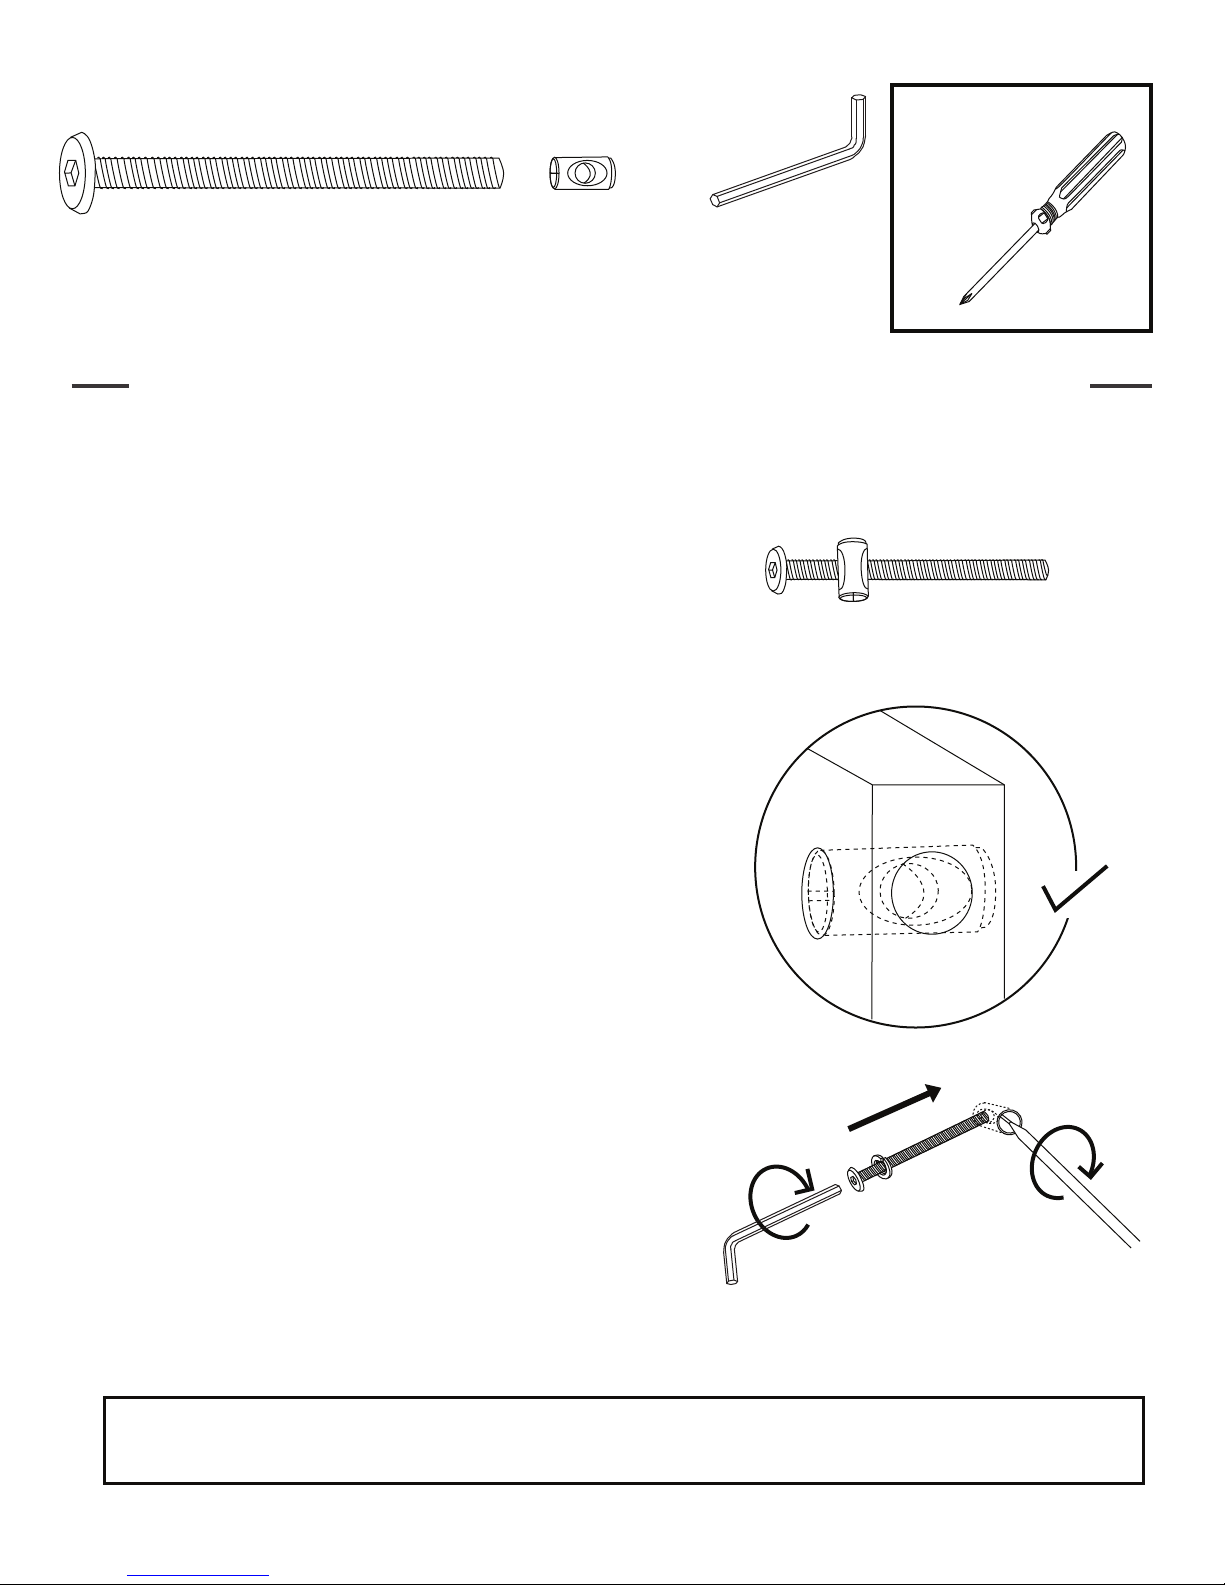
BARREL NUT - ADDITIONAL INSTRUCTION
ÉCROU CYLINDRIQUE - INSTRUCTIONS SUPPLÉMENTAIRES
1
All barrel nuts are threaded and come pre-attached to the
bolts. Please ensure you have the correct number of
barrel nuts needed as indicated in the instruction manual
before assembly.
Tous les écrous cylindriques sont filetés et posés sur leur
vis. Assurez-vous d’avoir le nombre adéquat de ces
écrous, tel qu’indiqué dans le manuel d’instructions avant
l’assemblage.
2
Phillips
screwdriver
Tournevis
cruciforme
Insert the barrel nuts all the way into the holes. Do not
insert at an angle to avoid damaging the threaded area.
Insérez les écrous cylindriques jusqu’au fond dans les
trous. Ne les insérez pas en angle afin d’éviter d’abîmer
la partie filetée.
3
Please use an Allen wrench to screw the bolt with the
lock washer straight into the threaded nut until it is tight.
À l’aide d’un clef Allen, vissez la vis avec une rondelle
de blocage dans la partie filetée de l’écrou et serrez.
* The bolt may not be able to screw through the barrel
nuts smoothly. It is suggested to use a flat screwdriver
to stabilize and adjust the direction of the barrel nut.
* Il est parfois difficile de visser correctement la vis
dans l’écrou. Vous pouvez utiliser un tournevis plat
pour corriger l’orientation de l’écrou cylindrique et
l’immobiliser.
Flat Screwdriver
Tournevis plat
Allen wrench
Clef Allen
Please follow the rest of the instruction steps in the instruction manual to complete the assembly.
Veuillez suivre le reste des instructions du manuel pour terminer l’assemblage.
page 2
Page 3
ASSEMBLY INSTRUCTIONS • INSTRUCTIONS D’ASSEMBLAGE
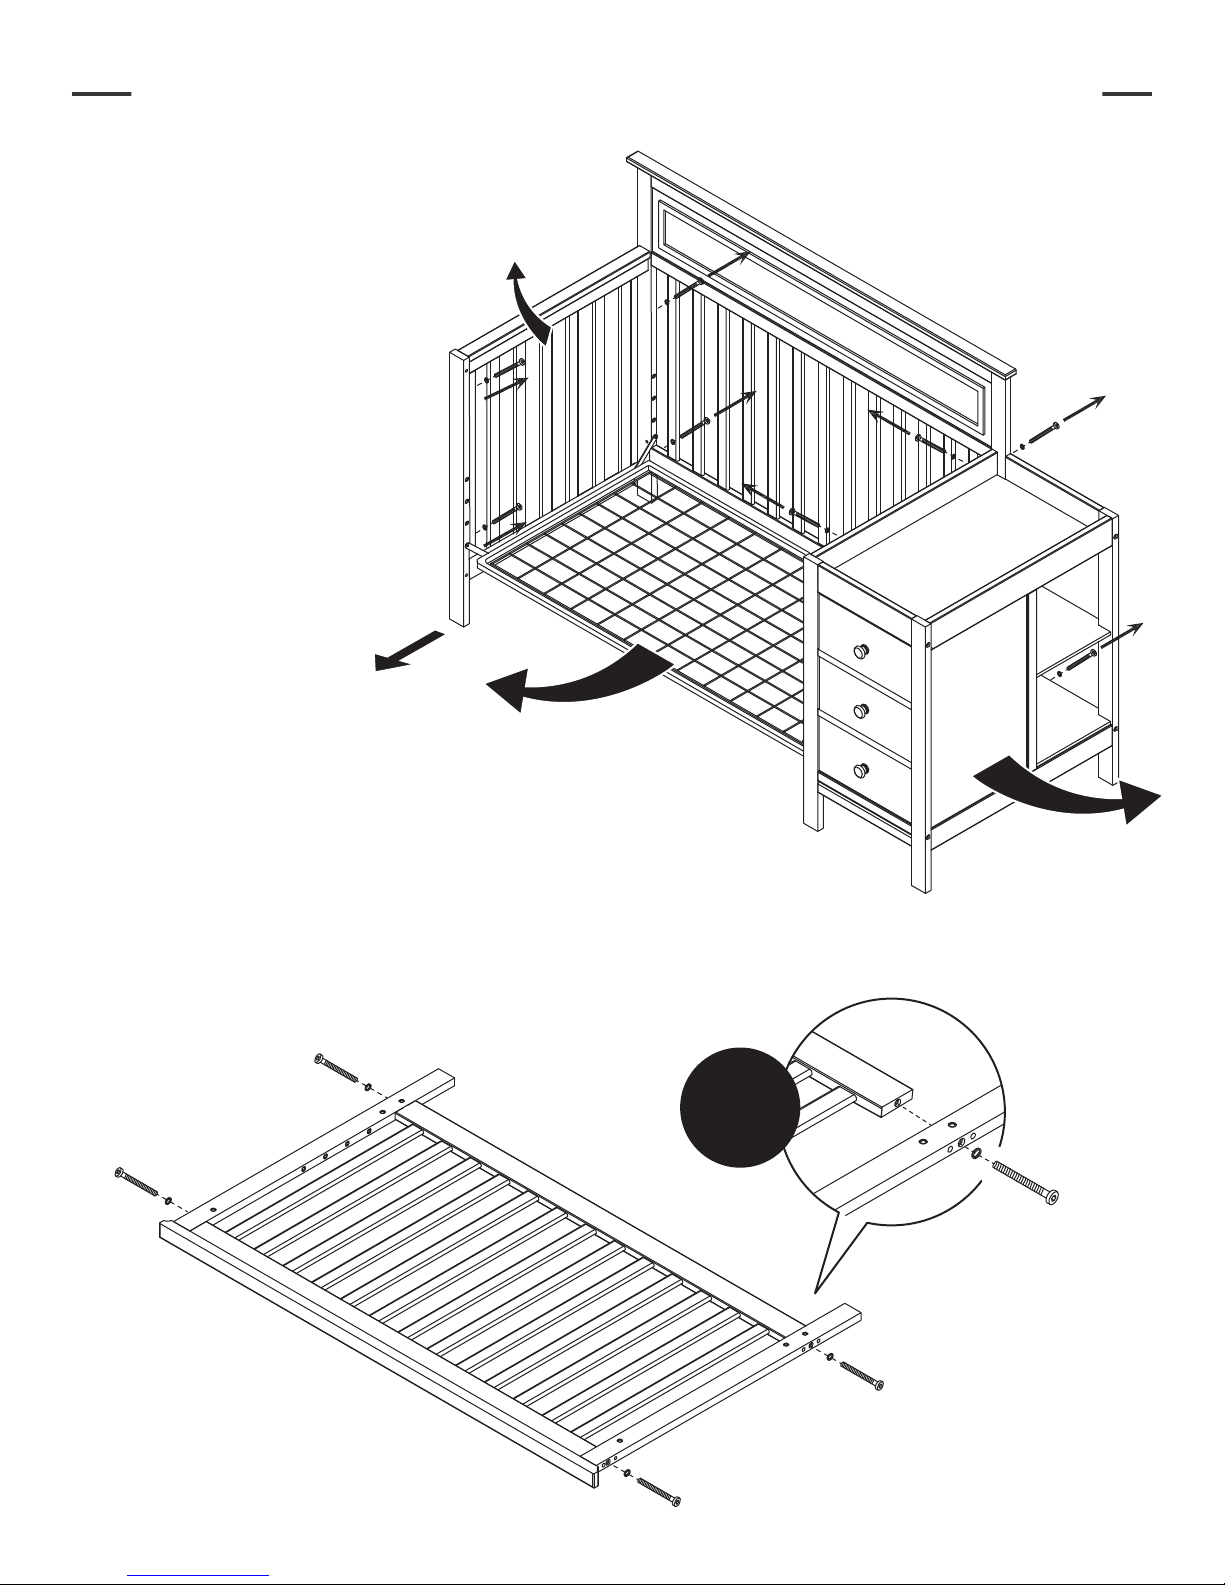
1
Remove the front left leg, left
side panel, mattress support
and the entire dresser section
from the crib. Keep all hardware for the following steps.
Retirer le pied avant gauche, le
panneau latéral gauche, le
support du matelas et toute la
section du bureau du lit de
bébé. Conserver toute la
quincaillerie pour les étapes
suivantes.
Front Left Leg
Pied antérieur
gauche
Left Side Panel
Panneau latéral
gauche
2
Use the same hardware to attach the crib’s front legs to
the footboard. The footboard may be removed when
you convert the crib to a toddler bed.
Utiliser la même quincaillerie pour fixer les pattes avant
du lit de bébé au pied de lit. Le pied de lit peut être
enlevé lors de la conversion du lit de bébé en un lit pour
tout-petit.
Front Left Leg
Pied antérieur
gauche
Footboard
Pied de lit
X4
2-1/2” Allen head
bolt and lock
washer
Boulon Allen de
6,4 cm et rondelle
de blocage
Do not overtighten the bolts.
Ne pas trop serrer les boulons.
C
page 3
Page 4

3
H2
H3
H2
H2
H4
H2
H1
H1
H1
H1
H1
C
Footboard
Pied de lit
Front Left Leg
Pied antérieur
gauche
4
X2
Do not overtighten the bolts.
Ne pas trop serrer les boulons.
Footboard
Pied de lit
B
A
page 4
Page 5

5
X2
Do not overtighten the bolts.
Ne pas trop serrer les boulons.
H5
* Take out the metal pin.
* Take out the metal pin.
* Retirer la tige métallique.
* Retirer la tige métallique.
H6
H6
A
H5
X1
!
Headboard
Tête de lit
Footboard
Pied de lit
B
The maximum weight for the
Conversion Rails is 500 lbs.
Le poids maximum pour les
traverses de conversion est de
227 kg (500 lb).
page 5
Page 6

6
X1
!
D
7
D
X2
1-1/2” Allen head bolt and
lock washer
Boulon Allen de 3,8 cm et
rondelle de blocage
Do not overtighten the bolts.
Ne pas trop serrer les boulons.
page 6
Page 7

8
FURNITURE ANTI-TIPPING KIT INSTALLATION
INSTALLATION DU DISPOSITIF ANTIBASCULEMENT
Serious or fatal crushing can occur when furniture tips over on children. To help prevent tip-over, follow the
steps below to install this anti-tipping strap.
Le basculement du meuble sur un enfant peut entraîner des blessures graves ou fatales par écrasement. Pour
aider à prévenir le basculement, suivre les étapes ci-dessous afin d'installer cette sangle antibasculement.
WARNING
Serious or fatal crushing injuries can occur
from furniture tip-over. To help prevent
tip-over:
Install tipover restraint provided.
Place heaviest item in the lowest drawers.
Unless specifically designed to accommodate,
do not set TVs or other heavy objects on
top of this product.
Never allow children to climb or hang on
drawers, doors, or shelves.
Never open more than one drawer at a time.
(OR)
Do not defeat or remove the drawer interlock
system.
Use of tip-over restraints may only reduce,
but not eliminate, the risk of tip-over.
This is permanent label. Do not attempt to remove!
AVERTISSEMENT
Le basculement du meuble peut entraîner
des blessures graves ou fatales par écrasement. Pour aider à prévenir le basculement :
Installer le dispositif antibasculement fourni.
Placer les objets les plus lourds dans les tiroirs
du bas.
À moins que le meuble soit spécialement conçu
pour recevoir un téléviseur, ne pas placer un
téléviseur ni tout autre objet lourd sur ce produit.
Ne jamais laisser les enfants grimper ou
s’accrocher aux tiroirs, aux portes ou aux
tablettes.
Ne jamais ouvrir plus d’un tiroir à la fois.
(OU)
Ne pas défaire ni enlever le système de blocage
des tiroirs.
L’utilisation de ce dispositif de retenue ne peut que
réduire mais pas éliminer le risque de basculement.
Cette étiquette est permanente. Ne pas essayer de l’enlever!
X 1
X 1
Tools Needed (not included)
Outils requis (non inclus)
X 2X 1
Stubby
Screwdriver
Tournevis
court
Pencil
Crayon
X 2X 1
Phillips
screwdriver
Tournevis
cruciforme
page 7
Page 8

8A
8B
Short
screw
Vis courte
8c.1
2”
8C
8E
3/16”
8c.2
8D
Long screw
Vis longue
E
page 8
Page 9

Finish
Terminé
READ ALL INSTRUCTIONS BEFORE USING THE
PRODUCT. KEEP THE INSTRUCTIONS FOR
FUTURE USE.
LISEZ ATTENTIVEMENT TOUTES LES
INSTRUCTIONS AVANT D’UTILISER CE PRODUIT.
CONSERVER CES INSTRUCTIONS POUR UN
USAGE ULTÉRIEUR.
KEEP THIS MANUAL IN A SAFE
PLACE FOR FUTURE REFERENCE.
GARDER CE MANUEL EN LIEU
SÛR POUR UN USAGE ULTÉRIEUR.
IMPORTANT:
As with all infant and baby furniture, it is important to check fasteners, screws, and bolts
periodically for tightness. Parents should ensure a safe environment for their children by
checking the furniture regularly before placing a child in the product.
IMPORTANT :
Comme pour tous les meubles de nourrissons et de bébés, il est important de vérifier
périodiquement le serrage des attaches, des vis et des boulons. Les parents doivent
procurer un environnement sécuritaire à leur enfant en vérifiant régulièrement le meuble
avant de placer l’enfant sur celui-ci.
page 9
Page 10

Storage:
Pine woods exchange moisture with the air adjust-
•
•
ing to major changes in room temperature and
humidity. Therefore, it is best to place your furniture
away from heating or air-conditioning vents.
Sunlight is not friendly to solid wood furniture and
•
•
prolonged direct exposure to harsh sunlight can
discolor the finish. Be careful not to place your furniture in direct sunlight for extended periods of time. As
with all your fine furniture, blot up spills immediately.
Rangement :
• Le bois de pin échange de l’humidité avec l’air en
s’adaptant aux principaux changements de température
et d’humidité ambiante. Il est donc préférable d’éloigner
ce meuble des bouches de chaleur et de climatisation.
• Les rayons du soleil ne font pas bon ménage avec les
meubles en bois massif et une exposition prolongée à la
lumière directe du soleil risque de décolorer le fini.
Prenez garde de ne pas laisser votre meuble directement au soleil pendant un temps prolongé. Comme pour
tous les meubles précieux, épongez immédiatement
toute éclaboussure.
Care and Cleaning:
•
Do not scratch or chip the finish. Do not use
abrasive chemicals for cleaning. Clean with mild
soap on a damp, soft rag. Rinse and dry thoroughly.
If you ever refinish this furniture, be sure to use only
a non-toxic finish specified for children’s products. If
you choose to refinish this furniture, the warranty will
be voided.
Registering your product is even easier than
before. You can register your product on our
website at :
www.themdbfamily.com/registrations
IF YOU WOULD LIKE T
REPLACEMENT OR MISSING PARTS,
PLEASE VISIT US AT:
WWW.THEMDBFAMILY.COM/SUPPORT
OR YOU CAN CONTAC
OR YOU CAN CONTAC
THE MDB FAMILY
855 WASHINGTON BLVD.
855 WASHINGTON BLVD.
MONTEBELLO, CA 90640
MONTEBELLO, CA 90640
O ORDER
A
T US BY MAIL:
T US BY MAIL:
Entretien et nettoyage :
• Évitez d’égratigner ou d’écailler le fini. N’utilisez pas
des nettoyants abrasifs. Nettoyez le meuble avec du
savon doux sur un chiffon non rugueux. Rincez et
séchez-le complètement. Si vous devez refaire la finition
de ce meuble, assurez-vous d’utiliser un fini non toxique
conçu pour les meubles pour enfants. Si vous entreprenez de refinir ce meuble, sa garantie sera annulée.
L’enregistrement de votre produit est plus
facile que jamais. Veuillez l’enregistrer sur
notre site Web à :
www.themdbfamily.com/registrations
POUR COMMANDER DES PIÈCES
DE RECHANGE OU MANQUANTES,
VISITEZ-NOUS À :
WWW.THEMDBFAMILY.COM/SUPPORT
OU CONTACTEZ-NOUS PAR LA POSTE :
THE MDB FAMILY
855 WASHINGTON BLVD.
MONTEBELLO, CA 90640
page 10
 Loading...