

Page 1
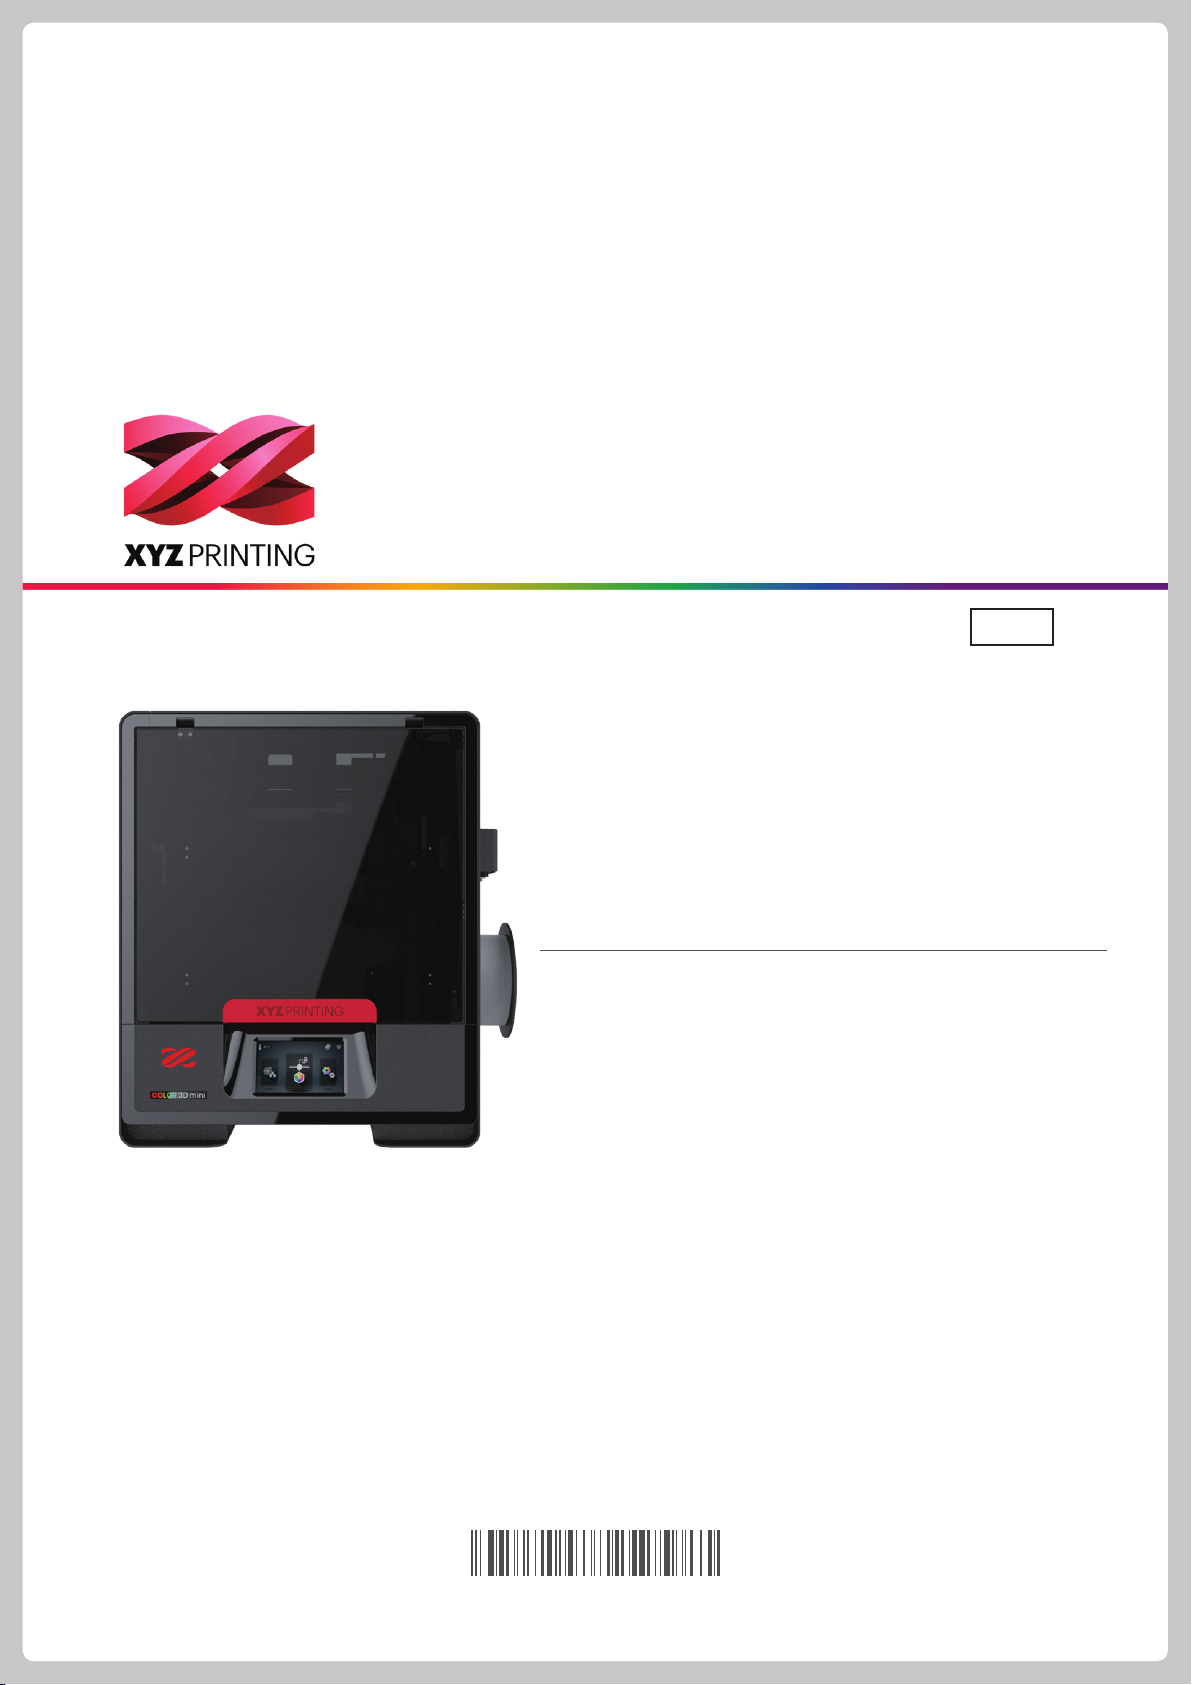
da Vinci Color mini
User manual
Safety Precautions 2
Product Descriptions 3
Unpacking and Installation 5
Touch Screen Menu, Functions and Messages 7
Function Operation and Instructions 8
Printing 18
Support detail 19
The manual is mainly intended for users to understand how to use
the da Vinci Color mini 3D printer (“Color mini”) correctly. In this
manual, users can learn more about the operating tips, application
skills and maintenance of the Color mini 3D printer.
New member is required to register account on http://support.
xyzprinting.com before able to download latest manual &
software for better user experience.
For more information on the Color mini, please contact your local
dealer or visit the ofcial website of XYZprinting: http://www.
xyzprinting.com.
ENG
HD23FCM1197
Page 2
Safety Precautions
Safety and Compliance
Please read through this manual and all safety precautions carefully before using, operating, unpacking, replacing, removing any part or maintaining this product. Please also comply with the instructions of relevant safety precautions.
CAUTION
Important Safety Precautions
●
Do not move the machine by yourself as it is heavy.
●
Do not place the printer in a dusty, humid or outdoor environment.
●
Do not place the printer on a soft or tilted surface. Otherwise, the machine will fall / ip over and become damaged or
cause personal injury.
●
Do not leave the product or power cord to unattended children. Otherwise, personal injury or electric shock might occur.
●
Use the provided power cord. Otherwise, incorrect grounding might lead to damage.
●
Do not place any liquid container on top of the product. Otherwise, overow or spill might go into the machine and pose
the risks of danger or safety concern.
●
Do not wipe the printer with alcohol or ammable chemicals. Otherwise, danger might occur.
●
Do not move the machine when it’s powered on.
●
Do not reach into the machine with your hands during operation. Otherwise, risks of impact from moving printing parts or
burn from high temperature might occur.
●
The machine becomes hot during operation and thus run in high temperature. Do not touch or replace parts when they
are not cooled down.
●
After startup, the parts in the machine will heat up or move depending on the user’s instructions. During product
operation, do not touch or block the operation of the parts.
●
Weak odors may be generated during the printing process. We recommend working in a well-ventilated and open area to
ensure operational comfort.
●
Defect reparation must be carried out according to the contents of this instruction manual. Where the defect cannot be
repaired, please contact your printer dealer or the customer service center.
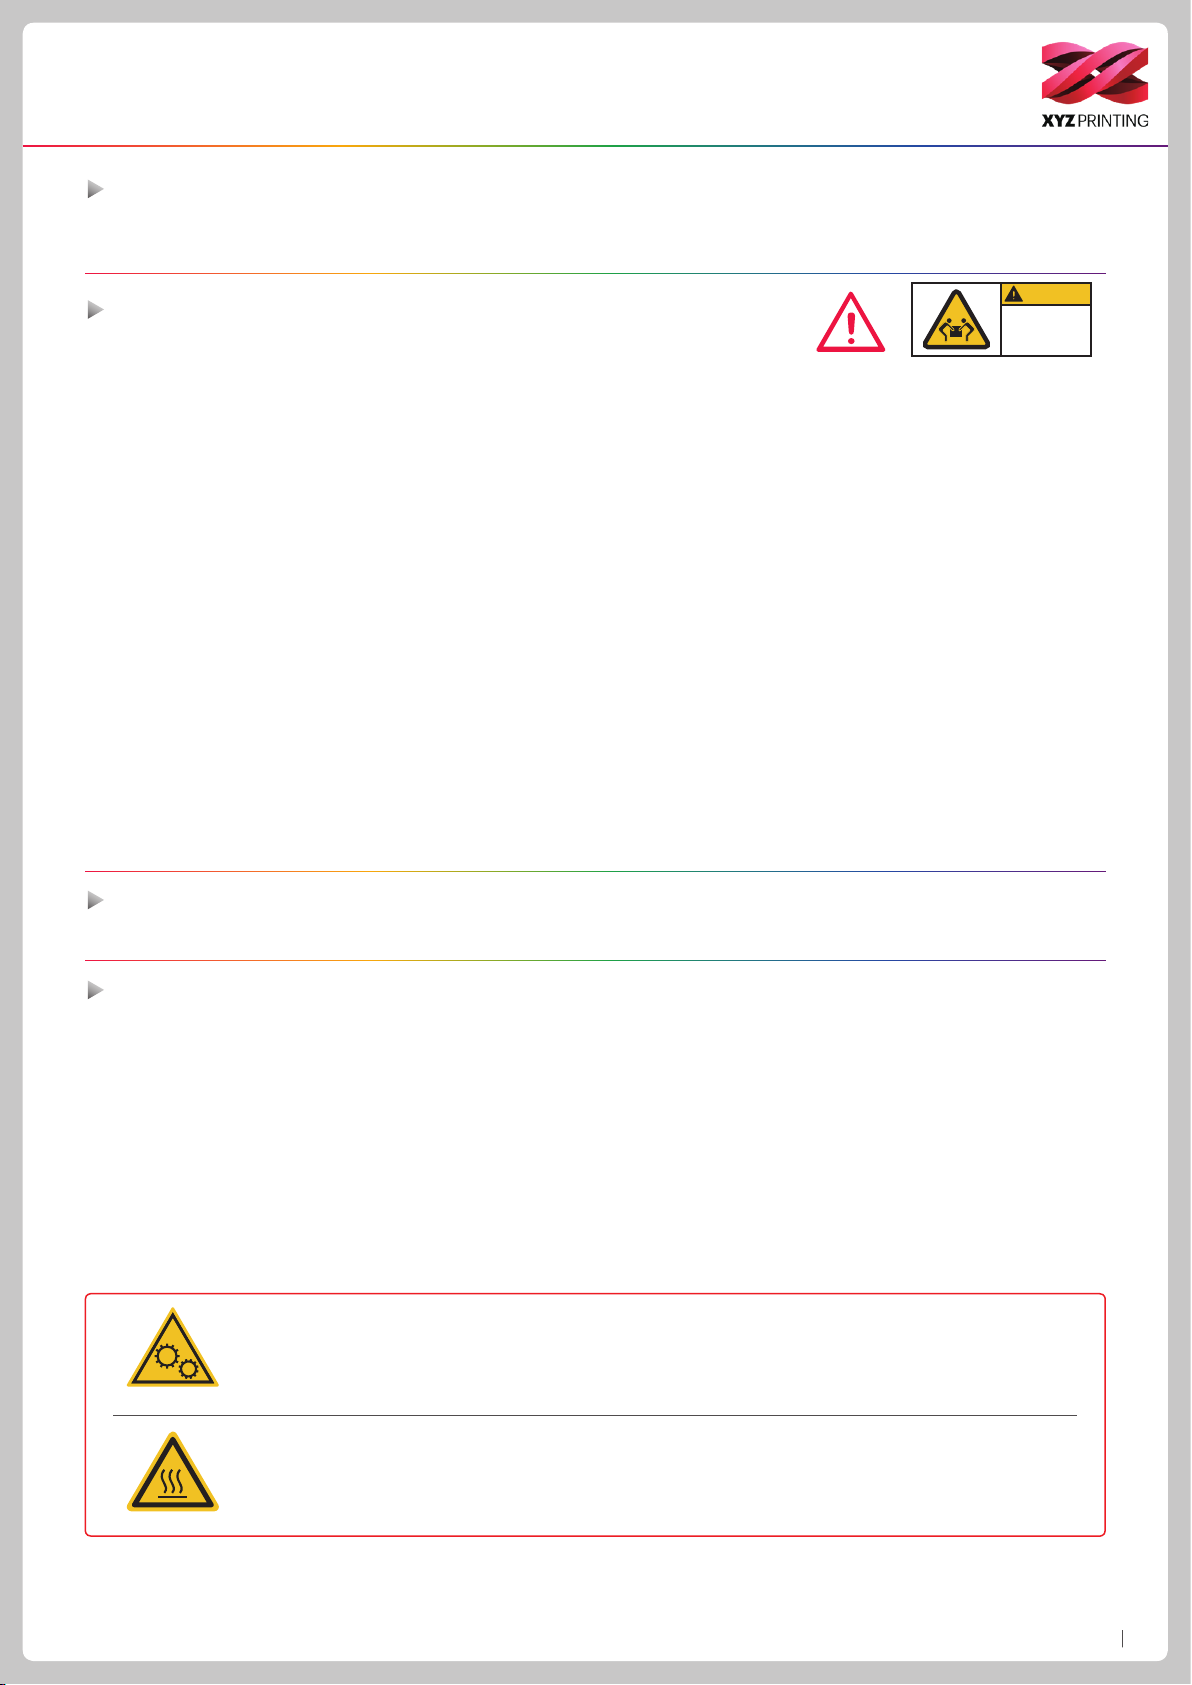
Heavy object.
2 person lift
required
Trademarks
All trademarks and registered trademarks are the properties of their respective owners.
Maintenance and Service
When the printer needs to be serviced during the term of the warranty, it is recommended that the machine is packed with
original packaging materials prior to shipment. For this purpose, the packaging materials are better to be kept. If other
packaging materials are used instead, the printer might be damaged during transportation. We reserve the right to assess
relevant service fees.
This equipment must be grounded. The power code for product should connect to a socket-outlet with
earthing connection.
WARNING:
AVERTISSEMENT:
partie du corps.
Hot parts!
Hazardous Moving Parts. Keep Fingers and Other Body Parts Away.
Dangereux Les Parties Mobiles. Evitez tout contact avec les doigts et toute autre
Burned ngers when handling the parts.
Do Not Touch.
Parties Chaudes!
Brûler les doigts lorsque de la manipulation des composants.
Ne pas toucher.
da Vinci Color mini
P2
Page 3
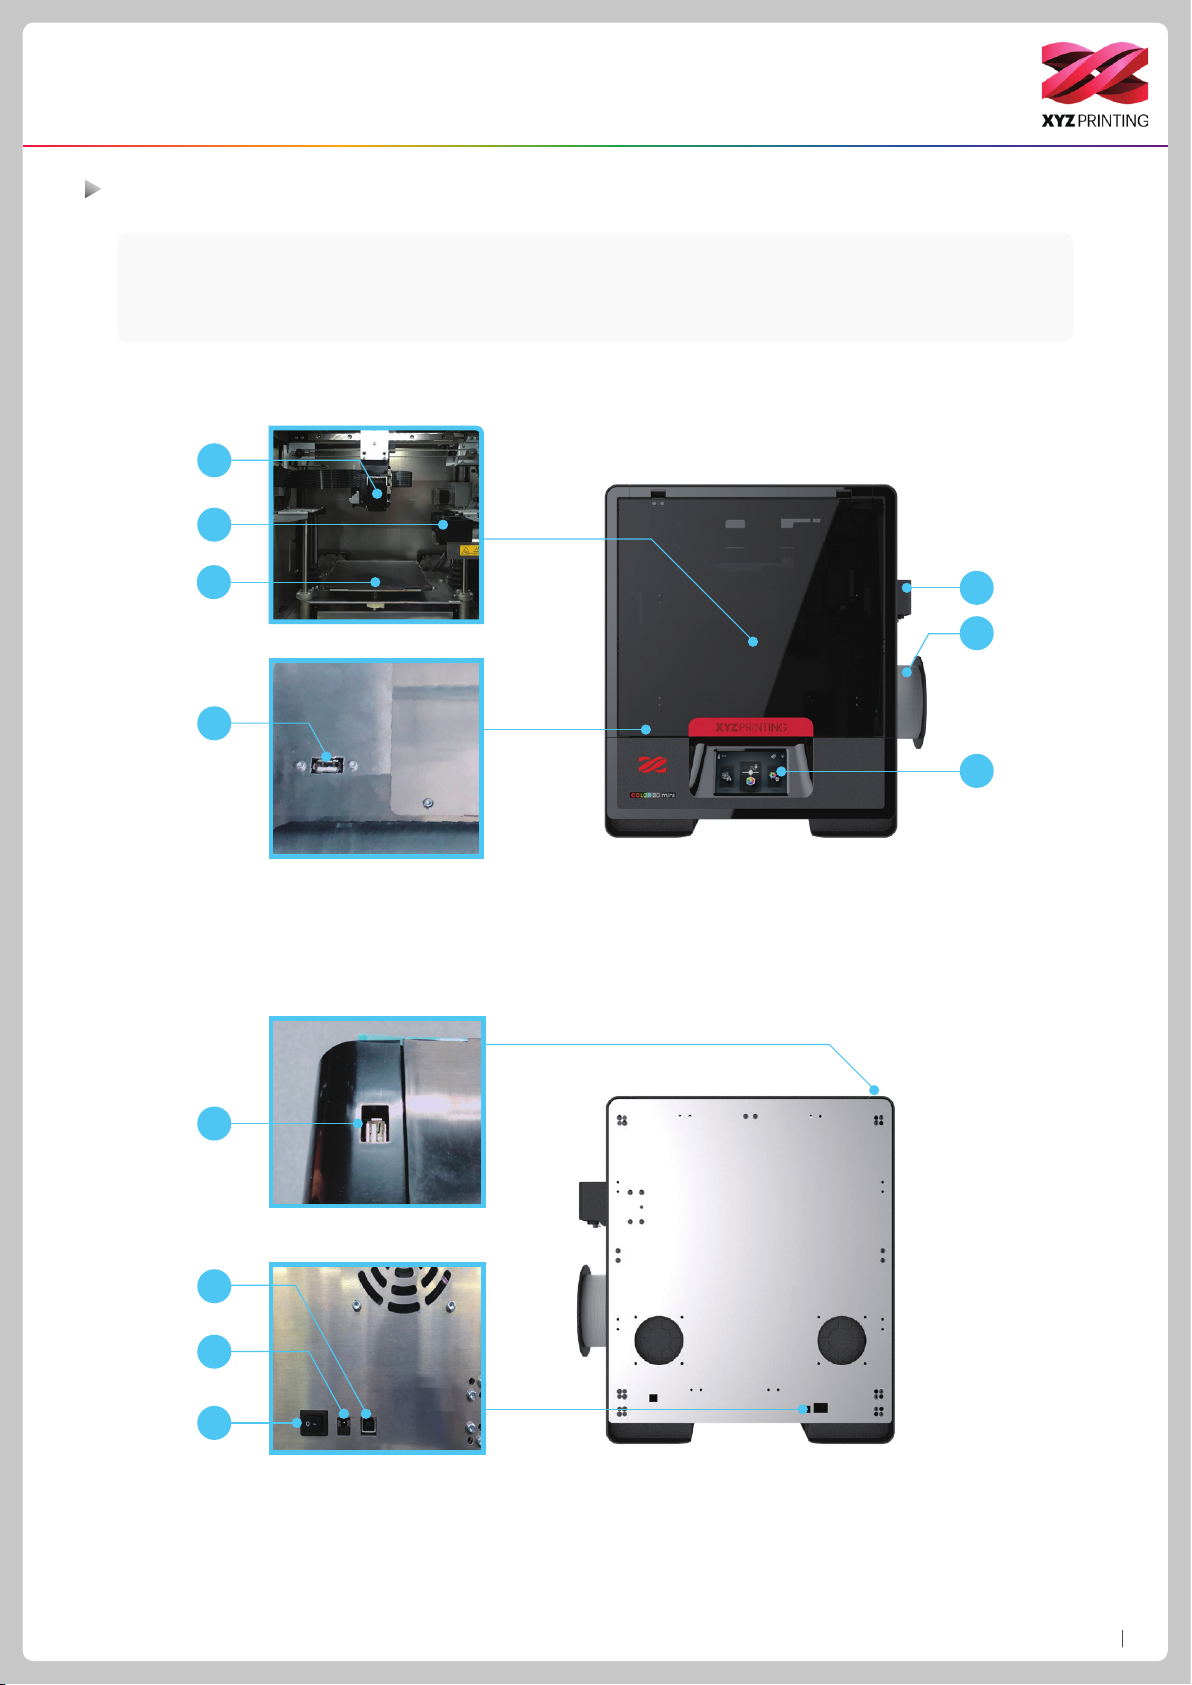
Product Descriptions
Product exterior
1. Print head 4. USB Port 7. 5 inch color touch panel 10. Power jack
2. Ink service station 5. Auto-feeding module 8. USB Port
3. Print bed+EZ removable rubber magnet 6. Filament spool holder 9. USB Port (To PC)
1
2
(WiFi dongle)
11. Power switch
3
5
6
4
7
8
9
10
11
da Vinci Color mini
P3
Page 4
Product Descriptions
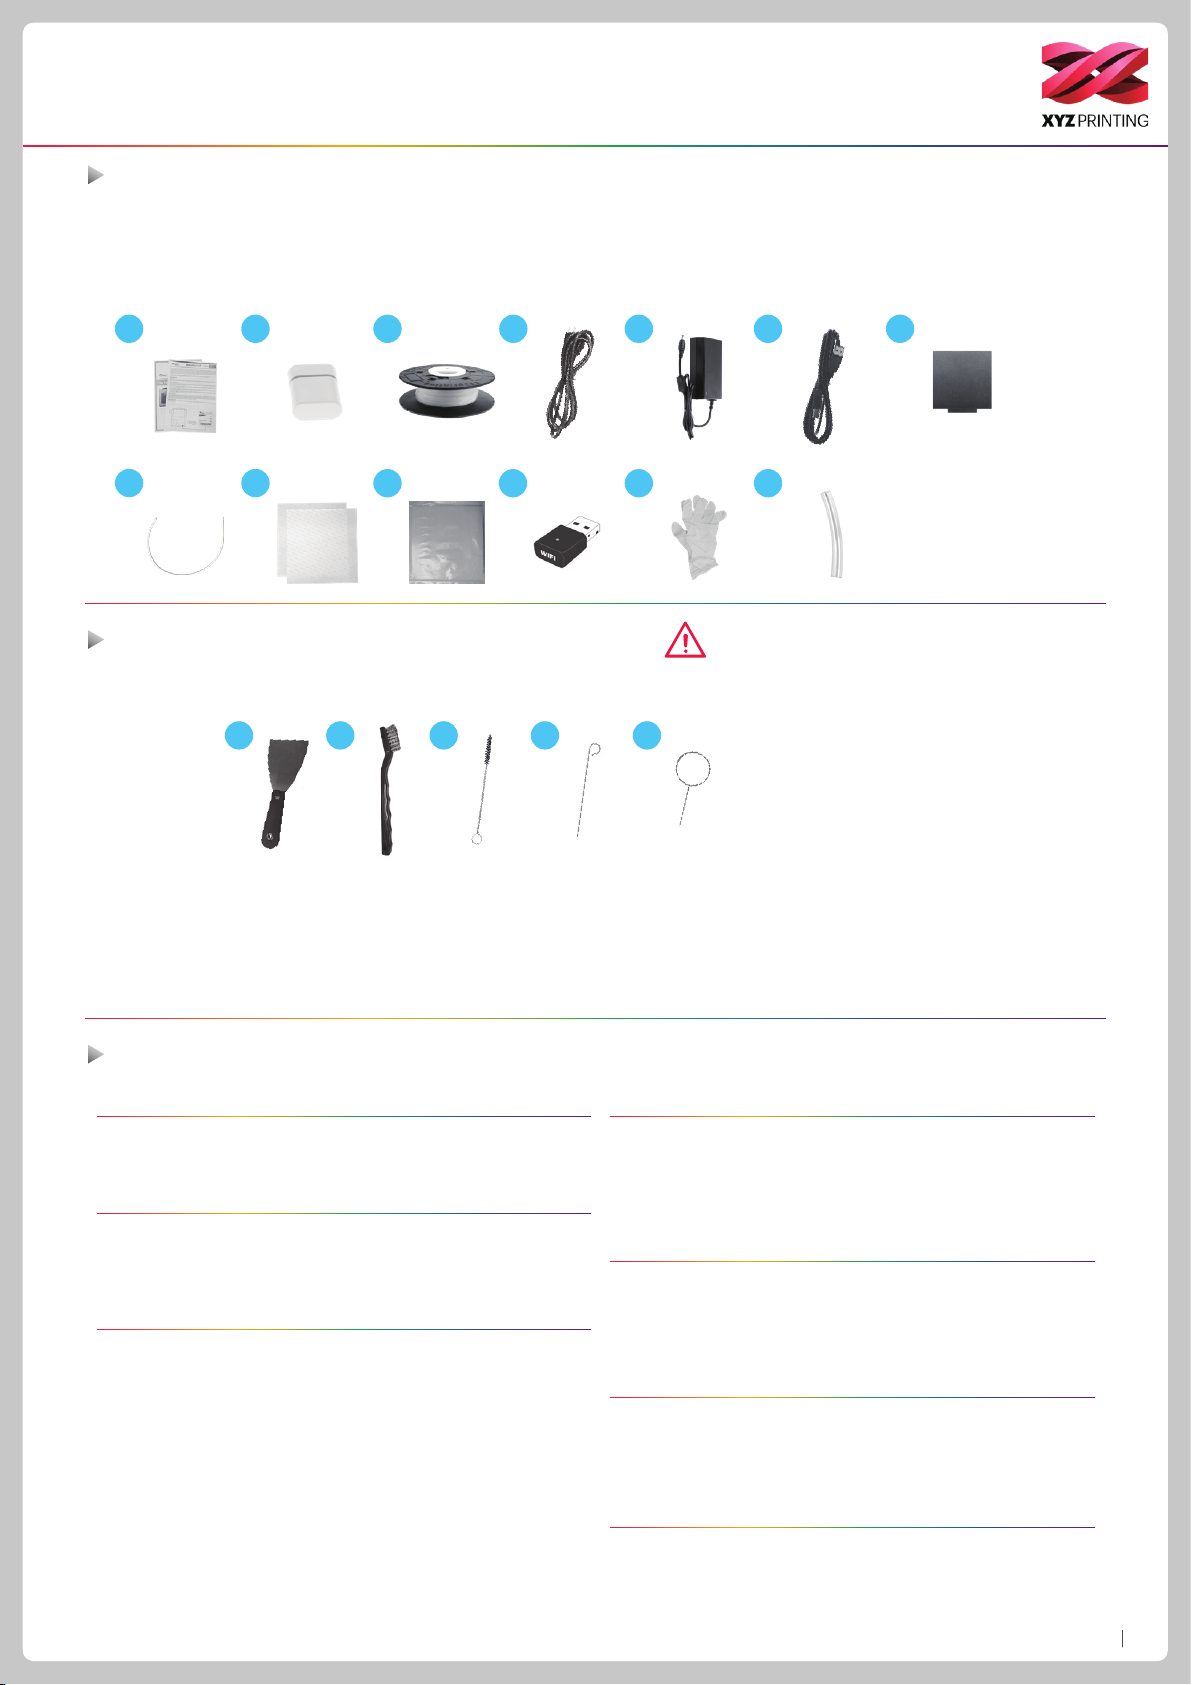
Accessory Checklist
1. User Manual 4. Power Cord 7. EZ Removable Rubber Magnet 10. Mask Tape x 3pcs 13. Clear Tube
2.
USB Drive 5. Power Adapter 8. Guide Tube 11. WiFi Dongle
3. 3D Color-inkjet PLA 6. USB Cable 9. PC Mylar x 2pcs 12. Pair Of Gloves
1 2 3 4
8
9
10
11
5 6
12 13
7
Precautions and Instructions of Maintenance Tools
The following tools are intended for use under the guidance or guardianship of an adult only. Do not allow children unfamiliar with the
tools to have access to them in case of danger.
Scraper
31 2 4 5
●
Make sure the maintenance work of the printer is carried out when the print bed has cooled down.
●
When printing is completed and the print bed is cooled down to room temperature, the printed object can be removed from the print bed
with the scraper.
●
Filament residues generated during the course of printing may be stuck on the print head and gears of the printing module. The printing
quality and printer operation as well as the measurement of the print bed may be affected. When this happens, clean the printing
module with the wire brush.
1.
Wire brush
2.
Gear cleaning brush
3.
Feed hole cleaning wire
4.
Print head cleaning wire
5.
Specications
Printing
Printing technology 2D pattern: Inkjet printing
3D structure: Fused lament fabrication (FFF)
Dimensions and Weight
Dimensions (W*D*H) 447x 447x 541 mm
Net weight 24 Kg
Gross weight 29 Kg
Performance
Printing dimensions (W*D*H) 130 x 130 x130 mm
Thickness of printed layer 0.1 mm ~0.4 mm
Alignment precision X/Y : 0.0125 mm
Auto calibration Yes
Auto feeding Yes
Ofine standalone printing Yes
Materials
3D printing materials
Filament diameter 1.75 mm
Ink type CMY 3in1 ink cartridge
3D Color-inkjet PLA / PLA / Antibacterial PLA /
Tough PLA / PETG / *Premium Metallic PLA / *XYZ
Carbon Fiber (*Option Hardened Steel Extruder)
Hardware
Print head diameter 0.4mm
User interface 5” color touch screen
Print bed Non-heated, removable
Transmission USB 2.0 drive / USB cable / wireless transmission
Software
User software XYZprint / XYZmaker
Supported le format AMF, OBJ, STL, XYZ Format (.3w), .3CP, .3MF
Operating system Mac OS X 10.10 / 10.11 / 10.12
Windows 7 /8/10 (64-bit)
Temperature
Machine operating temperature 15-35°C
Cartridge storage temperature -5-35°C
Filament storage temperature 0-38°C
da Vinci Color mini
P4
Page 5
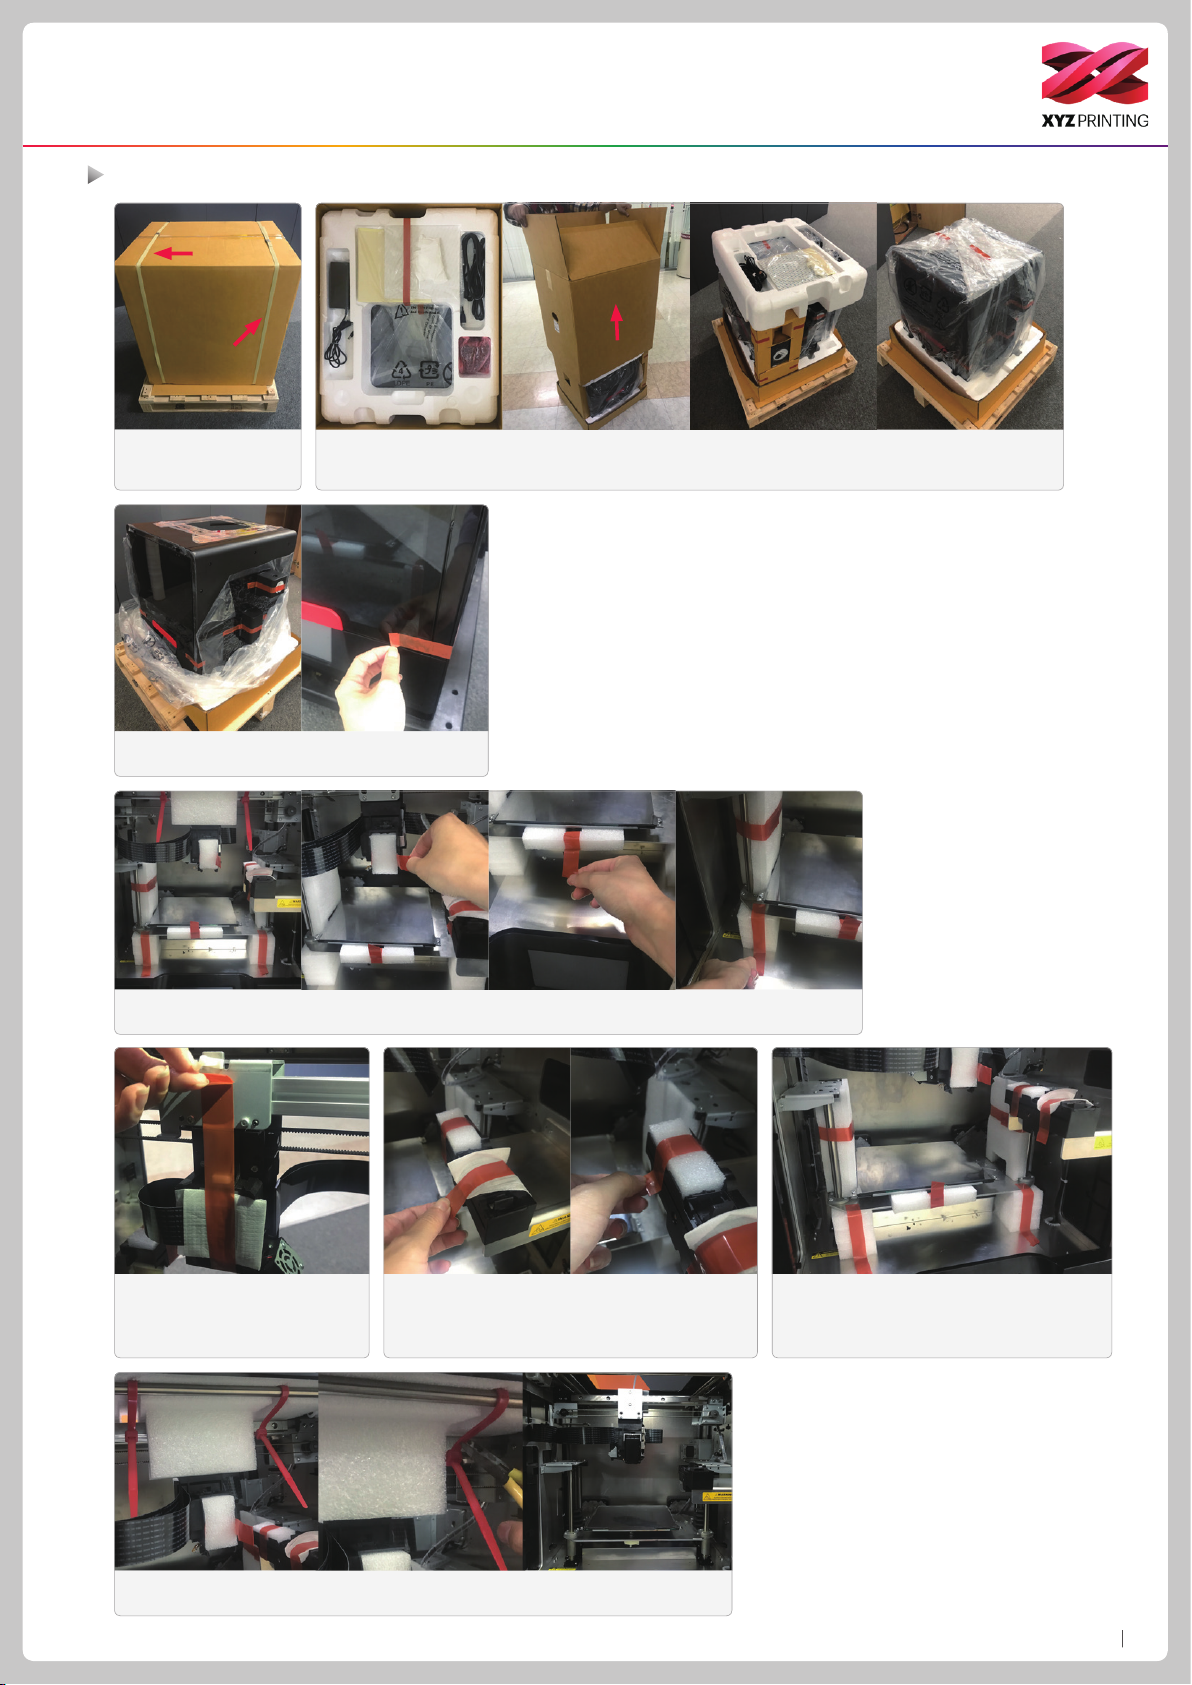
Unpacking and Installation
Unpacking
1. Remove the PP
belt.
3. Remove the tape on the body.
4. Open front door, remove all tape as shown in Illustration.
2. Remove the packaging materials, accessory box and plastic cover.
5. Remove the tape and
foam from the rear print
head installation position.
8. Remove the cable tie and foam in front and back of the front door.
6. Remove the foam on the ink service
station.
7. Remove the foam next to the
guide screws on both sides, and then
remove the foam under the print bed.
da Vinci Color mini
P5
Page 6
Unpacking and Installation
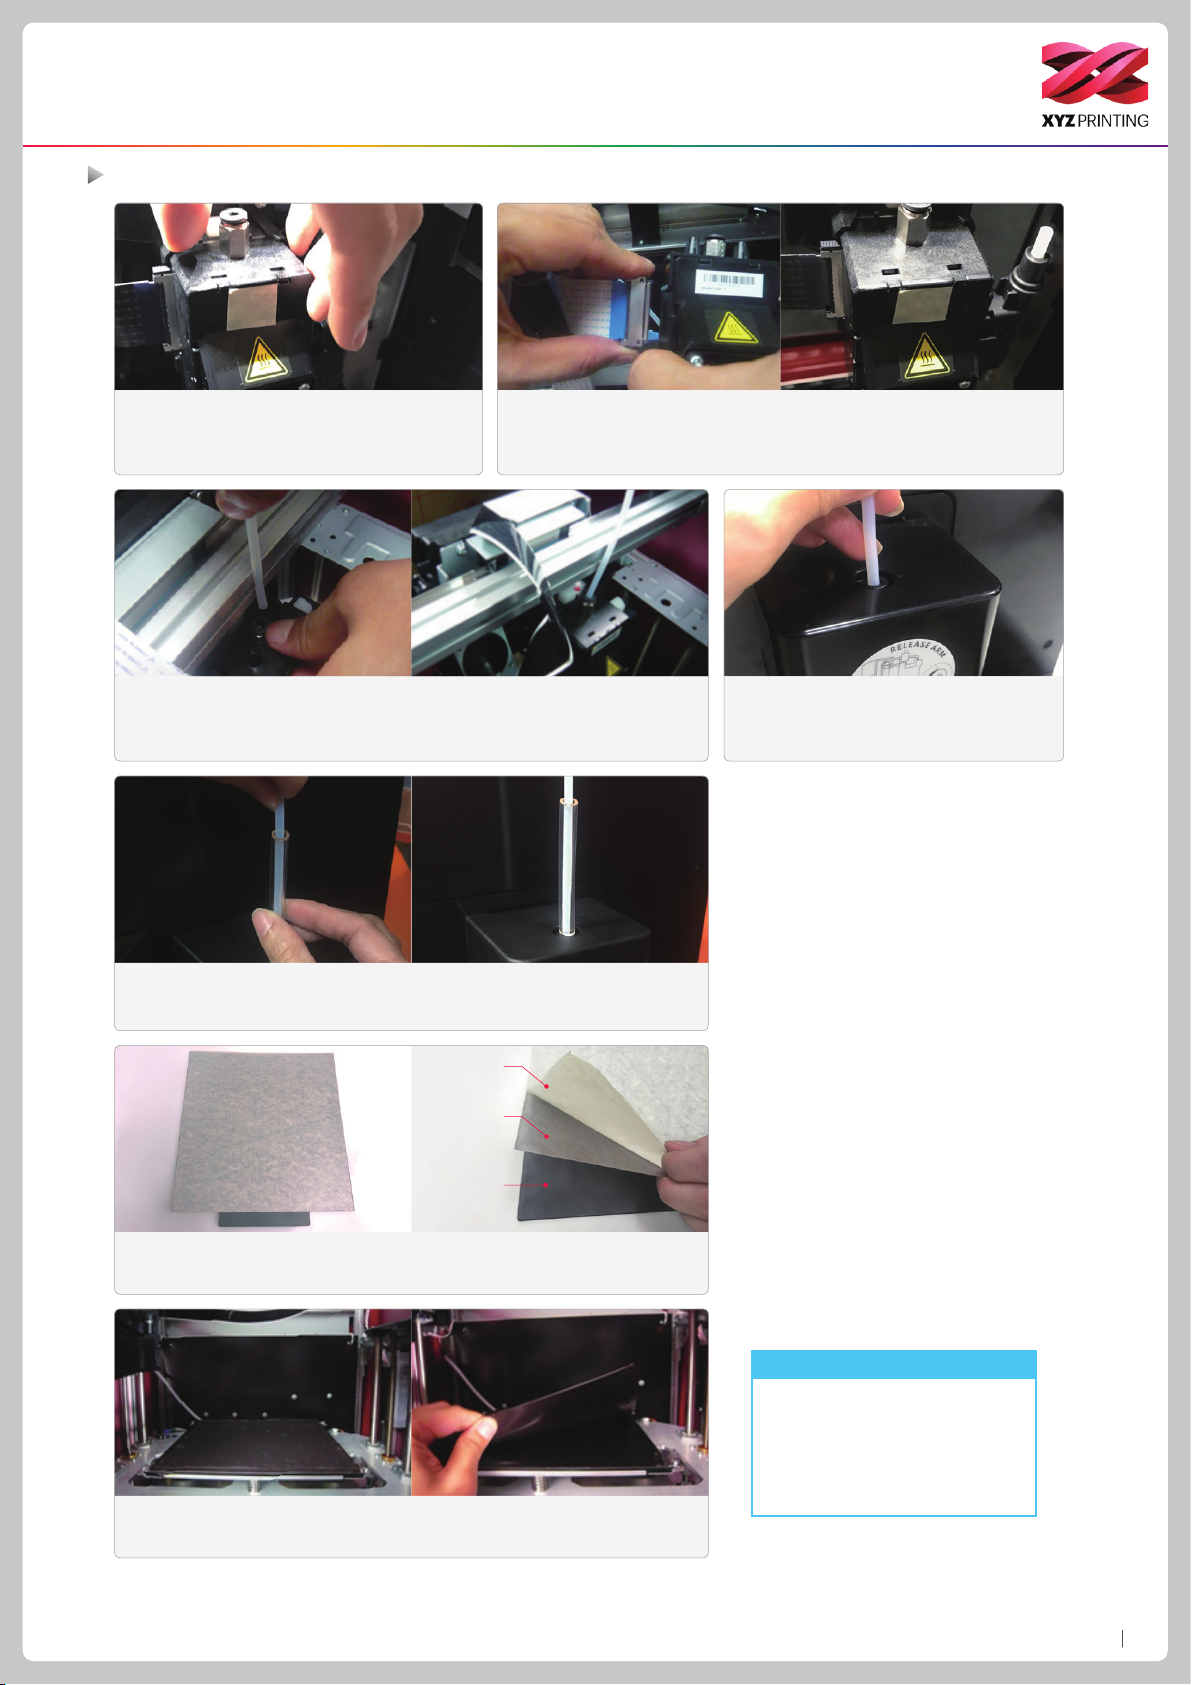
Installing the Extruder module and the guide tube
1. Make sure that the printer is powered
off. Place the extruder module that the
fitting pin is secured the proper location.
3. Insert one end into the feed module, ensure that the guide tube
has been tightly inserted into the port.
5. Insert the other end of the guide tube into the feed moduleand
secure it tightly.
2. Connect the bus (make sure it clicks into place).
4. Pass the guide tube going through
the top. Then insert the other end
into the clear tube (Accessory 13).
Mask Tape
PC Mylar
EZ Removable
Rubber Magnet
6. Please follow the order as image instruction, attach the PC
mylar and mask tape on the EZ removable rubber magnet.
7. Confirm the rubber magnet is well placed on the print bed.
Note
There is a sheet of PC lm to
rubber magnet with a double
sided adhesive, this PC lm is
replaceable, please replace it
when it's dirty or broken.
da Vinci Color mini
P6
Page 7

Touch Screen Menu, Functions and Messages
Main screen
Filament/Ink loading
and unloading
USB Printing Menu
Function
Guide
Settings
This includes Filament, Ink Load
and Unload.
This menu can be used to import
les (.3cp) from a USB drive to the
machine for printing without a computer.
This includes the functions in Home
Page 1:
Settings of the Print-Bed, PrintHead, Filament and Ink.
Next page includes
WiFi, Sound, Statistics, Language
and Display.
The last page includes
Model, Version, Reset and Legal
Info.
da Vinci Color mini
P7
Page 8

Function Operation and Instructions
A. Load/unload laments
A1
Filament
1. Please cut the lament at 45
angle before auto loading the
lament into the printer. During
loading lament process, the
lament should be straighten at
least 4” of the Filament end as
shown in pictures.
5. Tap Load. 6. Conrm the operation. 7. Insert the lament into the feed module, it will be automatically
Load laments
2. Place the lament on the
spool holder.
Make sure the lament rotates
Note
clockwise when pulled.
3. Tap Filament Load and
Unload in the main screen and
select Filament.
loaded.
4. Tap Filament.
8. Check if the temperature of the print head goes up to its operating temperature (Color PLA from
XYZprinting) after the lament is loaded. Once the set temperature is reached, the feeding motor
will feed the lament along the guide tube into the print head.
A2 Filament
1. Tap Filament Load and
Unload on the main screen.
5. When the unloading
operation completes, tap to
conrm.
Unloading laments
2. Tap “Unload” and conrm the
operation.
3. Conrm the unloading
operation.
9. Once lament has extruded
from the print head, the lament
will be successfully loaded.
Tap the screen to conrm and
continue.
4. When the print head has
been warmed up to 220 °C,
the feeding motor will eject the
lament.
da Vinci Color mini
P8
Page 9

Function Operation and Instructions
A3 Filament
Color mini will prompt you to rell material.
1. Tap the icon when printing.
5. Replace the empty spool with a new one. (please refer to the
LOADING section in this manual) and then tap "PROCEED" .
Rell Material
2. The screen will show lament
status, please tap "Rell" .
3. Conrm the operation.
6. The nozzle will be preheat and notify you when to insert
lament into the feed module.
4. The nozzle will be preheated
and the lament will be
unloaded automatically.
7. The lament will be
automatically loaded.
B. USB printing
1. Check if the USB drive is
plugged to the machine.
5. The screen will show the
print percentage when printing.
The Pause, Stop, and Rell
are shown below the print
percentage.
B1
Unload the prints
8. Check if lament is extruded from the nozzle, after
conrmation, the printer will resume printing.
2. Tap the USB Printing Menu
in the main screen.
3. Select the le you want to
print.
4. Check le information and
tap “Print”.
Please removed the EZ Removable Rubber Magnet with printed object together from the printer.
And peel off the printed object from the rubber magnet.
Please avoid touching the led strip of the
printer because the
LED strip will be slight
hot due to long hours
of been light on.
da Vinci Color mini
P9
Page 10

Function Operation and Instructions
C. Ink Cartridge Installation
The Color mini uses three color inks.
Ink Guidance
1. Prepare lens wiping cloth/ lens
paper and the ink cartridge.
4. If the ink did not transfer well, try
putting the lens wiping cloth/ lens
paper on the table and hold the ink
pressed on the lens wiping cloth/ lens
paper.
6. If the ink did not transfer well, please wet the lens wiping cloth/ lens paper with 75% Alcohol and wipe the ink, then hold
the ink pressed on the lens wiping cloth/ lens paper again. After you clean the inkjet, check to see if the ink transferred.
2. Remove the cartridge cover.
5. Check if the ink transferred to the
lens wiping cloth/ lens paper. If so, ink
guidance is successfully completed.
Once ink guidance is done, install the
ink cartridge.
3. Press the cartridge head against
the lens wiping cloth/ lens paper to
transfer some ink onto it.
Note
To prevent the opened ink cartridge from drying out when a print is nished or the printer will be idle for days, follow
the procedure to store the cartridge:
1. Clean the nozzle of the ink cartridge with alcohol.
2. Seal the ink cartridge with the protective cover, and store the cartridge in room temperature at 15 ~ 35 degree.
For the best print quality, clean the nozzle of the cartridge with alcohol after removing the protective cover from the
cartridge, and then install the cartridge back to the printer before the next print.
da Vinci Color mini
P10
Page 11

Function Operation and Instructions
Tap the ink, the screen will
show the status of the ink,
including "Ink Low", "No Ink",
"Invalid Ink"
Change InkC1 Ink
1. Tap Change Ink and tap to
conrm.
2. Conrm the operation.
Cartridge Installation
1 2 3
3.Wait until the cartridge moves
to the center of the print bed,
and then change the ink.
1. Place the ink cartridge along the ink
cartridge slot.
2. Snap the ink cartridge into the ink slot.
3. Check if the cartridge is placed
properly, ink installation is complete.
Note: Be sure to turn off the power before
replacing the ink cartridge. After the
replacement is complete, please conduct
inkjet calibration test.
4. Tap the PROCEED after you
change.
da Vinci Color mini
P11
Page 12

Function Operation and Instructions
InkC2-1
We suggest you print a test page after you install the ink cartridge. Please prepare a sheet of paper.
3. Take out the EZ Removable
Rubber Magnet. Use tape to
secure the A4 in the portrait
direction on the front side of the
rubber magnet.
Calibration Test Page
2. Tap Test Page.1. Tap Calibration.
4. Tighten/pull the A4 paper so
it is at(no gap) on the rubber
magnet.
5. Fold tightly the excess A4 paper to the back of the rubber
magnet.
6. Put the rubber magnet back
to print bed accordingly.
7. Fix the paper onto the print
bed and then tap PROCEED,
the printer will do a test print.
Test Page print examination
Picture 1 shows an example
of normal test page.
8. Remove the test page and
tap PROCEED.
Picture 2 show some
slight color offset on
horizontal part of test
page.
It is under acceptance range. If the
rprint of the test page
gets worst, please
proceed with the
cleaning procedure.
Picture 2-1 shown
some slighly black
ink smudge on the
horizontal & vertical
part, it may happen
to other color. This
is within accaptable
range.
da Vinci Color mini
P12
Page 13

Function Operation and Instructions
C2-2 Ink
1. Tap Inkjet Calibration. 2. Inkjet Calibration.
Caution: Please ensure the EZ Removable Rubber Magnet had
placed in the printbed.
5. The printer will print the
calibration card automatically.
This takes approximately 15
minutes. (Make sure you have
loaded the lament.)
Calibration Inkjet Calibration Calibration
3. Check that the print bed is
clear, then close the door.
6. After the printing is completed,
take out the calibration card.
4. The printing operation will
start once the print nozzle is
warmed up.
7. Horizontally and vertically,
nd the box where the ink is
the most aligned, and then tap
PROCEED.
8. Vertical direction: Enter the
number of the box you think the
lament and ink align the most,
and then tap PROCEED.
Calibration Inkjet Calibration Manual AdjustC2-3 Ink
1. After the color object is printed, if you nd color shift, you can
adjust the print position manually.
Y-Axis
X-Axis
2. The adjustment position
of X-Axis and Y-Axis was the
sample position, when facing
the printer.
Manually adjust the
movement of X-Axis
Select “X-AXIS” to move rightwards and leftwards.Press the
“Left” or “Right” button to select
the direction and distance to
be adjusted, each adjust has a
step of 0.05 mm.
9. Horizontal direction: Enter
the number of the box you think
the lament and ink align the
most, and then tap PROCEED.
Manually adjust the
movement of Y-Axis
Select “Y-AXIS” to move upwards and downwards.Press
the “Up” or “Down” button to
select the direction and distance
to be adjusted, each adjust has
a step of 0.05 mm.
10. After the calibration is
completed, tap PROCEED to
nish the ink calibration.
Once parameter settings are
completed, tap "PROCEED" to
save and apply the settings that
you have specied.
If you want to reset, select “ReType” to return to the X-Axis
moving position setting.
da Vinci Color mini
P13
Page 14

Function Operation and Instructions
D. Setting
D1
D2
D3 D9
D1-1
1. Select Calibration. 2. Conrm the operation.
3. Wait while the sensor measures the height of the print bed at three different locations. Once the
measurement is complete, the printer will automatically level the print bed.
Caution: Please ensure the EZ Removable Rubber Magnet had placed in the printbed.
Print-Bed
Calibration (leveling)
D4
D6
D8
D5
D7
4. After the calibration is
successfully completed, tap to
conrm.
D1-2
1. Tap Z-offset. 3. Users can tap the icon to
Print-Bed
D1-3 Print-Bed
Z-offset
2. Move the print head to thecenter of the print bed. Use a business card to check the distance between the nozzle and the print
bed. It is recommended that the space between the print head
and the print bed just touch and the nozzle can move smoothly
on the print bed.
Jog Mode
Jog mode lets manually move the print head via the touch
screen.
higher or lower the print bed,
the higher value the bigger
distance and vice versa.
How to move the print head:
Move along the X-axis.
1.
Move along the Y-axis.
2.
Move along the Z-axis. (Do not increase/shift upwards when
21 3
3.
print head at home position avoid hitting the print bed.)
da Vinci Color mini
P14
Page 15

Function Operation and Instructions
D2-1
1. Please clean the nozzle after
printing 60 hours.
Print-Head
Clean Nozzle
2. Tap Clean Nozzle in the print
head section.
3. Check if cleaning is necessary. Tap Check to clean it.
When the temperature of the print head reaches the operating temperature, the cleaning operation will start.
Note: do not touch the metal part of the print head as it becomes hot during the operation.
4. Inset the feed hole cleaning wire
into the feed hole and push it down-
wards to drive out the lament from
the print head. (It is recommended
that the operation is performed from
the top of the machine.)
In order to prevent print quality from impact due to residual and accumulated lament, which results in poor discharge, after
long-term use of print nozzle, it is recommended to enable the "CLEAN NOZZLE" (nozzle cleaning) function of the printer every
Note
60 hours of print to clear residuals with nozzle cleaning wire or feeding path cleaning wire. (Filament should be unloaded from
the extruder and remove the guide tube before cleaning the feeding path.)
5. Remove the lament residue from
the print head with a wire brush.
6. Insert the print head cleaning wire
into the nozzle from the bottom to
clean it.
7. After the cleaning operation is
completed, tap DONE.
D2-2 Print-Head
1. Tap Change Nozzle. 3. Wait until the print head moves to
5. Turn off the power before changing the print head.
Change Nozzle
2. Tap to conrm that you want to
change the nozzle.
6. Change the print head from above
the machine. (If there is a guide tube
installed, please make sure that the
material has been returned and then
removed the guide tube.)
a proper position for change.
7. Press the white release button to
separate the print head.
4. The position of the print head
change is shown above.
8. Hold the print head with one hand
and remove the bus with the other.
The removal of the print head is
completed.
Installation sequence of new print head:
1. Connect the bus.
2. Press the white release button on the print head and assemble the print head and the mechanism. After attaching the print head, check to
see that it is secure and does not shake.
3. Turn on and use the printer.
D2-3 Print-Head
This function can be operated
if the printing device is
colliding with the ink
service station at which will
automatically calibrated to the
correct position.
Calibration
da Vinci Color mini
P15
Page 16

Function Operation and Instructions
Filament
D3
Refer to the Change Filament function in the main screen. Unused lament for one day of longer should be stored in zip-lock bag.
WiFi
D4
Before turning on the printer
and setting up the WiFi network,
please insert the WiFi dongle
into the USB port on the top of
printer.
1. Tap ADD and the printer will
start to search for available
access points.
2. Tap the access point to be
used.
3. Enter the password for the
access point.
Use the XYZprint to establish WiFi connection
1. Use a USB cable to connect the printer to the computer and run the XYZprint.
●
Check if the WiFi function is activated on the computer and connect to the access point.
2. After the printer operation
function window opens, select
"Dashboard">"Setup">, click on
"Wireless " to enter the wireless
network setup screen.
3. Click "TURN WIFI BACK
ON"
4. Please select a wireless
network name that you
want to connect to and
click twice.
4. Conrm the connection is
completed.
5. Then enter the password
and click on”Connection”
to wait for the connection.
8. Once the connection
method has been changed
from USB to Wi-Fi, you
6. After the screen shows
completing WiFi setup, click
“Conrm”.
* Please refer to the XYZprint user manual.
For more information on software update, operation instructions and technical supports, please visit the XYZprinting
official website: http://www.xyzprinting.com/
7. Then connect the printing machine name above to
the COM port, pull down the menu to the same new
connection wireless network, click “Back”.
can unplug the USB cable
and continue with the
printing process.
da Vinci Color mini
P16
Page 17

Function Operation and Instructions
Language
D5
Change Language Setting
The Color mini provides eight display languages,
including traditional and simplied Chinese, English,
Japanese, German, Italian, Spanish and French.
The language setting can be changed by tapping
Settings > Languages in the main screen.
Display
D7
The Display setting can set the touch
screen to turn off when it remains inactive after a set time. There are five
settings, including one minute, two minutes, three minutes, five minutes and
always on.
Sound
D6
The Sound option can be set to ON or OFF to control
the sound emitted when the touch screen is tapped
Statistics
D8
The Statistics function can record the history data since the printer was turned on, including:
Last Calibration
D9
Reset
Print Job
Nozzle FilamentUptime
Ink Cartridge
Printer information will be deleted,
and returned to factory settings.
da Vinci Color mini
P17
Page 18

Printing
First-time printing
Users are able to do a rst print by following the steps below.
Calibration Z-offset Load Filament Change Ink
D1-1 A C C B
D1-2
- Test Page
- Color Calibration
- Ink Calibration
Calibration
Prepare the
le and then
execute the
printing
Transfer les to be printed via the computer software “XYZprint”
Internet access is required for product registration and software login.
Connect the printer and computer with a USB cable and install the “XYZmaker Suite” on the computer and start “XYZprint” to
transfer the les you want to print.
The “XYZmaker Suite” is compatible with 64 bit operating systems of Windows and Mac OS 10.10 10.11 and 10.12. You can
install it by using the included USB drive or downloading the installer from the ofcial XYZprinting website. The user manual of the
software can also be downloaded from the ofcial website.
For details, visit the ofcial website: http://www.xyzprinting.com/
1. Run the XYZprint. And select the printer to be used.
2. Click on OPEN to select the model le to be printed from the
folder. You can adjust the object size, printing position and
angle once the le is loaded. To print color objects, save the
le to be printed in the obj format and load it in the XYZprint.
3. You can change related settings to the desired printing result
and effect.
4. The Prepare function can convert a obj le to a .3cp le.
Once the le is edited and adjusted, click on Print to output
the object. The printing operation will start after the le is
sliced.
da Vinci Color mini
P18
Page 19

Support detail
When the problem occurs with the printer, please refer to the following troubleshooting instructions. If the problem persists, please
contact the Customer Service Center.
Problem code and handling
When a problem occurs with the printer, the service code will be displayed on the printer screen and / or the software interface. Please
refer to this service code description form for preliminary testing.
Service
Code
Symptom Action
0011 Print head heated for too long
please check the Flexible at cable and reboot
0014 Print head heated issue -- temperature exceed
0030 Abnormal--X axis
0031 Abnormal--Y axis
check the cable of the motor and the sensor, and check the
position of the sensor
0032 Abnormal--Z axis
0050 Internal communication error -- memory error reboot the printer
0052 Print head memory error replace the print head
0057 Abnormal- Ink cartridge temperature
0058 Abnormal- Problem with the ink cartridge
reboot the printer;
or re-plug the bus / or replace the ink cartridge after shutting
0059 Ink cartridge control error
down
0060 Ink cartridge data error
Maintenance and Service
Keep original packaging material in the event of sending your unit back for repair during the warranty period. If other packing materials are
used instead, the printer may be damaged during the transportation process.. In such situation, the XYZprinting the right to charge repair
fee.
Federal Communications Commission (FCC) Statement
You are cautioned that changes or modications not expressly approved by the part responsible for compliance could void the user’s
authority to operate the equipment.
This equipment has been tested and found to comply with the limits for a Class B digital device, pursuant to part 15 of the FCC rules. These
limits are designed to provide reasonable protection against harmful interference in a residential installation. This equipment generates,
uses and can radiate radio frequency energy and, if not installed and used in accordance with the instructions, may cause harmful
interference to radio communications. However, there is no guarantee that interference will not occur in a particular installation. If this
equipment does cause harmful interference to radio or television reception, which can be determined by turning the equipment off and on,
the user is encouraged to try to correct the interference by one or more of the following measures:
● Reorient or relocate the receiving antenna.
● Increase the separation between the equipment and receiver.
● Connect the equipment into an outlet on a circuit different from that to which the receiver is connected.
● Consult the dealer or an experienced radio/TV technician for help.
XYZprinting is not responsible for any radio or television interference caused by using other than recommended cables and connectors
or by unauthorized changes or modications to this equipment. Unauthorized changes or modications could void the user's authority to
operate the equipment.
This device complies with Part 15 of the FCC Rules. Operation is subject to the following two conditions: (1) this device may not cause
harmful interference, and (2) this device must accept any interference received, including interference that may cause undesired operation.
This device complies with FCC radiation exposure limits set forth for an uncontrolled environment and it also complies with Part 15 of the
FCC RF Rules. This equipment must be installed and operated in accordance with provided instructions and the antenna(s) used for this
transmitter must be installed to provide a separation distance of at least 20 cm from all persons and must not be co-located or operating
in conjunction with any other antenna or transmitter. End-users and installers must be provided with antenna installation instructions and
consider removing the no-collocation statement.
da Vinci Color mini
P19
 Loading...