

Page 1
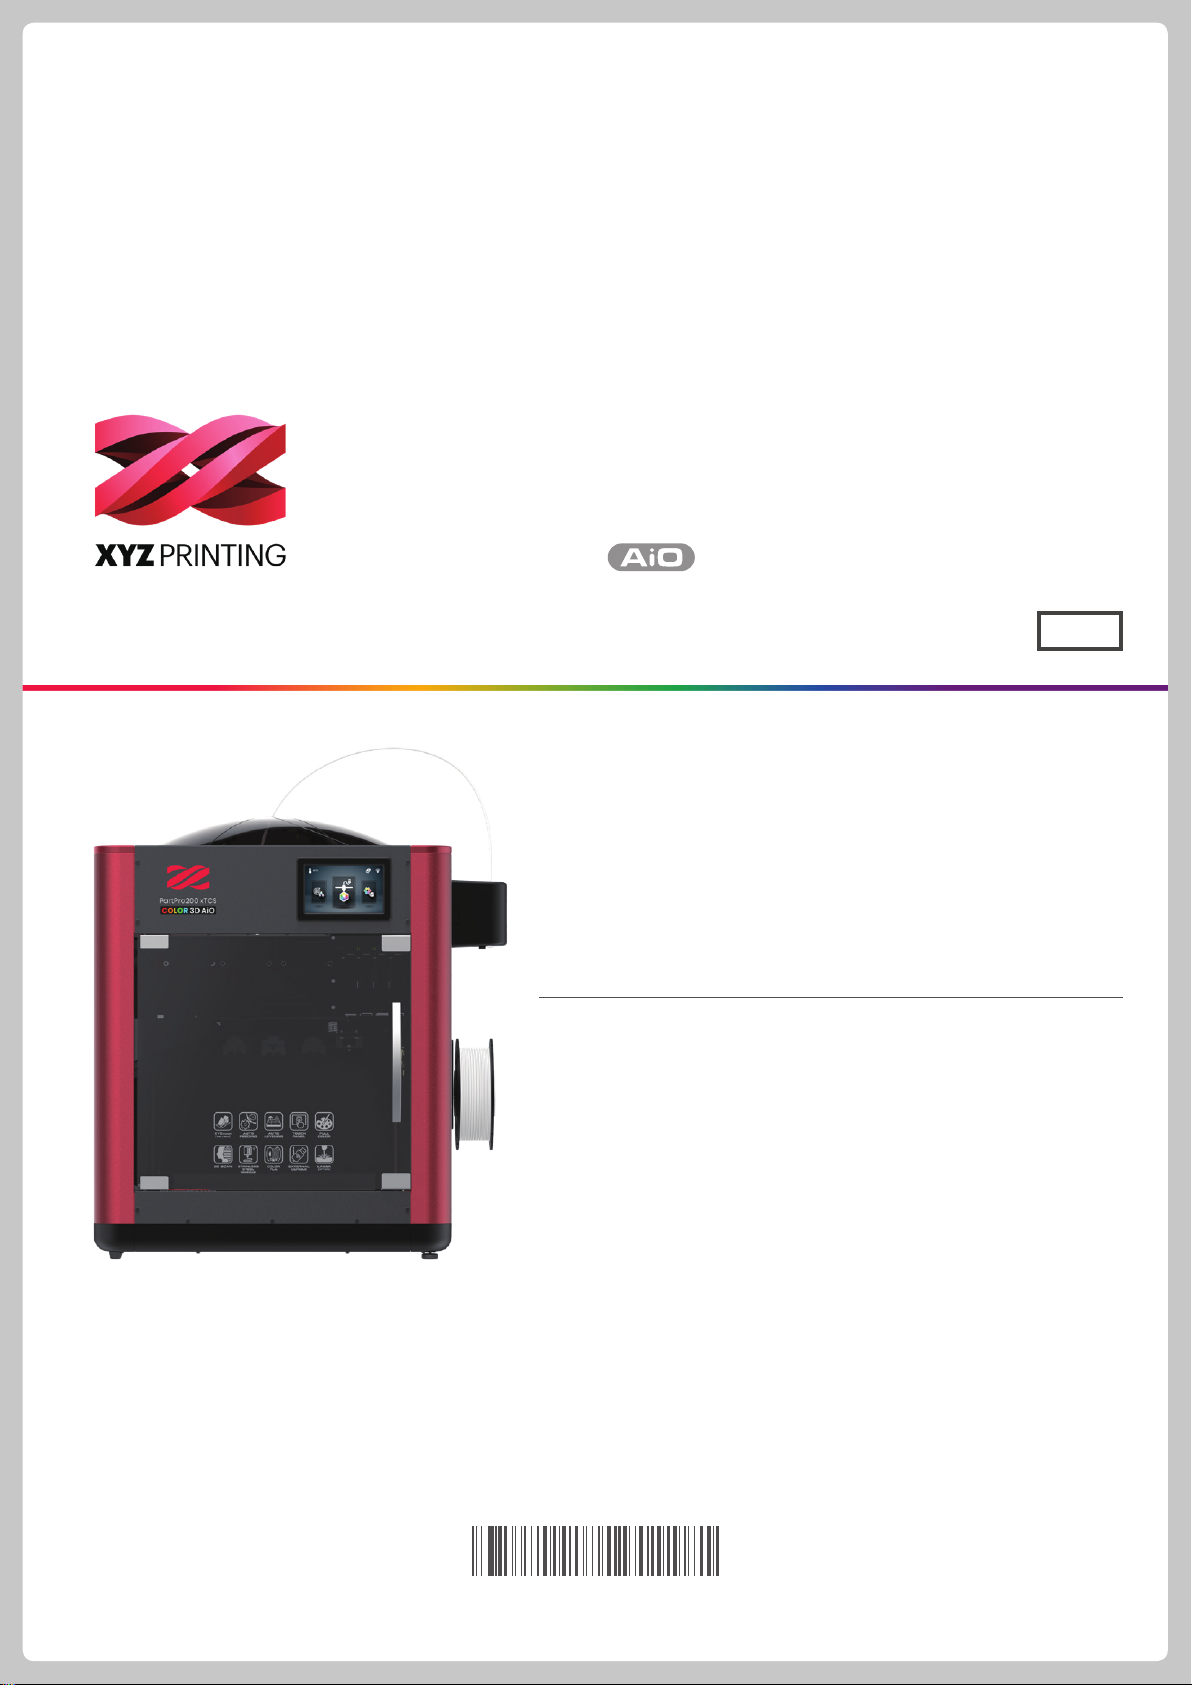
PartPro200 xTCS
Touch Screen Menu, Functions and Messages 7
The manual is mainly intended for users to understand how to use the
PartPro200 xTCS 3D printer (“200 xTCS”) correctly. In this manual,
users can learn more about the operating tips, application skills and
maintenance of the 200 xTCS 3D printer.
New member is required to register account on http://support.
xyzprinting.com before able to download latest manual &
software for better user experience.
For more information on the 200 xTCS, please contact your local
dealer or visit the ofcial website of XYZprinting: http://www.
xyzprinting.com.
User manual
Safety Precautions 2
Product Descriptions 3
Unpacking and Installation 5
Function Operation and Instructions 8
Printing 21
Scanning 22
Support detail 25
ENG
HD23FC1S166
Page 2
Safety Precautions
Safety and Compliance
Please read through this manual and all safety precautions carefully before using, operating, unpacking, replacing, removing any part or maintaining this product. Please also comply with the instructions of relevant safety precautions.
CAUTION
Important Safety Precautions
●
Do not move the machine by yourself as it is heavy.
●
Do not place the printer in a dusty, humid or outdoor environment.
●
Do not place the printer on a soft or tilted surface. Otherwise, the machine will fall / ip over and become damaged or
cause personal injury.
●
Do not leave the product or power cord to unattended children. Otherwise, personal injury or electric shock might occur.
●
Use the provided power cord. Otherwise, incorrect grounding might lead to damage.
●
Do not place any liquid container on top of the product. Otherwise, overow or spill might go into the machine and pose
the risks of danger or safety concern.
●
Do not wipe the printer with alcohol or ammable chemicals. Otherwise, danger might occur.
●
Do not move the machine when it’s powered on.
●
Do not reach into the machine with your hands during operation. Otherwise, risks of impact from moving printing parts or
burn from high temperature might occur.
●
The machine becomes hot during operation and thus run in high temperature. Do not touch or replace parts when they
are not cooled down.
●
After startup, the parts in the machine will heat up or move depending on the user’s instructions. During product
operation, do not touch or block the operation of the parts.
●
Weak odors may be generated during the printing process. We recommend working in a well-ventilated and open area to
ensure operational comfort.
●
Defect reparation must be carried out according to the contents of this instruction manual. Where the defect cannot be
repaired, please contact your printer dealer or the customer service center.
Heavy object.
2 person lift
required
Watch Your Hands.
Trademarks
All trademarks and registered trademarks are the properties of their respective owners.
Maintenance and Service
When the printer needs to be serviced during the term of the warranty, it is recommended that the machine is packed with
original packaging materials prior to shipment. For this purpose, the packaging materials are better to be kept. If other
packaging materials are used instead, the printer might be damaged during transportation. We reserve the right to assess
relevant service fees.
P2P2
Page 3
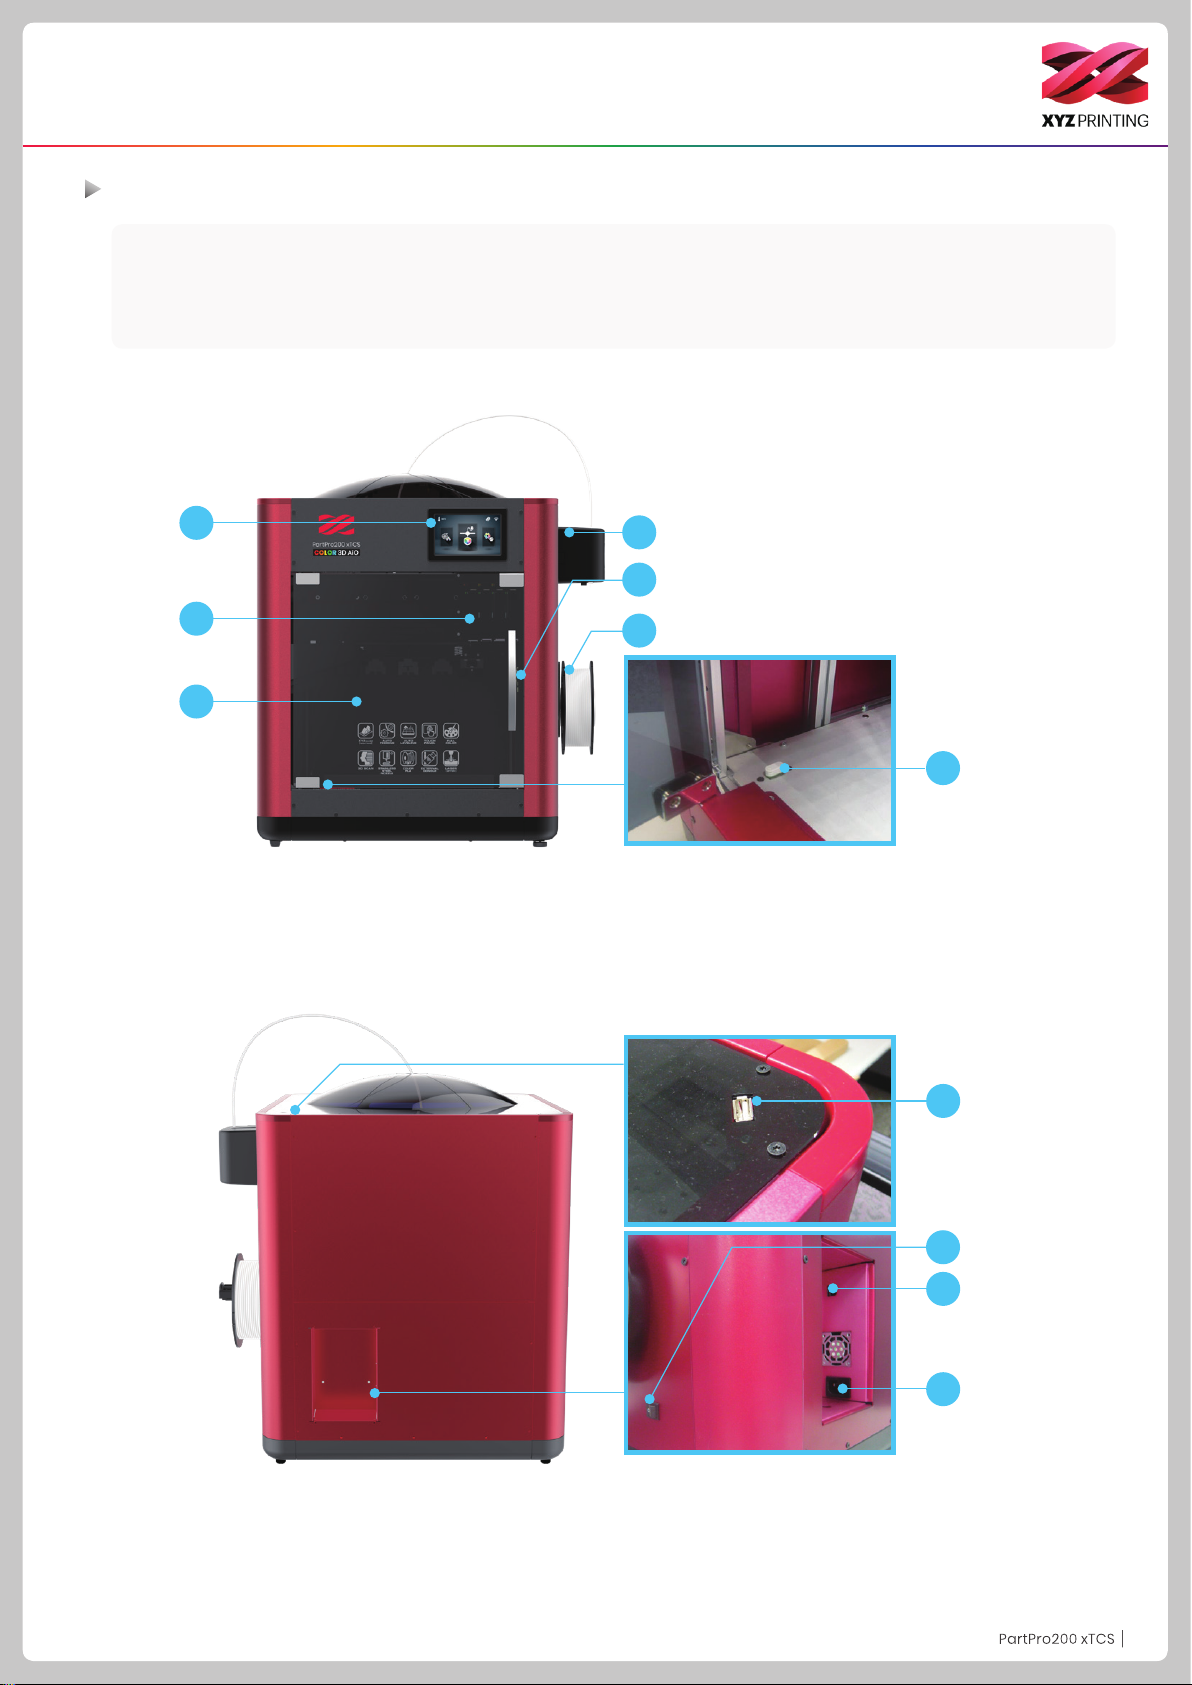
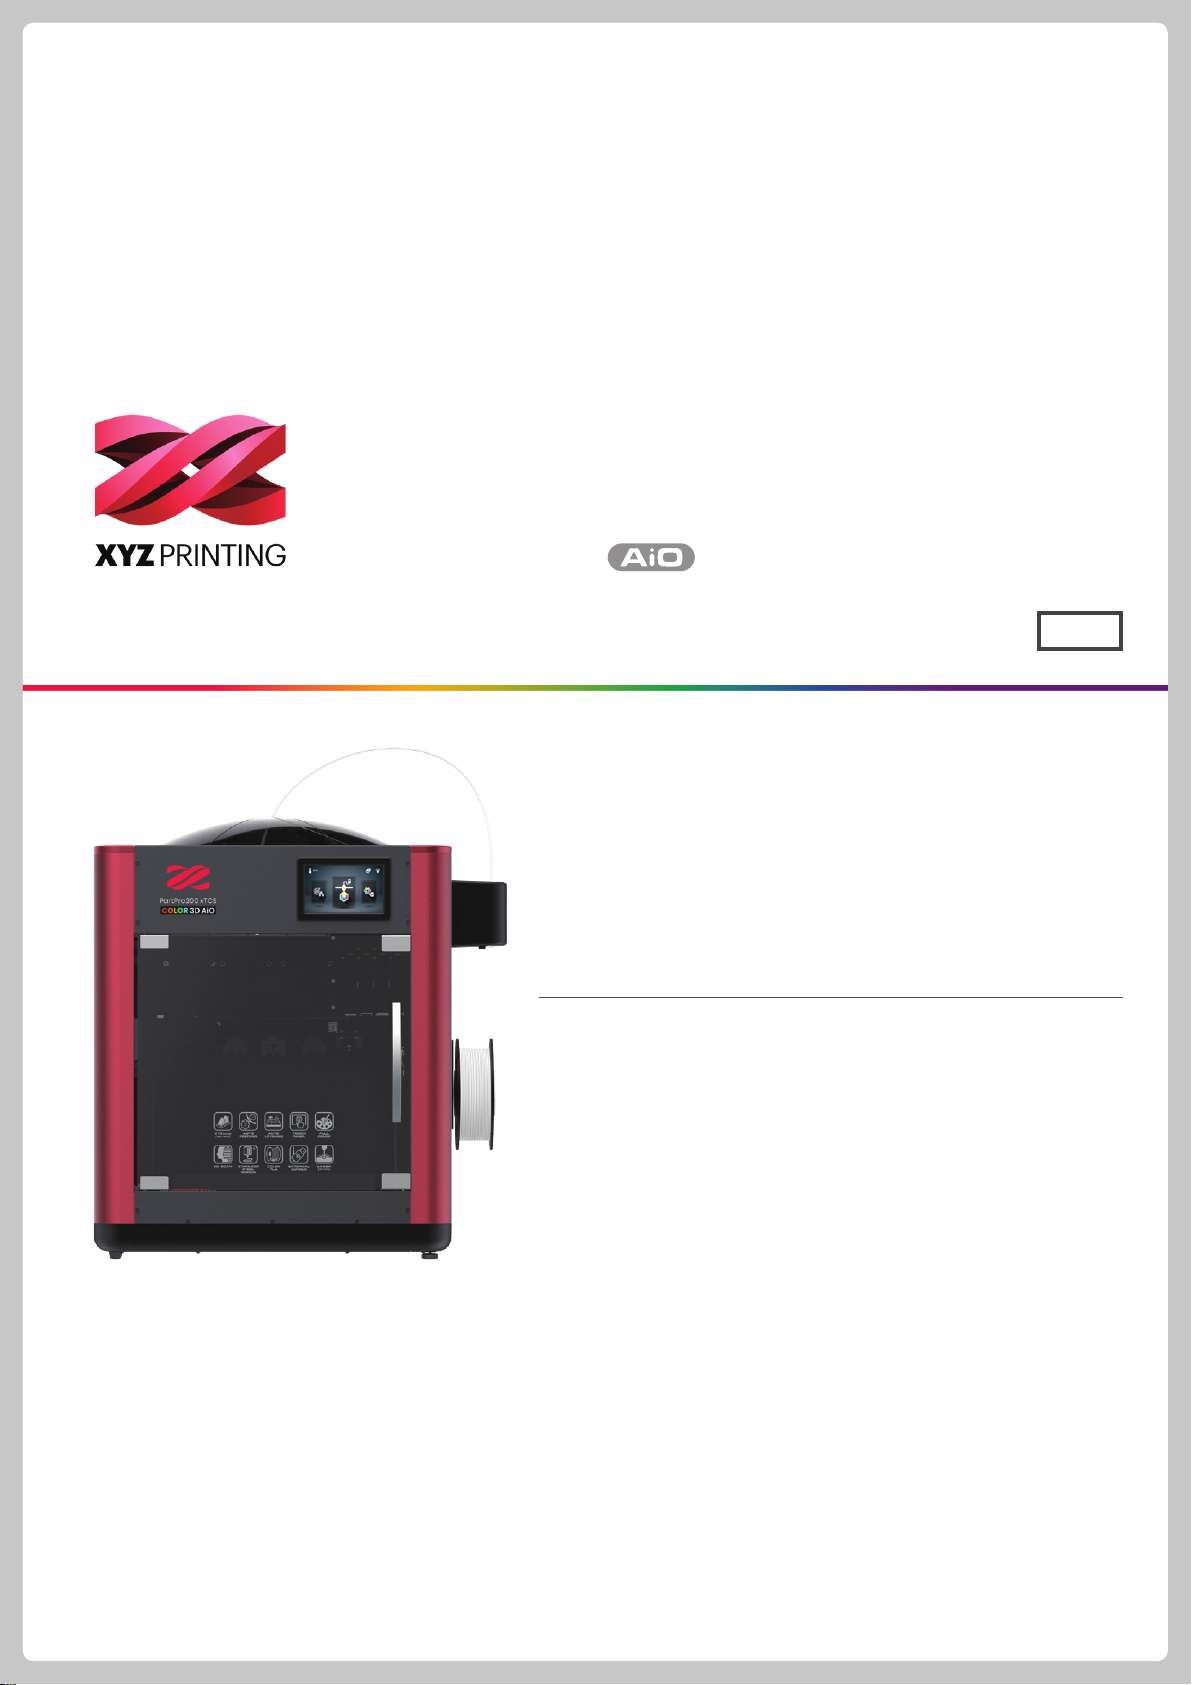
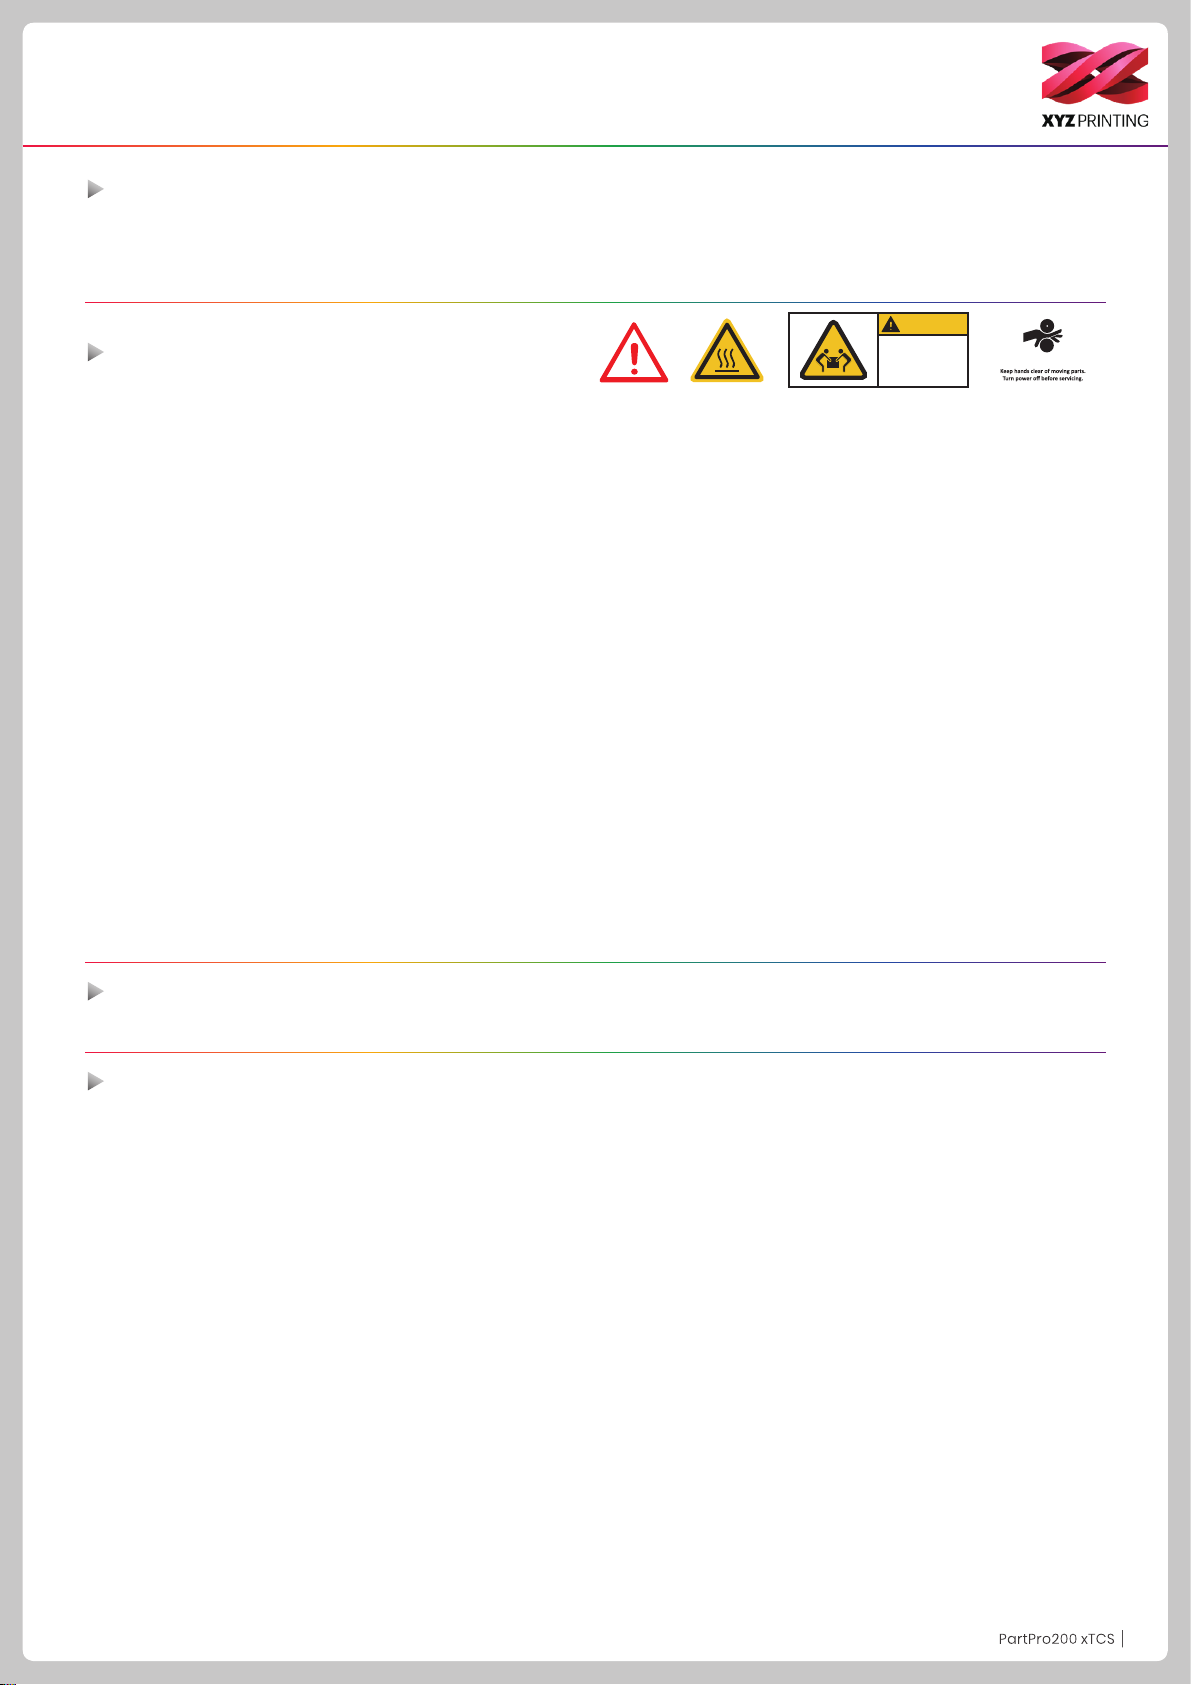
Product Descriptions
Product exterior
1. 5 inch color touch panel 2. Auto-feeding module 3. Print head 4. Print bed+EZ removable rubber magnet
5. Scan module 6. Filament spool holder 7. USB Port 8. USB Port
9. Power switch 10. USB Port (To PC) 11. Power jack
(WiFi dongle)
1
2
5
3
6
4
7
8
9
10
11
P3P3
Page 4
Product Descriptions
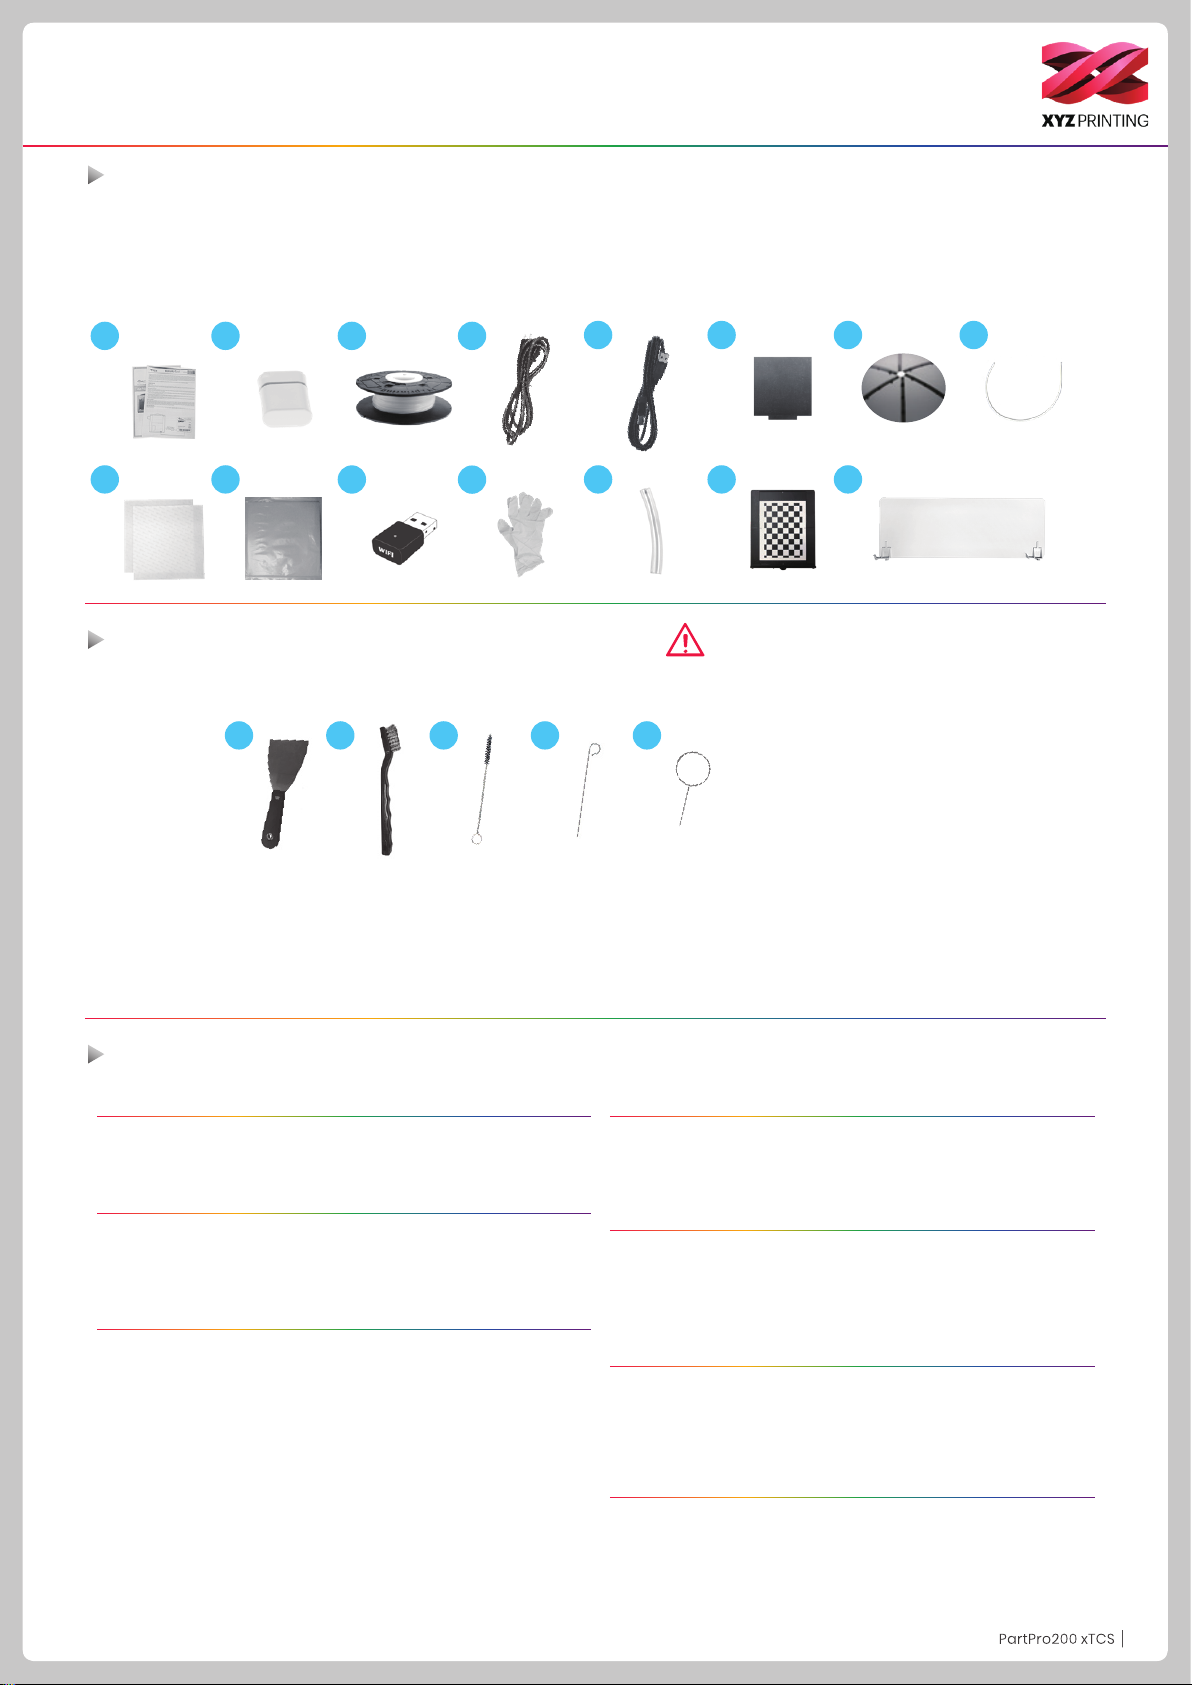
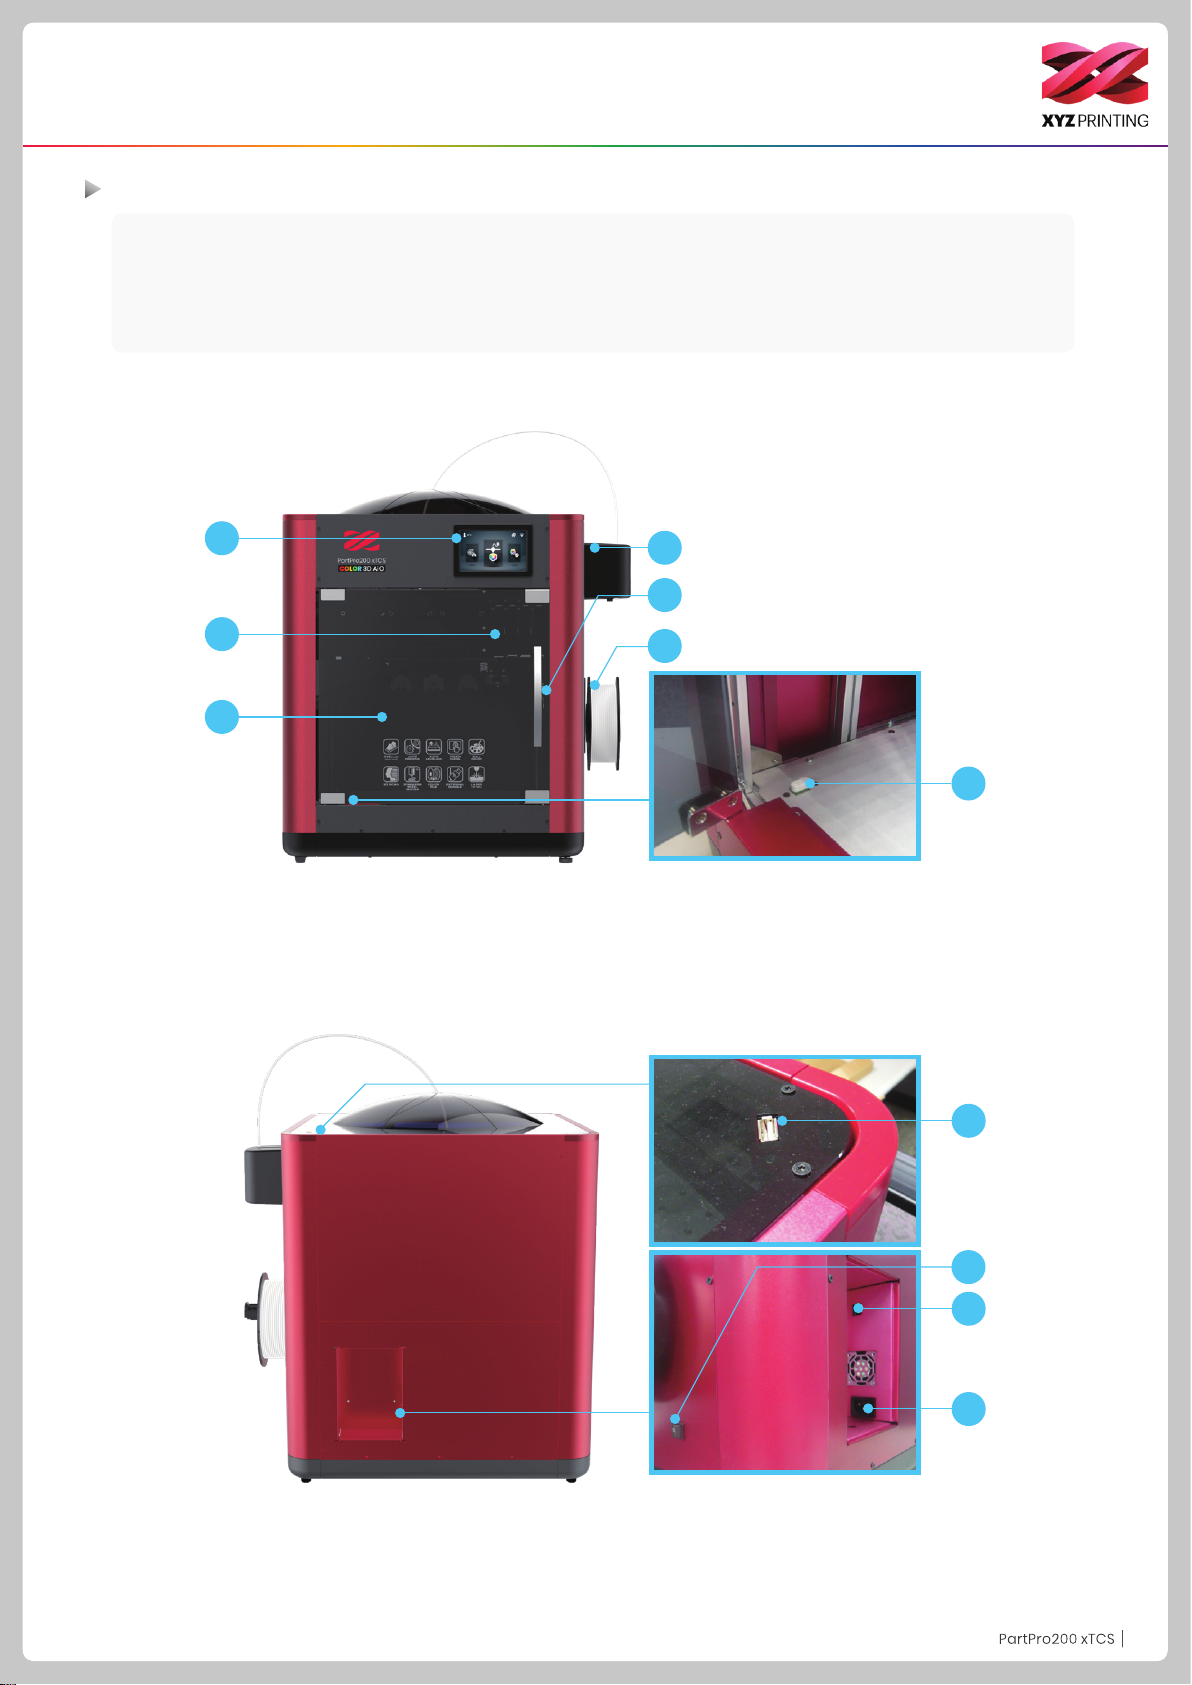
Accessory Checklist
1. User Manual 5. USB Cable 9. PC Mylar x 2pcs 13. Clear Tube
2.
USB Drive 6. EZ Removable Rubber Magnet 10. Mask Tape x 3pcs 14. Calibrating Plate
3. 3D Color-inkjet PLA 7. Top Cover 11. WiFi Dongle 15. Scan Backboard
4. Power Cord 8. Guide Tube 12. Pair Of Gloves
1 2 3 4
9 10
11
12
5 6
13 1514
7 8
Precautions and Instructions of Maintenance Tools
The following tools are intended for use under the guidance or guardianship of an adult only. Do not allow children unfamiliar with the
tools to have access to them in case of danger.
Scraper
31 2 4 5
●
Make sure the maintenance work of the printer is carried out when the print bed has cooled down.
●
When printing is completed and the print bed is cooled down to room temperature, the printed object can be removed from the print bed
with the scraper.
●
Filament residues generated during the course of printing may be stuck on the print head and gears of the printing module. The printing
quality and printer operation as well as the measurement of the print bed may be affected. When this happens, clean the printing
module with the wire brush.
1.
Wire brush
2.
Gear cleaning brush
3.
Feed hole cleaning wire
4.
Print head cleaning wire
5.
Specications
Printing
Printing technology 2D pattern: Inkjet printing
3D structure: Fused lament fabrication (FFF)
Dimensions and Weight
Dimensions (W*D*H) 600* 581* 640 mm
Net weight 32 Kg
Gross weight 43 Kg
Performance
Printing dimensions (W*D*H)
Thickness of printed layer 0.1 mm ~0.4 mm
Alignment precision X/Y : 0.0125 mm
Auto calibration Yes
Auto feeding Yes
Ofine standalone printing Yes
Mono color printing (without inkjet printing)
200 x 200 x 150 mm
Full color printing
185 x 185 x 150 mm
Materials
3D printing materials 3D Color-inkjet PLA, PLA, Tough PLA, PETG
Filament diameter 1.75 mm
Ink type CMYK cartridge with separate colors
Hardware
Print head diameter 0.4mm
User interface 5” color touch screen
Print bed Non-heated, removable
Transmission USB 2.0 drive / USB cable / wireless transmission
Software
User software XYZmaker
Supported le format AMF, OBJ, STL, XYZ Format (.3w), .3CP, .3MF
Operating system Mac OS X 10.10 / 10.11 / 10.12
Windows 7 /8/10 (64-bit)
Temperature
Machine operating temperature 15-30°C
Cartridge storage temperature 15-35°C
Filament storage temperature 0-38°C
P4P4
Page 5
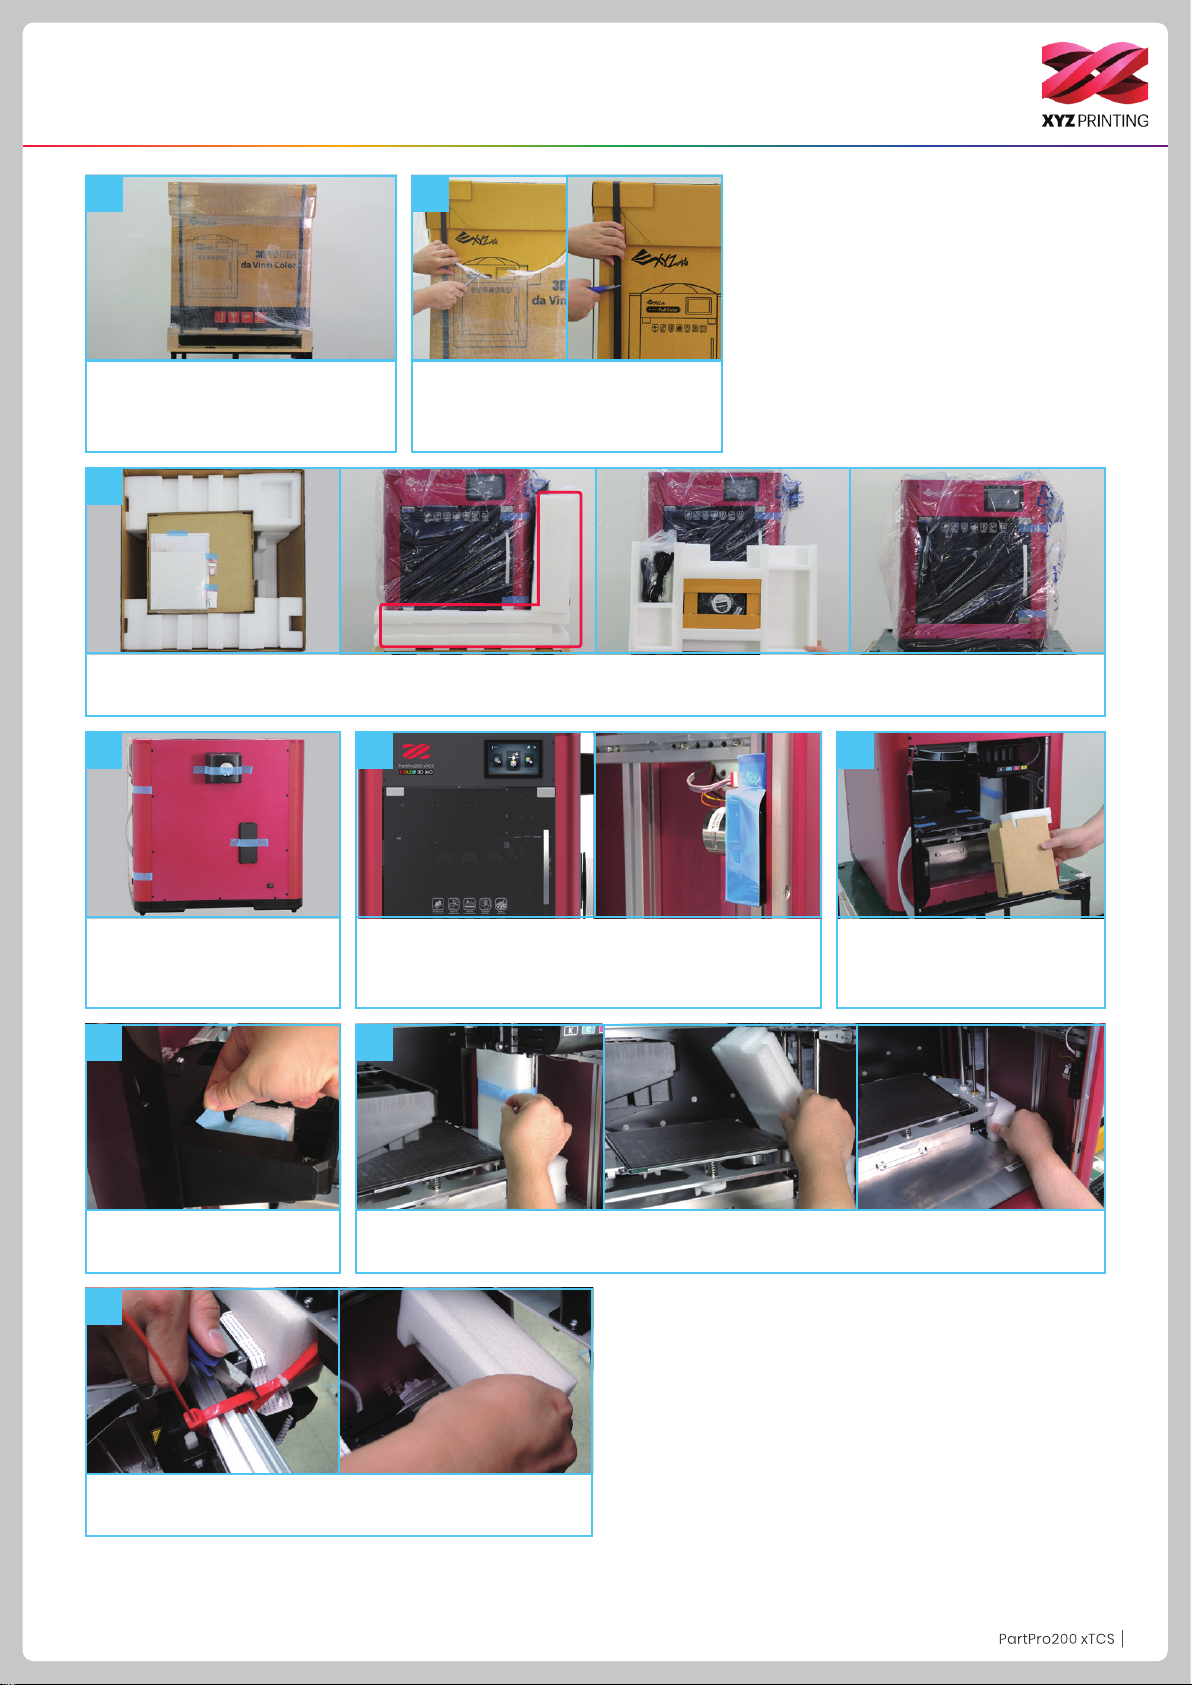
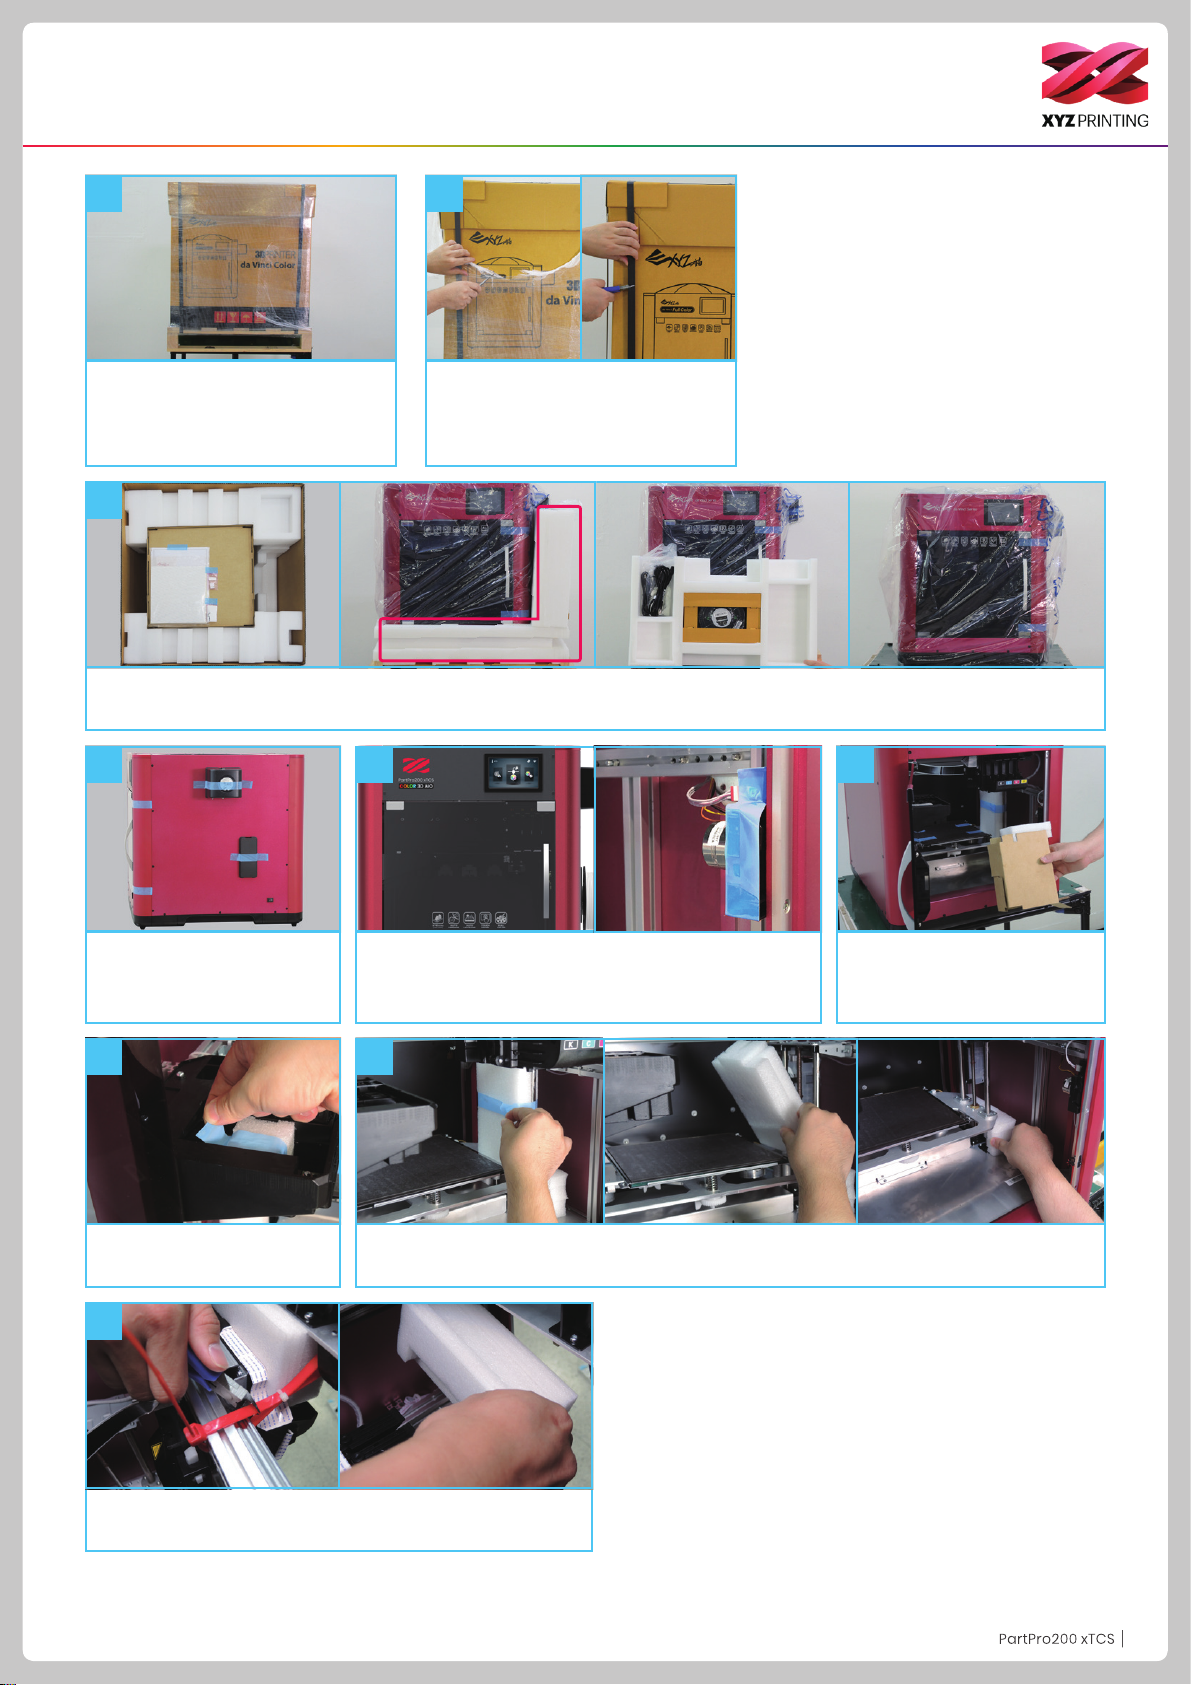
Unpacking and Installation
1
Move the printer to a table or platform. (Do not move the printer by
yourself as it is heavy.)
2
Remove the plastic wrap and PP.
3
Remove the packaging materials, top cover box, assessory box and plastic cover.
4
5
6
Remove the tape on the
body (4 in total).
7
Remove the foam on the
cartridge holder.
Open front door, remove the tape at mark printer door
post.
8
Remove the foam next to the guide screws on both sides, and then remove the foam under
the print bed.
9
Remove the cable tie and foam in front and back of the front
door.
Open the front door. Remove
the tape from the supporting
materials and print bed.
P5P5
Page 6
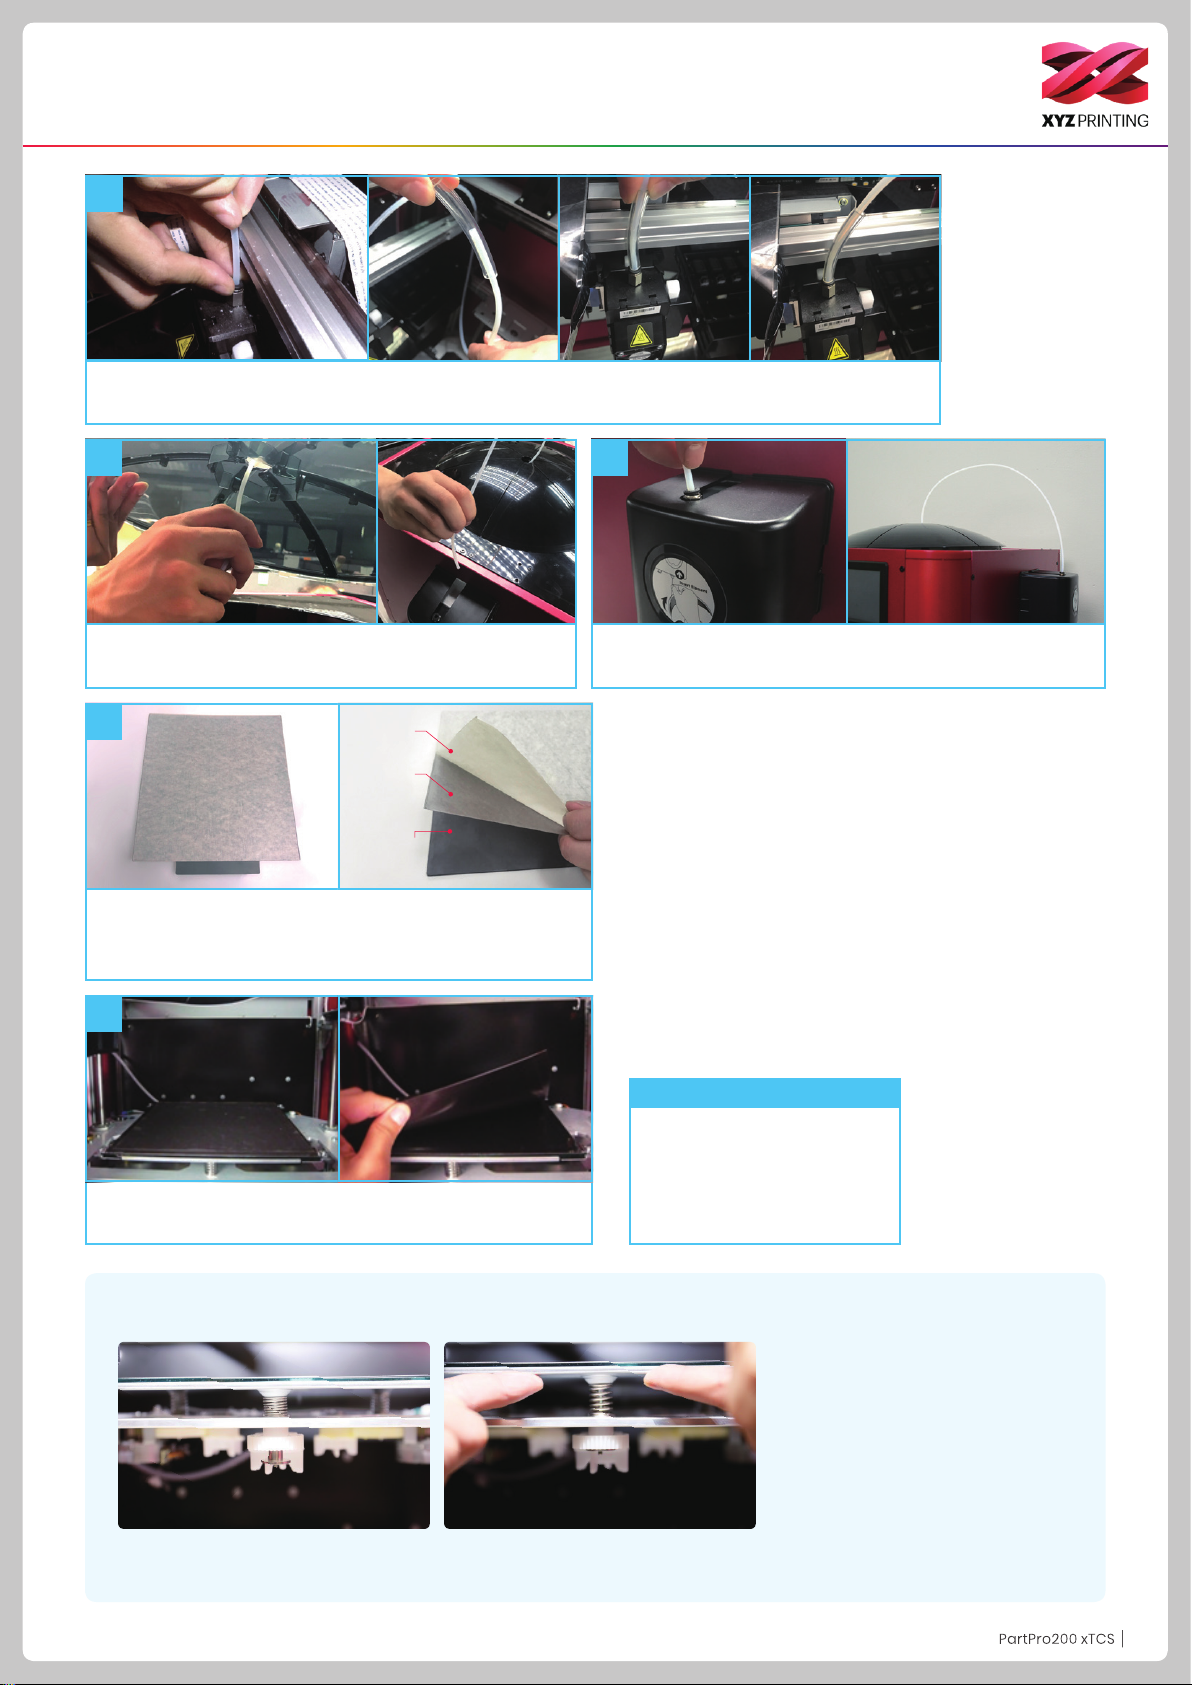
Unpacking and Installation
10
Ensure that the one end of guide tube(Accessory 8) has been tightly. inserted into the printing module
port, then insert the other end into the clear tube (Accessory 13) to the end.
11 12
Feed the guide tube through the top cover then attach the
top cover to the machine.
13
Please follow the order as image instruction, attach the PC
mylar (accessory 9) and mask tape(accessory 10) on the EZ
removable rubber magnet(accessory 6).
Mask Tape
PC Mylar
EZ Removable
Rubber Magnet
14
Conrm the rubber magnet is well placed on the print bed.
Insert the other end of the guide tube into the feed module
and secure it tightly.
Note
There is a sheet of PC lm to
rubber magnet with a double
sided adhesive, this PC lm is
replaceable, please replace it
when it's dirty or broken.
Precautions
1. Check if the print bed calibration screws
was stuck.
2. Used to 2 thumb to push up the printbed
to release the calibration screw.
P6P6
Page 7
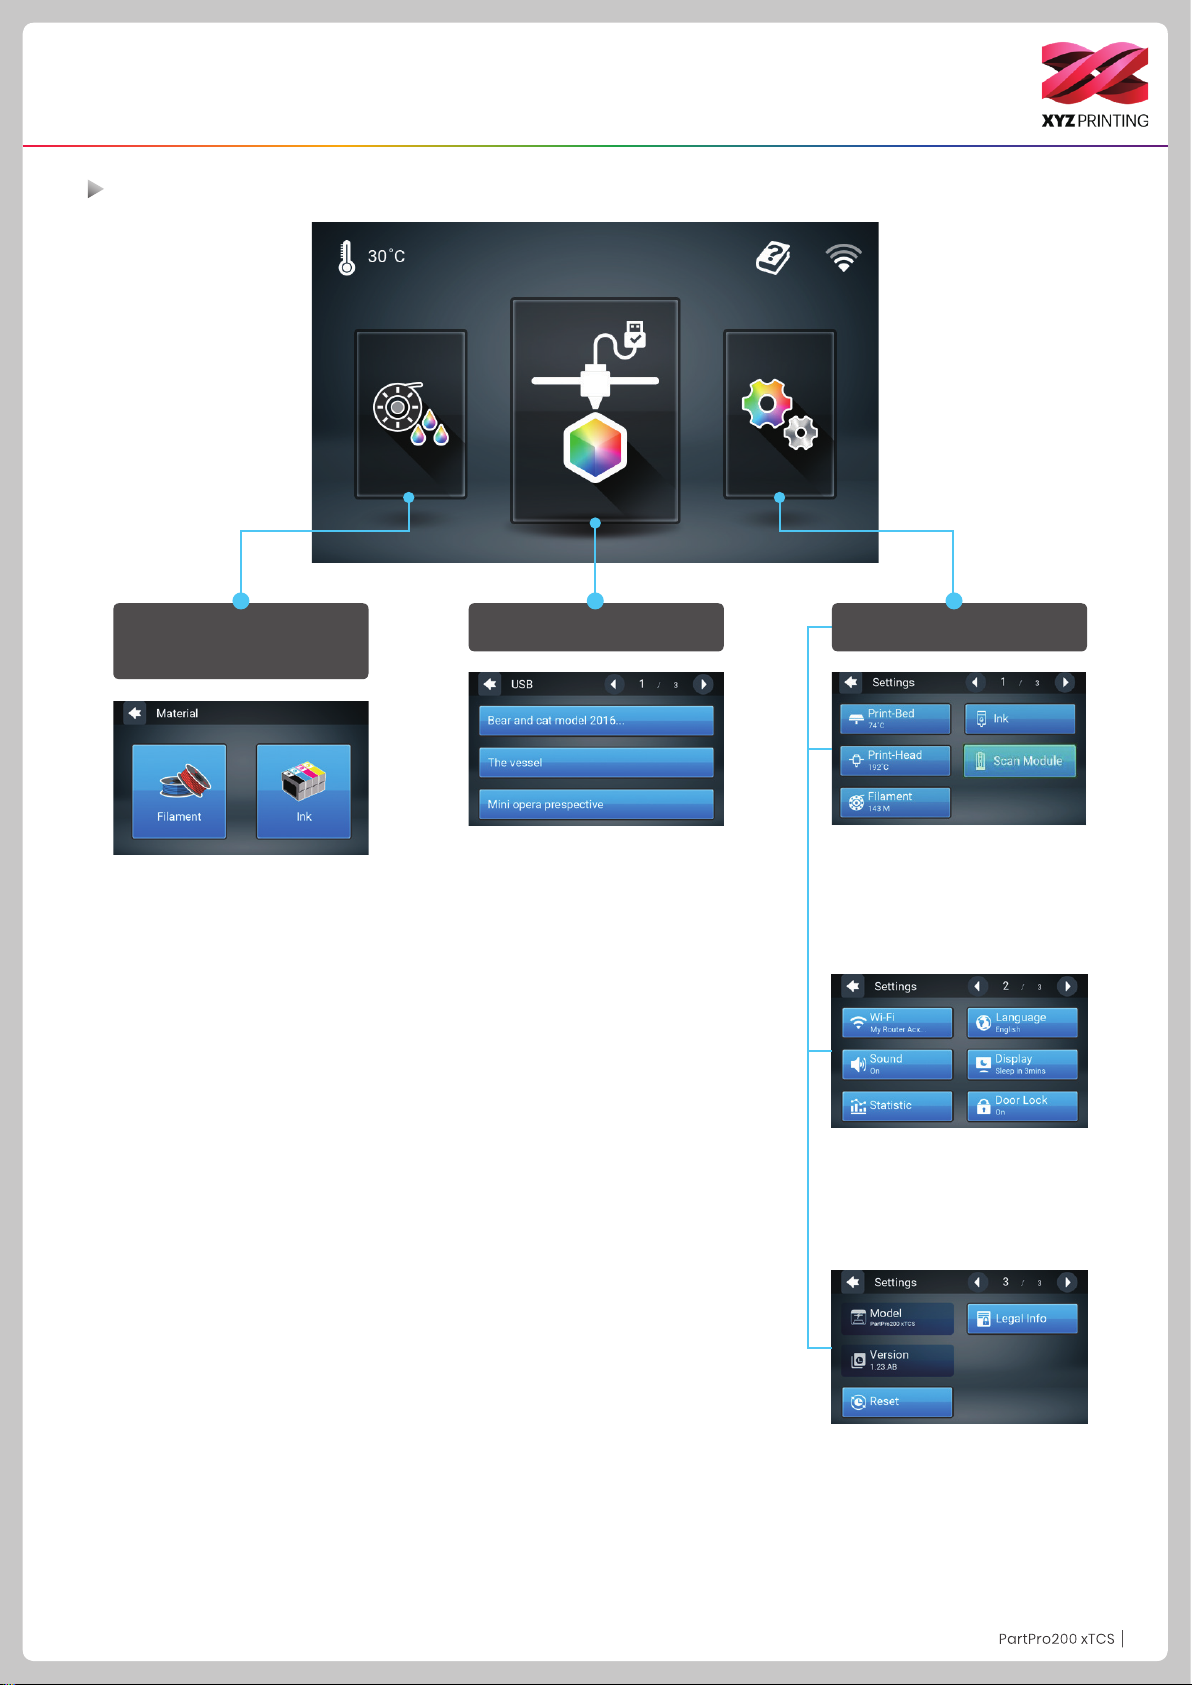
Touch Screen Menu, Functions and Messages
Main screen
Filament/Ink loading
and unloading
This includes Filament, Ink Load
and Unload.
USB Printing Menu
This menu can be used to import
les (.3cp) from a USB drive to the
machine for printing without a computer.
Settings
This includes the functions in Home
Page 1:
Settings of the Print-Bed, PrintHead, Filament, Ink and Scan
Module.
Next page includes
WiFi, Sound, Statistics, Language
and Display.
The last page includes
Model, Version, Reset and Legal
Info.
P7P7
Page 8
Function Operation and Instructions
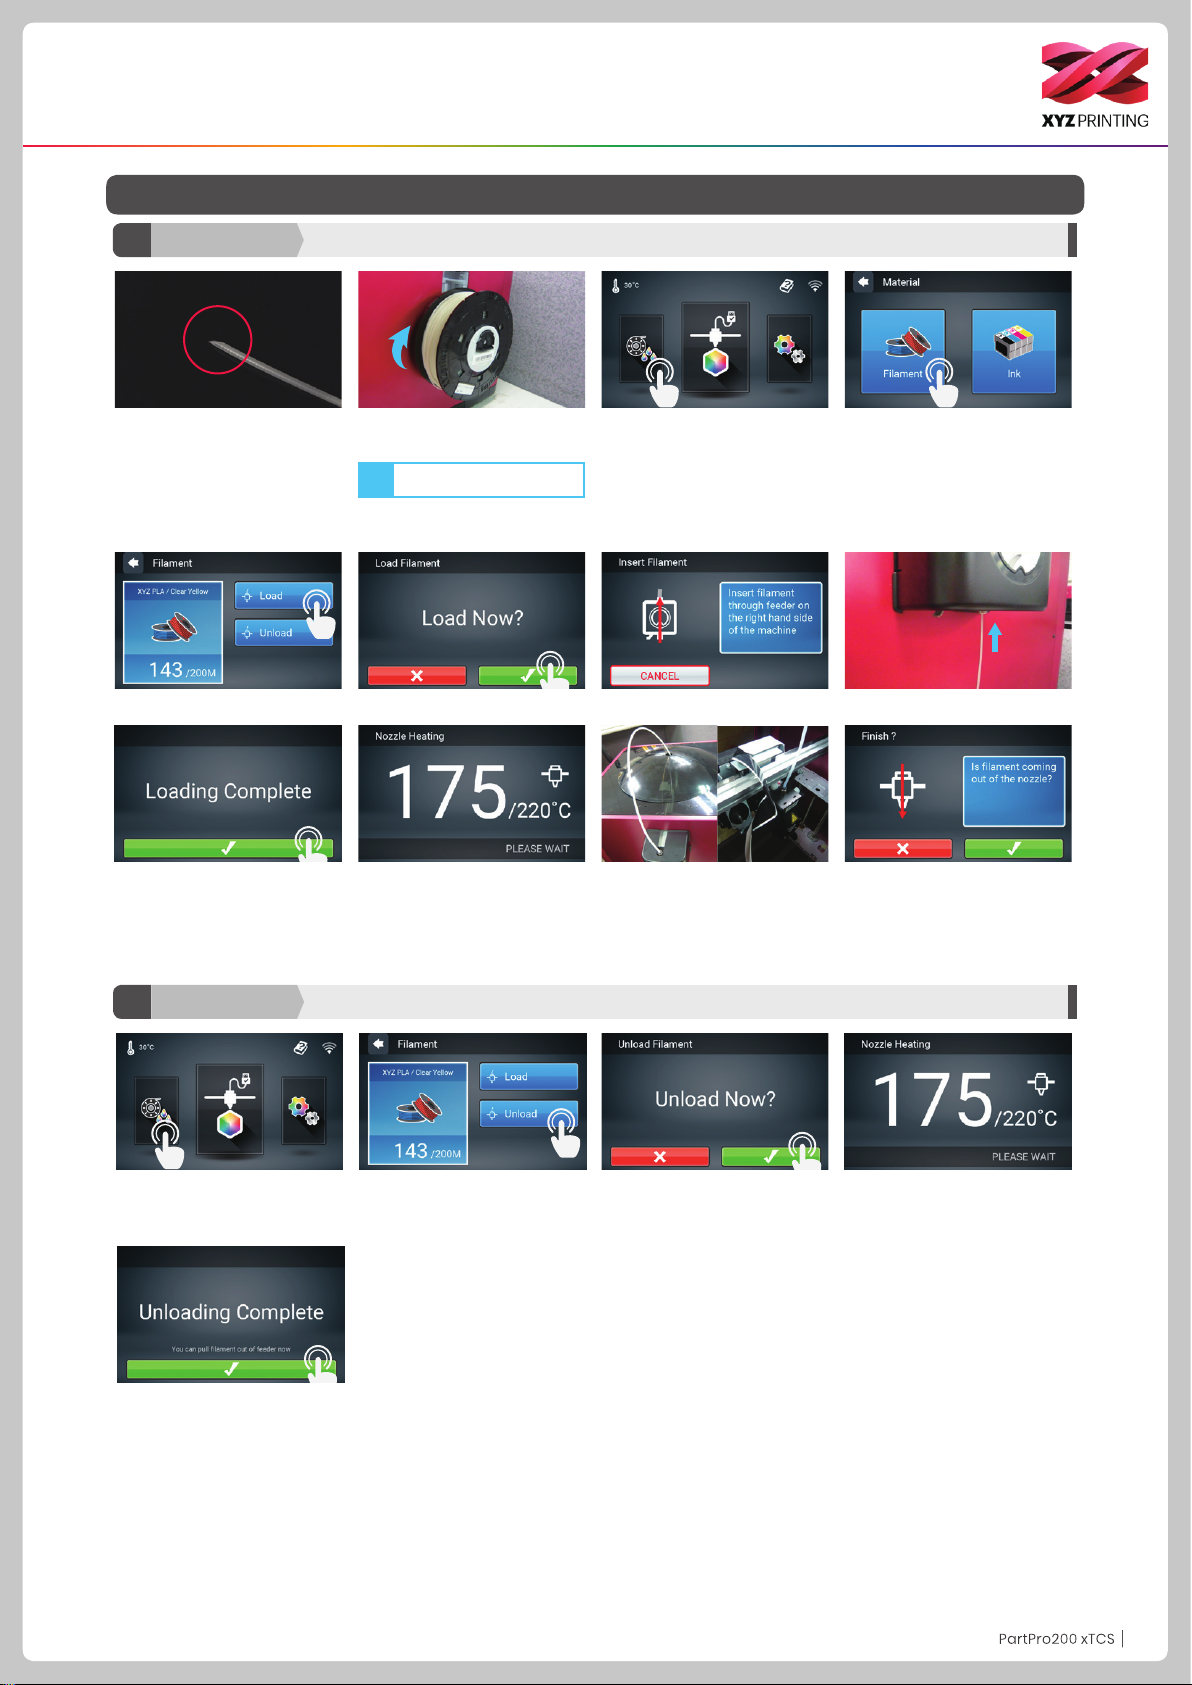
A. Load/unload laments
A1
1. Please cut the lament at 45
angle before auto loading the
lament into the printer. During
loading lament process, the
lament should be straighten at
least 4” of the Filament end as
shown in pictures.
5. Tap Load. 6. Conrm the operation. 7. Insert the lament into the feed module, it will be automatically loaded.
Filament
Load laments
2. Place the lament on the
spool holder.
Make sure the lament rotates
Note
clockwise when pulled.
3. Tap Filament Load and
Unload in the main screen and
select Filament.
4. Tap Filament.
8. Check if the temperature of the print head goes up to its operating temperature (Color PLA from
XYZprinting) after the lament is loaded. Once the set temperature is reached, the feeding motor will
feed the lament along the guide tube into the print head.
A2 Filament
1. Tap Filament Load and
Unload on the main screen.
5. When the unloading
operation completes, tap to
conrm.
Unloading laments
2. Tap “Unload” and conrm the
operation.
3. Conrm the unloading
operation.
9. Once lament has extruded
from the print head, the lament
will be successfully loaded.
Tap the screen to conrm and
continue.
4. When the print head has
been warmed up to 220 °C,
the feeding motor will eject the
lament.
P8P8
Page 9
Function Operation and Instructions
A3 Filament
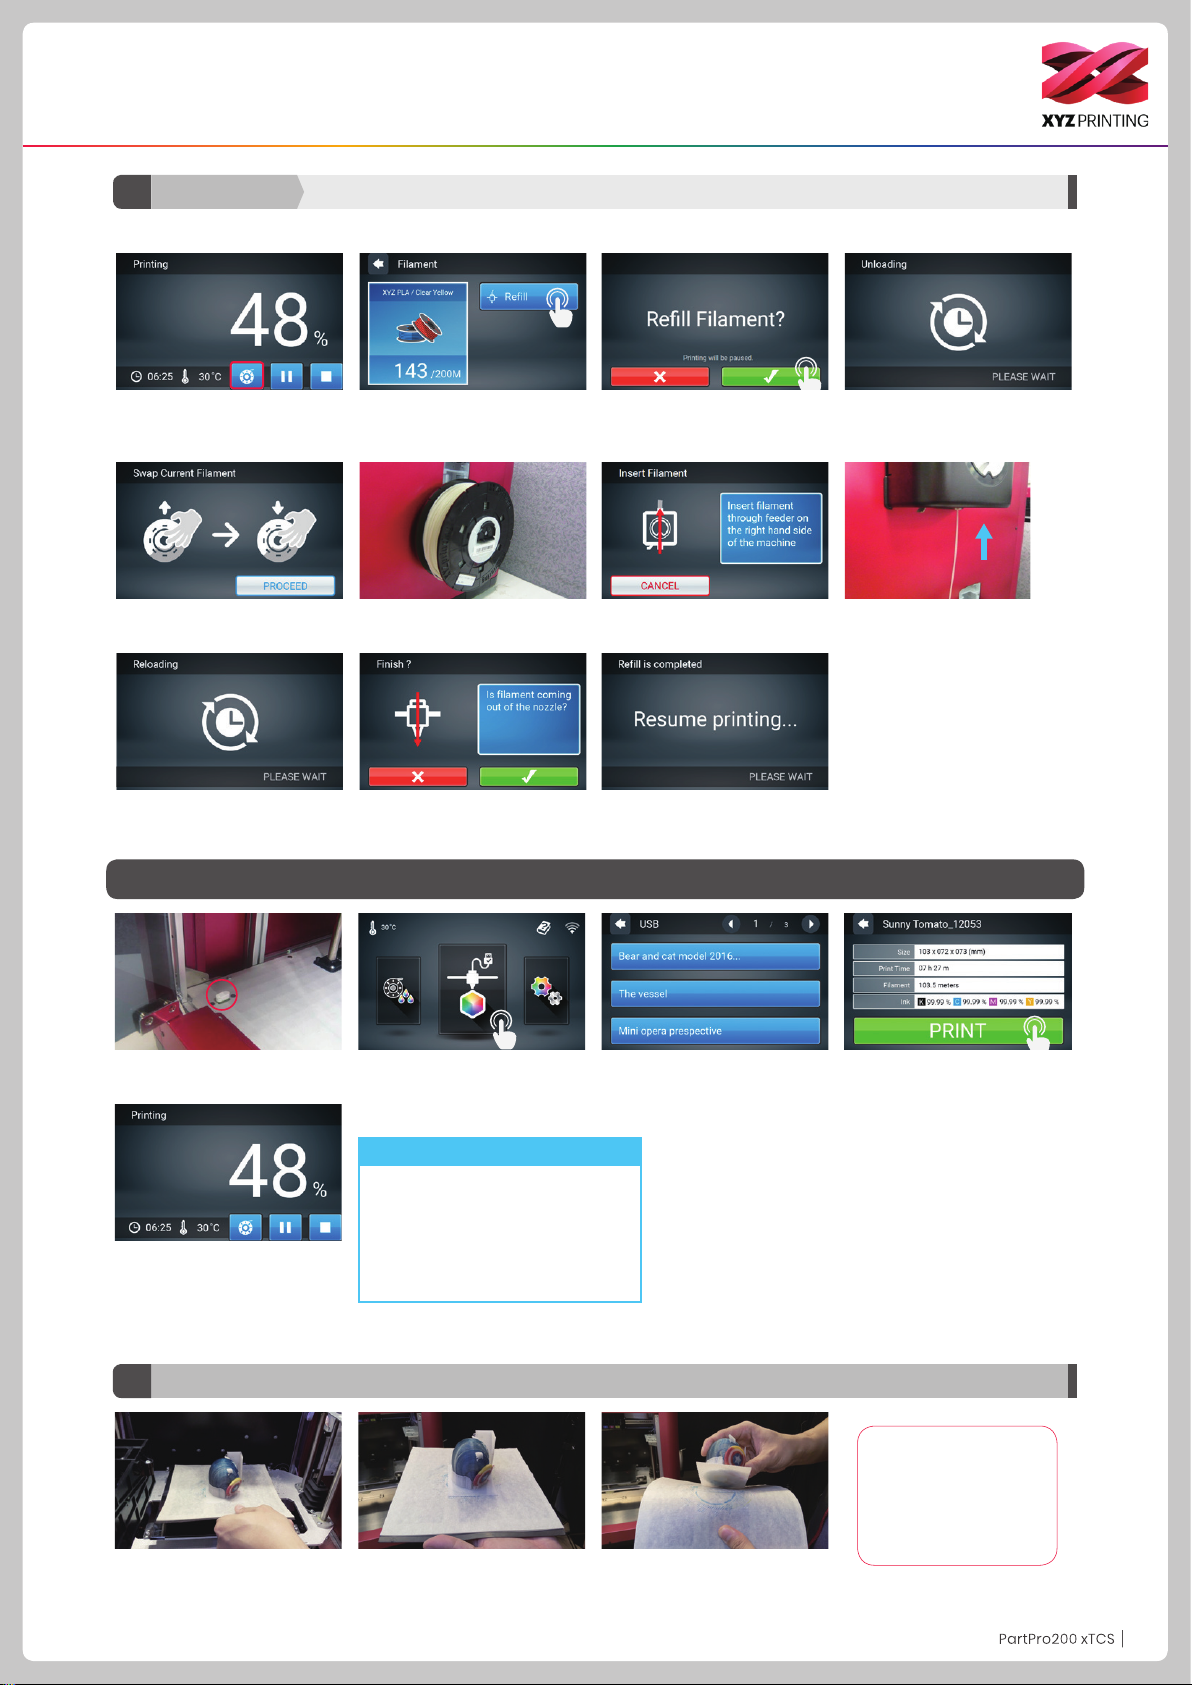
200 xTCS will prompt you to rell material.
1. Tap the icon when printing.
5. Replace the empty spool with a new one. (please refer to the
LOADING section in this manual) and then tap "PROCEED" .
Rell Material
2. The screen will show lament
status, please tap "Rell" .
3. Conrm the operation.
6. The nozzle will be preheat and notify you when to insert lament
into the feed module.
4. The nozzle will be preheated
and the lament will be
unloaded automatically.
7. The lament will be
automatically loaded.
B. USB printing
1. Check if the USB drive is
plugged to the machine.
5. The screen will show the
print percentage when printing.
The Pause, Stop, and Rell
are shown below the print
percentage.
B1
Unload the prints
8. Check if lament is extruded from the nozzle, after conrmation,
the printer will resume printing.
2. Tap the USB Printing Menu in
the main screen.
3. Select the file you want to
print.
Note
By default, the front door will be
locked when printing. If you want to
change this setting, go to Setting >
Door Lock to change it.
4. Check file information and
tap “Print”.
Please removed the EZ Removable Rubber Magnet with printed object together from the printer.And
peel off the printed object from the rubber magnet.
Please avoid touching the led strip of the
printer because the
LED strip will be slight
hot due to long hours
of been light on.
P9P9
Page 10
Function Operation and Instructions
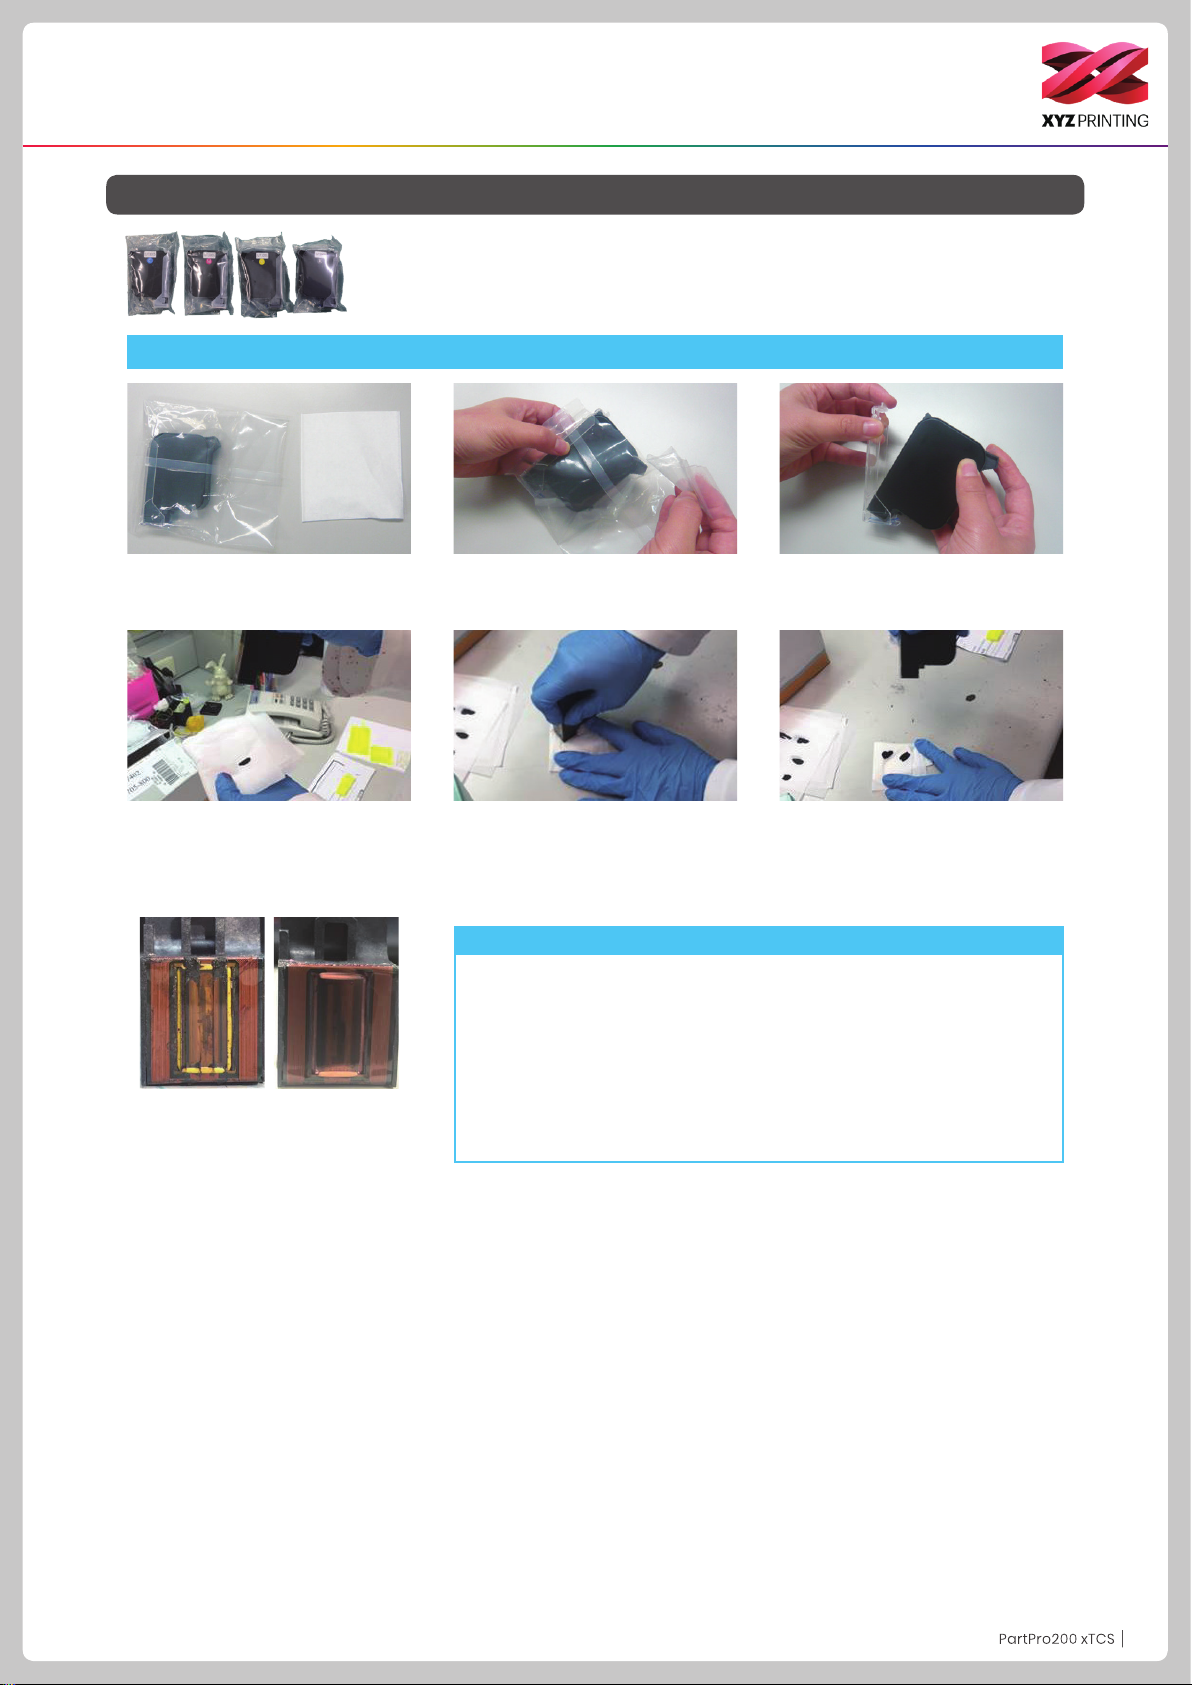
C. Ink Cartridge Installation
The 200 xTCS uses four color inks which can be replaced separately.
Ink Guidance
1. Prepare several paper towels and the
ink cartridge.
4. Press the cartridge head against the
paper towel to transfer some ink onto it.
7. If the ink did not transfer well, please
wet the paper towel with 75% Alcohol to
wipe the ink. After you clean the inkjet,
check to see if the ink transferred.
2. Unpack the ink cartridge. 3. Remove the cartridge cover.
5. If the ink did not transfer well, try
putting the paper towel on the table and
hold the ink pressed on the paper towel.
6. Check if the ink transferred to the
paper towel displays two straight lines.
If so, ink guidance is successfully
completed. Once ink guidance is done,
install the ink cartridge.
Note
To prevent the opened ink cartridge from drying out when a print is
nished or the printer will be idle for days, follow the procedure to store
the cartridge:
1. Clean the nozzle of the ink cartridge with alcohol.
2. Seal the ink cartridge with the protective cover, and store the cartridge
in room temperature at 15 ~ 35 degree.
For the best print quality, clean the nozzle of the cartridge with alcohol
after removing the protective cover from the cartridge, and then install the
cartridge back to the printer before the next print.
P10P10
Page 11
Function Operation and Instructions
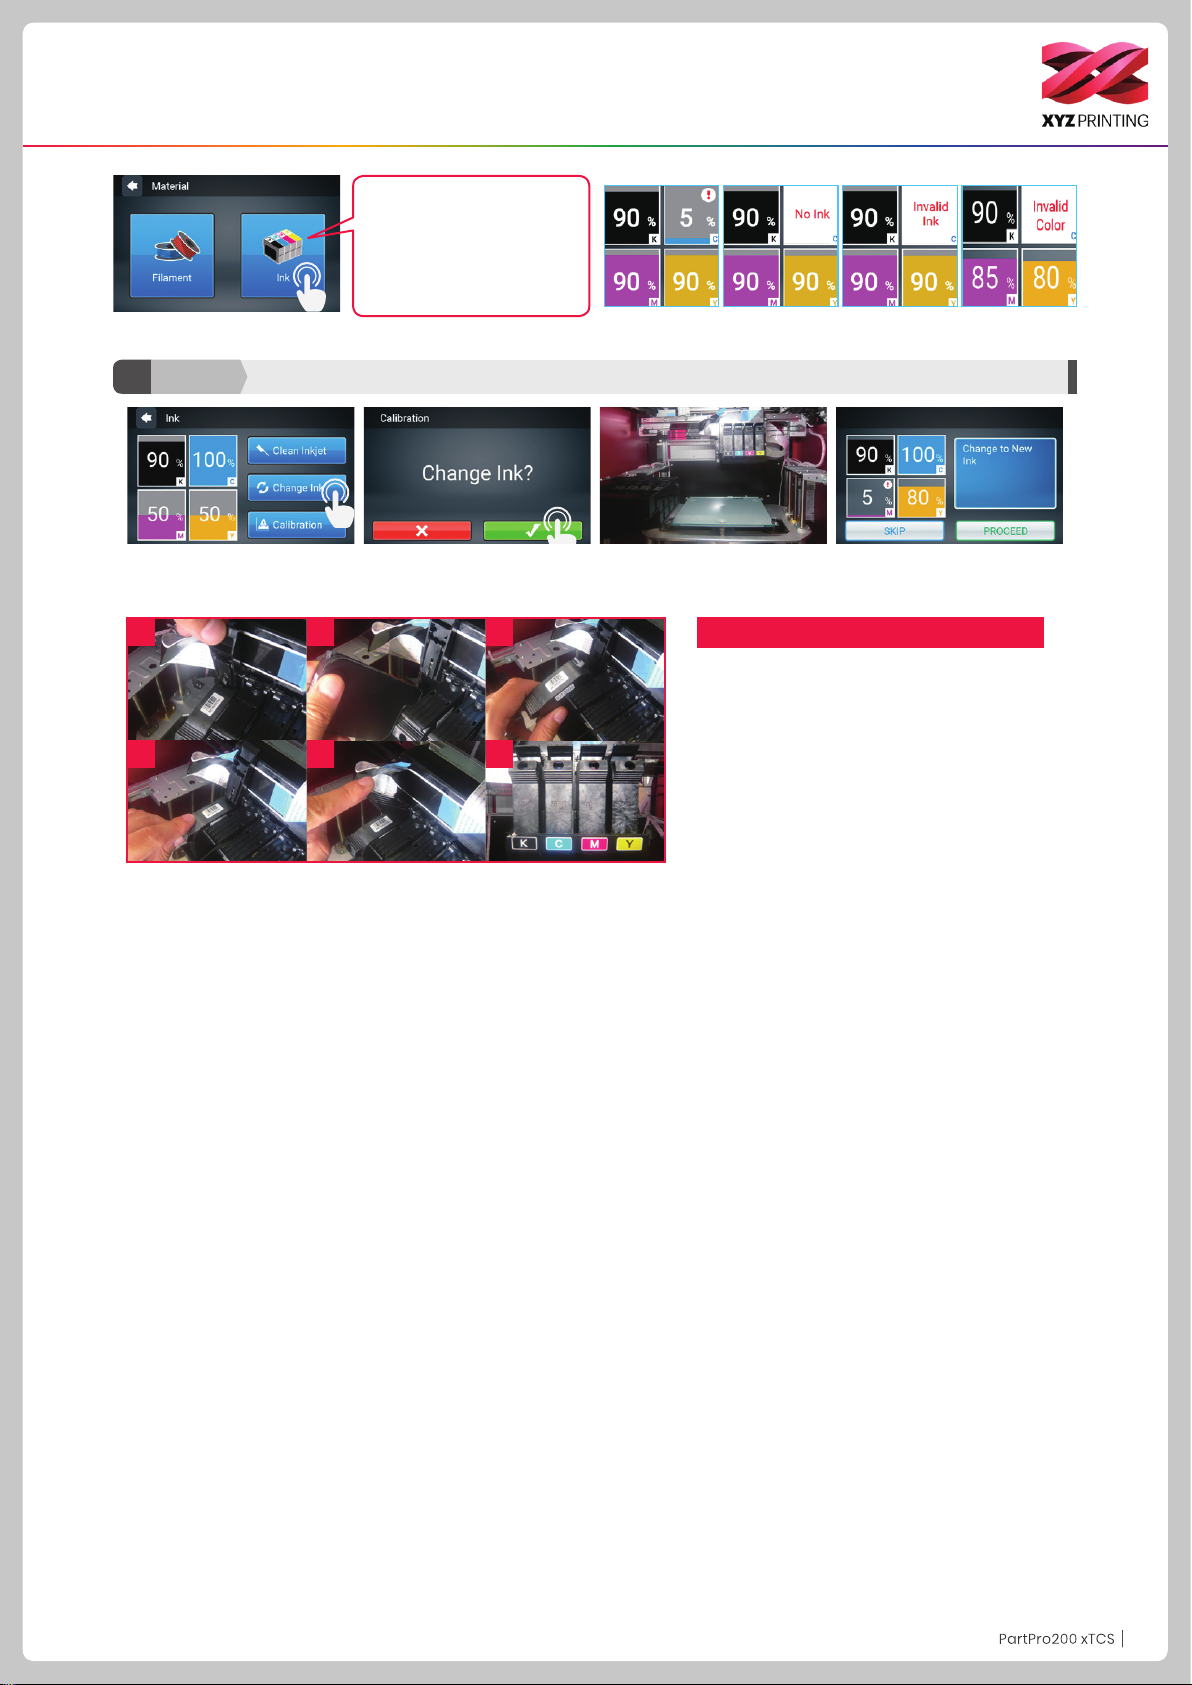
Tap the ink, the screen will
show the status of the ink,
including "Ink Low", "No Ink",
"Invalid Ink", and "Invalid Color"
Change InkC1 Ink
1. Tap Change Ink and tap to
conrm.
1
4
2
5
2. Conrm the operation.
3
6
3.Wait until the cartridge moves
to the center of the print bed,
and then change the ink.
Cartridge Installation
1. Lift up the plate upwards.
2. Take out the cartridge.
3. Put in a new cartridge.
4. Check if the cartridge is placed properly.
5. Press down the plate on top.
6. Check if the order of the ink color is K(Black),
C(Cyan), M(Magenta) and Y(Yellow) from left
to right.
Note : Replacement of any ink cartridge, please
conduct inkjet calibration test.
4. Tap the PROCEED after you
change.
P11P11
Page 12
Function Operation and Instructions
C2-1
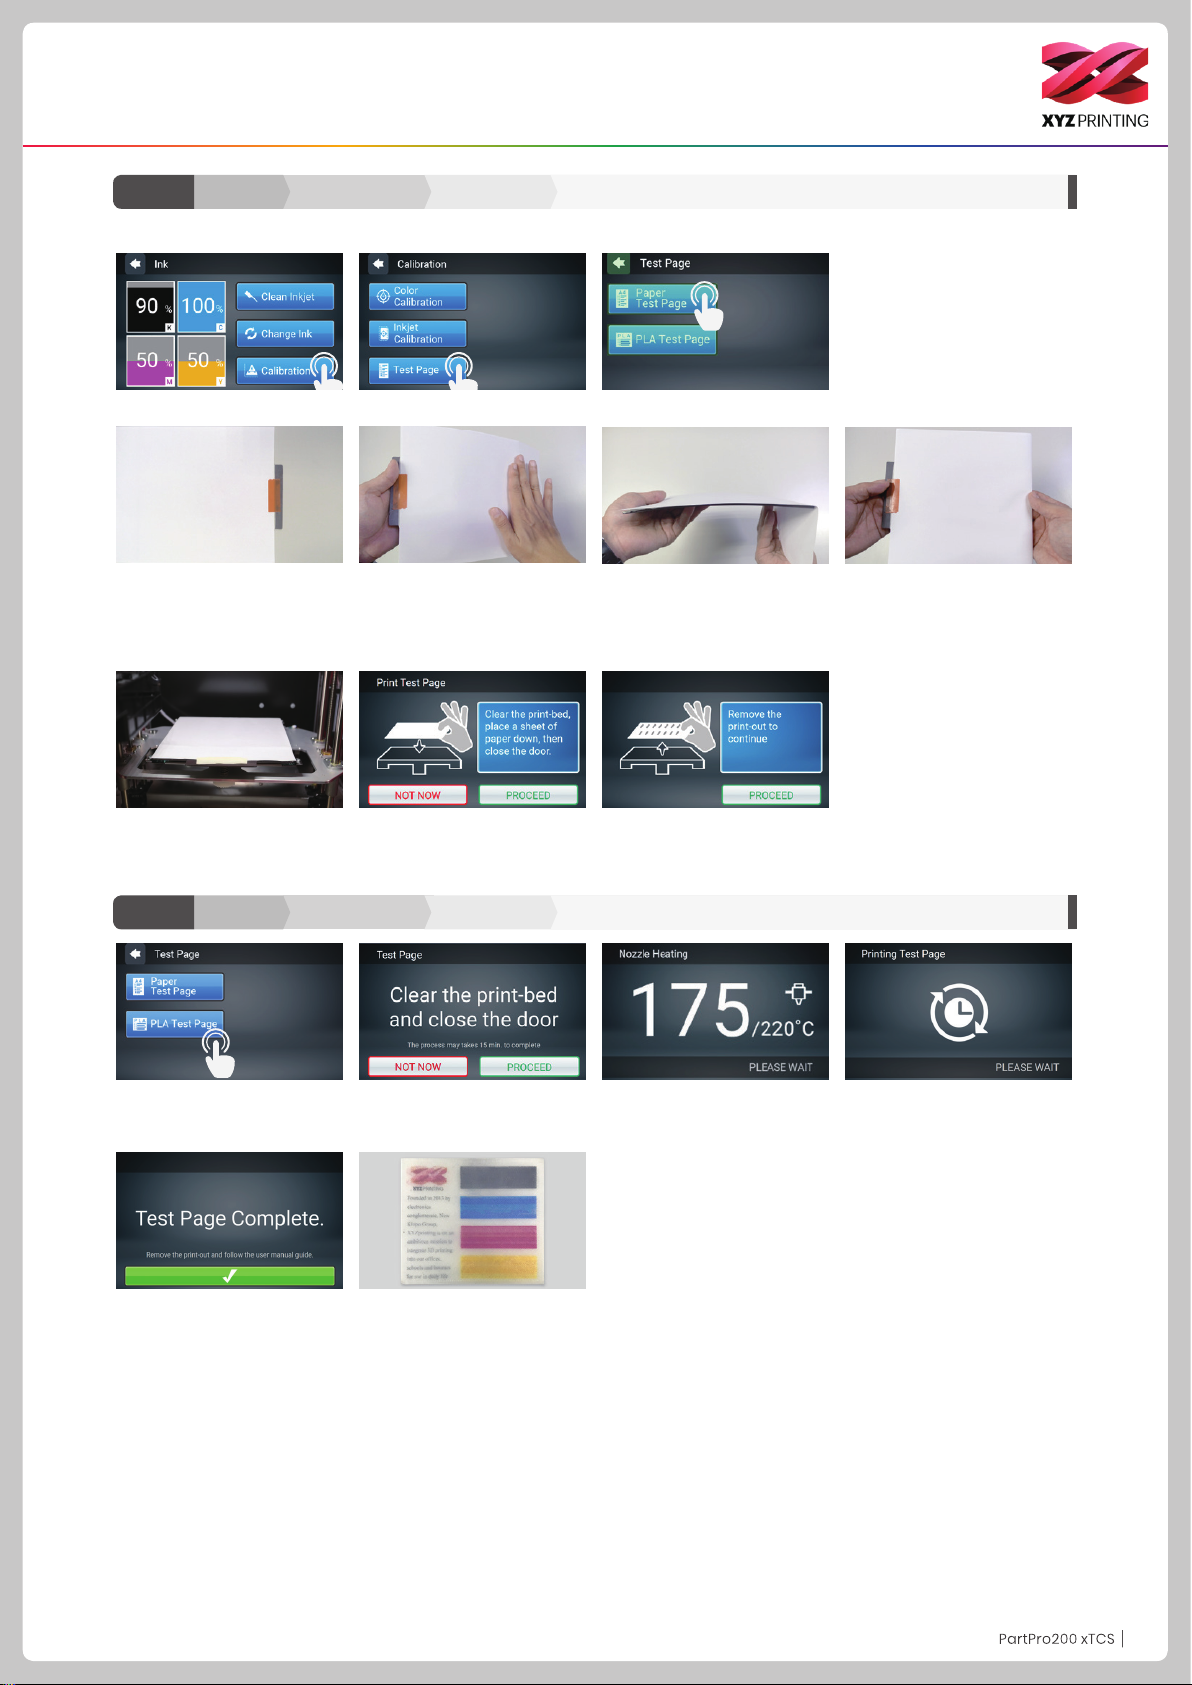
We suggest you print a test page after you install the ink cartridge. Please prepare a sheet of paper.
4. Take out the EZ Removable
Rubber Magnet. Use tape to
secure the A4 in the portrait
direction on the front side of the
rubber magnet.
Ink
Calibration Test Page
2. Tap Test Page.
5. Tighten/pull the A4 paper so
it is at(no gap) on the rubber
magnet.
Paper Test Page
. Test Page.1. Tap Calibration.
3
6. Fold tightly the excess A4 paper to the back of the rubber
magnet.
7. Put the rubber magnet back
to print bed accordingly.
Calibration
1. You can also choose to print
the "PLA Test Page" to conrm
the ink status.
5. Conrm if the print job is
completed.
8. Fix the paper onto the print
bed and then tap PROCEED,
the printer will do a test print.
9. Remove the test page and
tap PROCEED.
Test PageInk PLA Test PageC2-1
2. Tap “PLA Test Page" to print. 3. Wait for the extruder to heat
6. Taken off the printing object
and check the coloring status.
up to operating temperature.
4. Printing "PLA Test Page".
P12P12
Page 13
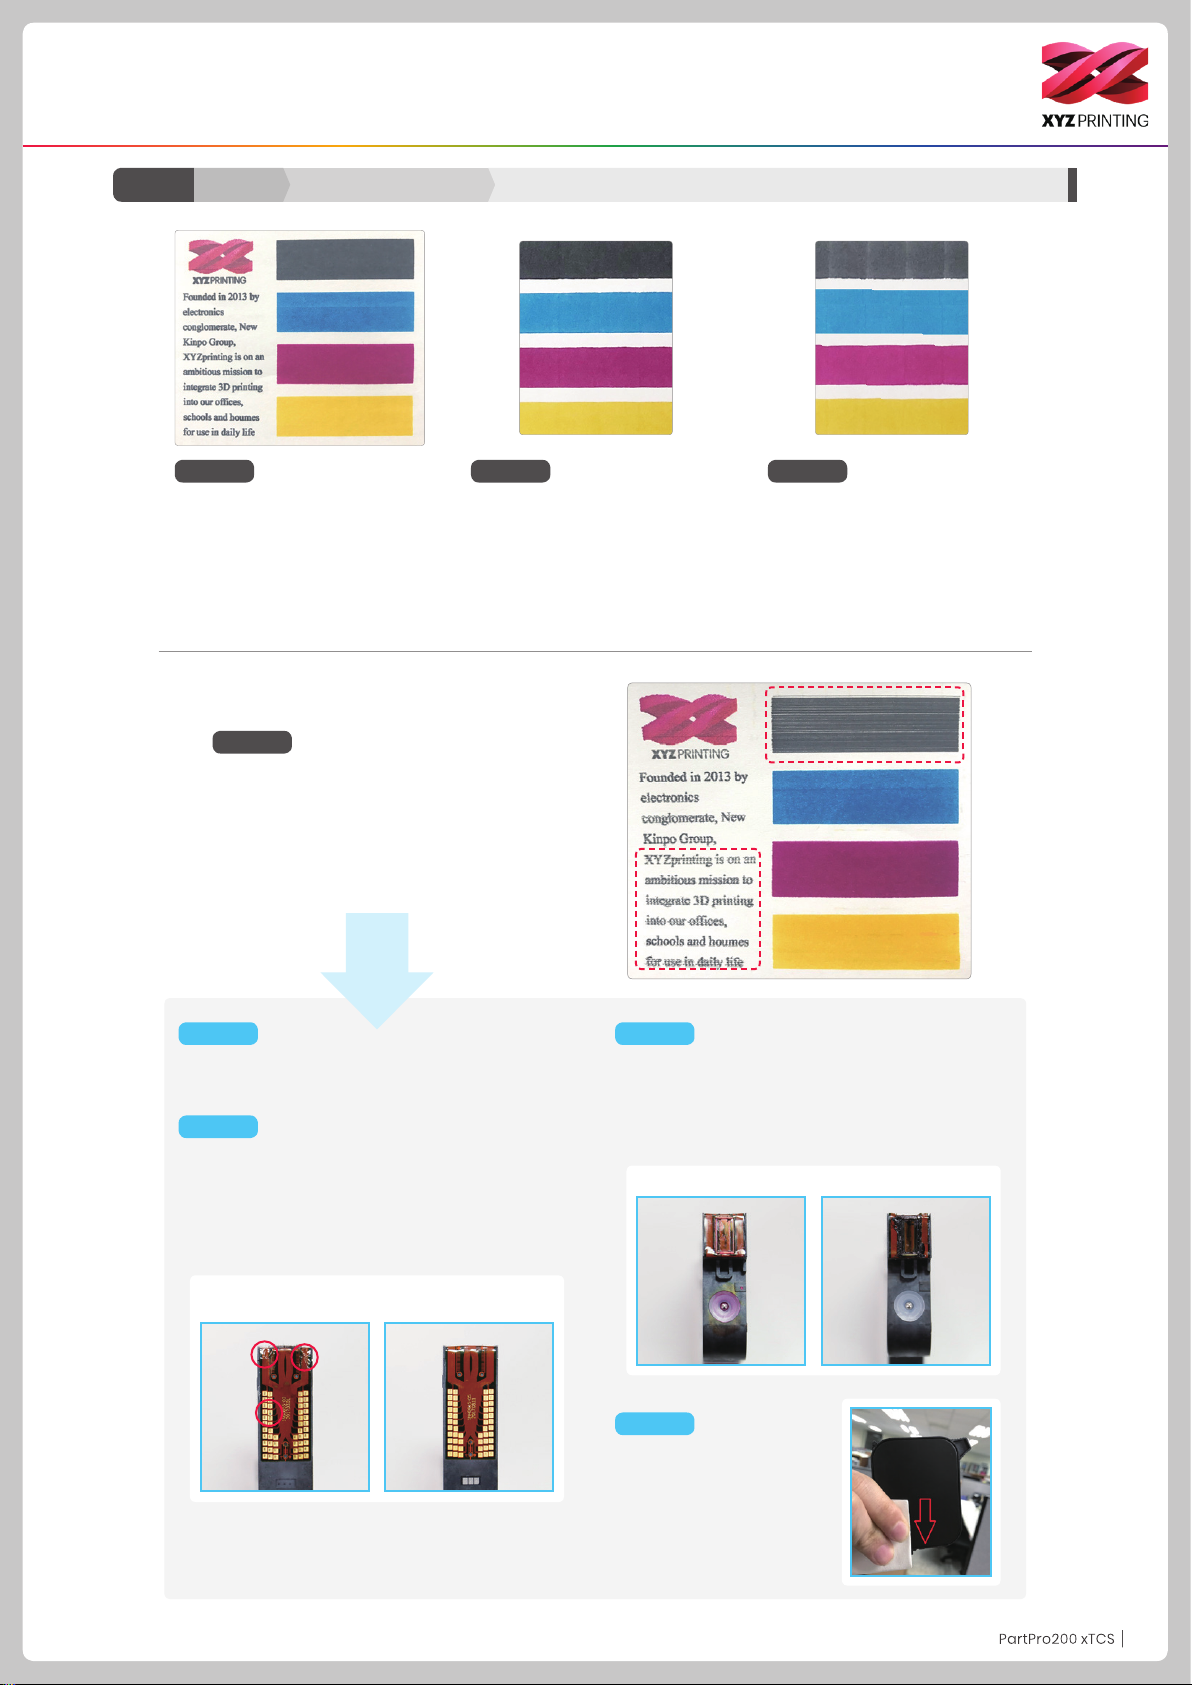
Function Operation and Instructions
Ink Calibration
Pic 1 Pic 2 Pic 2-1
Picture 1 shows an example of
normal test page.
Pic 3
Picture 3 show example of no good test page.
While line was shown horizontal and vertical
color of bars.
Please conduct the below steps accordingly.
Ink Cartridge TroubleshootC2-2 Ink
Picture 2 show some slight color
offset on horizontal part of test
page.
It is under acceptance range. If the
rprint of the test page gets worst,
please proceed with the cleaning
procedure.
Picture 2-1 shown some slighly
black ink smudge on the horizontal & vertical part, it may happen
to other color.
This is within accaptable range
Stept 1
Please reinstall the cartridge and print the test page.
If problem not solved, please proceed with step 2.
Stept 2
Check for any torn cable or damaged contacting pad
in shown example.
If found torn cable, please change new cartridge
If found damaged contacting pad and also the pin in
cartridge station was also damaged, contact support
for replacement.
NG Cartridge
(Torn cable & pad)
Note : Please refer to our support website for
latest ink cartridge cleaning procedure.
Please refer C2-1 for preparing the A4 test page.
Normal Cartridge
Stept 3
Check for possible clog ink head cartridge as example shown.
Please conduct cartridge cleaning process in Pg 10
ink guidance paragraph.
If problem not solved, please proceed with step 4.
Clean Ink Head Clog/dirty Ink Head
Stept 4
Using paper towel to cover
the ink cartdrigde as shown in
the picture 4 and downward.
If the ink comes out, please
print the test page.
If not solved, please change
the new ink cartridge.
P13P13
Page 14
Function Operation and Instructions
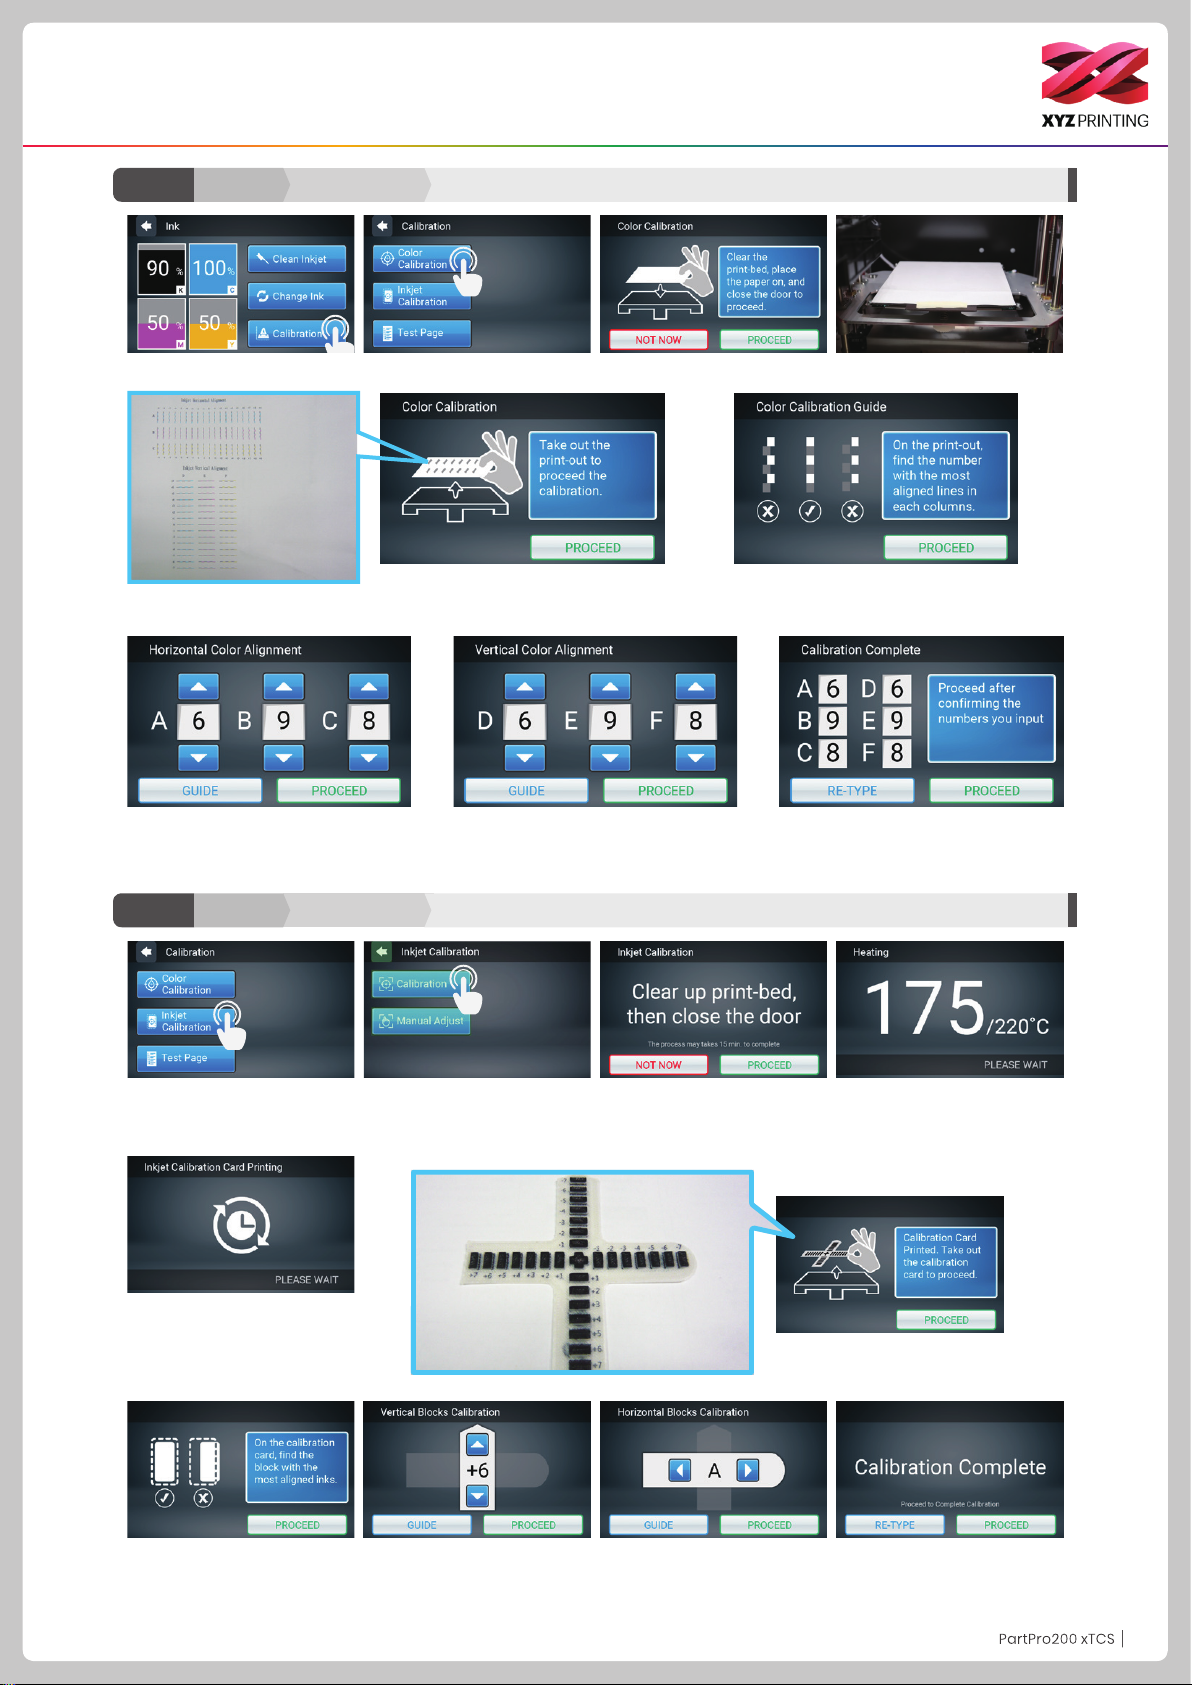
Calibration
4. Take out the printed paper and tap
PROCEED.
Color CalibrationC2-3 Ink
3. Please x the printing paper onto the print bed.1. Tap Calibration. 2. Tap Color.
5. Check the printed calibration chart using the onscreen instructions. For each color select the line that
is the best aligned with black (K).
6. For horizontal alignment, enter each
color’s corresponding number. After
entering the number, tap PROCEED.
7. For vertical alignment, enter each
color’s corresponding number. After
entering the number, tap PROCEED.
Calibration Inkjet CalibrationC2-4 Ink
1. Tap Inkjet Calibration. 2. Inkjet Calibration.
Caution: Please ensure the EZ Removable Rubber Magnet had
placed in the printbed.
5. The printer will print the
calibration card automatically.
This takes approximately 15
minutes. (Make sure you have
loaded the lament.)
8. Confirm the numbers entered in the
boxes and tap PROCEED.
3. Check that the print bed is
clear, then close the door.
6. After the printing is completed,
take out the calibration card.
4. The printing operation will
start once the print nozzle is
warmed up.
7. Horizontally and vertically,
nd the box where the ink is
the most aligned, and then tap
PROCEED.
8. Vertical direction: Enter the
number of the box you think the
lament and ink align the most,
and then tap PROCEED.
9. Horizontal direction: Enter
the number of the box you think
the lament and ink align the
most, and then tap PROCEED.
10. After the calibration is
completed, tap PROCEED to
nish the ink calibration.
P14P14
Page 15
Function Operation and Instructions
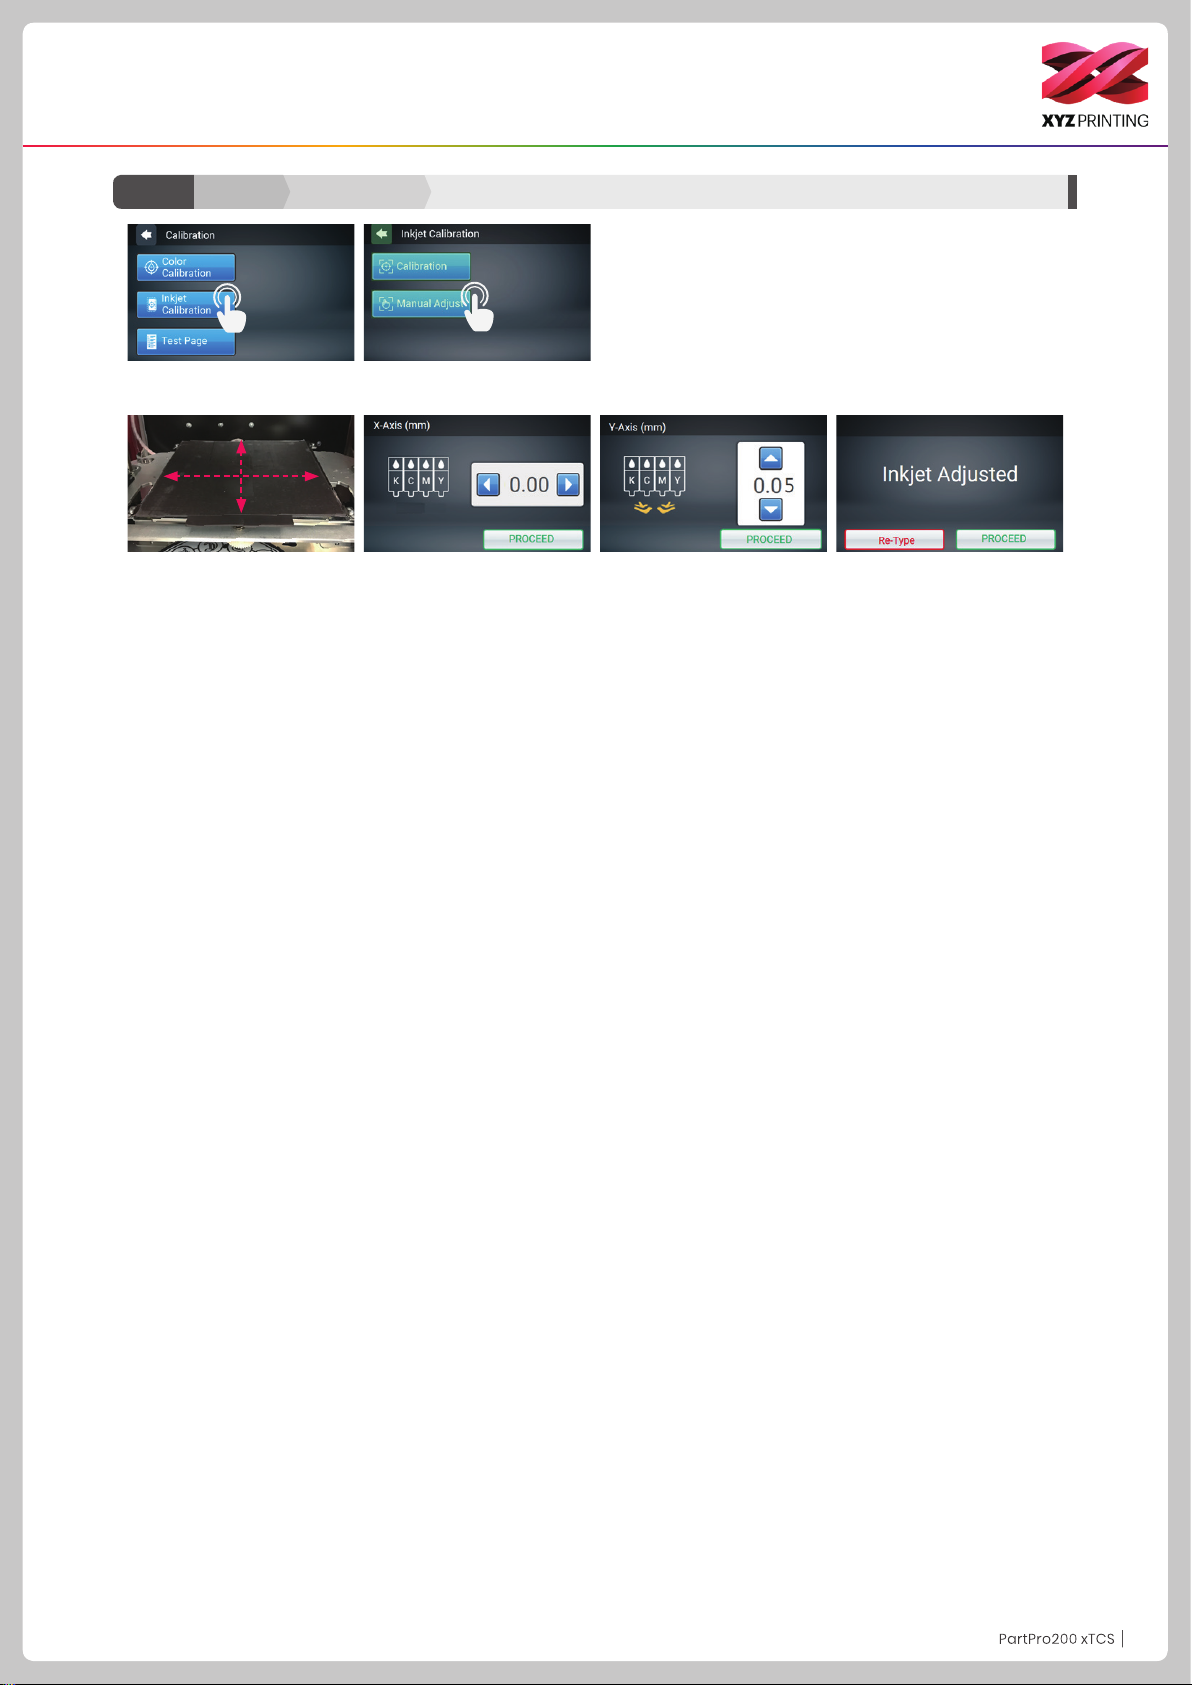
C2-4 Ink
1. After the color object is printed, if you nd color shift, you can
adjust the print position manually.
Y-Axis
2. The adjustment position
of X-Axis and Y-Axis was the
sample position, when facing
the printer.
Calibration Inkjet Calibration
X-Axis
Manually adjust the
movement of X-Axis
Select “X-AXIS” to move rightwards and leftwards.Press the
“Left” or “Right” button to select
the direction and distance to
be adjusted, each adjust has a
step of 0.05 mm.
Manually adjust the
movement of Y-Axis
Select “Y-AXIS” to move upwards and downwards.Press
the “Up” or “Down” button to
select the direction and distance
to be adjusted, each adjust has
a step of 0.05 mm.
Once parameter settings are
completed, tap "PROCEED" to
save and apply the settings that
you have specied.
If you want to reset, select “Re-
Type” to return to the X-Axis
moving position setting.
P15P15
Page 16
Function Operation and Instructions
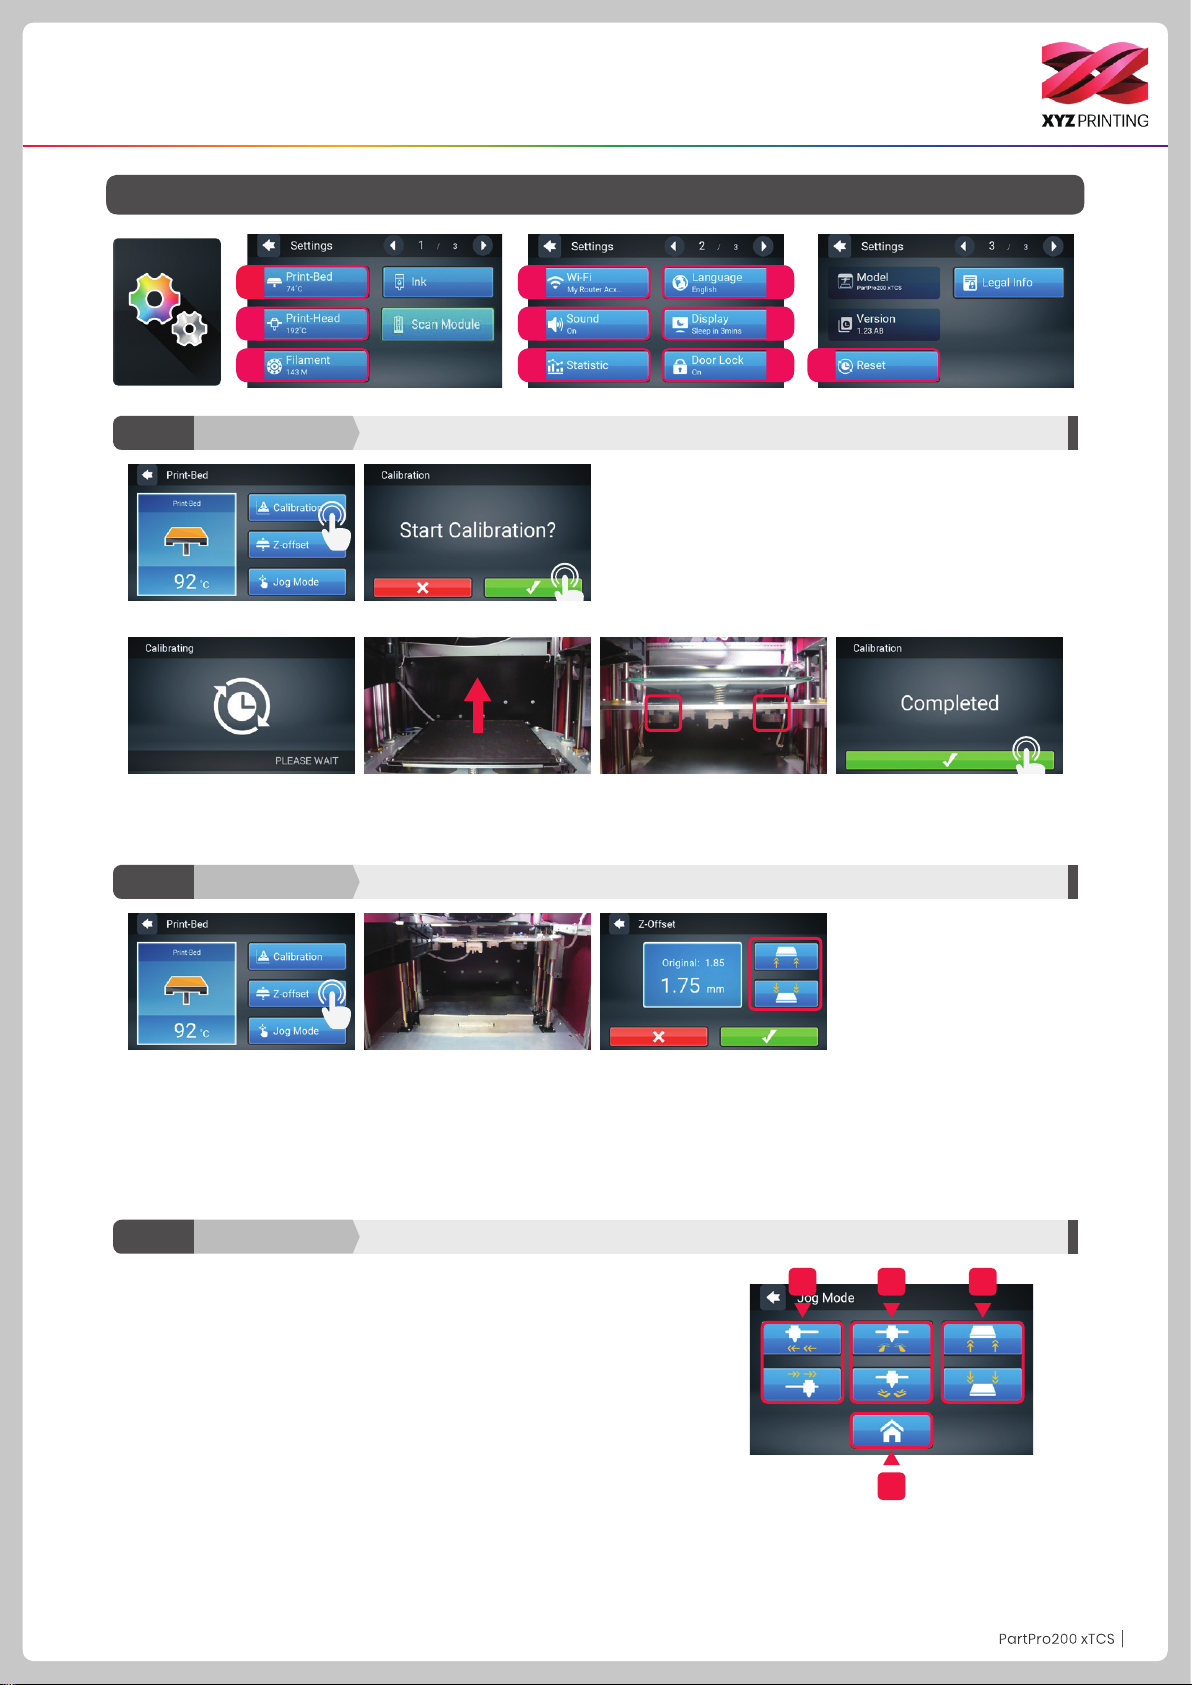
D. Setting
D1
D2
D3 D10
D1-1
1. Select Calibration. 2. Conrm the operation.
3. Wait while the sensor measures the height of the print bed at three different locations. Once the
measurement is complete, the printer will automatically level the print bed.
Caution: Please ensure the EZ Removable Rubber Magnet had placed in the printbed
Print-Bed
Calibration (leveling)
D4
D6
D8
D5
D7
D9
4. After the calibration is
successfully completed, tap to
conrm.
D1-2
1. Tap Z-offset. 3. Users can tap the icon to
Print-Bed
Z-offset
2. Move the print head to the
center of the print bed. It is
recommended that the space
between the print head and
the print bed just touch and the
nozzle can move smoothly on
the print bed.
higher or lower the print bed,
the higher value the bigger
distance and vice versa.
Jog ModeD1-3 Print-Bed
Jog mode lets manually move the print head via the touch screen.
How to move the print head:
1. Return to the Home point. Always return to the Home point prior to any movement in any direction.
2. Move along the X-axis.
3. Move along the Y-axis.
4. Move along the Z-axis. (Do not increase/shift upwards when print head at home
position avoid hitting the print bed.)
32 4
1
P16P16
Page 17

Function Operation and Instructions
D2-1
1. Please clean the nozzle after
printing 60 hours.
Print-Head
Clean Nozzle
2. Tap Clean Nozzle in the print
head section.
3. Check if cleaning is necessary. Tap Check to clean it.
When the temperature of the print head reaches the operating temperature, the cleaning operation will start.
Note: do not touch the metal part of the print head as it becomes hot during the operation.
4. Inset the feed hole cleaning wire
into the feed hole and push it down-
wards to drive out the lament from
the print head. (It is recommended
that the operation is performed from
the top of the machine.)
In order to prevent print quality from impact due to residual and accumulated lament, which results in poor discharge, after
long-term use of print nozzle, it is recommended to enable the "CLEAN NOZZLE" (nozzle cleaning) function of the printer every
Note
60 hours of print to clear residuals with nozzle cleaning wire or feeding path cleaning wire. (Filament should be unloaded
from the extruder before cleaning the feeding path.)
5. Remove the lament residue from
the print head with a wire brush.
6. Insert the print head cleaning wire
into the nozzle from the bottom to
clean it.
7. After the cleaning operation is
completed, tap DONE.
D2-2 Print-Head
1. Tap Change Nozzle. 3. Wait until the print head moves to a proper
4. The position of the print head change is
shown above.
Change Nozzle
2. Tap to conrm that you want to change the
nozzle.
5. Turn off the power before changing the
print head.
position for change.
6. Change the print head from above the
machine.
Installation sequence of new print head:
1. Connect the bus.
2. Press the white release button on the print head
and assemble the print head and the mechanism.
After attaching the print head, check to see that it
7. Press the white release button to separate
the print head.
8. Hold the print head with one hand and
remove the bus with the other. The removal
of the print head is completed.
is secure and does not shake.
3. Turn on and use the printer.
P17P17
Page 18
Function Operation and Instructions
Filament
D3
Refer to the Change Filament function in the main screen. Unused lament for one day of longer should be stored in zip-lock bag.
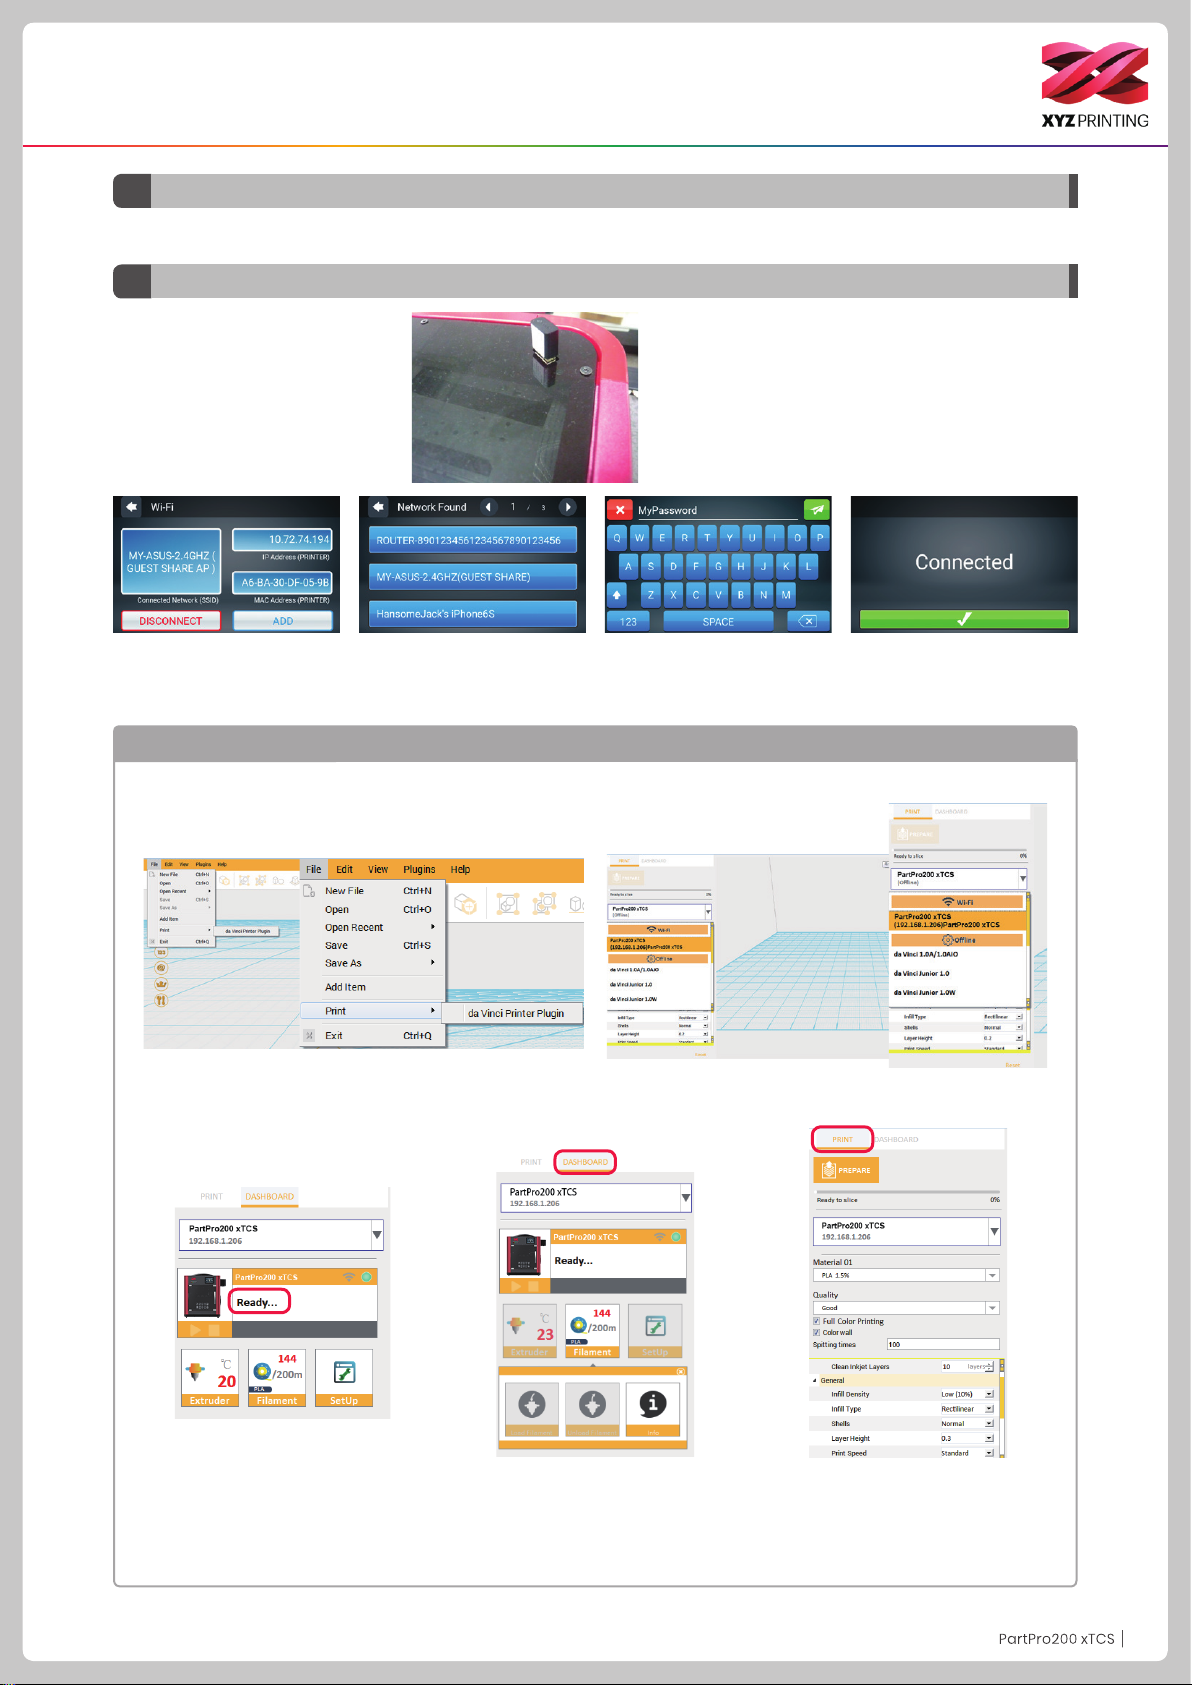
WiFi
D4
Before turning on the printer and setting
up the WiFi network, please insert the
WiFi dongle into the USB port on the
top of printer.
1. Tap ADD and the printer will
start to search for available
access points.
2. Tap the access point to be
used.
3. Enter the password for the
access point.
4. Conrm the connection is
completed.
Use the XYZmaker to verify if the WiFi connection is established successfully
●
Use a USB cable to connect the printer to the computer and run the XYZmaker.
●
Check if the WiFi function is activated on the computer and connect to the access point.
1. Run the XYZmaker. Click on File > Print > da Vinci Printer Plugin. 2. Select the printer to be used.
3. When the software displays ”
connection is established successfully.
Now, you can click on “DASHBOARD” to
monitor the printer or “PRINT” to print a
le.
READY
”, the
DASHBOARD:
ture, filament used and filament loading /
unloading.
Monitor print head tempera-
PRINT:
Set printing parameters and quality.
If only a le conversion is needed, tap “PREPARE”.
P18P18
Page 19
Function Operation and Instructions
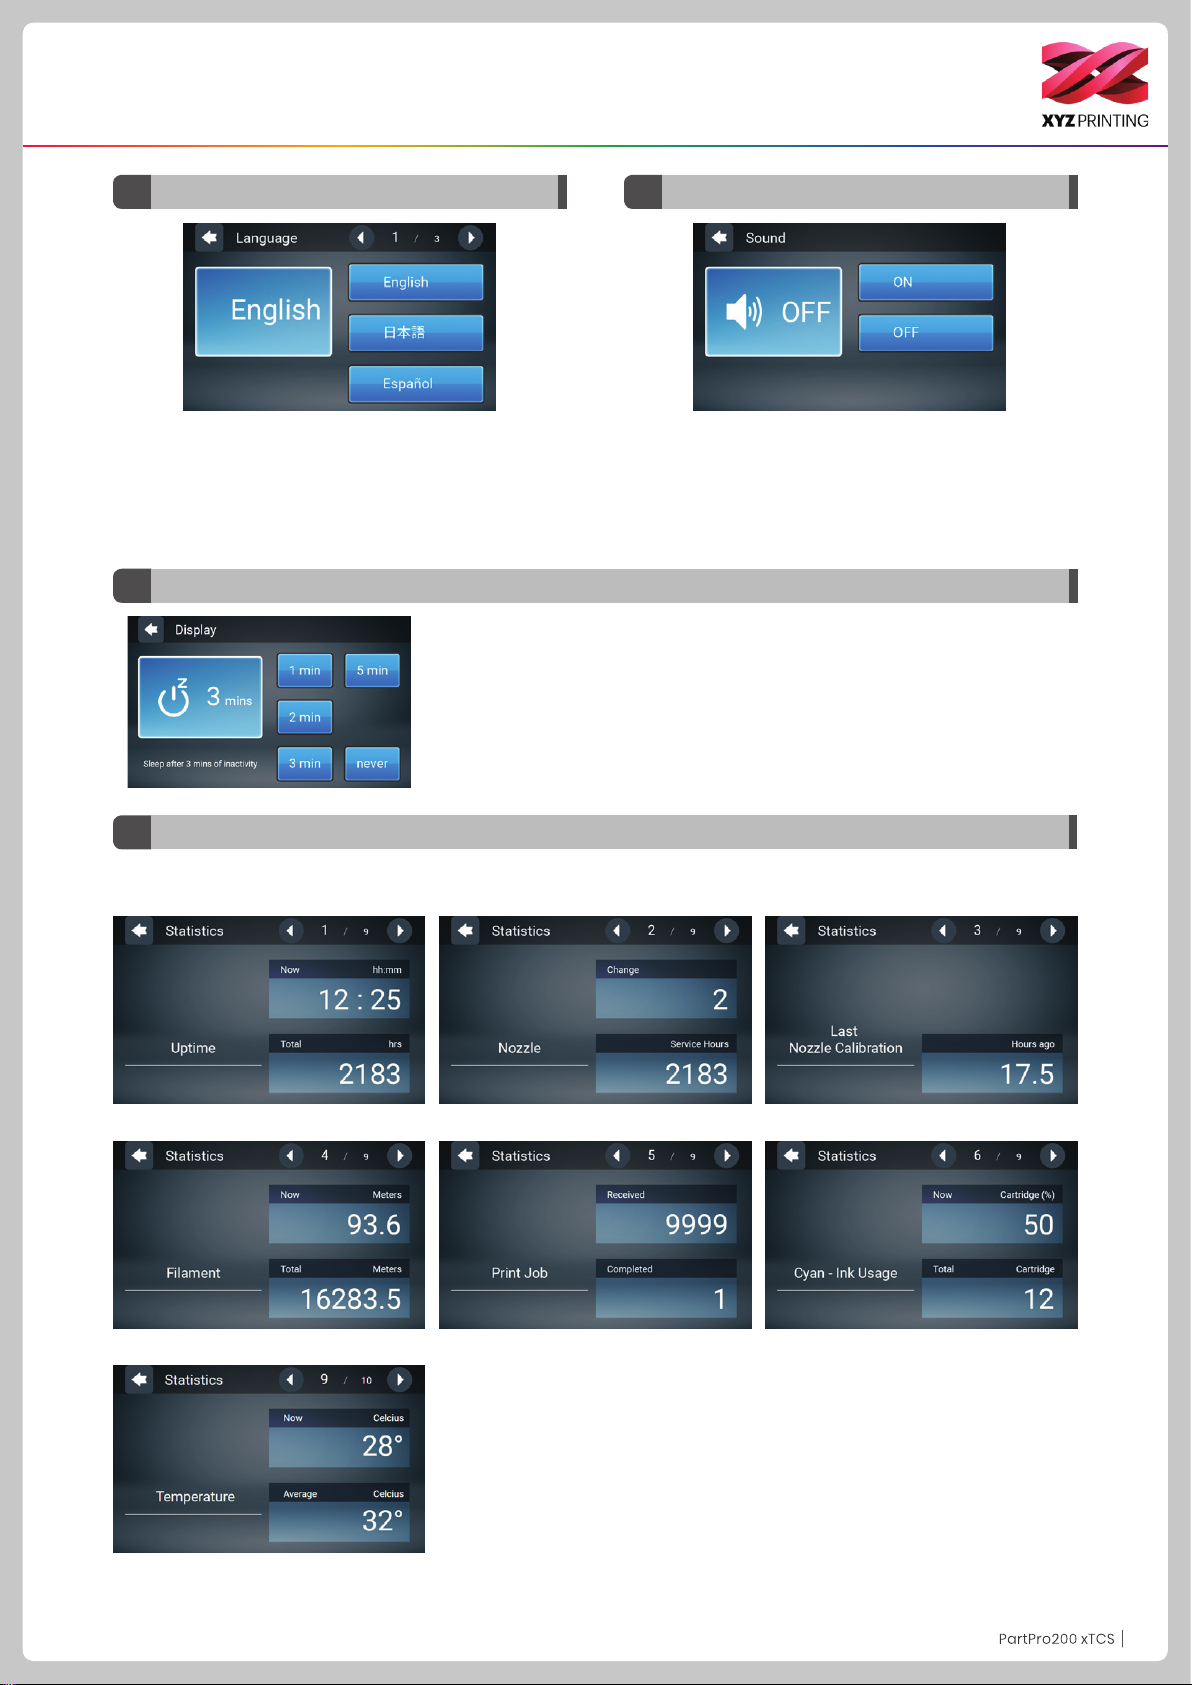
Language
D5
Change Language Setting
The 200 xTCS provides eight display languages,
including traditional and simplied Chinese, English,
Japanese, German, Italian, Spanish and French.
The language setting can be changed by tapping
Settings > Languages in the main screen.
Display
D7
The Display setting can set the touch
screen to turn off when it remains inactive after a set time. There are five
settings, including one minute, two minutes, three minutes, five minutes and
always on.
Sound
D6
The Sound option can be set to ON or OFF to control
the sound emitted when the touch screen is tapped
Statistics
D8
The Statistics function can record the history data since the printer was turned on, including:
Uptime
Filament
Temperature
Nozzle
Print Job
Last Calibration
Ink Cartridge
P19P19
Page 20
Function Operation and Instructions
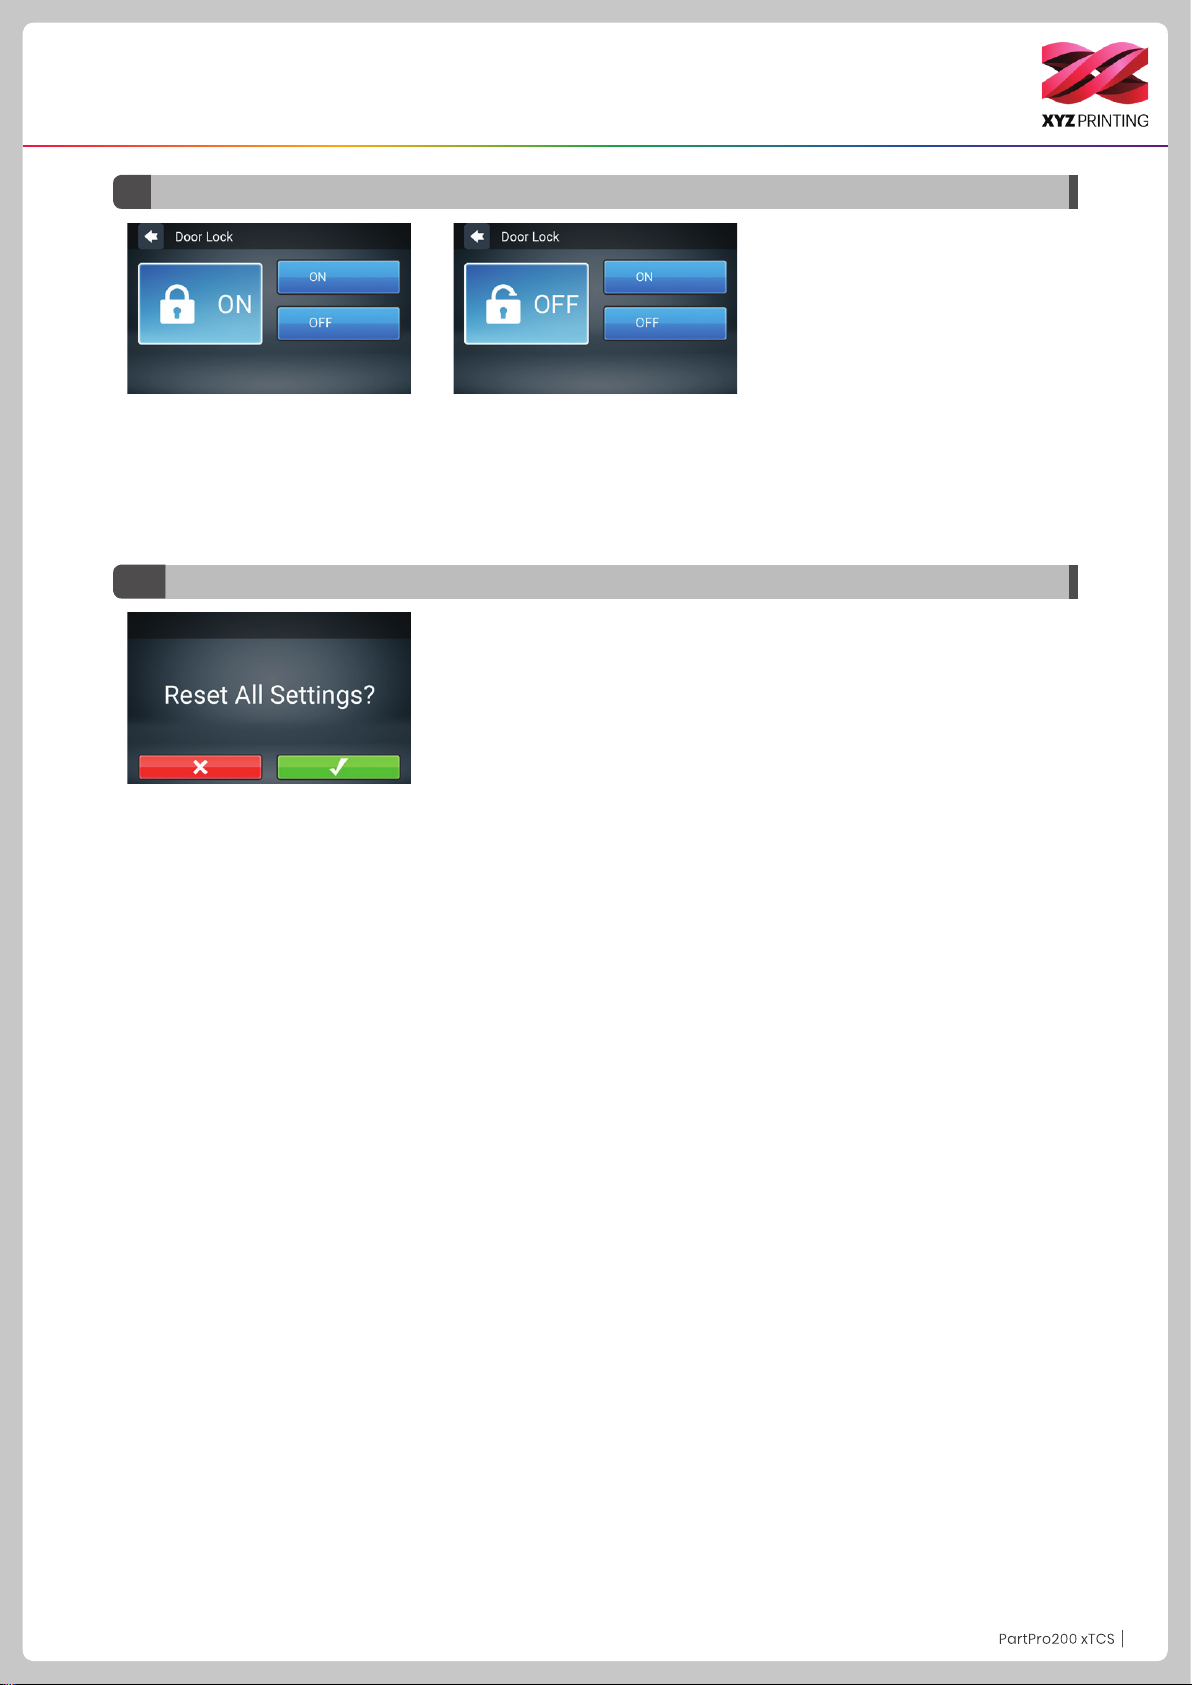
Door Lock
D9
1. Door lock on (ON) : when printing,
the door will be locked; 60 sec after
the print ends, the door will unlock. The
door will be unlocked when users tap
Pause or Stop during printing. The door
will lock again, when the door is closed
and printing is resumed.
D10
Reset
2. Door lock off (OFF) : the door won't
be locked during printing, pause, or stop
status.
Printer information will be deleted,
and returned to factory settings.
P20P20
Page 21
Printing
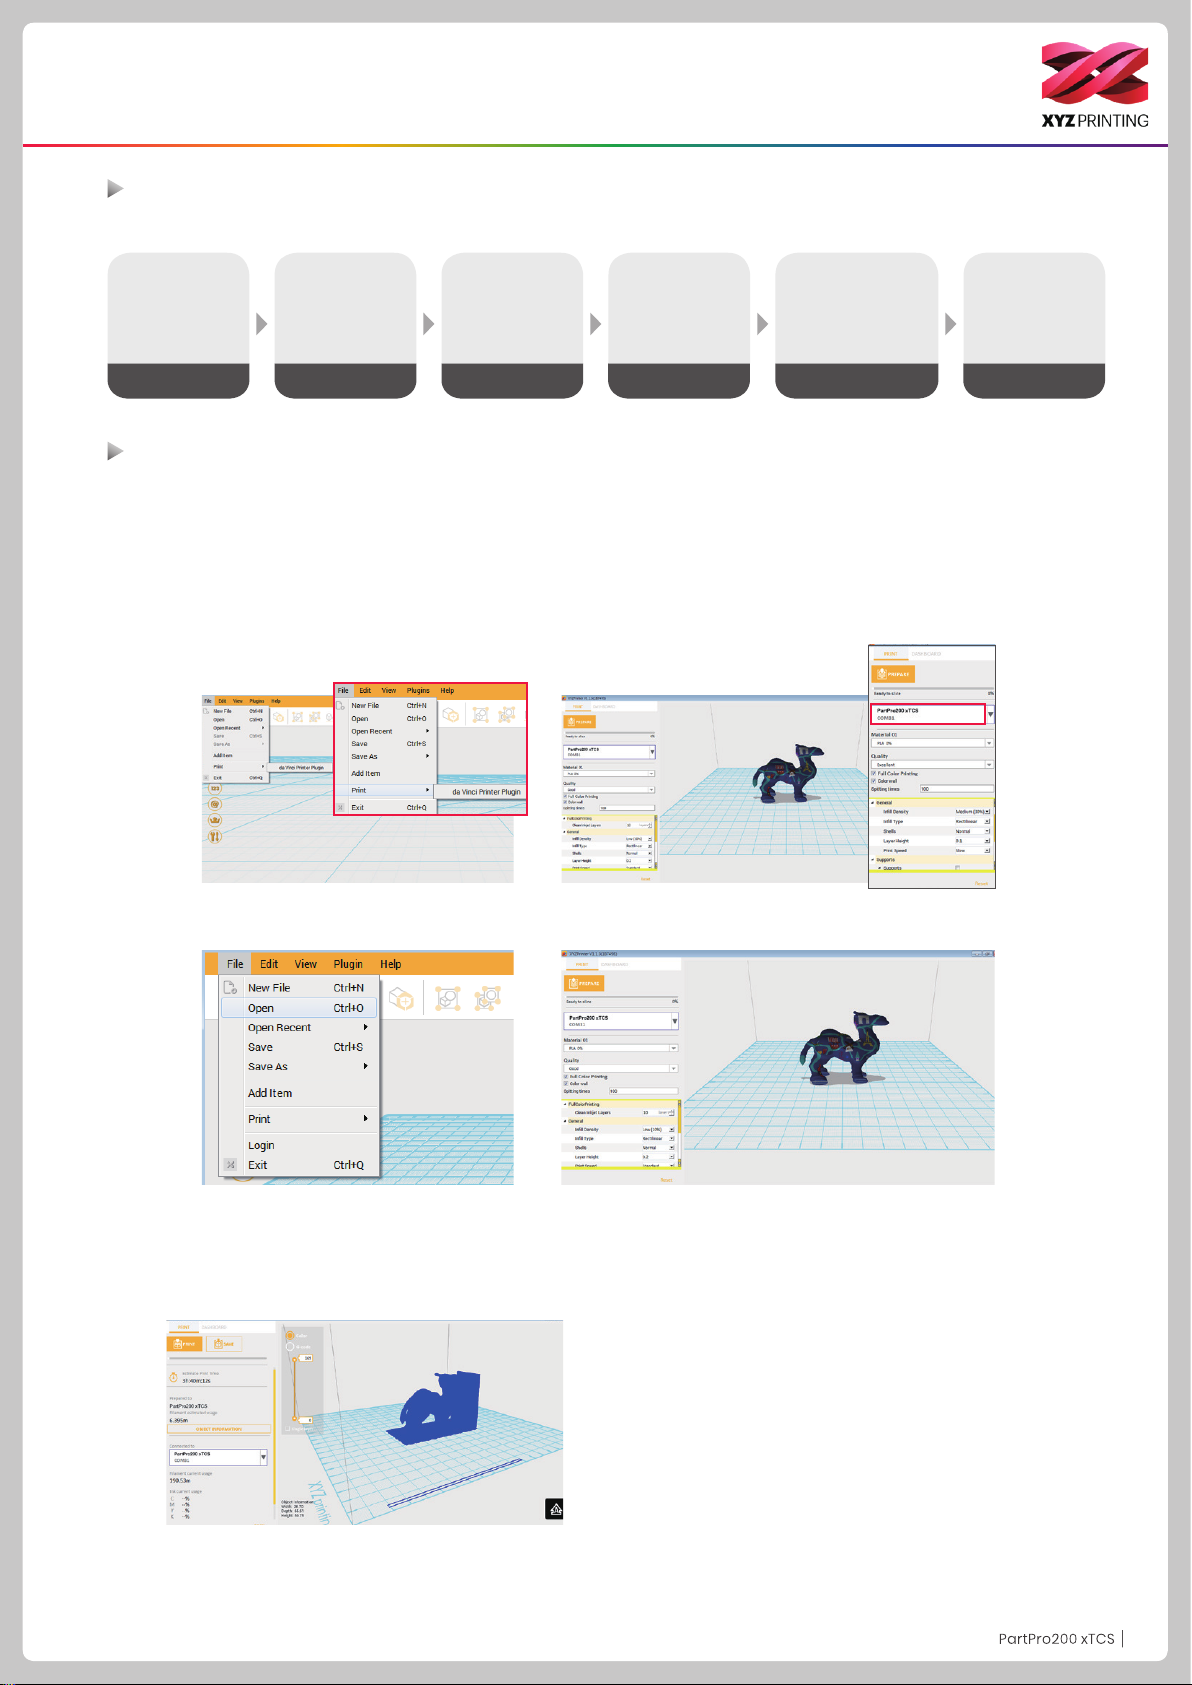
First-time printing
Users are able to do a rst print by following the steps below.
Calibration Z-offset Load Filament Change Ink
D1-1 B C C A
D1-2
- Test Page
- Color Calibration
- Ink Calibration
Calibration
Prepare the
le and then
execute the
printing
Transfer les to be printed via the computer software “XYZmaker”
Internet access is required for product registration and software login.
Connect the printer and computer with a USB cable and install the “XYZmaker” on the computer to transfer the les you want to
print.
The “XYZmaker” is compatible with 64 bit operating systems of Windows and Mac OS 10.10 10.11 and 10.12. You can install it by
using the included USB drive or downloading the installer from the ofcial XYZprinting website. The user manual of the software
can also be downloaded from the ofcial website.
For details, visit the ofcial website: http://www.xyzprinting.com/
1. Connect the computer and printer and select PartPro200 xTCS.
2. Click on OPEN to select the model le to be printed from
the folder. You can adjust the object size, printing position
and angle once the le is loaded. To print color objects,
save the le to be printed in the obj format and load it in
the XYZmaker.
3. You can change related settings to the desired printing result
and effect.
4. The Prepare function can convert a obj le to a .3cp le.
Once the le is edited and adjusted, click on Print to output
the object. The printing operation will start after the le is
sliced.
P21P21
Page 22
Scanning
Mount the scan module in the machine (see the installation steps) and install the “XYZscan Color” software on your
computer to operate the scanning fuction of your 3D printer.
Face the front side of the object to be scanned toward the scan module and it takes about 10-40 minutes to scan it,
depending on computer performance and scanning quality. When you scan an object, the turntable rotates clockwise. At
this time, the camera on the scan module will capture continuous images at a speed of 30 images per minute. When the
scan is completed, “XYZscan Color” will display the 3D image captured in the 3D image.
Product Overview
Scan Module
Hardware Requirements
Operating systems Windows 7, 8.1, 10 (64-bit)
Minimum system
requirements
CPU 4th Generation Intel® Core™ i5
USB 2.0
8GB/ Hard disk or more
Support the OpenGL 2.1 or above graphic
card
Scan Specication
Scan Technology Photogrammetry 3D
Scan Resolution
(Diameter x H)
Scan Software XYZscan Color
Turntable Payload ≦ 3 Kg/6.6lbs
Rescolution 5M pixel
Scan Accuracy 1.48 mm
File Types OBJ, STL
5cm ϕ x 5 cm – 14cm ϕ x 14 cm (H)
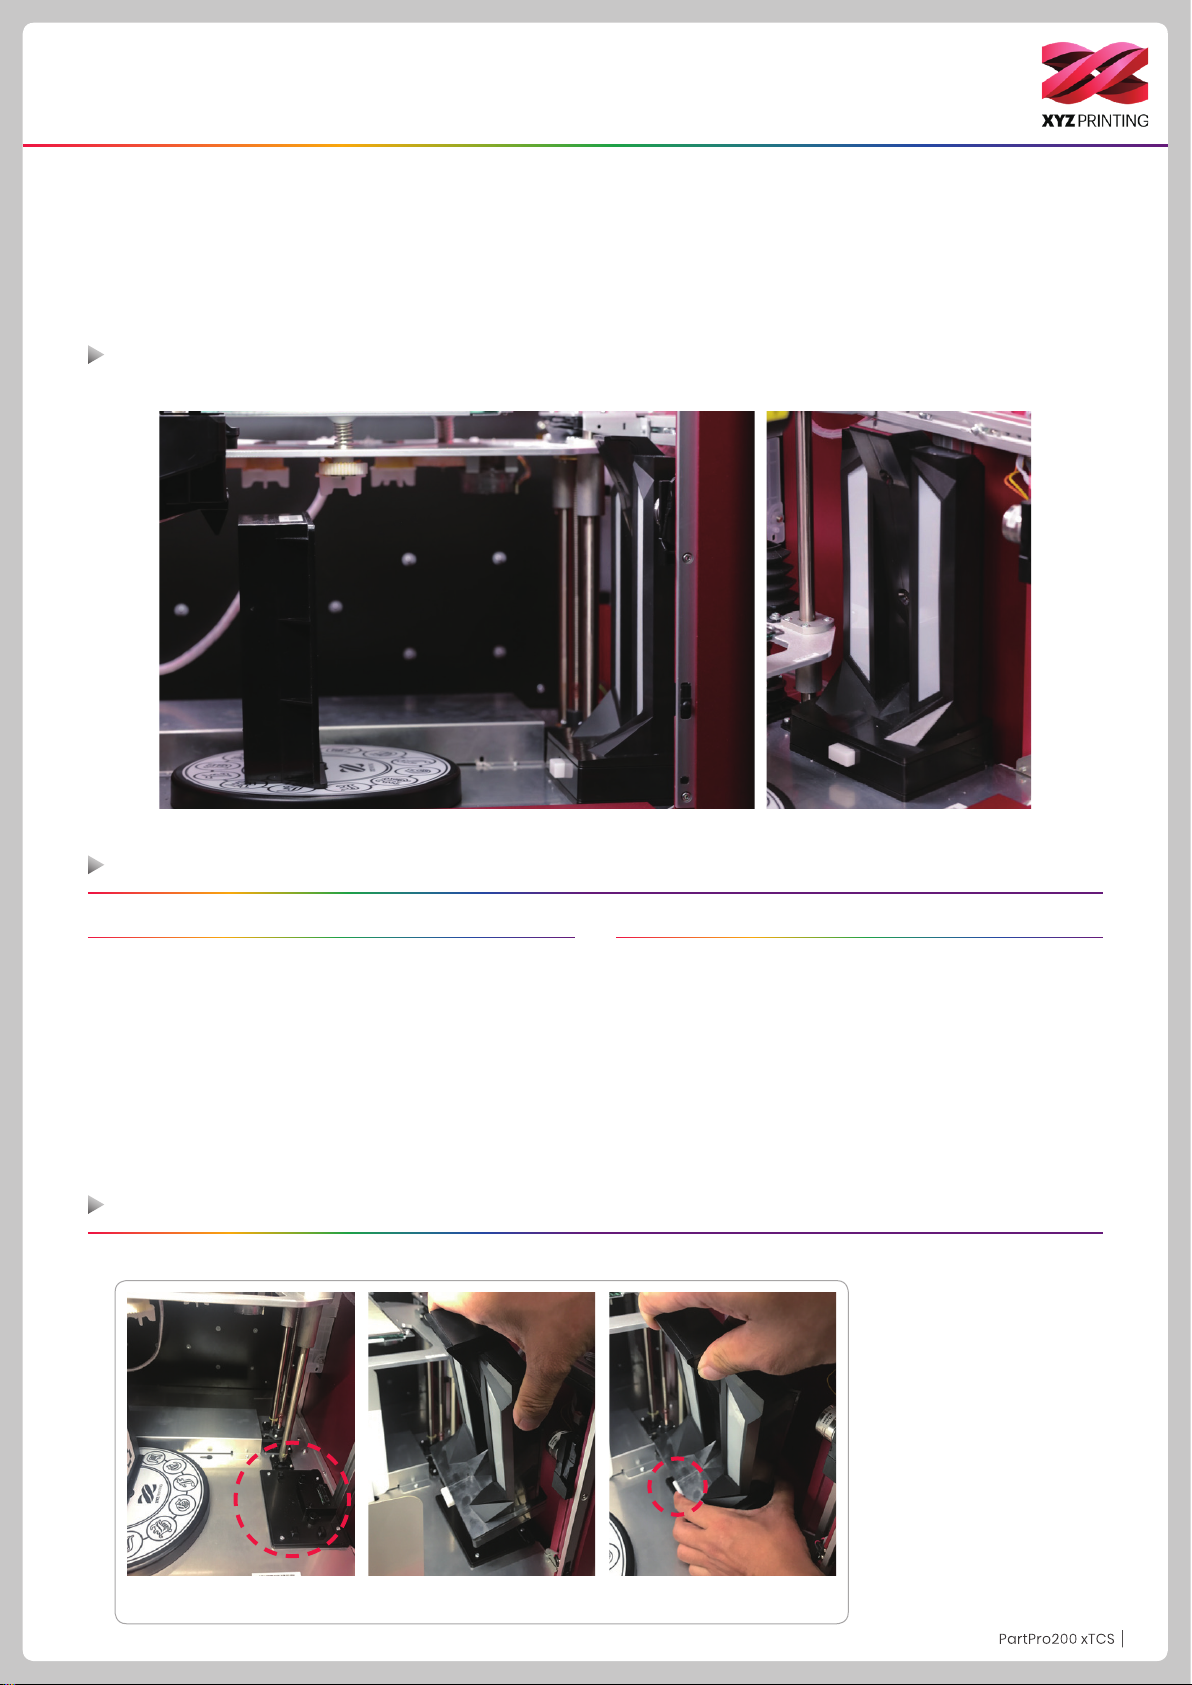
Install the scan module
To install the scan module, align it with the scanner base, press and hold the button, and attach it to the base vertically.
Scan Module Slot Button
Attach scan module to the
base vertically.
P22P22
Page 23
Scanning
The limitations of the object to be scanned
The object should be stable and stationery. It must not be shaken or moved during the rotation of the turntable.
•
Scan area for the object mode is 5cm ϕ x 5 cm – 14cm ϕ x 14 cm (H).
•
The object should not be reective, tranparent, or translucent ones.
•
The object with a reective surface, metal, or transparent material will have an impact on the scanning quallity. If you
•
want to scan an object like this, it is recommended to spray the developer on the surface before scanning it.
If the object has a solid color, or does not have obvious textures or an obvious shape, you may not have the best scan-
•
ning results.
The round object will have scanning results, while the slime and long or sharp objects won’t have good scanning re-
•
sults.
Scan steps - Install the scan backboard
1. Remove the object from the
tumtable.
Scan steps
1. Select the scan module in the
Settings.
2. Wait until the scan turntable
returns.
bottom of the scan backboard
into the holes and secure them.
2. Empty the printer platform.
3. Install the scan backboard.
Direction of the latch.Insert the two sides at the
3. Install the scan backboard.
The installation of the scan
backboard is completed.
4. Wait until the printer platform
returns.
5. Pleace the object to be
scanned.
6. The object is being scanned.
7. When the scan is completed,
you can nish the scan job and
perform other jobs.
P23P23
Page 24
Scanning
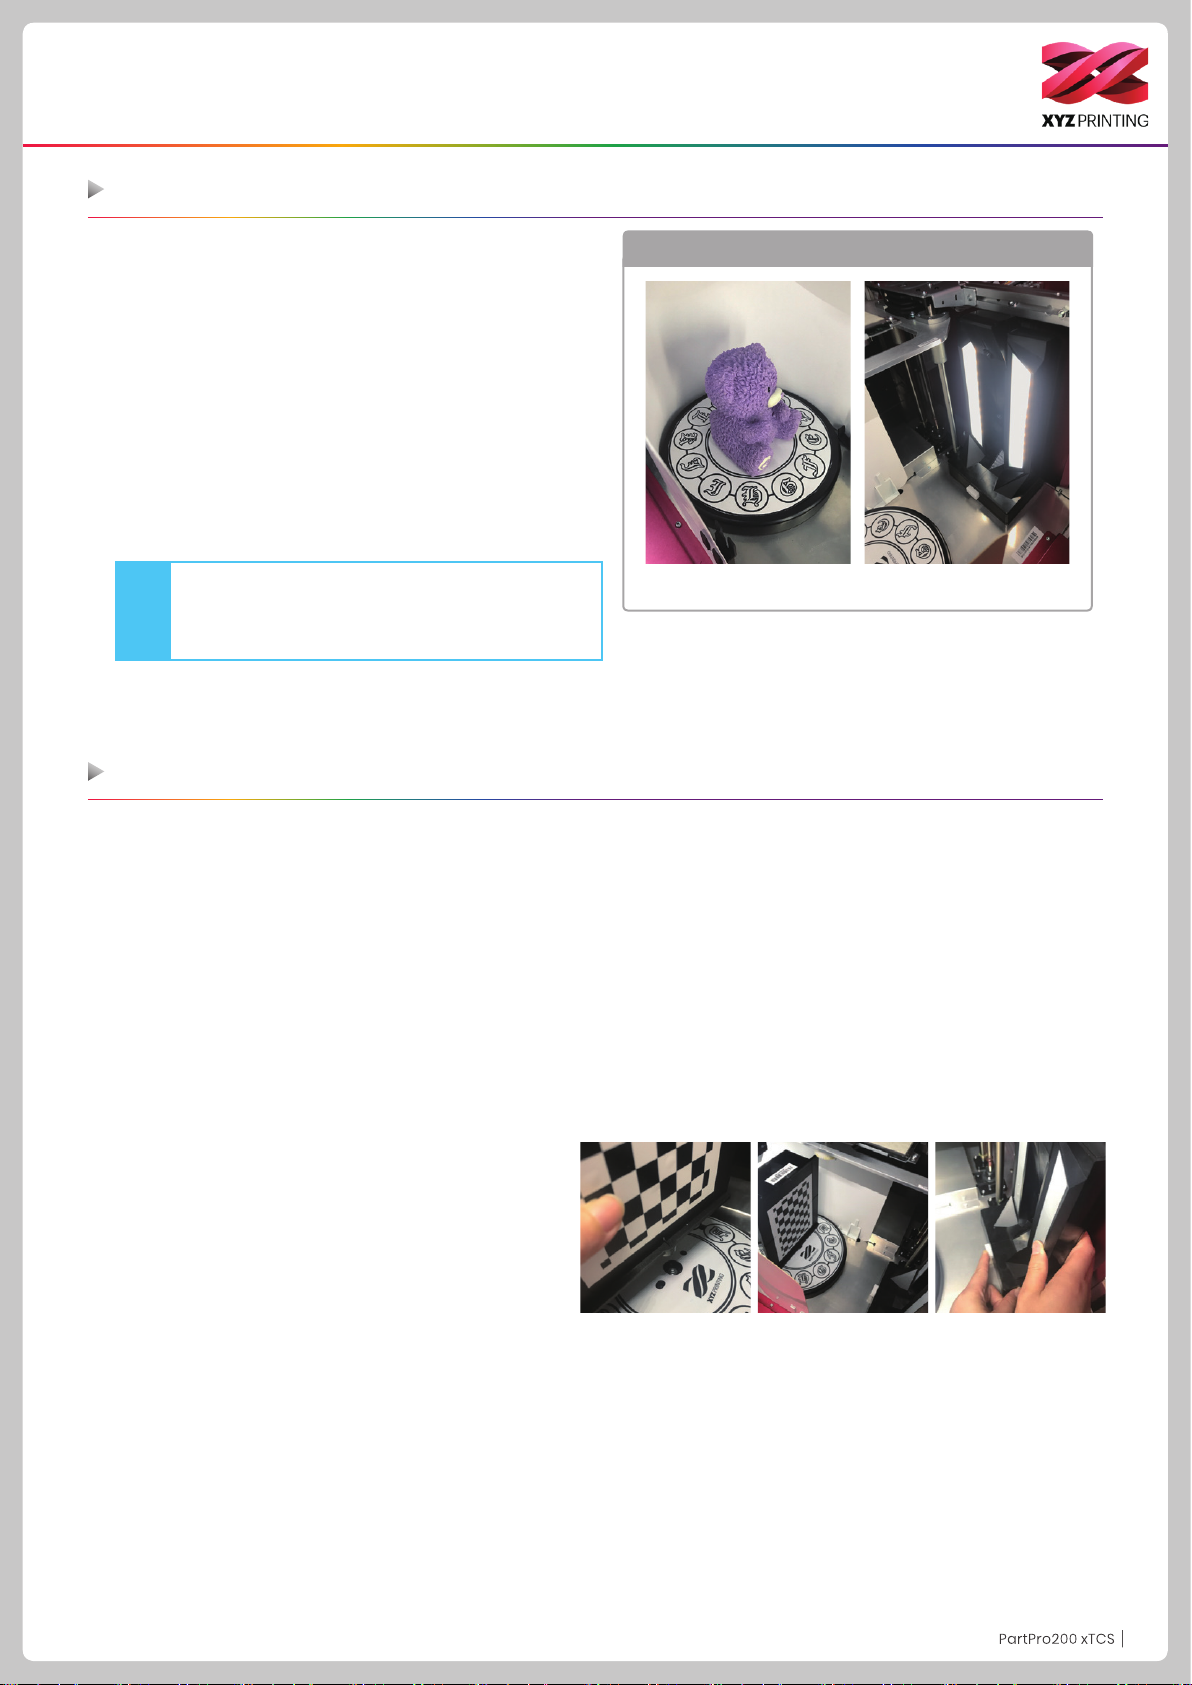
Scan software: Operate XYZscan Color
Make sure that the scan backboard is properly installed in
your 3D printer and press the "Scan" button on the machine,
make sure the machine enters scan mode.
1. Open the scan software.
2. Check the ambient brightness in the preview screen.
Adjust the preliminary settings. If no error is found, click
"Scan" to perform the process.
3. In the Model Preview area, the model slowly rotates. Wait
until the scan point clouds are created.
4. Wait until the scan point clouds are created. Press
Continue and perform meshing.
5. The scan is completed.
1. You can have better performance under good
Note
* For details about the scan feature, refer to the "XYZscan
Color Software User's Manual"
lighting conditions.
2. The front side of the object must face the scan
module.
Use the calibration plate
Environmental illustration
Rotating Table Module Scan Module
When the printer is relocated, or the scan result is not accurate, peform the following steps to calibrate the scan module:
1. Remove the object from the tumtable.
2. Perform "Settings" > "Calibrate" in the main menu of "XYZscan Color."
3. Use the calibration plate.
When the screen prompt asks you to place the calibration plate follow the instructions and place the calibration plate in
the middle of the turntable. (The side with the checkered patten faces the scan module and then snap the bottom latch
into the middle notch of the turntable) Click "Calibrate Now" in the software.
4. Check if the calibration plate is properly displayed in the preview screen. If correct, click "Calibrate" to perform the
calibration process.
5. Wait for the XYZscan Color performs calibraiton with the printer (it takes about 2 miniutes.)
6. When the XYZscan Color prompts that the cabiliation is completed, remove the calibration plate from the turntable.
7. Click "Conrm" in the software to exit this function to proceed with scanning.
P24P24
Page 25
Support detail
When the problem occurs with the printer, please refer to the following troubleshooting instructions. If the problem persists, please
contact the Customer Service Center.
Problem code and handling
When a problem occurs with the printer, the service code will be displayed on the printer screen and / or the software interface. Please
refer to this service code description form for preliminary testing.
Service
Code
Symptom Action
OO11 Print head heated for too long
please check the Flexible at cable and reboot
OO14 Print head heated issue -- temperature exceed
OO30 Abnormal--X axis
OO31 Abnormal--Y axis
check the cable of the motor and the sensor, and check the
position of the sensor
OO32 Abnormal--Z axis
OO50 Internal communication error -- memory error reboot the printer
OO52 Print head memory error replace the print head
OO55 inkjet head error replace the inkjet head
OO56 inkjet data error reboot the printer
Maintenance and Service
Keep original packaging material in the event of sending your unit back for repair during the warranty period. If other packing materials are
used instead, the printer may be damaged during the transportation process.. In such situation, the XYZprinting the right to charge repair
fee.
Federal Communications Commission (FCC) Statement
You are cautioned that changes or modications not expressly approved by the part responsible for compliance could void the user’s
authority to operate the equipment.
This equipment has been tested and found to comply with the limits for a Class B digital device, pursuant to part 15 of the FCC rules. These
limits are designed to provide reasonable protection against harmful interference in a residential installation. This equipment generates,
uses and can radiate radio frequency energy and, if not installed and used in accordance with the instructions, may cause harmful
interference to radio communications. However, there is no guarantee that interference will not occur in a particular installation. If this
equipment does cause harmful interference to radio or television reception, which can be determined by turning the equipment off and on,
the user is encouraged to try to correct the interference by one or more of the following measures:
● Reorient or relocate the receiving antenna.
● Increase the separation between the equipment and receiver.
● Connect the equipment into an outlet on a circuit different from that to which the receiver is connected.
● Consult the dealer or an experienced radio/TV technician for help.
XYZprinting is not responsible for any radio or television interference caused by using other than recommended cables and connectors
or by unauthorized changes or modications to this equipment. Unauthorized changes or modications could void the user's authority to
operate the equipment.
This device complies with Part 15 of the FCC Rules. Operation is subject to the following two conditions: (1) this device may not cause
harmful interference, and (2) this device must accept any interference received, including interference that may cause undesired operation.
This device complies with FCC radiation exposure limits set forth for an uncontrolled environment and it also complies with Part 15 of the
FCC RF Rules. This equipment must be installed and operated in accordance with provided instructions and the antenna(s) used for this
transmitter must be installed to provide a separation distance of at least 20 cm from all persons and must not be co-located or operating
in conjunction with any other antenna or transmitter. End-users and installers must be provided with antenna installation instructions and
consider removing the no-collocation statement.
P25P25
Page 26
PartPro200 xTCS
Touchscreen-Menü, Funktionen und Meldungen 7
Die Anleitung soll Nutzer vorwiegend mit der richtigen Bedienung
des 3D-Druckers PartPro200 xTCS („200 xTCS“) vertraut machen.
In dieser Anleitung erfahren Nutzer mehr über Bedienungshinweise,
Anwendungsmöglichkeiten und Wartung des 3D-Druckers 200 xTCS.
Siehe Support. http://support.xyzprinting.com, um das
neueste Handbuch & die neueste Software für eine besser
Benutzererfahrung herunterzuladen.
Neumitglieder müssen ein Konto auf der Website anmelden,
bevor sie auf diese Ressourcen zugreifen können.
Bedienungsanleitung
Sicherheitsmaßnahmen 2
Produktbeschreibung 3
Auspacken und Installieren 5
Funktionsbedienung und Anweisungen 8
Printing (Druck) 21
Scannen 22
Einzelheiten zum Kundendienst 25
DEU
Weitere Informationen zum 3D-Drucker 200 xTCS und zur
vollständigen XYZprinting-Produktreihe erhalten Sie von Ihrem
örtlichen Händler oder der ofziellen Webseite von XYZprinting.
Page 27
Sicherheitsmaßnahmen
Sicherheit und Konformität
Bitte lesen Sie diese Anleitung und sämtliche Sicherheitshinweise sorgfältig, bevor Sie dieses Produkt auspacken, benutzen, bedienen, warten oder ein Teil davon ersetzen oder entfernen. Beachten Sie zudem alle sicherheitsrelevanten Anweisungen.
CAUTION
Wichtige Sicherheitsmaßnahmen
●
Transportieren Sie das Gerät nicht eigenhändig. Es ist sehr schwer.
●
Stellen Sie den Drucker nicht an sehr staubigen oder feuchten Orten bzw. im Freien auf.
●
Stellen Sie den Drucker nicht auf einen weichen oder geneigten Untergrund. Andernfalls könnte das Gerät umkippen /
herunterfallen und beschädigt werden oder Verletzungen verursachen.
●
Lassen Sie Produkt oder Netzkabel nicht unbeaufsichtigt in der Nähe von Kindern. Andernfalls können Verletzungen und
Stromschläge auftreten.
●
Verwenden Sie nur das mitgelieferte Netzkabel. Andernfalls könnte eine unsachgemäße Erdung Schäden verursachen.
●
Stellen Sie niemals mit Flüssigkeit gefüllte Behälter auf das Produkt. Flüssigkeit kann auslaufen oder verschüttet werden,
so in das Gerät gelangen und eine gefährliche Situation verursachen.
●
Wischen Sie den Drucker nicht mit Alkohol oder entammbaren Chemikalien ab. Andernfalls drohen gefährliche
Situationen.
●
Bewegen Sie das Gerät nicht, während es eingeschaltet ist.
●
Greifen Sie im Betrieb nicht mit den Händen in das Gerät. Andernfalls drohen Gefahren durch bewegliche Druckerteile und
Verbrennungen aufgrund hoher Temperaturen.
●
Das Gerät wird im Betrieb heiß. Berühren oder ersetzen Sie Teile erst, wenn Sie abgekühlt sind.
●
Nach dem Start können sich Teile im Gerät je nach Anweisungen des Bedieners erhitzen oder bewegen. Berühren oder
blockieren Sie im Betrieb keine Teile.
●
Während des Drucks können leichte Gerüche auftreten. Zur Gewährleistung Ihres Wohlbendens sollten Sie in einem gut
belüfteten, offenen Bereich arbeiten.
●
Reparaturen müssen entsprechend den Anweisungen in dieser Bedienungsanleitung durchgeführt werden. Wenn ein
Defekt nicht behoben werden kann, wenden Sie sich bitte an Ihren Druckerhersteller oder den Kundendienst.
Heavy object.
2 person lift
required
Watch Your Hands.
Marken
Alle Marken und eingetragenen Marken sind das Eigentum ihrer jeweiligen Inhaber.
Wartung und Reparatur
Wenn der Drucker im Rahmen der Garantie repariert werden muss, müssen Sie das Gerät vor dem Versand in der
Originalverpackung verpacken. Daher sollten Sie das Verpackungsmaterial nach Möglichkeit aufbewahren. Falls stattdessen andere Verpackungsmaterialien genutzt werden, kann der Drucker während des Transport beschädigt werden. Wir
behalten uns das Recht vor, in diesem Fall entsprechende Gebühren zu erheben.
P2P2
P2
Page 28
Produktbeschreibung
Produktaufbau
1. 5-Zoll-Farb-Touchscreen 2. Automatisches Zuführungsmodul 3. Druckkopf
4. Druckplatte + abnehmbarer EZ-Gummimagnet 5. Scan-Modul 6. Filamentspulenhalter
7. USB-Port 8. USB-Port (WLAN-Dongle) 9. Ein-/Ausschalter
10. USB-Port (an PC) 11. Netzanschluss
1
2
5
3
6
4
7
8
9
10
11
P3P3
P3
Page 29
Produktbeschreibung
Prüiste zum Zubehör
1. Bedienungsanleitung 5. USB-Kabel 9. PC-Mylar x 2 13. Transparenten Schlauch
2.
USB-Laufwerk 6. Abnehmbarer EZ-Gummimagnet 10. Plattenklebeband 14. Kalibrierungsplatte
3. 3D Color-inkjet PLA 7. Obere Abdeckung 11. WLAN-Dongle 15. Schattierungsplatte
4. Netzkabel 8. Führungsschlauch 12. Handschuhe (ein Paar)
1 2 3 4
9 10
11
12
5 6
13 1514
7 8
Warnhinweise und Anweisungen zu Wartungswerkzeugen
Die folgenden Werkzeuge dürfen nur von oder unter Aufsicht eines Erwachsenen verwendet werden. Halten Sie die Werkzeuge von Kindern fern, die nicht damit vertraut sind.
Schaber
31 2 4 5
●
Achten Sie darauf, die Wartungsarbeiten des Druckers erst auszuführen, wenn die Druckplatte abgekühlt ist.
●
Wenn der Druck abgeschlossen und die Druckplatte auf Zimmertemperatur abgekühlt ist, kann das gedruckte Objekt mit dem Schaber
von der Druckplatte entfernt werden.
●
An Druckkopf und Zahnrädern des Druckmoduls können während des Drucks erzeugte Filamentreste haften. Dies kann Druckqualität
und Druckerbetrieb sowie die Messung der Druckplatte beeinträchtigen. Reinigen Sie das Druckmodul in diesem Fall mit der
Drahtbürste.
1.
Drahtbürste
2.
Zahnrad-Reinigungsbürste
3.
Reinigungsdraht für Zufuhröffnung
4.
Reinigungsdraht für Druckkopf
5.
Technische Daten
Printing (Druck)
Drucktechnologie 2D-Muster: Tintenstrahldruck
3D-Struktur: Fused Filament Fabrication (FFF)
Abmessungen und Gewicht
Abmessungen (B x T x H) 600* 581* 640 mm
Nettogewicht 32 Kg
Bruttogewicht 43 Kg
Leistung
Druckabmessungen (B x T x H)
Dicke der gedruckten Schicht 0.1 mm ~0.4 mm
Ausrichtungsgenauigkeit X/Y : 0.0125 mm
Automatische Kalibrierung YES (Ja)
Automatische Zuführung YES (Ja)
Autonomer Ofine-Druck YES (Ja)
Einfarbiger Druck (ohne Tintenstrahldruck)
200 x 200 x 150 mm
Vollfarbiger Druck
185 x 185 x 150 mm
Materialien
3D-Druckmaterialien 3D Color-inkjet PLA, PLA, Tough PLA, PETG
Filamentdurchmesser 1.75 mm
Tintentyp CMYK-Patrone mit separaten Farben
Hardware
Druckkopfdurchmesser 0.4mm
Nutzerschnittstelle Farbiger 5-Zoll-Touchscreen
Druckplatte Nicht erhitzt, abnehmbar
Übertragung USB-2.0-Laufwerk / USB-Kabel /
kabellose Übertragung
Software
Nutzersoftware XYZmaker
Unterstütztes Dateiformat AMF, OBJ, STL, XYZ Format (.3w), .3CP, .3MF
Betriebssystem Mac OS X 10.10 / 10.11 / 10.12
Windows 7/8/10 (64-bit)
Temperature (Temperatur)
Betriebstemperatur des Gerätes 15-30°C
Lagerungstemperatur der Patrone 15-35°C
Lagerungstemperatur des Filaments 0-38°C
P4P4
P4
Page 30
Auspacken und Installieren
1
Stellen Sie den Drucker auf einen Tisch
oder eine Plattform.
(Transportieren Sie das Gerät nicht
eigenhändig. Es ist sehr schwer.)
2
Entfernen Sie Plastikfolie und PP.
3
Entfernen Sie die Verpackungsmaterialien, den Karton mit der oberen Abdeckung, den Zubehörkarton und die Kunststoffabdeckung.
4
5
6
Entfernen Sie das Klebeband am
Gehäuse (insgesamt 4 Stück).
7
Entfernen Sie den Schaumstoff
am Patronenhalter.
Die Frontklappe öffnen und das Klebeband an der Markierung
der Druckklappenposition entfernen.
8
Entfernen Sie den Schaumstoff neben den Führungsschrauben an beiden Seiten, entfernen Sie dann
den Schaumstoff unter der Druckplatte.
9
Entfernen Sie Kabelbinder und Schaumstoff an der Vorder- und
Rückseite der vorderen Klappe.
Öffnen Sie die vordere Klappe.
Entfernen Sie das Klebeband von
Stützmaterial und Druckplatte.
P5P5
P5
Page 31

Auspacken und Installieren
10
Stellen Sie sicher, dass ein Ende des Führungsschlauchs (Zubehör 8) fest in die Öffnung am Druckmodul eingesteckt
ist, stecken Sie dann das andere Ende in den transparenten Schlauch (Zubehör 13) am Ende.
11
Führen Sie das Führungsrohr durch die obere Abdeckung und
setzen Sie diese dann wieder auf die Maschine.
13
Bitte befolgen Sie die auf den Bildern beschriebene Reihenfolge und
befestigen Sie das PC-Mylar (Zubehör 9) und das Plattenklebeband
(Zubehör 10) auf dem abnehmbaren EZ-Gummimagnet (Zubehör 6)
Plattenklebeband
PC Mylar
Abnehmbarer
EZ-Gummimagnet
14
12
Stecken Sie das andere Ende des Führungsschlauchs in das
Zuführungsmodul und sichern Sie es.
Stellen Sie sicher, dass der Gummimagnet richtig auf der Druckplatte
platziert ist.
Vorsichtsmaßnahmen
1. Prüfen, ob die Kalibrierungs schrauben
der Druckplatte klemmen.
2. Die Druckplatte mit beiden Daumen
nach oben drücken, um die Kalibrierungsschraube zu lösen.
Hinweis
Am Gummimagnet ist eine
PC-Folie mit doppelseitigem
Klebeband angebracht. Diese
PC-Folie kann ersetzt werden.
Tauschen Sie sie aus, falls sie
schmutzig oder beschädigt ist.
P6P6
P6
Page 32

Touchscreen-Menü, Funktionen und Meldungen
Hauptbildschirm
Filament/Tinte
laden und entladen
Dies beinhaltet Optionen zum
Laden und Entladen von Filament
und Tinte.
USB-Druckmenü
Über dieses Menü können Sie
Dateien (.3cp) zum Drucken ohne
Computer von einem USB-Laufwerk
auf das Gerät importieren.
Einstellungen
Dies beinhaltet die Funktionen der
Startseite 1:
Einstellungen zu Print-Bed (Druckplatte), Print-Head(Druckkopf),
Filament, Ink (Tinte) und Scan
Module(Scan-Modul).
Nächste Seite enthält
WiFi (WLAN), Sound (Ton), Statistics (Statistik), Language (Sprache),
Display (Anzeige) und Door Lock
(Klappenverriegelung).
Die letzte Seite enthält Model (Mod-
ell), Version, Reset (Rücksetzen)
und Legal Info (Rechtliche Informa-
tionen).
P7P7
P7
Page 33

Funktionsbedienung und Anweisungen
A. Filament laden/entladen
A1
1. Das Filament mit einem 45 GradWinkel abschneiden, bevor es
automatisch in den Drucker geladen
wird. Während des Vorgangs zum
Laden des Filaments sollte das
Filament am Ende mindestens 4”
gerade sein, wie in den Bildern
dargestellt.
5. Tippen Sie auf „Load (Laden)“. 6. Bestätigen Sie den Vorgang. 7. Stecken Sie das Filament in das Zuführungsmodul. Es wird automatisch geladen.
Filament
Filament laden
2. Platzieren Sie das Filament im
Spulenhalter.
Das Filament muss
sich beim Ziehen im
Hinweis
Uhrzeigersinn drehen.
3.Tippen Sie am Hauptbildschirm
auf „Filament Load and Unload
(Filament laden und entladen)“ und
wählen Sie Filament.
4. Tippen Sie auf „Filament“.
8. Prüfen Sie, ob die Temperatur des Druckkopfs auf 210 °C steigt (farbiges PLA von XYZprinting), nachdem
das Filament geladen wurde. Sobald die eingestellte Temperatur erreicht wurde, führt der Zuführungsmotor das
Filament durch den Führungsschlauch in den Druckkopf ein.
Filament entladenA2 Filament
1. Tippen Sie am
Hauptbildschirm auf „Filament
Load and Unload (Filament
laden und entladen)“.
5. Tippen Sie nach Abschluss
des Entladens zum Bestätigen.
2. Tippen Sie auf „Unload
(Entladen)“ und bestätigen Sie
den Vorgang.
3. Bestätigen Sie den Vorgang. 4. Wenn sich der Druckkopf auf
9. Sobald das Filament am
Druckkopf extrudiert wird, wurde das
Filament erfolgreich geladen. Tippen
Sie zum Bestätigen und Fortfahren
auf den Bildschirm.
220 °C erwärmt hat, gibt der
Zuführungsmotor das Filament
aus.
P8P8
P8
Page 34

Funktionsbedienung und Anweisungen
A3 Filament
Material auffüllen
200 xTCS fordert Sie zum Auffüllen von Material auf.
1. Tippen Sie beim Drucken auf das
Symbol.
5. Ersetzen Sie die leere Spule durch eine neue. (Bitte beachten Sie den
Abschnitt zum Laden in dieser Anleitung.) Tippen Sie dann auf „PROCEED
(Fortfahren)“.
2. Der Bildschirm zeigt den
Filamentstatus. Tippen Sie auf „Rell
(Auffüllen)“.
3. Bestätigen Sie den Vorgang.
6. Die Düse wird aufgeheizt und Sie werden benachrichtigt, sobald Sie
Filament in das Zuführungsmodul stecken sollen.
4. Die Düse wird erhitzt und das
Filament wird automatisch entladen.
7. Das Filament wird automatisch
geladen.
B. USB-Druck
1. Prüfen Sie, ob das USB-Laufwerk
an das Gerät angeschlossen ist.
5. Der Bildschirm zeigt den
Fortschritt des Drucks in Prozent.
Unter dem Prozentsatz werden
Pause, Stop (Stopp) und Rell
(Auffüllen) angezeigt.
B1
Drucke entnehmen
8. Prüfen Sie, ob Filament aus der Düse extrudiert wird. Nach der
Bestätigung setzt der Drucker den Druck fort.
2. Tippen Sie am Hauptbildschirm
auf das USB-Druckmenü.
3. Wählen Sie die Datei, die Sie
drucken möchten.
Hinweis
Die vordere Klappe ist
beim Drucken standardmäßig
verriegelt. Wenn Sie diese
Einstellung ändern möchten,
rufen Sie Setting (Einstellung) >
Door Lock (Klappenverriegelung)
auf.
4. Prüfen Sie die Dateiinformationen
und tippen Sie auf „Print (Drucken)“.
Den abnehmbaren EZ-Gummimagneten zusammen mit dem gedruckten Objekt vom Drucker entnehmen.
Das gedruckte Objekt vom Gummimagneten abziehen.
Den LED-Streifen des
Druckers nicht berühren,
da der LED-Streifen durch
die lange Zeit mit eingeschaltetem Licht heiß sein
wird.
P9P9
P9
Page 35

Funktionsbedienung und Anweisungen
C. Tintenpatrone installiert
Der 200 xTCS nutzt vier Farbtinten, die separat ersetzt werden können.
Tintenführung
1. Halten Sie einige Papiertücher und
die Tintenpatrone bereit.
4. Drücken Sie den Patronenkopf gegen
das Papiertuch, damit etwas Tinte
darauf übertragen wird.
7. Falls die Tinte nicht richtig übertragen
wurde, feuchten Sie das Papiertuch
zum Abwischen der Tinte bitte mit
75-prozentigem Alkohol an. Prüfen Sie
nach Reinigung der Tintenstrahldüse,
ob die Tinte richtig übertragen wird.
2. Packen Sie die Tintenpatrone aus.
5. Falls die Tinte nicht richtig übertragen
wurde, versuchen Sie, das Papiertuch
auf den Tisch zu legen und den
Patronenkopf auf das Papiertuch
gedrückt zu halten.
3. Entfernen Sie die Patronenabdeckung.
6. Prüfen Sie, ob die auf das Papiertuch
übertragene Tinte zwei gerade Linien
anzeigt. Falls ja, ist die Tintenführung
erfolgreich abgeschlossen. Sobald
die Tintenführung durchgeführt
wurde, können Sie die Tintenpatrone
installieren.
Hinweis
Um zu verhindern, dass die geöffnete Tintenpatrone austrocknet, wenn
ein Druck abgeschlossen ist oder der Drucker mehrere Tage lang nicht
benutzt wird, sollten Sie die Patrone wie folgt lagern:
1. Die Düse der Tintenpatrone mit Alkohol reinigen.
2. Die Tintenpatrone mit ihrer Schutzfolie abdecken und die Patrone bei
Raumtemperatur (15 bis 35 Grad) lagern.
Zum Erzielen der besten Druckqualität sollten Sie die Düse der
Tintenpatrone nach dem Entfernen der Schutzfolie von der Patrone mit
Alkohol reinigen und die Patrone dann wieder in den Drucker einsetzen,
bevor Sie mit dem Drucken beginnen.
P10P10
P10
Page 36

Funktionsbedienung und Anweisungen
Tippen Sie auf die Tinte und
der Bildschirm zeigt den
zugehörigen Status, wie „Ink
Low (Tintenstand gering)“, „No
Ink (Keine Tinte)“ oder „Invalid
Ink (Ungültige Tinte)“.
C1
1. Tippen Sie auf „Change Ink
(Tinte wechseln)“. Tippen Sie
dann zum Bestätigen.
Ink (Tinte)
1
4
Change Ink (Tinte wechseln)
2. Bestätigen Sie den Vorgang.
2
5
3
6
3. Warten Sie, bis sich die Patrone
in die Mitte der Druckplatte
bewegt hat. Wechseln Sie die
Patrone anschließend.
Patrone installieren
1. Heben Sie die Platte nach oben.
2. Nehmen Sie die Patrone heraus.
3. Setzen Sie eine neue Patrone ein.
4. Prüfen Sie, ob die Patrone richtig platziert ist.
5. Drücken Sie die Platte nach unten.
6. Prüfen Sie die Reihenfolge der Tintenfarben.
Sie muss von links nach rechts wie folgt sein:
K (Schwarz), C (Cyan), M (Magenta) und Y
(Gelb).
Hinweis: Bei Austausch einer Tintenpatrone bitte
den Tintenstrahl-Kalibrierungstest durchführen.
4. Tippen Sie nach dem
Wechsel auf „PROCEED
(Fortfahren)“.
P11P11
P11
Page 37

Funktionsbedienung und Anweisungen
C2-1 Ink (Tinte)
Wir empfehlen, nach Installation der Tintenpatrone eine Testseite zu drucken. Bitte bereiten Sie ein Blatt Papier vor.
(Kalibrierung)“.
4. Den abnehmbaren EZ-Gummimagneten herausnehmen.
Das A4 mit einem Klebeband in
Hochformat an der Vorderseite
des Gummimagneten befestigen.
Calibration (Kalibrierung) Test Page (Testseite)
2. Tippen Sie auf „Test Page
(Testseite)“.
5. Das A4 Papier so glattziehen,
dass es ach (ohne Lücke) am
Gummimagneten anliegt.
. Test Page.1. Tippen Sie auf „Calibration
3
6. Das restliche A4 Papier fest an die Rückseite des Gummimagneten falten.
Paper Test Page
7. Den Gummimagneten wieder
entsprechend an der Druckplatte einsetzen.
1. Sie können sich auch
entscheiden, die "PLATestseite" zu drucken, um den
Tintenstatus zu bestätigen.
5. Bestätigen, ob der
Druckauftrag abgeschlossen
wurde.
8. Befestigen Sie das Papier auf
der Druckplatte, tippen Sie dann
auf „PROCEED (Fortfahren)“
und der Drucker führt einen
Testdruck durch.
Calibration (Kalibrierung) Test Page (Testseite)C2-1 Ink (Tinte)
2. "PLA-Testseite" tippen, um
zu drucken.
6. Druckobjekt herausnehmen
und die Farbgebung überprüfen.
9. Entfernen Sie die Testseite
und tippen Sie auf „PROCEED
(Fortfahren)“.
3. Warten Sie, bis sich der
Extruder auf Betriebstemperatur
erwärmt hat.
PLA Test Page
4. "PLA-Testseite" wird
gedruckt.
P12P12
P12
Page 38

Funktionsbedienung und Anweisungen
Tintenkalibrierung
Bild 1 Bild 2 Bild2-1
Bild 1 zeigt ein Beispiel einer
normalen Testseite.
Bild 3
Bild 3 zeigt ein Beispiel einer schlechten Testseite.
Waagerecht und senkrecht ziehen sich
Farbbalken.
Bitte die nachfolgenden Schritte durchführen.
Bild 2 zeigt einen leichten Farbversatz im waagerechten Teil der
Testseite. Dieser liegt im akzeptablen Bereich. Wenn der Druck
auf der Testseite schlechter wird,
das Reinigungsverfahren durchführen.
Fehlersuche TintenpatroneC2-2 Ink (Tinte)
Bild 2-1 zeigt eine leicht
schwarze Tintenverwischung im
waagerechten & senkrechten Teil,
das kann auch bei einer anderen
Farbe der Fall sein.
Sie liegt im akzeptablen Bereich.
Schritt 1
Patrone wieder installieren und Testseite drucken.
Wenn das Problem nicht behoben ist, mit Schritt 2
fortfahren.
Schritt 2
Prüfen, dass kein gerissener Draht oder ein beschädigter Kontaktblock vorhanden ist, wie im
Beispiel gezeigt.
Wenn der Draht gerissen ist, eine neue Patrone
einsetzen.
Wenn der Kontaktblock und der Pin in der Patronenstation beschädigt sind, den Support bezüglich eines
Austauschs kontaktieren.
NG Patrone (gerissener
Draht & Block)
Hinweis: Auf unserer Website ndet man das
neueste Patronenreinigungsverfahren.
Siehe C2-1, um die A4-Testseite vorzubereiten.
Normale Patrone
Schritt 3
Prüfen, ob der Tintenpatronenkopf eventuell verstopft ist, wie im gezeigten Beispiel.
Bitte Patronenreinigungsverfahren von Seite 10
Abschnitt Tintenführung durchführen.
Wenn das Problem nicht behoben ist, mit Schritt 4
fortfahren.
Druckkopf reinigen
Schritt 4
Mit einem Papiertuch die
Tintenpatrone abdecken, wie
in Bild 4 dargestellt, und nach
unten halten.
Wenn die Tinte herausläuft,
die Testseite drucken.
Wenn das Problem nicht behoben ist, eine neue Tintenpatrone einsetzen.
Verstopfter/verschmutz-
ter Druckkopf
P13P13
P13
Page 39

Funktionsbedienung und Anweisungen
C2-3 Ink (Tinte)
(Kalibrierung)“.
5. Prüfen Sie das gedruckte
Kalibrierungsdiagramm anhand
der Bildschirmanweisungen.
Wählen Sie bei jeder Farbe
die Linie, die am besten an
Schwarz (K) ausgerichtet ist.
Calibration (Kalibrierung) Color Calibration (Farbkalibrierung)
2. Tippen Sie auf „Color
(Farbe)“.
6. Geben Sie bei der
horizontalen Ausrichtung die
entsprechende Nummer jeder
Farbe ein. Tippen Sie nach
Eingabe der Nummer auf
„PROCEED (Fortfahren)“.
3. Bitte befestigen Sie das Druckpapier auf der Druckplatte.1. Tippen Sie auf „Calibration
4. Nehmen Sie das bedruckte
Papier heraus und tippen Sie
auf „PROCEED (Fortfahren)“.
7. Geben Sie bei der vertikalen
Ausrichtung die entsprechende
Nummer jeder Farbe ein.
Tippen Sie nach Eingabe
der Nummer auf „PROCEED
(Fortfahren)“.
8. Bestätigen Sie die in
den Feldern eingegebenen
Nummern und tippen Sie auf
„PROCEED (Fortfahren)“.
Calibration (Kalibrierung)
1. Tippen Sie auf „Inkjet
Calibration (Tintenkalibrierung)“.
Vorsicht: Bitte sicherstellen, dass der abnehmbare EZ-Gummimagnet an der Druckplatte angebracht ist.
5. Der Drucker druckt die
Kalibrierungskarte automatisch.
Dies dauert etwa 15 Minuten.
(Stellen Sie sicher, dass Sie
das Filament geladen haben.)
2. Inkjet Calibration.
Inkjet Calibration (Tintenkalibrierung)C2-4 Ink (Tinte)
3. Stellen Sie sicher, dass
sich nichts auf der Druckplatte
bendet.
6. Nehmen Sie die
Kalibrierungskarte nach
Abschluss des Drucks heraus.
4. Der Druck beginnt, sobald
sich die Druckdüse erwärmt
hat.
7. Suchen Sie horizontal und
vertikal nach dem Kästchen,
in dem die Tinte am stärksten
ausgerichtet ist, und tippen Sie
auf „PROCEED (Fortfahren)“.
8. Vertikale Ausrichtung: Geben
Sie die Nummer des Kästchens
ein, von dem Sie denken, dass
Filament und Tinte am stärksten
ausgerichtet sind, und tippen Sie
dann auf „PROCEED (Fortfahren)“.
9. Horizontale Ausrichtung: Geben
Sie die Nummer des Kästchens
ein, von dem Sie denken, dass
Filament und Tinte am stärksten
ausgerichtet sind, und tippen Sie
dann auf „PROCEED (Fortfahren)“.
10. Tippen Sie nach Abschluss
der Kalibrierung zum Fertigstellen
auf „PROCEED (Fortfahren)“.
P14P14
P14
Page 40

Funktionsbedienung und Anweisungen
C2-4 Ink (Tinte)
1.Wenn Sie eine Farbverschiebung nden, nachdem das
Farbobjekt gedruckt wurde, können Sie die Druckposition manuell
anpassen.
Y-Axis
X-Axis
2. Die Einstellposition der
X-Achse und der Y-Achse war
die Probeposition, wenn man
dem Drucker zugewandt ist.
Calibration (Kalibrierung) Inkjet Calibration (Tintenkalibrierung)
Manuelle Einstellung der
X-Achsen-Bewegung
“X-ACHSE” wählen, um nach
rechts und links zu bewegen.
Die Taste “Links” oder “Rechts”
drücken, um die einzustellen-
de Richtung und den Abstand
auszuwählen; jede Anpassung
bedeutet einen Schritt von 0,05
mm.
Manuelle Einstellung der
Y-Achsen-Bewegung
“Y-ACHSE” wählen, um nach
oben und unten zu bewegen.
Die Taste “Aufwärts” oder
“Abwärts” drücken, um die
einzustellende Richtung und
den Abstand auszuwählen;
jede Anpassung bedeutet einen
Schritt von 0,05 mm.
Sobald die
Parametereinstellungen
abgeschlossen sind, auf
"WEITER" tippen, um die
spezizierten Einstellungen zu
speichern und anzuwenden.
Wenn Sie zurücksetzen
möchten, “erneut eingeben”
auswählen, um zur Einstellung
der X-Achsen-Bewegung zurückzukehren.
P15P15
P15
Page 41

Funktionsbedienung und Anweisungen
D. Einstellungen
D1
D2
D3
D1-1
1. Wählen Sie Calibration
(Kalibrierung).
3. Warten Sie, während der Sensor die Höhe der Druckplatte an drei verschiedenen Positionen misst.
Sobald die Messung abgeschlossen ist, gleicht der Drucker die Druckplatte automatisch aus.
Vorsicht: Bitte sicherstellen, dass der abnehmbare EZ-Gummimagnet an der Druckplatte angebracht ist.
Print-Bed (Druckplatte)
2. Bestätigen Sie den Vorgang.
D4
D6
D8
D5
D7
D9
Druckplatte kalibrieren (ausgleichen)
D10
4. Tippen Sie nach erfolgreicher
Kalibrierung zur Bestätigung.
D1-2 Print-Bed (Druckplatte)
1. Tippen Sie auf „Z-offset
(Z-Versatz)“.
2. Bewegen Sie den Druckkopf
in die Mitte der Druckplatte. Der
Abstand sollte so sein, dass
sich Druckkopf und Druckplatte
ganz knapp berühren, sodass
sich die Düse mühelos auf der
Druckplatte bewegen kann.
Z-offset (Z-Versatz)
3. Sie können das Symbol zum
Erhöhen oder Absenken der
Druckplatte antippen. Je höher
der Wert, desto größer der
Abstand und umgekehrt.
Jog-ModusD1-3 Print-Bed (Druckplatte)
Der Jog-Modus ermöglicht die manuelle Bewegung des Druckkopfs über den
Touchscreen.
So bewegen Sie den Druckkopf:
1. Setzen Sie Kopf auf die Startposition zurück. Setzen Sie ihn vor Bewegung in
eine beliebige Richtung immer auf die Startposition zurück.
2. Führen Sie die Bewegung entlang der X-Achse aus.
3. Führen Sie die Bewegung entlang der Y-Achse aus.
4. Führen Sie die Bewegung entlang der Z-Achse aus. (Wenn der Druckkopf in
der Ausgangsposition ist, nicht erhöhen/nach oben schieben, um die Druck-
platte nicht zu berühren.)
32 4
1
P16P16
P16
Page 42

Funktionsbedienung und Anweisungen
D2-1
1. Bitte reinigen Sie die Düse nach
60 Druckstunden.
Print-Head (Druckkopf)
2. Tippen Sie im Druckkopfabschnitt
auf „Clean Nozzle (Düse reinigen)“.
Düse reinigen
3. Prüfen Sie, ob eine Reinigung erforderlich ist. Tippen Sie zum Reinigen
auf „Check (Prüfen)“.
Sobald die Temperatur des Druckkopfs Betriebstemperatur erreicht, beginnt die Reinigung.
Hinweis: Berühren Sie den Metallteil des Druckkopfs nicht, da dieser während des Betriebs heiß wird.
4. Stecken Sie den Reinigungsdraht
in die Zufuhröffnung und drücken
Sie ihn zur Beseitigung des
Filaments im Druckkopf nach unten.
(Sie sollten diesen Vorgang von der
Oberseite des Gerätes durchführen.)
Damit die Druckqualität nicht durch Ausgabeprobleme aufgrund von Filamentresten nach langfristiger Benutzung der
Hinweis
Druckdüse beeinträchtigt wird, sollten Sie die Funktion „CLEAN NOZZLE“ (DUESE REINIGEN) (Düsenreinigung) alle 60
Betriebsstunden ausführen und angesammelte Reste mit dem Düsenreinigungsdraht oder Zufuhrpfad-Reinigungsdraht
entfernen. (Filament sollte vor der Reinigung des Zufuhrpfades aus dem Extruder entladen werden.)
5. Entfernen Sie Filamentreste am
Druckkopf mit einer Drahtbürste.
6. Stecken Sie den Reinigungsdraht
des Druckkopfs zur Reinigung von
unten in die Düse.
7. Tippen Sie nach Abschluss der
Reinigung auf „DONE (Fertig)“.
1. Tippen Sie auf „Change Nozzle
(Düse wechseln)“.
5. Schalten Sie das Gerät vor dem
Druckkopfwechsel aus.
2. Tippen Sie zur Bestätigung, dass
Sie die Düse tauschen möchten.
6. Wechseln Sie den Druckkopf von
oberhalb des Gerätes.
Installation des neuen Druckkopfs:
1. Verbinden Sie den Bus.
2. Drücken Sie die weiße Freigabetaste am Druckkopf
und montieren Sie Druckkopf und Mechanismus.
Prüfen Sie nach Anbringung des Druckkopfs, dass
er sicher sitzt und nicht wackelt.
3. Schalten Sie den Drucker ein und benutzen Sie ihn.
Düse wechselnD2-2 Print-Head (Druckkopf)
3. Warten Sie, bis sich der Druckkopf
an eine für den Wechsel geeignete
Position bewegt.
7. Drücken Sie zum Trennen des
Druckkopfs die weiße Freigabetaste.
4. Die Position des
Druckkopfwechsels wird oben
gezeigt.
8. Halten Sie den Druckkopf mit
einer Hand und entfernen Sie den
Bus mit der anderen Hand. Damit
ist die Entfernung des Druckkopfs
abgeschlossen.
P17P17
P17
Page 43

Funktionsbedienung und Anweisungen
Filament
D3
Beachten Sie die Funktion Change Filament (Filament wechseln) am Hauptbildschirm. Filament, das einen Tag oder länger nicht benutzt
wird, sollte in einem Beutel mit Reißverschluss aufbewahrt werden.
WLAN
D4
Bitte schließen Sie vor dem Anstellen
des Druckers und vor der WLANEinrichtung den WLAN-Dongle an
den USB-Port an der Oberseite des
Druckers an.
1. Tippen Sie auf „ADD
(Zufügen)“ und der Drucker
beginnt mit der Suche nach
verfügbaren Zugangspunkten.
2. Tippen Sie auf den
gewünschten Zugangspunkt.
3. Geben Sie das Kennwort des
Zugangspunkts ein.
4. Bestätigen Sie den
Verbindungsaufbau.
Bestätigen Sie mit Hilfe von XYZmaker, ob die WLAN-Verbindung erfolgreich hergestellt wurde
●
Verbinden Sie den Drucker über ein USB-Kabel mit dem Computer und führen Sie XYZmaker aus.
●
Prüfen Sie, ob die WLAN-Funktion am Computer aktiviert ist, und stellen Sie eine Verbindung zum
Zugangspunkt her.
1. Führen Sie XYZmaker aus. Tippen Sie auf „File“ > „Print “ > „da Vinci
Printer Plugin“.
2. Wählen Sie den gewünschten Drucker.
3. Wenn die Software „READY (Bereit)“
anzeigt, wurde die Verbindung
erfolgreich hergestellt. Nun können
Sie zur Überwachung des Druckers
auf „DASHBOARD (Dashboard)“ oder
zum Drucken einer Datei auf „PRINT
(Drucken)“ tippen.
DASHBOARD (Dashboard):
Sie Druckkopftemperatur, verwendetes Fila-
ment und Laden/Entladen von Filament.
Überwachen
PRINT (Drucken):
rameter und -qualität ein. Falls nur eine
Dateikonvertierung erforderlich ist, tippen
Sie auf „PREPARE (Vorbereiten)“.
Stellen Sie Druckpa-
P18P18
P18
Page 44

Funktionsbedienung und Anweisungen
Language (Sprache)
D5
Spracheinstellung ändern
Der 200 xTCS bietet acht Anzeigesprachen: Traditionelles Chinesisch, vereinfachtes Chinesisch,
Englisch, Japanisch, Deutsch, Italienisch, Spanisch
und Französisch. Die Spracheinstellung kann durch
Antippen von Settings (Einstellungen) > Languages
(Sprache) am Hauptbildschirm geändert werden.
Display (Anzeige)
D7
Die Einstellung Display (Anzeige) kann den Touch-
screen so kongurieren, dass er sich nach einer
bestimmten Zeit der Inaktivität abschaltet. Es gibt
fünf Einstellungen: Abschaltung nach einer Minute,
zwei Minuten, drei Minuten oder vier Minuten und
Deaktivierung der automatischen Abschaltung.
Sound (Ton)
D6
Die Option Sound (Ton) kann zur Steuerung des bei
Berührung des Touchscreens ausgegebenen Tons auf
ON (Ein) oder OFF (Aus) gesetzt werden.
Statistics (Statistik)
D8
Die Funktion Statistics (Statistik) kann Verlaufsdaten seit Einschaltung des Druckers aufzeichnen, wie:
Uptime (Betriebszeit)
Filament
Temperature (Temperatur)
Nozzle (Düse)
Print Job (Druckauftrag)
Last Calibration (Letzte Kalibrierung)
Ink Cartridge (Tintenpatrone)
P19P19
P19
Page 45

Funktionsbedienung und Anweisungen
Door Lock (Klappenverriegelung)
D9
1. Klappenverriegelung aktiv (ON (Ein))
: Beim Druck wird die Klappe verriegelt;
60 Sekunden nach Abschluss des
Drucks wird sie entriegelt. Die Klappe
wird entriegelt, wenn Sie während
des Drucks Pause oder Stop (Stopp)
antippen. Die Klappe wird erneut
verriegelt, wenn Sie sie schließen und
den Druck fortsetzen.
D10
Reset (Rücksetzen)
2. Klappenverriegelung inaktiv (OFF
(Aus)) : Die Klappe wird während des
Drucks sowie bei Pause oder Stopp
nicht verriegelt.
Druckerinformationen werden gelöscht
und auf die Werkseinstellungen
zurückgesetzt.
P20P20
P20
Page 46

Printing (Druck)
First-time printing (Erstmaliger Druck)
Sie können anhand der nachstehenden Schritte einen ersten Druck durchführen.
Calibration
(Kalibrierung)
D1-1 B C C A
Z-offset
(Z-Versatz)
D1-2
Load Filament
(Filament laden)
Change Ink
(Tinte wechseln)
(Kalibrierung)
(Testseite)
- Test Page
- Color Calibration
- Inkjet Calibration
(Farbkalibrierung)
(Tintenkalibrierung)
Calibration
Datei
vorbereiten,
dann Druck
ausführen
Zu druckende Dateien über die PC-Software „XYZmaker“ übertragen
Für Produktregistrierung und Software-Login ist ein Internetzugang erforderlich.
Verbinden Sie Drucker und Computer über ein USB-Kabel und installieren Sie „XYZmaker“ auf dem Computer. Anschließend können Sie die zu druckenden Dateien übertragen.
Der „XYZmaker“ ist mit den 64-bit Betriebssystemen von Windows, sowie Mac OS 10.10.10.11 und 10.12 kompatibel. Sie können
sie über das mitgelieferte USB-Laufwerk oder durch Herunterladen des Installationsprogrammes von der offiziellen XYZprinting-Webseite installieren. Die Bedienungsanleitung der Software können Sie ebenfalls von der ofziellen Webseite herunterladen.
Einzelheiten nden Sie auf der ofziellen Webseite: http://www.xyzprinting.com/
1. Verbinden Sie Computer und Drucker und wählen Sie PartPro200 xTCS.
2. Wählen Sie die zu druckende Modelldatei aus dem Ordner,
indem Sie auf OPEN (Öffnen) tippen. Sie können Objektgröße, Druckposition und Winkel anpassen, sobald die Datei
geladen ist. Drucken Sie farbige Objekte, indem Sie die zu
druckende Datei im OBJ-Format speichern und in XYZmaker
laden.
3. Sie können relevante Einstellungen ändern, damit das
gewünschte Druckergebnis erzielt wird.
4. Mit der Funktion Prepare (Vorbereiten) können Sie eine OBJDatei in eine .3cp-Datei umwandeln.
Sobald die Datei bearbeitet und angepasst wird,
klicken Sie zur Ausgabe des Objekts auf Print (Drucken).
Der Druckbetrieb beginnt nach Aufschichtung der Datei.
P21P21
P21
Page 47

Scannen
Montieren Sie das Scan-Modul in der Maschine (siehe Installationsschritte) und installieren Sie die „XYZscan Color“ Software auf Ihrem Computer, um die Scan-Funktion Ihres 3D-Druckers zu bedienen.
Richten Sie die Vorderseite des zu scannenden Objekts zum Scan-Modul hin aus und es wird etwa 10-15 Minuten dauern, es zu scannen. Wenn Sie ein Objekt scannen, dreht sich die Rotationseinheit im Uhrzeigersinn. Dabei nimmt die
Kamera am Scan-Modul eine durchgehende Serie von Bildern bei einer Geschwindigkeit von 30 Bildern pro Minute auf.
Wenn das Scannen abgeschlossen ist, zeigt „XYZscan Color“ das aufgenommene 3D-Bild als 3D-Bild an.
Produktübersicht
Scan-Modul
Hardwarevoraussetzungen
Betriebssysteme Windows 7, 8.1, 10 (64-bit)
Mindestsystemanforderungen
CPU 4. Generation Intel® Core™ i5
USB 2.0
8GB Festplatte oder mehr
Unterstützt die OpenGL 2.1 oder
höhere Grakkarte
Scan-Spezikationen
Scan-Technologie Photogrammetry 3D
Scan-Auösung
(Durchmesser x H)
Scan-Software XYZscan Color
Tragkraft der Rotationseinheit ≦ 3 Kg/6.6lbs
Auösung 5M pixel
Scan-Genauigkeit 1.48 mm
Dateitypen OBJ, STL
5cm ϕ x 5 cm – 14cm ϕ x 14 cm (H)
Installieren Sie das Scannermodule
Um das Scanmodul zu installieren, richten Sie es an der Scannerbasis aus, drücken und halten Sie die Taste und
befestigen Sie es vertikal an der Basis.
Scannermodule-Steckplatz Taste
Befestigen Sie das Scanmodul
vertikal an der Basis.
P22P22
P22
Page 48

Scannen
Begrenzungen für das zu scannende Objekt
Das Objekt sollte stabil und unbeweglich sein. Es darf während des Drehens der Rotationseinheit nicht gerüttelt oder
•
bewegt werden.
Der Scan-Bereich des Objekt-Modus beträgt 5 cm ϕ x 5 cm – 14 cm ϕ x 14 cm (H)
•
Das Objekt sollte nicht reektierend, transparent oder durchscheinend sein.
•
Ein Objekt mit einer reektierenden Oberäche, Metall oder einem transparenten Material hat Auswirkungen auf die
•
Druck-Qualität. Wenn Sie ein solches Objekt scannen möchten, wird empfohlen, das Entwickler-Spray oberächlichaufzusprühen, bevor Sie es scannen.
Die Scan-Qualität kann bei einfarbigen Objekten oder Objekten ohne merkliche Besonderheiten oder mit einem gro-
•
ßen Bereich in einer schlichten Form variieren.
Runde Objekte weisen gute Scan-Ergebnisse auf, während schmale und lange oder scharfe Objekte keine guten
•
Scan-Ergebnisse aufweisen werden.
Scan-Schritte - Installieren Sie die Schattierungsplatte
1. Entfernen Sie das Objekt von
der Rotationseinheit
Scan-Schritte
1. Wählen Sie das Scan-Modul
in den Einstellungen.
2. Warten Sie, bis sich die Rotationseinheit zurückgedreht hat.
an der Schattierungsplatte in
die Löcher und sichern Sie sie.
2. Leeren Sie die Drucker-Plattform.
3. Installieren Sie die Schattierungsplatte.
Verriegelungsrichtung.Stecken Sie beide Seiten unten
3. Installieren Sie die
Schattierungsplatte.
Die Installation der
Schattierungsplatte ist
abgeschlossen.
4. Warten Sie, bis die DruckerPlattform fertig ist.
5. Platzieren Sie das zu
scannende Objekt.
6. Das Objekt wird gescannt.
7. Wenn das Scannen
abgeschlossen ist, können Sie
den Scan-Auftrag beenden und
andere Aufträge ausführen.
P23P23
P23
Page 49

Scannen
Scan-Software: XYZscan Color bedienen
Stellen Sie sicher, dass die Scan-Backplane korrekt in Ihrem
3D-Drucker installiert ist und drücken Sie die "Scan" -Taste
auf dem LCM-Bedienfeld. Vergewissern Sie sich, dass der
Drucker in den Scan-Modus wechselt.
1. Öffnen Sie die Scan-Software.
2. Überprüfen Sie die Umgebungshelligkeit über das
Vorschaufenster. Passen Sie die vorläugen Einstellungen
an. Wenn kein Fehler gefunden wird, klicken Sie
„Scannen“, um den Vorgang auszuführen.
3. Im Modell-Vorschaubereich dreht sich das Modell langsam.
Warten Sie, bis die Scan-Punktewolken erstellt sind.
4. Warten Sie, bis die Scan-Punktewolken erstellt
sind. Drücken Sie Fortsetzen und führen Sie die
Gittererzeugung durch.
5. Das Scannen ist abgeschlossen.
1. Sie können unter guten Lichtverhältnissen eine
Hinweis
* Für Details zur Scan-Funktion siehe „XYZscan Color
Software-Bedienungsanleitung"
bessere Leistung erhalten.
2. Die Vorderseite des Objekts muss zum ScanModul hin ausgerichtet sein
Umgebungsabbildung
Scandrehscheibe Scan-Modul
Verwenden Sie die Kalibrierungsplatte
Wenn der Drucker umgestellt wird oder das Scan-Ergebnis nicht genau ist, befolgen Sie folgende Schritte, um das Scan-
Modul zu kalibrieren:
1. Entfernen Sie das Objekt von der Rotationseinheit.
2. Wählen Sie „Einstellungen“ > „Kalibrieren“ im Hauptmenü von „XYZscan Color“.
3. Verwenden Sie die Kalibrierungsplatte.
Wenn Sie der Bildschirm-Befehl auffordert, die Kalibrierungsplatte zu platzieren, befolgen Sie die Anweisungen und
platzieren Sie die Kalibrierungsplatte in der Mitte der Rotationseinheit. (Richten Sie die Seite mit dem Karomuster zum
Scan-Modul hin aus und lassen Sie dann die Verriegelung unten in der Aussparung in der Mitte der Rotationseinheit
einschnappen). Klicken Sie „Jetzt kalibrieren“ in der Software.
4. Überprüfen Sie, ob die Kalibrierungsplatte im Vorschaufenster richtig dargestellt wird. Wenn ja, klicken Sie „Kalibrieren“,
um die Kalibrierung durchzuführen.
5. Warten Sie, während XYZscan Color die Kalibrierung mit dem Drucker vornimmt (das dauert etwa 2 Minuten).
6. Wenn XYZscan Color anzeigt, dass die Kalibrierung abgeschlossen ist, entfernen Sie die Kalibrierungsplatte von der
Rotationseinheit.
7. Klicken Sie „Bestätigen“ in der Software, um die Funktion zu verlassen und mit dem Scannen fortzufahren.
P24P24
P24
Page 50

Einzelheiten zum Kundendienst
Bitte beachten Sie folgende Informationen zur Problemlösung, wenn ein Problem mit dem Drucker auftritt. Falls sich das Problem nicht
beheben lässt, wenden Sie sich bitte an den Kundendienst.
Problemcode und Handhabung
Wenn ein Problem mit dem Drucker auftritt, wird der Servicecode am Druckerbildschirm und/oder in der Softwareschnittstelle angezeigt.
Bitte beachten Sie zunächst die Beschreibung der Servicecodes.
Servicecode Symptom Maßnahme
OO11 Druckkopf heizt sich zu lange auf
OO14
OO30 Problem, X-Achse
OO31 Problem, Y-Achse
OO32 Problem, Z-Achse
OO50 Interner Kommunikationsfehler, Speicherfehler Drucker neu starten
OO52 Druckkopf-Speicherfehler Druckkopf ersetzen
Problem beim Erhitzen des Druckkopfs, Temperatur
überschritten
Flexibles flaches Kabel prüfen und neu starten
Kabel von Motor und Sensor und Position des
Sensors prüfen
OO55 Tintenstrahlkopf-Fehler Tintenstrahlkopf ersetzen
OO56 Tintenstrahl-Datenfehler Drucker neu starten
Wartung und Reparatur
Bewahren Sie das Originalverpackungsmaterial für den Fall einer Reparaturrücksendung während der Garantiezeit auf. Falls stattdessen
andere Verpackungsmaterialien genutzt werden, kann der Drucker während des Transports beschädigt werden. In solch einem Fall ist
XYZprinting berechtigt, eine Gebühr für die Reparatur zu erheben.
P25P25
P25
Page 51

Manuel de l'utilisateur
PartPro200 xTCS
Menu, fonctions et messages de l’écran tactile 7
Le présent manuel vise principalement à instruire les utilisateurs
sur l'utilisation correcte de l'imprimante PartPro200 xTCS 3D (« 200
xTCS »). Ce manuel permet aux utilisateurs d'apprendre des astuces
de fonctionnement ainsi que des compétences d'application et de
maintenance de l'imprimante 3D 200 xTCS.
Veuillez consulter l'assistance : http://support.xyzprinting.com,
pour télécharger les tout derniers manuel et logiciel pour proter
d'une meilleure expérience utilisateur.
Manuel de l'utilisateur
Mesures de sécurité 2
Description du produit 3
Déballage et installation 5
Utilisation des fonctions et instructions 8
Impression 21
Scanner 22
Détails d'assistance 25
FRA
Avant de pouvoir accéder à ces ressources, les nouveaux
membres doivent ouvrir un compte sur le site Web.
Pour plus d'informations sur l'imprimante 3D 200 xTCS et la ligne
complète de produits XYZprinting, contactez votre revendeur local
ou consultez le site Internet officiel de XYZprinting : http://www.
xyzprinting.com.
Page 52

Mesures de sécurité
Sécurité et compatibilité
Lire attentivement ce manuel et toutes les mesures de sécurité avant d’utiliser, de faire fonctionner, de déballer, de remplacer, de déposer toute pièce ou de maintenir ce produit. Se conformer également aux instructions des mesures de sécurité correspondantes.
Consignes de sécurité importantes
●
La machine est lourde. Ne pas la déplacer tout seul.
●
Ne pas positionner l'imprimante dans un milieu poussiéreux, humide ni à l'extérieur.
●
Ne pas poser l'imprimante sur une surface non rigide ou inclinée. Cela pourrait entraîner la chute/le renversement de la
CAUTION
Heavy object.
2 person lift
required
Watch Your Hands.
machine et provoquer des dommages ou blessures corporelles.
●
Ne pas laisser le produit ou le cordon d'alimentation à la portée d'enfants sans surveillance. Le non-respect de cette
instruction implique un risque de blessure corporelle ou de choc électrique.
●
Utiliser le cordon d'alimentation fourni. Une liaison à la terre incorrecte pourrait entraîner des dommages.
●
Ne pas poser de récipient de liquide par-dessus le produit. Un débordement ou des projections peuvent pénétrer dans la
machine et provoquer des risques ou problèmes de sécurité.
●
Ne pas essuyer l'imprimante avec de l'alcool ni des produits chimiques inammables. Cela peut entraîner un danger.
●
Ne pas déplacer la machine lorsqu'elle est sous tension.
●
Ne pas introduire ses mains dans la machine pendant son fonctionnement. Cela implique un risque d'impacts des pièces
d'impression en mouvement ou de brûlures dues à la température élevée.
●
La machine devient très chaude pendant son fonctionnement et atteint de hautes températures. Ne pas toucher ni
remplacer de pièces tant qu'elles n'ont pas refroidi.
●
Après le démarrage, les pièces de la machine chauffent et se déplacent conformément aux instructions de l'utilisateur.
Pendant le fonctionnement du produit, ne pas toucher ni bloquer le fonctionnement des pièces.
●
Le processus d'impression peut générer de légères odeurs. Il est recommandé de travailler dans un milieu bien aéré et
ouvert an de garantir un confort opérationnel.
●
La réparation des défauts doit être effectuée conformément aux indications de ce manuel d'instructions. Lorsque le
défaut ne peut pas être réparé, contacter le revendeur de votre imprimante ou le centre de service clientèle.
Marques commerciales
Toutes les marques commerciales et déposées appartiennent à leurs propriétaires respectifs.
Maintenance et Réparation
Si l’imprimante doit être réparée pendant la période de garantie, il est recommandé d’emballer la machine dans son matéri-
au d’emballage d’origine avant de l’envoyer. À cette n, il est conseillé de conserver le matériau d’emballage. L’utilisation
d’autres matériaux d’emballage à la place pourrait endommager imprimante pendant son fonctionnement. Nous nous
réservons le droit d’évaluer les frais d’assistance correspondants.
P2P2
P2
Page 53

Description du produit
Extérieur du produit
1. Panneau tactile couleur 5 pouces 2. Module d'alimentation 3.Tête d’impression 4. Plaque d'impression +
automatique aimant à caoutchouc amovible EZ
5. Module de balayage 6. Support de bobine de lament 7. Port USB 8.Port USB (clé WiFi)
9. Interrupteur marche/arrêt 10. Port USB (Sur PC) 11. Prise électrique
1
2
5
3
6
4
7
8
9
10
11
P3P3
P3
Page 54

Description du produit
Liste de contrôle des accessoires
1. Manuel de l'utilisateur 5. Câble USB 9. PC Mylar x 2 13.Tube transparent
2.
Périphérique USB 6. Aimant à caoutchouc amovible EZ 10. Ruban adhésif de masquage 14. Plaque d'étalonnage
3. 3D Color-inkjet PLA 7. Couvercle supérieur 11 . Clé WiFi 15. Plaque d'ombrage
4. Cordon d’alimentation 8. Tube de guidage 12. Paire de gants
1 2 3 4
9 10
11
12
5 6
13 1514
7 8
Précautions et instructions relatives aux outils de maintenance
Les outils suivants sont conçus pour être utilisés uniquement sous la direction ou la surveillance d’un adulte. Tenir ces outils hors de
portée des enfants qui n’y sont pas familiarisés en cas de danger.
Grattoir
31 2 4 5
●
S'assurer que le travail de maintenance de l'imprimante est effectuée une fois que la plaque d'impression a refroidi.
●
Lorsque l'impression est terminée et que la plaque d'impression a refroidi à température ambiante, l'objet imprimé peut être retiré de la
plaque d'impression à l'aide du grattoir.
●
Des résidus de lament générés pendant l'impression peuvent rester coincés sur la tête d'impression et les engrenages du module
d'impression. La qualité de l'impression et le fonctionnement de l'imprimante, tout comme la mesure de la plaque d'impression peuvent
en être affectées. Dans ce cas, nettoyer le module d'impression à l'aide d'une brosse métallique.
1.
Brosse métallique
2.
Brosse de nettoyage de l’engrenage
3.
Fil de nettoyage du trou d'alimentation
4.
Fil de nettoyage de la tête d'impression
5.
Spécications
Impression
Technologie d’impression Modèle 2D : Impression à jet d'encre
Structure 3D : Dépôt de lament en
fusion (Fuse Filament Fabrication) (FFF)
Dimensions et poids
Dimensions (L*P*H) 600* 581* 640 mm
Poids net 32 Kg
Poids brut 43 Kg
Performance
Dimensions d'impression
(L*P*H)
Épaisseur de la couche imprimée 0.1 mm ~0.4 mm
Précision d'alignement X/Y : 0.0125 mm
Auto-étalonnage OUI
Alimentation automatique OUI
Impression autonome hors ligne OUI
Impression mono couleur
(sans impression à jet d'encre)
200 x 200 x 150 mm
Impression multicolore
185 x 185 x 150 mm
Matériaux
Matériau d’impression 3D 3D Color-inkjet PLA , PLA, Tough PLA, PETG
Diamètre du lament
Type d'encre Cartouche CMYK à couleurs séparées
1.75 mm
Matériel informatique
Diamètre de la tête d'impression 0.4mm
Interface de l'utilisateur Écran tactile couleur 5”
Plaque d'impression Non-chauffée, amovible
Transmission Périphérique USB 2.0 / Câble USB /
transmission sans l
Logiciel
Logiciel de l'utilisateur XYZmaker
Format de chier pris en charge AMF, OBJ, STL, XYZ Format (.3w), .3CP, .3MF
Système d'exploitation Mac OS X 10.10 / 10.11 / 10.12
Windows 7/8/10 (64-bit)
Température
Température de fonctionnement de la machine 15-30°C
Température de stockage de la cartouche 15-35°C
Température de stockage du lament 0-38°C
P4P4
P4
Page 55

Déballage et installation
1
Amener l’imprimante sur une table ou
une plate-forme.
(La machine est lourde. Ne pas la déplacer tout seul.)
2
Retirer l'enveloppe plastique et la
sangle.
3
Retirer les matériaux d'emballage, la boîte du couvercle supérieur, la boîte d'accessoires et l'enveloppe plastique.
4
5
6
Retirer les rubans adhésifs sur le
bâti (4 au total).
7
Retirer la mousse sur le support
du cartouche.
Ouvrez la porte avant et retirez le ruban adhésif du repère sur
le montant de porte de l'imprimante.
8
Retirer la mousse à côté des vis de guidage de chaque côté, puis retirer la mousse sous la plaque
d'impression.
9
Retirer l'attache et la mousse à l'avant et à l'arrière de la porte avant.
Ouvrir la porte avant. Retirer le
ruban adhésif des supports
et de la plaque d'impression.
P5P5
P5
Page 56

Déballage et installation
10
Assurez-vous qu'une extrémité du tube guide (accessoire 8) a été correctement insérée dans le port du module
d'impression, insérez ensuite l'autre extrémité dans le tube transparent (accessoire 13) jusqu'au bout.
11
Faites passer le tube de guidage à travers le couvercle supérieur,
puis xez le couvercle supérieur à la machine.
13
Veuillez suivre l’ordre tel qu’indiqué sur les instructions de l’image.
Fixez le PC mylar(accessoire 9) et la ruban adhésif de masquage(accessoire 10) sur l’aimant en caoutchouc amovible EZ(accessoire 6).
Ruban adhésif
de masquage
PC Mylar
Aimant à caoutchouc
amovible EZ
14
12
Introduire l'autre extrémité du tube de guidage dans le module
d'alimentation et le xer solidement.
Vérier que l'aimant à caoutchouc est bien placé sur la plaque
d'impression.
Précautions
1. Vérifiez que les vis d'étalonnage
du bain d'impression ne sont pas
bloquées.
2. Utilisez deux pouces pour pousser le
bain d’impression vers le haut pour
libérer la vis d’étalonnage.
Remarque
Une feuille de film PC recouvre
l'aimant à caoutchouc avec
un ruban adhésif double face
; ce film PC est remplaçable et
doit être changé s'il est sale ou
endommagé.
P6P6
P6
Page 57

Menu, fonctions et messages de l’écran tactile
Écran principal
Chargement
et déchargement du
lament/de l'encre
Cela inclut le chargement
et déchargement du lament, de
l’encre.
Menu Impression USB
Ce menu peut être utilisé pour
importer des chiers (.3cp) à partir
d’un périphérique USB sur la
machine pour une impression sans
ordinateur.
Réglages
Cet écran inclut les fonctions de la
page d’Accueil 1 :
Réglages de Print-bed (Plaque
d’impression), Print Head (Tête
d’impression), Filament, Ink (Encre)
et Scan Module(Module de balayage).
La page suivante comporte
WiFi, Sound (Audio), Statistics
(Statistiques), Language (Langue),
Display (Afchage) et Door Lock
(Verrouillage de porte).
La dernière page comprend Model
(Modèle), Version, la Reset (RAZ)
et Legal Info (Informations juridiques).
P7P7
P7
Page 58

Utilisation des fonctions et instructions
A. Chargement/déchargement de filaments
A1
1. Coupez le lament à un angle
de 45° avant de procéder au
chargement automatique du lament
dans l'imprimante. Lors du processus
de chargement du lament,
l'extrémité du lament doit être en
ligne droite sur au moins 10,16 cm,
comme indiqué sur les images.
5. Toucher Load (Charger). 6. Conrmer l'opération. 7. Insérer le lament dans le module d'alimentation, il sera chargé automatiquement.
Filament
Chargement de filaments
2. Placer le lament sur le support
de bobine.
S'assurer que le
Remarque
lament tourne dans le
sens horaire lorsqu'il
est tiré.
3.Toucher Chargement et décharge-
ment de lament sur l'écran principal
et sélectionner Filament.
4. Toucher Filament.
8. Contrôler si la température de la tête d'impression atteint 210 °C (PLA couleur de XYZprinting) après le
chargement du lament. Une fois la température dénie atteinte, le moteur d'alimentation alimente le lament le
long du tube de guidage dans la tête d'impression.
Déchargement de filamentsA2 Filament
1. Toucher Chargement et
déchargement de lament sur
l'écran principal.
5. Une fois l'opération de déchargement terminée, toucher
pour valider.
2. Toucher « Unload » (Déchar-
ger) et conrmer l'opération.
3. Valider l'opération de déchargement.
9. Une fois le lament extrudé de
la tête d'impression, ce dernier est
chargé avec succès. Toucher l'écran
pour valider et continuer.
4. Lorsque la tête d'impression
a atteint 220 °C, le moteur d'ali-
mentation éjecte le lament.
P8P8
P8
Page 59

Utilisation des fonctions et instructions
A3 Filament
Matériau de reremplissage
200 xTCS vous invite à faire l'appoint de matériau.
1. Toucher l'icône pendant
l'impression.
5. Remplacer la bobine vide par une neuve. (se reporter à la section
CHARGEMENT du présent manuel) puis toucher « PROCEED »
(Continuer).
2. L'écran afche l'état du lament,
toucher « Rell » (Reremplir).
3. Conrmer l'opération.
6. La buse est préchauffée et indique quand insérer le lament dans le
module d'alimentation.
4. La buse est préchauffée
et le lament se décharge
automatiquement.
7. Le lament est chargé
automatiquement.
B. Impression USB
1. Contrôler si le périphérique USB
est branché sur la machine.
5. L'écran afche le pourcentage
d'impression pendant celle-ci. Les
fonctions Pause, Stop, et Rell
(Reremplissage) sont indiquées
sous le pourcentage d'impression.
B1
Déchargement des impressions
8. Contrôler si le lament est extrudé de la buse ; après conrmation,
l'imprimante reprend l'impression.
2. Toucher le Menu Impression USB
sur l'écran principal.
3. Sélectionner le chier à imprimer.
Remarque
Par défaut, la porte avant se
verrouille pendant l'impression.
Pour éditer ce réglage, aller sur
Setting > Door Lock (Réglages >
Verrouillage de porte) et le modifier.
4. Contrôler les informations
de chier et toucher « Print »
(Imprimer).
Retirez l’aimant en caoutchouc amovible EZ avec l’objet imprimé de l’imprimante.
Détachez l’objet imprimé de l’aimant en caoutchouc.
Évitez de toucher la bande
LED de l’imprimante, car
la bande LED est légèrement chaude à cause des
longues heures pendant
lesquelles elle a été allumée.
P9P9
P9
Page 60

Utilisation des fonctions et instructions
C. Mise en place de la cartouche d'encre
200 xTCS utilise quatre encres de couleur qui peuvent être remplacées séparément.
Instructions relatives à l’encre
1. Préparer plusieurs serviettes en
papier et une cartouche d'encre.
4. Presser la tête de cartouche contre la
serviette en papier an de transférer de
l'encre dessus.
7. Si l'encre ne s'est pas transféré
correctement, imbiber la serviette en
papier d'alcool à 75% pour essuyer
l'encre. Après avoir nettoyé le jet
d'encre, vérier le bon transfert de
l'encre.
2. Déballer la cartouche d'encre. 3. Retirer le couvercle de la cartouche.
5. Si l'encre ne s'est pas bien transférée
dessus, essayer en mettant la
serviette en papier sur la table puis en
maintenant l'encre pressée contre la
serviette en papier.
6. Contrôler si l'encre transférée sur la
serviette en papier laisse apparaître
deux lignes droites. Dans ce cas, les
instructions relatives à l'encre ont été
exécutées avec succès. Une fois les
instructions relatives à l'encre suivies,
mettre la cartouche d'encre en place.
Remarque
Afin d'éviter que la cartouche d'encre ouverte ne sèche au terme d'une
impression ou en cas de non utilisation de l'imprimante pendant plusieurs
jours, suivez la procédure de stockage de la cartouche :
1. Nettoyez la buse de la cartouche d'encre à l'alcool.
2. Fermez la cartouche d'encre de façon étanche au moyen du capot
de protection et conservez la cartouche dans une pièce dont la
température est comprise entre 15 et 35 degrés.
Pour une qualité d'encre optimale, nettoyez la buse de la cartouche à
l'alcool après avoir retiré le capot de protection de la cartouche puis
reposez la cartouche dans l'imprimante avant l'impression suivante.
P10P10
P10
Page 61

Utilisation des fonctions et instructions
Toucher Ink (Encre) pour
que l'écran afche l'état de
l'encre, à savoir « Ink Low »
(Niveau encre bas), « No Ink
» (Encre épuisée), et « Invalid
Ink » (Encre invalide).
Encre
C1
Change Ink (Changer encre)
1. Toucher Change Ink
(Changer encre) puis conrmer.
1
4
2
5
2. Conrmer l'opération.
3
6
3. Attendre que la cartouche se
déplace au centre de la plaque
d'impression puis changer l'encre.
Mise en place de la cartouche
1. Soulever la plaque vers le haut.
2. Retirer la cartouche.
3. Insérer une cartouche neuve.
4. Contrôler si la cartouche est placée correctement.
5. Rabaisser la plaque du dessus.
6. Contrôler si l’ordre des couleurs de l’encre est
le suivant K (Noir), C (Bleu), M (Magenta) et Y
(Jaune) de gauche à droite.
Remarque : Pour le remplacement de toute
cartouche d’encre, veuillez procéder au test d’étalonnage de l’impression à jet d’encre.
4. Toucher « PROCEED »
(Continuer) après le
changement.
P11P11
P11
Page 62

Utilisation des fonctions et instructions
C2-1 Encre
Il est conseillé d'imprimer une page de test après avoir installé la cartouche d'encre. Préparer une feuille de papier.
(Étalonnage).
4. Retirez l’aimant en caoutchouc
amovible EZ. Utilisez du ruban
adhésif pour xer le papier A4
dans le sens Portrait sur le côté
avant de l’aimant en caoutchouc.
Calibration (Étalonnage) Test Page (Page de test)
2. Toucher Test Page (Page de
test).
5. Serrez/tirez le papier A4
de sorte qu’il soit à plat (sans
espace) sur l’aimant en caoutchouc.
. Test Page.1. Toucher Calibration
3
6. Pliez fermement le papier A4 en excès à l’arrière de l’aimant en
caoutchouc.
Paper Test Page
7. Replacez correctement
l’aimant en caoutchouc dans le
bain d’impression.
Calibration (Étalonnage)
1. Vous pouvez choisir
d'imprimer la « Page de test
PLA » pour conrmer le statut
de l'encre.
5. Conrmez si la tâche
d'impression est terminée.
8. Positionner le papier sur
la plaque d'impression puis
toucher « PROCEED »
(Continuer) ; l'imprimante
exécute une impression test.
2. Sélectionnez « Page de test
PLA » pour imprimer.
6. Retirez l'objet imprimé et
contrôlez le statut de coloration.
9. Retirer la page de test
puis toucher « PROCEED »
(Continuer).
Test Page (Page de test)C2-1 Encre
3. Attendez que l'extrudeuse
ait atteint sa température de
fonctionnement.
PLA Test Page
4. Impression de la « Page de
test PLA ».
P12P12
P12
Page 63

Utilisation des fonctions et instructions
Étalonnage de l'encre
Image 1 Image 2 Image 2-1
L’image 1 illustre un exemple
de page de test normale.
Image 3
L’image 3 illustre un exemple de mauvaise page
de test.
Une ligne blanche apparaît
sur les barres de couleur horizontale et verticale.
Procédez comme suit.
L’image 2 montre un léger décalage de couleur sur la partie
horizontale de la page de test.
Ce décalage est acceptable. Si
l’impression de la page de test est
pire, effectuez une procédure de
nettoyage.
Dépannage de la cartouche d'encreC2-2 Encre
L’image 2-1 montre une légère bavure d’encre noire sur les parties
horizontale et verticale. Cela peut
se produire avec d’autres couleurs.
Cette bavure est acceptable.
Étape 1
Replacez la cartouche et imprimez la page de test.
Si le problème persiste, passez à l’étape 2.
Étape 2
Recherchez tout câble arraché ou tout support de
contact endommagé, comme dans l’exemple.
En cas de câble arraché, remplacez la cartouche par
une cartouche neuve.
En cas de support de contact endommagé, et si la
broche de la station de cartouche est également
endommagée, contactez l’assistance pour leur remplacement.
Cartouche NG (câble
arraché et support de
contact endommagé)
Remarque : Pour connaître la toute dernière procédure
de nettoyage de la cartouche d’encre, veuillez consulter
notre site Web d’assistance.
Pour savoir comment préparer la page de test A4, reportez-vous à C2-1.
Cartouche normale
Étape 3
Recherchez toute cartouche à tête d’encrage colmatée, comme dans l’exemple.
Effectuez une procédure de nettoyage de la cartouche conformément au paragraphe de conseils
relatifs à l’encre à la page 10.
Si le problème persiste, passez à l’étape 4.
Nettoyage de la tête
d’encrage
Étape 4
Utilisez une serviette en papier pour couvrir la cartouche
d’encre, comme illustré sur
l’image 4 et vers le bas.
Si de l’encre sort, réimprimez
la page de test.
Si le problème persiste, remplacez la cartouche par une
cartouche d’encre neuve.
Tête d’encrage colmatée/
souillée
P13P13
P13
Page 64

Utilisation des fonctions et instructions
C2-3 Encre
(Étalonnage).
5. Contrôler le graphique
d'étalonnage imprimé selon
les instructions à l'écran. Pour
chaque couleur, sélectionner la
ligne la mieux alignée avec le
noir (K).
Calibration (Étalonnage) Color Calibration (Étalonnage de la couleur)
2. Toucher Color (Couleur).
6. Pour l'alignement horizontal,
saisir le chiffre correspondant
à chaque couleur. Après
avoir saisi le chiffre, toucher
« PROCEED » (Continuer).
3. Bitte befestigen Sie das Druckpapier auf der Druckplatte.1. Toucher Calibration
4. Extraire le papier imprimé
puis toucher « PROCEED »
(Continuer).
7. Pour l'alignement vertical,
saisir le chiffre correspondant
à chaque couleur. Après
avoir saisi le chiffre, toucher
« PROCEED » (Continuer).
8. Valider les valeurs saisies
dans les champs puis toucher
« PROCEED » (Continuer).
Calibration (Étalonnage)
1. Toucher Étalonnage de
l'encre (Inkjet Calibration).
Attention : Veillez à ce que l’aimant en caoutchouc amovible EZ soit
placé dans le bain d’impression.
5. L'imprimante imprime
automatiquement la carte
d'étalonnage. Cette opération prend
environ 15 minutes. (S'assurer d'avoir
chargé le lament.)
2. Inkjet Calibration.
Inkjet Calibration (Étalonnage de l'encre)C2-4 Encre
3. Vérier que la plaque
d'impression est vide.
4. L'impression démarre une
fois la buse d'impression
réchauffée.
6. Une fois l'impression
terminée, retirer la carte
d'étalonnage.
7. Trouver horizontalement
et verticalement les cadres
dans lesquels l'encre est le
mieux alignée puis toucher
« PROCEED » (Continuer).
8. Sens vertical : Saisir le numéro
du cadre où le lament et l'encre
semblent les mieux alignés
puis toucher « PROCEED »
(Continuer).
9. Sens horizontal : Saisir
le numéro du cadre où le
lament et l'encre semblent
les mieux alignés puis toucher
« PROCEED » (Continuer).
10. Une fois l'étalonnage
terminé, toucher PROCEED
(Continuer) pour nir la
procédure d'étalonnage de
l'encre.
P14P14
P14
Page 65

Utilisation des fonctions et instructions
C2-4 Encre
1. Après avoir imprimé l'objet couleur, vous pouvez ajuster
manuellement la position d'impression si vous décelez un
décalage de couleur.
Y-Axis
2. La position de réglage de
l'axe X et de l'axe Y était fournie
comme exemple de position
lorsque l'on se tient face à
l'imprimante.
Calibration (Étalonnage) Inkjet Calibration (Étalonnage de l'encre)
X-Axis
Réglez manuellement le
mouvement de l'axe X
Sélectionnez « AXE X » pour
des mouvements vers la droite
et vers la gauche. Pressez le
bouton « Gauche » ou « Droite » pour sélectionner la direction et la distance à ajuster,
chaque réglage a un pas de
0,05 mm.
Réglez manuellement le
mouvement de l'axe Y
Sélectionnez « AXE Y » pour
des mouvements vers le haut et
vers le bas. Pressez le bouton
« Haut » ou « Bas » pour sélectionner la direction et la distance à ajuster, chaque réglage
a un pas de 0,05 mm.
Une fois les réglages des
paramètres terminés, touchez
« VALIDER » pour enregistrer et
appliquer les réglages dénis.
Pour réinitialiser, sélectionner
« Re-Type » pour revenir au
réglage de la position de dé-
placement de l’axe X.
P15P15
P15
Page 66

Utilisation des fonctions et instructions
D. Réglages
D1
D2
D3
D1-1
1. Sélectionner Calibration
(Étalonnage).
3. Attendre que le capteur mesure la hauteur de la plaque d’impression en trois points différents. Une fois
la mesure effectuée, l’imprimante met automatiquement la plaque d’impression à niveau.
Attention : Veillez à ce que l’aimant en caoutchouc amovible EZ soit placé dans le bain d’impression.
Print-Bed (Plaque d'impression)
2. Conrmer l'opération.
D4
D6
D8
D5
D7
D9
D10
Étalonnage de la plaque d'impression (nivellement)
4. Une fois l’étalonnage terminé
avec succès, toucher pour con-
rmer.
D1-2
1. Toucher Z-offset (Décalage
Z).
Le mode Jog permet de déplacer manuellement la tête d’impression via l’écran
tactile.
Print-Bed (Plaque d'impression)
2. Amener la tête d’impression
au centre de la plaque
d'impression. Il est conseillé
de laisser un espace minimum
entre la tête d’impression et la
plaque d'impression de sorte
que la buse puisse se déplacer
sans à-coups sur la plaque
d'impression.
Print-Bed (Plaque d'impression)
Z-offset (Décalage Z)
3. Toucher l'icône pour
abaisser ou relever la plaque
d'impression, plus la valeur
est élevée, plus la distance est
grande et inversement.
Jog Mode (Mode Jog)D1-3
Comment déplacer la tête d’impression :
1. Revenir au point Accueil. Toujours revenir au point Accueil avant d’exécuter un
mouvement quelconque dans quelque direction que ce soit.
2. Se déplacer le long de l'axe X.
3. Se déplacer le long de l'axe Y.
4. Se déplacer le long de l’axe Z. (Ne procédez pas une augmentation/un décal-
age vers le haut quand la tête d’impression se trouve en position initiale, pour
éviter de heurter le bain d’impression.)
32 4
1
P16P16
P16
Page 67

Utilisation des fonctions et instructions
D2-1
1. Veuillez nettoyez la buse après
60 heures d’impression.
Tête d’impression
2. Toucher Clean Nozzle (Nettoyage
de la buse) dans la section Print
Head (Tête d’impression).
Nettoyage de la buse
3. Vérier si un nettoyage est requis. Valider pour la nettoyer.
Lorsque la température de la tête d’impression atteint la valeur de fonctionnement, le nettoyage démarre.
Remarque : la partie métallique de la tête d’impression devient brûlante lors du fonctionnement ; ne pas la toucher.
4. Introduire le l de nettoyage du
trou d'alimentation dans le trou
d'alimentation et le pousser vers
le bas pour chasser le lament
de la tête d’impression. (Il est
recommandé d'effectuer cette
opération depuis le dessus de la
machine.)
5. Éliminer les résidus de lament
de la tête d'impression à l'aide d'une
brosse métallique.
6. Introduire le l de nettoyage de la
tête d’impression dans la buse par
le fond an de la nettoyer.
7. Une fois le nettoyage terminé,
toucher DONE (Fait).
Afin d'éviter que la qualité d'impression se dégrade à cause des filaments résiduels ou accumulés, ce qui cause des
problèmes de retrait, pour une utilisation à long terme de la buse d'impression, il est conseillé d'activer la fonction
Remarque
1. Toucher Change Nozzle (Changer
buse).
5. Couper l'alimentation avant de
changer la tête d’impression.
NETTOYER BUSE (nettoyage de buse) de l'imprimante toutes
les 60 heures d'impression pour enlever les résidus avec le fil de nettoyage de la buse ou le fil de nettoyage du chemin
d'alimentation. (Le filament doit être retiré de l'extrudeuse avant de nettoyer
le chemin d'alimentation.)
2. Toucher pour conrmer vouloir
changer la buse.
6. Changer la tête d’impression
depuis le dessus de la machine.
Séquence de mise en place d’une nouvelle tête d’impression :
Changement de buseD2-2 Tête d’impression
3. Attendre que la tête d’impression
atteigne une position appropriée
pour le changement.
7. Presser le bouton blanc de
déverrouillage an de dégager la
tête d'impression.
4. La position de changement de la
tête d’impression est indiquée cidessus.
8. Maintenir la tête d’impression
d'une main et retirer le bus de
l'autre. La dépose de la tête
d’impression est terminée.
1. Brancher le bus.
2. Presser le bouton blanc de déverrouillage sur la
tête d’impression et assembler la tête d’impression au mécanisme. Après avoir assemblé la tête
d’impression, vérier qu’elle est solidement en
place et ne tremble pas.
3. Allumer l’imprimante et l’utiliser.
P17P17
P17
Page 68

Utilisation des fonctions et instructions
Filament
D3
Se reporter à la fonction Change Filament (Changer lament) de l'écran principal. Un lament non utilisé pendant un jour ou plus doit
être stocké dans le sac zippé.
WiFi
D4
Avant de mettre l'imprimante sous
tension et de congurer le réseau WiFi,
veuillez introduire la clé WiFi dans le
port USB sur le dessus de l'imprimante.
1. Toucher ADD (Ajouter)
pour que l'imprimante lance la
recherche des points d'accès
disponibles.
2. Toucher le point d'accès à
utiliser.
3. Saisir le mot de passe du
point d'accès.
Vérier si la connexion WiFi est établie avec succès à l’aide de XYZmaker
●
Utiliser un câble USB pour brancher l'imprimante à l'ordinateur et exécuter XYZmaker.
●
Contrôler si la fonction WiFi est activée sur l'ordinateur et se connecter au point d'accès.
1. Lancer XYZmaker. Cliquez sur File > Print > da Vinci
Printer Plugin.
4. Conrmer que la connexion
est terminée
2. Sélectionner l'imprimante à utiliser.
3. Lorsque « READY » (Prêt) s'afche à
l'écran, la connexion est établie avec
succès. Il est désormais possible de
cliquer sur DASHBOARD (Tableau de
bord) an de surveiller l'imprimante ou
sur PRINT (Imprimer) pour imprimer un
chier.
DASHBOARD (Tableau de bord) :
Surveille la température de la tête
d’impression, le lament utilisé et le chargement/déchargement de lament.
PRINT (Imprimer) :
Dénir les paramètres et la qualité d’impression. Si une seule conversion de chier est
nécessaire, toucher « PREPARE » (Prépar-
er).
P18P18
P18
Page 69

Utilisation des fonctions et instructions
Language (Langue)
D5
Modication des réglages de la langue
La 200 xTCS dispose de huit langues d’afchage,
dont le chinois traditionnel et simplié, anglais,
japonais, allemand, italien, espagnol et français. Le
réglage de la langue peut être modié en touchant
Settings > Languages (Réglages > Langues) sur
l’écran principal.
Display (Affichage)
D7
Le réglage de Display (Afchage) permet de dénir l’arrêt de l’écran tactile
après un temps d’inactivité donné. Il
existe cinq réglages, dont une minute,
deux minutes, trois minutes, cinq minutes et « Never » (Toujours allumé).
Sound (Audio)
D6
L’option Sound (Audio) peut être réglée sur ON (Marche)
ou OFF (Arrêt) an de commander
le son émis en touchant l’écran
Statistics (Statistiques)
D8
La fonction Statistiques (Statistics) peut enregistrer les données d’historique depuis la mise sous tension de l’imprimante, dont :
Uptime (Temps de fonctionnement)
Filament
Température
Nozzle (Buse)
Print Job (Tâche d'impression)
Last Calibration (Dernier étalonnage)
Ink Cartridge (Cartouche d’encre)
P19P19
P19
Page 70

Utilisation des fonctions et instructions
Door Lock (Verrouillage de porte)
D9
1. Door Lock on (ON) (Verrouillage de
porte activé) : pendant l'impression, la
porte est verrouillée puis se déverrouille
60 s après la n de l'impression.
La porte est déverrouillée lorsque
l'utilisateur touche Pause ou Stop
pendant l'impression. La porte se
verrouille à nouveau, lorsque la porte
est fermée et l'impression reprend.
D10
Reset (Remise à zéro)
2. Door lock off (OFF) (Verrouillage
de porte désactivé) : la porte ne sera
pas verrouillée pendant l'état Printing
(impression), Pause ou Stop.
Les informations de l'imprimante
sont effacées, et les réglages d'usine
rétablis.
P20P20
P20
Page 71

Impression
Première impression
Les utilisateurs peuvent exécuter une première impression selon les étapes ci-dessous.
Calibration
(Étalonnage)
D1-1 B C C A
Z-offset
(Décalage Z)
D1-2
Load Filament
(Charger
lament)
Change Ink
(Changer encre)
(Étalonnage)
- Test Page (Page de test)
- Color Calibration
(Étalonnage de la couleur)
- Inkjet Calibration
(Étalonnage de l'encre)
Calibration
Préparer le
chier puis
exécuter
l'impression
Transférer les chiers à imprimer via le logiciel de l’ordinateur « XYZmaker »
Pour enregistrer un produit et se connecter à un logiciel, il faut un accès à Internet.
Brancher l’imprimante à l’ordinateur à l’aide d’un câble USB et installer « XYZmaker » sur l’ordinateur an de transférer les chiers
à imprimer.
La « XYZmaker » est compatible avec les systèmes d’exploitation 64 bits Windows et Mac OS 10.10, 10.11 et 10.12. Vous pouvez
l’installer à l’aide de la clé USB incluse ou télécharger le programme d’installation depuis le site Web ofciel de XYZprinting. Vous
pouvez également télécharger le mode d’emploi du logiciel depuis le site Web ofciel.
Pour plus de détails, consulter le site Web ofciel : http://www.xyzprinting.com/
1. Brancher l'ordinateur à l'imprimante puis sélectionner PartPro200 xTCS.
2. Cliquer sur OPEN (Ouvrir) an de sélectionner le chier
modèle à imprimer dans le dossier. Un fois le chier chargé,
il est possible d’ajuster la taille de l’objet, sa position et l’angle
d’impression. Pour imprimer les objets en couleur, enreg-
istrer le chier à imprimer en format obj et le charger dans
XYZmaker.
3. Les réglages correspondants peuvent être modiés an de
les adapter aux résultats et effets d'impression souhaités.
4. La fonction Prepare (Préparer) peut convertir un chier obj
en un chier .3cp. Une fois le chier édité et ajusté, cliquer
sur Print (Imprimer) pour créer l’objet. L’impression démarre
une fois le chier découpé en tranches.
P21P21
P21
Page 72

Scanner
Placez le module de balayage dans la machine (voir les étapes d’installation) et installez le logiciel « XYZscan Color » sur
votre ordinateur pour utiliser la fonction de balayage de votre imprimante 3D.
Orientez le côté avant de l’objet à scanner vers le module de balayage. Il faut à peu près 10 à 15 minutes pour le scanner. Lorsque vous scannez un objet, le plateau tourne dans le sens horaire. Pendant ce temps, la caméra du module
de balayage capture des images continues à une vitesse de trente images par minute. Quand le balayage est terminé,
« XYZscan Color » afche l’image 3D capturée dans l’image 3D.
Vue d'ensemble du produit
Module de balayage
Conguration matérielle requise
Systèmes d'exploitation Windows 7, 8.1, 10 (64-bit)
Conguration système
minimale
CPU 4ème génération Intel® Core™ i5
USB 2.0
8 Go/Disque dur ou plus
Prise en charge de la carte graphique
OpenGL 2.1 ou version supérieure
Scan-Spezikationen
Technologie de balayage Photogrammetry 3D
Résolution de balayage
(Diamètre x H)
Logiciel de balayage XYZscan Color
Charge utile du plateau ≦ 3 Kg/6.6lbs
Résolution 5M pixel
Précision de balayage 1.48 mm
Types de chier OBJ, STL
5cm ϕ x 5 cm – 14cm ϕ x 14 cm (H)
Installez le Modules du scanner
Pour installer le module de numérisation, alignez-le avec la base du scanner, appuyez sur le bouton et maintenez-le
enfoncé, puis xez-le à la base verticalement.
Emplacement du module
de numérisation
Fixez le module
de numérisation
verticalement à la base.
Bouton
P22P22
P22
Page 73

Scanner
Limites de l'objet à scanner
L'objet doit être stable et xe. Il ne doit pas être secoué ni déplacé pendant la rotation du plateau.
•
Zone de balayage du mode objet 5 cm ϕ x 5 cm – 14 cm ϕ x 14 cm (H)
•
L'objet ne doit pas être rééchissant, transparent ni translucide.
•
Un objet avec une surface rééchissante, métallique ou un matériau transparent aura un impact sur la qualité de
•
balayage. Si vous souhaitez scanner un tel objet, il est recommandé de pulvériser le développeur sur la surface avant
de le scanner.
La qualité de balayage peut varier avec des objets de couleur unie, sans reliefs particuliers, ou avec une grande
•
partie de forme unie.
Un objet rond offrira de bons résultats de balayage, tandis que des objets longs ou ns, quant à eux, n’offriront pas de
•
bons résultats de balayage.
Étapes de balayage - Installation de la plaque d'ombrage
1. Retirez l'objet du plateau. 2. Attendez le retour du plateau
de balayage.
de la plaque d'ombrage dans
les trous et xez-les.
Étapes de balayage
1. Sélectionnez le module de
balayage dans les Paramètres.
2. Videz la plate-forme de l’imprimante.
3. Installez la plaque d'ombrage.
Sens du loquet.Insérez les deux côtés au bas
3. Installez la plaque
d'ombrage.
L'installation de la plaque
d'ombrage est terminée.
4. Attendez le retour de la plateforme de l'imprimante.
5. Placez l'objet à scanner.
6. Le balayage de l'objet est en
cours.
7. Une fois le balayage terminé,
vous pouvez terminer la tâche
de balayage et effectuer
d'autres tâches.
P23P23
P23
Page 74

Scanner
Logiciel de balayage : Fonctionnement de XYZscan Color
Assurez-vous que le fond de panier de numérisation est
correctement installé dans votre imprimante 3D et appuyez
sur le bouton "Numériser" sur le panneau LCM, assurez-vous
que l'imprimante passe en mode Numérisation.
1. Ouvrez le logiciel de balayage.
2. Vériez la luminosité ambiante sur l'écran Aperçu.
Réglez les paramètres préliminaires. Si aucune erreur
n'est trouvée, cliquez sur « Scanner » pour effectuer le
processus.
3. Dans la zone Aperçu du modèle, le modèle tourne
lentement. Attendez que les nuages de points de balayage
soient créés.
4. Attendez que les nuages de points de balayage soient
créés. Appuyez sur Continuer pour effectuer le maillage.
5. Le balayage est terminé.
1. Vous pouvez obtenir de meilleures performances
Remarque
* Pour des informations détaillées sur la fonction de balayage,
voir le « Manuel de l'utilisateur du logiciel XYZscan Color ».
dans de bonnes conditions d'éclairage.
2. Le côté avant de l'objet doit faire face au module
de balayage.
Illustration environnementale
Plaque tournante
de numérisation
Module de balayage
Utilisez la plaque d'étalonnage
Quand l'imprimante est relocalisée ou lorsque le résultat de balayage n'est pas approprié, procédez comme suit pour
étalonner le module de balayage :
1. Retirez l'objet du plateau.
2. Ouvrez « Paramètres » > « Étalonner » dans le menu principal de « XYZscan Color ».
3. Utilisez la plaque d'étalonnage.
Quand l'invite à l'écran vous demande de placer la plaque d'étalonnage, suivez les instructions et placez la plaque
d'étalonnage au centre du plateau. (Le côté avec le motif à carreaux fait face au module de balayage, puis accrochez le
loquet inférieur dans l'encoche au centre du plateau.) Cliquez sur « Étalonner maintenant » dans le logiciel.
4. Vériez que la plaque d'étalonnage est correctement afchée sur l'écran Aperçu. Si tout est correct, cliquez sur
« Étalonner » pour effectuer le processus d'étalonnage.
5. Attendez que XYZscan Color effectue l'étalonnage avec l'imprimante (cela prend environ deux minutes).
6. Quand XYZscan Color indique que l'étalonnage est terminé, retirez la plaque d'étalonnage du plateau.
7. Cliquez sur « Conrmer » dans le logiciel pour quitter cette fonction et passer au balayage.
P24P24
P24
Page 75

Détails d'assistance
En cas de problème avec l'imprimante, se reporter aux instructions de dépannage suivantes. Si le problème persiste, contacter le centre
de service à la clientèle.
Codes et gestion des problèmes
Si un problème survient avec l'imprimante, le code de réparation s'afche sur l'écran de l'imprimante et / ou l'interface logicielle. Se
reporter au formulaire de description du code de réparation suivant pour les essais préliminaires.
Code de
réparation
OO11 Tête d’impression chauffée trop longtemps
OO14
OO30 Axe X anormal
OO31 Axe Y anormal
OO32 Axe Z anormal
OO50 Erreur de communication interne -- erreur mémoire redémarrer l'imprimante
OO52 Erreur de mémoire de la tête d'impression remplacer la tête d’impression
OO55 erreur de la tête à jet d'encre remplacer la tête à jet d'encre
OO56 erreur des données de jet d'encre redémarrer l'imprimante
Symptôme Action
Problème de tête d'impression chauffée-température dépassée
contrôler le câble plat flexible et redémarrer
contrôler le câble du moteur et le capteur puis
vérifier la position du capteur
Maintenance et Réparation
Conserver le matériel d'emballage original dans l'éventualité d'un retour de l'unité pour réparation pendant toute la période couverte par la
garantie. L'utilisation d'autres matériaux d'emballage à la place pourrait entraîner l'endommagement de l'imprimante pendant le transport.
Dans ce cas, XYZprinting se réserve le droit de facturer des frais de réparation.
P25P25
P25
Page 76

PartPro200 xTCS
Il manuale è destinato principalmente agli utenti per capire come
utilizzare correttamente la stampante 3D PartPro200 xTCS ("200
xTCS"). In questo manuale, gli utenti possono ottenere ulteriori
informazioni sui suggerimenti per l'uso, sulle capacità operative e
sulla manutenzione della stampante 3D 200 xTCS.
Fare riferimento all'assistenza sul sito http://support.xyzprinting.
com per scaricare il manuale e il software più recente per una
migliore esperienza utente.
Manuale d’uso
Precauzioni di sicurezza 2
Descrizione del prodotto 3
Disimballaggio e installazione 5
Menu touchscreen, funzioni e messaggi 7
Utilizzo delle funzioni e istruzioni 8
Stampa 21
Scansione 22
Dettagli sull’assistenza 25
ITA
I nuovi membri devono registrare un account sul sito Web prima
di poter accedere a queste risorse.
Per ulteriori informazioni sulla stampante 3D 200 xTCS e sulla linea
completa di prodotti XYZprinting, contattare il rivenditore locale o
visitare il sito web ufciale di XYZprinting: http://www.xyzprinting.com.
Page 77

Precauzioni di sicurezza
Sicurezza e conformità
Please read through this manual and all safety precautions carefully before using, operating, unpacking, replacing, removing any part or maintaining this product. Please also comply with the instructions of relevant safety precautions.
Importanti precauzioni di sicurezza
●
Non spostare la macchina da soli in quanto è pesante.
●
Non collocare la stampante in ambienti polverosi, umidi o all'esterno.
●
Non collocare la stampante su superci morbide o inclinate. In caso contrario, la macchina potrebbe cadere/capovolgersi e danneggiarsi
o causare lesioni personali.
●
Non lasciare il prodotto o il cavo di alimentazione ai bambini senza sorveglianza. In caso contrario, potrebbero vericarsi
CAUTION
Heavy object.
2 person lift
required
Watch Your Hands.
lesioni personali o scosse elettriche.
●
Utilizzare il cavo di alimentazione in dotazione. In caso contrario, una messa a terra non corretta potrebbe causare
danni.
●
Non collocare alcun contenitore di liquidi sopra il prodotto. Altrimenti, la fuoriuscita o il versamento di liquidi potrebbe
penetrare nella macchina e causare pericoli o problemi di sicurezza.
●
Non pulire la stampante con alcol o prodotti chimici inammabili. In caso contrario, potrebbero vericarsi pericoli.
●
Non spostare la macchina, se accesa.
●
Non toccare la macchina con le mani durante il funzionamento. In caso contrario, potrebbero vericarsi rischi di impatto
causati da componenti della stampante in movimento o ustioni dovute a temperature elevate.
●
La macchina diventa calda durante il funzionamento e, pertanto, funziona ad alta temperatura. Non toccare o sostituire i
componenti se non si sono raffreddati.
●
Dopo l'avvio, i componenti della macchina si riscaldano o si muovono a seconda delle istruzioni dell'utente. Durante il
funzionamento del prodotto, non toccare o bloccare il funzionamento dei componenti.
●
Un lieve odore potrebbe essere generato durante il processo di stampa. Si consiglia di lavorare in una zona ben ventilata
e all'aperto per garantire il comfort operativo.
●
La riparazione dei difetti deve essere effettuata in base al contenuto di questo manuale di istruzioni. Qualora il difetto non
possa essere riparato, contattare il rivenditore della stampante o il centro di assistenza clienti.
Marchi registrati
Alle Marken und eingetragenen Marken sind das Eigentum ihrer jeweiligen Inhaber.
Manutenzione e assistenza
Se la stampante deve essere sottoposta a manutenzione durante il periodo di garanzia, si consiglia di imballarla con
i materiali di imballaggio originali prima della spedizione. A tal ne, è necessario conservare i materiali di imballaggio. Se
si utilizzano altri materiali di imballaggio, la stampante potrebbe danneggiarsi durante la stampa. Ci riserviamo il diritto di
valutare i relativi costi di servizio.
P2P2
P2
Page 78

Descrizione del prodotto
Esterno del prodotto
1. Touchscreen a colori a 5" 2. Modulo di alimentazione automatica 3. Testina di stampa
4. Piano di stampa + magnete in gomma rimovibile EZ 5.
7. Porta USB 8. Porta USB (dongle WiFi) 9.Interruttore di alimentazione
10. Porta USB (a PC) 11. Connettore di alimentazione
Modulo di scansione
6. Supporto bobina di lamento
1
2
5
3
6
4
7
8
9
10
11
P3P3
P3
Page 79

Descrizione del prodotto
Lista di controllo degli accessori
1. Manuale d’uso 5. Cavo USB 9. PC Mylar x 2 13. Tubo chiaro
2.
Unità USB 6. Magnete in gomma rimovibile EZ 10. Nastro adesivo 14. Piastra di calibratura
3. 3D Color-inkjet PLA 7. Coperchio superiore 11. Dongle WiFi 15.
4. Cavo di alimentazione 8. Tubo di guida 12. Un paio di guanti
Piastra di ombreggiatura
1 2 3 4
9 10
11
12
5 6
13 1514
7 8
Precauzioni e istruzioni degli strumenti di manutenzione
I seguenti strumenti sono destinati esclusivamente all’uso sotto la guida o la tutela di un adulto. Evitare che i bambini che non hanno familiarità con gli strumenti accedano ad essi in caso di pericolo.
Raschietto
31 2 4 5
●
Assicurarsi che la manutenzione della stampante venga effettuata una volta raffreddato il piano di stampa.
●
Al termine della stampa e una volta raffreddato il piano di stampa alla temperatura ambiente, è possibile rimuovere l'oggetto stampato
dal piano di stampa con il raschietto.
●
I residui di lamento generati durante la stampa potrebbero essere bloccati sulla testina di stampa e sugli ingranaggi del modulo
di stampa. Potrebbero compromettere la qualità di stampa e il funzionamento della stampante, nonché la misurazione del piano di
stampa. In tal caso, pulire il modulo di stampa con lo spazzolino metallico.
1.
Spazzolino metallico
2.
Spazzolino per la pulizia degli ingranaggi
3.
Filo di pulizia del foro di alimentazione
4.
Filo di pulizia della testina di stampa
5.
Speciche
Stampa
Tecnologia di stampa Modello 2D:
Struttura 3D:
Dimensions and Weight
Dimensioni (LxPxA) 600* 581* 640 mm
Peso netto 32 Kg
Peso lordo 43 Kg
Prestazioni
Dimensioni di stampa (LxPxA)
Spessore dello strato stampato 0.1 mm ~0.4 mm
Precisione di allineamento X/Y : 0.0125 mm
Calibratura automatica SÌ
Alimentazione automatica SÌ
Stampa autonoma ofine SÌ
Stampa monocromatica
(senza stampa a getto di inchiostro)
200 x 200 x 150 mm
Stampa a colori
185 x 185 x 150 mm
stampa a getto di inchiostro
fabbricazione lamento fuso (FFF)
Materiali
Materiali di stampa 3D 3D Color-inkjet PLA, PLA, Tough PLA, PETG
Diametro lamento 1.75 mm
Tipo di inchiostro Cartuccia CMYK con colori separati
Hardware
Diametro testina di stampa 0.4mm
Interfaccia utente Touchscreen a colori a 5”
Piano di stampa Non riscaldato, rimovibile
Trasmissione Unità USB 2.0 / cavo USB / trasmissione wireless
Software
Software utente XYZmaker
Formato le supportato AMF, OBJ, STL, XYZ Format (.3w), .3CP, .3MF
Sistema operativo Mac OS X 10.10 / 10.11 / 10.12
Windows 7/8/10 (64-bit)
Temperatura
Temperatura operativa della macchina 15-30°C
Temperatura di conservazione della cartuccia 15-35°C
Temperatura di conservazione del lamento 0-38°C
P4P4
P4
Page 80

Disimballaggio e installazione
1
Spostare la stampante su un tavolo o
una piattaforma.
(Non spostare la stampante da
soli in quanto è pesante.)
2
Rimuovere la pellicola di plastica e PP.
3
Rimuovere i materiali di imballaggio, la scatola del coperchio superiore, la scatola accessori e il coperchio in plastica.
4
5
6
Rimuovere il nastro sul corpo (4
in totale).
7
Rimuovere il polistirolo sul
supporto della cartuccia.
Aprire lo sportello anteriore, rimuovere il nastro adesivo dal
segno sul supporto dello sportello della stampante.
8
Rimuovere il polistirolo accanto alle viti guida su entrambi i lati, quindi rimuovere il
polistirolo sotto il piano di stampa.
9
Rimuovere la fascetta per cavi e il polistirolo sulle parti anteriore e
posteriore dello sportello anteriore.
Aprire lo sportello anteriore.
Rimuovere il nastro dai materiali di
supporto e dal piano di stampa.
P5P5
P5
Page 81

Disimballaggio e installazione
10
Assicurarsi che un'estremità del tubo guida (accessorio 8) sia stata inserita saldamente nella porta del modulo di
stampa, quindi inserire l'altra estremità nel tubo chiaro (accessorio 13) no alla ne.
11
Inserire il tubo guida nel coperchio superiore, quindi ssare il
coperchio superiore alla macchina.
13
Seguire l’ordine indicato nelle immagini con le istruzioni, ssare il PC
mylar (accessorio 9) e il nastro adesivo (accessorio 10) al magnete
in gomma rimovibile EZ(accessorio 6)
Nastro adesivo
PC Mylar
Magnete in gomma rimovibile EZ
14
12
Inserire l'altra estremità del tubo di guida nel modulo di
alimentazione e ssarlo saldamente.
Vericare che il magnete in gomma sia posizionato
correttamente sul piano di stampa.
Precauzioni
1. Verificare se le viti di calibratura del
piano di stampa sono rimaste bloccate.
2. Usare i 2 pollici per spingere verso l’alto
il piano di stampa per rilasciare la vite
di calibratura.
Nota
Sul magnete in gomma è
presente un foglio di pellicola PC
biadesivo. Questa pellicola PC è
sostituibile: sostituirla se sporca
o rotta.
P6P6
P6
Page 82

Menu touchscreen, funzioni e messaggi
Schermata principale
Filament/Ink loading
and unloading
(Caricamento e
scaricamento di
lamento/inchiostro)
Include Filament (Filamento)
e Ink (Inchiostro).
USB Printing Menu
(Menu di stampa USB)
Questo menu può essere utilizza-
to per importare le (.3cp) da una
unità USB alla macchina per la
stampa senza un computer.
Settings
(Impostazioni)
Include le funzioni della
pagina iniziale 1:
impostazioni di Print-Bed (Piano
di stampa), Print-Head (Testina di
stampa), Filament (Filamento), Ink
(Inchiostro) e Scan Module(Modulo
di scansione).
La pagina successiva include
WiFi, Sound (Suono), Statistics
(Statistiche), Language (Lingua),
Display e Door Lock (Blocco sportello).
L’ultima pagina include Model (Mod-
ello), Version (Versione), Reset
(Ripristina) e Legal Info (Info legali).
P7P7
P7
Page 83

Utilizzo delle funzioni e istruzioni
A. Load/unload filaments (Carica/scarica filamenti)
A1
Filament (Filamento)
1. Tagliare il lamento a un angolo
di 45 gradi prima del caricamento
automatico del lamento nella
stampante. Durante il processo di
caricamento del lamento, questo
dovrebbe essere raddrizzato in
modo da trovarsi ad almeno 10 cm di
distanza dall'estremità del lamento,
come illustrato nelle immagini.
5. Toccare Load (Carica). 6. Confermare l'operazione. 7. Inserendo il lamento nel modulo di alimentazione, viene automaticamente caricato.
Load filaments (Carica filamenti)
2. Collocare il lamento sul
supporto bobina.
Assicurarsi che il lamento
ruoti in senso orario quando
Nota
viene tirato.
3. Toccare Filament Load
and Unload (Caricamento e
scaricamento di lamento) nella
schermata principale e
selezionare Filament (Filamento).
4. Toccare Filament (Filamento).
8. Controllare se la temperatura della testina di stampa aumenta a 210°C (PLA a colori di XYZprinting) una volta
caricato il lamento. Quando si raggiunge la temperatura impostata, il motore di alimentazione alimenta il lamento
lungo il tubo di guida nella testina di stampa.
A2 Filament (Filamento)
1. Toccare Filament Load
and Unload (Caricamento e
Scaricamento di filamenti
2. Toccare “Unload” (Scarica) e
confermare l'operazione.
3. Confermare l'operazione di
scaricamento.
scaricamento di lamento) sulla
schermata principale.
5. Al termine dell'operazione
di scaricamento, toccare per
confermare.
9. Una volta estruso il lamento dalla
testina di stampa, il lamento viene
caricato correttamente. Toccare
la schermata per confermare e
continuare.
4. Una volta riscaldata la testina
di stampa no a 220°C, il
motore di alimentazione espelle
il lamento.
P8P8
P8
Page 84

Utilizzo delle funzioni e istruzioni
A3 Filament (Filamento)
200 xTCS richiede di ricaricare materiale.
1. Toccare l'icona durante la
stampa.
5. Sostituire la bobina vuota con una nuova (fare riferimento alla
sezione CARICAMENTO del presente manuale), quindi toccare
"PROCEED" (PROCEDI).
Refill Material (Ricarica materiale)
2. Sulla schermata viene
visualizzato lo stato del
lamento. Toccare "Rell"
(Ricarica).
3. Confermare l'operazione.
6. L'ugello viene preriscaldato e l'utente viene avvisato di inserire
il lamento nel modulo di alimentazione.
4. L'ugello viene preriscaldato
e il lamento viene scaricato
automaticamente.
7. Il lamento viene caricato
automaticamente.
8. Controllare se il filamento viene estruso dall'ugello. Dopo la
conferma, la stampante riprende la stampa.
B. Stampa USB
1. Vericare se l'unità USB è
inserita nella macchina.
B1
Rimuovere il magnete in gomma rimovibile EZ con l’oggetto stampato dalla stampante
e staccare l’oggetto stampato dal magnete in gomma.
Scaricare le stampe
2. Toccare USB Printing Menu
(Menu di stampa USB) nella
schermata principale.
5. Durante la stampa, sulla
schermata viene visualizzata la
percentuale di stampa. Sotto la
percentuale di stampa vengono
visualizzati Pause (Interrompi),
Stop (Arresta) e Rell (Ricarica).
3. Selezionare il le da
stampare.
Per impostazione predefinita, lo sportello anteriore viene
bloccato durante la stampa. Per modificare l'impostazione,
andare su Settings (Impostazioni) > Door Lock (Blocco
sportello).
4. Controllare le informazioni sul
le e toccare “Print” (Stampa).
Nota
Evitare di toccare la
striscia LED della
stampante dal momento che potrebbe essere
leggermente calda dopo
le numerose ore in cui è
rimasta accesa.
P9P9
P9
Page 85

Utilizzo delle funzioni e istruzioni
C. Installazione della cartuccia di inchiostro
La stampante 200 xTCS utilizza quattro inchiostri a colori, che possono essere sostituiti separatamente.
Guida dell’inchiostro
1. Preparare vari tovaglioli di carta e la
cartuccia di inchiostro.
4. Premere la testina della cartuccia
contro il fazzoletto di carta per trasferire
inchiostro su di esso.
7. Se l'inchiostro non si trasferisce
correttamente, inumidire il fazzoletto di
carta con alcol al 75% per rimuovere
l'inchiostro. Una volta pulito il getto di
inchiostro, vericare se si trasferisce
l'inchiostro.
2. Disimballare la cartuccia di inchiostro.
5. Se l'inchiostro non si trasferisce
correttamente, provare a collocare il
fazzoletto di carta sul tavolo e tenere
premuto l'inchiostro sul fazzoletto di
carta.
3. Rimuovere il coperchio della cartuccia.
6. Controllare se l'inchiostro trasferito
sul tovagliolo di carta presenta due linee
diritte. In tal caso, la guida dell'inchiostro
è stata completata correttamente. Una
volta eseguita la guida dell'inchiostro,
installare la cartuccia di inchiostro.
Nota
Per evitare l'essiccazione di una cartuccia d'inchiostro aperta al termine di
una stampa o quando la stampante rimane inattiva per giorni, seguire la
procedura per riporre la cartuccia:
1. Pulire l'ugello della cartuccia d'inchiostro con alcol.
2. Sigillare la cartuccia d'inchiostro con la copertura protettiva e riporla a
una temperatura ambiente di 15 ~ 35 gradi.
Per la migliore qualità di stampa, pulire l'ugello della cartuccia con alcol
dopo aver rimosso la copertura protettiva, quindi installare nuovamente
la cartuccia nella stampante prima della stampa successiva.
P10P10
P10
Page 86

Utilizzo delle funzioni e istruzioni
Toccando Ink (Inchiostro), sulla
schermata viene visualizzato lo
stato dell'inchiostro, compresi
"Ink Low" (Inchiostro in
esaurimento), "No Ink" (Nessun
inchiostro) e "Invalid Ink"
(Inchiostro non valido).
Ink (Inchiostro)
1. Toccare Change Ink (Cambia
inchiostro) per confermare.
1
4
2
5
Change Ink (Cambia inchiostro)C1
2. Confermare l'operazione.
3
6
3. Attendere che la cartuccia
si sposti al centro del piano
di stampa, quindi cambiare
l'inchiostro.
Installazione della cartuccia
1. Sollevare la piastra.
2. Estrarre la cartuccia.
3. Inserire la nuova cartuccia.
4. Controllare se la cartuccia è collocata correttamente.
5. Premere la piastra sul piano superiore.
6. Controllare se l’ordine del colore di inchiostro è K
(Nero), C (Ciano), M (Magenta) e Y (Giallo) da sinistra
a destra.
Nota: per la sostituzione di qualsiasi cartuccia di inchiostro, effettuare il test di calibratura del getto di inchiostro.
4. Toccare PROCEED
(PROCEDI) dopo il cambio.
P11P11
P11
Page 87

Utilizzo delle funzioni e istruzioni
C2-1 Ink
Si consiglia di stampare una pagina di prova dopo l'installazione della cartuccia di inchiostro. Preparare un foglio di carta.
(Calibratura).
4. Estrarre il magnete in gomma
rimovibile EZ. Utilizzare il nastro
per ssare il foglio A4 in direzi-
one verticale sul lato anteriore
del magnete in gomma.
(Inchiostro)
Calibration
2. Toccare Test Page (Pagina di
prova).
5. Serrare/tirare il foglio A4 in
modo che sia piano (senza
spazi) sul magnete in gomma.
(Calibratura)
Test Page
. Test Page.1. Toccare Calibration
3
6. Piegare accuratamente la parte di foglio A4 in eccesso sul retro
del magnete in gomma.
(Pagina di prova)
Paper Test Page
7. Reinserire il magnete in gomma sul piano di stampa come
opportuno.
C2-1 Ink
1. È anche possibile scegliere
di stampare la "PLA Test
Page" (Pagina di prova in
PLA) per confermare lo stato
dell'inchiostro.
5. Conferma se il lavoro di
stampa è stato completato.
(Inchiostro)
8. Fissare la carta sul piano di
stampa e toccare PROCEED
(PROCEDI). La stampante
effettua una stampa di prova.
Calibration
2. Tocca "PLA Test Page"
(Pagina di prova in PLA) per
stampare.
6. Rimuovi l'oggetto di stampa e
verica lo stato di colorazione.
(Calibratura)
9. Rimuovere la pagina di
prova e toccare PROCEED
(PROCEDI).
Test Page
3. Attendi il riscaldamento
dell'estrusore no alla
temperatura operativa.
(Pagina di prova)
PLA Test Page
4. Stampa della "PLA Test
Page" (Pagina di prova in PLA)
in corso.
P12P12
P12
Page 88

Utilizzo delle funzioni e istruzioni
C2-2
Ink (Inchiostro)
Immagine 1 Immagine 2 Immagine 2-1
L’immagine 1 mostra un esempio
di una normale pagina di prova.
Immagine 3
L’immagine 3 mostra un esempio di pagina di
prova non valida.
Si nota una riga bianca sulle barre di colore
orizzontali e verticali.
Seguire le fasi seguenti.
Calibratura dell'inchiostro
L’immagine 2 mostra un leggero
offset di colore sulla parte orizzontale della pagina di prova. È al
di sotto del range accettabile. Se
la stampa della pagina di prova
dovesse peggiorare, passare alla
procedura di pulizia.
Risoluzione di problemi della cartuccia di inchiostro
L’immagine 2-1 mostra una leggera sbavatura dell’inchiostro nero
sulla parte orizzontale e verticale
che può accadere anche con altri
colori.
Rientra nel range accettabile.
fase 1
Reinstallare la cartuccia e stampare la pagina di
prova. Se il problema non viene risolto, procedere
con la fase 2.
fase 2
Vericare che non vi siano cavi strappati o un cuscinetto di contatto danneggiato come nell’esempio
indicato.
Se si individua un cavo strappato, sostituire la cartuccia con una nuova.
Se si individua un cuscinetto di contatto danneggiato e anche il pin nella postazione della cartuccia è
danneggiato, contattare l’assistenza per una sostituzione.
Cartuccia NG (cavo e
cuscinetto strappati)
Nota: fare riferimento al nostro sito Web di assistenza per la procedura di pulizia delle cartucce di
inchiostro più recente.
Fare riferimento a C2-1 per la preparazione della
pagina di prova A4.
Cartuccia normale
fase 3
Vericare che non vi siano cartucce con possibili
otturazioni della testina di inchiostro come illustrato
nell’esempio.
Effettuare la procedura di pulizia della cartuccia al
paragrafo sulle linee guida per l’inchiostro alla pag. 10.
Se il problema non viene risolto, passare alla fase 4.
Pulire la testina di
inchiostro
fase 4
Utilizzando un foglio di carta
assorbente, coprire la cartuccia di inchiostro come illustrato nell’immagine 4 e premerla
verso il basso.
Se fuoriesce dell’inchiostro,
stampare la pagina di prova.
Se il problema non viene
risolto, sostituire la cartuccia
di inchiostro con una nuova.
Testina di inchiostro
otturata/sporca
P13P13
P13
Page 89

Utilizzo delle funzioni e istruzioni
C2-3 Ink (Inchiostro)
(Calibratura).
5. Controllare la tabella di
calibratura stampata utilizzando
le istruzioni su schermo. Per
ogni colore, selezionare la linea
meglio allineata con il nero (K).
Calibration (Calibratura) Color Calibration (Farbkalibrierung)
2. Toccare Color (Colore).
6. Per l'allineamento
orizzontale, immettere il numero
corrispondente ad ogni colore.
Dopo aver immesso il numero,
toccare PROCEED (PROCEDI).
3. Sistemare la carta di stampa sul piano di stampa.1. Toccare Calibration
4. Estrarre la carta stampata e
toccare PROCEED (PROCEDI).
7. Per l'allineamento
verticale, immettere il numero
corrispondente ad ogni colore.
Dopo aver immesso il numero,
toccare PROCEED (PROCEDI).
8. Vericare i numeri immessi
nelle confezioni e toccare
PROCEED (PROCEDI).
C2-4
1. Toccare Inkjet Calibration
(Calibratura inchiostro).
Attenzione: assicurarsi che il magnete in gomma rimovibile EZ sia
stato posizionato nel piano di stampa.
5. La stampante avvia automaticamente
la scheda di calibratura. Questa
operazione richiede circa 15 minuti.
(Assicurarsi di aver caricato il lamento.)
Ink (Inchiostro)
Calibration (Calibratura) Inkjet Calibration (Calibratura inchiostro)
2. Inkjet Calibration.
3. Vericare che il piano di
stampa sia libero.
4. L'operazione di stampa
si avvia una volta riscaldato
l'ugello di stampa.
6. Al termine della stampa,
estrarre la scheda di calibratura.
7. In orizzontale e in verticale,
trovare la confezione in cui
l'inchiostro è meglio allineato e
toccare PROCEED (PROCEDI).
8. Direzione verticale: immettere
il numero della confezione in
cui si ritiene che il lamento
e l'inchiostro siano meglio
allineati e toccare PROCEED
(PROCEDI).
9. Direzione orizzontale:
immettere il numero della
confezione in cui si ritiene
che il lamento e l'inchiostro
siano meglio allineati e toccare
PROCEED (PROCEDI).
10. Al termine della calibratura,
toccare PROCEED (PROCEDI)
per terminare la calibratura
dell'inchiostro.
P14P14
P14
Page 90

Utilizzo delle funzioni e istruzioni
C2-4 Ink (Inchiostro)
1. Una volta stampato l'oggetto a colori, se riscontri una modica
del colore, puoi regolare manualmente la posizione di stampa.
Y-Axis
X-Axis
2. La posizione di regolazione
dell'asse X e dell'asse Y era la
posizione campione, guardando
la stampante.
Calibration (Calibratura) Inkjet Calibration (Calibratura inchiostro)
Regola manualmente il
movimento dell'asse X
Seleziona “X-AXIS” (asse X)
per lo spostamento a destra e
sinistra. Premi il pulsante “Left”
(sinistra) o “Right” (destra) per
selezionare la direzione e la
distanza da regolare, ciascuno
esegue una regolazione di un
incremento di 0,05 mm.
Regola manualmente il
movimento dell'asse Y
Seleziona “Y-AXIS” (asse Y) per
lo spostamento verso l’alto e
verso il basso. Premi il pulsante
“Up” (su) o “Down” (giù) per
selezionare la direzione e la
distanza da regolare, ciascuno
esegue una regolazione di un
incremento di 0,05 mm.
Una volta completate le
impostazioni dei parametri,
tocca "PROCEED" (procedi)
per salvare e applicare le
impostazioni specicate.
Se desideri eseguire il ripristi-
no, seleziona “Re-Type” (digita
di nuovo) per tornare all’impostazione della posizione di
spostamento dell’asse X.
P15P15
P15
Page 91

Utilizzo delle funzioni e istruzioni
D. Settings (Impostazioni)
D1
D2
D3
D1-1
1. Selezionare Calibration
(Calibratura).
3. Attendere che il sensore misuri l’altezza del piano di stampa in tre diversi punti. Al termine della misurazione, la stampante livella automaticamente il piano di stampa.
Attenzione: assicurarsi che il magnete in gomma rimovibile EZ sia stato posizionato nel piano di stampa.
Print-Bed (Piano di stampa)
2. Confermare l'operazione.
D4
D6
D8
D5
D7
D9
Calibratura del piano di stampa (livellamento)
D10
4. Una volta terminata completamente la calibratura, toccare
per confermare.
D1-2
1. Toccare Z-offset (Offset Z). 3. Gli utenti possono toccare
Print-Bed (Piano di stampa)
2. Spostare la testina di stampa
al centro del piano di stampa.
Si consiglia che la testina di
stampa e il piano di stampa
vengano appena a contatto e
che l'ugello si possa spostare
uniformemente sul piano di
stampa.
Z-offset (Offset Z)
l'icona per sollevare o
abbassare il piano di stampa.
Quanto più elevato è il valore,
maggiore sarà la distanza e
viceversa.
Jog Mode (Modalità jog)D1-3 Print-Bed (Piano di stampa)
Jog Mode (Modalità jog) consente di spostare manualmente la testina di stampa
tramite il touchscreen.
Come spostare la testina di stampa:
1. Tornare al punto di origine. Tornare sempre al punto di origine prima di effettuare
un movimento in qualsiasi direzione.
2. Spostarsi sull'asse X.
3. Spostarsi sull'asse Y.
4. Spostarsi sull’asse Z. (Non alzare/spostare verso l’alto quando la testina di stam-
pa si trova nella posizione di origine per evitare di colpire il piano di stampa.)
32 4
1
P16P16
P16
Page 92

Utilizzo delle funzioni e istruzioni
D2-1
1. Pulire l’ugello dopo 60 ore di
stampa.
Print-Head
Clean Nozzle (Pulizia ugello)
2. Toccare Clean Nozzle (Pulizia
ugello) nella sezione della testina di
stampa.
3. Vericare se è necessaria la pulizia. Toccare Check (Controlla) per pulirlo.
Quando la temperatura della testina di stampa raggiunge la temperatura operativa, si avvia l'operazione di pulizia.
Nota: non toccare la parte metallica della testina di stampa, in quanto diventa calda durante il funzionamento.
4. Inserire il lo di pulizia del
foro di alimentazione nel foro di
alimentazione e spingerlo verso il
basso per estrarre il lamento dalla
testina di stampa. (Si consiglia di
eseguire l'operazione dalla parte
superiore della macchina.)
5. Rimuovere il residuo di lamento
dalla testina di stampa con uno
spazzolino metallico.
6. Inserire il lo di pulizia della testina di stampa nell’ugello dalla parte
inferiore per pulirla.
7. Al termine dell'operazione di
pulizia, toccare DONE (FINE).
Per evitare di influire negativamente sulla qualità di stampa a causa di filamenti residui e accumulati, con conseguente scarico
scadente, dopo l'uso prolungato dell'ugello di stampa, si consiglia di attivare la funzione "CLEAN NOZZLE" (PULIRE AUGELLO)
Nota
(pulizia dell'ugello) della stampante ogni 60 ore di stampa per eliminare i residui con filo per la pulizia degli ugelli o filo
per la pulizia del percorso di alimentazione. (Il filamento deve essere scaricato dall'estrusore prima di pulire il percorso di
alimentazione.)
D2-2 Print-Head
1. Toccare Change Nozzle (Cambia
ugello).
5. Spegnere l'alimentazione prima di
cambiare la testina di stampa.
Change Nozzle (Cambia ugello)
2. Toccare per confermare la pulizia
dell'ugello.
6. Cambiare la testina di stampa
dalla parte superiore della macchina.
3. Attendere che la testina di stampa
si sposti nella posizione corretta per
il cambio.
7. Premere il tasto di rilascio bianco
per separare la testina di stampa.
4. La posizione di cambio della
testina di stampa viene mostrata in
precedenza.
8. Tenere la testina di stampa con
una mano e rimuovere il bus con
l'altra. La rimozione della testina di
stampa viene completata.
Sequenza di installazione della nuova
testina di stampa:
1. Collegare il bus.
2. Premere il tasto di rilascio bianco sulla testina di
stampa e montare la testina di stampa e il mec-
canismo. Una volta ssata la testina di stampa,
vericare che sia salda e non oscilli.
3. Accendere e utilizzare la stampante.
P17P17
P17
Page 93

Utilizzo delle funzioni e istruzioni
Filament (Filamento)
D3
Fare riferimento alla funzione Change Filament (Cambia lamento) nella schermata principale. Il lamento non utilizzato per un giorno
deve essere conservato nella busta con chiusura lampo.
WiFi
D4
Prima di accendere la stampante
e impostare la rete Wi-Fi, inserire il
dongle WiFi nella porta USB sulla parte
superiore della stampante.
1. Toccando ADD (AGGIUNGI),
la stampante cerca gli access
point disponibili.
2. Toccare l'access point da
utilizzare.
3. Immettere la password
dell'access point.
4. Vericare che la connessione
sia completata.
Utilizzare XYZmaker per vericare che la connessione WiFi sia stata stabilita correttamente
●
Utilizzare un cavo USB per collegare la stampante al computer ed eseguire XYZmaker.
●
Vericare che la connessione WiFi sia attivata sul computer e connettersi all'access point.
1. Eseguire XYZmaker. Fare clic su File > Print > da Vinci
Printer Plugin.
2. Selezionare la stampante da utilizzare.
3. Quando sul software viene visualizzato
”READY” (PRONTO), la connessione è
stabilita correttamente. Quindi, è possibile
fare clic su “DASHBOARD” per monitorare la stampante o su “PRINT” (STAMPA)
per stampare un le.
DASHBOARD:
della testina di stampa, il lamento utilizzato
e il caricamento/lo scaricamento del lamen-
to.
monitorare la temperatura
PRINT (STAMPA):
la qualità di stampa. Se è necessaria unica-
mente la conversione del le, toccare “PREPARE” (PREPARA).
impostare i parametri e
P18P18
P18
Page 94

Utilizzo delle funzioni e istruzioni
Language (Lingua)
D5
Impostazione Change Language
(Cambia lingua)
La stampante 200 xTCS offre otto lingue di visual-
izzazione, tra cui cinese tradizionale e semplicato,
inglese, giapponese, tedesco, italiano, spagnolo e
francese. L’impostazione della lingua può essere
modicata toccando Settings (Impostazioni) > Languages (Lingue) nella schermata principale.
Display
D7
L’impostazione Display può essere
impostata sul touchscreen per disattivarla quando rimane inattiva dopo un
periodo di tempo impostato. Vi sono
cinque impostazioni, tra cui un minuto,
due minuti, tre minuti, cinque minuti e
sempre attivo.
Sound (Suono)
D6
L’opzione Sound (Suono) può essere impostata su ON
o OFF per controllare il suono emesso quando si tocca
il touchscreen.
Statistics (Statistiche)
D8
La funzione Statistics (Statistiche) consente di registrare i dati cronologici dal momento in cui si è accesa la stampante, tra cui:
Uptime (Tempo di attività)
Filament (Filamento)
Temperatura
Nozzle (Ugello)
Print Job (Lavoro di stampa)
Last Calibration (Ultima calibratura)
Ink Cartridge (Cartuccia di inchiostro)
P19P19
P19
Page 95

Utilizzo delle funzioni e istruzioni
Door Lock (Blocco sportello)
D9
1. Blocco sportello attivato (ON):
durante la stampa, lo sportello è
bloccato; 60 sec dopo il termine della
stampa, lo sportello si sblocca. Lo
sportello viene sbloccato quando gli
utenti toccano Pause (Interrompi) o
Stop (Arresta) durante la stampa. Lo
sportello si blocca di nuovo, quando si
chiude lo sportello e la stampa riprende.
D10
Reset (Ripristina)
2. Blocco sportello disattivato (OFF):
lo sportello non si sblocca durante la
stampa, l'interruzione o l'arresto.
Le informazioni sulla stampante
vengono eliminate e vengono
ripristinate le impostazioni predenite.
P20P20
P20
Page 96

Stampa
Prima stampa
Gli utenti possono effettuare la prima stampa attenendosi alle procedure di seguito.
Calibration
(Calibratura)
D1-1 B C C A
Z-offset
(Offset Z)
D1-2
Load Filament
(Carica
lamento)
Change Ink
(Cambia
inchiostro)
Calibration
(Calibratura)
- Test Page (Pagina di prova)
- Color Calibration (Calibratura colore)
- Ink jet Cal ibrati on (Calibratura inchiostro)
Preparare il
le, quindi
eseguire la
stampa
Trasferire i le da stampare tramite il software per PC “XYZmaker”
È necessario disporre di accesso a Internet per la registrazione del prodotto e l’accesso al software.
Collegare la stampante al computer con un cavo USB e installare “XYZmaker” sul computer per trasferire i le da stampare.
“XYZmaker” è compatibile con sistemi operativi da 64 bit Windows e Mac OS 10.10, 10.11 e 10.12. È possibile installarlo utilizzando l’unità USB inclusa o scaricando il programma di installazione dal sito Web ufciale XYZprinting. Anche il manuale d’uso del
software può essere scaricato dal sito Web ufciale.
Per i dettagli, visitare il sito web ufciale: http://www.xyzprinting.com/
1. Collegare il computer alla stampante e selezionare PartPro200 xTCS.
2. Fare clic su OPEN (APRI) per selezionare il le del modello
da stampare dalla cartella. È possibile regolare le dimensioni
dell’oggetto, la posizione di stampa e l’angolo, una volta
caricato il le. Per stampare oggetti a colori, salvare il le da
stampare in formato obj e caricarlo in XYZmaker.
3. È possibile modicare le impostazioni correlate in base al
risultato ed effetto di stampa desiderati.
4. La funzione Prepare (Prepara) è in grado di convertire un le
obj in un le .3cp.
Una volta modicato e regolato il le, fare clic su Print (Stam-
pa) per emettere l’oggetto. L’operazione di stampa si avvia
una volta sezionato il le.
P21P21
P21
Page 97

Scansione
Monta il modulo di scansione sulla macchina (vedi i passaggi di installazione) e installa il software “XYZscan Color” sul
computer per attivare la funzione di scansione della tua stampante 3D.
Posiziona il lato anteriore dell’oggetto da scansionare verso il modulo di scansione; occorrono circa 10-15 minuti per la
scansione. Quando scansioni un oggetto, la piattaforma girevole ruota in senso orario. In questa fase, la videocamera sul
modulo di scansione acquisirà immagini continue a una velocità di 30 immagini al minuto. Una volta completata la scansi-
one, “XYZscan Color” visualizzerà l’immagine 3D acquisita nell’immagine 3D.
Descrizione del prodotto
Modulo di scansione
Requisiti hardware
Sistemi operativi Windows 7, 8.1, 10 (64-bit)
Requisiti minimi di
sistema
CPU Intel® Core™ i5 4° generazione
USB 2.0
8 GB / Spazio su disco sso o superiore
Supporto della scheda graca OpenGL 2.1
o superiore
Scan-Spezikationen
Tecnologia di scansione Photogrammetry 3D
Risoluzione di scansione
(Diametro x H)
Software di scansione XYZscan Color
Carico utile della piattaforma girevole ≦ 3 Kg/6.6lbs
Risoluzione 5M pixel
Precisione di scansione 1.48 mm
Formato dei le OBJ, STL
5cm ϕ x 5 cm – 14cm ϕ x 14 cm (H)
installare il Moduli di scansione
Per installare il modulo di scansione, allinearlo con la base dello scanner, premere e tenere premuto il pulsante e ssarlo
alla base verticalmente.
Slot del modulo
di scansione
Attaccare il modulo di
scansione verticalmente
alla base.
Pulsante
P22P22
P22
Page 98

Scansione
I limiti dell'oggetto da scansionare
El objeto debe ser estable y estar jo. No debe agitarse ni moverse durante la rotación de la plataforma giratoria.
•
L'area di scansione per la modalità oggetto è pari a 5 cm ϕ x 5 cm – 14 cm ϕ x 14 cm (H).
•
L'oggetto non deve essere riettente, trasparente o traslucido.
•
Gli oggetti con supercie riettente, materiale metallico o trasparente avranno un impatto negativo sulla qualità della
•
scansione. Se desideri scansionare un oggetto di questo tipo, si raccomanda di spruzzare il developer sulla supercie
prima della scansione.
La qualità di scansione può variare sugli oggetti di colore neutro, senza caratteristiche di rilievo, o con sezioni grandi di
•
forma piana.
Gli oggetti rotondi avranno buoni risultati di scansione, mentre gli oggetti molli e lunghi o appuntiti non otterranno buoni
•
risultati.
Fasi di scansione fasi - Monta la piastra di ombreggiatura
1. Rimuovi l'oggetto dalla
piattaforma girevole.
2. Attendi no a quando la piattaforma girevole di scansione
non ritorna in posizione.
Fasi di scansione fasi
1. Seleziona il modulo di scansione in Settings (Impostazioni).
2. Svuota la piattaforma della
stampante.
inferiore della piastra di
ombreggiatura nei fori e ssali.
3. Monta la piastra di
ombreggiatura.
Direzione del fermo.Inserisci i due lati nella parte
3. Monta la piastra di
ombreggiatura.
L'installazione della piastra
di ombreggiatura è stata
completata.
4. Attendi no a quando la
piattaforma della stampante
non ritorna in posizione.
5. Posiziona l'oggetto da
scansionare.
6. L'oggetto è in fase di
scansione.
7. Al termine della scansione,
puoi completare l'attività di
scansione ed eseguire altre
attività.
P23P23
P23
Page 99

Scansione
Software di scansione: Aziona XYZscan Color
Assicurarsi che il backplane di scansione sia installato
correttamente nella stampante 3D e premere il pulsante
"Scansione" sul pannello LCM, assicurarsi che la stampante
entri nella modalità di scansione.
1. Apri il software di scansione.
2. Verica la luminosità ambiente nella schermata di
anteprima. Regola le impostazioni preliminari. Se non
vengono rilevati errori, fai clic su "Scansiona" per eseguire
la procedura.
3. Nell'area Anteprima modello, il modello ruota lentamente.
Attendi no a quando non vengono create nuvole di punti
di scansione.
4. Attendi no a quando non vengono create nuvole di punti
di scansione. Premi Continua ed esegui la retinatura.
5. La scansione è stata completata.
1. Puoi ottenere prestazioni migliori con buone
Nota
* Per i dettagli relativi alla caratteristica di scansione, fai
riferimento a "Manuale d'uso del software XYZscan Color".
condizioni di luminosità.
2. Il lato anteriore dell'oggetto da scansionare deve
essere rivolto verso il modulo di scansione.
Illustrazione ambientale
Piano rotante
di scansione
Modulo di scansione
Utilizza la piastra di calibratura
Quando la stampante viene trasferita o quando il risultato di scansione non è accurato, effettua i passaggi seguenti per
calibrare il modulo di scansione:
1. Rimuovi l'oggetto dalla piattaforma girevole.
2. Esegui "Impostazioni" > "Calibra" nel menu principale di "XYZscan Color."
3. Utilizza la piastra di calibratura.
Quando il suggerimento della schermata ti chiede di posizionare la piastra di calibratura, segui le istruzioni e posiziona
la piastra di calibratura al centro della piattaforma girevole. (Il lato con il prolo a scacchi è rivolto verso il modulo di
scansione, quindi fai scattare il fermo inferiore in quello centrale della piattaforma girevole). Fai clic su "Calibra ora" nel
software.
4. Verica che la piastra di calibratura sia correttamente visualizzata nella schermata di anteprima. Se è corretta, fai clic su
"Calibra" per seguire la procedura di calibratura.
5. Attendi che XYZscan Color esegua la calibratura con la stampante (occorrono circa 2 minuti).
6. Quando XYZscan Color indica che la calibratura è stata completata, rimuovi la piastra di calibratura dalla piattaforma
girevole.
7. Fai clic su "Conferma" nel software per uscire da questa funzione e procedere con la scansione.
P24P24
P24
Page 100

Dettagli sull’assistenza
In caso di problemi alla stampante, fare riferimento alle seguenti istruzioni di risoluzione dei problemi. Se il problema persiste, contattare
il Centro assistenza clienti.
Codice e gestione del problema
In caso di problemi alla stampante, il codice di servizio viene visualizzato sulla schermata della stampante e/o sull'interfaccia software.
Fare riferimento al modulo di descrizione di questo codice di servizio per il test preliminare.
Codice
servizio
OO11 Testina di stampa riscaldata troppo a lungo
OO14
OO30 Anomalia--asse X
OO31 Anomalia--asse Y
OO32 Anomalia--asse Z
OO50 Errore comunicazione interna -- errore di memoria riavviare la stampante
OO52 Errore di memoria testina di stampa sostituire la testina di stampa
OO55 errore testina getto di inchiostro sostituire la testina getto di inchiostro
OO56 errore dati getto di inchiostro riavviare la stampante
Problema Azione
Problema di testina di stampa riscaldata-surriscaldamento
controllare il cavo piatto flessibile e riavviare
controllare il cavo del motore e del sensore e
controllare la posizione del sensore
Manutenzione e assistenza
Conservare il materiale di imballaggio originale per inviare l'unità per la riparazione durante il periodo della garanzia. Se si utilizzano
altri materiali di imballaggio, la stampante potrebbe danneggiarsi durante il processo di trasporto. In tal caso, XYZprinting ha il diritto di
addebitare i costi di riparazione.
P25P25
P25
 Loading...