

Page 1

Changer (0302) - Assembly and Operation Manual
Congratulations on purchasing an MDB Family product.
to the following guidelines for assembly, maintenance and operation. This product is for residential use only.
Any institutional use is strictly prohibited.
Please be sure to follow the instructions for proper assembly. Use a Phillips head screwdriver for the assembling the
product. Do not use power screwdrivers. All of our products are made from natural woods. Please understand that
natural woods have color variations which are the result of nature and are not defects in workmanship.
DO NOT SUBSTITUTE PARTS. ALL MODELS HAVE THE SAME QUANTITY OF PARTS AND HARDWARE.
YOUR MODEL MAY LOOK DIFFERENT FROM THE ONE ILLUSTRATED DUE TO STYLISTIC VARIATIONS.
This product will provide many years of service if you adhere
!
WARNING!
READ ALL INSTRUCTIONS BEFORE USE OF THE CHANGING TABLE, ADD-ON
CHANGING UNIT, OR CONTOURED CHANGING PAD.
revised 16JUL2015
page 1
Page 2
Unpacked and separated all parts, bolts and screws. All holes for attachment, including the ones for an optional
drawer, have been pre-drilled. No drilling by the customer is necessary. Ask your store or call us for replacement of missing part.
Do not substitute parts. All models have the same quantity of parts and hardware. Your model may look different from the one illustrated due to stylistic variations. We continue to improve our product and may make minor
changes to the design. These changes may not be reflected in the instructions.
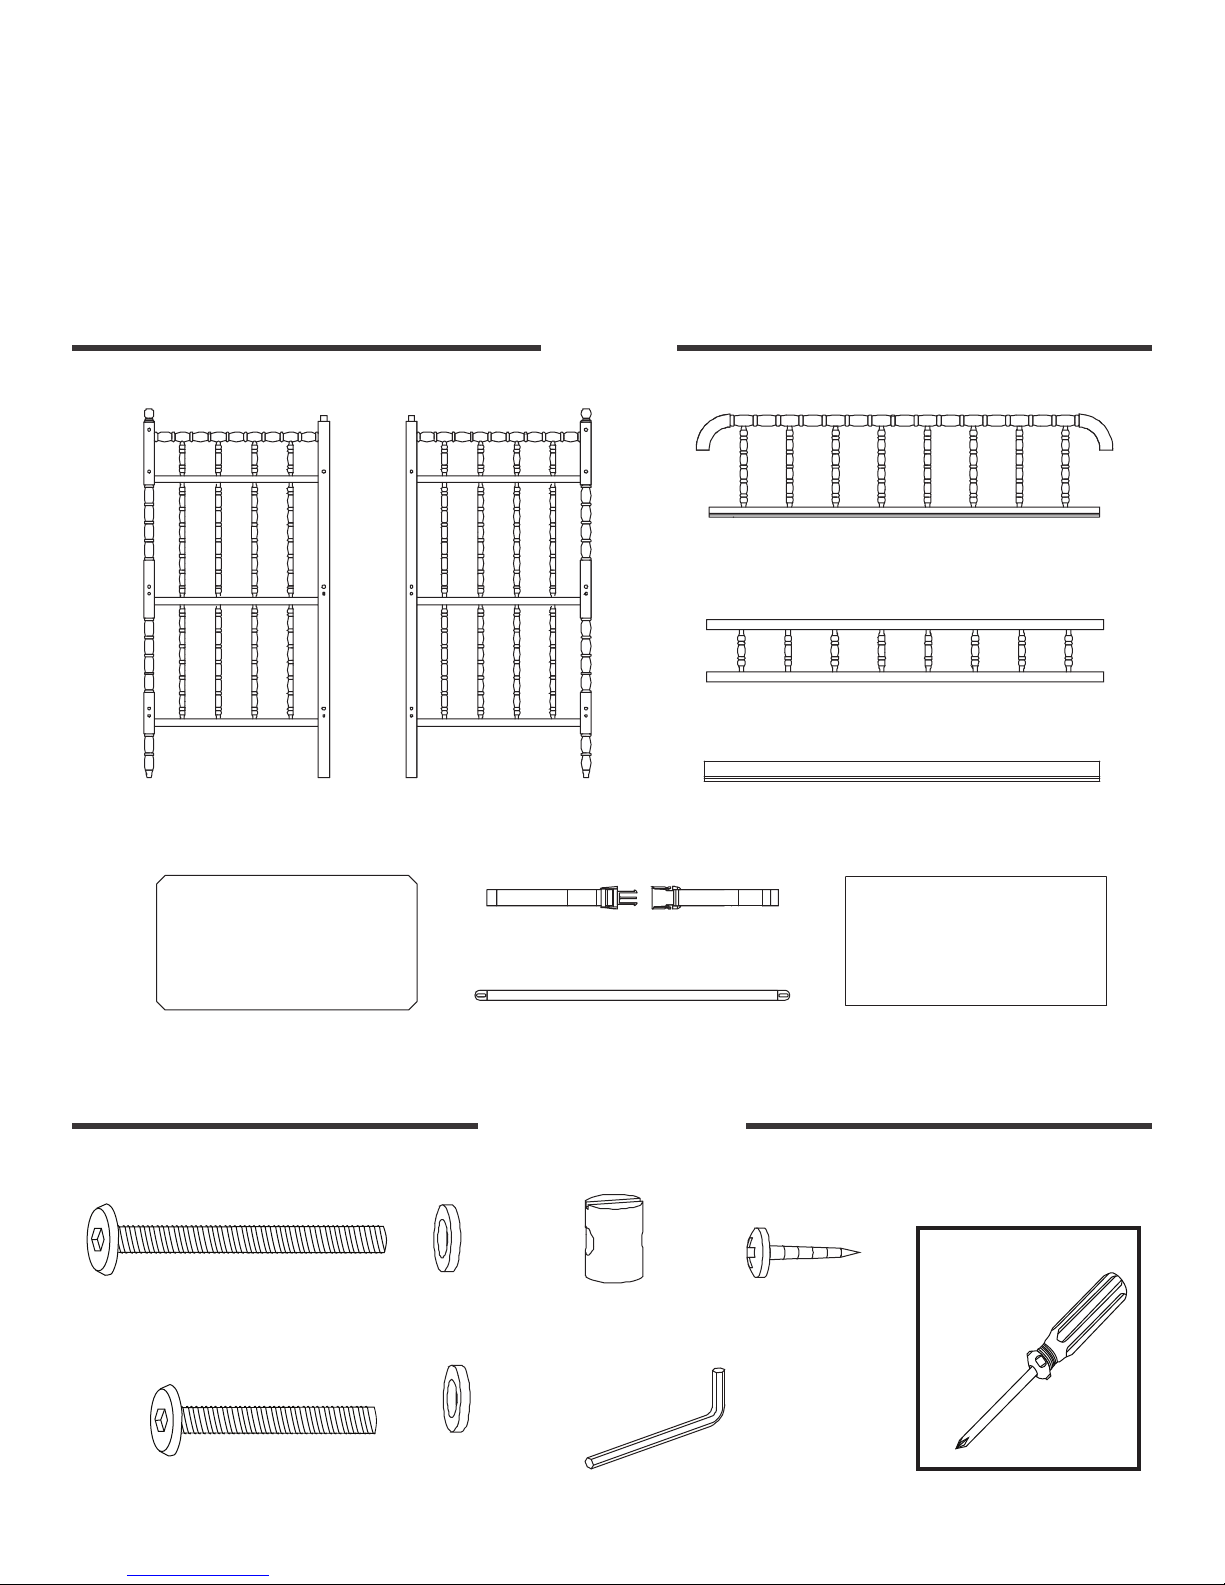
PARTS
C. Top back rail
A. Left panel B. Right panel
G. Safety strap
F. Shelf boards (3)
H. Metal cross brace (3)
HARDWARE
D. Top front rail
E. Shelf rails (4)
J. Changing pad
Tools Needed
(not included)
K. 2” Allen head bolts & washers (8)
M. 1-1/2” Allen head bolts & washers (6)
L. Barrel nut (8) N. 5/8” Wood
screws (6)
Phillips
screwdriver
O. Allen wrench
page 2
Page 3

BARREL NUT - ADDITIONAL INSTRUCTION
Step 1
STEP 1.
All barrel nuts are threaded and come pre-attached to the
bolts. Please ensure you have the correct number of
barrel nuts needed as indicated in the instruction manual
before assembly.
Step 2
Insert the barrel nuts all the way into the holes. Do not
insert at an angle to avoid damaging the threaded area.
Step 3
Please use an
washer straight into the threaded nut until it is tight.
* The bolt may not be able to screw
through the barrel nuts smoothly. It is
suggested to use a flat screwdriver to
stabilize and adjust the direction of the
barrel nut.
Please follow the rest of the instruction steps in the instruction manual to complete the assembly.
Allen wrench
to screw the bolt with the lock
Flat Screwdriver
Allen wrench
page 3
Page 4

ASSEMBLY INSTRUCTIONS
Step 1
Use the Allen head bolts and washers
M to connect the top back rail C to the
left panel A. Use the Allen head bolts
and washers K and barrel nuts L to
connect the shelf rails E to the same
panel.
A
C
M
Step 2
Make sure the groove at each rail
faces the inside of the unit.
M
L
E
L
K
D
E
L
K
A
L
Step 3
Turn the unit on its side as shown.
F
page 4
Page 5

Step 4
K
M
B
Step 5
L
L
Step 6
Adjust the safety strap and test the locking mechanism.
Slide the male connector into the female connector until
they lock together. Press the side tabs on the male
connector to release. Make sure the safety strap goes
over the pad. Recheck all connections.
J
page 5
Page 6

Step 7
FURNITURE ANTI-TIPPING KIT INSTALLATION
Serious or fatal crushing can occur when furniture tips over on children. To help prevent tip-over, follow the
steps below to install this anti-tipping strap.
WARNING
Serious or fatal crushing injuries can occur
from furniture tip-over. To help prevent
tip-over:
Install tipover restraint provided.
Place heaviest item in the lowest drawers.
Unless specifically designed to accommodate,
do not set TVs or other heavy objects on
top of this product.
Never allow children to climb or hang on
drawers, doors, or shelves.
Never open more than one drawer at a time.
(OR)
Do not defeat or remove the drawer interlock
system.
Use of tip-over restraints may only reduce,
but not eliminate, the risk of tip-over.
This is permanent label. Do not attempt to remove!
X 1
X 1
Tools Needed (not included)
Stubby
Screwdriver
Pencil
X 2X 1
X 2X 1
Phillips
screwdriver
7A
Short
screw
7B
7C
7C.1
3/16”
2”
7C.2
page 6
Page 7

7D
7E
Long
screw
READ ALL INSTRUCTIONS BEFORE
USING THE PRODUCT. KEEP THE
INSTRUCTIONS FOR FUTURE USE.
KEEP THIS MANUAL IN A SAFE
PLACE FOR FUTURE REFERENCE.
Finish
The recommended maximum
weight of the occupant is 30 lbs
on changing table.
page 7
Page 8

ONE YEAR LIMITED WARRANTY:
WARNING!
FALL HAZARD
TO PREVENT DEATH OR SERIOUS
INJURY, ALWAYS KEEP CHILD WITHIN
ARM’S REACH.
READ ALL INSTRUCTIONS BEFORE ASSEMBLING THIS
PRODUCT. KEEP THE MANUAL FOR FUTURE USE.
WARNING:
• Always secure this pad to the changing surface (removable
or stationary changing tray) by placing the pad within the
boundaries of the tray. See instructions.
• The pad is to be used on a surface that is level, stable and
structurally sound with a minimum surface dimension of
34” by 17”.
• Read all instructions before use of the changing table.
• Do not use changing table if it is damaged or broken.
• This product is not intended to be used as a changing table
without adult supervision. Use of the product without this
may result in death or serious injury to your child from falling.
Follow all instructions on attaching and using the changing
table.
• Only use the pad provided by MDB FAMILY.
• The maximum weight of the child for which the changing
table is intended is 30 lbs.
• Stop using this changing table when the child is able to sit
up or roll over.
• As with all infant and baby furniture, it is important to check
fasteners, screws, and bolts periodically for tightness.
Parents should ensure a safe environment for their child by
checking the furniture regularly before placing the child in the
product.
• When using this product, always secure the child with the
safety strip.
We will replace any missing parts at the time
of purchase or any defective item within a
one year period from the date of original
purchase. Please keep your receipt so that
we may process your warranty request. This
warranty only covers new units with original
packaging and ownership, and is not transferable. It does not cover any used, secondhand or demo models.
This warranty does not cover any damaged
or defective parts that result from installation
and assembly, normal wear and tear, abuse,
negligence, improper use or alteration to the
finish, design, and hardware. The specific
legal rights of this warranty may vary from
state to state. Some states do not allow any
exclusion or limitation of incidental damages. Some states do not allow limitation on
how long an implied warranty lasts.
Storage:
Pine woods exchange moisture with the air adjust-
•
ing to major changes in room temperature and
humidity. Therefore, it is best to place your furniture
away from heating or air-conditioning vents.
Sunlight is not friendly to solid wood furniture and
•
prolonged direct exposure to harsh sunlight can
discolor the finish. Be careful not to place your furniture in direct sunlight for extended periods of time. As
with all your fine furniture, blot up spills immediately.
Care and Cleaning:
Do not scratch or chip the finish. Do not use abra-
•
sive chemicals for cleaning. Clean with mild soap on
a soft rag. Rinse and dry thoroughly. If you ever
refinish this furniture, be sure to use only a non-toxic
finish specified for children’s products. If you choose
to refinish this furniture, the warranty will be voided.
WARNING!
FALL HAZARD
To prevent death or
serious injury, always
keep child within arm’s
reach. Never leave child
unattended and always
use restraining system.
Registering your product is even easier than
before. You can register your product on our
website at : www.themdbfamily.com
IF YOU WOULD LIKE TO ORDER
REPLACEMENT OR MISSING
PLEASE VISIT US AT:
WWW.THEMDBFAMILY.COM
OR YOU CAN CONTACT US BY MAIL:
MDB FAMILY
855 WASHINGTON BLVD.
MONTEBELLO, CA 90640
PARTS
page 8
Page 9

Restraint System
WARNING:
During the diaper changing process, be sure always to keep one hand on the baby to prevent the baby from falling off the
changing pad. Falling from the changing pad could cause severe injury or even death to the baby.
Step 1.
Place a baby on the pad with his/her bottom on the
top of the diaper. Safely secure the baby on the pad
with the safety straps and buckle on the pad. This
helps prevent the baby from falling off the pad,
which can result in severe injury or even death of
the baby.
Step 3.
Push the baby’s legs forward and create a cavity
under the baby’s bottom. Clean the baby.
Step 2.
Remove the dirty diaper from the baby.
Step 4.
Reattach the new diaper to a clean and happy
baby!
page 9
 Loading...