

Page 1
LCD EWP/Fan Digital Controller Customer Instructions – Part #18922 (July17) Page 1 of 12
77 Taras Avenue
P.O. Box 363
Altona North
Vic 3025 Australia
Phone: +61(0)3 9369 1234
Fax: +61(0)3 9369 3456
info@daviescraig.com.au
www.daviescraig.com.au
LCD EWP®/FAN DIGITAL CONTROLLER INSTRUCTIONS
(SUITABLE FOR USE WITH ALL DAVIES, CRAIG EWP®s (ELECTRIC WATER PUMP), EBP®s
(ELECTRIC BOOSTER PUMP), AND THERMATIC
®
FANS)
PLEASE READ ALL THESE INSTRUCTIONS THOROUGHLY BEFORE YOU START WORK.
DON’T RUSH - ENSURE YOU HAVE FULL UNDERSTANDING OF THE WORK AHEAD BEFORE YOU
COMMENCE. ENSURE YOU HAVE ALL TOOLS AND COMPONENTS REQUIRED.
Congratulations on your purchase of the Davies, Craig EWP®/Fan Digital
Controller (PATENTS: USA 6425353, EU 1133624, AUS 756453). This Controller will
manage the operation of your chosen EWP
®
or EBP® by varying the speed of
your pump in response to coolant temperature and it will manage the on/off
control of your Thermatic
®
Fan.
The Controller will run the EWP
®
after ignition shutdown to dissipate
heat and avoid heat-soak.
The Controller has a push-button control to allow you to choose one of
nine set operating temperatures.
Generally, higher engine temperatures will offer improved fuel
efficiency and lower temperatures will increase power.
It’s recommended that engine operational temperatures be checked
against those nominated by your vehicle manufacturer.
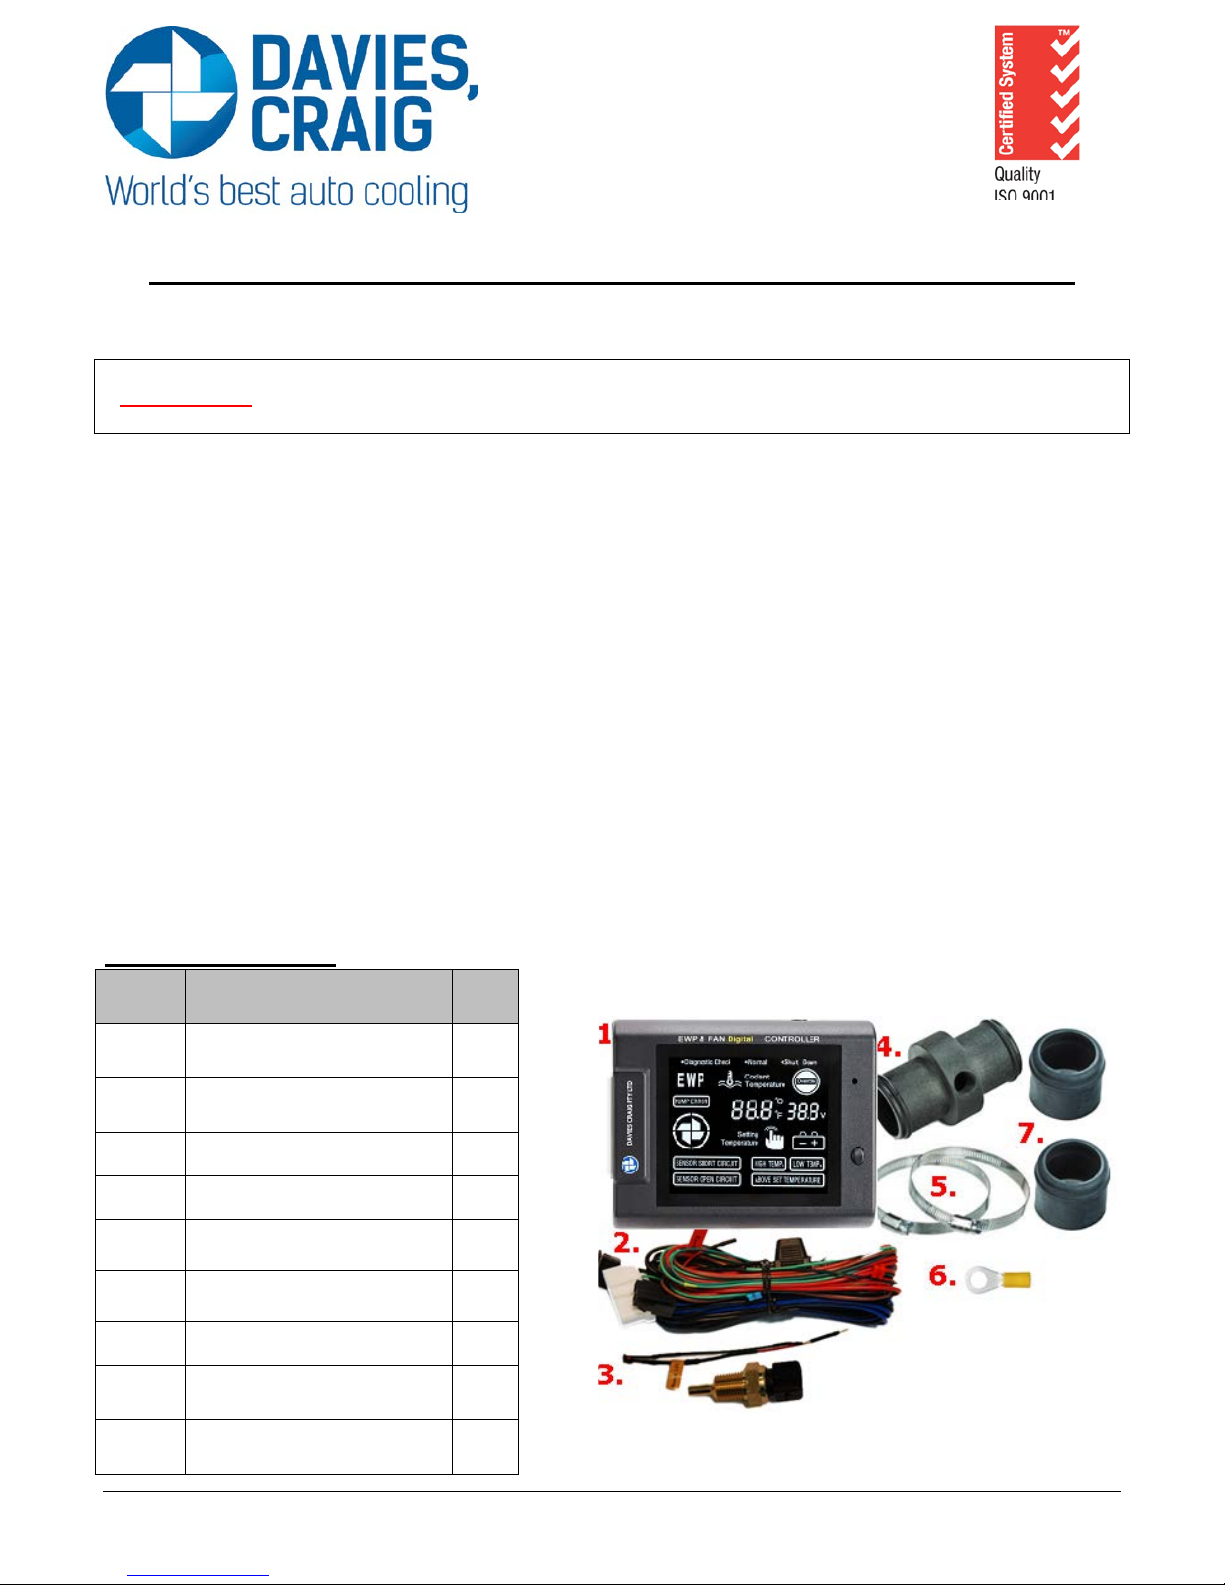
KIT CONTENTS:
Item
No.
Description Qty
1.
EWP Digital Controller
Assembly
1
2.
Wiring Harness
(Includes 10Amp Fuse)
1
3. Sensor Assembly 1
4. In-Line Adaptor 1
5.
Hose Clamps 2
6.
Ring Terminal 1
7. Rubber Sleeves 2
Not
Shown
Velcro 2
Not
Shown
Installation Instructions 1
Figure
1: LCD EWP/Fan Digital Controller Kit
Components.
Page 2

Page 2 of 12
INSTALLING THE LCD EWP®/FAN DIGITAL CONTROLLER
1. The Controller should be installed inside the pas senger compartment to mini mise its
ambient temperature and exposures to water as the unit is not waterproof. Also
minimise exposure to direct sunli ght. Locate a hole in the firewall (approx. 20 mm in
diameter) and pass the wiring harness (including the sensor & pump “T-connector”)
through. If a hole of adequate size cannot be located, then wires may be cut then rejoined as a last resort. Connect T-Plug in wiring loom to the pump.
2. Connect black Sensor Plug to the thermal sensor located in the thermostat
housing/inline adaptor (Refer to Digital Controller Wiring diagram, Page 3).
3. Connect the white plug in the wiring harness to the controller then mount the
controller with Velcro supplied. Ensure it is mounted where access to the
temperature adjustment button is easy. NOTE: Ensure a good earth connection
using the self-tapping scr ew provided. The ear th lead must be connected to a metal
part of the car body.
4. Connect the Red wire fro m the wiring harne ss to the batt ery positive us ing the ring
terminal provided. Connect the Green wire from the wiring harness to an ignition
source (accessor y +12V/24V or switched 12V/24V), the wires may be spliced then
soldered if necessary. Ensure no wire is exposed, by insulating the join with
electrical tape.
5. Connect the Green and Black striped wire to the fan rela y if you w ish to c ontro l the
Thermatic® Fan 3º C above the set temperature. NOTE: The Co ntroller will ea rth the
fan relay, not power it.
6. Mount ‘Remote Test Light’ in a locatio n where it will be visible. The ‘T est Light’ may
be fitted by inserting it through a 4.6mm diameter drilled hole in a plastic area of the
interior/dashboard or simply with adhesive tape. T he ‘Remote Test Light’ has a two
pin connections. Heat shrink or insulation tape can be applied to these pin
connections once th e te st lig h t is mo unted. This will ens ur e the co nne c tio n po i n ts ar e
insulated and secure.
NOTE:
In carrying out the wiring procedure, please bear in mind that it is adva ntageous
to minimise voltage drop by keeping the wiring as short as possible.
Remove the engine the rmos tat from the thermo stat ho using and i nstall the se nso r
using Method 1 or 2 as shown below.
If you often operate in very cold climates, drill 2 x 5mm holes in the thermostat
plate before reinstalling.
Ensure there is no damage to the thermostat-housing gasket, and re-fit the
thermostat housing without the thermostat.
Page 3

Page 3 of 12
OPERATION OF DIGITAL CONTROLLER
CONTROLLER ALGORITHM-PUMP OPERATION
The ‘set point’ can be programmed to any setting betw ee n 40°C (104°F) to 110°C
(230°F).
Figure 2: Digital Controller Wiring Diagram
Digital Controller Operation Chart.
Page 4

Page 4 of 12
OPERATION of LCD
THEMPERATURE INDICATOR
Rises with increased engine temperature
EWP SYMBOL
FLASHING = EWP
®
operating in ‘pulsing’ mode – Refer Digital Controller Operations
Curve, areas &
ON = Electric Water Pump (EWP®) working at full speed.
FAN SYMBOL Circulating = fan operating
DIAGNOSTIC CHECK
System warning has been triggered. Therefore, refer to “Diagnostic Chart” in order to
determine possible cause, and take measures to correct the problem.
REMOTE TEST LIGHT (RED)
This light will “flash” when the system works in diagnostic check mode.
SYSTEM CHECK:
Every time the ignit ion is turned ON, all s ymbols will illum inate. This featur e allows you
to check all functions are operational.
SHUT DOWN MODE:
Your Controller will continue to operate your EWP® for three (3) minutes or until the
coolant temperature has reduce d -10°C/-14°F below your set point – whichever occurs
first. The “Shut Dow n” feature will eliminate heat so ak and reduce engine temperature
evenly. The feature protects your engine against gasket damage due to hot spots. This
Figure 2: LCD EWP
®
/Fan Digital Controller.
A
B
C
Page 5

Page 5 of 12
cooling efficiency can be improved further with the use of high performance Davies
Craig Thermatic® Fan/s.
VOLTAGE DISPLAY:
Indicates the controller input voltage.
OVERRIDE:
When controller is at “Normal” mode, by pressing & holding the “Set Button” for 5
seconds the EWP® will override (7 Seconds for EWP & FAN). This feature benefits for
drive the EWP® at full speed similar as hot wire the pump. To cancel the “Override”
mode, press & hold the set button for 5 seconds or switch off the ignition.
°C to °F change:
When controller is at “Normal” mode, by pressing & holding the “Set Button” for 3
seconds the controller will change to °C to °F or °F to °C.
DIGITAL CONTROLLER THERMAL SENSOR INSTALLATION
There are two installation methods available.
METHOD 1: IN-LINE ADAPTOR METHOD (supplied & recommended)
As with other Davies Craig products the In-line Adaptor has universal application.
NOTE: Top Radiator Hose Measurements to Sleeve.
30 to 35 mm inside diameter (ID) – use adaptor without sleeves.
36 to 42 mm ID – use 2 sleeves included in the kit
42+mm ID – contact Davies, Craig for thicker 6mm sleeves (Part #18511)
1. Thermal Sensor Fitting
Apply a couple of layers of Teflon sealant tape around the threaded body of the
sensor, Fit the sensor assembly into the threaded black In-line Adaptor and tighten.
Do not over tighten, which may damage the sensor body or adaptor.
2. Hose Fitting
• When the cooling system is cold, remove top radiator hose and confirm that the
inside diameter of your top radiator hose is between 30 to 42 mm prior to cutting
hose. If the hose is more than 42mm, call Davies Craig and await 6mm sleeves.
Use the “O” ring supplied with
the sensor.
Apply PTFE sealant tape (not
supplied)
on to the threaded
body before tightening to the
adaptor.
Figure
3: Thermal Sensor and In-line Adaptor Installation
Page 6

Page 6 of 12
• If the parts supplied (adaptor and/or sleeves) are suitable, select an appropriate
location in a straight section of the hose then cut the radiator hose.
• Temporarily slide radiator hose clamps on each end of the hose. Fit both cut ends
of hose onto the In-line Adaptor (with or without sleeves as appropriate). If fitting
is tight, use silicon base grease or petroleum jelly to assist fitment of adaptor to
hoses.
• Refit top radiator hose, ensure no twisting of hose and tighten all clamps.
METHOD 2 - IN THERMOSTAT HOUSING OR RADIATOR
Please check wall thickness of thermostat housing/radiator as it is recommended that
the Thermal Sensor only be installed if there is a wall thickness of at least 3mm.
If the thickness is less than 3mm, please proceed with installation Method ‘1’.
We suggest removal of the thermostat ho using before be ginning the installatio n process
so that metal shavings do not enter the cooling system.
1. Mark location on thermostat
housing where sensor assembly is
to be fitted – “top of dome is
recommended”.
2. Drill an 11.0mm (7/16”) hole
through the marked area. For your
safety and to avoid drilling on an
angle, please ensure thermostat
housing is well secured before
beginning the drilling process.
3. Using a ¼” NPT tap, tap the hole
to allow the sensor assembly to
“just” protrude the thickness of the
thermostat housing. It is
recommended that the fitment of
the sensor assembly be checked
regularly to achieve the condition
in the diagram.
Page 7

Page 7 of 12
4. Once the tapping process is
completed, apply a couple of
layers of PTFE sealant tape (not
supplied) to the thread on the
brass body, then screw it into the
thermostat housing.
SETTING THE LCD EWP®/FAN DIGITAL CONTROLLER
It’s recommended as a mi nimum the Digita l Controller’s s et-point is fixed to that of the
engine manufacturer’s mechanical thermostat opening temperature. You may use a
lower ‘set-point’ to run the engine colder or a higher ‘se t-point’ to run the engine hotter
if appropriate. Gen erally, running the en gine slightly colder w ill increase the power and
running the engine slightly hotter will improve the fuel efficiency.
The LCD EWP & Fan Dig ital Controller has been set at the factory at 85°C/185°F. This
setting can be altered up or down by using the ‘set-point’ adjustment button on the
right hand side as follows:
1. Pushing the ‘set’ button once will indicate the present setting.
2. Push set button repeatedly until the desired set temperature displays. Hold set
button down 2 seconds until Controller beeps. The ‘set’ temperature will then
illuminate
3. If the new s e tt ing is not confirme d within 2 sec, the D ig i tal Controller will r e ve r t to
previous ‘set’ temperature.
4. To check ‘set’ temperature, repeat Step 1 above.
Note: Controller will keep the last state of “Set Temp” memory, when disconnected
from the power source
NOTE: Monitor the existing engine temperature gauge to check that your set engine
temperature is similar to the actual engine temperature. The engine temperature sender
unit may be located in a different position than your Thermal Sensor and may display a
temperature variation.
Figure 4: Sensor Installation in to Thermostat Diagram
Page 8

Page 8 of 12
FAN ONLY OPERATION
The Davies, Craig LCD EWP/Fan Digital Controller is programmed to earth the electric
fan relay at 3°C above the set point. The Controller will continue to operate the fan until
the coolant temperature is below the set point.
To enable fan only control without using an Electric Water Pump, connect the remote
LED (supplied) to the controller wires labelled “PUMP” as shown below
Please refer to the Figure 6 (page 9) for fan to controller wiring details. Please call
Davies, Craig at (03)93691234 if you require another remote LED to complete the
wiring.
EWP & FAN DIGITAL CONTROLLER TECHNICAL
SPECIFICATIONS
Input Voltage
12VDC to 29VDC
Output Voltage
6V to 29V
Max. Current
12A
Operating
Temperature
-20ºC to 120ºC (-4ºF to 248ºF)
Setting
Temperatures
C
40º
To
110º
F
104º
To
230º
Fan Cut in
Temperature
+3ºC/5.4°F above t he set temperature
Sensor Type
Thermistor
Time Out
3 Min. (or Set –10ºC/14°F) after ignition OFF
Weight
100 grams (3.5 oz.)
Dimensions
110mm (L) X 90mm (W) X 30mm (D)
[41/3” (L) x 31/2” (W) x 1.1” (D)]
A 12V LED connected to the Pump
connector
Figure 5: Fan Only Connec t ion Wiring Diagram
Page 9

Page 9 of 12
THERMATIC® FAN WIRING TO THE DIGITAL CONTROLLER
Please follow the instructions 1&2 below if you are using the Davies
Craig Universal Fan Fitting Kit (Parts #1000, 12V; #1001, 24V).
1. Cut the ring terminal off the black wire (8 5) from the Fan wiring loom to a sufficien t
length, this wire (w ith relay) to be join ed with the black/green wire from the Digital
Controller.
2. Cut the green wire, then join suffic ient length of wire to connect to battery positive
as shown in the diagram below (86).
Note: To wire the controller for duel fan operation repeat the wiring instructions above
for a second relay (not supplied). Pin 85 on both relays should be connected to the
green wire with black stripe from the controller. We recommend getting a second Davies
Craig Universal Fan Fitting Kit (Parts #1000, 12V; #1001, 24V) for proper fan
installation.
Figure 6: Fan Controller Wiring Diagram
Page 10

Page 10 of 12
CONTROLLER DIAGNOSTIC CHART
Condition Troubleshooting
Controller does not operate / No display
• Blown fuse
• Check all the wire connections
12V voltage indicator flashing
• Controller receiving low voltage <
10.5V
• Controller receiving high voltage >
17.5V
24V voltage indicator flashing
• Controller receiving low voltage <
21.5V
• Controller receiving high voltage >
27.5V
Sensor open circuit
• Check sensor wiring for any open
circuits
Sensor short circuit
• Check sensor wiring for any short
circuits
Low Temp
<40°C (104°F) after 5 Minutes
• Check engine temperature
Above Set Temperature
• Sensor temperature is at least 10°C
(18°F) above the set temperature.
Pump Error
• Check pump wiring for open/short
circuits
Override ON
• EWP manually override by the user.
• To turn OFF, Press & hold the set
button for 5 to 7 seconds or switch
OFF & ON the IGN.
ERR • Temp sensor Open or Short circuit
Page 11

Page 11 of 12
INSTALLATION RECOMMENDATIONS
• For improved heater pe rf or manc e on vehicle s w hic h hav e the heater inlet (retur n) an d
outlet ports in the mechanical pump housing, Davies Craig has available an Electric
Booster Pump Kit, EBP15 #9001 (12V) or EBP23 #9050 (12V) or EBP40 #9040
(12V). These compact units fit neatly into the heater hose and boosts coolant flow
through the heater circuit and/or cylinder heads.
• LPG (Liquid Petroleum Gas) vehicles require constant coolant flow through the LPG
converter once a EWP Combo Pack has been fitted. We strongly recommend the
installation of Ele ctric Boo ster Pump Kit , EBP15 #9001 (12V) or EBP23 #9050 (12V)
or EBP40 #9040 (12V) to overcom e freezing of the conv erter on engine start-up.
CAUTIONS
• Engine temperature must be monitored cl osely at all times, especially,
immediately after EWP
installation and until the EWP operation and
capability have been confirmed.
• Do not use the vehicle’s engine management system or wiring
connected to the vehicle’s engine ma nagement system as an ignition
source because it may cause failure of the management system
and/or the electrical system. The ignition source must be a steady
positive supply of 12-29V DC.
These installation instructions may suit most applications but there are
circumstances surrounding some engine designs, environments, and the nature
of system involved, which may require other installation arrangements not
outlined here. Frequently Asked Questions (FAQ) are listed on our website
www.daviescraig.com.au . Emails can be directed to info@daviescraig.com.au
or Telephone +61 (0) 3 9369 1234 during business hours.
WARRANTY
Davies, Craig Pty Ltd warrants for a period of two years or 2000 hours continuous
running (whichever is the lesser) from the date of purchase. Davies, Craig shall carry
out, free of cost, any repairs that are reasonably necessary to correct any fault in the
operation of your Davies, Craig product provided that s uch a faul t is directly at tributable
to a defect in the workmanship or materials used in the manufac ture of the part(s) and
is not due to installation other than described in these instructions. Labour and
consequential costs are excluded.
DAVIES, CRAIG PTY. LTD.
Register your warranty at: daviescraig.com.au
Page 12

Page 12 of 12
 Loading...