

Page 1
P/No:8926
EWP®80 & EWP® -FAN DIGITAL CONTROLLER
INSTALLATION INSTRUCTIONS
DAVIES, CRAIG EWP® (ELECTRIC WATER PUMP) AND PUMP CONTROL
Congratulations on your purchase of the Davies, Craig EWP® 80 & EWP® -FAN Digital Controller which is
designed to replace the existing belt driven mechanical water pump of your engine and to switch your
Thermatic® Fan on and off. The Digital controller will vary the speed of your EWP® in response to the engine
temperature and switch the Thermatic® fan at 3°c above the target set point. The EWP® will continue running
after hot engine shut down to prevent damaging heat soak. When your EWP® is used to replace the mechanical
pump, you will notice an increase in engine power and torque, especially at high engine speeds. Automatic
gear changes, both up and down, will be smoother.
PLEASE READ THESE INSTRUCTIONS IN THEIR ENTIRETY BEFORE YOU START WORK.
ALSO NOTE THAT THE EWP IS A „CIRCULATION‟ PUMP IDEAL FOR „CLOSED CIRCUIT‟ OPERATION SIMILAR
TO AN AUTOMOTIVE COOLING SYSTEM. IT IS NOT A „SELF-PRIMING‟ PUMP AND THEREFORE WILL NOT
OPERATE WITHOUT A POSITIVE „HEAD‟ IN AN „OPEN‟ SYSTEM.
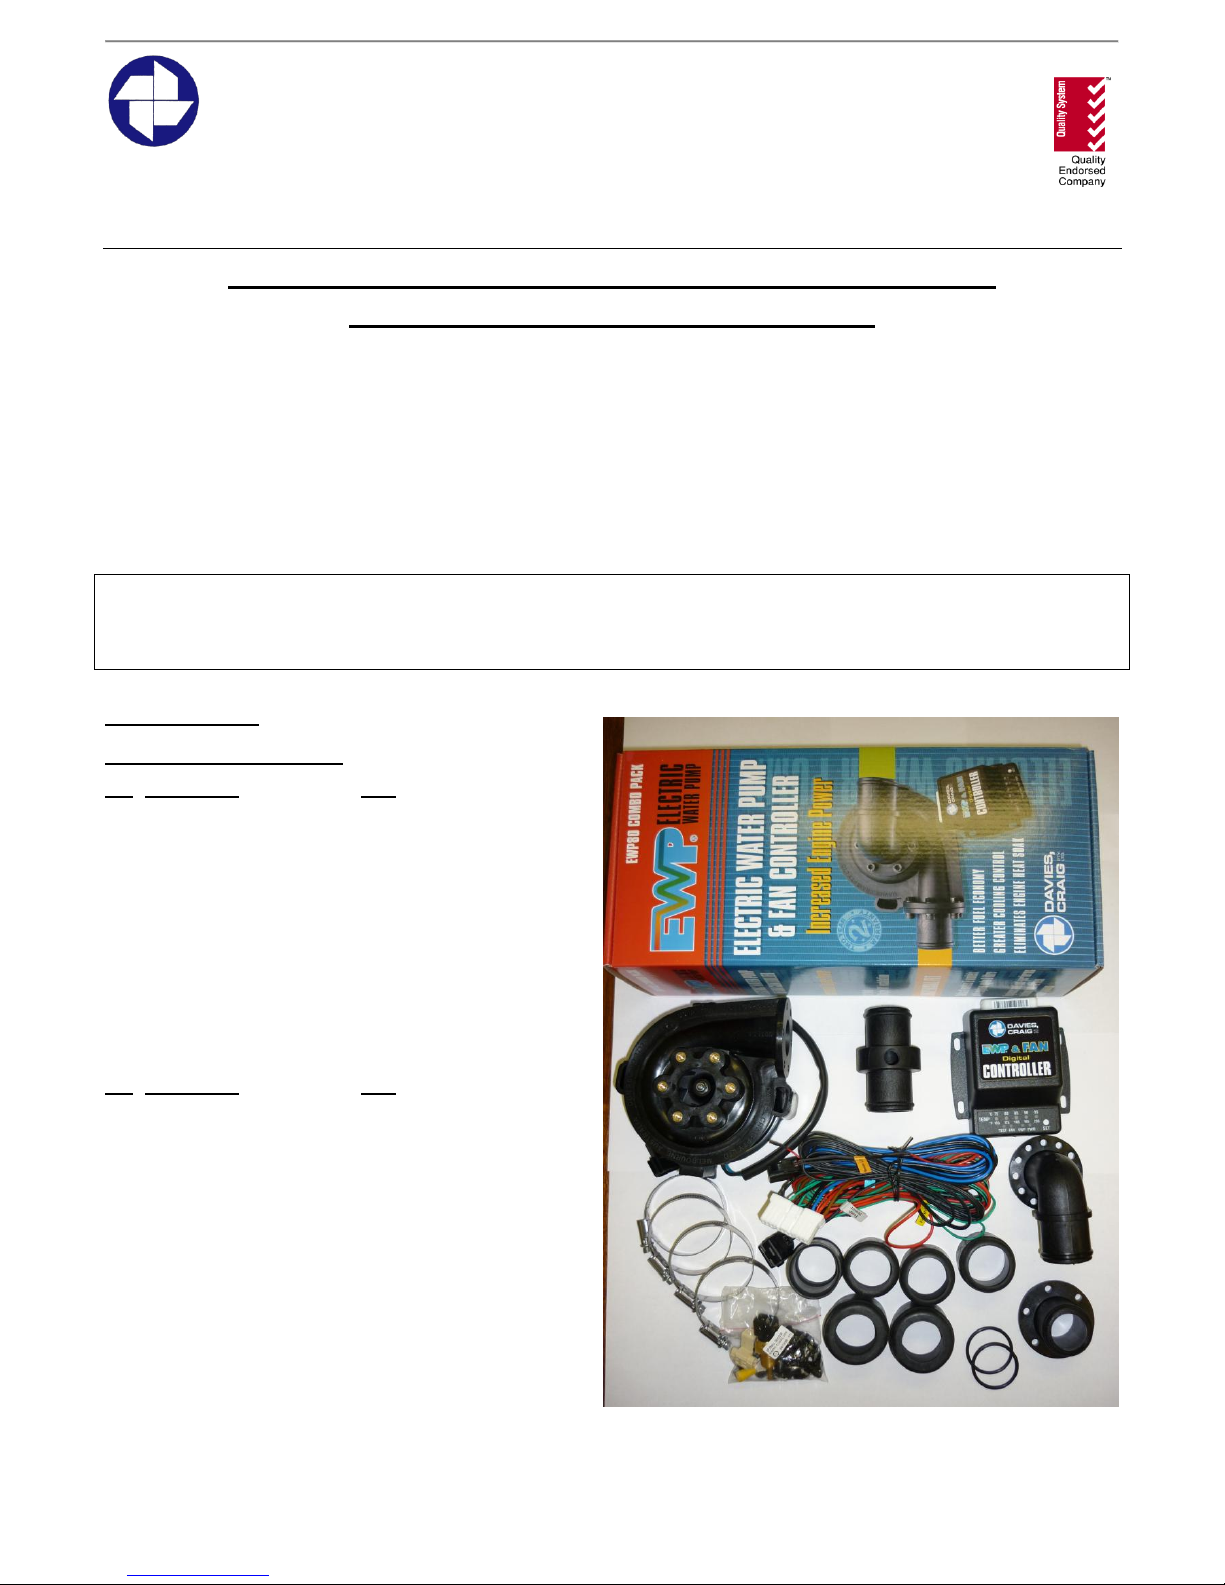
CONTENTS:
EWP® COMPONENTS:
No. Description Qty.
1. EWP Pump Assembly 1
2. Inline Adaptor 1
3. Digital Controller 1
4. Wiring Harness with 10A fuse 1
5. Angle Adaptor 1
6. Straight adaptor 1
7. O-ring 2
8. Thick Rubber Sleeve 2
9. Thin Rubber sleeve 4
10. Hose Clamp 4
11 .HARDWARE COMPONENTS
No. Description Qty.
11a. Screw Self tap 5
11b. Scotchlock 1
11c. Ring Terminal 1
11d. Ring Term.(Yellow) 1
11e. Sensor Assembly 1
11f. Adaptor M5 Bolt 6
11g. Adaptor M5 Nut 6
11h. Adaptor Washer 18
11i. M5 cap screw long 6
Please contact Davies, Craig for
additional straight or angled adaptors if
required.
ISO 9001
Standards
Lic No 4528
Australia
DAVIES, CRAIG
PROPRIETARY LIMITED
A.B.N. 71 004 918 825 A.C.N. 004 918 825
MELBOURNE AUSTRALIA
77 Taras Avenue
P.O. Box 363
Altona North
Vic 3025 Australia
Phone: +61(0)3 9369 1234
Fax: +61(0)3 9369 3456
Email: info@daviescraig.com.au
Web: www.daviescraig.com.au
1 2 3 2 4 9 8 7 6
11 5 10
Page 2

Page 2 of 8
SECTION ONE: INSTALLING THE EWP®
The EWP® should fit in the lower radiator hose connecting the radiator to the existing mechanical water pump
housing. Check the area for available space and shape of the lower hose. The section of radiator hose
connected to the bottom of the radiator must be connected to the inlet of the electric pump and the section of
radiator hose connected to the original pump/engine block must be connected to the outlet of the electric water
pump. The pump inlet and outlet are marked on the pump. The EWP® should be positioned as low as
possible to maximise the gravity feed from the radiator and prevent air entering the pump.
1. Configure the electric pump so that the motor‟s black rubber drain boot is at 6 o‟clock, that is, pointing
down so that any condensation forming in the motor will drain. If the EWP cannot conveniently be
positioned with the rubber drain boot at 6 o‟clock, the motor can be rotated 180. This in most cases will
allow the rubber drain boot to be positioned in the preferred 6 o‟clock position. To rotate the motor,
follow these instructions:
a. Turn EWP over to gain access to the 2 screws, which fasten the motor to the pump body.
b. Slowly unscrew the first screw halfway, then unscrew the second screw all the way and then finally
unscrew the first screw totally. Be careful not to alter the alignment of the motor shaft when unscrewing
the screws.
c. Carefully ease the motor away from the pump by no more than 1 mm.
d. Rotate motor 180C, keeping the shaft square and making sure no plastic shavings lodge between the
motor and mounting surface.
e. Fasten motor to pump body. Slowly tighten the two screws incrementally until both are home. Do not over
tighten.
If it is impossible to mount the boot at 6 o‟clock, cover the rubber boot with silicon to ensure no water can
enter the motor. Assemble the EWP® plastic adaptors (Item No‟s: 5 & 6) to suit the hose configuration and
space available. Make sure that the adaptors have an o-ring (Item No: 7) between them and the flange
faces on the pump body. The short bolts (Item No: 11f) supplied should be used to connect the adaptor
(Item Nos: 5&6) to the inlet face and the longer bolts (Item No: 11i) to connect the adaptor (Item Nos: 5 &
6) to the outlet face with the nuts (Item No: 11g) provided. The washers (Item No: 11h) provided should
be used between the bolt head and the flange face and between the nut and flange face.
2. Add the appropriate thickness rubber sleeves (Item No‟s: 8 & 9) to the adaptors (Item No‟s: 5 & 6), if
required, to suit your particular hose diameter.
3. Cut out the required section of the lower radiator hose. Connect the pump inlet and outlet to the
appropriate hoses ensuring that the pump is oriented in the CORRECT ORIENTATION as shown in Fig
9, page 9 “BLEEDING THE EWP®”. Ensure hose clamps are tight.
Do not bleed EWP® until you installs the digital controller and disables the mechanical pump.
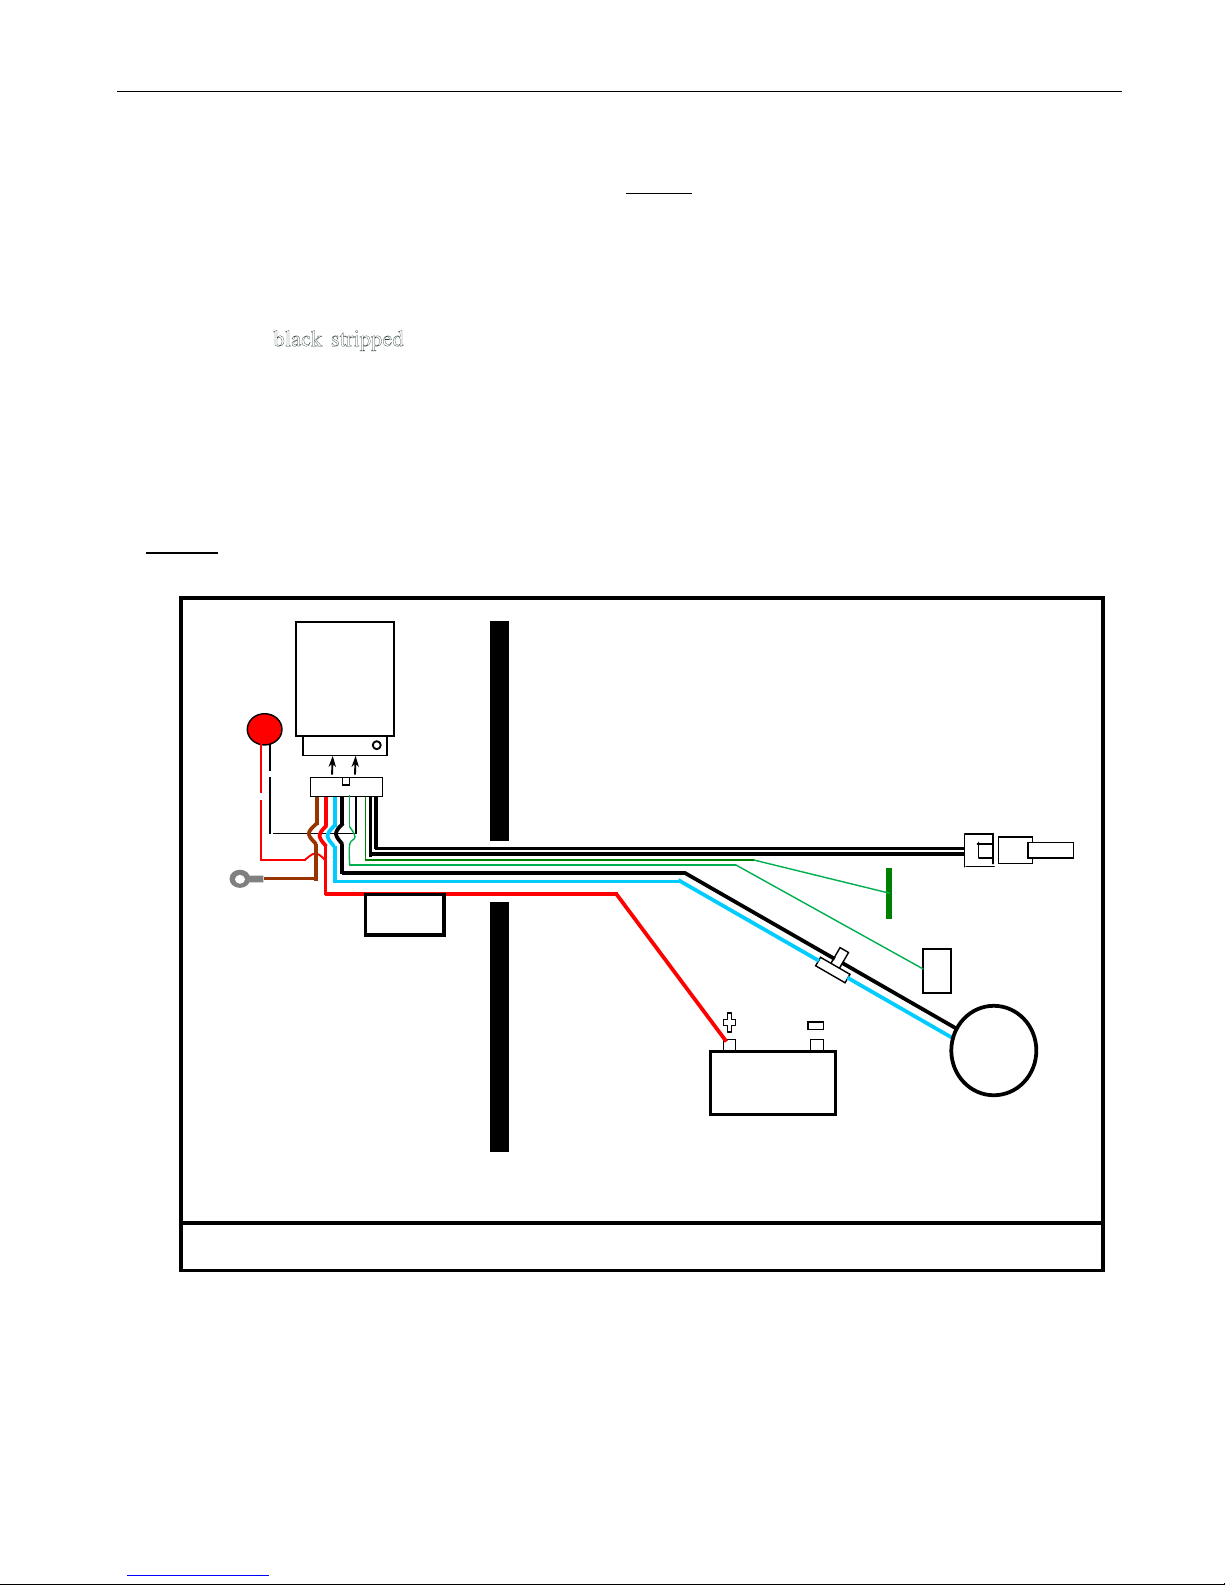
SECTION TWO:
INSTALLING THE EWP® & FAN DIGITAL CONTROLLER (Refer Figure 2 below)
Do not begin the installation of the Digital Controller prior to the EWP® being installed.
1. The controller must be fitted inside the passenger compartment. Locate a hole in the firewall (approx.
20mm in diameter) where the harness wiring (including the sensor & pump “T-connector”) will be able to
pass through. If a spot of adequate size cannot be located, then wires may be cut then re-joined as a last
resort.
2. Pass the “T-connector” of the wiring harness though the firewall into the engine bay and connect to pump.
3. Pass the black sensor connector through the firewall and out to the thermostat housing/ Inline adaptor
(Refer page number 3 to 5 on installing digital controller sensor)
Page 3
Page 3 of 8
4. Connect the wiring harness to the controller and mount the controller (using 2 of the screws provided) in
an appropriate position such as near the fuse box so that there is access to the temperature adjustment
button --- avoid mounting the controller where it may be exposed to direct sunlight. Ensure a good earth
connection using the self-tapping screw provided. NOTE: The earth lead must be connected to a metal
part of the body.
5. An additional screw is provided for mounting controller fuse holder where necessary.
6. Connect the red wire from the wiring harness to the battery positive using the ring terminal provided.
Connect the green wire from the wiring harness to an ignition source – the wires may be spliced then
soldered if necessary. Ensure no wire is exposed, by insulating the join with electrical tape.
Connect the green wire to the Fan relay if you wish to control the Thermatic® fan 3ºC
above the set point (refer to page 7, setting the Digital Controller)
7. Mount „Remote Test Light‟ in a location, which will be visible. The „Test Light‟ may be fitted by
inserting it through a 4.6mm dia. drilled hole in a plastic area of the interior/dashboard or simply with
adhesive tape. The „Remote Test Light„ has pin connections to assist installation. Heat shrink or insulation
tape can be applied to these pin connections once the test light is mounted. This will ensure the connection
points are insulated and secure.
NOTE: In carrying out the wiring procedure, please bear in mind that it is advantageous to minimise
voltage drop and this can be achieved by keeping the wiring as short as possible.
Figure 2: Digital Controller Wiring Diagram.
REMOTE
TEST
LIGHT
+VE IGNITION
SOURCE
PASSENGER
COMPARTMENT
FIREWALL
ENGINE BAY
Fan Relay
SENSOR – TO BE INSTALLED IN
THERMOSTAT HOUSING OR IN-
LINE ADAPTOR
“T” CONNECTOR
EWP®
DIGITAL
CONTROLLER
TEMP.
ADJUSTMENT
BUTTON
EARTH (Ground)
BATTERY
FUSE
HOLDER
EWP
Page 4
Page 4 of 8
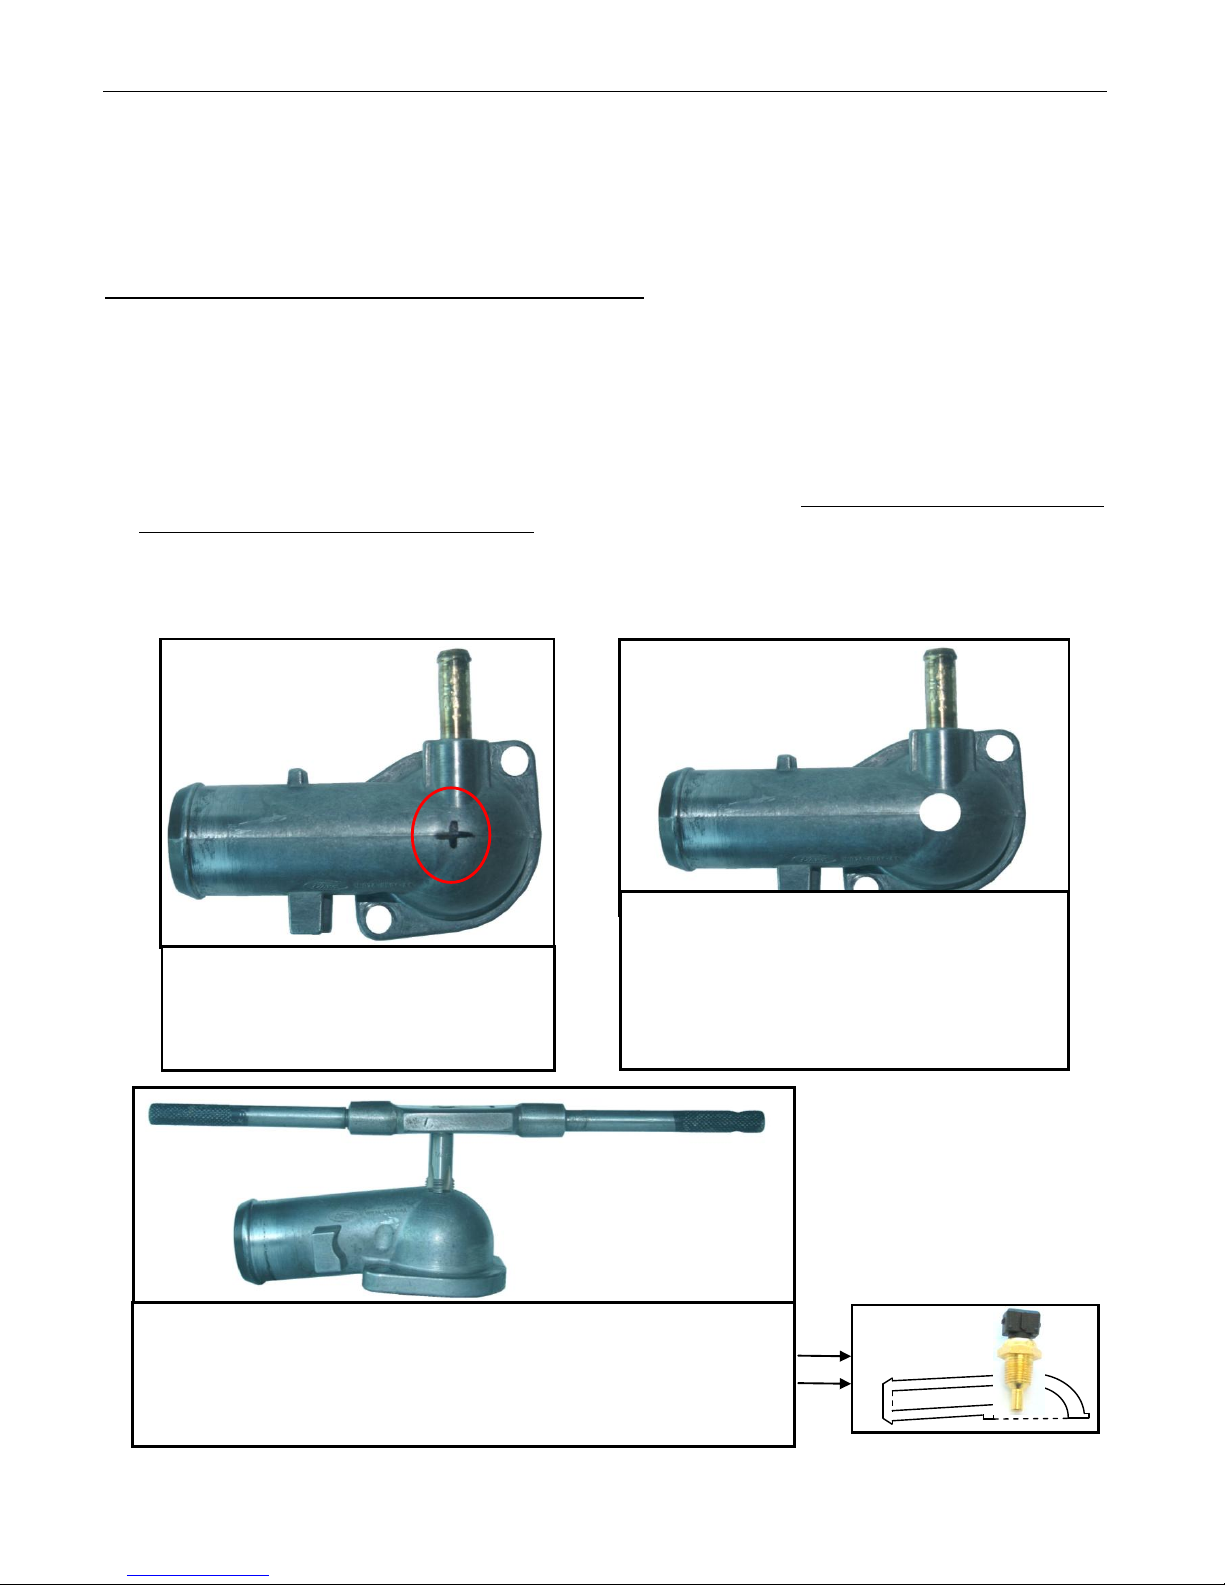
Remove the engine thermostat from the thermostat housing and install the sensor using method A or B as
shown below. Re-fit the thermostat housing without the thermostat and ensuring that there is no damage to the
thermostat-housing gasket.
DIGITAL CONTROLLER SENSOR INSTALLATION
There are two installation methods available:
A) IN THERMOSTAT HOUSING METHOD
Please ensure these instructions are read in their entirety before proceeding with installation.
It is recommended that the Sensor assembly be installed in the thermostat housing (not supplied).
However, please check wall thickness of thermostat housing as it is recommended that the Sensor
assembly be installed only if there is a wall thickness of at least 3.0mm. If the thickness is less than 3mm,
please proceed with installation method „B‟
We suggest removal of the thermostat housing before beginning the installation process so that metal
shavings do not enter the cooling system.
STEP 2: Drill an 11.0mm (7/16”) hole
through the marked area. For your safety and
to avoid drilling on an angle, please ensure
thermostat housing is well secured before
beginning the drilling process.
STEP 1: Mark location on thermostat
housing where sensor assembly is to be
fitted – “top of dome is recommended”.
¼” BSPT TAP
(not supplied)
TAPPING
WRENCH
STEP 3: Using a ¼” BSPT tap, tap the hole to allow the sensor
assembly to “just” protrude the thickness of the thermostat housing
(refer to diagram). It is recommended that the fitment of the sensor
assembly be checked regularly to achieve the condition in the
diagram.
Figure3: Sensor Installation Method A
Page 5

Page 5 of 8
B) IN-LINE ADAPTOR’ METHOD
As with other Davies, Craig products the „All-in-One‟ adaptor has universal application.
Top Radiator Hose:
30 to 35 mm inside diameter -- use adaptor without sleeves.
36 to 42 mm inside diameter – use 2 sleeves included in the kit (Item No.8 & 9)
42+ mm inside diameter – contact Davies, Craig
„ALL-IN-ONE‟ ADAPTOR INSTALLATION
1. Sensor Fitting
Apply a couple of layers of PTFE sealant tape around the threaded body of the sensor, Fit the sensor
assembly in to the threaded black nylon adaptor and tighten.
Do not over tighten, over tightening may damage the sensor body / adaptor.
2. Hose Fitting
When the cooling system is cold, remove top radiator hose and confirm that the inside diameter of your top
radiator hose is between 30 to 42 mm prior to cutting hose.
If the parts (adaptor and sleeves) provided in the kit are not suitable for your top radiator hose diameter
please contact Davies, Craig before proceeding any further.
If the parts supplied (adaptor and/or sleeves) are suitable, cut your radiator hose to remove around 17 mm
in length at an appropriate location. Select a location in a straight section of the hose.
Temporarily slide radiator hose clamps on each end of the hose. Fit both cut ends of hose onto adaptor
(with or without sleeves as appropriate). If fitting is tight, use silicon base grease or petroleum jelly to
assist fitment of adaptor to hoses.
Refit top radiator hose, ensure no twisting of hose and tighten all hose clamps.
Figure 4: Sensor Installation Method B
Apply PTFE sealant tape
(not supplied) on to the
threaded body before
tightening to the adaptor.
Page 6

Page 6 of 8
OPERATION
CONTROLLER
ALGORITHM-PUMP
OPERATION
Figure 5 shows the typical
operational curve of the pump.
The „SET POINT‟ is the
temperature at which full
battery/system voltage is
supplied to the pump. This can
be set to any of the 5 „SET
POINTS‟ available: 75ºC, 80ºC,
85ºC, 90ºC, 95ºC.
CONTROLLER
OPERATION
LED CHECK:
Every time ignition is turned
ON, all LED‟s will be on for 5
secs before returning to the normal operation mode. This feature allows for checking that all LED‟s are
operational.
DIAGNOSTICS:
To avoid any premature diagnostic indication during „temporary‟ events – especially where the engine is
OFF for very short periods, the diagnostic functions will be activated 2 minutes after ignition is switched
ON.
OVER-RUN MODE:
To reduce heat-soak after ignition shutdown, the controller will continue to run the EWP® for 2 minutes or
until the temperature has reduced to 5°C below „set-point‟ – whichever occurs first. The “Over-Run”
feature will reduce heat soak but will be more effective when used in conjunction with a Thermatic Fan.
Figure 6: Controller Operation
Figure 5: EWP® Operation Curve.
0
2
4
6
8
10
12
14
60 65 70 75 80 85 90 95 100
COOLANT TEMP. RELATIVE TO TARGET ( °C)
OUTPUT VOLTAGE (V)
-20
-15
-10
-5
TARGET
(SET POINT)
LINEAR RAMP FROM 6V
TO SYSTEM VOLTAGE
10 SEC ON , 30 SEC OFF
AMBIENT
10 SEC ON , 10 SEC OFF
A
B
C
Area A - Pump pulsing at 6V: 10sec ON, 30sec OFF
Area B – Pump pulsing at 6V: 10sec ON, 10sec OFF
Area C – Pump voltage increases with increasing temperature, Fan begins the
operation when the temperature reaches 3ºc above the set point
F
A
N
O
N
TEMPERATURE LED‟s
TEST LED
EWP LED
FAN LED
POWER LED
SET BUTTON
Page 7

Page 7 of 8
LED DISPLAY:
The following identifies each LED and its operational status:
TEMP LED (GREEN):
FLASHING 75ºC LED = Sensor temperature is below 75ºC.
ON = ACTUAL sensor temperature.
PWR LED (AMBER):
ON = The controller has power.
EWP LED (GREEN):
FLASHING = EWP operating in „pulsing‟ mode – Refer Figure 5, areas & .
ON = Electric Water Pump (EWP®) running between 6V – Battery Voltage: Refer Figure 5, area .
FAN LED (GREEN): ON= Fan operating
TEST LED (RED):
ON = System warning has been triggered. Therefore, refer to “Diagnostic Chart” in order to determine
possible cause, and take measures to correct the problem.
REMOTE TEST LIGHT (RED):
This light will “flash” whenever the TEST LED is on. The purpose of this light is to provide remote indication
when the TEST LED has been activated.
OVER-RUN MODE:
During “Over-Run” mode:
- Actual sensor temperature will be indicated by GREEN temperature LED.
- PWR LED will flash
- EWP LED will be solid and pump will run at full battery voltage.
- FAN LED will be solid and Fan will run until temperature below the target
temp.
SETTING THE EWP® & FAN DIGITAL CONTROLLER
The Digital Controller can be set in accordance with your requirements. The factory „set-point‟ on the
controller is 85°C. This setting can be changed by using the „set-point‟ adjustment button on the control panel
as follows:
i. Pushing the „SET‟ button once will indicate the present setting with an amber LED.
ii. When „SET‟ button is held down, the „set-point‟ settings will be scrolled through. Button should be
released when desired „set-point‟ is reached.
iii. The LED will then flash and the setting must be confirmed („locked in‟) by holding button down for 2
sec. If setting is not confirmed within 5 sec, controller will revert to previous setting.
iv. To check „SET‟ point, see (i) above.
It is recommended that initially the „set-point‟ be set to approximately the mechanical thermostat opening
temperature. Use a lower „set-point‟ to run the engine colder or a higher „set-point‟ to run the engine hotter.
Generally, running the engine slightly colder will increase the power and running the engine slightly hotter
will improve the fuel efficiency.
To verify „SET‟ temperature, run the engine and monitor existing engine temperature gauge.
NB: For your convenience, brief operating instructions are available on the reverse side of the
controller.
A B C
Page 8

Page 8 of 8
Davies Craig Thermatic FanWiring to the Digital Controller
Please follow the below instructions 1&2 if you are using the wiring loom provided with Davies Craig
Thermatic Fan.
1. Cut the green wire from the Fan wiring loom to a sufficient length, this wire (with relay) to be joined with the
black traced green wire from the Digital Controller
2. Cut the black wire before the ring terminals attached, and then join sufficient length of wire to connect the
battery positive as shown in the diagram below (85). Please discard the ring terminal part.
EWP DIGITAL CONTROLLER
Technical Specifications:
Input Voltage 12V DC to 15V DC
Output Voltage 6V to 13.5V
Max. Current 12A
Operating Temperature -20ºC to 60ºC (-5ºF to 140ºF)
Setting Temperature 75º, 80º, 85º, 90º, 95ºC
(165º, 175º, 185º, 195º, 205ºF)
Controller Type PCB with Micro Processor
Sensor Type Thermistor in waterproof housing
Time Out 2 Min. (or Set –5ºC) after ignition OFF
Indicator LED‟s Temp., Power ON, Pump mode, Fan and Test
Weight 90 grams (3.2 oz.)
Dimensions 101mm (L) X 95mm (W) X 35mm (D)
[4” (L) X 3-3/4” (W) X 1-3/8” (D)]
Fan
Motor
87
Fan Motor
86
30
85
Black
Relay
Wire - Green with black stripe
from controller
Battery +ve
Blue
Red
Battery +ve
Relay
FAN
Fig.7
Page 9

Page 9 of 8
Cra Crank
Water Pump
Pulley
Water Pump
Pulley
Crank
Alternator
Pulley
Alternator
Pulley
MODIFYING EXISTING PUMP
To modify the existing pump, please do either:
1. Remove the existing belt driven water pump.
2. Pull the pump impeller off the belt driven pump shaft. (NOTE: You may need to drill holes through the
impeller close to the drive shaft to make it easier to remove.) Be careful not to damage the seal or bearing
when removing the impeller. Alternatively, remove vanes from impeller in situ.
3. Re-fit the belt driven water pump housing without the impeller ensuring that there is no damage to the water
pump gasket and the pump seal is still retained. Re-fit the water pump belt and tighten to manufacturer‟s
specifications.
Or:
By-pass the belt-drive on the water-pump, if possible, by installing a shorter belt that omits the pump
pulley. This option is not possible if the pulley drives a belt-driven fan unless you replace the fan with a
Davies, Craig Thermatic Fan®. For example:
BLEEDING THE EWP
®
Ensure the EWP® is orientated correctly as shown below before continuing and hose clamps are tight.
NOTE: This orientation is a temporary requirement for the purpose of bleeding the pump and ensuring there
is no air entrapped within the seal housing of the pump. The pump can be set-up in another orientation upon
completion of the bleeding procedure.
1. Fill up the cooling system with appropriate coolant.
2. Do not run the engine but temporarily hardwire the pump direct to the battery so that the pump runs at
full power.
3. With the radiator cap off, run the pump for 5 - 10 minutes to ensure that there is no air trapped in the
cooling system. Fill with coolant as the air is removed from the system.
4. Once all air is removed from the cooling system replace the radiator cap and reconnect the pump to your
original controlling method.
NOTE: Slightly loosening the hose clamps and rotating pump to desired position can change the pump
orientation. If leakage occurs from hoses during re-positioning, the coolant level must be topped up.
Ensure that hose clamps are tight.
FIGURE 9a: BEST ORIENTATION
FIGURE 9b: INCORRECT ORIENTATION
AIR POCKET
INLET
INLET
BEFORE
AFTER
Fig.8
Page 10

Page 10 of 8
RUNNING THE EWP®
Start engine to confirm no leakage at radiator hose or sensor and re-torque radiator hose clamps. Monitor
the engine temperature, which should take slightly longer than usual to reach steady state.
Using EWP & Fan Digital Controller instructions digitally SET the temperature of the engine. It is
recommended that initially the „set point‟ be set to approximately the mechanical thermostat opening
temperature. Generally, running the engine slightly colder will increase the power and running the engine
slightly hotter will improve the fuel efficiency. The Digital Controller has an in-built function to run the
EWP & Fan after ignition OFF and prevent engine heat soak.
Re-tighten hose clamps after a few hours operation at normal temperature and again after 20 hours running.
Check for leaks. The cabin heater may take slightly longer than normal to warm up
These installation instructions will suit most situations but there are conditions of engine design,
environment, and the kind of motoring involved, which may call for other arrangements not
described here. Advice is available from Davies, Craig and we would very much appreciate your
feedback.
If you encounter any difficulties during the installation and require further assistance, please
contact Davies, Craig on +61 (0)3 9369-1234.
CAUTIONS
Use of the EWP® after removing the pump impeller or deleting the mechanical pump pulley from the
belt system will increase maximum engine speed. Running an engine at higher speeds than normal may
affect other engine components.
Do not run pump dry as seal damage may occur and your warranty will be void.
Engine temperature must be monitored closely at all times but especially immediately after installation
and until pump operation and capacity have been proved.
The EWP® can handle most rust particles and sludge found in cooling systems but large rust particles
should be flushed from the radiator before the EWP® is installed.
Some vehicles may require special bleeding procedures to remove air from the cooling system not
described here. The EWP must be completely flooded with coolant at all times to achieve the life
specification of the EWP and to preserve warranty.
Do not use the vehicle‟s engine management system or wiring connected to the vehicle‟s engine
management system as an ignition source because it may cause failure of the management system and/or the
electrical system. The ignition source must be a steady positive supply of 12-14V DC.
The cooling system should have antifreeze in accordance to the vehicle manufacturer‟s specification.
The EWP is a „circulation‟ pump ideal for „closed circuit‟ operation found in an automotive cooling
system. It is not a „self-priming‟ pump and therefore will not operate well without a positive „head‟ in an
„open‟ system
The impeller tip clearance is very tight for maximum efficiency, and may when new actually scrape the
pump housing causing a slight noise. The impeller will bed in over time and the noise cease.
EWP Installation Recommendations
To ensure maximum life and optimum performance from your new EWP, Davies, Craig recommends:
If an EWP is installed on a vehicle which is kept in storage for more than 3 months, for example. a
show or race-car, it is advised that the pump be operated for approximately 5mins constant running every
month. This will minimise the build up of any sediment in the EWP and also lubricate all parts within the
pump.
For improved heater performance on vehicles which have the heater inlet (return) and outlet ports in the
mechanical pump housing (referred to in “Warnings”), Davies, Craig has developed the Electric Booster
Page 11

Page 11 of 8
Pump, EBP, part no 9001, which fits into the heater hose and boosts flow through the heater circuit and/or
cylinder heads. There is more information on our web page www.daviescraig.com.au
LPG (Liquid Petroleum Gas) vehicles require constant flow through the LPG converter and if the EWP
is used in conjunction with the Controller, we recommend the installation of an EBP (Electric Booster
Pump) to overcome freezing of the converter body at start up.
It is recommended that the cooling system is flushed every 6 months or 10,000kms to remove any built
up sediment in the cooling system.
WARRANTY
We warrant that for a period of two years or 2000 hours continuous running (whichever is the
lesser) from the date of purchase, we shall carry out, free of cost, any repairs that are reasonably
necessary to correct any fault in the operation of your Electric Water Pump provided that such a
fault is directly attributable to a defect in the workmanship or materials used in the manufacture
of the part(s) and is not due to installation other than described in these instructions. Labour and
consequential costs are excluded
DAVIES, CRAIG PTY. LTD.
09/11/2009
WARRANTY REGISTRATION
Part number 8007 – EWP80 Electric Water Pump
& Digital Controller
Name:______________________________________________________________________________
Address:_______________________________________________________________________________
_____________________________________________________________Post Code:______________
Purchased From:_________________________________________Date:_______________
Fitted to vehicle:__________________________________________________Year:________
Comments:___________________________________________________________________
___________________________________________________________________________
___________________________________________________________________________
Mail to: Davies,Craig Pty Ltd, P O Box 363, Altona North, Victoria, Australia 3025
OR REGISTER ON-LINE AT www.daviescraig.com.au
Page 12

Page 12 of 8
COOLING SYSTEM DIAGNOSTIC CHART
The following table lists the Digital EWP
®
Controller diagnostic capability for your cooling system and the LED diagnosis sequence.
NOTE: In all instances where the TEST light is ON, the EWP is running a
t full battery voltage.
TROUBLESHOOTING
Check fuse or connection.
Check battery, alternator
and/or regulator.
Check battery or regulator.
Check sensor wiring.
Check sensor wiring.
Check engine temperature.
Check sensor installation or
cooling system. e.g. Fans, fan
thermal switch.
Re-set; if this fails contact
Davies, Craig.
Check pump wiring and
operation.
Contact Davies, Craig.
NOTE: When a temperature related error has occurred, this may not necessarily be associated with the pump but could be associate
d with
the overall cooling system. e.g Fans, fan thermal switch, coolant level. Therefore, inspection should not be limited to the p
ump alone in
trying to isolate the cause
PLEASE RETAIN THESE INSTRUCTIONS FOR FUTURE REFERENCE
LED SEQUENCE
TEMP
(95º)
OFF
ON
FLASH
OFF
FLASH
ON
FLASH
OFF
FLASH
OFF
TEMP
(90º)
OFF
ON
ON
OFF
OFF
ON
ON
OFF
FLASH
OFF
TEMP
(85º)
OFF
ON
ON
OFF
OFF
ON
ON
FLASH
FLASH
OFF
TEMP
(80º)
OFF
ON
ON
OFF
OFF
ON
ON
OFF
FLASH
OFF
TEMP
(75º)
OFF
FLASH
ON
FLASH
OFF
FLASH
ON
OFF
FLASH
OFF
EWP
OFF
ON
ON
ON
ON
ON
ON
ON
FLASH
OFF
PWR
OFF
FLASH
FLASH
ON
ON
ON
ON
OFF
ON
OFF
TEST
OFF
ON
ON
ON
ON
ON
ON
ON
ON
ON
CONDITION
Blown Fuse:
Controller does not operate.
Low Voltage:
Battery Voltage < 11V.
High Voltage:
Battery Voltage > 15.0V
Sensor Read Error 1:
Open-circuit on sensor lead or thermistor.
Sensor Read Error 2:
Short-circuit of sensor leads.
Low Operating Temp Fault:
Sensor Temp < 30ºC after two minutes.
Over-Temperature:
Sensor Temperature is at least 10ºC above „SET‟ point.
Set-Point Error:
„SET‟ point value stored is invalid.
Pump Connection Error:
Open circuit on pump leads or pump leads not connected.
Microprocessor Error:
Controller Programme Invalid.
1 2 3 4 5 6 7 8 9
10
 Loading...