

Page 1
19/12/2018 DIGITAL GAUGE THERMATIC
FAN/EWP SWITCH 1 | Page
77 Taras Avenue
P.O. Box 363
Altona North
Vic 3025 Australia
Phone: +61(0)3 9369 1234
Fax: +61(0)3 9369 3456
info@daviescraig.com.au
www.daviescraig.com.au
DIGITAL GAUGE THERMATIC® FAN/EWP® SWITCH
INSTALLATION INSTRUCTIONS
Congratulations on your purchase of the Davies, Craig Digital Gauge Thermatic®
Fan/ EWP® Switch. The Digital Gauge Thermatic® Switch allows you to keep an eye
on your cooling system’s temperature whilst it automatically controls single or twin
Thermatic® fans, or a combination of a Thermatic® fan and Electric Water Pump
(EWP®) or Electric Booster Pump (EBP®) at independent target temperatures for
those times when extra cooling is required.
PLEASE READ ALL THESE INSTRUCTIONS THOROUGHLY BEFORE YOU START WORK.
DON’T RUSH - ENSURE YOU HAVE FULL UNDERSTANDING OF THE WORK AHEAD BEFORE
YOU COMMENCE. ENSURE YOU HAVE ALL TOOLS AND COMPONENTS REQUIRED.
COMPONENTS
1 x Digital Gauge Display
1 x Digital Gauge Stand
1 x Digital Gauge Wiring Loom
1 x Rubber Gauge Retainer
1 x U-Bracket Gauge Mount
1 x Double Sided Tape Disc
1 x Sensor Probe Mounting Kit
2 x 15 Amp Fuses
2 x 30 Amp Fuses
2 x 12v 40 Amp Relays
2 x Fan Wiring Harnesses
2 x 5mm Ring Terminals
2 x Yellow 6mm Ring Terminals
2 x Yellow Connectors
6 x Scotch Locks
3 x Self-Tapping Screws
FUNCTIONS
KEY FEATURES:
Temperature setting range.
5°C → 110°C (41°F → 230°F).
Selectable °C & °F.
12v and 24v compatible.
Universal 52mm Gauge design.
Individual fan set temperature.
Over temperature alarm with snooze
function.
LED temperature readout.
LED status indicators.
Extra-long temperature sensor wire.
Display dimmer (optional).
A/C override (optional).
Works as manual override.
Independent control of fan.
overridden.
SPECIAL FEATURES:
Manually turn off either fan’s ‘control
by temperature’ functionality.
Disables (turns off) each fan.
Interchangeable sensor.
Replicable sensor probe.
Can detect coolant temperature.
Use #0409 for top radiator hose.
Use #0465 for ¼” NPT port.
Transmission fluid detection.
Requires the use of #0465 and a
sensor adaptor.
Adaptor can be made using:
1 x female tee ¼” NPT
2 x barb fitting to ¼” NPT
Barb to fit transmission hose
(above parts sourced externally)
Page 2

19/12/2018 DIGITAL GAUGE THERMATIC
FAN/EWP SWITCH 2 | Page
DIGITAL GAUGE THERMATIC® FAN/EWP® SWITCH MOUNTING
The Digital Gauge Thermatic® Fan/ EWP® Switch is compatible with many 52mm
Gauge stands and mounts.
The Digital Gauge Thermatic® Fan/ EWP® Switch MUST be mounted inside the
passenger compartment to minimise its ambient temperature and exposure to
water.
For a neat installation the Gauge Display can be mounted to the underside of
the dash to avoid drilling holes in the dash or having exposed wiring.
Locate or drill a minimum 13mm hole in the dash and pass the wiring loom
through leaving the ‘loom connector’ free to plug into the Gauge.
Thermal Sensor wire MUST NOT be cut in ANY circumstances.
Ensure the mounting location allows easy access to the 3 set buttons.
If using an alternative mounting method follow appropriate installation
procedure.
Mount the Gauge Stand in position. This can be done using the two screw holes in
the base of the stand or with the double-sided tape disc.
Pass the ‘loom connector’ through the rectangular hole in the back of the Gauge
Stand and plug into the socket of the Gauge.
Carefully push the Gauge Display into the Gauge Stand ensuring the rubber
retainer ring is installed on the Gauge Display.
Be mindful of the orientation of Gauge Display as it can be hard to rotate once
fully installed into the Gauge Stand.
DIGITAL GAUGE THERMATIC® FAN/EWP® SWITCH WIRING
Ensure all wiring is protected from rubbing on bare metal or other sharp edges.
Locate a hole in the firewall (approx.15 mm in diameter) and pass the required
wiring (below) through the firewall from the passenger cabin to the engine bay.
BLUE “FAN 1” wire.
ORANGE “FAN 2” wire.
Temperature probe wiring.
GREEN “AIR CONDITONER” wire (OPTIONAL).
If using the “AIR CONDITONER” wire as a manual override simply
connect it to a positive source though toggle switch.
Locate a Positive ignition or accessories source within the passenger compartment
and connect the RED “IGNITION” wire.
Connect the BLACK “EARTH” wire to the chassis or negative Earth supply.
If using the Dimmer function locate a positive source that is controlled by the
headlight switch and connect the “DIMMER” wire. YELLOW
If an appropriate source cannot be located you will need to run the YELLOW
“DIMMER” wire through the firewall and connect it to the positive feed of one
of the headlights.
*For positive earth systems, wire ‘Earth’ to battery negative not the chassis
Page 3
19/12/2018 DIGITAL GAUGE THERMATIC
FAN/EWP SWITCH 3 | Page
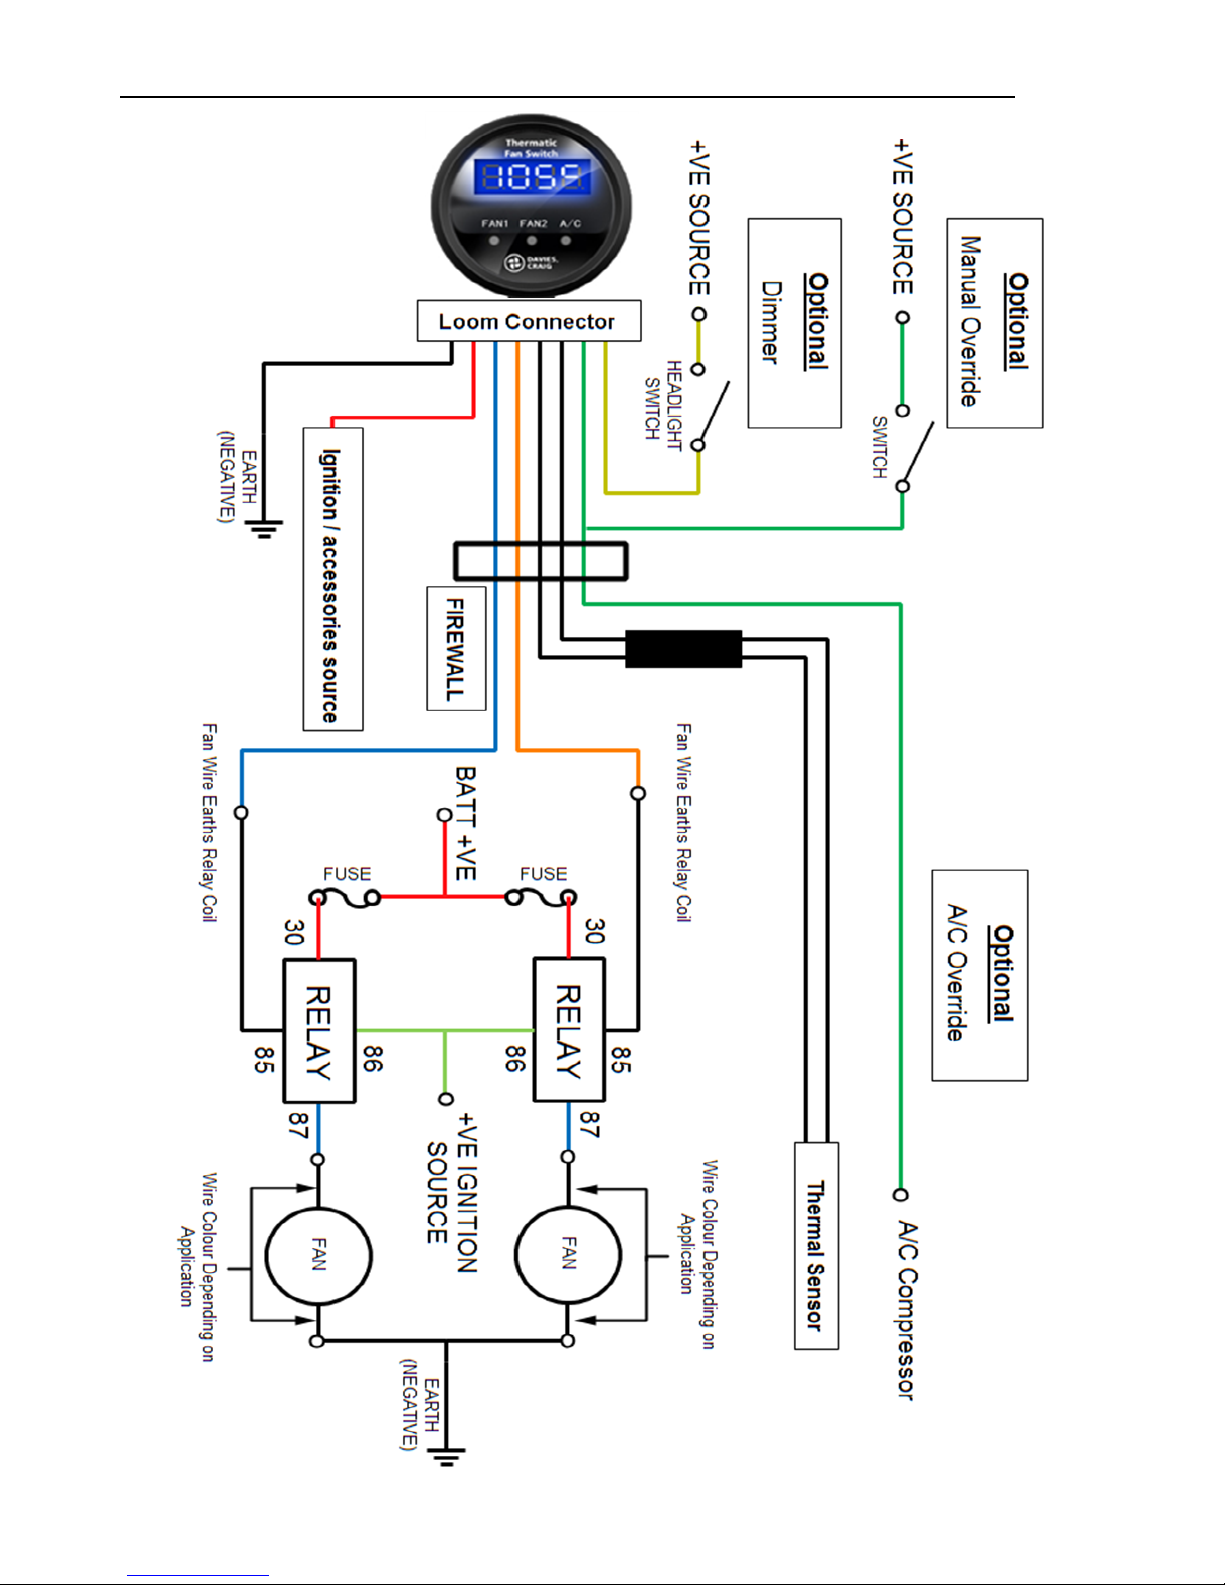
DIGITAL GAUGE THERMATIC® FAN/EWP® WIRING DIAGRAM
Page 4

19/12/2018 DIGITAL GAUGE THERMATIC
FAN/EWP SWITCH 4 | Page
THERMAL SENSOR INSTALLATION
Temperature sensor probe installation requires access to both sides of the radiator.
Remove the radiator and/or condenser, if necessary.
RADIATOR FIN MOUNTING
Select the temperature sensor mounting location
For optimum performance, install the temperature sensor in the radiator fin section
as close to the hot coolant inlet as possible.
Select a mounting position that will not interfere with the fan.
The temperature probe must not extend through the radiator core as this will
affect the switch’s operation.
Remove backing paper from foam pad. Slide foam pad onto the quick mount rod
so the pad adheres to the head of the quick mount rod.
Gently separate the radiator fins where you propose to insert the sensor probe
A small screwdriver can assist with this.
Insert the quick mount rod through the separated fins. Push the locking button and
sensor onto the quick mount rod to sit flush with the face of the radiator.
Cut off excess quick mount rod.
Installation directly into coolant requires part #0409 or #0465 (NOT SUPPLIED).
THREADED PORT INSTALLATION - REQUIRES #0465
Ideal for installing the Thermal Sensor into the thermostat housing, engine block, or
directly into the radiator.
Replace the Temperature Sensor Prob with the wiring and thermal sensor from
Part #0465. Adaptor fittings (not supplied) may be required.
You need to be mindful that the location of the Thermal Sensor can affect the
temperature reading and adjustments may be needed when setting the target
temperature.
When a port is not available, it is possible to drill and tap a hole for locating the
Thermal Sensor. When tapping a custom port, you need to be certain there is
minimum wall thickness of 3mm.
When tapping a hole is not possible, a weld-on fitting can be installed.
Install the Thermal Sensor into the port, making sure not to over tighten or
damage the sensor.
You may require some thread tape or sealant to achieve a water tight seal.
Page 5

19/12/2018 DIGITAL GAUGE THERMATIC
FAN/EWP SWITCH 5 | Page
THERMATIC® FAN INSTALLATION AND WIRING
Although we always recommend the use of Davies, Craig Thermatic® Fans, our Fan
Switch is able to control all single speed 12V or 24V electric cooling fan.
THERMATIC® FAN INSTALLATION
Install your fan/s as per the instructions included with your fan/s.
To wire your fan/s relay please follow wiring instructions provided below.
For correct operation please ensure the fan/s blade is rotating in the correct
direction.
THERMATIC® FAN WIRING CONNECTIONS
THERMATIC® FAN WIRING DIAGRAM
FAN Relay Pin
Wire colour
Connection location
85
BLACK
BLUE OR ORANGE Fan wire
86
GREEN
Ignition source
30
RED
Fused Battery Positive
87
BLUE
Fan wire
Page 6

19/12/2018 DIGITAL GAUGE THERMATIC
FAN/EWP SWITCH 6 | Page
DIGITAL GAUGE THERMATIC® FAN/EWP® SWITCH OPERATION
SETTING TARGET TEMPERATURE factory set to 85°C (185°F)
Push the ‘Fan Button’ once to indicate the present temperature setting.
‘Fan 1 Button’ adjusts Fan 1’s set temperature.
‘Fan 2 Button’ adjusts Fan 2’s set temperature.
Push the ‘Fan Button’ again to increment set temperature by 1 unit.
Push hold the ‘Fan Button’ down to scroll through the temperature range.
Start the engine and allow the temperature to reach normal operating temperature.
Once normal operating temperature is reached set ‘Fan 1’ to 10°C (18°F) above
temperature displayed.
Once target temperature is reached release the button. The new target temperature
will automatically be saved after 3 seconds unless the ‘Fan Button’ is pressed again.
If the other ‘Fan Button’ is pressed the target temperature change is cancelled.
It is recommended that ‘Fan 2’ is set to at least 15°C (27°F) above normal operating
temperature.
When only ‘Fan 1’ is being used ‘Fan 2’ should be adjusted to match ‘Fan 1’
target temperature.
ADJUSTING A/C OVERRIDE CONTROL
Push the ‘A/C Button’ to select what fan is activated by the A/C override.
Select from FAN 1, FAN 2, BOTH (shown as 1 – 2)
ACTIVATING MANUAL OVERRIDE FUNCTION
Push the ‘Fan 1 Button’ and ‘A/C Button’ for 2 second to turn OFF Fan 1.
Push the ‘Fan 1 Button’ and ‘A/C Button’ for 2 second to cancel override.
Push the ‘Fan 2 Button’ and ‘A/C Button’ for 2 second to turn OFF Fan 2.
Push the ‘Fan 2 Button’ and ‘A/C Button’ for 2 second to cancel override.
ALARM FUNCTION
Over set temperature.
Fan activated.
Temperature + 10°C (18°F) over highest set temperature.
Temperature display flashing.
Audible alarm goes off once.
Manual override cancelled.
Temperature + 20°C (36°F) over highest set temperature.
Temperature display Flashing.
Audible alarm goes continuously.
Press ‘Fan 1 Button’ or ‘Fan 2 Button’ to turn off alarm for 5 minutes.
Page 7

19/12/2018 DIGITAL GAUGE THERMATIC
FAN/EWP SWITCH 7 | Page
DIAGNOSTIC CHART
Condition
Troubleshooting
Unit does not operate Check all the wire connections
Display flashing Over temperature warning
FAN 1 LED
and
FAN 2 LED
No colour
Fan in standby mode
BLUE Fan triggered
Flash RED Sensor Error
Flash BLUE
Fan override by A/C control
RED Fan Manual overridden (FAN OFF)
A/C LED
BLUE
A/C activated from external signal
RED Manually overridden by independent control
Err 1 Check sensor wiring for any short circuits
Err 2 Check sensor wiring for any open circuits
Fans not activating
Check all the wire connections
Check manual override is off
Alarm going off
Temp > set + 10°C (18°F) – alarm sounds once
Temp > set + 20°C (36°F) – continuous alarm
Display on when ignition is off Check fan relay pin 86 is connected to ignition
Temperature doesn’t increase
or has constant high reading
Thermal Sensor Open or Short circuit
These installation instructions will suit most applications but there are
circumstances surrounding some engine designs, environments, and the nature of
the system involved, which may require other installation arrangements not
outlined here. Frequently Asked Questions (FAQ) are listed on our website
www.daviescraig.com.au . Emails can be directed to info@daviescraig.com.au
or
Telephone +61 (0) 3 9369 1234 during business hours.
WARRANTY
Davies, Craig Pty Ltd warrants for a period of two years or 2000 hours continuous
running (whichever is the lesser) from the date of purchase. Davies, Craig shall carry
out, free of cost, any repairs that are reasonably necessary to correct any fault in the
operation of your Davies, Craig product provided that such a fault is directly
attributable to a defect in the workmanship or materials used in the manufacture of
the part(s). This warranty is void if the product is misused, altered, tampered with or
is installed or used in a manner that is inconsistent with Davies, Craig’s written
recommendations and/or installation instructions. Labour and consequential costs are
excluded.
DAVIES, CRAIG PTY. LTD.
Register your warranty at: www.daviescraig.com.au under the support tab.
Page 8

 Loading...