

Page 1
P/No:0990 – ‘All in One’ Temperature Sensor Adaptor Kit Customer Instructions.
77 Taras Avenue
PO Box 363
Altona North, Vic 3025 Australia
Phone: +61(0)3 9369 1234
Fax: +61(0)3 9369 3456
E-mail: info@daviescraig.com.au
Web: www.daviescraig.com.au
TEMPERATURE SENSOR ‘ALL-IN-ONE’ ADAPTOR KIT
Installation Instructions - Part No. 0409
BEFORE BEGINNING INSTALLATION, READ THESE INSTRUCTIONS FULLY.
ADAPTOR APPLICATIONS
As with other Davies Craig products the ‘All-in-
One’ adaptor has universal application.
Top Radiator Hose:
Top Radiator Hose Measurements to Sleeve inside
Diameter (ID).
30 to 35 mm (ID) – use adaptor without sleeves.
36 to 42 mm (ID) – use 2 sleeves included in the kit
42+mm (ID) – contact Davies, Craig Pty. Ltd.
Sensor Fittings
To suit the Davies, Craig Thermal Switch (Part
#0400, #0401, or # 0404) use 6mm olive
supplied.
Thermal Sensor units with ¼” BSPT thread (not
supplied) will readily screw into the ‘All-in-One’
adaptor. For other sizes, the threaded hole can be
sealed with a ¼” BSPT plug, available from most
plumbing outlets. Drill and tap a thread to suit the
specific sender unit type.
ADAPTOR INSTALLATION
1. Sensor Fitting
Remove lock nut and olive of compression fitting
body supplied in the kit. Fit the brass
compression fitting body into the threaded black
nylon adaptor and tighten.
Slide the sensor through the lock nut then the
olive. Insert sensor through compression fitting
until it bottoms out or at least 15 mm will be
located in coolant flow. Tighten lock nut. It is
important that whilst tightening the lock nut, the
compression fitting body is held stationary to
avoid over tightening.
2. Hose Fitting
When the cooling system is cold, remove top
radiator hose and confirm that the inside
diameter of your top radiator hose is between 30
to 42 mm prior to cutting hose.
If the parts (adaptor and sleeves) provided in the
kit are not suitable for your top radiator hose
diameter please contact Davies, Craig before
proceeding any further.
If the parts supplied (adaptor and sleeves) are
suitable, cut your radiator hose to remove around
17 mm in length at an appropriate location.
Preferably select a location in a straight section of
the hose.
Temporarily slide radiator hose clamps on each
end of the hose. Fit both cut ends of hose onto
adaptor (with or without sleeves as appropriate).
If fitting is tight, use silicon base grease or
petroleum jelly to assist fitment of adaptor to
hoses.
Refit top radiator hose, ensure no twisting of the
hose occurs and tighten all hose clamps.
Start engine to confirm no leakage at the radiator
hose, compression fitting, or sensor.
After running vehicle, again, confirm no leaks and
re-torque radiator hose clamps.
COMPLETION OF INSTALLATION:
As are likely to be using either Parts #0400,
#0401 or #0404, please refer to the respective
Installation Instructions to ensure the unit is
installed correctly.
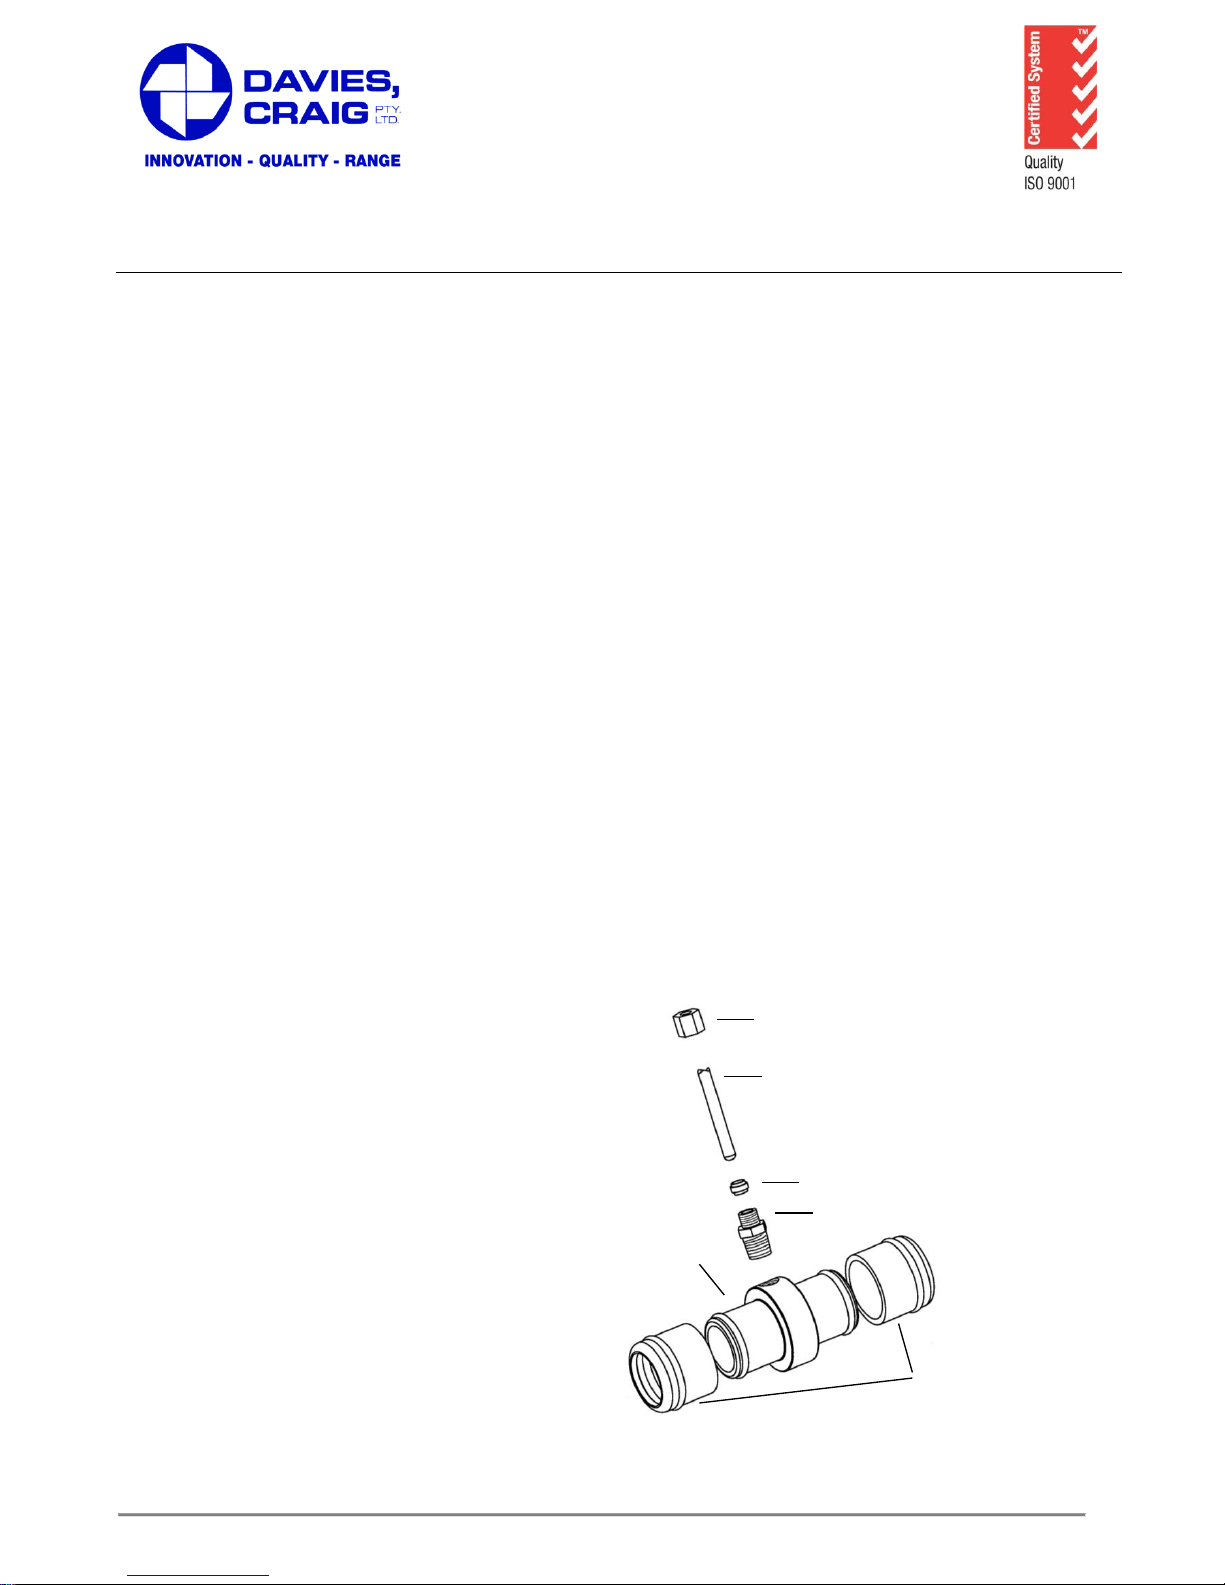
ILLUSTRATION
** THERMAL SENSOR SHOWN IS INCLUDED IN KITS
(PART #0400, #0401 & #0404).
LOCKNUT
THERMAL SENSOR **
OLIVE
COMPRESSION FITTING BODY
RUBBER
SLEEVES
BLACK NYLON
ADAPTOR
(Not Supplied)
Page 2

P/No:0990 – ‘All in One’ Temperature Sensor Adaptor Kit Customer Instructions.
VISIT WWW.DAVIESCRAIG.COM.AU TO VIEW OUR FULL PRODUCT RANGE, INCLUDING
PRODUCTS SUCH AS:
Shop online at: www.daviescraig.com.au
LCD EWP & FAN DIGITAL
CONTROLLER
WATER TEMPERATURE
SENSOR ADAPTOR
INSTALLATION
INSTRUCTIONS
EWP130
LOCKNUT
THERMAL SENSOR **
OLIVE
COMPRESSION FITTING BODY
RUBBER
SLEEVES
BLACK NYLON
ADAPTOR
(Not Supplied)
 Loading...