

David-Link DL=A User Manual

DL-A Biometric Access Control System
USER'S MANUAL

Table of Contents
1. General Information ......................................................................................................... 1
1.0 Notification .................................................................................................................... 2
1.1 System Overview ........................................................................................................... 2
1.2 Main Features ................................................................................................................ 2
2. Basic Concepts ................................................................................................................. 4
2.1 Basic Concepts ............................................................................................................... 4
2.1.1 User Enrollment ................................................................................................... 4
2.1.2 User Verification .................................................................................................. 4
2.1.3 Match Threshold Levels ....................................................................................... 4
2.1.4 User ID Number ................................................................................................... 5
2.1.5 Authority (Status) Levels ...................................................................................... 5
2.1.6 Start-up ................................................................................................................ 5
2.2 How to Place the Finger ................................................................................................ 6
2.2.1 More Tips for Fingerprint Record ........................................................................ 7
3. Enrollment and Verification Procedures ........................................................................... 8
3.1 Enrolling User ................................................................................................................ 8
3.1.1 Types of Enrollment ............................................................................................. 9
3.1.2 Fingerprint & Password ..................................................................................... 11
3.2 Testing an Enrollment ................................................................................................. 12
3.3 Backup Enrollment ...................................................................................................... 12
4. System Options ............................................................................................................. 13
4.1 System Options ........................................................................................................... 13
4.1.1 Date Time ........................................................................................................... 13
4.1.2 Language ............................................................................................................ 13
4.1.3 Format ................................................................................................................ 13
4.1.4 Advanced Options .............................................................................................. 14
4.2 Log Options ................................................................................................................. 15
4.3 Communication Options ............................................................................................. 15
4.4 Access Control ............................................................................................................. 16
4.4.1 Access Control Setting ...................................................................................... 16

4.4.2 Access Control Function .................................................................................... 17
4.4.3 Time Period Definition ...................................................................................... 17
4.4.4 Grouping Function ............................................................................................ 18
4.4.5 User Access Control Setup ................................................................................ 20
4.4.6 Lock Delay ......................................................................................................... 20
5. System Information ....................................................................................................... 21
6. Specification .................................................................................................................. 22
CAUTION:
Changes or modifications not expressly approved by the party responsible for compliance could
void the user's authority to operate the equipment.
1. General Information
1
2
3
M
4
5
6
7
8
9
0
OK
C
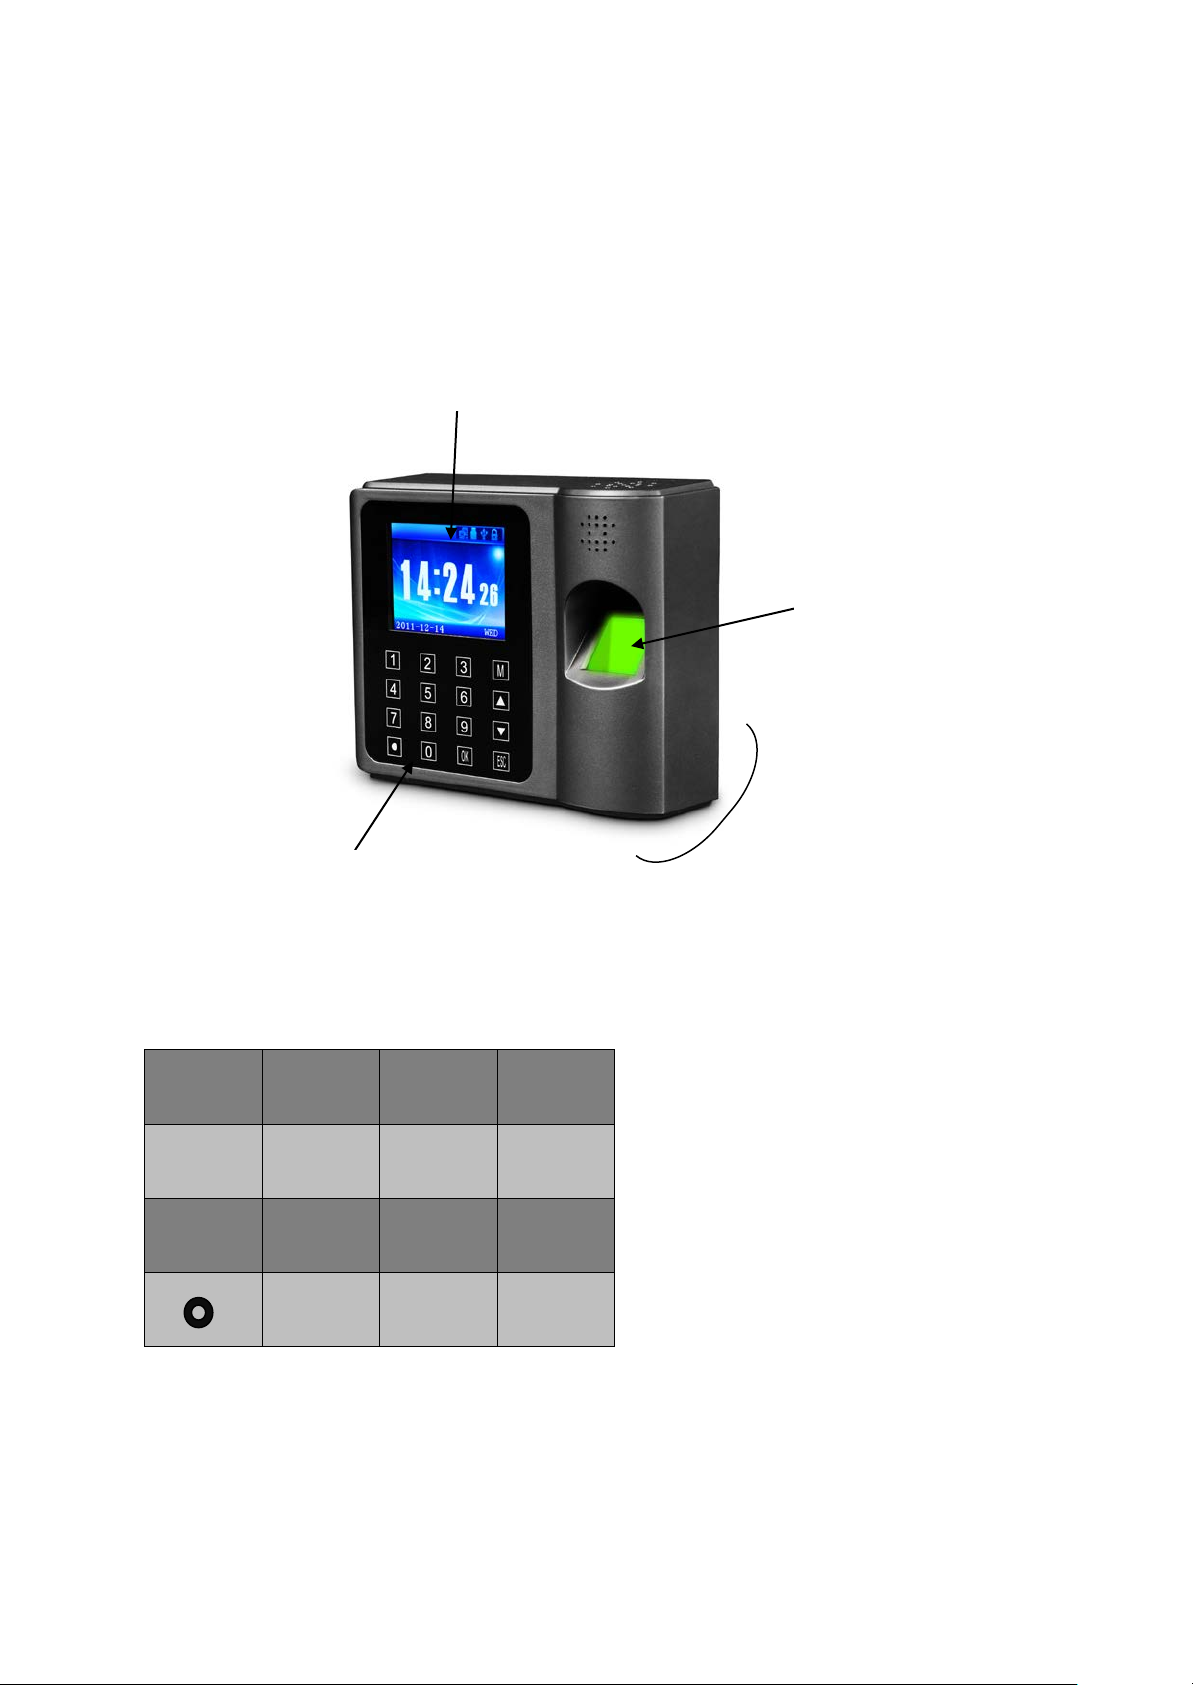
LCD Display
Keypad
Fingerprint Sensor
Proximity Sensor
This chapter explains the outlook of David-Link Biometric/Fingerprint Door Access Control
Terminal and its basic functions in details.
External Overview
Keypad Function
▲
▼
OK: Press to confirm your settings and/or present operation
M: Press to enter the menu options. Admin/manager’s fingerprint authentication, if any, will
be required
C: Press to exit the menu options and/or cancel present operation
4

: Press to scroll up/down the menu
: Press to turn on/off the power
Number: Press number 0---9 to select or input
David-Link Door Access Control Terminal is a simple, easy-to-use terminal. It can be installed at
any area where access of the entries requires authority. This terminal combines the latest
fingerprint recognition technology with multiple levels of security control to provide the safest
environment.
1.0 Notification
Do not attempt to service the terminal yourself. Opening the terminal will void your 1- year
manufacturer’s limited warranty. Always follow the instructions in this user’s manual.
1. Do not place the terminal in direct sunlight. Bright light may significantly affect
fingerprint reads. The terminal is designed for indoor use within a temperature range
of 32-110ºF (0-43ºC). Keep the terminal away from heat sources.
2. This terminal is intended to be used as Door Access Control System. Do not use this terminal
for other purposes. The terminal warranty does not cover defects or damages arising from
improper installation, improper storage, abuse, ordinary wear-and-tear or unauthorized
service.
3. Please save your data and records in USB thumb drive or in your computer periodically.
David-Link is not responsible for any lost data and records from the terminal and software.
1.1 System Overview
DL-A is a Door Access Control System designed for any size of office environment with up to
3,000 authorized users. The system verifies user’s identity based on individual matching
fingerprint.
1.2 Main Features
• Identification Method: Fingerprint, RFID Card, Password, Fingerprint + Password, or
Fingerprint + RFID Card
• Identification Speed: ≤ 1 second
• Fingerprint Capacity: 3,000
• Management Record Capacity: 1,000
• Storage Capacity: 60,000
• Verification Mode: 1:1 and 1:N
5

• FRR: ≤ 1%
• FAR: ≤ 0.0001%
• Communication: TCP/IP, RS485, USB
• USB Thumb Drive Download Function
• Lock Output: NO/NC
• Access Control Interface: Wiegand 26/34
• DC/Current: 12V/1A
2. Basic concepts
2.1 Basic concepts
This section contains definitions and descriptions of David-Link Biometric Fingerprint Access Control
concepts including:
• User Enrollment
• User Verification
• Match Threshold Levels
• User ID Numbers
• Authority (Status) Levels
2.1.1 User Enrollment
During user verification, live fingerprint scan is compared with the matching stored fingerprint
template to confirm user’s identity. Each enrollment process takes less than 1 second. All ten
fingers can be enrolled and assigned to the same ID number or the same user.
Ideally, one finger from each hand should be enrolled so that in case one finger is injured, the
alternate finger can still be verified. It is recommended to enroll the left and right index fingers
for enrollment.
2.1.2 User Verification
Verification process starts when a user enters an ID number, places a finger on the
fingerprint sensor, or inputs a password combination for comparison with the stored
template.
6
2.1.3 Match Threshold Levels
Match Threshold Levels establishes a balance between False Acceptance Rate (FAR) and False
Rejection Rate (FRR). FAR is the frequency of a non-authorized user is falsely recognized and
granted access to the system. FRR the frequency of an enrolled and authorized user, who should be
granted access to the system, is denied on the basis that the system did not recognize. FAR and
FRR affect each other. Lower FAR yields to higher FRR.
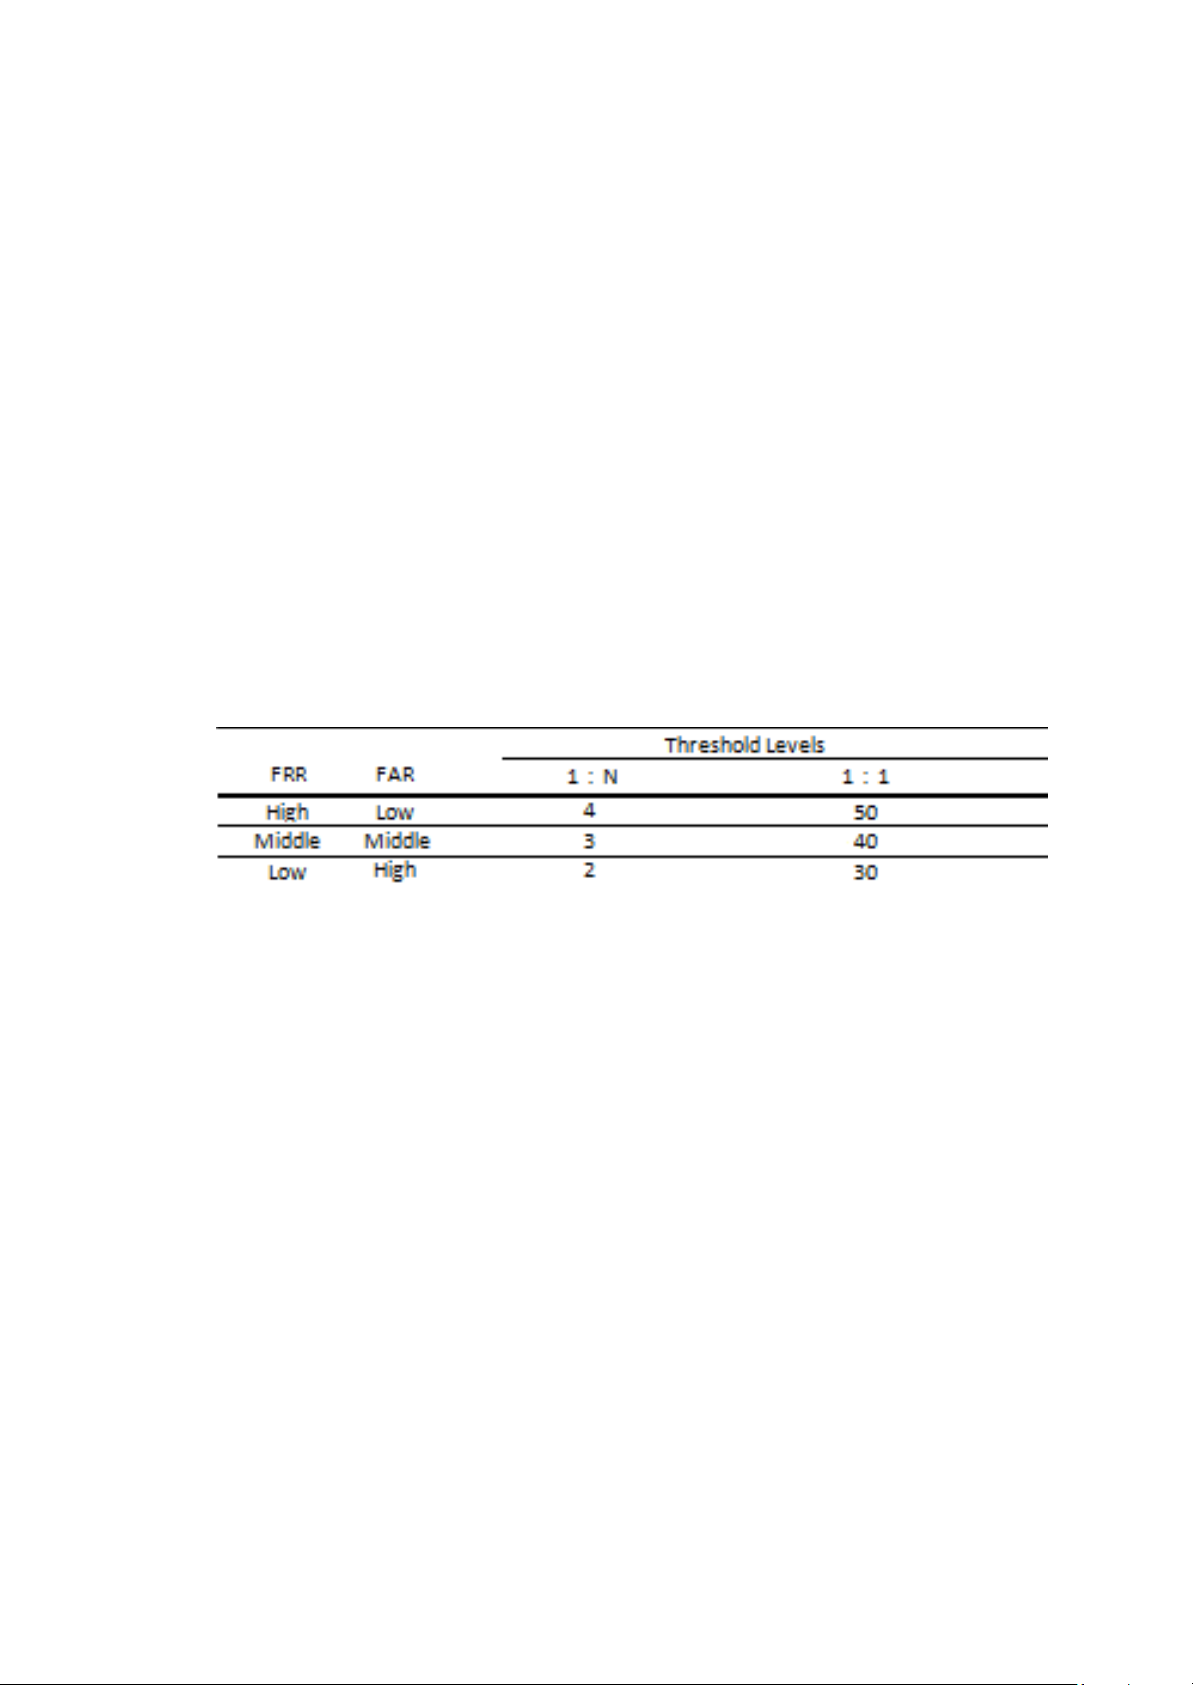
You can set match threshold levels on a per-use basis. The higher the threshold is set, the higher
the security is ensured; however, it is recommended to leave this setting as default, threshold
value = 3, since the default threshold is commonly accepted as the balance of FAR and FRR rate.
In case of fingerprint verification difficulty, one can enter ID number before fingerprint verification
(1:1 match) or lower the matching threshold (1: N).
Table 2-1 Match threshold description
2.1.4 User ID number
Before the fingerprint enrollment, a user is assigned with a User ID Number. This ID number is
matched with a user’s identity and the matching fingerprint template during verification process.
An ID number is assigned sequentially based on availability; however, you may choose any ID
number as desired.
2.1.5
Authority/Privilege
Level
David-Link DL-A Door Access Control System contains authority/privilege levels:
• User: one whose identity must be verified in order to gain access into a facility or to have
his/her attendance recorded.
• Enroll Manager: One who only has access to enroll a new user.
•
General Manager: One who has access to all menu functions, except advanced settings.
• Super Manager: One who has access to all functions and is allowed to make any change in
the system setting.
7
Note: A Super Manager’s enrollment is required in order to assign other privilege levels such
as Enroll Manager or General Manager.
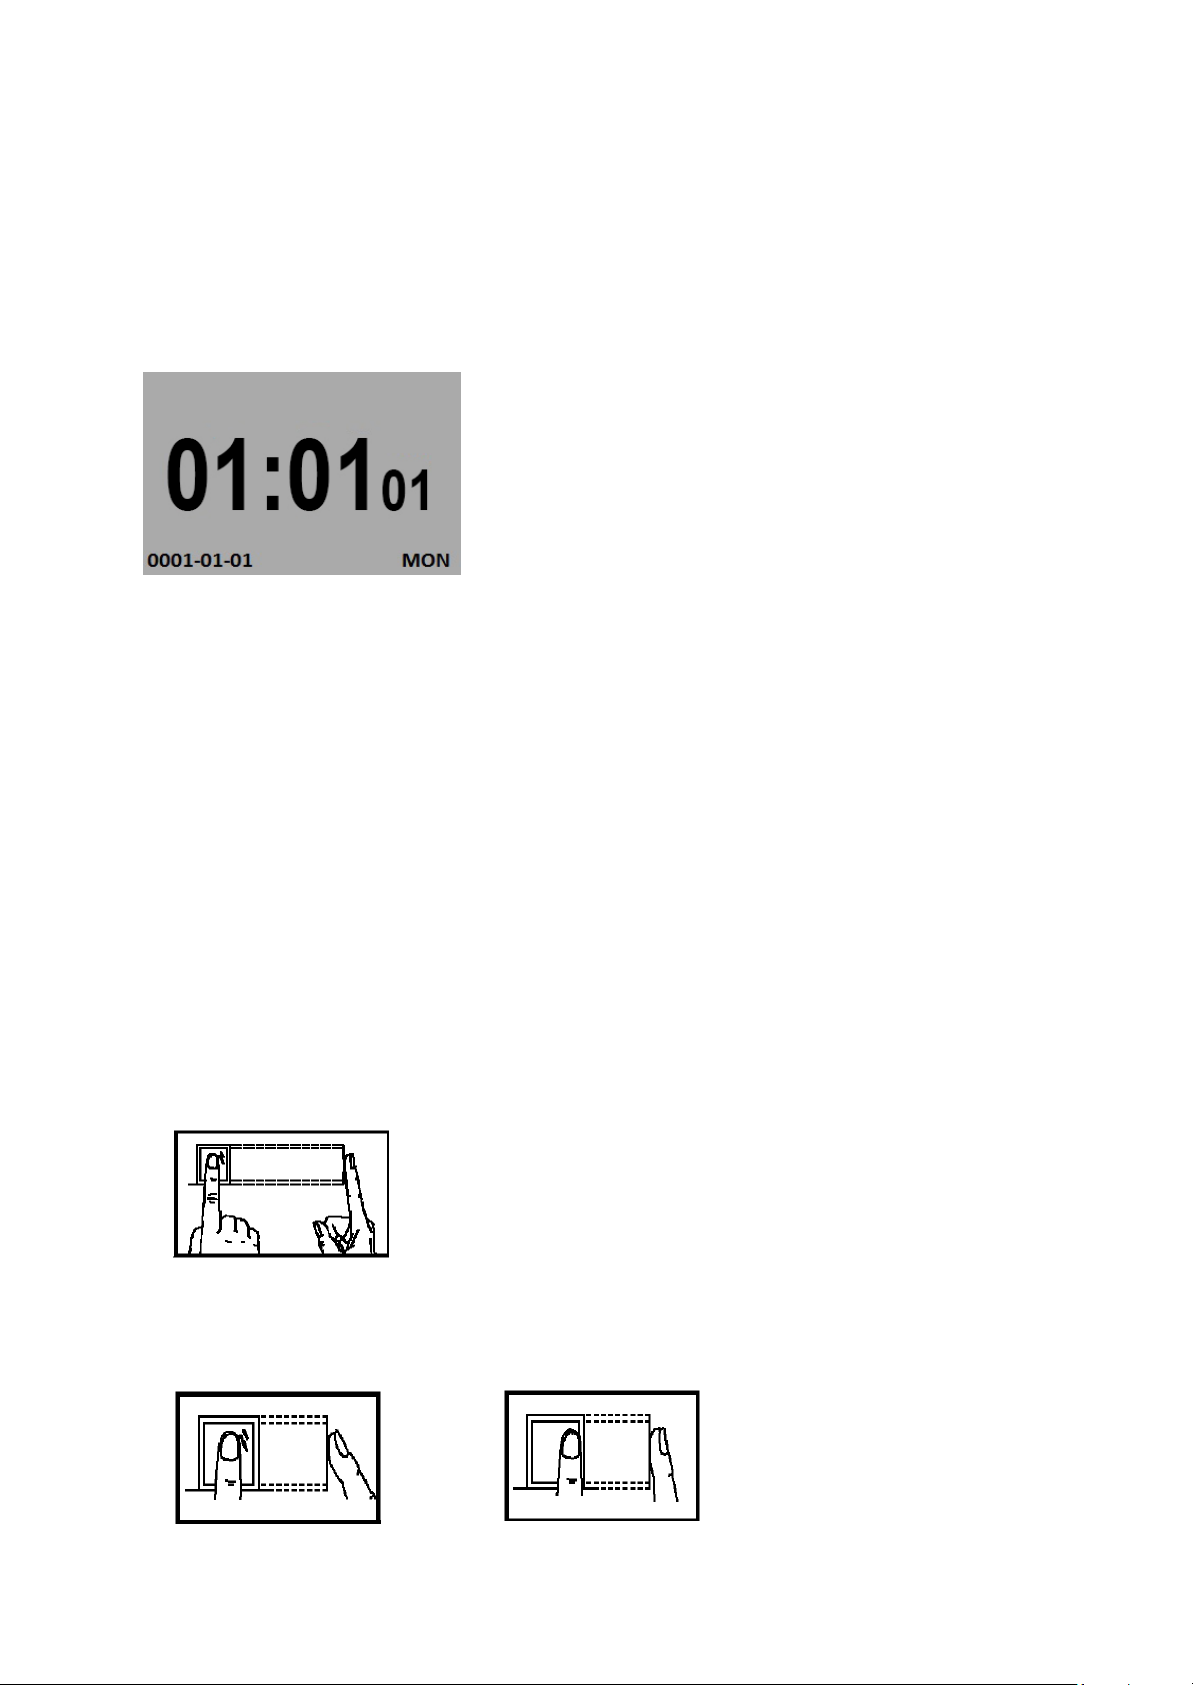
2.1.6 Start-up
Press the power button [0] to turn on the terminal. The Start-up window will appear as the following:
2.2 How to Place the Finger
Tips: It is recommended that at least 2 fingerprints are enrolled in the terminal for each user in the
event that if one of the fingerprints is injured or damaged, a user can always user the alternate
finger for entries. Each user can enroll 1 to 10 fingerprints in the terminal.
DL-A requires each fingerprint to be pressed 3 times in order to successfully enroll the user. Place
your finger in the middle of the sensor. To ensure better fingerprint reads, each time press the finger
flat and firmly on the center of the sensor surface and cover as much of the sensor surface as
possible.
1) Correct Finger Positioning:
2) Incorrect finger Positioning:
Vertical Offset
Place finger flat on the center of sensor
surface.
8
 Loading...