


PHASER
Digital Mode Transceiver
A single-board, 4-watt, Digital Mode SSB transceiver
for use on 80, 60, 40, 30, 20 or 17 meters
by Dave Benson, K1SWL
INSTRUCTION MANUAL
(80M Version)
Revision C3
(June 2020)
Produced by Midnight Design Solutions
© Copyright 2019-2020, David Benson, K1SWL. All rights reserved.

INSTRUCTION MANUAL (for 80m)
K1SWL “Phaser Digital Mode Transceiver” 2 www.MidnightDesignSolutions.com/Phaser
THIS PAGE INTENTIONALLY LEFT BLANKish
Allows the Phaser instruction manual, when printed as a double-sided document, to show the Group Assembly
Instructions on the left (the even page) with the corresponding Group Component Placement on the right (the odd page)
... like an open book. This avoids the need to flip pages when viewing corresponding pictorials.
Note: This instruction manual describes the assembly and checkout of the Phasers starting in Round 4 Production
(orders #300-and-up). The PCBs for this version are identified by the silkscreen text
‘K1SWL Phaser, Rev.C’ on the left edge of the PCB.
See page 37 for a Summary of ‘Rev C’ board changes introduced in production Round 4.

INSTRUCTION MANUAL (for 80m)
K1SWL “Phaser Digital Mode Transceiver” 3 www.MidnightDesignSolutions.com/Phaser
Table of Contents
Contents
INTRODUCTION .................................................................................................................................................................. 3
SPECIFICATIONS ................................................................................................................................................................. 4
PREPARATION FOR ASSEMBLY ...................................................................................................................................... 5
GROUP 1 ASSEMBLY: Board Power .................................................................................................................................. 8
GROUP 2 ASSEMBLY: T-R Switching ............................................................................................................................. 10
GROUP 3 ASSEMBLY: Local Oscillator ........................................................................................................................... 12
GROUP 4 ASSEMBLY: Receiver ...................................................................................................................................... 14
GROUP 5 ASSEMBLY: SSB Phasing ................................................................................................................................ 16
GROUP 6 ASSEMBLY: Transmitter Strip ......................................................................................................................... 18
APPENDIX 1: Parts List (for the Phaser-80) ...................................................................................................................... 20
APPENDIX 2a: Phaser-40 Schematic: (1 of 2) ................................................................................................................... 23
APPENDIX 2b: Phaser-40 Schematic: (2 of 2) ................................................................................................................... 24
APPENDIX 3: Parts Layout ................................................................................................................................................ 25
APPENDIX 4: ‘Quick-Start’ Operation Guide ..................................................................................................................... 26
APPENDIX 5: Adjustment/Calibration ................................................................................................................................ 30
APPENDIX 6: Theory of Operation ..................................................................................................................................... 32
APPENDIX 7: User-Programmable ALT Frequency Entry ................................................................................................ 34
APPENDIX 8: Winding Toroids ......................................................................................................................................... 35
CREDITS .............................................................................................................................................................................. 36
REVISION HISTORY .......................................................................................................................................................... 37
INTRODUCTION
The Phaser Digital Transceiver™ is a single-board, 4-watt SSB radio specifically designed for using digital modes
with computers running WSJT-X and FLDIGI applications. The Phaser is capable of transmitting and receiving on the
80m, 60m, 40m, 30m, 20m or 17m amateur bands. Each of these monoband transceivers is programmed to operate first at
the popular FT8 frequencies, while a pushbutton entry shifts the operating frequency to an alternate frequency of the
user’s choice, initially provided at the JS8 ‘watering hole’. This ALT frequency may be easily reprogrammed to be
anywhere in the HF spectrum, thus providing frequency flexibility to accommodate other digital modes such as PSK31,
Feld Hell, Olivia, SSTV, etc. To ensure efficient use of spectrum in operation, the transmitter features an adjustment-
free phasing single-sideband (SSB) design. The use of precision components provides unwanted sideband suppression
in excess of 30 dB across its operating range, thus minimizing inadvertent QRM to other operators on the (unused) lower
sideband. The use of SSB also eliminates the issue of out-of-phase signal cancellation at the Phaser's direct-conversion
receiver. As such, it allows Phaser users to communicate with each other. This is a clear advantage over the use of
'entry-level' double-sideband (DSB) transceivers.

INSTRUCTION MANUAL (for 80m)
K1SWL “Phaser Digital Mode Transceiver” 4 www.MidnightDesignSolutions.com/Phaser
SPECIFICATIONS
Frequency coverage*:
Phaser-80 board: 3.573 MHz (FT8) and 3.578 MHz (JS8/Alt)
Phaser-60 board: 5.357 MHz (FT8) and 5.357 MHz (JS8/Alt)
Phaser-40 board: 7.074 MHz (FT8) and 7.078 MHz (JS8/Alt)
Phaser-30 board: 10.136 MHz (FT8) and 10.130 MHz (JS8/Alt)
Phaser-20 board: 14.074 MHz (FT8) and 14.078 MHz (JS8/Alt)
Phaser-17 board: 18.100 MHz (FT8) and 18.104 MHz (JS8/Alt)
* FT8 frequency is hard-coded
* Alt frequency is soft-coded for JS8 mode, user reprogrammable
Transmit:
- 4 Watts – nominal
- Phasing SSB -- all power into one sideband (USB)
Receive: MDS of -109 dBm
Frequency Calibration: 1-time
User Programmable ‘Alt’ frequency: 100 kHz to 30MHz, 1 kHz resolution
Adjustments: Tx Drive
DC Power: 12V @ 130ma (Rx), 1A (Tx), center-positive 2.1mm coaxial plug
Dimensions: 4.125” x 3.85” x 1.20”
Kits: Currently available for 80m, 60m, 40m, 30m, 20m or 17m
Components:
- All through-hole parts for user assembly
- Employs eight surface mount parts, all pre-installed
Enclosure Kits: Optionally available

INSTRUCTION MANUAL (for 80m)
K1SWL “Phaser Digital Mode Transceiver” 5 www.MidnightDesignSolutions.com/Phaser
PREPARATION FOR ASSEMBLY
Take a moment to carefully read this section, as it provides good “starting point” guidance that can be of great help in
building the Phaser.
Tools & Supplies:
You’ll need the following tools and supplies for assembling the Phaser:
[ ] Soldering iron – 20 to 40W, preferably thermostatically controlled
[ ] Fine 60/40 (Pb/Sn) rosin core solder
[ ] Diagonal cutters
[ ] Needle-nose pliers
[ ] Small flat- blade screwdriver
[ ] Adhesive (Scotch®) tape
[ ] (Helpful) Close-up glasses or magnifier
[ ] Operational Needs: Power supply, antenna, audio cables, computer and WSJT-X or FLDIGI apps
General Assembly Notes:
• A number of components are polarity-sensitive. This includes all semiconductor devices and diodes, and the five
electrolytic capacitors. These are contained in antistatic envelopes.
• Components these days are tiny! In sunlight, one can read their printed values with +3.0 reading glasses. Most of
the time, though, builders can benefit from using a 10-power eye loupe (costing about $3-4 from DigiKey).
• Assembly sequence: These assembly instructions provide a step-by-step guide to successful construction of the
Phaser. It is recommended that you follow the six grouped assembly sequences in order.
• Schematic and Component Placement diagrams are provided in Appendices 2 and 3, respectively. It is highly
recommended to print a copy of this manual for reference during construction. As you build, you can check off each
construction step as you complete them in order.
• Further details may be found in the grouped assembly sequences.
Parts Organization:
• Take some time to organize the parts provided and check them against the Parts List shown in Appendix 1. You may
want to organize parts in a muffin tin or insert them into a sheet of Styrofoam® to keep them from disappearing…
especially if you have a cat.
• To minimize the chance of static damage, keep ICs and semiconductors in the anti-static package until you’re ready to
install them. As a practical matter, you don’t need an antistatic mat or ESD wrist strap. Note: You should try to
avoid setting these components down on paper.
• The Phaser parts kit has been thoughtfully prepared on a number of individually-bagged small cards containing all
parts that will ultimately be attached to the printed circuit board. Now would be a good time to inventory the parts on
these cards against the Parts List shown later in this manual in Appendix 1. If parts are missing in your kit, send an
email to n2apb@midnightdesignsolutions.com and he will promptly provide shortages/replacements.
INSTRUCTION MANUAL (for 80m)
K1SWL “Phaser Digital Mode Transceiver” 6 www.MidnightDesignSolutions.com/Phaser
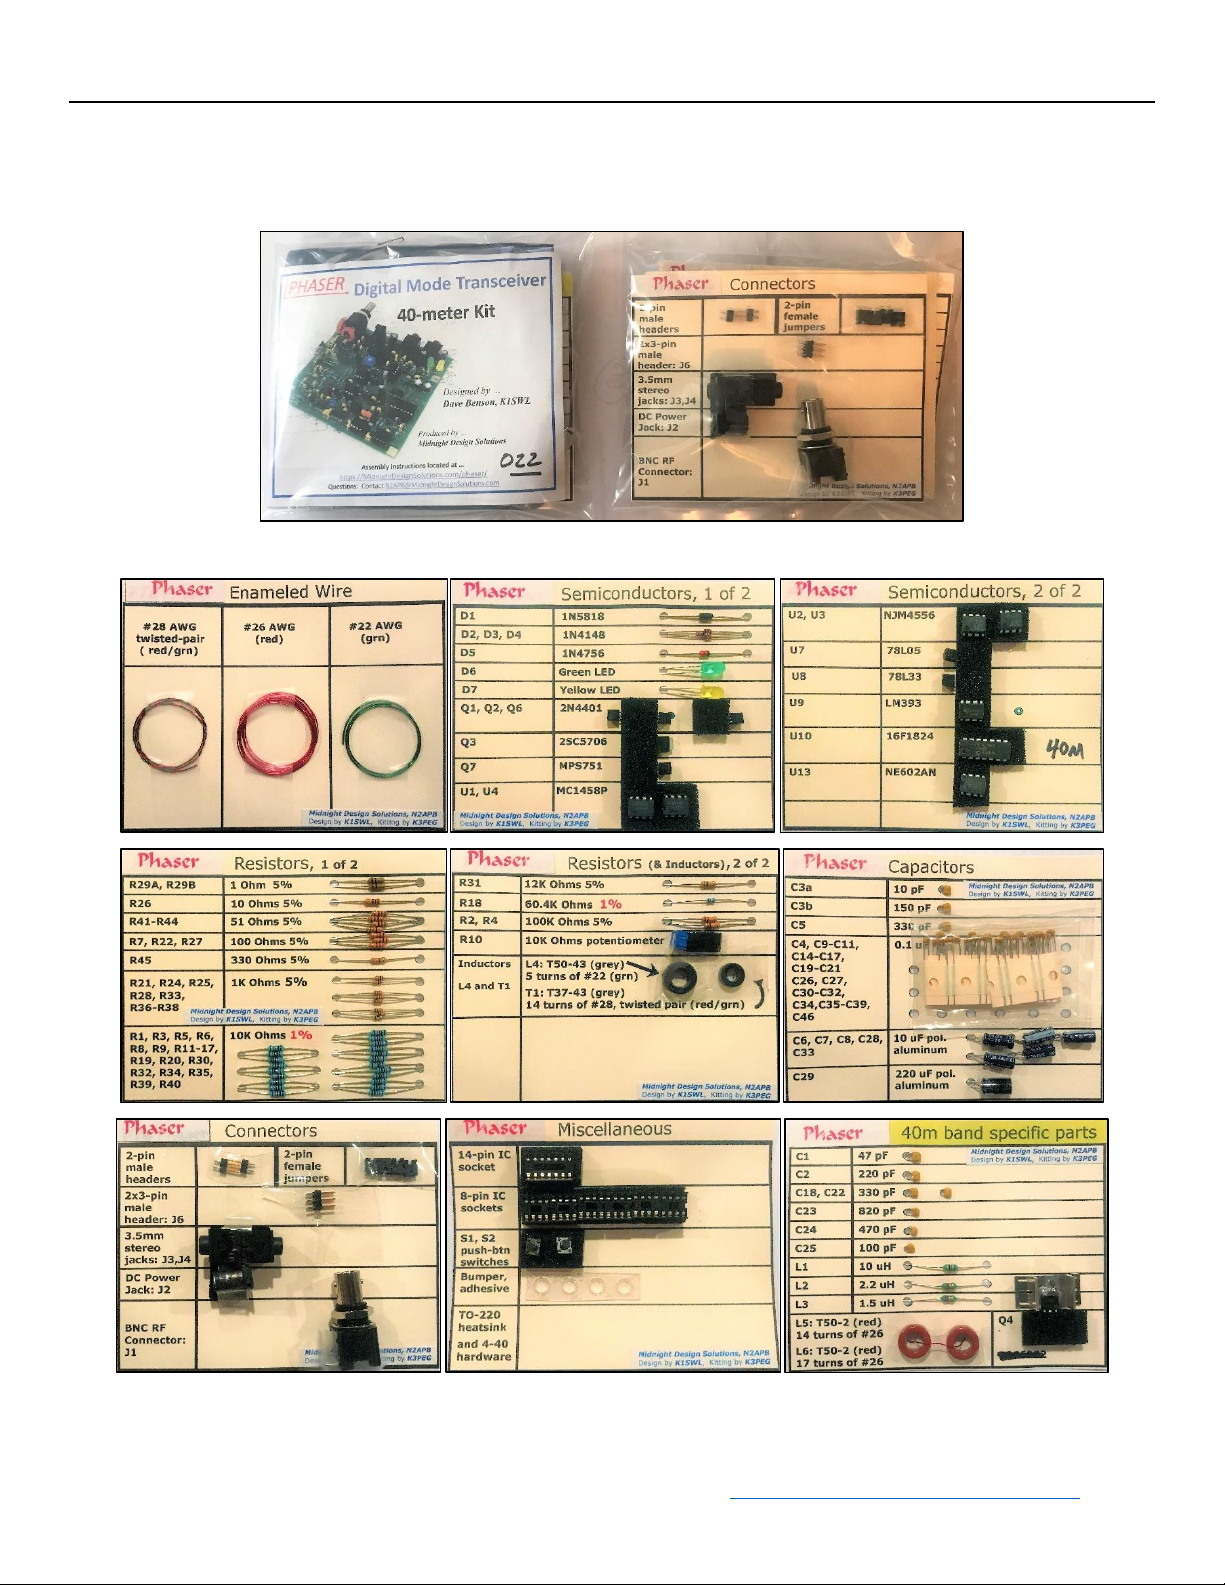
Phaser Parts:
Refer to the Parts List shown in Appendix 1 for inventorying all parts.
As received, these two bags contain the 9 cards shown below. (Sample shown is for Phaser-40.)
Stack 'em up in a small box, plastic drawer, etc to provide easy access to the parts when called for in the Instructions!

INSTRUCTION MANUAL (for 80m)
K1SWL “Phaser Digital Mode Transceiver” 7 www.MidnightDesignSolutions.com/Phaser
PC Board:
The Phaser PC Board contains eight (8) pre-attached Surface Mount Devices. Handle with anti-static care!
Recommendation for Staging Parts:
Arranging the parts cards in a plastic bin such as the one shown below can provide easy access to each part when called
for in these instructions. For example, when a capacitor is called for, just flip through to the card containing the caps!
INSTRUCTION MANUAL (for 80m)
K1SWL “Phaser Digital Mode Transceiver” 8 www.MidnightDesignSolutions.com/Phaser
GROUP 1 ASSEMBLY: Board Power
Refer to the diagram “Group 1 Component Placement” on the next page for reference to the location of components being
installed here.
NOTE: The location of components installed in this assembly group are shown with either a green dot (for the ceramic
capacitors) or a yellow dot (for all others).
[ ] IC Sockets: Install the five 8-pin IC sockets and the 14-pin IC socket. Tape each of these sockets down on the top
side of the board to hold them in place before soldering. Observe the orientation as shown on the silkscreen (i.e., the
printing on the board). Ensure that all socket leads protrude through the board before soldering. It’s helpful to solder
a pair of opposite corner-pins and check to make sure the sockets are solidly seated on top of the board. Retouch as
needed.
[ ] J2: Install DC power connector J2. It may be helpful to tape it down before turning the board over to solder.
[ ] 2-pin Pinheader: Install a 2-pin male header at the location next to D1. Place a 2-pin jumper on the header just
installed.
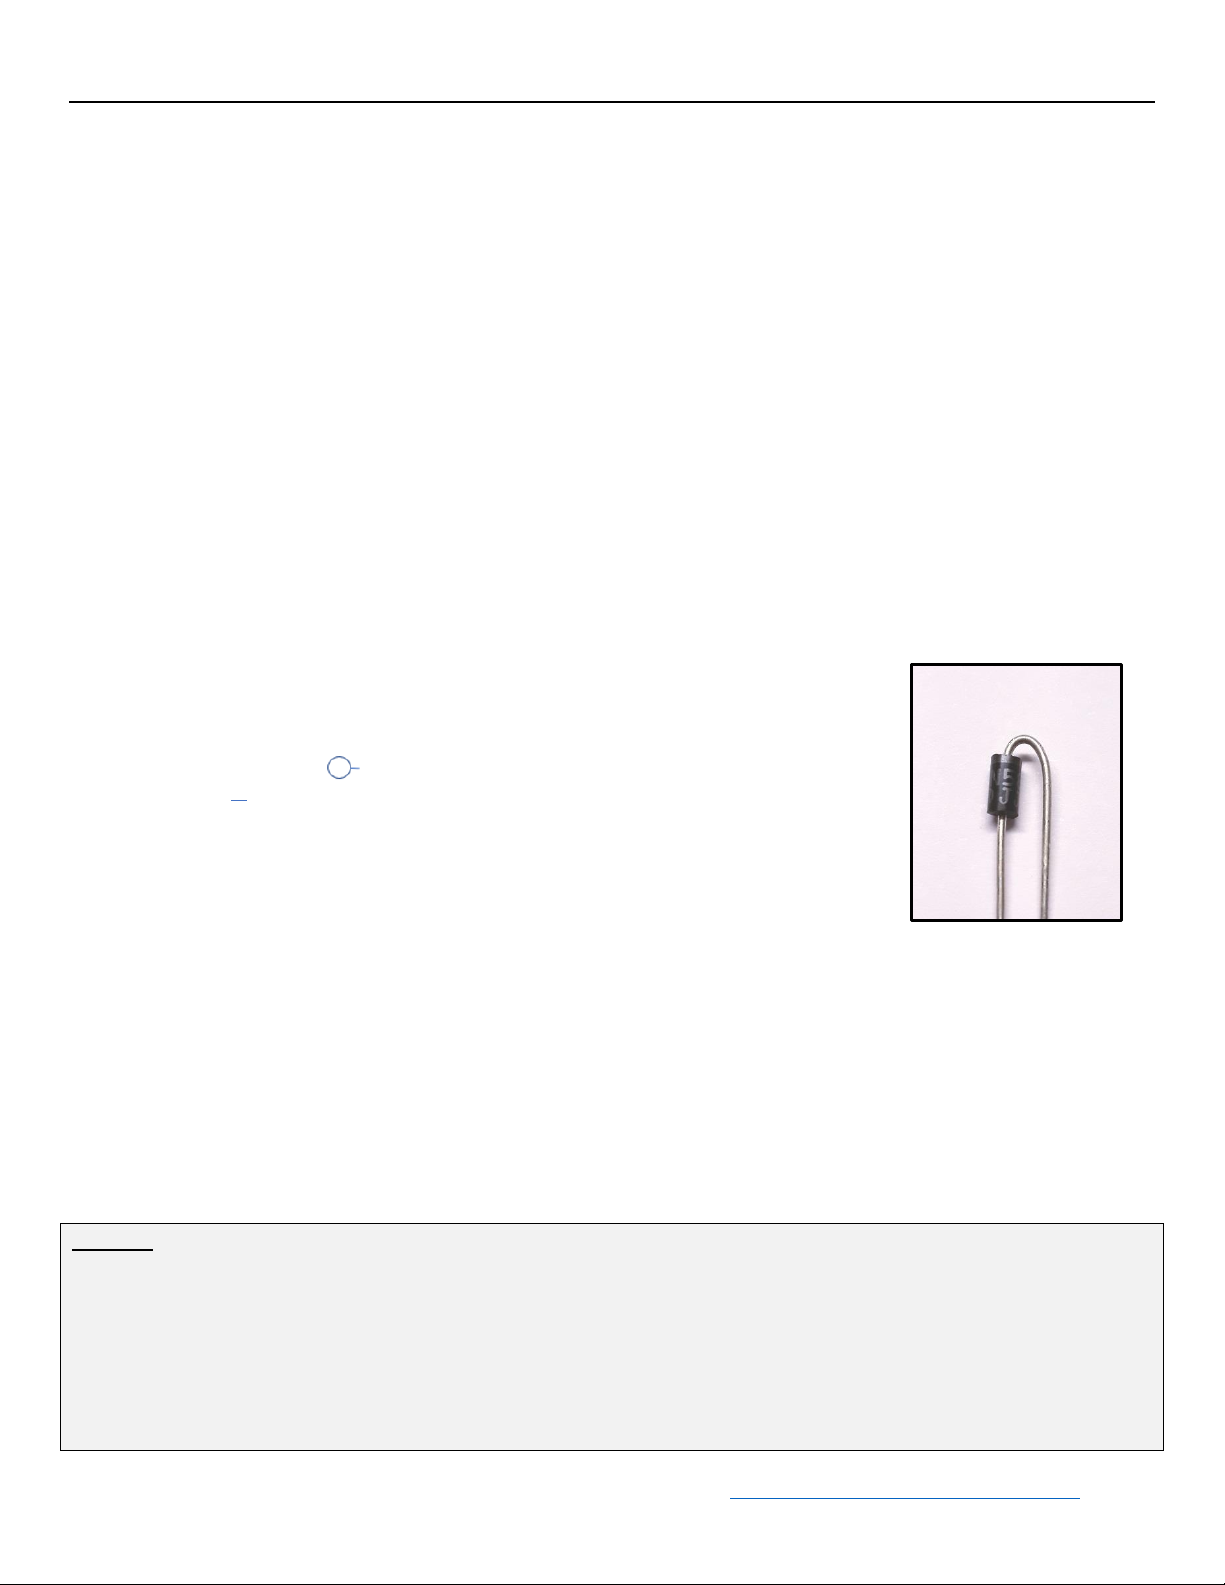
[ ] D1: To install diode D1 vertically, bend the lead on the BANDED end of the 1N5818
so the component forms a ‘hairpin’ shape. Install the component with the body of the
component oriented as shown in the photo. The diode’s body is closest to the male
header and jumper installed in the previous step.
The silkscreen symbol indicates that a component’s leads are formed into a
hairpin prior to installation. See the photo on the right. The straight component lead
gets inserted to the center of the circular silkscreen designator, while the lead that is
bent over gets inserted into the other hole.
[ ] 0.1 uF ceramic capacitors: Install 19 0.1 uF capacitors (marked as ‘104’) at the
locations shown on the next page. These locations are shown in green. The remaining
capacitors will be installed in a later assembly group.
[ ] U7: Install the 78L06 3-pin IC (U7), matching its orientation to that of the silkscreen outline.
[ ] U8: Install the 3-pin 78L33 regulator at U8, again matching its orientation to that of the silkscreen outline.
[ ] C7, C33: Install the 10 uF electrolytic caps at C7 and C33. These and all other electrolytic capacitors are polarity-
sensitive. In each case, the longer lead must be installed nearest the ‘+’ sign on the silkscreen legend. Double-check
to ensure that the negative side of the capacitor (marked with a ‘-‘) shown on the side of the capacitor is facing away
from the ‘+’ sign on the silkscreen.
[ ] C29: Install the 220 uF electrolytic cap at C29, again observing polarity.
TEST #1: Basic Power
• Apply 12V power through jack J2. (The center pin is positive.)
• With your multimeter ground clip attached to any of the board mounting holes, measure for 6V at pin 8 of the U1 pin
socket.
• Then measure for 3.3V at pin 1 of the U10 IC socket.
• Do not proceed until you see these voltages, as the rest of the components depend on these voltages for proper
operation.
• Remove power before proceeding to the next assembly group.

INSTRUCTION MANUAL (for 80m)
K1SWL “Phaser Digital Mode Transceiver” 9 www.MidnightDesignSolutions.com/Phaser
Group 1 Component Placement
Measure for
+6V here
Measure for +3.3V here
Ground
clip here

INSTRUCTION MANUAL (for 80m)
K1SWL “Phaser Digital Mode Transceiver” 10 www.MidnightDesignSolutions.com/Phaser
GROUP 2 ASSEMBLY: T-R Switching
This assembly group installs the T-R switching logic. Component locations are indicated with orange dots in the diagram
on the next page.
[ ] J3, J4: Install 3.5mm audio connectors at J3 and J4.
[ ] R5, R6, R30, R32, R34 and R35: Install 10K resistors (brn-blk-blk-red-brown) resistors at R5, R6, R30, R32, R34
and R35.
[ ] C6, C28: Install two 10 uF electrolytic caps, at C6 and C28. This and all other electrolytic capacitors are polarity-
sensitive. In each case, the longer lead must be installed nearest the ‘+’ sign on the silkscreen legend. Again,
double-check the polarity before soldering.
[ ] R31: Install the 12K (brown-red-orange-gold) resistor at R31.
[ ] R33, R36: Install 1K (brown-blk-red-gold) resistors at R33 and R36.
[ ] R47A, R47B: Install 1.8 ohm (brown-grey-gold-gold) resistors at R47A and R47B. These components are
unmarked on the silkscreen and are just to the right of Q7.
[ ] Transistor Q6: Install a 2N4401 3-pin device at Q6. Observe orientation of the devices flat edge. Take care not to
overheat solid-state devices.
[ ] Transistor Q7: Install the NTD2955 3-pin device at Q7. Observe orientation of the device’s flat edge.
[ ] Transistor Q8: Install the 2N3906 3-pin device at Q8. Observe orientation of the device’s flat edge.
[ ] Resistor R46: Install 1K (brown-blk-red-gold) resistors at R46.
[ ] D8 ‘Tx’ LED: Install the Red LED above the ‘Tx’ legend. Observe the orientation of the device’s flat edge. The
longer of the device’s two leads installs in the upper hole of the two pads. Note: If you plan to install the Phaser in
its companion enclosure, do not install this part. Set it aside for later use.
[ ] Integrated Circuit U9: Insert the LM393 8-pin IC in the socket at U9. Observe orientation of pin 1, as marked with
a small dot or cutout at the pin 1 edge of the device.
[ ] 2-pin Pinheader: Install the remaining 2-pin male header at the location marked ‘CAL’ near U10.
TEST #2: T-R Switching
• Upon completion of this group, you can connect the 12V power source again to J2 and a cable from your computer
audio output at J3.
• Launch the WSJT-X software on your computer and command it to ‘TUNE’. (See “Quick Start” in Appendix 4.)
• Measure the voltage ‘Vsw’ (at the top pad of L3, near C34) and see it change from 0V DC to a nominal 12V DC.
Verify that the ‘Tx’ LED Illuminates.
• Do not proceed until you see these voltages, as the rest of the components depend on these voltages for proper
operation.
• Uncheck the WSJT ‘TUNE’ box and verify that the LED turns off.’
• Remove power before proceeding to the next assembly group.

INSTRUCTION MANUAL (for 80m)
K1SWL “Phaser Digital Mode Transceiver” 11 www.MidnightDesignSolutions.com/Phaser
Group 2 Component Placement
Observe the change in voltage from 0V to 12V at
top of L3 (and the red LED turning on) when
commanding ‘Tune” in WSJT-X software

INSTRUCTION MANUAL (for 80m)
K1SWL “Phaser Digital Mode Transceiver” 12 www.MidnightDesignSolutions.com/Phaser
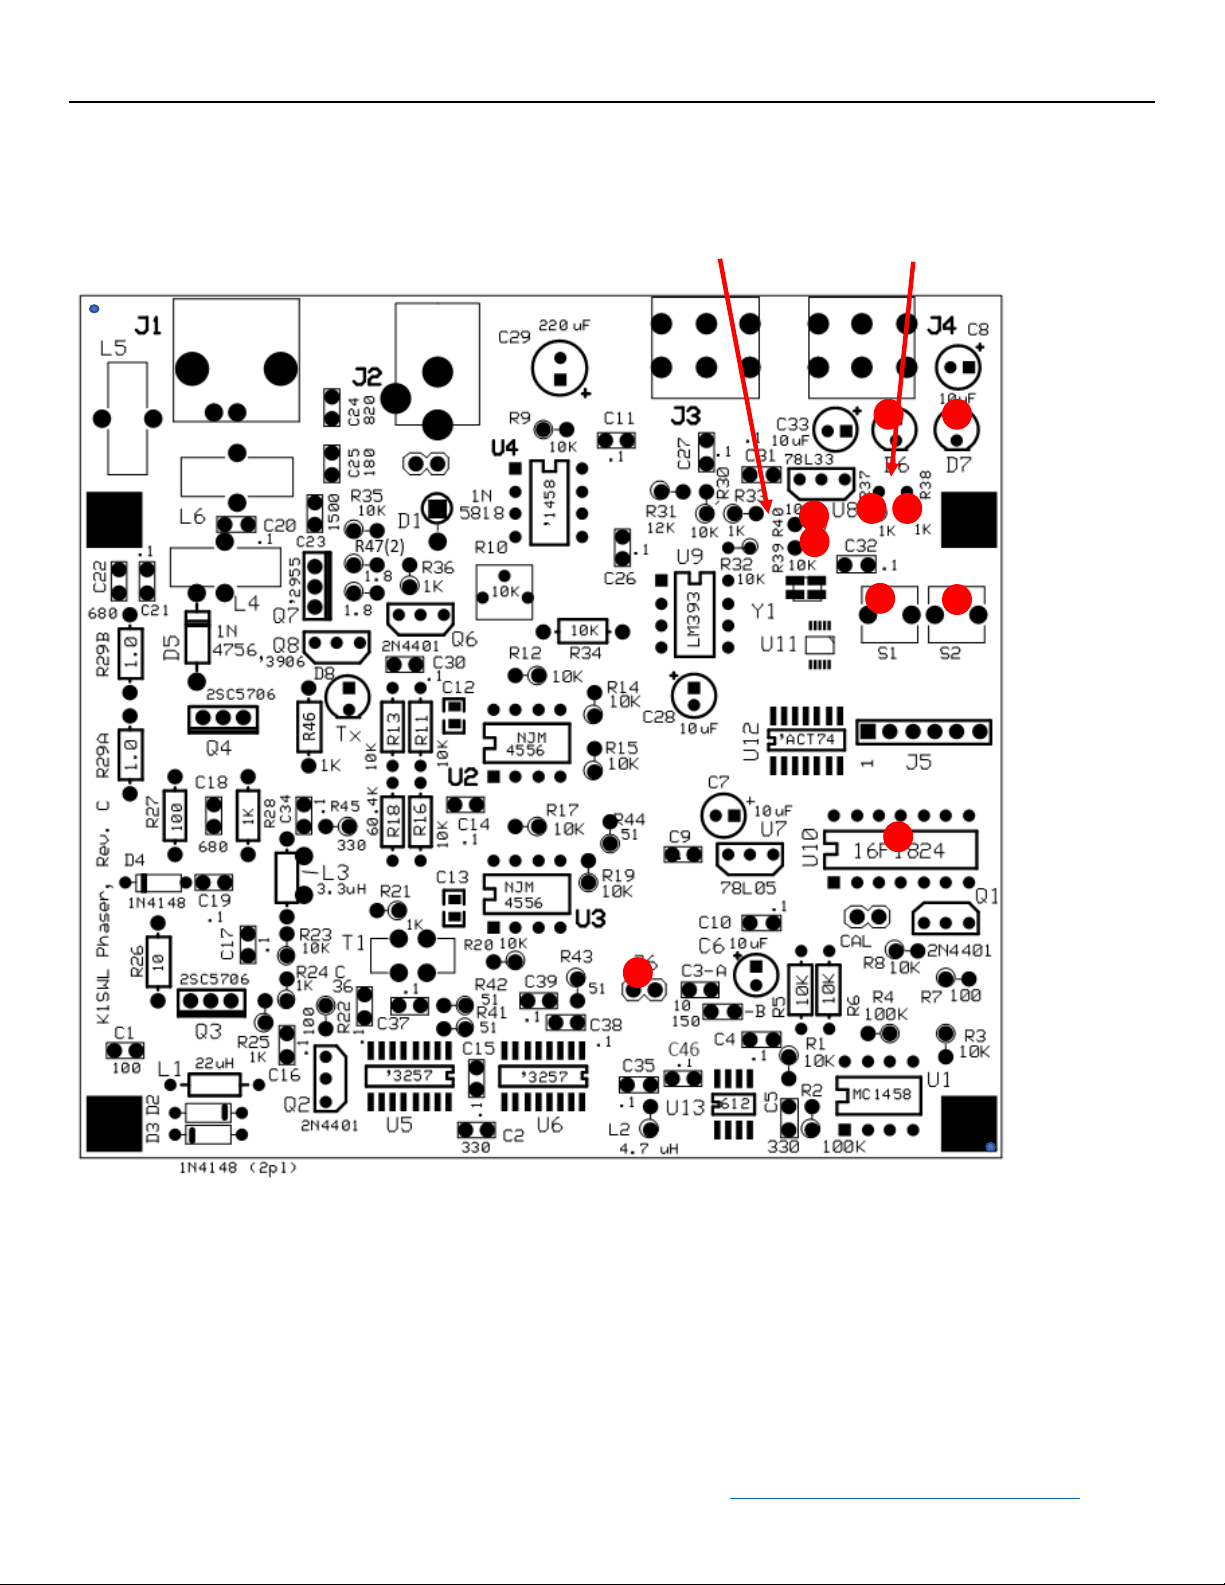
GROUP 3 ASSEMBLY: Local Oscillator
This assembly group installs the local oscillator function. Component locations are indicated with red dots in the
diagram on the next page.
[ ] Green LED: Install the Green LED at the board location labeled ‘FT8’. Ensure that the longer lead (the anode) is
installed toward the rear (top) of the board. The shorter lead (the cathode) is identifiable by its proximity to the ‘flat’
on the otherwise-round base of the diode body. (It may be difficult to see this flat.)
[ ] Yellow LED: Install the Yellow LED at the board location labeled ‘ALT’. (Same caution about orientation.)
[ ] R37, R38 (1K): Install two 1K resistors (brown-blk-red-gold) at R37 and R38. These
resistor labels are not shown on silkscreen but are located next to the green ‘FT8’
LED.
[ ] R39, R40 (10K): Install two 10K resistors (brn-blk-blk-red-brown) R39 and R40.
These positions are also not on the silkscreen but are located just above Y1.
[ ] S1, S2: Install tactile switches S1 and S2.
[ ] Integrated Circuit U10: Install 14-pin IC U10 (PIC16F1824). This device is polarity-
sensitive. The dot and/or notch at one end of the device must face to the left as you are
viewing the ‘U10’ designator. You may need to bend the IC pins gently inward to mate
with the socket. The best approach is to push the IC down on each side separately
using a hard surface to bend one 7-pin row at a time. Once you’ve installed the IC,
ensure that all leads are seated in the socket.
[ ] J6 (1x2 Pinheader): Install the 2-pin male header at the positioned labeled J6.
Test #3: Measure the Carrier
Connect a 12V power source to J2, then connect a clip lead to one of the exposed pins on J6. The clip lead serves as an
antenna to radiate to clock frequency present on J6. You should be able to hear this steady carrier on your ‘big rig’ at
3573.0 kHz. The frequency may be off by several hundred Hz. Refer to the ‘Adjustment/Calibration’ section of these
Instructions for calibration.
INSTRUCTION MANUAL (for 80m)
K1SWL “Phaser Digital Mode Transceiver” 13 www.MidnightDesignSolutions.com/Phaser
Group 3 Component Placement
R37 & R38
R39 & R40

INSTRUCTION MANUAL (for 80m)
K1SWL “Phaser Digital Mode Transceiver” 14 www.MidnightDesignSolutions.com/Phaser
GROUP 4 ASSEMBLY: Receiver
This assembly group installs the Phaser’s receiver components. See next page for component placement, as indicated by blue dots.
[ ] C1 (100 pF): Install a 100 pF (marked as ‘101’) capacitor at C1.
[ ] D2, D3 (1N4148): Install 1N4148 diodes (small, glass bodies) at D2 and D3. Match their orientations as shown on the
silkscreen.
[ ] C2, C5 (330 pF): Install 330 pF (marked as ‘331’) capacitors at C2 and C5.
[ ] C3-A (10 pF): Install a 10 pF (marked as ‘100’ or ‘10J’) capacitor at C3-A.
[ ] C3-B (150 pF): Install a 150 pF (marked as ‘151’) capacitor at C3-B.
[ ] C22 (680 pF): Install a 680 pF (marked as ‘681’) capacitor at C22 (upper left quadrant of board).
[ ] L1 (22 uH): Install a 22 uH RF Choke (red-red-blk-gold) at L1. The RF chokes are slight larger in diameter than the ¼W
resistors and are more tapered at the ends of the body. Caution: Avoid sharp bends in the leads right where they leave the
body, as this may damage the component.
[ ] L2 (4.7 uH): Install a 4.7 uH RF Choke (yellow-violet-gold-gold) at L2.
[ ] R1, R3, R8 (10K resistor): Install 10K (brn-blk-blk-red-brn) 1/4W resistors at R1, R3 and R8.
[ ] R2, R4 (100K resistor): Install 100K (brn-black-yellow-gold) resistors at R2 and R4.
[ ] R7 (100-ohm): Install a 100-ohm (brn-black-brn-gold) resistor at R7.
[ ] C8 (10 uF): Install the remaining 10uF electrolytic capacitor at C8.
[ ] Q1 (2N4401): Install a 2N4401 transistor at Q1, matching its outline to that of the silkscreen.
[ ] C23 (1500 pF): Install the 1500 pF ( ‘152’) capacitor at C23.
[ ] C24 (820 pF): Install the 820 pF (‘821’) capacitor at C24.
[ ] C25 (180 pF): Install the 180 pF (‘181’) capacitor at C25.
[ ] U1 (MC1458): Install an MC1458 8-pin IC at U1. The notch or dot on the case must face to the left.
[ ] L5 (T50-2 Toroid): Cut a 18” length of #26 red magnet wire and wind 20 turns on a T50-2 (red) toroid. Prepare the leads and
install at L5. See Appendix 8 for guidelines on winding toroids.
[ ] L6 (T50-2 Toroid): Cut a 20” length of #26 red magnet wire and wind 24 turns on a T50-2 (red) toroid. Prepare the leads and
install at L6. See Appendix 8 for guidelines on winding toroids.
[ ] BNC (J1): Install the BNC connector at J1. Solder all connections. The two ‘press-fit’ leads are not used electrically but they
provide mechanical stability
Test 4: Receiving FT8 Signals
When this assembly group is complete, the Phaser receiver should be operational. Refer to the Quick-Start section of
these instructions for hookup and operating guidance.

INSTRUCTION MANUAL (for 80m)
K1SWL “Phaser Digital Mode Transceiver” 15 www.MidnightDesignSolutions.com/Phaser
Group 4 Component Placement

INSTRUCTION MANUAL (for 80m)
K1SWL “Phaser Digital Mode Transceiver” 16 www.MidnightDesignSolutions.com/Phaser
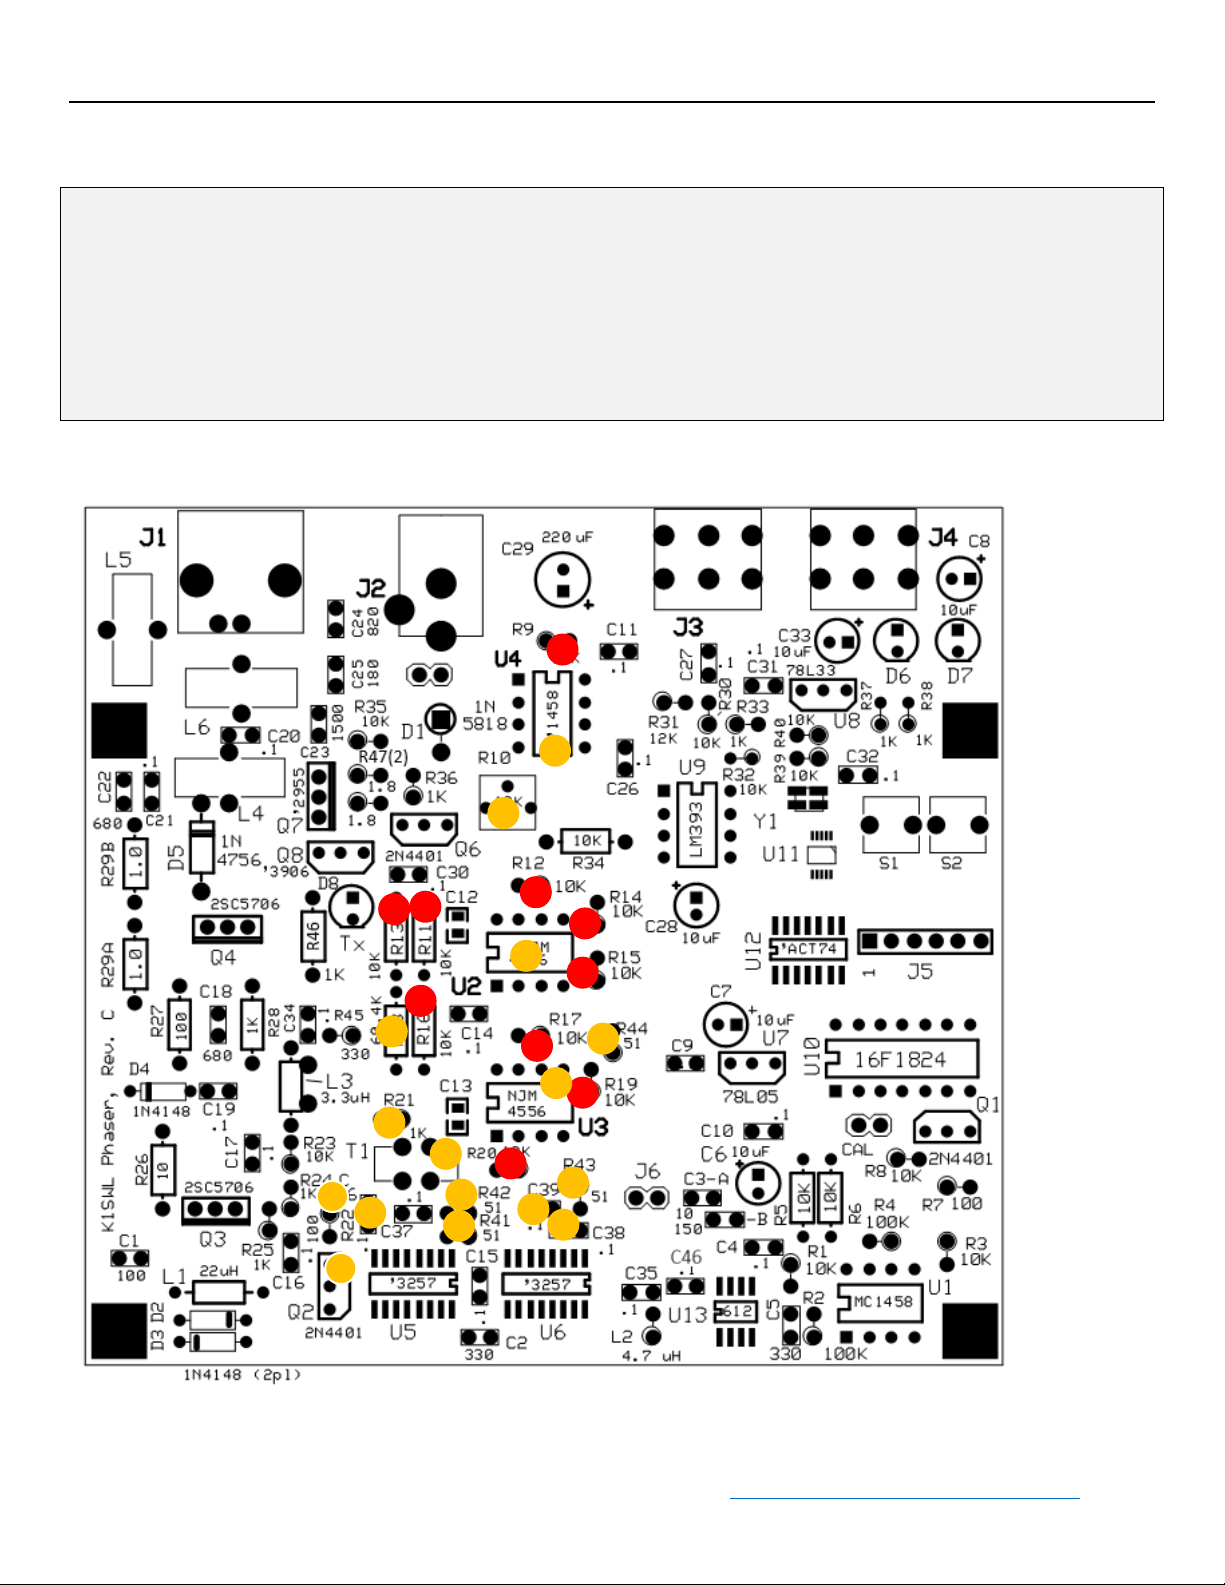
GROUP 5 ASSEMBLY: SSB Phasing
This assembly group installs the SSB phasing components. See next page for component placement, with red and orange
dots indicating component locations.
[ ] R18 (60.4K): Install the 60.4K 1%-tolerance (blue-black-yellow-red-gold) resistor at R18.
[ ] R9, R11, R12, R13,R14,R15, R16,R17,R19, R20 (10K): Install 10K (brn-blk-blk-red-brown) resistors. These are
highlighted in red on the next page.
[ ] R10 (Trimmer): Install the 10K trim pot (blue, 3 leads) at R10.
[ ] U4 (MC1458): Install an MC1458 8-pin IC at U4. The notch or dot on the case must face toward the back of the
board, near R9.
[ ] R21 (1K): Install a 1K 5% resistor (brown-blk-red-gold) at R21.
[ ] C36, C38, C39, C46 (0.1 uF): Install the remaining (4) 0.1 uF capacitors (marked ‘104’).
[ ] R41, R42, R43, R44 (51 ohm 5%): Install 51 ohm 5% resistors (green-brown-blk-gold) at R41-R44
[ ] T1 (Toroid FT37-43): Wind 14 turns of the #28 red/green twisted-pair wire on the FT37-43 toroid form (gray, 0.37”-
dia). Take extra care to avoid scrambled turns. Prepare the leads as described next. Refer to Appendix 8 “Winding
Toroids.”
Two leads of a given color must be arranged to one side of the finished toroid.
The two remaining leads must be grouped to the other side of the toroid. This is
illustrated in the photo to the right.
Now, install the toroid at T1 in either orientation as shown below.
[ ] R22 (100-ohm): Install a 100-ohm resistor (brown-blk-brown-gold) at R22.
[ ] Q2 (2N4401): Install the remaining 2N4401 transistor at Q2. Match its
orientation to that of the silkscreen.
[ ] U2, U3 (NJM4556): Insert the NJM4556 8-pin ICs at locations U2 and U3. The
notch or dot on the case must face toward the left side of the board, toward C12
and C13.
INSTRUCTION MANUAL (for 80m)
K1SWL “Phaser Digital Mode Transceiver” 17 www.MidnightDesignSolutions.com/Phaser
Test 5: Listening for the Carrier
You can connect a clip lead to R22. Leave the other end free. Apply 12V power via J2 and audio via J3. Command WSJTX to “Tune”. (See ‘Quick-Start’.) As you tune across the operating frequency with your ‘big rig’, you’ll note that one
sideband is much stronger than the other. Opposite sideband at 2400 Hz is down ~35 dB, and noise is ~20 mV pp at this
point.
Group 5 Component Placement

INSTRUCTION MANUAL (for 80m)
K1SWL “Phaser Digital Mode Transceiver” 18 www.MidnightDesignSolutions.com/Phaser
GROUP 6 ASSEMBLY: Transmitter Strip
This assembly group installs the Transmitter strip, whereby the mixer output is amplified and sent to the antenna jack.
[ ] L3 (3.3 uH) Install the 3.3 uH (orange-orange-gold-gold) RF Choke at L3. (NOTE: the extra pair of pads and
silkscreen outline at L3 are unused. They are reserved for use on higher-frequency bands.)
[ ] C18 (680 pF): Install the 680 pF capacitor (‘681’) at C18.
[ ] R45 (330 ohm): Install the 330 ohm (orange-orange-brn-gold) resistor at R45.
[ ] R23 (10K): Install the remaining 10K resistor (brown-blk-orange-gold) at R23.
[ ] R24, R25, R28 (1K): Install the remaining (3) 1K resistors (brown-blk-red-gold) at R24, R25 and R28.
[ ] R27 (100-ohm): Install the remaining 100-ohm resistor (brown-blk-brown-gold) at R27.
[ ] R26 (10-ohm): Install the 10-ohm resistor (brown-blk-blk-gold) at R26
[ ] D4 (1N4148): Install the remaining 1N4148 diode at D4. Match the orientation to that shown on the silkscreen.
[ ] D5 (1N4756): Install the 1N4756 diode (glass, larger body) at D5. Match the orientation to that shown on the
silkscreen.
[ ] R29A, R29B (1-ohm): Install the two 1-ohm resistors (brown-blk-gold-gold) at R29A and R29B.
[ ] Q3 (2SC5706): Install the 2SC5706 transistor at Q3. Make sure the tab on the device matches the orientation shown
on the silkscreen
[ ] L4 (Toroid FT50-43): Wind 5 turns of the heavier-gauge magnet wire on the remaining toroid form. Prepare the
leads and install at L4.
[ ] Q4 & Heatsink Assembly (2SC5706): The 2SC5706 PA device is supplied with its heatsink pre-installed. (You’re
welcome!) Install the assembly at Q4, ensuring that the heatsink fins are oriented as shown below.

INSTRUCTION MANUAL (for 80m)
K1SWL “Phaser Digital Mode Transceiver” 19 www.MidnightDesignSolutions.com/Phaser
This completes the assembly of the FT8 Phaser board kit!
We recommend cleaning the flux residue from the underside of the circuit board. You may use cotton swabs dipped in acetone (a
hardware store item). It does a great job removing the flux. Do not use nail polish remover for this job as it may contain oil or other
ingredients.
Group 6 Component Placement
INSTRUCTION MANUAL (for 80m)
K1SWL “Phaser Digital Mode Transceiver” 20 www.MidnightDesignSolutions.com/Phaser
APPENDIX 1: Parts List (for the Phaser-40)
Quantity
Ref. Designator
Description
Notes & Markings
Capacitors:
1
C3a
10 pF
'100'
1
C3b
150 pF
'151'
1
C5
330 pF
'331'
23
C4, C9-C11, C14-C17,
C19-C21, C26, C27, C30C32, C34, C35-C39, C46
0.1 uF
'104'
5
C6, C7, C8, C28, C33
10 uF
Polarized
1
C29
220 uF
Polarized
Resistors are ±5% tolerance ¼ watt unless otherwise noted:
2 R29A, R29B
1 ohm
Brown-black-gold-gold
2
R47A, R47B
1.8 ohm
Brown-grey-gold-gold
1
R26
10 ohm
Brown-black-black-gold
4
R41-R44
51 ohm
Green-brown-black-gold
3
R7, R22, R27
100 ohm
Brown-black-brown-gold
1
R45
330 ohm
Orange-Orange-brown-gold
9
R21, R25, R24, R28, R33,
R36-R38, R46
1K ohm
Small- on cut tape
Brown-black-red-gold
22
R1, R3, R5, R6, R8, R9,
R11-R17, R19, R20, R23,
R30, R32, R34, R35, R39,
R40
10K 1%
Brown-blk-blk-red-brown
1
R10
10K
Potentiometer, Blue, 3 leads
1
R31
12K
Brown-red-orange-gold
1
R18
60.4K 1%
Small
Blu-blk-ylw-red-brown
2
R2, R4
100K
Brown-black-yellow-gold
Connectors:
2
CAL, Power
2-pin male header, 0.1”
2 CAL, Power
2-pin female jumper
1
J1
BNC jack, right-angle
mount
1
J2
DC power jack
2
J3, J4
Audio jacks, 3.5mm 3cond.
1
J6
2x3-pin male header
Placed at "J6" position on PCB

INSTRUCTION MANUAL (for 80m)
K1SWL “Phaser Digital Mode Transceiver” 21 www.MidnightDesignSolutions.com/Phaser
Inductors:
1
L4
FT50-43, 5 turns, #22 wire
Grey toroid, larger core diameter
1
T1
FT37-43 toroid, 14 turns
bifilar, red/green #28
twisted pair
Grey toroid, smaller core diameter
Semiconductors:
1
D1
1N5818
Black body
3
D2, D3, D4
1N4148
Glass body, small
1
D5
1N4756
Glass body
1
D6
Green LED
1 D7
Yellow LED
1 D8
Red LED 3
Q1, Q2, Q6
2N4401
TO-92, 3 leads
1
Q3
2SC5706
3 leads, small, w/ tab
1
Q4
2SC5706
3 leads w/ pre-installed heatsink
1
Q7
NTD2955
TO-251-3
1
Q8
2N3906
TO-92, 3 leads
2
U1, U4
MC1458P
8-pin DIP IC
2
U2, U3
NJM4556
8-pin DIP IC
1
U7
78L06
TO-92, 3 leads
1
U8
78L33
TO-92, 3 leads
1
U9
LM393
8-pin DIP IC
1
U10
16F1824
14-pin DIP IC
Miscellaneous:
1
- -
14-pin IC socket
5 - -
8-pin IC socket
2 S1, S2
tactile pushbutton switch
1 - -
#28 red/green twisted pair
8", pre-twisted
1
- -
#26 magnet wire
36” length
1
- -
#22 magnet wire
8" length
4
- -
bumper, adhesive
clear plastic, place in 4 corners of
pcb
INSTRUCTION MANUAL (for 80m)
K1SWL “Phaser Digital Mode Transceiver” 22 www.MidnightDesignSolutions.com/Phaser
PCB (with pre-installed parts):
1
- -
PCB
4" x 4" (approx)
2
C12, C13
4700 pF 1%
(pre-installed)
2
U5, U6
FST3257
(pre-installed)
1
U11
Si5351
(pre-installed)
1
U12
74ACT74
(pre-installed)
1
U13
SA612AD
(pre-installed)
1
Y1
25.000 MHz
(pre-installed)
40 meter-specific parts
1
C1
100 pf
'101'
1
C2
330 pF
'331'
2
C18, C22
680 pF
'681'
1
C23
1500 pF
'152'
1
C24
820 pF
'821'
1
C25
180 pF
'181'
1
L1
22 uH
Red-red-black-gold
1
L2
4.7 uH
Yellow-violet-gold-gold
1
L3
3.3 uH
Orange-orange-gold-gold
1
L5
T50-2 toroid. Use 18” of #26
wire to make 20 turns.
Red core. See group 4
instructions
1
L6
T50-2 toroid. Use 22” of #26
wire to make 24 turns.
Red core. See group 4
instructions

INSTRUCTION MANUAL (for 80m)
K1SWL “Phaser Digital Mode Transceiver” 23 www.MidnightDesignSolutions.com/Phaser
APPENDIX 2a: Phaser-80 Schematic: (1 of 2)

INSTRUCTION MANUAL (for 80m)
K1SWL “Phaser Digital Mode Transceiver” 24 www.MidnightDesignSolutions.com/Phaser
APPENDIX 2b: Phaser-80 Schematic: (2 of 2)

INSTRUCTION MANUAL (for 80m)
K1SWL “Phaser Digital Mode Transceiver” 25 www.MidnightDesignSolutions.com/Phaser
APPENDIX 3: Parts Layout

INSTRUCTION MANUAL (for 80m)
K1SWL “Phaser Digital Mode Transceiver” 26 www.MidnightDesignSolutions.com/Phaser
APPENDIX 4: ‘Quick-Start’ Operation Guide
FT8 operation is based on a computer software application called WSJT-X. This application is available in Windows,
Mac and Linux versions. Here’s a link to the definitive Guide to get you started:
http://www.physics.princeton.edu/pulsar/K1JT/wsjtx-doc/wsjtx-main-2.0.0.html
Getting on the air with WSJT-X isn’t difficult. The process follows this sequence:
• Download and Install WSJT-X
• Enter your Call sign and Grid Square into a setup dialog box
• Select from several operating options
These steps are well documented in the online ‘Helps’ available from the URL above, and especially in the “FT8 Hinson
Tips” guide at https://g4ifb.com/FT8_Hinson_tips_for_HF_DXers.pdf
FT8 relies on fairly accurate timekeeping. Transmissions follow a 15-second pattern, starting at the beginning of the 15second interval. Transmissions last for 13 seconds. Following a transmission, users are receiving for the next 15-second
frame. During the receiving period, your computer is gathering all signals within the receiver passband for 13 seconds. In
the remaining 2 seconds, your computer is analyzing the received content and displays decoded text on the left side of the
WSJT-X display screen.
To be successful with FT8, you need to ensure that your computer timekeeping is accurate. The Windows timekeeping
(for instance) is probably not adequate. The WSJT-X guide recommends an application, and we use ‘Dimension4’
software. It’s free.
http://www.thinkman.com/dimension4/download.htm
The software lists a multitude of timekeeping providers. Chose a publicly-available one near you. You’ll also need to
choose how often the program syncs your computer. Every 20-30 minutes should be fine.
The need for accurate timekeeping often confounds newcomers to this mode. If you’re seeing good signals and clear FT8
traces…. but no decodes – make sure your timekeeping application is running. Tip: There’s an option to make the time-
syncing a startup task, so it’s always running in the background.

INSTRUCTION MANUAL (for 80m)
K1SWL “Phaser Digital Mode Transceiver” 27 www.MidnightDesignSolutions.com/Phaser
A good way to get started is to answer a CQ. These will appear in
green on the left side of the WSJT display screen. Doubleclicking on the green bar puts that station into the callsign field in
your reply. You need to be quick -- any reply starting much
more than one second late probably won’t be decoded at the
other end. As an alternate, you can click on a CQ later, say at 11-
12 seconds into the frame, and wait patiently in the queue for
your call to go out 15+ seconds later.
Of course, the other approach is to call CQ. First, click on the
‘globe’ symbol on your computer’s task bar. Select the ‘WSJT- X
Wide Graph’, which is a ‘waterfall’ display. Click on an open
frequency, which sets the receiver frequency. Click the upwardpointing triangle just above the receiver tone to set the transmit
tone to the same frequency. Check the ‘Auto Seq’ box and select
‘CQ ….’ in the ‘Generate Std. Msgs’ field. Click ‘Enable Tx’ and
your CQ goes out at the next frame time. Replies to your call will
be highlighted in red.
‘
:
Figure 2. Mid-afternoon local time on
40M. The dashed lines mark each 15-second
interval
On more than one occasion, I’ve had multiple stations come
back to my CQs. WSJT-X will decode stations calling you
anywhere in the passband -- ‘zero-beating’ isn’t necessary
with FT8.
Figure 3- A completed FT8 contact
This was with the Phaser-80 just after sundown local time. A distance
of 2336 miles to a station in the Azores. 4 Watts to a dipole up 30 feet.

INSTRUCTION MANUAL (for 80m)
K1SWL “Phaser Digital Mode Transceiver” 28 www.MidnightDesignSolutions.com/Phaser
System Set-up with the Phaser-40 SSB FT8 Transceiver:
Connect to the Phaser as shown in the diagram below.
Figure 4: Connecting the Phaser Board to a Computer
Audio Cables -- Be sure the audio cables are going to the correct I/O jacks on your computer by following the signal flow
as indicated by the arrows for ‘Audio In’ and ‘Audio Out’.
Power Supply – Use a sufficiently capable supply to power the Phaser board. Oftentimes, ac adapters (e.g., ‘wall-warts’)
do not have good regulation at their current rating, and the transmitted signal will suffer if there is low voltage or AC
ripple.
Antenna – The Phaser is expecting to see a matched, 50-ohm antenna feedline at the BNC port. Use a tuned antenna or a
pre-adjusted antenna tuning unit (ATU).
‘Mic’ Setting on Computer – The receive audio being sent to the computer is fairly strong and you will need to reduce
the computer ‘mic’ input level to a near-minimum setting. Open your computer's 'Control Panel' and make the following
selections in sequence: 'Hardware and Sound' ...'Sound' ... 'Manage Audio Devices' ...'Recording' ... 'Microphone' ....
'Levels'. [This sequence may vary somewhat with different operating systems.] Adjust the slider to have the WSJT
receive level bar indicator read approximately 40 dB when your antenna is connected to the board. (See lower-left corner
of Fig 5 below for this indicator.)
‘Speaker/Volume’ Setting on Computer – The computer ‘speaker’ slidebar sets the audio level delivered to the Phaser
board, and together with the ‘Pwr’ slidebar on the WSJT-X control screen, it serves as the RF ‘power adjust’. A good
setting to use as a starting point is mid-scale on both of these controls.

INSTRUCTION MANUAL (for 80m)
K1SWL “Phaser Digital Mode Transceiver” 29 www.MidnightDesignSolutions.com/Phaser
https://www.astrogaming.com/en-us/products/accessories/cable-adapters/y-adapter-headset-cable.html#993-001517
Figure 5: Sample view of WSJT-X control screen
If your computer has a single 4-pin jack instead of separate ‘mic in’ and
speaker/headset jacks, there’s a solution. There are several Y-adapters available:
Here’s one that appears to be readily available:
https://www.walmart.com/ip/3-5mm-Headset-Adapter-Y-Splitter-Jack-Cable-withSeparate-Microphone-and-Audio-Headphone/521294778
It splits the laptop’s 4-pin connection into a pair of separate 3-pin audio and
microphone connections. You’ll still need a pair of 3.5mm 3-pin cables, but you
probably have those from your PSK31 days.

INSTRUCTION MANUAL (for 80m)
K1SWL “Phaser Digital Mode Transceiver” 30 www.MidnightDesignSolutions.com/Phaser
APPENDIX 5: Adjustment/Calibration
There’s not much to it!
Adjustment:
• Turn trim pot R10 fully counterclockwise.
• Connect cables to J1 through J4 as described in the previous section (Appendix 4). Open the WSJT-X application on
your computer.
NOTE: This step assumes you have an SWR/power meter between the Phaser-40 and the antenna or dummy load.
• Set the WSJT-X ‘Pwr’ slider (lower right corner of display) to minimum.
• Connect an oscilloscope probe or multimeter (select volts DC) to the right end of R34. (To right of blue trimpot)
• Click on the ‘TUNE’ button on your computer’s display monitor. Advance the Pwr slider until the multimeter/scope
reading changes to 4-5V DC. Advance the Pwr slider 5-10% of full-scale further.
Click the TUNE button on and off a few times to verify that the computer’s audio is reliably detected by the Phaser.
• With TUNE selected, Advance trim pot R10 clockwise for an output power reading of 4 Watts into a 50-ohm load or
matched antenna.
• Click on ‘TUNE’ again to end the test.
It’s tempting to set the Power slider to maximum, but there’s a reason not to: Your computer’s sound
card output may have
noticeable
distortion content at its maximum setting. It’s best to run the sound
card output at a moderate level to keep your on-the-air signal as clean as possible.

INSTRUCTION MANUAL (for 80m)
K1SWL “Phaser Digital Mode Transceiver” 31 www.MidnightDesignSolutions.com/Phaser
Calibration:
Apply 12 volts DC via J2. The other cables are not needed.
Install the remaining 2-pin jumper at ‘CAL’ (just below U10, the 14-pin DIP IC). This puts the logic in Frequency
Calibration mode.
If you have a frequency counter:
• Connect a probe to one of the two pins on J6 and observe the displayed frequency. (J6 has the two jumpers attached
and two open pins. Refer to the photos in Assembly Group 3 on page 12.)
• Pressing S1 lowers the operating frequency and pressing S2 raises the frequency. Adjust the frequency to 3573.00
kHz. There’s plenty of time to perform this adjustment. NOTE: During the interval when the logic is updating the
Si5351, that device’s output is turned off. The result is that the frequency will read somewhat low. Wait several
seconds after letting up on S1 or S2 to let the reading stabilize.
No frequency counter?
• Connect a clip lead to one of the two open pins on J6 and set your ‘big rig’ to 3573.00 kHz. Leave the other end of the
clip lead free. You should be able to hear a steady carrier from the Phaser. Adjust frequency with S1 and S2 until the
carrier’s pitch matches that of your big rig’s (key-down) sidetone.
• No ‘big-rig’?
• Install all cables to the Phaser as described in the previous section (Quick-Start). You should see the
characteristic waterfall traces of FT8 signals. Adjust frequency with S1 and S2 until significant activity starts at
about 500 Hz on the WSJT-X waterfall display. There’ll be more activity during nighttime hours.
• Once you’ve set the frequency by any of the methods above, remove the jumper from the ‘CAL’ location. This
commands the logic to store the adjusted frequency in non-volatile memory and the Phaser returns to normal
operation. This calibration should not need to be repeated.
INSTRUCTION MANUAL (for 80m)
K1SWL “Phaser Digital Mode Transceiver” 32 www.MidnightDesignSolutions.com/Phaser
APPENDIX 6: Theory of Operation
Receiver: The receiver input is supplied from a connection (‘Tx PA’) on the collector side of the low-pass filter. The
combination of C1 and L1 provides a fairly broad peak at 3.5 MHz for a measure of selectivity. C2 and L2 provide
rejection of AM broadcast energy, with L2 also providing equal DC biases to the receiver mixer inputs. An NE602 (U13)
provides the mixer function. When signals are mixed with another signal, the resulting product includes sum and
difference frequencies. We’re interested in the difference frequency; in this case, audio.
The resulting audio is amplified by a gain of 100 (40 dB) in the two sections of U1. Note that the output level is quite
low. The audio level is inadequate for headphone use but is perfectly adequate for a sound card’s microphone input.
Transmitter: The frequency source for both transmitting and receiving is a Silicon Labs Si5351 (U11). This IC
outputs a 3V square wave at four times the operating frequency. Two flip-flops comprising U12 divide the frequency by a
factor of 4 and provide a reference phase (‘I’) and a quadrature phase (‘Q’) delayed 90 degrees from the reference.
A dual op-amp (U2) generates complementary (180° apart) signals from audio supplied by the host computer sound card.
U3 has the same function, but its complementary audio outputs are delayed in phase by a nominal 90 degrees with respect
to U2’s outputs. U4 and adjustment pot R10 set the signal level applied to the transmit strip. This adjustment allows
setting the output power without needing to tinker with the WSJT-X sound card settings. This ensures reliable T-R
operation even at very low power levels, should you choose to do that.
The two sets of audio signals, 0 degrees (‘I’) and 90 degrees (‘Q’), are applied to the inputs of 2:1 multiplexers U5 and
U6. The RF inputs to these devices are at the ‘S’ (Select) inputs and are also in quadrature. The two multiplexer output
signals each consists of a double-sideband waveform. The two signals are combined by T1 to form a single-sideband
signal.
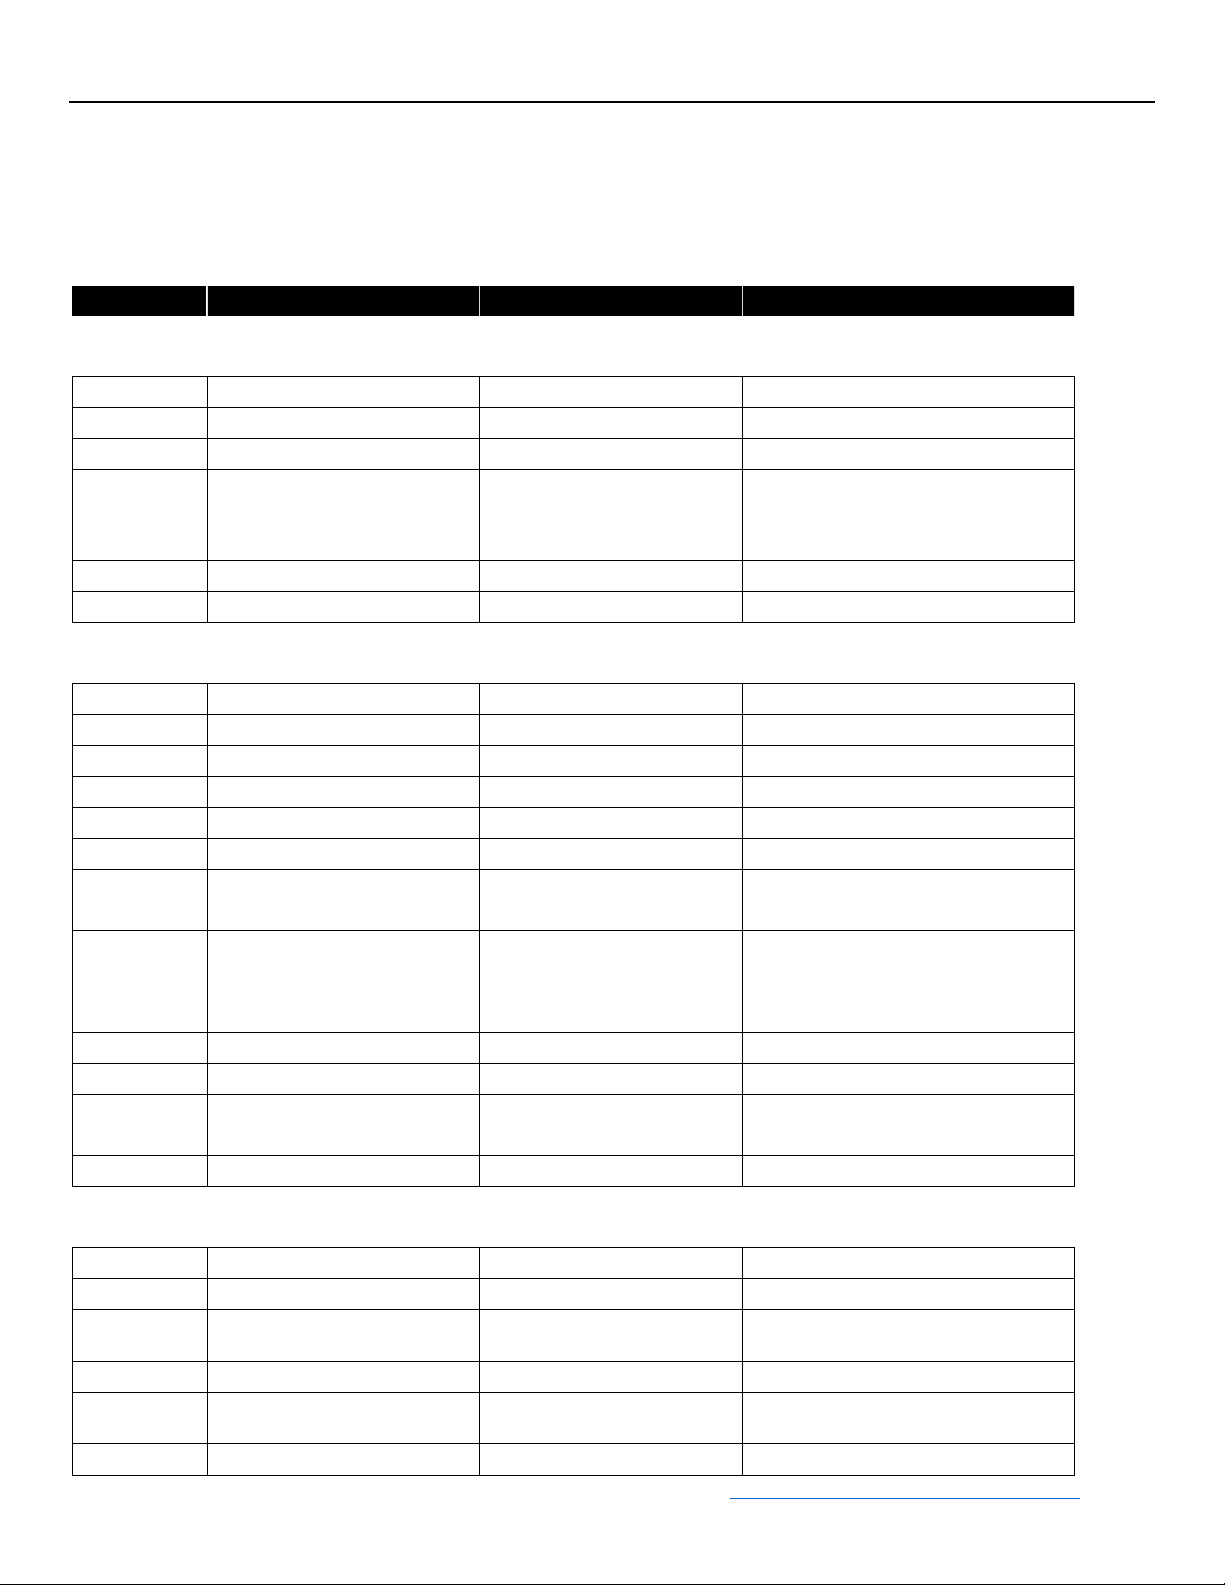
Suppression of the unwanted sideband was measured as 35 dB-or-better over an audio frequency range of 800-2800 Hz.
Transmitted 1-kHz USB tone.
Note suppression of both carrier and opposite sideband.
(The carrier frequency is marked by a diamond symbol at mid-screen.)
Measurements were taken with a homebrew transceiver chosen for its lack of AGC. At low audio frequencies, both
sidebands were present in the audio output due to IF bandwidth limitations. Lower tone-frequency suppression can be

INSTRUCTION MANUAL (for 80m)
K1SWL “Phaser Digital Mode Transceiver” 33 www.MidnightDesignSolutions.com/Phaser
expected to be worse. The phasing network design is from Experimental Methods for RF Design , Figure 9.48. This
network was scaled up in frequency for the Phaser by reducing the values of capacitors C12 and C13.
An emitter-follower (Q2) buffers the SSB signal, and feedback amplifier Q3 provides sufficient gain to drive the PA
stage. Collector choke L3 and associated capacitor C18 form an L-C network. This transforms the stage’s 200-ohm
design value to the lower 20-ohm nominal input impedance of the PA stage. The PA stage collector impedance is
designed for 18 ohms. The output low-pass filter provides an impedance-step-up to 50 ohms in addition to cleaning up
the collector waveform. Capacitor C25 provides a notch near the filter’s 2nd harmonic response. This allows the
relatively-simple low-pass filter to meet FCC/EU standards for spectral purity.
Logic: The controller IC (U10) is a PIC 16F1824 running on an internal 16 MHz clock. Upon application of power, the
PIC initializes the Si5351 to the FT8 operating frequency. In normal operation it’s in a polling loop looking for closures
on frequency-select switches S1 and S2. Upon sensing a closure, it re-initializes the Si5351 to the appropriate frequency
and illuminates the corresponding discrete LED.
Transmit/Receive switching is done by sensing the presence of audio from the computer sound card. An LM393
comparator output shorts capacitor C28 to ground for audio input signals greater than 450 mV p-p . The second
comparator section is used solely as an inverter and turns Q6 and Q7 on to serve as a bias source for transmit operation.
Frequency Calibration: The PIC controller polls the ‘CAL’ input and detects when the user puts a jumper in
place. The controller then enters a process of changing the Si5351 reference signal slightly based on the user’s pressing
the S1 and S2 to decrease or increase (respectively) the operating frequency. The frequency correction is stored in nonvolatile memory upon removal of the CAL jumper. This is a one-time procedure. See ‘Adjustment/ Calibration’
(Appendix 5).

INSTRUCTION MANUAL (for 80m)
K1SWL “Phaser Digital Mode Transceiver” 34 www.MidnightDesignSolutions.com/Phaser
APPENDIX 7: User-Programmable ALT Frequency Entry
The ALT frequency may be programmed to be anywhere in the HF spectrum. This supports other digital operating modes
and the use of the Si5351A as a general-purpose signal source. The signals present on the 2x3 male pinheader at the
‘REV’ board location are 5V TTL/CMOS compatible logic signals that may be taken off the Phaser board by means of a
suitable mating connector.
Here’s how to program the ALT frequency:
1) Press and hold the FT8 pushbutton during power-up.
2) Upon releasing the pushbutton, the FT8 LED blinks on and off TWO times.
3) Enter any 5-digit frequency (i.e., only the kilohertz digits) between 00100 and 30000, as follows:
a) Use the FT8 and Alt pushbuttons to enter the frequency using Morse characters;
Press the FT8 pushbutton for a DIT and the Alt pushbutton for a DAH;
b) Enter Morse elements at any speed and element spacing. ‘Slow is good’; and
c) After each DIT is entered, notice the FT8 LED blink on and off ONCE;
After each DAH is entered, notice the Alt LED blink on and off ONCE.
7) After five kilohertz digits are entered the Phaser will:
a) Blink the Alt LED on-and-off FIVE times;
b) Save the new frequency in EEPROM for future use (as the Alt frequency); and
c) Illuminate the ALT LED to indicate that this new frequency is in effect. Operation of the FT8 frequency is
unchanged.
If there is an error during entry of the Alt Frequency, the Phaser will blink the Alt LED continuously until power is
removed, at which point you may try again.
INSTRUCTION MANUAL (for 80m)
K1SWL “Phaser Digital Mode Transceiver” 35 www.MidnightDesignSolutions.com/Phaser
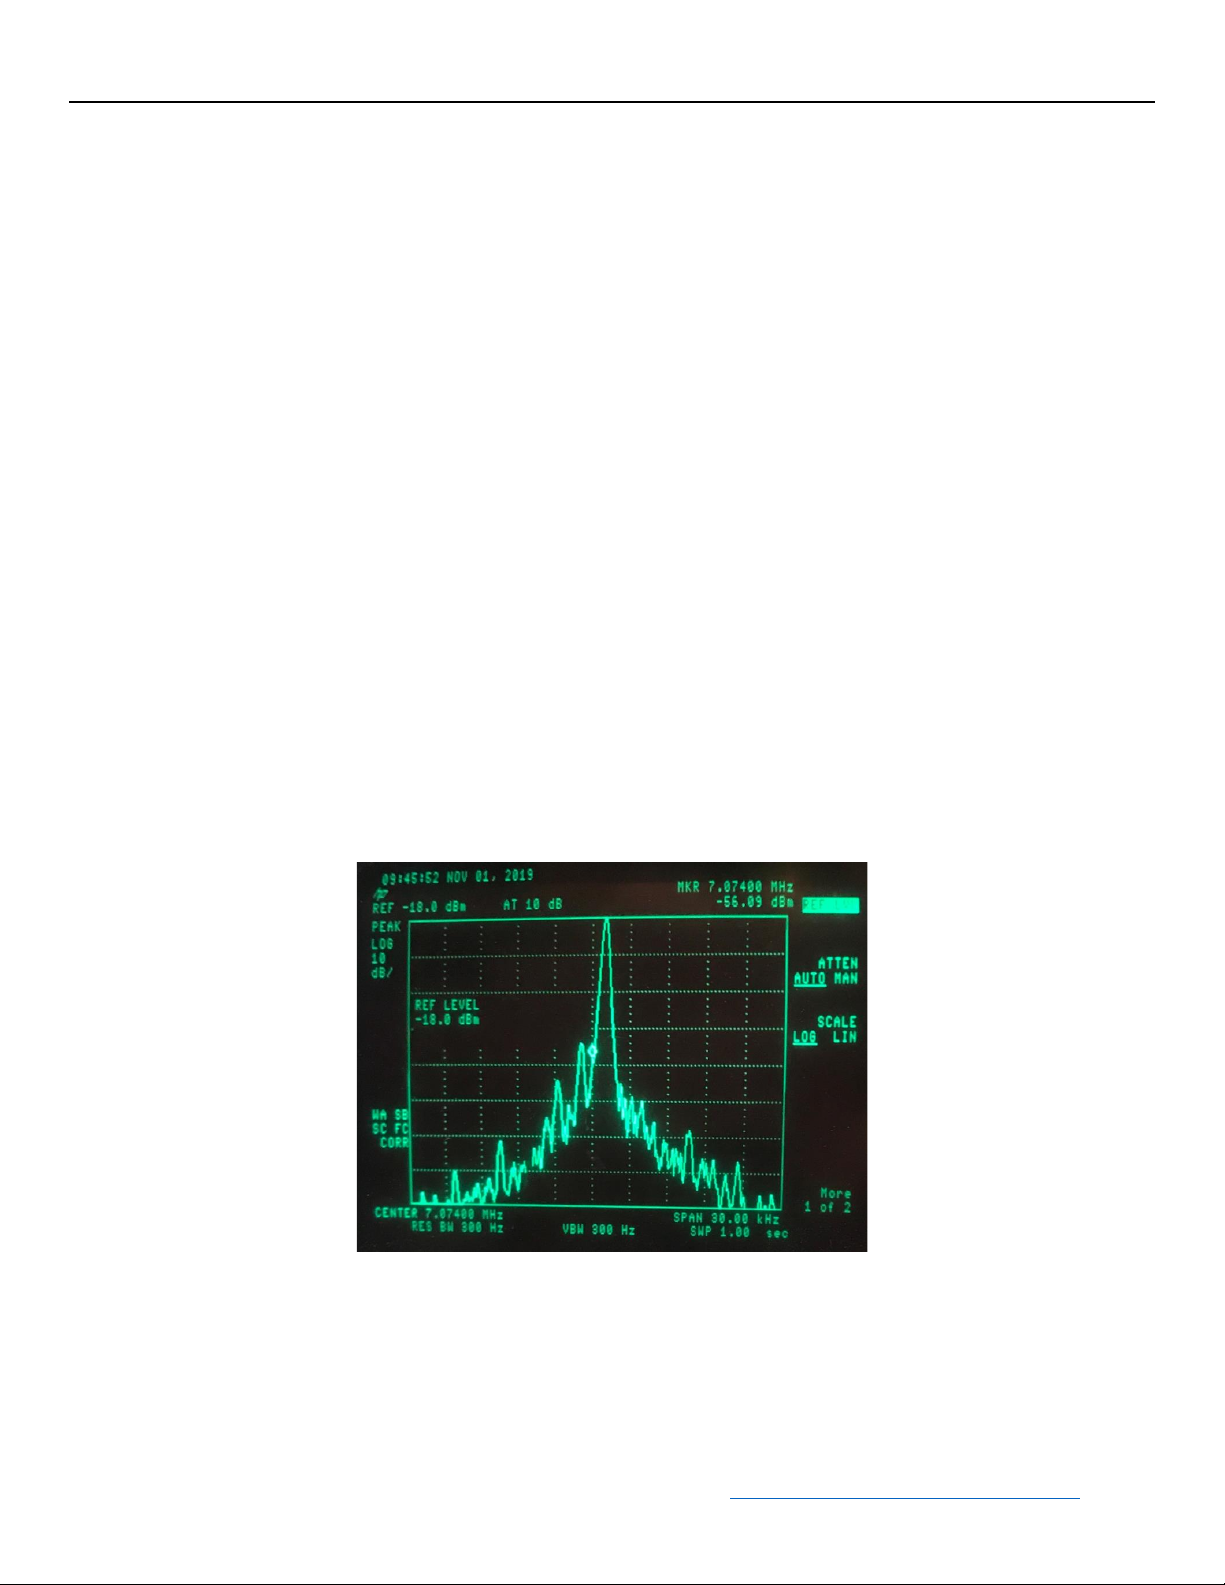
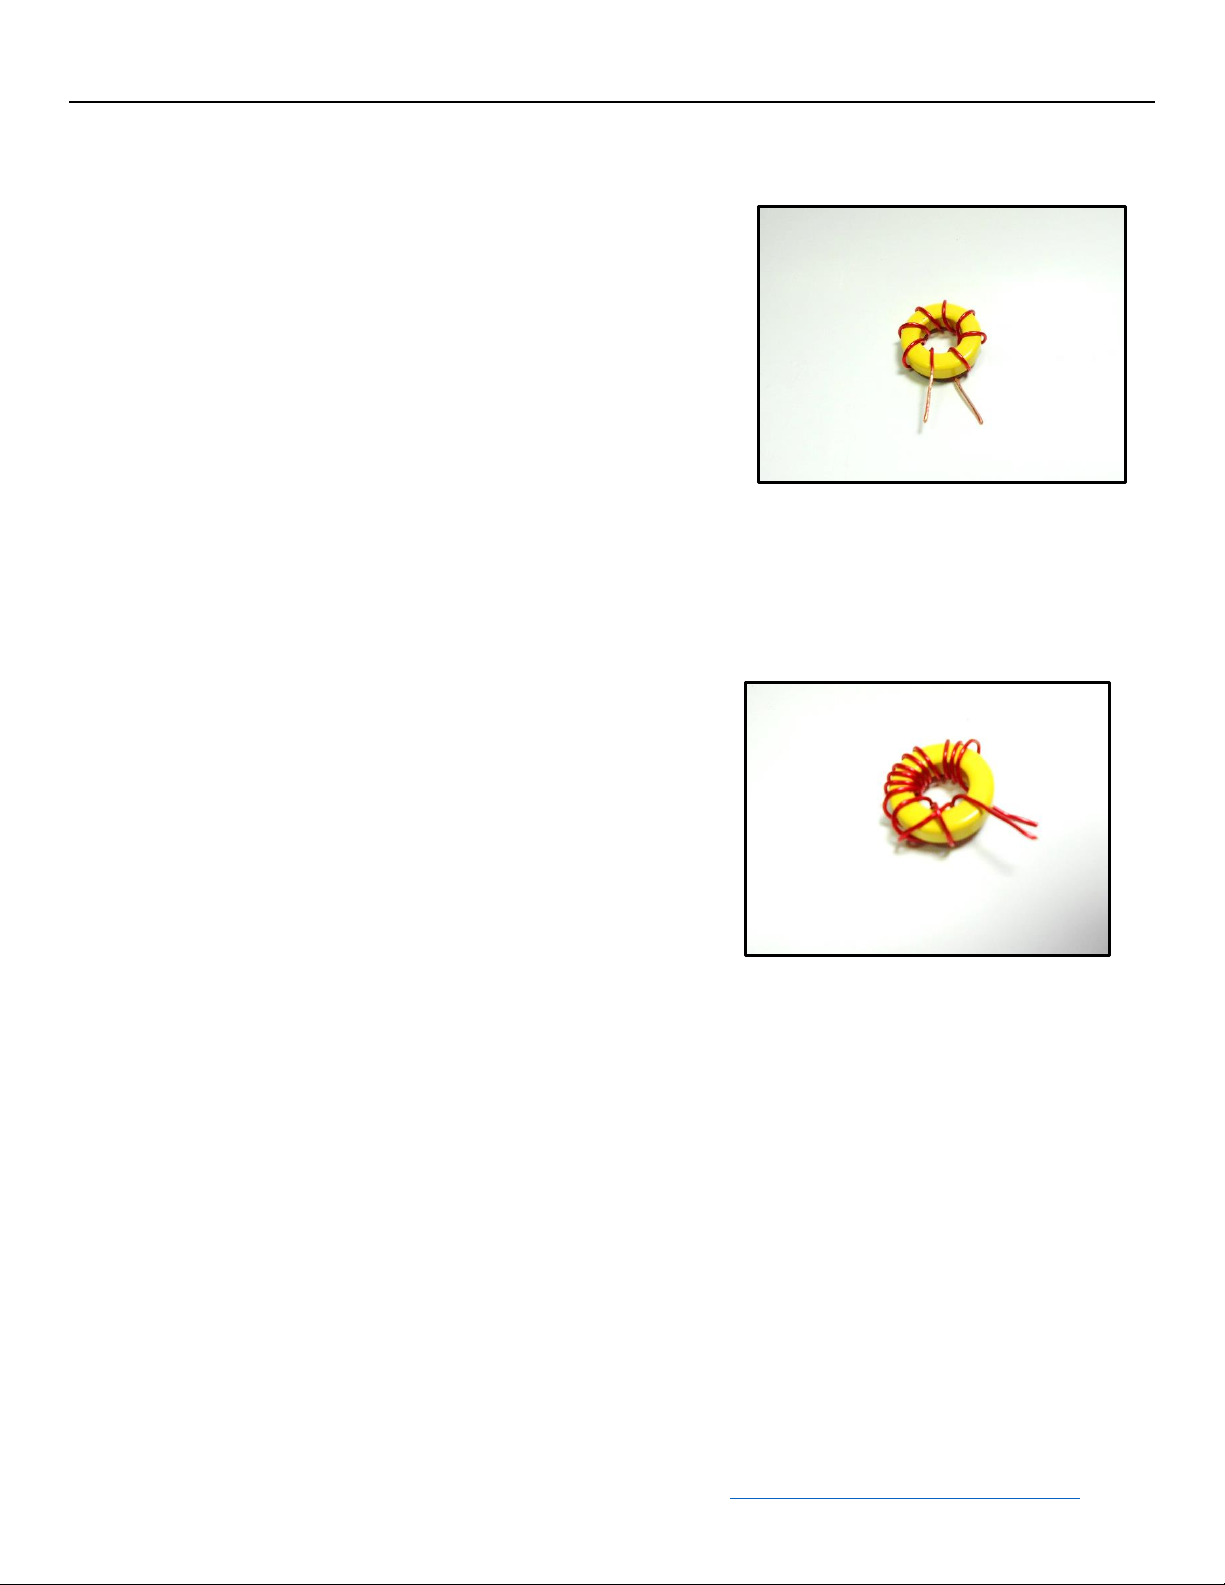
APPENDIX 8: Winding Toroids
A properly-wound toroid is shown at right.
• Each time the wire goes through the hole it counts as a turn
• The windings are tight. Pull the wire taut after each turn comes over
the outer edge of the core.
and please… no scrambled turns!
• Doublecheck the turns count. I do this by bumping a fingernail over each turn. When the number of turns is correct,
cut the leads to a length of 3/8” (1cm).
• Strip the leads by scraping with a small knife to remove the
insulation. (Despite the manufacturer’s claims, the insulation will
probably not melt when you apply a soldering iron.)
• Once the leads are prepared, make sure the turns are evenly
spaced on the toroid form. If the leads are bunched together, the
inductance will be too high. This results in low power output.
BAD TOROID!
(bad bad toroid!)
GOOD TOROID
GOOD TOROID!

INSTRUCTION MANUAL (for 80m)
K1SWL “Phaser Digital Mode Transceiver” 36 www.MidnightDesignSolutions.com/Phaser
CREDITS
Concept, Design, Prototyping, Documentation … Dave Benson, K1SWL
Microcontroller Software … Craig Johnson, AA0ZZ
Kitting … Larry Przyborowski, K3PEG
Productization, Documentation, Financing, Sales, Website, Support … George Heron, N2APB
Beta Trial Team … Tellico Lake ARC (N1ESK, N2APB, K4RQT, KV4XYZ, WW4WTF, KF4DKW, K4BXA) and AA0ZZ
---

INSTRUCTION MANUAL (for 80m)
K1SWL “Phaser Digital Mode Transceiver” 37 www.MidnightDesignSolutions.com/Phaser
DOCUMENT REVISION HISTORY
Rev A.8 – Baseline
Rev A.9 – Added revision date to cover page. Fixed typo in Group 6 Assembly section for L3: “Prepare the leads and
install at L3.” Clarified length of magnet wire in Parts List for L5 and L6.
Rev A.10 – Page 5, Specs, at the end of the page on Kits, 17 meters was missing. Page 21, Parts List, R23 (10K) added,
with 10K parts count now correct at 22. Generic version of Figure 4 added on page 29. Red dot by R9 on page 17.
Rev B – Internal use; not released.
Rev C – Documents effective with Round 4 (orders #300-up) where new ‘Rev C’ Phaser PCB we introduced.
Rev C.0 –Numerous changes reflected in the new ‘Rev C’ pcb for Round 4 production:
1) Added Tx indicator LED and current limit resistor, providing clear onboard indication of when the Phaser is in Tx
mode;
2) J6 changed to 2-position pinheader for test point purposes only and the two associated jumpers were eliminated,
as sideband selection is no longer necessary (always USB);
3) Replaced DIP-version NE602 with factory-installed surface mount SA612AD to improve buildability and
reliability;
4) Replaced Q7 (a 2A-rated TO-92 Q7 device) with a 12A-rated TO-220 packaged device (NTD2955) to better
sustain higher-than-recommended RF power levels;
5) Added Q8 and R47A/B to serve as an 800-900mA current-limit function for the Vsw bus to the Tx final, further
protecting the Q4 final from overdrive failure; and
6) Replaced 5V regulator U7 with a 6V regulator to improve Tx audio signals (minimize distortion) at higher drive
settings. The logic ICs (U12, U5 and U6) are rated for a maximum 7V supply and are unaffected by this change.
NOTE: Changes 4,5 and 6 above are all related to ‘Turning the Amp up to 11’ (i.e., attempting to overdrive the Tx
audio input to the Tx chain which can lead to Q4 and Q7 failures.) While it is tempting, things do not improve when
pushing the audio drive all the way up. Available output power is unaffected by these changes - the goal is improved
reliability.
Rev C.1 – The ‘C40’ designator on the PCB silkscreen (next to U13 in lower right) is wrong and should actually be
‘C46’. Similarly, the designators for R46 and R47 are swapped on the pcb silkscreen. These has been corrected in all
Component Placement diagrams in this Instructions document, on pages 9, 11, 13, 15, 17, 19 and 25. The green dot
locater on the Group 1 Component Placement was moved from the upper-left (near C25) to be next to C30 (below Q6).
Follow these Component Placement diagrams in the manual for putting the parts onto the pcb.
Rev C.2 – “Measure for 6V here” text corrected on page 9. Instruction in Assembly Group 5 (on page 16) now properly
reflects the four remaining 0.1 uF caps to install (C38, C38, C39 and C46). Orange dot removed from C37 in diagram on
page 17.
 Loading...