

Davey DES2-15E, DES2-15EL, DES2-25E, DES2-25EL, DES2-35E Installation and Operating Instructions
...Page 1

7 LANGUAGES
Eco
2
English, Deutsch, Italiano,
Nederlands, Português,
Español & Français
ENGLISH
®
Salt
Salt Pool Chlorination System
Model: DES2-15E, DES2-15EL, DES2-25E,
DES2-25EL, DES2-35E, DES2-15US, DES2-15USL,
DES2-25US, DES2-25USL, DES2-35US
Installation and Operating
Instructions
WARNING: Failure to follow these instructions and comply with all applicable
codes may cause serious bodily injury and/or property damage.
The installation of this product should be carried out by a person knowledgeable
in swimming pool plumbing requirements following the installation instructions
provided in this manual.
Please pass these instructions on to the operator of this equipment.
Page 2

Eco
®
2
Salt
Congratulations! You are now the proud owner of a new EcoSalt2. Please read all information in this manual
carefully before installing or operating your EcoSalt2.
Contents:
PACKING LIST ..................................................................................................................................................3
IMPORTANT SAFETY INSTRUCTIONS ...........................................................................................................4
COMMON TERMS ............................................................................................................................................6
INSTALLING THE EcoSalt2 ..............................................................................................................................6
CONNECTING THE IN-LINE ELECTROLYTIC CELL TO THE POWER SUPPLY ...........................................7
CONNECTING THE FLOW SWITCH TO THE CELL HOUSING ......................................................................7
PRE-START UP PROCEDURE .........................................................................................................................8
OPERATION OF YOUR EcoSalt2 .....................................................................................................................8
CONTROL PANEL .............................................................................................................................................9
INITIAL START-UP ............................................................................................................................................9
TYPICAL (EVERYDAY) START-UP .................................................................................................................12
EcoSalt2 FEATURES ......................................................................................................................................13
MAINTENANCE OF POWER SUPPLY ...........................................................................................................25
MAINTENANCE OF THE IN-LINE ELECTROLYTIC CELL .............................................................................25
DAY TO DAY OPERATION ..............................................................................................................................26
CHLORINE PRODUCTION .............................................................................................................................28
GENERAL INFORMATION ..............................................................................................................................29
TROUBLE SHOOTING ...................................................................................................................................29
SPARE PARTS ................................................................................................................................................30
ENGLISH
2
Page 3
PACKING LIST
Models | Modelle | Modelli | Modellen | Modelos | Modèles |:
DES2-15E, DES2-15EL, DES2-25E, DES2-25EL, DES2-35E,
DES2-15US(L), DES2-25US(L), DES2-35US
Quick Reference Guide | Salt Pool Chlorination System
Kurzanleitung | Desinfektionssystem unter verwendung des salzwassers
Guida rapida | Trattamento ad acqua salata
Korte handleiding | Badzout zwembad systemen
Guia rápido de referências | Tratamento da água da piscina com base na adição de sal
Guia de referencia rapida | Sistema de sal para piscinas
Guide de référence rapide | Electrolyseur de piscine au sel
EcoSalt
®
2
M
o
d
e
l
s
|
M
o
de
l
l
e
|
M
o
de
l
l
i
|
M
o
de
l
l
e
n |
M
o
de
l
o
s
|
M
o
dè
l
e
s |
:
DES
2-
15E, DE
S
2-
15EL
,
D
ES
2-
25E, DES
2-
25EL
, DES
2-
35E
Q
u
i
c
k
R
e
fe
re
n
c
e
Gu
id
e
|
Salt
P
o
o
l
C
h
lo
rin
atio
n
Syst
e
m
Kurza
nl
ei
t
un
g
| D
es
i
nf
ek
t
i
ons
syst
em unt
er verw
endung des
sa
l
zwa
ss
ers
G
u
i
d
a
rap
id
a
|
Tratt
a
m
e
n
to
ad
acq
u
a
sala
t
a
K
o
rte
h
an
d
l
e
id
in
g
|
B
ad
z
o
u
t
zwe
m
b
a
d
sy
st
e
m
e
n
G
u
i
a
r
á
p
i
d
o
d
e
r
efer
ê
n
c
i
a
s
|
T
r
a
ta
men
to d
a
á
gu
a
d
a
p
i
s
c
i
n
a
c
om
b
a
s
e
n
a
a
d
iç
ã
o
d
e
s
a
l
G
u
ia
d
e
re
fe
re
n
ci
a
ra
p
id
a
|
Sist
e
ma
d
e
sa
l
p
ara
p
isc
in
a
s
G
u
i
d
e
d
e
ré
f
é
re
n
ce
rap
id
e
|
El
e
c
t
ro
lyse
u
r
d
e
p
isci
n
e
au
se
l
EcoSalt
®
2
2
x
2
x
www
.
bit
.
ly
/
Ec
o
S
a
lt
2
2 x
EU ü
US Ï
2 x
www.bit.ly/EcoSalt2
Salt P
ool
C
hl
orinati
on System
M
o
del
s
:
DE
S
2-
15
E
,
DE
S
2-
15E
L
,
DE
S2-25E
,
DE
S2-
2
5E
L
&
DE
S2-35E
I
n
s
t
allat
ion and O
p
erat
ing
Ins
t
ru
ct
ions
T
h
e
i
n
s
t
a
l
l
a
t
i
o
n
o
f
t
h
i
s
p
r
o
d
u
ct
s
h
o
u
l
d
b
e
c
a
r
r
i
e
d
o
u
t
b
y
a
p
e
r
s
o
n
kn
o
wl
e
d
g
ea
b
l
e
i
n
s
wi
m
m
i
n
g
p
o
o
l
p
l
u
m
b
i
n
g
r
eq
u
i
r
em
e
n
t
s
f
o
l
l
o
wi
n
g
t
h
e
i
n
s
t
al
l
a
t
i
o
n
i
n
st
r
u
c
t
i
o
n
s
p
r
o
vi
d
e
d
i
n
t
h
i
s
m
a
n
u
al
.
W
A
R
N
I
N
G:
F
ai
l
u
r
e
t
o
f
o
l
l
o
w
t
h
es
e
i
n
s
t
r
u
ct
i
o
n
s
a
n
d
co
m
p
l
y
wi
t
h
a
l
l
a
p
p
l
i
ca
b
l
e
c
o
d
e
s
m
a
y
c
au
s
e
s
er
i
o
u
s
b
o
d
i
l
y
i
n
j
u
r
y
a
n
d
/
o
r
p
r
o
p
e
r
t
y
d
a
m
a
g
e
.
o
n
t
o
t
h
e
o
pe
r
a
t
or
of
t
h
i
s
e
qu
i
pm
e
n
t
.
EcoSalt
®
2
E
NGLI
S
H
1 x
1 x
1 x
1 x
1 x
1 x1 x 1 x
2 x
EU ü
US Ï
2 x
www.bit.ly/EcoSalt2
Salt Pool Chlorination System
Models: DES2-15E, DES2-15EL, DES2-25E,
DES2-25EL & DES2-35E
Installation and Operating
Instructions
The installation of this product should be carried out by a person knowledgeable
in swimming pool plumbing requirements following the installation instructions
provided in this manual.
WARNING: Failure to follow these instructions and comply with all applicable
codes may cause serious bodily injury and/or property damage.
EcoSalt
®
2
7 LANGUAGES
English, Deutsch, Italiano,
Nederlands, Português,
Español & Français
ENGLISH
1 x
1 x
1 x
1 x
1 x
1 x 1 x 1 x
Eco
Salt
®
2
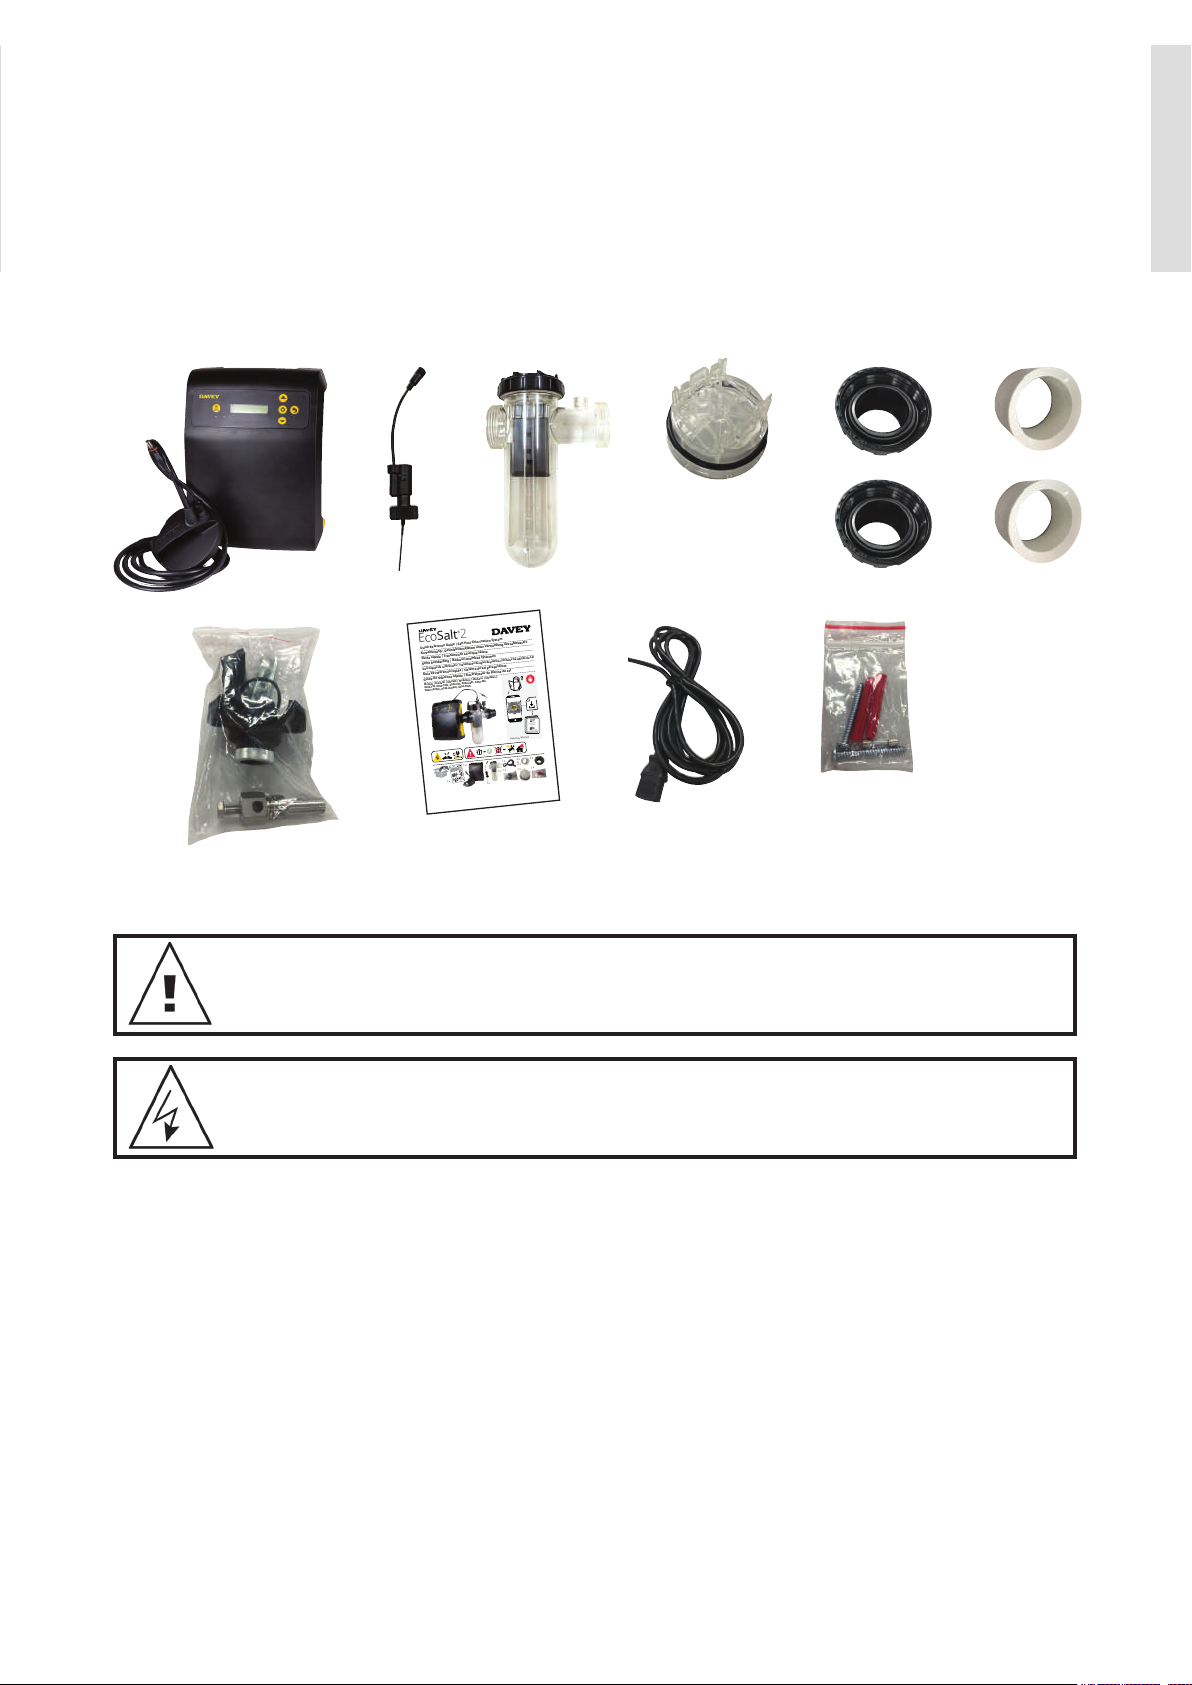
Included with your EcoSalt2 are the following items, please check the contents of the box carefully prior to
attempting to install the system:
a. 1 x Power supply with cell lead;
b. 1 x Flow switch;
c. 1 x In-line electrolytic cell & housing;
d. 1 x Cell blanking cap & o-ring;
e. 2 x Barrel unions including nut, tail & o-ring;
f. 2 x Reducing bushes;
g. 1 x Earth bolt assembly;
h. 1 x Quick reference guide;
i. 1 x Power lead; and
j. 1 x Mounting screws & plugs pack
ENGLISH
a
b c d e f
g h i j
NOTE: Your EcoSalt2 is not intended for use by young children or inrm persons
without supervision. Please ensure that young children are supervised to ensure that
they do not play with the EcoSalt2 System.
Power connections and wiring must be carried out by an authorised electrician.
3
Page 4
IMPORTANT SAFETY INSTRUCTIONS
When installing and using this electrical equipment, basic safety precautions should always
be followed, including the following: READ AND FOLLOW ALL INSTRUCTIONS
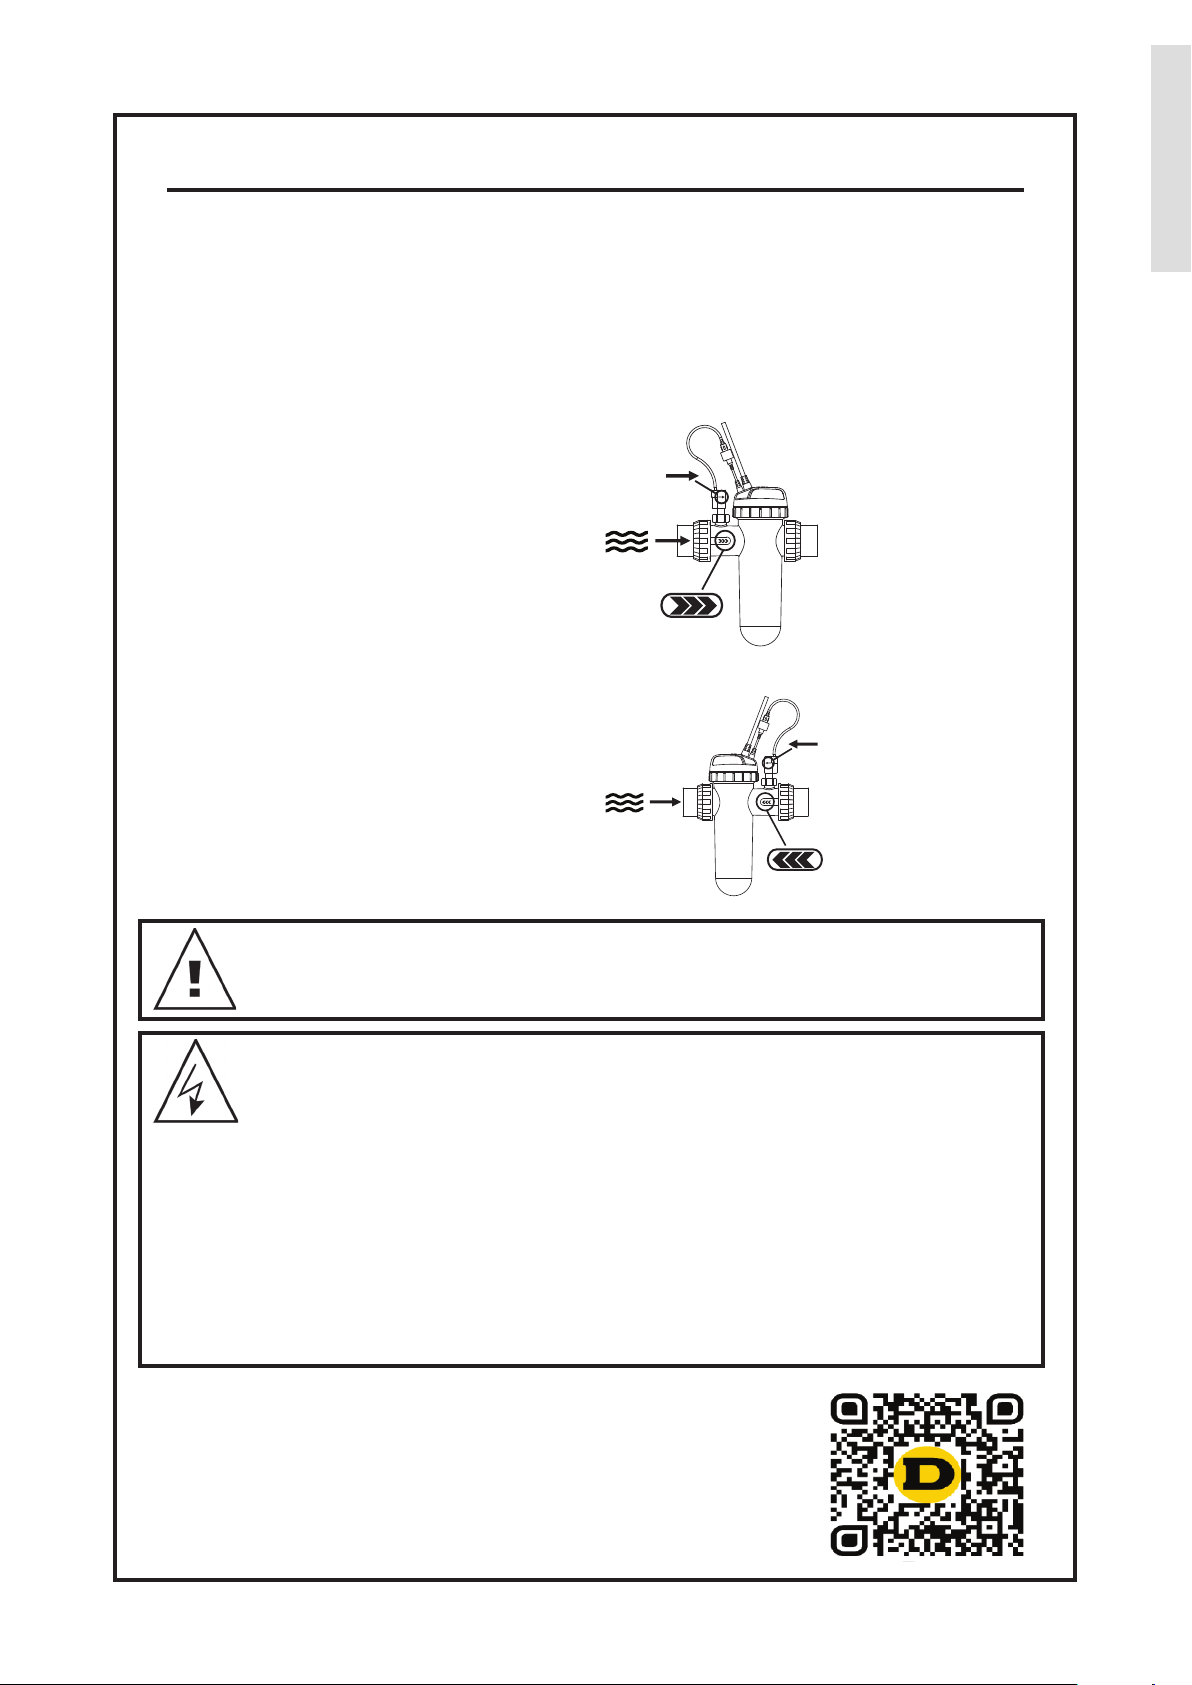
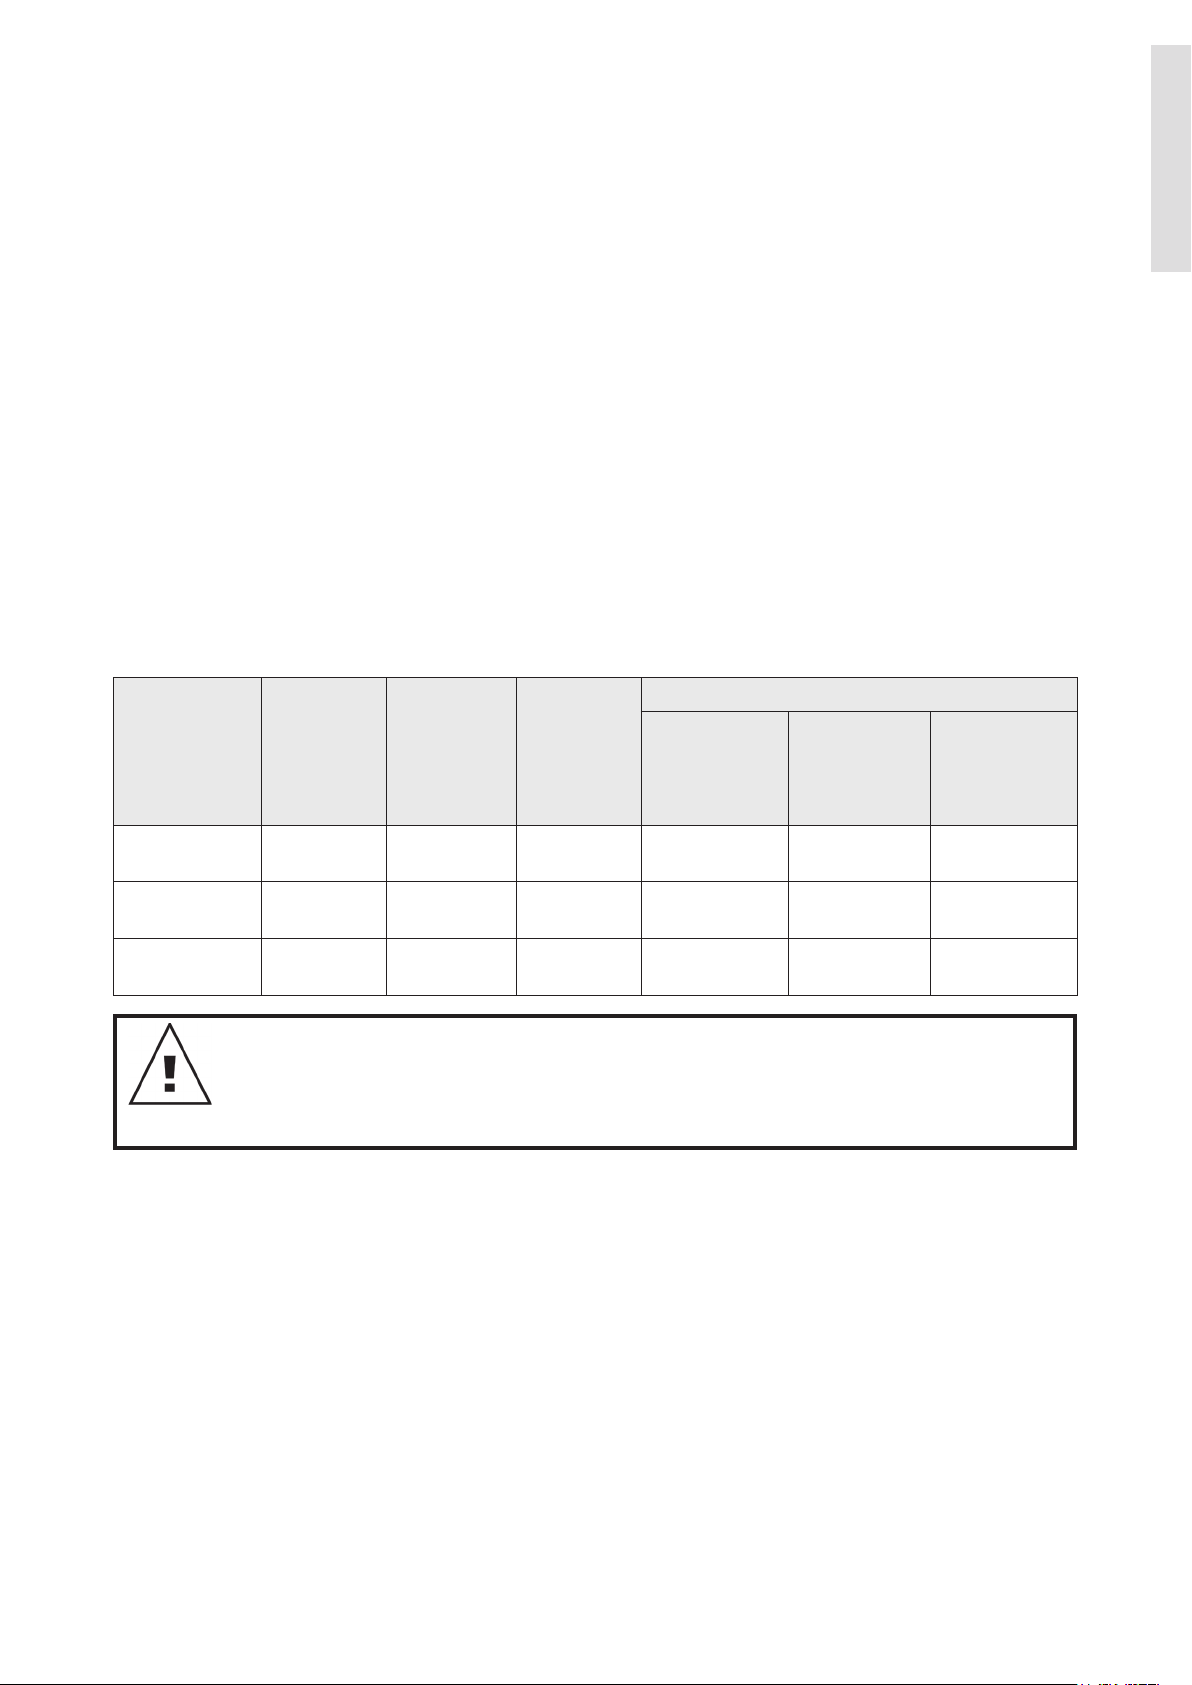
• To minimise the risk of gas build-up in the cell housing, you must ensure there is sufcient water ow
through the cell when the unit is on and producing chlorine.
• It is essential that your pool pump circulates sufcient water through the cell housing to completely ll
the cell housing with water during the chlorination process.
• Periodically check the paddle of the safety ow switch to ensure it is free to move back and forth and
that the lock nut is done up hand tight.
ü
Diagram A
CORRECT OPERATION
WITH A PUMP RUNNING
ENGLISH
û
Diagram B
INCORRECT OPERATION
WITH A PUMP RUNNING
WARNING: To reduce the risk of injury, do not permit children to use this product
unless they are closely supervised at all times. SAVE THESE INSTRUCTIONS.
WARNING: Risk of Electric Shock. Power connections and wiring must be carried
out by an authorised electrician. Connect only to a branch circuit protected by a
ground-fault circuit-interrupter (GFCI). Contact a qualied electrician if you cannot
verify that the circuit is protected by a GFCI.
The unit must be connected only to a supply circuit that is protected by a
ground-fault circuit-interrupter (GFCI). Such a GFCI should be provided by the
installer and should be tested on a routine basis. To test the GFCI, push the test
button. The GFCI should interrupt power. Push the reset button. Power should
be restored. If the GFCI fails to operate in this manner, the GFCI is defective. If
the GFCI interrupts power to the pump without the test button being pushed,
a ground current is owing, indicating the possibility of an electric shock. Do
not use this pump. Disconnect the pump and have the problem corrected by a
qualied service representative before using.
• Always check for the latest versions of installation and
operation instructions that support these products.
Simply scan this QR code, or go to: www.bit.ly/EcoSalt2
WARNING – To reduce the risk of electric shock, replace
damaged cord immediately. SAVE THESE INSTRUCTIONS.
4
Page 5

IMPORTANT INFORMATION
ABOUT YOUR EcoSalt2
FACTORS THAT WILL IMPROVE THE PERFORMANCE & LIFE OF YOUR EcoSalt2.
PLEASE READ THIS BEFORE OPERATING YOUR CHLORINATOR
POOL BUILDERS:
Please cover this information with your customer during the new pool “Handover Session”.
Chlorinators are a valuable piece of pool equipment and must be cared for to get the best
performance and life span. There are THREE main factors that will damage your EcoSalt2
and reduce the life of the product. Please monitor the following factors in accordance with your
installation & operating instructions.
1. MAINTAIN RECOMMENDED SALT LEVELS
RECOMMENDED OPERATING RANGE: (see page 27)
• Run your EcoSalt2 at the salt levels stated within this document and on the product to
ensure optimum performance and cell life;
• Operating the EcoSalt2 at low salt levels will damage the cell and reduce its life;
•ThecontrolpaneldisplaysaashingredLEDindicatorwarningwhenthesaltlevels
are low;
• If no action is taken to rectify the salt levels, damage to the cell may result which will
not be covered under warranty.
ENGLISH
2. MONITOR & MAINTAIN YOUR EcoSalt2 IN-LINE CELL
EcoSalt2 has a “reverse polarity” in-line cell.
• To keep your EcoSalt2 in the best possible condition, regular monitoring of the cell is
recommended. The cell is in the clear plastic housing and contains the Titanium plates.
• During the chlorination process a white powdery Calcium scale may naturally build up
on the Titanium plates in the cell. Monitor the cell to prevent excessive scale build up.
Excessive scale build-up will cause damage to your cell, and dramatically reduce its
efciencyandlifespan.
• The control panel displays a red LED indicator warning that indicates that the cell may
require cleaning.
• If Calcium scale builds up please clean the cell, following the cleaning instructions provided
on page 26.
• NEVER: Use concentrated acid to clean your cell.
• NEVER: Leave cell in cleaning solution for extended periods of time.
• NEVER: Use metal implements, scourers, or brushes to clean the cell.
3. BALANCED POOL WATER CHEMISTRY
• Correct salt levels MUST be maintained (see page 27) for optimum performance and lifespan.
• Calcium Hardness levels MUST be kept to ideal ranges of 200 - 275ppm (for Concrete
and Tiled Pools) and 100 - 225ppm (for other surfaces) to prevent excessive scale build up
and damage to equipment.
• pH levels MUST be kept to ideal levels to prevent damage to equipment and pool surfaces
and to obtain optimum chlorination effectiveness.
• Total Alkalinity and Stabiliser levels must also be kept in an ideal range.
Note: Please refer to the POOL WATER CHEMISTRY chart on page 29 for more information.
4. EARTH BOLT ASSEMBLY
Please install the supplied earth sensor bolt (item g.) to minimise stray currents and prolong
the life of your electrolytic cell.
5
Page 6
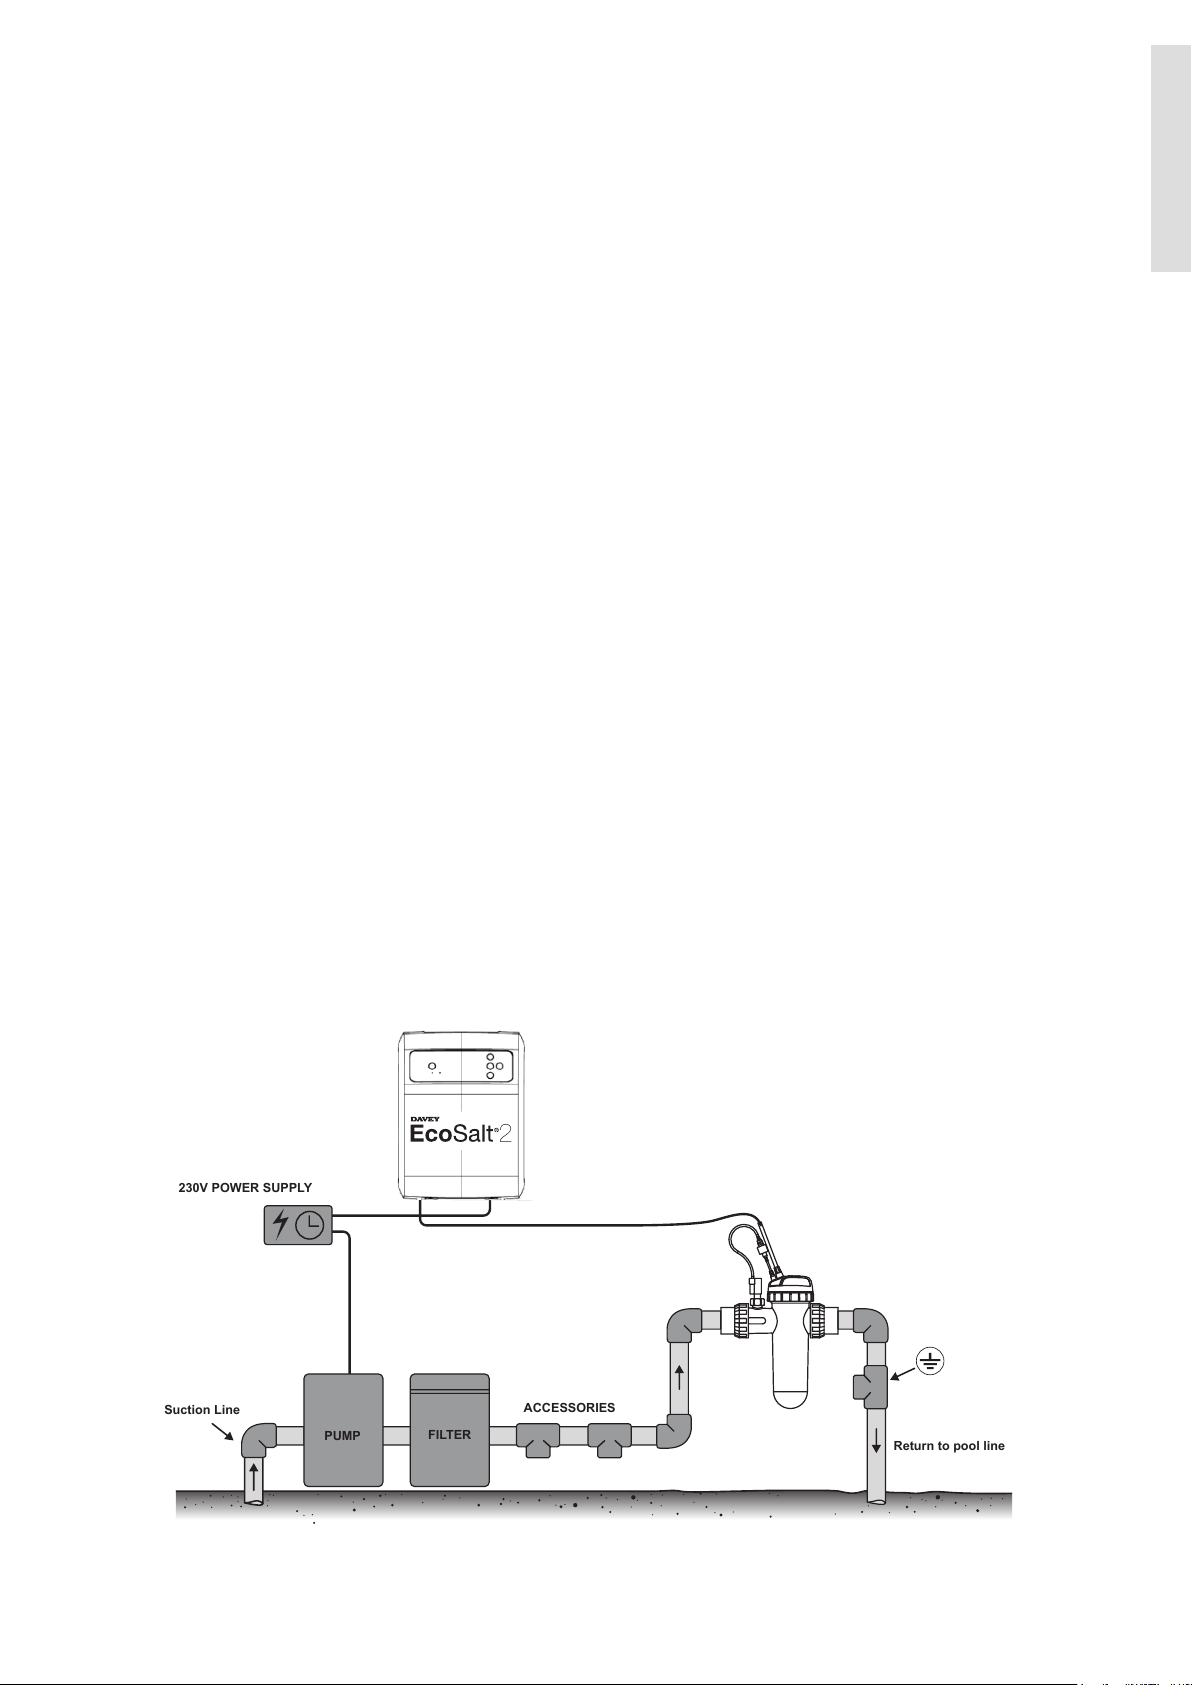
COMMON TERMS
Return to pool line
Suction Line
FILTER
PUMP
ACCESSORIES
230V POWER SUPPLY
Algae Microscopic forms of plant life which enter the pool by rain, wind and dust. There are
numerous varieties – some are free floating whilst others grow on walls and in cracks
and come in different colours. Some are more resistant to chemical treatment than others.
Bacteria The germs that contaminate your pool. Introduced by swimmers, dust, rain storms
and other elements.
Balanced water The correct ratio of mineral content and pH level that prevents pool water from being
corrosive or scale forming.
Chloramines Compounds formed when chlorine combines with nitrogen from urine, perspiration, etc.
Chloramines cause eye and skin irritation, as well as unpleasant odours.
Chlorine demand The chlorine required to destroy germs, algae and other contaminants in the pool.
Chlorine residual The amount of chlorine remaining after chlorine demand has been satisfied.
This is the reading obtained with your test kit.
Cyanuric acid Also known as stabiliser or conditioner. It reduces dissipation of chlorine by direct
sunlight.
Liquid acid Chemical used to reduce the pH and total alkalinity in the pool water, and for cleaning
Sanitiser cell.
ppm An abbreviation for Parts Per Million the accepted measurement of chemical
concentration in swimming pool water. 1 ppm = 1 mg/L.
INSTALLING THE EcoSalt2
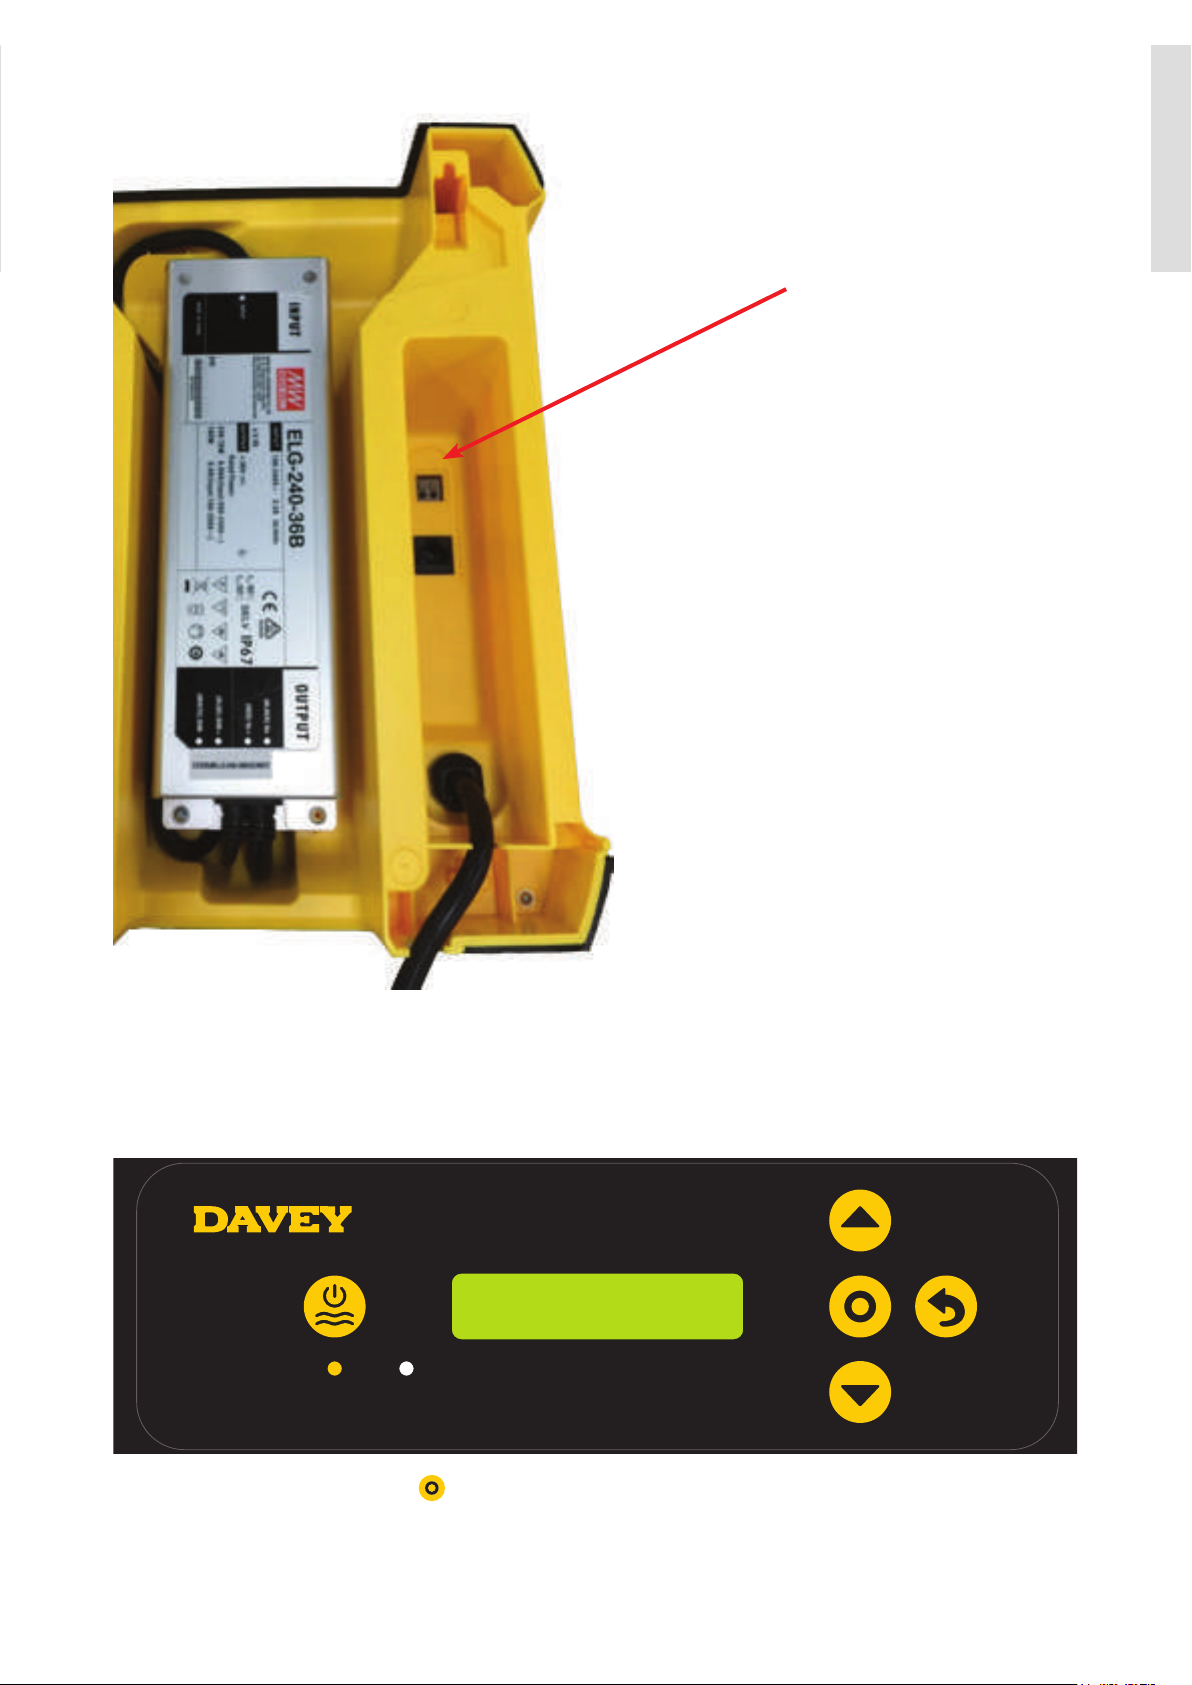
INSTALLING THE POWER SUPPLY
Select a convenient well-ventilated location within one metre of filter equipment and mount the power supply
vertically onto a wall, or post at least as wide as the EcoSalt2 power supply itself. Davey recommends that
the power supply shall not be located within 1.5m (5 feet) of the pool water. Plug pump and chlorinator power
supply into a suitable weatherproof power outlet/controller. Where applicable, some model variants have a
3-pin socket on the underside of the power supply, provide pump power. The unit must be kept away from
acid and other chemical storage areas. Acid and chemical vapours will corrode the electronics inside the unit.
It must also be kept away from heat sources. Good ventilation is necessary for correct operation.
ENGLISH
Two self-tapping screws and wall plugs have been provided for fast and simple installation.
Use a 6mm (¼”) masonry drill bit when fitting Power Supply to a brick or concrete wall. When mounting to a
post drill pilot holes and fit screws provided. Holes should be level and 164mm (6½”) apart. Once screws are
in position simply hang EcoSalt2 power supply via mounts on back of unit. For adequate weatherproofing, the
wall or post that EcoSalt2 is mounted to, should be flat and at least as wide as the EcoSalt2 power supply.
6
Page 7
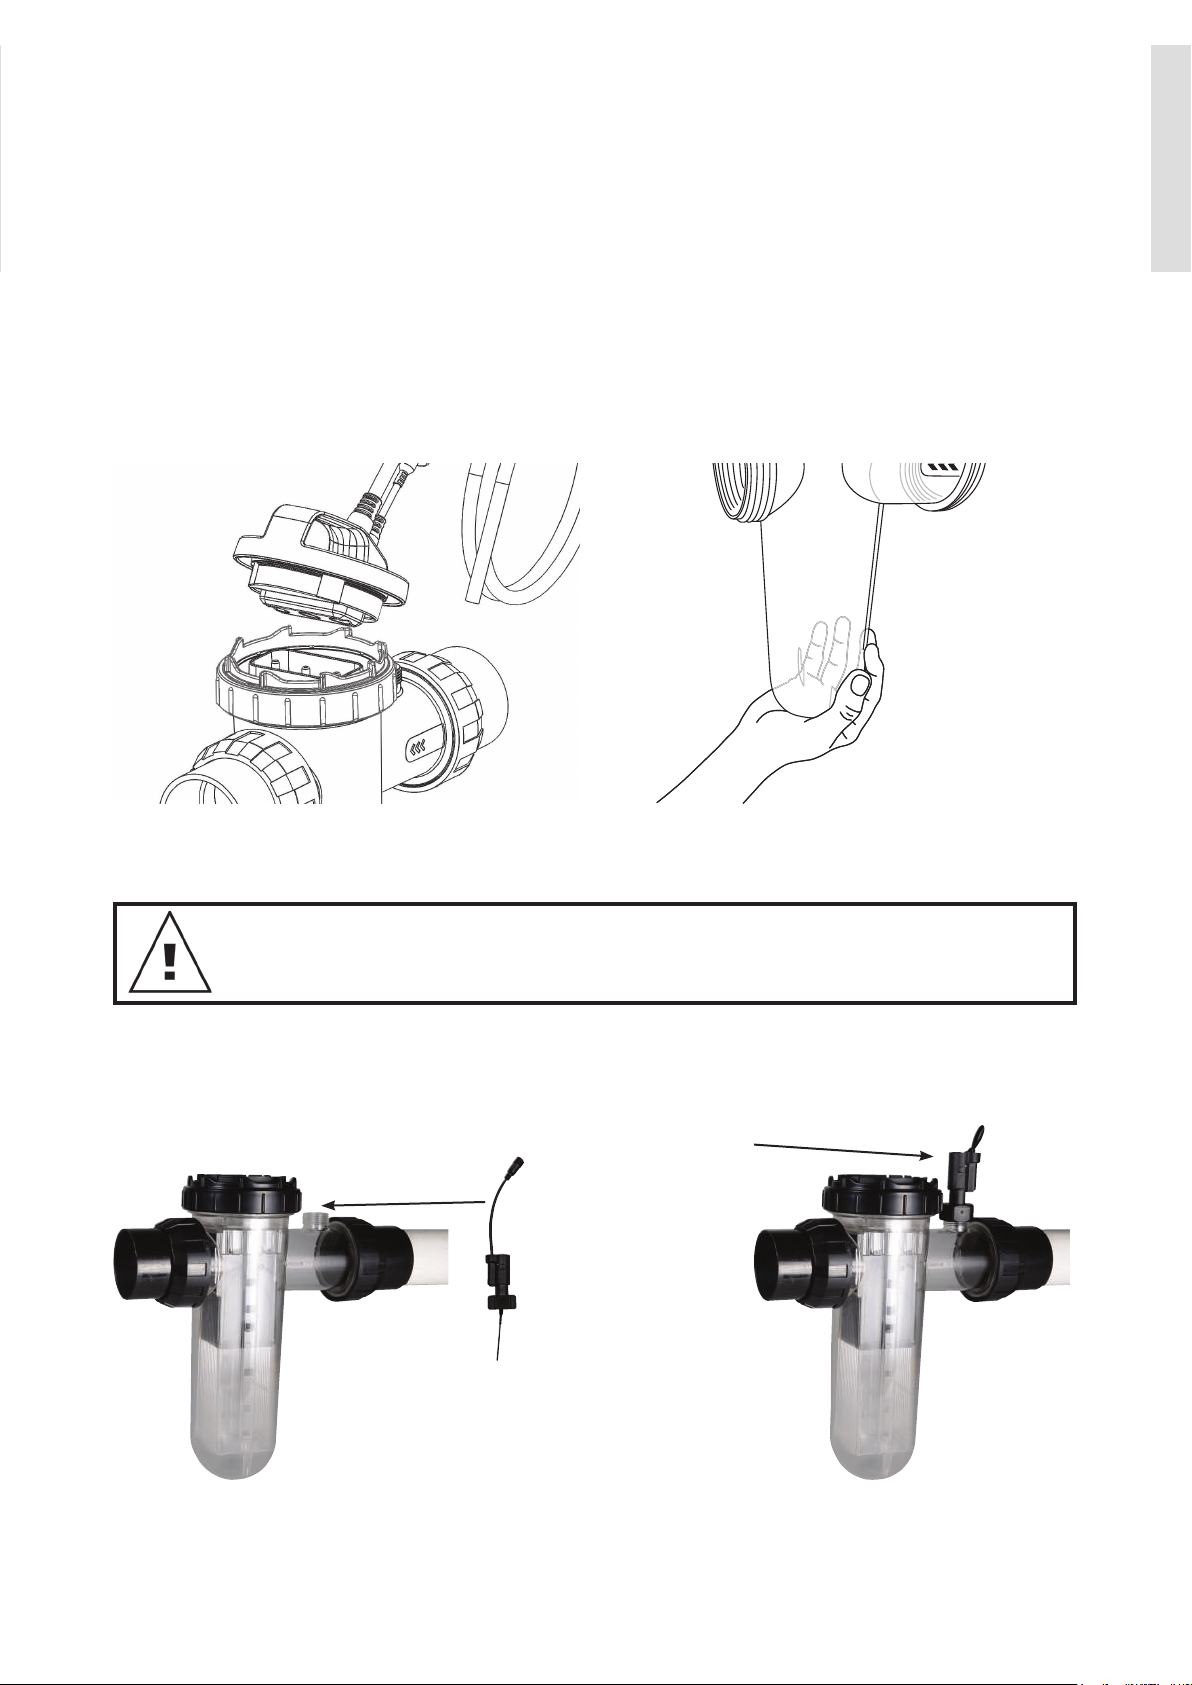
INSTALLING THE CELL
The EcoSalt2 cell should always by the last appliance in your system. Ensure the cell is installed after pumps,
filters and any heating appliances. To achieve best efficiency, the EcoSalt2 cell should be installed such that
turbulent water is limited as much as possible. Do not install a 90° elbow closer that 200mm (8”) from the cell’s
inlet barrel union. Isolation valves used where equipment is located below pool water level, should also be
installed no closer than 200mm (8”) from inlet barrel union. This will assist laminar flow. Allow a minimum of
25mm (an inch) between the cell housing and any (and all) walls, for easier cell removal when servicing. The
cell installation shall be restricted to outdoor locations in order to reduce the risk of gas accumulation.
CONNECTING THE IN-LINE ELECTROLYTIC CELL TO THE POWER SUPPLY
The EcoSalt2 salt water sanitiser uses a reverse polarity in-line electrolytic cell for low maintenance
operation. The EcoSalt2 power supply is fitted with a flexible lead terminated with the cell connectors
built into a plastic moulding. The three in-line connectors are not “polarity sensitive”. Depending on the
installation, it may be necessary to support the cell housing underneath, by hand.
ENGLISH
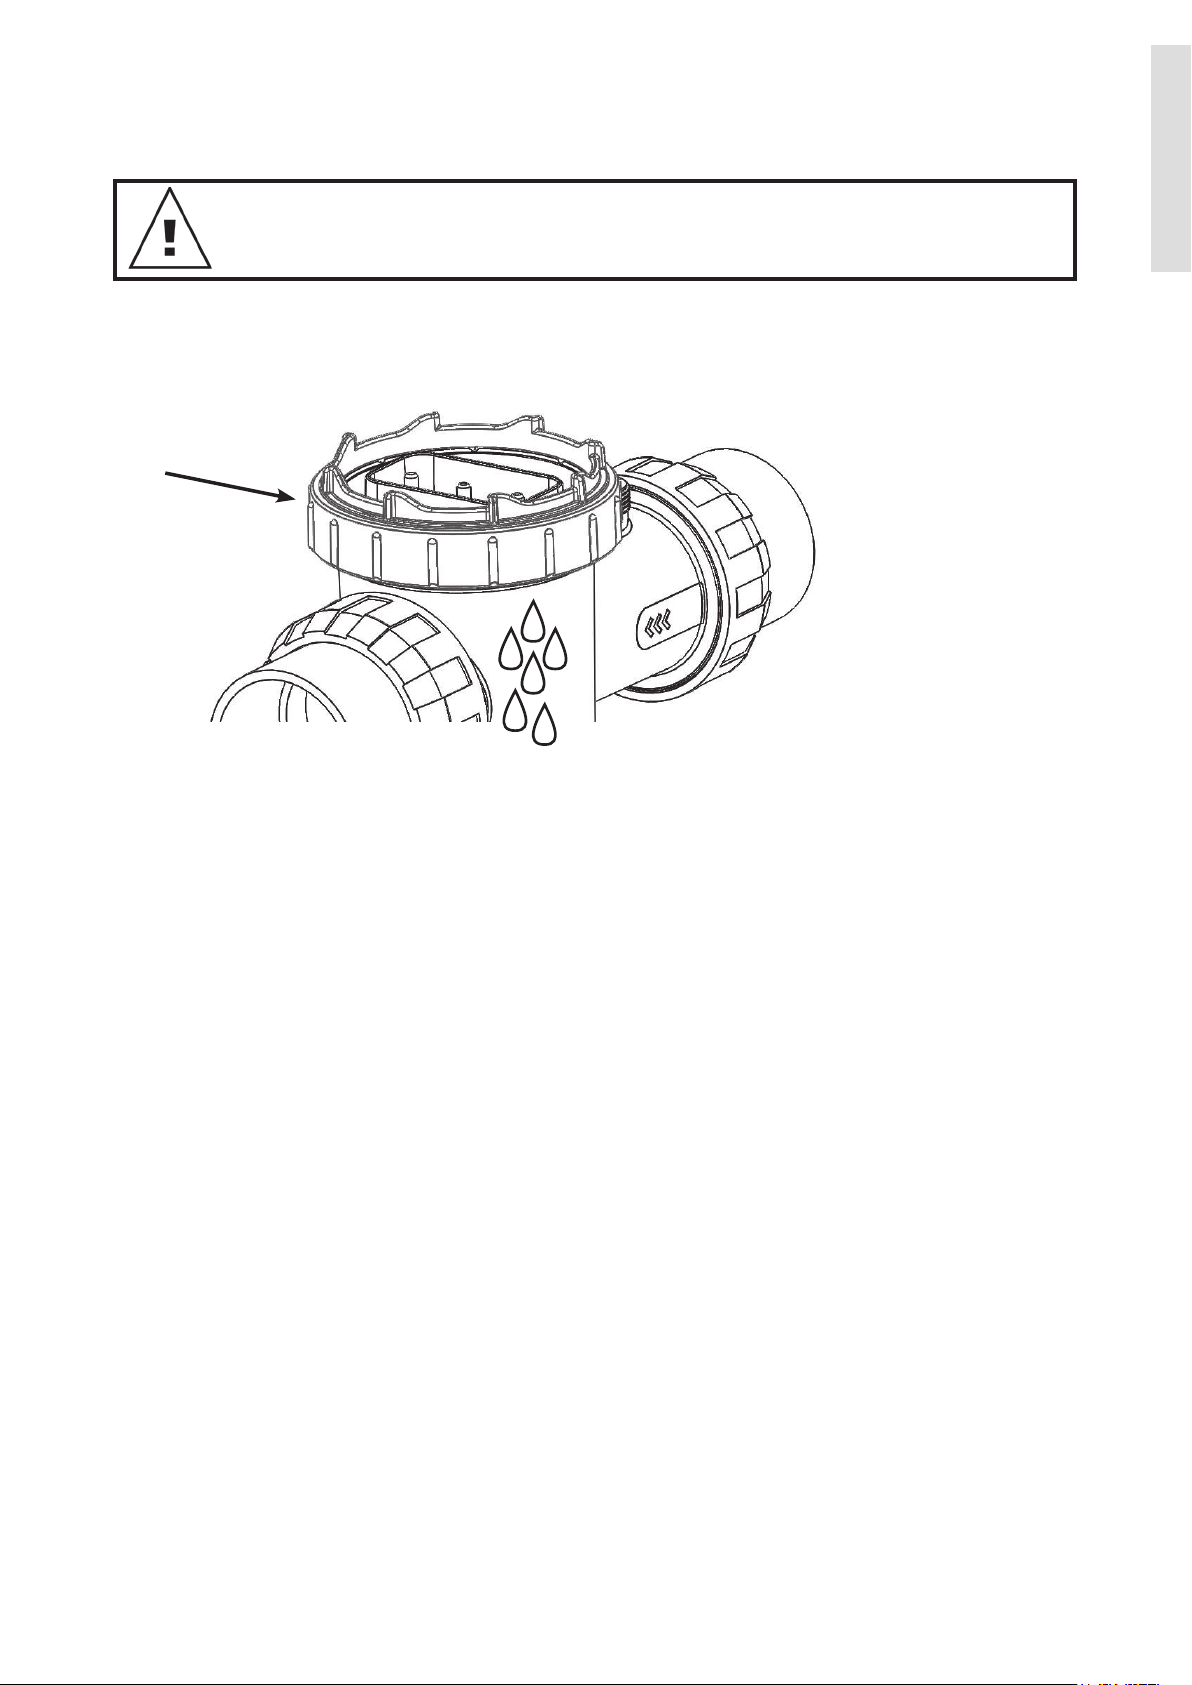
NOTE: The EcoSalt2 cell is supplied with a paddle type flow switch, which is to be installed on the
cell as shown in the diagram on page 4 and connected to the cell lead via the connector on the end
of the cable.
WARNING: The ow switch must be mounted with the highlighted arrow on side of the
switch pointing in the direction of ow.
CONNECTING THE FLOW SWITCH TO THE CELL HOUSING
Ensure that the flow switch is installed into the cell housing.
Ensure the flow switch direction is correct (see page 4)
Fitted
7
Page 8
PRE-START UP PROCEDURE
Before operating your EcoSalt2 salt pool chlorination system, please ensure the following quantity of pool
salt has been added to your pool.
• POOL SALT:
ENGLISH
To raise salt
concentration by
ppm
(mg/L)
%
30,000L
(7,925 gal)
40,000L
(10,567 gal)
50,000L
(13,208 gal)
(15,850 gal)
Salt required
60,000L
70,000L
(18,492 gal)
80,000L
(21,134 gal)
90,000L
(23,775 gal)
100,000L
(26,417 gal)
kg lbs kg lbs kg lbs kg lbs kg lbs kg lbs kg lbs kg lbs
1,000 0.1 30 66 40 88 50 110 60 132 70 154 80 176 90 198 100 220
2,000 0.2 60 132 80 176 100 220 120 265 140 309 160 353 180 397 200 441
3,000 0.3 90 198 120 265 150 331 180 397 210 463 240 529 270 595 300 661
4,000 0.4 120 265 160 353 200 441 240 529 280 617 320 705 360 794 400 882
5,000 0.5 150 331 200 441 250 551 300 661 350 772 400 882 450 992 500 1,102
6,000 0.6 180 397 240 529 300 661 360 794 420 926 480 1,058 540 1,190 600 1,323
• CHLORINE: For a new pool installation that has not been chlorinated, add sufficient Chlorine (liquid or
granular) to achieve a reading of 3ppm (mg/L) with a suitable test kit. Alternatively, run the EcoSalt2 salt pool
chlorination system continuously on BOOST MODE, for approximately 24 hours, or until a reading of 3ppm
(mg/L) is reached.
• STABILISER: It is essential that pool stabiliser be added and maintained at the rate of 25-50ppm (mg/L)
at all times (FOR OUTDOOR POOLS ONLY). For ORP controlled systems the stabiliser level should be
maintained between 15-25ppm (mg/L).
• (Refer Day to Day Operation page 27 for further information).
OPERATION OF YOUR EcoSalt2
CHLORINE OUTPUT is expressed as a percentage. Set the EcoSalt2 to the percentage output required
and the unit will automatically adjust the cell output to the set level. The EcoSalt2 is fitted with an electronic
control and warning system. This regulates the output of the EcoSalt2 to the pre-set maximum and changes
cell polarity as indicated by the + or – on the digital display. The polarity will alternate over a number of hours
of chlorination time, not necessarily pump-run hours.
8
Page 9
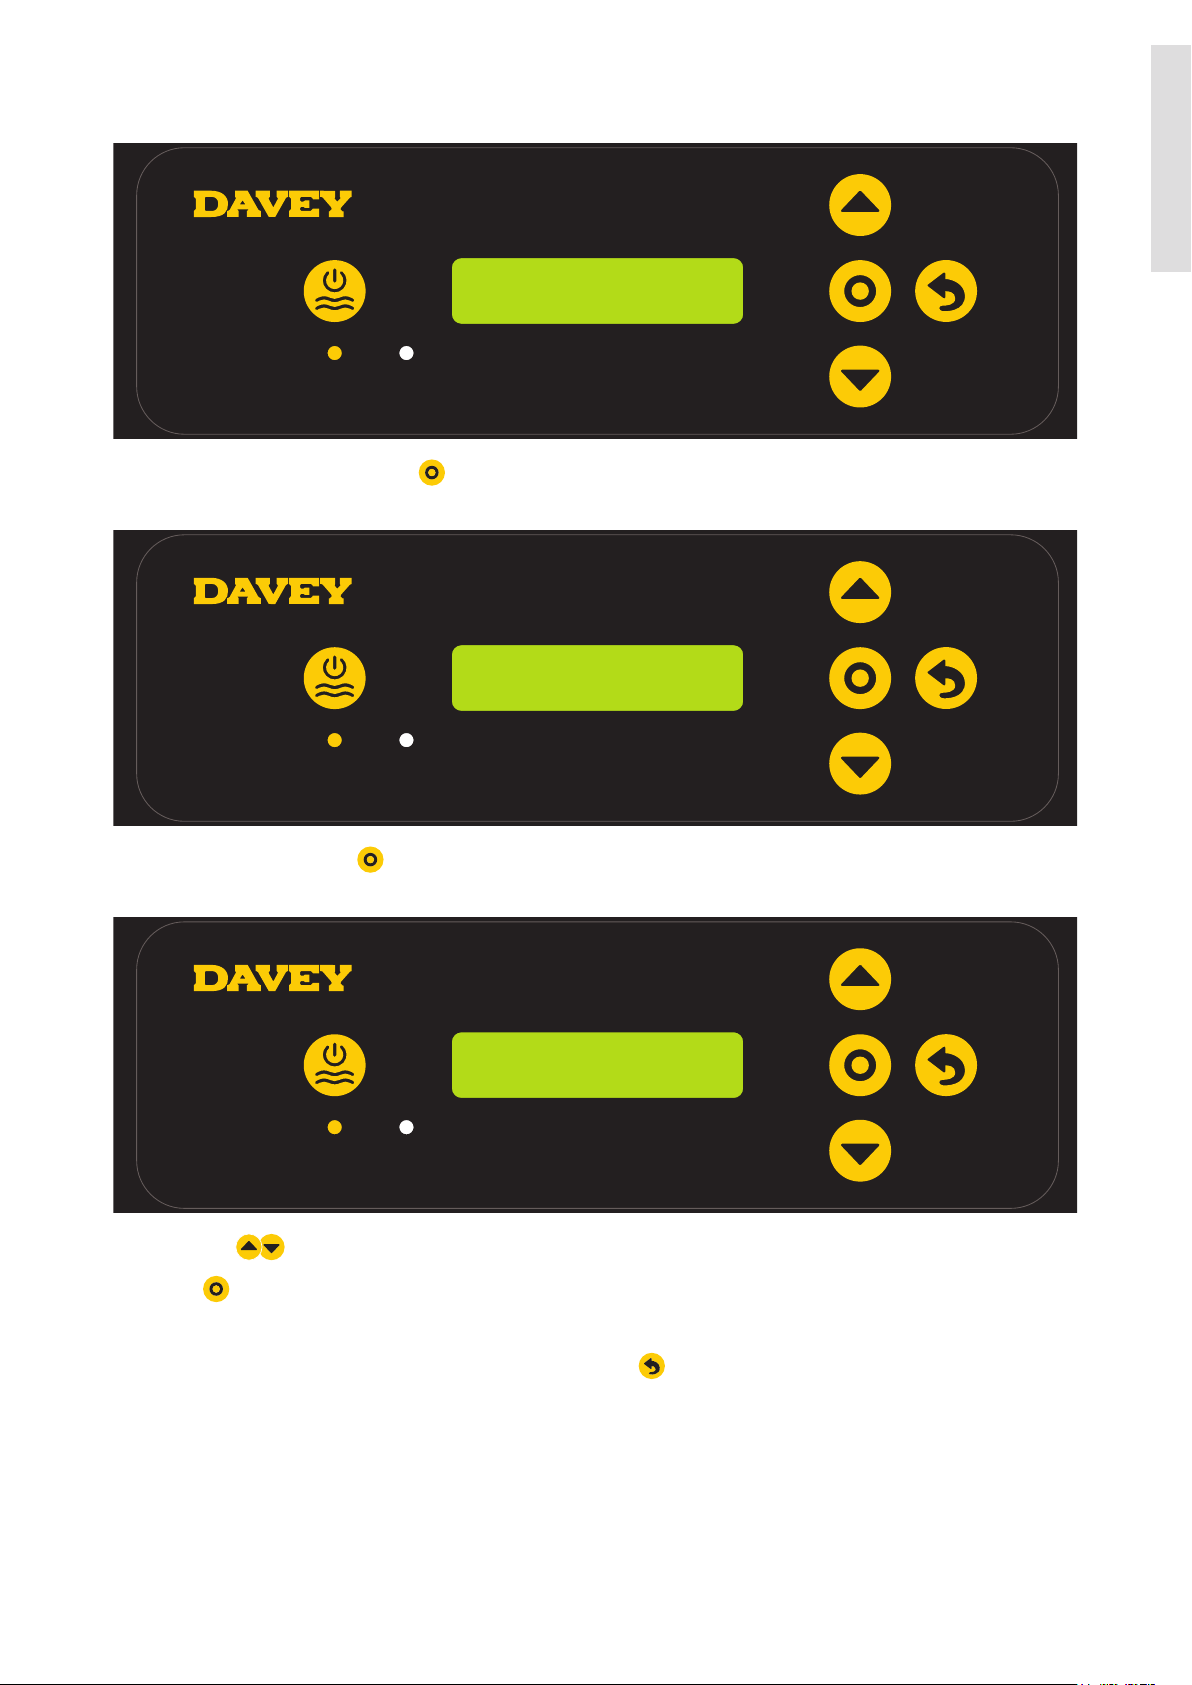
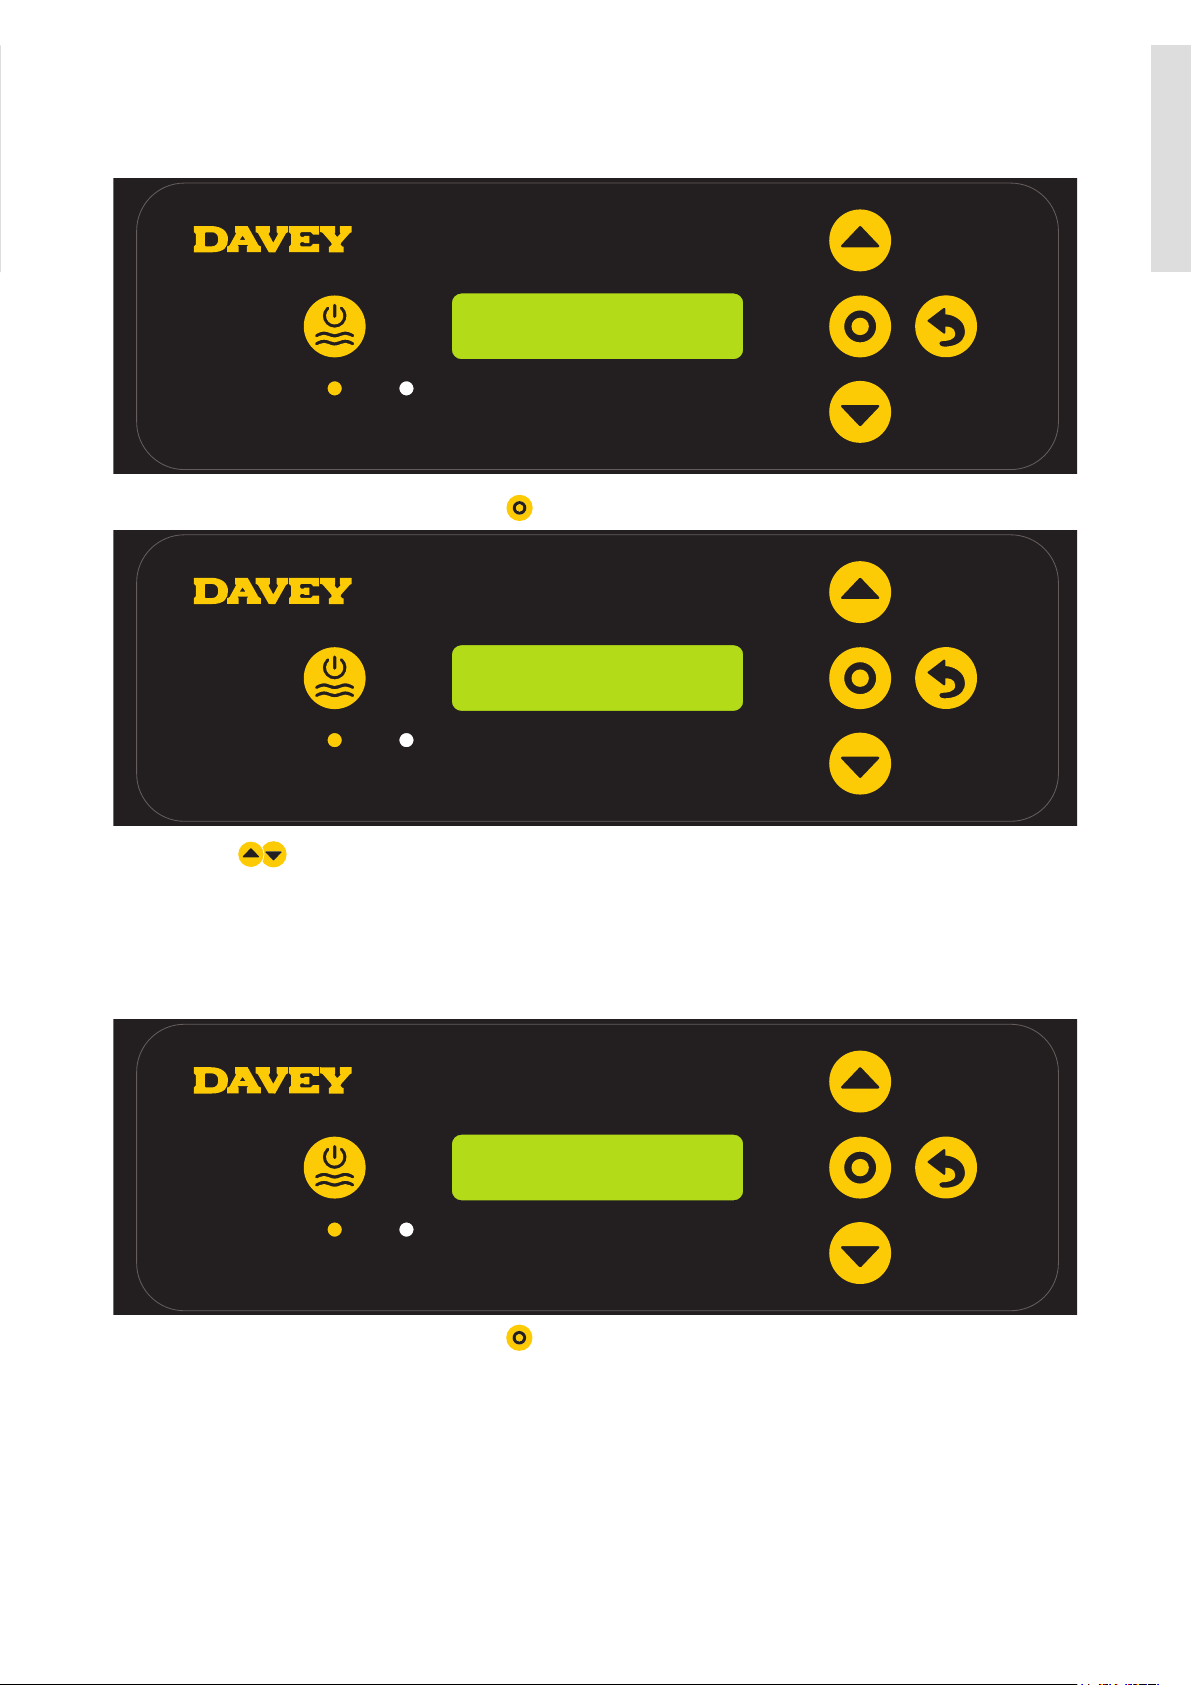
CONTROL PANEL
LAYOUT
Manual on/off
ENGLISH
100% – 09:29 AM
ON
Power indicator
(lit when EcoSalt2 on)
Menu up/down
Menu/setting select
Menu/setting cancel (go back)
Alarm indicator
(asheswhenalarmactive)
Time out
(whenever device is left for 30 seconds
without input from user, settings are saved,
and home screen displayed)
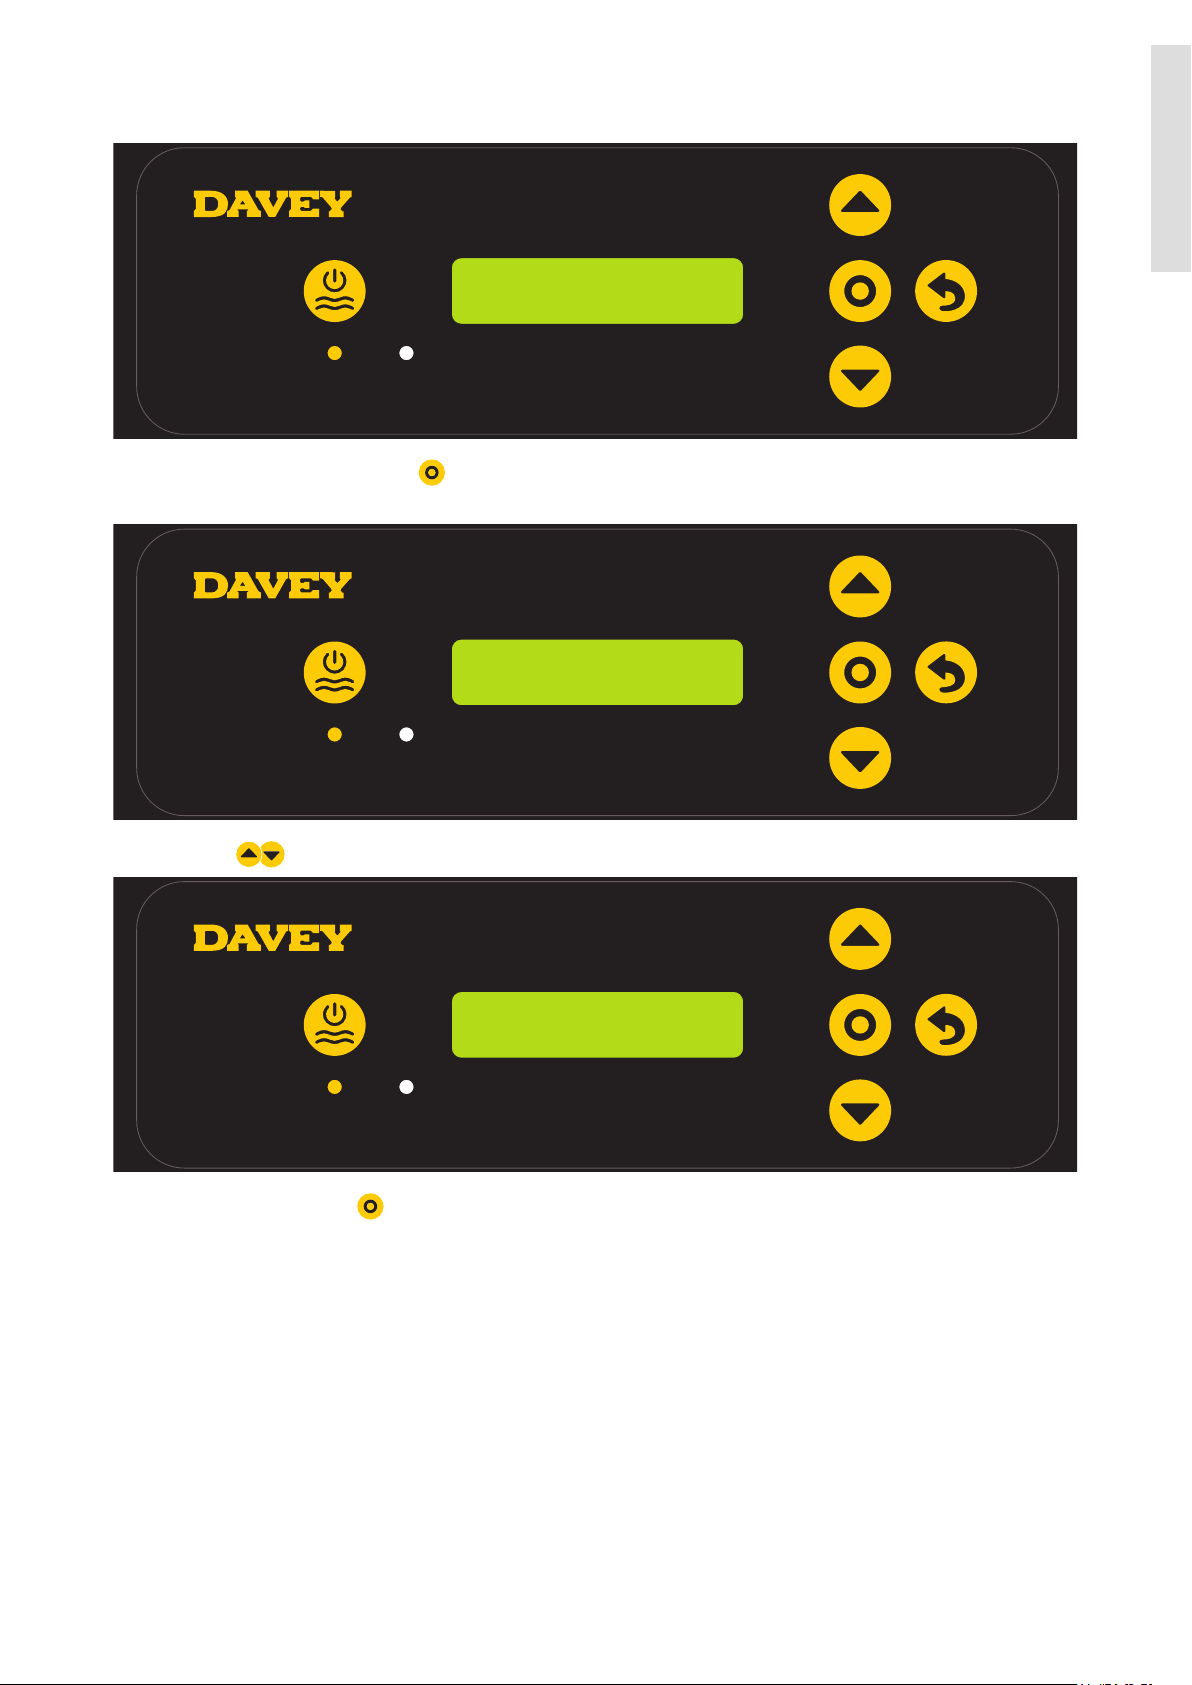
INITIAL START-UP
Once the salt level in the pool is correct the unit may be switched on.
Note: Once the unit starts there is a short time delay until the cell operates to ensure the filtration
system is primed with water.
• The first time the EcoSalt2 is turned on, the following screen is shown on start-up:
DAVEY
V1.2.1 EU 15L
> This screen shows the version of software (ie v1.2.1 shown) and your model of EcoSalt2 (ie EU 15L
shown, meaning DES2-15EL).
• The display then automatically reverts to the following screen:
9
Page 10
3. LANGUAGE
ENGLISH
> This screen shows the language menu and the current language setting (ie English shown);
ENGLISH
> The language setting can be changed by pressing the
available languages;
> Press
> If a mistake is made, the setting can be changed later.
• The display then automatically reverts to the following screen:
menu/setting select once your preferred language is displayed;
menu up/down buttons to scroll through
4. TIME FORMAT
12HR
> This screen shows the time format menu and the current time format (ie 12HR shown);
> The time format can be changed by pressing the
and 24HR formats;
menu up/down buttons to toggle between 12HR
> Press
> If a mistake is made, the setting can be changed later.
• The display then automatically reverts to the following screen:
menu/setting select once your preferred time format is displayed;
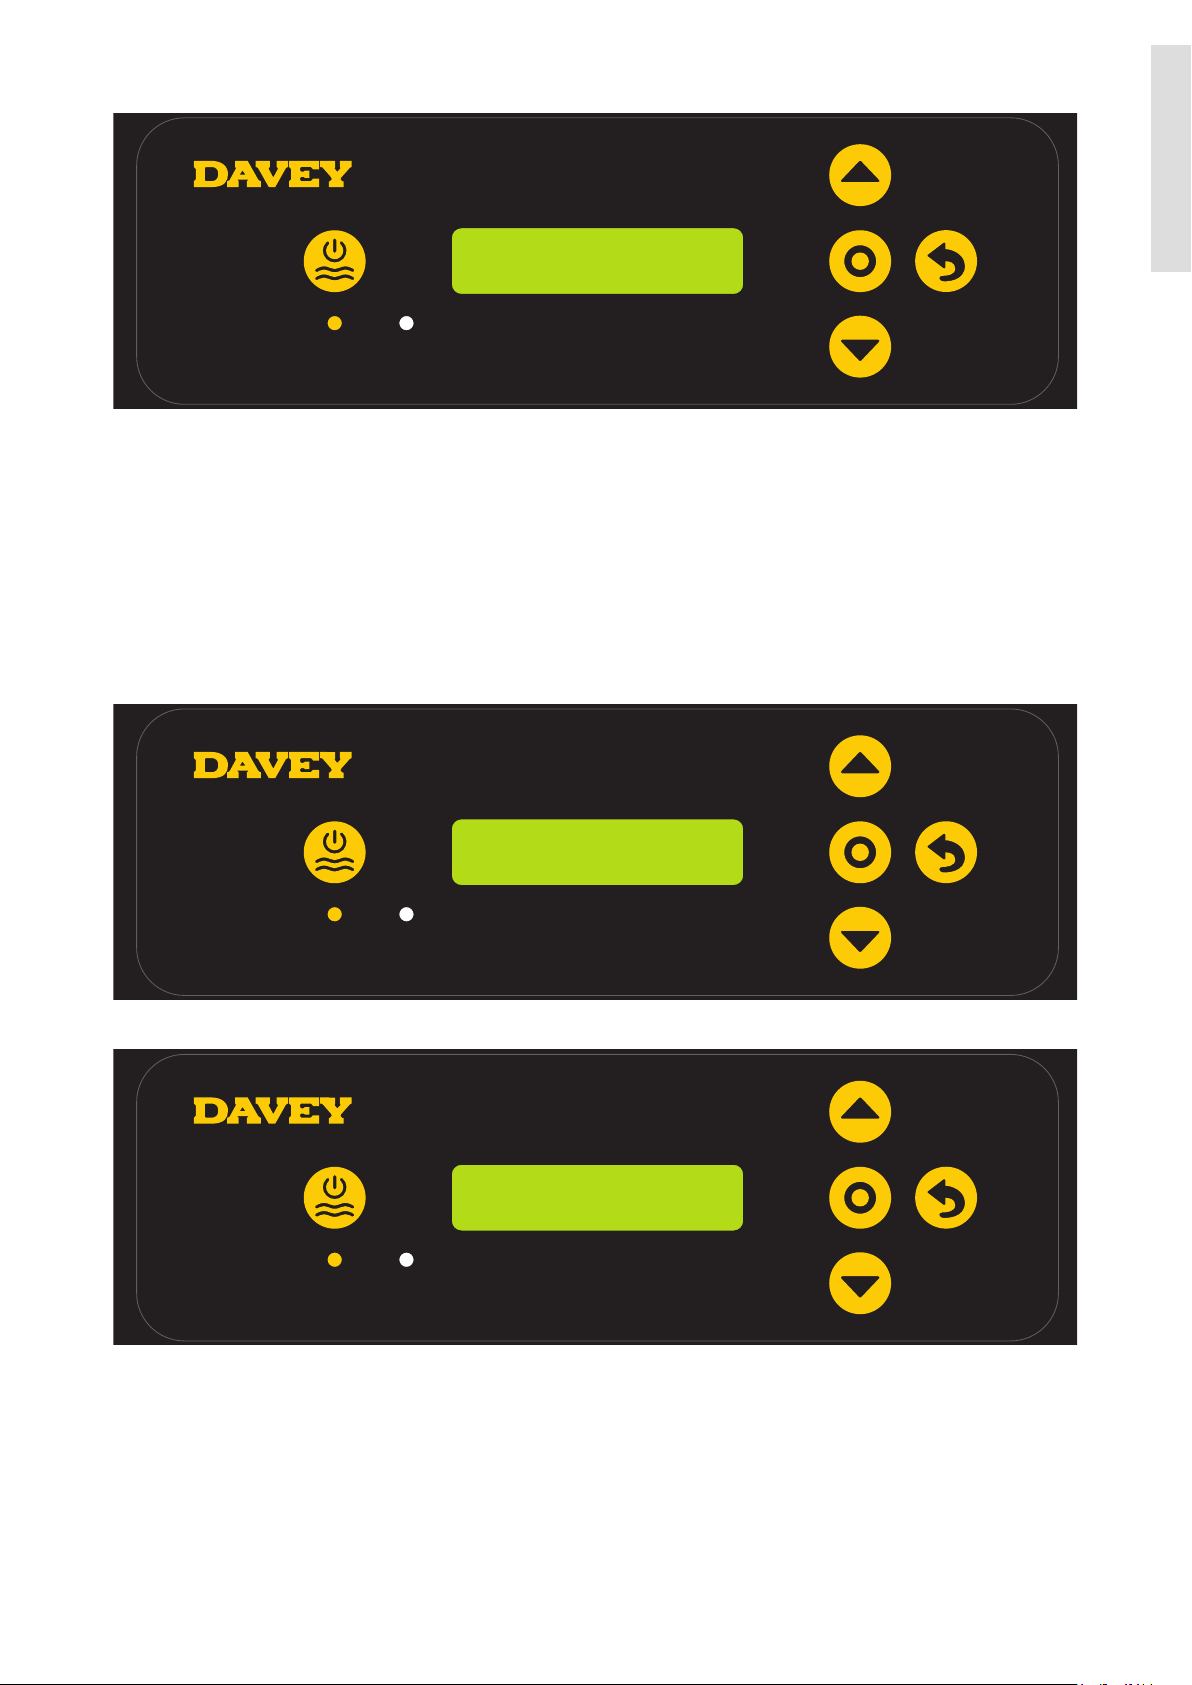
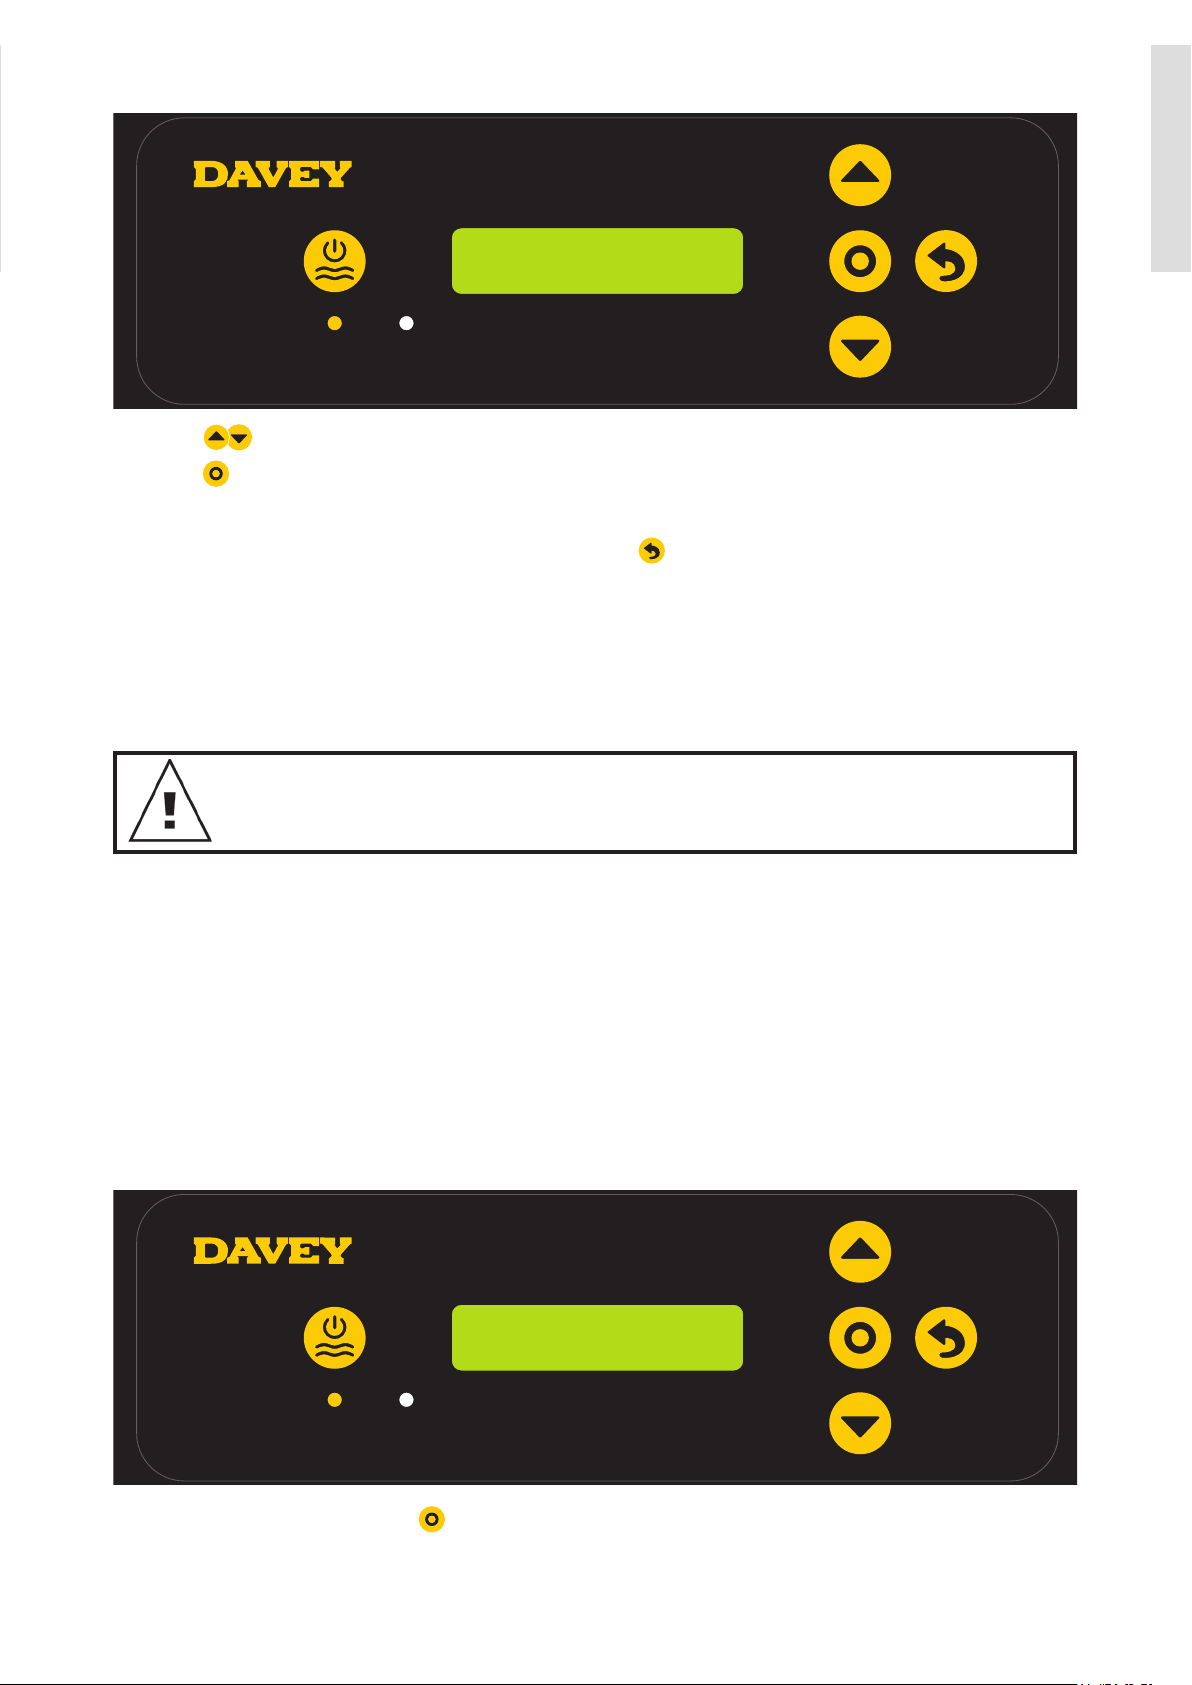
1. CLOCK
07:34 PM
> This screen shows the clock’s current time (ie 07:34PM shown);
> Initially the clock hours will be flashing;
> The clock hours can be changed by pressing the
menu up/down buttons to scroll to your chosen time;
10
Page 11

> Press
> If a mistake is made, the setting can be changed later.
> Next the clock minutes will be flashing;
menu/setting select once your preferred clock hour is displayed;
ENGLISH
> The clock minutes can be changed by pressing the
> Press
> If a mistake is made, the setting can be changed later.
> Next the clock AM/PM will be flashing;
> The clock AM/PM can be changed by pressing the
AM and PM;
> Press
> If a mistake is made, the setting can be changed later.
• The display then automatically reverts to the following screen:
menu/setting select once your preferred clock minutes is displayed;
menu/setting select once your preferred clock AM/PM is displayed;
menu up/down buttons to scroll to your chosen time;
menu up/down buttons to toggle between
2. DATE
01 JAN 2000
> This screen shows the date format menu and the current date (ie 01 JAN 2000 shown);
> Initially the date day will be flashing;
> The date day can be changed by pressing the
chosen date day;
> Press
> If a mistake is made, the setting can be changed later.
> Next the date month will be flashing;
> The date month can be changed by pressing the
date month;
> Press
> If a mistake is made, the setting can be changed later.
> Next the date year will be flashing;
> The date year can be changed by pressing the
date year;
> Press
> If a mistake is made, the setting can be changed later.
• The display then automatically reverts to the HOME screen:
menu/setting select once your preferred date day is displayed;
menu/setting select once your preferred date month is displayed;
menu/setting select once your preferred date year is displayed;
menu up/down buttons to scroll to your
menu up/down buttons to scroll to your chosen
menu up/down buttons to scroll to your chosen
11
Page 12
100% – 09:29 AM
ON
> This screen shows the:
■ current chlorine output setting (ie 100% shown);
■ current time setting;
■ current power status (ie ON shown).
TYPICAL (EVERYDAY) START-UP
Note: Once the unit starts there is a short time delay until the cell operates to ensure the filtration
system is primed with water.
• Every time the EcoSalt2 is turned on, the following screen is shown on start-up:
ENGLISH
DAVEY
V1.2.1 EU 15L
• The display then automatically reverts to the HOME screen:
100% – 09:29 AM
ON
> This screen shows the:
■ current chlorine output setting (ie 100% shown);
■ current time setting;
■ current power status (ie ON shown).
12
Page 13

EcoSalt2 FEATURES
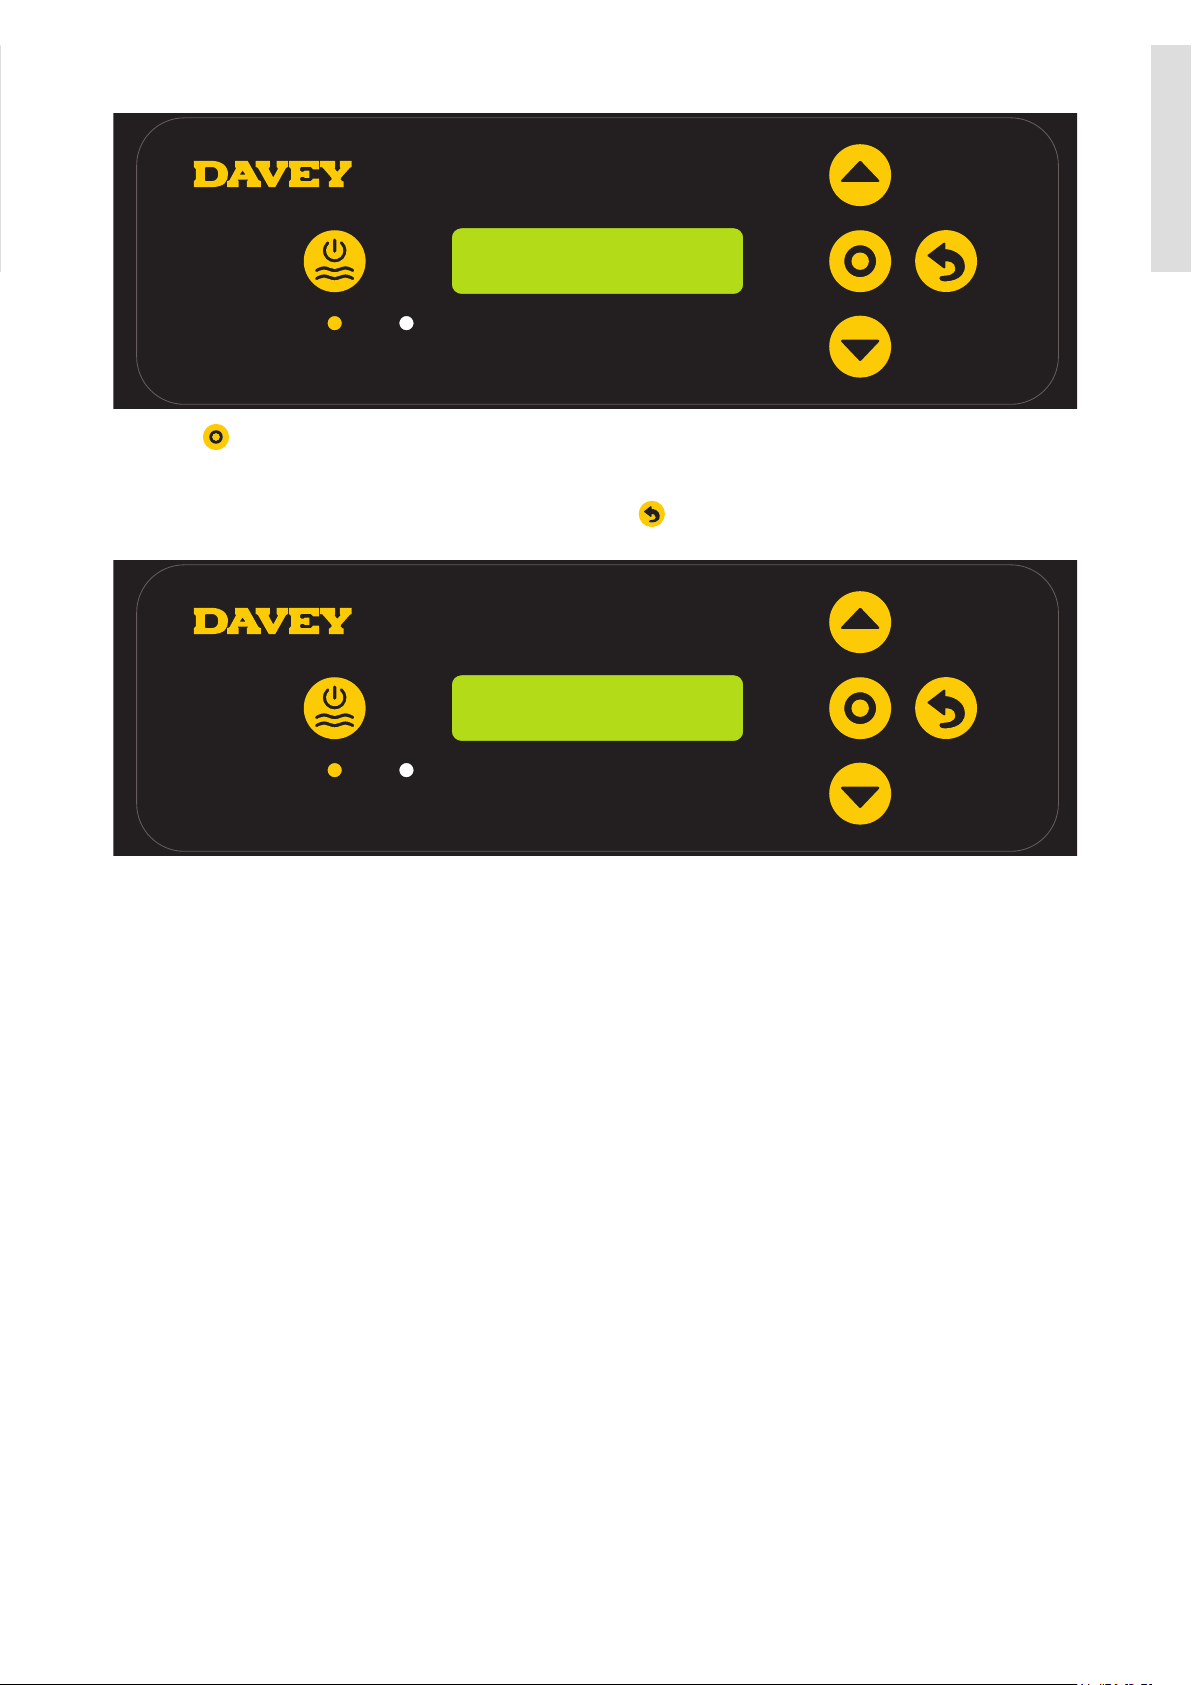
CONTROLLING CHLORINE OUTPUT
65% – 09:35 AM
0N
The CHLORINE OUTPUT controls the time that the cell is producing chlorine, as a percentage of total time
that the EcoSalt2 is on. If the EcoSalt2 cell is producing, it is producing at 100%, unless otherwise altered
(see sections WINTER MODE, or SPA MODE). The cell run time is referred to as “cell duty cycle”.
For example:
• If the EcoSalt2 is on for 8 hours per day, and the CHLORINE OUTPUT is set to 50%: the EcoSalt2 cell
duty cycle is only 4 hours, of that day;
• If the EcoSalt2 is on for 8 hours per day, and the CHLORINE OUTPUT is set to 25%: the EcoSalt2 cell
duty cycle is only 2 hours, of that day.
ENGLISH
To adjust the CHLORINE OUTPUT:
70% – 09:35 AM
CHLORINE OUTPUT
> Press the menu up/down buttons to scroll to your chosen CHLORINE OUTPUT;
> The setting will change the cell duty cycle by 5% increments;
> Press
> This will then take you back to the HOME screen.
ACTIVATING COVER MODE
A pool’s exposure to UV contributes significantly to the pool’s total chlorine demand. Ie the amount of
chlorine the pool uses. Excessive amounts of chlorine in a pool with a cover on, can significantly shorten the
life expectancy of the pool cover, if left for long periods of time (eg weeks). Turning on the COVER MODE
reduces the cell duty cycle by 80% of its current setting.
menu/setting select once your preferred CHLORINE OUTPUT is displayed;
For example:
• If the EcoSalt2 is on for 8 hours per day, the CHLORINE OUTPUT is set to 50%, but the COVER MODE is
on: the EcoSalt2 cell duty cycle is only 48 minutes, of that day;
• If the EcoSalt2 is on for 8 hours per day, the CHLORINE OUTPUT is set to 25%, but the COVER MODE is
on: the EcoSalt2 cell duty cycle is only 24 minutes, of that day.
13
Page 14
To turn on COVER MODE:
70% – 09:35 AM
CHLORINE OUTPUT
> From the HOME screen, press menu/setting select.
> The display will show this screen:
MODE
1. COVER
ENGLISH
> From this screen, press menu/setting select to enter cover mode menu;
> The display will show the current COVER MODE setting (ie COVER MODE off shown):
1. COVER
OFF
> Press the menu up/down buttons to toggle between COVER MODE on and off;
> Press
> This will then take you back to the first setting menu;
> If the EcoSalt2 is left untouched for ~ 30 seconds, or the
pushed, the display reverts to the HOME screen.
menu/setting select once your preferred COVER MODE is displayed;
menu/setting cancel (go back) button is
14
Page 15
COVER MODE can also be triggered remotely
by an automated pool cover controller. By
closing the terminal block contacts on the
rear of the power supply, the EcoSalt2 will
remotely switch to COVER MODE. This
can be overridden by user intervention, by
following the steps explained previously.
ENGLISH
ACTIVATING BOOST MODE
Should the pool experience a heavy bather load, debris/contamination, or extreme warm weather, there may
be a need to super-chlorinate the pool. Turning on the BOOST MODE increases the cell duty cycle to 100%
and overrides the cell current (output) to 100% for a period of 24 hours.
To turn on BOOST MODE:
70% – 09:35 AM
CHLORINE OUTPUT
> From the HOME screen, press menu/setting select.
> The display will show this screen:
15
Page 16
MODE
1. COVER
> Press the menu up/down buttons to toggle between BOOST MODE;
MODE
2. BOOST
ENGLISH
> Press menu/setting select;
2. BOOST
OFF
> The display will show the current BOOST MODE setting (ie BOOST MODE off shown);
> Press the
menu up/down buttons to toggle between BOOST MODE on and off;
16
Page 17
2. BOOST
ON
> Press menu/setting select once your preferred BOOST MODE is displayed;
> This will then take you back to the first setting menu;
ENGLISH
> If the EcoSalt2 is left untouched for ~ 30 seconds, or the
pushed, the display reverts to the HOME screen.
menu/setting cancel (go back) button is
50% – 09:40 AM
BOOST
> The HOME screen will continue to show the cell duty cycle percentage, however the reference to “ON” has
been notably replaced by the reference to “BOOST”. This will remain for the 24 hour period;
> It is possible to alter the cell duty cycle during a 24-hour boost and the display percentage on the HOME
screen changes as expected. This could be handy if the setting needs altering for the next day, once the
BOOST MODE is finished;
> It should be noted though, BOOST MODE overrides every other setting. During the 24 hour period while
is BOOST MODE is active, the cell current is 100% output, and duty cycle is overridden to 100%. This is
regardless of the display on the screen.
ACTIVATING SPA MODE
The EcoSalt2 system is compatible with large swimming pool applications as well as much smaller spa
applications. Turning on the SPA MODE reduces the cell duty cycle by 80% of its current setting.
For example:
• If the EcoSalt2 is on for 10 hours per day, the CHLORINE OUTPUT is set to 50%, but the SPA MODE is
on: the EcoSalt2 cell duty cycle is only 1 hour, of that day;
• If the EcoSalt2 is on for 10 hours per day, the CHLORINE OUTPUT is set to 25%, but the spa MODE is
on: the EcoSalt2 cell duty cycle is only 30 minutes, of that day.
17
Page 18
To turn on SPA MODE:
70% – 09:35 AM
CHLORINE OUTPUT
> From the HOME screen, press menu/setting select.
> The display will show this screen:
MODE
1. COVER
ENGLISH
> Press the menu up/down buttons to scroll to SPA MODE;
MODE
3. SPA
> From this screen, press menu/setting select to enter SPA MODE menu;
> The display will show the current SPA MODE setting (ie SPA MODE off shown):
18
Page 19
3. SPA
OFF
> Press menu up/down buttons to toggle between SPA MODE on and off;
ENGLISH
> Press
> This will then take you back to the first setting menu;
> If the EcoSalt2 is left untouched for ~ 30 seconds, or the
pushed, the display reverts to the HOME screen.
ACTIVATING SPA MODE AND COVER MODE SIMULTANEOUSLY
Should it be necessary to run SPA MODE and COVER MODE simultaneously, the cell duty cycle is only
reduced by 80% That is, the cell duty cycle isn’t reduced by 80%, followed by a further 80%. The HOME
screen display will toggle between showing COVER and SPA.
ACTIVATING WINTER MODE
A pool’s exposure to UV contributes significantly to the pool’s total chlorine demand. Ie the amount of
chlorine the pool uses. Bather load is also a significant contributor to the pool’s total chlorine demand. In
winter, the pool’s chlorine demand is typically far less. Unless otherwise altered, if the cell is producing
chlorine, it is producing at 100% current (output). WINTER MODE reduces the cell’s current (output) to 85%.
For example:
• If the EcoSalt2 is on for 10 hours per day, the CHLORINE OUTPUT is set to 100%, the WINTER MODE is
off: the EcoSalt2 cell duty cycle is 10 hours. The cell current will be operating at 100% capacity;
menu/setting select once your preferred SPA MODE is displayed;
menu/setting cancel (go back) button is
If system is being shut down over the winter period, either turn power off to the
EcoSalt2 or change chlorine output to 0%.
• If the EcoSalt2 is on for 10 hours per day, the CHLORINE OUTPUT is set to 100%, but the WINTER
MODE is on: while the EcoSalt2 cell duty cycle is still 10 hours, the cell current will only be operating at
85% capacity.
To turn on WINTER MODE:
70% – 09:35 AM
CHLORINE OUTPUT
> From the HOME screen, press menu/setting select.
19
Page 20

> The display will show this screen:
MODE
1. COVER
> Press the menu up/down buttons to scroll to WINTER MODE;
MODE
4. WINTER
ENGLISH
> From this screen, press menu/setting select to enter WINTER MODE menu;
> The display will show the current WINTER MODE setting (ie WINTER MODE off shown):
4. WINTER
OFF
> Press menu up/down buttons to toggle between WINTER MODE on and off;
> Press
> This will then take you back to the first setting menu;
> If the EcoSalt2 is left untouched for ~ 30 seconds, or the
pushed, the display reverts to the HOME screen.
menu/setting select once your preferred WINTER MODE is displayed;
menu/setting cancel (go back) button is
20
Page 21
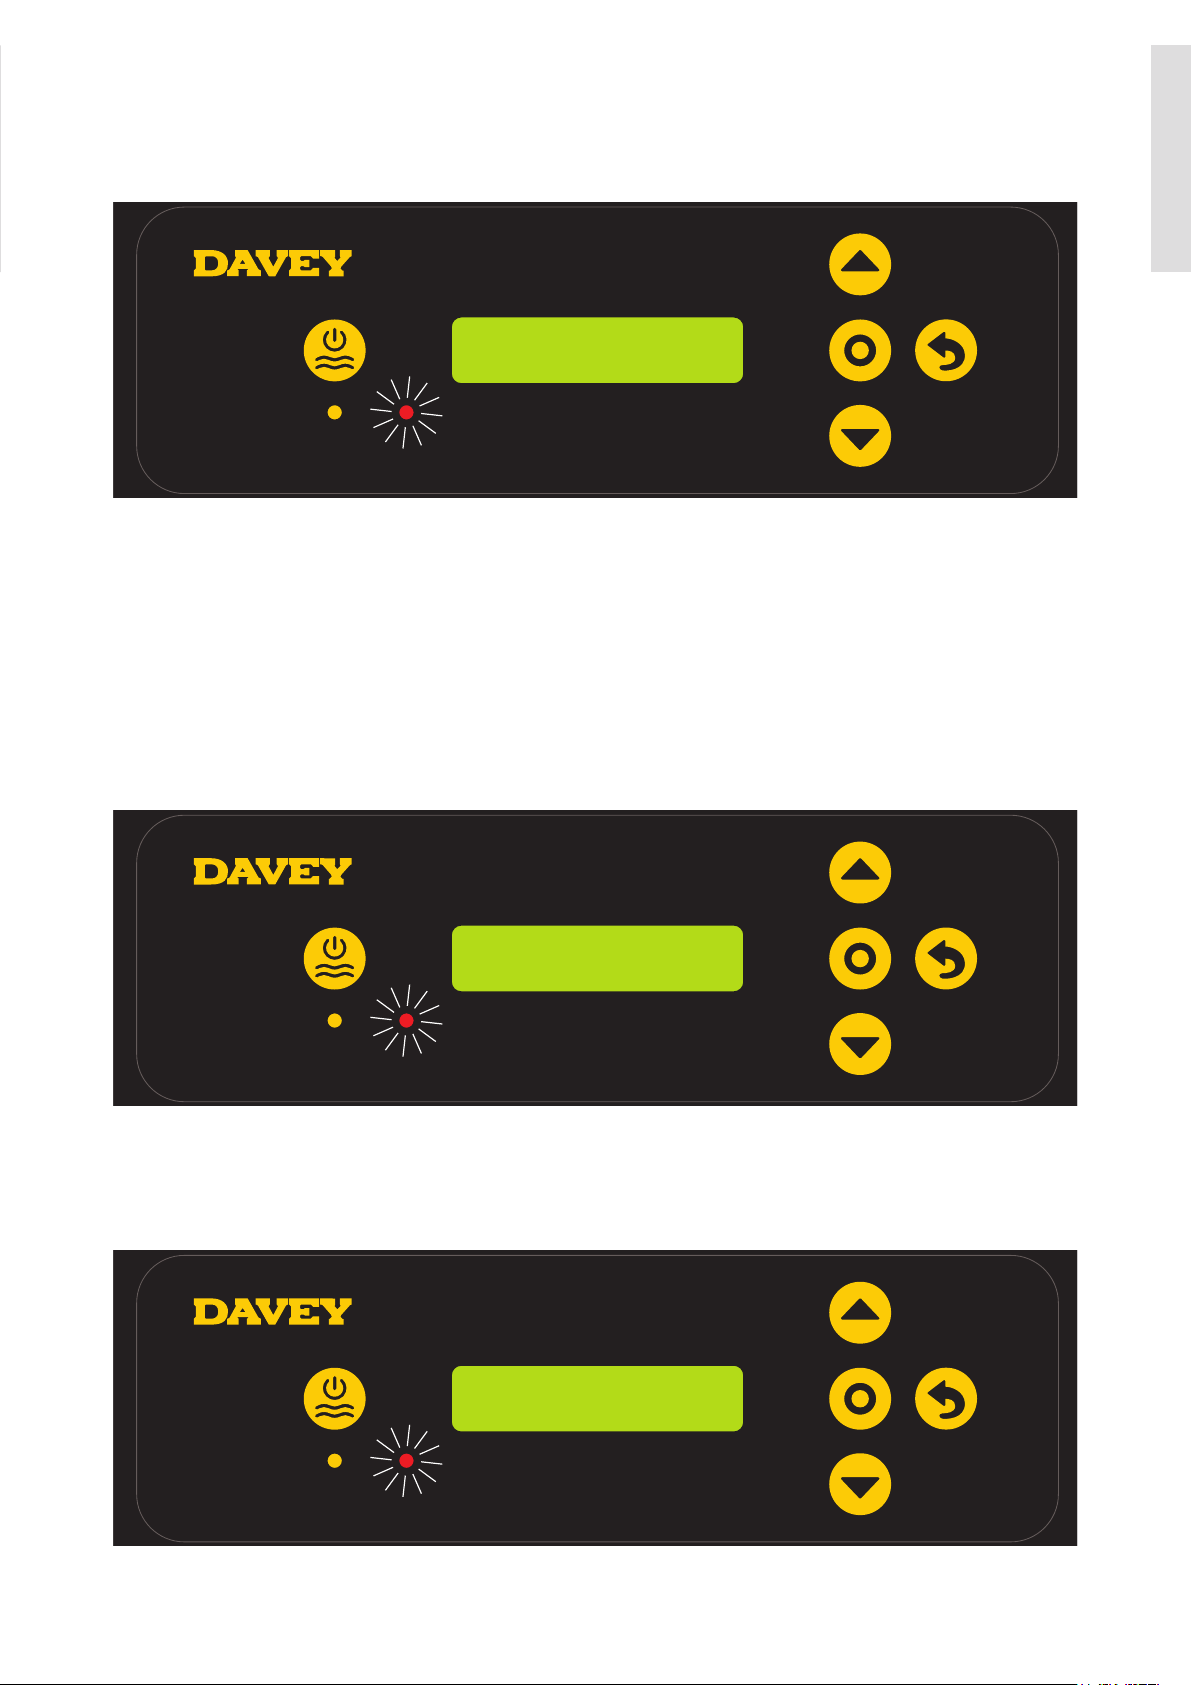
LOW FLOW ALARM
Should the EcoSalt2 flow switch register a flow rate below 3.6m3/h (16 gal/min), the EcoSalt2 will enter LOW
FLOW ALARM:
ALARM
LOW FLOW
In LOW FLOW ALARM, the EcoSalt2 will not produce chlorine. Once the flow switch registers flow above 60L/
min (16 gal/min), the EcoSalt2 will return to normal operation. To achieve best efficiency, the EcoSalt2 cell should
be installed such that turbulent water is limited as much as possible. Do not install a 90° elbow closer that 200mm
(8”) from the cell’s inlet barrel union. Isolation valves used where equipment is located below pool water level,
should also be installed no closer than 200mm (8”) from inlet barrel union. This will assist laminar flow.
ADD SALT ALARM
Should the EcoSalt2 register low conductivity within the cell, this could be triggered by cold water (below
15ºC / 59ºF), or a salt concentration below its minimum (refer to recommended salt range section in the
manual), the EcoSalt2 will enter ADD SALT ALARM. Additional salt may be added to overcome a lower
temperature. However, the maximum salt level should also be considered and if water temperature drops too
far, the system should be turned off.
ENGLISH
ALARM
ADD SALT
Once the EcoSalt2 registers a salt concentration within range (refer to recommended salt range section in the
manual), the EcoSalt2 will return to normal operation.
LOW SALT CUT-OUT ALARM
Should the salt concentration continue to be diluted, the EcoSalt2 will enter LOW SALT CUT-OUT ALARM.
ALARM
LOW SALT CUT-OUT
21
Page 22
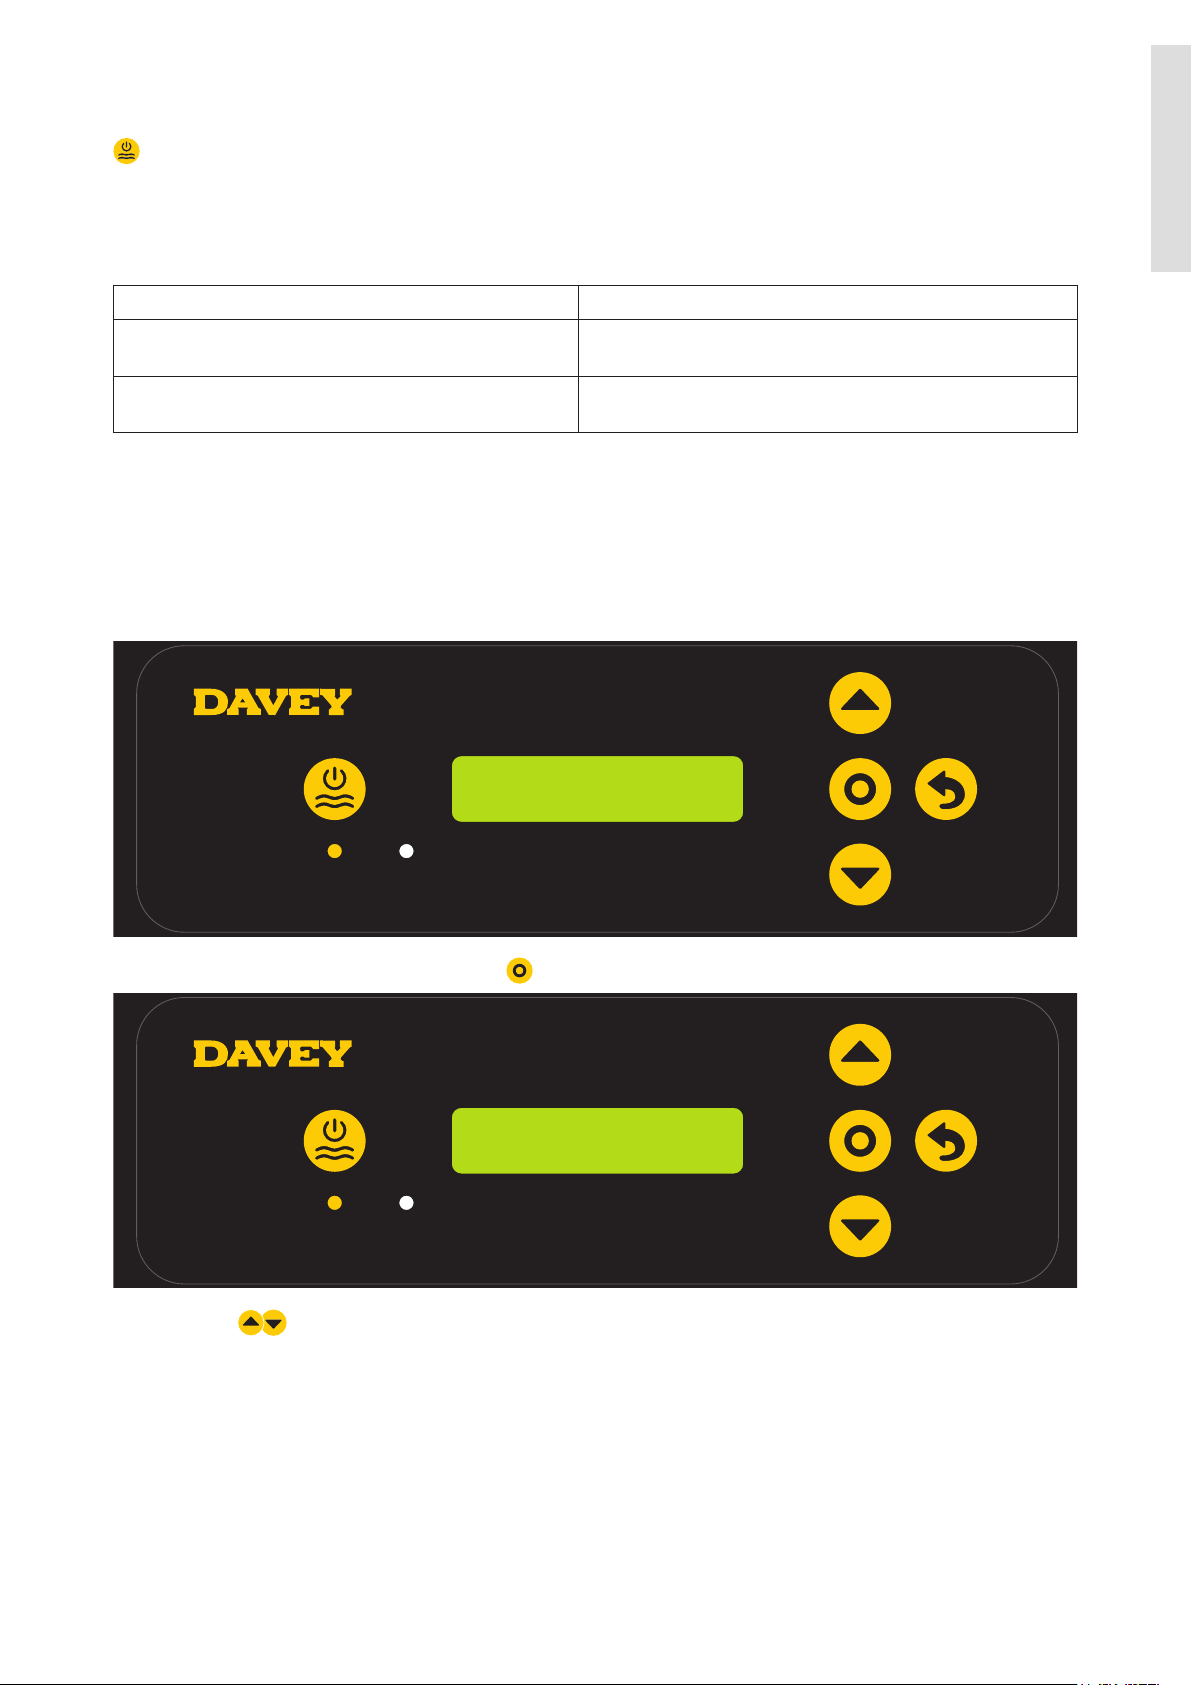
Once the salt concentration is corrected, the LOW SALT CUT-OUT ALARM must be reset by pushing the
manual ON/OFF button. Alternatively, the EcoSalt2 will conduct a system check automatically when
powered up the next time (if operating via a separate power supply). Upon start-up if the EcoSalt2 registers
a salt concentration within range (refer to recommended salt range section in the manual), the EcoSalt2 will
return to normal operation.
LOW SALT CUT-OUT ALARM is triggered at the following (approximate) salt concentrations:
EcoSalt2 model Low salt cut-out alarm (approx. salt concentration)
DES2-15EL, DES2-25EL
DES2-15USL, DES2-25USL
DES2-15E, DES2-25E, DES2-35E
DES2-15US, DES2-25US, DES2-35US
ADD SALT ALARM AND LOW FLOW ALARM
Should the EcoSalt2 register low flow and a salt concentration below its minimum (refer to recommended
salt range section in the manual), the EcoSalt2 will alarm. The display will toggle between the ADD SALT
ALARM and the LOW FLOW ALARM. In LOW FLOW ALARM, the EcoSalt2 will not produce chlorine. As
shown previously once faults are rectified, normal operation will resume.
OVERRIDING LANGUAGE SETTING
1,200ppm (mg/L)
2,500ppm (mg/L)
ENGLISH
70% – 09:35 AM
CHLORINE OUTPUT
> From the HOME screen, press and hold menu/setting select for 3 seconds.
SETTINGS
1. CLOCK
> Press the menu up/down buttons to scroll down to LANGUAGE;
22
Page 23
> Adjust language following instructions detailed in INITIAL START UP section, earlier in this manual.
OVERRIDING TIME FORMAT SETTING
70% – 09:35 AM
CHLORINE OUTPUT
> From the HOME screen, press and hold menu/setting select for 3 seconds.
SETTINGS
1. CLOCK
ENGLISH
> Press the menu up/down buttons to scroll down to TIME FORMAT;
> Adjust time format following instructions detailed in INITIAL START UP section, earlier in this manual.
DISPLAY ALARM HISTORY
The EcoSalt2 keeps a history log for the user that registers the number of hours during which the EcoSalt2
is in alarm mode. As a reminder, the cell life expectancy will be reduced if the EcoSalt2 is run with salt
concentrations outside of the recommended range.
70% – 09:35 AM
CHLORINE OUTPUT
> From the HOME screen, press and hold menu/setting select for 3 seconds;
23
Page 24

SETTINGS
1. CLOCK
> Press the menu up/down buttons to scroll down to ALARM HISTORY;
SETTINGS
5. ALARM HISTORY
> Press menu/setting select;
ENGLISH
CELL RUN TIME
0
> Press the menu up/down buttons to toggle between cell run time and low salt time.
LOW SALT TIME
0
24
Page 25
MAINTENANCE OF POWER SUPPLY
Little, or no maintenance is typically required. However, it is essential that the wall or post to which the
EcoSalt2 is installed be sprayed (not the EcoSalt2 itself) periodically with a good surface type insect
repellent, since penetration by insects may cause damage, which is not covered by your warranty.
IMPORTANT. Certain local electrical regulations state “If the supply cord is damaged, it
must be replaced by a special cord available from the manufacturer or its service agent”.
MAINTENANCE OF THE IN-LINE ELECTROLYTIC CELL
The EcoSalt2 cell is composed of precious materials, and although proper maintenance can prolong its life
to the maximum, eventually the output will wear away its delicate coating, at which time it gradually ceases
to produce chlorine. Calcium (scale) is deposited on the plates as electrolysis takes place. This build up will
interfere with the flow of electrical current in the cell and thus lowers chlorine production. It is essential to
inspect the cell regularly and clean when necessary. The rate at which deposits will form on the plate differs
with each pool and can be influenced by the following:
• Calcium Hardness of the water;
• Water temperature;
• pH level;
• Water which has been chlorinated with calcium hypochlorite for an extended period; and/or
• Calcium in the plaster surfaces of a concrete pool.
ENGLISH
Because these conditions vary so much, check the cell at least weekly to begin with to see if either scale
or a blue/green soapy substance appears on the plates. You will then be able to determine the cleaning
cycle necessary for your pool (more frequent cleaning may be required in summer). The intervals between
cleaning could get longer to the point where cleaning is only necessary a couple of times each year.
NOTE: In areas with hard water, even reverse polarity systems may require occasional
manual cleaning.
The life of the EcoSalt2 cell varies substantially from one installation to another due to variations in operating
time, water quality and composition, system and cell maintenance.
Please ensure that when cell replacement is necessary you use the correct genuine EcoSalt2 replacement
cell to match your system. The correct EcoSalt2 replacement cells to use are shown in the table below:
Model
DES2-15E, DES2-15US DES2C15REP
DES2-15EL, DES2-15USL
DES2-25E, DES2-25US
DES2-25EL, DES2-25USL
DES2-35E, DES2-35US
TO CLEAN THE EcoSalt2 IN-LINE CELL
Replacement
Cell Code
DES2C25REP
DES2C35REP
ALWAYS INSIST ON GENUINE DAVEY REPLACEMENT PARTS.
If it is necessary to replace the in- line electrolytic cell, beware
of “look-a-likes”. Only the Genuine EcoSalt2 cell is designed
and warranted to operate with the EcoSalt2 Power Supply.
SERIOUS DAMAGE MAY RESULT TO THE ELECTRONICS
INSIDE THE EcoSalt2, IF CLONE CELLS ARE USED. THIS
MAY ALSO VOID WARRANTY.
Ensure that the EcoSalt2 and pool pump is turned off. Failure to do so may result in the pool pump turning
on while the cell is not in place. Disconnect the flow switch and cell lead from the top of the cell housing.
Remove the cell from the pool return line by undoing the cell nut, taking care not to lose the o-rings. Inspect
the cell for obvious damage. If damage is present, do not energize, or operate the unit. Instead consult your
place of purchase, or nearest Davey representative from the back page of this manual.
Method one:
Add 1 part HYDROCHLORIC ACID to 10 parts WATER in a suitable container and immerse the cell in this
solution. It should not take longer than a few minutes to clean, if it does the cell should be cleaned more
frequently. If the build – up is not excessive it may be possible to clean the cell plates with a jet of running
water. Return the cell to its housing and connect leads to the head assembly.
25
Page 26
Method two:
As an alternative, an approved commercial cell cleaning solution can be used a number of times effectively.
NOTE: Always add acid to water. Never add water, to acid. Always wear eye protection
and rubber gloves. Always clean the cell in a well-ventilated area.
RE-INSTALLING CELL AFTER CLEANING OR REPLACEMENT
When re-installing the Eco-Salt2 cell into the in-line housing, ensure that the cell locking nut is tight. Do this
by turning on the pool pump once fitted, then checking for leaks.
ENGLISH
If there is a leak, remove the lock nut and inspect the o-ring for debris, or damage. Then re-try. Before refitting the cell connectors, ensure that the terminals are dry.
SAFETY DEVICE
Hydrogen Gas is a by-product of the chlorine producing process. A Flow Switch has been supplied with the
EcoSalt2, which will stop output if low or no flow is detected. The EcoSalt2 system will run to flows down to
3
/h (16 gal/min).
3.6m
DAY TO DAY OPERATION
Four prime rules must be observed if your unit is to give the best possible service:
1. STABILISER
The importance of pool stabiliser cannot be over – emphasised. It is essential in helping retain chlorine
in your pool. Chlorine is rapidly dissipated by sunlight and the use of stabiliser will reduce this dissipation
substantially. Without stabiliser, it may be necessary to run the Unit for up to three times as long!
Stabilizer should be added at the rate of 500g (1.1 pounds) for every 10,000L (2,640 gallons) of water.
Stabilizer should be maintained at a level of 25-50ppm (mg/L). If a ORP controller is used, Stabilizer should
be maintained at a level of 15-25ppm (mg/L).. Before adding more stabiliser, have your pool water analysed
at your pool shop to ensure that you do not add too much. (FOR OUTDOOR POOLS ONLY, INDOOR DO
NOT REQUIRE STABILISER)
2. pH AND TOTAL ALKALINITY
A correct pH level must be maintained to prevent problems such as black spot, staining, cloudy water, etc. An
incorrect pH level can damage the pool. Correct pH levels are as follows; Fibreglass – 7.2 to 7.4; Concrete &
tiled – 7.4 to 7.6 If you allow the pH level to rise to 8.0 or above, the chlorine required could be as much as
three times the normal amount, in order to correctly sanitise the pool.
Total Alkalinity should not be confused with pH. Although the two are closely related, Total Alkalinity determines
the speed and ease of pH change. The ideal range is 80 – 150 ppm (mg/L) or, refer to your pool professional.
You should use a test kit which includes a test for Total Alkalinity. Low Total Alkalinity can cause unstable pH
levels. An inability to keep the pH constant may cause staining, etching and corrosion of metals. High Total
Alkalinity will cause constantly high pH levels and tends to encourage Calcium scaling.
26
Page 27
3. TDS LEVELS
WARNING: Some people recommend that you put salt directly in the skimmer box.
This is a poor practice as it allows very high concentrations of salt to be passed
through your ltration and other pool equipment.
Salt is the essential element by which your EcoSalt2 operates with. Insufficient Salt will damage your cell.
RECOMMENDED SALT LEVEL RANGE
EcoSalt2 model Operating salt level Add salt alarm
DES2-15EL, DES2-15USL,
DES2-25EL, DES2-25USL
DES2-15E, DES2-15US,
DES2-25E, DES2-25US,
DES2-35E, DES2-35US
WARNING: Do not add Hydrogen Peroxide to pool water or through swimming
pool hydraulic, or sanitiser system. Use of Hydrogen Peroxide will void warranty
on Davey products.
Salt is NOT used up in the chlorination process, or by evaporation. It is only lost through dilution caused
from: backwashing, splash-out, overflow, leakage from the pool, or plumbing. Heavy rain can dilute the salt
levels in your pool therefore, salt levels should be checked during these events.
1,500 – 6,000ppm ~ 1,500ppm
3,000 – 6,000ppm ~ 3,000ppm
ENGLISH
Low salt levels will destroy the coating on the cell plates and will void all Warranty.
The EcoSalt2 has a built-in warning indicator to minimise damage resulting from insufficient salt levels however,
the ultimate responsibility is on the owner to ensure adequate salt levels are maintained all year round.
4. RUNNING TIMES
These instructions cover EcoSalt2 for residential use only.
If you run your Sanitiser on maximum output for, 24 hours a day, or for longer periods, the cell life will be
greatly reduced. It is important that the correct model EcoSalt2 has been installed on your pool. Many
models are available from Davey to cope with small courtyard pools up to commercial size pools. (Consult
your local EcoSalt2 Dealer for more information).
Note: The EcoSalt2 warranty does not apply to commercial or semi-commercial applications, i.e. where the
pool chlorine demand is far in excess of a typical residential pool.
27
Page 28
CHLORINE PRODUCTION
The EcoSalt2 must be run daily to generate sufficient chlorine to sanitise the pool. During summer a typical
installation would require eight hours per day of chlorination. Depending on when you choose to run the
EcoSalt2, it is best to test the residual Chlorine in the pool at the point where you would anticipate the levels
be at their lowest. At that chosen time of the day, if the residual Chlorine level from your test is reading too
high, reduce the EcoSalt2 CHLORINE OUTPUT. Alternatively, if the residual Chlorine level from your test is
reading too low, increase the EcoSalt2 CHLORINE OUTPUT (refer to page 13). Correct chemical balances
(see page 29) are critical to ensure the EcoSalt2 performs correctly.
In cooler times of the year, it’s typically possible to reduce running hours of the EcoSalt2. Follow instruction
from your pool professional. Chlorine output can also be reduced throughout this time by entering WINTER
MODE, (see page 19).
“SHOCK” TREATMENT
Periodically, especially during extremely hot conditions, it may be necessary to boost the chlorine level in the
pool. This can be achieved by selecting BOOST MODE, which will run the system on full for 24 hours, (see
page 15). Alternatively, add either liquid, or granulated chlorine. If granulated chlorine is added, the cell must
be checked regularly, since the additives from this product can clog the electrodes.
CHLORINE TYPES AND COMPARISONS / MAX POOL SIZE
Many chlorinator manufacturers calibrate their units to compare with 65% granulated chlorine, making it
necessary to adjust their readings to a lower level in order to determine true chlorine production. Below is a
comparison table of the available types of chlorine used to sanitise pools.
ENGLISH
EcoSalt2
Model
DES2-15E(L)
DES2-15US(L)
DES2-25E(L)
DES2-25US(L)
DES2-35E(L)
DES2-35US(L)
NOTE: The appropriate EcoSalt2 for your pool is dependent on the local climate,
bather load of the pool and running times. Please note that the EcoSalt2 cell life can be
increased with shorter running times during winter and lower output settings. Davey
recommends the EcoSalt2 be run for between 6 - 8 hours a day during summer, and 4
hours during winter.
Maximum
production
grams (lb)
per hour
@ 100%
15
(0.03)
25
(0.06)
35
(0.07)
Production
@ 65%
equivalent in
grams (lb)
per hour
23
(0.05)
38
(0.08)
53
(0.12)
Chlorine
produced
over 8 hours
grams (lb)
per hour
120
(0.22)
200
(0.28)
280
(0.62)
Maximum Pool Size
Cool Climates
< 25ºC
(< 77ºF)
3
75m
(20,000 gal)
3
125m
(33,000 gal)
3
175m
(46,000 gal)
Temperate
Climates
25ºC to 30ºC
(77ºF to 86ºF)
3
58m
(15,000 gal)
3
96m
(25,000 gal)
3
134m
(35,000 gal)
Hot & Tropical
Climates
> 30ºC
(> 86ºF)
3
46m
(12,000 gal)
3
80m
(21,000 gal)
3
112m
(30,000 gal)
28
Page 29
GENERAL INFORMATION
POOL WATER CHEMISTRY INSTRUCTIONS
POOL
WATER
BALANCE
Ideal
reading
/ range
To increase
Free Chlorine
(ppm)
1.5 - 3
Increase
output of
sanitiser.
Add chlorine.
Increase
ltrationtime.
pH
Concrete &
tiled pools
7.4-7.6
Other surfaces
7.2-7.4
Add Soda
Ash (Sodium
Carbonate)
Total
Alkalinity TA
(ppm)
80 - 150
Add Buffer
(Sodium
Bicarbonate)
Calcium
Hardness
(ppm)
Concrete &
tiled pools
200-275
Other surfaces
100-225
Add Calcium
Chloride
Stabiliser -
Cyanuric Acid
(ppm)
25-50ppm
(15-25ppm if
used with an
ORP controller)
Not to be used
in indoor pools.
Add Cyanuric
Acid
ENGLISH
Recommended
salt Levels
(ppm)
Depends on
model (see
page 27)
Add salt
Decrease
To decrease
Frequency
of testing
output of
sanitiser.
Decrease
ltrationtime.
Weekly Weekly Weekly Weekly Regularly Regularly
Add
Hydrochloric
Acid
TROUBLE SHOOTING
No Chlorine Production - Check for:
1. No power to system
2. Insufficient flow from pump
3. Control set to manual off
4. CHLORINE OUTPUT set to “0” setting
5. Dirty cell
6. Filter needs back washing
7. Flow switch not connected or damaged
Add
Hydrochloric
Acid or Dry
Acid
Low Chlorine Production - Check for:
1. Dirty cell - clean if required
2. Filter needs back washing
3. Pool stabiliser too low
4. pH too high
5. Salt level too low
6. Running time inadequate
7. CHLORINE OUTPUT set too low
Partially drain
&rellpool
with lower
hardness
water to Dilute
Partially drain
&rellpoolto
dilute
Partially drain
&rellpoolto
dilute
8. Salt level too low triggering low salt cut-out
9. Main house fuse blown
10. Pump faulty
8. POOL COVER MODE accidently turned on
9. SPA COVER MODE accidently turned on
10. WINTER MODE accidently turned on
11. Pump faulty
12. Cell failing
13. Cell requires cleaning more than weekly
– refer to manual addendum:
https://www.daveywater.com/products/resources/
chlorinators/EcoSalt2_Addendum.pdf
29
Page 30
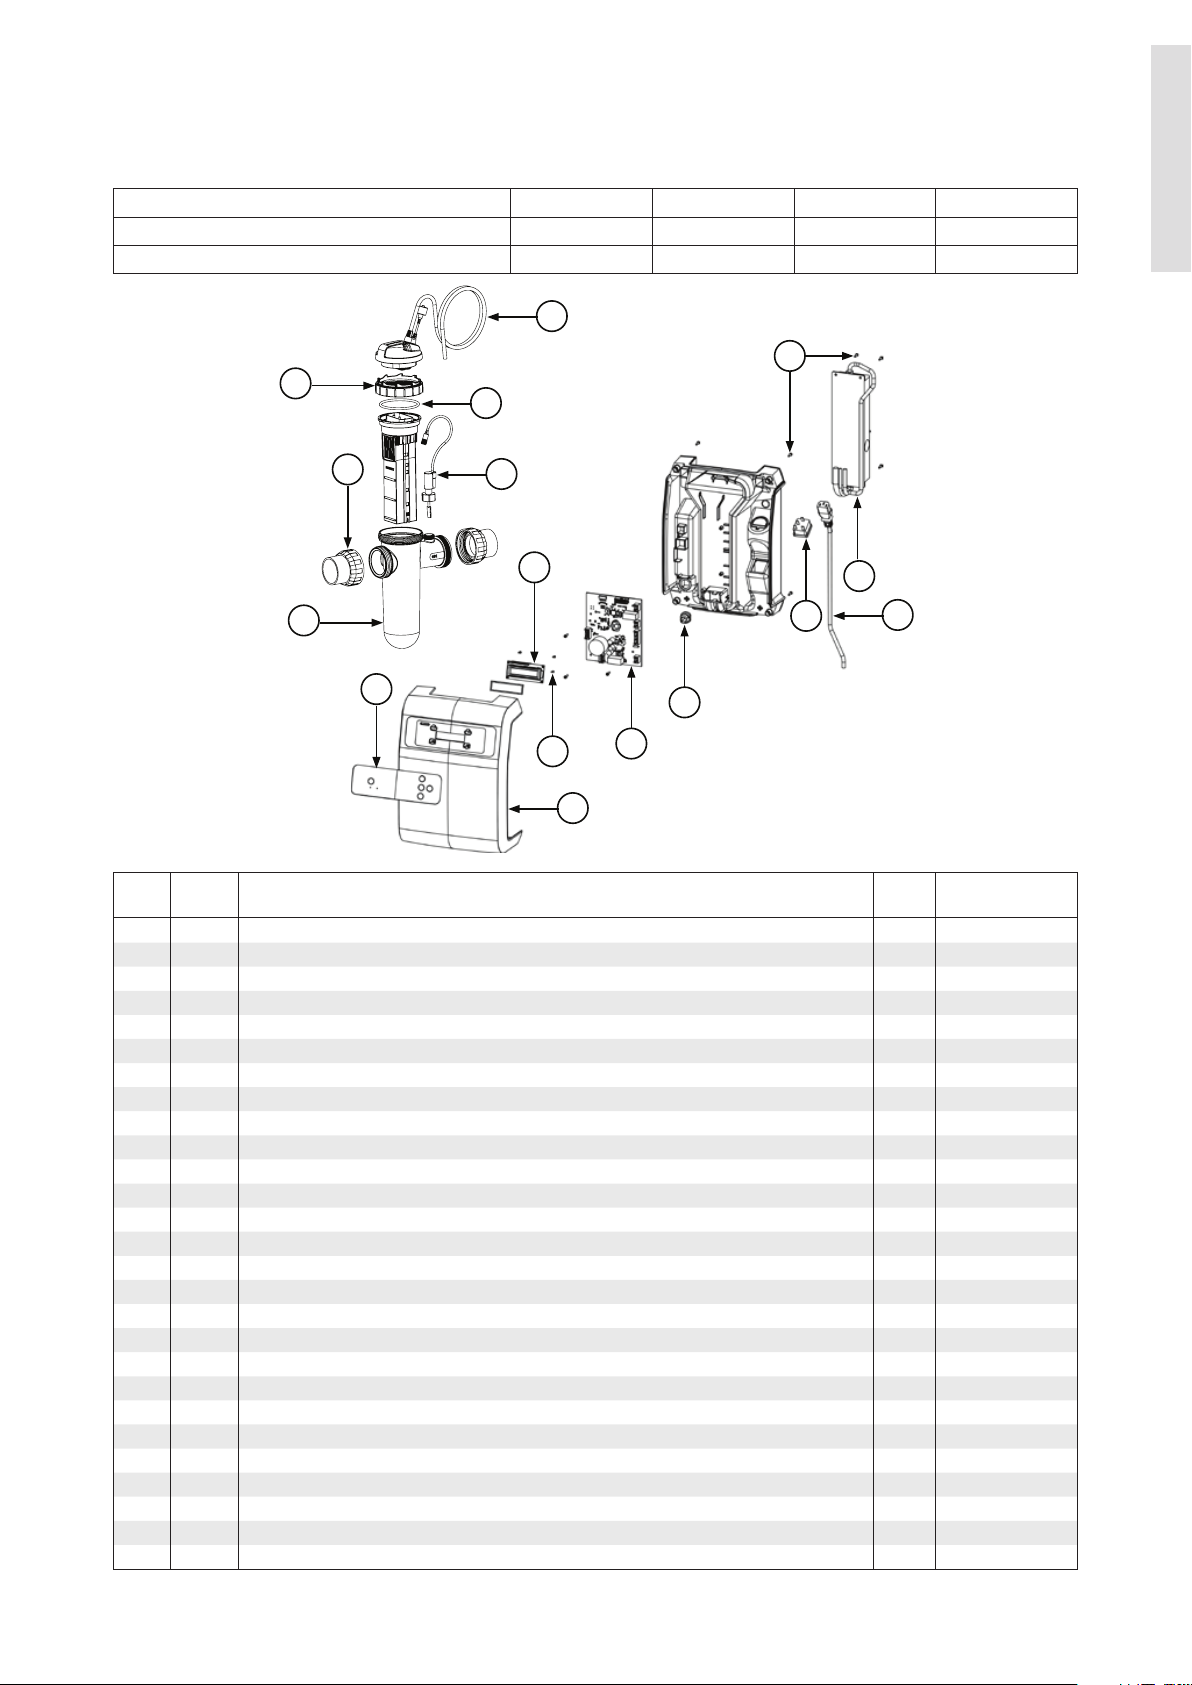
SPARE PARTS
DES2-25E DES2-25EL DES2-35E
SPARE PARTS EXPLODED DIAGRAM
15g/h system DES2-15E DES2-15EL DES2-15US DES2-15USL
125g/h system DES2-25E DES2-25EL DES2-25US DES2-25USL
35g/h system DES2-35E DES2-35US
1
7
2
3
ENGLISH
5
4
11
14
6
16
15
12
13
8
9
10
17
QTY
ITEM NOTES DESCRIPTION
1 Cell connection plug assy 1 33021
2 Cell locking ring 1 16058
3 O-ring - cell head 1 403377
4 Paddle switch 1 16102-3SP
5 Barrel union assembly - EU 2 48722B-1
5 Barrel union assembly - US 2 48722B
6 Cell body 1 16056
7 Screw 8 403625
8 Switch mode p/supply DES2-15E(L) & DES2-15US(L) 1 403368
8 Switch mode p/supply DES2-25E(L), DES2-25US(L), DES2-35E, DES2-35US 1 403369
9 Mains loom 1 16073
10 Power cord - EU 1 403371
10 Power cord - US 1 16190
12 Bush power cable 1 403372
13 PCB assy DES2-15E, DES2-15US 1 33005C-15ESP
13 PCB assy DES2-15EL, DES2-15USL 1 33005C-15ELSP
13 PCB assy DES2-25E, DES2-25US 1 33005C-25ESP
13 PCB assy DES2-25E, DES2-25US 1 33005C-25ELSP
13 PCB assy DES2-35E, DES2-35US 1 33005C-35ESP
14 PCB LCD & gasket 1 16046C
15 Screw LCD 4 403366
16 Control panel decal 1 16047
17 Front casing 1 16042
– Mounting kit 1 33040
– Blanking cap 1 16057-1
– O-ring - blanking cap 1 403377
– Reducing bush - EU only 2 403393
REQ’D PART NO.
30
Page 31

Davey Warranty (Inside the USA)
Davey Water Products come with guarantees that cannot be excluded under the local country Law. You are entitled to a
replacement, or refund for a major failure and compensation for any other reasonably foreseeable loss, or damage. You
are also entitled to have the goods repaired or replaced if the goods fail to be of acceptable quality and the failure does
not amount to a major failure.
Davey Water Products Pty Ltd (Davey) of 6 Lakeview Drive Scoresby VIC 3179 provides the following warranty in relation
to this product:
1. The guarantee period commences on either the date of installation or the original purchase of the equipment (whichever is the later). Evidence of this date must be provided when claiming repairs under guarantee. It is recommended
you retain all receipts in a safe place.
2. Davey products are warranted, subject to the exclusions and limitations below, to the original user only to be free of defects in material and workmanship for a period of 36 months from date of installation or sale with a proof of a receipt,
but no more than 48 months from the date of manufacture. Davey’s liability under this warranty shall be limited to
repairing or replacing at Davey’s option, without charge, FOB Davey’s authorized service agent. Davey will not be liable
for any cost of removal, installation, transport or any other charges that may arise in connection with the warranty
claim. Product eligible for repair or replacement by the authorized Davey service agent, in accordance with Davey’s
warranty terms, shall be shipped back to the customer from the service center at Davey’s cost.
3. This guarantee is subject to due compliance by the original purchaser with all directions and conditions set out in the
Installation and Operating Instructions. Failure to comply with these instructions, damage or breakdown caused by fair
wear and tear, negligence, misuse, accident, incorrect installation, inappropriate chemicals or additives in the water,
inadequate protection against freezing, rain or other adverse weather conditions, corrosive or abrasive water, lightning
or high voltage spikes or through unauthorized persons attempting repairs are not covered under guarantee. The
product must only be connected to the voltage shown on the nameplate.
4. Daveyshallnotbeliableforanylossofprotsoranyconsequential,indirectorspecialloss,damageorinjuryofany
kind whatsoever arising directly or indirectly from the product or any defect, and the purchaser shall indemnify Davey
against any claim by any other person whatsoever in respect of any such loss, damage or injury.
ENGLISH
5. Some states do not allow the exclusion or limitation of incidental or consequential damages or limitations on how long
animpliedwarrantylasts,sotheabovelimitationsorexclusionsmaynotapplytoyou.Thewarrantygivesyouspecic
legal rights and you may also have other rights which vary from state to state.
6. This guarantee applies to all states and territories of United States of America and Canada only.
® Davey and Torrium are registered trademarks of Davey Water Products Pty Ltd.
© Davey Water Products Pty Ltd 2020.
USA
Have installation questions or problems?
Need warranty?
Before returning this product to your dealer contact a Davey Authorized Service Centre in the USA by calling
866.328.7867 or visit daveywater.com
31
Page 32

Davey Warranty (Outside the USA)
Davey Water Products Pty Ltd (Davey) warrants all products sold will be (under normal use and service) free of defects in
material and workmanship for a minimum period of one (1) year from the date of original purchase by the customer as
markedontheinvoice,forspecicwarrantyperiodsforallDaveyproductsvisitdaveywater.com.
This warranty does not cover normal wear and tear or apply to a product that has:
• been subject to misuse, neglect, negligence, damage or accident
• been used, operated or maintained other than in accordance with Davey’s instructions
• notbeeninstalledinaccordancewiththeInstallationInstructionsorbysuitablyqualiedpersonnel
• beenmodiedoralteredfromoriginalspecicationsorinanywaynotapprovedbyDavey
• had repairs attempted or made by other than Davey or its authorised dealers
• been subject to abnormal conditions such as incorrect voltage supply, lightning or high voltage spikes, or damages from
electrolytic action, cavitation, sand, corrosive, saline or abrasive liquids,
The Davey warranty does not cover replacement of any product consumables or defects in products and components that
havebeensuppliedtoDaveybythirdparties(howeverDaveywillprovidereasonableassistancetoobtainthebenetofany
third-party warranty).
To make a warranty claim:
• If the product is suspected of being defective, stop using it and contact the original place of purchase. Alternatively, phone
Davey Customer Service or send a letter to Davey as per the contact details below
• Provide evidence or proof of date of original purchase
• If requested, return the product and/or provide further information with respect to the claim. Returning the product to
the place of purchase is at your cost and is your responsibility.
• The warranty claim will be assessed by Davey on the basis of their product knowledge and reasonable judgement and will
be accepted if:
- a relevant defect is found
- the warranty claim is made during the relevant warranty period; and
- none of the excluded conditions listed above apply
• Thecustomerwillbenotiedofthewarrantydecisioninwritingandiffoundtobeinvalidthecustomermustorganise
collection of the product at their expense or authorise its disposal.
If the claim is found to be valid Davey will, at its option, repair or replace the product free of charge.
The Davey warranty is in addition to rights provided by local consumer law. You are entitled to a replacement or refund for a
major failure and compensation for any other reasonably foreseeable loss or damage. You are also entitled to have the goods
repaired or replaced if the goods fail to be of acceptable quality and the failure does not amount to a major failure.
For any internet connected products the consumer is responsible for ensuring a stable internet connection. In the event of a
network failure the consumer will need to address the concern with the service provider. Use of an App is not a substitute for
the User’s own vigilance in ensuring the product is working to expectation. Use of a Smart Product App is at the User’s own
risk. To the fullest extent permitted by law Davey disclaims any warranties regarding the accuracy, completeness or reliability
of App data. Davey is not responsible for any direct or indirect loss, damage or costs to the User arising from its reliance on
internetconnectivity.TheUserindemniesDaveyagainstanyclaimsorlegalactionsfromthemorothersrelyingoninternet
connectivity or App data may bring in this regard.
Products presented for repair may be replaced by refurbished products of the same type rather than being repaired.
Refurbished parts may be used to repair the products. The repair of your products may result in the loss of any user-generated
data. Please ensure that you have made a copy of any data saved on your products.
Tothefullestextentpermittedbylaworstatute,Daveyshallnotbeliableforanylossofprotsoranyconsequential,indirect
or special loss, damage or injury of any kind whatsoever arising directly or indirectly from Davey products. This limitation does
not apply to any liability of Davey for failure to comply with a consumer guarantee applicable to your Davey product under
locallawsanddoesnotaectanyrightsorremediesthatmaybeavailabletoyouunderlocallaws.
For a complete list of Davey Dealers visit our website (daveywater.com) or call:
ENGLISH
NORTH AMERICA
Ph: 1-888-755-8654
Email: info@daveyusa.com
Davey Water Products Pty Ltd
Member of the GUD Group
ABN 18 066 327 517
NEW ZEALAND
7 Rockridge Avenue,
Penrose, Auckland 1061
Ph: 0800 654 333
Fax: 0800 654 334
Email: sales@dwp.co.nz
daveywater.com
AUSTRALIA
Head Offi ce
6 Lakeview Drive,
Scoresby, Australia 3179
Ph: 1300 232 839
Fax: 1300 369 119
Email: sales@davey.com.au
® Davey is a trademark of Davey Water Products Pty Ltd. © Davey Water Products Pty Ltd 2020.
EUROPE
ZAC des Gaulnes
355 Avenue Henri Schneider
69330 Meyzieu, France
Ph: +33 (0) 4 72 13 95 07
Fax: +33 (0) 4 72 33 64 57
Email: info@daveyeurope.eu
MIDDLE EAST
Ph: +971 50 6368764
Fax: +971 6 5730472
Email: info@daveyuae.com
32
P/N 403450-7
Page 33

Eco
®
2
Salt
Chlorungssystem Für
Salzbetriebene Pools
Model: DES2-15E, DES2-15EL, DES2-25E,
DES2-25EL & DES2-35E
Installations- und
Betriebsanweisungen
DEUTSCH
WARNUNG: Die Nichteinhaltung dieser Anleitungen und jeglicher in diesem
Zusammenhang geltenden Vorschriften kann schwerwiegende Personen-
und/oder Sachschäden nach sich ziehen.
Die Installation dieses Produkts sollte von einem kompetenten Schwimmbad-
Installateur und gemäß den Installationsanleitungen in dieser Betriebsanleitung
vorgenommen werden.
Bitte geben Sie diese Anweisungen an den Bediener dieser Anlage weiter.
Page 34

Eco
®
2
Salt
Herzlichen Glückwunsch! Sie sind von nun an der stolze Besitzer einer EcoSalt2 Anlage. Lesen Sie bitte alle
Informationen in dieser Betriebsanleitung sorgfältig durch, bevor Sie Ihre EcoSalt2 Anlage installieren und in
Betrieb nehmen.
Inhalt:
PACKLISTE .....................................................................................................................................................35
WICHTIGE SICHERHEITSANWEISUNGEN ..................................................................................................36
GÄNGIGE BEGRIFFE .....................................................................................................................................38
INSTALLATION DER EcoSalt2 ANLAGE ........................................................................................................38
ANSCHLUSS DER LINEAR ANGEORDNETEN ELEKTROLYSEZELLE AN DAS STROMAGGREGAT .......39
ANSCHLUSS DES STRÖMUNGSWÄCHTERS AN DAS ZELLENGEHÄUSE ...............................................39
VOR DER INBETRIEBNAHME .......................................................................................................................40
BETRIEB IHRER EcoSalt2 ANLAGE ..............................................................................................................40
BEDIENFELD ..................................................................................................................................................41
ERSTE INBETRIEBNAHME ............................................................................................................................41
NORMALE (TÄGLICHE) INBETRIEBNAHME ................................................................................................44
EIGENSCHAFTEN DER EcoSalt2 ANLAGE...................................................................................................45
INSTANDHALTUNG DES STROMAGGREGATS ...........................................................................................57
INSTANDHALTUNG DER ELEKTROLYSEZELLE ..........................................................................................57
TÄGLICHER BETRIEB....................................................................................................................................58
CHLORPRODUKTION ....................................................................................................................................60
ALLGEMEINE INFORMATIONEN ...................................................................................................................61
FEHLERSUCHE ..............................................................................................................................................61
ERSATZTEILE .................................................................................................................................................62
DEUTSCH
34
Page 35

PACKLISTE
Models | Modelle | Modelli | Modellen | Modelos | Modèles |:
DES2-15E, DES2-15EL, DES2-25E, DES2-25EL, DES2-35E,
DES2-15US(L), DES2-25US(L), DES2-35US
Quick Reference Guide | Salt Pool Chlorination System
Kurzanleitung | Desinfektionssystem unter verwendung des salzwassers
Guida rapida | Trattamento ad acqua salata
Korte handleiding | Badzout zwembad systemen
Guia rápido de referências | Tratamento da água da piscina com base na adição de sal
Guia de referencia rapida | Sistema de sal para piscinas
Guide de référence rapide | Electrolyseur de piscine au sel
EcoSalt
®
2
M
o
d
e
l
s
|
M
o
de
l
l
e
|
M
o
de
l
l
i
|
M
o
de
l
l
e
n |
M
o
de
l
o
s
|
M
o
dè
l
e
s |
:
DES
2-
15E, DE
S
2-
15EL
,
D
ES
2-
25E, DES
2-
25EL
, DES
2-
35E
Q
u
i
c
k
R
e
fe
re
n
c
e
Gu
id
e
|
Salt
P
o
o
l
C
h
lo
rin
atio
n
Syst
e
m
Kurza
nl
ei
t
un
g
| D
es
i
nf
ek
t
i
ons
syst
em unt
er verw
endung des
sa
l
zwa
ss
ers
G
u
i
d
a
rap
id
a
|
Tratt
a
m
e
n
to
ad
acq
u
a
sala
t
a
K
o
rte
h
an
d
l
e
id
in
g
|
B
ad
z
o
u
t
zwe
m
b
a
d
sy
st
e
m
e
n
G
u
i
a
r
á
p
i
d
o
d
e
r
efer
ê
n
c
i
a
s
|
T
r
a
ta
men
to d
a
á
gu
a
d
a
p
i
s
c
i
n
a
c
om
b
a
s
e
n
a
a
d
iç
ã
o
d
e
s
a
l
G
u
ia
d
e
re
fe
re
n
ci
a
ra
p
id
a
|
Sist
e
ma
d
e
sa
l
p
ara
p
isc
in
a
s
G
u
i
d
e
d
e
ré
f
é
re
n
ce
rap
id
e
|
El
e
c
t
ro
lyse
u
r
d
e
p
isci
n
e
au
se
l
EcoSalt
®
2
2
x
2
x
www
.
bit
.
ly
/
Ec
o
S
a
lt
2
2 x
EU ü
US Ï
2 x
www.bit.ly/EcoSalt2
Salt P
ool
C
hl
orinati
on System
M
o
del
s
:
DE
S
2-
15
E
,
DE
S
2-
15E
L
,
DE
S2-25E
,
DE
S2-
2
5E
L
&
DE
S2-35E
I
n
s
t
allat
ion and O
p
erat
ing
Ins
t
ru
ct
ions
T
h
e
i
n
s
t
a
l
l
a
t
i
o
n
o
f
t
h
i
s
p
r
o
d
u
ct
s
h
o
u
l
d
b
e
c
a
r
r
i
e
d
o
u
t
b
y
a
p
e
r
s
o
n
kn
o
wl
e
d
g
ea
b
l
e
i
n
s
wi
m
m
i
n
g
p
o
o
l
p
l
u
m
b
i
n
g
r
eq
u
i
r
em
e
n
t
s
f
o
l
l
o
wi
n
g
t
h
e
i
n
s
t
al
l
a
t
i
o
n
i
n
st
r
u
c
t
i
o
n
s
p
r
o
vi
d
e
d
i
n
t
h
i
s
m
a
n
u
al
.
W
A
R
N
I
N
G:
F
ai
l
u
r
e
t
o
f
o
l
l
o
w
t
h
es
e
i
n
s
t
r
u
ct
i
o
n
s
a
n
d
co
m
p
l
y
wi
t
h
a
l
l
a
p
p
l
i
ca
b
l
e
c
o
d
e
s
m
a
y
c
au
s
e
s
er
i
o
u
s
b
o
d
i
l
y
i
n
j
u
r
y
a
n
d
/
o
r
p
r
o
p
e
r
t
y
d
a
m
a
g
e
.
o
n
t
o
t
h
e
o
pe
r
a
t
or
of
t
h
i
s
e
qu
i
pm
e
n
t
.
EcoSalt
®
2
E
NGLI
S
H
1 x
1 x
1 x
1 x
1 x
1 x1 x 1 x
2 x
EU ü
US Ï
2 x
www.bit.ly/EcoSalt2
Salt Pool Chlorination System
Models: DES2-15E, DES2-15EL, DES2-25E,
DES2-25EL & DES2-35E
Installation and Operating
Instructions
The installation of this product should be carried out by a person knowledgeable
in swimming pool plumbing requirements following the installation instructions
provided in this manual.
WARNING: Failure to follow these instructions and comply with all applicable
codes may cause serious bodily injury and/or property damage.
EcoSalt
®
2
7 LANGUAGES
English, Deutsch, Italiano,
Nederlands, Português,
Español & Français
ENGLISH
1 x
1 x
1 x
1 x
1 x
1 x 1 x 1 x
Eco
Salt
®
2
Die nachstehenden Teile sollten im Lieferumfang Ihrer EcoSalt2 Anlage enthalten sein. Überprüfen Sie vor
der Installation der Anlage sorgfältig den Inhalt auf Vollständigkeit:
a. 1 x Stromversorgung mit Zellenkabel;
b. 1 x Strömungswächter;
c. 1 x Elektrolysezelle mit Gehäuse;
d. 1 x Zellen-Blindstopfen mit O-Ring;
e. 2 x Rohrverbinder mit Gewinde, Stutzen und
f. 2 x Keildichtungen;
g. 1 x Erdungsbolzen-Baugruppe;
h. 1 x Kurzanleitung;
i. 1 x Stromkabel; und
j. 1 x Packung Montageschrauben und Dübel
O-Ring;
a
b c d e f
g h i j
DEUTSCH
HINWEIS: Ihre EcoSalt2 Anlage ist nicht für die Verwendung durch Kleinkinder
oder gebrechliche Personen ohne Aufsicht ausgelegt. Bitte stellen Sie sicher, dass
Kleinkinder beaufsichtigt werden, um ein Spielen mit dem EcoSalt2 System zu
verhindern.
Die Netzanschlüsse und Verdrahtung müssen von einem qualizierten Elektriker
vorgenommen werden.
35
Page 36

WICHTIGE SICHERHEITSANWEISUNGEN
• Um das Risiko von Gasansammlungen in der Elektrolysezelle zu minimieren, ist
sicherzustellen, dass eine ausreichende Wassermenge durch die Elektrolysezelle strömt,
wenn die Anlage in Betrieb ist und Chlor produziert.
• Es ist überaus wichtig, dass Ihre Poolpumpe ausreichend Wasser durch das Zellengehäuse
ießen lässt, sodass das Zellengehäuse bei laufender Chlorierung komplett mit Wasser gefüllt ist.
• Überprüfen Sie das Paddel des Sicherheits-Strömungswächters regelmäßig, um sicherzustellen,
dass es sich sowohl in Vorwärts- als auch in Rückwärtsrichtung frei bewegen lässt.
ü
Schema A
KORREKTE FUNKTIONSWEISE
BEI LAUFENDER PUMPE
DEUTSCH
û
Schema B
INKORREKTE
FUNKTIONSWEISE
BEI LAUFENDER PUMPE
• Überprüfen Sie immer, ob es eine neuere Version der
Montage- und Betriebsanleitung für diese Produkte gibt.
Scannen Sie einfach den QR-Code, oder schauen Sie auf:
www.bit.ly/EcoSalt2
36
Page 37

WICHTIGE INFORMATIONEN
ZU IHRER ANLAGE EcoSalt2
FAKTOREN, DIE DAS LEISTUNGSVERMÖGEN UND DIE LEBENSDAUER IHRER EcoSalt2 ANLAGE ERHÖHEN.
BITTE LESEN SIE DIE FOLGENDEN ZEILEN VOR DER INBETRIEBNAHME IHRES ELEKTROLYSEGERÄTES
POOLBAUER:
Bitte sorgen Sie dafür, dass Ihr Kunde diese Informationen bei der „Übergabe-Sitzung“ erhält.
Elektrolysegeräte sind ein wertvoller Teil der Poolausstattung. Für optimale Leistungsvermögen
undLebensdaueristeinegewissePegenötig.EsgibtDREIHauptfaktorendieSchädenan
Ihrer EcoSalt2 Anlage verursachen und seine Lebensdauer verringern. Bitte überwachen Sie
die folgenden Faktoren in Übereinstimmung mit Ihrer Montage- und Betriebsanleitung.
1. AUFRECHTERHALTEN DES EMPFOHLENEN SALZGEHALTS
EMPFOHLENER BETRIEBSBEREICH: (siehe Seite 27)
• Betreiben Sie Ihre EcoSalt2 Anlage bei dem in diesem Dokument und auf dem Produkt
festgelegten Salzgehalt, um für
optimale Leistungsvermögen und Lebensdauer der Zelle zu sorgen;
• Der Betrieb der EcoSalt2 Anlage bei niedrigem Salzgehalt beschädigt die Elektrolysezelle
und verringert ihre Lebensdauer;
• Das Steuerfeld zeigt eine rot blinkende LED-Warnleuchte, wenn der Salzgehalt niedrig ist;
• Wenn keine Maßnahmen zur Korrektur des Salzgehaltes ergriffen werden, kann es zu
Schäden an der Zelle kommen, die nicht durch die Garantie gedeckt sind.
DEUTSCH
2. ÜBERWACHUNG & AUFRECHTERHALTUNG IHRER EcoSalt2
ELEKTROLYSEZELLE
Die EcoSalt2 Anlage besitzt eine linear angeordnete Elektrolysezelle mit
„Polaritätswechsel“.
• Um Ihre EcoSalt2 Anlage in bestmöglichem Zustand zu erhalten, wird eine regelmäßige
Überwachung der Zelle empfohlen. Die Zelle besteht aus einem durchsichtigen
Kunststoffgehäuse und enthält die Elektrodenplatten aus Titan.
• Bei der Chlorierung kann es kann es zu weißen pulverförmigen Kalkablagerungen auf den
Titanplatten in der Zelle kommen. Überwachen Sie den Zustand der Elektrolysezelle, um
übermäßigen Kalkablagerungen vorzubeugen. Übermäßige Kalkablagerungen führen zu
Schäden an der Zelle und zu erheblicher Minderung ihrer Wirksamkeit und Lebensdauer.
• Das Steuerfeld zeigt eine rot blinkende LED-Warnleuchte, wenn die Zelle einer Reinigung bedarf;
• Bitte reinigen Sie die Elektrolysezelle bei entstehenden Kalkablagerungen entsprechen der
Reinigungsanweisungen auf Seite 26.
• NIEMALS: konzentrierte Säure zur Reinigung Ihrer Zelle verwenden.
• NIEMALS: die Zelle für längere Zeit in Reinigungslösung lassen.
• NIEMALS: Metallwerkzeuge, Kratzer oder Bürsten zur Reinigung der Zelle verwenden.
3. AUSGEWOGENE POOLWASSER-CHEMIE
• Zur Optimierung von Leistungsvermögen und Lebensdauer MUSS ein korrekter Salzgehalt
aufrechterhalten werden (siehe Seite 27).
• Die Werte der Calciumhärte MÜSSEN innerhalb der idealen Bereiche von 200 - 275 ppm
(beiBeton-undgeiestenPools)und100 - 225 ppm(beianderenOberächen)gehalten
werden, um übermäßiger Kalkablagerung und Schäden an der Anlage vorzubeugen.
• Der pH-Wert MUSS auf Idealniveau gehalten werden, um Schäden an der Anlage und den
PooloberächenvorzubeugenundumdieWirksamkeitderChlorierungzuoptimieren.
• Die Werte der Gesamtalkalinität und des Stabilisators müssen ebenfalls im Idealbereich
gehalten werden.
Hinweis: Bitte ziehen Sie für weitere Informationen das Schaubild für die POOLWASSERCHEMIE auf Seite 29 zu Rate.
4. ERDUNGSBOLZEN-BAUGRUPPE
Bitte installieren Sie den mitgelieferten Erdungssensorbolzen (Punkt g.), um Streuströme zu
minimieren und die Lebensdauer Ihrer Elektrolysezelle zu verlängern.
37
Page 38

GÄNGIGE BEGRIFFE
Rücklaufleitung
zum Pool
Saugleitung
FILTER
PUMPE
ZUBEHÖR
230V STROMAGGREGAT
Algen Mikroskopische pflanzliche Lebensformen, die durch Regen, Wind und Staub in den Pool
gelangen. Es gibt zahlreiche Algenarten. Einige sind freischwimmend, während andere
an Wänden und in Rissen wachsen, und sie unterscheiden sich auch farblich.
Einige Algen sind gegenüber chemischer Behandlung resistenter als andere.
Bakterien Keime, die Ihren Pool kontaminieren. Sie stammen von Schwimmern, Staub,
Regenstürmen oder aus anderen Quellen.
Gleichgewicht des Wassers Das korrekte Verhältnis zwischen Mineralgehalt und pH-Wert, bei dem das
Poolwasser weder Korrosion noch Kalkablagerungen verursacht.
Chloramine Verbindungen, die durch Reaktion von Chlor und Stickstoff aus Urin, Schweiß usw. entstehen.
Chloramine verursachen Augen- und Hautreizungen sowie unangenehme Gerüche.
Chlorbedarf Die erforderliche Chlormenge zur Bekämpfung von Keimen, Algen und anderen
Schadstoffen im Pool.
Chlorüberschuss Die nach der Deckung des Chlorbedarfs verbleibende Chlormenge.
Sie entspricht dem Wert, den Sie mit Ihrem Poolwassertester erhalten.
Cyanursäure Auch bekannt als Stabilisator. Sie wirkt der durch direkte Sonneneinstrahlung
verursachten Verflüchtigung des Chlors entgegen.
Flüssigsäure Chemikalie zur Reduzierung des pH-Werts und der Gesamtalkalinität im Poolwasser
sowie zur Reinigung der Elektrolysezelle.
ppm Abkürzung für Parts Per Million (Teile von einer Million), die gängige Maßeinheit für die
chemische Konzentration im Poolwasser. 1 ppm = 1 mg/l.
INSTALLATION DER EcoSalt2 ANLAGE
INSTALLATION DES STROMAGGREGATS
Wählen Sie einen geeigneten, gut gelüfteten Installationsort mit einem Abstand von höchstens einem Meter von
der Filteranlage aus, und montieren Sie das Stromaggregat senkrecht an einem Pfosten oder einer Wand, und mit
einem Mindestabstand, der der Breite des EcoSalt2 Stromaggregats entspricht. Davey empfiehlt, das Stromaggregat
mehr als 3 Meter vom Poolwasser entfernt zu installieren. Schließen Sie das Stromaggregat der Pumpe und des
Elektrolysegeräts in eine geeignete Feuchtraumsteckdose. Gegebenenfalls besitzen manche Modellvarianten eine
3-polige Steckdose an der Unterseite des Stromaggregats für die Stromversorgung der Pumpe. Das Stromaggregat
muss von Säure und Lagerbereichen sonstiger Chemikalien ferngehalten werden. Säure und chemische
Dämpfe führen zur Korrosion der Elektronik im Stromaggregat. Ferner darf das Aggregat nicht in der Nähe von
Wärmequellen angebracht werden. Für die einwandfreie Funktion ist eine gute Belüftung notwendig.
Für eine schnelle und einfache Montage sind zwei selbstschneidende Schrauben und Wanddübel im
Lieferumfang enthalten.
Verwenden Sie einen 6mm-Steinbohrer zur Befestigung des Stromaggregats an einer Ziegel- oder Betonwand. Wenn Sie
das Aggregat an einem Pfosten montieren, bohren Sie zunächst Befestigungslöcher, und verwenden Sie die mitgelieferten
Schrauben. Die Löcher sollten sich im Abstand von 164 mm auf gleicher Höhe befinden. Sobald die Schrauben in
Position sind, hängen Sie das EcoSalt2-Netzteil einfach über die Halterungen an der Rückseite des Geräts auf. Für eine
ausreichende Wetterbeständigkeit sollte die Wand oder der Pfosten, an der EcoSalt2 montiert ist, flach und mindestens so
breit sein wie das EcoSalt2-Netzteil.
DEUTSCH
38
Page 39

INSTALLATION DER ELEKTROLYSEZELLE
Die EcoSalt2 Zelle sollte in Ihrer Anlage immer das letzte Glied sein. Stellen Sie sicher, dass die Zelle
nach allen Pumpen, Filtern und Heizgeräten installiert wird. Für einen optimalen Wirkungsgrad sollte die
EcoSalt2 Anlage so installiert werden, dass Wasserwirbel so weit wie möglich begrenzt werden. Keinen
90°-Bogen näher als 200 mm an der Rohrverschraubung am Einlass installieren. Absperrventile unterhalb
des Beckenwasserspiegels sollten ebenfalls nicht näher als 200 mm vor der Rohrverschraubung am Einlass
installiert werden. Diese Maßnahme unterstützt laminare Strömung.
ANSCHLUSS DER LINEAR ANGEORDNETEN ELEKTROLYSEZELLE AN
DAS STROMAGGREGAT
Die EcoSalt2 Wasserreinigungsanlage auf Salzbasis verwendet eine linear angeordnete Elektrolysezelle
mit Polaritätswechsel für wartungsarmen Betrieb. Das EcoSalt2 Stromaggregat verfügt über ein flexibles
Kabel, an dessen Ende sich kunststoffummantelte Steckverbinder für die Zelle befinden. Die drei in Reihe
angeordneten Anschlüsse sind nicht polaritätsgebunden. Je nach Einbausituation kann es notwendig sein,
das Zellengehäuse manuell von unten zu stützen.
DEUTSCH
HINWEIS: Die EcoSalt2 Elektrolysezelle ist mit einem Paddel-Strömungswächter ausgestattet,
der entsprechend der Abbildung auf Seite 4 an der Elektrolysezelle zu montieren und über den
Anschluss am Kabelende an die Führung anzuschließen ist.
WICHTIG: Der Strömungswächter muss so montiert werden, dass der seitlich am
Wächter hervorgehobene Pfeil in Fließrichtung zeigt.
ANSCHLUSS DES STRÖMUNGSWÄCHTERS AN DAS ZELLENGEHÄUSE
Stellen Sie sicher, dass der Strömungswächter im Zellengehäuse installiert ist.
Stellen Sie sicher, dass die Richtung des Strömungswächters korrekt ist (siehe Seite 4).
Montiert
39
Page 40

VOR DER INBETRIEBNAHME
Bitte stellen Sie sicher, dass vor der Inbetriebnahme Ihres EcoSalt2 Chlorungssystems Ihrem Poolwasser
die folgende Menge an Salz zugegeben wurde.
• POOLSALZ:
Zur Erhöhung
des Salzgehalts
von
Benötigte Salzmenge
ppm %
30 000 l 40 000 l 50 000 l 60 000 l 70 000 l 80 000 l 90 000 l 100 000 l
kg lbs kg lbs kg lbs kg lbs kg lbs kg lbs kg lbs kg lbs
1 000 0,1 30 66 40 88 50 110 60 132 70 154 80 176 90 198 100 220
2 000 0,2 60 132 80 176 100 220 120 265 140 309 160 353 180 397 200 441
3 000 0,3 90 198 120 265 150 331 180 397 210 463 240 529 270 595 300 661
4 000 0,4 120 265 160 353 200 441 240 529 280 617 320 705 360 794 400 882
5 000 0,5 150 331 200 441 250 551 300 661 350 772 400 882 450 992 500 1 102
6 000 0,6 180 397 240 529 300 661 360 794 420 926 480 1 058 540 1 190 600 1 323
• CHLOR: Geben Sie bei einer noch nicht gechlorten, neuen Poolinstallation ausreichend Chlor zu (flüssig
oder als Granulat), bis Sie (unter Zuhilfenahme eines geeigneten Testkits) einen Wert von 3 ppm zu
erreichen. Oder lassen Sie das EcoSalt2 Chlorungssystem für salzbetriebene Pools ca. 24 Stunden lang,
oder bis ein Wert von 3 ppm erreicht ist, durchgehend im BOOST MODUS laufen.
• STABILISATOR: Es ist überaus wichtig, Pool-Stabilisator zuzugeben und dessen Anteil ständig bei 25 50 ppm zu halten (NUR FÜR POOLS IM AUSSENBEREICH). Bei Systemen, deren Redoxpotential/ORP
kontrolliert wird, sollte der Anteil an Stabilisator bei 15 - 25 ppm gehalten werden.
• (Weitere Informationen im Kapitel „Täglicher Betrieb“ auf Seite 27).
BETRIEB IHRER EcoSalt2 ANLAGE
Die Chlorabgabe wird in Prozent angegeben. Stellen Sie die EcoSalt2 Anlage auf den gewünschten
Prozentwert. Die Chlorabgabe der Elektrolysezelle wird dadurch automatisch an diesen Sollwert angepasst.
Die Anlage ist mit einer elektronischen Steuerungs- und Warnanlage ausgestattet. Diese reguliert die
Chlorabgabe der EcoSalt2 Anlage auf den voreingestellten Maximalwert und zeigt die Polaritätsänderung der
Elektrolysezelle durch + und - auf dem Digitaldisplay an. Die Polarität ändert sich über einen mehrstündigen
Chlorierungszeitraum hinweg, der nicht unbedingt mit dem Pumpenbetrieb übereinstimmt. Die Warnanlage
besteht aus einer LED-Betriebsanzeige, die bei Normalbetrieb grün leuchtet, und rot, um den Benutzer auf
etwas aufmerksam zu machen - siehe Problembehandlung auf Seite 21.
DEUTSCH
40
Page 41

BEDIENFELD
ANSICHT
Manuell ein/aus
100% – 09:29 AM
AN
DEUTSCH
Betriebsanzeige
(leuchtet wenn EcoSalt2 an)
Menü auf/ab
Menü/Einstellung wählen
Menü/Einstellung annullieren (zurück gehen)
Alarmanzeige
(blinkt wenn Alarm aktiv)
Zeitüberschreitung
(jedes Mal, wenn das Gerät mehr als
30 Sekunden auf eine Eingabe seitens
des Benutzers wartet, Speicherung der
Einstellungen und Anzeige der Startseite)
ERSTE INBETRIEBNAHME
Sobald der vorgegebene Salzgehalt im Pool erreicht ist, kann die Anlage eingeschaltet werden.
Hinweis: Nach Einschalten der Anlage dauert es einen kleinen Moment, bevor die Elektrolysezelle
den Betrieb aufnimmt, da zuerst überprüft wird, ob die Filteranlage Wasser enthält.
• Bei der ersten Inbetriebnahme der EcoSalt2 Anlage wird folgender Bildschirm beim Hochfahren angezeigt:
DAVEY
V1.2.1 EU 15L
> Hier werden die Softwareversion (hier im Beispiel v1.2.1) und Ihr EcoSalt2 Modell (hier im Beispiel EU
15L, d.h. DES2-15EL) angezeigt.
• Das Display geht dann automatisch auf folgenden Bildschirm über:
41
Page 42

3. SPRACHE
DEUTSCH
> Dieser Bildschirm zeigt das Sprachenmenü und die aktuell eingestellte Sprache (hier im Bsp. Englisch);
> Die eingestellte Sprache kann durch das Drücken auf die Tasten
die einen Bildlauf durch die verfügbaren Sprachen ermöglichen;
> Drücken Sie
> Bei irrtümlicher Wahl kann die Einstellung später wieder geändert werden.
• Das Display geht dann automatisch auf folgenden Bildschirm über:
Menü/Einstellung wählen, sobald die von Ihnen gewünschte Sprache angezeigt wird;
Menü auf/ab geändert werden,
4. ZEITFORMAT
12 STD
> Dieser Bildschirm zeigt das Menü für das Zeitformat und das aktuelle Zeitformat an (hier im Bsp. 12 Std.);
> Das Zeitformat kann durch das Drücken auf die Tasten
Umschalten zwischen 12 und 24 Std. ermöglichen;
Menü auf/ab geändert werden, die ein
DEUTSCH
> Drücken Sie auf
> Bei irrtümlicher Wahl kann die Einstellung später wieder geändert werden.
• Das Display geht dann automatisch auf folgenden Bildschirm über:
Menü/Einstellung wählen, sobald das von Ihnen gewünschte Zeitformat angezeigt wird;
1. UHR
07:34 PM
> Dieser Bildschirm zeigt die aktuelle Uhrzeit an (hier im Bsp. 07:34PM);
> Zu Beginn blinken die Stunden;
> Die Stunden können durch das Drücken auf die Tasten
42
Menü auf/ab geändert werden, die einen
Page 43

Bildlauf bis zur gewählten Zeit hin ermöglichen;
> Drücken Sie auf
> Bei irrtümlicher Wahl kann die Einstellung später wieder geändert werden.
> Danach blinken die Minuten;
> Die Minuten können durch das Drücken auf die Tasten Menü auf/ab geändert werden, die einen
Bildlauf bis zur gewählten Zeit hin ermöglichen;
> Drücken Sie auf Menü/Einstellung wählen, sobald die von Ihnen gewünschte Minute angezeigt wird;
> Bei irrtümlicher Wahl kann die Einstellung später wieder geändert werden.
> Danach blinkt der AM/PM-Zusatz;
> Der AM/PM-Zusatz kann durch das Drücken auf die Tasten Menü auf/ab geändert werden, die ein
Umschalten zwischen AM und PM ermöglichen;
> Drücken Sie auf Menü/Einstellung wählen, sobald der von Ihnen gewünschte AM/PM-Zusatz
angezeigt wird;
> Bei irrtümlicher Wahl kann die Einstellung später wieder geändert werden.
• Das Display geht dann automatisch auf folgenden Bildschirm über:
Menü/Einstellung wählen, sobald die von Ihnen gewünschte Stunde angezeigt wird;
DEUTSCH
2. DATUM
01 JAN 2000
> Dieser Bildschirm zeigt das Menü für das Datumformat und das aktuelle Datum an (hier im Bsp. 01 JAN 2000);
> Zu Beginn blinkt das Tagesdatum;
> Das Tagesdatum kann durch das Drücken auf die Tasten
Bildlauf bis zum gewählten Tagesdatum hin ermöglichen;
> Drücken Sie auf
angezeigt wird;
> Bei irrtümlicher Wahl kann die Einstellung später wieder geändert werden.
> Danach blinkt das Monatsdatum;
> Das Monatsdatum kann durch das Drücken auf die Tasten
einen Bildlauf bis zum gewählten Monatsdatum hin ermöglichen;
> Drücken Sie auf
angezeigt wird;
> Bei irrtümlicher Wahl kann die Einstellung später wieder geändert werden.
> Danach blinkt das Jahresdatum;
Menü/Einstellung wählen, sobald das von Ihnen gewünschte Tagesdatum
Menü/Einstellung wählen, sobald das von Ihnen gewünschte Monatsdatum
Menü auf/ab geändert werden, die einen
Menü auf/ab geändert werden, die
> Das Jahresdatum kann durch das Drücken auf die Tasten
einen Bildlauf bis zum gewählten Jahresdatum hin ermöglichen;
> Drücken Sie auf
angezeigt wird;
> Bei irrtümlicher Wahl kann die Einstellung später wieder geändert werden.
• Das Display kehrt dann automatisch zum STARTBILDSCHIRM zurück:
Menü/Einstellung wählen, sobald das von Ihnen gewünschte Jahresdatum
43
Menü auf/ab geändert werden, die
Page 44

100% – 09:29 AM
AN
> Dieser Bildschirm zeigt:
■ den Sollwert für die gängige Chlorabgabe (hier im Bsp. 100%);
■ aktuell eingestellte Uhrzeit;
■ aktueller Betriebszustand (hier im Bsp. ON).
NORMALE (TÄGLICHE) INBETRIEBNAHME
Hinweis: Nach Einschalten der Anlage dauert es einen kleinen Moment, bevor die Elektrolysezelle
den Betrieb aufnimmt, da zuerst überprüft wird, ob die Filteranlage Wasser enthält.
• Bei jedem Einschalten der EcoSalt2 Anlage wird folgender Bildschirm beim Hochfahren angezeigt:
DAVEY
V1.2.1 EU 15L
DEUTSCH
• Das Display kehrt dann automatisch zum STARTBILDSCHIRM zurück:
100% – 09:29 AM
AN
> Dieser Bildschirm zeigt:
■ den Sollwert für die gängige Chlorabgabe (hier im Bsp. 100%);
■ aktuell eingestellte Uhrzeit;
■ aktueller Betriebszustand (hier im Bsp. ON).
44
Page 45

EIGENSCHAFTEN DER EcoSalt2 ANLAGE
STEUERUNG DER CHLORABGABE
65% – 09:35 AM
AN
Die CHLORABGABE steuert die Zeit, in der die Elektrolysezelle Chlor produziert, und zwar als prozentualer
Anteil der gesamten Zeit, in der die EcoSalt2 Anlage eingeschaltet ist. Wenn die EcoSalt2 Elektrolysezelle
produziert, dann tut sie das zu 100%, außer bei anderweitigen Veränderungen (siehe Abschnitte WINTER-
MODUS, oder WELLNESS-MODUS). Die Laufzeit der Elektrolysezelle wird im Weiteren als „ZellenBetriebszyklus“ bezeichnet.
Beispiele:
• Wenn die EcoSalt2 Anlage 8 Stunden pro Tag eingeschaltet ist und die CHLORABGABE auf 50% steht,
dann beträgt der EcoSalt2 Zellen-Betriebszyklus nur 4 Stunden an diesem Tag;
• Wenn die EcoSalt2 Anlage 8 Stunden pro Tag eingeschaltet ist und die CHLORABGABE auf 25% steht,
dann beträgt der EcoSalt2 Zellen-Betriebszyklus nur 2 Stunden an diesem Tag.
Zur Regelung der CHLORABGABE:
DEUTSCH
70% – 09:35 AM
CHLORLEISTUNG
> Drücken Sie die Tasten Menü auf/ab, um einen Bildlauf bis zur gewünschten CHLORABGABE
hin zu ermöglichen;
> Die Einstellungen ändern den Zellen-Betriebszyklus in Schritten von je 5%;
> Drücken Sie auf Menü/Einstellung wählen, sobald die von Ihnen gewünschte CHLROABGABE
angezeigt wird;
> Das führt sie dann wieder zum STARTBILDSCHIRM zurück.
AKTIVIEREN DES ABDECKUNGS-MODUS
Wie stark ein Pool UV-Strahlung ausgesetzt ist hat großen Einfluss darauf, wie hoch sein Chlorbedarf ist,
d.h. welche Menge an Chlor er verbraucht. Eine übermäßige Chlormenge in einem abgedeckten Pool kann
die Lebensdauer der Poolabdeckung deutlich verringern, wenn diese für längere Zeit verwendet wird (etwa
mehrere Wochen). Das Einschalten des ABDECKUNGS-MODUS verringert den Zellen-Betriebszyklus um
80% seines gängigen Wertes.
Beispiele:
• Wenn die EcoSalt2 Anlage 8 Stunden pro Tag eingeschaltet ist und die CHLORABGABE auf 50% steht,
der ABDECKUNGS-MODUS aber eingeschaltet ist, dann beträgt der EcoSalt2 Zellen-Betriebszyklus nur
48 Minuten an diesem Tag;
• Wenn die EcoSalt2 Anlage 8 Stunden pro Tag eingeschaltet ist und die CHLORABGABE auf 25% steht,
der ABDECKUNGS-MODUS aber eingeschaltet ist, dann beträgt der EcoSalt2 Zellen-Betriebszyklus nur
24 Minuten an diesem Tag.
45
Page 46

Einstellen des ABDECKUNGS-MODUS:
70% – 09:35 AM
CHLORLEISTUNG
> Drücken Sie vom STARTBILDSCHIRM aus Menü/Einstellung wählen.
> Das Display zeigt folgenden Bildschirm:
MODUS
1. ABDECKUNG
DEUTSCH
> Drücken Sie von diesem Bildschirm aus Menü/Einstellung wählen, um zum Menü des
Abdeckungs-Modus zu gelangen;
> Das Display zeigt die aktuelle Einstellung des ABDECKUNGS-MODUS (hier im Bsp.ABDECKUNGS-
MODUS aus):
1. ABDECKUNG
AUS
> Drücken Sie die Tasten Menü auf/ab, um zwischen ABDECKUNGS-MODUS ein und aus
umzuschalten;
> Drücken Sie auf
MODUS angezeigt wird;
> Das führt sie dann wieder zum ersten Einstellmenü zurück.
Menü/Einstellung wählen, sobald der von Ihnen gewünschte ABDECKUNGS-
> Wenn die EcoSalt2 Anlage über ~30 Sekunden lang unberührt bleibt, oder die Taste
Einstellung annullieren (zurück gehen) gedrückt wird, kehrt das Display zum
STARTBILDSCHIRM zurück.
46
Menü/
Page 47

Der ABDECKUNGS-MODUS kann auch
ferngesteuert über die Steuerung für eine
automatische Poolabdeckung ausgelöst
werden. Durch das Schließen der Klemmleiste
an der Rückseite des Stromaggregats
schaltet die EcoSalt2 Anlage ferngesteuert
auf den ABDECKUNGS-MODUS. Dies
kann durch ein Eingreifen des Benutzers
aufgehoben werden, indem die vorstehend
beschriebenen Schritte befolgt werden.
DEUTSCH
AKTIVIEREN DES BOOST-MODUS
Bei zahlreichen Badegästen, großer Verschmutzung oder extrem warmem Wetter, kann es zu einem Bedarf an
besonders starker Chlorierung des Pools kommen. Das Einschalten des BOOST-MODUS erhöht den ZellenBetriebszyklus unabhängig von der gängigen Abgabe der Zelle für einen Zeitraum von 24 Stunden auf 100%.
Einstellen des BOOST-MODUS:
70% – 09:35 AM
CHLORLEISTUNG
> Drücken Sie vom STARTBILDSCHIRM aus Menü/Einstellung wählen.
> Das Display zeigt folgenden Bildschirm:
47
Page 48

MODUS
1. ABDECKUNG
> Drücken Sie die Tasten Menü auf/ab, um auf den BOOST-MODUS umzuschalten;
MODUS
2. BOOST
> Drücken Sie Menü/Einstellung wählen;
2. BOOST
AUS
DEUTSCH
> Das Display zeigt die aktuelle Einstellung des BOOST-MODUS (hier im Bsp.BOOST-MODUS aus):
> Drücken Sie die Tasten
Menü auf/ab, um zwischen BOOST-MODUS ein und aus umzuschalten;
48
Page 49

2. BOOST
AN
> Drücken Sie auf Menü/Einstellung wählen, sobald der von Ihnen gewünschte BOOST-MODUS
angezeigt wird;
> Das führt sie dann wieder zum ersten Einstellmenü zurück.
> Wenn die EcoSalt2 Anlage über ~30 Sekunden lang unberührt bleibt, oder die Taste
Einstellung annullieren (zurück gehen) gedrückt wird, kehrt das Display zum STARTBILDSCHIRM
zurück.
Menü/
50% – 09:40 AM
BOOST
> Der STARTBILDSCHIRM zeigt weiterhin den Prozentsatz des Zellen-Betriebszyklus an, allerdings fällt
ins Auge, dass der Wert „ON“ (Ein) nun durch den Wert „BOOST“ ersetzt wurde. Diese Einstellung bleibt
24 Stunden lang gültig;
> Der Zellen-Betriebszyklus kann während des 24-stündigen Boost-Zeitraums geändert werden, und der
auf der STARTSEITE angezeigte Prozentsatz ändert sich dementsprechend. Das kann sich als praktisch
erweisen, wenn die Einstellung am Tag nach der Beendigung des BOOST-MODUS einer Änderung
bedarf;
> Allerdings wird darauf hingewiesen, dass der BOOST-MODUS Vorrang vor allen anderen Einstellungen
hat. Während des 24-stündigen Zeitraums, in dem der BOOST-MODUS aktiv ist, produziert die
Elektrolysezelle zu 100% und der normale Betriebszykus wird auf 100% hochgefahren. Dies geschieht
unabhängig von der Bildschirmanzeige.
DEUTSCH
AKTIVIEREN DES WELLNESS-MODUS
Das EcoSalt2 System ist sowohl mit Anwendungen für große Schwimmbäder kompatibel als auch mit
viel kleineren Wellness-Anwendungen. Das Einschalten des WELLNESS-MODUS verringert den ZellenBetriebszyklus um 80% seines gängigen Sollwertes.
Beispiele:
• Wenn die EcoSalt2 Anlage 10 Stunden pro Tag eingeschaltet ist und die CHLORABGABE auf 50% steht,
der WELLNESS-MODUS aber eingeschaltet ist, dann beträgt der EcoSalt2 Zellen-Betriebszyklus nur 1
Stunde an diesem Tag;
• Wenn die EcoSalt2 Anlage 10 Stunden pro Tag eingeschaltet ist und die CHLORABGABE auf 25% steht,
der WELLNESS-MODUS aber eingeschaltet ist, dann beträgt der EcoSalt2 Zellen-Betriebszyklus nur 30
Minuten an diesem Tag.
49
Page 50

Einstellen des WELLNESS-MODUS:
70% – 09:35 AM
CHLORLEISTUNG
> Drücken Sie vom STARTBILDSCHIRM aus Menü/Einstellung wählen.
> Das Display zeigt folgenden Bildschirm:
MODUS
1. ABDECKUNG
DEUTSCH
> Drücken Sie die Tasten Menü auf/ab, um auf den WELLNESS-MODUS umzuschalten;
MODUS
3. SPA
> Drücken Sie von diesem Bildschirm aus Menü/Einstellung wählen, um zum Menü des WELLNESS-
MODUS zu gelangen;
> Das Display zeigt die aktuelle Einstellung des WELLNESS-MODUS (hier im Bsp.WELLNESS-MODUS aus):
3. SPA
AUS
50
Page 51

> Drücken Sie die Tasten
aus umzuschalten;
Menü auf/ab, um zwischen WELLNESS-MODUS ein und
> Drücken Sie auf
WELLNESS-MODUS angezeigt wird;
> Das führt sie dann wieder zum ersten Einstellmenü zurück;
> Wenn die EcoSalt2 Anlage über ~30 Sekunden lang unberührt bleibt, oder die Taste
Einstellung annullieren (zurück gehen) gedrückt wird, kehrt das Display zum
STARTBILDSCHIRM zurück.
GLEICHZEITIGES AKTIVIEREN VON WELLNESS-MODUS UND ABDECKUNGS-MODUS
Sollte es sich als notwendig erweisen, den WELLNESS-MODUS und den ABDECKUNGS-MODUS
gleichzeitig zu betreiben, wird der Zellen-Betriebszyklus lediglich um 80% verringert. Das heißt, der ZellenBetriebszyklus wird nach einer ersten Verringerung um 80% nicht um weitere 80% verringert. Die Anzeige
auf dem STARTBILDSCHIRM schaltet zwischen ABDECKUNGS und WELLNESS hin und her.
AKTIVIEREN DES WINTER-MODUS
Wenn das System im Winter heruntergefahren wird, schalten Sie entweder den EcoSalt2
aus oder ändern Sie die Chlorleistung auf 0%.
Wie stark ein Pool UV-Strahlung ausgesetzt ist hat großen Einfluss darauf, wie hoch sein Chlorbedarf ist,
d.h. welche Menge an Chlor er verbraucht. Die Anzahl der Badegäste hat ebenfalls großen Einfluss auf den
Gesamt-Chlorbedarf. Im Winter ist der Chlorbedarf des Pools normalerweise weitaus geringer. Solange die
Elektrolysezelle Chlor produziert und anderweitig nichts verändert wurde, beträgt die Abgabe grundsätzlich
100%. Beim WINTER-MODUS verringert sich die gängige Abgabe der Zelle auf 85%.
Menü/Einstellung wählen, sobald der von Ihnen gewünschte
Menü/
DEUTSCH
Beispiele:
• Wenn die EcoSalt2 Anlage 10 Stunden pro Tag eingeschaltet ist, die CHLORABGABE auf 100% steht und
der WINTER-MODUS ausgeschaltet ist, dann beträgt der EcoSalt2 Zellen-Betriebszyklus 10 Stunden; Die
Elektrolysezelle läuft mit einer Kapazität von 100%;
• Wenn die EcoSalt2 Anlage 10 Stunden pro Tag eingeschaltet ist und die CHLORABGABE auf 100% steht,
der WINTER-MODUS aber eingeschaltet ist, dann beträgt der EcoSalt2 Zellen-Betriebszyklus zwar immer
noch 10 Stunden, aber die Kapazität der Zelle ist auf 85% verringert;
Einstellen des WINTER-MODUS:
70% – 09:35 AM
CHLORLEISTUNG
> Drücken Sie vom STARTBILDSCHIRM aus Menü/Einstellung wählen.
51
Page 52

> Das Display zeigt folgenden Bildschirm:
MODUS
1. ABDECKUNG
> Drücken Sie die Tasten Menü auf/ab, um auf den WINTER-MODUS umzuschalten;
MODUS
4. WINTER
DEUTSCH
> Drücken Sie von diesem Bildschirm aus Menü/Einstellung wählen, um zum Menü des WINTER-
MODUS zu gelangen;
> Das Display zeigt die aktuelle Einstellung des WINTER-MODUS (hier im Bsp.WINTER-MODUS aus):
4. WINTER
AUS
> Drücken Sie die Tasten Menü auf/ab, um zwischen WINTER-MODUS ein und aus umzuschalten;
> Drücken Sie auf
angezeigt wird;
> Das führt sie dann wieder zum ersten Einstellmenü zurück;
> Wenn die EcoSalt2 Anlage über ~30 Sekunden lang unberührt bleibt, oder die Taste
Einstellung annullieren (zurück gehen) gedrückt wird, kehrt das Display zum
STARTBILDSCHIRM zurück.
Menü/Einstellung wählen, sobald der von Ihnen gewünschte WINTER-MODUS
Menü/
52
Page 53

ALARMZUSTAND DURCHFLUSS GERING
Sollte der Strömungswächter der EcoSalt2 Anlage eine Durchflussrate von weniger als 3,6 m3/h (60l/min)
feststellen, dann schaltet die EcoSalt2 Anlage in den ALARMZUSTAND DURCHFLUSS GERING:
ALARM
GERINGER FLUSS
DEUTSCH
Im ALARMZUSTAND DURCHFLUSS GERING produziert die EcoSalt2 Anlage kein Chlor. Sobald der
Strömungswächter wieder Durchflussraten von 3,6 m
den Normalbetrieb zurück. Für einen optimalen Wirkungsgrad sollte die EcoSalt2 Anlage so installiert werden, dass
Wasserwirbel so weit wie möglich begrenzt werden. Keinen 90°-Bogen näher als 200mm an der Rohrverschraubung
am Einlass installieren. Absperrventile unterhalb des Beckenwasserspiegels sollten ebenfalls nicht näher als 200mm
vor der Rohrverschraubung am Einlass installiert werden. Diese Maßnahme unterstützt laminare Strömung.
ALARMZUSTAND SALZ HINZUFÜGEN
Sollte die EcoSalt2 Anlage in der Elektrolysezelle geringes Leitvermögen feststellen, kann das durch
eine geringe Wassertemperatur (unter 15ºC) ausgelöst worden sein oder durch eine Salzkonzentration
unterhalb des Minimalwertes (siehe Abschnitt für empfohlene Salzmenge in vorliegender Betriebsanleitung).
Die EcoSalt2 Anlage schaltet dann in den ALARMZUSTAND SALZ HINZUFÜGEN. Bei geringeren
Temperaturen kann eine erhöhte Salzzugabe hilfreich sein. Allerdings sollte auch der maximale Salzgehalt
berücksichtigt werden, und bei zu geringen Wassertemperaturen sollte die Anlage abgeschaltet werden.
3
/h (60l/min) feststellt, kehrt die EcoSalt2 Anlage wieder in
ALARM
SALZ NIEDRIG
Sobald die EcoSalt2 Anlage eine genügend hohe Salzkonzentration feststellt (siehe Abschnitt für empfohlene
Salzmenge in der Betriebsanleitung), kehrt die EcoSalt2 Anlage wieder in den Normalbetrieb zurück.
ALARMZUSTAND SALZMANGELABSCHALTUNG
Sollte die Salzkonzentration weiterhin schwach bleiben, schaltet die EcoSalt2 Anlage in den
ALARMZUSTAND SALZMANGELABSCHALTUNG.
ALARM
AUSSCHALTUNG WG. SALZMANGEL
53
Page 54

Sobald die Salzkonzentration korrigiert wurde, muss der ALARMZUSTAND SALZMANGELABSCHALTUNG
durch Drücken auf die Taste
Anlage automatisch eine Systemüberprüfung durch, wenn sie beim nächsten mal eingeschaltet wird (sofern
die Stromzufuhr separat gesteuert wird). Sobald die EcoSalt2 Anlage beim Hochfahren eine genügend hohe
Salzkonzentration feststellt (siehe Abschnitt für empfohlene Salzmenge in der Betriebsanleitung), kehrt die
EcoSalt2 Anlage wieder in den Normalbetrieb zurück.
Der ALARMZUSTAND SALZMANGELABSCHALTUNG wird bei folgenden (annähernden)
Salzkonzentrationen ausgelöst:
EcoSalt2 Modell Alarmzustand Salzmangelabschaltung (annähernde Salzkonzentration)
DES2-15EL, DES2-25EL 1 200 ppm
Manuell EIN/AUS zurückgesetzt werden. Alternativ hierzu führt die EcoSalt2
DES2-15E, DES2-25E, DES2-35E 2 500 ppm
ALARMZUSTAND SALZ HINZUFÜGEN UND ALARMZUSTAND DURCHFLUSS GERING
Sollte die EcoSalt2 Anlage eine geringe Durchflussrate und geringe Salzkonzentration unterhalb der
Minimalmenge feststellen (siehe Abschnitt für empfohlene Salzmenge in der Betriebsanleitung), schaltet
die EcoSalt2 Anlage in den Alarmzustand. Die Anzeige schaltet dann zwischen ALARMZUSTAND SALZ
HINZUFÜGEN und ALARMZUSTAND DURCHFLUSS GERING hin und her. Im ALARMZUSTAND
DURCHFLUSS GERING produziert die EcoSalt2 Anlage kein Chlor. Wie weiter oben ausgeführt, wird nach
Behebung der Mängel der Normalbetrieb wieder aufgenommen.
SPRACHEINSTELLUNGEN ÄNDERN
70% – 09:35 AM
CHLORLEISTUNG
DEUTSCH
> Vom STARTBILDSCHIRM aus, drücken Sie Menü/Einstellung wählen 3 Sekunden lang.
EINSTELLUNGEN
1. UHR
> Drücken Sie die Tasten Menü auf/ab bis zum Menüpunkt SPRACHE;
> Stellen Sie die gewünschte Sprache ein, indem Sie den weiter oben aufgeführten Anweisungen des
Abschnitts ERSTE INBETRIEBNAHME folgen.
54
Page 55

ZEITFORMAT ÄNDERN
70% – 09:35 AM
CHLORLEISTUNG
> Vom STARTBILDSCHIRM aus, drücken Sie Menü/Einstellung wählen 3 Sekunden lang.
EINSTELLUNGEN
1. UHR
DEUTSCH
> Drücken Sie die Tasten Menü auf/ab bis zum Menüpunkt ZEITFORMAT;
> Stellen Sie das gewünschte Zeitformat ein, indem Sie den weiter oben aufgeführten Anweisungen des
Abschnitts ERSTE INBETRIEBNAHME folgen.
VERLAUFSANZEIGE ALARM
Die EcoSalt2 Anlage speichert für den Benutzer einen Verlauf, in dem die Anzahl der Stunden aufgezeichnet
wird, in denen sich die EcoSalt2 Anlage im Alarmzustand befindet. Es wird daran erinnert, dass die
voraussichtliche Lebensdauer der Elektrolysezelle sinkt, wenn die EcoSalt2 Anlage mit Salzkonzentrationen
außerhalb des empfohlenen Bereichs betrieben wird.
70% – 09:35 AM
CHLORLEISTUNG
> Vom STARTBILDSCHIRM aus, drücken Sie Menü/Einstellung wählen 3 Sekunden lang.
55
Page 56

EINSTELLUNGEN
1. UHR
> Drücken Sie die Tasten Menü auf/ab bis zum Menüpunkt ALARMVERLAUF;
EINSTELLUNGEN
5. ALARMLISTE
> Drücken Sie Menü/Einstellung wählen;
ZELLE LAUFZEIT
0
DEUTSCH
> Drücken Sie die Tasten Menü auf/ab, um zwischen Zellenlaufzeit und Salzmangelzeit hin- und
herzuschalten;
SALZMANGEL ZEIT
0
56
Page 57

INSTANDHALTUNG DES STROMAGGREGATS
Normalerweise sind nur geringe oder gar keine Instandhaltungsarbeiten vonnöten. Allerdings ist es
erforderlich, die Mauer bzw. den Pfosten an der/dem das Stromaggregat montiert ist, (nicht jedoch das
Stromaggregat selbst) regelmäßig mit einem effizienten Insektenschutzmittel einzusprühen, da eindringende
Insekten Schäden verursachen können, die nicht unter die Garantieleistung fallen.
WICHTIG: Gemäß bestimmten örtlich geltenden Vorschriften zu elektrischen Anlagen ist
vorgeschrieben, das Netzkabel auszuwechseln, wenn es beschädigt ist, und durch ein
spezielles Kabel des Herstellers bzw. seiner Servicestelle zu ersetzen.
INSTANDHALTUNG DER ELEKTROLYSEZELLE
Die Elektrolysezelle besteht aus wertvollen Materialien, und obgleich ihre Lebensdauer durch sachgerechte
Instandhaltung maximiert werden kann, nutzt sich die empfindliche Beschichtung im Laufe der Zeit durch
den Elektrolysevorgang ab, und die Chlorproduktion kommt schrittweise zum Stillstand. Die Elektrolyse
verursacht Kalkablagerungen an den Elektrodenplatten. Diese Ablagerungen beeinträchtigen den
elektrischen Stromfluss in der Elektrolysezelle und verringern somit die Chlorproduktion. Daher ist es wichtig,
die Elektrolysezelle regelmäßig zu prüfen und bei Bedarf zu reinigen. Die Stärke der Ablagerungen auf den
Elektrodenplatten ist bei jedem Pool unterschiedlich und kann von folgenden Faktoren abhängen:
• Calciumhärte des Wassers;
• Wassertemperatur;
• pH-Wert;
• Über einen längeren Zeitraum mit Calciumhypochlorit behandeltes Wasser; und/oder
• Aus dem Verputz von Betonpools ausblühender Kalk.
Da diese Bedingungen stark variieren, ist die Elektrolysezelle anfangs mindestens einmal pro Woche auf
Kalkablagerungen oder blau-grüne seifenartige Substanzen zu überprüfen, die sich an den Platten bilden
können. Dadurch können Sie den für Ihren Pool erforderlichen Reinigungszyklus bestimmen (der im Sommer
natürlich etwas enger getaktet sein sollte). Die Intervalle zwischen den Reinigungsarbeiten können sich
gegebenenfalls vergrößern, sodass die Reinigung nur wenige Male pro Jahr erfolgen muss.
DEUTSCH
HINWEIS: In Regionen mit hartem Wasser kann es erforderlich sein, das
Elektrolysegerät gelegentlich manuell zu reinigen.
Die Lebensdauer von EcoSalt2 Elektrolysezellen ist von einer Anlage zur anderen sehr unterschiedlich
und ist abhängig von Betriebszeiten, Wasserqualität und -zusammensetzung sowie der Instandhaltung der
Anlage und der Elektrolysezelle.
Beachten Sie beim Auswechseln der Elektrolysezelle, dass Sie für Ihre Anlage eine Original-EcoSalt2
Ersatz-Elektrolysezelle verwenden. Die zu verwendenden EcoSalt2 Ersatzzellen können der untenstehenden
Tabelle entnommen werden:
Modell Code der Ersatzzelle
DES2-15E DES2C15REP
DES2-15EL DES2C25REP
DES2-25E DES2C25REP
DES2-25EL DES2C35REP
DES2-35E DES2C35REP
BESTEHEN SIE GRUNDSÄTZLICH AUF ORIGINAL-ERSATZTEILEN VON DAVEY.
Achten Sie beim Auswechseln Ihrer Elektrolysezelle darauf, kein
nachgeahmtes Ersatzgerät zu erwerben. Nur die Original-EcoSalt2Elektrolysezelle ist für den Einsatz mit dem EcoSalt2 Stromaggregat
vorgesehen und von der Garantie gedeckt.
DIE NUTZUNG VON ELEKTROLYSEZELLEN ANDERER MARKEN
KANN EINE SCHWERE BESCHÄDIGUNG DER ELEKTRONIK IM
STROMAGGREGAT ZUR FOLGE HABEN. ES KANN DEN VERFALL
JEGLICHER GARANTIEANSPRÜCHE NACH SICH ZIEHEN.
REINIGUNG DER EcoSalt2 ELEKTROLYSEZELLE
Stellen Sie sicher, dass die EcoSalt2 Anlage und die Poolpumpe ausgeschaltet sind. Andernfalls besteht
das Risiko, dass sich die Poolpumpe in Betrieb setzt, bevor die Elektrolysezelle eingebaut ist. Trennen Sie
den Strömungswächter und das Kabel der Elektrolysezelle vom oberen Teil des Zellengehäuses. Nehmen
Sie die Elektrolysezelle aus dem Leitungssystem der Poolwasserrückführung heraus, nachdem Sie die
Gewindemutter der Zelle abgeschraubt haben. Achten Sie darauf, dass Sie keinen O-Ring verlieren.
Methode 1:
Mischen Sie in einem geeigneten Behälter zu 10 Teilen Wasser 1 Teil Salzsäure und tauchen Sie die
Elektrolysezelle in diese Lösung. Der Reinigungsvorgang sollte nicht länger als ein paar Minuten dauern.
Falls es länger dauert, sollte die Zelle öfter gereinigt werden. Wenn die Rückstände nicht übermäßig sind,
können sie eventuell unter fließendem Wasser gereinigt werden. Bauen Sie die Elektrolysezelle wieder in
das Gehäuse und schließen Sie die Kabel an das Kopfteil an.
57
Page 58

Methode 2:
Alternativ hierzu kann ein anerkanntes kommerzielles Reinigunsmittel für Elektrolysezellen ab und zu gute
Wirkung zeigen.
HINWEIS: Fügen Sie die Säure immer dem Wasser zu. Fügen Sie niemals Wasser der
Säure zu. Tragen Sie jedes Mal Augenschutz und Gummihandschuhe. Reinigen Sie die
Zelle jedes Mal in einem gut gelüfteten Bereich.
ERSETZEN DER ZELLE NACH REINIGUNG ODER AUSTAUSCH
Stellen Sie beim Wiedereinbau der EcoSalt2-Zelle in das Inline-Gehäuse sicher, dass die
Zellensicherungsmutter fest angezogen ist. Schalten Sie dazu die Poolpumpe ein, sobald sie montiert ist,
und prüfen Sie sie auf Lecks.
DEUTSCH
Wenn es ein Leck gibt, entfernen Sie die Mutter und prüfen Sie die Dichtung auf Verschmutzungen oder
Beschädigungen. Versuchen Sie es dann erneut. Stellen Sie vor dem Wiedereinbau der Zellenanschlüsse
sicher, dass die Anschlüsse trocken sind.
SICHERHEITSVORRICHTUNG
Wasserstoff ist ein Nebenprodukt des Chlorproduktionsprozesses. Die EcoSalt2 Anlage wurde mit einem
Strömungswächter ausgestattet, der die Abgabe stoppt, sobald zu geringer bzw. kein Durchfluss festgestellt
wird. Die EcoSalt2 Anlage funktioniert noch bei so niedrigen Durchflussraten wie 3,6 m³/h (60l/min).
TÄGLICHER BETRIEB:
Für eine optimale Betriebstüchtigkeit Ihrer Anlage sind vier Grundregeln zu beachten:
1. STABILISATOR
Für Außenpools ist ein Stabilisator von grundlegender Bedeutung. Er dient zum Erhalt des Chlors in
Ihrem Pool. Chlor verflüchtigt sich durch Sonneneinstrahlung sehr schnell, und durch den Einsatz eines
Stabilisators wird dieser Vorgang deutlich eingeschränkt. Ohne Stabilisator muss die Anlage bis zu dreimal
länger betrieben werden!
Der Stabilisator ist in einem Verhältnis von 500 Gramm je 10 000 Liter Wasser hinzuzugeben. Der
Stabilisatorgehalt sollte bei 25 – 50 ppm aufrechterhalten werden. Falls eine ORP-Steuerung zum Einsatz
kommt, sollte der Stabilisatorgehalt bei 15 – 50 ppm aufrechterhalten werden. Lassen Sie Ihr Poolwasser
zunächst von Ihrem Schwimmbad-Fachhändler analysieren, um sicherzustellen, dass Sie den Stabilisator
nicht in zu großen Mengen verwenden. (NUR FÜR AUSSENPOOLS, INNENPOOLS BENÖTIGEN KEINEN
STABILISATOR)
2. pH-WERT UND GESAMTALKALINITÄT
Ein angemessener pH-Wert muss aufrechterhalten werden, um Problemen wie Schwarzfärbung,
Fleckenbildung, milchiges Wasser usw. vorzubeugen. Ein unsachgerechter pH-Wert kann Beschädigungen
des Pools zur Folge haben. Folgende pH-Werte sind korrekt: Glasfaser – 7,2 bis 7,4; Beton & gefliest – 7,4
bis 7,6. Wenn Sie pH-Werte bis 8,0 oder höher steigen lassen, kann der für einen korrekten Poolzustand
benötigte Chlorbedarf bis zu dreimal so hoch sein wie bei einem normalen pH-Wert.
Die Gesamtalkalinität sollte nicht mit dem pH-Wert verwechselt werden. Obwohl beide Werte eng
miteinander verknüpft sind, bestimmt die Gesamtalkalinität, wie schnell und einfach sich der pH-Wert ändern
kann. Der Idealbereich liegt zwischen 80 und 150 ppm, falls von Ihrem Schwimmbad-Fachmann nicht anders
vorgeschrieben.
58
Page 59

Verwenden Sie einen Poolwasser-Prüfsatz, in dem auch ein Test für die Gesamtalkalinität enthalten ist.
Eine geringe Gesamtalkalinität kann kann pH-Werte instabil werden lassen. Gelingt es nicht, den pH-Wert
konstant zu halten, kann dies zu Fleckenbildung, Ätzungen und Korrosion von Metallen führen. Eine hohe
Gesamtalkalinität führt zu dauerhaft hohen pH-Werten und fördert Kalkablagerungen.
3. TDS-WERTE
WARNUNG: Es wird manchmal dazu geraten, Salz direkt in den Skimmerkasten zu
geben.
Diese Vorgehensweise ist dürftig, da sie große Salzmengen durch Ihre Filteranlage und
andere Pool-Baugruppen leitet.
Salz ist der grundlegende Bestandteil, mit dem Ihre EcoSalt2 Anlage arbeitet. Eine unzureichende
Salzmenge beschädigt Ihre Elektrolysezelle.
BEREICH DES EMPFOHLENEN SALZGEHALTS
EcoSalt2 modell Salzgehalt bei Betrieb Alarmzustand salz hinzufügen
DES2-15EL, DES2-25EL 1,500 – 6,000ppm ~ 1,500ppm
DES2-15E, DES2-25E, DES2-35E 3,000 – 6,000ppm ~ 3,000ppm
WARNUNG: Fügen sie weder Ihrem Poolwasser noch Ihrer Pump- oder
Reinigungsanlage Hydrogenperoxid zu. Durch die Verwendung von Hydrogenperoxid
erlischt bei Produkten von Davey die Garantie.
Beim Chlorungsprozess oder durch Verdunstung geht KEIN Salz verloren. Es geht nur durch Verdünnung
verloren, die auf Rückspülung, Verspritzen, Überlaufen, Leckage oder Installateursarbeiten zurückzuführen
ist. Daher kann auch kräftiger Regen den Salzgehalt in Ihrem Pool verdünnen. In solchen Fällen sollte der
Salzgehalt überprüft werden.
Bei einem niedrigen Salzgehalt wird die Beschichtung der Elektrodenplatten beschädigt, was zu
einem Verlust jeglicher Garantieansprüche führt.
Die EcoSalt2 Anlage verfügt über eine integrierte Warnanlage, um Schäden aufgrund unzureichenden
Salzgehalts zu minimieren. Allerdings liegt es letztlich beim Betreiber der Anlage, sicherzustellen, dass das
ganze Jahr über ein ausreichender Salzgehalt erhalten bleibt.
4. LAUFZEITEN
Diese Anleitungen gelten ausschließlich für privat genutzte EcoSalt2 Anlagen.
Wenn Sie Ihr Elektrolysegerät rund um die Uhr oder über längere Zeiträume in Betrieb lassen, reduziert
sich die Lebensdauer der Elektrolysezelle maßgeblich. Daher ist es wichtig, dass Sie das richtige
EcoSalt2 Modell in Ihrem Pool installiert haben. Bei Davey sind zahlreiche Modelle erhältlich, die für kleine
Gartenpools bis hin zu gewerblichen Anwendungen geeignet sind. (Für nähere Informationen wenden Sie
sich bitte an Ihren EcoSalt2 Fachhändler.)
Hinweis: Die EcoSalt2 Garantie entfällt bei kommerzieller oder halb-kommerzieller Verwendung, d.h. wo der
Chlorbedarf des Pools denjenigen normaler Privatschwimmbäder weit übersteigt.
DEUTSCH
59
Page 60

CHLORPRODUKTION
Die EcoSalt2 Anlage muss täglich betrieben werden, damit genug Chlor zur Desinfektion des Pools
produziert wird. Im Sommer verlangt eine normale Anlage eine Chlorierungsdauer von täglich acht Stunden.
Je nachdem, wann Sie Ihre EcoSalt2 Anlage laufen lassen - am besten testen Sie den verbleibenden
Chlorgehalt im Pool zu einem Zeitpunkt, von dem Sie glauben, dass die Werte dort am geringsten sind.
Wenn zu dieser gewählten Tageszeit die abgelesenen Testwerte zu hoch sind, dann verringern Sie die
EcoSalt2 Chlorabgabe. Wenn dagegen die Chlorwerte beim Test zu niedrig sind, dann erhöhen Sie die
EcoSalt2 Chlorabgabe (siehe Seite 13). Ein korrektes chemisches Gleichgewicht (siehe Seite 29) ist für eine
korrekte Funktionsweise der EcoSalt2 Anlage von größter Bedeutung.
Im Normalfall ermöglicht die kühlere Jahreszeit eine Verringerung der Laufzeiten der EcoSalt2 Anlage.
Befolgen Sie die Anweisungen Ihres Poolfachmanns. Die Chlorabgabe für diesen Zeitraum kann auch durch
das Einstellen des WINTER-MODUS verringert werden (siehe Seite 19).
„SCHOCK“-BEHANDLUNG
Gelegentlich, besonders unter extrem warmen Bedingungen, kann es erforderlich sein, den Chlorgehalt in
Ihrem Pool zu steigern. Das kann durch die Auswahl des BOOST-MODUS erreicht werden, der die Anlage
24 Stunden lang auf voller Kapazität laufen lässt (siehe Seite 15). Als Alternative hierzu können Sie auch
Flüssigchlor oder in Granulatform zugeben. Falls Sie Chlorgranulat verwenden, muss die Elektrolysezelle
regelmäßig geprüft werden, da sich die Zusatzstoffe dieses Produkts an den Elektroden ablagern können.
CHLORARTEN UND VERGLEICHE / MAX. POOLGRÖSSE
Viele Chlorhersteller stimmen ihre Einheiten für den Vergleich mit 65%igem Chlorgranulat ab. Daher müssen
deren Angaben auf einen niedrigeren Wert umgerechnet werden, um die tatsächliche Chlorproduktion
festzustellen. Die nachfolgende Tabelle zeigt die für die Pooldesinfektion erhältlichen Chlorarten.
DEUTSCH
EcoSalt2
Modell
Maximale
Produktion
(g/h 100 %)
DES2-15E(L) 15 23 120 75 m
Produktion
(g/h 65 %
Entsprechung)
Chlorproduktion
über 8 Stunden
(Gramm 100%)
Kühle
Klimazonen
<25ºC
3
58 m
Gemäßigte
Klimazonen
25ºC bis 30ºC
DES2-25E(L) 25 38 200 125 m3 96 m
DES2-35E 35 53 280 175 m3 134 m
HINWEIS: Welche EcoSalt2 Anlage sich am besten für Ihren Pool eignet hängt vom
Klima vor Ort, der Zahl der Badegäste und den Laufzeiten ab. Bitte beachten Sie, dass
die Lebensdauer der Zelle mit kürzeren Betriebszeiten im Winter und niedrigeren
Abgabeeinstellungen verlängert werden kann. Davey empehlt einen 6- bis 8-stündigen
Betrieb der EcoSalt2 Anlage im Sommer und einen 4-stündigen Betrieb im Winter.
Maximale Poolgröße
Heiße & tropische
Klimazonen
3
3
3
>30ºC
46 m
80 m
112 m
3
3
3
60
Page 61

ALLGEMEINE INFORMATIONEN
ANWEISUNGEN FÜR DIE POOLWASSER-CHEMIE
POOLWASSERGLEICHGEWICHT
Idealer
Messwert
/ -bereich
Zum Erhöhen
Zum Verringern
Freies Chlor
(ppm)
1,5 – 3
Chlor-
Abgabe
erhöhen.
Chlor zugeben.
Filtrationszeit
erhöhen.
Chlor-
Abgabe
verringern.
Filtrationszeit
verringern.
pH
Beton- &
geieste
Pools
7,4 - 7,6
Andere
Oberächen
7,2 - 7,4
Natriumcarbonat
zugeben
Salzsäure
zufügen
Gesamt-
Alkalinität
TA (ppm)
80 – 150
Puffer
zugeben
(Natrium-
bicarbonat)
Salzsäure
oder
pH-Senker
zugeben
Calcium-
härte
(ppm)
Beton- &
geiestePools
200-275
Andere
Oberächen
100-225
Calciumchlorid
zugeben
Pool teilweise
leeren und wieder
mit weicherem
Wasser
zur Verdünnung
befüllen
Stabilisator -
Cyanursäure
(ppm)
25-50 ppm
(15-25 ppm in
Verbindung mit
ORP-Steuerung)
Nicht zur
Verwendung in
Innenraumpools.
Cyanursäure
zugeben
Pool teilweise
leeren und
zur Verdünnung
wieder befüllen
Empfohlener
Salzgehalt
(ppm)
Modellabhängig
(siehe Seite 27)
DEUTSCH
Salz zugeben
Pool teilweise
leeren und
zur Verdünnung
wieder befüllen
Test-
häugkeit
Wöchentlich Wöchentlich Wöchentlich Wöchentlich Regelmäßig Regelmäßig
FEHLERBEHEBUNG
Keine Chlorproduktion - Überprüfen Sie:
1. Keine Stromversorgung der Anlage
2. Unzureichender Pumpendurchfluss
3. Steuerung auf manuell aus
4. Einstellung der CHLOR-ABGAGE auf „0“
5. Verschmutzte Zelle
6. Filter benötigt Rückspülung
7. Strömungswächter nicht angeschlossen oder
beschädigt
8. Zu geringer Salzgehalt und Auslösung der
Salzmangelabschaltung
9. Hauptsicherung herausgesprungen
10. Pumpe defekt
Unzureichende Chlorproduktion - Überprüfen Sie:
1. Elektrolysezelle verschmutzt - bei Bedarf
reinigen
2. Filter benötigt Rückspülung
3. Pool-Stabilisator zu niedrig
4. pH-Wert zu hoch
5. Salzgehalt zu gering
6. Unangemessene Betriebszeiten
7. CHLOR-ABGABE zu niedrig eingestellt
8. POOL-ABDECKUNGS-MODUS versehentlich
eingestellt
9. WELLNESS-MODUS versehentlich eingestellt
10. WINTER-MODUS versehentlich eingestellt
11. Pumpe defekt
12. Versagen der Elektrolysezelle
13. Zelle muss mehr als einmal pro Woche
gereinigt werden - ziehen Sie den Nachtrag zur
Betriebsanleitung zu Rate über:
https://www.daveywater.com/products/resources/
chlorinators/EcoSalt2_Addendum.pdf
61
Page 62

ERSATZTEILE
DES2-25E DES2-25EL DES2-35E
EXPLOSIONSZEICHNUNG DER ERSATZTEILE
EcoSalt2
DES2-15E DES2-15EL
DES2-25E DES2-25EL DES2-35E
1
7
2
3
DEUTSCH
5
4
11
14
6
16
15
12
13
8
9
10
17
NOTWENDIGE
NUMMER VERMERK BESCHREIBUNG
1 Steckanschlussteil der Zelle 1 33021
2 Zellenverschlussring 1 16058
3 O-Ring - Zellenkopfteil 1 403377
4 Strömungswächter 1 16102-3SP
5 Rohrverbinder 2 48722B-1
6 Zellengehäuse 1 16056
7 Schraube 8 403625
8 Stromaggregat Modelle DES2-15E (L) 1 403368
8 Stromaggregat Modelle DES2-25E (L) & DES2-35E (L) 1 403369
9 Netzanschlussteil 1 16073
10 Netzkabel 1 403371
12 Stromkabelmuffe 1 403372
13 Leiterplatte DES2-15E 1 33005C-15ESP
13 Leiterplatte DES2-15EL 1 33005C-15ELSP
13 Leiterplatte DES2-25E 1 33005C-25ESP
13 Leiterplatte DES2-25EL 1 33005C-25ELSP
13 Leiterplatte DES2-35E 1 33005C-35ESP
14 Leiterplatte mit LCD & Dichtung 1 16046C
15 LCD-Schraube 4 403366
16 Steuertafel-Aufkleber 1 16047
17 Frontgehäuse 1 16042
– Montagekit 1 33040
– Blindstopfen 1 16057-1
– O-Ring - Blindstopfen 1 403377
– Keildichtung 2 403393
MENGE TEILE-NR.
62
Page 63

DEUTSCH
63
Page 64

Davey-Garantie
Davey Water Products Pty Ltd (Davey) garantiert, dass alle verkauften Produkte (bei normalem Gebrauch und Betrieb) für einen
Mindestzeitraum von einem (1) Jahr ab ursprünglichem, auf der Rechnung angegebem Datum des Kaufs durch den Kunden frei
vonMaterial-undVerarbeitungsfehlernsind.BesuchenSiefürspezischeGarantiezeitenallerDavey-Produktedaveywater.com.
Diese Garantie gilt nicht für normalen Verschleiß oder für Produkte,:
• die Gegenstand von Missbrauch, Vernachlässigung, Fahrlässigkeit, Beschädigung oder Unfall waren
• die anders als den Anweisungen von Davey entsprechend verwendet, betrieben oder gewartet wurden
• dienichtgemäßdenInstallationsanweisungenodervonentsprechendqualiziertemPersonalinstalliertwurden
• diegegenüberdenursprünglichenVorgabenoderaufirgendeinevonDaveynichtgenehmigteArtundWeisemodiziert
oder abgeändert wurden
• bei denen Reparaturen von anderen als von Davey oder seinen hierzu berechtigten Händlern versucht oder vorgenommen wurden
• die anormalen Bedingungen ausgesetzt wurden, wie falscher Stromspannung, Blitzschlag oder Hochspannungsspitzen oder
Schäden durch Elektrolyse, Kavitation, Sand, ätzende, salzhaltige oder abrasive Flüssigkeiten,
Die Davey-Garantie umfasst nicht den Ersatz von Produkten, Verbrauchsmaterialien oder Defekten an Produkten und
Komponenten, die Davey von Dritten geliefert wurden (Davey bietet jedoch angemessene Unterstützung für das Erlangen der
Garantieleistungen Dritter).
Um Gewährleistungsansprüche geltend zu machen:
• Wenn Sie bei einem Produkt einen Defekt vermuten, verwenden Sie es nicht weiter und kontaktieren Sie die ursprüngliche
Verkaufsstelle. Wahlweise können Sie auch den Davey-Kundendienst anrufen oder Davey über die unten aufgeführte
Adresse schreiben
• Legen Sie Belege oder Beweise für das Kaufdatum vor
• Falls Sie dazu aufgefordert werden, senden Sie das Produkt zurück und / oder liefern Sie weitere Informationen zum
Schadensfall. Die Kosten und die Verantwortung für die Rücksendung gehen zu Ihren Lasten.
• Der Garantieanspruch wird von Davey auf Grundlage der eigenen Produktkenntnisse und vernünftigem Ermessen beurteilt
und akzeptiert, sofern:
- ein relevanter Defekt gefunden wurde
- der Garantieanspruch innerhalb des entsprechenden Garantiezeitraums geltend gemacht wurde; und
- keine der oben genannten Ausschlusskriterien zur Anwendung kommen
• Der Kunde wird schriftlich über die Entscheidung zu einem Garantieanspruch benachrichtigt, und falls sich dieser als
unberechtigt erweist, muss der Kunde für die Rückholung des Produkts auf eigene Kosten sorgen oder seine Zustimmung
zur Beseitigung geben.
Sollte der Anspruch sich als berechtigt erweisen, repariert oder ersetzt Davey nach eigenem Ermessen das Produkt kostenlos.
Die Davey-Garantie gilt zusätzlich zu dem vor Ort geltenden Verbraucherrecht. Bei schwerwiegenden Fehlern haben Sie Anspruch
auf Ersatz oder Rückerstattung und auf Entschädigung für jeden anderen vernünftigerweise vorhersehbaren Verlust oder
Schaden. Sie haben auch das Recht, die Ware repariert oder ersetzt zu bekommen, wenn die Ware nicht von akzeptabler Qualität
ist und es sich nicht um einen schwerwiegenden Fehler handelt.
Bei allen mit dem Internet verbundenen Produkten ist der Verbraucher eine stabile Internetverbindung verantwortlich. Bei einem
Ausfall des Netzwerks muss der Verbraucher den Umstand seinem Dienstanbieter melden. Die Verwendung einer App befreit
den Verbraucher nicht davon, aufmerksam zu verfolgen, ob das Produkt den Erwartungen gerecht wird. Die Verwendung der
Smartphone-App erfolgt auf Risiko des Benutzers. Soweit gesetzlich zulässig, lehnt Davey jegliche Gewährleistung hinsichtlich der
Richtigkeit, Vollständigkeit oder Zuverlässigkeit von App-Daten ab. Davey trägt keine Verantwortung für direkte oder indirekte
Verluste, Schäden oder Kosten für den Benutzer, die aus der Abhängigkeit von einer Internetverbindung hervorgehen. Der
Benutzer stellt Davey von jeglichen Ansprüchen oder rechtlichen Schritten seitens des Benutzers oder anderer Personen frei, die
sich auf Internetverbindungen oder App-Daten stützen.
Zur Reparatur vorgelegte Waren werden u.U. nicht repariert, sondern durch instandgesetzte Waren desselben Typs ersetzt. Zur
Reparatur von Produkten können instandgesetzte Teile benutzt werden. Die Reparatur Ihrer Produkte kann den Verlust aller vom
Benutzer erstellten Daten zur Folge haben. Bitte stellen Sie sicher, dass sie von allen auf Ihren Produkten gespeicherten Daten
eine Kopie angefertigt haben.
Soweit gesetzlich zulässig, haftet Davey nicht für entgangenen Gewinn oder Folgeschäden, indirekte oder spezielle Verluste,
SchädenoderVerletzungenjeglicherArt,diedirektoderindirektdurchDavey-Produkteentstehen.DieseEinschränkungbetrit
nicht Daveys Haftung für die Nichterfüllung der für Ihr Davey-Produkt gemäß der europäischen Gesetzgebung geltenden
Verbrauchergarantie und beeinträchtigt weder die Rechte noch die Rechtsbehelfe, die Ihnen im Rahmen des europäischen
Verbraucherrechts zustehen.
EinevollständigeListederDavey-FachhändlerndenSieaufunsererWebsite(daveyeurope.eu),oderperTelefonunter:
DEUTSCH
NORTH AMERICA
Ph: 1-888-755-8654
Email: info@daveyusa.com
Davey Water Products Pty Ltd
Member of the GUD Group
ABN 18 066 327 517
NEW ZEALAND
7 Rockridge Avenue,
Penrose, Auckland 1061
Ph: 0800 654 333
Fax: 0800 654 334
Email: sales@dwp.co.nz
daveywater.com
AUSTRALIA
Head Offi ce
6 Lakeview Drive,
Scoresby, Australia 3179
Ph: 1300 232 839
Fax: 1300 369 119
Email: sales@davey.com.au
® Davey is a trademark of Davey Water Products Pty Ltd. © Davey Water Products Pty Ltd 2020.
EUROPE
ZAC des Gaulnes
355 Avenue Henri Schneider
69330 Meyzieu, France
Ph: +33 (0) 4 72 13 95 07
Fax: +33 (0) 4 72 33 64 57
Email: info@daveyeurope.eu
MIDDLE EAST
Ph: +971 50 6368764
Fax: +971 6 5730472
Email: info@daveyuae.com
64
P/N 403450-7
Page 65

Eco
®
2
Salt
Sistema di clorazione per piscina ad
acqua salata
Model: DES2-15E, DES2-15EL, DES2-25E,
DES2-25EL & DES2-35E
Istruzioni di montaggio e
di utilizzo
ITALIANO
AVVERTENZA: La mancata osservanza delle presenti istruzioni e il
mancato rispetto di tutti i codici applicabili possono causare gravi lesioni
personali e/o danni alle cose.
L'installazione di questo prodotto deve essere eseguita da una persona che
conosca a fondo i requisiti idraulici della piscina e che segua le istruzioni di
installazione fornite nel presente manuale.
Si prega di trasmettere le presenti istruzioni all'operatore di questa apparecchiatura.
Page 66

Eco
®
2
Salt
Complimenti! Hai appena acquistato il nuovo cloratore EcoSalt2. Ti invitiamo a leggere tutte le informazioni
contenute nel presente manuale con attenzione prima di installare o utilizzare il cloratore EcoSalt2.
Indice:
CONTENUTO DELLA CONFEZIONE .............................................................................................................67
IMPORTANTI PRECAUZIONI DI SICUREZZA ...............................................................................................68
TERMINI COMUNI ..........................................................................................................................................70
INSTALLAZIONE DEL CLORATORE EcoSalt2 ..............................................................................................70
COLLEGAMENTO DELLA CELLA ELETTROLITICA IN LINEA ALL’ALIMENTATORE ...................................71
COLLEGAMENTO DEL FLUSSOSTATO ALL’ALLOGGIAMENTO DELLA CELLA .........................................71
CONTROLLI PRIMA DELL’AVVIAMENTO ......................................................................................................72
FUNZIONAMENTO DEL CLORATORE EcoSalt2 ...........................................................................................72
PANNELLO DI CONTROLLO ..........................................................................................................................73
PRIMO AVVIAMENTO .....................................................................................................................................73
AVVIAMENTO TIPICO (QUOTIDIANO) ..........................................................................................................76
CARATTERISTICHE DEL CLORATORE EcoSalt2 .........................................................................................77
MANUTENZIONE DELL’ALIMENTATORE ......................................................................................................89
MANUTENZIONE DELLA CELLA ELETTROLITICA IN LINEA .......................................................................89
FUNZIONAMENTO QUOTIDIANO .................................................................................................................90
PRODUZIONE DI CLORO ..............................................................................................................................92
INFORMAZIONI GENERALI ...........................................................................................................................93
RISOLUZIONE DEI PROBLEMI......................................................................................................................93
PEZZI DI RICAMBIO .......................................................................................................................................94
ITALIANO
66
Page 67

CONTENUTO DELLA CONFEZIONE
Models | Modelle | Modelli | Modellen | Modelos | Modèles |:
DES2-15E, DES2-15EL, DES2-25E, DES2-25EL, DES2-35E,
DES2-15US(L), DES2-25US(L), DES2-35US
Quick Reference Guide | Salt Pool Chlorination System
Kurzanleitung | Desinfektionssystem unter verwendung des salzwassers
Guida rapida | Trattamento ad acqua salata
Korte handleiding | Badzout zwembad systemen
Guia rápido de referências | Tratamento da água da piscina com base na adição de sal
Guia de referencia rapida | Sistema de sal para piscinas
Guide de référence rapide | Electrolyseur de piscine au sel
EcoSalt
®
2
M
o
d
e
l
s
|
M
o
de
l
l
e
|
M
o
de
l
l
i
|
M
o
de
l
l
e
n |
M
o
de
l
o
s
|
M
o
dè
l
e
s |
:
DES
2-
15E, DE
S
2-
15EL
,
D
ES
2-
25E, DES
2-
25EL
, DES
2-
35E
Q
u
i
c
k
R
e
fe
re
n
c
e
Gu
id
e
|
Salt
P
o
o
l
C
h
lo
rin
atio
n
Syst
e
m
Kurza
nl
ei
t
un
g
| D
es
i
nf
ek
t
i
ons
syst
em unt
er verw
endung des
sa
l
zwa
ss
ers
G
u
i
d
a
rap
id
a
|
Tratt
a
m
e
n
to
ad
acq
u
a
sala
t
a
K
o
rte
h
an
d
l
e
id
in
g
|
B
ad
z
o
u
t
zwe
m
b
a
d
sy
st
e
m
e
n
G
u
i
a
r
á
p
i
d
o
d
e
r
efer
ê
n
c
i
a
s
|
T
r
a
ta
men
to d
a
á
gu
a
d
a
p
i
s
c
i
n
a
c
om
b
a
s
e
n
a
a
d
iç
ã
o
d
e
s
a
l
G
u
ia
d
e
re
fe
re
n
ci
a
ra
p
id
a
|
Sist
e
ma
d
e
sa
l
p
ara
p
isc
in
a
s
G
u
i
d
e
d
e
ré
f
é
re
n
ce
rap
id
e
|
El
e
c
t
ro
lyse
u
r
d
e
p
isci
n
e
au
se
l
EcoSalt
®
2
2
x
2
x
www
.
bit
.
ly
/
Ec
o
S
a
lt
2
2 x
EU ü
US Ï
2 x
www.bit.ly/EcoSalt2
Salt P
ool
C
hl
orinati
on System
M
o
del
s
:
DE
S
2-
15
E
,
DE
S
2-
15E
L
,
DE
S2-25E
,
DE
S2-
2
5E
L
&
DE
S2-35E
I
n
s
t
allat
ion and O
p
erat
ing
Ins
t
ru
ct
ions
T
h
e
i
n
s
t
a
l
l
a
t
i
o
n
o
f
t
h
i
s
p
r
o
d
u
ct
s
h
o
u
l
d
b
e
c
a
r
r
i
e
d
o
u
t
b
y
a
p
e
r
s
o
n
kn
o
wl
e
d
g
ea
b
l
e
i
n
s
wi
m
m
i
n
g
p
o
o
l
p
l
u
m
b
i
n
g
r
eq
u
i
r
em
e
n
t
s
f
o
l
l
o
wi
n
g
t
h
e
i
n
s
t
al
l
a
t
i
o
n
i
n
st
r
u
c
t
i
o
n
s
p
r
o
vi
d
e
d
i
n
t
h
i
s
m
a
n
u
al
.
W
A
R
N
I
N
G:
F
ai
l
u
r
e
t
o
f
o
l
l
o
w
t
h
es
e
i
n
s
t
r
u
ct
i
o
n
s
a
n
d
co
m
p
l
y
wi
t
h
a
l
l
a
p
p
l
i
ca
b
l
e
c
o
d
e
s
m
a
y
c
au
s
e
s
er
i
o
u
s
b
o
d
i
l
y
i
n
j
u
r
y
a
n
d
/
o
r
p
r
o
p
e
r
t
y
d
a
m
a
g
e
.
o
n
t
o
t
h
e
o
pe
r
a
t
or
of
t
h
i
s
e
qu
i
pm
e
n
t
.
EcoSalt
®
2
E
NGLI
S
H
1 x
1 x
1 x
1 x
1 x
1 x1 x 1 x
2 x
EU ü
US Ï
2 x
www.bit.ly/EcoSalt2
Salt Pool Chlorination System
Models: DES2-15E, DES2-15EL, DES2-25E,
DES2-25EL & DES2-35E
Installation and Operating
Instructions
The installation of this product should be carried out by a person knowledgeable
in swimming pool plumbing requirements following the installation instructions
provided in this manual.
WARNING: Failure to follow these instructions and comply with all applicable
codes may cause serious bodily injury and/or property damage.
EcoSalt
®
2
7 LANGUAGES
English, Deutsch, Italiano,
Nederlands, Português,
Español & Français
ENGLISH
1 x
1 x
1 x
1 x
1 x
1 x 1 x 1 x
Eco
Salt
®
2
Il cloratore EcoSalt2 comprende i seguenti componenti; verificare attentamente il contenuto della confezione
prima di procedere con l’installazione del sistema:
a. 1 alimentatore con cella in piombo;
b. 1 flussostato;
c. 1 cella elettrolitica in linea e alloggiamento;
d. 1 tappo di chiusura della cella e o-ring;
e. 2 raccordi con dado, estremità e o-ring;
a
b c d e f
f. 2 boccole di riduzione;
g. 1 gruppo bullone di terra;
h. 1 guida rapida;
i. 1 cavo di alimentazione; e
j. 1 gruppo viti di montaggio e tappi
g h i j
ITALIANO
NOTA: Il sistema EcoSalt2 non è destinato all’uso da parte di bambini o persone inferme
senza supervisione. Assicurarsi che i bambini siano supervisionati afnché non
giochino con il sistema EcoSalt2.
I collegamenti elettrici e i cablaggi devono essere eseguiti da un elettricista autorizzato.
67
Page 68

IMPORTANTI PRECAUZIONI DI
SICUREZZA
• Per ridurre al minimo il rischio di accumulo di gas nell'alloggiamento della cella, è necessario
assicurare la presenza di un usso d'acqua sufciente attraverso la cella quando l'unità è
accesa e produce cloro.
• È essenziale che la pompa della piscina faccia circolare acqua sufciente attraverso
l'alloggiamento della cella per riempire completamente tale alloggiamento con acqua durante
il processo di clorazione.
• Controllare periodicamente la paletta del ussostato di sicurezza per assicurarsi che sia
libera di muoversi in avanti e indietro e che il controdado sia serrato a mano.
ü
Schema A
ITALIANO
FUNZIONAMENTO CORRETTO
CON UNA POMPA IN FUNZIONE
û
Schema B
FUNZIONAMENTO ERRATO
CON UNA POMPA IN FUNZIONE
• Controllare sempre la versione più recente delle istruzioni
di installazione e funzionamento che supportano tali
prodotti. È sufciente acquisire il codice QR o andare su:
www.bit.ly/EcoSalt2
68
Page 69

INFORMAZIONI IMPORTANTI
SUL SISTEMA EcoSalt2
FATTORI CHE MIGLIORERANNO LE PRESTAZIONI E LA VITA UTILE DEL SISTEMA EcoSalt2
LEGGERE LE SEGUENTI INDICAZIONI PRIMA DI UTILIZZARE IL CLORATORE
COSTRUTTORI DI PISCINE:
Trattare queste informazioni con il cliente durante la "Sessione di consegna della piscina".
I cloratori sono una preziosa attrezzatura per le piscine e devono essere sottoposti a opportuna
manutenzione per ottenere le migliori prestazioni e durata utile. Sono TRE i fattori principali che
possono danneggiare il sistema EcoSalt2 e ridurne la durata utile. Monitorare i seguenti fattori
in conformità alle istruzioni operative e di installazione.
1. MANTENERE I LIVELLI DI SALE CONSIGLIATI
INTERVALLO DI ESERCIZIO CONSIGLIATO: (vedere pagina 27)
• Far funzionare il sistema EcoSalt2 con i livelli di sale indicati in questo documento e sul
prodotto così da garantire prestazioni e durata ottimali della celle;
• Il funzionamento del sistema EcoSalt2 con bassi livelli di sale danneggerà la cella e ne
ridurrà la durata;
• Il pannello di controllo mostra un indicatore LED rosso lampeggiante se il livello di sale
risulta bassi;
•Senonvieneeseguitoalcuninterventoperretticareilivellidisale,potrebbevericarsiun
danno alla cella non coperto da garanzia.
ITALIANO
2. MONITORARE E SOTTOPORRE A MANUTENZIONE LA CELLA IN LINEA
EcoSalt2
Il sistema EcoSalt2 dispone di una cella in linea a "inversione di polarità".
• Per mantenere il sistema EcoSalt2 nelle migliori condizioni possibili, si raccomanda il
monitoraggio regolare della cella. La cella si trova nell'alloggiamento in plastica trasparente
e contiene placche in titanio.
• Durante il processo di clorazione, il calcare sotto forma di polvere bianca può accumularsi
naturalmente sulle piastre di titanio nella cella. Monitorare la cella per evitare un eccessivo
accumulo di calcare. Un eccessivo accumulo di incrostazioni causerà danni alla cella
riducendonedrasticamentel'efcienzaeladurata.
• Il pannello di controllo mostra un indicatore LED rosso che informa dell'eventuale
necessità di pulire la cella.
• Se il calcare si accumula, pulire la cella seguendo le istruzioni di pulizia fornite a pagina 26.
• MAI: Usare acido concentrato per pulire la cella.
• MAI: Lasciare la cella nella soluzione detergente per lunghi periodi di tempo.
• MAI: Usare strumenti metallici, pagliette o spazzole per pulire la cella.
3. CHIMICA DELL’ACQUA DELLA PISCINA BILANCIATA
• È NECESSARIO mantenere i livelli di sale corretti (vedere pagina 27) per prestazioni e
durata ottimali.
• I livelli di durezza del calcio DEVONO essere mantenuti a intervalli ideali di 200 - 275 ppm
(perlepiscineincementoepiastrellate)e100-225ppm(peraltresuperci)alnedi
evitare un eccessivo accumulo di incrostazioni e danni alle attrezzature.
• I livelli di pH DEVONO essere mantenuti a livelli ideali per evitare danni alle attrezzature e
allesupercidellapiscinaeperottenerel'efcaciaottimaledellaclorazione.
• Anche i livelli di alcalinità totale e dello stabilizzatore devono essere mantenuti in un
intervallo ideale.
Nota: Fare riferimento alla tabella CHIMICA DELL'ACQUA DELLA PISCINA a pagina 29
per ulteriori informazioni.
4. ASSEMBLAGGIO DEI BULLONI DI TERRA
Per ridurre al minimo le correnti vaganti e prolungare la vita della cella elettrolitica, si prega
di installare il bullone del sensore di terra fornito in dotazione (pos. g.).
69
Page 70

TERMINI COMUNI
Ritorno alla linea
di pompaggio
Linea di aspirazione
FILTRO
PUMPA
ACCESSORI
230V ALIMENTAZIONE
Alghe Forme microscopiche di vita vegetale che penetrano nella piscina per mezzo di pioggia,
vento e polvere. Ne esistono numerose varietà: alcune galleggiano liberamente mentre
altre crescono sulle pareti e nelle fessure, e si presentano in diversi colori. Alcune sono
più resistenti al trattamento chimico di altre.
Batteri Germi che contaminano la piscina. Introdotti da nuotatori, polvere, temporali
e altri elementi.
Acqua bilanciata Rapporto corretto tra contenuto minerale e livello di pH che impedisce la formazione di
corrosioni o incrostazioni nell'acqua della piscina.
Cloramina Composti formati dalla combinazione del cloro con azoto proveniente da urina, sudore,
ecc. La cloramina provoca irritazioni agli occhi e alla pelle nonché odori sgradevoli.
Richiesta di cloro Cloro necessario per distruggere i germi, le alghe e gli altri contaminanti nella piscina.
Residui di cloro Quantità di cloro rimanente dopo che la richiesta di cloro è stata soddisfatta.
Questa corrisponde alla lettura ottenuta con il kit di prova.
Acido cianurico Noto anche come stabilizzatore o condizionatore. Riduce la dissipazione del cloro per
azione della luce solare diretta.
Acido liquido Sostanza chimica utilizzata per ridurre il pH e l'alcalinità totale nell'acqua della piscina e
per la pulizia della
cella dell’igienizzatore.
ppm Abbreviazione di Parti Per Milione, l’unità di misura accettata per la
concentrazione di sostanze chimiche nell'acqua della piscina. 1 ppm = 1 mg/L.
INSTALLAZIONE DEL CLORATORE EcoSalt2
INSTALLAZIONE DELL’ALIMENTATORE
Selezionare una posizione comoda e ben ventilata entro un metro dall'attrezzatura filtrante e montare
l'alimentatore verticalmente su una parete o un palo di larghezza almeno pari a quella dell'alimentatore del
cloratore EcoSalt2. Davey consiglia di non installare l'alimentatore a meno di 3 metri dall'acqua della piscina.
Collegare la pompa e l'alimentatore del cloratore in un'apposita presa/unità di controllo a tenuta stagna. Ove
applicabile, alcune varianti del modello dispongono di una presa tripolare sul lato inferiore dell'alimentatore,
per fornire potenza alla pompa. L'unità deve essere tenuta lontana da sostanze acide e da altre aree
di stoccaggio di sostanze chimiche. Vapori acidi e chimici corrodono i componenti elettronici all'interno
dell'unità. Tenerla inoltre lontana da fonti di calore. Una buona ventilazione è necessaria per il corretto
funzionamento.
Sono fornite due viti autofilettanti e tasselli per un’installazione rapida e semplice.
Utilizzare una punta da muratura da 6 mm per l’installazione dell’alimentatore a un muro di mattoni o
cemento. Per l’installazione su un pale, praticare i fori pilota e inserire le viti fornite. Una volta che le viti sono
in posizione, appendere semplicemente l’alimentatore EcoSalt2 tramite i supporti sul retro dell’unità. Per
un’adeguata impermeabilità, la parete o il palo su cui è montato EcoSalt2 deve essere piatto e largo almeno
quanto l’alimentatore di EcoSalt2.
ITALIANO
70
Page 71

INSTALLAZIONE DELLA CELLA
La cella EcoSalt2 deve sempre essere l'ultima ad essere installata nel sistema. Assicurarsi che la cella sia
installata dopo pompe, filtri ed eventuali apparecchi di riscaldamento. Per ottenere la massima efficienza,
la cella EcoSalt2 deve essere installata in modo tale da limitare al massimo flussi d’acqua turbolenti. Non
installare un gomito a 90° a meno di 200 mm dal raccordo della cella. Le valvole di intercettazione, utilizzate
nei casi in cui l'apparecchiatura si trova al di sotto del livello dell'acqua della piscina, devono essere installate
a non più di 200mm dal raccordo. Questo aiuterà a ottenere un regime laminare.
COLLEGAMENTO DELLA CELLA ELETTROLITICA IN LINEA ALL’ALIMENTATORE
L'igienizzatore per acqua salata EcoSalt2 utilizza una cella elettrolitica in linea a polarità inversa per un
funzionamento a bassa manutenzione. L'alimentatore EcoSalt2 è dotato di un cavo flessibile terminato con
i connettori della cella integrati in uno stampo di plastica. I tre connettori in linea non sono "sensibili alla
polarità". A seconda dell'installazione, potrebbe essere necessario sostenere l'alloggiamento della cella
sottostante manualmente.
ITALIANO
NOTA: La cella EcoSalt2 viene fornita con un flussostato a paletta, che deve essere installato sulla
cella come mostrato nello schema a pagina 4, e collegato al cavo della cella tramite il connettore
sull'estremità del cavo.
IMPORTANTE: Il ussostato deve essere installato con la freccia evidenziata sul lato
dell'interruttore rivolta nella direzione del usso.
COLLEGAMENTO DEL FLUSSOSTATO ALL’ALLOGGIAMENTO DELLA CELLA
Assicurarsi che il flussostato sia installato nell'alloggiamento della cella.
Assicurarsi che la direzione del flussostato sia corretta (vedere pagina 4)
Installato
71
Page 72

PROCEDURA PRIMA DELL’AVVIAMENTO
Prima di utilizzare il sistema di clorazione per piscina ad acqua salata EcoSalt2, assicurarsi che la seguente
quantità di sale da piscina sia stata aggiunta alla piscina.
• SALE DELLA PISCINA:
Per aumentare la
concentrazione
di sale di
Sale richiesto
ppm %
30.000L 40.000L 50.000L 60.000L 70.000L 80.000L 90.000L 100.000L
kg lb kg lb kg lb kg lb kg lb kg lb kg lb kg lb
1.000 0,1 30 66 40 88 50 110 60 132 70 154 80 176 90 198 100 220
2.000 0,2 60 132 80 176 100 220 120 265 140 309 160 353 180 397 200 441
3.000 0,3 90 198 120 265 150 331 180 397 210 463 240 529 270 595 300 661
4.000 0,4 120 265 160 353 200 441 240 529 280 617 320 705 360 794 400 882
5.000 0,5 150 331 200 441 250 551 300 661 350 772 400 882 450 992 500 1.102
6.000 0,6 180 397 240 529 300 661 360 794 420 926 480 1.058 540 1.190 600 1.323
• CLORO: Per una piscina di nuova installazione mai clorurata, aggiungere sufficiente cloro (liquido o
granulare) per ottenere un valore di 3 ppm (con un kit di prova adatto). In alternativa, azionare il sistema di
clorazione per piscine ad acqua salata EcoSalt2 in modo continuo in MODALITÀ BOOST, per circa 24 ore
o fino al raggiungimento di un valore di 3 ppm.
• STABILIZZATORE: È essenziale aggiungere e mantenere lo stabilizzatore della piscina al valore di 25 50 ppm in ogni momento (SOLO PER PISCINE ESTERNE). Per sistemi controllati con ORP, il livello dello
stabilizzatore dev’essere mantenuto tra 15-25 ppm.
• (Fare riferimento alla sezione Funzionamento quotidiano, pagina 27 per ulteriori informazioni).
FUNZIONAMENTO DEL CLORATORE EcoSalt2
IL RILASCIO DI CLORO è espresso in percentuale. Impostare EcoSalt2 sulla percentuale richiesta e l'unità
regolerà automaticamente il rilascio della cella al livello impostato. Il cloratore EcoSalt2 è dotato di un
sistema di controllo elettronico e di allarme. Questo regola il rilascio del cloratore EcoSalt2 al livello massimo
preimpostato e cambia la polarità della cella come indicato dal segno + o - sul display digitale. La polarità si
alternerà per un numero di ore del periodo di clorazione, non necessariamente per le ore di funzionamento
della pompa. Il sistema di allarme è composto da un LED operativo che si accende con luce verde per
indicare il normale funzionamento o ROSSA per richiamare l'attenzione dell'utente; si veda la risoluzione dei
problemi a pagina 21.
ITALIANO
72
Page 73

PANNELLO DI CONTROLLO
DISPOSIZIONE
100% – 09:29 AM
ACCESO
Modalità manuale attiva/disattiva
Indicatore di alimentazione
(acceso con il sistema EcoSalt2 acceso)
Su/giù menu
Menu/seleziona impostazione
Menu/annulla impostazione (indietro)
Indicatore di allarme
(lampeggia con l'allarme attivo)
Tempo scaduto
(ogni volta che il dispositivo viene lasciato
per 30 secondi senza intervento da parte
dell'utente, le impostazioni vengono salvate e
viene visualizzata la schermata principale)
PRIMO AVVIAMENTO
Una volta che il livello di sale nella piscina è corretto, l'unità può essere accesa.
Nota: Una volta avviata l'unità, segue un breve intervallo di tempo prima che la cella funzioni per
garantire che il sistema di filtrazione sia adescato con acqua.
• Al primo avvio del cloratore EcoSalt2, viene visualizzata la seguente schermata:
DAVEY
V1.2.1 EU 15L
ITALIANO
> Questa schermata mostra la versione del software (ad esempio v1.2.1) e il modello del cloratore
EcoSalt2 (EU 15L, ovvero DES2-15EL).
• Il display ritorna automaticamente alla seguente schermata:
73
Page 74

3. LINGUA
ITALIANO
> Questa schermata mostra il menu della lingua e l'impostazione della lingua corrente (cioè l'inglese in
questo caso);
> L'impostazione della lingua può essere modificata premendo i pulsanti
scorrere tra le lingue disponibili;
> Premere
> In caso di errore, è possibile modificare tale impostazione successivamente.
• Il display ritorna automaticamente alla seguente schermata:
menu/seleziona impostazione una volta visualizzata la lingua desiderata;
su/giù del menu per
4. FORMATO ORA
12 ORE
> Questa schermata mostra il menu del formato dell'ora e il formato dell'ora attuale (cioè 12 ore in questo caso);
> Il formato dell'ora può essere modificato premendo i pulsanti
formati 12 e 24 ore;
> Premere
> In caso di errore, è possibile modificare tale impostazione successivamente.
• Il display ritorna automaticamente alla seguente schermata:
menu/seleziona impostazione una volta visualizzato il formato dell'ora desiderato;
su/giù del menu per passare tra i
ITALIANO
1. OROLOGIO
07:34 PM
> Questa schermata mostra l'ora corrente dell'orologio (ossia le 19:34, in questo caso);
> Inizialmente l’indicazione delle ore dell’orologio lampeggerà;
> L'ora dell'orologio può essere modificata premendo i pulsanti
all'ora desiderata;
74
su/giù del menu per scorrere fino
Page 75

> Premere
> In caso di errore, è possibile modificare tale impostazione successivamente.
> Quindi l’indicazione dei minuti inizierà a lampeggiare;
menu/seleziona impostazione una volta visualizzata l'ora desiderata;
> I minuti dell'orologio possono essere modificati premendo i pulsanti
fino al valore desiderato;
> Premere
> In caso di errore, è possibile modificare tale impostazione successivamente.
> Quindi l’indicazione AM/PM inizierà a lampeggiare;
> Il valore AM/PM dell'orologio può essere modificato premendo i pulsanti
passare tra AM e PM;
> Premere
> In caso di errore, è possibile modificare tale impostazione successivamente.
• Il display ritorna automaticamente alla seguente schermata:
menu/seleziona impostazione una volta visualizzati il valore dei minuti desiderato;
menu/seleziona impostazione una volta visualizzato il formato desiderato;
2. DATA
01 GEN 2000
su/giù del menu per scorrere
su/giù del menu per
ITALIANO
> Questa schermata mostra il menu del formato della data e il formato della data attuale (cioè 01 GEN
2000, in questo caso);
> Inizialmente l’indicazione del giorno lampeggerà;
> Il giorno della data può essere modificato premendo i pulsanti
valore desiderato;
> Premere
> In caso di errore, è possibile modificare tale impostazione successivamente.
> Quindi l’indicazione del mese inizierà a lampeggiare;
> Il mese della data può essere modificato premendo i pulsanti
valore desiderato;
> Premere
> In caso di errore, è possibile modificare tale impostazione successivamente.
> Quindi l’indicazione dell’anno inizierà a lampeggiare;
> L’anno della data può essere modificato premendo i pulsanti
valore desiderato;
> Premere
> In caso di errore, è possibile modificare tale impostazione successivamente.
menu/seleziona impostazione una volta visualizzato il giorno desiderato;
menu/seleziona impostazione una volta visualizzato il mese desiderato;
menu/seleziona impostazione una volta visualizzato l’anno desiderato;
su/giù del menu per scorrere fino al
su/giù del menu per scorrere fino al
su/giù del menu per scorrere fino al
• Il display ritorna automaticamente alla schermata HOME:
75
Page 76

100% – 09:29 AM
ACCESO
> Questa schermata mostra:
■ l’impostazione di rilascio del cloro attuale (in questo caso, 100%);
■ l’impostazione dell'ora attuale;
■ lo stato dell’alimentazione attuale (in questo caso, attiva).
AVVIAMENTO TIPICO (QUOTIDIANO)
Nota: Una volta avviata l'unità, segue un breve intervallo di tempo prima che la cella funzioni per
garantire che il sistema di filtrazione sia adescato con acqua.
• A ogni avvio del cloratore EcoSalt2, viene visualizzata la seguente schermata:
ITALIANO
DAVEY
V1.2.1 EU 15L
• Il display ritorna automaticamente alla schermata HOME:
100% – 09:29 AM
ACCESO
> Questa schermata mostra:
■ l’impostazione di rilascio del cloro attuale (in questo caso, 100%);
■ l’impostazione dell'ora attuale;
■ lo stato dell’alimentazione attuale (in questo caso, attiva).
76
Page 77

CARATTERISTICHE DEL CLORATORE ECOSALT2
CONTROLLO DEL RILASCIO DEL CLORO
65% – 09:35 AM
ACCESO
Il RILASCIO DI CLORO controlla il periodo in cui la cella produce cloro, come percentuale del tempo totale
in cui il cloratore EcoSalt2 è acceso. Se la cella EcoSalt2 sta producendo, produce al 100%, a meno che non
sia impostata diversamente (si vedano le sezioni MODALITÀ INVERNO o MODALITÀ SPA). Il periodo di
funzionamento della cella viene definito "ciclo di lavoro della cella".
Per esempio:
• Se il cloratore EcoSalt2 rimane acceso per 8 ore al giorno e il RILASCIO DI CLORO è impostato su 50%:
il ciclo di lavoro della cella EcoSalt2 è di sole 4 ore per quel giorno;
• Se il cloratore EcoSalt2 rimane acceso per 8 ore al giorno e il RILASCIO DI CLORO è impostato su 25%:
il ciclo di lavoro della cella EcoSalt2 è di sole 2 ore per quel giorno.
Per regolare il RILASCIO DI CLORO:
70% – 09:35 AM
EMISSIONE CLORO
> Premere il pulsante su/giù del menu per scorrere fino al RILASCIO DI CLORO scelto;
> L’impostazione varierà il ciclo di lavoro della cella con incrementi del 5%;
> Premere
menu/seleziona impostazione una volta visualizzato il RILASCIO DI CLORO desiderato;
ITALIANO
> Successivamente, si tornerà alla schermata HOME.
ATTIVAZIONE DELLA MODALITÀ DI COPERTURA
L'esposizione ai raggi UV di una piscina contribuisce in modo significativo alla richiesta complessiva di cloro
della piscina; vale a dire alla quantità di cloro utilizzata dalla piscina. Quantità eccessive di cloro in una
piscina con copertura possono ridurre significativamente l'aspettativa di vita utile della copertura, se lasciata
per lunghi periodi di tempo (ad esempio diverse settimane). L'attivazione della MODALITÀ DI COPERTURA
riduce il ciclo di lavoro della cella dell'80% della sua attuale impostazione.
Per esempio:
• Se il cloratore EcoSalt2 rimane acceso per 8 ore al giorno, il RILASCIO DI CLORO è impostato su 50%,
ma la MODALITÀ DI COPERTURA è attiva: il ciclo di lavoro della cella EcoSalt2 è di soli 48 minuti per
quel giorno;
77
Page 78

• Se il cloratore EcoSalt2 rimane acceso per 8 ore al giorno, il RILASCIO DI CLORO è impostato su 25%,
ma la MODALITÀ DI COPERTURA è attiva: il ciclo di lavoro della cella EcoSalt2 è di soli 24 minuti per
quel giorno.
Per attivare la MODALITÀ DI COPERTURA:
70% – 09:35 AM
EMISSIONE CLORO
> Dalla schermata HOME, premere menu/seleziona impostazione.
> Il display mostrerà la seguente schermata:
ITALIANO
MODALITA
1. COPERTURA
> Da questa schermata, premere menu/seleziona impostazione per accedere al menu della modalità
di copertura;
> Il display mostrerà l’impostazione corrente per la MODALITÀ DI COPERTURA (in questo caso,
MODALITÀ DI COPERTURA disattivata);
1. COPERTURA
SPENTO
> Premere il pulsante su/giù del menu per attivare o disattivare la MODALITÀ DI COPERTURA;
> Premere
> Successivamente, si tornerà al primo menu di impostazione;
> Se non si preme alcun tasto sul cloratore EcoSalt2 per ~ 30 secondi, o si preme il pulsante
annulla impostazione (indietro), il display tornerà alla schermata HOME.
menu/seleziona impostazione una volta visualizzato il valore desiderato;
menu/
78
Page 79

La MODALITÀ DI COPERTURA può anche
essere attivata a distanza da un dispositivo
di controllo automatico della copertura
della piscina. Chiudendo i contatti della
morsettiera sul retro dell'alimentatore, il
sistema EcoSalt2 passerà da remoto alla
MODALITÀ DI COPERTURA. Questo può
essere bypassato dall'intervento dell'utente,
seguendo i passaggi illustrati in precedenza.
ITALIANO
ATTIVAZIONE DELLA MODALITÀ BOOST
Se la piscina viene frequentata da un numero eccessivo di bagnanti, o esposta a detriti/contaminazione
o condizioni climatiche estreme, potrebbe essere necessario iper clorurare la piscina. L'attivazione della
MODALITÀ BOOST aumenta il ciclo di lavoro della cella al 100% e applica una corrente della cella
(potenza) del 100% per un periodo di 24 ore.
Per attivare la MODALITÀ BOOST:
70% – 09:35 AM
EMISSIONE CLORO
> Dalla schermata HOME, premere menu/seleziona impostazione.
> Il display mostrerà la seguente schermata:
79
Page 80

MODALITA
1. COPERTURA
> Premere il pulsante su/giù del menu per passare alla MODALITÀ BOOST;
MODALITA
2. BOOSTER
> Premere menu/seleziona impostazione;
ITALIANO
2. BOOSTER
SPENTO
> Il display mostrerà l’impostazione corrente per la MODALITÀ BOOST (in questo caso, MODALITÀ
BOOST disattivata);
> Premere il pulsante
su/giù del menu per attivare o disattivare la MODALITÀ BOOST;
80
Page 81

2. BOOSTER
ACCESO
> Premere menu/seleziona impostazione una volta visualizzato il valore desiderato;
> Successivamente, si tornerà al primo menu di impostazione;
> Se non si preme alcun tasto sul cloratore EcoSalt2 per ~ 30 secondi, o si preme il pulsante
annulla impostazione (indietro), il display tornerà alla schermata HOME.
menu/
50% – 09:40 AM
BOOSTER
> La schermata HOME continuerà a mostrare la percentuale del ciclo di lavoro della cella, tuttavia
l’indicazione della condizione “attiva” è stato visibilmente sostituito dall’indicazione “BOOST”. Questo
rimarrà presente per un periodo di 24 ore;
> È possibile modificare il ciclo di lavoro della cella durante il periodo di 24 ore e la percentuale visualizzata
nella schermata HOME varia di conseguenza. Questo potrebbe essere utile se l'impostazione deve
essere modificata per il giorno successivo, una volta terminata la MODALITÀ BOOST;
> Va notato, tuttavia, che la MODALITÀ BOOST ha la precedenza su ogni altra impostazione. Durante
il periodo di 24 ore mentre è attiva la MODALITÀ BOOST, la corrente della cella è al 100% e il ciclo
di lavoro viene impostato al 100%. Questo avviene indipendentemente da quanto visualizzato sullo
schermo.
ITALIANO
ATTIVAZIONE DELLA MODALITÀ SPA
Il sistema EcoSalt2 è compatibile con applicazioni che comprendono piscine di grandi dimensioni, nonché
spa di dimensioni molto ridotte. L'attivazione della MODALITÀ SPA riduce il ciclo di lavoro della cella
dell'80% della sua attuale impostazione.
Per esempio:
• Se il cloratore EcoSalt2 rimane acceso per 10 ore al giorno, il RILASCIO DI CLORO è impostato su 50%,
ma la MODALITÀ SPA è attiva: il ciclo di lavoro della cella EcoSalt2 è di solo 1 ora per quel giorno;
• Se il cloratore EcoSalt2 rimane acceso per 10 ore al giorno, il RILASCIO DI CLORO è impostato su 25%,
ma la MODALITÀ SPA è attiva: il ciclo di lavoro della cella EcoSalt2 è di soli 30 minuti per quel giorno.
81
Page 82

Per attivare la MODALITÀ SPA:
70% – 09:35 AM
EMISSIONE CLORO
> Dalla schermata HOME, premere menu/seleziona impostazione.
> Il display mostrerà la seguente schermata:
MODALITA
1. COPERTURA
> Premere il pulsante su/giù del menu per passare alla MODALITÀ SPA;
MODALITA
3. IDROMASSAGGIO
> Da questa schermata, premere menu/seleziona impostazione per accedere al menu della
MODALITÀ SPA;
> Il display mostrerà l’impostazione corrente per la MODALITÀ SPA (in questo caso, MODALITÀ SPA
disattivata);
ITALIANO
3. IDROMASSAGGIO
SPENTO
82
Page 83

> Premere il pulsante
su/giù del menu per attivare o disattivare la MODALITÀ SPA;
> Premere
> Successivamente, si tornerà al primo menu di impostazione;
> Se non si preme alcun tasto sul cloratore EcoSalt2 per ~ 30 secondi, o si preme il pulsante
annulla impostazione (indietro), il display tornerà alla schermata HOME.
ATTIVAZIONE DELLA MODALITÀ SPA E DELLA MODALITÀ DI COPERTURA
CONTEMPORANEAMENTE
Qualora fosse necessario attivare contemporaneamente la MODALITÀ SPA e la MODALITÀ DI
COPERTURA, il ciclo di lavoro della cella sarà ridotto solo dell’80%. In altre parole, il ciclo di lavoro della
cella non viene ridotto dell'80%, seguito da un ulteriore 80%. Il display della schermata HOME si alternerà
tra la visualizzazione della MODALITÀ COPERTURA e SPA.
ATTIVAZIONE DELLA MODALITÀ INVERNO
L'esposizione ai raggi UV di una piscina contribuisce in modo significativo alla richiesta complessiva di
cloro della piscina; vale a dire alla quantità di cloro utilizzata dalla piscina. Anche il numero di bagnanti
contribuisce significativamente alla richiesta complessiva di cloro della piscina. In inverno, la richiesta di
cloro della piscina è in genere molto inferiore. Se non diversamente modificata, se la cella produce cloro, lo
produce con una corrente (potenza) al 100%. La MODALITÀ INVERNO riduce la corrente (potenza) della
cella all'85%.
menu/seleziona impostazione una volta visualizzato il valore desiderato;
menu/
Se il sistema viene arrestato durante il periodo invernale, spegnere l’EcoSalt2 o
impostare l’uscita di cloro allo 0%.
ITALIANO
Per esempio:
• Se il cloratore EcoSalt2 rimane acceso per 10 ore al giorno, il RILASCIO DI CLORO è impostato su
100%, ma la MODALITÀ INVERNO è disattiva: il ciclo di lavoro della cella EcoSalt2 è di 10 ore. La cella
funzionerà al 100% della capacità;
• Se il cloratore EcoSalt2 rimane acceso per 10 ore al giorno, il RILASCIO DI CLORO è impostato su 100%,
ma la MODALITÀ INVERNO è attiva: il ciclo di lavoro della cella EcoSalt2 è ancora di 10 ore; la cella
funzionerà all’85% della capacità.
Per attivare la MODALITÀ INVERNO:
70% – 09:35 AM
EMISSIONE CLORO
> Dalla schermata HOME, premere menu/seleziona impostazione.
83
Page 84

> Il display mostrerà la seguente schermata:
MODALITA
1. COPERTURA
> Premere il pulsante su/giù del menu per passare alla MODALITÀ INVERNO;
MODALITA
4. INVERNO
ITALIANO
> Da questa schermata, premere menu/seleziona impostazione per accedere al menu della
MODALITÀ INVERNO;
> Il display mostrerà l’impostazione corrente per la MODALITÀ INVERNO (in questo caso, MODALITÀ
INVERNO disattivata);
4. INVERNO
SPENTO
> Premere il pulsante su/giù del menu per attivare o disattivare la MODALITÀ INVERNO;
> Premere
> Successivamente, si tornerà al primo menu di impostazione;
> Se non si preme alcun tasto sul cloratore EcoSalt2 per ~ 30 secondi, o si preme il pulsante
annulla impostazione (indietro), il display tornerà alla schermata HOME.
menu/seleziona impostazione una volta visualizzato il valore desiderato;
menu/
84
Page 85

ALLARME FLUSSO BASSO
Se il flussostato del sistema EcoSalt2 registra una portata inferiore a 3,6 m3/h (60 L/min), il sistema
EcoSalt2 attiverà l’ALLARME FLUSSO BASSO:
ALLARME
FLUSSO BASSO
Con l’ALLARME FLUSSO BASSO, il sistema EcoSalt2 non produrrà cloro. Una volta che il flussostato registra
un flusso superiore a 3,6 m
la massima efficienza, la cella EcoSalt2 deve essere installata in modo tale da limitare al massimo flussi
d’acqua turbolenti. Non installare un gomito a 90° a meno di 200 mm dal raccordo della cella. Le valvole di
intercettazione, utilizzate nei casi in cui l'apparecchiatura si trova al di sotto del livello dell'acqua della piscina,
devono essere installate a non più di 200mm dal raccordo. Questo aiuterà a ottenere un regime laminare.
ALLARME AGGIUNTA SALE
Se il sistema EcoSalt2 registra una bassa conduttività all'interno della cella, questo potrebbe essere attivato
dall'acqua fredda (inferiore a 15 ºC), o una concentrazione di sale inferiore al livello minimo (fare riferimento
alla sezione relativa all’intervallo di sale consigliato nel manuale), il sistema EcoSalt2 attiverà l’ALLARME
AGGIUNTA SALE. Altro sale può essere aggiunto per evitare una temperatura più bassa. Tuttavia, occorre
considerare anche il livello massimo di sale e se la temperatura dell'acqua scende troppo, il sistema
dev’essere spento.
3
/h (60 L/min), il sistema EcoSalt2 tornerà al normale funzionamento. Per ottenere
ALLARME
SALE BASSO
ITALIANO
Quando il sistema EcoSalt2 registra una concentrazione di sale nell'intervallo (fare riferimento alla sezione
dell’intervallo di sale raccomandato nel manuale), il sistema EcoSalt2 tornerà al normale funzionamento.
ALLARME INTERRUZIONE SALE BASSO
Se la concentrazione di sale continua continua ad essere diluita, il sistema EcoSalt2 attiverà l’ALLARME
INTERRUZIONE SALE BASSO.
ALLARME
SOGLIA SALEBASSO
85
Page 86

Una volta corretta la concentrazione del sale, l’ALLARME INTERRUZIONE SALE BASSO dev'essere
ripristinato premendo il pulsante
automaticamente un controllo del sistema all'accensione successiva (in caso di funzionamento tramite un
alimentatore separato). All’avvio, se il sistema EcoSalt2 registra una concentrazione di sale nell'intervallo
(fare riferimento alla sezione dell’intervallo di sale raccomandato nel manuale), il sistema EcoSalt2 tornerà al
normale funzionamento.
L’ALLARME INTERRUZIONE SALE BASSO viene attivato alle seguenti concentrazioni di sale
(approssimative):
ON/OFF manuale. In alternativa, il sistema EcoSalt2 eseguirà
Modello del sistema EcoSalt2
DES2-15EL, DES2-25EL 1.200 ppm
DES2-15E, DES2-25E, DES2-35E 2.500 ppm
ALLARME AGGIUNTA SALE E ALLARME FLUSSO BASSO
Se il sistema EcoSalt2 registra un flusso basso e una concentrazione di sale inferiore al livello minimo
(fare riferimento alla sezione dell’intervallo di sale consigliato nel manuale), il sistema EcoSalt2 emetterà
un allarme. Il display passerà tra l’ALLARME AGGIUNTA SALE e l’ALLARME FLUSSO BASSO. Con
l’ALLARME FLUSSO BASSO, il sistema EcoSalt2 non produrrà cloro. Come mostrato in precedenza, una
volta corrette le anomalie, riprenderà il normale funzionamento.
IGNORARE L’IMPOSTAZIONE DELLA LINGUA
Allarme interruzione sale basso (concentrazione del sale approssimativa)
70% – 09:35 AM
EMISSIONE CLORO
ITALIANO
> Dalla schermata HOME, tenere premuto menu/seleziona impostazione per 3 secondi.
IMPOSTAZIONI
1. OROLOGIO
> Premere il pulsante su/giù del menu per passare fino a LINGUA;
Modificare la lingua seguendo le istruzioni indicate nella precedente sezione PRIMO AVVIAMENTO del manuale.
>
86
Page 87

IGNORARE L’IMPOSTAZIONE FORMATO DELL’ORA
70% – 09:35 AM
EMISSIONE CLORO
> Dalla schermata HOME, tenere premuto menu/seleziona impostazione per 3 secondi.
IMPOSTAZIONI
1. OROLOGIO
> Premere il pulsante su/giù del menu per passare fino a FORMATO DELL'ORA;
> Modificare il formato dell'ora seguendo le istruzioni indicate nella precedente sezione PRIMO
AVVIAMENTO del manuale.
VISUALIZZAZIONE CRONOLOGIA ALLARMI
Il sistema EcoSalt2 conserva un registro cronologico per l'utente che tiene traccia del numero di ore durante
le quali il sistema EcoSalt2 si trovava in modalità allarme. Si ricorda che l'aspettativa di durata utile delle celle
sarà ridotta se il sistema EcoSalt2 funziona con concentrazioni di sale al di fuori dell'intervallo consigliato.
70% – 09:35 AM
EMISSIONE CLORO
ITALIANO
> Dalla schermata HOME, tenere premuto menu/seleziona impostazione per 3 secondi;
87
Page 88

IMPOSTAZIONI
1. OROLOGIO
> Premere il pulsante su/giù del menu per passare fino a CRONOLOGIA ALLARMI;
IMPOSTAZIONI
5. STORIA ALLARMI
> Premere menu/seleziona impostazione;
ITALIANO
TEMPO ESECUZIONE
0
> Premere il pulsante su/giù del menu per passare tra il tempo di funzionamento della cella e il
tempo di sale basso.
TEMPO SALE BASSO
0
88
Page 89

MANUTENZIONE DELL’ALIMENTATORE
In genere, è richiesta una minima manutenzione, se non praticamente nulla. Tuttavia, è essenziale che
il muro o il palo su cui è installato il sistema EcoSalt2 sia spruzzato (e non lo stesso sistema EcoSalt2)
periodicamente con un buon repellente per insetti di tipo superficiale, poiché la penetrazione degli insetti può
causare danni, che non sono coperti dalla garanzia.
IMPORTANTE Alcune normative elettriche locali indicano che "se il cavo di
alimentazione è danneggiato, questo deve essere sostituito da un cavo speciale
disponibile presso il produttore o il suo agente addetto all’assistenza".
MANUTENZIONE DELLA CELLA ELETTROLITICA IN LINEA
La cella EcoSalt2 è composta da materiali preziosi e, sebbene una corretta manutenzione possa prolungarne
al massimo la durata utile, il funzionamento logorerà comunque il suo delicato rivestimento, momento in cui
cesserà gradualmente di produrre cloro. Il calcio (calcare) si depositato sulle piastre durante l'elettrolisi. Questo
accumulo interferisce con il flusso di corrente elettrica nella cella riducendo quindi la produzione di cloro. È
essenziale ispezionare regolarmente la cella e pulirla se necessario. La velocità di formazione dei depositi sulla
piastra varia in funzione della piscina e può essere influenzata dai seguenti fattori:
• durezza del calcio dell'acqua;
• temperatura dell'acqua;
• livello di pH;
• acqua clorurata con ipoclorito di calcio per un periodo prolungato; e/o
• calcio nelle superfici in gesso di una piscina in cemento.
Poiché queste condizioni variano in maniera notevole, ispezionare la cella almeno settimanalmente per
verificare l’eventuale presenza di una sostanza saponata blu/verde o calcare sulle piastre. Sarà quindi possibile
determinare il ciclo di pulizia necessario per la propria piscina (potrebbe essere necessaria una pulizia più
frequente in estate). Gli intervalli di pulizia potrebbero anche essere richiesti solo un paio di volte all'anno.
ITALIANO
NOTA: Nelle aree con acqua dura, anche i sistemi a inversione di polarità possono
richiedere una pulizia manuale occasionale.
La vita utile della cella EcoSalt2 varia in modo sostanziale da un impianto all'altro in virtù dei diversi tempi
operativi, della qualità e della composizione dell'acqua, della manutenzione del sistema e della cella.
Assicurarsi che, quando è necessaria la sostituzione delle celle, venga impiegata la cella di ricambio
EcoSalt2 originale e corretta per il proprio sistema. Le celle di ricambio EcoSalt2 corrette da usare sono
mostrate nella tabella di seguito:
Modello
DES2-15E DES2C15REP
DES2-15EL DES2C25REP
DES2-25E DES2C25REP
DES2-25EL DES2C35REP
DES2-35E DES2C35REP
PULIZIA DELLA CELLA EcoSalt2 IN LINEA
Assicurarsi che il sistema EcoSalt2 e la pompa della piscina siano spenti. In caso contrario, la pompa della
piscina potrebbe accendersi mentre la cella non si trova al suo posto. Scollegare il flussostato e il cavo
della cella dalla sommità dell'alloggiamento della cella. Rimuovere la cella dalla linea di ritorno della piscina
svitando il dado della cella, facendo attenzione a non perdere gli o-ring.
Codice della cella sostitutiva
UTILIZZARE SOLO PARTI DI RICAMBIO ORIGINALI DAVEY.
Se è necessario sostituire la cella elettrolitica in linea, diffidare da
componenti “simili”. Solo la cella originale EcoSalt2 è progettata e
garantita per il funzionamento con l'alimentatore EcoSalt2.
POSSONO VERIFICARSI GRAVI DANNI AI COMPONENTI
ELETTRONICI ALL'INTERNO DEL SISTEMA ECOSALT2 IN CASO
DI UTILIZZO DI CELLE NON ORIGINALI. QUESTO PUÒ ANCHE
INVALIDARE LA GARANZIA.
Metodo uno:
Aggiungere 1 parte di ACIDO CLORIDRICO a 10 parti di ACQUA in un contenitore adatto e immergere la
cella in questa soluzione. La pulizia non dovrebbe richiedere più di un paio di minuti; in caso contrario pulire
la cella con maggiore frequenza. Se l'accumulo non è eccessivo, può essere possibile pulire le piastre
della cella con un getto d'acqua corrente. Riportare la cella nel suo alloggiamento e collegare i conduttori al
gruppo principale.
89
Page 90

Metodo due:
In alternativa, è possibile utilizzare una soluzione detergente per celle disponibile in commercio per il numero
di volte necessario.
NOTA: Aggiungi sempre acido all'acqua. Non aggiungere mai acqua all’acido. Indossare
sempre occhiali protettivi e guanti di gomma. Pulire sempre la cella in un'area ben
ventilata.
REIMPOSTAZIONE DELLA CELLA DOPO LA PULIZIA O LA SOSTITUZIONE
Quando si reinstalla la cella EcoSalt2 nell’alloggiamento in linea, assicurarsi che il dado di bloccaggio della cella
sia ben fissato. A tale scopo, accendere una volta la pompa della piscina, quindi verificare la presenza di perdite.
ITALIANO
Se c’è una perdita, rimuovere il dado e ispezionare la guarnizione per eventuali detriti o danni. Quindi
riprovare. Prima di rimontare i connettori della cella, assicurarsi che i terminali siano asciutti.
DISPOSITIVO DI SICUREZZA
L'idrogeno è un sottoprodotto del processo di produzione del cloro. Il sistema EcoSalt2 dispone di un
flussostato che interrompe la produzione se viene rilevato un flusso basso o assente. Il sistema EcoSalt2
funzionerà fino a una portata di 3,6 m³/h (60 l/min).
FUNZIONAMENTO QUOTIDIANO
Occorre rispettare quattro regole fondamentali per un funzionamento ottimale dell’unità.
1. STABILIZZATORE
L'importanza dello stabilizzatore della piscina non può essere sottovalutata. È fondamentale per aiutare
a trattenere il cloro nella piscina. Il cloro viene rapidamente dissipato dalla luce solare e l'uso dello
stabilizzatore ridurrà sostanzialmente questa dissipazione. Senza stabilizzatore, potrebbe essere necessario
un funzionamento dell'unità fino a tre volte più a lungo!
Lo stabilizzatore dev’essere aggiunto con la proporzione di 500 grammi ogni 10.000 litri di acqua. Lo
stabilizzatore deve essere mantenuto a un livello di 25-50 ppm. Se si utilizza un controller ORP, lo
stabilizzatore deve essere mantenuto a un livello di 15-25ppm. Prima di aggiungere una quantità maggiore
di stabilizzatore, far analizzare l'acqua della piscina presso il negozio in cui è stata acquistata per assicurarsi
di non esagerare. (SOLO PER PISCINE ESTERNE, QUELLE INTERNE NON RICHIEDONO UNO
STABILIZZATORE)
2. pH E ALCALINITÀ TOTALE
È necessario mantenere un livello di pH corretto per evitare problemi quali punti neri, macchie, acqua
torbida, ecc. Un livello di pH errato può danneggiare la piscina. I livelli di pH corretti sono i seguenti: fibra
di vetro - da 7,2 a 7,4; calcestruzzo e piastrellata - da 7,4 a 7,6. Se il livello di pH aumenta oltre 8,0, il cloro
richiesto potrebbe essere fino a tre volte superiore rispetto alla quantità normale, per poter igienizzare
correttamente la piscina.
L'alcalinità totale non deve essere confusa con il pH. Sebbene i due siano strettamente correlati, l'alcalinità
totale determina la velocità e la facilità di variazione del pH. L’intervallo ideale è compreso tra 80 - 150 ppm,
oppure consultare un professionista.
È necessario utilizzare un kit di prova che includa un test per l'alcalinità totale. Una bassa alcalinità totale
può causare livelli di pH instabili. L'incapacità di mantenere il pH costante può causare macchie, incisioni
90
Page 91

e corrosione dei metalli. Un’alcalinità totale elevata provoca livelli di pH costantemente elevati e tende a
favorire la formazione di calcare.
3. LIVELLI DI TDS
AVVERTENZA: Alcune persone consigliano di versare il sale direttamente nella scatola
dello skimmer.
Questa è una pratica inadeguata in quanto consente il passaggio di concentrazioni
elevate di sale attraverso la ltrazione e altre attrezzature della piscina.
Il sale è l'elemento essenziale con cui opera il sistema EcoSalt2. Una quantità di sale insufficiente pertanto
danneggerà la cella.
QUANTITÀ DI SALE CONSIGLIATA
Modello del sistema EcoSalt2 Livello salino operativo Allarme aggiunta sale
DES2-15EL, DES2-25EL 1,500 – 6,000ppm ~ 1,500ppm
DES2-15E, DES2-25E, DES2-35E 3,000 – 6,000ppm ~ 3,000ppm
AVVERTENZA: Non aggiungere il perossido di idrogeno all'acqua della piscina o
all'impianto idraulico o al sistema igienizzante della piscina. L'uso del perossido di
idrogeno invaliderà la garanzia sui prodotti Davey.
Il sale NON viene consumato nel processo di clorazione o per evaporazione. Viene consumato solo dalla
diluizione causata da: controlavaggio, spruzzi, fuoriuscite, perdite dalla piscina o dalle tubature. Forti piogge
possono diluire i livelli di sale nella piscina, quindi è opportuno controllare il livello di sale al verificarsi di
questi eventi.
Bassi livelli di sale distruggono il rivestimento sulle piastre delle celle e invalidano la garanzia.
Il sistema EcoSalt2 dispone di un indicatore di avviso incorporato per ridurre al minimo i danni derivanti da
livelli insufficienti di sale; tuttavia, spetta al proprietario garantire livelli di sale adeguati per tutto l'anno.
4. PERIODI DI FUNZIONAMENTO
Le presenti istruzioni riguardano il sistema EcoSalt2 e il suo utilizzo esclusivamente residenziale.
Se l’igienizzante funziona alla massima potenza per 24 ore al giorno o per periodi più lunghi, la durata della
cella sarà notevolmente ridotta. È importante che nella piscina sia installato il modello corretto del sistema
EcoSalt2. Davey mette a disposizione diversi modelli per ogni applicazione: dalle piccole piscine in giardino
fino alle piscine destinate a uso commerciale. (Consultare il proprio rivenditore EcoSalt2 locale per ulteriori
informazioni).
Nota: La garanzia del sistema EcoSalt2 non si applica a impianti commerciali o semi-commerciali, ovvero
laddove la richiesta di cloro della piscina è di gran lunga superiore a quella di una tipica piscina residenziale.
ITALIANO
91
Page 92

PRODUZIONE DI CLORO
Il sistema EcoSalt2 deve essere azionato quotidianamente per generare una quantità di cloro sufficiente
per sanificare la piscina. Durante l'estate, un impianto tipico richiederebbe un funzionamento di otto ore al
giorno di clorazione. A seconda del momento in cui si sceglie di azionare il sistema EcoSalt2, è consigliabile
testare il cloro residuo nella piscina nel momento in cui si prevede di trovare i livelli minimi. In quel dato
momento della giornata, se il livello di cloro residuo individuato dal test è troppo alto, ridurre il RILASCIO DI
CLORO del sistema EcoSalt2. In alternativa, se il livello di cloro residuo del test è troppo basso, aumentare il
RILASCIO DI CLORO del sistema EcoSalt2 (fare riferimento a pagina 13). I corretti equilibri chimici (vedere
pagina 29) sono fondamentali per garantire il corretto funzionamento del sistema EcoSalt2.
Nei periodi più freddi dell'anno, è in genere possibile ridurre le ore di funzionamento del sistema EcoSalt2.
Seguire le istruzioni del proprio consulente. Il rilascio del cloro può anche essere ridotto in questo periodo
attivando la MODALITÀ INVERNO (vedere pagina 19).
TRATTAMENTO “SHOCK”
Periodicamente, soprattutto in condizioni estremamente calde, potrebbe essere necessario aumentare il
livello di cloro nella piscina. Questo è possibile selezionando la MODALITÀ BOOST, che azionerà il sistema
per 24 ore (vedere pagina 15). In alternativa, aggiungere cloro liquido o granulato. Se viene aggiunto cloro
granulato, controllare regolarmente la cella, in quanto gli additivi di questo prodotto possono intasare gli
elettrodi.
TIPI DI CLORO E CONFRONTO/DIMENSIONI MAX PISCINA
Molti produttori di cloratori calibrano le proprie unità per confrontarle con il 65% di cloro granulato, rendendo
necessario adeguare le letture a un livello inferiore per determinare l’effettiva produzione di cloro. Di seguito
è riportata una tabella di confronto dei tipi disponibili di cloro utilizzati per disinfettare le piscine.
Cloro
Modello
EcoSalt2
Produzione
Massima
(g/hr 100%)
Produzione
(equivalente
g/h 65%)
prodotto in
più di 8 ore
(grammi
100%)
DES2-15E(L) 15 23 120 75m
DES2-25E(L) 25 38 200 125m3 96m
DES2-35E 35 53 280 175m3 134m
Dimensione massima della piscina
Climi freddi
<25 ºC
Climi temperati
25-30 ºC
3
58m
3
3
3
Climi caldi e
tropicali
>30ºC
3
46m
3
80m
3
112m
NOTA: Il sistema EcoSalt2 appropriato per la piscina dipende dal clima locale, dal carico
della piscina e dai tempi di funzionamento. Si noti che la durata della cella EcoSalt2 può
essere aumentata con tempi di esecuzione più brevi durante l'inverno e impostazioni di
uscita inferiori. Davey raccomanda di far funzionare il sistema EcoSalt 2 da 6 a 8 ore al
giorno durante l'estate e 4 ore durante l'inverno.
ITALIANO
92
Page 93

INFORMAZIONI GENERALI
ISTRUZIONI PER LE SOSTANZE CHIMICHE NELL’ACQUA DELLA PISCINA
BILANCIAMENTO
ACQUA DELLA
PISCINA
Valore
ideale
/intervallo
Per aumentare
Per diminuire
Cloro libero
(ppm)
1,5 - 3
Aumentare la
potenza del
cloratore.
Aggiungere cloro.
Aumentare
iltempodiltrazione.
Diminuire la potenza
del cloratore.
Diminuire
iltempodiltrazione
pH
Piscine
piastrellate
e in
calcestruzzo
7,4-7,6
Altre
superci
7,2-7,4
Aggiungere
carbonato
di sodio
Aggiungere
acido
cloridrico
.
Alcalinità
totale TA
(ppm)
80 - 150
Aggiungere
carbonato
di sodio
Aggiungere
acido
cloridrico o
acido
secco
Durezza
del calcio
(ppm)
Piscine
piastrellate e
in calcestruzzo
200-275
Altresuperci
100-225
Aggiungere
cloruro di calcio
Svuotare
parzialmente
e riempire la
piscina
con acqua di
durezza inferiore
per diluire
Stabilizzatore
- Acido
cianurico
(ppm)
25-50 ppm
(15-25 ppm in
caso di utilizzo
di un controller
ORP)
Non per le
piscine da
interno.
Aggiungere
acido
cianurico
Svuotare
parzialmente
e riempire la
piscina per
diluire
Livelli di sale
consigliati
(ppm)
A seconda
del modello
(vedere
pagina 27)
Aggiungere
sale
Svuotare
parzialmente
e riempire la
piscina per
diluire
ITALIANO
Frequenza
del test
Ogni settimana
Ogni
settimana
RISOLUZIONE DEI PROBLEMI
Nessuna produzione di cloro - Verificare:
1. Sistema non alimentato
2. Flusso insufficiente dalla pompa
3. Controllo impostato su modalità manuale
disattiva
4. RILASCIO DI CLORO impostato a “0”
5. Cella sporca
6. Il filtro necessita di controlavaggio
7. Flussostato non collegato o danneggiato
8. Il livello di sale troppo basso ha attivato
interruzione per sale basso
9. Fusibile principale bruciato
10. Pompa difettosa
Ogni
settimana
Produzione di cloro scarsa - Verificare:
1. Cella sporca; pulire se necessario
2. Il filtro necessita di controlavaggio
3. Stabilizzatore della piscina troppo basso
4. pH troppo elevato
5. Livello di sale troppo basso
6. Periodo di funzionamento inadeguato
7. RILASCIO DI CLORO impostato troppo basso
8. MODALITÀ DI COPERTURA PISCINA attivata
9. MODALITÀ SPA attivata accidentalmente
10. MODALITÀ INVERNO attivata accidentalmente
11. Pompa difettosa
12. Anomalia della cella
Ogni settimana Regolarmente Regolarmente
accidentalmente
13. La cella richiede una pulizia più frequente di
una volta a settimana; consultare l’allegato al
manuale al link:
https://www.daveywater.com/products/resources/
chlorinators/EcoSalt2_Addendum.pdf
93
Page 94

PEZZI DI RICAMBIO
DES2-25E DES2-25EL DES2-35E
VISTA ESPLOSA DEI PEZZI DI RICAMBIO
EcoSalt2
DES2-15E DES2-15EL
DES2-25E DES2-25EL DES2-35E
1
7
2
3
5
4
11
14
6
8
9
10
ITALIANO
16
15
12
13
17
QTÀ
ARTICOLO NOTE DESCRIZIONE
1 Gruppo spina di collegamento della cella 1 33021
2 Anello di bloccaggio della cella 1 16058
3 O-ring - Testa della cella 1 403377
4 Interruttore a paletta 1 16102-3SP
5 Gruppo del raccordo 2 48722B-1
6 Corpo della cella 1 16056
7 Vite 8 403625
8 Modelli alimentatore DES2-15E (L) 1 403368
8 Modelli alimentatore DES2-25E (L) e DES2-35E (L) 1 403369
9 Telaio principale 1 16073
10 Cavo di alimentazione 1 403371
12 Boccola cavo di alimentazione 1 403372
13 Gruppo PCB DES2-15E 1 33005C-15ESP
13 Gruppo PCB DES2-15EL 1 33005C-15ELSP
13 Gruppo PCB DES2-25E 1 33005C-25ESP
13 Gruppo PCB DES2-25EL 1 33005C-25ELSP
13 Gruppo PCB DES2-35E 1 33005C-35ESP
14 LCD e guarnizione PCB 1 16046C
15 Vite LCD 4 403366
16 Decalcomania pannello di controllo 1 16047
17 Cassa anteriore 1 16042
– Kit di montaggio 1 33040
– Tappo di chiusura 1 16057-1
– O-ring - Tappo di chiusura 1 403377
– Boccola di riduzione 2 403393
NECESSARIA COD. COMP.
94
Page 95

ITALIANO
95
Page 96

Garanzia Davey
Davey Water Products Pty Ltd (Davey) garantisce che tutti i prodotti venduti saranno (in condizioni di normale utilizzo e
servizio) privi di difetti materiali e di lavorazione per un periodo minimo di un (1) anno dalla data di acquisto del prodotto
originaledapartedelclientecomeindicatosullafattura,perspeciciperiodidigaranziapertuttiiprodottiDaveyvisitareil
sito web daveywater.com.
La presente garanzia non copre la normale usura o si applica ad un prodotto il quale:
• è stato oggetto di uso improprio, trascuratezza, negligenza, danneggiamento o incidente
• è stato utilizzato, azionato o sottoposto a manutenzione in modo non conforme alle istruzioni di Davey
• nonèstatoinstallatoinconformitàalleistruzionidiinstallazioneodapersonaleadeguatamentequalicato
• èstatomodicatooalteratorispettoallespecicheoriginalioinqualunquemodalitànonapprovatadaDavey
• ha subito tentativi di riparazione da parte di soggetti diversi da Davey o dai suoi concessionari autorizzati
• è stato soggetto a condizioni anomale come alimentazione di tensione errata, fulmini o picchi di alta tensione, danni da
azione elettrolitica, cavitazione, sabbia, liquidi corrosivi, salini o abrasivi,
La garanzia Davey non copre la sostituzione di qualsiasi prodotto destinato al consumo o difetti di prodotti e componenti
chesonostatifornitiaDaveydapartiterze(tuttaviaDaveyforniràun'assistenzaadeguataalnediottenereilbeneciodi
qualsiasi garanzia di parte terza).
Per rivendicare la garanzia:
• Se si ritiene che il prodotto sia difettoso, interromperne l'utilizzo e contattare il luogo di acquisto di provenienza. In
alternativa, telefonare al Servizio Clienti Davey o inviare una comunicazione a Davey come indicato nei seguenti recapiti
• Fornire la documentazione o la ricevuta della data di acquisto in originale
• Se richiesto, restituire il prodotto e/o fornire ulteriori informazioni in merito al reclamo. La restituzione del prodotto al
luogo di acquisto è a carico e responsabilità dell'acquirente.
• La rivendicazione della garanzia sarà valutata da Davey sulla base delle proprie conoscenze relative al prodotto e del
proprio giudizio ragionevole e sarà accettata se:
- siriscontraundifettosignicativo
- larivendicazionedellagaranziaèeettuataduranteilrelativoperiodocopertodagaranzia;e
- non si applicano nessuna delle condizioni escluse sopra elencate
• Alclienteverrànoticataperiscrittoladecisionerelativaallagaranziaeincasodiinvaliditàilclientedovràorganizzareil
ritiro del prodotto a sue spese o autorizzarne lo smaltimento.
Se la rivendicazione della garanzia è ritenuta valida, Davey provvederà, a sua discrezione, a riparare o sostituire
gratuitamente il prodotto.
La garanzia Davey si aggiunge ai diritti previsti dal diritto locale a favore dei consumatori. Avete diritto a una sostituzione o
al rimborso in caso di guasto grave e al risarcimento di qualsiasi altra perdita o danno ragionevolmente prevedibile. Avete
inoltre diritto a far riparare o sostituire il prodotto qualora non fosse di qualità accettabile e il guasto non costituisse un
guasto grave.
Per tutti i prodotti che sono collegati a Internet, il consumatore è responsabile nel garantire una connessione Internet stabile.
In caso di guasto della rete, il consumatore dovrà rivolgersi al provider del servizio per risolvere il problema. L'utilizzo di
un'Appnonsostituisceilmonitoraggiodapartedell'Utentealnedigarantirecheilprodottofunzionisecondoleaspettative.
L'utilizzo di un'App Smart Product è ad esclusivo rischio e pericolo dell'Utente. Nella misura massima consentita dalla legge,
Daveydeclinaognigaranziacircal'accuratezza,lacompletezzaol'adabilitàdeidatidell'App.Daveynonèresponsabileper
qualsiasiperdita,dannoocostodirettooindirettoacaricodell'utentederivantedalsuoadamentoallaconnettivitàinternet.
L'utentesollevaDaveydaqualsiasirivendicazioneoazionelegaledapartesuaoditerzichesiadanoallaconnettività
internet o ai dati delle applicazioni.
I prodotti presentati per la riparazione possono essere sostituiti da prodotti ricondizionati dello stesso tipo piuttosto che essere
riparati. Possono essere utilizzati componenti ricondizionati per la riparazione dei prodotti. La riparazione dei prodotti può
comportare la perdita di qualsiasi dato generato dall'utente. Accertarsi di aver fatto una copia di tutti i dati salvati sui prodotti.
Nella misura massima consentita dalla legge o dal regolamento, Davey declina ogni responsabilità per eventuali perdite
diprottioperdite,danniolesioniconseguenti,indirettiospeciali,diqualsivoglianaturaderivantidirettamenteo
indirettamente dai prodotti Davey. Questa limitazione non si applica ad alcuna responsabilità di Davey per il mancato
rispetto di una garanzia del consumatore applicabile al prodotto Davey secondo le leggi locali e non pregiudica i diritti o i
provvedimenti che possono essere messi a disposizione dell'utente secondo le leggi locali.
Per un elenco completo dei rivenditori Davey, visitare il nostro sito Web (daveywater.com) oppure chiamare:
ITALIANO
NORTH AMERICA
Ph: 1-888-755-8654
Email: info@daveyusa.com
Davey Water Products Pty Ltd
Member of the GUD Group
ABN 18 066 327 517
NEW ZEALAND
7 Rockridge Avenue,
Penrose, Auckland 1061
Ph: 0800 654 333
Fax: 0800 654 334
Email: sales@dwp.co.nz
daveywater.com
AUSTRALIA
Head Offi ce
6 Lakeview Drive,
Scoresby, Australia 3179
Ph: 1300 232 839
Fax: 1300 369 119
Email: sales@davey.com.au
® Davey is a trademark of Davey Water Products Pty Ltd. © Davey Water Products Pty Ltd 2020.
EUROPE
ZAC des Gaulnes
355 Avenue Henri Schneider
69330 Meyzieu, France
Ph: +33 (0) 4 72 13 95 07
Fax: +33 (0) 4 72 33 64 57
Email: info@daveyeurope.eu
MIDDLE EAST
Ph: +971 50 6368764
Fax: +971 6 5730472
Email: info@daveyuae.com
96
P/N 403450-7
Page 97

Eco
®
2
Salt
Zout water chloreringsysteem
Model: DES2-15E, DES2-15EL, DES2-25E,
DES2-25EL & DES2-35E
Installatie- en
gebruiksinstructies
NEDERLANDS
WAARSCHUWING: Niet-naleving van deze instructies en alle toepasselijke
codes kan ernstig lichamelijk letsel en/of materiële schade veroorzaken.
De installatie van dit product moet daarom worden uitgevoerd door een persoon
die ervaring heeft met de loodgieterijvereisten van zwembaden en die de
instructies voor installatie in deze handleiding correct volgt.
Geef deze instructies aan de persoon die met de uitrusting werkt.
Page 98

Eco
®
2
Salt
Gefeliciteerd! U bent nu de trotse eigenaar van een nieuwe EcoSalt2. Lees alle informatie in deze
handleiding zorgvuldig voordat u uw EcoSalt2 systeem installeert of gebruikt.
Inhoud:
ONDERDELENLIJST ......................................................................................................................................99
BELANGRIJKE VEILIGHEIDSVOORSCHRIFTEN .......................................................................................100
GEBRUIKELIJKE TERMEN ..........................................................................................................................102
INSTALLATIE VAN DE EcoSalt2 ...................................................................................................................102
AANSLUITEN VAN DE ELEKTROLYTISCHE CEL OP DE STROOMVOORZIENING .................................103
AANSLUITEN VAN DE FLOW SCHAKELAAR OP DE CELBEHUIZING .....................................................103
PRE - START-UP PROCEDURE ...................................................................................................................104
GEBRUIK VAN UW EcoSalt2 ........................................................................................................................104
CONTROLEPANEAL .....................................................................................................................................105
INITIEEL OPSTARTEN .................................................................................................................................105
TYPISCHE (DAGELIJKSE) START...............................................................................................................108
EcoSalt2 FUNCTIEKENMERKEN .................................................................................................................109
ONDERHOUD VAN DE STROOMVOORZIENING .......................................................................................121
ONDERHOUD VAN DE IN-LINE ELECTROLYTISCHE CEL ........................................................................121
DAGELIJKSE WERKING ..............................................................................................................................122
CHLOORPRODUCTIE ..................................................................................................................................124
ALGEMENE INFORMATIE ............................................................................................................................125
PROBLEEMOPLOSSING: ............................................................................................................................125
VERVANGINGSONDERDELEN ...................................................................................................................126
NEDERLANDS
98
Page 99

ONDERDELENLIJST
Models | Modelle | Modelli | Modellen | Modelos | Modèles |:
DES2-15E, DES2-15EL, DES2-25E, DES2-25EL, DES2-35E,
DES2-15US(L), DES2-25US(L), DES2-35US
Quick Reference Guide | Salt Pool Chlorination System
Kurzanleitung | Desinfektionssystem unter verwendung des salzwassers
Guida rapida | Trattamento ad acqua salata
Korte handleiding | Badzout zwembad systemen
Guia rápido de referências | Tratamento da água da piscina com base na adição de sal
Guia de referencia rapida | Sistema de sal para piscinas
Guide de référence rapide | Electrolyseur de piscine au sel
EcoSalt
®
2
M
o
d
e
l
s
|
M
o
de
l
l
e
|
M
o
de
l
l
i
|
M
o
de
l
l
e
n |
M
o
de
l
o
s
|
M
o
dè
l
e
s |
:
DES
2-
15E, DE
S
2-
15EL
,
D
ES
2-
25E, DES
2-
25EL
, DES
2-
35E
Q
u
i
c
k
R
e
fe
re
n
c
e
Gu
id
e
|
Salt
P
o
o
l
C
h
lo
rin
atio
n
Syst
e
m
Kurza
nl
ei
t
un
g
| D
es
i
nf
ek
t
i
ons
syst
em unt
er verw
endung des
sa
l
zwa
ss
ers
G
u
i
d
a
rap
id
a
|
Tratt
a
m
e
n
to
ad
acq
u
a
sala
t
a
K
o
rte
h
an
d
l
e
id
in
g
|
B
ad
z
o
u
t
zwe
m
b
a
d
sy
st
e
m
e
n
G
u
i
a
r
á
p
i
d
o
d
e
r
efer
ê
n
c
i
a
s
|
T
r
a
ta
men
to d
a
á
gu
a
d
a
p
i
s
c
i
n
a
c
om
b
a
s
e
n
a
a
d
iç
ã
o
d
e
s
a
l
G
u
ia
d
e
re
fe
re
n
ci
a
ra
p
id
a
|
Sist
e
ma
d
e
sa
l
p
ara
p
isc
in
a
s
G
u
i
d
e
d
e
ré
f
é
re
n
ce
rap
id
e
|
El
e
c
t
ro
lyse
u
r
d
e
p
isci
n
e
au
se
l
EcoSalt
®
2
2
x
2
x
www
.
bit
.
ly
/
Ec
o
S
a
lt
2
2 x
EU ü
US Ï
2 x
www.bit.ly/EcoSalt2
Salt P
ool
C
hl
orinati
on System
M
o
del
s
:
DE
S
2-
15
E
,
DE
S
2-
15E
L
,
DE
S2-25E
,
DE
S2-
2
5E
L
&
DE
S2-35E
I
n
s
t
allat
ion and O
p
erat
ing
Ins
t
ru
ct
ions
T
h
e
i
n
s
t
a
l
l
a
t
i
o
n
o
f
t
h
i
s
p
r
o
d
u
ct
s
h
o
u
l
d
b
e
c
a
r
r
i
e
d
o
u
t
b
y
a
p
e
r
s
o
n
kn
o
wl
e
d
g
ea
b
l
e
i
n
s
wi
m
m
i
n
g
p
o
o
l
p
l
u
m
b
i
n
g
r
eq
u
i
r
em
e
n
t
s
f
o
l
l
o
wi
n
g
t
h
e
i
n
s
t
al
l
a
t
i
o
n
i
n
st
r
u
c
t
i
o
n
s
p
r
o
vi
d
e
d
i
n
t
h
i
s
m
a
n
u
al
.
W
A
R
N
I
N
G:
F
ai
l
u
r
e
t
o
f
o
l
l
o
w
t
h
es
e
i
n
s
t
r
u
ct
i
o
n
s
a
n
d
co
m
p
l
y
wi
t
h
a
l
l
a
p
p
l
i
ca
b
l
e
c
o
d
e
s
m
a
y
c
au
s
e
s
er
i
o
u
s
b
o
d
i
l
y
i
n
j
u
r
y
a
n
d
/
o
r
p
r
o
p
e
r
t
y
d
a
m
a
g
e
.
o
n
t
o
t
h
e
o
pe
r
a
t
or
of
t
h
i
s
e
qu
i
pm
e
n
t
.
EcoSalt
®
2
E
NGLI
S
H
1 x
1 x
1 x
1 x
1 x
1 x1 x 1 x
2 x
EU ü
US Ï
2 x
www.bit.ly/EcoSalt2
Salt Pool Chlorination System
Models: DES2-15E, DES2-15EL, DES2-25E,
DES2-25EL & DES2-35E
Installation and Operating
Instructions
The installation of this product should be carried out by a person knowledgeable
in swimming pool plumbing requirements following the installation instructions
provided in this manual.
WARNING: Failure to follow these instructions and comply with all applicable
codes may cause serious bodily injury and/or property damage.
EcoSalt
®
2
7 LANGUAGES
English, Deutsch, Italiano,
Nederlands, Português,
Español & Français
ENGLISH
1 x
1 x
1 x
1 x
1 x
1 x 1 x 1 x
Eco
Salt
®
2
Uw EcoSalt2 bevat de volgende items, controleer de inhoud zorgvuldig voordat u het systeem installeert:
a. 1 x stroomvoorziening met celleiding;
b. 1 x flow schakelaar;
c. 1 x in-line elektrolytische cel en behuizing;
d. 1 x cel afsluitdop en o-ring;
e. 2 x koppeling inclusief moet, schroef en o-ring;
a
b c d e f
F. 2 x reductiebussen;
g. 1 x aardlek geheel;
h. 1 x quick reference guide;
I. 1 x stroomkabel; en
j. 1 x Montage schroeven & pluggen pack
g h i j
Opmerking: Uw ecoSalt2 is niets bestemd voor gebruik zonder toezicht door jonge
kinderen of invalide personen. Houd toezicht op jonge kinderen om te voorkomen dat
ze met het EcoSalt2 systeem spelen.
Elektrische aansluiting en bedrading moten worden geïnstalleerd door een erkende
elektricien.
NEDERLANDS
99
Page 100

BELANGRIJK
VEILIGHEIDSVOORSCHRIFTEN
• Om het risico op gasophoping in de cel te beperken, moet u ervoor zorgen dat er voldoende
water door de cel stroomt als de eenheid is ingeschakeld en chloor produceert.
• Het is van essentieel belang dat uw zwembadpomp voldoende water door de cel pompt om
deze volledig met water te vullen tijdens het chloreerproces.
• Controleer geregeld of de schoep van de ow beveiligingsschakelaar vrij heen en weer kan
bewegen en dat de vergrendeling goed is vastgedraaid..
ü
Diagram A
CORRECTE WERKING
MET EEN DRAAIENDE POMP
û
Diagram B
NIET CORRECTE WERKING
MET EEN DRAAIENDE POMP
• Kijk altijd of er een nieuwe versie beschikbaar is van de
installatie- en gebruiksinstructies voor deze producten.
Scan deze QR-code of ga naar: www.bit.ly/EcoSalt2
NEDERLANDS
100
 Loading...