

Page 1
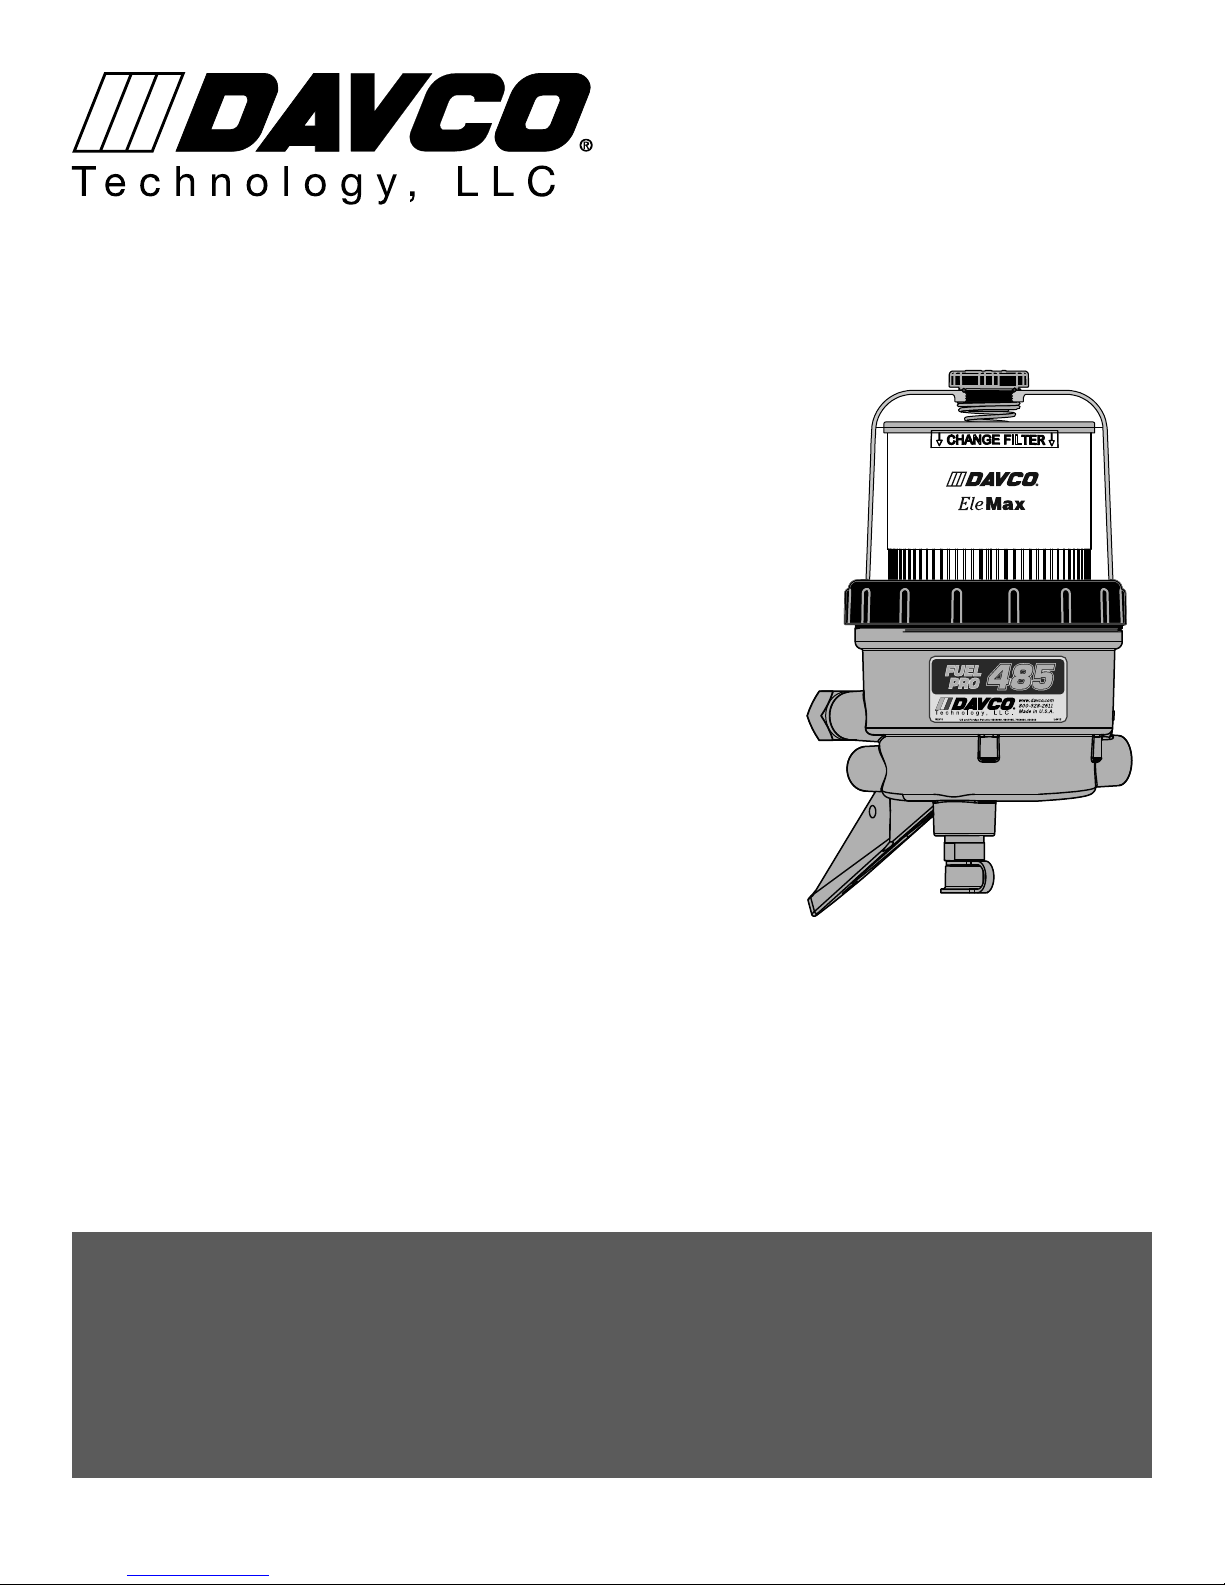
TABLE OF CONTENTS
Applications, Models, and Options....................................... 1
How it Works ...........................................................1
“SEEING IS BELIEVING”® ............................................... 2
Dimensions and Specifications.......................................... 3
E Important Safety Precautions .........................................4
Installation Instructions . . . . . . . . . . . . . . . . . . . . . . . . . . . . . . . . . . . . . . . . . . . . . . . . . 5
120VAC Overnight Heater Installation.................................... 6
Water-in-Fuel Sensor (WIF) Installation ..................................6
12VDC/24VDC Pre-heater Installation ................................... 7
Visual Diagnostics - Air vs. Vapor Bubbles................................ 8
Visual Diagnostics with Clear Cover ..................................... 9
Diagnostic Procedures - Air Leaks ......................................10
Diagnostic Procedures - Check Valve and Heater Testing ................11
Service Procedure - Bypass Valve.......................................12
Filter Change Procedure ...............................................13
Preventative Maintenance .............................................14
Service Part Numbers..................................................15
Warranty Policy ........................................................17
Parts Return Policy ....................................................18
FOR UPDATED INFORMATION VISIT WWW.DAVCO.COM
FUEL PRO 485
TECHNICAL MANUAL FOR DTNA
2018 ©DAVCO Technology, LLC. Last Updated: 05/18/17
F1485 REV A
Page 2

Page 3
Technology, LLC
APPLICATIONS, MODELS, AND OPTIONS
FUEL PRO® 485
®
TECHNICAL MANUAL
Applications 2017 engine models
• Detroit DD13, DD15, DD16
• Cummins X15
• New Cascadia
Meets/Exceeds 2017 engine manufacturer’s stringent water separation
requirements
Models and Options
• Base Model - Unheated
• Electric Pre-heater Options
• 12VDC PTC pre-heater
• 120 VAC Overnight heater
• Water-in-Fuel (WIF) Sensor (standard
when used with Cummins X15 Engines)
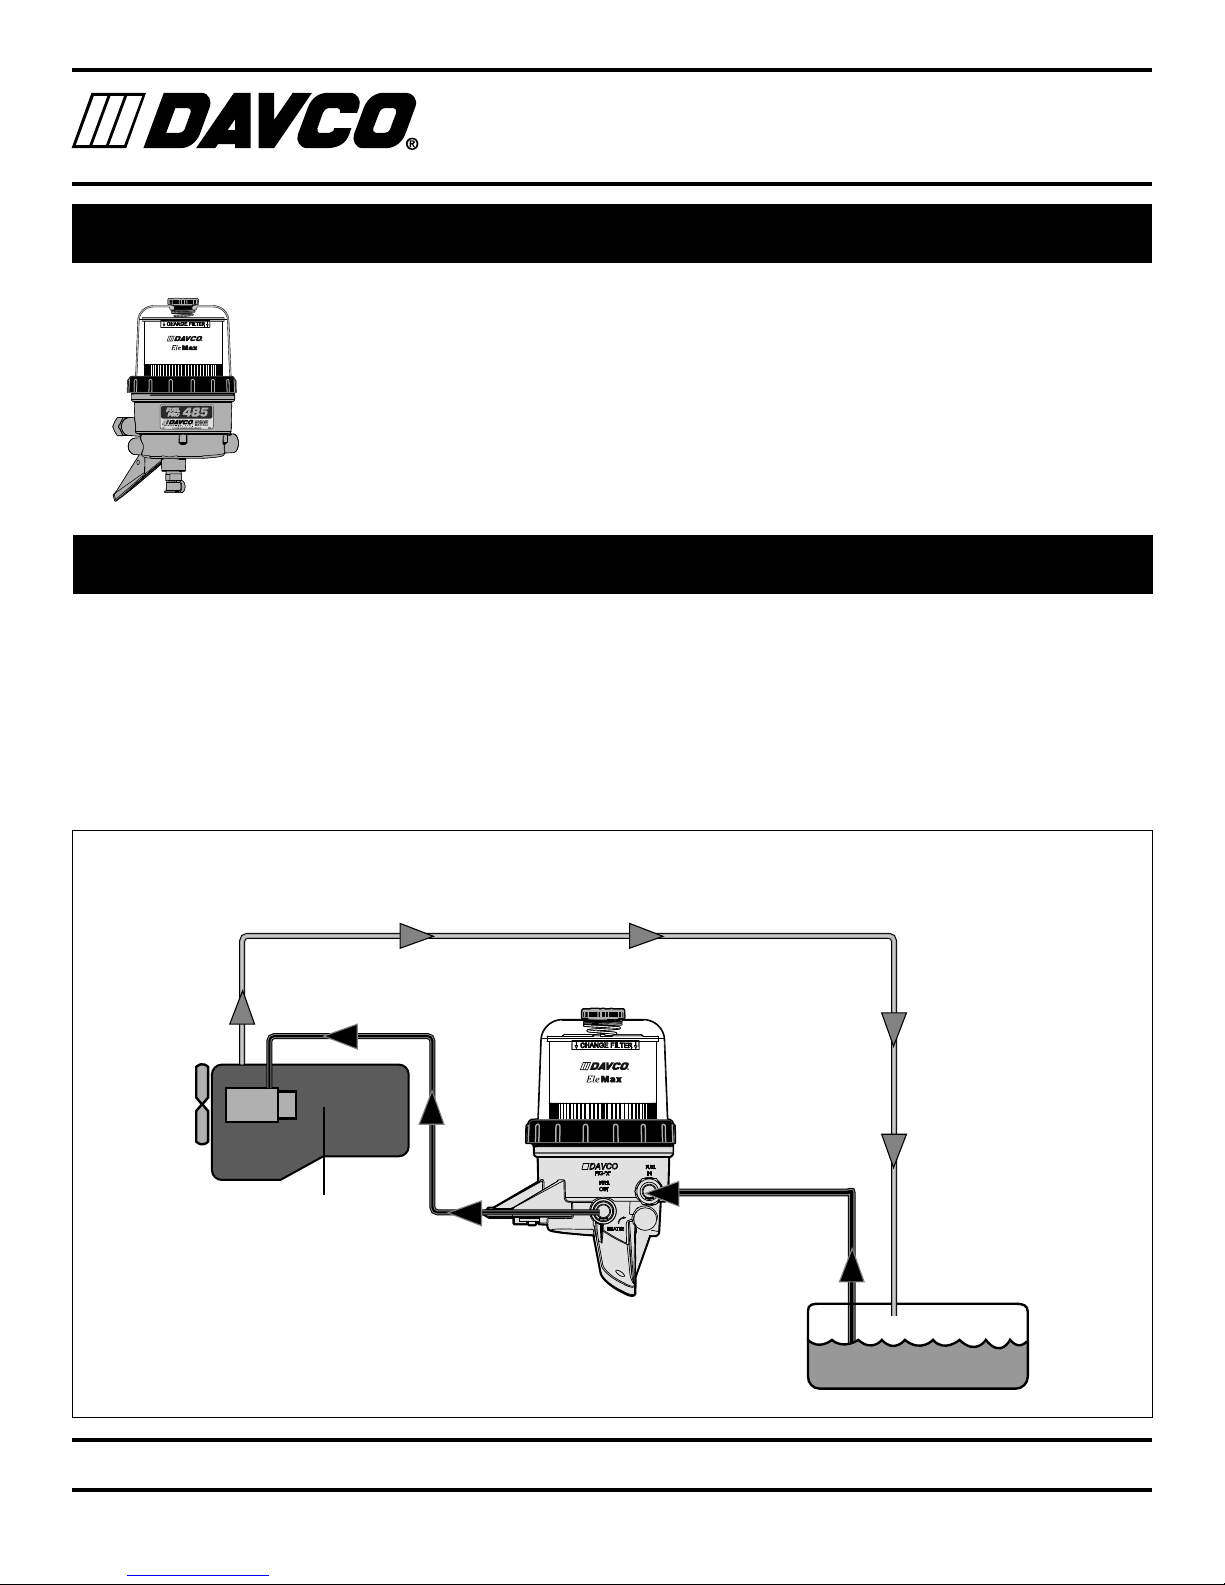
HOW IT WORKS
• Fuel from the tank enters the Fuel Processor body (suction side of the fuel system).
• Large contaminants and “free” water are separated from the fuel and remain in the body.
• Fuel rises into the clear cover.
• Contaminants and emulsified water are captured by the filter media.
• Fuel level rises to maintain a fuel path through the clean filter media and with lowest restriction.
• Clean, water-free fuel exits the Fuel Processor and flows to the engine fuel module.
Fuel System Diagram
FUEL TO ENGINE
ENGINE LIFT PUMP
DAVCO Technology, LLC www.davco.com800-328-26111600 Woodland Drive, Saline, MI 48176-1629
FUEL TO FUEL TANK
FUEL FROM
FUEL TANK
FUEL TANK
F1485 REV B
1
Page 4
FUEL PRO® 485
®
Technology, LLC
“SEEING IS BELIEVING”®
See when NOT to change the fuel filter.
See the condition of the fuel. Seeing what collects on the filter media or what’s happening inside the clear cover can help
diagnose many fuel and mechanical conditions.
“Filter on Top” configuration. Water and debris removed from the fuel falls to the lower chamber and stays away from the
filter media resulting in longer filter life.
Built in protection when priming the fuel filter. Unfiltered fuel is kept on the “dirty” side of the filter media during priming
ensuring only clean fuel reaches the engine.
Patented media. The “Best in Class” StrataPore™ media removes 98% of free and emulsified water over the life of the filter.
This far exceeds the performance of cellulose media.
TECHNICAL MANUAL
When new, the fuel level in the filter will be very low
with minimal restriction. As the filter is used, contami-
nants collect on the filter from the bottom up. Fuel rises
on the filter indicating remaining filter life.
Fuel level at filter wrap level. Even though the fuel level
is now more than half of the filter element, the fuel is still
flowing through clean media at minimal restriction levels.
The filter still has significant life remaining.
Fuel level increases in clear cover. As contaminants
collect on the filter, the fuel rises to a non-contaminated
section of the filter, providing optimal filtration while
maintaining lowest restriction.
The filter element is now completely covered by fuel.
At this point, all of the media’s surface area is utilized.
Restriction is increasing and the filter element should be
changed at the next scheduled maintenance interval.
DAVCO Technology, LLC www.davco.com800-328-26111600 Woodland Drive, Saline, MI 48176-1629
F1485 REV B
2
Page 5
Technology, LLC
®
TECHNICAL MANUAL
DIMENSIONS AND SPECIFICATIONS
All dimensions are in inches (millimeters)
FUEL PRO® 485
RIGHT VIEW TOP VIEW
FRONT VIEW LEFT VIEW
SPECIFICATIONS
Height Overall 15.54 in.
Depth Overall 10.34 in.
Width, Max. 11.62 in.
Weight, Dry 10.35 lbs
Fuel In Connection M22 x 15-6H
Fuel Out Connection M22 x 15-6H
Filter Service Clearance Min. 5.5 in.
Max. Fuel Flow 180 gph
Electric Pre-heater 12VDC (155W or 195W) or
24VDC (195W)
Overnight heater 120VAC, 75 W, .65 A
FILTRATION PERFORMANCE AT 174 GPH
Micron 8
Coarse water removal (%) >99%
Emulsified water removal (%) >93%
% Emulsified water removal (end of life filter) >80%
Dirt holding capacity (grams) 150
2.00
1.80
1.60
1.40
1.20
1.00
0.80
0.60
0.40
0.20
0.00
0 50 100 150 200 250
Differential Pressure (in-Hg)
Restriction vs. flow
Flow (gph)
DAVCO Technology, LLC www.davco.com800-328-26111600 Woodland Drive, Saline, MI 48176-1629
F1485 REV B
3
Page 6
FUEL PRO® 485
®
Technology, LLC
E IMPORTANT SAFETY PRECAUTIONS
Preventative Maintenance
Environmental Concerns and Seasonal Maintenance
• Steam clean the DieselPro with fresh water regularly to keep corrosive salt or dirt from building up on the housing, cover
and collar.
• Extreme winter or salt corrosion environments may require lubrication of the collar with anti-seize lubricant every 180 days.
Weekly water drains
1. Turn off the engine and remove the vent cap.
2. Place a suitable container under the DieselPro and open the drain valve.
3. Collected water will flow into the container. When fuel begins to flow out the drain, close the drain valve. Drain the least
amount of fuel as possible.
4. Install the vent cap and tighten it by hand until it clicks.
5. Start the engine and raise the RPM for one minute to purge the air from the system.
During each filter change
• Change the o-rings on the cover and vent cap (included with the service filter kit).
Annual inspection
• Inspect all electrical connections for corrosion.
• Inspect all fuel fittings for leaks.
• Inspect the DieselPro for damage or signs of leaks.
TECHNICAL MANUAL
DAVCO Technology, LLC www.davco.com800-328-26111600 Woodland Drive, Saline, MI 48176-1629
F1485 REV B
4
Page 7
®
Technology, LLC
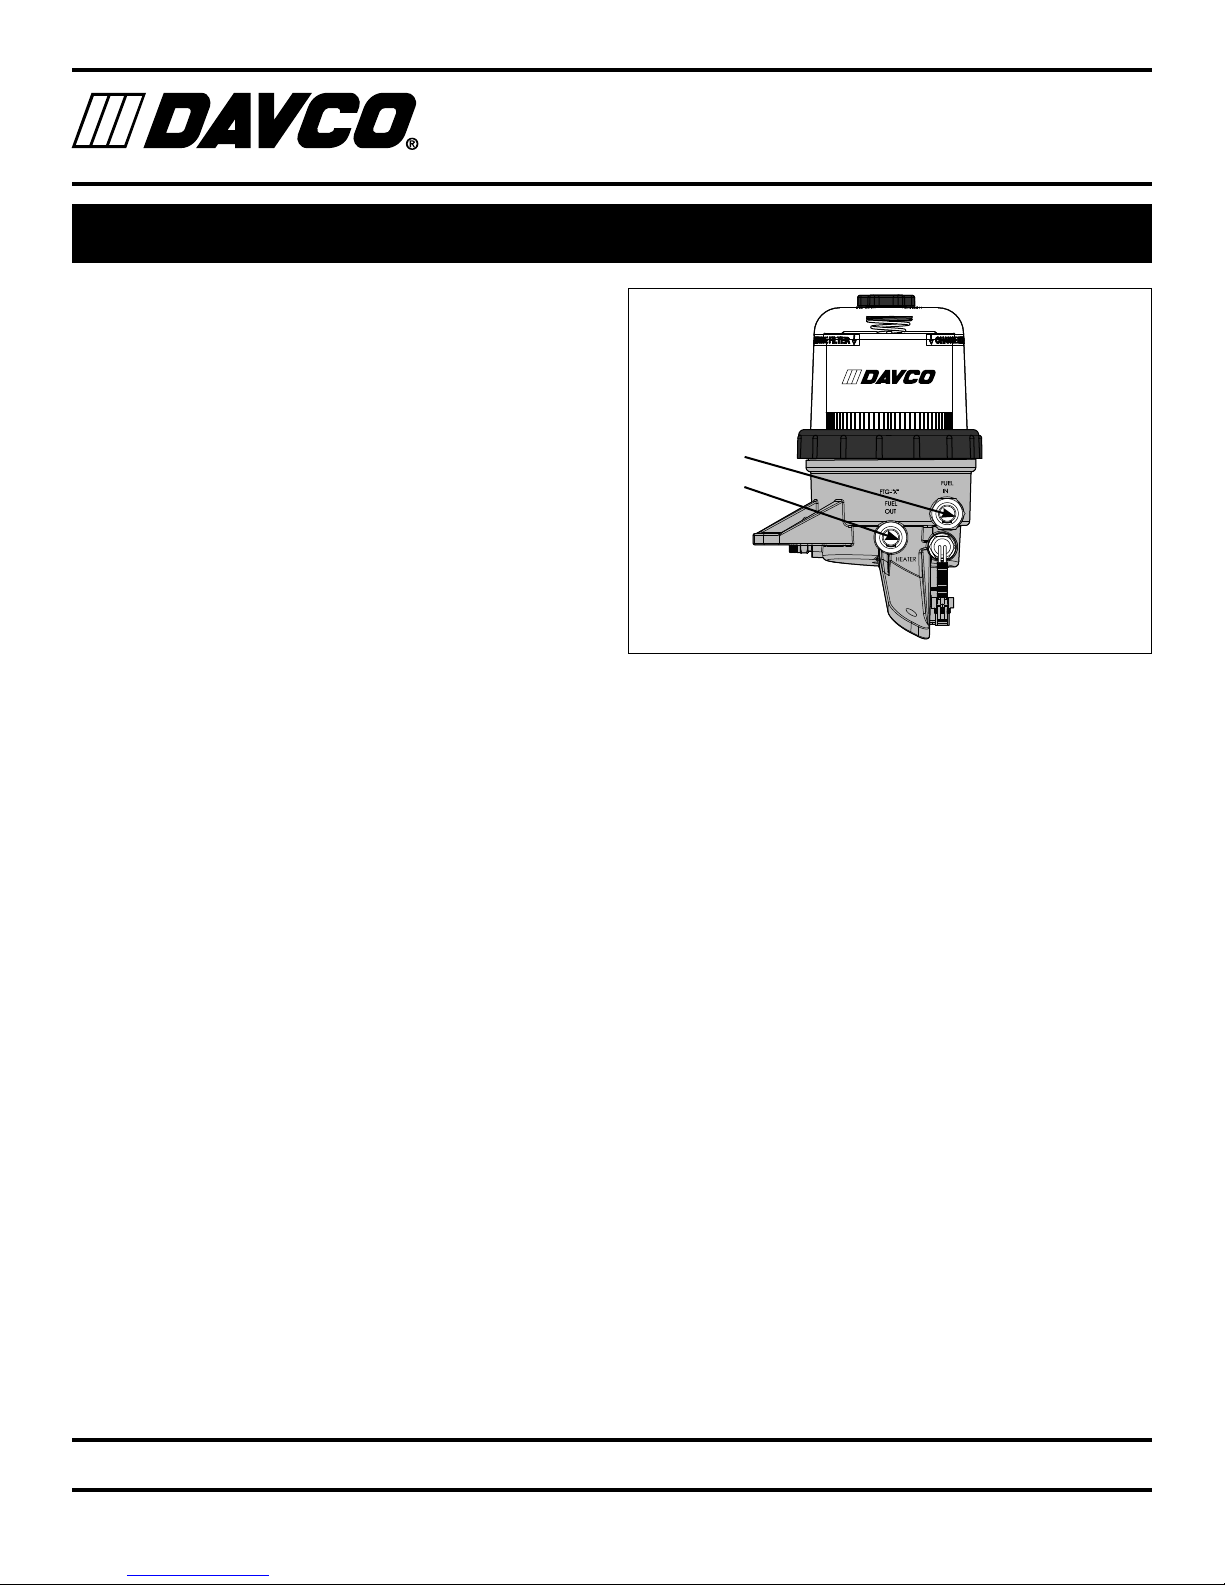
INSTALLATION INSTRUCTIONS
Installation Location
The FuelPro must be installed between the fuel tank and the
fuel transfer pump. In some cases, the FuelPro can be used
as the only fuel filter in the system. This is generally dependent on the engine model year. Consult the engine manufacturer for their recommendation.
Mounting the FuelPro
• Do not install the FuelPro directly on the engine.
• Mount vertically with the cover and element pointing up.
• Make sure there is enough top and side clearance for the
cover to be conveniently removed for filter replacement.
• The FuelPro MUST be installed so that the filter element
is above the "FULL" level of the fuel tank.
E The ignition key must be in the off position, unless oth-
erwise directed. To avoid unintentional engine startup,
use a lockout key and/or signage to alert personnel
that work is being performed. Chock the wheels.
1. With the engine shut down and at ambient temperature,
close the fuel shutoff valve (if equipped) and place a suitable container under the fuel filters.
2. Remove the primary fuel filter element assembly,
sedimenter, and/or water separator. Drain the used
element and dispose of it in an environmentally responsible manner, according to state and/or federal (EPA)
recommendations.
Fuel Line Routing
To minimize fuel system restriction, observe the following
guidelines when plumbing the fuel system:
• Keep the fuel line routing as smooth as possible with no
low-hanging loops which can trap water.
• Use 90° elbows only when necessary.
• If the fuel hoses are cut to length on the job, be sure that
the inner liner of the fuel hose is not cut by the fitting,
which can cause check valve performance issues. Make
sure hoses are clean and free of debris before installing.
• To avoid damaging the aluminum FuelPro body, do not
over-tighten fuel lines or fuel line fittings.
FUEL PRO® 485
TECHNICAL MANUAL
FUEL IN
FUEL OUT
1. Route the fuel supply line from the pick up on the fuel
tank to the FuelPro inlet (labeled “FUEL IN” on figure
below, not labeled on housing).
2. Route the fuel outlet line from the FuelPro outlet (labeled
“FUEL OUT”) to the inlet of the fuel pump.
Priming the Fuel System
1. Check to make sure the drain valve at the base of the
FuelPro is closed.
2. Remove the vent cap from the top of the clear cover. Fill
the FuelPro full with clean fuel. Re-install the vent cap.
Tighten the vent cap by hand until it clicks.
3. Start the engine. When the lubrication system reaches its
normal operating pressure, increase engine RPM to high
idle for one to two minutes. After the air is purged loosen
the vent cap until the fuel level lowers to just above the
collar. Tighten the vent cap by hand until it clicks.
4. Apply downward pressure on the top of the cover and
rotate the collar until contact.
5. Use a DAVCO wrench if necessary to tighten 3 additional
ribs..
The clear filter cover will not fill completely during engine
operation. It will gradually fill over time and the fuel level will
rise as the filter becomes contaminated.
DAVCO Technology, LLC www.davco.com800-328-26111600 Woodland Drive, Saline, MI 48176-1629
F1485 REV B
5
Page 8

Technology, LLC
120VAC OVERNIGHT HEATER INSTALLATION
FUEL PRO® 485
®
TECHNICAL MANUAL
The FuelPro 120VAC overnight heater is installed in the side
of the FuelProcessor.
120VAC Overnight
Heater Port
WATERINFUEL SENSOR WIF INSTALLATION
1. Open the vent cap. Open the drain valve by turning one to
one and a half revolutions. Drain the FuelPro completely.
Close the drain valve.
2. Remove the pipe plug from the heater port.
3. Apply liquid thread sealant to the heater threads and
install into the 120VAC overnight heater port on the
FuelPro. Tighten to 15-30 ft-lbs.
4. Connect the wire harness to the heater and route the
harness to a location where it can easily be plugged into
a 120VAC outlet.
5. Prime the FuelPro and check for leaks.
1. Open the vent cap. Open the drain valve by turning one to
one and a half revolutions. Drain the FuelPro completely.
Close the drain valve.
2. Install WIF into WIF port. Torque to 20-24 in-lbs.
3. Install the filter and prime the unit.
DAVCO Technology, LLC www.davco.com800-328-26111600 Woodland Drive, Saline, MI 48176-1629
WIF Port
F1485 REV B
6
Page 9

Technology, LLC
12VDC24VDC PREHEATER INSTALLATION
FUEL PRO® 485
®
TECHNICAL MANUAL
The 12VDC or 24VDC electric pre-heater is installed in the
pre-heater port on the side of the FuelPro.
Pre-heater Port
1. Open the vent cap. Open the drain valve by turning one to
one and a half revolutions. Drain the FuelPro completely.
Close the drain valve.
2. Remove the pipe plug in the heater port.
3. Apply liquid thread sealant to the pre-heater threads and
install into the bottom plate. Tighten to 15-30 ft-lbs.
4. Connect the chassis harness to the FuelPro harness.
5. Connect the power lead to the fused accessory side of
the ignition switch. The fuse rating depends on the preheater installed.
6. Prime the FuelPro and check for leaks.
Approved fuse ratings
• 12VDC System:
- 20 amp fuse for a 155W PTC heater
- 25 amp fuse for a 195W PTC heater
• 24VDC System:
- 15 amp fuse for a 195W PTC heater
If the keyed circuit will not handle the required amperage for
the pre-heater, use a relay.
Pre-heater Wiring with Relay
Harness
Connector
Pre-heater Fuse
OPTIONAL
RELAY
DAVCO Technology, LLC www.davco.com800-328-26111600 Woodland Drive, Saline, MI 48176-1629
87
85
Heater
30/51
12/24 VDC
+ -
Ignition
Circuit
Fuse
86
87A
87
86
85
30/51
F1485 REV B
7
Page 10

FUEL PRO® 485
®
Technology, LLC
VISUAL DIAGNOSTICS AIR VS. VAPOR BUBBLES
There are two kinds of bubbles that may be visible at the fuel pump inlet of a diesel fuel system. The bubbles can be
characterized as either air bubbles or vapor bubbles.
TECHNICAL MANUAL
Air Bubbles
Air bubbles are caused by any air leak on the vacuum (suction) side of the fuel system from the fuel tank pick-up to, and
including, the lift pump.
If there is an air leak in the fuel system, air bubbles will be
present in the clear cover of the Fuel Pro follow Diagnostic
Procedures for air leak diagnostics. If there are no bubbles
present in the Fuel Pro cover and the engine continues to
run rough, lopes or has a loss of power, there may be an air
leak between the Fuel Pro outlet port and lift pump inlet. This
type of air bubble can be seen if a sight tube is installed at
the lift pump inlet. Air bubbles may also be visible in the fuel
return (spill) hose out of the fuel gallery. These leaks are easily
eliminated by checking and torquing the fuel fittings in the
area of the leak.
NOTE 1: A quick procedure to determine if the air leak is
between the fuel tank and the Fuel Pro is to remove the Fuel
Pro inlet hose and route a new hose from the Fuel Pro inlet
into a container of fuel or the fuel tank fill cap opening. Start
the engine and check for bubbles.
If there are no air leak symptoms, but bubbles are present in a
sight tube at the fuel lift pump inlet, they are most likely vapor
bubbles.
Vapor Bubbles
All diesel fuel has some level of entrained air caused by the
natural splashing that occurs in the fuel tank during normal
vehicle or equipment operation. Vapor bubbles develop in the
Fuel Pro because the pressure inside the Fuel Pro is lower
than the atmospheric pressure in the fuel tank. Vapor bubbles
can vary from champagne size up to ¼" in diameter. They
may increase in size or volume as engine rpm increases. The
lower pressure draws the entrained air/vapor out of the fuel
and these bubbles will be visible as the fuel exits the Fuel Pro.
As the fuel enters the lift pump, it is pressurized and the
bubbles are compressed back into the fuel. There will be no
bubbles on the fuel return side of the system. These vapor
bubbles will not affect the performance of the engine.
NOTE 2: An easy way to determine the difference between
vapor and air bubbles is by temporarily removing the filter
element from the Fuel Pro. Fill the cover with clean diesel
fuel, replace the vent cap. Tighten the vent cap by hand until
it clicks. Re-run the outlet fitting sight glass test. If there are
no bubbles present in the sight glass then they were vapor.
If bubbles are still present then they are air. If air bubbles
still exist, re-run the test in NOTE 1 to eliminate the chassis
plumbing as a variable.
There is no troubleshooting or repair procedure required
for vapor bubbles. Vapor bubbles do not cause performance issues and will not be present after the lift pump.
AIR BUBBLES VAPOR BUBBLES
DAVCO Technology, LLC www.davco.com800-328-26111600 Woodland Drive, Saline, MI 48176-1629
F1485 REV B
8
Page 11

®
Technology, LLC
TECHNICAL MANUAL
VISUAL DIAGNOSTICS WITH CLEAR COVER
Fuel level is not at the top of the fuel filter.
ÎNormal - Do not change the filter.
Fuel level is at the top of the filter and appears to be full of wax.
ÎChange the filter - Run the engine for a minimum of 25 minutes at idle. Do not run at full RPM.
Bubbles are seen flowing in with the fuel.
ÎCheck all fittings and lines from the fuel tank to the FuelProcessor. Check lower and upper collar
o-rings.
FUEL PRO® 485
Fuel drains back to the fuel tank when changing the fuel filter or draining separator.
ÎRemove the check valve assembly. Clean or replace and retest. Check air leaks in the fuel system.
Fuel level is at the top of the filter. Low power.
ÎChange the filter at the first available opportunity.
There is a power complaint and the fuel level is below the collar.
ÎCheck for a missing grommet at the lower end of the filter or missing/broken spring at top of filter.
Water is noticed in the cover.
ÎDrain the water.
DAVCO Technology, LLC www.davco.com800-328-26111600 Woodland Drive, Saline, MI 48176-1629
F1485 REV B
9
Page 12

Technology, LLC
DIAGNOSTIC PROCEDURES AIR LEAKS
FUEL PRO® 485
®
TECHNICAL MANUAL
Every FuelPro is factory tested for leaks and is identified
with a traceable number prior to shipment. Most field issues
associated with leaks are related to loose fittings. These
leaks are easily eliminated by checking and torqueing the fuel
fittings in the area of the leak. Some fittings may also require
the application of liquid or paste type thread sealant.
All suction side fuel filters experience bubbles. It is normal
to see champagne size bubbles in the FuelPro cover, at the
FuelPro outlet or at the lift pump.
IN ORDER TO RETURN A FUELPRO FOR EVALUATION,
THE FOLLOWING PROCEDURESTESTS MUST BE
COMPLETED BEFORE REQUESTING A DAVCO RGA
RETURN GOODS AUTHORIZATION NUMBER.
I. Air bubbles will be visible in the clear cover of the
FuelPro if the leak originates between the fuel tank and
the FuelPro. The following is a quick test to isolate the air
leak source.
A. Remove the FuelPro inlet hose.
1. Install a jumper hose from the FuelPro to the
fuel tank (through the fill cap) or to a container of
fuel.
2. Start the engine. If this eliminates the air
bubbles, the air source is at the fuel tank fittings
or hose connections.
3. Tighten all fittings and connectors. Retest.
a. If air bubbles persist, the air source is on the
FuelPro side of the system:
i. Tighten all fittings on the FuelPro.
ii. Loosen the collar until it spins freely.
Apply downward pressure on the top of
the cover and rotate the collar until contact. Use a DAVCO wrench (if necessary)
to tighten the collar three additional ribs.
b. If the drain valve is suspected, install a plug
in place of the drain valve (for test purposes
only).
4. If air bubbles persist, test as follows:
a. Remove the FuelPro from the chassis.
b. Plug the fuel outlet port. Do not remove filter,
cover/collar, vent cap, drain valve and/or
check valve. If the FuelPro is equipped with a
pre-heater, do not remove the pre-heater.
c. Apply 15 PSI of air pressure at the fuel inlet.
Immerse the FuelPro in a tank of water and
look for air bubbles.
d. Correct the source of the air leak and retest.
II. Bubbles Not Visible: If there are symptoms of sucking air
(indicated by engine loping/rough running performance/
power loss, etc.) and there are no bubbles in the clear
cover, the air leak is either at the FuelPro outlet fitting,
vent cap o-ring, the lift pump inlet connection, or the fuel
hose/connections to the lift pump. Inspect and tighten
fittings as needed.
III. Excessive Restriction: If the fuel level is at the top of the
filter, replace the fuel filter. The FuelPro will not cause
excess system restriction if the fuel level is below the top
of the filter. The only exception is if the grommet is not
installed in the bottom of the filter element.
IV. Loss of Prime: When air is introduced into the fuel
system, (i.e. draining water from the FuelPro or when
replacing the fuel filter) a check valve is needed to keep
the fuel system primed from the FuelPro back to the fuel
tank. A check valve is standard with every FuelPro.
V. To test for proper check valve operation, place a drain pan
under the FuelPro, remove the fuel inlet hose and open
the vent cap. Fuel should not flow out of the FuelPro,
although slight seepage of fuel is normal. If fuel flows out
of the FuelPro fuel inlet, “Check Valve Service”.
DAVCO Technology, LLC www.davco.com800-328-26111600 Woodland Drive, Saline, MI 48176-1629
F1485 REV B
10
Page 13

Technology, LLC
DIAGNOSTIC PROCEDURES CHECK VALVE AND HEATER TESTING
FUEL PRO® 485
®
TECHNICAL MANUAL
Check Valve Diagnostics
1. To test for proper check valve operation, remove the fuel
inlet hose and open the vent cap. Fuel should not flow
out of the FuelPro, although a slight seepage of fuel is
normal. If fuel drains back to the fuel tank, remove the
check valve assembly at the fuel inlet fitting.
2. Open the vent cap. Open the drain valve by turning one to
one and a half revolutions. Drain the FuelPro completely.
Close the drain valve.
3. Use a back-up wrench to hold the check valve body and
remove the fuel hose from the inlet of the FuelPro.
4. Remove and disassemble the check valve assembly.
5. Clean and inspect the check valve body. Replace the
check valve body if any cuts, grooves or nicks are evident
or if the ball seat is not smooth.
6. Inspect the check valve spring and spring retainer. If the
spring or spring retainer is broken or if the check ball
has groves, nicks or is out of round, replace with a check
valve service kit. Otherwise, clean and reassemble the
check valve assembly. The spring retainer snaps into a
groove in the check-valve body.
7. Replace the check valve assembly into the body and
torque to 30-55 ft-lb.
8. Connect the fuel inlet hose, using liquid or paste type
thread sealant.
9. Prime the fuel system, start the engine and check for any
fuel leaks.
PTC Pre-heater/Overnight Heater
Testing Procedures
E Do not energize pre-heater/heater outside of the
Diesel Pro. Caution! Very hot.
Equipment Needed: A precision low resistance ohm
meter capable of measuring with accuracy to two decimal
places.
1. Disconnect the harness from the pre-heater or overnight
heater.
2. Connect the ohm meter leads to the pins of the preheater or overnight heater. Use the following to determine
whether the resistance value is in the acceptable range.
PTC Pre-heater Watts Resistance Range (ohms)
12VDC (PTC) 195 W 0.4 to 0.6 @ 77°F (25°C)
24VDC (PTC) 195 W 2.0-3.0 @ 77°F (25°C)
12VDC (PTC) 155W 0.95 to 1.2 @ 77°F (25°C)
Overnight Heater Watts Resistance Range (ohms)
120VAC 75 W 173 to 203 @ 77°F (25°C)
DAVCO Technology, LLC www.davco.com800-328-26111600 Woodland Drive, Saline, MI 48176-1629
F1485 REV B
11
Page 14

Technology, LLC
®
TECHNICAL MANUAL
SERVICE PROCEDURE BYPASS VALVE
FUEL PRO® 485
Bypass valve Installation
1. Remove the vent cap. Open the drain valve by turning one
to one and a half revolutions. Drain the FuelPro completely. Close the drain valve.
2. Remove the collar (using a DAVCO wrench) then remove
the clear cover.
3. Remove the filter.
4. Using a clean shop rag, clean the cover, the collar and the
threads on the FuelPro body.
5. Flush the inside of the FuelPro body with clean diesel
fuel to clear it of any debris.
6. Remove the bypass valve assembly and discard.
7. Remove the protective cap from the replacement bypass
valve assembly.
8. Install the replacement bypass valve assembly into the
FuelPro body (torque to 20 ft-lbs).
9. Install the filter. Refer to the section “Filter Change” to
ensure that the filter is aligned correctly.
10. Apply downward pressure on the top of the cover and
rotate the collar until contact.
11. Use a DAVCO wrench (if necessary) to tighten 3 additional ribs.
12. Prime the unit by filling the clear cover with diesel fuel
until it reaches the top of the filter.
13. Install the vent cap. Hand tighten until it clicks.
14. Start the engine and run for one minute. Slowly open the
vent cap and allow the fuel level to drop to about one inch
above the collar.
15. Hand tighten the vent cap until it clicks.
Bypass Valve
DAVCO Technology, LLC www.davco.com800-328-26111600 Woodland Drive, Saline, MI 48176-1629
F1485 REV B
12
Page 15

Technology, LLC
®
FILTER CHANGE PROCEDURE
FUEL PRO® 485
TECHNICAL MANUAL
Recommended Filter Guide
FILTERS AVAILABLE THROUGH OEM DISTRIBUTORS
DDC A0000905051
Fleetguard FS20083
1. Turn off the engine. Remove the vent cap and dispose of
the o-ring. Clean the threads of the vent cap and on the
top of the cover. Set the vent cap aside.
2. Open the drain valve by turning one to one and a half
revolutions and drain the fuel completely from the unit,
then close the drain valve.
1-1.5x 1-1.5x
First Generation Drain Second Generation Drain
3. Using the Collar Wrench, loosen the collar.
4. Remove the clear cover and collar from the Fuel Pro.
Discard the cover o-ring and install a new o-ring (supplied with the filter) on the cover. Clean the threads on
the collar and the body.
5. Install the new o-ring on vent cap (supplied with the
filter).
6. Remove the filter element by pulling upward.
7. Install the new filter element. Position the filter element
so the key is lined up with the keyway on the separator
plate of the housing. Use the arrow on the top of the
endplate to align the filter. Ensure the filter element is
fully seated by firmly pushing on the endplate. The filter
should not rotate freely.
Endplate
Arrow
Key
Keyway
Separator plate
8. After checking to make sure the new o-ring seal is seated
correctly on the base of the cover, install the cover and
collar.
9. Apply downward pressure on the top of the cover and
rotate the collar until contact.
DAVCO Technology, LLC www.davco.com800-328-26111600 Woodland Drive, Saline, MI 48176-1629
F1485 REV B
13
Page 16

Technology, LLC
®
PREVENTATIVE MAINTENANCE
FUEL PRO® 485
TECHNICAL MANUAL
2. Use a DAVCO wrench to tighten 3 additional ribs.
1
3
2
3. Prime the unit by filling the clear cover with clean diesel
fuel until it reaches the top of the filter.
4. Install the vent cap. Tighten the vent cap by hand until it
clicks.
Preventative Maintenance
Weekly – Drain water
1. Turn off the engine and open the vent cap.
2. Place a suitable eight ounce, plastic or metal container
under the drain valve at the base of the Fuel Pro.
3. Turn the drain valve one to one and a half revolutions to
open the drain valve.
4. Water will flow into the container. When fuel begins to
flow out the drain, close the drain valve. Drain the least
amount of fuel as possible.
5. Tighten the vent cap by hand until it clicks.
6. Start the engine. Raise the RPM for one minute to purge
the air from the system.
Every filter change
• Change the cover and vent cap o-rings (included
with the service filter kit).
Every 12 months
• Check all electrical connections for corrosion.
Check all fuel fittings for leaks.
• Extreme winter or salt corrosion environments may
require lubrication of the collar threads with
anti-seize lubricant every 180 days.
5. Start the engine. When the lubrication system reaches its
normal operating pressure, increase engine RPM to high
idle for one to two minutes.
6. After the air is purged loosen the vent cap until the fuel
level drops to just above the collar. Tighten the vent cap
by hand until it clicks.
DAVCO Technology, LLC www.davco.com800-328-26111600 Woodland Drive, Saline, MI 48176-1629
14
F1485 REV B
Page 17

®
Technology, LLC
SERVICE PART NUMBERS
ITEM DESCRIPTION DTNA PN
A Vent Cap Service Kit DVC 240023DAV
B Collar Wrench DVC 482017
C Cover, Collar and Vent Cap DVC 482044
not shown Cover and Collar (black band) and Vent
Cap
D Collar DVC 482003
E Filter Spring DVC 380056
F O-Ring Service Kit, Vent Cap/Cover DVC 482022
G Bypass Valve DVC 482010SVC
H Pre-heater 120V Overnight DVC 102145
I Check Valve Assembly M22 DVC 482012
see below Check Valve Service Kit DVC 101132
Check Valve Assembly (with body) P/N DVC 482012
DVC 482046DAV
FUEL PRO® 485
TECHNICAL MANUAL
B
F
A
E
C
Cover,
Collar,
Vent Cap
Service Kit
Check Valve Service Kit
P/N DVC 101132
J Plug DVC 020909
K-see next
page
L Quick Connect Drain Valve - Includes:
M Retaining Ring DVC 485025DAV
N Drain Valve Seal Service Kit DVC 485021DAV
O Drain Valve Dust Cap DVC 102712DAV
P WIF (see next page) DVC 102770
FILTERS AVAILABLE THROUGH OEM DISTRIBUTORS
DDC A0000905051
Fleetguard FS20083
PTC Pre-heater 12V-155W Metri Pack DVC 103594DAV
PTC Pre-heater 12V-195W Metri Pack DVC 103528
PTC Pre-heater 24V-195W Weather Pack DVC 102692
valve body, retaining ring (M), both seals
(N), drain valve and protective cap (O)
Check Valve
Body
DVC 485022DAV
PARTS ARE AVAILABLE THROUGH
DAIMLER TRUCKS NORTH AMERICA
D
G
K
H
Housing is not a
service part.
J
M
N
I
L
O
H
FOR UPDATED INFORMATION, VISIT WWW.DAVCO.COM
P
DAVCO Technology, LLC www.davco.com800-328-26111600 Woodland Drive, Saline, MI 48176-1629
F1485 REV B
15
Page 18

®
Technology, LLC
SERVICE PART NUMBERS
PART NUMBER DESCRIPTION
DVC102145 120VAC 75W Overnight heater
DVC103528 12VDC 195W PTC Pre-heater (Metri-Pack)
Harness Length 19.5 inches
DVC103594 12VDC 155W PTC Pre-heater (Metri-Pack)
Harness Length 19.5 inches
DVC 102692 24VDC 195W PTC Pre-heater Weather Pack
Harness Length 18.5 inches
DVC 102770 WIF Metri-Pack
Harness Length 6.5”
FUEL PRO® 485
TECHNICAL MANUAL
DAVCO Technology, LLC www.davco.com800-328-26111600 Woodland Drive, Saline, MI 48176-1629
F1485 REV B
16
Page 19

FUEL PRO® 485
®
Technology, LLC
WARRANTY POLICY
Please review DAVCO’s Product Warranty terms and conditions carefully before installing and/or using a
DAVCO product.
DieselPro
DAVCO Technology, LLC warrants these products to be free of defects in material and workmanship for five years, 500,000 miles
or 10,000 hours (whichever comes first) and electrical parts for two-years, 200,000 miles or 4,000 hours (whichever comes first)
from the purchase date*.
Shop Pro®
DAVCO Technology, LLC warrants the Shop Pro (except for the motor) to be free of defects in material and workmanship for two
years from the date of purchase. The Shop Pro motor is warranted for one year from date of purchase.
REN Products, EyeMax®, and Fuel Pro® 384
DAVCO Technology, LLC warrants these products to be free of defects in material and workmanship for two-years or 200,000
miles (whichever comes first) from the purchase date.
By installing and/or using the product, you agree to be bound by the following:
This Warranty does not apply to:
• Failure or inadequate performance due to improper installation, misuse, misapplication, faulty installation, alteration/
modification, poor maintenance, neglect, accident, or conditions resulting from actions outside DAVCO’s control, including
but not limited to the use of contaminated, corrosive, and unapproved fluids.
• Downtime, loss of use, loss of profits or income, loss of capital, cost of substitute equipment, living expenses, claims by
purchaser’s customers or other third parties, or other incidental, special or consequential damages.
• Attachments, accessory items, and parts not manufactured or distributed by DAVCO.
• Any aftermarket or OEM component not approved specifically to work with a DAVCO manufactured product
• Product that has been installed with aftermarket parts or altered or modified in any way.
• Normal wear and tear, abuse, vandalism, acts of God, improper storage or handling, disasters such as flood, fire, or war,
failure to operate, maintain or repair in accordance with instructions, or failure to repair the vehicle into which the product is
installed in accordance with the vehicle manufacturer’s instructions or common maintenance practices.
This warranty is the sole warranty made by DAVCO. DAVCO makes no other warranties, expressed or implied, of merchantability
or fitness for a particular purpose.
In the unlikely event of a defective product, DAVCO will either rework the defective product or replace it at DAVCO’s discretion.
If you feel you have a warrantable issue, contact DAVCO at 800-328-2611 for a Return Goods Authorization (RGA) number **. An
RGA number is required prior to the return of any product.
®
243 and 245, Fuel Pro® 382, 482, 483, 485, 487 and 488, Industrial Pro®, Pro-Chek®, Sea Pro®
TECHNICAL MANUAL
* Purchase Date: The date of the first retail purchase of a new vehicle or piece of equipment from the OEM dealer or factory. For
“Over the Counter” purchase: The date of sale to the first retail customer.
**Products submitted for Warranty consideration will be inspected by DAVCO personnel. Re-work or replacement will be based
on DAVCO’s Warranty procedure and/or the results of their evaluation. DAVCO’s Warranty Program does not in any way constitute a product guarantee.
DAVCO Technology, LLC www.davco.com800-328-26111600 Woodland Drive, Saline, MI 48176-1629
F1485 REV B
17
Page 20

FUEL PRO® 485
®
Technology, LLC
PARTS RETURN GENERAL POLICY
A Return Goods Authorization (RGA) must be obtained from DAVCO prior to returning any products. Returns may be accepted
under the following circumstances:
Order Shipping Error: A credit against the original invoice, including freight charges for both ways will be issued for returns in
which DAVCO inadvertently shipped incorrect quantity or product.
Overstock: Returns for ordering more product(s) than required, or incorrect part(s), will be accepted within 60 days from the date
of purchase. Proof of purchase will be required, i.e.: original invoice/delivery receipt. These types of return(s) are subject to a
minimum restock fee of 40% or $40.00, whichever is higher. Additional restock fees may apply. Product(s) will be inspected for
“like new” condition and additional costs will be the responsibility of the customer. No obsolete parts may be returned.
Freight charges for return(s) will be the responsibility of the customer.
TECHNICAL MANUAL
DAVCO Technology, LLC www.davco.com800-328-26111600 Woodland Drive, Saline, MI 48176-1629
F1485 REV B
18
Page 21

 Loading...