

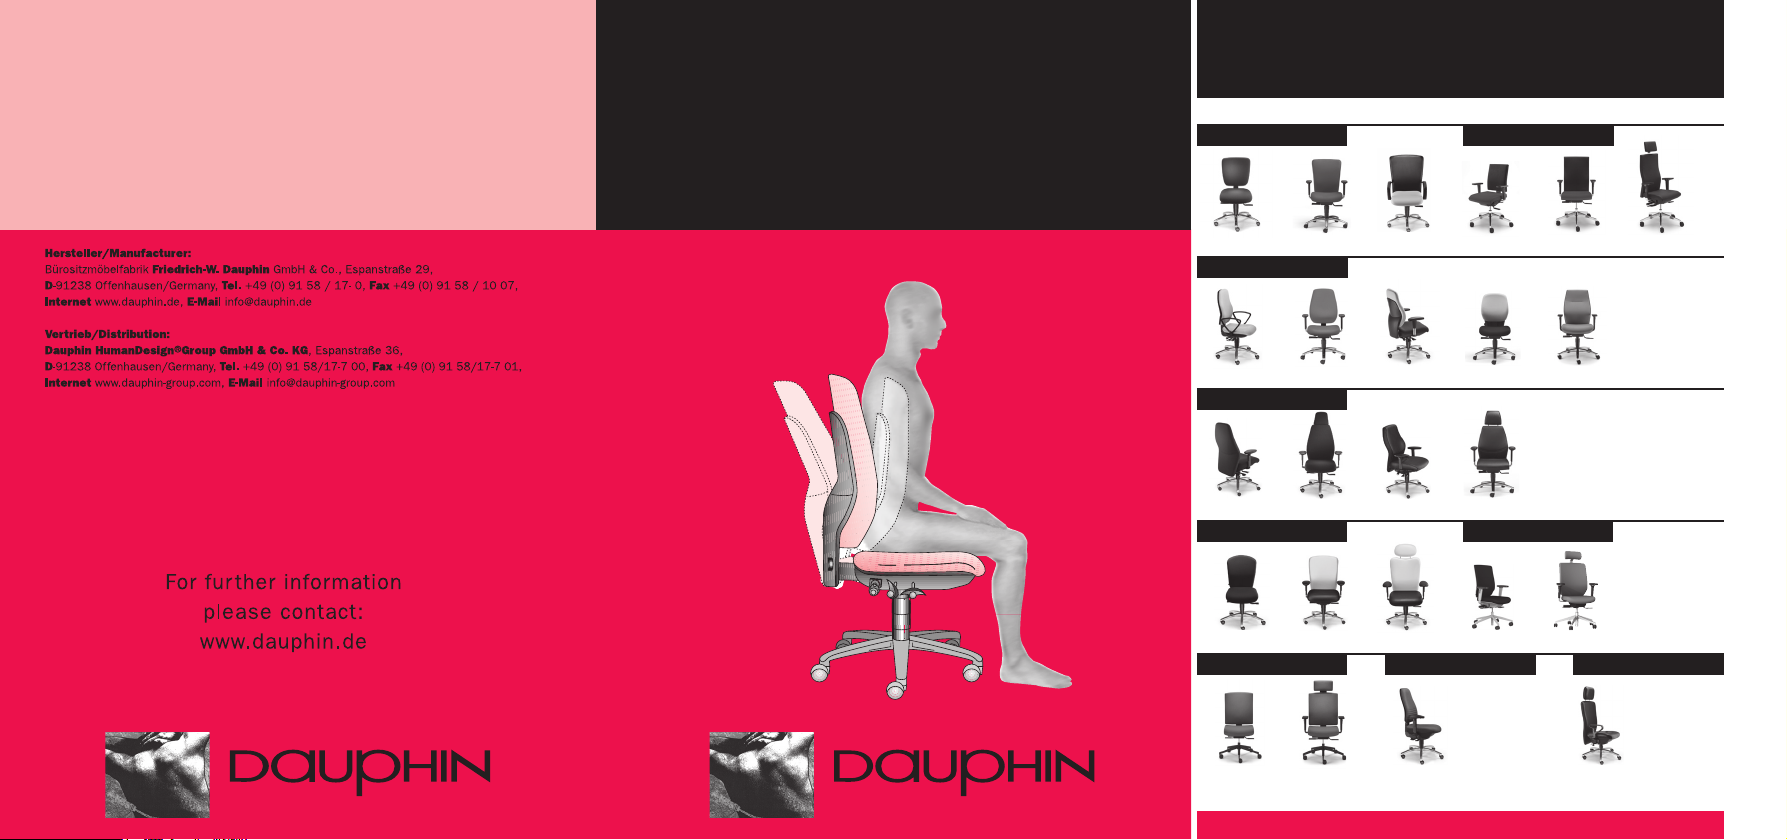
Dauphin CT 05640, OM 08430, SH 28385, CT 02320, CT 02980 Owner's Manual
...
HumanDesign® C o m p a n y
HumanDesign® C o m p a n y
Ihr Fachhändler / Your Stockist:
SYNCRO-
Modelle mit Syncro-Activ-Balance
Models with Syncro-Activ-Balance
®
®
ACTIV-BALANCE
®
B e d i e n u n g s a n l e i t u n g /
O w n e r s M a n u a l
Alpha
AP 05430 AP 05695 AP 05490
Shape
SH 08170 SH 08370
Shape
SH 08690 SH 08870
Omega
OM 08430 OM 08490 OM 08590
@Just plus
AJ 26285 AJ 26585
SH 28185
SH 28885 SH 28985
Contour
CT 02340
Alpha 2
AP 32150 AP 32385 AP 32585
SH 28385 SH 35385
Bionic
BC 29180 BC 29285
Tec
ohne Abb./
not illustrated:
CT 02320
CT 05540
CT 05640
CT 02690
CT 02980
TC 09660
10 453 78 12/07 10´ 31 26 Irrtum sowie Änderung vorbehalten./Dif ferences in errors and modifications excepted.
1 2
2
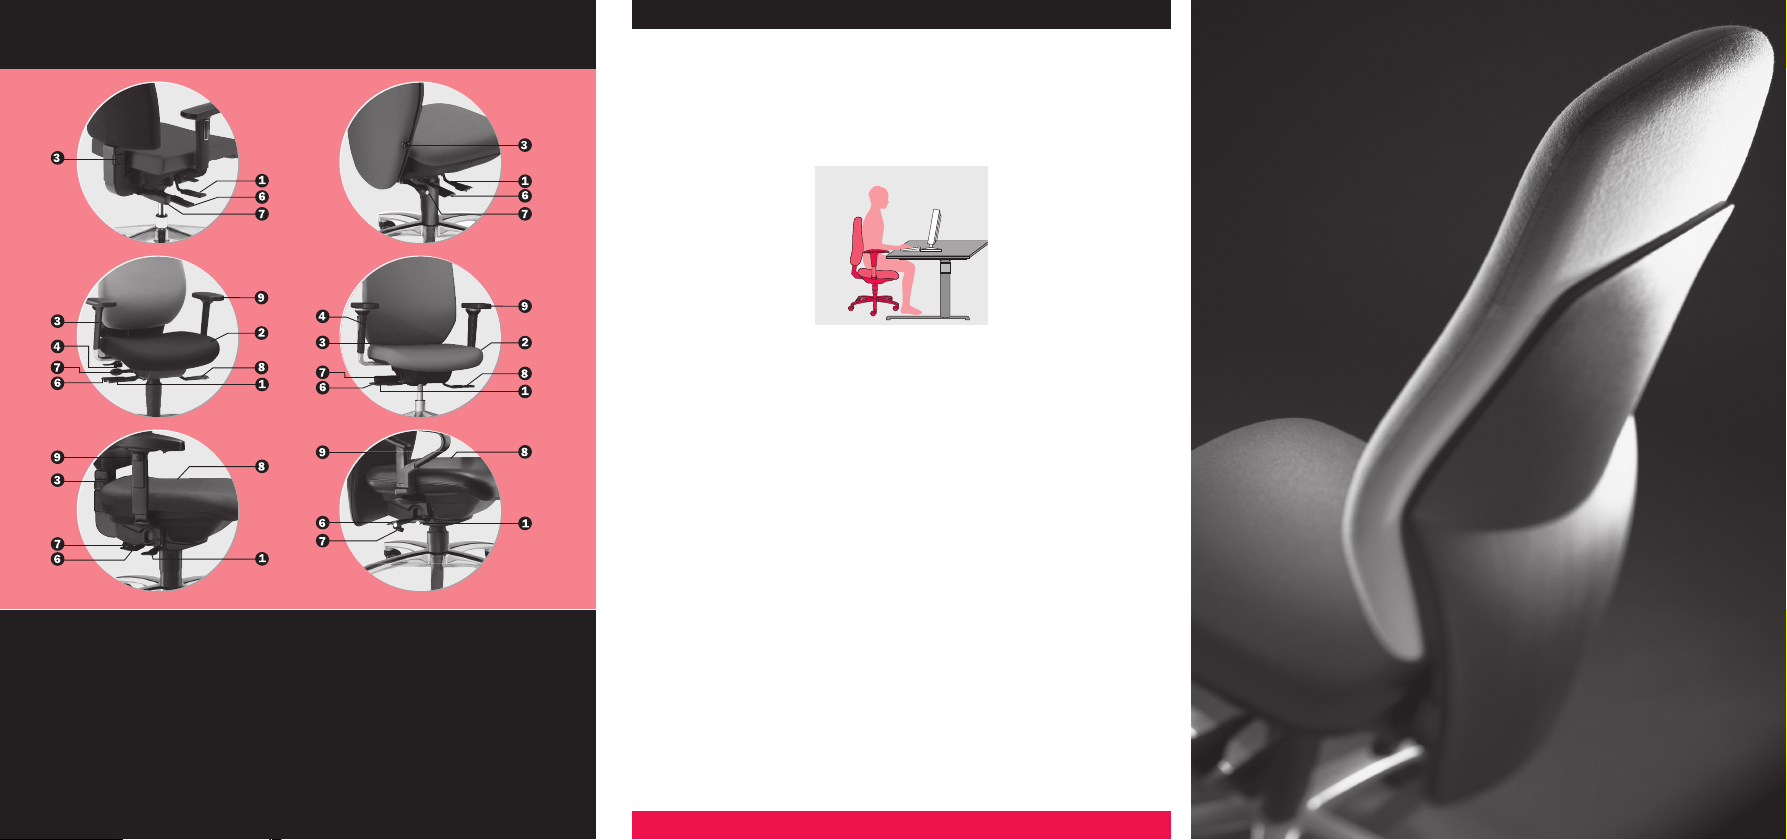
Auf einen Blick / At-a-glance
Herzlichen Glückwunsch
Sie sitzen auf einem Qualitätsprodukt aus dem Hause Dauphin. Bitte beachten Sie jedoch, dass
falsch benutzte Stühle Verursacher von Beschwerden sein können. Nutzen Sie daher unsere
Sitztipps und die vorhandenen Funktionen Ihres Stuhles. Somit leisten Sie einen wesentlichen,
eigenen Beitrag zur Vermeidung von Sitzproblemen.
Alpha
AP 32780
Shape
SH 28485
Contour
CT 02340
Omega
OM 08530
Bionic
BC 29285
Tec
TC 09660
Sitzhöhenverstellung / Seat height adjustment
Sitztiefenverstellung / Seat depth adjustment
Verstellung der Rückenlehnenhöhe / Adjustment of backrest height
Verstellung der Lumbalstütze / Adjustment of lumbar support
Verstellung der Kopfstütze / Adjustment of headrest
Synchrontechnik / Synchronised technology
Verstellung des Rückenlehnengegendruck / Tension adjustment
Syncro-Activ-Balance
®
/ Syncro-Activ-Balance
®
Verstellung der Armlehnen / Adjustment of armrests
1. Nehmen Sie tief im Sitz Platz und nutzen Sie die volle Sitzfläche bis zur Rückenlehne.
2. Stellen Sie die Sitzhöheå so ein, dass die Ober- und Unterschenkel einen Winkel von
mindestens (besser: größer) 90° zueinander bilden. Die Füße stehen dabei entlastet
und vollflächig auf dem Boden. Die Ellbogen liegen auf der Schreibtischoberfläche auf.
Die Schultermuskulatur ist dabei entlastet.
3. Nutzen Sie zur optimalen Abstützung der Oberschenkel ggf. eine Sitztiefenverstellung,
so dass zwischen der Sitzvorderkante und den Kniekehlen für ungefähr zwei Finger bis
zu einer Handbreite Platz ist.
4. Stellen Sie die Höhe der Rückenlehneé bzw. Lumbalstützeè (stärkste Polsterung der
Rückenlehne) so ein, dass die Lumbalstütze ungefähr auf Gürtelhöhe positioniert ist.
5. Wenn Sie viel in der Relaxposition arbeiten, empfehlen wir eine Kopf- und
Nackenstütze
so ein, dass der Kopf weder nach vorn gedrückt noch überstreckt und vollflächig
abgestützt wird.
6. Aktivieren Sie nun – nach Einstellung der o.a. Grundfunktionen –
Synchrontechnikë. Wechseln Sie die Oberkörperhaltung möglichst oft, damit sich
die
die Muskulatur nicht verkrampft (dynamisches Sitzen).
7. Stellen Sie den Gegendruck der Rückenlehneí so ein, dass der Oberkörper
aufgerichtet, aber nicht nach vorn gedrückt wird.
8. Aktivieren Sie insbesondere für die vorderen Sitzhaltungen die Sitzneigeverstellungì.
Achten sie in den Knie- und Armbeugen sowie im Hüftgelenk auf einen Öffnungswinkel
von mindestens 90° (rechter Winkel).
9. Stellen Sie nun die Höhe der Armlehnenî so ein, dass die Ellbogen aufliegen und die
Schulter- und Nackenmuskulatur entspannt ist (gleiche Höhe wie Schreibtisch bzw.
Tastatur). Korrigieren Sie dazu ggf. die Sitzhöhe. Stellen Sie die
so ein, dass die Ellbogen nicht am Körper anliegen.
10.Nutzen Sie alle Möglichkeiten, die Ihnen der Stuhl bietet. So leisten Sie einen eigenen
Beitrag zur Vermeidung von Sitzproblemen.
Bitte beachten Sie auch die Übersicht auf Seite 3.
4
ê zur Abstützung der Nackenmuskulatur. Stellen Sie die Nackenstütze
Breite der Armlehnenî
4
33
You are sitting on a quality product from the company Dauphin. However, please note that chairs
can cause health problems if used incorrectly. With this in mind, use our sitting tips and the
functions built into your chair. By doing so, you will make a substantial, personalcontribution to
avoiding problems when sitting.
1. Sit well back in the seat and use the entire seat area as far as the backrest.
2. Adjust the seat height å so that your thighs and lower legs together form an angle of at
least (though ideally more than) 90°. Your feet are then relaxed and flat on the floor. Your elbows
are resting on the desk top and therefore the weight is taken off your shoulder muscles.
3. In order to achieve optimum support for your thighs, use the seat-depth adjustment where
appropriate so that there is enough space for about two fingers up to the width of a hand between
the front edge of the seat and the back of the knee.
4. Adjust the height of the backresté or lumbar supportè (where the upholstery of the
backrest is thickest) so that the lumbar support is roughly positioned at the level of your belt.
5. If you spend a lot of time working in the relaxed position we recommend a headrest and
neckrestê to support the neck muscles. Adjust the neckrest so that your head is neither
pushed forwards nor overstretched and is supported over its entire surface.
6. Activate the synchronised mechanismë once the basic functions above have been set.
Change your upper-body posture as often as possible so that your muscles do not become
cramped (dynamic seated posture).
7. Adjust the backrest tensioní so that the upper body is held upright but is not pushed
forwards.
8. Activate the seat-tilt adjustmentì, particularly for forward-seated postures. Observe an
opening angle of at least 90° (right angle) in the bend in your knees and arms as well as in
your hip joint.
9. Now adjust the height of the armrestsî so that your elbows rest on the desk and your
shoulder and neck muscles are relaxed (same height as the desk or keyboard). Correct the
seat height, if appropriate. Adjust the width of the armrestsî so that the elbows are not
pressed against the body.
10.Make use of all the possibilites that your chair offers. By doing so, you will make a personal
contribution to avoiding problems when sitting.
Please also note the summary on page 3.
Congratulations
5

12
13
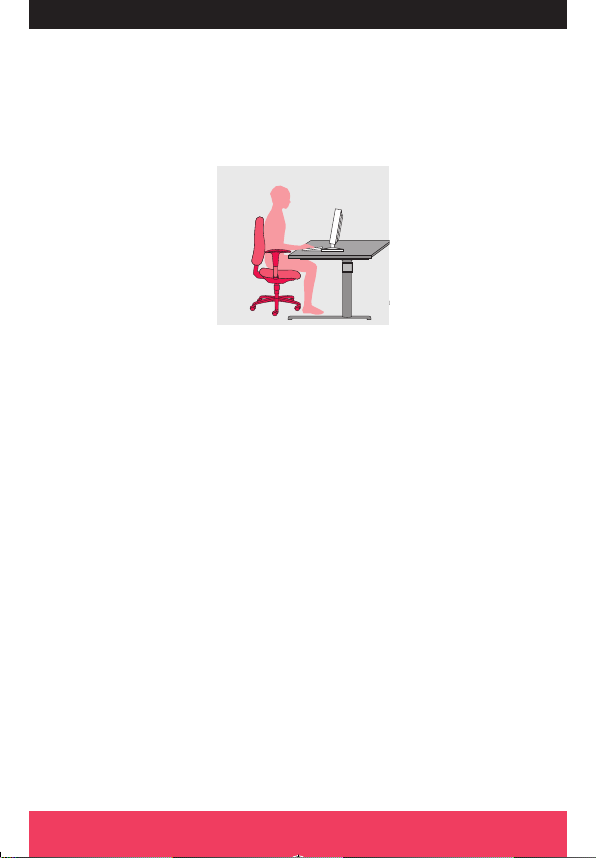
Optimale Sitzhöhe: die Ober- und Unterschenkel
bilden zueinander einen Winkel von mindestens
(besser: größer) 90°.
Sitz höher stellen: Sitz entlasten, Hebel nach oben
ziehen, in der gewünschten Sitzhöhe loslassen.
Sitz tiefer stellen: Sitz belasten, Hebel nach unten
drücken, in der gewünschten Sitzhöhe loslassen.
Seat heightSitzhöhe Zithoogte
Optimum seat height: the thighand lower leg
together form an angle of at least (though ideally
more than) 90°.
To raise the seat: take your weight off the seat,
pull the lever upwards, adjust the seat to the
desired height.
To lower the seat: put your weight on the seat,
pull the lever downwards, adjust the seat to the
desired height.
Hauteur d‘assise
Hauteur d‘assise optimale : la cuisse et le bas de la
jambe doivent former un angle d‘au moins 90° (de
préférence plus encore).
Remonter l‘assise : délester l‘assise, tirer le levier
vers le haut, relâcher lorsque la hauteur d‘assise
souhaitée est atteinte.
Baisser l‘assise : exercer un poids sur l‘assise,
pousser le levier vers le bas, relâcher lorsque la
hauteur d‘assise souhaitée est atteinte.
Optimale zithoogte: de boven- en onderbenen
vormen onderling een hoek van ten minste (bij
voorkeur zelfs groter dan) 90°.
Zitting hoger instellen: zitting ontlasten, hendel
naar boven trekken en op de gewenste zithoogte
loslaten.
Zitting lager instellen: zitting belasten, hendel
naar beneden drukken en op de gewenste zithoogte
loslaten.
Altezza del sedile Sædehøjde
Altezza ottimale del sedile: le parti superiore ed
inferiore delle gambe formano un angolo di 90°,
o meglio, ancora maggiore.
Alzare il sedile: non fare pressione sul sedile, tirare
la leva in alto e lasciarla andare quando avrete
trovato la posizione desiderata.
Abbassare il sedile: fare pressione sul sedile, tirare
la leva in alto e lasciarla andare quando avrete
trovato la posizione desiderata.
Altura del asiento
Altura de asiento óptima: la parte superior y la
parte inferior de las piernas deben for mar un ángulo
de al menos 90º (mejor si es mayor).
Ajustar más alto el asiento: levantarse del asiento,
tirar de la palanca hacia arriba y soltarla cuando el
asiento alcance la altura deseada.
Ajustar más bajo el asiento: sentarse sobre el
asiento, tirar de la palanca hacia abajo y soltarla
cuando el asiento alcance la altura deseada.
Optimal sædehøjde: Over- og underbenene danner
en vinkel på mindst 90° (og helst mere).
Stil sædet højere: Aflast sædet, drej armen opad,
slip når sædet har den ønskede højde.
Stil sædet længere ned: Belast sædet, drej armen
nedad, og slip når sædet har den ønskede højde.
Регулировка высоты сиденья
Оптимальная высота сиденья: бёдра и голени
образуют уго л не менее (а лучше более) 90°.
Поднять сиде нье выше: Приподняться с сиденья,
потянуть рыч ажок вверх, и на необходимой высоте
отпустить.
Опустить сид енье ниже: Сидя на стуле, надавить
рычажок вниз , и на необходимой высоте отпустить.

14
15
Optimale Sitztiefe: Nutzen Sie zur optimalen
Abstützung der Oberschenkel die Sitztiefenverstellung, so dass zwischen der Sitzvorderkante und den
Kniekehlen für ungefähr zwei Finger bis zu einer
Handbreite Platz ist.
Größere Sitztiefe: Taste herausziehen und die
Sitzfläche nach vorn führen; Taste zur Arretierung
loslassen.
Kleinere Sitztiefe: Sitz entlasten und Taste
herausziehen: der Sitz wird automatisch in die
Grundposition geführt.
*Bionic = 5 cm
6 cm*
Optimum seat depth: in order to achieve optimum
support for your thighs, use the seat-depth adjustment so that there is enough space for about two
fingers up to the width of a hand between the front
edge of the seat and the backs of the knees.
To increase the seat depth: pull the button out
and guide the seat forwards; to lock, let go of the
button.
To reduce the seat depth: take your weight off the
seat and pull the button out; the seat is automatically guided into the basic position.
*Bionic = 5 cm
La profondeur de l‘assiseSeat depthSitztiefe Zitdiepte
Profondeur d’assise optimale : Pour un support op-
timal des cuisses, réglez la profondeur de l’assise
de telle sorte qu’il y ait un écar t de la largeur de
deux doigts à une main entre le rebord avant de
l’assise et le creux des genoux.
Pour une profondeur d’assise supérieure, appuyez
sur la touche et guidez l’assise vers l’avant ;
relâchez ensuite la touche pour le verrouillage.
Pour une profondeur d’assise inférieure, libérez
l’assise de toute charge et appuyez sur la touche :
l’assise est automatiquement ramenée en position
de base.
*Bionic = 5 cm
Optimale zitdiepte: gebruik voor de optimale
ondersteuning van de dijen de zitdiepteverstelling,
zodat tussen de voorkant van de zitting en de knieholtes ongeveer twee vingers tot een handbreedte
plaats is.
Grotere zitdiepte: knop uittrekken en zitopper vlak
naar voren brengen; knop voor vergrendeling
loslaten.
Kleinere zitdiepte: zitting ontlasten en knop uittrekken; de zitting komt automatisch in de basisstand.
*Bionic = 5 cm
Profondità sedile
Profondità ottimale del sedile:
per un sostegno ottimale delle cosce consigliamo
di utilizzare il regolatotore in profondità del
sedile in modo che tra il bordo
anteriore ed il retro ginocchio ci sia uno spazio
compreso tra due dita e una mano.
Maggiore profondità: estraete il tasto e fate
scorrere in avanti il sedile; rilasciate il tasto per
effettuare il bloccaggio.
Minore profondità: sollevatevi leggermente dal
sedile ed estraete il tasto: il sedile, in automatico,
ritornerà nella posizione iniziale.
*Bionic = 5 cm
La perfecta posición del asiento en la horizontal:
Utilice la regulación del asiento en la horizontal para
apoyar perfectamente las piernas. Ajuste el asiento
de modo que entre el borde delantero del asiento y las
piernas quepan entre dos y cuatro dedos.
Para adelantar el asiento: Tire del botón y mueva
el asiento hacia adelante; suelte el botón para
bloquear el asiento.
Para introducir el asiento: Levántese del asiento y
pulse el botón; el asiento vuelve automáticamente
a su posición original.
*Bionic = 5 cm
SædedybdeProfundidad del asiento
Optimal sædedybde: Brug sædedybdejusteringen for
optimal støtte af lår ene, og indstil, så der er cirka to
fingre til en håndsbreddes afstand mellem sædets
forkant og knæhaserne.
Større sædedybde: Træk knappen ud, og stil sædet
frem; slip knappen igen for at låse.
Mindre sædedybde: Aflast sædet, og træk knappen
ud: Sædet stilles automatisk i grundpositionen.
*Bionic = 5 cm
Регулировка глубины сиденья
Оптимальная глубина сиденья: для оптимального
упора бедер отрегулируйте глубину сиденья таким
образом, что бы расстояние между передним краем
сиденья и по дколенными впадинами имело ширину
примерно в д ва пальца или более.
Увеличить гл убину сиденья: вынуть клавишу и
подвинуть си денье вперед, для фиксации отпустить
клавишу.
Уменьшить гл убину сиденья: освободить сиденье
и вынуть кла вишу – сиденье автоматически
вернется в и сходное положение.
*Bionic = 5 cm
 Loading...