

Daum electronic Premium 8 User Manual
User Manual

Table of Contents
Miscelleaneous
2
This ergometer bike is specially designed for health and endurance training.
High quality manufacturing, an easy to read dashboard, and ease of use and
of maintenance contribute to make this appliance an ideal training device for
sport and fitness training. We would also stress that the complete equipment
list and the convincing performance range appeal to athletes and fitness conscious
persons of every age group.
Introduction
Designed and manufactured in conformity with the DIN EN 957 1/-5 Class SA/HA
standard, the ergo_bike is suited for a therapeutic utilisation (It does not meet
the requirements for medical diagnosis usage in medical clinics). An important
aspect, and therefore an identifying feature, of an ergometer is the fact that the
required pedalling resistance in watt can be prescribed. This pedalling resistance
will be maintained irrespective of the pedalling speed (as shown on the diagram
of page 33).
This means that the user can work out under a steady load at various speeds,
and unconstrained by the speed. The advantage being that the user cannot
unknowingly be subjected to a wrong load.
At the heart of the ergo_bike is the full electronically controlled, maintenance
free, eddy current brake, which adjusts the braking load to fit the users personal
requirements based on the computed data, and which allows load setting
continuously from 20 to 600 Watt.
The ergo_bike premium8i is thus more than just a Home Trainer, since it can
be used for sportive and therapeutic objectives.
Miscellaneous
- Introduction ........................................................................... 2
- Keywords Glossary / Info Texts .................................................. 2
- Data Interface .............................................................................................. 2
Safety Notes
- Using the Device in Compliance with the Recommendations ..................... 3
- The user ..................................................................................... 3
- User Safety ............................................................................. 3
- Notes From the Manufacturer to the User ............................... 3
- Accessories ............................................................................ 3
- Software ..................................................................................... 3
- Documentation ........................................................................... 3
- Other Notes .............................................................................. 3
- Information About Personal Safety .......................................... 3
Setting Up
- Control Elements and Connections ........................................... 4
- Switching On / Off .................................................................... 5
- Saddle adjustment ...................................................................... 5
- Handlebars adjustment ............................................................. 5
- Notes about Pulse Rate Measure ............................................ 6
The Dashboard
- Top panel - Overview of the control elements ................................. 7
- Underside - Overview of the connectors ................................... 7
Dashboard User Guide
- Switching On ............................................................................ 8
- Starting Training Without Selecting a Program ......................... 8
- Setting Personal Data ................................................................. 8
- Starting Training by Selecting a Program .................................. 9
- Training Programs .................................................................... 9 - 10
- Setting Limit Values ................................................................ 10 - 11
- Reviewing Stored Training Data ............................................. 11 - 12
- Fitness Test and Fitness Mark ............................................... 12
- Relax Function .............................................................. 12 - 13
- Premium programs ........................................................ 13 - 14
- Premium Coaching ......................................................... 15 - 20
- System Software Update Using the Card .................................. 21
- Keywords Glossary .................................................................... 21
- MP3 Player ................................................................................. 22
- TeamAward ..................................................................................... 23
Keywords Glossary / Info Texts
Please refer to the information concerning each operation`s status stored in the
dashboard. Use the Info-key to display this information.
The keywords glossary provides additional information and explanations.
The keywords glossary and the info-texts are an essential part of this user
manual.
General Notes
- Important Notes ....................................................................... 24
- Training Hints ...................................................................................... 24
- Environmental Conditions .................................................................... 24
- Used Symbols .................................................................................. 24
- Compliance to Standards ..................................................................... 24
Maintenance
- Troubleshooting ................................................................................. 25
EC Declaration of Conformity .................................................................... 26
Specifications ................................................................................ 27
Assembly and Installation Guide
- Assembly Notes ..................................................................... 27
- Package content ....................................................................... 28
- Tools and Small Parts ................................................................. 28
- Installation steps 1 - 7 ..................................................... 29 - 31
Service
- Liability ......................................................................................... 32
- Replacement of the Dashboard Battery ............................................ 32
- Replacing the V-belt .......................................................................... 32
Tables and Diagrams
- Table of Target Heart Rate / Aerobic Zone ......................................... 33
- Overview Diagram of the Target Heart Rate ..................................... 33
- Speed Power Diagram .................................................................... 34
Accessories
- ergo_memo-card2 .............................................................................. 35
- Ear Clip .............................................................................................. 35
- Relax Sensor ..................................................................................... 35
- Cardio Sensor Chest Strap ................................................................... 35
- Triathlon Handlebars add on....................................................................................35
Warranty Conditions ............................................................. 36
GNU General Public License ..................................................... 37 - 39
Data-Interface
You can use a personal computer (PC) to control the ergo_bike premium8i.
A special data cable is needed to this effect, which you can order from daum
electronics gmbh.
!
Safety Notes
3
Using the Device in Compliance with the Recommendations
The ergometers of the ergo_bike premium8i series may be used exclusively for
ergomettry, cardiovascular rehabilitation and for kinesitherapy.
Their use is only allowed in compliance with the instructions of the user manual.
The manufacturer will not be held liable if the ergometer is not used in compliance
with the provided instructions and consequently causes injury to persons or
other severe consequences, as well as material damages.
The CE label covers only the accessories included in the package.
Every user of this device, who is concerned with assembling, maintaining, testing
or troubleshooting it, must read and understand the contents of this user manual
before starting to work on the device.
The quality assurance system used at daum electronic gmbh complies with the
DIN EN ISO 13485:2003 standard.
daum electronic gmbh considers itself to be liable for the safety, reliability and
functionality of the device only if:
- the device is used in compliance with the instructions of the user manual.
The user
Please read the user manual carefully before starting to use the training device.
The user manual should be kept in the direct vicinity of the ergo_bike premium8i.
It is an integral component of the device.
User Safety
When coupling many devices to a test site care must be taken to avoid any
danger arising from the summation of the leakage currents and to ensure the
potential equalisation is effected through a common current (power) supply (e.g.
a wall socket-outlet). If you have any questions please ask your dealer or the
service department of daum electronic gmbh.
If a socket with multiple outlets is installed after the initial start-up, no other
device may be connected to this socket. (use covers on the multiple sockets)
An electrical shock hazard exists when touching devices that are not separately
grounded.
Defective or faulty devices and accessories may not be used.
The personal computer and all other connected devices (e.g. monitor, printer,
etc) must be installed at least 1.5m away from the training place, because
leakage currents could be generated on the housing (or use separate grounding,
housing leakage current).
Notes From the Manufacturer to the User
The device is not protected against the infiltration of liquids.
Direct contact with humidity or liquids must absolutely be avoided.
Care must be taken to wipe out sweat drops after training (sweat attacks paint
and plastic parts)
Damages caused by sweat are not covered by the warranty
Accessories
The device may only be used with the accessories prescribed and distributed
by daum electronic gmbh.
Every accessory item and every device connected must be manufactured in
conformity with the corresponding standard, e.g. DIN EN 60950 for computer
devices, DIN EN 60601-1 for electromedical devices.
Software
The supplied software may only be copied and archived for safety and functional
reasons. In special cases a request must be addressed in writing to daum
electronic gmbh. Releasing it to non-authorised persons is not allowed. The
ergo-bike premium8i may only be used with the internal and external softwares
supplied and authorised by daum electronic gmbh.
Documentation
The documentation supplied is an integral part of the ergo_bike premium8i and
may only be copied or distributed with the authorisation of daum electronic gmbh.
Other Notes
All the diagrams and evaluations are to be considered as a suggestion from the
device. When providing a diagnosis the results must always be controlled and
evaluated by a qualified physician.
The electronic installations of the rooms where the device will be used must
absolutely comply with the requirements of directive VDE 0107.
The device is not suited for operation in rooms and / or areas with explosion
risks.
Cellular telephones may not be used in the direct vicinity of the device, otherwise
they may interfere with its functionality.
Wireless telephones may be used.
Electromagnetic interference are primarily characterised by the oscillation of the
displayed load value. If the displayed value varies uncontrollably frequently,
even when the speed is higher than 30 /min, this can be an effect of electromagnetic
compatibility (EMC).
Only cables certified by daum electronic gmbh may be used to connect the
device with other devices.
Information About Personal Safety
The ergo_bike ergometer is intended for adults. Children
should only be allowed to train with the ergometer under adult
supervision.
Persons suffering from any of the following diseases should consult their family
physician or a specialist before starting training with the ergo_bike.
- Heart disorders like angina pectoris, coronary thrombosis (infarct),
stenosis, and high blood pressure
- Diabetes
- Respiratory disorders like asthma, chronic bronchitis, etc.
- Rheumatism
- Gout
- Or any other disease or illness
You should never train when you feel ill or weak.
Persons who are not used to exercise must start with an easy training program,
and then increase the load intensity very gradually. Persons with declared health
problems must evaluate their personal risks with the help of their family physician.
You should never use the ergo_bike to find out your maximum degree of
physical endurance. This can have serious consequences on your health!
Training Conditions
You should pay attention to providing good training conditions; this includes
choosing the training room and installation place. Makeshift installation places
do not incite to training!
Note!
You will find more information about training for sport and health in the pocket
book Training with the bike ergometer Improvement of health and fitness as
training target with the ergo_bike (in German).
Order from: daum electronic gmbh
Flugplatzstr. 100
D-90768 Fürth
Fax ++49(0)911/753714
GB
4
Setting Up
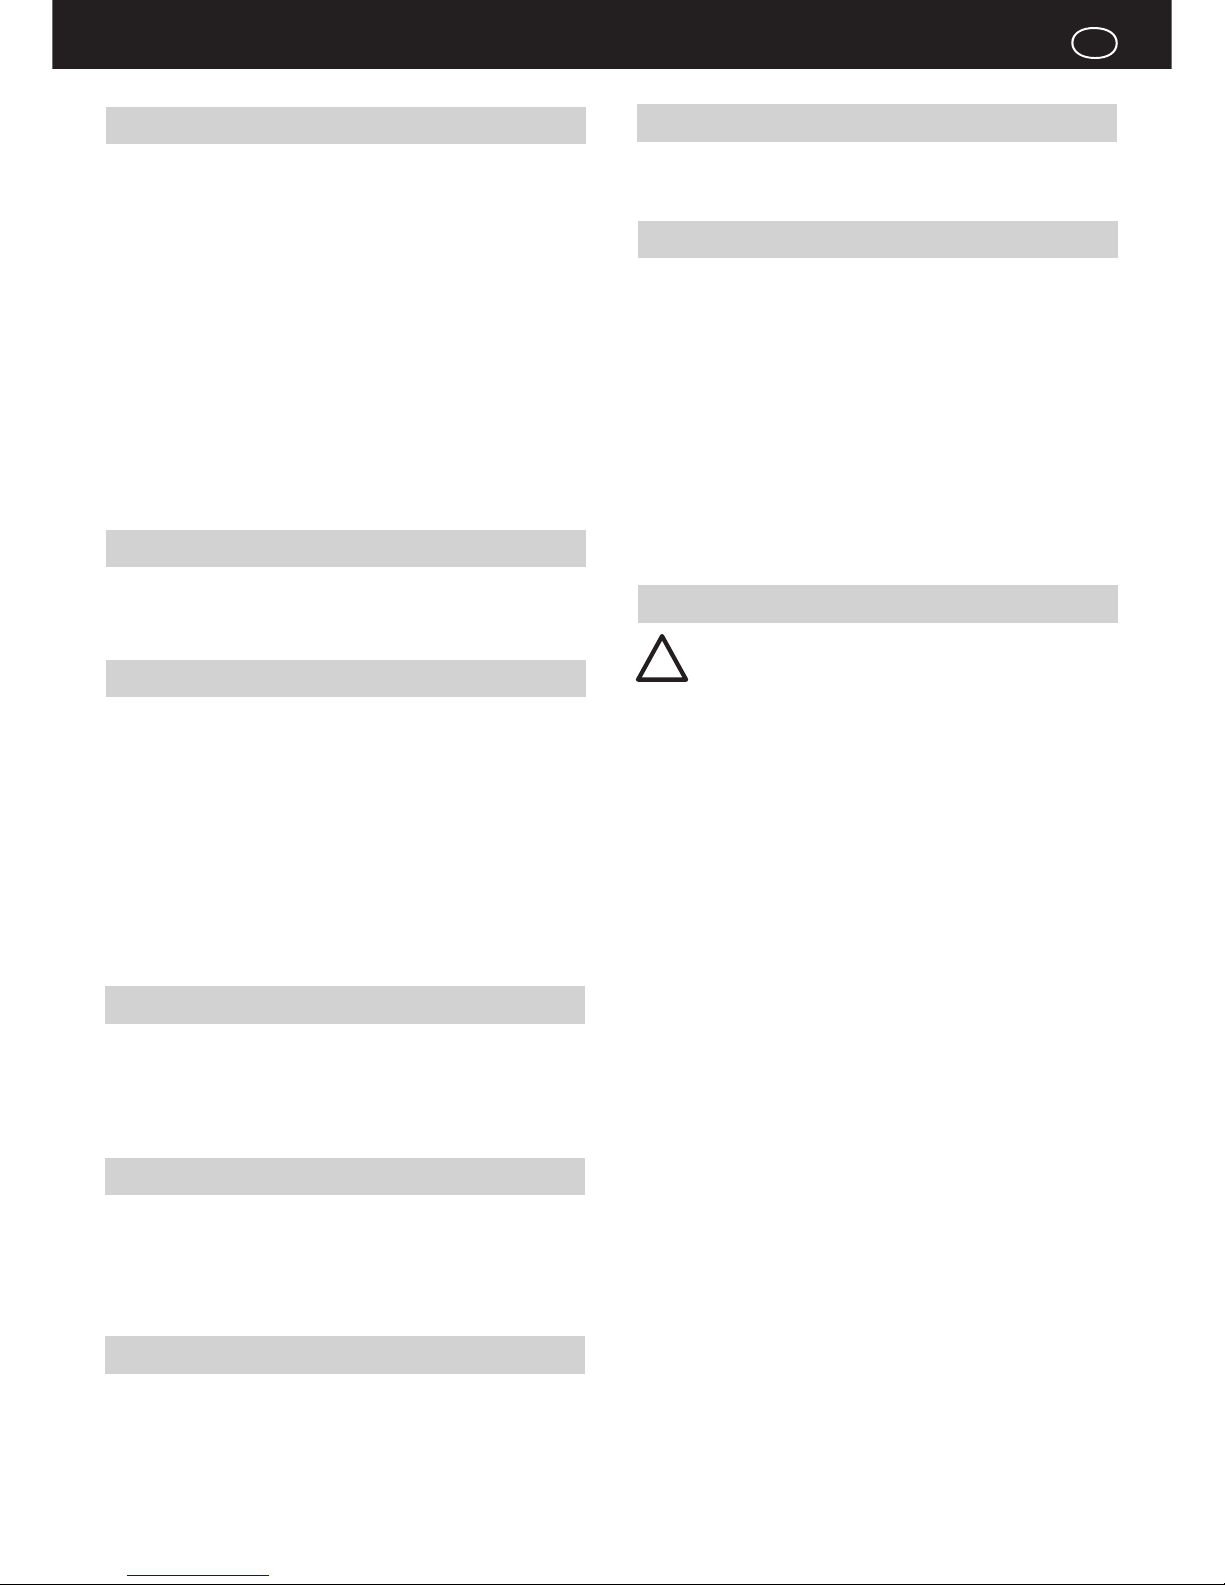
Contol Elements and Connections
1 Dashboard
2 Clamp screw for the handlebars
3 Articulation (hinge) of the handlebars column
4 Interfaces and connectors
5 Handlebars continuously adjustable over 360°
6 Height adjustment of the handlebars
7 Stand-foot with roller casters
8 Name plate
9 Stand-foot with ground level adjustment
10 On/Off switch
11 Height adjustment of the saddle
12 Saddle column
13 Horizontal adjustment of the saddle
14 Saddle
4
5
1
7
11
12
2
6
3
9
8
10
13
14
35
150
KG
daum electronic GmbH
D-90768 Fürth
ergo-bike premium
230V
~
50Hz 50W
123456789101112
200
SN
P
Made in Germany
z
10
11

5
Setting Up
2
1
13cm
A
-/+ 45° continuous
B
(or M8x40 screw)
ergo_memo-card2
Protection
slider
18 levels
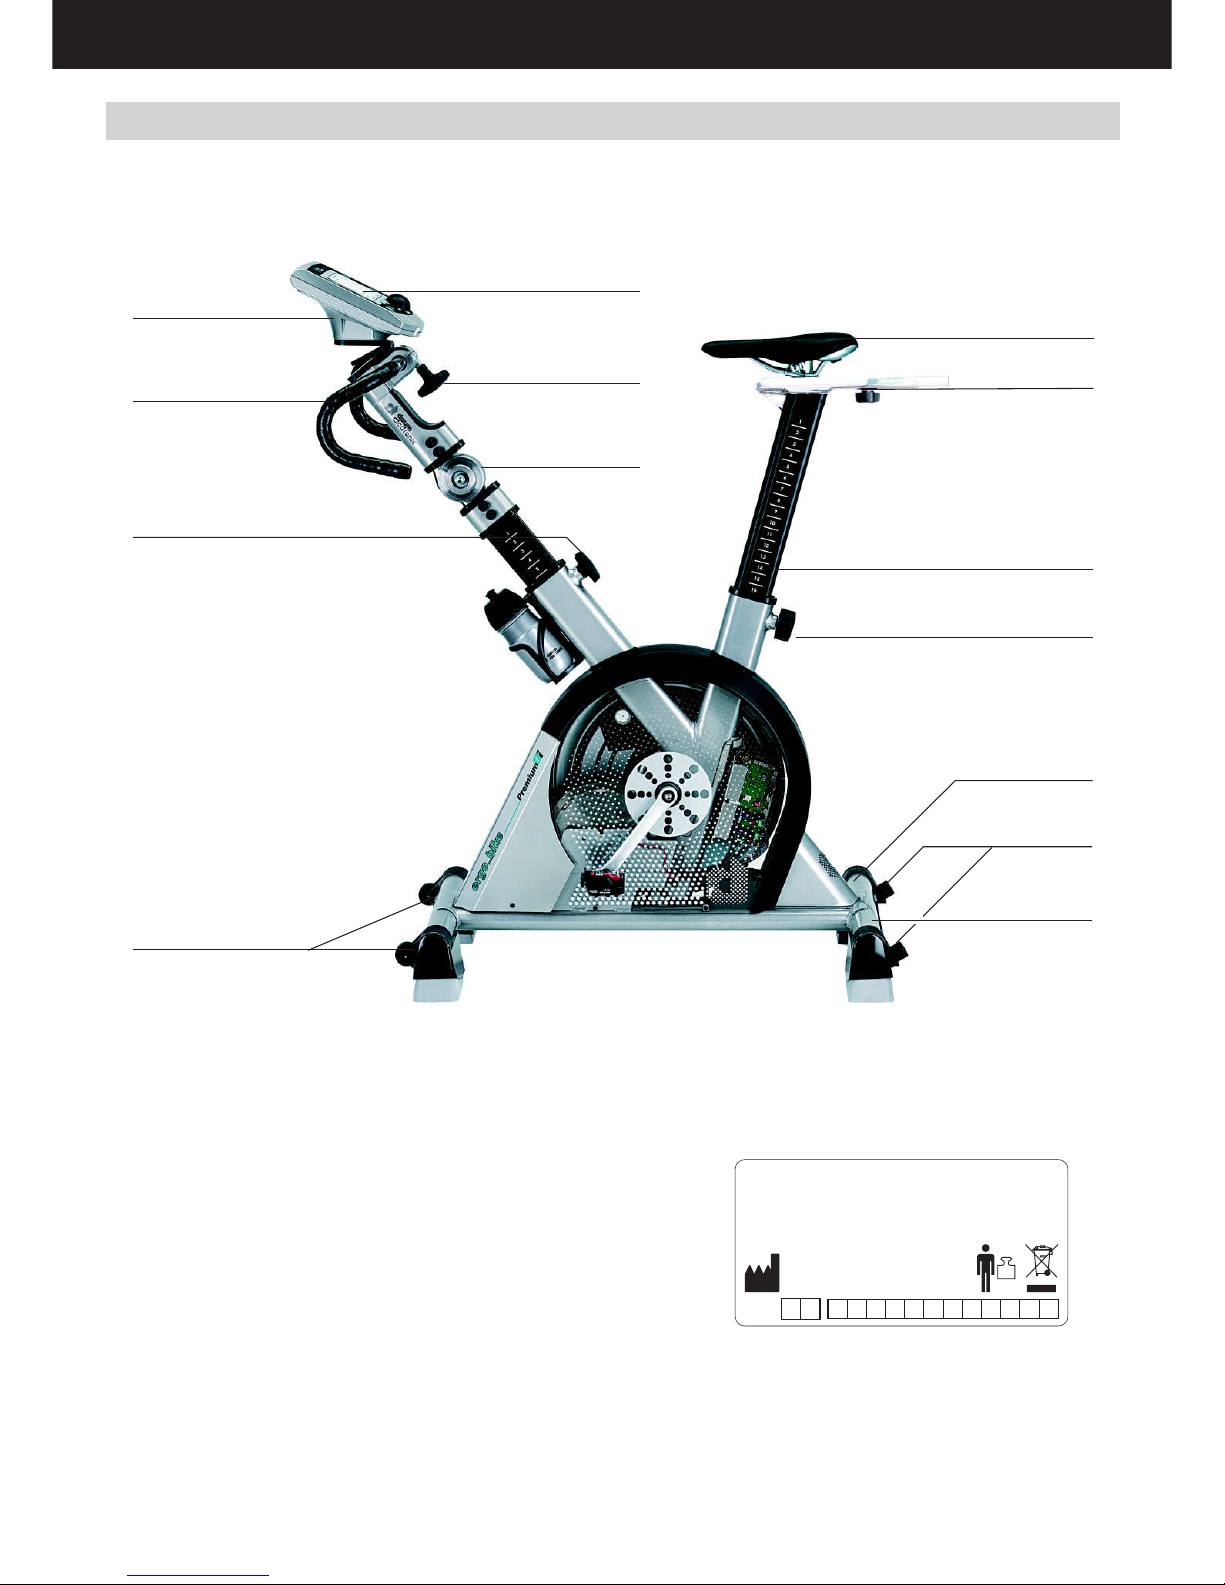
Vertical adjustment
Loosen the spring loaded tommy head button 2 by one to two turns, and then
pull it out. Move the saddle column up or down to the required height. Release
the tommy head button and move the saddle column a little bit up or down until
the protruding red safety button on the tommy head button locks in. Then tighten
the tommy head button.
For safety reasons height adjustment is only possible up to level 18!
safety button
Handlebars adjustment
Loosen slightly the articulation (hinge) of the handlebars column (with allen
wrench no 10). You can now swivel the complete handlebars and dashboard
unit into the required position. Then tighten the hinge again.
Loosen the handlebars with star knob B as appropriate for its set position, turn
it to the required position and tighten it back.
(Please use the supplied M8x40 screw in place of the star knob B if the handlebars
is subjected to a heavy load, e.g. in the case where you pedal standing on the
pedals and laying your weight on the handlebars.)
You can adjust position of the dashboard in the same way by means of the
tommy screw A.
Switching ON / Off
Please read the safety notes before switching the ergo_bike premium8i on, and
follow the installation and assembly instructions.
Insert the ergo_memo-card2 in the dashboard before switching the device on.
Use the On/Off switch " I " on the lower rear section of the device to switch it
on and off.
3
On / Off power switch
Saddle adjustment
Horizontal adjustment
Loosen the lever 1 slide the saddle to the required position and then tighten
the lever again.
The lever should point to the rear after tightening. Pull and turn the lever to point
to the rear.
- risk of injury.
When switched on, the system takes about 1 minute to load the software. The
colour screen displays during this time a software load progress bar.
Wait for the beep signal before using the dashboard.
If the memory card is inserted after the device is switched on then you must
wait for the beep signal. This can take about 5 seconds.
In principle the memory card should be pulled out while you are not pedalling
or only after the beep signal!
The protection slider on the ergo_memo-card2 must point to the bottom when
the card is inserted into the dashboard. This will make it possible to write to the
card.
If the slider points upward the card is locked/write protected.
If the card is empty it will be initialised. Only then can you use a computer to
save e.g. mp3 files (in the \mp3 folder) or update files (in the \update folder) on
the card.
GB
!
!
Setting Up
6
B
A
20 levels
safety button
B
star knob
(or M8x40 screw )
Ear clip
Cardio Sensor-chest
strap correctly put
on
Cardio Sensor-Strap
Handlebars adjustment
Loosen the clamp by means of the star knob A (on the rear side of the handlebars
column/small illustration), then loosen the spring loaded knob B by 1 to 2 turns
and pull it out. Adjust the now unlocked handlebars to the required length.
Release the knob and move the handlebars column a little up or down until the
protruding red safety button of the knob clicks in. Then tighten the knob back.
Finally tighten the clamp of the handlebars by mean of star knob A.
For safety reasons, the highest length setting allowed is limited to level
20!.
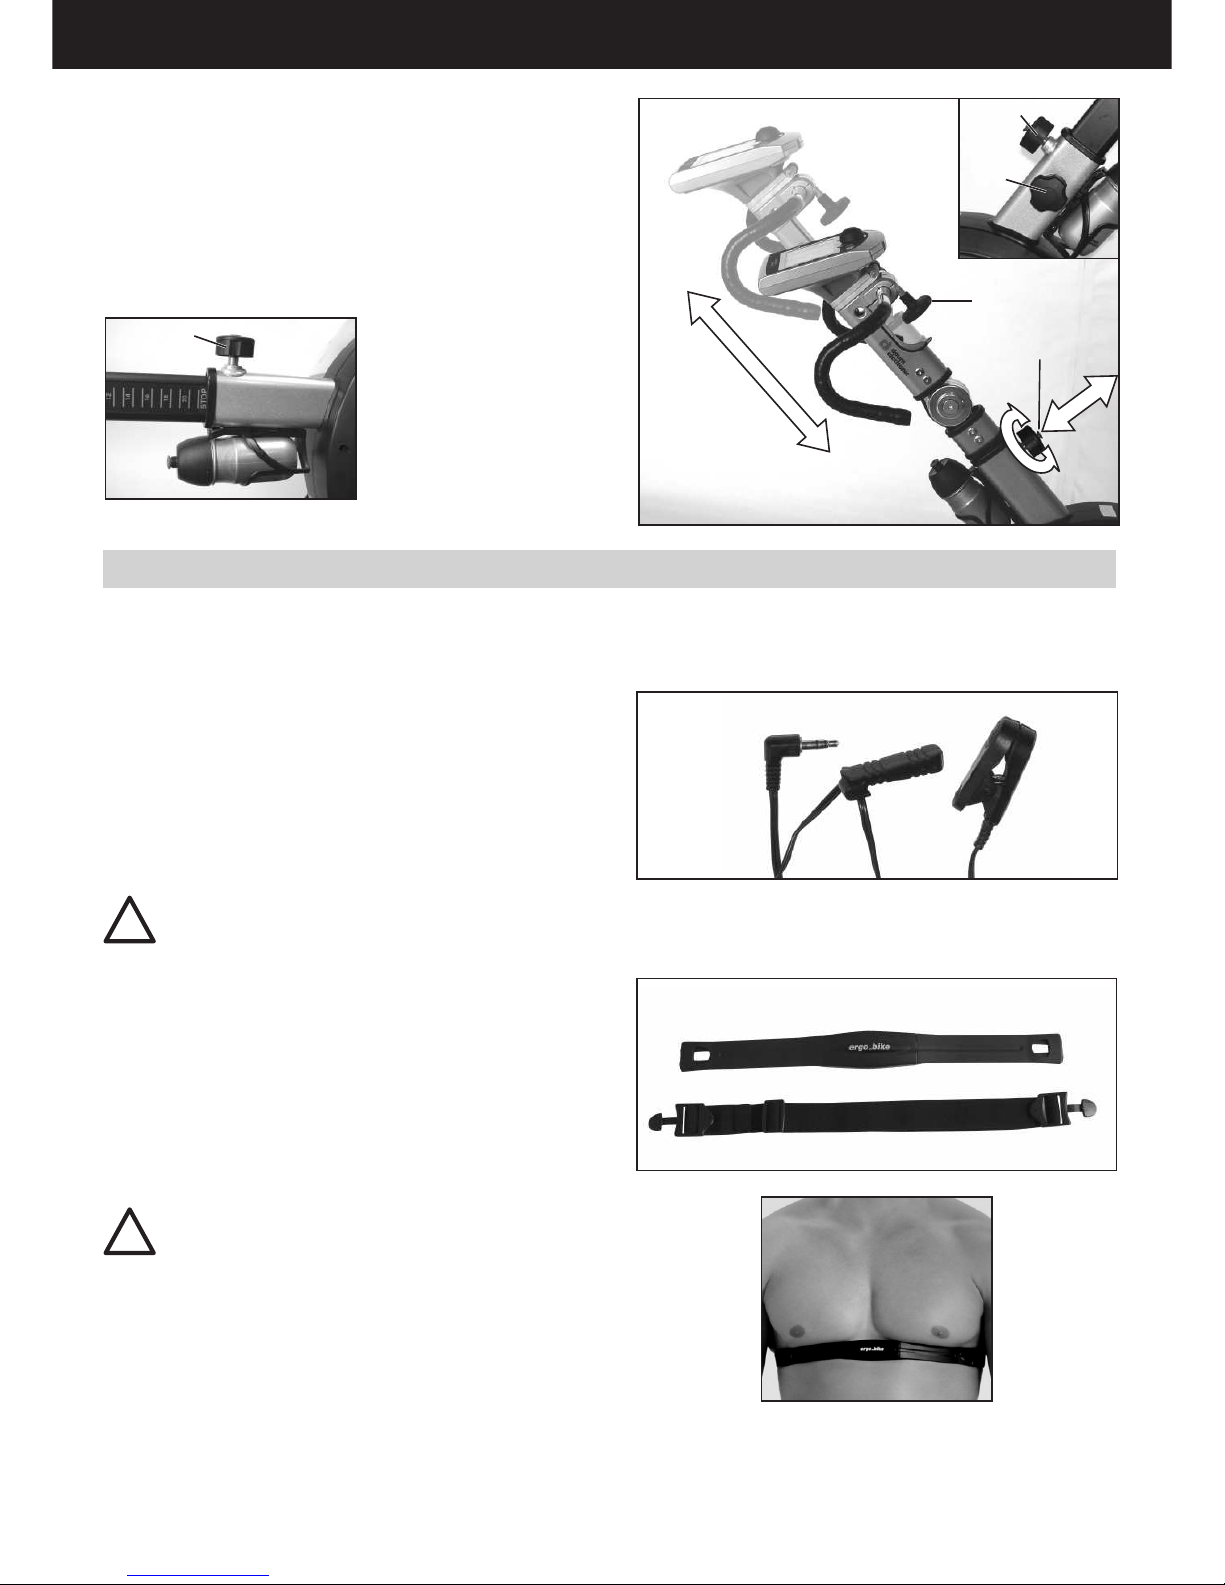
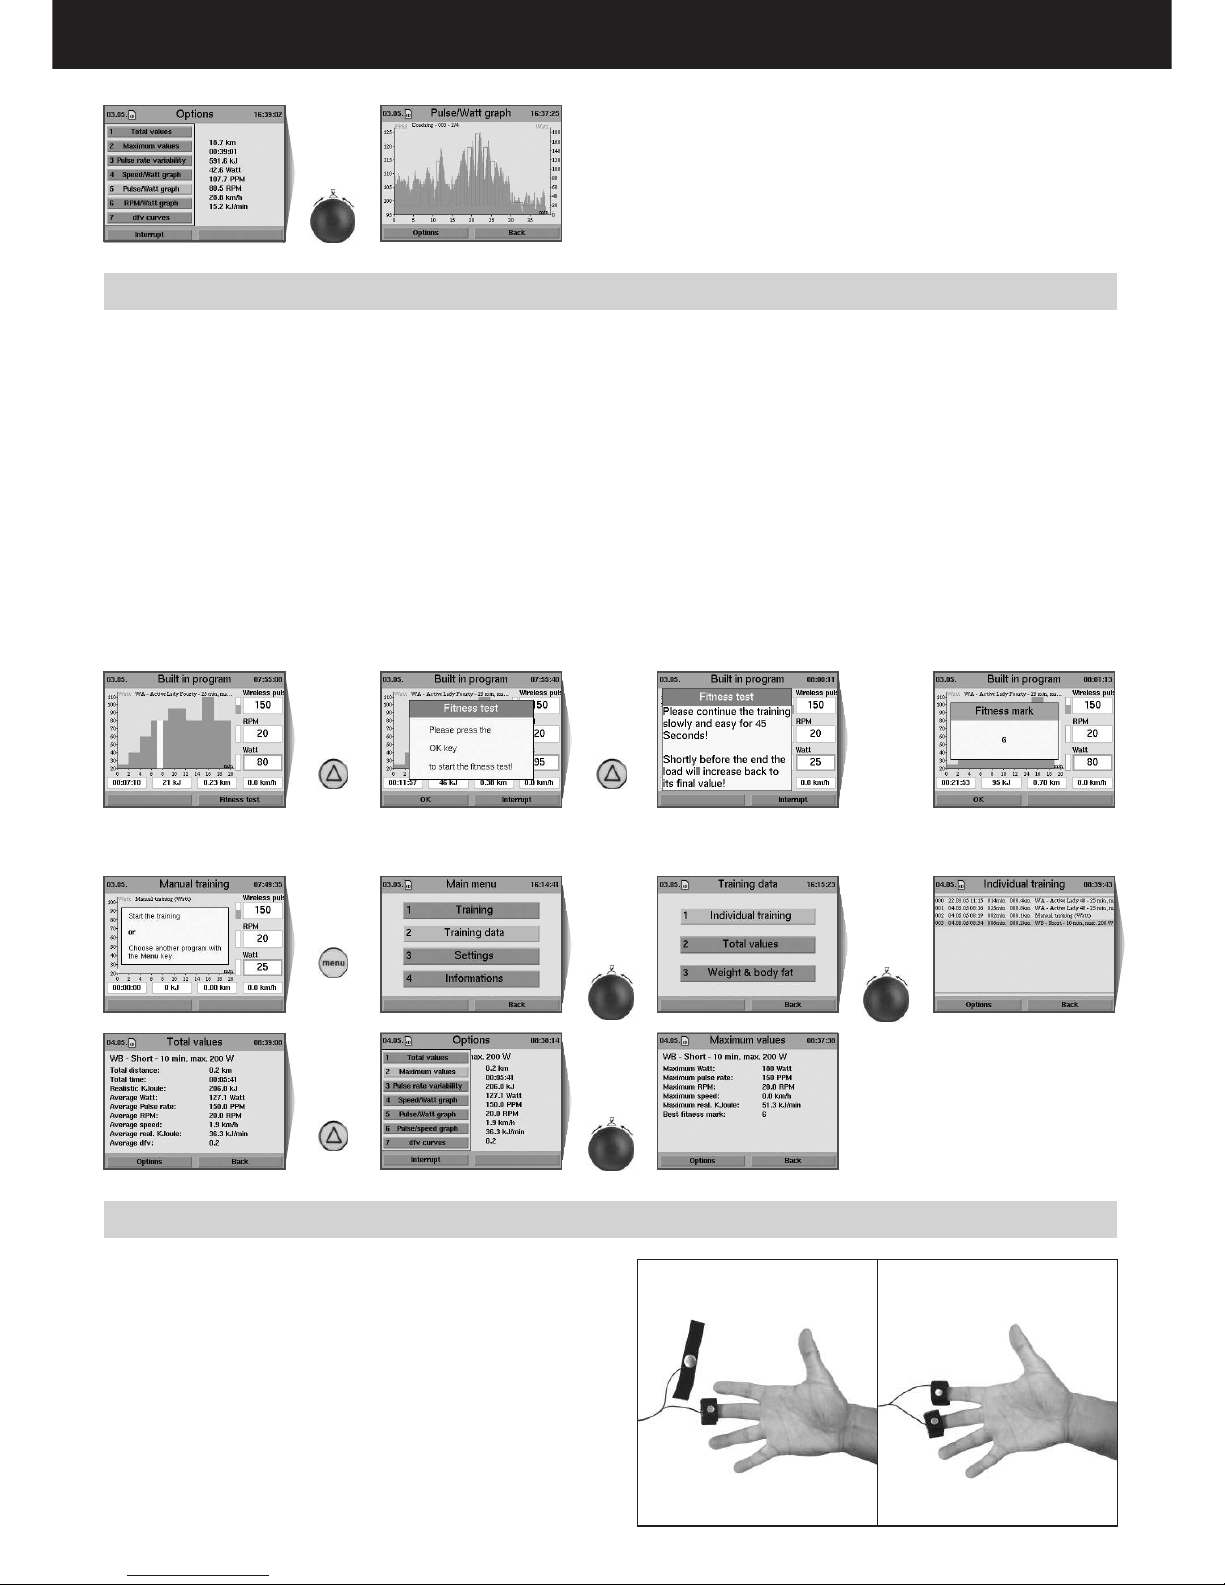
Notes about Pulse Rate Measure
Ear Pulse Rate Measure
Every heart pulse modulates the light passing through the lobe, and can thus
be detected by an infrared sensor in the ear clip, and displayed as heart pulse
rate. The measure of the pulse rate over the ear is much more precise than the
measure over the hand sensor.
Please make sure that the ear clip is correctly put on:
1. Insert the connector into the Cardio socket.
2. You should rub the ear lobe to stimulate blood circulation.
3. Attach the ear clip to the ear lobe (the closest possible to the head). The
contact surfaces must sit entirely on the skin.
The scattering in the display of the pulse rate variability is larger than with the
wireless pulse measure (factor 2).
Note: Strong light sources, like sunlight, halogen projectors,
and neon lamps, and also ear piercing or ear rings, or the
intake of beta-blocker could affect the measurements.
Wireless Pulse Measure
The Cardio sensor chest strap transmits the pulse rate directly to the integrated
wireless Cardio pulse receiver in the device. This pulse measurement method
is the most precise.
We recommend using the wireless pulse rate measure !
Note: Your pulse rate will be correctly evaluated over the whole measuring
range only if you use a non-coded wireless pulse rate transmitter.
To ensure the maximum efficiency of the Cardio sensor strap, you should lightly
humidify the contact surfaces (inner side) of the chest strap before starting the
training.
Note: Using two chest straps simultaneously in the same room,
either of the coded or non-coded type, at about 1.5 meter from
the receiver, can lead to the display of a wrong pulse rate.
Note:
When you train without ergo_memo-card2 you will not have the possibility to
store training results.
When you train without pulse rate measure, the pulse rate will not be displayed!
The user controls the dashboard by means of the control button, the Menu
key, the Info key and the two function keys.
Use the Info key to obtain more information about the individual menu
items.
If the request information spans many pages, you can leaf through the pages
by turning the control button. Press the Info key to display the keywords glossary
(page 21).
The Dashboard
7
14
Front side of the console
14
2
3
4
10
5
6
7
9
8
11 12
1
13
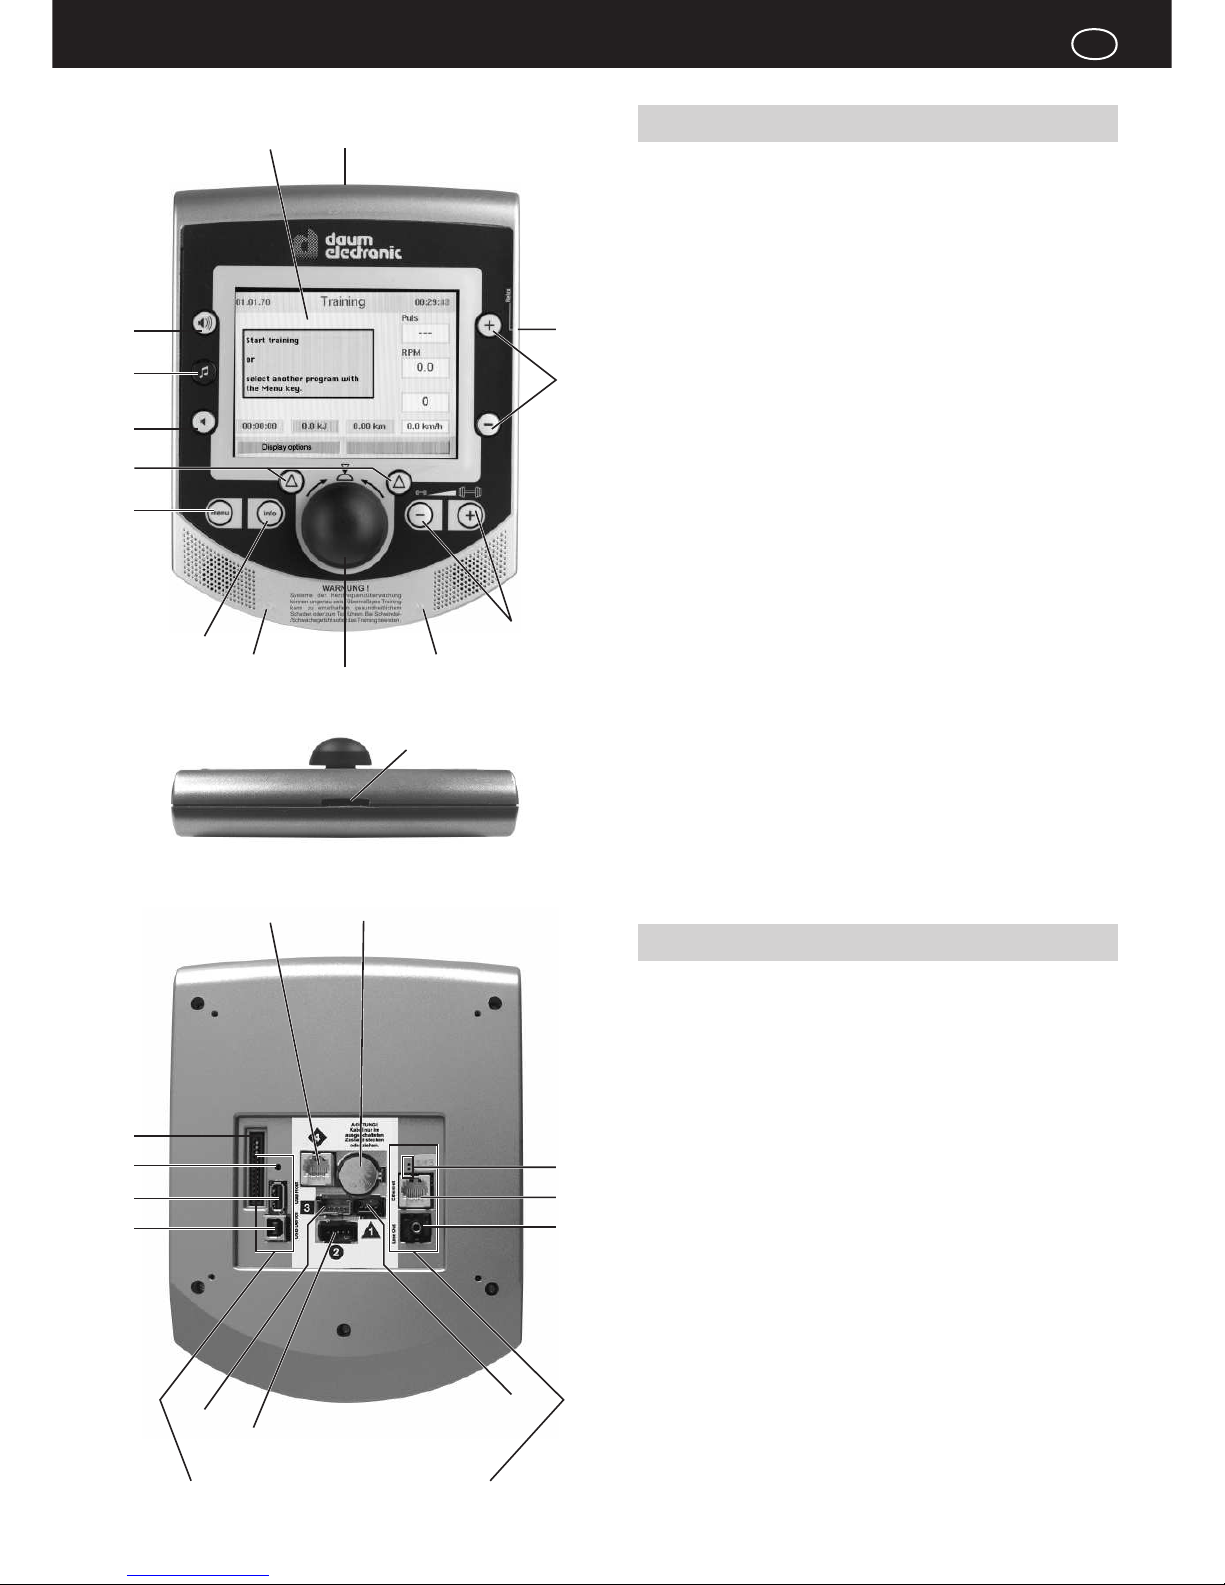
Top panel
1. Colour screen
2. Volume (up)
3. MP3-Player
4. Volume (down)
5. Function keys
6. Menu
Calls the main menu
7. Info
Displays detailed information about the current situation
8. Control button
By turning and pressing this button you can select and open menu items
9. -/+ Dumbbell
Decrease or increase the load
10. -/+ Values
Decrease or increase the pulse rate, RPM, torque and gear
The value that can be actually modified will be colour-highlighted in the
training view.
11. Audio connector
Used to connect a headphone
12. Cardio connector
Used to connect the ear clip
13. Relax connector
Used to connect the Relax sensor
14. Card reader for the ergo_memo-card2
Underside
15. RS422 interface to the control board
16. Treadmill keyboard
17. Reset key
18. USB-Host
19. USB-Slave
20. Wireless pulse rate
21. Operating power from control board
22. Hand pulse rate
23. Audio connector L/R to external amplifier (Line Out)
24. Network connector (Ethernet)
25. Light-emitting diode (LED) for network connector
26. Battery 3.3 V
Battery replacement
The button cell battery (CR 2032) is located on the underside of the circuit board
of the dashboard. Replace this battery when you notice a loss of time and date
on the system clock. (See the maintenance section)
17
16
18
19
26
15
These areas are still visible when installed
25
20
22
21
24
23
GB
Dashboard User Guide
8
Start
pedalling
Press the
function key
under End
Press the
Menu key
Turn and
press control
button to
select
Setting
Turn and
press control
button to
select Name
& Addr.
Turn and
press control
button to
select Name
Slider switch
lower position:
write protection
is deactivated.
Turn and
press control
button to
select
Personal data
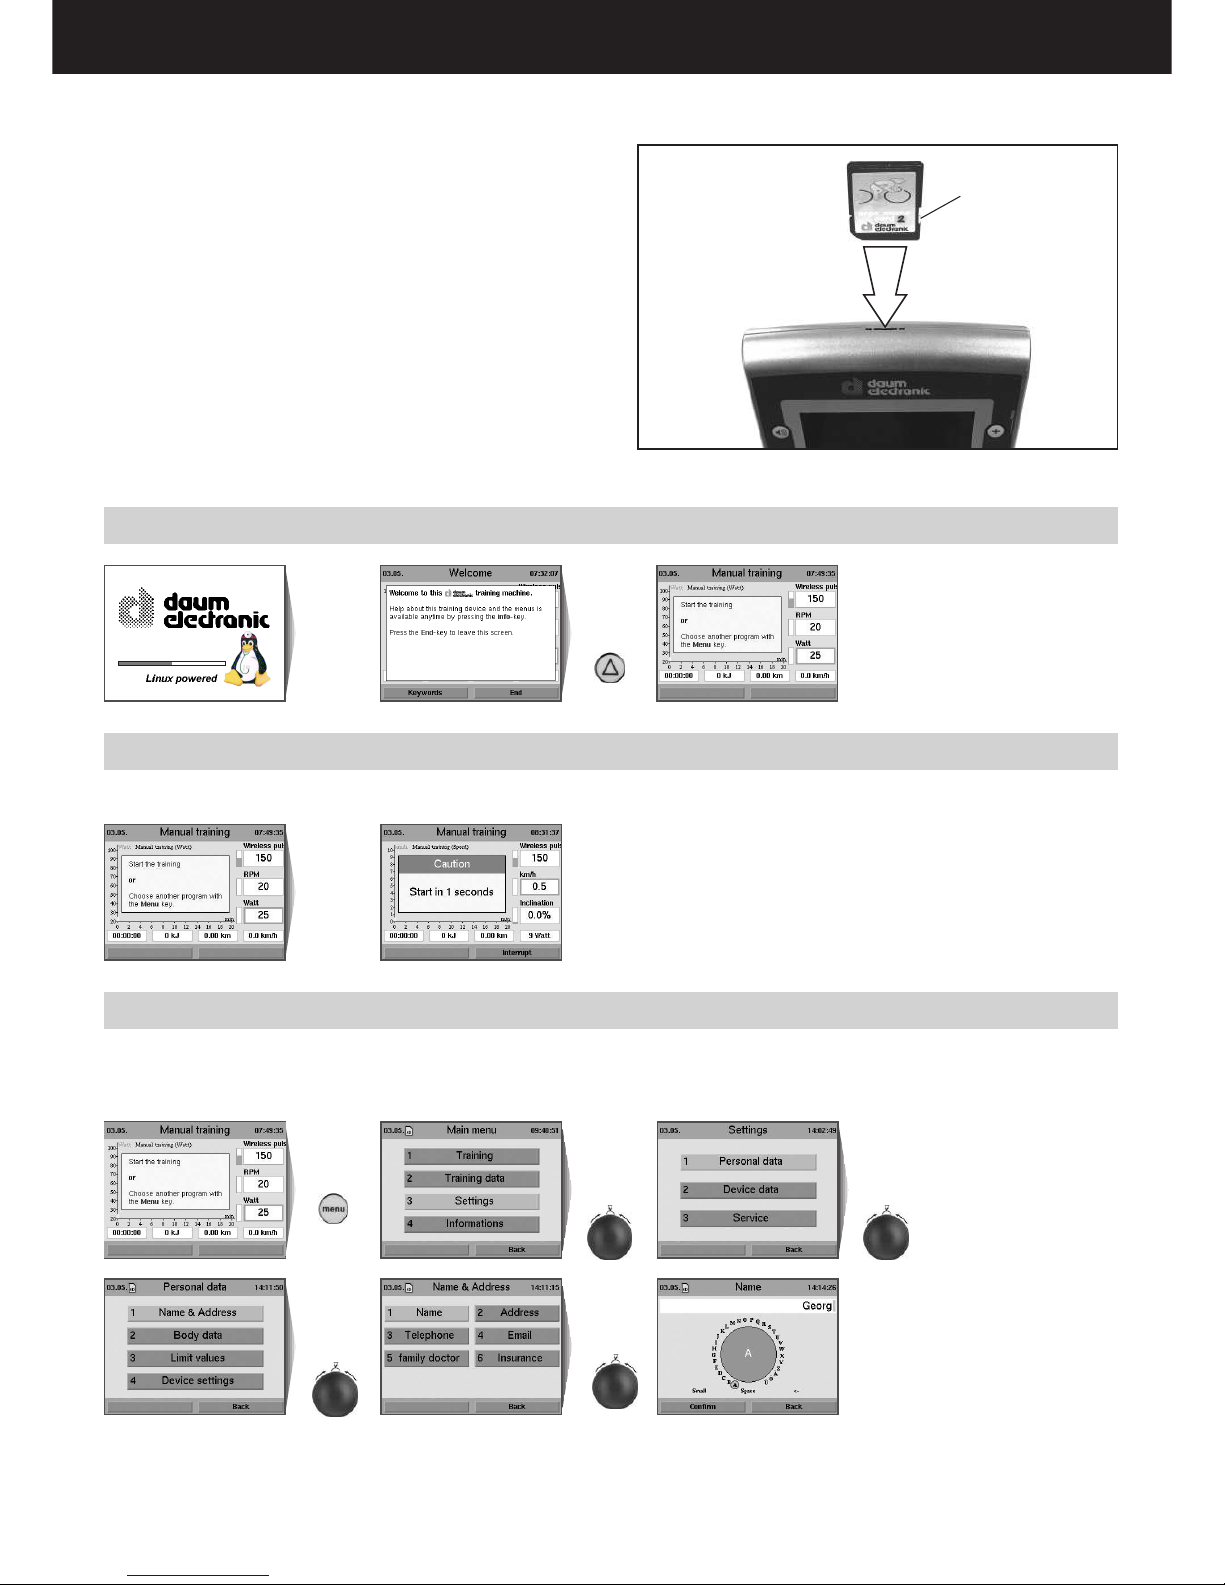
Please use the ergo_memo-card2 with every training session to store your
personal settings and actual training data. This card is user related. It is not
possible to store the personal settings of a second user on the same card.
Note:
When you train without ergo_memo-card2 you will not have the possibility to
store training results.
The user controls the dashboard by means of the control button, the Menu
key, the Info key and two function keys.
Use the info key to obtain more information about the individual menu
items.
If the requested information spans many pages, you can leaf through the pages
by turning the control button. Press the Info key to display the keywords glossary
(page 21).
Note:
We reserve the right to modify the figures!
Insert the ergo_memo-card2 in the card reader before turning the device on.
Setting Personal Data
Before training you should enter your personal data and limit values under menu
item Setting.
User and device data can be set here.
Starting Training Without Selecting a Program
You can start training immediately with this screen displayed.
Switching ON (with ergo_memo-card2)
You can enter all the characters and special characters by turning and pressing
the control button. Use the position Small to switch between capital and small
characters as well as special characters. Use the <- position to delete and
correct your entry
Dashboard User Guide
9
Press the
menu key
Press control
button
Press control
button
Press control
button
Press control
button
Press control
button
Press control
button
Press control
button
Press control
button
Press control
button
Press control
button
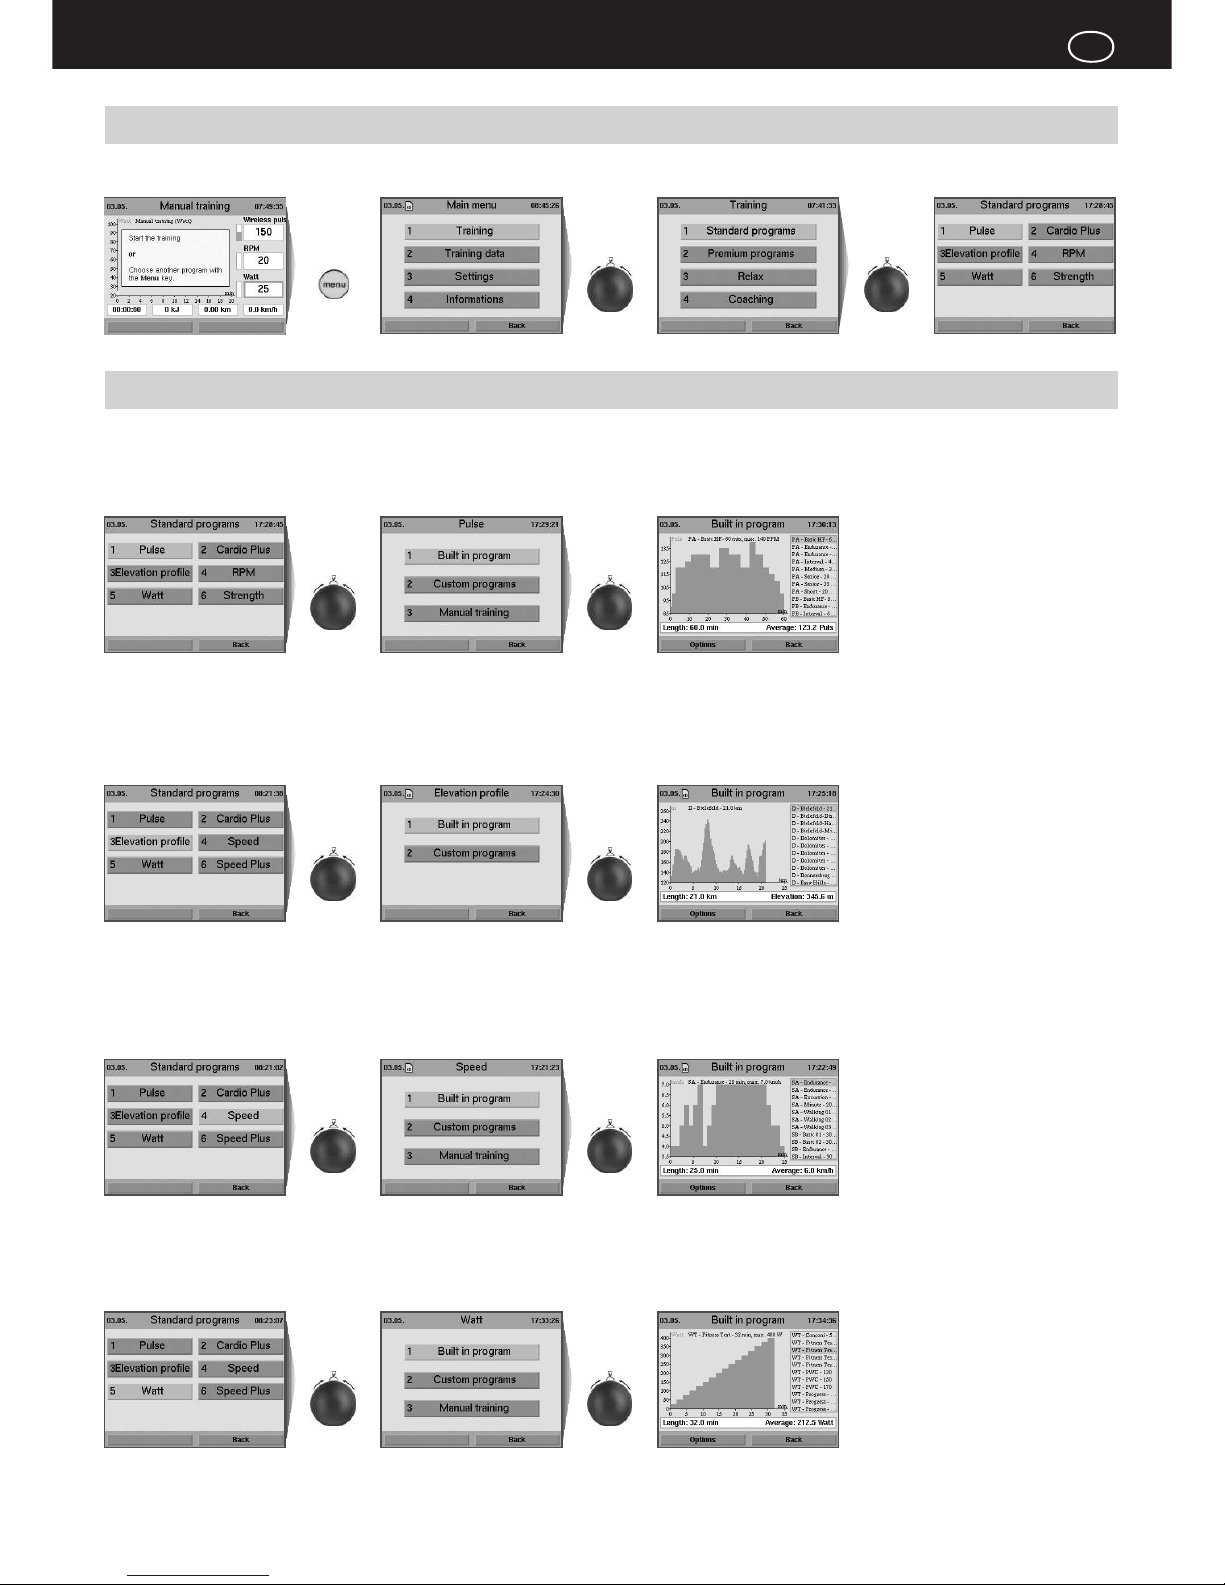
Starting Training by Selecting a Program
You can choose from various program types.
Elevation Profile Training Porgrams (distance programs)
The distance programs are varied, efficient, and simulate a realistic biking
tour. Only here you have the possibility to use the gearshift.
Training Programs
Pulse Rate Training Programs ( Constant Pulse Rate)
With the pulse rate programs the heart pulse rate is controlled and adjusted
automatically by means of the braking power.
Watt Training Programs
With the watt controlled programs the braking power is adjusted according
to the set up watt value.
RPM Training Programs
With the RPM controlled programs the wheel speed in revolutions per minute
is maintained at a level defined by the user.
Use the Info key to obtain more information about the individual menu items.
GB
Dashboard User Guide
10
Press control
button
Press control
button
Press the
Menu key
Turn and
press control
button to
select
Setting
Turn and
press control
button to
select Limit
values
Turn and
press control
button to
select
Personal data
Turn and
press control
button to
select Watt
Turn control
button to
select the watt
limit-value and
press
Confirm
Turn and
press control
button to
select
Dynamic limit
values
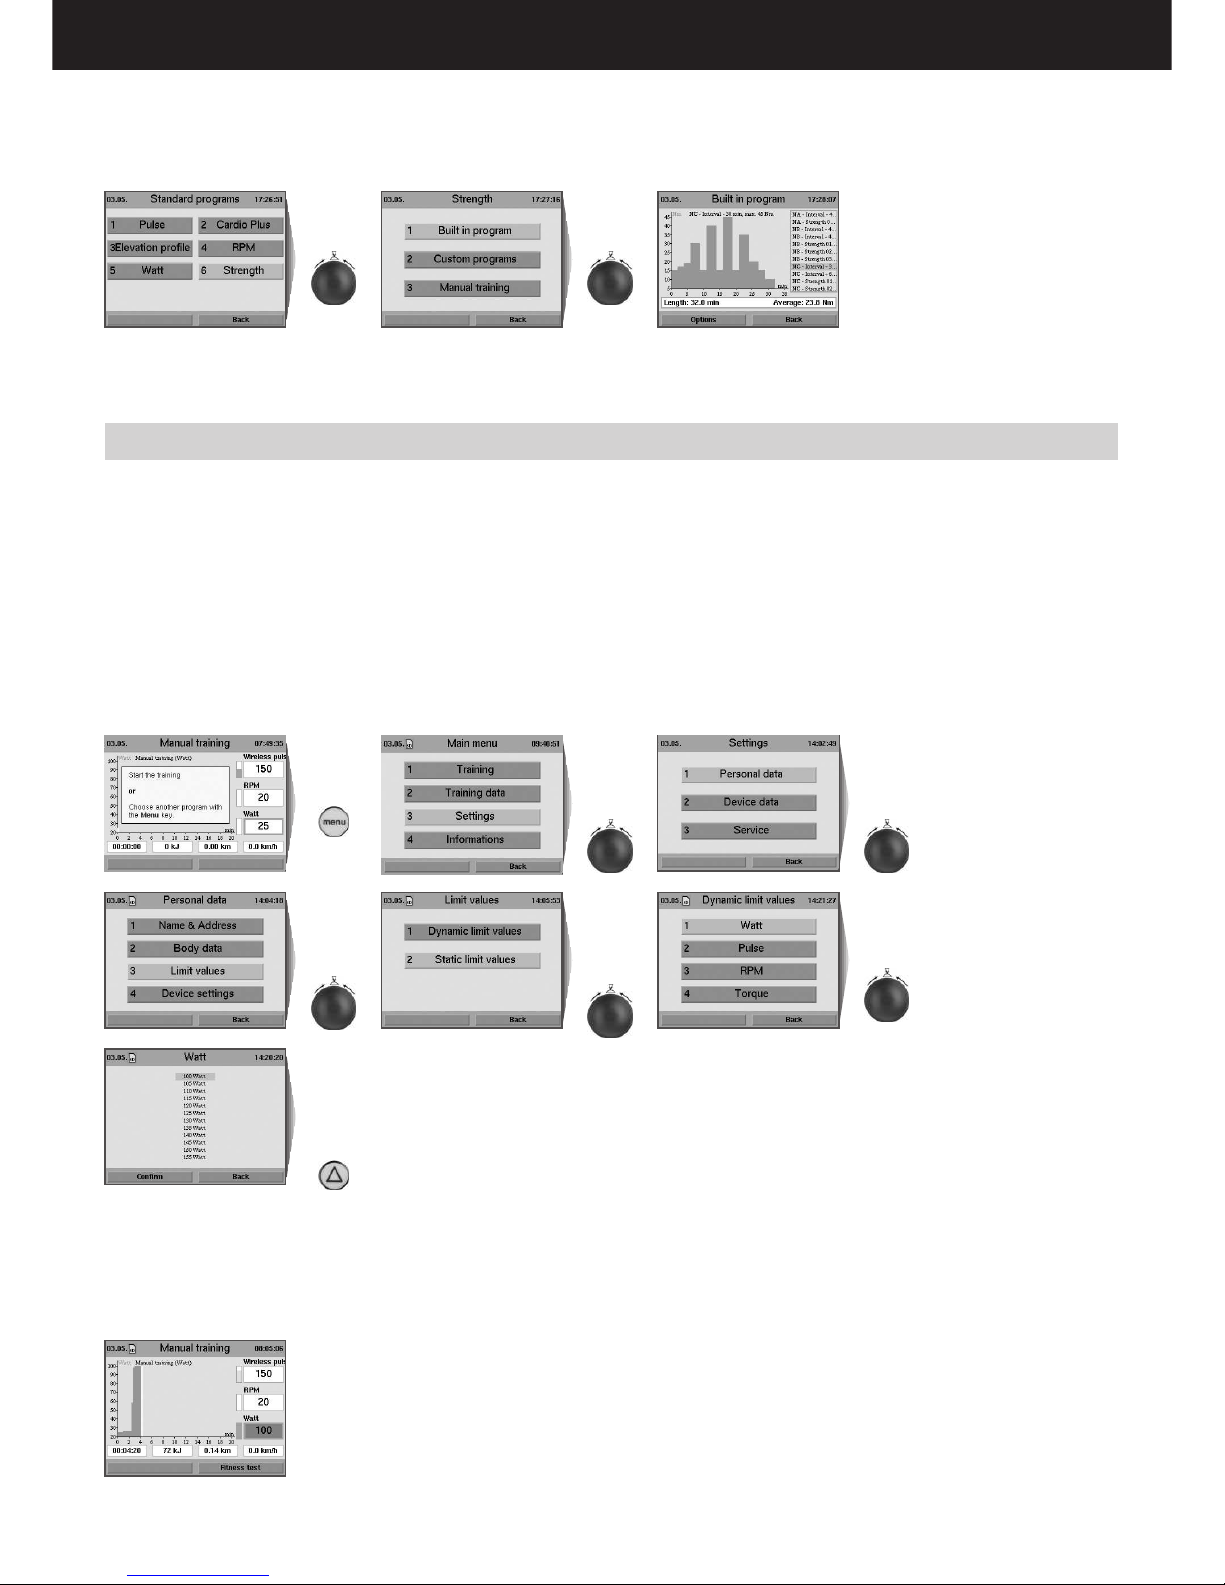
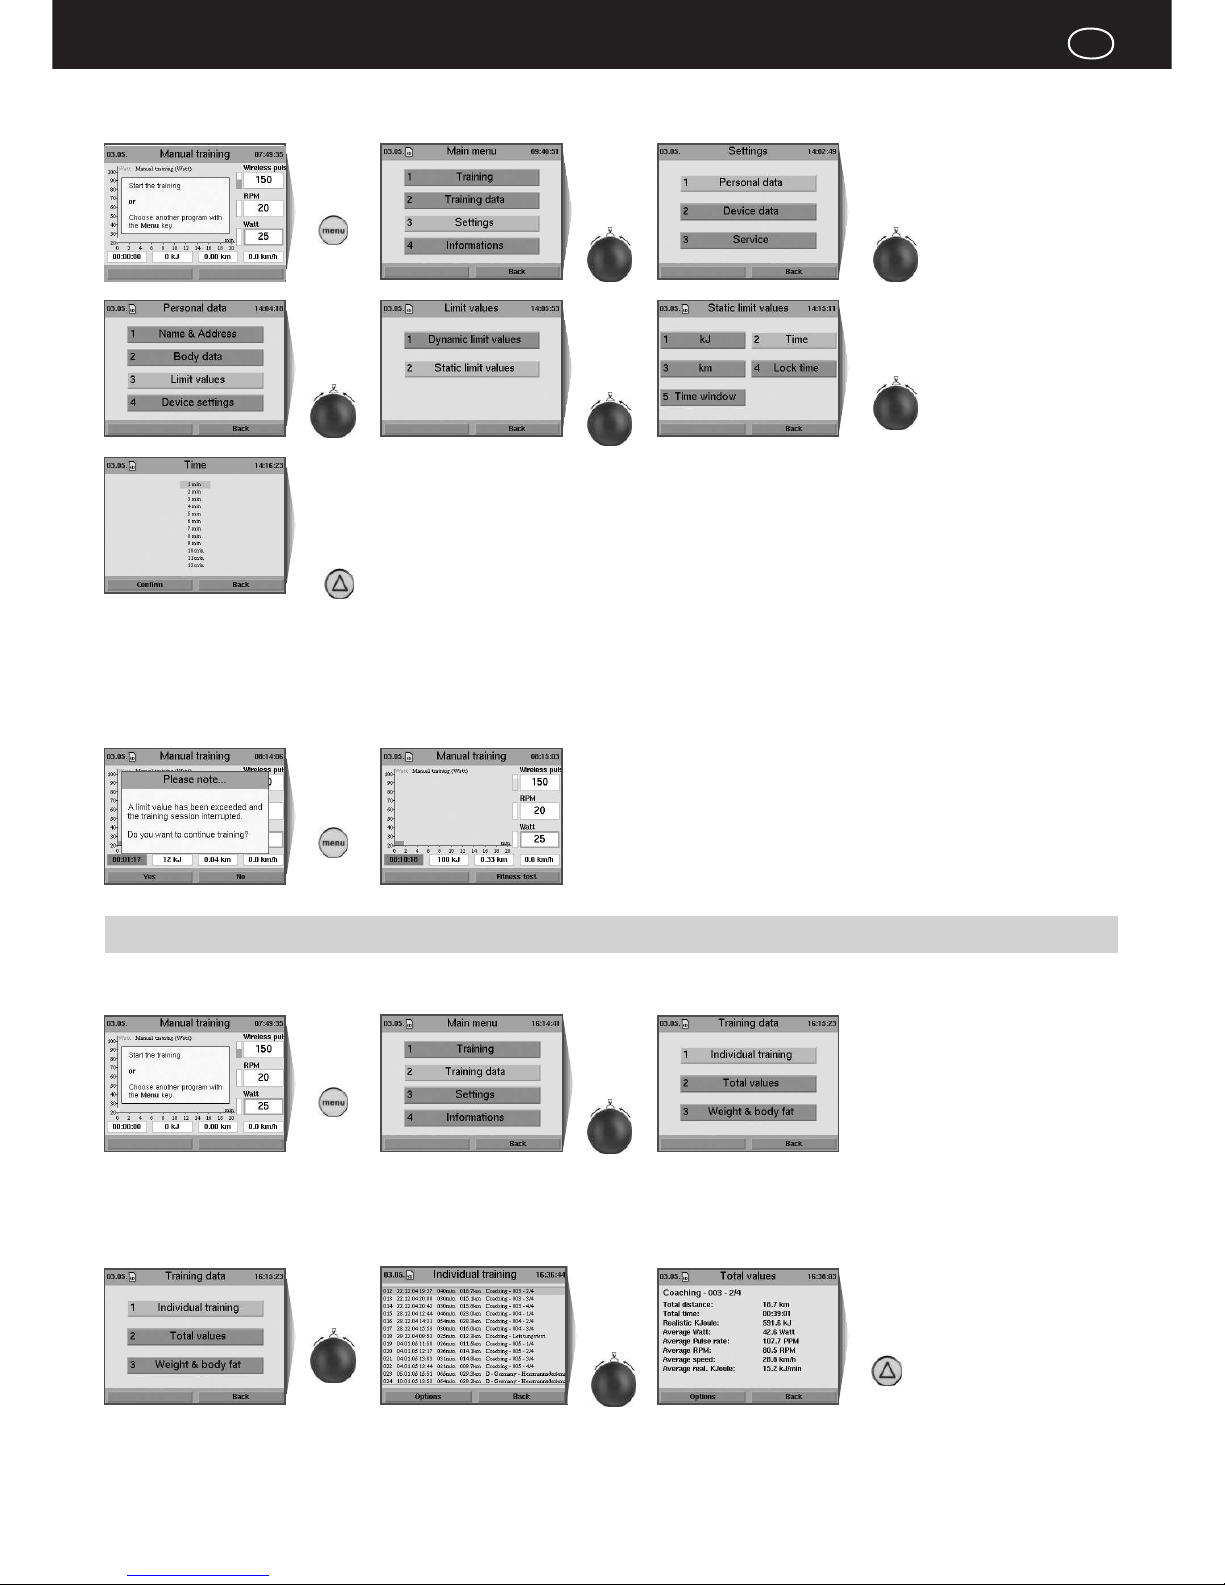
Setting Limit Values
In order to protect the user against overloading or physical injuries the training
intensity can be controlled by various adjustable limit values. These should be
set in menu Setting before starting training or before setting the loading values
after a few training units.
Dynamic Limit Values and Static Limit Values can be set.
- Due to their natural variability, dynamic limit values are continually exceeded.
- Static limit values are reached only once per training.
Setting the Dynamic Limit Value for "Watt"
Watt limit value reached while training
The field displaying the watt value will be highlighted in red when the set Watt
limit value is reached or exceeded during training. If the loading is reduced and
thus falls below the limit value the warning is removed.
Strength Training Programs (pedalling speed dependent programs)
With the strength programs a pre-selected constant pedalling resistance is applied. The
effort produced by the user is a function of the pedalling speed.
Use the info key to obtain more information about the individual menu
items.
Dashboard User Guide
11
Press control
button
Press the
Menu key
Turn and press
control button
to select
Training Data
Press function
key under
Options
Turn and
press control
button to
select Limit
Values
Turn and
press control
button to
select Time
Turn control
button to select
the time limit-
value and
press the
function key
under Confirm
Press function
key under
Yes
Setting the Static Limit Value for Time
Press the
Menu key
Turn and
press control
button to
select
Setting
Turn and
press control
button to
select
Personal data
Turn and
press control
button to
Select
Training Unit
Turn and
press control
button to
select Static
Limit Values
Reviewing Stored Training Data
Recalling stored training data.
e.g. Individual Training
The individual training units can be recalled under several specific performance
diagrams.
Time limit value reached while training
When the Time limit value is exceeded during training the braking load is
automatically reduced to a minimal value. Simultaneously the system displays
a warning message that must be acknowledged. The training can then be
terminated or continued.
Use the Info key to obtain more information about the individual menu
items.
GB
Dashboard User Guide
12
Press the
Menu key
Turn and
press control
button to
select
Training data
Turn and
press control
button to select
Maximum
Values
Press the
function key
under
Options
Fig. A Fig. B
Reviewing Fitness Mark
Press the
function key
under
Fitness Test
Press the
function key
under OK
Fitness mark
evaluated
after 60
seconds
Turn and
press control
button to
Select
Diagram
Turn and
press control
button to
select
Individual
Training
Relax-Function
The relax-function is a biofeedback-process that is measured over the electrical
resistance of the skin. Biofeedback is thus the translation into perceptible signals
of physiological processes occurring in our body whose values are indicated by
means of optical signals.
The ergo_bike controls the relaxation process by means of the relax-function,
and highlights the process of stress elimination after a physical fitness training
or other loading.
The displayed relax value drops gradually with increasing relaxation level and
increases with the increase of stress level. You can assist this process by getting
off the device and sit in a relaxed position, or even lay down, close to the
ergo_bike and calm down.
Fitness Test and Fitness Mark
The fitness test can be executed anytime during training. A pulse rate measuring
device (pulse sensor, ear clip, or chest strap) must be connected and functional,
and the training should had already started at least 10 minutes earlier.
The measurement principle is based on the fact that the pulse rate falls faster
within one minute (following a load period) for well-trained users than for less
trained users. Fitness marks from 1 to 6 are assigned. The lower the fitness
mark the better is the training status (fitness) of the user.
When the fitness test is started during training, the present training will be
interrupted and the load will be lowered to minimum value for the device for a
short period of time. During this pause the system measures the drop in pulse
rate within a period of 60 seconds and computes a fitness mark. Afterwards the
training resumes automatically at the interrupted position, and the load in Watt
is raised to its previous value.
e. g. Fitness test during a training
 Loading...