

User Manual
ergo run
classic

2
Miscellaneous
- Introduction.................................................................................................. 2
- Data Interface ..............................................................................................2
Safety Information
- Information About Personal Safety ............................................................. 3
- Technical specication................................................................................ 3
- Connecting the device................................................................................. 3
- Forbidden Use............................................................................................. 4
- Used Symbols............................................................................................. 5
- Accessories................................................................................................. 5
Training Hints................................................................................................ 5
Installing and starting
- Control elements, Connections.................................................................... 6
- Transport and packaging............................................................................. 7
- Installation hints........................................................................................... 7
- Installing the device..................................................................................... 7
- Folding / unfolding....................................................................................... 8
- Disassembling the handrails........................................................................ 8
- Disassembling the front column................................................................... 8
- Level adjustment......................................................................................... 8
- Switching On / Off....................................................................................... 9
- EMERGENCY STOP switch........................................................................ 9
- EMERGENCY STOP Safety Rope ............................................................. 9
- Setting the inclination of the dashboard...................................................... 9
- Heart rate measurement............................................................................ 10
The dashboard
- Top panel – Control elements .................................................................. 11
- Underside - Connections........................................................................... 11
- Dashboard display windows ..................................................................... 12
Dashboard User Guide
- Using the menu ........................................................................................ 13
- User selection........................................................................................... 13
- Language selection................................................................................... 13
- Personal data ........................................................................................... 14
- Device data .............................................................................................. 15
- Training .................................................................................................... 16
- Programs overview............................................................................... 17-21
- Personal programs ................................................................................... 22
- Card programs .......................................................................................... 23
- Relax function ...................................................................................... 23-24
- Recalling saved training data.................................................................... 24
- Fitness Test and Fitness Mark.................................................................. 25
- Error messages / problems solving........................................................... 25
Menu diagram ........................................................................................ 26-27
EC Declaration of conformity....................................................................... 28
Specications............................................................................................... 29
Maintenance
- Liability....................................................................................................... 29
- Maintenance and technical safety controls ............................................... 29
- About the V-belt......................................................................................... 29
- Adjusting the running belt.......................................................................... 30
- Lubrication of the running belt / sliding plate............................................. 30
- Glass tube fuse.......................................................................................... 30
- Contacting your dealer.............................................................................. 30
Tables and Diagrams
- Table of Target Heart Rate / Aerobic Zone................................................ 31
- Overview Diagram of the Target Heart Rate............................................. 31
Accessories
- EMERGENCY-STOP safety rope.............................................................. 32
- Ear Clip...................................................................................................... 32
- Relax sensor ............................................................................................. 32
- ergo_win classic ....................................................................................... 32
- ergo_memo-card1 .................................................................................... 33
- Bluetooth Adapter ..................................................................................... 33
- Floor protection mat................................................................................... 33
- Cardio sensor chest belt............................................................................ 33
Optional software
- ergo_win premium pro .............................................................................. 34
- ergo_win race edition ............................................................................... 34
Sample blank diagrams.......................................................................... 35-36
Warranty Conditions ................................................................................... 37
This ergometer-treadmill is specially designed for health and endurance
training. High quality manufacturing, an easy to read dashboard, and ease of
use and of maintenance contribute to make this appliance an ideal training
device for sport and tness training. We would also stress that the complete
equipment list and the convincing performance range appeal to athletes and
tness conscious persons of every age group.
Introduction
Designed and manufactured in conformity with the DIN EN 957 1/-6 Class SA/
HA standard, the ergo_run is more than just a “home trainer”. It is suited for
sportive and therapeutic utilisation at home.
The operating principle of the treadmill ergometer is based on a moving surface, whose variable inclination can be precisely set. This physiological load
can be evaluated in numbers.
The ergo_run adjusts itself to the user’s personal requirements.
The training intensity is controlled by adjusting the speed or the inclination
or both parameters combined, under constant control of the heart rate frequency.
Data Interface
The ergo_run classic can be remote controlled by a personal computer (PC).
The serial cable provided is needed for this operation.
Table of Contents
Miscellaneous
3
D
Information About Personal Safety
Important notices, warnings and hazards information are
identied with the symbol to the side. This symbol highlights information that must be taken into consideration
when performing a measurement or when connecting the
device to other devices.
The ergo_run ergometer is intended for adults. Children
should only be allowed to train with the ergometer under
adult supervision.
Persons suffering from any of the following diseases should consult their
family physician or a specialist before starting training with the ergo_run.
- Heart disorders like angina pectoris, coronary thrombosis (infarct), stenosis, and high blood pressure
- Diabetes
- Respiratory disorders like asthma, chronic bronchitis, etc.
- Rheumatism
- Gout
- Or any other disease or illness
You should never train when you feel ill or weak.
Please read the user manual carefully before starting training on the treadmill. Utilisation of the treadmill is approved only under observance of the
user manual.
The user manual should be kept within reach of the ergo_run classic.
It is to be considered an integral part of the device.
The manufacturer will not be held liable if the ergometer is not used in
accordance with our instructions and should this result in injuries to persons
or other severe consquences, like damages to properties.
The daum-electronic gmbh will only be held liable for the device with regard
of safety, reliability and functionality if:
- the device is used in accordance with the instructions of the user manual.
Please take the time to become acquainted with all the functions and setting
possibilities of the device before the rst training on the treadmill.
Never grab the moving endless belt with the hands. Never leave any object
in the vicinity of the running rollers, where it could be pulled in.
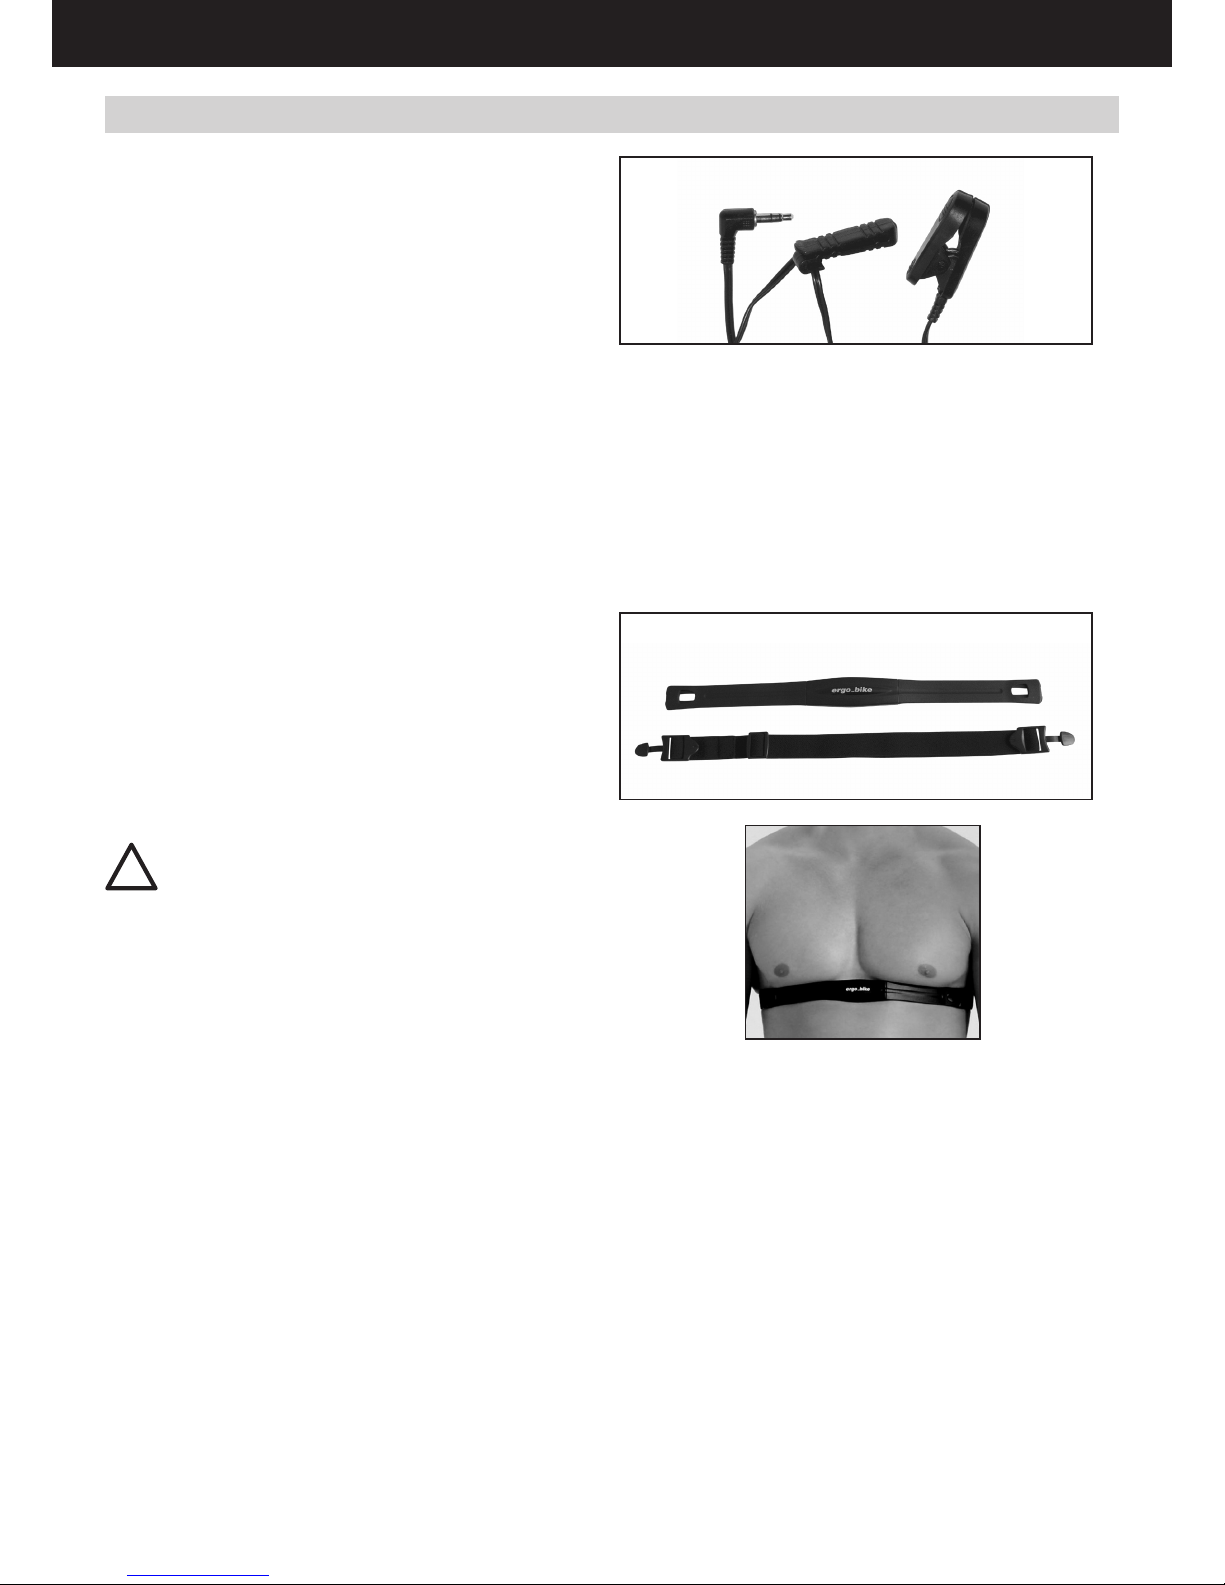
The treadmill is equipped with an EMERGENCY STOP me-
chanism. Before starting the training the user must attach
the clothes peg of the safety rope to his clothing. Whenever
the safety rope is pulled out the running belt will automa-
tically stop. The belt will not restart upon reinstalling the
safety rope. The length of the safety rope can be adjusted
to t the user.
Before starting the training please also put on the ear clip or the Cardio sensor
belt, in addition to the safety rope, before starting the program.
Do not hop or jump during the running training.
You can prevent others unauthorised persons from using the treadmill by
pulling the safety rope out.
You should never use the ergo_run to nd out your maximum degree
of physical endurance. This can have serious consequences on your
health!
Should you change the installation location of the treadmill, you must verify
the operation of the running belt in its new location. It should always stay in
the centre of both shafts.
daum electronic gmbh is not liable for personal physical injury or material damage.
In emergency situations or when you feel you will fall down you must immediately press the EMERGENCY STOP button. You must hold the lateral
handrails and/or the front handle with both hands. You must immediately lay
your feet on the treadways (stepping areas) on the sides of the belt.
No brake effect is possible with direct current motors.
Training and measurement results (e.g. heart rate) are affected by the fact
of holding the handrails. We recommend that healthy persons training under
normal training conditions hold the handrails only in emergency situations, or
for safety, or to relieve the load.
Pull out the power cord before cleaning or disinfecting the device.
The safety, reliability and functionality of the device can only be achieved if:
- the installation room complies with the installation prescriptions according to
DIN and VDE, and when the device is connected to a power outlet with safety
grounding system.
- the installation room complies with the environmental requirement of the
device, and it is used in compliance with the instructions of the user manual.
The device is not protected against the inltration of liquid.
Avoid direct contact with humidity or liquids of any kind.
Take care to remove (wipe) any sweat drops after training (sweat attacks
paint as well as the plastic parts).
Damage caused by sweat is not covered by the warranty.
Please ask the customer service department of daum electronic gmbh for help
in the case of a liquid inltration in the device.
Starts a training by walking slowly for the rst few minutes to warm up, then
increase the speed. Take your individual physical and tness condition into
consideration!
You should only run with sport or running shoes and sport garments. Running
with smart shoes or bare foot is not permitted.
Do not jump on to or from the belt while it is running. Do not jump to the front.
Do not stand still on the belt while it is running. To dot turn around on the belt
while it is running. Do not run to the side or rearwards on the belt while it is
running. The speed and inclination must always be set to a value appropriate
to the physical condition of the user.
If the belt is stopped (e.g. by pressing the Stop button or through the Emergency Stop feature, because of a power failure, etc) and if at this moment the
inclination is set to positive value, the weight of the user combined with the
gravity will cause an acceleration of the belt..
During a training the Emergency Stop implements must always be within reach of the user.
The Emergency Stop implements are only to be used in case of hazard or
falling down risks.
Do never step on the rear return cylinder (running belt extremity); this could
set the belt in motion. Falling risk!
The rear and lateral areas of the running belt and the lifting
mechanism have dangerous nipping points and slots. Users
with long hair, loose garments, jewellery, etc. may not come
close to these nipping points and slots. Including not in the
case of a fall. Never put any clothes, towels, jewellery or simi
lar items down on the running belt.
Children and animals may not use the treadmill. Care must be taken to keep
children and animals at least 5 m away from the treadmill.
Using the treadmill when under the inuence of alcohol, drug and/or narcotics
is not allowed.
Interrupt the training if you feel dizzy or ill, or in the event of pain of any type
and immediately consult a physician.
Inadequate or excessive training and loading through tests
can be dangerous to your health.
Users with a cardiac pacemaker or any other limitation may only use the treadmill with an express prescription or authorisation of a physician.
A safety clearance of at least 2 m in length and 1 m width must be kept free directly behind the treadmill, this area should be padded (e.g. with a soft mat).
!
!
!
!
!
Safety Information
GB
4
!
Inadequate and/or unauthorised use of the treadmill is not allowed and we
warn you expressly against it.
All connection cables (power supply cable, data interface cable, etc) must be
securely installed and routed. You must make sure that no one could stumble
or fall down on them.
All the safety and usage instructions in this user manual must be most carefully respected. In particular all the instruction about maintenance and technical
safety checks.
In the case of a detected, or even only suspected, fault or defect, the treadmill
must be put out of service for safety reasons, and clear visible sign must
be posted to that effect. This is to prevent it from being used inadvertently.
You should then contact the technical customer service department of daum
electronic gmbh.
Failure to comply with the safety prescriptions can cause in
juries or death.
Oil and other maintenance products, as well as parts of the device and of the
accessories, are not suitable for consumption. Therefore you should keep
them away from the reach of children and animals.
Warning! The manufacturer is not liable for personal physical injuries or material damages.
When coupling many devices, care must be taken to avoid any danger arising from the summation of the leakage currents and to ensure the potential
equalisation is effected through a common current (power) supply (e.g. a wall
socket-outlet). If you have any questions please ask your dealer or the service
department of daum electronic gmbh.
If a socket with multiple outlets is installed after the initial start-up, no other
device may be connected to this socket. (use covers on the multiple sockets).
Only cables certied by daum electronic gmbh may be used to connect the
device with other devices.
A electrical shock hazard exists when touching devices that are not separately
grounded.
Defective or faulty devices and accessories may not be used.
The personal computer and all other connected devices (e.g. monitor, printer,
etc) must be installed at least 1.5m away from the training place, because leakage currents could be generated on the housing (or use separate grounding,
housing leakage current).
The device is not suited for operation in rooms and / or areas with explosion
risks.
Cellular telephones may not be used in the direct vicinity of the device, they
may interfere with its functionality.
Electromagnetic interference are primarily characterised by the oscillation of
the displayed load value. If the displayed value varies often uncontrollably this
can be an effect of electromagnetic compatibility (EMC).
Treadmill ergometers are not suited for operation in rooms and / or areas with
explosion risks or in a combustive atmosphere. The devices may not be operated in the near vicinity of e.g. motors or transformers with big electrical con-
nections because electric or magnetic elds may disturb or deactivate some
functions. The vicinity of high voltage cables is also to be avoided.
Unless otherwise specied in the accompanying documentation and delivery
documents, all the devices are designed to be used in the usual closed conditions under the climate conditions considered normal:
Temperature:+ 10°... +40° C
The devices must therefore be protected against particular humidity effects.
Ventilation opening must not be covered in order to avoid restricting the circu-
lation of air. Storage temperature range: -20°C .....+50°C.
Technical specication
The ergo_run classic may not be used if the certications/approval and the
dened safety standards do not comply with the local prescriptions. The local
country specications must be compared with those of the device before using
the device and the device may only be used if they comply with each other.
Supplying power to the device:
The ergo_run classic must be connected to a 230Volt 50 Hz AC socket outlet.
This outlet must be protected by a 16 amperes fuse (C type).
Before connecting the device to the power outlet socket,
proceed with a careful visual examination of the power cord
and its plug to make sure they a free of damage. A damaged
cord and/or plug must immediately be replaced by an aut-
horised person.
Before connecting the ergo_run to the local power supply compare the spe-
cications concerning voltage and frequency indicated on the nameplate with
your local power supply specications. You may not connect the device be-
fore doing this comparison.
The connection to the power supply socket must be done directly to the wall
socket. The usage of extension cords and/or multiplier socket is not allowed.
Power surges or power failure may cause the device to malfunction and/or become defective, as well as to a complete
shutdown of the ergo_run. In order to restart the device in
this case you must switch the device OFF by means of the
mains switch and wait for the ON/OFF interval (about 1 - 2
minutes). Then you can restart the device.
Mains Voltage 230 Volt
Because of new regulations the mains voltage must be specied in the form
of a denite value. Consequently, the mains voltage values indicated with a
tolerance from 220 to 240 Volt will be restricted for all the ergometers of daum
electronic to the single mains voltage value of 230 Volt.
Mains Power Supply
In order to avoid all hazards any damages to the connection cable to the
mains power supply or to the On/Off switch must immediately be repaired, or
replaced with new parts, by the manufacturer, the customer service department of the manufacturer, or similarly qualied service personnel.
Forbidden Use
Automatic operations (remote controlled from a computer) is forbidden, when
the health and the physical condition of the user do not allow this usage. Non
compliance to this can lead to injuries and serious health risks or even to
death.
Any utilisation with wheels (bicycle, wheelchair, inline skates or wheel skis),
as well as spiked running shoes or other spiked shoes on the standard running surfaces or belts is forbidden.
If you believe that not authorised persons may have access to the device,
or know of any other reason to lock the treadmill, then you must lock the
treadmill.
Used Symbols
The symbols used on the ergo_run premium8 comply with the IEC 417 and
IEC 878 standards (table D1/D2).
Warnings / Danger Notices
Accompanying documents / instructions.
Device of type B
Dangerous electrical voltage
!
!
!
Safety hints
5
D
Fig.1
Alternating current
Protective cable connection
Ground
Dispose of electrical and electronic old devices
Read the user manual
Accessories
The documentation supplied is an integral part of the ergo_run classic and
may only be copied or distributed with the authorisation of daum electronic
gmbh.
The device may only be used with the accessories prescribed and distributed
by daum electronic gmbh.
Every accessory item and every device connected must be manufactured in
conformity with the corresponding standard.
The supplied software may only be copied and archived for safety and functional reasons. In special cases a request must be addressed in writing to daum
electronic gmbh. Releasing it to non-authorised persons in not allowed.
You should pay attention to providing good training conditions; this includes
choosing the training room and installation place. Makeshift installation places
do not incite to training!
The ergo_run makes it possible to dene and control the exercise sequence
yourself.
It is thus possible to adapt constantly the training plan to the capacities of the
user. This device is suitable for therapeutic use. It does not meet the requi-
rements for medical and diagnostic usage (in medical clinics).
Ergometers are designed for endurance, agility, and physical condition training, as well as for strengthening the cardiovascular system and increasing
the muscle mass. The inclusion of the pulse rate in the parameters used to
control the load enables training in the efcient aerobic zone.
Being in the aerobic zone means the muscles’ loading is at the exact level
where they can be adequately supplied with oxygen without overproduction of
lactic acid (muscles’ ache). Therefore, the treadmill ergometer is also a great
value for sports medicine and physical education.
The fact that the training effort can be nely measured gives you the possibility
to carry out physical stress tests to get information on your physical condition.
You can thus identify early any cardiovascular problems and, with the help of
a physician, set up a special endurance training-plan to deal with them.
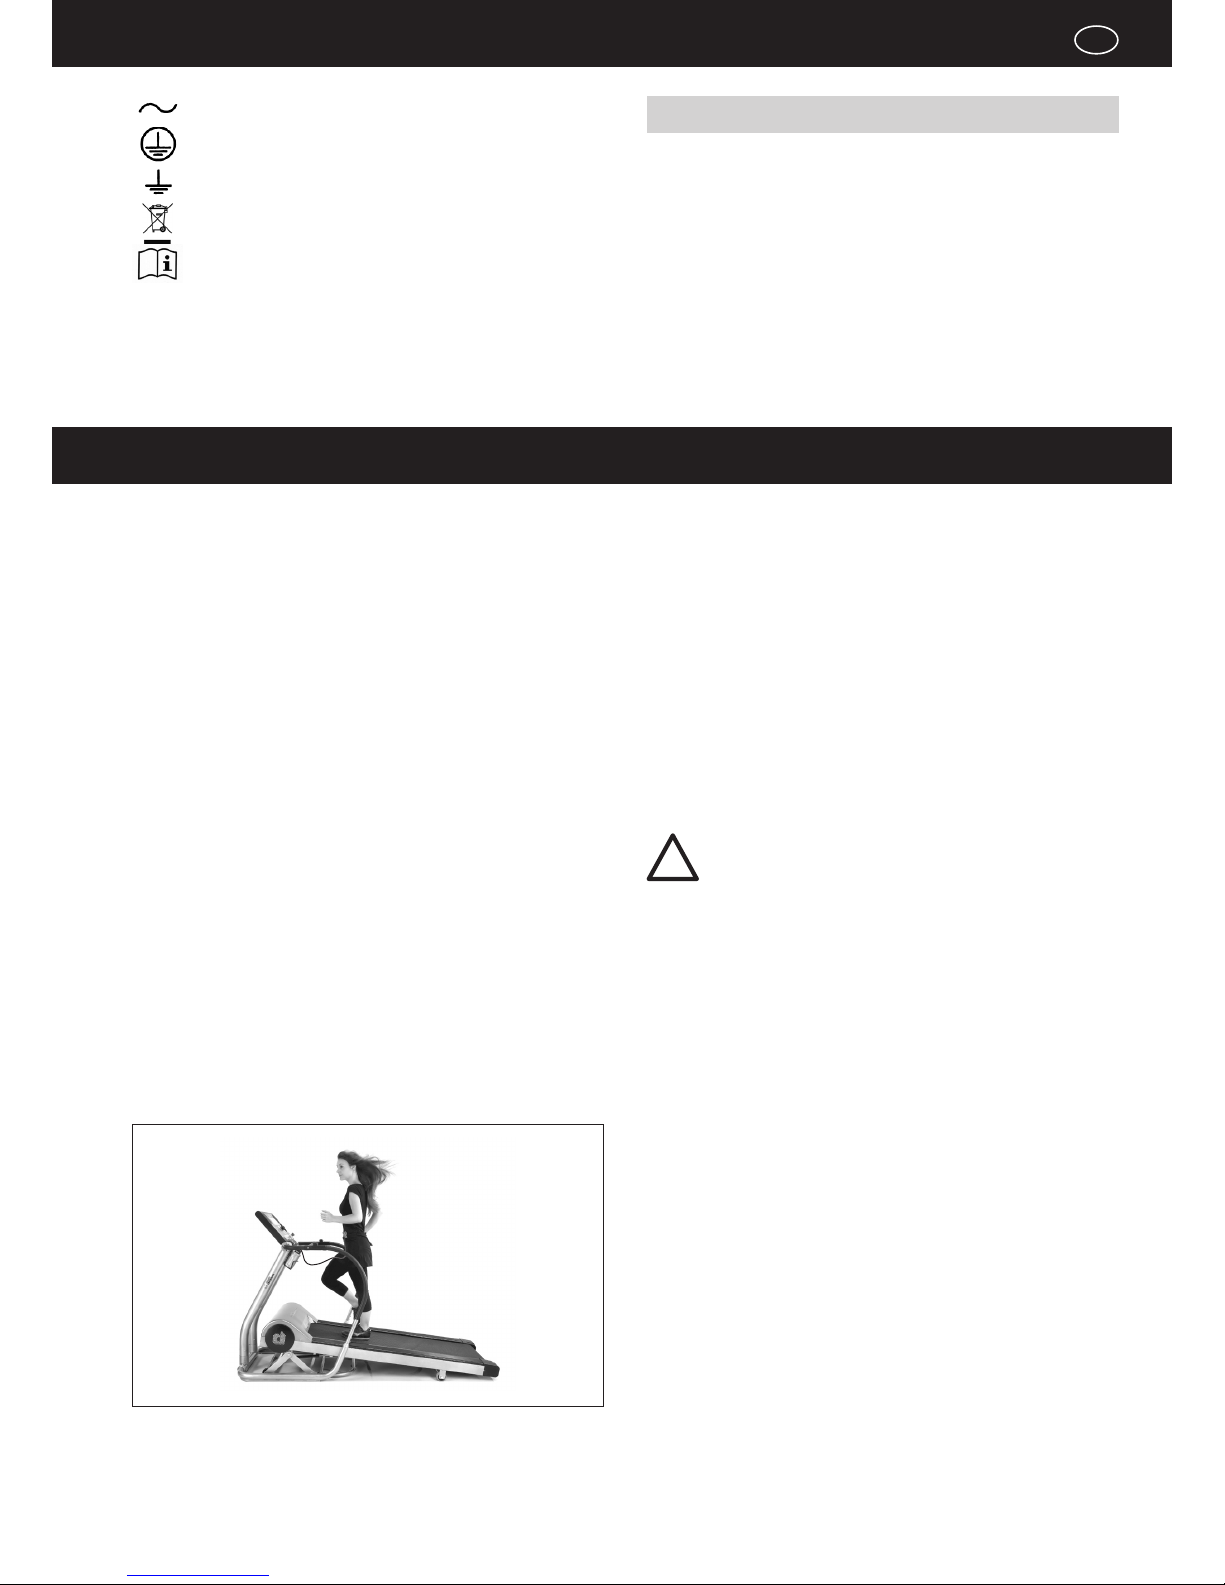
Running is a very efcient training form for tness. You can carry out a controlled running training at home without fearing any interference from bad
weather. The treadmill is also appropriate for walking (jogging) exercises.
Running on a treadmill belt differs from running on normal ground. Therefore,
you should prepare for the running training by walking slowly on the belt.
A steady running pace and appropriate shoes (running shoes) are of great si-
gnicance for the efciency and the benet of the training with the ergo_run.
The wrong shoes can lead to overloading the joints, tendons (sinews) and
ligaments. Please ask your dealer for advice when buying your running
shoes.
Training Hints
Generally speaking, training twice a week will help retain your physical con-
dition level. To improve your tness level you must train at least three or four
times per week.
You should consult a physician before increasing the number of weekly
training units, to avoid overloading yourself. A steady running pace and
appropriate shoes (running shoes) are of great signicance for the efciency
and the benet of the training with the ergo_run.
The wrong shoes can lead to overloading the joints, tendons (sinews) and ligaments. Please ask your dealer for
advice when buying your running shoes.
!
Summary of the Important Safety Hints:
- Read the user manual and the safety hints
- Install on a horizontal and solid oor without unevenness
- Safety clearance of 1 m on each side and 2 m to the rear
- Only persons in good physical and health conditions may use train
the device
- Train only with sport clothing and running shoes
- Before starting a training session attach the EMERGENCY STOP safety
rope to the clothing and adjust it to the correct length
- Put on the ear clip or the Cardio sensor strap before starting a training
session
- Begin training at walking speed and only then start running
- Do not jump on to or from the belt
- Do not stand still, turn around or jump while the belt is running
- Be careful with the dangerous nipping point of the running belt
- Use the EMERGENCY STOP when falling
- Interrupt the training if you feel dizzy or ill
- Children may use the treadmill only under adult supervision
- Always pull out the mains plug to repair or clean the device
- When you change the installation location check that the running belt
runs in the centre of both shafts
Safety hints
Training Hints
GB
6
3
16
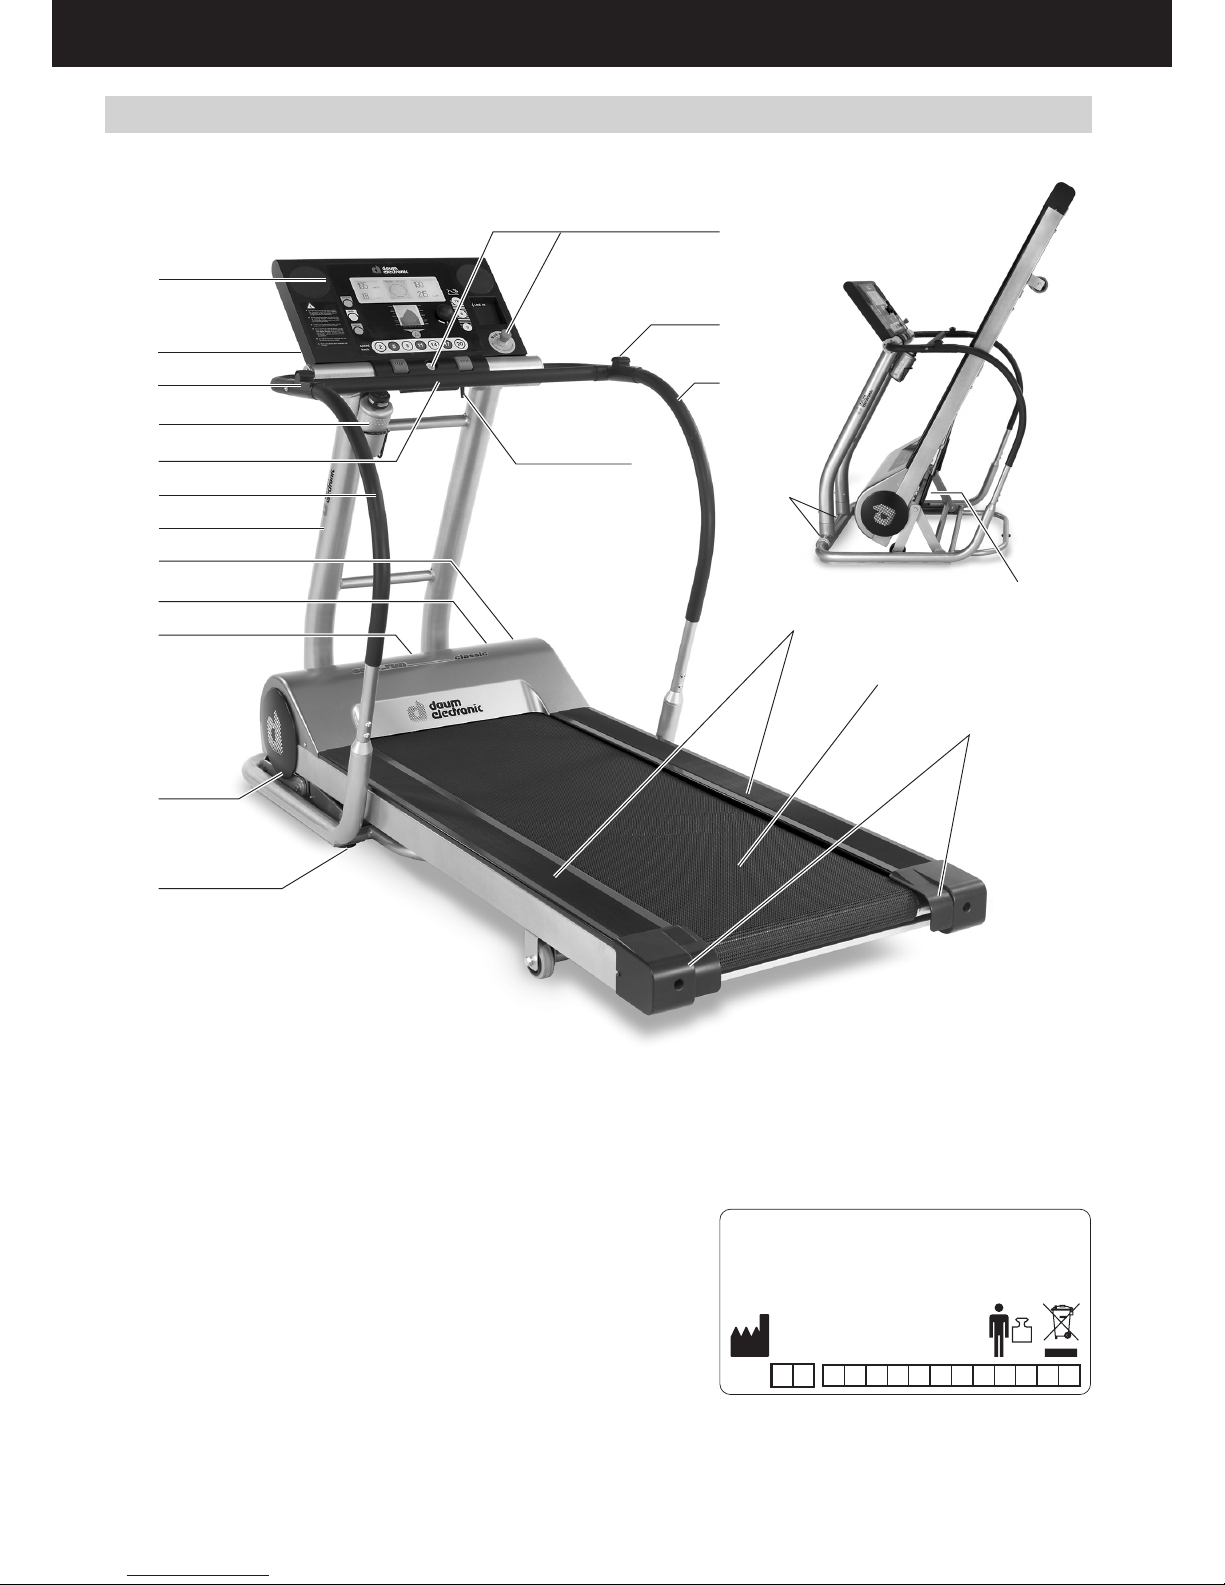
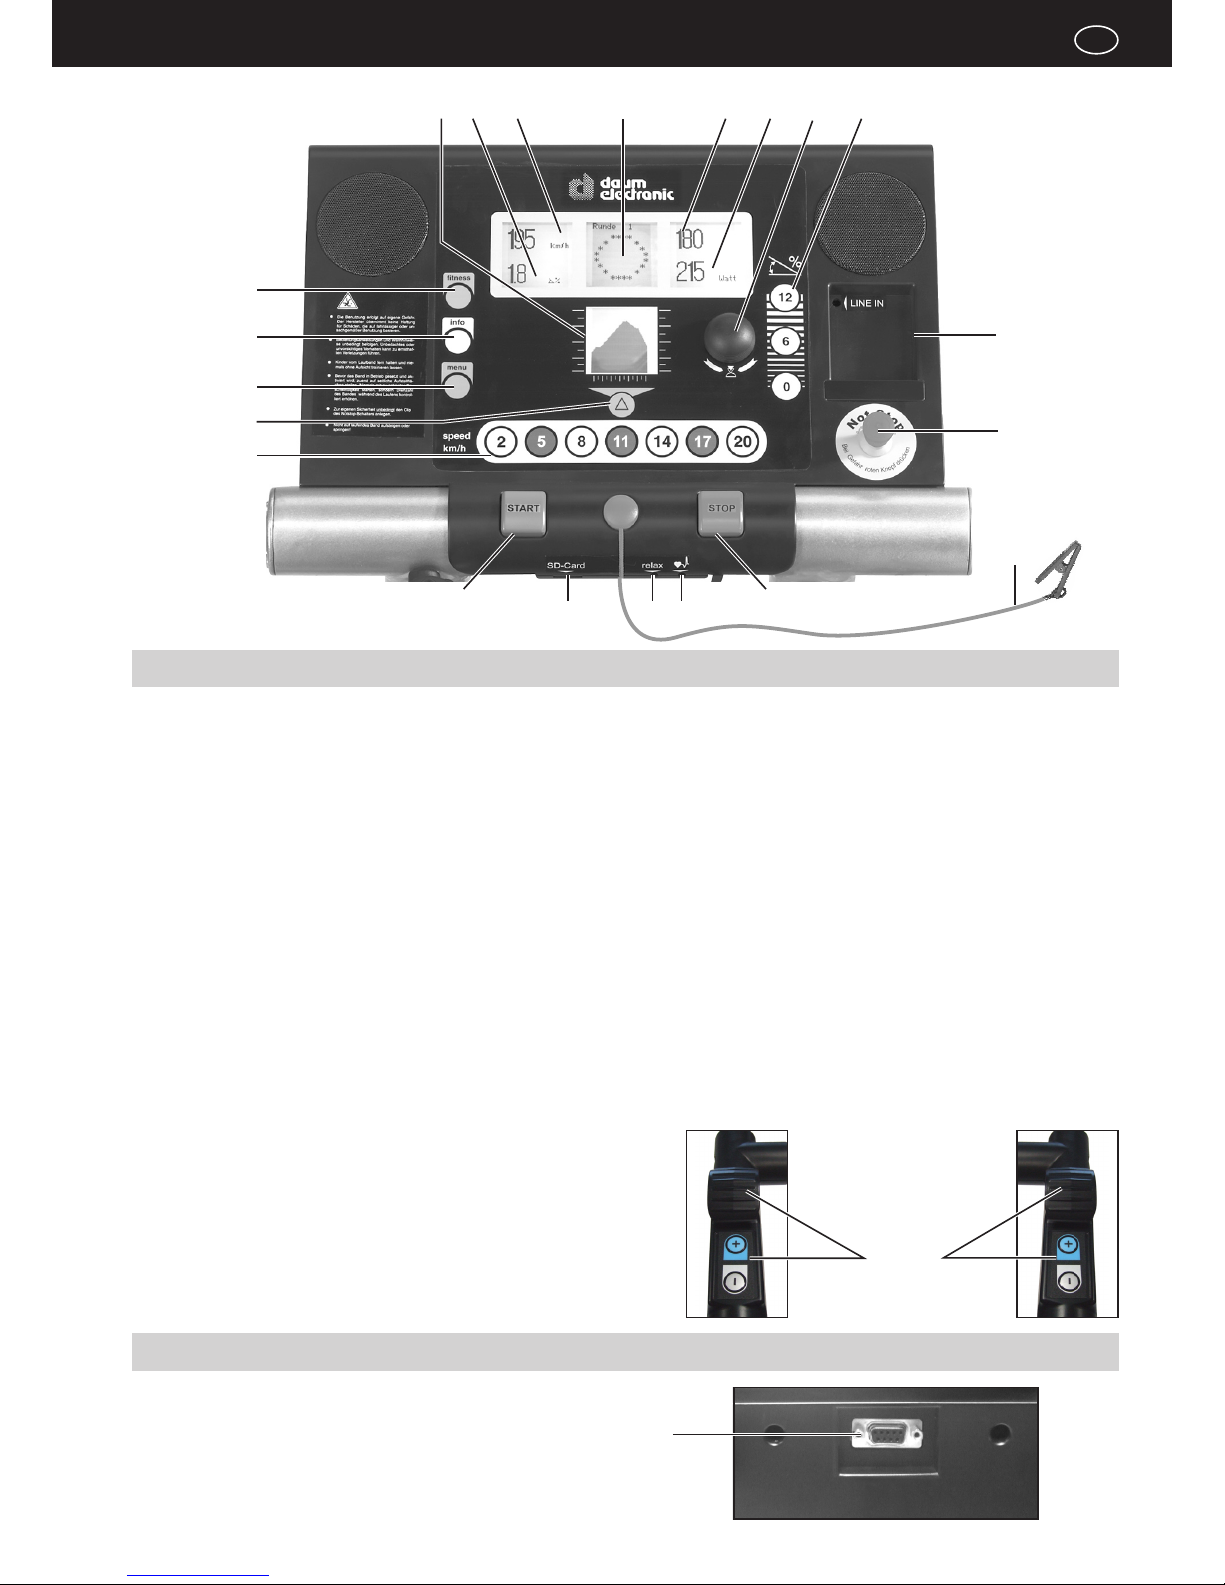
Control Elements and Connections
1 Dashboard
2 Interfaces and connectors
3 Remote control keys
4 Drinking bottle
5 Handrails front
6 Handrails
7 Front column
8 Power switch
9 Fuse 70A/250V
10 Name plate
11 Roller casters
12 Level compensation
13 Rear cylinder cover
14 Running area (belt)
15 Lateral treadways with non slipping surface
16 Toggle button for dashboard hinge joint (2x)
17 Emergency Stop Mechanism
18 Release lever
19 Integrated roller casters
1
5
8
9
10
11
17
15
14
13
6
2
6
7
4
12
3
18
19
Installing and starting
11
35
150
KG
daum electronic GmbH
D-90768 Fürth
ergo-run classic
230V
~
50/60Hz 2000W
1 2 3 4 5 6 7 8 9101112
200
SN
LC
Made in Germany
z
10
7
D
2
4
Installing the device
The ergometer should be installed on a rigid oor (e.g. concrete oor).
For other types of oor we recommend using a protective underlay. Appropriate oor protection mats can be ordered from daum electronic
gmbh. The manufacturer shall not be liable for any damage done to the
oor. Order No.: 0810402
To ensure the safety of the user you must leave a safety clearance area, of
at least 2 m in length and 1 m in width, behind the treadmill. In order to avoid
injuries this safety clearance area should be covered by a soft exercise mat or
any similar furniture. The location of the device must be level (at) and clean.
The device must be installed in a horizontal position and may not “wobble”.
The feet must be adjusted accordingly and must absolutely have a steady
contact with the oor.
It is not intended for use in rooms with damp conditions. This could cause rust
to build up on the ergo_run, which would damage device parts and impair both
the operating functions and the safety features.
The load carrying capacity of the ceiling / oor in the building must at least be
equal to 600 kg / square meter. If in doubt consult a building stress analyst.
The tension of the running belt must be checked upon installation or whenever
the device is moved from one location to another, and adjusted as needed
(see the maintenance chapter).
The treadmill may only be connected to the power supply and put into opera-
tion when the above conditions are satised; connect it by plugging its power
cable to an appropriate power socket (see connecting the device).
The ergo_run functions with a mains voltage of 230 Volt, 50 Hz and has a
power consumption of 2000 Watt. The power supply you wish to use must
satisfy these requirements!
Before proceeding with the assembly please make sure that
the mains plug is pulled out!
Transport and packaging
The manufacturer and the dealer will not be held liable for
damages occurring during the transport and for missing
parts.
Therefore please check the packaging and its content ca-
refully upon receiving of the device. Complaints related to
transport damages will only be accepted by the transport
insurance if they are immediately recorded by writing on the
delivery documents of the freight forwarder.
Please address any complaints to daum electronic gmbh.
In general daum training devices are delivered by a forwarding company.
Daum electronic gmbh is a member of the organisation: “Der grüne Punkt –
Duales System Deutschland GmbH.”
Please proceed with the unpacking of the device and accessories as described in the user manual. Please make sure that the device and accessories
are not damaged, that small parts are not inadvertently misplaced, and that
connection cables are not damaged.
Please dispose of all packaging material in a safe way. Keep all foil and plastic
bags away from children
- suffocation risk.
If in doubt, ask another person to help you with the installation.
Heavy equipments may only be transported by authorised
personnel and under compliance with the relevant safety
regulations. Otherwise a serious risk exists for the persons
and machine.
!
!
!
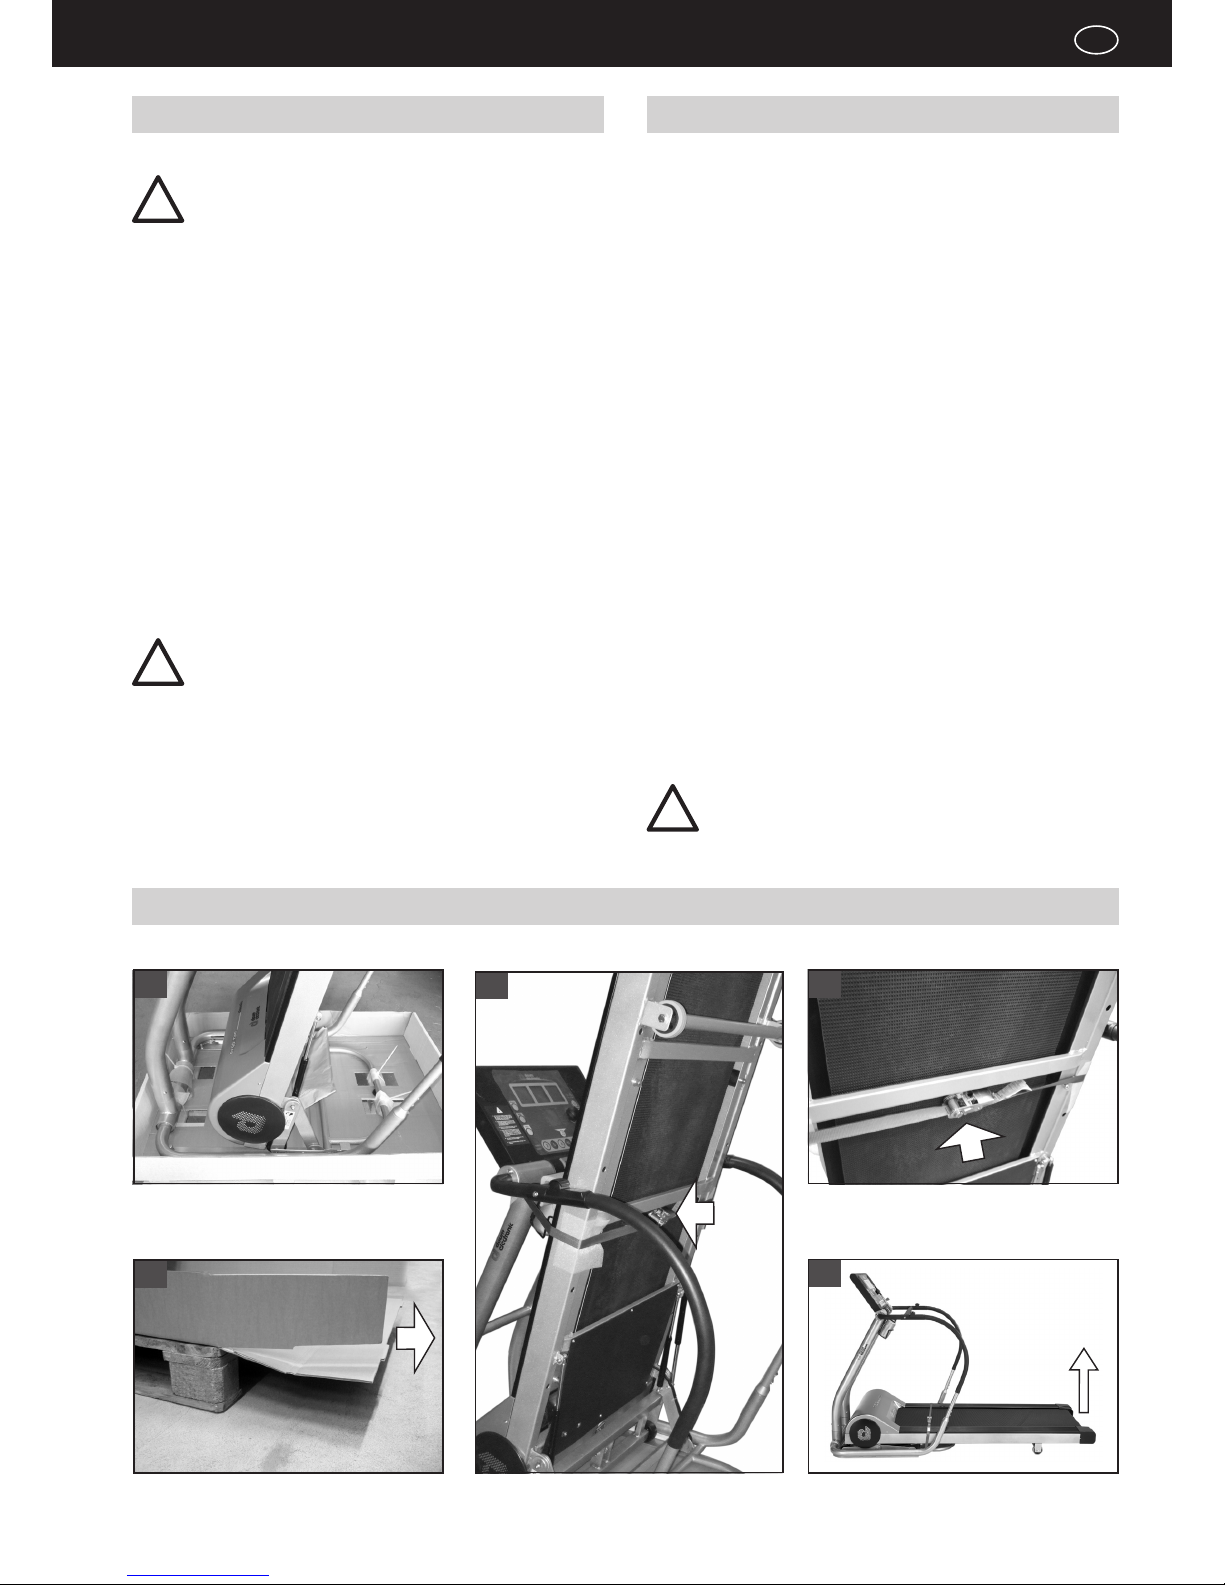
3
Installing the device
Release the immobilising belt.
1
Release the cable tie.
Open the bottom box.
Pull/raise the device carefully.
3.1
Moving the device: attach the belt, lift the rear of
the device and move it on its wheels.
Installing and starting
GB
8
Warning:
Do not squeeze
the cable when
assembling the lower
cover plate.
Folding / unfolding
The treadmill is shipped folded to save place. Three gas pressure springs
support the folding mechanism for ease of use and safety. This makes unfolding and folding much easier.
Folding up:
- Set the inclination angle to 0°.
- Unplug the power cord!!!
- Fold up the treadmill from the rear until the locking lever audibly engages.
The treadmill is now locked and can be transported and moved.
Unfolding:
- Stand behind the treadmill and hold the running surface with both hands
- Press the release pedal
(this releases the locked folding mechanism)
- Slowly unfold the ergo_run (hold the running surface while unfolding).
The treadmill is unlocked.
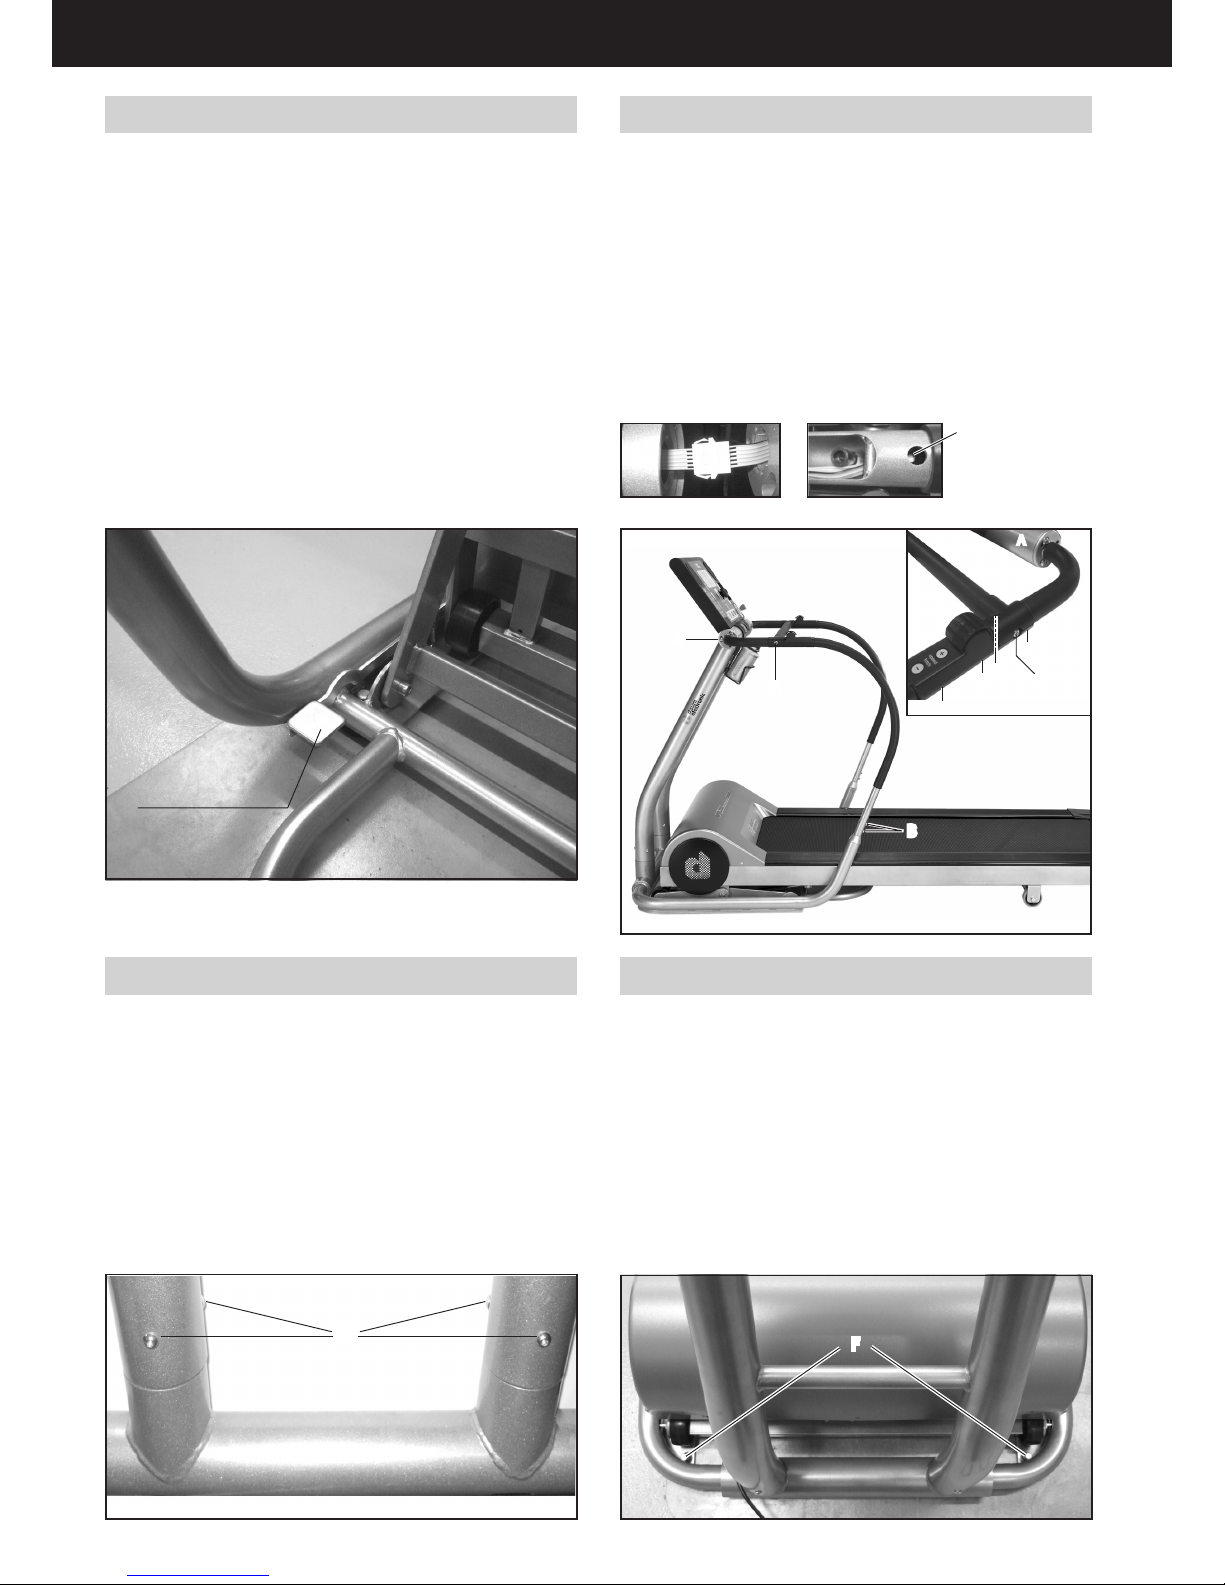
Disassembling the handrails
If the device happens to be too bulky upon delivery (for instance if it would not
pass through a door), it is possible to disassemble the handrails.
Watch the cables and the cable connectors!
Disassembling the handrails:
- remove the 5 screws (A and B) on the left and right handrails
(Fig.1). 3 screws (A) top and 2 screws (B) bottom.
- you only need to remove the screws on one side (left or right) to
disassemble the central handrail.
4 screws C on the bottom side of the cover plate
1 screw D on the connection to the central handrail
- be careful not to damage the cable connections in the columns when lifting
the handrails. Release carefully the connections (g. 3)
- when reassembling be careful not to squeeze or damage any cable.
Level adjustment (foot level compensation)
Set the height adjustable feet to ensure a stable, safe stand to the treadmill. Only the rear feet are mounted in the factory (makes moving the device
easier).
If the treadmill stand is not stable once it is unfolded and installed, then both
front stand feet F must be mounted (screwed in).
Removing the front feet makes moving the device easier.
Assembling, disassembling the stand feet
Please ask a second person to help you:
- lightly tilt the device to one side
- screw the stand foot in or out (from underneath)
- repeat on the other side
Disassembling the front columns with the dashboard
It is possible to disassemble the front columns with the dashboard after the
handrails have been removed. This makes transporting the device easier.
Watch the cables and the cable connectors!
Disassembling the front columns:
- remove the 3 screws E, on the left and right front column (bottom)
- when lifting the front column be careful not to damage the 2 connectors (right
column in the running direction)
- when reassembling be careful not to squeeze or damage any cable.
Fig.1
A
B
D
A
A
D
C
C
C
C
Fig.2
A
release pedal
Fig.3 Fig.4
E
F
Using the device
9
D
ergo_run
www.
ergo-run.com
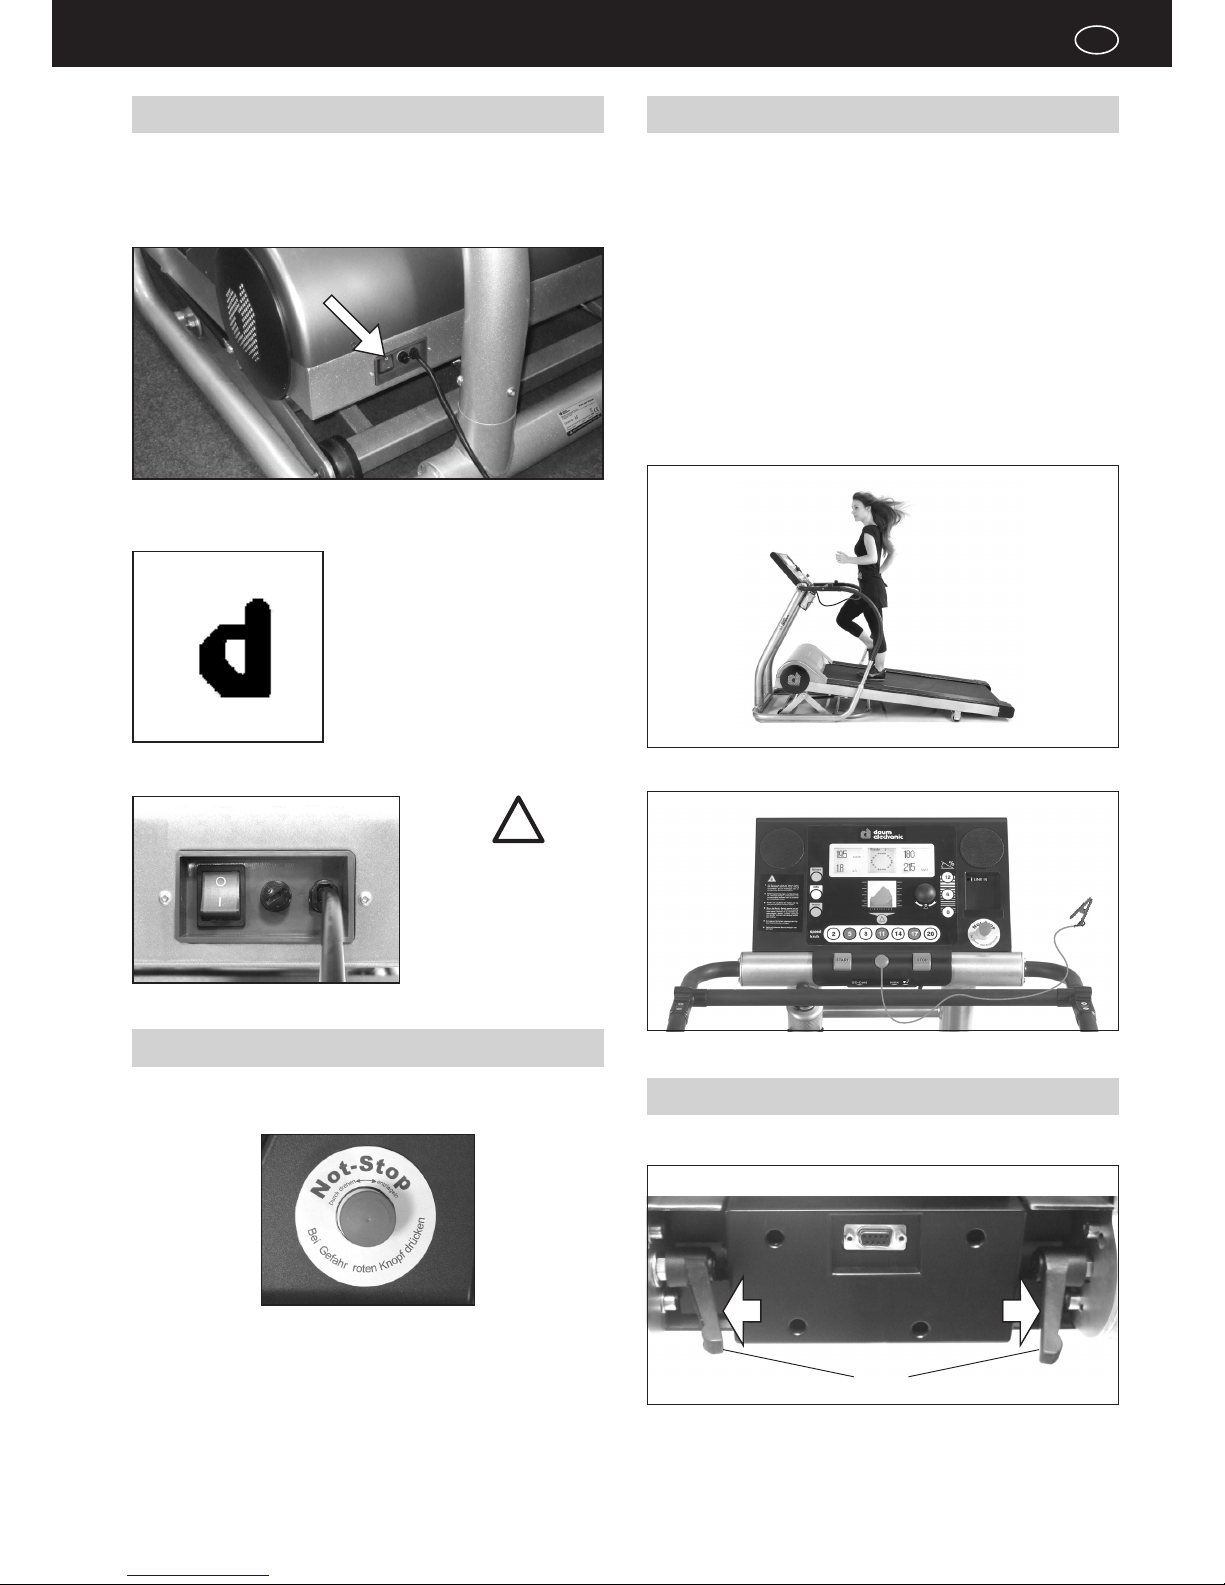
On / O switch
On / O switch
Switching On / Off
Please read the safety notes before switching the treadmill ergometer on.
Use the green On/Off switch „ O / I „ on the front motor cover lower of the
device to switch it on and off. The switch is illuminated in the ON position
Upon switching the device on a “d” appears on the display screen and a welcome
melody sounds. Wait for the beep signal to start using the dashboard.
For safety reasons the
power cord must be driven away to the front,
otherwise it risks being
damaged by the height
adjusting mechanism.
!
EMERGENCY STOP switch
The Emergency Stop switch must be unlocked before you can use the ergo_
run classic. To unlock it turn the red button to the left/right slightly.
Fig - Press the red button in hazard situations
EMERGENCY STOP Safety Rope
The ergo_run classic is equipped with an Emergency Stop Safety Rope. This
rope guarantees that when the user/patient is about to fall, or when the user/
patient runs too slowly, the running belt will stop automatically.
The patient/user must therefore attach himself or herself to the safety rope before starting a training session (Fig. 1). The length of the safety rope must be
adjusted in such a way that the Emergency Stop Function is surely executed
when
- the user is about to fall.
- before the user reaches the rear third section of the running belt.
When the Emergency Stop Safety Rope is pulled out, the running belt will resume its operation when the Start key is pressed (dashboard console) after the
safety rope is reinstalled on the dashboard (Fig. 2)
.
Fig.1
Fig.2
The last program last used is now
selected after start-up is complete
The rst time the device is turned on
The manual speed program is selected.
Setting the inclination of the dashboard
Slightly loosen the toggle screw ( A ) and adjust the inclination of the
dashboard.
A
Using the device
GB
10
Cardio-Sensor belt correctly worn
Ear clip
Cardio Sensor-Belt
Heart rate measurement
Ear Pulse Rate Measure
Every heart pulse modulates the light passing through the lobe, and can thus
be detected by an infrared sensor in the ear clip, and displayed as heart pulse
rate.
Please make sure that the ear clip is correctly put on:
1. Insert the connector into the Cardio socket.
2. You should rub the ear lobe to stimulate blood circulation.
3. Attach the ear clip to the ear lobe (the closest possible to the head). The
contact surfaces must sit entirely on the skin.
4. After the training clean the ear clip with a soft cloth and 5% soap
suds.
The variation in the display of the pulse rate variability is larger than with the
wireless pulse measure (factor 2).
Note: Strong light sources, like sunlight, halogen projectors, and neon
lamps, and also ear piercing or ear rings, or the intake of beta-blocker
could affect the measurements.
Wireless Pulse Measure - Cardio Sensor Belt
The Cardio sensor chest strap transmits the pulse rate directly to the integrated wireless Cardio pulse receiver in the device. This pulse measurement
method is the most precise.
Note: Your pulse rate will be correctly evaluated over the whole measu-
ring range only if you use a non-coded wireless pulse rate transmitter.
To ensure the maximum efciency of the Cardio sensor strap, you should
lightly humidify the contact surfaces (inner side) of the chest strap before starting the training.
Note: Using two chest straps simultaneously in the same
room (about 1.5 meter) can lead to the display of a wrong
pulse rate.
See page 31 for heart rate control tables and diagrams.
!
Using the device
11
D
21
Top panel
1. Display 4 / Program prole / Main menu
2. Display 1 / Inclination
3. Display 1 / Speed
4. Display 2 / Circular display / actual training and program data
5. Display 3 / Heart rate
6. Display 3 / Distance / Relax / Watt (only in watt programs)
7. Control button
Turn and press to select menu items. The program prole can be indi-
vidually adjusted for various program types.
8. Inclination keys
Sets a xed inclination (in %)
9. tness
Starts the tness test
10. info
Shows more programs, training data, and utilisation information
11. menu
Opening and closing main menus
12. Function key
Used to control the menu
Used to switch the setting value for heart rate programs
13. Speed keys
Sets a xed speed (km/h)
14. START
Starts the selected program
15. SD Card reader
Underside
24. RS232 PC connector
Used to connect a serial cable.
When connecting a USB to serial adapter be careful not to have screw
connector on the serial side, otherwise you must use a serial cable or
the cable supplied by daum electronic.
16. Relax connector
Connects the relax sensor
17. Cardio connector
Connects the ear clip
18. STOP
Stops the running belt slowly
19. Audio connector
for instance for an MP3-Player
20. EMERGENCY STOP button
Stops the running belt when pressed
21. EMERGENCY STOP safety rope
Stops the running belt when pulled out
22. -/+ Inclination
Reduces or increases the inclination
23. -/+ Speed
Reduces or increases the speed in 0.5 km/h steps. The program prole
can be individually adjusted for various program types.
41 5 6 7 8
9
10
11
12
13
14
15 16 17 18
20
19
22
23
32
24
The dashboard
GB
12
♥
s
t
%
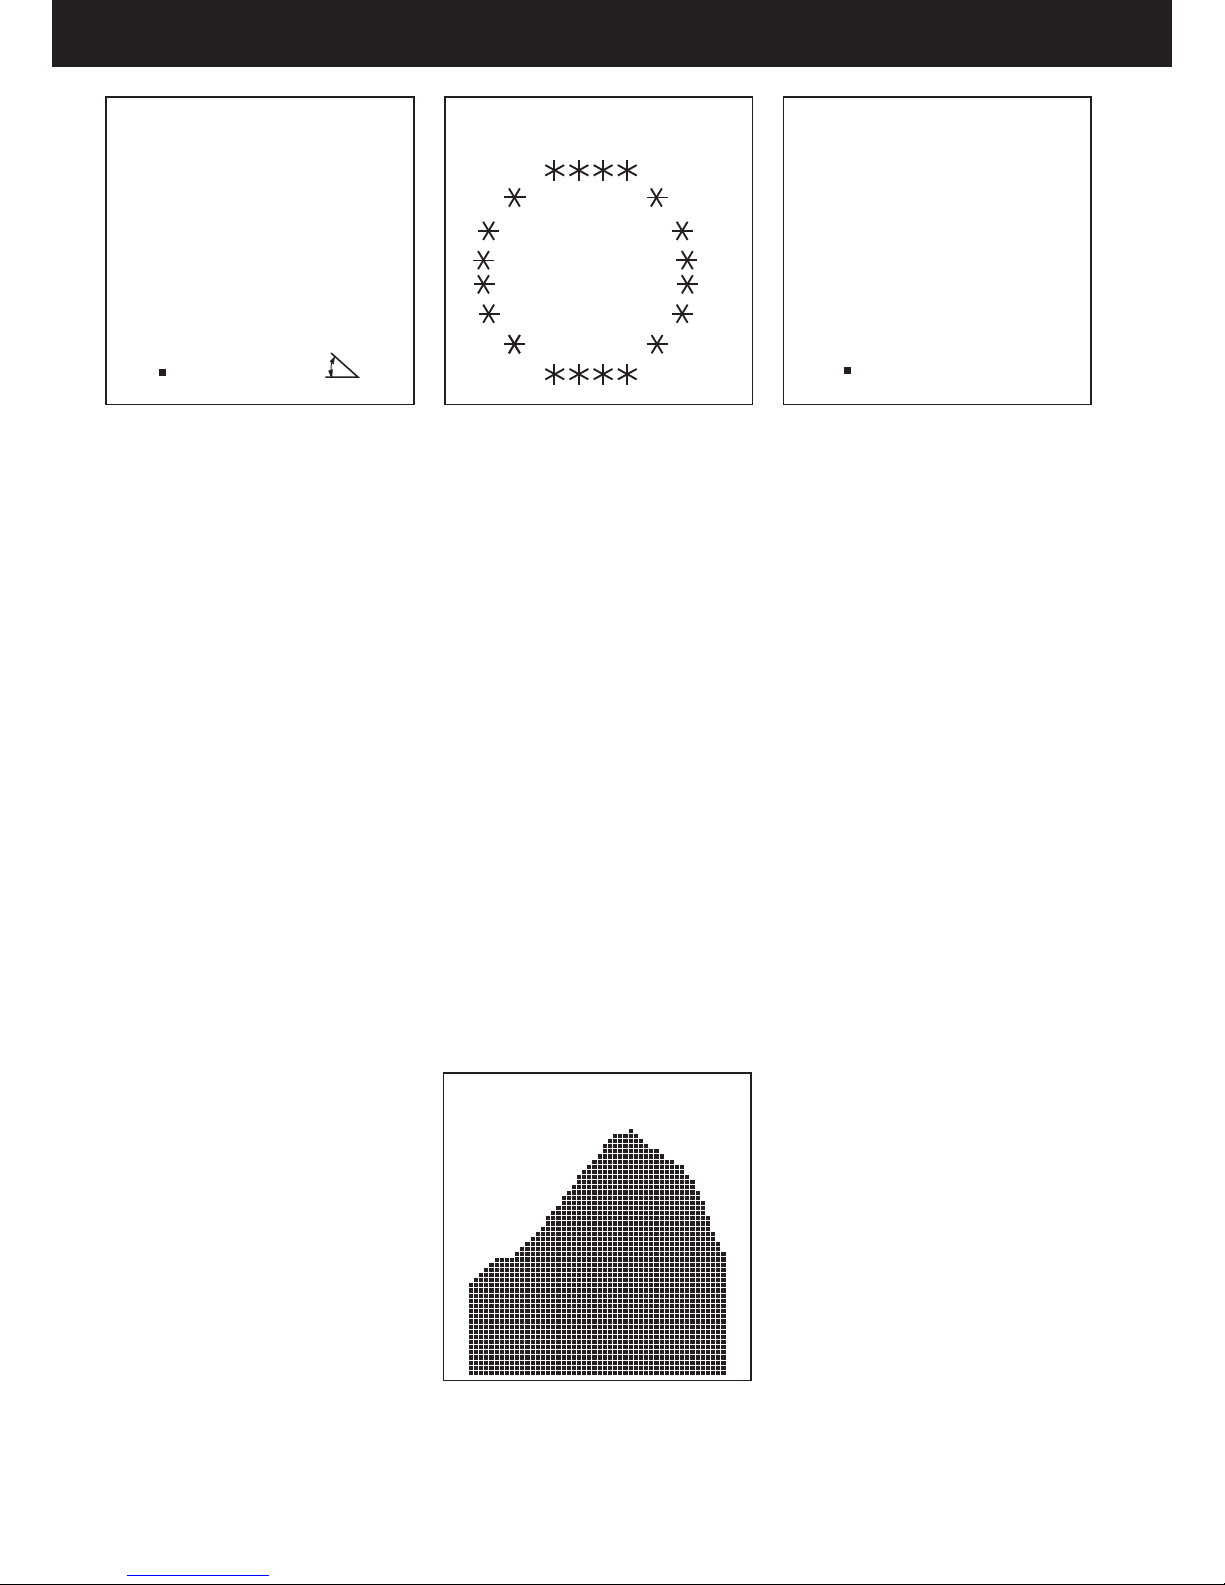
Menu:
Displays the main menu.
Program prole or program name:
Displayed during the training or upon selecting the program.
Heart rate:
Indicates the heart rate.
If the arrow points upward: the heart rate is too
low
If the arrow points downward: the heart rate is
too high
If the downward arrow blinks and a signal beep
sounds:
The load is too high and will be automatically reduced.
Reaching the heart rate limit is indicated by blinking the heart rate display.
Distance:
Indicates the distance.
Watt (only in watt programs):
Indicates the load in watt. Indicates reaching the
device’s load limit or personal limit by blinking the
watt display.
Relax:
Indicates the relax value in the Relax program.
Speed:
Indicates the actual speed.
Indicates reaching a speed limit by blinking (max.
device limit or personal limit)
Inclination:
Indicates the actual inclination.
Indicates reaching an inclination limit by blinking
(max. device limit or personal limit)
Display window 1 Display window 2
Display window 4
Display window 3
19 . 5
1 8
km/h
5 8
18 0
km
Lap
1
Circular display:
The lap number is shown and the actual position
blinks. (1 lap = 400m; every dot stands for 20m)
Limit display:
Displays a message whenever a limit value is
reached
Note
Press the Info key during the training:
Displays various information pages:
- actual training data
e.g. training time, real. kJoule, Ø km/h, Ø Watt,
Min:s/km...
- Program information
e.g. program No, min. value, max. value ...
- other data
e.g. actual time...
Fitness mark:
Displays a time countdown during the evaluation of
your tness mark (from 1 to 60 seconds) and then
the tness mark
Warning messages and error notications:
e.g. after pressing the EMERGENCY STOP button
Select “Automatic” in display window 2
(see p. 14 under Info display)
The displayed value will automatically change between various information pages.
OK
Note:
The gures (drawing) may be changed without notice!
The dashboard

13
D
menu
tness
info
Function key
menu
Press
menu key
Turn and
press
control button
to select
“Settings”
Turn and
press
control button
to select
“Device data”
Turn and
press
control button
to select
“Language”
Press
control button
Fitness key: Evaluating the tness mark (see page 25)
Info key: Information about the operation of the menu.
Pressing the info key during a training displays actual training
and program data.
Menu key: opens and closes the main menu
Using the menu
Choosing the User
This device can save the total training data
and the “last training” of four users.
It is therefore important that each user
trains under his own “number”
Guest data are not saved.
!
Here is a possible number distribution within a family:
Mum dad daughter son
user 1 user 2 user 3 user 4
Function key: used to control the menu
Switch the setting value for heart rate program.
Turning the control button:
Selects a menu option
Pressing the control button:
Opens the selected menu option
Menu
Training
Training data
Settings
Information
User
Back
Settings
User data
Device data
Back
Device data
Date
Time
Contrast
Language
Limit values
Back
Language
Deutsch
English
Français
Italiano
Portugues
Back
Language selection
menu
Press the
menu key
Turn
and press
control button
to select the
“User”
option
Turn and
press
control button
to select
User/Guest
User
Guest
User 1
User 2
User 3
User 4
Back
Dashboard controls is effected by means of the
control button, the menu key, the info key, and the function key.
Menu
Training
Training data
Settings
Information
User
Back
Dashboard User Guide
GB

14
User data
When you want to edit the user data you must always carefully check which user
is currently selected. (page 12)
!
Turn and press the control button to enter your physical data
Birth date Enter your birth date.
Gender Choose M (male) or F (female) to enter your gender.
Height Enter you height in cm.
Weight Enter your weight in kg.
Fat content (%) Enter your body fat content (if available).
You can also enter your own limit values. The system will warn you if one of these values is exceeded.
Speed Enter here your maximum allowable speed (between 1 and 20).
Inclination Enter here your maximum allowable inclination (between 1% and 12%).
Watt You can select here the maximal load (between 0 and 1000 watts). If you choose e.g. 180W the
load will not exceed this value ant the watt display will blink.
Heart rate when the actual heart rate exceeds the entered limit value the system reduces automatically the
applied load and a beep signal sounds. “OFF” means without heart rate limit, “Auto” = limit
corresponding to the user’s age
Training time a signal melody plays when the time limit is exceeded.
Distance a signal melody plays when the distance limit is exceeded.
Phys. kJoule a signal melody plays when the kJoule limit is dissipated
Use the erase function to reset all the data of the selected user to the default values.
Start point Select “On” if you want to have the possibility to start a program from any position within its course.
Info display Select one from course laps, training data and automatic.
Start up Select the program you want to use upon start-up
(last dashboard program / next card program)
Load increase Set the load increase rate (in seconds) for heart rate programs.
Load decrease Set the load decrease rate (in seconds) for heart rate programs.
Heart rate adaptation Adapt the heart rate built-in programs to your own heart rate capacity.
menu
Press the
Menu key
Turn and
press
control button
to select
“Settings”
Turn and
press
control button
to select
“User data”
Turn and
press
control button
to select
Menu
Training
Training data
Settings
Information
User
Back
Settings
User data
Device data
Back
User data
Physical data
Limit values
Erase
Miscellaneous
Back
User data
Physical data
Limit values
Erase
Miscellaneous
Back
User data
Physical data
Limit values
Erase
Miscellaneous
Back
User data
Physical data
Limit values
Erase
Miscellaneous
Back
User data
Physical data
Limit values
Erase
Miscellaneous
Back
Dashboard User Guide

15
D
menu
Press the
menu key
Turn
and press
control button
to select the
“Settings
option
Turn and
press
control button
to select
“Device data”
Turn and
press
control button
to select
Device data
Date
Time
Contrast
Language
Limit values
Back
Device data
Date
Time
Contrast
Language
Limit values
Back
Device data
Date
Time
Contrast
Language
Limit values
Back
Device data
Date
Time
Contrast
Language
Limit values
Back
Limit values
Speed
Inclination
Back
Turn and
press
control button
to select
“Limit values”
Device data
Enter date
1. turn and press the control button to set the day.
2. turn and press the control button to set the month.
3. turn and press the control button to set the year
(DD/MM/YYYY).
Setting the time
1. turn and press the control button to set the hour.
2. turn and press the control button to set the minute.
3. turn and press the control button to set the seconds
( HH:MM:SS ).
Contrast
You can choose a value for the contrast from 10 to 25.
The optimal value lies normally around 16.
Language
Choose the appropriate language:
German, English, French, Italian, Portuguese, Finnish, Danish.
Menu
Training
Training data
Settings
Information
User
Back
Settings
User data
Device data
Back
Device data
Date
Time
Contrast
Language
Limit values
Back
Device data
Date
Time
Contrast
Language
Limit values
Back
Speed
Set a device limit for the max allowable speed.
Inclination
Set a device limit for the max allowable inclination
Dashboard User Guide
GB

16
menu
Press the
Menu key
Turn
and press
control button
to select the
“Training”
option
Turn
and press
control button
to select
Training
Speed: With the speed controlled programs you will be running at a xed set speed.
Heart rate: When your heart rate exceeds the prescribed value the load is decreased, and vice versa.
Height prole: The course proles are variated and effective. Their objective is to raise your endurance and physical
tness.
Watt: The load (which is a function of the weight) is adjusted by means of the speed and inclination
SpeedPlus: With SpeedPlus programs the speed and inclination are set for a given time unit
Built-in programs: With the built-in programs you will run at a prescribed speed.
The speed is indicated on the vertical axis, while the horizontal axis shows the elapsed time.
Personal programs: Create or modify your own program using the dashboard.
(Only one personal program can be saved in the dashboard for each user).
Manual training: Run at the speed you set up regardless of the load.
Adjust the value to your needs during the training.
Built-in programs: During the training the device controls the prescribed heart rate by means of the speed / inclination.
The speed is indicated on the vertical axis, while the horizontal axis shows the elapsed time.
Personal programs: Create or modify your own program using the dashboard.
(Only one personal program can be saved in the dashboard for each user).
Manual training: Once you enter the required heart rate the program will control the heart rate.
If the heart rate exceeds the value entered (prescribed) the running speed will automatically drop.
If the heart rate drops below the value entered (prescribed) the running speed will automatically
increase.
Built-in programs: With the built-in programs you will run at a prescribed inclination (0% to 12%).
The elevation in meter is indicated on the vertical axis, while the horizontal axis shows the elapsed time.
Built-in programs: whether you are a beginner or a high performance athlete, adjust the training load to your
cardiovascular system. You can choose from short, endurance, and interval programs.
The load in watt is indicated on the vertical axis, while the horizontal axis shows the elapsed time.
Personal programs: Create or modify your own program using the dashboard.
(Only one personal program can be saved in the dashboard for each user).
Manual training: In this program you decide what the load in watt will be, the running speed will adjust to this load
value.
Built-in programs: Speed and inclination are prescribed for a given time unit.
The speed is indicated on the vertical axis, while the horizontal axis shows the elapsed time.
Menu
Training
Training data
Settings
Information
User
Back
Training
Dashboard prog.
Card prog.
Relax
Back
Dashboard prog.
Speed
Heart rate
Height prole
Watt
Speed Plus
Back
Dashboard prog.
Speed
Heart rate
Height prole
Watt
Speed Plus
Back
Dashboard prog.
Speed
Heart rate
Height prole
Watt
Speed Plus
Back
Dashboard prog.
Speed
Heart rate
Height prole
Watt
Speed Plus
Back
Dashboard prog.
Speed
Heart rate
Height prole
Watt
Speed Plus
Back
Dashboard prog.
Speed
Heart rate
Height prole
Watt
Speed Plus
Back
Dashboard prog.: You can choose from built-in programs, your
own programs, and manual training
Card prog.: Select one of your own programs from the card,
that you would have created with a PC
(ergo_win)
Relax: Select the relax program
Note:
You can raise or lower the training level by means of the control button and the control elements on the right handrail for all programs. You can increase
or decrease the inclination by means of the control elements on the left handrail for all programs (except height prole and speed plus programs).
Dashboard User Guide

17
D
Programs overview
Watt programs
Speed programs
Program 1
WA - Active Lady 40 - 25 min, max. 110
Program 2
WB - Cool Down - 20 min, max. 150 W
Program 3
WC - Pyramid - 45 min, max. 135 W
Program 4
WT - Progress - 10 min, max. 175 W - B
Program 8
SA - Basic 02 - 30 min, max. 7.5 kmh
Dashboard User Guide
GB

18
Program 9
SA - Endurance - 30 min, max. 8.5 kmh
Program 10
SA - Walking 03 - 20 min, max. 6.0 kmh
Program 11
SB - Endurance - 45 min, max. 10.0 kmh
Program 12
SB - Interval - 30 min, max. 9.0 kmh
Program 13
SB - Walking 03 - 30 min, max. 7.5 kmh
Program 14
SC - Basic 02 - 40 min, max. 12.0 kmh
Dashboard User Guide

19
D
SpeedPlus
Program 15
SC - Interval - 60 min, max. 15.0 kmh
Program 16
SC - Steps - 40 min, max. 14.0 kmh
Program 17
Conconi performance test
Program 26
EA - Walking - 30 min, max. 7 kmh, max. 6%
Program 27
EB - Speed Jogging - 35 min, max. 12 kmh, max. 8%
Program 28
SPB - Basic 01 - 30 min, max. 9.0 kmh, max. 10%
Dashboard User Guide
GB

20
Heart rate
programs
Program 29
PA - Basic HF- 60 min, max. 140 PPM
Program 30
PA - Endurance - 25 min, max. 125 PPM
Program 31
PA - Endurance - 30 min, max. 140 PPM
Program 32
PA - Interval - 40 min, max. 140 PPM
Program 33
PA - Senior - 25 min, max. 120 PPM
Program 34
PA - Short - 20 min, max. 130 PPM
Dashboard User Guide

21
D
Height prole
Program 35
PB - Interval - 60 min, max. 160 PPM
Program 52
D - Styria - Trofaiach 1 - 7.5 km
Program 53
D - The Alps - Kaiserau - 16.4 km
Program 54
D - Half Marathon - 21.0 km
Dashboard User Guide
GB

22
Creating your own programs
The actual bar is blinking.
Turn the control button to the left/right to increase/decrease the height of the bar on the display until you set the bar to
the proper height. Press the control button to save the actual bar and advance to the next one.
Each bar represents 1 min training.
Display window No. 2 shows some additional information.
Press the control button when the required speed value is set.
Repeat the procedure with the next bar.
menu
Press Menu
key
Turn
and press
control button
to select the
“Training”
option
Turn
and press
control button
to select the
“Dashboard
prig.”
option
Turn
and press
control button
to select the
“Speed”
option
Menu
Training
Training data
Settings
Information
User
Back
Training
Dashboard prig.
Card prig.
Relax
Back
Speed
Build-in prig.
Personal Prig.
Manual
Back
Dashboard prig.
Speed
Heart rate
Elevation prole
Watt
Speed Plus
Back
Turn
and press
control button
to select the
“Personal
prig.”
option
Each user can create one of each a speed program, a heart rate program, and a watt program on the dashboard.
Users No. 1 to 3 can create programs with a duration of up to 60 minutes.
User No. 4 can create programs with a duration of up to 240 minutes.
Start by choosing the type of program you want to create.
Use the blank program diagrams (found on pages 35 – 36) to sketch your program before entering them.
e.g. Creating a speed program
Personal prig.
Training
Modify
Back
Turn
and press
control button
to select the
“Modify”
option
e.g. Modifying a personal program
Proceed as described above.
You can also set the program end point within the program.
Select a value/bar and press the function key.
(all the subsequent bars will be deleted.)
Choose the training option to start your created program.
For heart rate controlled program you would create a heart rate graph.
When the actual heart rate in training is lower than the graph the load is increased and vice versa.
For watt controlled program you would create a load graph in watt.
Turn and
press the
control button
Press
Function key
Repeat this procedure until you nish creating your program.
When you create a new program the program ends after
the last value/bar entered.
Delete
remaining
bars?
Yes
Back
Dashboard User Guide

23
D
menu
Card programs
Please congure your card with the ergo_win software on your computer before you start training with an ergo_memo-card1 (personal data entry).
Training with the ergo_memo-card1:
Use the card to execute a personal training program that you created on the
card using the computer and the ergo_win software. Your actual training data
will be written on the ergo_memo-card1 for each training. These data are personal. It is not possible to save the data of another user on the card.
You would nd additional information on the following web page:
www.daum-electronic.de/de/support/c4-run.htm
l
Press the
Menu key
Turn
and press
control button
to select the
“Training”
option
Turn
and press
control button
to select the
“Card prog.”
option
Menu
Training
Training data
Settings
Information
User
Back
Training
Dashboard Prog.
Card prog.
Relax
Back
Card of
Name
recognised
Training with the ergo_memo-card:
Insert the ergo_memo-card in the card reader (ergo_card) in the dashboard.
Turn
and press
control button
to select
Press
Function key
Card prog.
D-Tour de France
Testd200d300d
SA - Basic 02SA - Endurance
SA - Walking 03
Back
Card prog.
No. 1
Elevation prole m
km 192
Min. 16
Max. 228
Conrm
If you selected the next card prog. option
(settings / personal data / start up ...), then the next card program will be
automatically activated when you insert the ergo_memo-card1.
No program will be selected on the screen when:
- no card program is available (no program is saved on the card)
- the last program on the card has been executed.
The personal data saved on the ergo_memo-card1 cannot be changed on
the dashboard.
Relax function
The relax-function is a biofeedback-process that is measured over the electrical resistance of the skin. Biofeedback is thus the translation into perceptible
signals of physiological processes occurring in our body whose values are
indicated by means of optical signals.
The ergo_run controls the relaxation process by means of the relax-function,
and highlights the process of stress elimination after a physical tness training
or other loading.
The displayed relax value drops gradually with increasing relaxation level and
increases with the increase of stress level. You can assist this process by
getting off the device and sit in a relaxed position, or even lay down, close to
the ergo_run and calm down.
Connecting the relax sensor:
1. Attach the relax-sensor tape, with the big contact surface (Fig. >A<), to the
ngertip of the middle and index ngers on the inner side of the hand (Fig.
>B<). The Velcro tape should not be tightened too hard.
2. Plug the connector of the relax sensor into the “Relax” socket on the dashboard.
Fig. A Fig. B
Dashboard User Guide
GB

24
Recalling saved training data
You will view the training data of the selected user:
Actual: Training values of the last training
Total: The total values of all the training units together
Weight: the distribution over a period of 60 days and of 1 year
Fat content: the distribution over a period of 60 days and of 1 year
Warning:
Whenever you do not run a program to its end you should press the menu
key and conrm with “yes” before switching off the treadmill in order to save
your training data.
menu
press Menu
key
Turn and
press
control button
to select the
“Training data”
option
Turn and
press
control button
to select the
“Actual”
option
Menu
Training
Training data
Settings
Informations
User
Back
Training data
Actual
Total
Weight
Fat content
Back
Actual
Ø km/h 23.0
Max km/h 31.0
Time min 56.4
Distance 18.0
Back
Turn
control button
to view more
Training data
Calling the Relax-Function
The text in display window No. 1 (speed) changes from km/h to Relax.
The relax function count from the maximal relax value (199) down to the minimal relax value (0). The displayed value drops gradually as you relax after
training, and increases with the stress level.
The Relax-value can drop all the way to almost zero. The user should therefore contribute to his/her relaxing and avoid any other stress.
The graphic screen displays a representation of the relaxation process (Fig.
C). The actual relax level is indicated by a blinking bar in the display window.
The complete relaxing process is divided into 25 levels. A short beep sound
signals when each level is achieved. The successive beeps are each lower
in tonality.
menu
Press the
Menu key
Turn
and press
control button
to select the
“Training”
option
Menu
Training
Training data
Settings
Informations
User
Back
Training
Dashboard prog.
Card prog.
Relax
Back
Turn
and press
control button
to select the
“Relax”
option
Fig. C
Dashboard User Guide

25
D
tness
Fitness Test and Fitness Mark
The tness test can be executed anytime during training. A pulse rate measuring device (ear clip, or chest belt) must be connected and functional, and the training
should had already started at least 10 minutes earlier.
The measurement principle is based on the fact that the pulse rate falls faster within one minute (following a load period) for well-trained users than for less trained
users. Fitness marks from 1 to 6 are assigned. The lower the tness mark the better is the training status (tness) of the user.
When the tness test is started during training, the present training will be interrupted and the load will be lowered to minimum value for the device for a short period
of time. During this pause the system measures the drop in pulse rate within a period of 60 seconds and computes a tness mark. Afterwards the training resumes
automatically at the interrupted position, and the load in Watt is raised to its previous value.
The mark of “ 0 ” is awarded if no usable result can be measured.
A tness evaluation is not possible after the training session is nished.
Fitness evaluation process:
The measuring process takes 60 seconds and its progress is displayed.
1. Train at least 10 minutes in the OK-area.
2. Press the tness key
The tness mark 1 is awarded for a pulse rate drop of more than 25.0% within 60 sec
The tness mark 2 is awarded for a pulse rate drop of 20.0% to 24.9% within 60 sec
The tness mark 3 is awarded for a pulse rate drop of 16.0% to 19.9% within 60 sec
The tness mark 4 is awarded for a pulse rate drop of 12.0% to 15.9% within 60 sec
The tness mark 5 is awarded for a pulse rate drop of 8.0% to 11.9% within 60 sec
The tness mark 6 is awarded when the pulse rate drop is less than 8% within 60 sec
Press the
tness key
Cancel
tness
mark
evaluation
Please
keep going
slowly for
48
seconds
more
Fit. mark
2
Error messages / problems solving
The following messages may appear in window No. 2:
Warning
Emergency
stop
active
Error
Please switch
device off
and then on
again
Error
Communication
To
correct
please
press
stop key
3. Display window No. 2 shows the remaining time.
4. Continue running “loosely” during the measurement process.
5. At the end of the 60 seconds process window no 2 displays the tness
mark and the system plays a short melody.
Window 2
Error
Belt speed too high
To
correct
please
press
stop key
Error
Belt blocked
To
correct
please
press
stop key
e.g. if the belt is
push-driven
e.g. if the belt is
braked up
Problem solving:
If the treadmill operates erratically press the STOP key and check if normal
operation is restored.
Turn the treadmill off and then on again and check if normal operation is
restored.
If the treadmill is still not operating properly please contact our customer service department.
Dashboard User Guide
GB

26
menu
1. Training
1.1 Dashboard Prog.
1.2 Card Prog.
1.3 Relax
2. Training data
1.1.1 Speed.
1.1.2 Heart rate
1.1.3 Elevation prole
1.1.4 Watt
1.1.5 Speed Plus
1.1.1.1 Built in programs
1.1.1.2 Personal Prog.
1.1.1.3 Manual
1.1.4.1 Built in programs
1.1.2.1 Built in programs
1.1.2.2 Personal Prog.
1.1.2.3 Manual
1.1.4.2 Personal Prog.
1.1.4.3 Manual
2.1 Actual
2.2 Total
2.3 Weight
2.4 Fat content
2.1.1 Ø-km/h, Max-km/h, Time min, Distance
2.1.2 Ø-RPM, Ø-Watt, Ø-Heart rate, Max. Heart rate
2.1.3 Phys-kJ, Real-kJ, BMI, Fitness mark
2.2.1 Phys-MJ, Real-MJ, Time-h, Distance
2.3.1 60 Days
2.3.2 1 Year
2.4.1 60 Days
2.4.2 1 Year
Menu Diagram

27
D
menu
3.1 Personal data
3.2 Device data
3. Settings
4. Information
5. User
3.1.1 Physical data
3.1.2 Limit values
3.1.3 Delete
3.1.4 Other
3.1.1.1 Birth date
3.1.1.2 Gender
3.1.1.3 Size
3.1.2.2 Speed
3.1.1.4 Inclination
3.1.1.5 Weight
3.1.2.1 Fat content.
3.1.2.3 Watt
3.1.2.4 Heart rate
4.1 Service
3.1.2.5 Training time
3.1.2.6 Distance
3.1.2.7 Phys. kJoule
3.1.4.2 Info display
3.1.4.1 Distance
3.1.4.3 Start up
3.1.4.4 Load increase
3.1.4.5 Load decrease
3.1.4.6 Heart rate adaptation
3.2.1 Date
3.2.2 Time
3.2.3 Contrast
3.2.4 Language
1)
5.1 Guest
5.2 User 1
5.3 User 2
5.4 User 3
5.5 User 4
1) Language selection see p. 13
4.2 Version data
3.2.5 Limit value
3.2.5.1 Speed
3.2.5.2 Inclination
Menu Diagram
GB

28
EC Declaration of conformity
EC Declaration of Conformity
We declare under our sole responsibility that the
product: treadmill ergometer
model: ergo_run classic
article number: 9070080
complies with all applicable requirements of the following prescriptions:
2006/42/EG Machinery Directive
2004/108/EG EMC Electromagnetic Compatibility
2006/95/EG Low Voltage Directive
Applied standards:
EN 957-1:2005
EN 60601-1-2:2007
EN 60335-1:2007
daum electronic gmbh
Flugplatzst. 100
D-90768 Fürth
Tel.: ++49 (0)911 / 9 75 36-0
Fax: ++49 (0)911 / 9 75 36-96
Fürth, 18/12/2009

29
D
EMERGENCY STOP: 2 EMERGENCY STOP Systems
EMERGENCY STOP button and
EMERGENCY STOP safety rope
Running surface: 1.5 x 0.5m foldable
Inclination setting: adjustable from 0 % to 12% in 0.5 % in
crements
Load precision: Conform to DIN EN 957 1/-6 Class SA/HA
Speed: adjustable from 0.8 to 20 km/h in 0.5 km/h
increments
Drive: 1.9 kW direct current motor
Displays: 4 graphical windows
Heart rate measurement: using the ear clip
measuring range 50 to 199 beats/min.;
Telemetric using the Cardio sensor chest
belt measuring range 50 to 215 beats/min.
Alarm signals: Acoustic and optical
Weight: approx. 150 kg
Installed dimensions: L 205 cm, W 86, and H 136
Folded dimensions: L 106 cm, W 86, and H 190
Power supply: 230 V alternating current, 50 Hz, 2000W
Safety class: I
Technical Safety Recommendations:
Compare the supply voltage indicated on the nameplate located on the
housing with your local supply voltage prior to plugging the power cord to the
power supply. Please contact you dealer if the values are not the same.
The device is completely disconnected from the power supply by pulling out
the power cord, therefore it should always be plugged into an easily accessible socket.
Liability
The manufacturer will not be held liable if the treadmill is not used in compliance with the provided instructions and recommendations and if the prescriptions are ignored
.
Maintenance and technical safety controls
Before every maintenance operation the device must be
completely disconnected from the power supply by pulling
out the power plug. The treadmill must also be turned OFF
for safety reasons.
Preventive maintenance
A regular maintenance schedule helps prevent failures and problems before
they appear and guarantees an optimal functional state for the device. The
manufacturer recommends a yearly maintenance cycle.
Before the device is turned ON, you must always check that the power cord,
power plug, wall socket and power supply are faultless.
Immediate maintenance operations
Immediate maintenance operations are needed when:
- any liquid penetrated the device
- the device was exposed to a heavy mechanical shock (e.g. impact,
strong pull on the power cord or other connection cables).
- the cables and/or connector are damaged
- the cover elements went off
- the rubber elements are cracked (particularly the running belt and
the drive belt) the running belt is not centred.
Lateral treadways: make sure they are not slippery
Every treadmill ergometer is equipped on both sides of the running surface
with a non-slippery treadway. These surfaces guarantee a safe stand in emergency situations. Please check the non-slip surface at regular intervals and
replace them immediately when they are worn out.
Fastening Screws
All the fastening screws must be tightened up from time to time. We recom-
mend tightening them at least after the rst 50 km and then once every 500
km.
!
Noises
The lubricant applied by the manufacturer between the running belt and its
base plate must be renewed if the device is used frequently. At the very latest
lubricate the running belt when you hear dry rubbing sound while running.
Cleaning
For safety reasons you must switch the treadmill off and pull out the power
cord before you proceed with cleaning or disinfecting the treadmill and every
time you open the cover or access its components. Chemical products
needed for the operation or care of the treadmill must be kept, prepared and
presented exclusively in the designated container because of the risks of
confusion.
Clean the outside surfaces with a wetted soft cloth. Do not use any strong or
corrosive cleaning solution, or one containing solvents, (e.g., alcohol, stain
remover, etc).
Care should be taken to wipe out sweat drops after training (sweat attacks
paint and plastic parts). Damage caused by sweat is not covered by the
warranty. You can clean the coating of the handrails with a mild detergent,
applying appropriate caution.
These are wear parts and are not covered by the warranty.
Clean the drinking bottle after use out of hygienic reasons. We also recom-
mend cleaning the bottle before lling it with various drinks, particularly if not
used regularly.
About the V-belt
The driving surfaces of the drive pulley and the V-belt pulley are covered
with a rubber layer by the manufacturer.
This favours the development of an optimal tting of the V-belt into the grooves of the driving pulley during the rst 500 to 1000 kilometres.
During the rst 500 to 1000 km the belt will loose some excess rubber, which
will appear in the form of black powder deposits. You can remove these deposits using a small brush or a vacuum cleaner.
V-belts are wear parts and are not covered by the warranty.
Specications
Maintenance
GB

30
Adjusting the running belt
After an extended period of use, check for the existence of slip between the
driving shaft and the belt. To do this stand on the belt running at slow speed,
hold rmly the crossbar of the console with both hands and press your feet
against the running direction to block (immobilise) the belt. If at this moment
the driving shaft still revolves then the belt tension must be adjusted.
Turn the tension screws (Allen wrench no 6) equally alternating on both sides,
until you obtain the required belt tension.
Centring the running belt is carried out at a speed of 7 km/h.
Turn the right or left side screw according to the position of the belt.
Turn right side screw clockwise to move the belt to the left, counter-clockwise
to move the belt to the right.
Turn left side screw clockwise to move the belt to the right, counter-clockwise
to move the belt to the left..
The centring operation is complete when the belt remains in the centre of the
roller for an extended period of time.
Lubrication of the running belt / sliding plate
Take care not to touch the running belt. Ask another
person to stand with you, ready to push the EMERGENCY
STOP button if something arises during this maintenance
process.
A lubricant is applied by the manufacturer between the running belt and the
plate underneath it. This lubricant must be renewed depending on the frequency of use.
Use for this only the supplied special silicone oil lubricant!
Other lubricants or greases could damage the running belt and the running
surface and consequently lead to a failure of the running belt. Order the special silicone oil lubricant from daum-electronic gmbh.
At the very latest lubricate the running belt every 1000km or when you hear
dry rubbing noises while running.
If too much silicone-oil is applied it could lead to an acceleration effect on the
running belt under the weight of the user with high inclination values.
Remove the covers on the ends of the running belt and spray regularly on the
inner side of the belt running at a speed of 3 km/h.
Damages resulting from lack of care or lubrication of the running belt are not
covered by the warranty.
!
Contacting your dealer
If the cause of the failure could not be identied, you should contact the
dealer, where you bought the machine, or daum electronic gmbh.
We need the following information:
1. The device serial number (this number is on a silver label
underneath of the power ON/OFF switch).
2. The dashboard software version number (you can access this
number under the menu item “Menu” - “Information” - “Version” –
“Software”).
3. The proof of purchase and the device reference sheet.
If you wish to obtain more information on your device, please visit our service and repair hints site on Internet (www.daum-electronic.de).
Glass tube fuse 5x20 T10A H
The fuse is located close to the power switch (ON/OFF) on the lower front
part of the treadmill.
Defective fuse:
The green ON/OFF switch does not glow upon switching it to the ON position.
The machine does not start.
The power cord was veried.
Unplug the power cord before replacing the fuse!
Replacing the fuse:
- Unscrew and remove the black fuse holder (close to the ON/OFF switch).
- Replace the glass tube fuse 10A /250V
- Reinstall and screw the fuse holder.
- Plug the power cord into the power outlet.
!
Maintenance

31
D
200
190
180
170
160
150
140
130
120
110
100
90
80
70
20 25 30 35 40 45 50 55 60 65 70 Age
OK
Health
Hazard!
!
Alarm zone
Danger zone
Aerobic Zone
Heart rate
Aerobic Zone Danger Zone
Age up to 59% 60%-75% 76%-85% 86%-100%
20 40 - 119 120 - 150 151 - 170 171 - 200
25 40 - 116 117 - 146 147 - 165 166 - 195
30 40 - 113 114 - 142 143 - 161 162 - 190
35 40 - 110 111 - 138 139 - 157 158 - 185
40 40 - 107 108 - 135 136 - 153 154 - 180
45 40 - 104 105 - 131 132 - 148 149 - 175
50 40 - 101 102 - 127 128 - 144 145 - 170
55 40 - 98 99 - 123 124 - 140 141 - 165
60 40 - 95 96 - 120 121 - 136 137 - 160
65 40 - 92 93 - 116 117 - 131 132 - 155
70 40 - 90 91 - 113 114 - 127 128 - 150
75 40 - 86 87 - 109 110 - 123 124 - 145
Table of Target Heart Rate / Aerobic Zone
Example:
Heart rate - target zone as a percentage of maximum pulse rate with age
limit set up.
Overview Diagram of the Target Heart Rate
Example for a person 50 years old
- Alarm zone
Heart rate above 171
- Danger Zone
Heart rate 145 to 170
- Heart rate 128 to 144
- Aerobic Zone
Heart rate 102 to 127
- Heart rate 40 to 101
In the danger zone the load will automatically be reduced if a heart rate
limit is set.
Aerobic Zone
You should train in the aerobic zone if you want to increase your load capacity. In this zone more glucide get burned that fat.
The benets of the strengthening have an important impact on the cardiovascular and respiratory systems.
Danger Zone
High performance training - hard training with typical phenomena like pain,
exhaustion-fatigue. Lactic acid is transferred in the metabolism, without
producing excess lactate.
Alarm Zone
Extensive high performance training - to practice only with experience and
precaution, because it can easily lead to injuries and overloading. This zone
is reserved for high performance athletes only.
Tables and Diagrams
GB

32
Serial data cable
Silicone oil
Stand feet
EMERGENCY-STOP safety rope
Before starting the training the user must attach the clothes peg of the safety
rope to his clothing. Whenever the safety rope is pulled out the running belt
will automatically stop. The belt will not restart upon reinstalling the safety
rope. The length of the safety rope can be adjusted to t the user.
Ear clip
Relax Sensor
The relax-sensor controls the relaxation process by means of the relax func-
tion following a physical tness training or any other loading.
Relax Sensor
Ear clip
Connect the ear clip to the Cardio socket. The pulse rate is measured by
means of an infrared sensor and shown on the screen.
EMERGENCY STOP Safety Rope
ergo_win 2003 light c3 edition
Available for download from: www.daum-electronic.de / support / ...
The Software offers the following functionality:
- Formatting and initialising SD cards (ergo_memo-card1)
- Managing personal data on the ergo_memo-card1
- Creating and exporting your own training programs to use with the ergo_
memo-card1
- Managing training data on the ergo_memo-card1
Serial data cable
Connecting to a PC.
Silicone oil
For lubricating the running belt / friction plate.
2 Stand feet with height adjustment
Used to align the treadmill (level compensation).
Accessories (included with the machine)

33
D
ergo_memo-card1
Slider
switch
ergo_memo-card1
When this card is inserted in the dashboard, detailed training data are
automatically saved on the ergo_memo-card1. Individual training instructions
and personal data of the user can be written on the memory card. This data
are then automatically read by the dashboard making unnecessary to set the
dashboard manually.
The slider of the ergo_memo-card1 must point downward when the card is
inserted in the computer. This enables writing to the card. Slider pointing
upward: the card is locked/write protected. The training device ignores the
slider position.
The maximum usable card size is 1GByte.
In principle the card should only be removed when no training is being
executed!
What to consider when manipulating memory cards?
1. Electrostatic charges can damage electronic parts. Therefore you should
discharge any static electricity charges from your body before touching
the memory card by rst touching a grounded metal object (e.g. heating
pipes, water pipes).
2. Avoid touching the contact pins of the memory card.
3. Memory cards must not be exposed to heat, direct sunlight, or humidity.
4. Memory cards may not be bend, twisted, or dropped.
5. NEVER remove a memory card from a used device during data transmission, and NEVER pull a memory card when data are being written to the
card, e.g. during a training session to avoid data loss and/or damages to
the memory card.
6. Regularly make a backup copy of the contents of the memory card to your
computer.
Multifunction serial USB Bluetooth adapter
The serial USB Bluetooth adapter was designed specially to establish a
wireless connection of Daum training ergometers to a computer; it complies
with the Bluetooth 2.0 Standard. It can also be used as a USB or serial
adapter between the training device and the computer.
Range approx. 10 m (depending on architectural environment)
Order No.: 9091024
USB Bluetooth-Adapter
Floor protection mat
Size: 200 cm x 100 cm
Colour: transparent
Order No.: 0810402
You will nd more details on our home page:
www.daum-electronic.de
Cardio Sensor Chest Belt
The chest belt contains a wireless transmitter that transmits the heart rate to
the Cardio pulse rate receiver in the device.
What is in the box of a Cardio Sensor chest belt (non coded):
1 Skin-friendly Cardio Sensor chest belt with integrated pulse sensor and
transmitter
1 Adjustable elastic belt to attach it to your chest
Order No. 90 91 015
Cardio sensor chest belt
Underside of the Cardio sensor chest belt
The button type battery should be replaced when you note a loss of battery
power. Simply remove the battery cover on the underside of the transmitter
with a coin and replace the battery with an equivalent new one.
Note: Your pulse rate will be correctly evaluated over the whole
measuring range only if you use
a non-coded wireless pulse rate
transmitter.
Cardio sensor chest
belt correctly put on
Accessories (sold separately)
GB

34
ergo_win premium pro PC Software (EWPP)
Daum ergo_win premium pro connects training partners worldwide. With
a PC and via Internet it is now possible to work out with friends, similarly
minded persons, and training specialists – using a web cam and headset it is
also possible to communicate with image and sound.
Sport enthusiasts can participate to international online races and online
group rides.
- Multi-user capable
- Detailed personal setting possibilities
- Supports the ergo_memo card1 and ergo_memo card2
- Participation to online trainings via daum training server
- Participation to group training / network races
- Presenting your own group training / network races
- Supports Webcam / Headset
- Detailed training overview
- Detailed training evaluation with average and maximal values,
- heart rate / watt graphs and displays training details with a precision of
(up to) one second
- Generate your own training programs
- controls 4 training devices simultaneously
- Superimposing of the training details of each training device
- Visualising the limit values
- Supports the Daum TRS Relax system
- Ten picture and sound channels
- User friendly interface
- Training program manager
- Training data manager
- Memory card manager
- Backup manager
- Training program Import / Export
- Endless training via web server available.
And much more
Best.-Nr. 9091 026
ergo_win race edition PC Software (EWRE)
You can use the Race Edition software to participate in the Daum Online
Ergometer Training using a computer and over Internet.
The Race Edition can only be used for Online Training.
This software is available free of charges on our homepage:
www.daum-electronic.de under
Support > Accessories > ergo_win > ergo_win_race edition
(with installation instruction and user guide).
Optional software

35
D
Sample blank diagrams for speed programs
Sample blank diagrams for heart rate programs
20
15
10
5
20
15
10
5
20
15
10
5
Sample Blank Diagrams - Supplement for your own programs
GB

36
Sample blank diagrams for watt programs
1000
750
500
250
1000
750
500
250
1000
750
500
250
Sample Blank Diagrams - Supplement for your own programs

37
D
Please consult your dealer/retailer in the case of a failure or trouble. The
manufacturer, daum electronic gmbh, provides the warranty to your retailer
according to the following conditions:
1. We guarantee that our products are free of manufacturing and/or material
defects.
2. We will correct any problem pertaining to the above categories, while all
customer’s claims not related to those categories are excluded from any
repair services provided by us.
We reserve the right, upon returning of the product in question, to ex-
change it with another product of the same type and value or, at our own
discretion, to take it back against repayment of the amount paid by the
customer (deducting overhead costs).
3. Our warranty covers a period of two years for parts and labour in the case of
private utilisation of the product, and a period of three months, for parts and
labour, in the case of commercial utilisation of the product, in both cases
starting on the manufacturing date.
We will full this warranty service provided the customer will pay all freight
and transport costs, including those for spare parts, and the cost of any
packaging material we should possibly need to use.
Returned devices will only be accepted if in the original packaging.
Advance replacement of parts under warranty will be invoiced and deliver-
ed against payment (COD). The amount paid will be immediately refunded
upon reception of the returned old part by us.
4. All other warranty claims, specially claims for the compensation of direct or
indirect damages, or damage to a third party, or damages to other objects,
as well as of damages due to failure, and of labour costs, are expressly
excluded to the extend authorised by law.
Should the repair fail within a reasonable delay, the customer has the right
to demand a price reduction or the cancellation (modication) of the contract at his discretion.
5. We decline any responsibility for any wear occurring through normal uti-
lisation. The warranty will be considered null and void if our instructions
for mounting and utilising the device are not respected, or if the chemical
products we recommend and deliver are not used, or if any modication
was made to the device without our prior approval.
6. It is the responsibility of the customer to check each one of our deliveries
immediately upon reception. Any complaints about missing or defective
parts must each be immediately submitted in writing.
7. We do not guarantee that the delivered product will be suitable for the usa-
ge intended by our customer. Extended agreements need to be expressly
conrmed in writing.
8. Any technical advice provided by us is formulated according to the best
of our knowledge and in good faith, based on our own experience and
testing. We do not assume any responsibility for these services, unless
serious negligence can be proven on our part.
If you wish to obtain more information on your device, you can visit our
service and repair hints web site on Internet at (www.daum-electronic.de). You can also call us on our hotline at daum electronic gmbh
(++49(0)911/97536-0).
Warranty Conditions
GB

daum electronic gmbh
Flugplatzstr. 100
D-90768 Fürth
Tel. ++49(0)911/97536-0
Fax ++49(0)911/753714
www.daum-electronic.de
Stand: 26012010 Artikelnummer: 0630421e.0005
 Loading...