

NOTE
You can prevent unauthorised persons from using
your ergo_bike pedelec by entering a lock code.
In order to create your own lock code (1 to 8 digits
numeric code) you need rst the "always valid"
master lock code for your bike.
If you forget your own lock code, enter instead of it
the "always valid" master lock code for your bike.
Therefore you should store this code in a safe
place!
The IMEI (International Mobile Station Equipment
Identity) is an univoque 15-digit serial number with
which each GSM device can be unequivocally iden-
tied - e.g. in case of theft.
classic model
For the serial number of your frame: ______________
the "always valid" master lock code: ______________
premium model
For the serial number of your frame: ______________
the "always valid" master lock code: ______________
IMEI serial number: ____________________________________
daum electronic gmbh
Flugplatzstr. 100 · D-90768 Fürth
Phone: +49 (0)911 97536-0 · Fax: +49 (0)911 753714
www.daum-electronic.de
no. 0630424e.0006 2010 05 31
Your daum electronic dealer
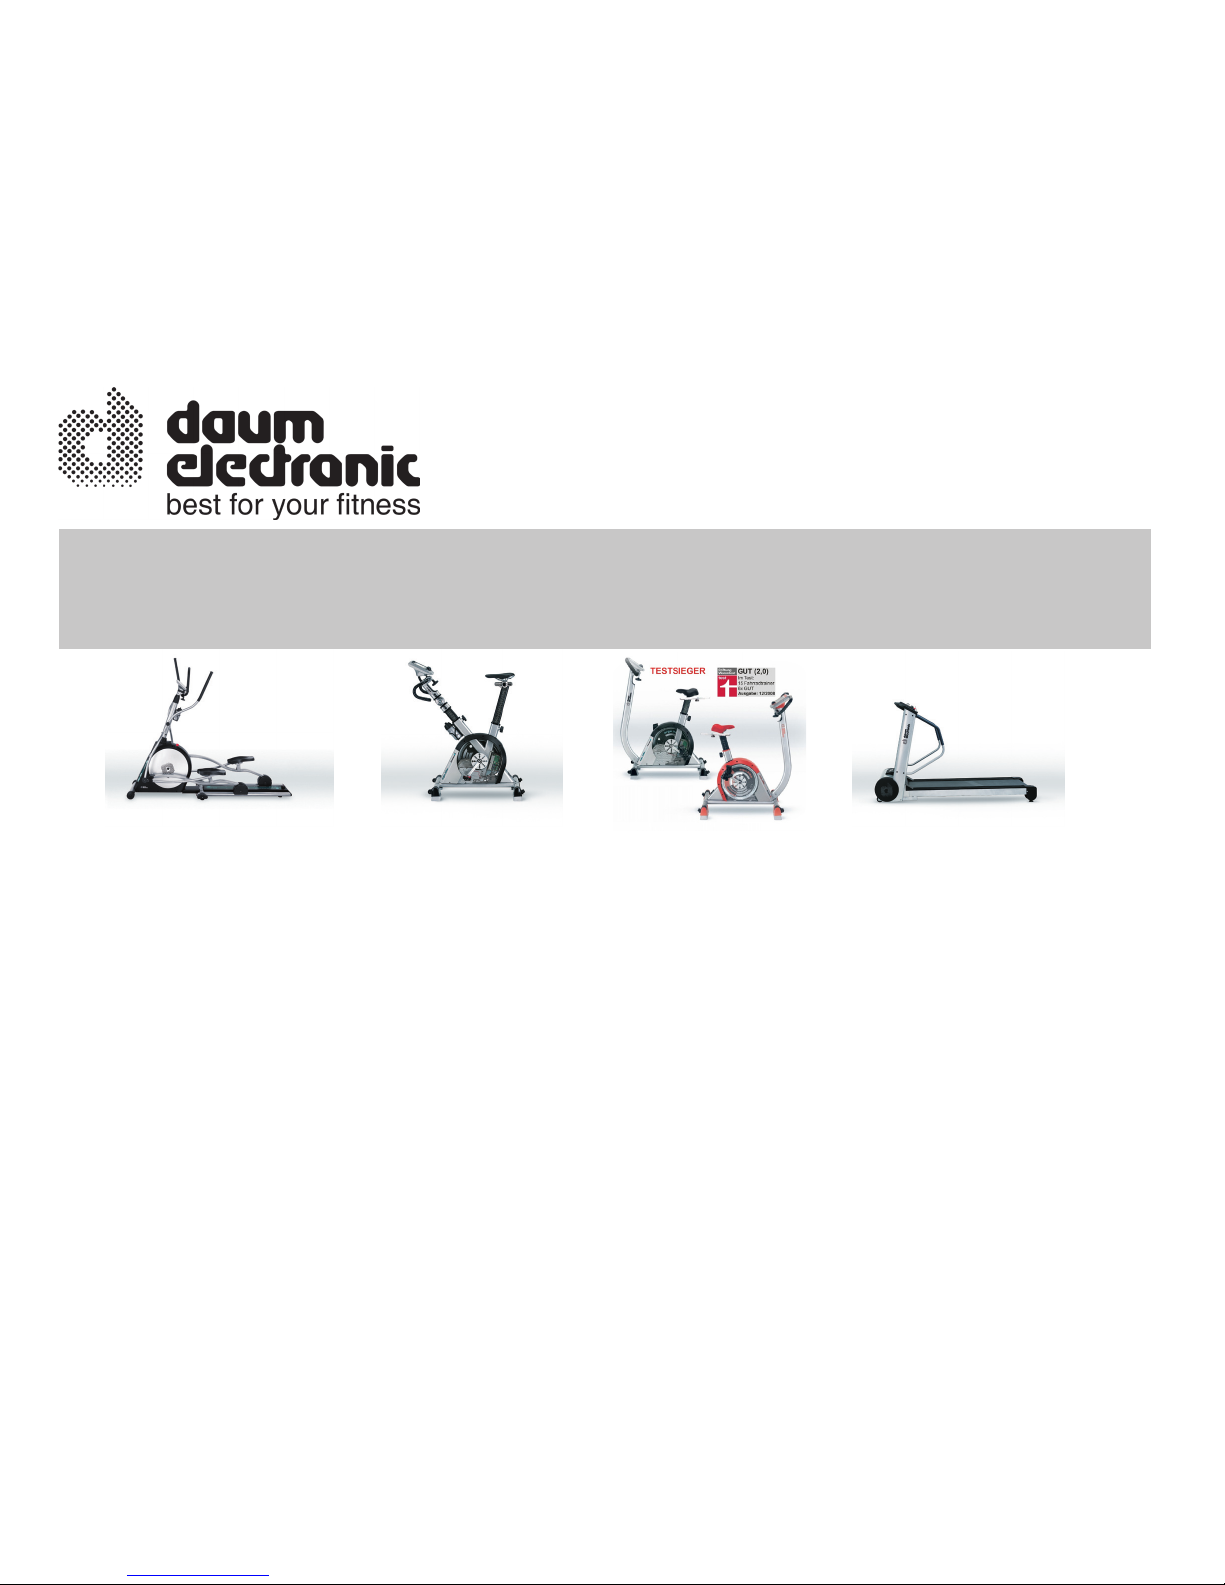
We develop and manufacture also training devices for sport, therapeutic and medical usage. More than 500,000
devices are in use by satised customers around the world. Visit our web page at www.daum-electronic.de to learn
more about our complete product range.
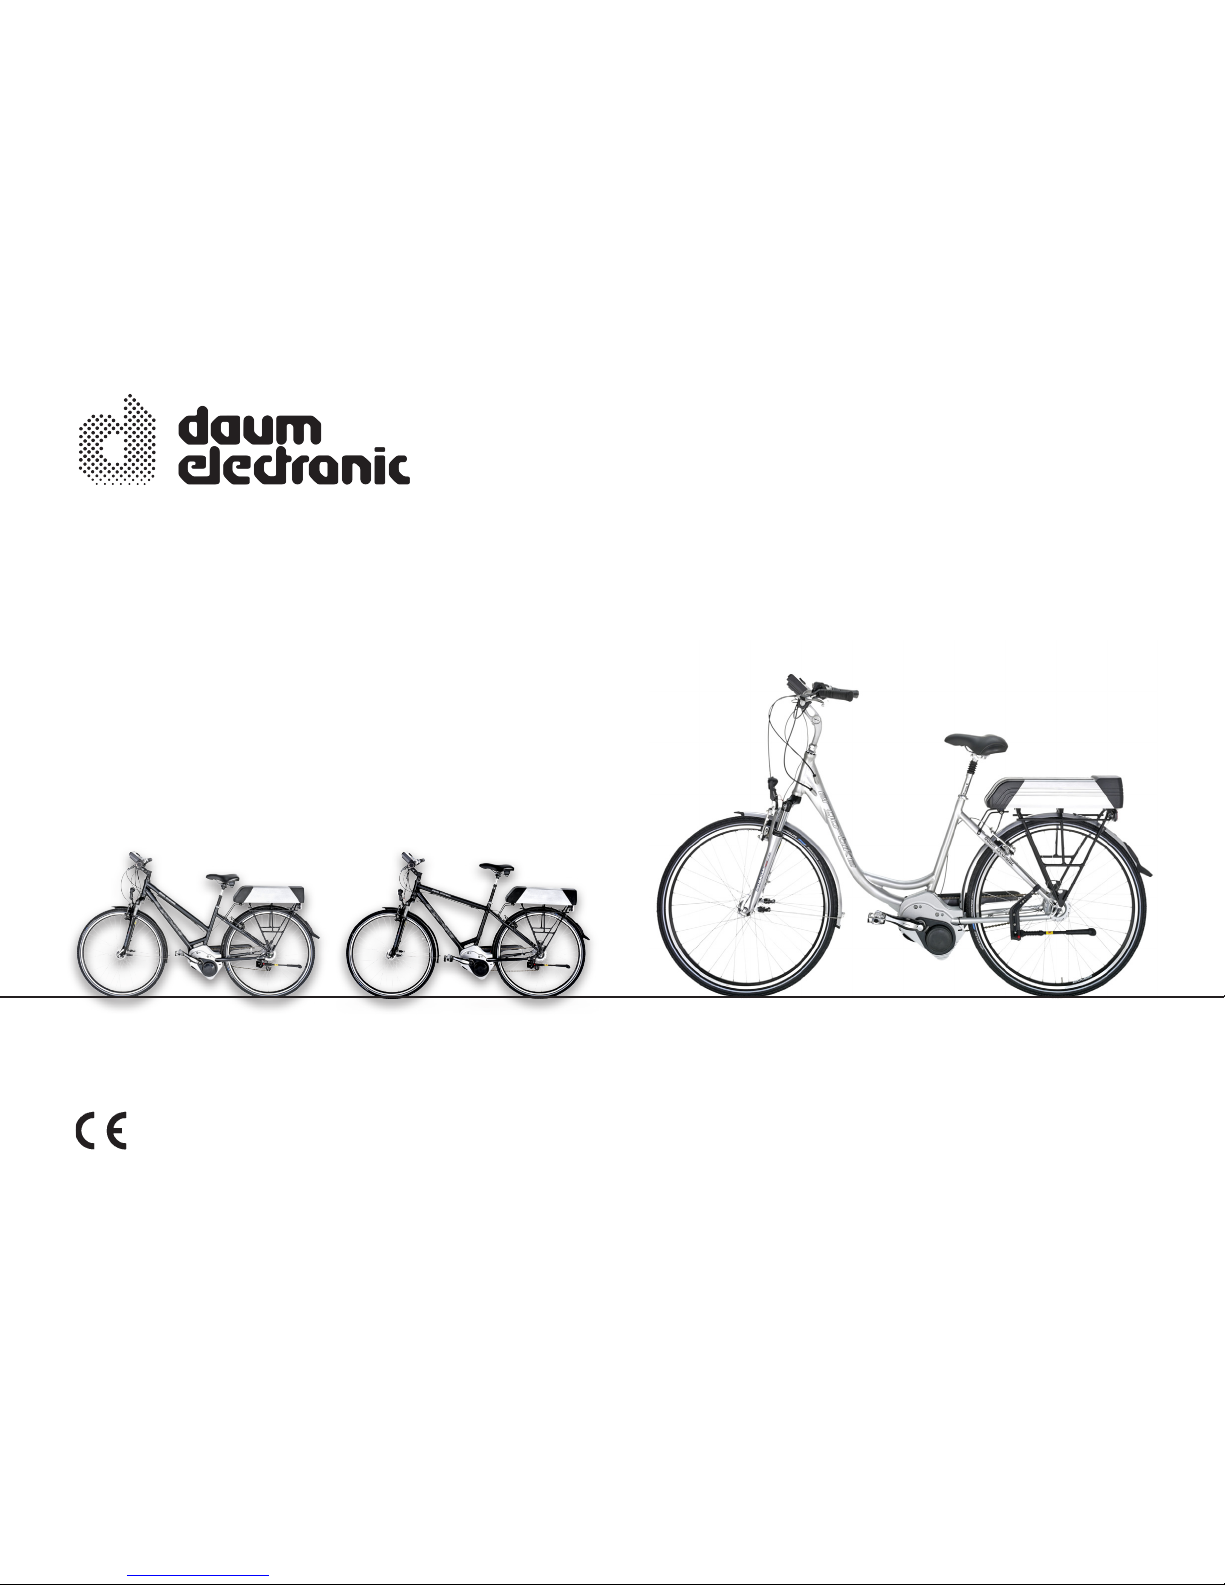
User Manual
ergo_bike pedelec classic
premium
Pedelec stands for Pedal Electric Cycling.
It designates a bike with electric assisted pedalling
having the following characteristics:
- Pedelecs combine a bike with an electric motor,
a rechargeable battery, control electronics, and
sensors for recognising crank movements.
- Pedelecs are considered as bikes and may be
used without driving licence and without auto mobile liability insurance.
- A helmet is not required but we do recommend
wearing a bicycle helmet.
- All pedelecs sold in the EU must comply with the
directive DIN EN 15194.
- While pedalling pedelecs are assisted by a motor
from 0 to 25 km/h.
We recommend that you carefully read this user
manual to quickly familiarise yourself with your
ergo_bike pedelec. Competent handling and regular
care and maintenance of the ergo_bike pedelec help
preserve its value.
Also for safety reasons take into consideration the
information about modifications, accessories, and
spare parts.
Please if you sell your ergo_bike pedelec give also
this user manual to the buyer.
PREFACE
daum electronic is permanently working to improve all
its models. Keep in mind that the delivery scope can
be modified any time. The modifications can cover
the form, equipment, and technology. Therefore no
complaint or claim can be made based on the illustrations and descriptions contained in this user manual.
All texts, illustrations, and instructions contained in
this user manual are actual at the moment this user
manual is put to print. The data contained in this user
manual are valid at the moment of printing. Errors
and omissions excepted.
The illustrations show the Comfort model for the
extend that it does not differ from the Trekking model. The descriptions for the Trekking D (ladies) and
Trekking H (gentlemen) models are similar.
Reprinting, copying, or translating of this manual,
in complete or in parts, is not allowed without an
express authorisation. All the rights remain with
daum electronic according to the Copyright law.
Subject to modifications.
daum electronic gmbh
Used symbols
Notes important to your safety are especially iden-
tied. Take these notes into consideration to avoid
injuries to a person and damages to the bicycle.
WARNING
Warns you against hazards for your health and
indicates potential injury risks.
ATTENTION
Signals possible dangers for the bicycle or other
objects. Non-observance of these remarks can
lead to voiding the warranty.
NOTES
Highlight tips and information for you.
The keys
Two identical keys for the battery are provided
with your ergo_bike pedelec. Please keep the
spare key in a safe place.
Please read all the important information about the
SHIMANO gear shift, the suspended fork, and the
TRANZ X components in the included manufac-
turer’s manual.
ergo_bike pedelec

1
OPERATING classic and premium
Side view of the right side ............................................... 2
Handlebar functions and operation .................................. 3
Seating position ............................................................... 4
Adjusting the saddle ................................................... 4-5
Adjusting the handlebar ............................................... 6-7
Adjusting the suspension fork ......................................... 8
Safety hints for the battery charger ................................. 9
Battery charger operations ........................................... 10
Safety hints for the rechargeable battery ..................... 11
Handling the rechargeable battery and the charger ..... 12
Charging the rechargeable battery .......................... 13-15
Dashboard ....................................................................... 16
Menu diagram ............................................................... 17
Displays ....................................................................... 18-21
SD card ................................................................... 22-23
Software update ...................................................... 23-26
OPERATING premium series
Functions overview ....................................................... 27
GSM/GPRS ................................................................. 28-29
Displaying travelled tracks with Google Earth ......... 30-31
Displaying travelled tracks with GPSies .................. 32-33
Posting your own tracks on Internet ............................... 33
GPS menu ......................................................................... 34
Biking through tracks from Internet .......................... 35-38
Maintenance and care plan ...................................... 57-58
Bike chain tension ......................................................... 59
Verifying chain wear ...................................................... 60
Pedal cranks, pedals ..................................................... 61
Steering bearing, spokes ............................................. 62
Adjusting the brakes ................................................. 63-65
Disassembling and assembling the front wheel ....... 66-67
Disassembling and assembling the rear wheel ....... 68-69
Hub gear ....................................................................... 69
Dismounting and mounting the tyres ............................. 70
Lighting system ............................................................. 71
Checking the fuse of the rechargeable .
battery and of the charger ............................................. 72
SPECIFICATIONS ............................................... 73-77
WARRANTY AND SERVICE
Warranty conditions ...................................................... 78
Wear parts list .......................................................... 79-80
Delivery list ................................................................... 81
EC DECLARATION OF CONFORMITY ............ 82
BIKE ID CARD ....................................................... 83
Your own tracks / last tracks .......................................... 39
Querying the position ..................................................... 39
Sending the position ...................................................... 39
Determining the altitude ........................................... 39-40
BIKING
Starting up ..................................................................... 41
Assistance level ............................................................ 42
Pushing assistance .................................................. 42-43
Driving conditions ......................................................... 43
Hub gear ....................................................................... 44
Gear recommendation ................................................. 44
Braking .............................................................................. 45
Parking .............................................................................. 46
Safety hints .............................................................. 47-49
Transport .......................................................................... 50
Theft protection ............................................................ 50
Carrying loads ............................................................... 50
CARE
Bicycle care .............................................................. 51-52
Disposal of waste .......................................................... 53
Technical modications, spare parts .............................. 54
ACCESSORIES.................................................... 54-55
MAINTENTANCE AND CARE
Miscellaneous ................................................................. 56
TABLE OF CONTENTS
1
ergo_bike pedelec
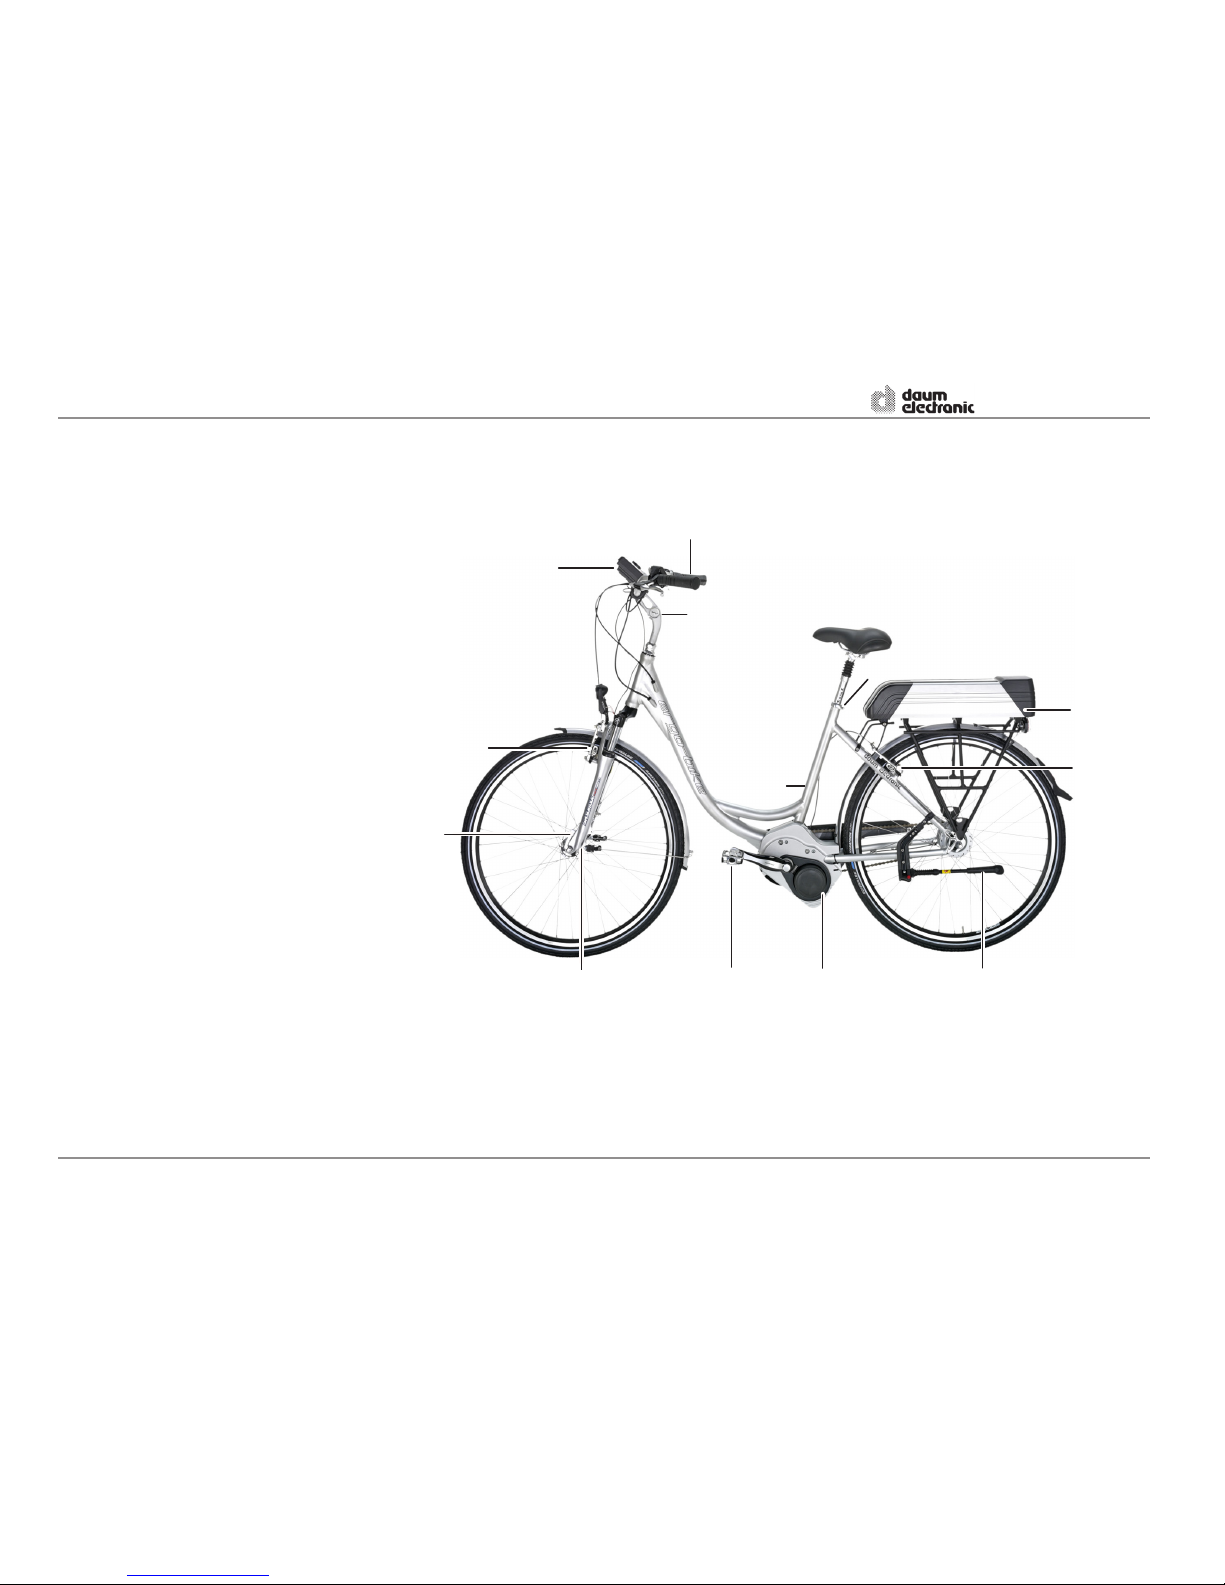
1 Display
2 Handlebar
3 Handlebar stem
4 Serial number
5 Saddle clamp for saddle height
6 Rechargeable battery, lockable
7 V-Brake rear wheel
8 Side stand
9 Electric motor
10 Pedals
11 Hub dynamo
12 Quick release lever front wheel
13 V-Brake front wheel
OPERATING classic and premium
Side view of the right side
2
ergo_bike pedelec
3
2
7
1
8
5
4
6
10 9
11
13
12

3
Handlebar functions and operation
1 Handle
2 Brake lever for the front wheel
3 Close control buttons
4 Dashboard with display
OPERATING classic and premium
Close control buttons
1 Decrease assistance level
2 Increase assistance level
3 Pushing assistance
4 Switching the display between standard view and:
- "Current data" (only with premium model)
- "Current tour"
- "Total values"
- "GPS data" (only with premium model)
5 Brake lever for the rear wheel
6 Handle
7 8-speed twist gear shifter
+ : 1 x shift to the next higher speed
(8th speed = highest transmission ratio)
- : 1 x shift to the next lower speed
(1st speed = lowest transmission ratio)
8 Bell
3
ergo_bike pedelec
1
4
3
2
8
7
1
3
6
5
2
4
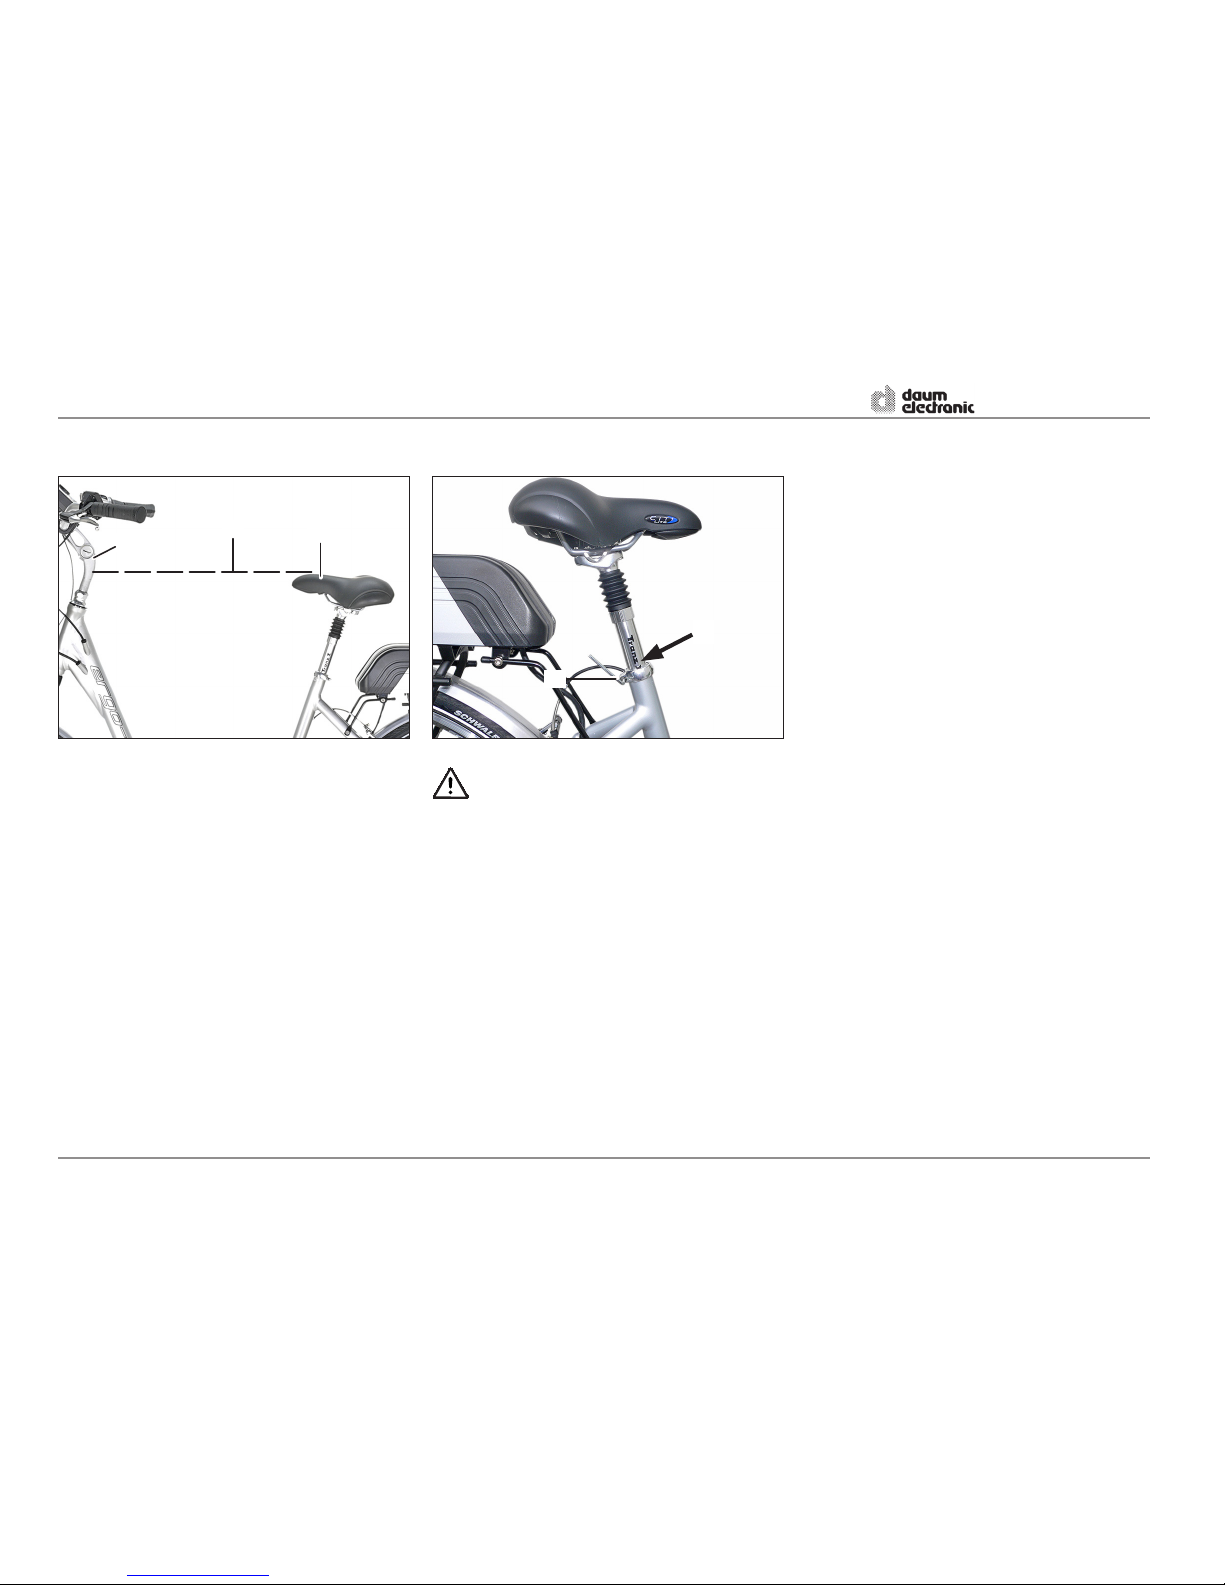
Seating position Setting the saddle height
WARNING
Please note that the saddle may be pulled
up at most to the marking (2) on the saddle tube.
- Loosen the saddle clamp (1) by means of an
Allen wrench SW4, adjust the saddle height and
retighten the screw.
Adjust the height of the saddle and handlebar to
adapt them to your body size in order to allow for a
comfortable, non tiring, and safe driving.
Sit on the saddle, put one pedal in the lowest position
and place your heel on the pedal. The saddle height
should be set so that your leg is almost straight in
the lowest pedal position.
The handlebar setting is correct when the handlebar
stem (1) is at the same level (3), or a little higher as
the upper edge (2) of the saddle.
3
1
2
2
1
OPERATING classic and premium
4
ergo_bike pedelec
5
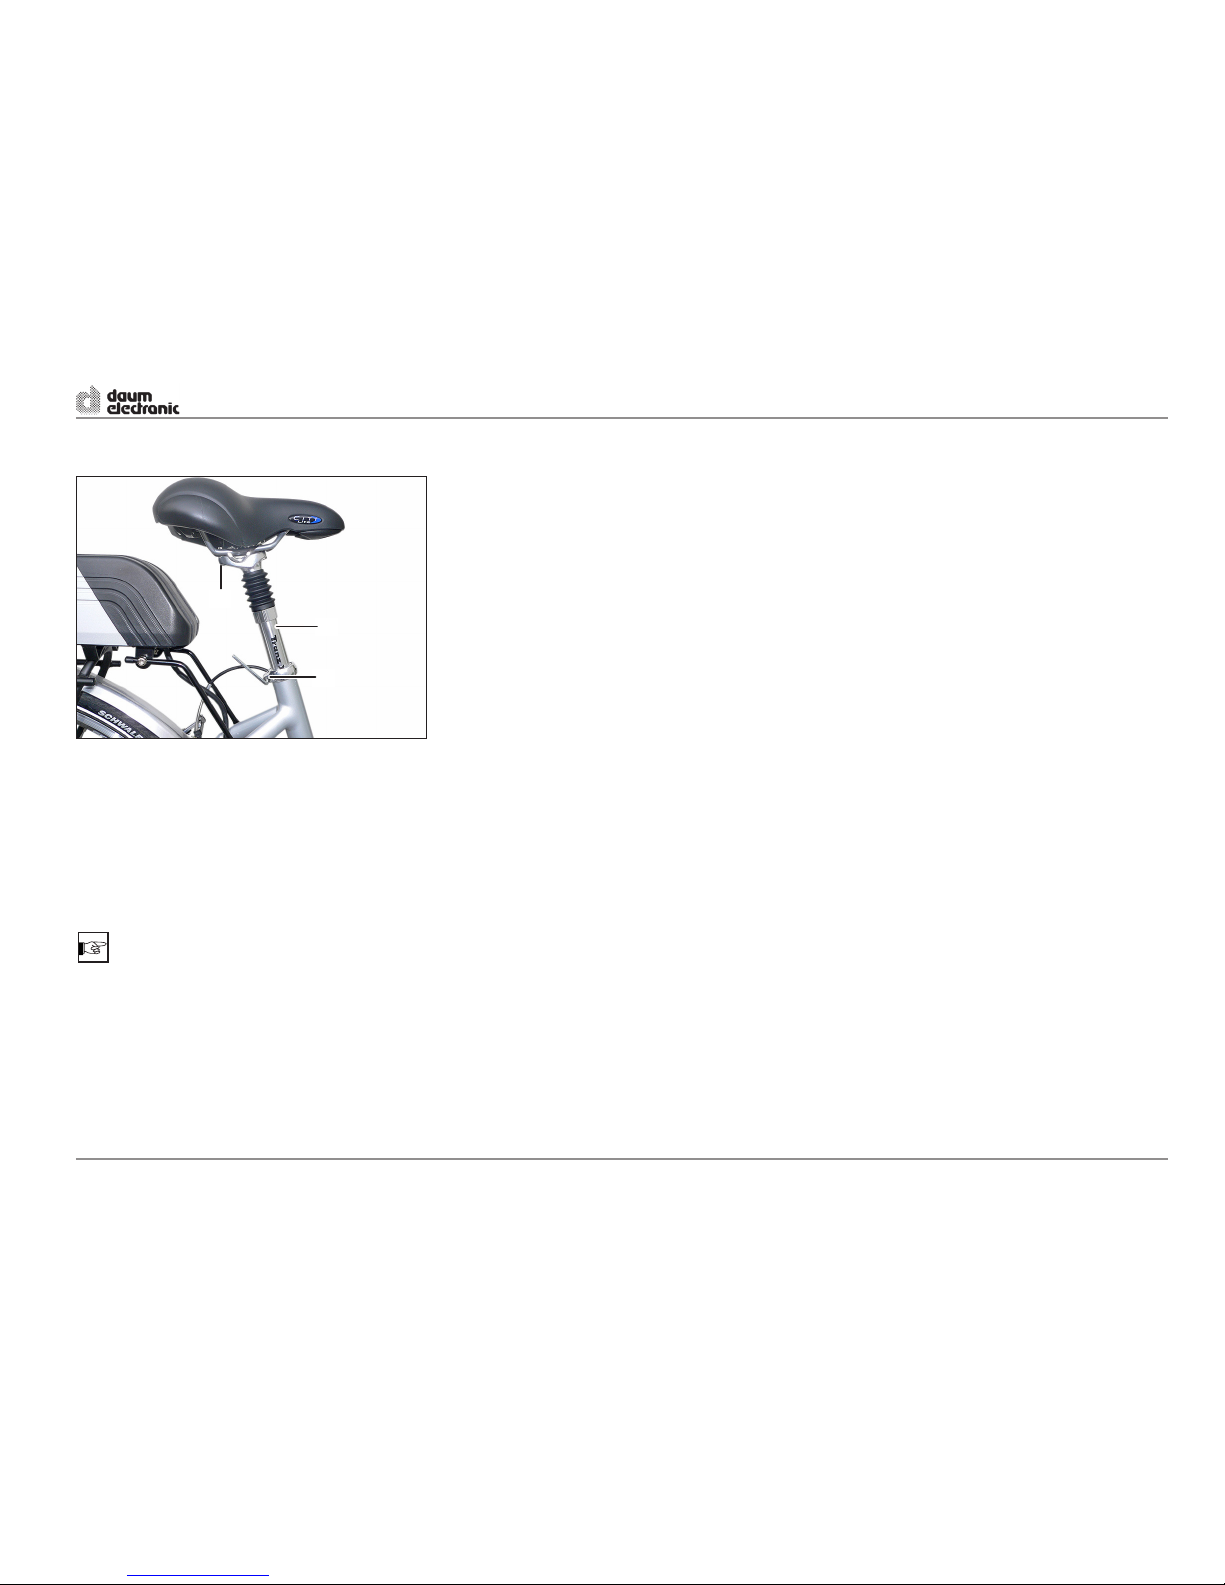
The saddle can also be inclined and adjusted in the
longitudinal direction.
- Loosen screw (1).
- Position the saddle in the required horizontal
position or shift it to the front or to the rear and
tighten screw (1).
NOTE
To avoid sitting discomfort, the saddle should be set
as horizontal as possible.
Setting the spring suspension of the saddle pillar
The saddle pillar (2) equiped with a spring suspension can be set to be soft or hard.
The setting is done by means of an Allen wrench
SW6 on the lower end of the saddle pillar.
- To this end loosen the clamp (3) of the saddle
pillar and pull out the saddle.
Turn clockwise = harder
Turn counterclockwise = softer
- Insert the saddle pillar, adjust the saddle height,
and tighten the clamp (3) of the saddle pillar.
Adjusting the saddle
OPERATING classic and premium
5
ergo_bike pedelec
2
3
1
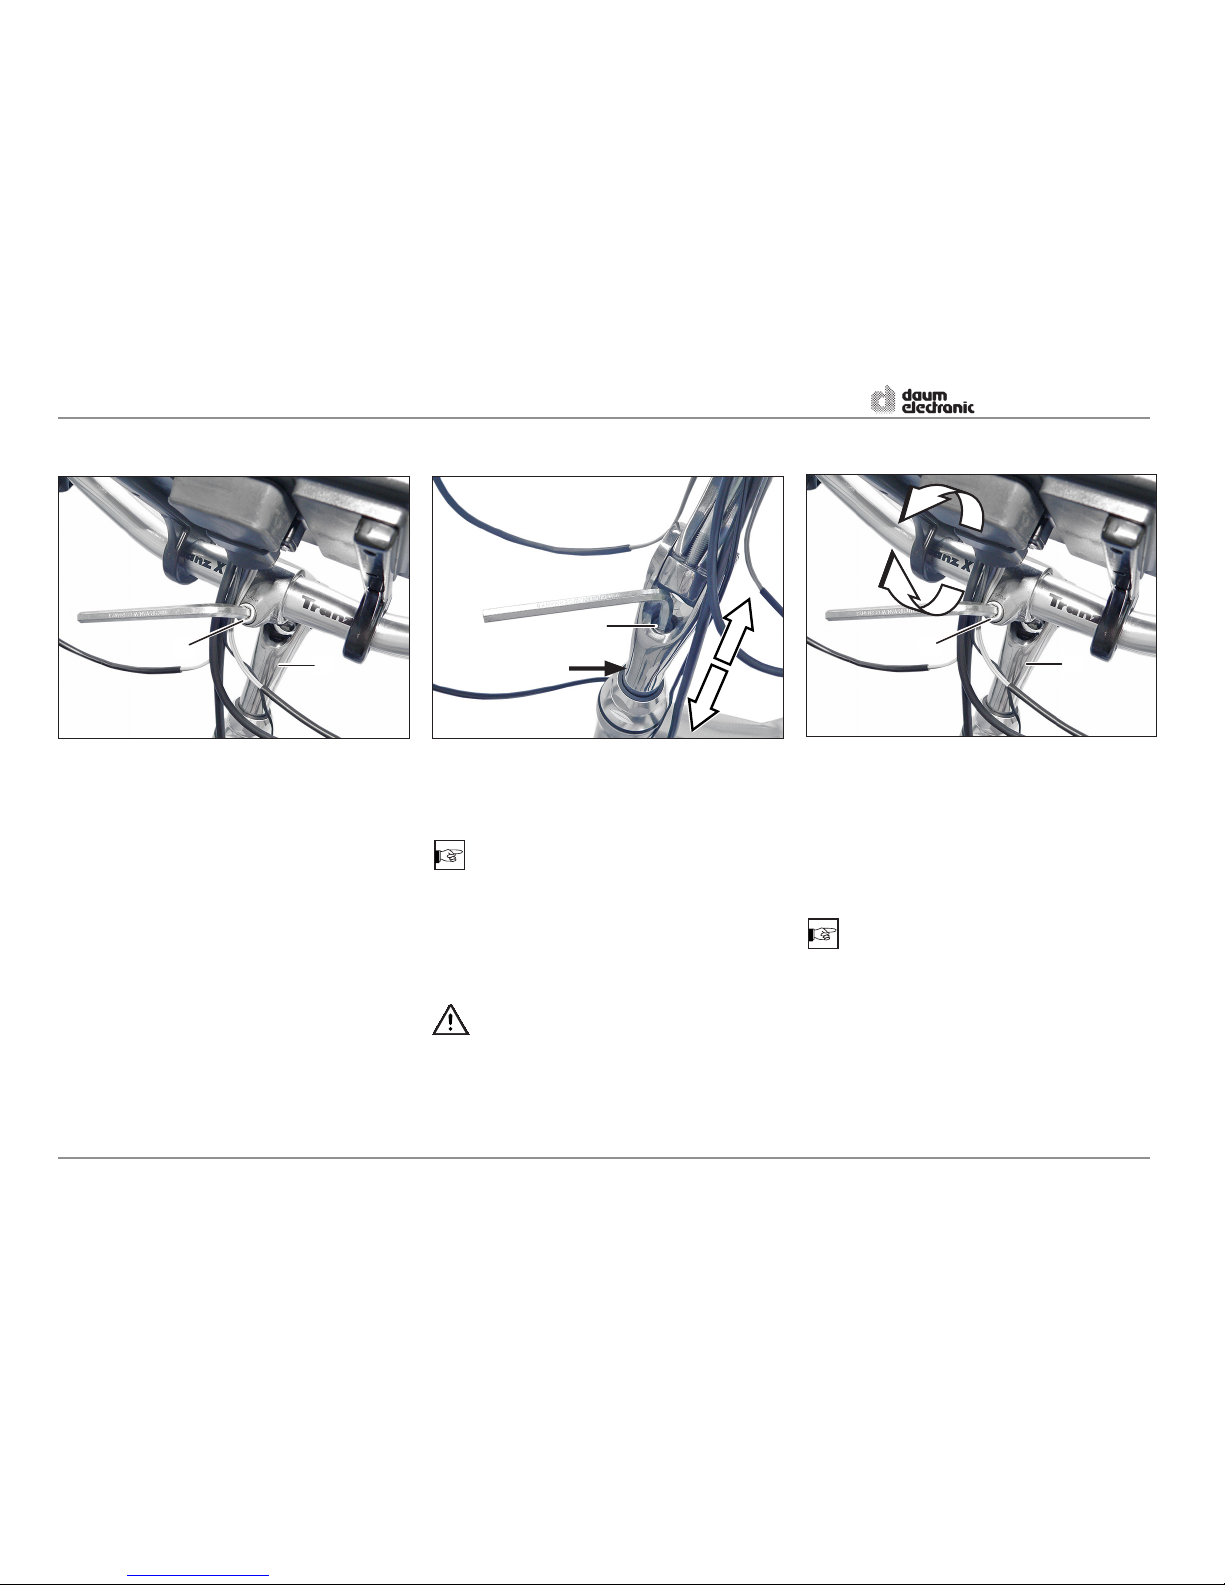
Adjusting the handlebar position on the
Comfort model
- Loosen the clamp screw (1) of the handlebar
stem (2) using an Allen wrench SW6.
Adjusting the handlebar height on the Comfort model
- Loosen the clamp screw (1) by means of an Allen
wrench SW6.
- Adjust the handlebar position by moving the
handlebar stem (2).
- Tighten the clamp screw (1).
NOTE
Pay attention to leave the sheated cables free running and avoid setting the handlebar to the extreme
high or low position.
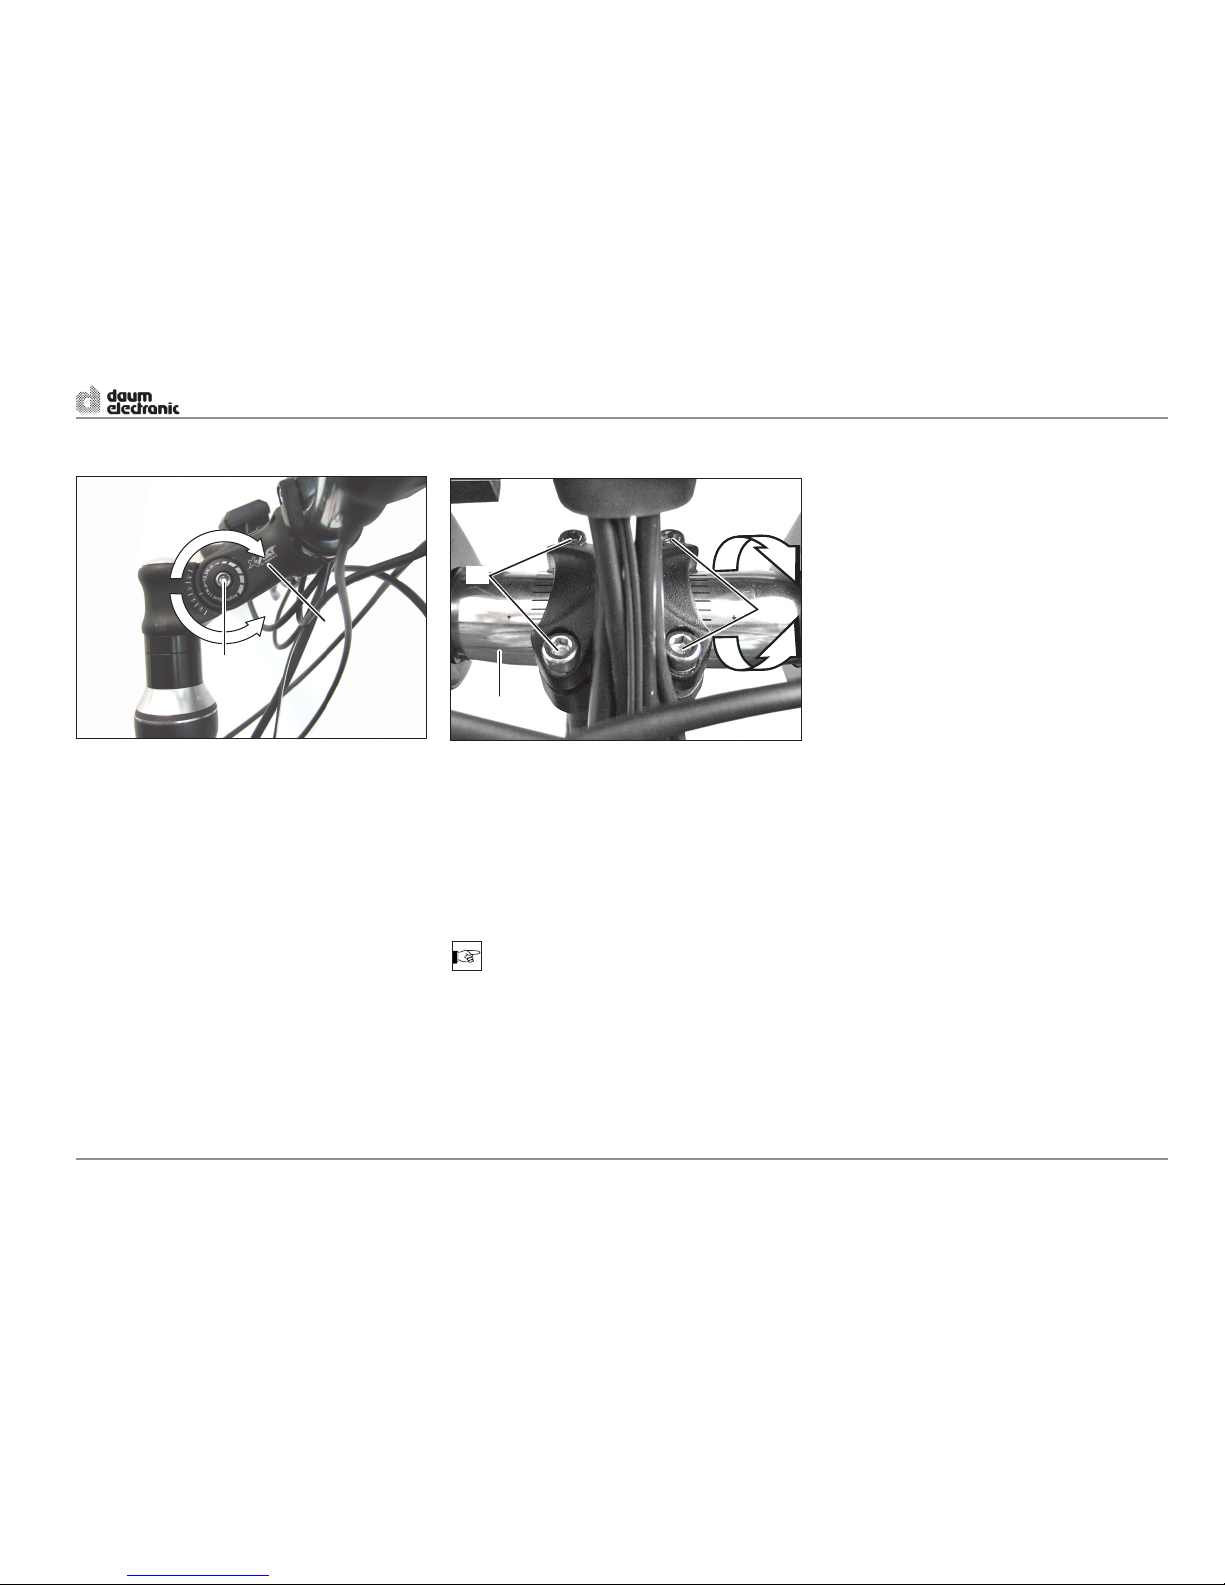
- Loosen the clamp screw (3) of the handlebar
stem using an Allen wrench SW6 by one to two
turns.
NOTE
The clamping is done by a conical body. It is therefore
enough to apply a rotary motion to the handlebar to
loosen the clamping.
- Adjust the handlebar height and tighten the clamp
screw (3).
WARNING
Please note that the handlebar stem may be
pulled up at most to the marking (4).
OPERATING classic and premium
6
ergo_bike pedelec
3
4
1
2
1
2
7
- Loosen the clamp screw (1) of the handlebar
stem (2) by means of an Allen wrench SW6 and
adjust the position.
- Retighten the clamp screw (1).
Adjusting the handlebar stem on the Trekking model
Adjusting the handlebar position on the
Trekking model
- Loosen the four clamp screws (1) by means of
an Allen wrench SW6.
- Adjust the handlebar position by shifting the
handlebar (2).
- Retighten the clamp screws (1) alternatively
crossed.
NOTE
Pay attention to leave the sheated cables free running and avoid setting the handlebar to the extreme
high or low position.
OPERATING classic and premium
7
ergo_bike pedelec
1
2
1
1
2
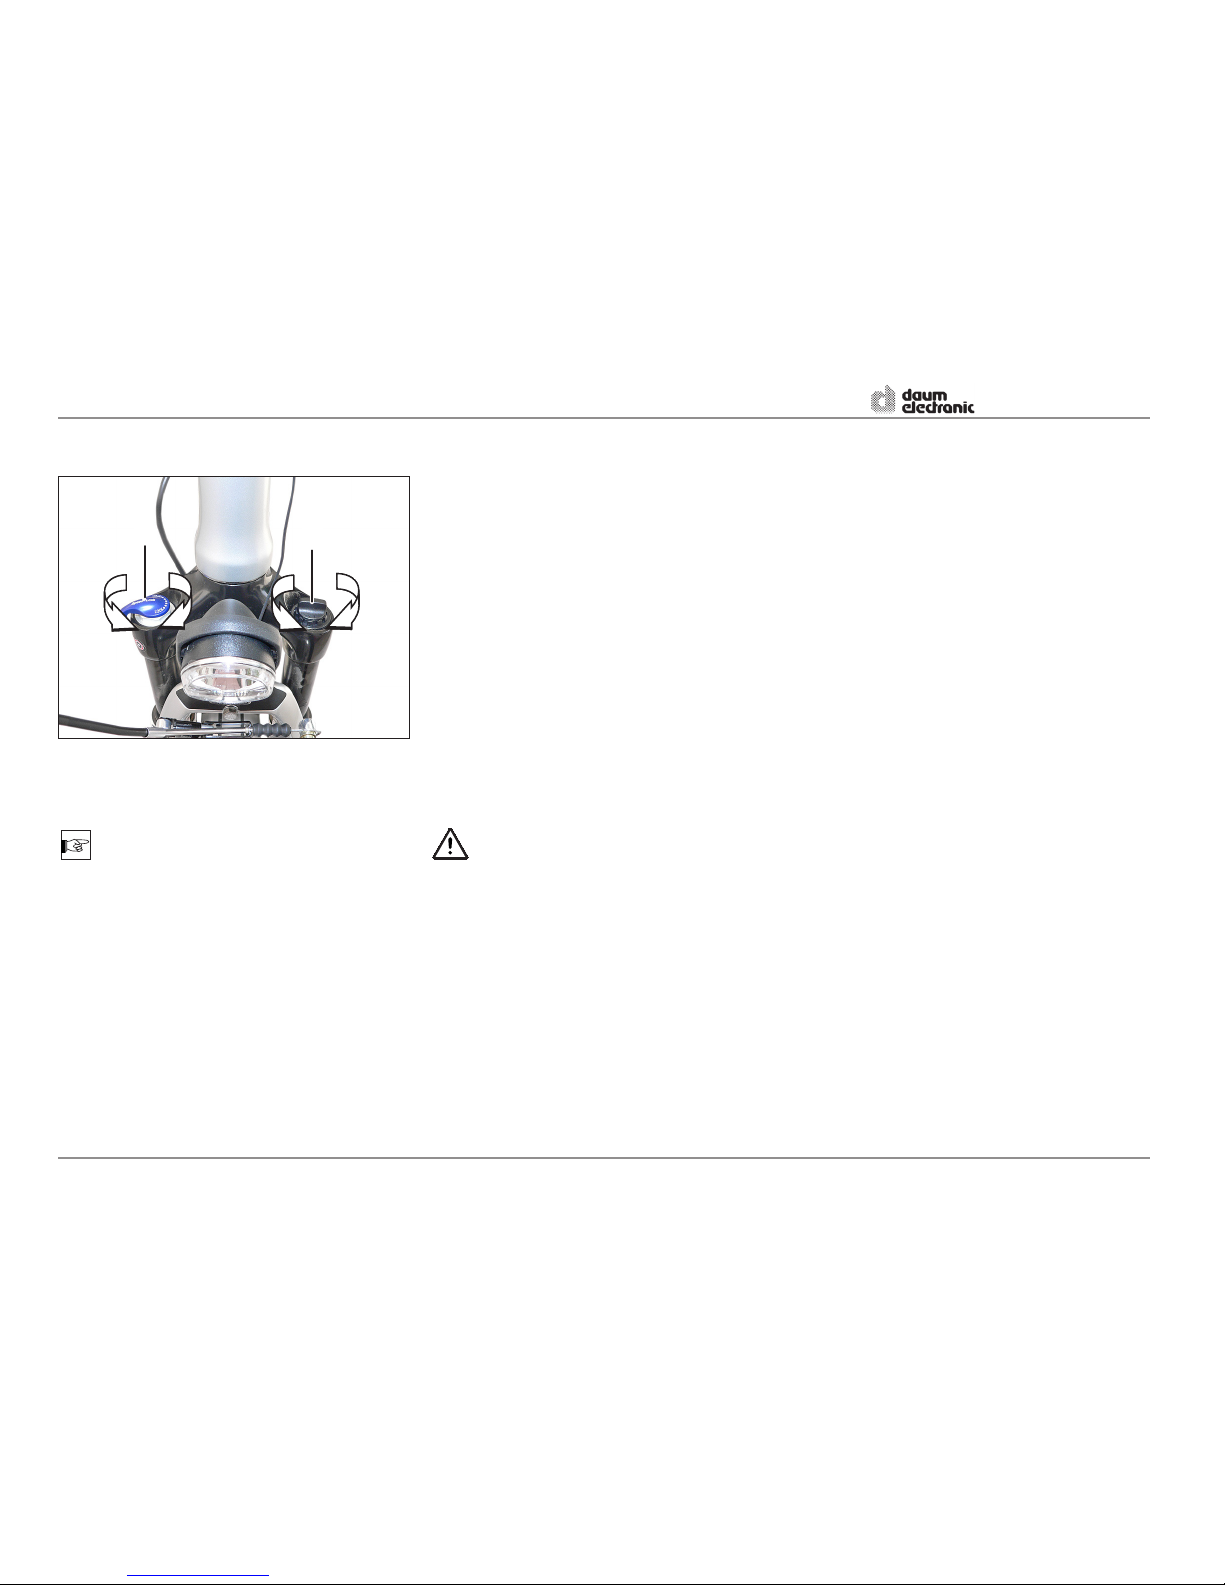
Turn the setscrew (1) as desired:
+ =
- =
Lock function (option)
If required you can lock the suspension of the fork
by means of the lock lever (2).
LOCK = suspension locked
OPEN = suspension active
WARNING
Do not make any other modication to the suspension fork.
Adjusting the initial tension of the suspension
fork
NOTE
The initial tension is used to adjust the response
characteristics of the suspension fork to adapt it to
the road conditions and user's weight. The higher
the initial tension is, the higher the pressure to apply
before the suspension fork reacts.
Adjusting the suspension fork
OPERATING classic and premium
Suspension hard:
Turn clockwise to increase the initial tension.
Suspension soft:
Turn counterclockwise to decrease the
initial tension.
8
ergo_bike pedelec
1
2

9
Important safety notes for the battery charger
Please read these safety notes before you start
using the battery charger.
WARNING
Keep the charger out of reach of children. To
prevent risks of injury you should only recharge
daum electronic Lithium-Ion (Li-Ion) rechargeable
batteries. Other battery types may explode when
recharged. This can cause injuries to persons and
material damages.
Using accessories or rechargeable batteries that
we do not sell or recommend, introduces risks of
re, electrical shocks or injuries.
In any case avoid using the device in humid or
wet environment.
Avoid absolutely water infiltrations in the
device. If liquid inltration does occur: imme-
diately disconnect the charger from the power
supply and take it to your daum electronic dealer
for testing.
Please provide for a safe stand for the device on
a at level surface.
When not in use disconnect the power supply.
Do not pull on the cable to avoid damaging
the cable and prevent the risks of an electrical
shock.
After use, make sure that the power cable is
properly rolled up or fold up.
Do not use the charger with a damaged cable or
power plug. Have it immediately replaced by a
qualied technician.
Do not use the charger after it received a
strong shock, was dropped or anyhow damaged.
Do never disassemble the charger yourself. A
faulty assembly can lead to electrical shocks or
re hazards.
To prevent electrical shocks, disconnect the
charger from power supply before cleaning it.
Clean the device only with a dry cloth. Do
never use oil, water or solvents.
An extension cable should only be used
if absolutely necessary. Using an extension
cable that is not in perfect condition can lead to
re hazards or electrical shocks. If an extension
cable is used, you must make sure that:
- the pins of the cable power plug correspond
to those of the charger exactly in number, size
and shape,
- the extension cable is correctly wired and in
good electrical state,
- the cable section is large enough to support
the AC current load of the charger,
- the extension cable does not present any
visible damage,
- the drum is completely unwound when using
cable drums.
OPERATING classic and premium
9
ergo_bike pedelec
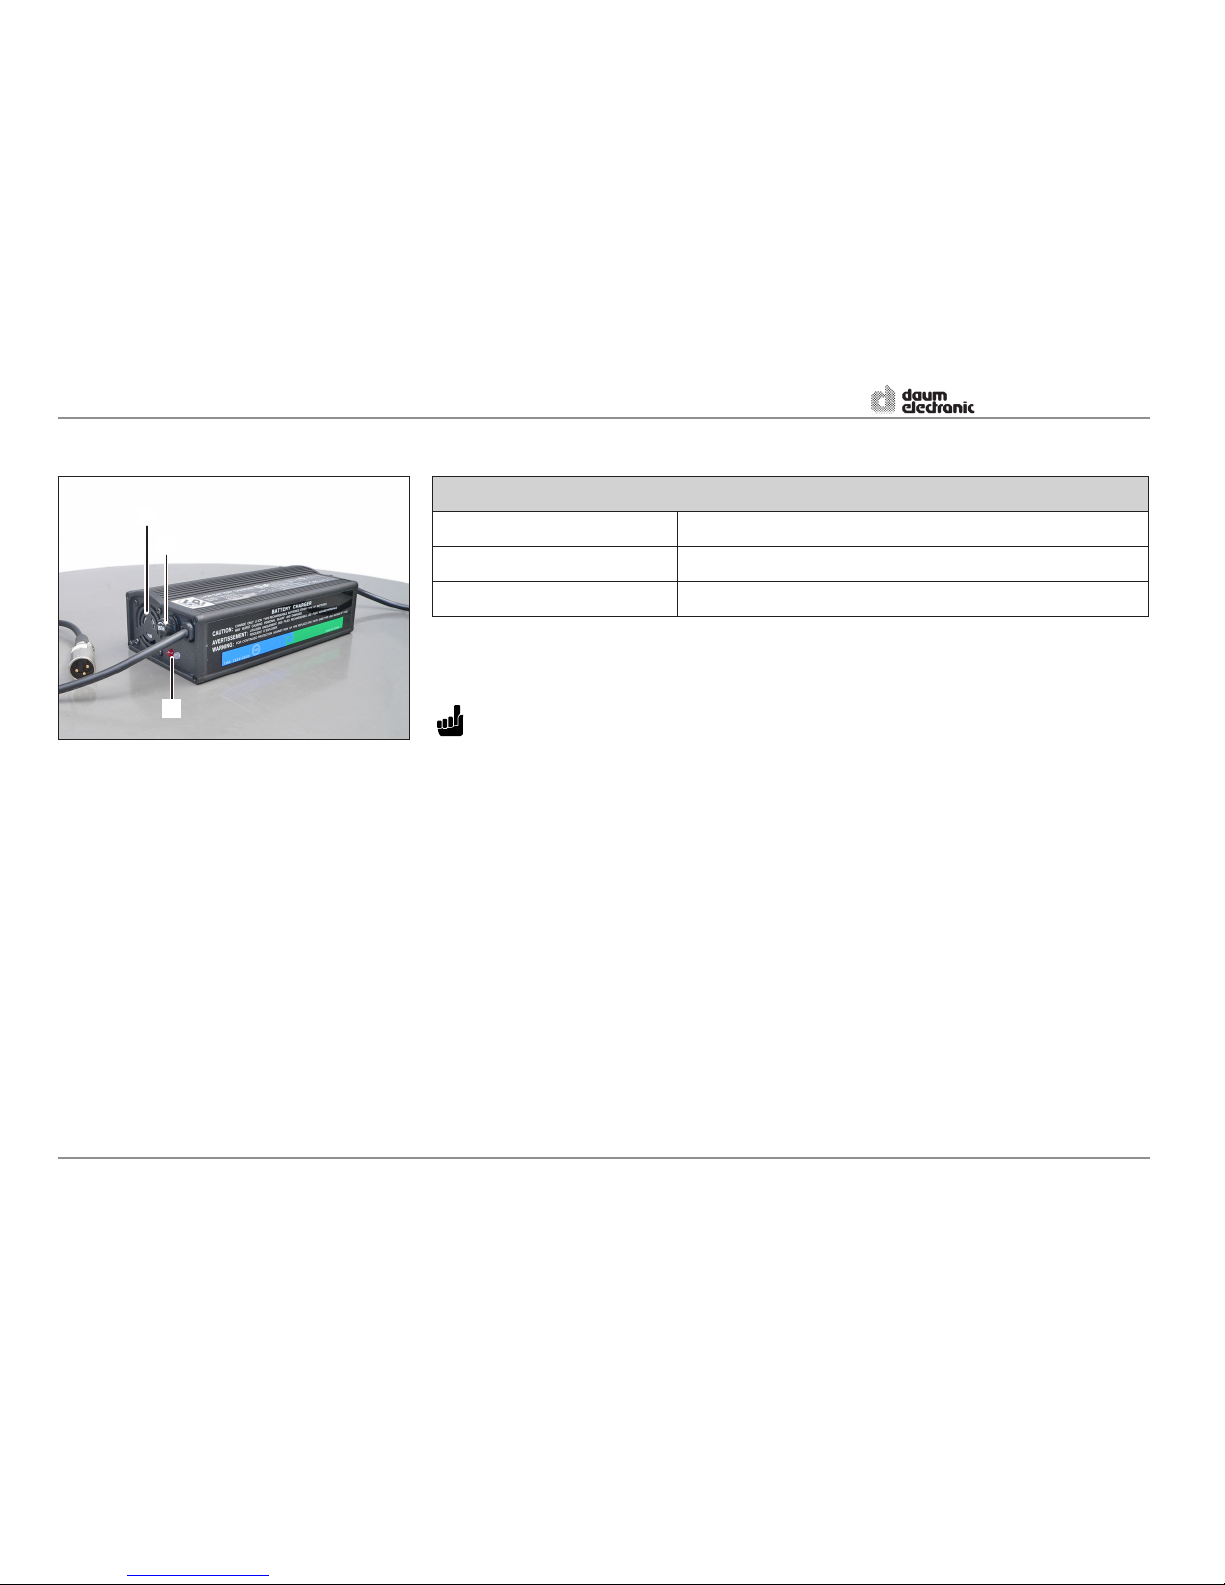
ATTENTION
To prevent overheating the charger, the ventilator (2) may not be covered during the charging
process.
In case of troubles check if:
- the fuse (3) of the charger is defective?
- the power cable is properly plugged in?
- the contact pins of the charger and the rechargeable battery are clean and not damaged
or bent?
- the rechargeable battery is damaged or defective?
- the plug of the charger is rmly plugged in the
connector of the rechargeable battery?
Battery charger operations
The LEDs (1) on the battery charger give actual information about the operation of the battery charger. You can check at a glance the charging status
and charging state of the rechargeable battery.
Charging cycle and LED displays on the charger
LED Mode
Red and yellow Charging
Red and green Charging completed
In the case that a proper battery charge cannot be
obtained:
- Verify that the power outlet is connected to power,
eventually plug in another device.
- Verify that the connecting plugs t in properly and
establish contact.
- If it is still not possible to recharge the battery,
then please have the charger and the rechargeable battery tested by your daum electronic dealer.
OPERATING classic and premium
10
ergo_bike pedelec
2
1
3
11
Important safety hints for the rechargeable battery
- Protect the rechargeable battery against shocks
and humidity.
- Before you plug the charger into a power outlet
please verify that the voltage supplied corre-
sponds to the voltage specied on the nameplate
of the charger.
- Rechargeable batteries will achieve their maximal usable life when recharged in an ambient
temperature of +10°C to a max. of +30°C.
- The rechargeable battery will get warm when
used heavily. Please wait for the rechargeable
battery to cool down to room temperature, or
about 30 minutes, before starting the recharging
process.
WARNING
- Keep the rechargeable battery out of reach
of children.
- Do not open or disassemble the rechargeable
battery yourself.
- Do not short-circuit the rechargeable battery
with metal objects.
- Do not immerse the rechargeable battery in
any liquid.
- A not usable rechargeable battery may not in
any case be incinerated or put to re! There
is risk of explosion!
CORROSION RISK
- Stop using the rechargeable battery in
the presence of leaks or loss of electrolyte.
FIRST AID
Rinse acid sprays in the eyes immediately with
clear water for a few minutes! Then consult a physician without delay.
Neutralize acid splash on skin or clothes immediately with acid neutralizer (soda) or soap suds and
rinse with plenty of water.
If acid is swallowed, consult a physician immediately.
NOTE
Used rechargeable batteries are subject to waste
disposal regulations. Rechargeable batteries contain heavy metals and are therefore subject to toxic
(hazardous) waste control.
Your daum electronic dealer will take care of
battery disposal for you.
Before starting operating, we strongly recommend
you read the following important notes and comply
with them:
- A new ergo_bike pedelec rechargeable battery
is charged to about 80% capacity.
- The rechargeable battery develops its maximum capacity after about five discharge/
recharge cycles.
WARNING
- The rechargeable batteries of the ergo_bike
pedelec and the provided charger are tuned
to each other. Therefore you should always
recharge the battery with a charger of the
same model series.
OPERATING classic and premium
11
ergo_bike pedelec
Handling the rechargeable battery and the charger
ATTENTION
Ignoring the following directives can lead to a
deep discharge of the rechargeable battery.
A deep discharge of the rechargeable battery
voids the warranty.
In order to achieve the longest possible service
life of the rechargeable battery you should
follow the following directives:
- The charger will not operate when the temperature of the rechargeable battery is below
0°C and higher than +60°C. Therefore you
should bring the rechargeable battery to
about room temperature before starting the
charging process.
- If the pedelec will be exposed to low temperatures at its storage location, we recommend to
remove the rechargeable battery and store it
at room temperature.
- If the rechargeable battery is kept turned off
or removed for an extended period of time,
then it is expected that you will need to set
the date and time again!
- Recharge the battery at the soonest opportunity after use, regardless of the amount of
discharged energy.
- After the charging process is complete, the
rechargeable battery must be disconnected
from the charger, and it maynot be left connected to a switched off charger (self discharge).
- When not used for a prolonged period, the rechargeable battery may not be left connected
to the charger.
- When storing the bike (e.g. in winter) the
rechargeable battery must be stored fully
charged in a dry room at room temperature.
- Recharge every 3 months.
NOTE
About self discharge
The rechargeable battery will self discharge mainly
through chemical processes occurring in the gastight cells. The discharge rate depends on the time,
charging level and environmental conditions (temperature, air humidity).
This results in a correspondingly shorter range with
electric drive.
OPERATING classic and premium
12
ergo_bike pedelec
13
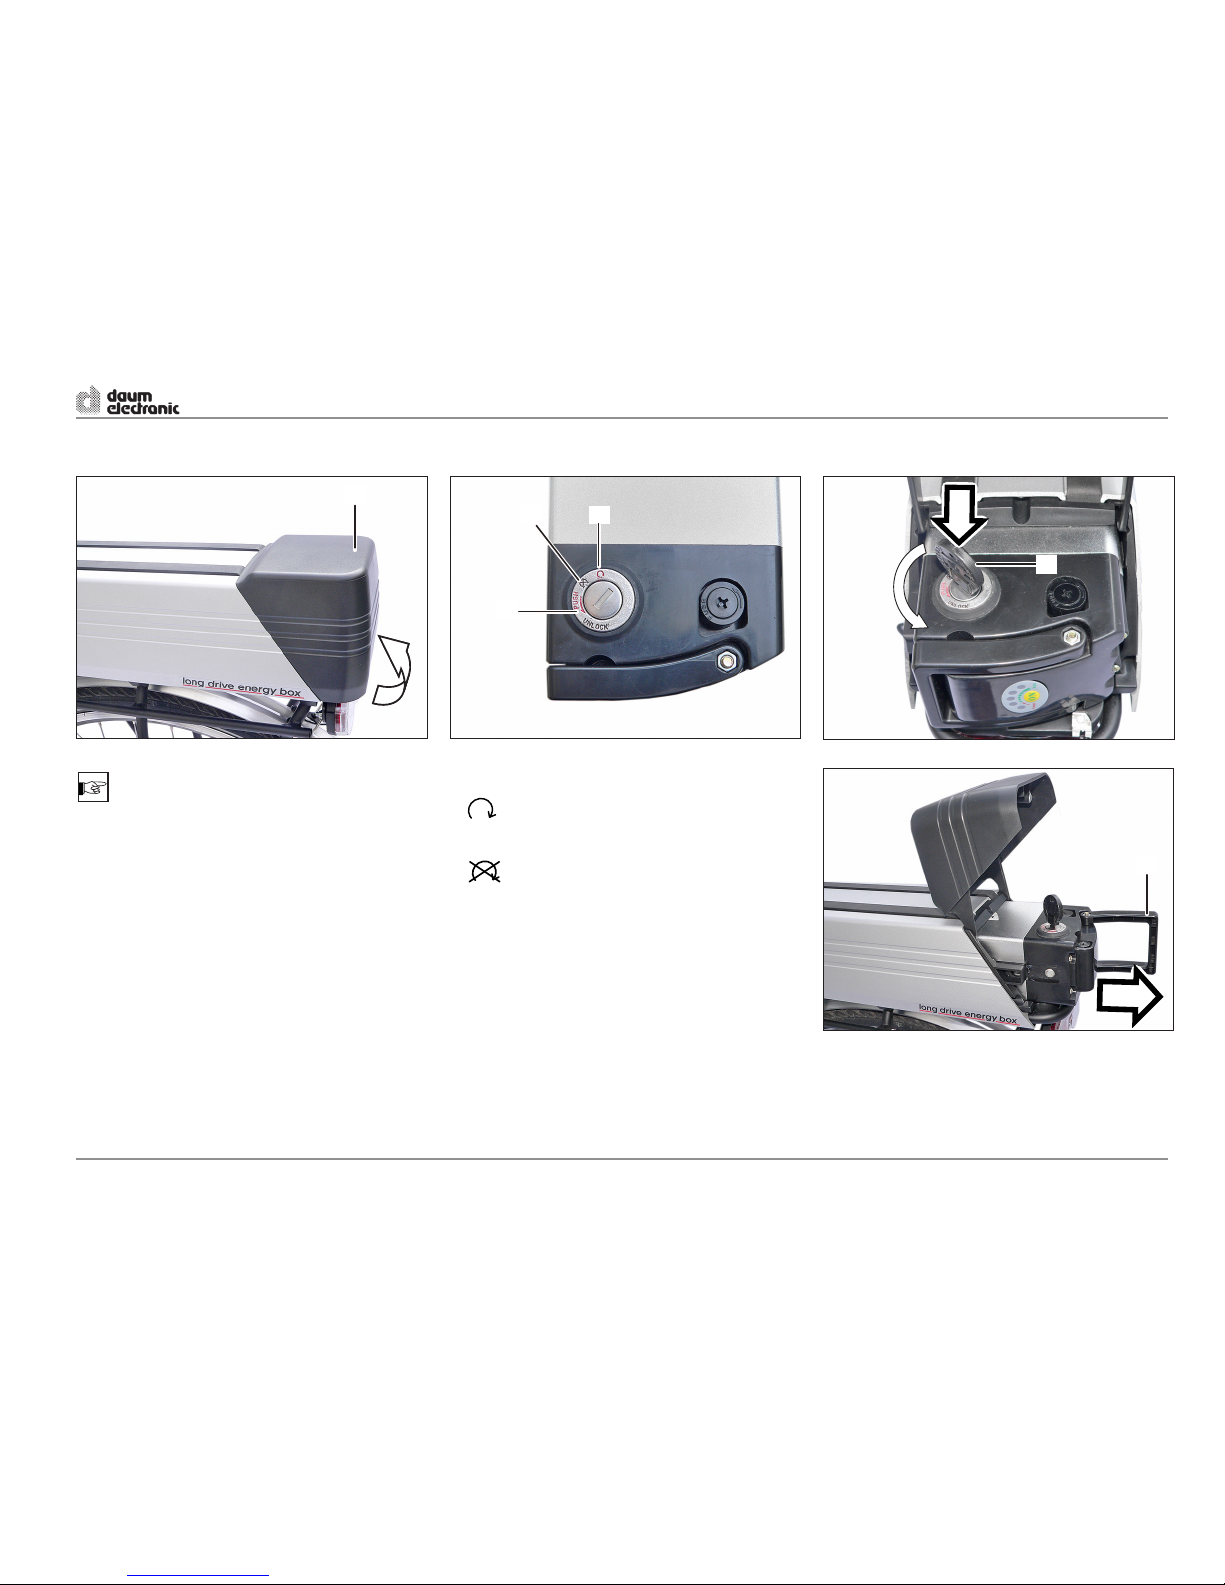
Removing the rechargeable battery to recharge it
NOTE
The rechargeable battery is locked by means of a
key-lock. The rechargeable battery must be removed
from the battery compartment to be recharged.
The charging time is about 3 hours for a discharged
rechargeable battery.
- Open the cover (1) of the battery compartment
upward.
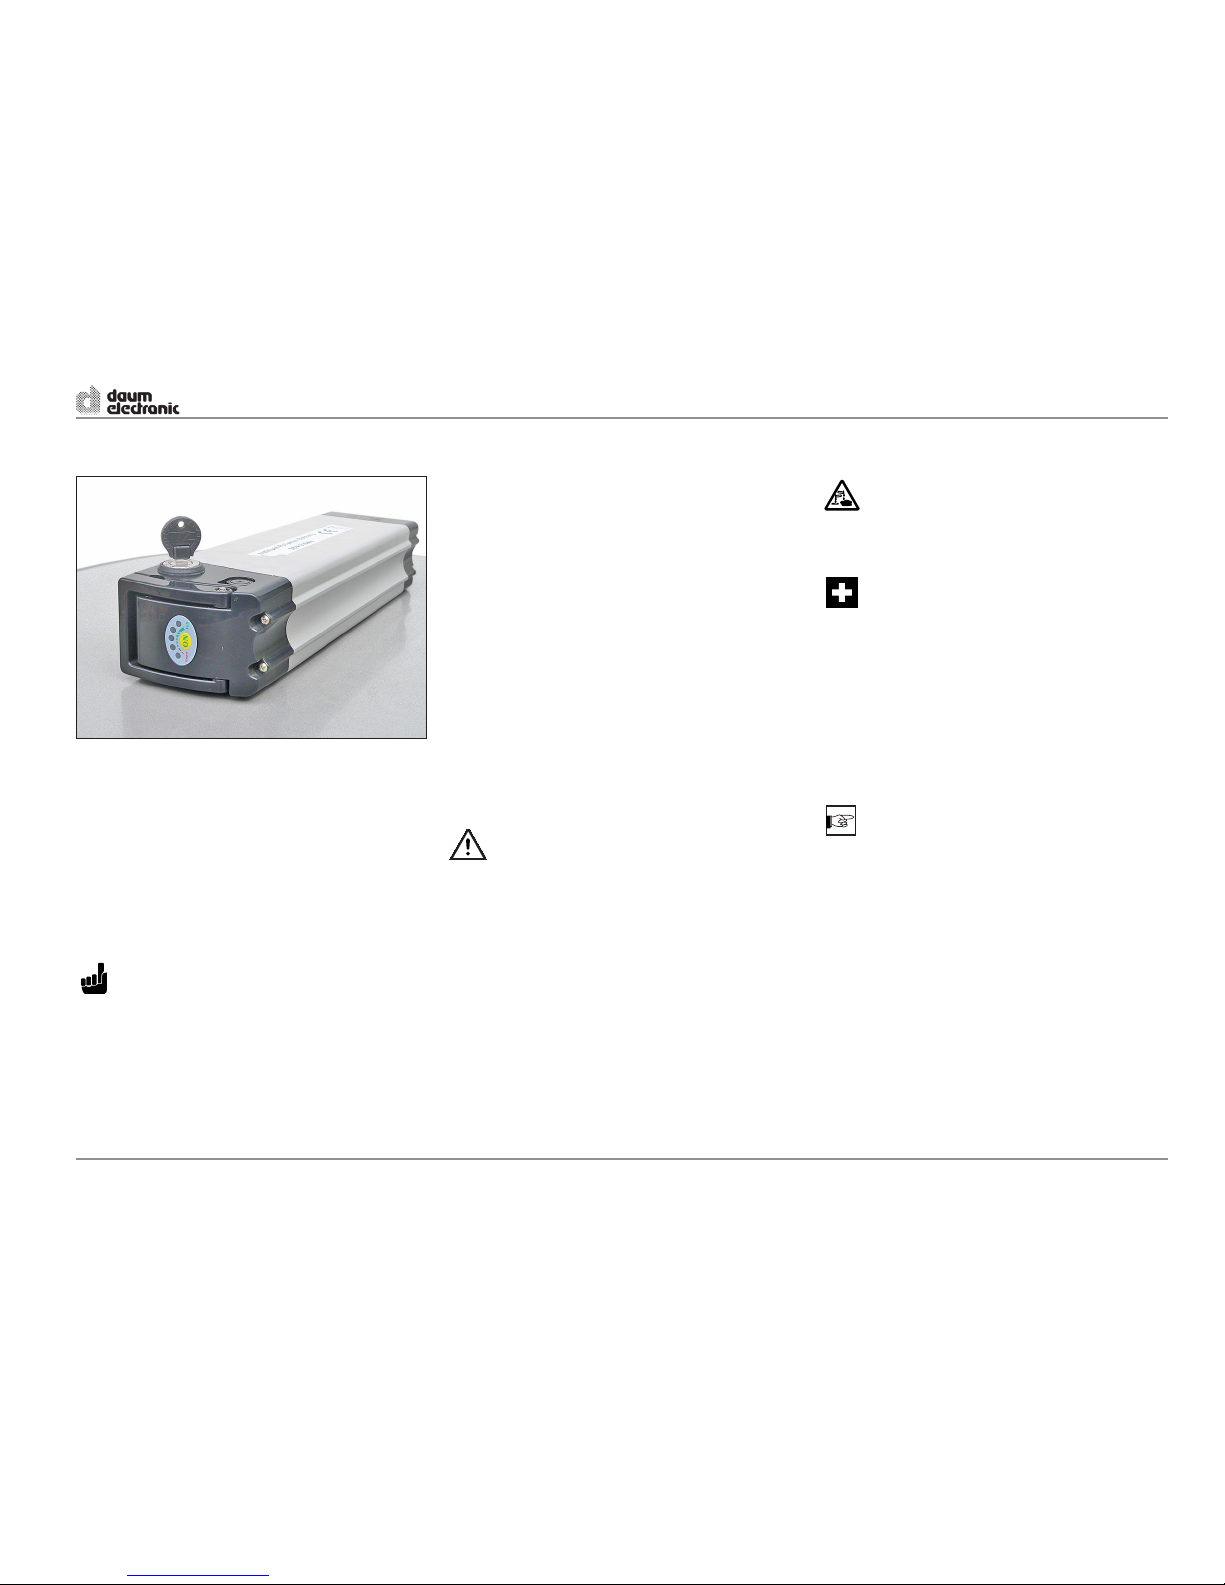
Key positions on the rechargeable battery
1
Operating position: the rechargeable
battery is switched ON.
2
The rechargeable battery is switched
OFF. The key can be removed.
3 PUSH The rechargeable battery is unlocked
UNLOCK and can be removed.
- Press the key (4) and turn it counterclockwise
to the PUSH UNLOCK position. The rechargeable
battery is unlocked.
- Pull the rechargeable battery on the handle (5)
out of the battery compartment.
OPERATING classic and premium
13
ergo_bike pedelec
1
2
3
4
1
5
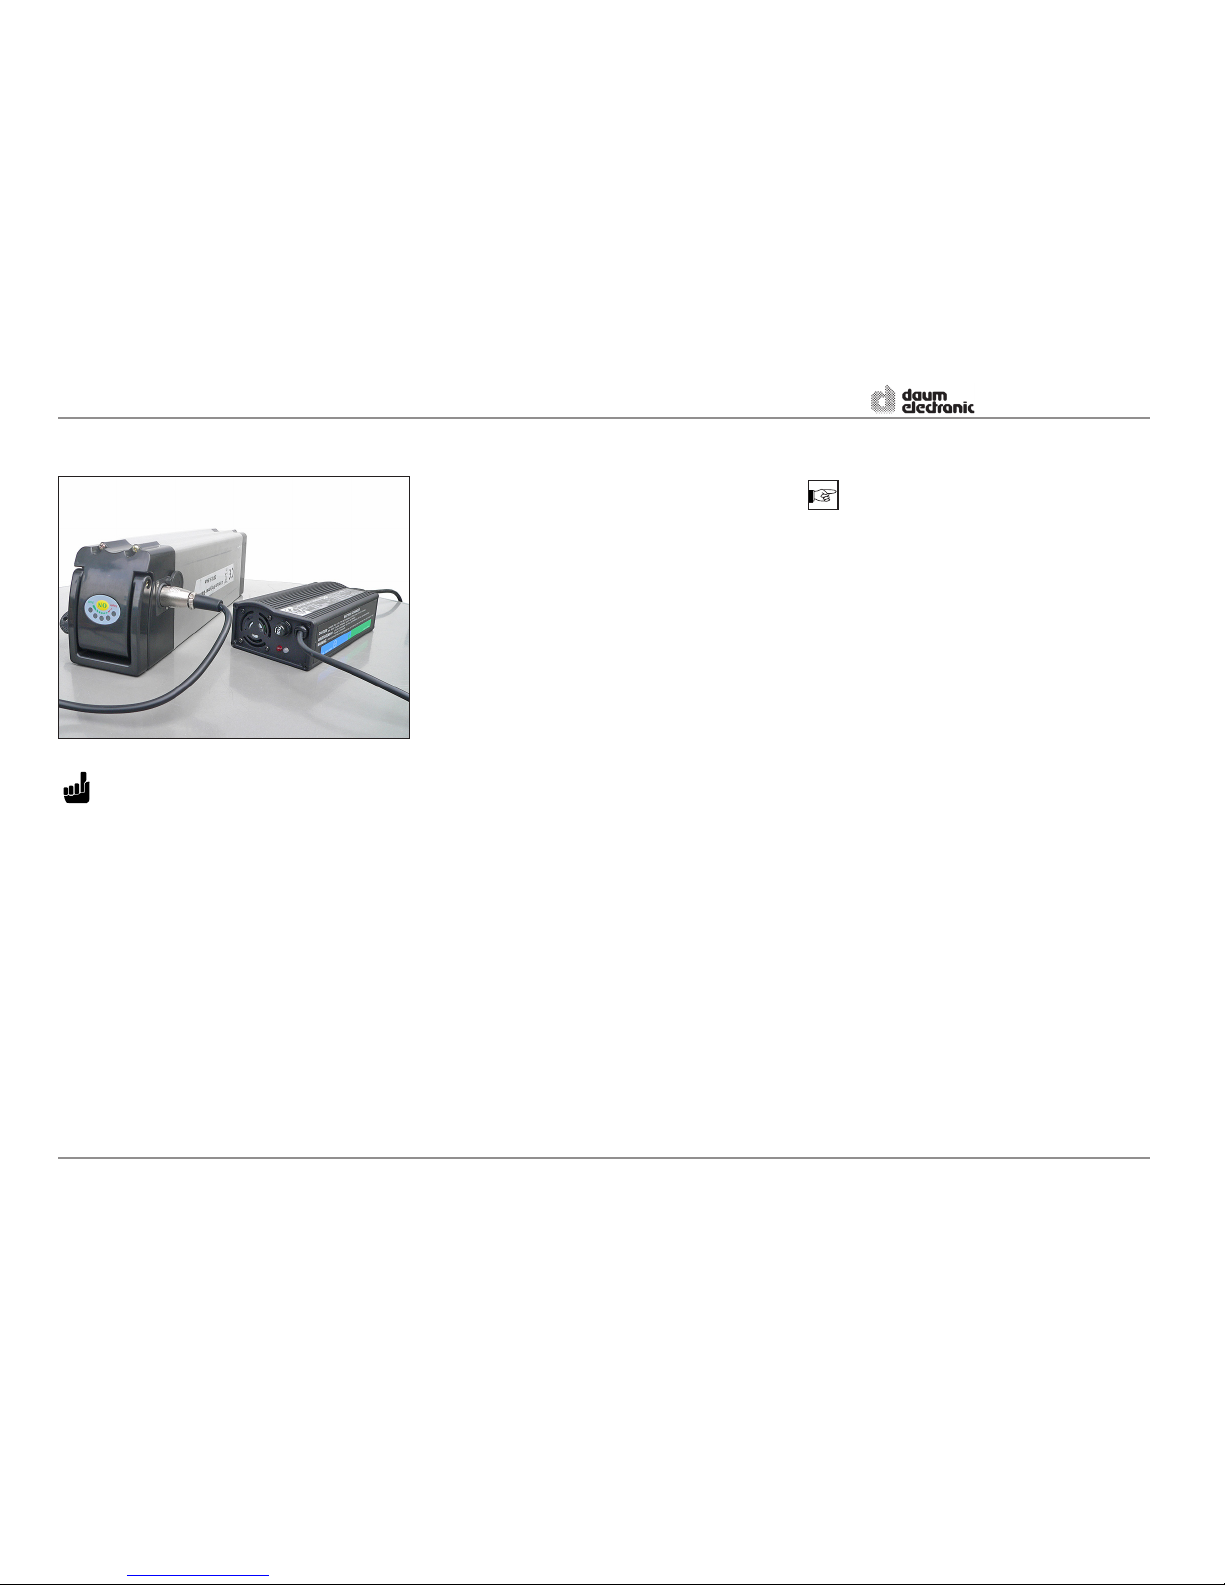
Charging the rechargeable battery
ATTENTION
The switch (4) on the charger may only be
switched ON after the connections to the rechargeable battery and to the power supply
have been established. Otherwise the charging
process will not start.
After the charging process is complete disconnect the rechargeable battery from the
charger.
- Connect the plug (1) to the connector (2) of the
rechargeable battery.
- Connect the power plug of the charger (3) to a
power outlet at 100-240V, 50-60Hz.
- Turn ON the switch (4) on the charger.
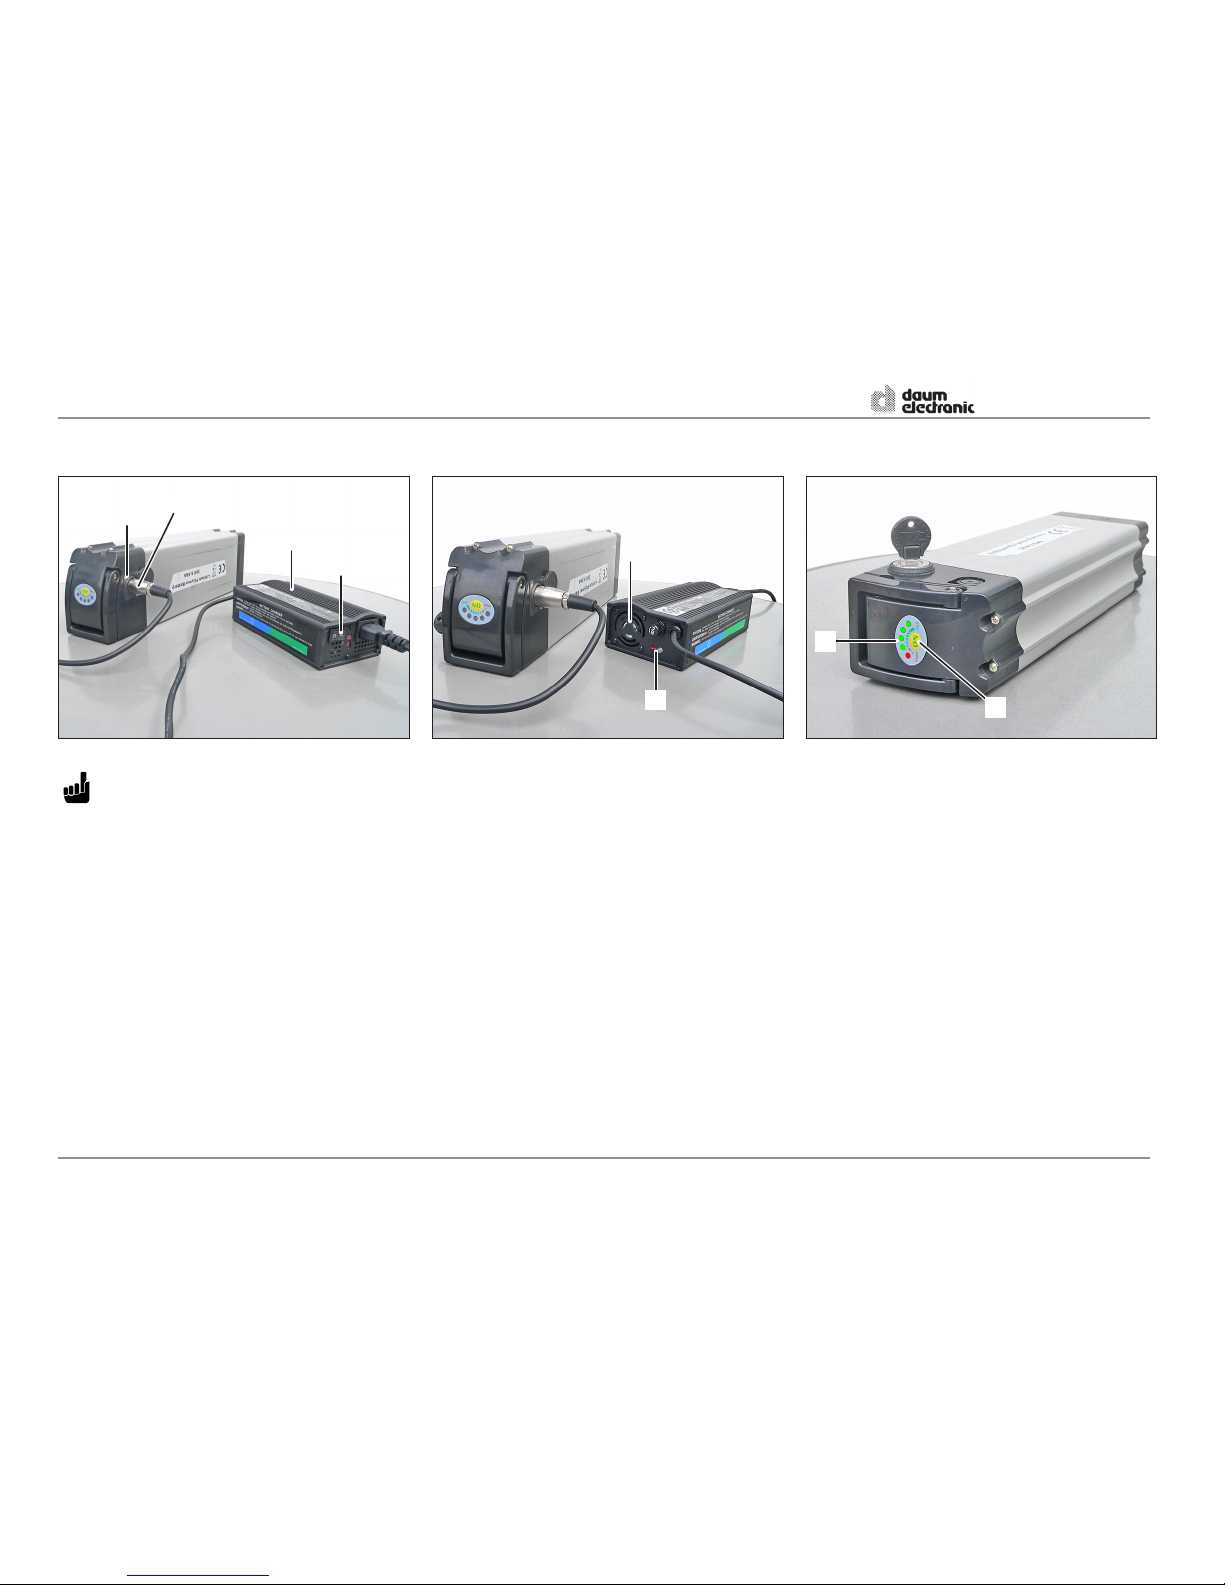
Checking the charge level of the rechargeable
battery
- The LEDs (7) (red + green) light up when you
press the ON key (8).
When the rechargeable battery is fully charged all 4
green LEDs and the red one will glow.
Charge status on the charger
The LEDs (5) on the charger indicate the charging
status.
Red + yellow The charging process is active and
the ventilator (6) is running.
Red + green The charging process is complete
and the ventilator is not running.
OPERATING classic and premium
14
ergo_bike pedelec
4
2
3
1
6
5
8
7

15
Installing the rechargeable battery
- Insert the rechargeable battery (1) in the battery
compartment until it stops and fold the handle
(2) back.
- Turn the key (3) to the right into position .
This will lock the rechargeable battery and turn it
OFF.
ATTENTION
- The rechargeable battery must be turned OFF
when not in use.
- Close the cover (4) of the battery compartment.
OPERATING classic and premium
15
ergo_bike pedelec
4
3
1
2
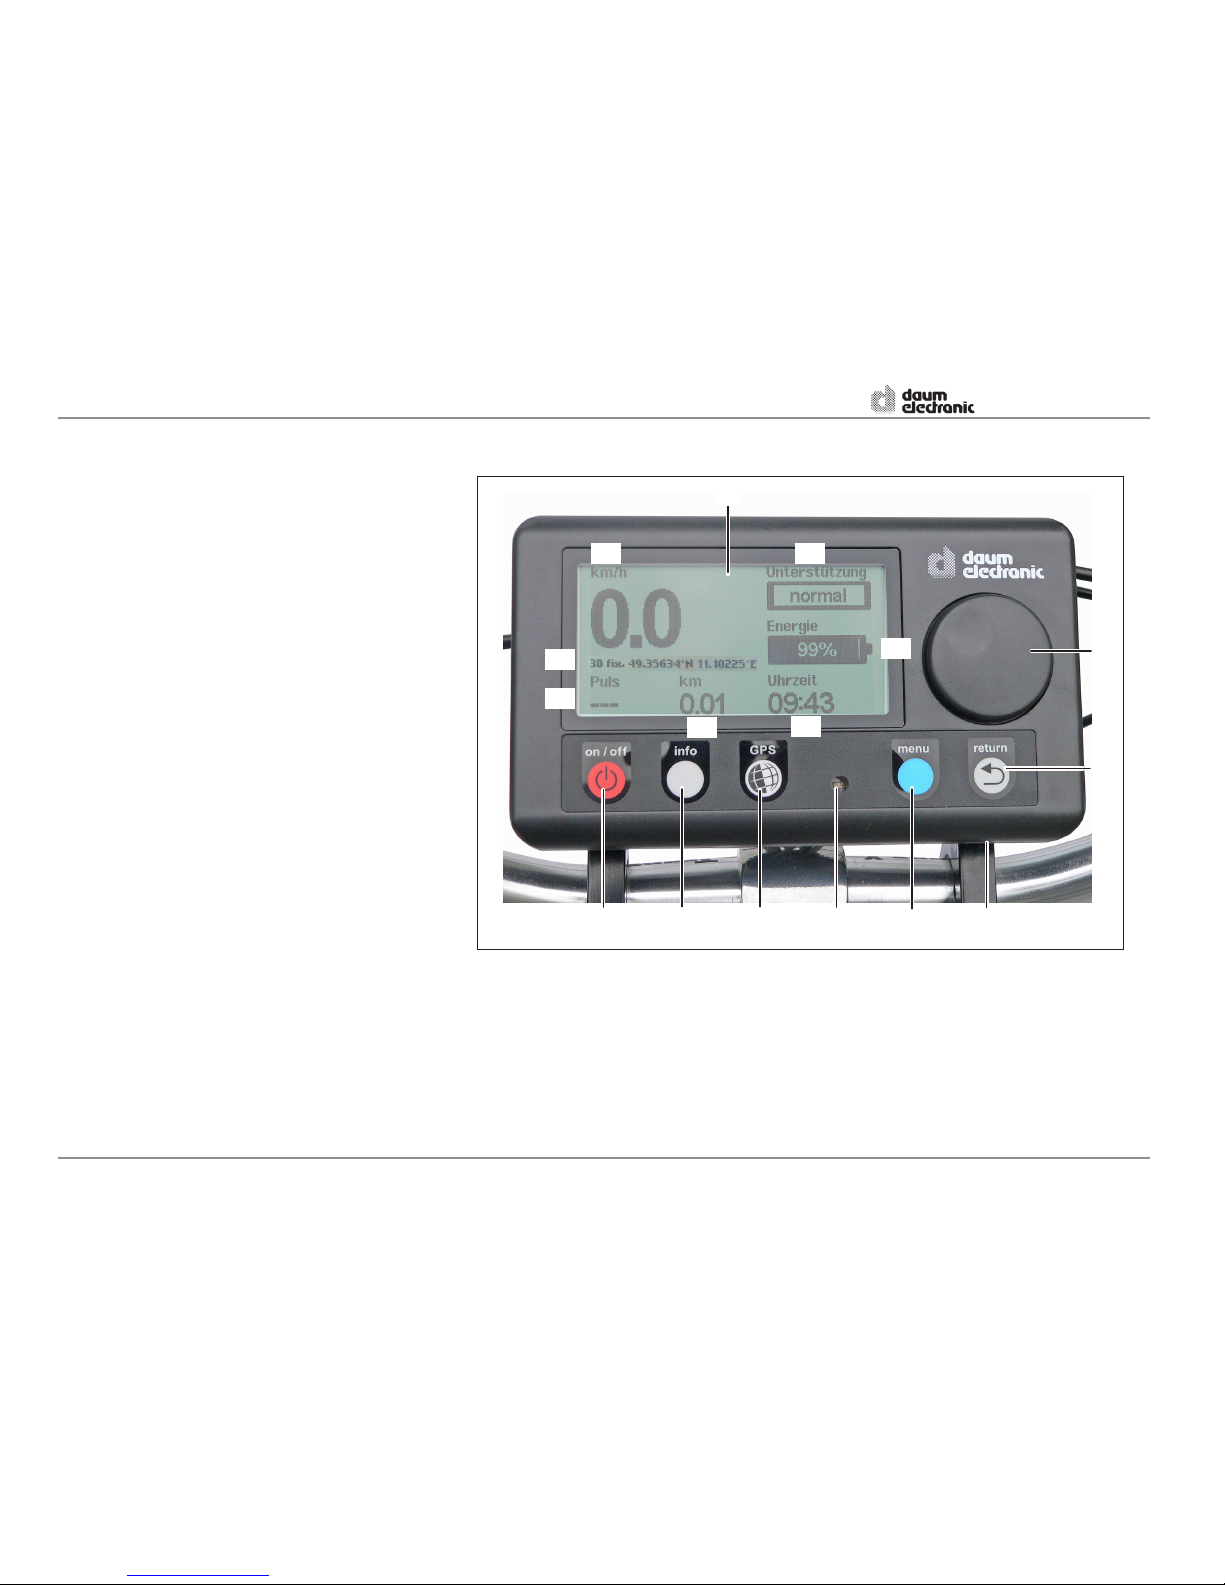
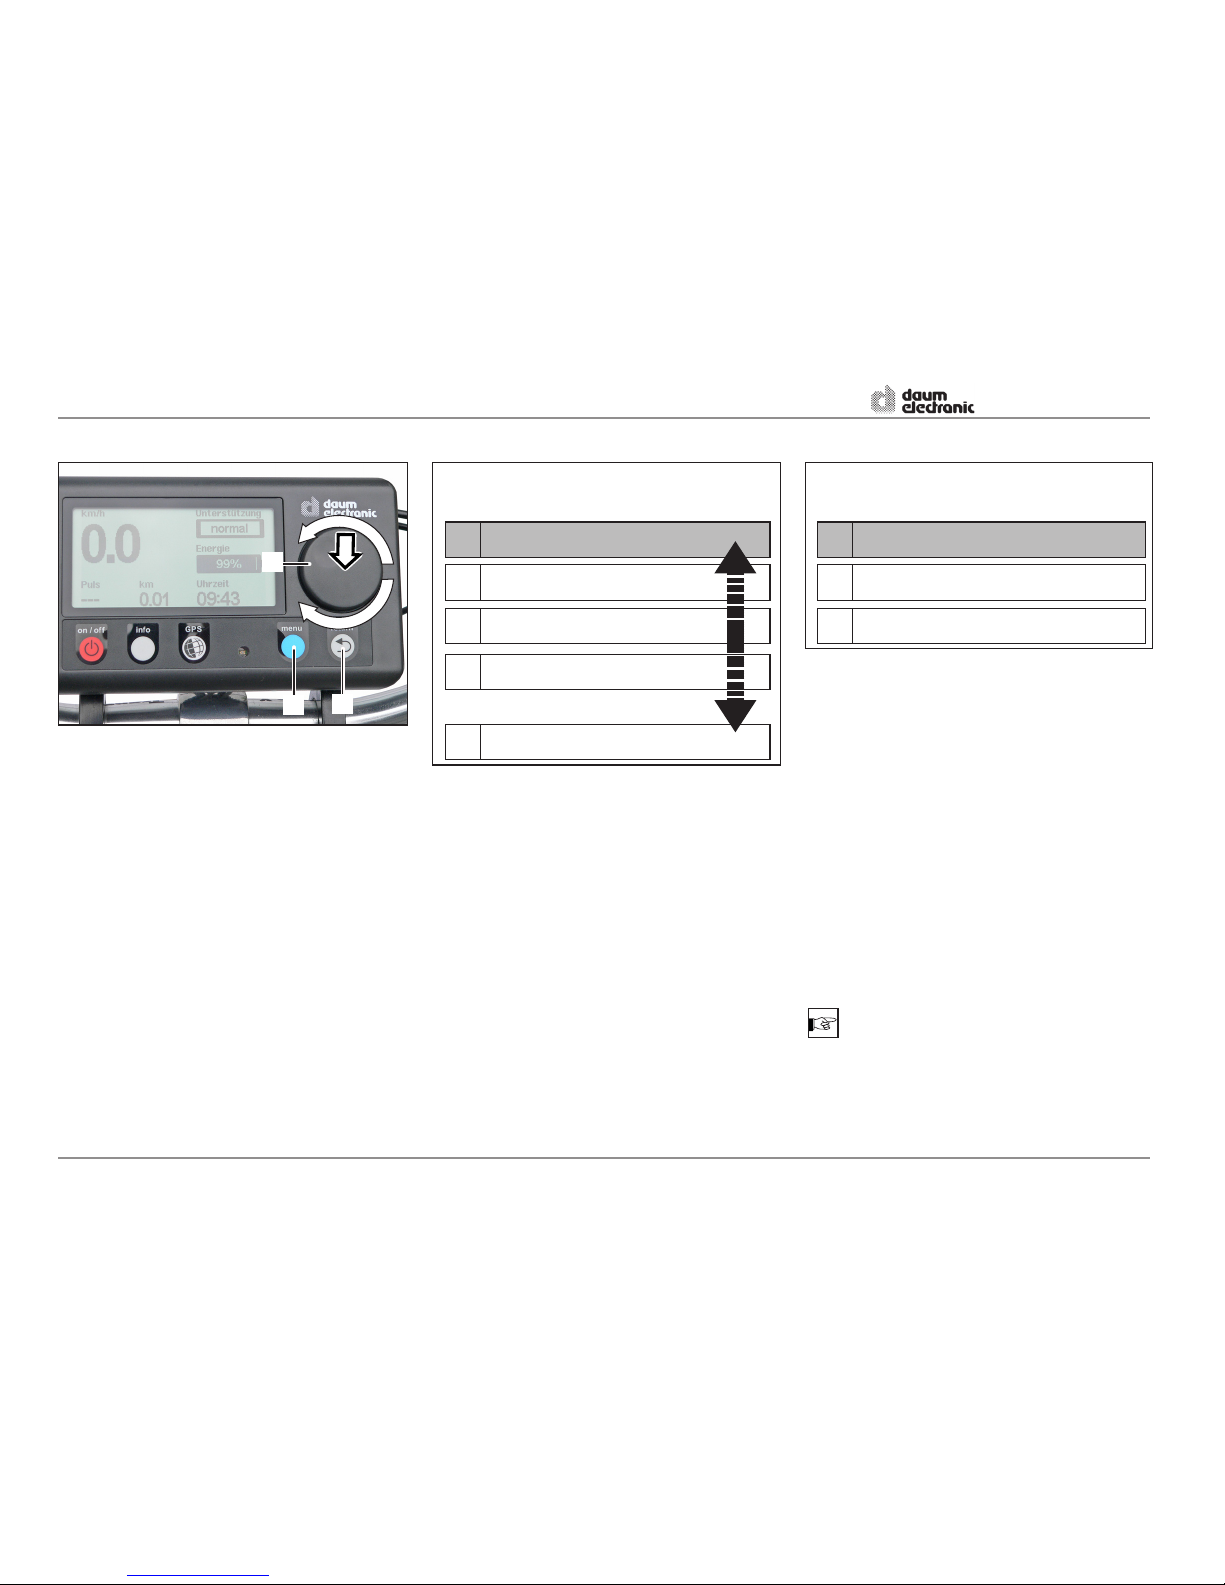
Dashboard functions and operation
1 Display
1.1 Speed in km/h
1.2 Assistance level / Energy consumption /
Pushing assistance
off (without motor assistance)
low (with motor assistance)
normal (with motor assistance)
high (with motor assistance)
Energy consumption (length of the bar)
Pushing assistance (up to 6 km/h)
1.3 Energy
Rechargeable battery charge level %
(length of the bar)
Remaining travel range in km based on
the energy consumption for the current
tour and the last 5 minutes
1.4 Time / Trip time
1.5 Tour kilometre
1.6 Heart rate (option) .
Measuring range of the heart rate 40
to 220 (The menu option to set the displayed value is available only on bikes of
the premium series)
1.7 GPS position
(only on bikes of the premium series)
5 Menu ON/OFF key
6 Display brightness sensor
7 GPS key (only on bikes of the premium series)
8 Info key
9 ON/OFF key dashboard and motor
2 Control button (turn and press)
Main menu - sub menus
3 Return key
Sub menu - main menu - normal display
4 SD card slot
OPERATING classic and premium
16
ergo_bike pedelec
9
8 7
6
5
3
4
2
1.1
1.2
1.3
1.4
1.5
1.6
1.7
1

17
Menu diagram overview ergo_bike pedelec
Tourdaten
Neue Tour starten
Aktuelle Tour
Gesamtwerte
Tourdatensätze, Distanz, Fahrzeit,
Ø km/h, Ø Puls, max. km/h, max. Puls,
Persönliche Einstellun gen
Grenzwerte
Geschwindigkeit
Gefahrene Dist anz
Fahrzeit
Puls
Anzeigewerte
Puls, Temperatur, Höhe über NN,
Luftdruck, S teigung, Trittfrequenz
Geräteeinstellungen
Display
Helligkeit
Kontrast
Uhrzeit
Datum
Sprache
Radumfang
Informationen
Gerätedaten
Service für den Fach händler
Sperrcode
GPRS
Hauptmenü
Datum, Uhrzeit, Distanz, Fahrzeit,
Ø km/h, Ø Puls, max. km/h, max. Puls,
Software
Version
Update
Service für den Endku nden
Speicherkarte
Scan-Taste-
Anzeige umschalten, GPS Wegpunkt
GPRS akti vieren
APN
Benutzername
Passwort
deutsch, english, francais, italiano,
suomi, nederlands, dansk
max. Steigung
max. Steigung
Bold text on clear background:
only for bikes of the premium
series
OPERATING classic and premium
Main menu
Tour data
Display
Time
Date
Language
Wheel circumference
Lock code
GPRS
Scan key
Device data
Switch display, GPS waypoint, GPS photo position
Memory card
Update
Service for dealer
Speed
Heart rate
Trip time
Trip distance
Distance, trip time, Ø km/h, Ø heart rate, max.
km/h, max. heart rate,
max. incline
Date, time, distance, trip time,
Ø km/h, Ø heart rate, max. km/h, max.
heart rate,
max. incline
Brightness
Contrast
Version
Limit values
Display values
Start new tour
Total values
Current tour
Personal settings
Device settings
Software
Information
Heart rate, temperature, altitude above sea level,
air pressure, incline, cadence
deutsch, english, français, italiano,
suomi, nederlands, dansk
Activate GPRS
APN
User name
Password
Service for customer
17
ergo_bike pedelec
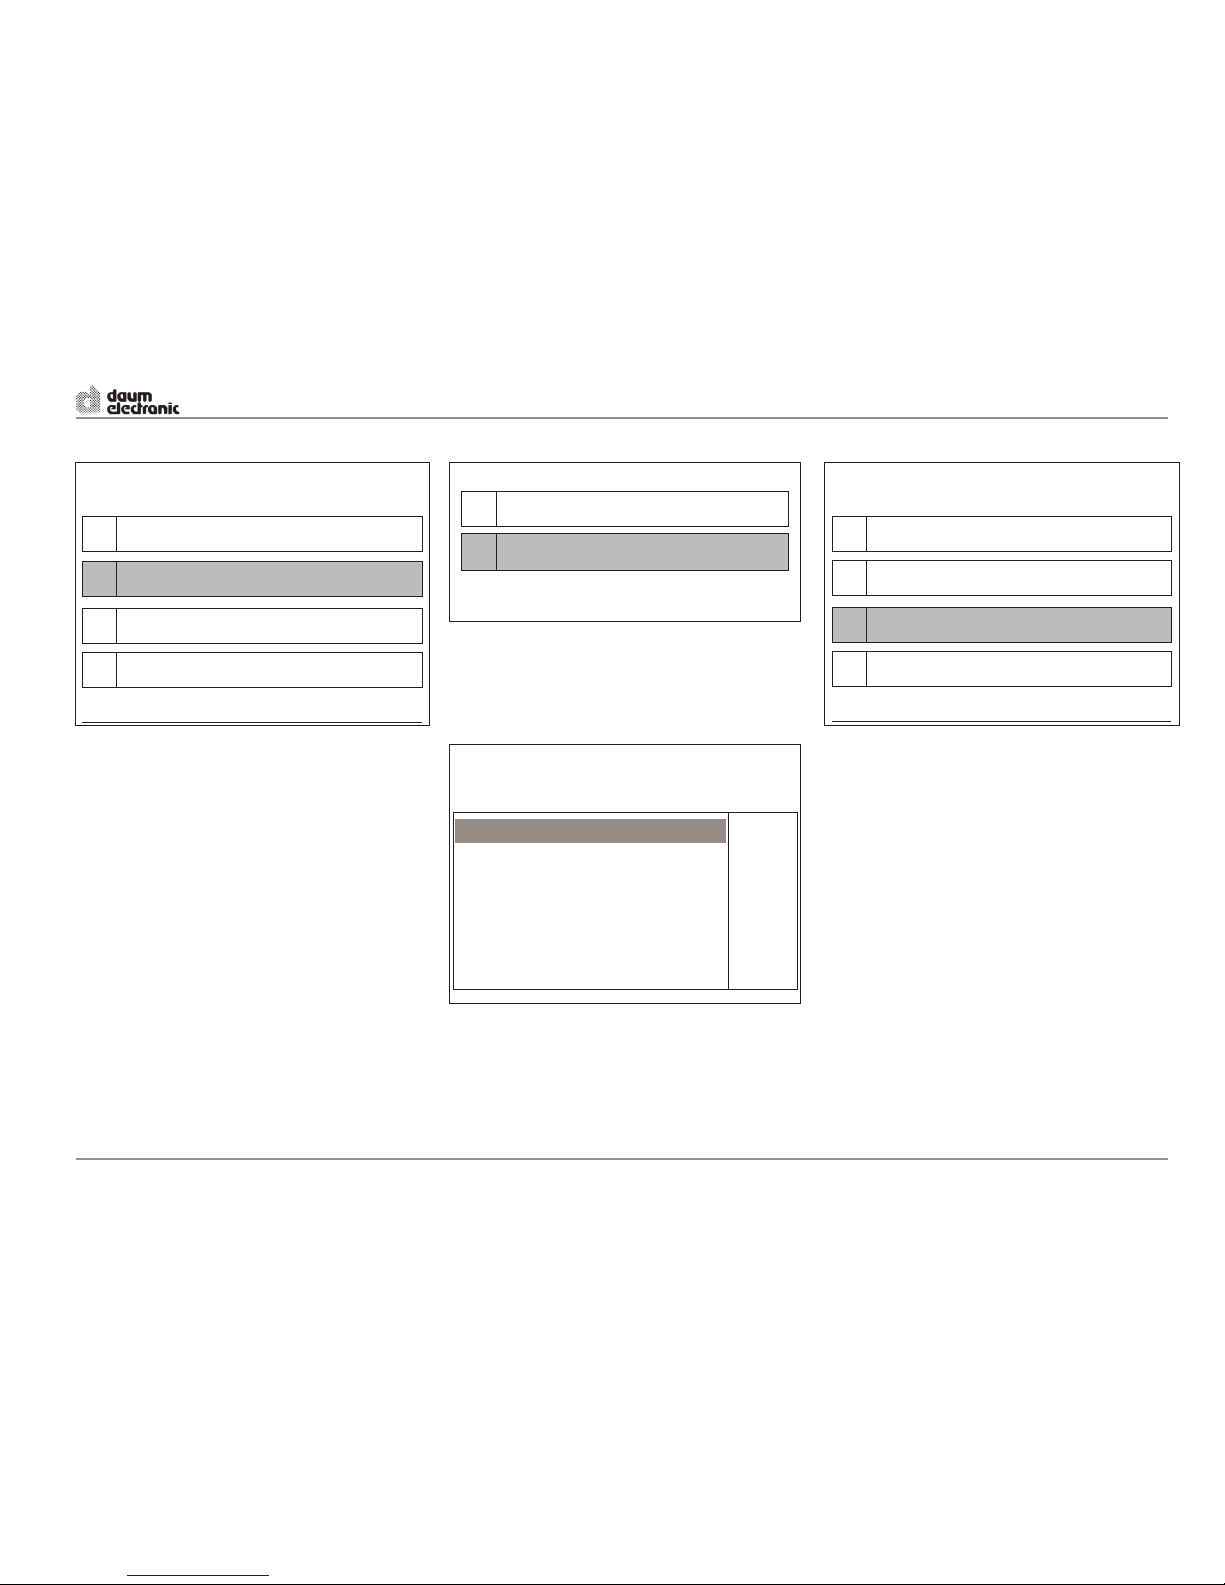
Main menu
1 Tour data
2 Personal settings
3 Device settings
4 Information
5 Software
Tour data
1 Current tour
2 Total values
3 Start new tour
Displays
1 Current tour
Date, time, distance, trip time, Ø km/h, Ø heart
rate, max. km/h, max. heart rate, max. incline
(premium series)
2 Total values
Distance, trip time, Ø km/h, Ø heart rate, max.
km/h, max. heart rate, max. incline (premium
series)
Turn the control button to switch between the display modes.
3 Start new tour
Current tour counter is reset to 0.
NOTE
That also happens
- after a trip pause of at least 6 hours,
- when the tour length of 24.5 hours is exceeded.
Using the menus
The menu is activated by pressing the menu key
(1).
Turn the control button (2) to navigate in the menu.
Press the control button (2) to open a sub menu.
Press the return key (3) to return to the previous
menu.
Turn the control button (2) on the dashboard to navigate to the menu options 1 to 5.
Press the control button to open the sub menus.
OPERATING classic and premium
18
ergo_bike pedelec
1
3
2
19
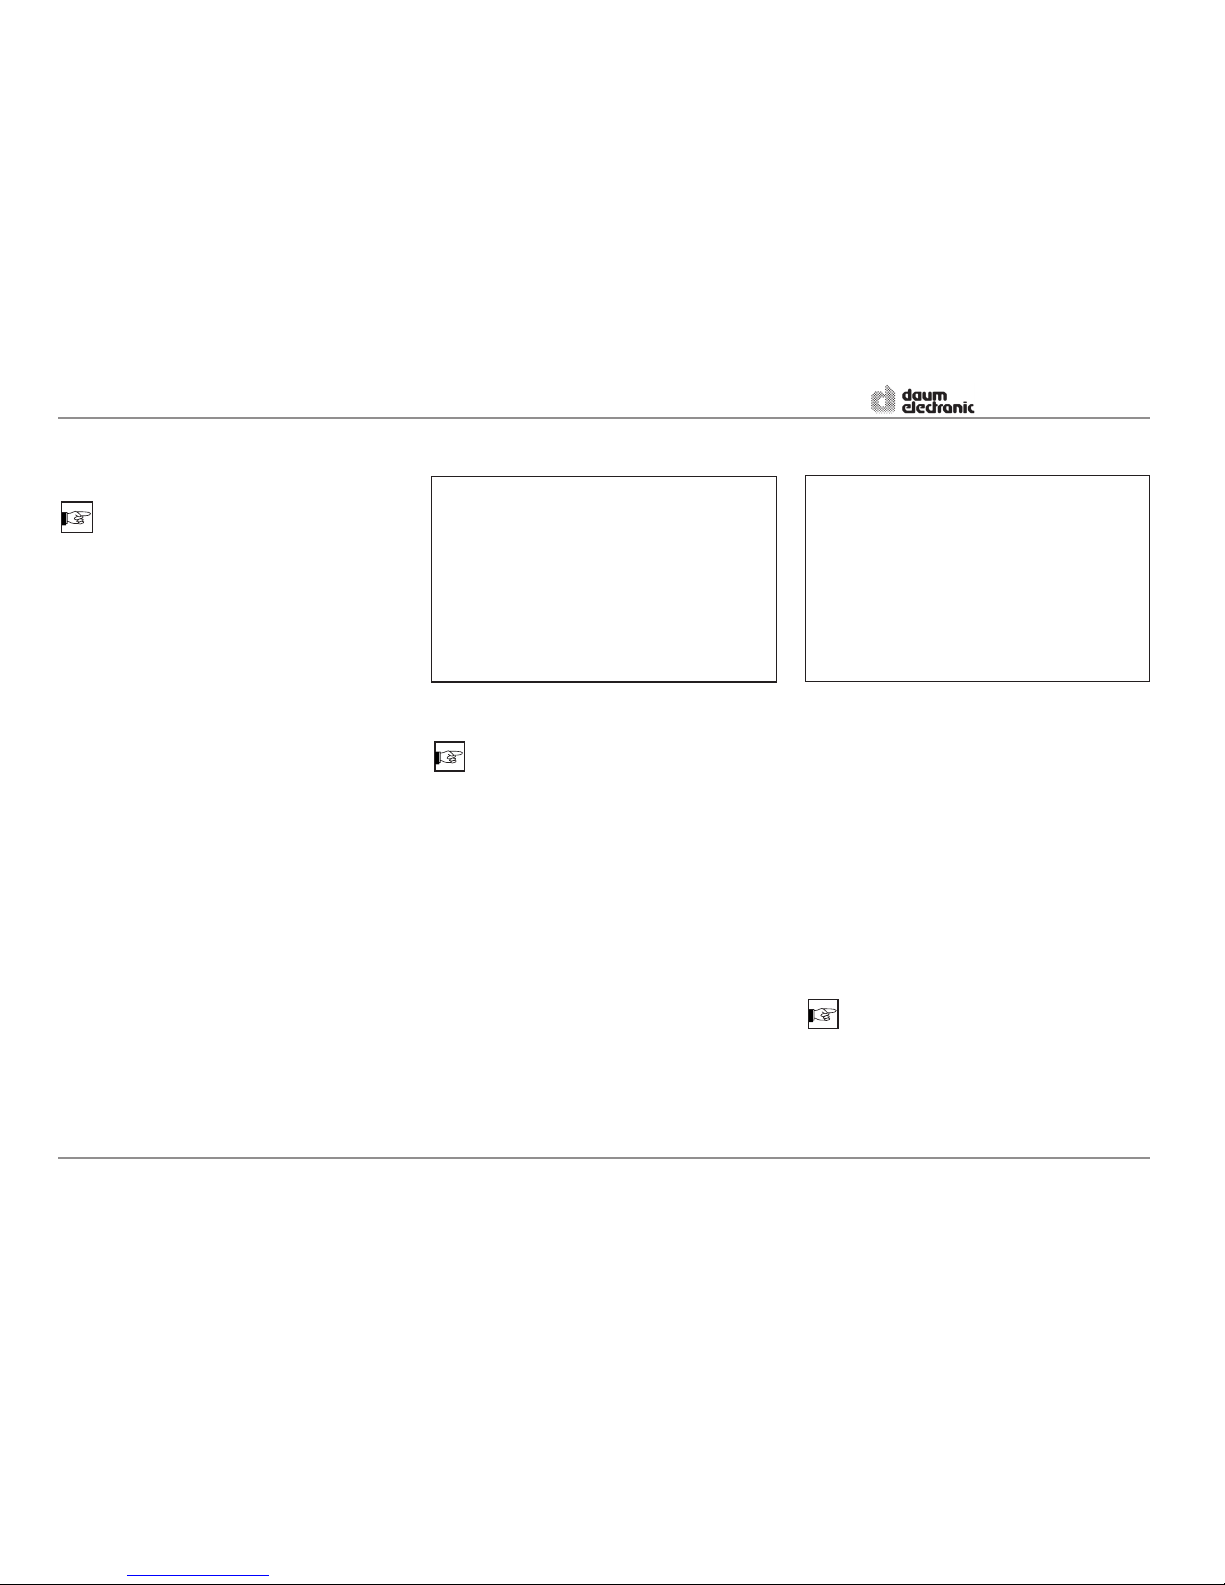
Main menu
1 Tour data
2 Personal settings
3 Device settings
4 Information
Personal settings
1 Limit values
1 Set the speed at which motor assistance should
cease (max. 25 km/h). When the actual speed
exceeds the limit value the speed display will
blink.
2 Heart rate; set the limit value. When the actual
value exceeds the limit value an audio signal
sounds and the heart rate display blinks.
3 Set the trip time in minutes. When the actual
trip time exceeds the limit value an audio signal
sounds and the trip time display blinks.
4 Set the trip distance you want to ride in km.
When the actual distance exceeds the limit value an audio signal sounds, and the distance
display blinks.
Displays
Main menu
1 Tour data
2 Personal settings
3 Device settings
4 Information
Device settings
1 Display Brightness – Contrast
2 Time (important for the recording of tour data on
the memory card)
3 Date (important for the recording of tour data on
the memory card)
4 Language
5 Wheel circumference
The wheel circumference is set at the factory to
216 cm as a reference value. This menu permits
to correct this value according to total weight,
tyre air pressure, and tyre type.
6 Lock code
7 GPRS (only on bikes of the premium series, see
page 29)
8 Scan key (only on bikes of the premium series,
set the function of the scan key: "Switch dis-
play", "GPS waypoint" or "GPS photo position").
2 Display values
The display values can be set only on bikes of the
premium series (see page 16 / 1.6).
Personal settings
1 Limit values
2 Display values
Display 1
Heart rate
Temperature
Altitude above sea level
Air pressure
Incline
Cadence
OPERATING classic and premium
19
ergo_bike pedelec
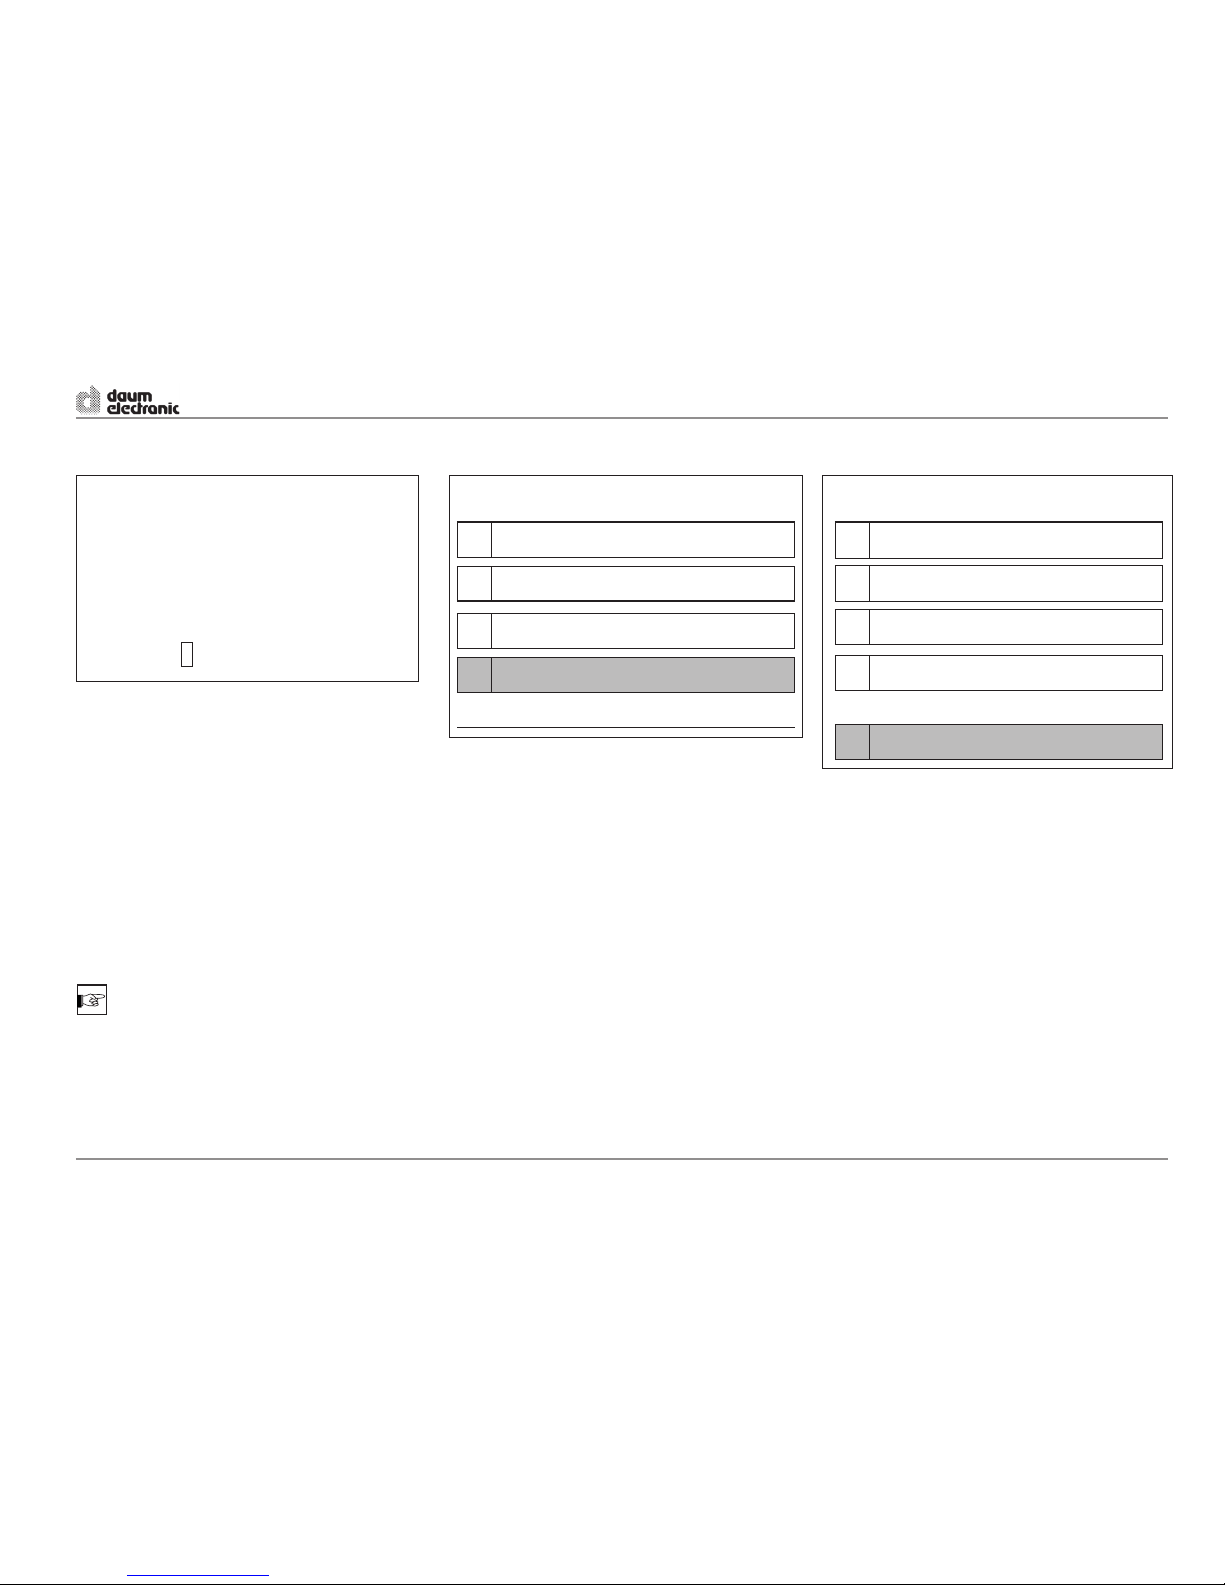
NOTE
As delivered no personal lock code is created.
In order to set your personal code you must enter
rst the master lock code set at the factory. The mas-
ter lock code is located on the last inner page of this
user manual.
Enter the actual master lock code by turning and
pressing the control button.
Press the control button for every digit entered. An
X will be displayed in the upper line for every digit.
When the code is entered turn to select OK and
press the control button.
Lock code
Please enter the new code and
keep it in mind!
- XX -
0123456789 < - ok
Lock code
To change the code please rst enter the actual code.
- XXXXXXXX-
0123456789 < - ok
Lock
Enter your personal lock code of 1 to 8 digits by
turning and pressing the control button.
Press the control button for every digit entered. An
X will be displayed in the upper line for every digit.
When the code is entered turn to select OK and
press the control button.
Your display can now be activated only with your
personal code.
NOTE
If you want to deactivate the lock code, set a new
lock code, turn the control button directly to OK and
press the control button.
Display lock code
NOTE
You can prevent unauthorised persons from using
your ergo_bike pedelec by entering a lock code.
In order to create your own lock code (1 to 8 digits
numeric code) you need rst the "always valid"
master lock code for your bike.
If you forget your own lock code, enter instead of it
the "always valid" master lock code for your bike.
Therefore you should store this code in a safe
place!
Displays
OPERATING classic and premium
20
ergo_bike pedelec
21
Lock code
Please enter the valid code to unlock.
- -
0123456789 < - ok
Unlock
Enter your personal lock code upon switching ON
the display.
Press the control button for every digit entered. An
X will be displayed in the upper line for every digit.
When the code is entered turn to select OK and
press the control button. The display is activated.
NOTE
If you forget your own lock code, enter instead of
it the master lock code for your bike as the actual
code.
Main menu
1 Tour data
2 Personal settings
3 Device settings
4 Information
Information
1 Device data
2 Memory card
3 Service for customer
4 Service for dealer
Main menu
1 Tour data
2 Personal settings
3 Device settings
4 Information
5 Software
Software
1 Version
2 Update
Displays
OPERATING classic and premium
21
ergo_bike pedelec
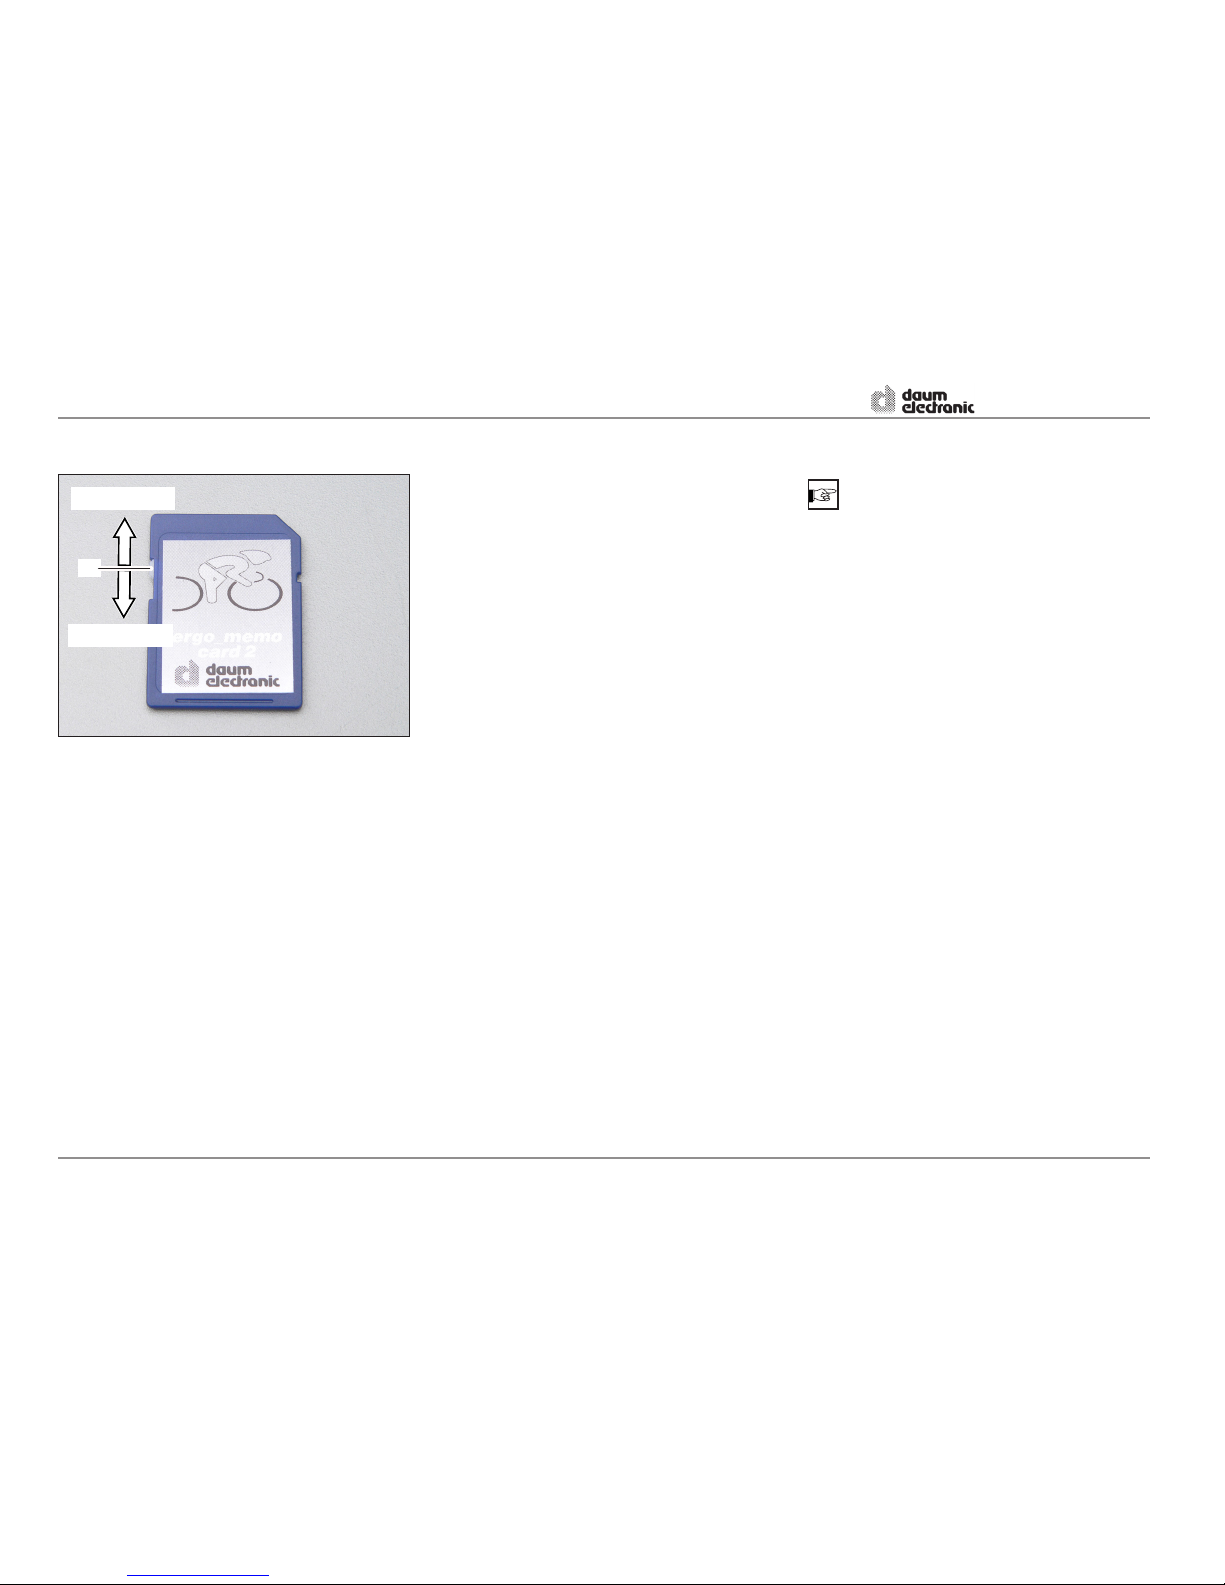
The slider (1) of the ergo_memo-card2 must point
upward when the card is inserted into the dashboard. This enables writing to the card.
When the slider (1) is pointing downward the card is
locked and write protected.
What to consider when manipulating memory
cards?
1. Electrostatic discharges can damage electronic
components. Therefore discharge your body of
any potential electrostatic charge before manipulating the memory card, by touching a grounded metallic object (e.g. heating or water pipe).
2. Avoid always touching the uncovered gold contacts (pins) of the memory card.
3. The memory card may not be exposed to heat,
direct sun light, and humidity.
4. The memory card may not be bent, twisted, or
dropped on the ground.
5. To prevent data losses and/or damages to the
memory card, it may NEVER be removed from
the device during data transfer. Do NEVER pull
the card from the device while data are being
written, e.g. during a trip.
6. Make a safety copy of the contents of the memory card on your PC at regular interval.
SD card
NOTE
The SD card is specic to the user and should there-
fore not be used by another person.
To enable a second person to use the ergo_bike
pedelec you may order an ergo_memo-card2. Order
No. 0017994.
Important folders on your SD card:
\UPDATE: Software update
\DATA\RESULT\PEDELEC: Tour data
\DATA\USER: Specic user and device settings
\DATA\TRACK: Track data
OPERATING classic and premium
22
ergo_bike pedelec
1
Unlocked
Locked
23
SD Card
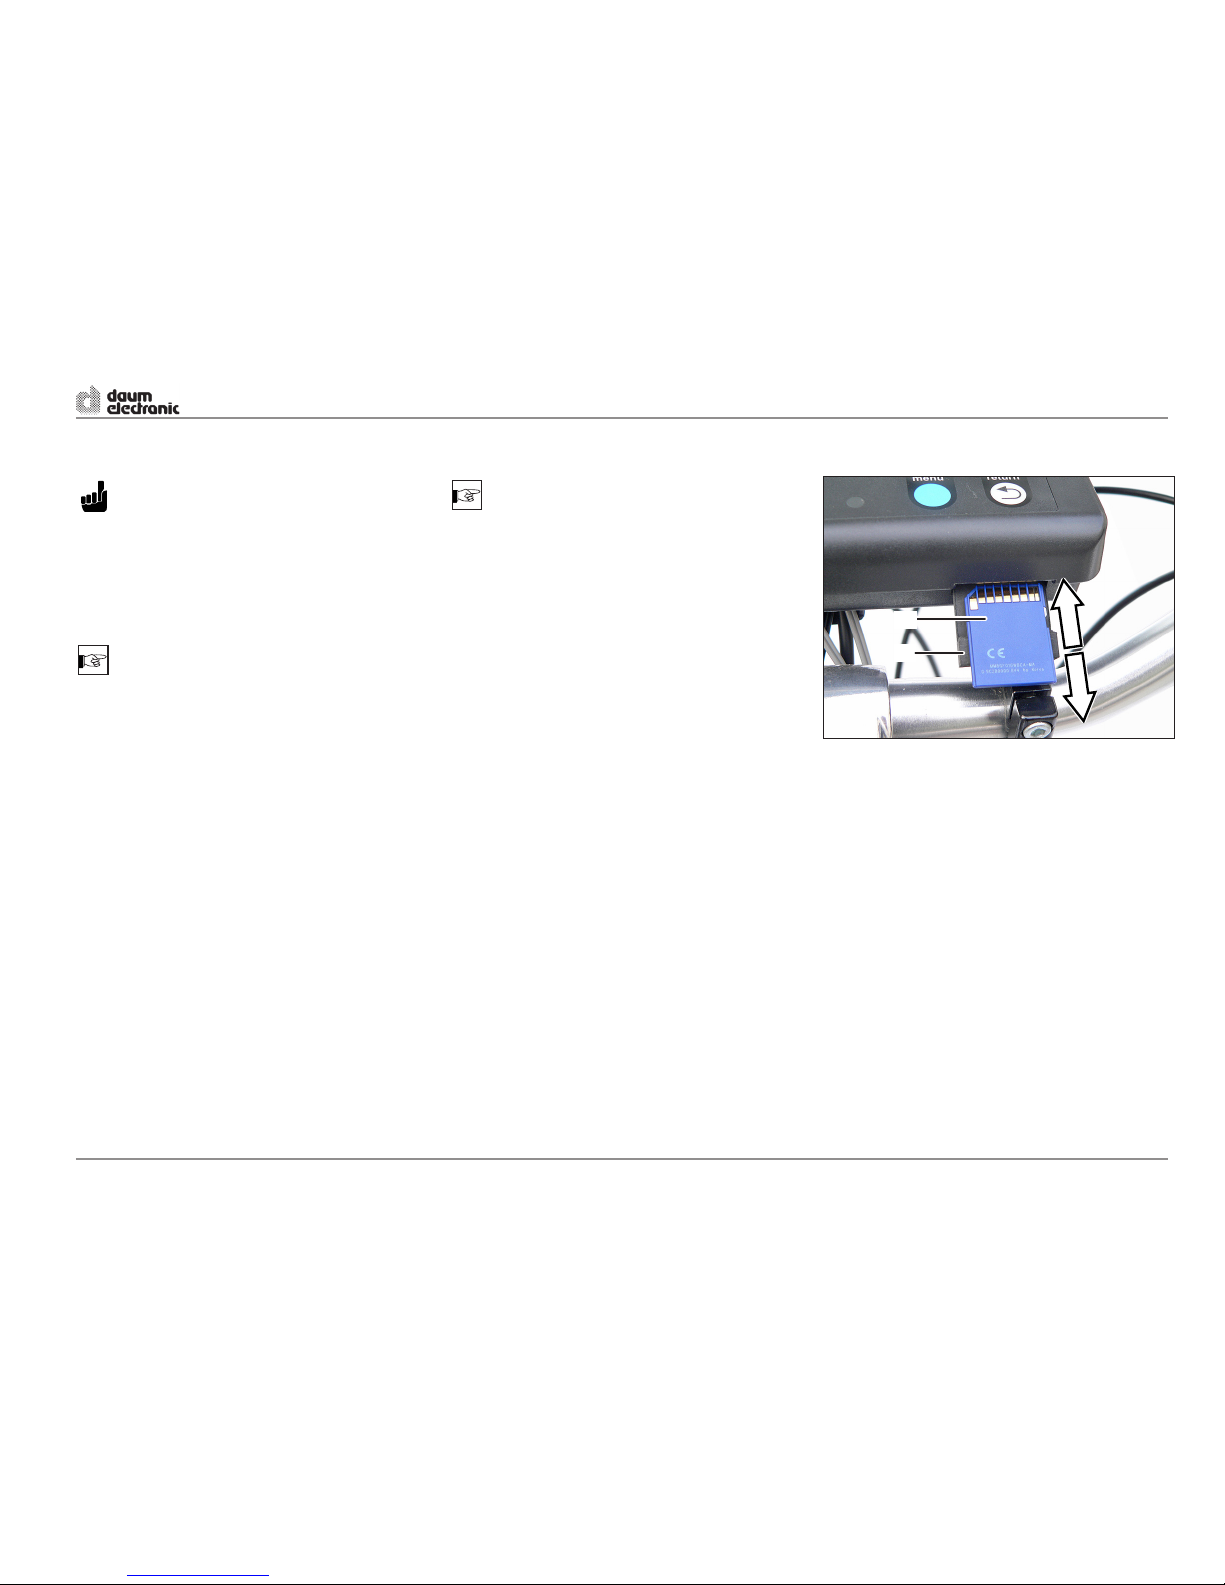
ATTENTION
The display must be turned OFF when you remove or insert an SD card (2). Proper operation
is only guaranteed for SD/SDHC cards provided
by daum electronic. Nevertheless commercially
available SD/SDHC cards can often be used.
NOTE
Daum ergo_bike pedelecs combine premium and
aesthetical tness training and biking fun. They bring
the proven daum ergometer technology to the roads.
Deneable limit values provide for controlled biking
and a measured enhancement of endurance and t-
ness. All the data, for instance the heart rate, trip time,
speed, and travelled distance can be stored on an
SD card, reviewed and evaluated. An ideal technical
prerequisite not only for therapeutic purposes: health
oriented users can pedal for preset distances under
guidance by the tour manager system (optional) and
obtain their individual biological values.
- Remove the cover (1) carefully.
- Press the SD/SDHC card (2) slightly to unlock it
and pull it out.
- Copy the update le on the card.
- Insert the SD/SDHC card (2).
- When inserting the card, the contact pins must
be facing upward.
- Close the cover (1).
- Execute the software update.
NOTE
Optional software
A special PC software will be made available at no
cost on our home page www.daum-electronic.de,
under support, for our pedelecs. With this software
you can process the tour data saved on your SD
card.
An update for our "ergo_win premium pro" software
will be made available on our home page www.
daum-electronic.de, under support. With this software you can optionally process the tour data saved
on your SD card.
OPERATING classic and premium
Software update using the SD/SDHC card
23
ergo_bike pedelec
1
2

Software update with the daum update card
Since the scope of the user software is constantly actualised and expanded, it is possible to bring
your device to the latest state by means of a software update. The latest update will always be
available as an update le "update.s32" on our
internet page www.daum-electronic.de under support, or you can receive an update card directly from
daum electronic gmbh.
You can order the update card directly from daum
electronic gmbh; once the update is completed you
can use the card as a ergo_memo-card2 for a second user.
If you prefer to update over internet, you will need
an SD card reader (available commercially or from
daum electronic gmbh) and a PC.
Save the downloaded "update.s32" le in the subdirectory \UPDATE on the ergo_memo-card2.
Software update
Requirements
If you have an empty memory card start here:
- Insert the empty or formatted memory card (1) in
the card slot of the dashboard (open the cover in
order to have access to insert the card).
- Wait until the card is initialised (conrmation
tune will play).
If you have a memory card that is already initial-
ised (the folders \DATA, \MP3, and \UPDATE exist):
- Insert the memory card into the card reader of
the computer.
- Copy the update le "update.s32" in the folder
\UPDATE on the memory card.
OPERATING classic and premium
24
ergo_bike pedelec
1

25
Main menu
1 Tour data
2 Personal settings
3 Device settings
4 Information
5 Software
- Open the main menu on the dashboard by
pressing the menu key, and turn the control button to select the "Software" menu option.
- Press the control button and turn it to select the
menu option "Update".
Update
1 Version
2 Update
- Turn the control button to select "Yes" and press
the control button.
Update
The device has the software
1.118/1.118 (dashboard/motor).
Do you want to update?
No
Yes
Software update
- Press the control button.
OPERATING classic and premium
25
ergo_bike pedelec

- Turn the control button to select "Yes" and press
the control button.
- The update of the motor software is executed
rst.
- At the completion of the update the system is
reset and the dashboard is restarted.
Software update
Update
33%
0%
Update
100%
39%
- The dashboard update is executed after.
OPERATING classic and premium
Update
Are you sure you want
to run the update?
No
Yes
Motor
Dashboard
Motor
Dashboard
26
ergo_bike pedelec

27
GSM/GPRS
NOTE
GSM stands for Global System for Mobile Communications, GPRS stands for General Packet Radio
Service.
GPRS is a specic system to transmit information
over the GSM network.
This technology is used, for instance, to connect to
internet, to download tracks, and to send and receive SMS messages.
To enable this capability the GSM module in the
dashboard must be tted with a standard SIM card.
ATTENTION
If needed ask a daum electronic dealer to install
the SIM card for you.
The bikes of the premium series are equipped, in
addition to the standard equipment of the classic
series, with a combined GSM/GPS module and with
a barometric altitude sensor. The GPS module can
be used anytime. If the user wishes to use the GSM
module he must t it with a standard SIM card (optional).
Display of travelled tracks on the PC
The collected GPS and altitude data are automatically saved to the SD/SDHC card. These data can
afterwards be analysed with the "ergo_win premium pro" software (e.g. what heart rate achieved at
which inclination), and exported to Google Earth.
There the complete routing can be represented on
the ground, and the user can attach his own pictures
and texts.
Travelling through biking tracks from Internet
The ergo_bike pedelec premium connects to the
www.GPSies.com web page over GPRS and downloads the biking tracks available for the actual geographical position.
These tracks can then be viewed and selected on
the display of the pedelec. This way the most beautiful tracks are always available to the biker of the
ergo_bike pedelec premium, who is automatically
guided along them.
Antitheft protection
If an ergo_bike pedelec premium is ever stolen, it
is capable of receiving an SMS message from its
owner. Then the next time it is turned on it will respond with an SMS containing the coordinates of its
geographic location. This will inform the owner of
the exact location of his bike.
Bike rental
The operator can locate his vehicle eet over Internet at any moment. He also has the possibility
to generate his own tracks by simply covering
them, and then editing them by means of the
"ergo_win premium pro" software. He can then
deliver these tracks on a SD/SDHC card to his
customers, who would comfortably follow them.
Emergency call function
A specic menu option gives the biker of a pedelec
the possibility of sending an emergency SMS message with his location information, thus giving away
his exact position.
Functions overview
OPERATING premium
27
ergo_bike pedelec

GSM/GPRS
- Insert the SIM card (4) completely until it locks in
place.
PIN for SIM card
Please enter the PIN for the SIM card!
- -
0123456789 < - ok
Press return key to deactivate GSM!
- Close back the dashboard and fasten it with the
screws, then turn it on.
- Once the SIM card is recognized by the system,
it will ask you to enter the corresponding SIM
card PIN.
NOTE
The accessories box contains a Power-Bit for the
dashboard screws, that can be used with standard
tools.
- Unscrew the 6 dashboard screws (1) and the
mounting bracket screws (2).
- Lift the upper part of the dashboard until the SIM
card socket (3) is visible (on the left side of the
dashboard close to the red power switch).
1
2
1
1
1
1
1
2
4
- Be careful to insert the SIM card (4) correctly
(watch for the slanted corner).
- Once you enter a valid PIN the entry eld will go
away.
OPERATING PREMIUM
4
3
28
ergo_bike pedelec

29
OPERATING PREMIUM
GPRS
1 Activate GPRS
2 APN
3 User name
4 Password
GPRS
1 Activate GPRS
2 APN
3 User name
4 Password
Activate GPRS
No
Yes
APN
Please enter the APN of your provider!
a b c d e f g h i j k l m n o
p q r s t u v w x y z @ . - +
< - ok ABC...
- At this point you still have to activate the GPRS
(Main menu -> Device settings -> GPRS -> "Ac-
tivate GPRS").
- Select option "Yes".
- Subsequently select the "APN" (Access Point
Name) option in the GPRS menu.
- At the end enter the APN of the provider.
GSM/GPRS
APN examples of some providers for GPRS:
Provider
APN / Access point name
T-Mobile internet.t-d1.de
Vodafone event.vodafone.de
E Plus internet.eplus.de
Simyo internet.eplus.de
Fonic pinternet.interkom.de
29
ergo_bike pedelec

- Start new tour (Pedelec, Main menu -> Tour
data -> "Start new tour").
- Before starting you should conrm that a suf-
ciently precise GPS position is received ("3D x,
...").
Displaying travelled tracks with Google Earth
- Bike through the dened track.
- Start new tour to conclude the travelled tour
(Main menu -> Tour data -> "Start new tour").
- Remove the memory card from the dashboard
and insert it into the memory card reader of the
PC.
- Start the "ergo_win premium pro" software.
- Select the menu option Data -> "Training re-
sults
".
- Import all the tracks from the memory card
(note: the import operation can take several minutes depending on the numbers of data sets).
OPERATING premium
30
ergo_bike pedelec

31
- Select the desired tour by means of a double
click.
- Export the selected tour.
- Choose KML as the export format.
- Open the saved KML le with the Google Earth
software.
- You can set waypoints or photo positions during
the trip.
- You do this by pressing the Scan key during the
trip.
- When in a halt, waypoints as well as photo positions can be set by means of the GPS menu.
- You can change the setting by means of the option Main menu -> Device settings -> Scan key.
- The illustration below shows 2 waypoints (black
dots with black border).
Displaying travelled tracks with Google Earth
OPERATING premium
31
ergo_bike pedelec

Displaying travelled tracks with GPSies
- Follow the same sequence as on the pages 3031, but choose GPX as export format.
- Click the button to upload the GPX le to
GPSies (www.GPSies.com).
- Enter the track properties and storage location
and then click the save button.
- First set the visibility of the track as "private
".
OPERATING premium
32
ergo_bike pedelec

33
- Track view in GPSies.
- Follow the same sequence as described on
page 32.
- When uploading a track for the rst time you
should declare it rst as "private".
- After this you should check the track path and
correct it if needed ("Edit track", then "Change
track").
- When correcting a track you can remove waypoints or move them.
- After the track is corrected as desired, then you
can declare it as "public".
Displaying travelled tracks with GPSies Posting your own tracks on Internet
OPERATING premium
33
ergo_bike pedelec

Strecken
Letzte Strecken
Eigene Strecken
Strecken aktualisieren
Wegpunkt speichern
Fotoposition speichern
Position versenden
GPS-Menü
Strecken anzeigen
Strecken von GPSies
GPS menu
OPERATING premium
GPS menu
Tracks
Store waypoint
Store photo position
Send position
Tracks from GPSies
Display tracks
Update tracks
Own tracks
Last tracks
Strecken aktualisieren
Strecken anzeigen
Send SMS
SMS recipient
34
ergo_bike pedelec

35
- Press the GPS key to open the GPS menu.
GPS menu
1 Tracks
2 Store waypoint
3 Store photo position
4 Send position
Tracks
1 Tracks from GPSies
2 Own tracks
3 Last tracks
- Select the "Tracks" menu option.
Tracks from GPSies
1 Display tracks
2 Update tracks
- Select the "Tracks from GPSies" menu option.
Please conrm...
Do you want to update the tracklist?
No
Yes
Update tracks
Perimeter
020 km
030 km
040 km
050 km
060 km
Number of results
010
020
030
040
050
- Select the "Update tracks" menu option.
- Set the perimeter and number of results.
- Choose "Yes" to conrm the "Update tracks" option.
Biking through tracks from Internet
OPERATING premium
35
ergo_bike pedelec

- The data transmission starts shortly.
Update tracks
Tracks are updated!
- The following message is displayed at the end
of the data transmission.
Tracks from GPSies
1 Display tracks
2 Update tracks
- Select the "Tracks from GPSies" menu option.
Display tracks
10
11
12
13
14
15
13
Fürth, Kalchreuth,
Kleinsendelbach, Hetzles,
Walkersbrunn, Neunkirchen
Start 3.2 km/323°, Dest. 3.2 km/323°
Length 64.9 km (Circular track)
Ascent 646 m, Descent 646 m
- Display the tracks (scroll through the tracks by
turning the control button).
Data transfer
Sending request to server ...
Please wait 145 s ...
Biking through tracks from Internet
OPERATING premium
- Press the control button to select the track.
36
ergo_bike pedelec

37
Please conrm
Do you want to download the track?
No
Yes
Data transfer
Sending request to server ...
Please wait 148 s ...
- The track data transmission starts once you
conrm the download by choosing "Yes".
Data transfer
Receiving data ...
11776 Bytes
Select track ...
No
Yes
- The track data are displayed at the end of the
data transmission.
- Press the control button to select the track.
- Choose "Yes" if you want to bike through the
track.
Biking through tracks from Internet
OPERATING premium
37
ergo_bike pedelec

- Start the trip, then once your direction of motion
is recognized, the cross changes to an arrow
pointing in the actual direction of motion.
- With the help of the arrow you can now move
toward the selected track, and then bike through
the track in the desired direction with the help of
the displayed track guide.
- During the trip you can zoom in to enlarge the
track section by turning the control button, to
view track details, or zoom out to view e.g. the
whole track.
Biking through tracks from Internet
- Once the track is started the system shows the
actual GPS position (cross) and the actual track
section together at a xed zoom ratio of 2.0 (see
lower line).
- The actual scale is shown in the lower left corner.
- The distance to the track is shown in the upper
left corner.
OPERATING premium
Alt. AMSL m
206.5
km/h
0.0
km
18.75
Time
19:35
Energy
94%
Zoom: 2.0
1.0km
Distance: <= 1000 m
Alt. AMSL m
206.5
km/h
19.4
km
18.75
Trip time
01:49
Energy
67km
Zoom: 20.0
Distance: <= 1000 m
10km
Alt. AMSL m
206.5
km/h
19.4
km
18.75
Trip time
01:49
Energy
Zoom: 2.0
Distance: <= 1000 m
1.0km
67km
38
ergo_bike pedelec

39
With devices of the premium series the position of
your device can be informed and a SMS be transmitted by means of the GPS menu option "Send
position
".
- Enter the phone number of the desired SMS
recipient by means of "Send position" -> SMS
recipient".
- Put the country code in front, e.g. +49 for Ger many (then drop the leading zero of the mobile
phone number).
- Select one of the following short messages by
means of "Send position" -> "Send SMS" and
send it out by pressing the control button.
-> "Injured" ("I am injured. My position is ...")
-> "Break down" ("My bike is broken, please
pick me up. My position is ...")
-> "Pick up" ("Please pick me up! My position
is ...")
- In the transmitted SMS message the GPS
information (Latitude and longitude as well as
date yyyy-mm-dd and time T 00:00) will be
added automatically.
The pedelec is equipped with a GPS module and a
barometric altimeter to determine the altitude above
sea level. The GPS module is too inaccurate for a
continuous display of the altitude, since depending
on the position and on the number of received satellites, the altitude determined by GPS can vary by
more than 100m (e.g. between high buildings, in a
dense forest, or under heavy clouds).
The expected vertical deviation depends on the
number of received satellites and their locations.
The number of received satellites oscillates normally between 5 and 12. Under very favourable receiving conditions the vertical accuracy is in the
range of about +/-10m; under normal receiving conditions +/- 20m.
When starting a new tour, we recommend to wait
until a valid GPS position can be determined, which
will be used as start altitude. Otherwise no valid altitude will be displayed. The accuracy is generally
sufcient, but can vary as explained above.
Your own tracks / Last tracks
You can generate own tracks, with the "ergo_win
premium pro" software, based on tours you have
travelled and exported to the SD card. These tracks
can then be rerun with the pedelec.
The menu option "Last tracks" shows the last travelled "Tracks from GPSies" and "Own tracks
".
Sending the position
In order to display the position of your pedelec,
send an SMS message with the word "Position" to
the mobile number of the SIM card tted in the dashboard of the bike. If the bike is on, or the next time it
is turned on, you will receive a response with a link.
With a properly equipped Smartphone (e.g. with the
"
Opera mini" browser), the position will be directly
displayed. You can also open the link on your PC.
Tracks
1 Tracks from GPSies
2 Own tracks
3 Last tracks
OPERATING premium
Sending SMS / SMS recipient Determining the altitude
39
ergo_bike pedelec

During the trip this altitude value is much more precise than the one obtained from the GPS module,
provided the weather conditions (air pressure, tem-
perature) do not change signicantly.
If the bike is parked for an extended period of time
during a tour (e.g. at the lunch break), and the
weather conditions change markedly during this
time, this will have no effect on the altitude recorded, because variations of the air pressure are
ignored when the bike is not moving. You need not
worry about the system recording a variation of the
altitude value while taking a rest break.
Depending on the weather conditions the following
deviations in the measured barometric altitude are
to be expected:
- in the case of an unstable high pressure area
> 25 m/h
- in the case of stable good weather 5 to 25 m/h
- in the case of stable weather -5 to 5 m/h
- in the case of stable rainy weather -25 to -5 m/h
- in the case of an unstable low pressure area
< -25 m/h
Determining the altitude
A HDOP value of 1 is the highest possible geometric positioning arrangement of the satellites, a value
around 6 is yet moderate. HDOP values higher than
10 are too inaccurate for a measurement (see Wikipedia -> http.//en.wikipedia.org/wiki/HDOP).
When using additional systems for the augmentation of the accuracy (e.g. EGNOS), it may also happen that a HDOP value below 1 is shown.
Start a new tour to use the more precise altitude
from the GPS module as the start altitude for the
barometric altitude sensor.
During the tour the altitude measured by the barometric sensor is used and displayed.
Current data
Trip time: 00:00:00
Heart rate: ---
Temperature °C: 19.8
Altitude AMSL m: 322.4
Incline %: 0.0
If you want to have a more accurate evaluation of
the start altitude then please wait until enough satellites are received (Scan display / GPS data).
GPS data
Latitude: 49.503538°
Longitude: 10.963827°
Altitude AMSL m: 314.7
Satellites: 7
Fix, HDOP: 3D, 1.2
OPERATING premium
What does „Fix“ mean in the GPS data?
Depending on the number of satellites received and
where these are positioned in the sky, the GPS position can be determined as „2D“ ( min. 3 satellites)
or „3D“ (min. 4 satellites).
In case the location can not be determined accurately (e.g. few satellites, unfavourable satellite
positions, etc.) „2D“ will be displayed (2 dimensions
longitude and latitude can be measured). In case of
a „3D“ display, the third dimension (altitude) can be
measured on top.
What does „HDOP“ mean in the GPS data?
Depending on the number of satellites received and
where these are positioned in the sky, the display
value HDOP (horizontal dilution of precision) can be
lower or higher.
40
ergo_bike pedelec

41
BIKING
Starting up
WARNING - FALL RISK!
A fall with heavy injuries could be the consequence of not complying with the following
directives:
- Fold up the side stand (1).
- Hold the handlebar (2) in the straight ahead
position before you set off.
- Start rst with the motor switched off to
practise and gain acquaintance with the
bike. Switch the motor on only while driving.
- Start pedalling (3) only after you have taken
a safe sitting and driving position.
- When setting off in a curve or when negotiating tight curves pull lightly the hand brake
lever. This will interrupt motor assistance
and ensure safe driving.
41
ergo_bike pedelec
3
2
1

BIKING
Assistance level
Pushing assistance
ATTENTION
Use the pushing assistance (3) only when you
are not sitting on the bicycle.
You can use the pushing assistance in the cases
where riding the ergo_bike is too hazardous, e.g.
in the case of a high slope or rough terrain.
The assistance provided depends on the slope, i.e.:
large slope high assistance
little slope low assistance
On larger slopes, pushing the ergo_bike pedelec
will be easier.
NOTE
If the bicycle is stopped or parked, after about 2
minutes the display is rst put into standby, and after
about 10 minutes the whole electronic system goes
into standby mode.
To reactivate the display or the drive system press
the red ON/OFF key (5).
In the case of extended upward trips the motor can
run so hot that the temperature sensor in the motor
reduces the electric power to the motor and thus the
motor assistance decreases.
After switching the dashboard ON you can select
the assistance level by means of the specic keys
(1 and 2).
Assistance level (4) on the display:
off (without motor assistance)
low (with motor assistance)
normal (with motor assistance)
high (with motor assistance)
42
ergo_bike pedelec
5
4
2
1
3

43
This function can only be activated at < 6 km/h. If the
speed exceeds 6 km/h while pushing assistance is
active, then it will be turned off.
- Shift into first speed (gear) before activating the
pushing assistance function by pressing the key
(1).
- The pushing assistance is deactivated by pulling
one of the brake levers (2) or by pressing the
corresponding key (1).
BIKING
Driving conditions
NOTE
The motor drive of your ergo_bike pedelec is
equipped with a high-quality two-levels transmission, that lowers (demultiplies) the rotational speed
of the powerful motor to the pedalling speed range.
This ensures you an easy start in most situations.
ATTENTION
The transmission noises will diminish to a minimum only after a running-in distance of about
100 kilometres.
The bicycle can be used with or without switching on
the power assistance.
With the power assistance switched on you start
pedalling like with a normal bicycle. When you
start pedalling, the electric motor kicks in and helps
accelerate the bicycle. The stronger you pedal, the
stronger the motor assistance will be.
In the speed range from about 24 to 25 km/h the
motor assistance is reduced.
From about 25 km/h the electric motor is set to idle,
there only muscle energy will be available.
Pushing assistance
43
ergo_bike pedelec
1
2

BIKING
Shifting
- Stop pedalling while you shift speed.
+: 1 x shift for the next higher speed.
(The eighth speed has the highest transmis-
sion ratio.)
-: 1 x shift for the next lower speed.
(The rst speed has the smallest transmis-
sion ratio.)
- Shift to a lower gear at the right moment before
a slope.
8-speed hub gear
Operation
The twist grip shifter (1) is easy to use and enables
precise shifting with the 8-speed hub gear.
The length of the bar (1) in the upper right corner of
the display indicates the actual energy consumption. The length of the bar increases with the ener-
gy consumption. You will be biking most efciently,
and have shifted to the optimal gear, when the actual energy consumption lies within the center third
area.
If the bar drops to the lower third (left side) during a
trip, then you should shift to a higher gear. If it lies
often in the higher third (right side) then you should
shift to a lower gear.
Gear recommendation
44
ergo_bike pedelec
2
1
1
1

45
BIKING
Hand brake lever for rear wheel brake (2)Hand brake lever for front wheel brake (1)
The brakes for the front wheel and the rear wheel
can be used independently from each other.
To stop or reduce the speed pull both hand brake
levers (1 and 2) simultaneously.
NOTE
Motor assistance is immediately interrupted when
you brake.
Braking
WARNING
The pedelec is equipped with V-brakes, which can
achieve very high braking power.
In tight curves, on sandy or greasy streets, on
wet asphalt, and on black ice you should be very
careful when using the front wheel brake to avoid
skidding the front wheel.
Please use the brake with moderation. Blocked
wheels have a lesser braking effect and can lead
to skidding and falls.
Do not brake in curves, but rather brake before
entering them!
Braking in a curve increases the risk of skidding.
NOTE
In order to be ready for "emergency situations", practise braking in places where you
will not expose yourself and others to hazardous
situations (e.g. on driving practising grounds).
45
ergo_bike pedelec
1
2

BIKING
ATTENTION
When unfolding the side stand (1) always be sure
to have a secure position and a stable ground in
order to prevent tilting over.
Parking and securing the ergo_bike pedelec
ATTENTION
Whenever the ergo_bike pedelec is parked,
always remove the key.
- Open the cover (2) of the rechargeable battery
compartment.
- Turn the rechargeable battery key (3) clockwise
into position
.
This locks the rechargeable
battery and switches it off.
- Remove the key.
- Close the cover (2) of the rechargeable battery
compartment.
- Switch off the dashboard and motor by pressing
the ON/OFF key (1).
46
ergo_bike pedelec
1
1
3
2

47
BIKING
Trafc security
According to the Road Trafc Licensing Regulations,
a bicycle must be equipped with two functional
brakes, independent from each other, a clearly audible alarm bell (chime), a headlight, a tail lamp,
reector pedals, lateral reectors for the wheel or
integrated reecting stripes on the wheels as well
as front and rear reectors.
This bicycle is intended only for driving on paved
roads. Do not use it then offside of paved roads or
on rough terrains.
Do not use this bicycle to cross water surfaces, to
cross terrain gaps, and in sporting events.
While driving you should keep in mind that for an
average speed of about 18 km/h the distance covered is 5 meters per second. Keep accordingly a
sufcient interval to other road users.
For your own safety do not drive with your hands
off the handlebar and not close to the side of other
road users.
You must be able to hear warning noises. To this end
do not use headsets or earphones while on the road.
Safety hints
Safe driving
The following, among other, contributes to a safe
driving experience: the proper setting of the saddle
and handlebar level according to your physical size,
adjusting the tyres to the prescribed ination pressure, sufcient tyre tread depth, and faultless opera-
tion of the brakes and lights.
The fastening parts "set down" after some time. It
is then recommended before using the bicycle and
every 6 months to check the proper fastening of axle
nuts, steering bearing, handlebar, saddle, saddle
pillar, pedal cranks and pedals, and if needed to let
your daum electronic dealer retighten them. See the
following sections:
- Disassembling and assembling the front wheel
- Disassembling and assembling the rear wheel
- Steering bearing
- Adjusting the handlebar
- Adjusting the saddle
- Saddle height
- Pedal crank and pedals
The gear shift and brakes should be regularly
checked by your daum electronic dealer.
ATTENTION
For the sake of your own safety use only acces-
sories certied by daum electronic and original
spare parts for your bike. These accessories and
spare parts were specially tested regarding their
safety, suitability and reliability with this bicycle.
We cannot evaluate this suitability for other
accessories and parts in spite of our continuous
market monitoring, and thus cannot be liable
for them, even if in some individual cases these
parts or accessories received technical approval
of a recognized technical inspection agency or
received the approval of a state certied agency.
If it were necessary to replace lighting parts or ped-
als, please note that only parts with the ofcial proof
mark are approved. The proof mark (wavy lines
with the letter "K" and a 5 digits number = ~ K..... )
is always placed on the spare part. Please use only
original spare parts.
47
ergo_bike pedelec

BIKING
Do never straighten any damaged or bent security
relevant parts like e.g. frame, fork, handlebar,
saddle pillar or pedal cranks, but instead have them
replaced before using this bicycle. There is a risk of
fracture. In case of doubt please consult your daum
electronic dealer.
Is the ergo_bike pedelec in proper state?
Before every trip with the ergo_bike pedelec you
should verify that it is in a faultless state. To that effect
you should carry out the following tests (please read
the complete explanation to each point below in the
corresponding section):
- Is the saddle clamp rmly attached to the saddle?
(see section "Adjusting the saddle")
- Do the brakes operate without fault?
- Is the light system operational?
- Is the rechargeable battery correctly locked in
the battery compartment?
Carry out the following tests at regular intervals:
- Is the tyre pressure correct? (see the section
about "Dismounting and mounting the tyres")
- Is the bike chain in proper condition? (see the
sections "Verifying chain wear" and "Bike chain
tension")
- Are the steering bearing and the pedal cranks
in proper condition? (see the sections "Steering
bearing" and "Pedal cranks")
- Are all the spokes rmly seated? (see the section
"Spokes")
Safety hints
Verify after a fall or accident that no part is bent or
distorted or damaged (the frame, the handlebar, the
wheel rims, etc.).
If any one of the elements mentioned above is not in
proper operating condition then please avoid using
the bike. The defects must immediately be repaired.
If you can not repair the defect yourself then please
contact your daum electronic dealer.
48
ergo_bike pedelec

49
BIKING
Safety hints
What should I consider while driving?
If your bicycle is in proper operating condition then
you can ride it and go. Now it depends on your
driving behaviour and capacities to avoid hazardous
situations:
- You should rst get thoroughly acquainted with
your bicycle.
WARNING
Hold the handlebar in the straight ahead position
before you set off.
Start rst with the motor switched off to practise
and gain acquaintance with the bike. Switch the
motor on only while driving!
- Always comply with the trafc regulations.
- Do never drive on the offside of paved roads.
- Do not drive in the dead angle region of other
vehicles.
- Do give signal early enough about the direction
you intend to take.
- Keep in mind that the manoeuvrability of
bicycles can surprise other road users,
and take into account the potential errors of
the other road users.
- Adopt a defensive driving technique and
adapt it to the circumstances around you.
- Hold the handlebar rmly with both hands. This
way only you will have the possibility to react
promptly and safely to sudden hazardous situa tions like e.g. obstacles.
- When driving on sandy ground, on foliage or
grass and on wet roads, take into consideration
that tyres have less adherence to the ground
than on dry asphalt. Keep this in mind when tak ing a curve or braking in order to prevent skid ding. Keep also in mind that braking to a stop
will take a longer distance.
- Shift down the gear in time before climbing
slopes.
What should I wear?
Many accidents occur because cyclists are not
recognized at the right moment. It is therefore sensible to wear bright and noticeable garments. Be
careful not to wear loose clothes that can catch and
remain hanged up on the bike chain, on the handlebar, on the pedals or on the wheels.
It should be self-evident to you that you always wear
a helmet. Make sure that your helmet complies with
the safety standards SNELL and ANSI, or with the
newer ECE standard. To protect your eyes wear
bicycle glasses.
49
ergo_bike pedelec

Transport
The ergo_bike pedelec may only be transported
standing on its wheels.
We recommend the use of an appropriate car bike
rack.
Before you transport your ergo_bike pedelec on the
roof or on the rear end of your car, please remove
in any case all parts that can get loose during the
transport (rechargeable battery, tool bag, etc.).
Secure your ergo_bike pedelec with an additional
cable lock against theft, and attach it only to xed
installations like e.g. street lamps or metal fences.
The lock should secure the frame and the rear wheel.
Make sure that the lock tightly encloses the bicycle
and the xed installation. The keyhole should face
downward to protect it against humidity.
Remove and take with you all loose parts like e.g.
drinking bottle, air pump or tool bag.
Theft protection
BIKING
Carrying loads
Carrying loads in any form modies the road hand-
ling of the bicycle. The heavier the load, the more
critical this modication will be.
Loads (shopping bags etc.) should not be attached
to the handlebar, but rather to the carrier rack provided.
Consider the total allowable load carrying capacity
of the ergo_bike pedelec.
WARNING
- Do not carry cumbersome loads.
- Do not cover the lighting.
- Do not take passengers (persons).
- Do not hitch a trailer.
50
ergo_bike pedelec

51
CARE
Bicycle care / care products
NOTE
Regular and competent care helps the bicycle keep
its value and is one of the requirements for accepting
warranty claims.
Corrosion as a result of lack of care or because of
winter operation is not covered by the warranty.
ATTENTION
Do not use aggressive or penetrating cleaning
substances and solvents on rubber and plastic
parts, as this could damage them.
WARNING
After cleaning and before using the bicycle
always perform a brake test.
ATTENTION
Do not use steam or high pressure jet devices.
High water pressure can cause damages to the
journals (pads), to the sealings, to the rechargeable battery and to the complete electric system.
Cleaning
- Use only a soft sponge and clear (pure) water to
wash the bike.
- Use only a soft cloth or leather for polishing.
- Do not use a dry cloth to remove dust and dirt (this
may cause scratches on the painted parts or on
the casings).
51
ergo_bike pedelec

Bicycle care / care products
Care products
When needed you should care for the bicycle with
standard commercially available preserving agents
and care products.
- Apply preventive treatments of preserving
products and care products to parts exposed to
corrosion, primarily and regularly in winter.
ATTENTION
Do not use care products containing silicone,
and paint polishing products on plastic parts.
- Clean thoroughly the frame and aluminium parts
after longer trips and apply a standard commercially available corrosion protection agent.
Winter operation and corrosion protection
NOTE
For the sake of environment protection you should
use care products sparingly, and choose those
products that are identied to be environmentally
friendly (ecological).
If the bicycle is used during the winter months, considerable degradation can be caused by road salt.
ATTENTION
Do not use warm water – this would increase
the salt action.
- Clean the bike with cold water immediately after
a trip.
- Dry the bicycle thoroughly.
- Apply wax based corrosion protection agents on
parts exposed to corrosion before using the bike,
and repeat eventually several times.
Repairing paint defects
Repair immediately small paint defects with a paint
stick.
Tyre care
If the bicycle is not used for an extended period of
time, we recommend to store the bike in such a way
that the tyres are not loaded.
Do not store the bicycle or the tyres for an extended
period of time in very hot rooms like a basement
boiler room.
ATTENTION
The tyre tread depth may not drop under 1 mm.
Driving over kerbstones, sharp edged obstacles, ground depressions, potholes, etc. can
cause damages to the wheel rims (spoke break)
or to the tyres (wall cracks), whereas a too low
tyre pressure can also have the same causal
effect.
Warranty claims for these effects are not accepted.
CARE
52
ergo_bike pedelec

53
CARE
NOTE
After the implementation of the European Directive
2002/96/EU in the national legal system, the following applies:
Electrical and electronic devices may not be disposed of with domestic waste.
Consumers are obliged by law to return electrical
and electronic devices at the end of their service
lives to the public collecting points set up for this
purpose or to the daum electronic dealer. Details to
this are dened by the national law of the respec-
tive country.
The symbol on the product points out these regulations.
Li-Ion
Disposal of waste
By recycling, reusing the materials or other forms of
utilising old devices, you are making an important
contribution to protecting our environment.
In many countries the waste regulations mentioned
above apply to batteries and rechargeable batteries, and are recommended for the international
countries as well.
Rechargeable battery
Rechargeable batteries are subject to the waste
disposal byelaw. They contain toxic heavy metals
and are consequently subject to the special waste
management byelaw. Your daum electronic dealer
will carry out the disposal for you.
Battery charger
Dispose of this device in conformity with the environmental regulations enforced in your country.
Electrical waste may not be disposed of with domestic waste.
You will obtain information from your local authority
or your daum electronic dealer.
When the charger reaches the end of its useful life,
make the device unusable by pulling the power plug
from the power outlet and cutting the power cable.
Other components
Dispose of other components in conformity with the
environmental regulations enforced in your country.
Electrical and electronic devices may not be disposed of with domestic waste. Please ask your local
authority or daum electronic dealer for recommendations and tips regarding recycling.
Rechargeable
battery
53
ergo_bike pedelec

CARE AND ACCESSORIES
Technical modications, spare parts, accessories
If you want to undertake technical modications
then you must comply with our directives. This ensures that no damage will be done to the ergo_bike
pedelec, that trafc and operational safety are
maintained and that the modications are approv-
able. Your daum electronic dealer will execute these
works diligently.
Before buying accessories and before carrying out
any technical modication you should always seek
advice from your daum electronic dealer.
ATTENTION
For the sake of your own safety use only acces-
sories certied by daum electronic and original
spare parts for your daum electronic ergo_bike
pedelecs. These accessories and spare parts
were specially tested regarding their safety, suitability, and reliability with this ergo_bike pedelec.
We cannot evaluate this suitability for other
accessories and parts in spite of our continuous
market monitoring, and thus cannot be liable
for them, even if in some individual cases these
parts or accessories received technical approval
of a recognized technical inspection agency or
received the approval of a state certied agency.
Approved accessories for your daum electronic
ergo_bike pedelec and original daum electronic
spare parts are available at your daum electronic
dealer.
Your dealer will also carry out the installation professionally for you.
Accessories
Spare rechargeable
battery
Lithium-Ion technology, 9.5 Ah, 36 V, with a set of
two keys
Order No.: M0041703.0001
Chest belt
The digitally encoded heart rate transmission system sends the heart rate data reliably at a frequency of 868 MHz to the dashboard from a distance of
up to 3 m, enabling a heart rate controlled ride of
the ergo_bike pedelec. Easy to use and comfortable to wear.
Order No.: 9091036
54
ergo_bike pedelec

55
ACCESSORIES
Shopping Basket
The KLICKfix basket can easily be mounted on
the handlebar with just a click and comes with a
matching handlebar adapter.
Order No.: 9091041
Laptop and
Office Bag
Equipped with magnetic press-in lock and additional zipper, two zipper compartments and side
pockets, detachable inside pocket, carry handle,
shoulder strap. Volume: 16 litres. Dimensions: L40
x H32 x W12 cm. Fastening system: vario hooks.
Order No.: 9091042
Shopping Bag
Colour: black/granite
Equipped with outside pocket, reinforcement, zipper, carry handle, reflective stripes. Volume: 15
litres. Dimensions: L36 x H32 x W15 cm.
Order No.: 9091043
Trekking Bag
Colour: black/granite
Equipped with water repellent tarpaulin fabric,
inside frame and reinforcement of unbreakable PE
material, outside pocket, carry handle, reflective
stripes, reflective push button. Can be used on
either side of the carry rack. Volume: 17 litres.
Dimensions: L30 x H32 x W16 cm.
Order No.: 9091044
Accessories
Luggage Bags
SD card
ergo_memo-card2
Order No.: 0017994
55
ergo_bike pedelec

Miscellaneous
Please take the following into account:
- Maintenance works during the warranty period
and afterwards should always, without exception, be executed by an approved daum electronic dealer.
- Use only original daum electronic spare parts.
NOTE
Please consult our service and repair notes on internet at www.daum-electronic.de if you wish to obtain more information about your product (ergo_bike
pedelec).
You can also call our central ofce at daum electronic
gmbh, phone no. +49 (0)911 / 9 75 36-0.
The maintenance plan describes the various maintenance operations.
D = by your daum electronic dealer
O = by the owner
WARNING
Safety requirements prohibit you from undertaking repairs and adjusting works on your own,
except for a narrowly delimited scope. Improper
or unqualied work on safety sensitive parts
compromises your own security and that of
other road users.
This applies particularly to work executed on:
steering, brake system and lighting.
ATTENTION
Remove the rechargeable battery from its
compartment before executing any work on the
electrical system. Do not undertake any work
on the electronic system. Failure to comply with
these recommendations will void the warranty.
Any intervention or disassembling work done
on the motor unit, cable harness, rechargeable
battery and battery charger will void the warranty.
MAINTENANCE AND CARE
56
ergo_bike pedelec

57
MAINTENANCE AND CARE
D = maintenance work executed by your daum electronic dealer
O = verication done by the owner
Works to be executed Page before using
the bike
monthly yearly when
needed
Checking all the screws, bolts and nuts that are important for safety and operation,
to make sure they are properly seated and tightening them when needed:
Axle nuts, steering bearing, handlebar, saddle, saddle pillar, brake, pedal cranks
O O
D
O
D
Bike chain, verifying chain tension and adjusting when needed. Cleaning and lubricating with bike chain spray. Verifying the alignment of the rear wheel and adjusting
it when needed.
59-60 O
D
O
D
Verifying the steering bearing. 62 O O
Verifying the steering bearing and adjusting it when needed. If needed re-lubricate
and adjust.
62 D D
Verifying the sheated cables. O
Verifying and adjusting the sheated cables. D D
Lubricating the side stand. O
D
O
D
Checking the operation of the braking system. 63-65 O O
Checking the operation of the braking system and adjusting it when needed. 63-65 D
Maintenance and care plan
57
ergo_bike pedelec

D = maintenance work executed by your daum electronic dealer
O = verication done by the owner
Works to be executed Page before using
the bike
monthly yearly
when
needed
Braking system
When the braking system is not operating properly, verify the state of the hand brake
levers, sheated cable and brake arms, and adjust them when needed. Lubricate the
joints and bearings. Replace cracked or jammed sheated cables. Replace oiled brake
linings, even minimal oiling means a reduction of braking effect.
D
Verifying the wheel rims and spokes for lateral and radial run-out. 62 O
Verifying the wheel rims and spokes for lateral and radial run-out. Checking the spokes
tension and adjusting it when needed.
62 D D
Checking tyre air pressure regularly. O O
D
Checking tyre tread depth. 52 O
D
Verifying lighting and signalling systems including head light, and adjusting them when
needed.
71 O O
D
Recharging the rechargeable battery with the charger. 38-40 O O
Test ride before and after the execution of works to verify the general operational state
and trafc safety.
O O
D
Maintenance and care plan
MAINTENTANCE AND CARE
58
ergo_bike pedelec

59
Bike chain tension
Verifying
- Place the ergo_bike pedelec on the side stand.
- The chain (1) must move 10 to 15 mm max. up
or down when pushed.
If the chain is too loose or too tight it must be corrected.
Adjusting
- Loosen the axle nuts (2 and 3) on both sides
by means of a ring spanner wrench SW 15 and
adjust the chain tension by shifting the rear
wheel (4).
- Before tightening the axle nuts you must check
that the front and rear wheels are exactly aligned
(both run on one single line).
- Assembling is executed in the opposite sequence.
- Verify chain tension one more time.
- Check the proper seating of the left (3) and right
(2) side axle nuts one more time.
ATTENTION
Please let your daum electronic dealer check the
bike chain tension.
MAINTENANCE AND CARE
Tightening moment of the axle nuts about 40 Nm.
59
ergo_bike pedelec
2
2
3
10-15 mm
1
3
4

Verifying chain wear
Under correct chain tension the chain may be lifted
no more than 3 mm from the base of the sprocket.
Even the very best bike chain has a limited usable
life.
If after adjusting and lubricating all parts you do not
obtain a satisfying chain run we recommend replacing the worn out chain.
- Place the ergo_bike pedelec on the side stand.
- Relax the chain tension (see adjusting the chain
tension).
- Assembling is executed in the opposite sequence.
NOTE
You should not use a new chain with worn out chain
sprocket and pinion. This combination will produce
clicking noises.
In that case it is advisable to replace the chain and
the chain sprockets and pinions together.
ATTENTION
These works are to be executed by your daum
electronic dealer.
MAINTENANCE AND CARE
60
ergo_bike pedelec
max. 3 mm

61
Pedal cranks
Pedals
Verify regularly that the pedals (4) are rmly screwed
to the pedal cranks. Keep in mind that the pedals
have different threading.
The left side pedal is equipped with a left-handed
thread; it is tightened counterclockwise. The right
side pedal is equipped with a right-handed thread; it
is tightened clockwise.
The pedal axles are marked accordingly: (L) for the
left side, (R) for the right side.
Tighten the pedals (4) with a fork wrench SW 15.
The pedal cranks are tightened to a max. moment
of 35 Nm.
Tightening:
- Remove the protective caps (3) on both sides
and have the screws located underneath them
tightened.
NOTE
If the pedal cranks are already loosened then the
internal square drive is generally already deected.
The pedal cranks and eventually the axle must then
be replaced. Disassemble well seated pedal cranks
only with a crank extractor, do never use force to knock
them out.
Before proceeding with the installation, the square
bearing surfaces of the crank and axle must be
completely oil and grease free.
WARNING
If you determine that the pedal cranks or the bottom bracket are loose please consult your daum
electronic dealer.
The pedal cranks (1) can get loose with time and
extended driving. Check regularly if the pedal cranks
are rmly seated. There should be no perceivable
play (slack) when you strongly laterally pull the
pedal crank.
The bottom bracket (2) must also present no play
(slack) and the pedal crank must rotate easily, in that
case the bearing is in proper condition. Verify the
bottom bracket regularly. To perform this verication
move the pedal cranks laterally back and forth.
MAINTENANCE AND CARE
61
ergo_bike pedelec
1
3
4
L
2

Steering bearing
WARNING
Respect the inspection intervals. In the case of
prolonged driving with a loose steering bearing
(1) a break of the fork stem (2) may not be
excluded. The consequence could be a fall with
heavy injuries.
Please let your daum electronic dealer execute
this adjustment, a special tool is needed for this
operation.
Verifying:
- Pull and hold the hand brake lever (3) and move
the bike back and forth.
- If a play in the steering bearing (1) is noticeable,
then it must be adjusted.
Adjusting:
- Loosen the top nut (5) and pull it upward.
- Tighten the steering cone (6) until the play is
eliminated.
- Tighten the top nut (5).
NOTE
The front fork (4) must not grip (clamp) at the steering stop (extremity) and must pivot easily in both
directions.
ATTENTION
Replacing, tensioning or loosening of wheel
spokes must be done by your daum electronic
dealer.
A tight seating of the spokes (1) is important to ensure a smooth running of the wheels. Have your loose
spokes timely retightened.
Broken spokes and the spokes opposite to them
must be immediately replaced and the wheel must
be recentred, or eventually equipped with new
spokes completely.
Spoke break and unbalance of the wheel is often
the result of an improper tensioning of the spokes.
Spokes
MAINTENANCE AND CARE
62
ergo_bike pedelec
6
5
1
1
2
4
3

63
Positioning the hand brake levers
Adjusting the hand brake levers
Detaching the brake cable down
- Press both brake arms (1) together and pull the
brake cable guide (2) out of the holder.
- If it is not possible to pull the brake cable guide,
tighten the setting screw on the brake lever until
it becomes possible to pull the brake cable guide.
WARNING
Adjusting the brake is absolutely necessary when
the hand brake lever can be pulled almost all the
way to the handlebar grip without producing a
noticeable braking effect.
- Loosen the counter nut (2).
- Turn the setting screw (3) outward until an interval
of about 1 mm between the brake shoe and the
wheel rim is achieved.
MAINTENANCE AND CARE
The position of the hand brake lever relative to the
handlebar grip can be adjusted by means of the
stop screw (1) .
63
ergo_bike pedelec
2
3
1
1
1
2

Disassembling and assembling the brake linings
Disassembling
- Detach the brake cable.
- Unscrew the nut (1), remove the washers and the
brake shoe (2).
(A) = 1 mm, (B) = 1.5 mm
Assembling
- Install the brake shoe with the washers and nuts
and tighten lightly.
- Adjust the brake shoe such that the interval (A)
from the upper edge of the wheel rim equals 1
mm and the interval (B) between the brake shoe
and the wheel rim equals 1.5 mm on both sides.
- The brake shoes must be adjusted to leave a gap
of about 0.5 mm to the wheel rim to the rear in
the direction of rotation.
- Tighten the nuts when the brake linings are
correctly adjusted.
- Attach the brake cable.
(C) = 0.5 mm
MAINTENANCE AND CARE
64
ergo_bike pedelec
BB
A
2
1
C

65
Disassembling and assembling the brake cable
Disassembling
- Detach brake cable.
- Remove the protective cap (1) using a pliers.
- Unscrew screw (2) by a few turns and remove
the sheated cable.
- Set the counter nut (3) and setting screw (4) such
that the slot coincides with the opening on the
brake lever.
- Remove the brake cable from the brake lever and
pull it from the cable conduit.
Assembling
- Attach the new brake cable to the brake lever and
drive it through the counter nut (3) and setting
screw (4).
- Tighten the setting screw completely.
- Pull the brake cable through the cable conduit
and drive it through the clamping bracket.
- Set the gap between the left and right brake
shoe and the wheel rim to 2 mm and tighten the
cable screw (2) (tightening moment 6-8 Nm).
- Clip a new protective cap on the end of the brake
cable.
- Pull the brake lever about 10 times to the grip
and verify the proper and correct operation of
the brake.
MAINTENANCE AND CARE
65
ergo_bike pedelec
2
1
3 4
2

Disassembling the front wheel
Disassembling
- Loosen the counter nut (1) on the hand brake
lever and screw in the setting screw (2).
- Press both brake arms (3) together and extract
the brake cable guide (4) from the bracket.
- Remove the cable plug (5) from the dynamo.
- Open the quick release lever (6) and loosen the
axle nut (7) by a few turns.
- Remove the front wheel (8) off the fork by pulling
downward.
MAINTENANCE AND CARE
66
ergo_bike pedelec
2
1
4
3
3
6
7
8
5

67
Assembling the front wheel
Assembling
- Seat the front wheel (1) in the front fork ends (2).
- Align the dynamo connector (5) for the cable plug
(6) and connect it.
- Pre-tighten the axle nut (3) and close the quick
release lever (4).
- The lever must point to the rear and close
against perceptible resistance.
WARNING
If the quick release lever is not completely closed
it can open by itself. This can cause heavy falls.
Moving the quick release lever must be so
hard that it requires using the hand palm push.
Only this guarantees that the tension is strong
enough.
- Press both brake arms (7) together and attach
the brake cable guide (8).
- Verify the operation of the brake.
MAINTENANCE AND CARE
67
ergo_bike pedelec
4
1
2
2
3
8
7
7
6
5

Disassembling and assembling the rear wheel
Disassembling
- Turn the gear shift handle grip (1) on the handle-
bar to shift to the rst speed.
- Loosen the axle nuts (2 and 3) on both sides by
means of a ring spanner wrench SW 15.
MAINTENANCE AND CARE
68
ergo_bike pedelec
-
1
2
3

69
Disassembling and assembling the rear wheel
Assembling
- Drive the chain over the chain pinion and install
the wheel in the frame end.
- Pre-tighten the axle nuts (2 and 3) by hand.
- Verify and adjust chain tension (see chain tension).
- The front and rear wheel must align exactly (stand
on one line).
- Tighten the axle nuts.
Tightening moment for the axle nuts is about 40 Nm.
- Attach the gear shift cable (4).
NOTE
Adjust the gear shifting as described in the attached
SHIMANO instructions.
- Take the gear shift cable (4) off the shift lever.
- Take the chain (5) off the chain pinion and remove
the wheel from the frame ends.
8-speed hub gear
Care
- The 8-speed hub (1) is adequately lubricated.
- When needed service lubrication only by your
daum electronic dealer.
- Do not spray water on the 8-speed hub when
cleaning the wheel.
- If the lateral play of the rear wheel becomes too
large, please have the bearings adjusted by your
daum electronic dealer.
NOTE
Adjust the gear shifting as described in the attached
SHIMANO instructions.
MAINTENANCE AND CARE
69
ergo_bike pedelec
4
5
1

Dismounting and mounting the tyres
NOTE
In principle, we recommend that you always install
a new inner tube.
You should use a plastic tyre lever for an easier
removal of the tyre.
An accessory set with tyre levers and repair kit is
available from your daum electronic dealer.
- Disassemble the tyre (see disassembling and
assembling the front and/or rear wheel).
- Unscrew the dust cap on the valve, press the pin
(1) inward and let the air out.
- Insert the longer end of the tyre lever (2) under
the side of the tyre opposite to the valve and
hook the short end under a spoke. Insert the
second tyre lever under the tyre about 2 to 3
spokes away and hook it too. Release the tyre
lever and remove the tyre cover from the rim
edge with the hand.
- Press the tyre opposite to the valve into the rim
well, then pull the tyre, in the region of the valve,
with the hand over the edge of the rim and lift it
off the rim over the whole circumference of the
rim.
- Verify the inner side of the tyre to detect any
damage or any foreign object (nails, etc.) that
may have penetrated.
- Lay in the tube and inate it slightly, otherwise
there is a risk that it gets crushed.
- Then pull the tyre over the rim edge, starting
opposite to the valve.
- Before fully inating the tyre, move the tyre
laterally to and fro. Make sure that distance
between the circular marking on the tyre and the
tyre edge is the same all around the rim.
- Assemble the wheel (see disassembling and
assembling the front and/or rear wheel).
WARNING
Please be careful when inating the tyre with an
air compressor (e.g. at a service station). Because of the small volume of the tubes the max
lling pressure is reached very quickly. The tyre
could burst.
Check air pressure
Please make sure that tyre air pressure is always
maintained. Non observance of the pressure leads
to poor wheel grip and to early tyre wear.
Tyre air pressure front and rear:
Total weight bar
up to 100 kg 4.0
125 kg 5.5
MAINTENANCE AND CARE
70
ergo_bike pedelec

71
Head light and rear light with standlight
The light system is equipped with an automatic
standlight system. This position light system works
after a ride with head light turned on. On parking the
light remains on for about 4 minutes.
NOTE
The head light and rear light (3) are not equipped
with replaceable incandescent bulbs (LED or diode
light).
If the light is not working, check rst whether a cable
connection is broken. If that is not the case then the
head light and/or the rear light must be replaced.
Lighting system
The headlight (1) must be tilted to the front in such a
way, that the centre of the light cone 5 m away from
the head light will drop to half the height at which it
leaves the head light.
In practice this means that the road may be illuminated to a maximum of 10 m.
Switch positions (2) on the head light:
OFF Light OFF.
ON Light ON (dynamo enabled).
AUTO The light turns ON automatically in case of
poor light conditions.
MAINTENANCE AND CARE
71
ergo_bike pedelec
2
3
1

MAINTENANCE AND CARE
Checking the fuse of the rechargeable battery and of the charger
ATTENTION
When checking or replacing the fuses:
- the rechargeable battery must be switched
OFF,
- the power plug of the charger must be unplugged.
Do never use a stronger fuse or repair the fuse.
Incorrect or improper handling can damage the
whole electrical system!
If the fuse blows up without an apparent reason,
please consult your daum electronic dealer.
NOTE
Use the following fuses for replacement:
Rechargeable battery (3) F 30A L 250V
Rechargeable battery (2) 5A 250V
Charger (5) T 10A L 250V
Replacing the fuse
- Open the cover (1 or 2) on the rechargeable battery or (4) on the charger.
- When replacing the fuse make sure it is well
seated. Loose fuses will blow up.
- Complete the installation in the opposite sequence.
72
ergo_bike pedelec
4
3
5
1
2

73
SPECIFICATIONS
Comfort Trekking D Trekking H
Chassis
Aluminium frame AL 6061, polished, high value painting • • •
Frame size S/M 44 cm 44 cm 48 cm
Frame size L/XL 52 cm 52 cm 56 cm
Adjustable suspension fork SR Suntour • • •
Drive
Powerful 250 Watt central motor drive developed and manufactured by daum electronic in compliance
with DIN EN 15194, Low-Noise Technology, with daum sensors for the detection of crank movements
and pedalling force
• • •
Intelligent assistance mode pre-adjustable in 3 levels • • •
Pushing assistance up to 6 km/h • • •
Pedalling assistance 0 to 25 km/h • • •
Autonomy range up to 80 km, depending on the assistance level, total weight, terrain, road conditions,
tyre air pressure, wind conditions, etc.
• • •
Rechargeable battery
Lithium-Ion technology, 9.5 Ah, 36 V • • •
Usable life expectation: about 500 charging cycles, 3-4 years • • •
External charger 115/230 Volt, 4 Amperes, charging time 0 to 100 % about 3 hours • • •
73
ergo_bike pedelec

SPECIFICATIONS
Comfort Trekking D Trekking H
Handlebar and control elements
Curved aluminium touring handlebar, aluminium stem adjustable in height and tilt •
Straight aluminium trekking handlebar, aluminium stem adjustable in tilt • •
Ergonomic handlebar grips, free of toxic substances • • •
Control unit conveniently located on the left side for the assistance mode +/-, pushing assistance,
dashboard display (scan)
• • •
Twist grip shifter on the right side with gear indicator • • •
Brake lever with safety motor cut-out on both sides • • •
Dashboard with 9.4 cm (3.7") grey scale display with backlight and brightness sensor • • •
Gear shift
Shimano Nexus 8-speed hub gear with free-wheel, total transmission ratio 307%, twist grip shifter
and gear indicator
• • •
Brakes
Mechanical V-brakes on the wheel rim with power modulator front and rear • • •
Wheels
Aluminium extruded rims 700c, stainless steel spokes 2 mm • • •
Tyres with puncture guard protection and reflective stripes 42-622 •
Tyres with puncture guard protection and reflective stripes 40-622 • •
Plastic mudguards with edge protection and rear spoiler • • •
74
ergo_bike pedelec

75
SPECIFICATIONS
Comfort Trekking D Trekking H
Lighting system
Shimano hub dynamo in the front wheel 6 Volt, minimal rolling resistance • • •
LED head light B&M Lumotec Fly IQ senso plus, 40 Lux, with light sensor and automatic standlight • • •
LED rear light B&M Toplight flat with automatic standlight • • •
Miscellaneous
High quality convenient gel / cold foam saddle, suspended aluminium saddle pillar • • •
Stable aluminium carrier rack with aluminium battery compartment, elastic rubber straps to fix the
luggage, possibility to attach extra pack bags, load capacity 25 kg
• • •
Anti-slip safety pedals • • •
Aluminium side stand • • •
Dimensions and weight
Weight bike without rechargeable battery ca. 22 kg ca. 22 kg ca. 22 kg
Weight of the rechargeable battery ca. 3.6 kg ca. 3.6 kg ca. 3.6 kg
Seat height for frame size S/M 89-100 cm 89-100 cm 93-107 cm
Seat height for frame size L/XL 95-110 cm 95-110 cm 100-116 cm
Step-through depth 46 cm - -
Authorised total weight (rider + bike) 125 kg 125 kg 125 kg
Dimensions (L/W/H in cm) 100/55/123 100/55/123 100/55/123
75
ergo_bike pedelec

Dashboard classic
Dashboard premium
Close control unit on the handlebar
Pushing assistance up to 6 km/h • •
Preselection of the intelligent assistance mode +/- (3 levels) • •
Preselection of the values displayed on the dashboard (scan) • •
Dashboard functions
9.4 cm (3.7") grey levels display with background illumination and brightness sensor • •
Card slot for SD card, integrated SD/SDHC card reader • •
Interference free digital heart rate receiver • •
Integrated buzzer • •
Recording of the heart rate, speed, distance, and trip time on the SD card • •
Incline adjusted pedalling assistance • •
Barometric height measurement •
GSM module with GPS for enhanced documentation of biking tours, transmission of position data
via SMS or Internet (SIM card required)
•
Theft protection per SMS notification (SIM card required) •
Gear recommendation for optimal travel range • •
Software update via SD card • •
SPECIFICATIONS
76
ergo_bike pedelec

77
SPECIFICATIONS
Dashboard premium
Dashboard display values
Assistance mode • •
Display of remaining battery charge • •
Speed • •
Average speed • •
Maximum speed • •
Distance • •
Total distance • •
Trip time • •
Total trip time • •
Clock • •
Date • •
Heart rate (requires chest belt) • •
Average heart rate (requires chest belt) • •
Temperature •
Incline •
Height above sea level •
GPS coordinates •
Dashboard classic
77
ergo_bike pedelec

WARRANTY AND SERVICE
Warranty Conditions
daum electronic gmbh will provide the following services within the scope of its legal liability obligations,
in case a defect should occur, through its authorised
daum electronic dealer (retailer) to the customer:
1. daum electronic gmbh will correct, through the
authorised daum electronic dealer (retailer), during a period of 24 months starting at the delivery
of the bike to the customer, the defects that occur
pertaining to material and production defects,
by repairing or replacing the parts in question
according to legal liability regulations. daum electronic gmbh may decline to accept the demanded
repair or replacement of the defective part, if this
is only possible at the expense of disproportionate
costs. In this case daum electronic gmbh may
correct the defect, through the authorised daum
electronic dealer (retailer), through the other
respective possibility of fullment. If both subsequent fullment methods can only be executed at
the expense of disproportionate costs, daum electronic gmbh may through the authorised daum
electronic dealer (retailer) decline to accept the
fullment altogether. The customer will then only
be entitled to the legal benets. Replaced parts
become the property of daum electronic gmbh.
2. The installation of replacement parts within the
scope of a warranty repair will not extend the
applicable warranty that started at the delivery
of the bike to the customer.
3. Signs of wear due to normal utilisation are excluded from the warranty, as well as wear due
to improper operation and improper utilisation.
Oxidation and corrosion are caused by environ-
mental inuences and are also excluded from the
warranty obligations.
4. The customer will forfeit his right to warranty
claims in the cases of: manipulating the bike,
modifying the drive and secondary transmission
ratio, and by installing accessories and spare
parts that are not authorised by daum electronic
gmbh. The right to warranty claims will also be
forfeited in the case of intervention in a workshop
not authorised by daum electronic gmbh, as well
as not respecting the prescribed maintenance
intervals at an authorised daum electronic dealer.
5. When filing a warranty claim the customer
must present the service booklet properly lled
to the retailer.
6. The following table gives the customer a summary
about the average limits concerning the respective wear parts:
78
ergo_bike pedelec

79
WARRANTY AND SERVICE
Wear parts list
Wear parts Wear limits
Tyres, inner tyre tubes, wheel rims Depending on the driving style, the load and the tyre air pressure, the wear limit can be reached at 500 km or
earlier.
Wheels, spokes, hubs Depending on the driving style, the load and the tyre air pressure, the wear limit can be reached at 1000 km or
earlier. Oxidation is due to a maintenance deciency!
Suspension fork To be controlled at every maintenance period.
Lighting, electric system, control electronic Depending on the road characteristics / roughness, the life expectancy can be reduced, the limit can already be
reached at 500 km.
Brake linings Depending on the driving style and load these can be worn out at 500 km.
Seal rings, sealing, O-rings These must be replaced at every maintenance interval to ensure a awless operation.
Shaft seal rings of the motor, transmission,
fork and wheels
Depending on the road characteristics and care provided, these can be worn out from 500 km. Dirt contamination
can reduce the life expectancy. To be controlled at every maintenance interval. Do not wash with the high pressure
cleaner!
Wheel bearings, Steering bearings Depending on the road characteristics and care provided, these can be worn out from 500 km. Dirt contamination
of the wheel hubs can reduce the life expectancy. To be controlled at every maintenance interval. Do not wash
with the high pressure cleaner!
79
ergo_bike pedelec

Wear parts Wear limits
Cables, cable connections, switches Depending on the care provided, wear is possible from 500 km. To be controlled at every maintenance interval.
Cleaning and lubrication of the chain Every 500 km and after every wash.
Pinions, chain wheels, chain guides, chain
sprockets
Depending on the road characteristics and care provided, wear is possible from 500 km. Do not wash with high
pressure cleaner! Control at every maintenance interval.
Rechargeable batteries, fuses Depending on the ambient temperature a failure can occur after the 6th month, earlier in the case of shorter trips.
Sheated cables, brake cables Depending on the utilisation and care from the 6th month.
Self locking nuts, splint pins, glued screw
connections, tab washers
At every maintenance interval or every time the nuts or locks are opened.
Gear shifting components Depending on the driving style and load these can be worn out at 500 km.
Wear parts list
WARRANTY AND SERVICE
80
ergo_bike pedelec

81
Delivery list
WARRANTY AND SERVICE
Frame serial number:
sold on:
by:
daum electronic dealer seal:
81
ergo_bike pedelec

EC Declaration of Conformity
We declare under our sole responsibility that the
Product : Pedelec
Model : Trekking D, Trekking H, Comfort
classic, order No. : 9510844 9512848 9514844
9510852 9512856 9514852
9500844 9502848 9504844
9500852 9502856 9504852
premium, order No. : 9511844 9513848 9515844
9511852 9513856 9515852
9501844 9503848 9505844
9501852 9503856 9505852
complies with all applicable requirements of the following prescriptions:
2006/42/EC Machinery Directive
2004/108/EC EMC Electromagnetic Compatibility
2006/95/EC Low Voltage Directive
Applied standards:
EN 15194:2009
EN 14764:2006
EN 60601-1-2:2007 Fürth, 05/05/2010
EN 50272-3:2003
EC DECLARATION OF CONFORMITY
daum electronic gmbh
Flugplatzstr. 100
D-90768 Fürth
Tel.: +49 (0) 911/9 75 36-0
Fax.: +49 (0) 911/9 75 36-97
82
ergo_bike pedelec

83
BIKE ID CARD
In order to protect your property we recommend you ll this card thoroughly.
Keep this card in your wallet. Should the bike be stolen, this card will help
you provide the police with the required information to signicantly help
recover your bike.
Please do not forget to always lock the bike when you park it (hook the cable
or U-lock to a xed object).
Bike ID card
Type of the bike: Electric bike
Make of the bike: daum electronic
ergo_bike pedelec
Model: .......................................................
Serial-No.: .......................................................
Frame colour: .......................................................
Tyre: .......................................................
Particular marking: .......................................................
.......................................................
Store in a safe place
83
ergo_bike pedelec

84
ergo_bike pedelec
 Loading...