

Page 1
CUSTOMER RELATION
Email id: [email protected]
Contact number: 1800 209 3456 [toll free]
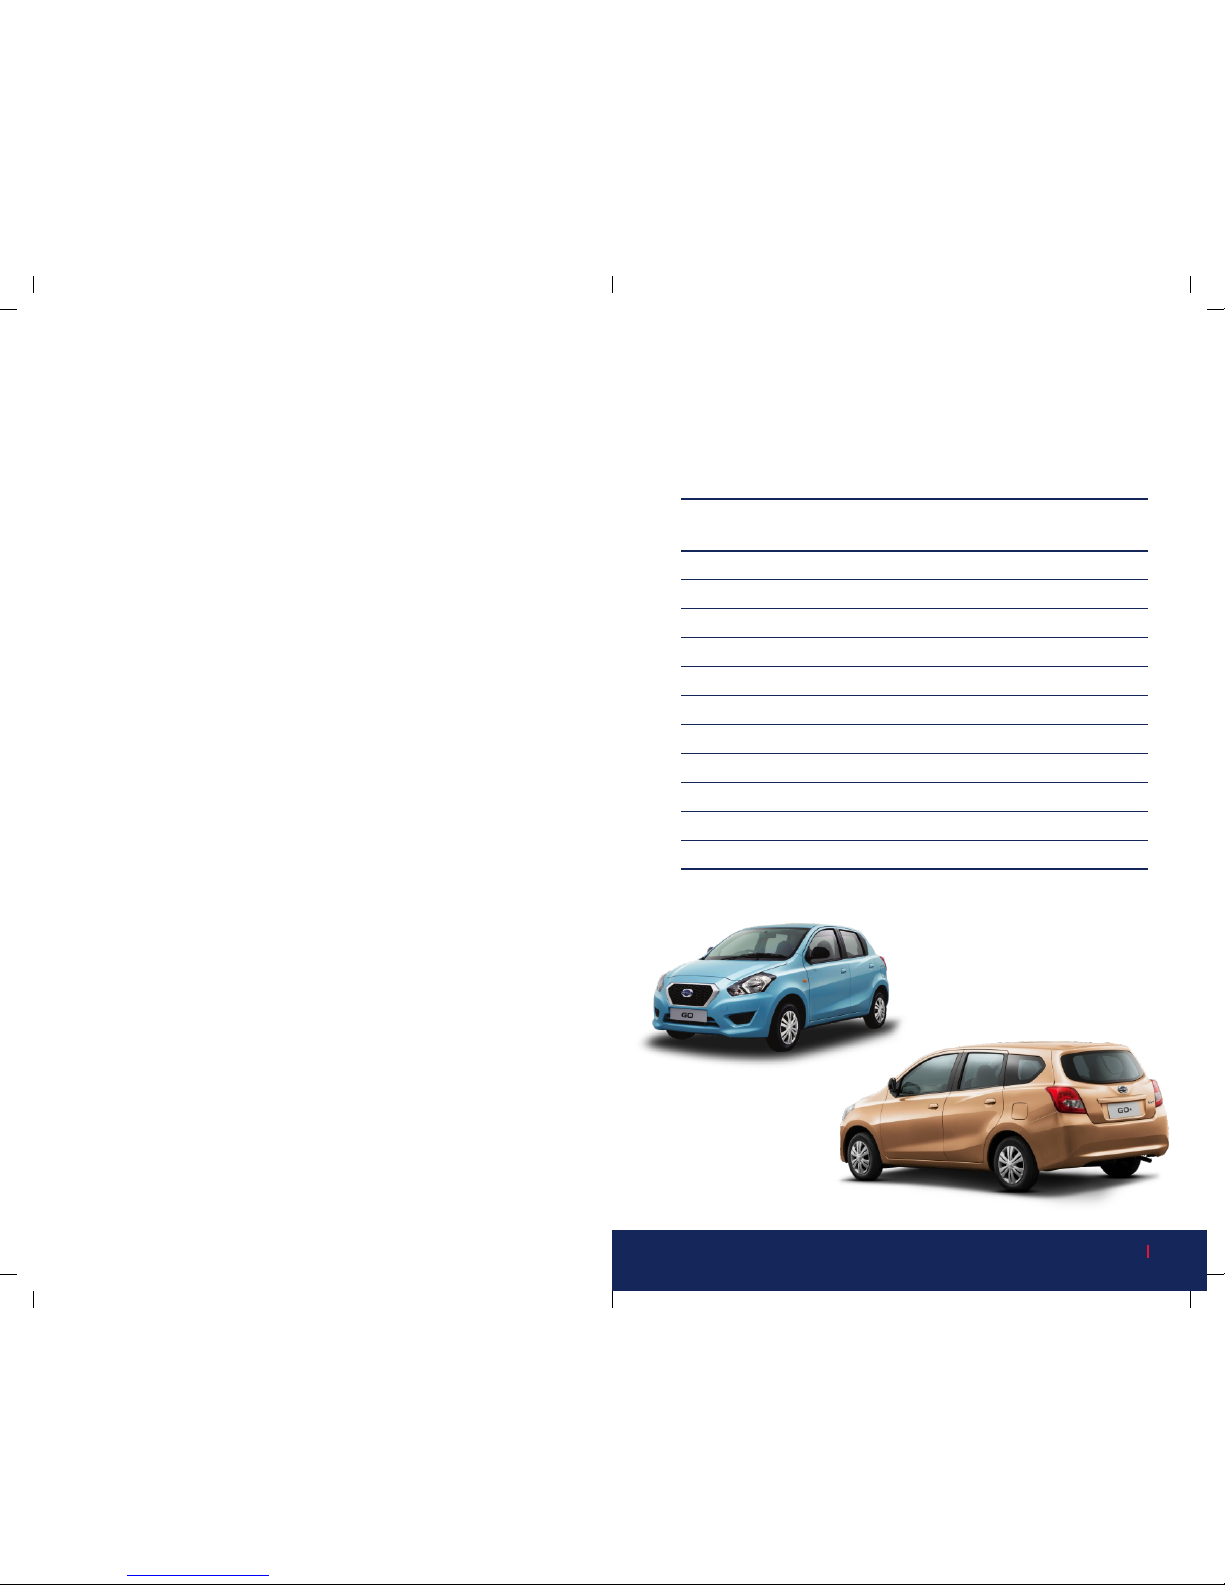
Datsun GO
This Quick Reference Guide does not replace you vehicle’s owner’s manual. It
provides creamy information about your vehicle. For additional information you
should always refer the owner’s manual or your nearest authorized dealer.
LOOKING FOR MORE INFORMATION
Quick Reference Guide
Datsun GO+
Page 2

Page 3
Quick Reference Guide
1
Revision 02
TABLE OF CONTENT
Sl. No. ITEM Page No.
1 TIPS ON IMPROVING YOUR 2
CAR FUEL EFFICIENCY
2 HOW TO CALCULATE MILEAGE 3
3 FOLLOW ME HOME 4
4 REAR SEAT BELT LENGTH ADJUSTMENT 5
5 TUMBLE SEAT OPERATION 6
6 THIRD ROW SEAT OPERATION 7
7 HOW TO USE MOBILE DOCKING STATION 8
8 KNOW YOUR DRIVE COMPUTER 10
9 DEFOGGING WINDSHIELD 12
10 JACK REMOVAL & STORAGE PROCEDURE 13
11 GENERAL TIPS 14
12 QUICK REFERENCE GUIDE FEEDBACK 15
Page 4
Quick Reference Guide
2
Quick Reference Guide
3
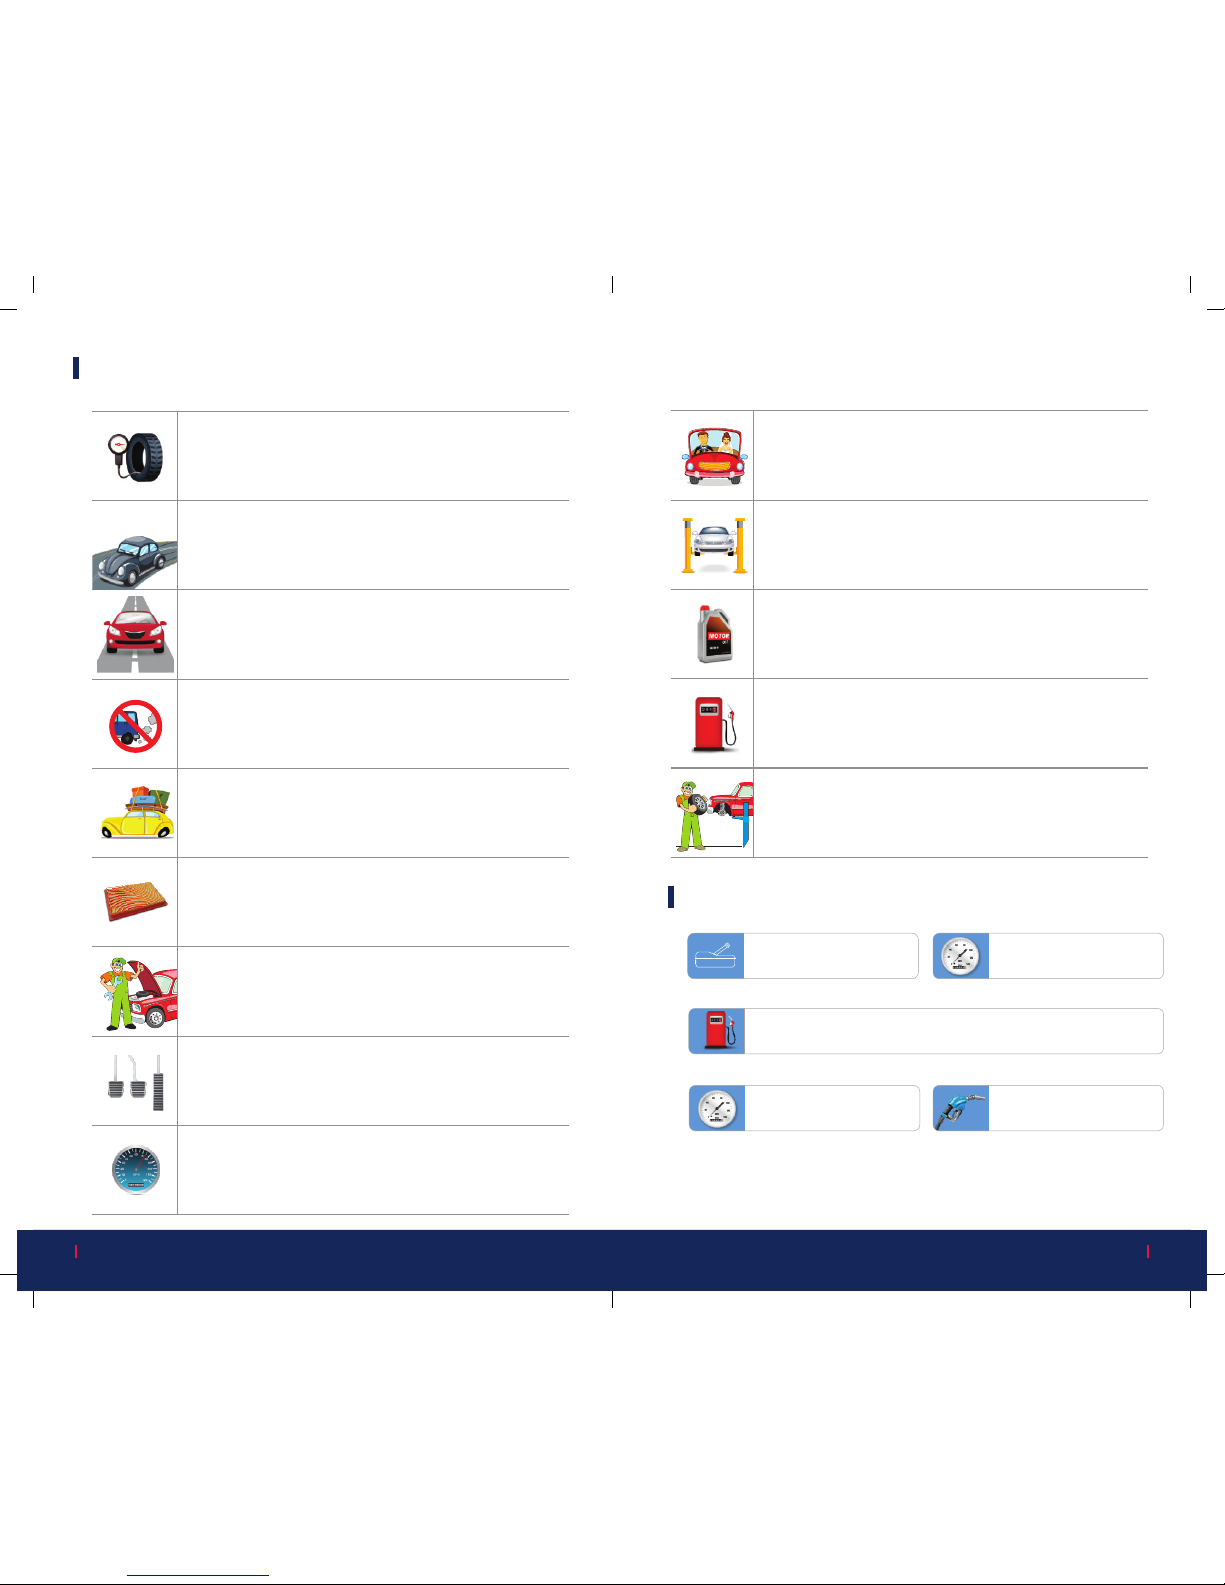
Use the Recommended Grade of Motor Oil:
For better fuel economy uses the recommended grade of
motor oil which is mentioned in the owner's manual.
Use Reputed Fuel Stations:
For good fuel quality, use reputed fuel stations. Don’t use
adulterated fuel.
Keep the Front Wheels in Proper Alignment:
Avoid hitting the kurb and slow down on rough roads.
Improper alignment not only causes faster tire wear but also
puts an extra load on the engine, which in turn, wastes fuel.
Keep the Bottom of Your Vehicle Free from Mud:
Keeping the underbody of the vehicle clean not only lessens
weight but also helps to prevent corrosion.
Use the Air Conditioner Smartly:
Drive with open window for a short while before using the
AC. Letting hot air out of the cabin first will put less demand
on the AC and help your vehicle cool faster.
6
1
2
Full filled “X” Liters Trip meter reading “Y” Kms
• •
HOW TO CALCULATE MILEAGE
03
Check Your Tire Pressure Regularly:
Check the Tire inflation pressure every two weeks, or at least
once a month (including the spare Tire).
Avoid Unnecessary Speeding Up & Breaking:
Always maintain a steady speed. Keep proper distance from
other vehicles to avoid sudden braking.
Acceleration Slowly & Smoothly:
Avoid sudden acceleration and use highest gear possible
while driving.
Do not rest your foot on the clutch or break pedal while
driving:
Resting your foot on the clutch pedal or brake pedal while driving
causes premature wear, overheating and poor fuel economy.
Avoid Long Engine Idling:
If you have a long wait or if you are at a traffic light, it is
better to turn off the engine and start again later.
Avoid Unneeded Weight in Your Vehicle:
Excess weight puts a heavier load on the engine, causing
greater fuel consumption.
Check Your Air Filter:
A dirty air filter restrict the flow of air into the engine,
which harms the performance economy.
Follow the Recommended Maintenance:
Good maintenance & handling of the vehicle can benefit you
in fuel efficiency and will avoid premature wear of
components.
Drive at Moderate Speed:
The faster you drive, the lower the fuel economy. Maintain
moderate speed on highways to improve fuel economy.
TIPS ON IMPROVING YOUR CAR FUEL EFFICIENCY
X X
Calculate average fuel
consumption (km/|)=Y/X
Fill the tank to full by using
auto cut-off mode on the fuel
gun at the fuel station.
4
Check the trip meter reading
for the distance driven - Y kms.
3
Set trip meter reading to zero
& drive for at least 100kms at
a moderate speed.
Again, fill the tank using auto cut-off mode at the same fuel station. Note
down the quantity of fuel filled - X liters.
1 2
4 5
3
Page 5
REAR SEAT BELT LENGTH ADJUSTMENT
Rear seat belt is not rolled up automatica lly, passe nger need to
adjust by manually.
STEP-1:
Pull out the shoulder portion of
th e bel t so t hat it is sl i g htl y
slack.
STEP-2:
To shorten the belt, pull the free
end in the direction of the arrow
as shown.
STEP-3:
Th e sho uld e r por tio n shou ld
have just enough slack so that a
cl en che d st can be inse rted
between belt and your chest as
shown.
STEP-4:
After use, always rehang the belt
o n t h e h o o k p r o v i d e d o n
shoulder anchor cover.
To Tighten
To Check Slack After Use
Value to customer
Quick Reference Guide
4
Quick Reference Guide
5
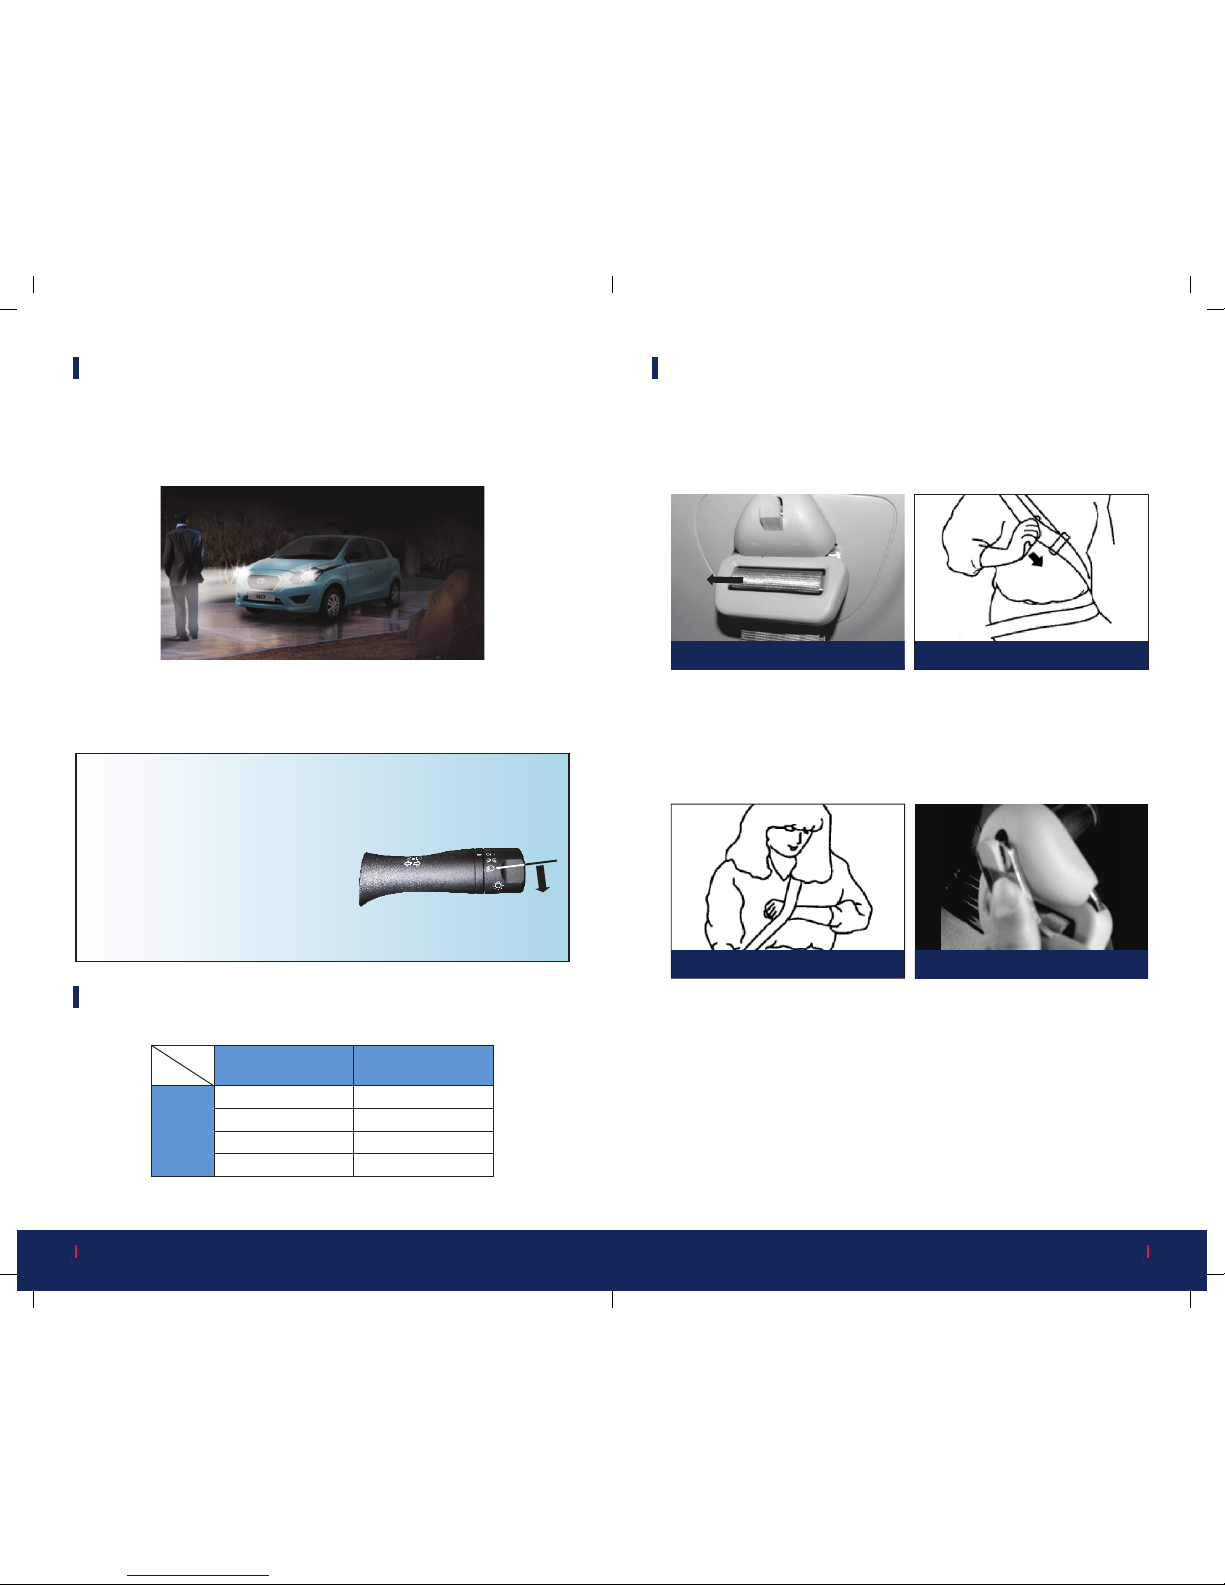
FOLLOW ME HOME [FMH]
Value to customer
DATSUN-GO helps customer by providing il lumination towards
home or destination after parking at night.
§ Good visibility & safety at night.
§ Automatic headlamps turn OFF.
§ Customized headlamp ON duration.
Timer Duration Customization:
Headlamps on-duration time can be customize by number of pulling.
1 30 sec
2 60 sec
3 90 sec
4 or more 120 sec
Passing switch
pulling sequence
Activation time
Operation
Steps to operate:
1. Turn off the IGN & ACC switch.
2. Ensu re all ot her lamp s are
turned OFF.
3. Pu ll an d rel eas e the pass ing
sw i tch tow a rd s ba c k of th e
vehicle as indicated.
4. Head lamp turns ON and turns
OFF 30 sec. later automatically.
Page 6
Quick Reference Guide
6
Quick Reference Guide
7
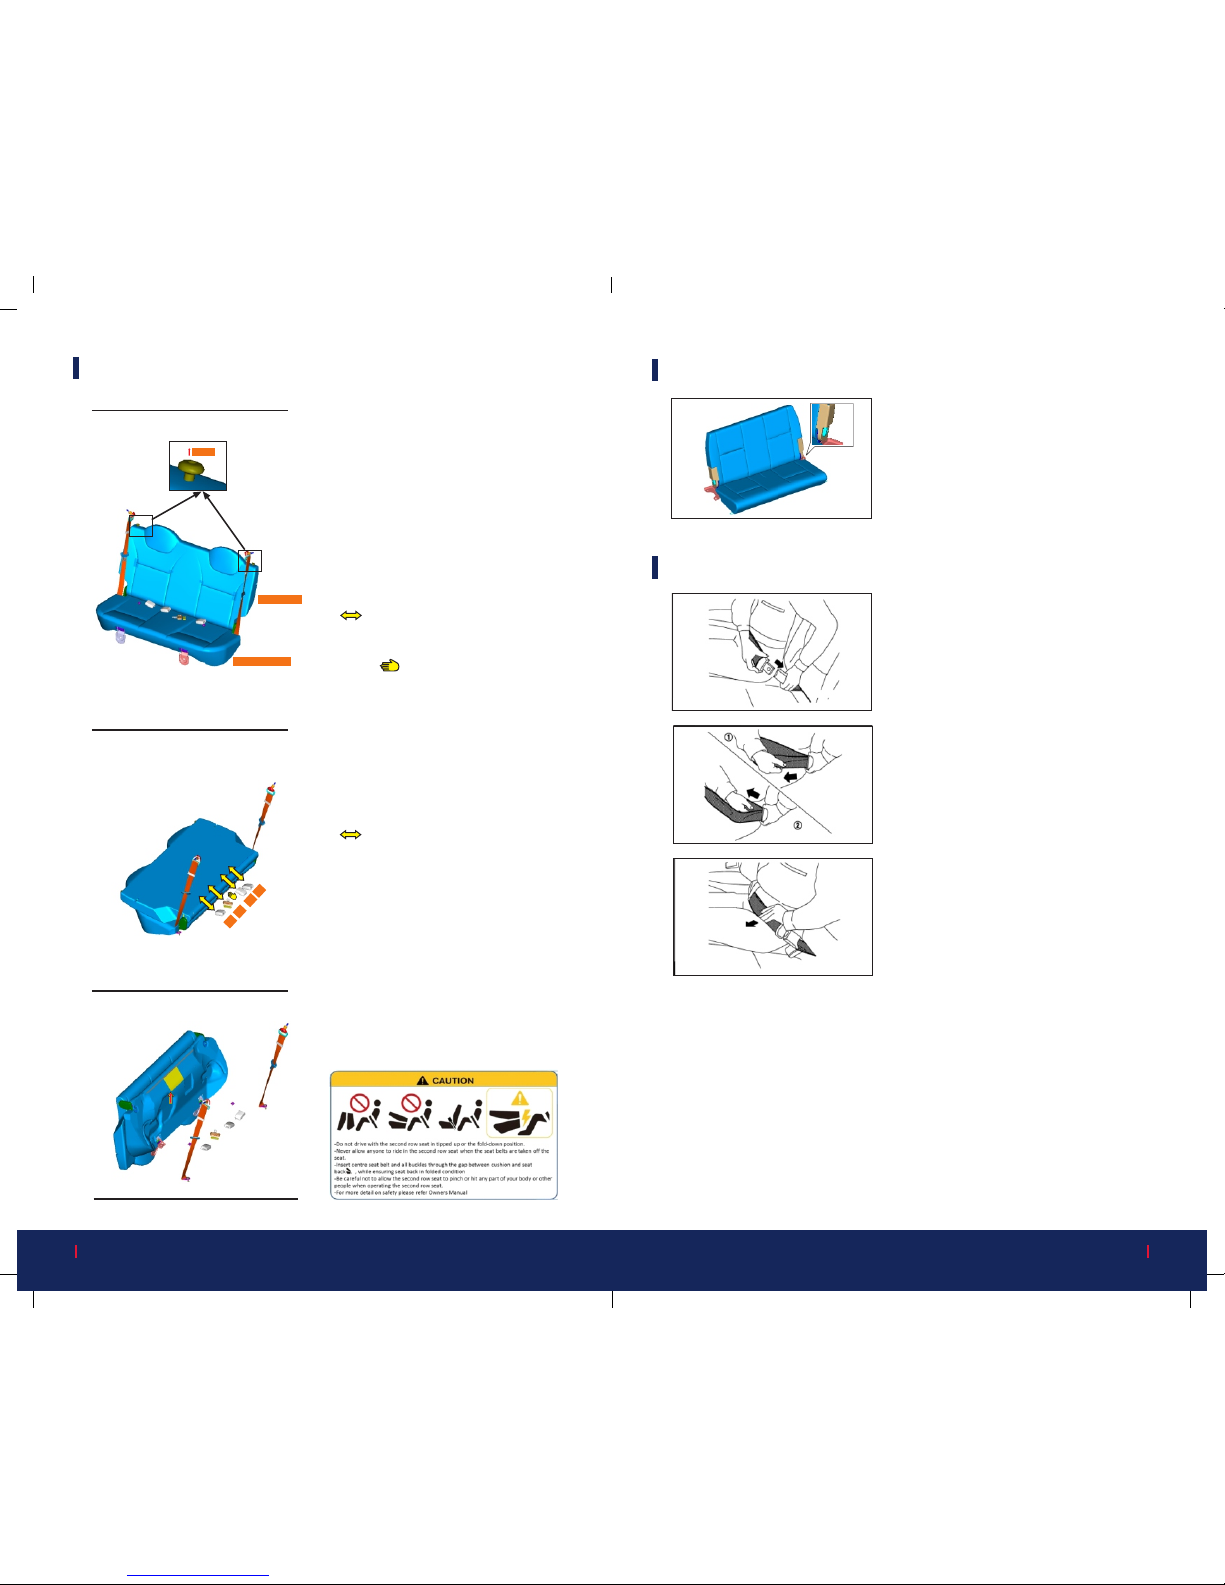
TUMBLE SEAT OPERATION [IF EQUIPPED]
PULL
Fig. 1
Fig. 2
Fig. 3
REAR TUMBLE SEAT USAGE
Re a r se a t tum b l e pos i t i on h e l p s th e
passenger to enter the third row seat
A) To fold 2nd row seat [For Tumble
position]
Ÿ Pull the Knobs to unlock seat back as
shown in (Fig: 1) & fold the seat back
as shown in (Fig: 2)
Ÿ Pullout all the buckles [b1,b2,b3] and
center s e a t b e lt [s ] fr o m t h e ga p
be tw ee n Sea t cu shi on & se at ba ck
( )an d pla ce it on th e oo r as in
(Fig: 2)
Ÿ L if t the fold ed seat from rea r si de
(Fig: 2 ) to take the seat for tumble
position as shown in (Fig: 3)
B) To unfold 2nd row seat [For Seating
position]
Ÿ Place the seat cushion on the oor as
shown in (Fig: 2)
Ÿ Insert all the buckles [b1,b2,b3] and
c ent er se at be l t [s] fro m t he ga p
b etween Seat cushion & seat bac k
( ) as shown in (Fig: 2)
Ÿ Lift the seat back and lock it to seating
position as in (Fig: 1)
Warning:
Ÿ Do not drive / ride the vehicle with the
second row seat in back fold position
or tumble position (Fig: 2 & Fig: 3)
Ÿ Be careful not to allow the second row
seat to pinch, hit any part of your body
or other peo ple when ope rat ing the
second row seat. Make sure the sea
Seat Back
Seat Cushion
b2
b3
b1
s
Caution Label information
THIRD ROW SEAT OPERATION [IF EQUIPPED]
Pull the lever towards the rear of the
vehicle to fold the seat back down.
To return the seat back to the seating
posi tion, li ft up the sea t ba ck and
push it to the upright position until it
is locked.
In ser t the tong ue in to th e buc kle
unt i l yo u he a r an d fe el th e la t ch
engage.
Ad j u s t t he s e a t b el t l e n g t h . To
shorten, hold the tongue and pull the
upper belt as illustrated. (1) To length,
hol d the tongu e and pull the under
belt as illustrated (2) .
Position the lap belt portion low and
sung on the hips as shown.
THIRD ROW SEAT BELT USAGE
Page 7
Quick Reference Guide
8
Quick Reference Guide
9
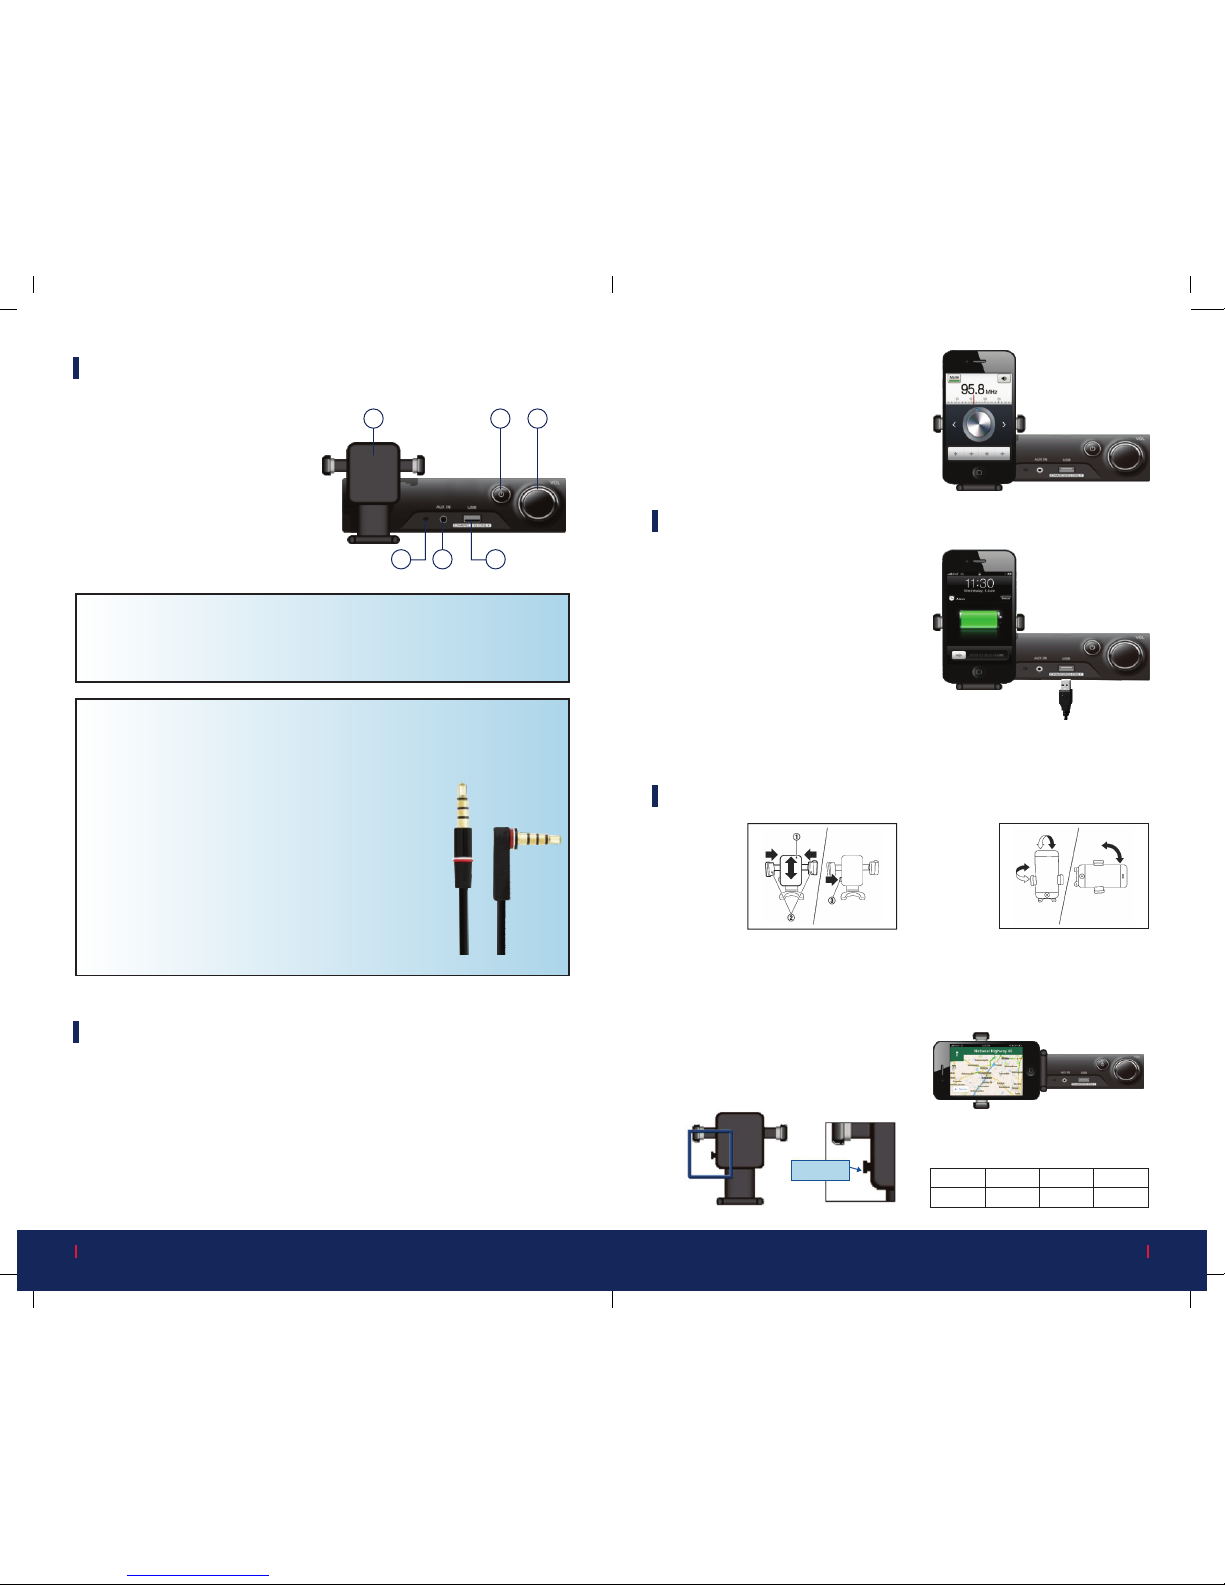
HOW TO USE MOBILE DOCKING STATION
Mobile docking station
1 Mobile Holder
2. Power ON/OFF Button
3. VOL (Volume) Control Knob
4. Microphone
5. AUX IN (auxiliary input) Jack
6. USB charging connector
MDS Features:
Mobile Docking Station (MDS) sys tem offers a
ha nds-free fac ili ty for you r mob ile pho ne to
enhance driving comfort:
§ Take 3.5mm (4 PIN) two terminal AUX-IN cable
(shown in picture).
§ Recommendation to use dealer option cable.
§ Connect one terminal of aux-cable to mobile
phone (Straight end).
§ Connect other terminal of aux-cable to MDS.
§ Place the mobile phone in mobile holder.
§ Dialing or Accept or Reject call in mobile phone.
Note: MDS will not support some mobile phones for hands-free telephone.
Music player connectivity
To enjoy, the personalized music play list, the MDS AUX IN audio input
jack accepts any standard analog audio input, such as from a portable
digital audio player, or mobile phone.
§ Take 3.5 mm (4PIN or 3PIN) two terminal AUX-IN cable.
§ Connect one terminal of aux-cable to mobile phone.
§ Connect other terminal of aux-cable to MDS.
§ Place the mobile phone in mobile holder.
MDS Features:
§ USB Charging
§ Mobile Holder
§ Handsfree Telephone (wired)
§ Music Player Connectivity
4
5
6
1
2
3
§ Enjoy your personal music play
list, music application and FM
rad io sta tion in usin g mobi le
phone.
§ So u n d o u tput from veh i c le
Speakers and Volume control in
MDS.
How to use mobile phone charging
Th e MD S ou tle t co nne c tor can
only charge the mobile phone.
§ Con ne ct a US B cable into the
connector.
§ The system starts charging the
U S B d ev i c e a u t o m a t i c a l l y
(Maximum output up to 1 A).
How to use mobile holder
To set a
mobile
phone,
place
the
mobile
phone
on the mobile holder and adjust
the mobile holder 1 depending
on size of mobile phone. Then
tighten the holder arms 2.
Adjust
the
mobile
holder
angle
until
the
desired position is achieved.
The mobile holder can be set
sideways or long ways.
To release the mobile phone from
mob ile holder, push the release
button 3.
Mobile holder
release button
Note: When AUX & USB cable are connec ted togeth er, noise may occur by
some mobile phone. In case, increase the mobile phone volume to max before
charging.
Caution - Maximum size & weight
of mobile phone that MDS support
Width Thickness
Height Weight
60mm 16mm 123mm 160g
Page 8
Quick Reference Guide
10
Quick Reference Guide
11
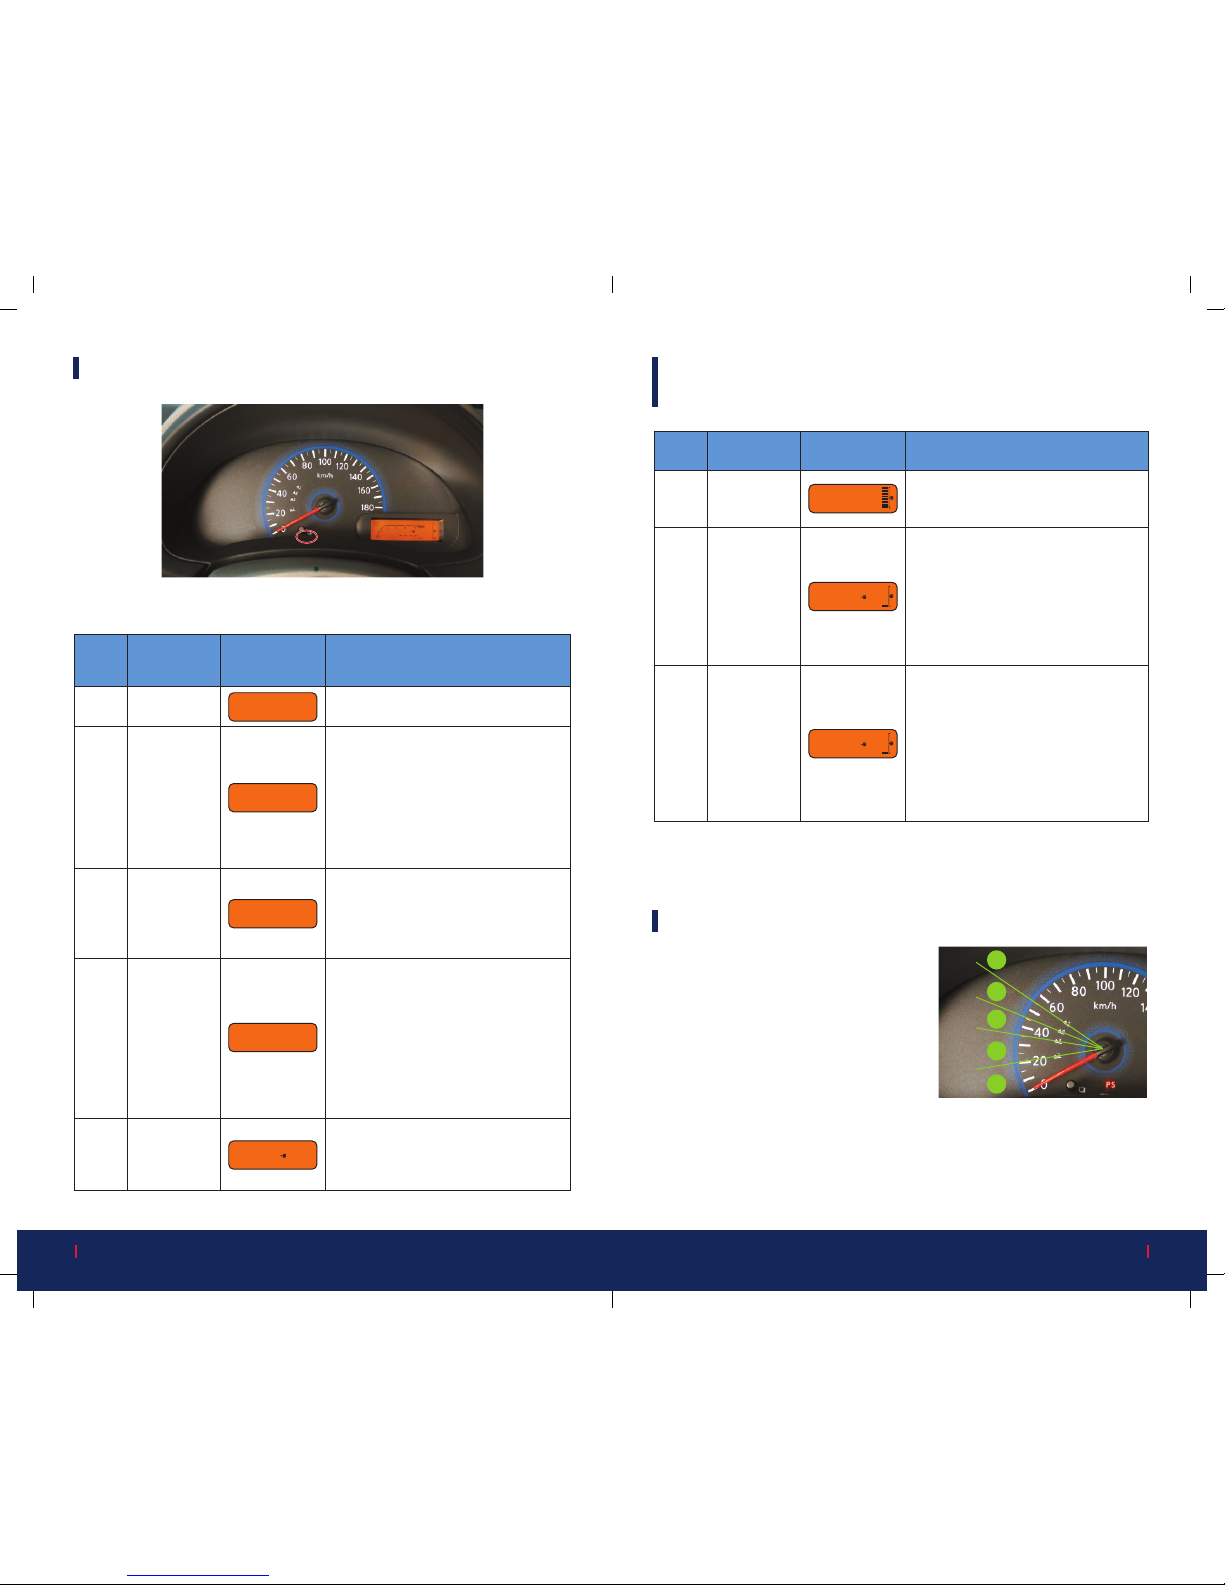
KNOW YOUR DRIVE COMPUTER
Mode
Display
Window
Press
Reset
Switch
Function
Odometer
(Km)
1.
Odometer displays the total distance
the vehicle has been driven.
Trip odometer
(km)
2.
Ca lc u la te s the di sta nc e tra ve ll e d
from previous reset.
I t c a n b e u s e d t o c a l c u l a t e t h e
dist an ce b e t w e e n one pl a c e t o
another.
To reset:
Wh ile di sp l ay ing TR IP od o me ter,
push the reset switch till reset to 0.0
Current Fuel
Consumption
(Km/l)
3.
It predicts the instantaneous mileage
based on your driving pattern.
Based on thi s pre di catio n, you can
ch a n g e yo u r dr i v i n g pa t ter n fo r
economic driving.
Average Fuel
Consumption
(Km/l)
4.
It sho ws the avera ge milea ge since
last reset.
Rec om me nd at io n: Rese t "averag e
fuel consumptio n" whenever tank is
relled.
To reset:
W h i l e di sp l ay i n g a v e ra g e fu e l
consumption, push the reset switch
till reset to 0.0.
Distance to
Empty (Km)
5.
It provides you with an estimation of
the distance that can be driven before
refueling. The display is updated every
30 Sec.
Each time the trip compute r reset switch is pushed, the display will change as
follows
888888
km
8888.8
km
88.8
km/l
88.8
km/l
AVG.
TRIP
ODO
8888
km
Reset
Know your Fuel Gauge, Low Fuel warning &
Distance to Empty Warning
Note: Fuel display in meter will be accurate only if the vehicle is parked on at
surface. When driving uphi ll or round ing curves, the fuel in the tank shifts,
which may momentarily change the display.
Usage (how to change gear)
Shifting gear at recommended speed that
is shown in meter scale.
Up to 20km/h : use 1st Gear
Between 20 to 35km/h : use 2nd Gear
Between 35 to 45km/h : use 3rd Gear
Between 45 to 55km/h : use 4th Gear
Above 55km/h : use 5th Gear
Mode
Display
Window
Function
Sl.
No.
Primary
Warning:
Distance to
empty display
& Low Fuel
warning
segments
starts blink.
2.
Blink star ts when fuel leve l in tank
drops below approximately 4.5ltrs.
This is the warning to rell the fuel on
priority.
Secondary
Warning:
Distance to
empty display
becomes "---"
and Low Fuel
warning
segments
blink.
3.
Distance To Empty display change to
"----" when fuel level in the tank drops
below approximately 3.5ltrs.
This state will continue unti l fuel in
the tank becomes empty.
No te: Ge ar Sh ift Gu ide he lp s to red uce fue l con s um pti on. I t doe s not
recomme nd the approp riate ge ar shi ft for all dri vin g situ ati ons. In certai n
sit uat ion s, only the driver can select the correc t gear (for exam ple , when
overtaking or driving up a steep gradient).
Fuel Gauge
Segments
Fuel tank capacity is around 32ltrs
Each segment denotes approximately
4ltrs.
1.
1
2
3
4
5
Know your Gear Shift Guide
8888
km 0
1
----
km 0
1
0
1
1
2
3
4
5
Page 9
Quick Reference Guide
12
Quick Reference Guide
13
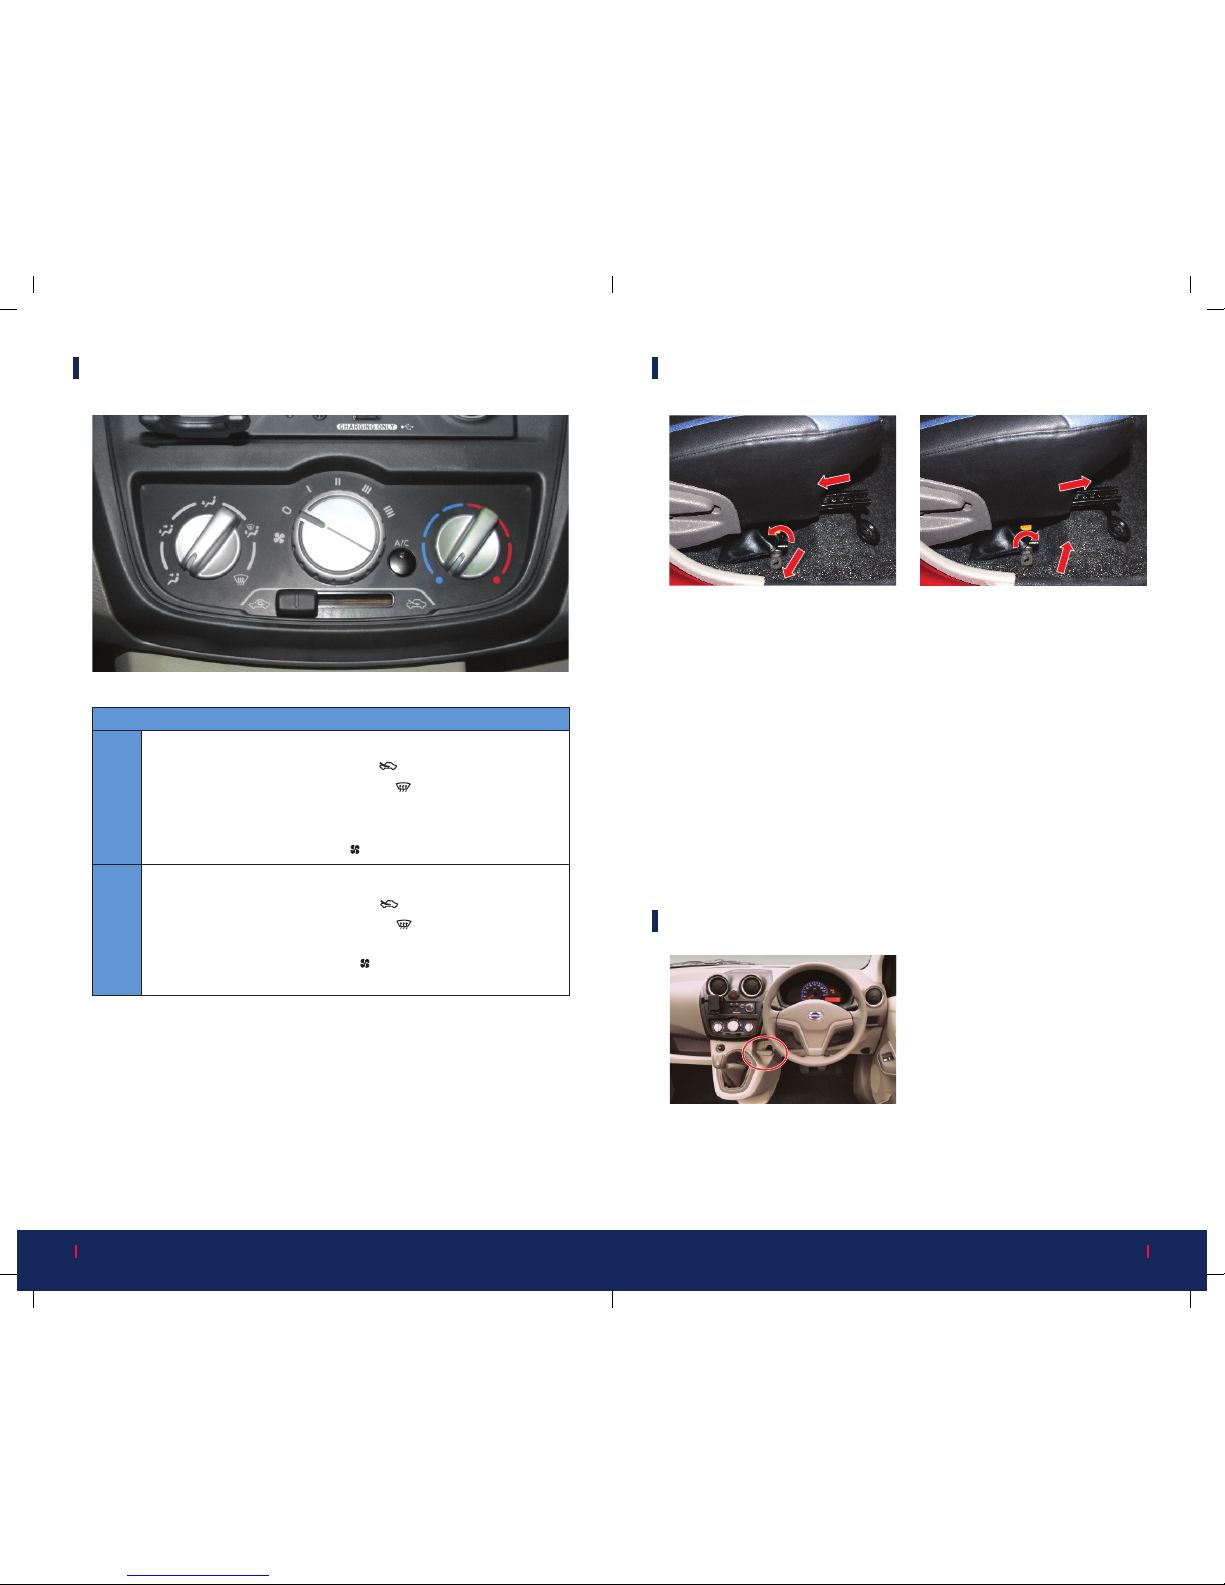
DEFOGGING WINDSHIELD
Manual Air Conditioner
To remove Internal fog on Windshield
1. Move the air intake lever to the “ ” fresh air position.
2. Turn the airow control dial to the “ ” defogger position.
3. Turn the “A/C” button on (if equipped).
4. Turn the temperature control dial to the desired position.
5. Turn the fan speed control “ ” dial to the desired position.
To remove External fog on Windshield
1. Move the air intake lever to the “ ” fresh air position.
2. Turn the airow control dial to the “ ” defogger position.
3. Turn the temperature control dial maximum hot position.
4. Turn the fan spee d control “ ” dial to the maximum spee d
position.
§ Blower without AC should only be used with Fresh Air mode to
avoid any fogging.
§ Operate AC at rst blow er speed after initial cooli ng at high
speed.
§ Do no t tur n the co l d air fro m the ve nti l ato rs to wards th e
windows side.
INTERNAL
DEFOGGING
EXTERNAL
DEFOGGING
JACK REMOVAL & STORAGE PROCEDURE
To take out the jack from the
vehicle:
1. Slide the FR RH seat
(Driver seat), to the rear
most position.
2. Hold the jack and slowly
screw down the handle
joint of the jack, so that
jack head will be free from
contact with Jack bracket.
3. Take the Jack out of the
vehicle.
To store th e ja c k in s ide the
vehicle:
1. Place the ja c k unde r the
driver seat.
2. Screw up the handle joint
s u c h t h a t j a c k h e a d
t o u c h e s w i t h th e J a c k
Bracket surface, below the
s e at c u sh i on [ p l ea s e
co n rm n o lo ose n e ss of
Jack].
3. Ad jus t the dr ive r sea t as
per your comfort.
To apply parking brake-
Pull the lever out slowly.
To release parking brake –
Sl i g htly tur n th e le v er anticlockwise.
Push in the lever completely &
ensure parking brake warning
light goes out, before driving.
Know your stick type parking brake
Page 10
Quick Reference Guide
14
Quick Reference Guide
15
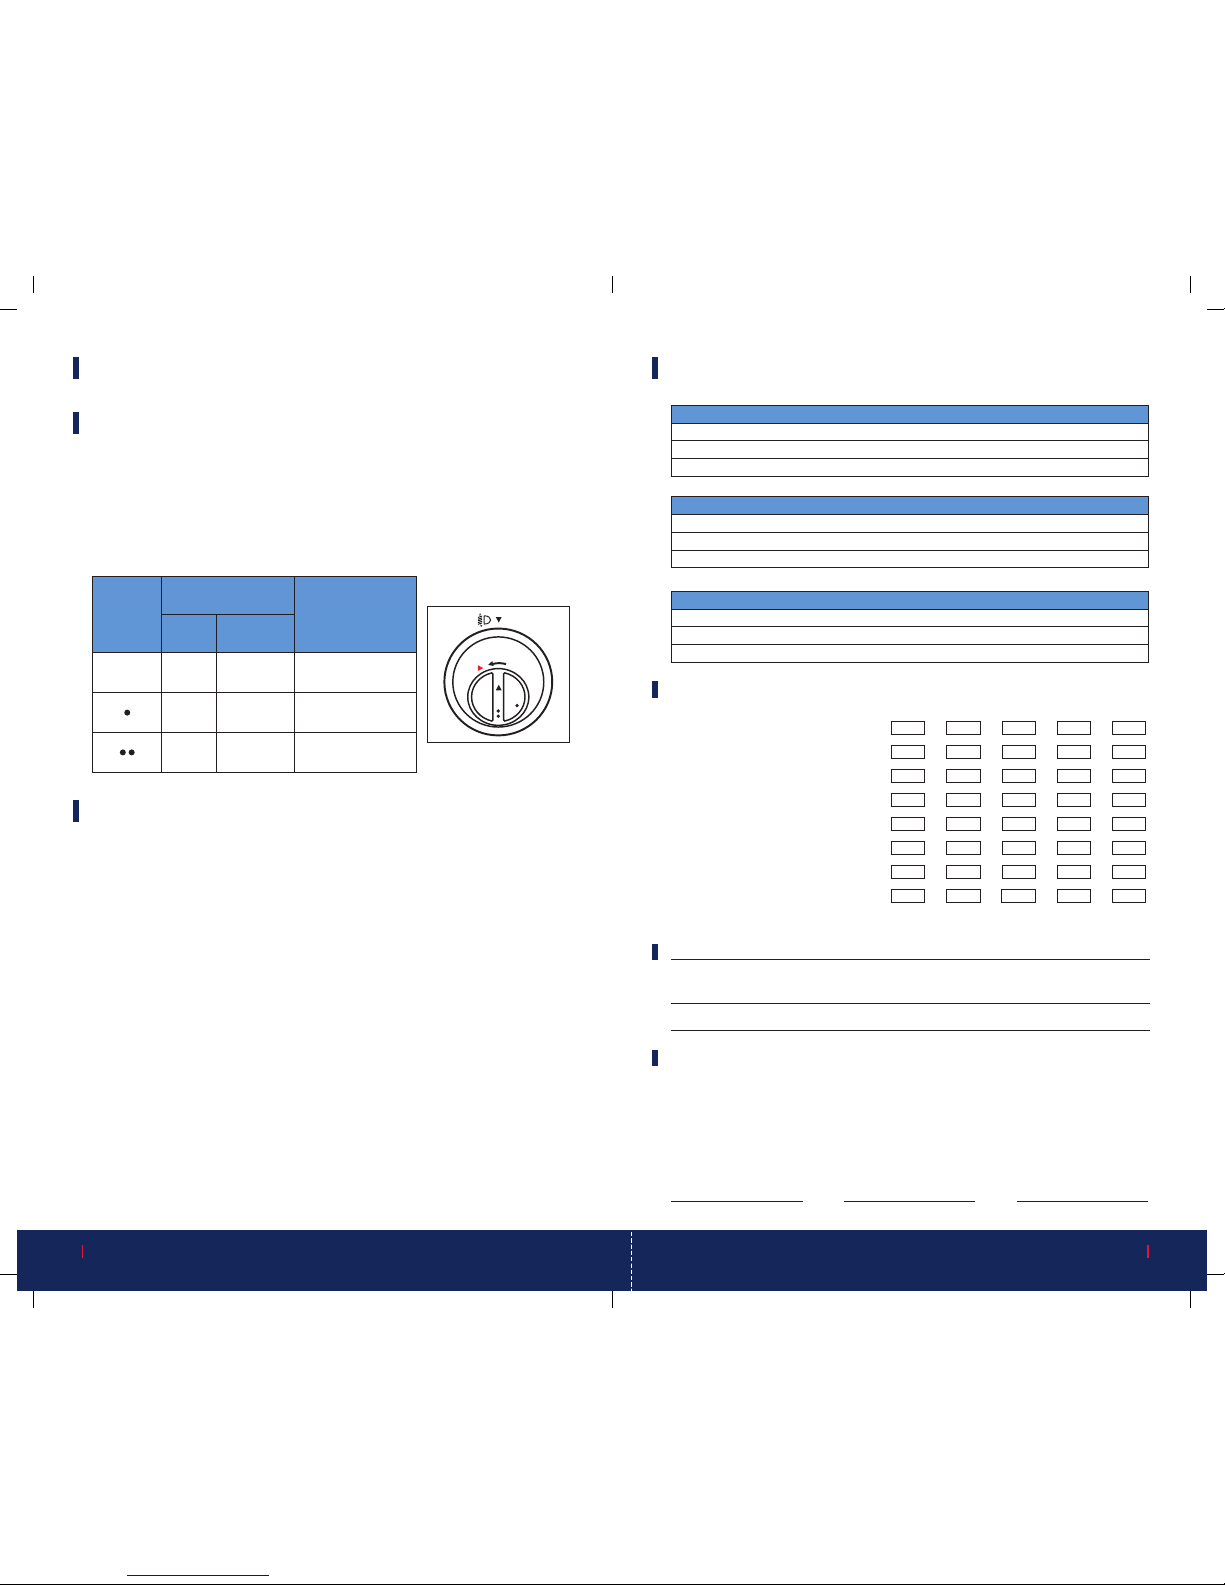
GENERAL TIPS
Head Light Levelling Device If Equipped
To adjust the headlight beam level accord ing to the number of
passengers and the loading weight, in the luggage area, turn the
beam leveling switch.
The higher the number of the switch position, the lower the
head light beam level.
Weight of load
in luggage
compartment
(approx)
1 or 20
No load
Number of
Occupants
Switch
Position
Front
Seat
Rear
Seat
No
occupants
2
No load or
approx. 16KG
3
1
Approx.
Max 224KG
No
occupants
Other Information
§ Audio and Haza rd switches are not ill um inated in the dark.
(without illumination)
§ Stopping distance increases with increasing vehicle speed. Apply
brakes well ahead of the stopping points.
§ Tire rotation should be done at after every 10,000 Km's.
§ Clutch pedal should be fully pressed for smooth gear shifting.
Fog may temporarily from inside the lens of the exterior lights in the
rain or in a car wash. A temperature difference between the inside &
the outside of the lens causes the fog.
The is not a malfunction. If large drops of water collect inside the
lens, contact authorized dealer.
Headlight Fog Condensation
0
QUICK REFERENCE GUIDE FEEDBACK
Dealer Information
Dealership Name
Customer Advisor
Sales Manager Name
Sale Date
Model
Variant
Color
Other
§ Warranty Information.
§ Owner’s Manual information.
Customer Customer Advisor Sales Manager
Material Quality Rating
§ Tips for car fuel efficiency
§ Follow me home
§ Tumble seat operation
§ Third row seat operation
§ Seat belt usage
§ Mobile docking station
§ Know your drive computer
§ Jack removal and storage
1 2 3 4 5
Suggestions for Improvement
Poor
Below
Average
Good Excellent
Average
Customer Information
Customer Name
Age
Mobile Number
Occupation
Vehicle Information
Vehicle
VIN Number
 Loading...