

Page 1

PRC1077-MSOP
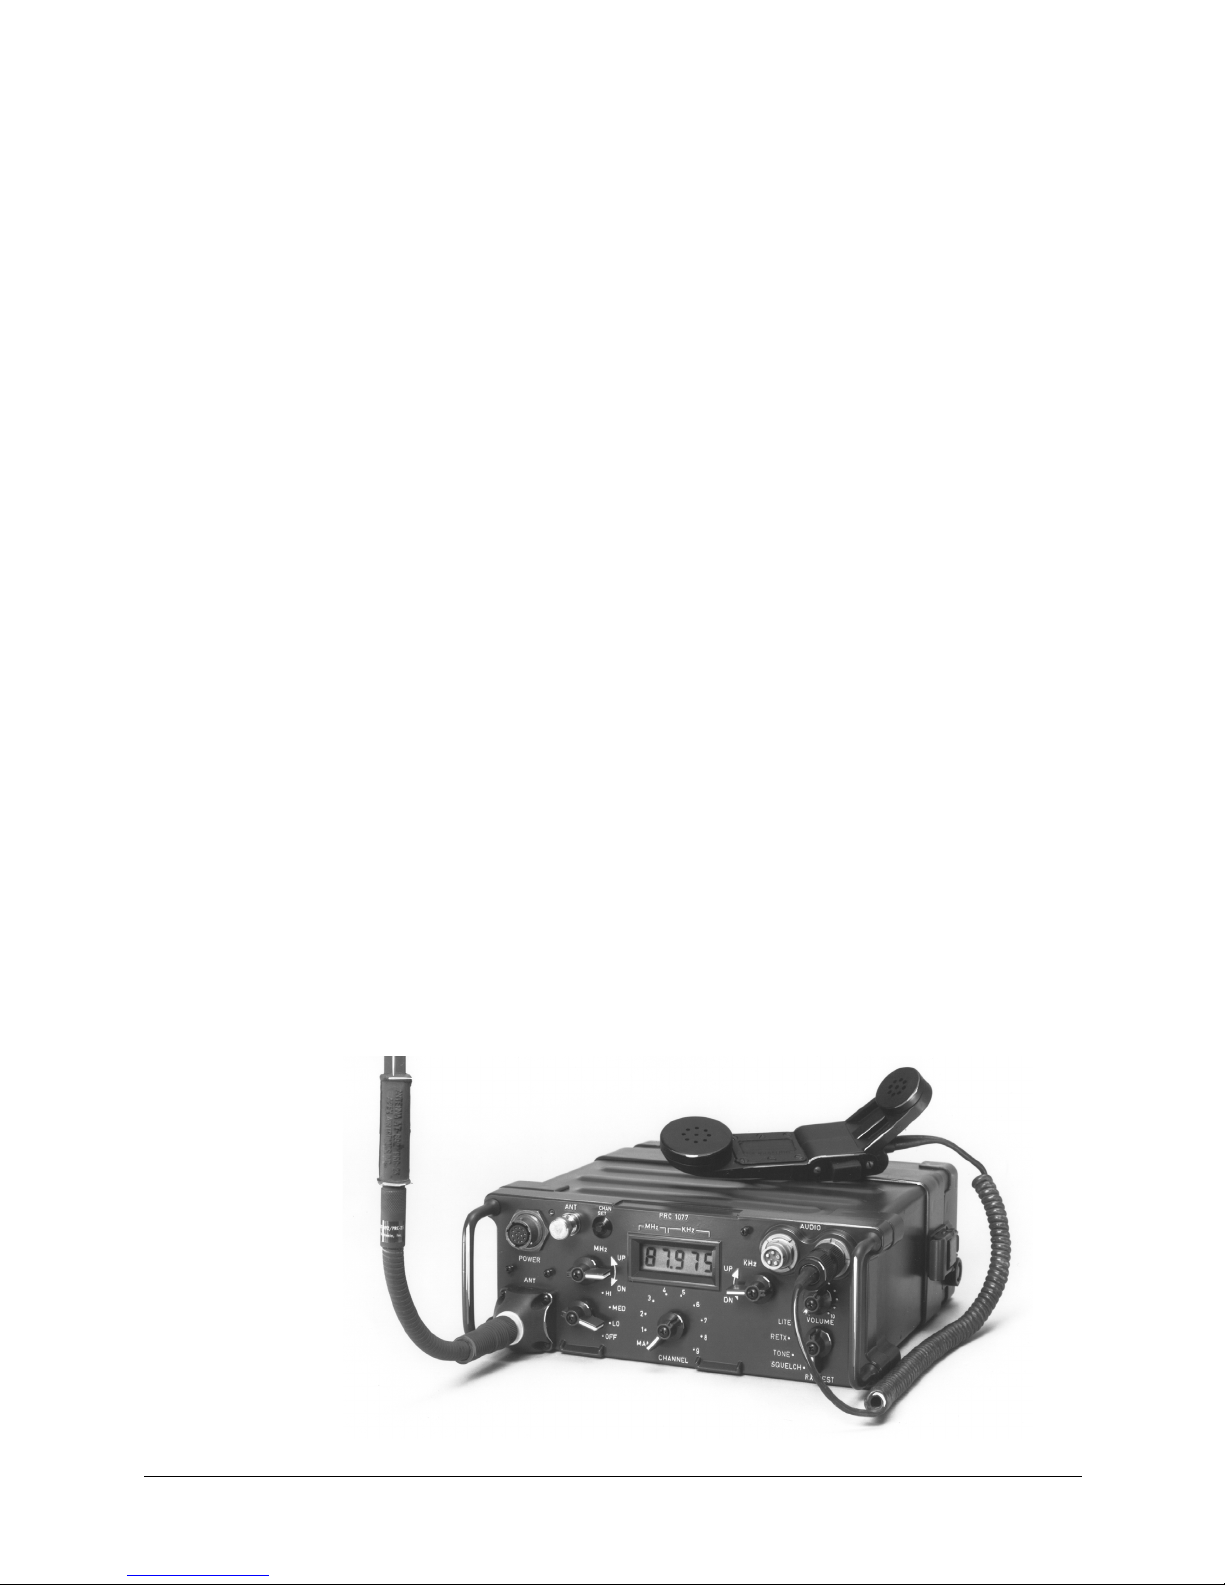
PRC1077
Radio Set
Operator Manual
Datron World Communications Inc.
Manual Part No. PRC1077-MSOP
Release Date: March 2007
Revision: C
3030 Enterprise Court
Vista, CA 92081, U.S.A.
Phone: (760) 597-1500 Fax: (760) 597-1510
E-Mail: sales@dtwc.com
www.dtwc.com
Page 2

Page 3

Change Description
Date of
Revision
Revision
Letter
Description of Changes
Pages
Affected
6/1991 A Original release All
6/2006 B Overall update to text and format. All
3/2007 C Changed cable part number part number from
C991611 to C991618.
Added protective power cap to replacement parts
Page 2-22
Figure 2-14
Page 4-4
table.
PRC1077-MSOP i
Page 4

Page 5

© 2003 Datron World Communications, Inc. (Datron)
All rights reserved.
Datron World Communications, Inc.
This manual, as well as the software described in it, is
furnished under license and may only be used or copied
in accordance with the terms of such license. The information
in this manual is furnished for informational use
only, is subject to change without notice, and should not
be construed as a commitment by Datron. Datron
assumes no responsibility or liability for any errors or
inaccuracies that may appear in this book.
Except as permitted by such license, no part of this publication
may be reproduced, stored in a retrieval system,
or transmitted, in any form or by any means, electronic,
mechanical, recording, or otherwise without the prior
written permission of Datron.
Software License Agreement and Warranty
This software is licensed to the user (licensee) under the
express terms and conditions of Datron’s software
licensing policies and agreement as outlined below. By
receiving and installing this software package the user
(licensee) has indicated acceptance of the terms and conditions
of this agreement presented herewith.
As used in this document, the term “Software” shall
mean the application or control software in machine readable
format and the hardware protection key, along with any or all
supporting documentation, as well as all updated or enhanced
versions of the program supplied to the user at later date(s).
This software license does not include source code, and therefore, no license is granted with respect to source code of any
kind utilized directly or indirectly in any Datron or Datron
supplied third party product. Note, in some cases, covered
software may be included in Datron products in RAM or
ROM, and/or forms of machine readable code, not readily
accessible to the user or licensee.
In consideration of the terms and conditions of this
agreement, Datron grants the user a non-exclusive, nontransferable license to install and operate one copy of the program.
Licensee agrees not to attempt, aid, authorize, or direct any
effort, either directly or indirectly to reverse engineer or
reverse compile the Software. Licensee further agrees they or
their agents are not authorized to
make derivative versions or changes to the Software.
Title to and ownership of the Software shall at all times
remain with Datron and/or its licensors. Further, no
license is granted to copy or reproduce in any form whatsoever
the Software supplied without the express written permission
of Datron, prior to any such contemplated action.
Datron may terminate this agreement and discontinue
further warranty coverage at any time due to failure to
comply with the terms and conditions of this agreement.
In such an event, Datron will provide the user
with written notice of such a “failure-to-comply” and the
user will have 10 days to demonstrate that a remedy has
been implemented. If the user fails to perform, the
agreement will be terminated by further written notice
from Datron. Upon termination, the user shall immediately
return all original Software, documentation, and
any copies of each to Datron.
This Software is licensed “AS IS” and Datron provides a warranty that covers the media upon which the Software is embedded for a period of 30 days from receipt of the product. Under
this warranty policy Datron’s sole obligation shall be to
replace or repair, at Datron’s discretion, any such media that in
Datron’s opinion proves defective.
The user is obligated to provide Datron with a detailed
description of possible defects along with sample material
such that Datron can reproduce the identified defects.
By receipt and use, user (licensee) acknowledges that
certain software developed or distributed by Datron is
controlled by one or more governmental agencies. The
user (licensee) herewith acknowledges they will take all
necessary actions to comply with applicable regulations
concerning the use of licensed software. Further, Datron
is under no obligation to supply source code or documentation
of its software for any reason.
Datron makes no representation, express or implied, with
respect to any Software licensed under this document as to its
fitness for any particular purpose or intended use.
Furthermore, Datron shall have no liability under this
agreement for any incidental, special, or consequential
damages arising out of the use of any supplied software
programs. Datron reserves the right to make periodic
changes in it’s software for any purpose without any
obligation to notify users.
One Year Limited Warranty and Remedies
Datron warrants that its equipment is free from defects in
design, materials, and workmanship for a period of 12
months from the date of installation of the equipment,
but in no event later than 15 months from the date of
shipment. If the equipment does not provide satisfactory
service due to defects covered by this warranty, Datron
will, at its option, replace or repair the equipment free of
charge.
Should it be impractical to return the equipment for
repair, Datron will provide replacements for defective
parts contained in the equipment for a period of 12
months from the date of installation of the equipment,
but in no event later than 15 months from the date of
shipment.
This warranty is limited to the original purchaser and is
not transferable. Repair service performed by Datron is
warranted for the balance of the original warranty or 90
days, whichever is longer.
Exclusive Warranty: There are no other warranties
beyond the warranty as contained herein. No agent,
employee, or representative of Datron has any authority
to bind Datron to any affirmation, representation, or warranty
concerning the equipment or its parts that is not in
conformity with the warranties contained herein.
EXCEPT AS EXPRESSLY SET FORTH ABOVE, NO
OTHER WARRANTIES, EITHER EXPRESS OR
IMPLIED, ARE MADE WITH RESPECT TO THE
EQUIPMENT OR THE PARTS CONTAINED
PRC1077-MSOP iii
Page 6

THEREIN, INCLUDING BUT NOT LIMITED TO
THE IMPLIED WARRANTIES OF MERCHANTABILITY
AND FITNESS FOR A PARTICULAR PURPOSE, AND
DATRON EXPRESSLY DISCLAIMS ALL WARRANTIES
NOT STATED HEREIN.
Limitations of Warranty: This warranty does not
cover:
Physical damage to the equipment or its parts that does
not involve defects in design, material, or workmanship,
including damage by impact, liquids, temperature, or
gases.
Damage to the equipment or its parts caused by lightning,
static discharge, voltage transients, or application
of incorrect supply voltages.
Defects or failures caused by unauthorized attempts to
repair or modify the equipment.
Defects or failures caused by Buyer abuse or misuse.
Return of Equipment - Domestic: To obtain performance
of any obligation under this warranty, the equipment
must be returned freight prepaid to the Technical
Support Services. Datron World Communications Inc.,
3030 Enterprise Court, Vista, California 92081. The
equipment must be packed securely. Datron shall not be
responsible for any damage incurred in transit. A letter
containing the following information must be included
with the equipment.
a. Model, serial number, and date of installation.
b. Name of dealer or supplier of the equipment.
c. Detailed explanation of problem.
d. Return shipping instructions.
e. Telephone or fax number where Buyer may be contacted.
Datron will return the equipment prepaid by United Parcel
Service, Parcel Post, or truck. If alternate shipping is
specified by Buyer, freight charges will be made collect.
Return of Equipment - International: Contact Datron or
your local Representative for specific instructions. Do
not return equipment without authorization. It is usually
not possible to clear equipment through U.S. Customs
without the correct documentation. If equipment is
returned without authorization, Buyer is responsible for
all taxes, customs duties, clearance charges, and other
associated costs.
Parts Replacement: The following instructions for the
supply of replacement parts must be followed:
a. Return the parts prepaid to “Parts Replacement”
Datron World Communications Inc., 3030 Enterprise
Court, Vista, California 92081; and
b. Include a letter with the following information:
1. Part number
2. Serial number and model of equipment
3. Date of installation
Parts returned without this information will not be
replaced. In the event of a dispute over the age of the
replacement part, components date-coded over 24
months previously will be considered out of warranty.
Remedies: Buyer’s sole remedies and the entire liability
of Datron are set forth above. In no event will Datron be
liable to Buyer or any other person for any damages,
including any incidental or consequential damages,
expenses, lost profits, lost savings, or other damages
arising out of use of or inability to use the equipment.
1/95
Safety Considerations
This product and manual must be thoroughly understood
before attempting installation and operation. To do so
without proper knowledge can result in equipment failure
and bodily injury.
Caution: Before applying ac power, be sure that the
equipment has be properly configured for the available
line voltage. Attempted operation at the wrong voltage
can result in damage and voids the warranty. See the
manuals section on installation. DO NOT operate equipment
with cover removed.
Earth Ground: All Datron products are supplied with a
standard, 3-wire, grounded ac plug. DO NOT attempt to
disable the ground terminal by using 2-wire adapters of
any type. Any disconnection of the equipment ground
causes a potential shock hazard that could result in personal
injury. DO NOT operate any equipment until a suitable ground
has been established. Consult the manual section on grounding.
Servicing: Trained personnel should only carry out servicing.
To avoid electric shock, DO NOT open the case
unless qualified to do so.
Various measurements and adjustments described in this manual are performed in ac power applied and the protective
covers removed. Capacitors (particularly the
large power supply electrolytics) can remain charged for
a considerable time after the unit has been shut off. Use
particular care when working around them, as a short circuit
can release sufficient energy to cause damage to the equipment
and possible injury.
To protect against fire hazard, always replace line fuses
with ones of the same current rating and type (normal
delay, slow-blow, etc.). DO NOT use higher value
replacements in an attempt to prevent fuse failure. If
fuses are failing repeatedly this indicates a probable
defect in the equipment that needs attention.
Use only genuine Datron factory parts for full performance
and safety of this product.
Made in the USA
iv PRC1077-MSOP
Page 7

CONTENTS
Chapter 1: Introduction
The PRC1077 . . . . . . . . . . . . . . . . . . . . . . . . . . . . . . . . . . . . . . . . . . . . . . . . . . . 1-1
Technical Specifications . . . . . . . . . . . . . . . . . . . . . . . . . . . . . . . . . . . . . . . . . . . 1-2
Chapter 2: Installation
Unpacking. . . . . . . . . . . . . . . . . . . . . . . . . . . . . . . . . . . . . . . . . . . . . . . . . . . . . . 2-1
Location Considerations . . . . . . . . . . . . . . . . . . . . . . . . . . . . . . . . . . . . . . . . . . . 2-1
Manpack Installation. . . . . . . . . . . . . . . . . . . . . . . . . . . . . . . . . . . . . . . . . . . . . . 2-1
Figure 2-1. BB-LA6 Battery Installation . . . . . . . . . . . . . . . . . . . . . . . . . . . . . . . . . . . . 2-3
Figure 2-2. Manpack Components . . . . . . . . . . . . . . . . . . . . . . . . . . . . . . . . . . . . . . . . . 2-4
Figure 2-3. Manpack Accessories. . . . . . . . . . . . . . . . . . . . . . . . . . . . . . . . . . . . . . . . . . 2-5
Figure 2-4. AT-892/U Antenna Orientation in Various User Positions . . . . . . . . . . . . . 2-7
Mobile Installation . . . . . . . . . . . . . . . . . . . . . . . . . . . . . . . . . . . . . . . . . . . . . . . 2-8
Figure 2-5. Typical 5W 24 Vdc Mobile System with MT-1077-24 Adapter . . . . . . . . . 2-8
Figure 2-6. 5W 24 Vdc Mobile System with OA3633/VRC Adapter . . . . . . . . . . . . . 2-10
Figure 2-7. 50W 24 Vdc Mobile System . . . . . . . . . . . . . . . . . . . . . . . . . . . . . . . . . . . 2-11
Figure 2-8. 50W 12 Vdc Mobile System . . . . . . . . . . . . . . . . . . . . . . . . . . . . . . . . . . . 2-13
Fixed Base Installation . . . . . . . . . . . . . . . . . . . . . . . . . . . . . . . . . . . . . . . . . . . 2-15
Figure 2-9. 5W Fixed Base System . . . . . . . . . . . . . . . . . . . . . . . . . . . . . . . . . . . . . . . 2-15
Figure 2-10. 50W Fixed Base System . . . . . . . . . . . . . . . . . . . . . . . . . . . . . . . . . . . . . 2-17
Battery Charger Installation . . . . . . . . . . . . . . . . . . . . . . . . . . . . . . . . . . . . . . . 2-19
Figure 2-11. PRC-PS Power Supply/Battery Charger . . . . . . . . . . . . . . . . . . . . . . . . . 2-19
Figure 2-12. PRC-BC4 Multiple Battery Charger . . . . . . . . . . . . . . . . . . . . . . . . . . . . 2-20
Figure 2-13. PRC-HC-30 Hand Crank Generator with Battery Installed. . . . . . . . . . . 2-21
Figure 2-14. PRC-HC-30 Hand Crank Generator with Battery Connected Directly . . 2-22
Figure 2-15. PRC-SPU-10 Solar Power Generator with Battery Installed . . . . . . . . . . 2-22
Figure 2-16. PRC-SPU-10 Solar Power Generator with Battery Connected Directly . 2-23
Chapter 3: Operation
Quick Start . . . . . . . . . . . . . . . . . . . . . . . . . . . . . . . . . . . . . . . . . . . . . . . . . . . . . 3-1
Figure 3-1. Front Panel Controls . . . . . . . . . . . . . . . . . . . . . . . . . . . . . . . . . . . . . . . . . . 3-1
Settings, Indications and Connections . . . . . . . . . . . . . . . . . . . . . . . . . . . . . . . . 3-2
Presetting Channel Frequencies . . . . . . . . . . . . . . . . . . . . . . . . . . . . . . . . . . . . . 3-4
Jamming Recognition and Identification . . . . . . . . . . . . . . . . . . . . . . . . . . . . . . 3-5
Radio Set Compatibility . . . . . . . . . . . . . . . . . . . . . . . . . . . . . . . . . . . . . . . . . . . 3-6
Voice Security. . . . . . . . . . . . . . . . . . . . . . . . . . . . . . . . . . . . . . . . . . . . . . . . . . . 3-7
Chapter 4: Maintenance
Preventative Maintenance. . . . . . . . . . . . . . . . . . . . . . . . . . . . . . . . . . . . . . . . . . 4-1
Figure 4-1. PRC1077 Replacement Parts . . . . . . . . . . . . . . . . . . . . . . . . . . . . . . . . . . . . 4-3
PRC1077-MSOP v
Page 8

Replacement Parts. . . . . . . . . . . . . . . . . . . . . . . . . . . . . . . . . . . . . . . . . . . . . . . . 4-4
Appendix A: Radio Relay and Repeaters
Introduction. . . . . . . . . . . . . . . . . . . . . . . . . . . . . . . . . . . . . . . . . . . . . . . . . . . . . A-1
Radio Relay Operation . . . . . . . . . . . . . . . . . . . . . . . . . . . . . . . . . . . . . . . . . . . . A-1
Repeater Operation . . . . . . . . . . . . . . . . . . . . . . . . . . . . . . . . . . . . . . . . . . . . . . . A-2
Radio Relay Procedures . . . . . . . . . . . . . . . . . . . . . . . . . . . . . . . . . . . . . . . . . . . A-2
Dedicated Receiver . . . . . . . . . . . . . . . . . . . . . . . . . . . . . . . . . . . . . . . . . . . . . . . A-2
PRC1077 Repeater Installation. . . . . . . . . . . . . . . . . . . . . . . . . . . . . . . . . . . . . . A-3
Figure A-1. Frequency Interference Chart . . . . . . . . . . . . . . . . . . . . . . . . . . . . . . . . . . . A-4
Figure A-2. Transceiver Connections - Relay System . . . . . . . . . . . . . . . . . . . . . . . . . . A-4
vi PRC1077-MSOP
Page 9
CHAPTER 1
INTRODUCTION
The PRC1077
The PRC1077 Radio Set is a short-range, rugged, compact, VHF/FM
transceiver designed as a drop-in replacement for the military VHF AN/PRC-77
radio. The PRC1077 has several improvements over the PRC-77 including
higher output power, an extended frequency range with increased granularity in
frequency spacing, as well as electronic tuning, with 10 preset channels. The
PRC1077 radio set can also be integrated into the VRC-64 and GRC-160
vehicular radio systems.
The PRC1077 can be configured for manpack, mobile, and base applications in
5W or 50W output levels. The PRC1077 is supported with a full line of
accessories such as:
• Antennas
• Retransmission cabling
• Audio accessories
• Extended control accessories and software
• Transmission encryption module
• Batteries and battery charging equipment
• Backpacks
• Mounting hardware for mobile and base applications
PRC1077-MSOP 1-1
Page 10

1: Introduction
Technical Specifications
Note: Specifications are subject to change with notice or obligation.
Characteristic Specification
General
Frequency range 30 to 87.975 MHz
Available channels 2,320 channels with 25kHz frequency spacing
Preset channels 10 programmable memory channels
Channel programming Front panel
Modes FM; simplex, semi-duplex
Input power requirements 11 Vdc to 15 Vdc
Battery pack BB-LA6 sealed lead calcium; BA5598/U Lithium (case holds
spare battery)
Battery life 30 hours at 9:1 duty cycle (5W Tx) using BB-LA6 battery pack
Antennas 3 ft. tape and 10 ft. whip; 50 ohm antenna
Antenna port BNC for 50 ohm broadband antennas or for connection to
external amplifier; whip antenna port
Display Backlit, multi-function custom LED
Mechanical
Size 11.1 in. x 4.1 in. x 9.25 in. (28.2 cm x 10.5 cm x 23.5 cm);
W x H x D, including battery pack
Weight 9.7 lbs (4.4 kg), w/o battery pack; BB-LA6 pack is 2 lbs (0.9kg)
Package OD, sealed, including battery pack
Environmental
Temperature –40 to +60° C
Shock, vibration, humidity,
Per MIL-STD-810
fungus, altitude
Transmitter
RF power output 0.5W, 2W, or 5W (selectable)
Duty cycle Continuous service
Harmonics –50 dB
Receiver
Sensitivity 10 dB SINAD for 0.3 µV input
Squelch 150 Hz tone, carrier; selectable
Audio 500 mW into 16 ohms; 50 mW at 150 ohms; 0 dBm into
1-2 PRC1077-MSOP
600 ohms
Page 11

1: Introduction
Characteristic Specification
Accessories
Amplifier AM1077, 50W RF unit
Mobile mount MT1077, +12 Vdc or +24 Vdc versions; mounts to any vehicle
Power supply PS1077 for portable use; UPF7000A-28 or UPF7000A-12 for
base station
Chargers PRC-BC4 (4-unit charger), PRC-PS (power supply or 2-unit
charger), PRC-SPU-10 (solar power unit), PRC-HC-30 (hand
crank generator)
Converter AM1077CONV, 12 Vdc to 28 Vdc
PRC1077-MSOP 1-3
Page 12

Page 13

CHAPTER 2
INSTALLATION
Unpacking
The PRC1077 is shipped in a heavy-duty corrugated cardboard carton with the
accessories packed in a separate carton. Do not discard the cartons and packing
materials in case the equipment needs to be reshipped.
Inspect the equipment for possible damage during shipment. Check all
accessories against the packing list.
Location Considerations
Manpack and
Fixed Base
Applications
The PRC1077 operates at high frequencies with low power so the equipment
location can greatly affect its operating range. Typically, if the other station can
be seen (line of sight), the PRC1077 can provide good communication. An
intervening hill or a tall building may hamper or prevent contact with other
stations. Valleys and densely wooded areas also impair communication quality.
Positioning the transceiver on a hilltop or a tower increases the operating range.
If possible, avoid locations near a source of electrical interference, such as
power or telephone lines, radar sets, and hospitals.
Manpack Installation
The PRC1077 manpack configuration includes the following equipment:
Part Number Description
PRC1077 VHF/FM Transceiver, 30 to 87.975 MHz, 5/50W
AT-892/U Whip antenna, 1.2m (3.9 ft.), flexible
AT-271A/U Whip antenna, 3m (10 ft.), with AB591/U flexible base
BB-LA6 Battery, rechargeable, 6 AH
LC-2 Lightweight tubular backpack
MHS Military Handset, H-189/U-type or H-250/U military
PRC1077-MSOP 2-1
style
Page 14

2: Installation
Installing the
Battery
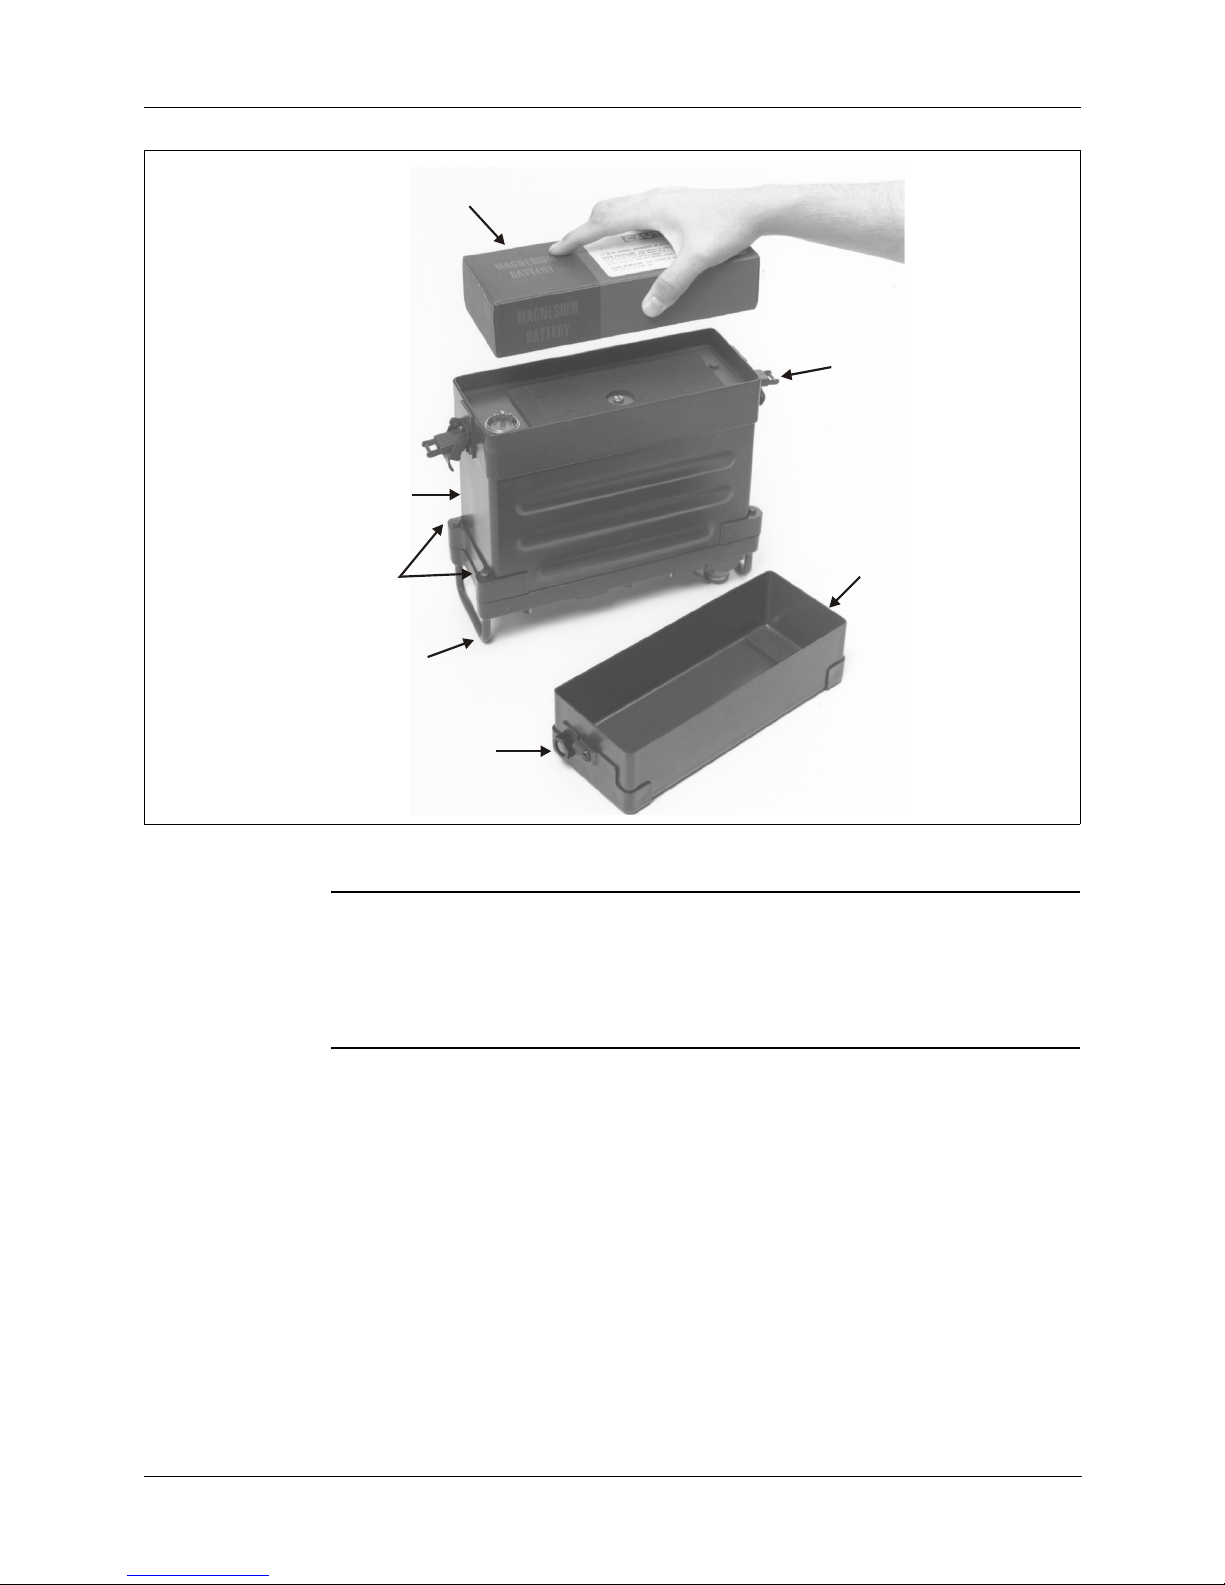
The PRC1077 uses the BB-LA6 sealed lead-calcium rechargeable battery. The
BB-LA6 battery is rated at 6.0 AH (maximum), providing the PRC1077 with
a mission life of approximately 30 hours when operating at a 9:1 (Rx:Tx) duty
cycle at 5W output power.
To install the BB-LA6 battery into the PRC1077 (refer to the figure on page
2-3):
1. Stand the PRC1077 on a level surface with the front panel facing down.
2. Pull the two clamps out from the transceiver case to release and push
down on the battery case.
3. Remove the battery box.
4. Check the battery connector. If it is damaged, the transceiver must be
repaired. Make sure the pressure test screw and relief valve are tight.
5. Position the battery so the connectors are aligned, then mate the
connectors.
6. Install the battery case, latch the clamps on the battery case hook, then
push the clamps in towards the case.
CAUTION: Remove the battery when the transceiver is not in use
for more than one day.
2-2 PRC1077-MSOP
Page 15
x
Radio
Connector
Transceiver
Case
Battery
Clamp
Pressure
Test S c r e w
2: Installation
lnstalling the
Manpack
Harness
Captive
Screws
Front Panel
Guard
Pressure
Relief
Val ve
Battery Bo
Figure 2-1. BB-LA6 Battery Installation
CAUTION: Battery power should be between 12.5 Vdc and 15 Vdc,
with positive (+) applied to the B terminal on the battery
connector (at the transceiver back) and negative (–) applied to the
A terminal. To avoid serious damage to the transceiver, do not
change the battery polarity.
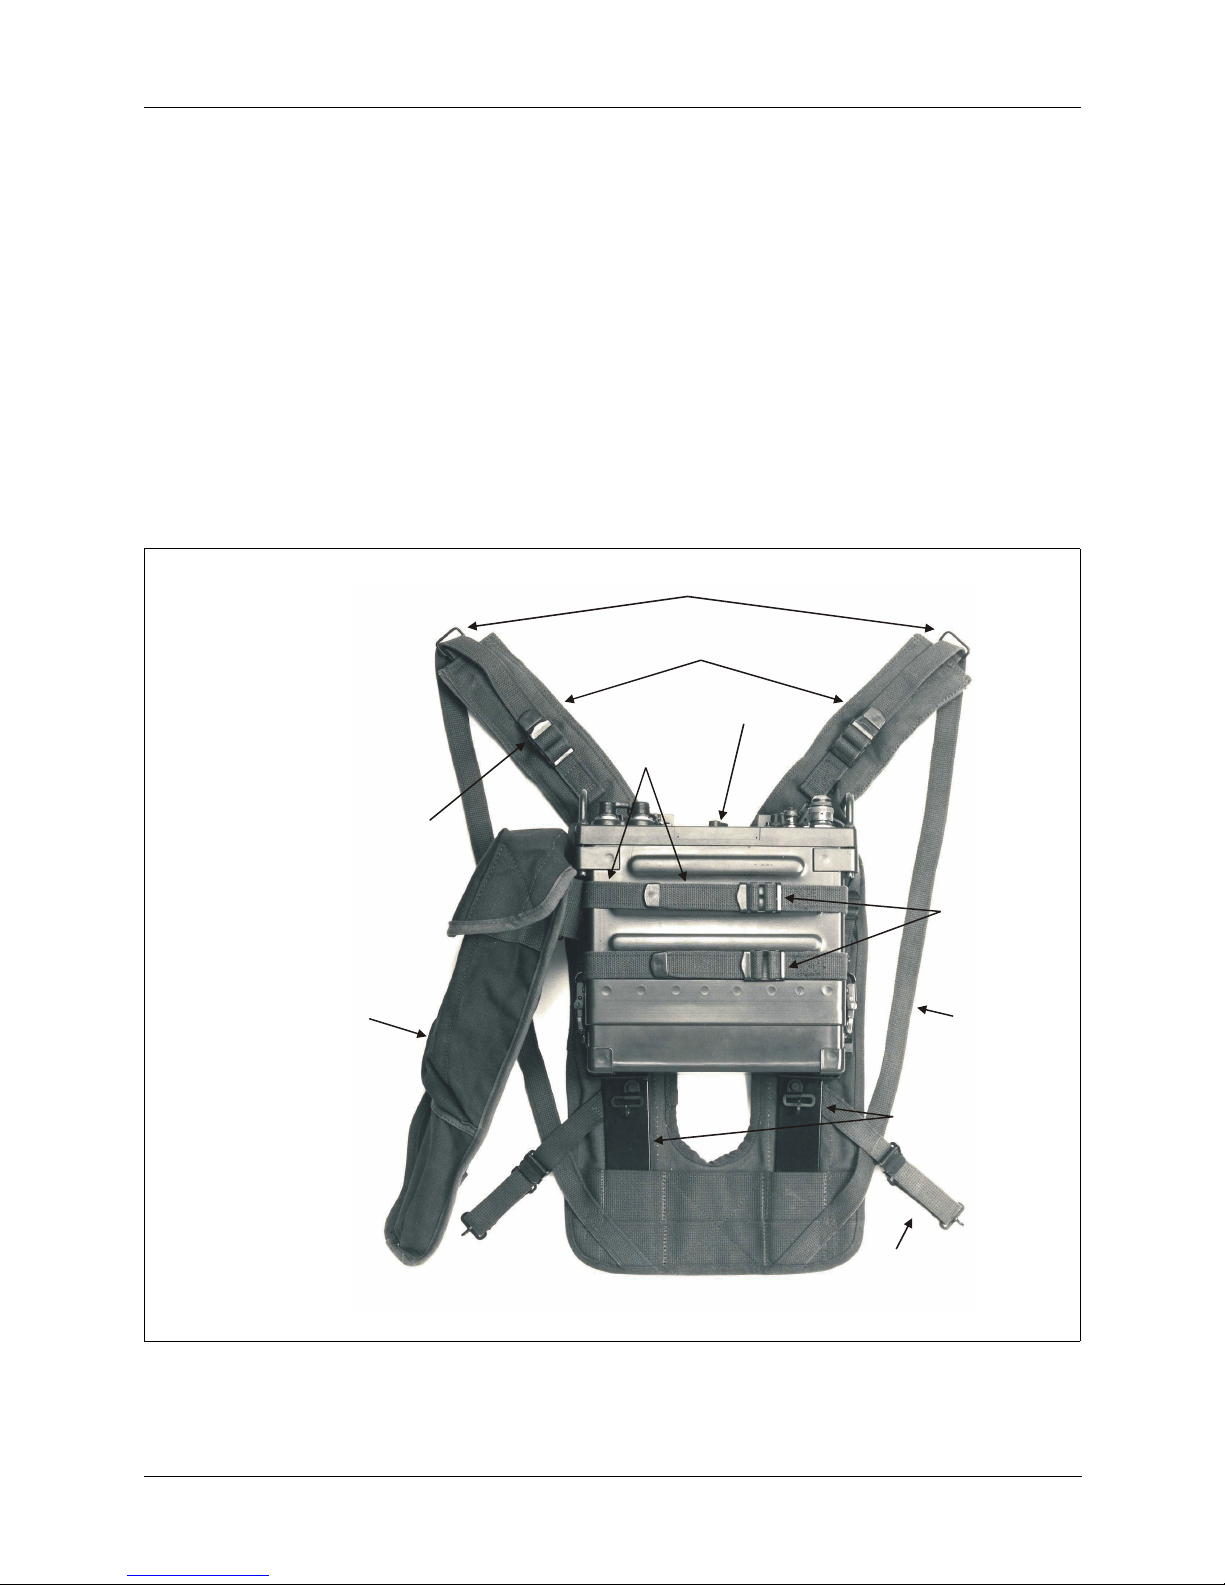
The PRC1077 manpack system includes the LC-2 or ST-138 backpack. The
LC-2 backpack is a lightweight tubular carrying frame with canvas straps.
To mount the transceiver to the harness (refer to the figure on page 2-5):
1. Place the harness flat on a level surface with the metal braces facing up.
2. Place the transceiver on the harness with the panel toward the top and the
battery case resting on the metal braces.
3. Fasten the transceiver to the harness with the two retaining straps; feed
the metal-tipped strap from below, through the center slot on the buckle,
and then down through the end slot on the buckle.
4. Clip the CW-503 canvas bag to the harness.
PRC1077-MSOP 2-3
Page 16
2: Installation
S
)
p
To mount the transceiver and harness on the operator:
1. Install either a AT-892/U or AT-271A/U antenna.
2. Connect the handset to one of the audio connectors on the transceiver
front panel.
3. Place the harness, with the transceiver attached, on the operator's back.
Place the shoulder straps over the operator's shoulders.
4. Feed the end of the lower strap through the right shoulder strap ring. Feed
the metal tip of the strap from below, through the center slot in the buckle,
then down through the end slot.
5. Install the left should strap in a similar manner to Step 4.
6. Hook the two belt straps to the combat belt.
houlder strap ring (2
Shoulder straps
Cotton Duck
Bag
Shoulder
Strap
Buckle (2)
Transceiver
Retaining
Straps
Retaining Stra
Buckles (2)
Lower
Strap (2)
Metal Braces
Belt Strap (2)
2-4 PRC1077-MSOP
Figure 2-2. Manpack Components
Page 17

2: Installation
Installing the
Antenna
Harness (ST-138)
Antenna
(AT-271A/U)
Support Antenna
(AB-591/U)
Figure 2-3. Manpack Accessories
Handset (H-250/U)
Cotton Duck Bag
(CW-503)
Use the AT-892/U 1.2m flexible tape whip antenna for smaller area coverage.
Use the AT-271A/U 3m folding whip antenna with AB-591/U flexible antenna
base.
To install the AT-892/U antenna (refer to the figure on page 3-1):
1. Remove the cover from the antenna mount.
2. Screw the bottom of the AT-892/U into the antenna mount.
To install the AT-271A/U antenna:
1. Remove the cover from the antenna mount.
2. Screw AB-591/U flexible antenna base into the mount.
3. Unfold the AT-271A/U by holding the base section (the heaviest section)
and carefully whipping it outward. If all sections are not secure, insert the
sections by hand.
4. Screw the extended AT-271A/U antenna into the AB-591/U antenna base.
PRC1077-MSOP 2-5
Page 18

2: Installation
Positioning the
Antenna
The AT-892/U 1.2m antenna is provided with a spring base to allow the
antenna to be oriented in other positions than vertical to the top of the
transceiver. For best communications the antenna should be vertical to the
ground (refer to the figure on page 2-7 examples A and B). When the operator
or the transceiver is in a position other than vertical, position the antenna so
that it is vertical to the ground, however, if having the antenna in the vertical
position reveals the operator's location, the antenna can be positioned so that it
is horizontal to the ground (refer to the figure on page 2-7 example C).
When the antenna is horizontal, the direction of communications is broadside
to the antenna. For best reception, position the communicating transceivers in
the same position (either horizontal or vertical).
CAUTION: Make sure the base is tight against the mount. Even a
small gap between the base and the mount can cause the antenna
to break leaving the threaded portion in the mount. The plastic
filling in the thread is designed to prevent the antenna from
unscrewing, however, if the plastic wears, vibration can cause the
antenna to become loose. Periodically tighten the antenna in the
mount.
2-6 PRC1077-MSOP
Page 19

A. MAN UPRIGHT
Antenna vertical
(radiation is directional)
2: Installation
B. MAN PRONE
Antenna vertical
(radiation is omni directional)
Antenna horizontal (see c)
Figure 2-4. AT-892/U Antenna Orientation in Various User Positions
Installing the
Handset
C. MAN PRONE
Antenna horizontal
(radiation directional and at
right angles to antenna)
The PRC1077 manpack configuration uses the MHS handset, which is either a
H-189/U or H-250/U military handset.
To install a handset on the PRC1077 front panel (refer to the figure on page
3-1):
1. Remove the rubber cover from the dual Audio connectors on the
transceiver front panel.
2. Place the handset connector onto the AUDIO connector. Turn the knurled
connector until the alignment pins engage with the audio connector slots,
then push in and twist clockwise. The flat side of the handset connector
should face the top of the PRC1077 transceiver.
PRC1077-MSOP 2-7
Page 20

2: Installation
0
Mobile Installation
The PRC1077 can be integrated into 12 Vdc or 24 Vdc mobile applications
with 5W or 50W output. Each configuration is designed for emergency rapid
removal.
MHS
to
+24 Vdc
source
4242-MK2
C991577
PRC1077
MHS
+24 Vdc
source
4242-MK2
C991577
PRC1077
C991949
to
C991580
MT-1
77-24
Figure 2-5. Typical 5W 24 Vdc Mobile System with MT-1077-24 Adapter
5W Systems All PRC1077 5W systems are designed for 24 Vdc power sources and require
the following accessories:
Accessory Part Number Description
Antenna 4242-MK2 Broadband vehicular center-fed whip
antenna.
Adapters MT-1077-24 24 Vdc vehicular adapter with integrated
shock mount, includes antenna tuning
control and loudspeaker.
OA3633/VRC 24 Vdc vehicular adapter, includes
antenna control and loudspeaker, (mounts
to MT-1029/VRC standard military shock
mount, includes CX-4655/GRC cable).
Handset MHS H-189/U military handset.
MHS H-250/U military handset, includes noise
canceling.
Cabling C991577 PRC1077 to 4242-MK2 RF cable.
2-8 PRC1077-MSOP
Page 21

2: Installation
Accessory Part Number Description
C991580 MT-1077-24 to dc power source cable.
C991949 PRC1077 to MT-1077-24 control and
power cable.
To install the PRC1077 into a 24 Vdc 5W mobile system (refer to the figure
on page 2-8):
1. Without installing a battery, install the battery box onto the PRC1077
transceiver case (refer to "Installing the Battery" on page 2-2).
2. Slide the PRC1077 transceiver onto the MT-1077-24 adapter and clamp it
in place with the two mounting clamps. The MT-1077-24 includes an
integrated shock mount.
3. On the PRC1077, remove the protective cap from the POWER connector.
Connect the C991949 cable to the PRC1077 POWER connector and to
the MT-1077 SET PWR connector (J4).
Note: Make sure the POWER connector protective cap is attached to the
PRC1077 transceiver front panel by a cord so it will not become lost. The
protective cap grounds the connector when the cap is installed. If the
protective cap is not installed or the C991949 cable is not installed and
connected to the MT-1077 adapter, the PRC1077 will not operate.
4. Connect the C991577 cable to the PRC1077 50 ohm ANT connector and
to the 4242-MK2 antenna.
5. Connect the C991580 cable to the MT-1077-24 adapter J1 connector (on
back), then to a 24 Vdc power source.
6. Remove the rubber protective cap from the dual AUDIO connectors and
connect a military handset (MHS either H-189/U or M-250/U) to one of
the connectors.
PRC1077-MSOP 2-9
Page 22

2: Installation
S
029/VRC
to
+24 Vdc
source
4242-MK2
C991577
4242-MK2
C991577
PRC1077
MHS
+24 Vdc
source
CX-4655/GRC
to
C991580
C991577
PRC1077
OA3633/VRC
MT-1
Figure 2-6. 5W 24 Vdc Mobile System with OA3633/VRC Adapter
MH
To install the PRC1077 on the OA3633/VRC adapter (refer to the figure
above):
1. Remove rubber protective cap from the power/control connector at the
back of the mount. Slide the OA3633/VRC adapter onto the
MT-1029/VRC shock mount and clamp in place with the two mounting
clamps.
2. Slide the PRC1077 transceiver onto the OA3633/U adapter and clamp in
place with the two mounting clamps.
3. On the PRC1077, remove the protective cap from the POWER connector.
Connect the CX-4655/GRC cable, provided with the OA3633/VRC
adapter, to the PRC1077 POWER connector and to the OA3633/VRC
adapter SET POWER connector.
4. Continue with standard 24 Vdc 5W mobile system installation procedure
(steps 4 to 6) above.
2-10 PRC1077-MSOP
Page 23

2: Installation
0
to
+24 Vdc
source
4242-MK2
AM-1077
C991577
PRC1077
MHS
+24 Vdc
source
4242-MK2
C991577
C991579
to
C991580
C991575
AM1077ADPT
AM-1077
PRC1077
C991949
MT-1
MHS
77-24
Figure 2-7. 50W 24 Vdc Mobile System
50W System The PRC1077 50W mobile system can be used in 12 Vdc or 24 Vdc vehicular
applications and requires a 50W RF power amplifier.
Accessory Part Number Description
Antenna 4242-MK2 Broadband vehicular center-fed whip
antenna.
Adapters MT-1077-24 24 Vdc vehicular adapter with integrated
shock mount, includes antenna tuning
control and loudspeaker.
MT-1077-12 12 Vdc vehicular adapter with integrated
shock mount, includes antenna tuning
control and loudspeaker.
OA3633/VRC 24 Vdc vehicular adapter, includes
antenna control and loudspeaker, (mounts
to MT-1029/VRC standard military shock
mount, includes CX-4655/GRC cable).
Amplifier AM-1077 50W RF Power amplifier (30 MHz to
87.975 MHz.
RF Amp.
Adapter
AM1077ADPT Empty case that attaches to the back of the
AM-1077 RF amplifier.
PRC1077-MSOP 2-11
Page 24

2: Installation
Accessory Part Number Description
RF Amp.
Converter
AM1077CONV 12 Vdc to 24 Vdc power converter (for
12 Vdc systems) (6A continuous service).
Handset MHS H-189/U military handset
MHS H250/U military handset, includes noise
canceling
Cabling C991577 PRC1077 to 4242-MK2 whip antenna
C991580 MT-1077-24 to dc power source cable
C991949 PRC1077 to MT-1077-24 control and
power cable
C991579 AM-1077 RF amplifier to MT-1077-24
control and power cable (24 Vdc systems
only)
C991658 AM1077CONV to MT-1077-12 control
and power cable (12 Vdc systems only)
To install the PRC1077 into a 24 Vdc 50W mobile system (refer to the figure
on page 2-11):
1. Without installing a battery, install the battery box onto the PRC1077
transceiver case (refer to "Installing the Battery" on page 2-2).
2. Slide the PRC1077 transceiver onto the MT-1077-24 adapter and clamp it
in place with the two mounting clamps. The MT-1077-24 includes an
integrated shock mount.
3. Install the AM-1077ADPT RF amplifier adapter to the back of the
AM-1077 RF amplifier case.
4. Position the AM-1077 50W RF amplifier on top of the PRC1077
transceiver case and install the two handle clamps to the front-panel
handles to secure the AM-1077 amplifier to the PRC1077.
5. Connect the C991579 cable to the AM-1077 RF amplifier DC POWER
INPUT connector and to the MT-1077-24 adapter AMP CNTL connector
(J3).
6. On the PRC1077, remove the protective cap from the POWER connector.
Connect the C991949 cable to the PRC1077 POWER connector and to
the MT-1077 SET PWR connector (J4).
Note: Make sure the POWER connector protective cap is attached to the
PRC1077 transceiver front panel by a cord so it will not become lost. The
protective cap grounds the connector when the cap is installed. If the
protective cap is not installed or the C991949 cable is not installed and
connected to the MT-1077 adapter, the PRC1077 will not operate.
2-12 PRC1077-MSOP
Page 25

2: Installation
source
S
A
7. Connect the C991577 cable to the AM-1077 RF amplifier 50 ohm RF
OUT connector and to the 4242-MK2 antenna.
8. Connect the C991580 cable to the MT-1077-24 adapter J1 connector (on
backside), then to a 24 Vdc power source.
9. Remove the rubber protective cap from the dual AUDIO connectors and
connect a military handset (MHS either H-189/U or M-250/U) to one of
the connectors.
4242-MK2
4242-MK2
MHS
M1077CONV
C991577
AM-1077
C991575
MH
to
+12 Vdc
source
PRC1077
C991658
AM-1077
C991577
C991949
PRC1077
C991580
to
+12 Vdc
MT-1077-12
Figure 2-8. 50W 12 Vdc Mobile System
To install the PRC1077 into a 12 Vdc 50W mobile system (refer to the figure
above):
1. Without installing a battery, install the battery box onto the PRC1077
transceiver case (refer to "Installing the Battery" on page 2-2).
2. Slide the PRC1077 transceiver onto the MT-1077-12 adapter and clamp it
in place with the two mounting clamps. The MT-1077-12 includes an
integrated shock mount.
3. Install the AM1077CONV power converter to the back of the AM-1077
RF Amplifier case.
4. Position the AM-1077 50W RF amplifier on top of the PRC1077
transceiver case and install the two handle clamps to the front-panel
handles to secure the AM-1077 amplifier to the PRC1077.
PRC1077-MSOP 2-13
Page 26

2: Installation
5. Connect the C991658 cable to the AM-1077 RF amplifier DC POWER
INPUT connector and to the MT-1077-12 adapter AMP CNTL connector
(J3).
6. On the PRC1077, remove the protective cap from the POWER connector.
Connect the C991949 cable to the PRC1077 POWER connector and to
the MT-1077 SET PWR connector (J4).
Note: Make sure the POWER connector protective cap is attached to the
PRC1077 transceiver front panel by a cord so it will not become lost. The
protective cap grounds the connector when the cap is installed. If the
protective cap is not installed or the C991949 cable is not installed and
connected to the MT-1077 adapter, the PRC1077 will not operate.
7. Connect the C991577 cable to the AM-1077 RF amplifier 50 ohm RF
OUT connector and to the 4242-MK2 antenna.
8. Connect the C991580 cable to the MT-1077-12 adapter J1 connector (on
backside), then to a 12 Vdc power source.
9. Remove the rubber protective cap from the dual AUDIO connectors and
connect a military handset (MHS either H-189/U or M-250/U) to one of
the connectors.
2-14 PRC1077-MSOP
Page 27

Fixed Base Installation
S
source
source
The PRC1077 can be used in 5W and 50W fixed base station applications.
2: Installation
MH
OE-254/GRC
OE-254/GRC
C991577
PRC1077
to
110 Va c
MHS
to
110 Vac
C991577
ACLP120-15
PRC1077
C991949
MT-1077-24
C991614
UPF7000A-28
Figure 2-9. 5W Fixed Base System
5W Systems The PRC1077 5W fixed base system uses the same adapters and mounts as the
mobile systems, however the system includes a 28 Vdc power supply that
connects to a 110 Vac source.
Accessory Part Number Description
Antenna OE-254/GRC VHF antenna kit including 30 MHz to
Adapters MT-1077-24 24 Vdc vehicular adapter with integrated
Power
source
Handset MHS H-189/U military handset
PRC1077-MSOP 2-15
87.975 MHz omni-direction antenna with
mast and transit bag
shock mount, includes antenna tuning
control and loudspeaker
UPF7000A-28 28 Vdc power supply for radio with
ACLP-120-15 AC Surge Suppressor (120
Vac/15A)
Page 28

2: Installation
Accessory Part Number Description
MHS H-250/U military handset, includes noise
canceling
Cabling C991614 UPF7000A-28 to MT1077-24 dc power
cable
C991580 MT-1077-24 to dc power source cable
C991949 PRC1077 to MT-1077-24 control and
power cable
To install the PRC1077 into a 5W fixed base system (refer to the figure on
page 2-15):
1. Without installing a battery, install the battery box onto the PRC1077
transceiver case (refer to "Installing the Battery" on page 2-2).
2. Slide the PRC1077 transceiver onto the MT-1077-24 adapter and clamp it
in place with the two mounting clamps. The MT-1077-24 includes an
integrated shock mount.
3. On the PRC1077, remove the protective cap from the POWER connector.
Connect the C991949 cable to the PRC1077 POWER connector and to
the MT-1077 SET PWR connector (J4).
Note: Make sure the POWER connector protective cap is attached to the
PRC1077 transceiver front panel by a cord so it will not become lost. The
protective cap grounds the connector when the cap is installed. If the
protective cap is not installed or the C991949 cable is not installed and
connected to the MT-1077 adapter, the PRC1077 will not operate.
4. Connect the C991577 cable to the PRC1077 50 ohm ANT connector and
to the OE-254/GRC antenna.
5. Connect the C991614 cable to the MT-1077-24 adapter J1 connector (on
back), and to the UPF7000A-28, 28 Vdc power source and
ACLP-120-15, 120 Vac Surge Suppressor. Connect the ACLP-120-15
surge suppressor to 115 Vac power source.
6. Remove the rubber protective cap from the dual AUDIO connectors and
connect a military handset (MHS either H-189/U or M-250/U) to one of
the connectors.
2-16 PRC1077-MSOP
Page 29

2: Installation
S
source
source
A
A
OE-254/GRC
AM-1077
PRC1077
to
110 Vac
MHS
OE-254/GRC
C991579
to
110 Va c
C991577
ACLP120-15
M-1077ADPT
C991575
C991575
C991949
MH
M-1077
PRC1077
MT-1077-24
C991614
UPF7000A-28
Figure 2-10. 50W Fixed Base System
50W Systems The PRC1077 50W fixed base system uses the same adapters and mounts as
the mobile systems, however the system includes a 28 Vdc power supply that
connects to 110 Vac source. The fixed base system also uses the same RF
amplifier and converter as the mobile system.
Accessory Part Number Description
Antenna OE-254/GRC VHF antenna kit including 30 MHz to
87.975 MHz omni-direction antenna with
mast and transit bag
Adapters MT-1077-24 24 Vdc vehicular adapter with integrated
shock mount, includes antenna tuning
control and loudspeaker
Amplifier AM-1077 50W RF power amplifier (30 MHz to
87.975 MHz (24 Vdc power source only)
PRC1077-MSOP 2-17
Page 30

2: Installation
Accessory Part Number Description
Power
source
UPF7000A-28 28 Vdc power supply for radio with
ACLP-120-15 AC Surge Suppressor (120
Vac/15A)
Handset MHS H-189/U military handset
MHS H-250/U military handset, includes noise
canceling
Cabling C991614 UPF7000A-28 to MT1077-24 dc power
cable
C991580 MT-1077-24 to dc power source cable
C991949 PRC1077 to MT-1077-24 control and
power cable
To install the PRC1077 into a 24 Vdc 50W mobile system (refer to the figure
on page 2-17):
1. Without installing a battery, install the battery box onto the PRC1077
transceiver case (refer to "Installing the Battery" on page 2-2).
2. Slide the PRC1077 transceiver onto the MT-1077-24 adapter and clamp it
in place with the two mounting clamps. The MT-1077-24 includes an
integrated shock mount.
3. Install the AM-1077ADPT RF amplifier adapter to the back of the
AM-1077 RF amplifier case.
4. Position the AM-1077 50W RF amplifier on top of the PRC1077
transceiver case and install the two handle clamps to the front-panel
handles to secure the AM-1077 amplifier to the PRC1077.
5. Connect the C991579 cable to the AM-1077 RF amplifier DC POWER
INPUT connector and to the MT-1077-24 adapter AMP CNTL connector
(J3).
6. On the PRC1077, remove the protective cap from the POWER connector.
Connect the C991949 cable to the PRC1077 POWER connector and to
the MT-1077 SET PWR connector (J4).
Note: Make sure the POWER connector protective cap is attached to the
PRC1077 transceiver front panel by a cord so it will not become lost. The
protective cap grounds the connector when the cap is installed. If the
protective cap is not installed or the C991949 cable is not installed and
connected to the MT-1077 adapter, the PRC1077 will not operate.
7. Connect the C991577 cable to the AM-1077 RF amplifier 50 ohm RF
OUT connector and to the 4242-MK2 antenna.
2-18 PRC1077-MSOP
Page 31

8. Connect the C991614 cable to the MT-1077-24 adapter J1 connector (on
source
back), and to the UPF7000A-28, 28 Vdc power source and
ACLP-120-15, 120 Vac Surge Suppressor. Connect the ACLP-120-15
surge suppressor to 115 Vac power source.
9. Remove the rubber protective cap from the dual AUDIO connectors and
connect a military handset (MHS either H-189/U or M-250/U) to one of
the connectors.
Battery Charger Installation
The PRC1077 typically uses a BB-LA6 sealed lead-calcium rechargeable
battery pack that fits into the battery case. The battery case is attached to the
back of the transceiver case. The BB-LA6 battery can be recharged using the
following battery recharge configurations:
• PRC-PS Power supply/battery charger
• PRC-BC4 Multiple battery charger
• PRC-HC-30 Hand crank charger
2: Installation
PRC-PS Power
Supply/Battery
Charger
• PRC-SPU-10 Solar power generator
The PRC-PS can operate both as an external power supply and as a battery
charger, powering a PRC1077 and recharging a BB-LA6 battery at the same
time. The PRC-PS does not provide power but derives power from either a
24 Vdc power source or a 115/230 Vac (internally strappable) power source.
PRC-PS
SET
J1
PWR
AC
INPUT
J3 J2
DC
INPUT
C991609
BB-LA6
J4
Figure 2-11. PRC-PS Power Supply/Battery Charger
PRC1077-MSOP 2-19
to
115/230 Vac
to
24 Vdc
source
Page 32

2: Installation
source
To recharge a BB-LA6 battery and power a PRC1077 at the same time (refer
to the figure on page 2-19):
1. Connect the C991608 cable to the PRC-PS POWER SET connector (J1)
and to the PRC1077 POWER connector.
2. When using a 24 Vdc source, connect the C991609 cable to the PRC-PS
J2 connector and to a 24 Vdc power source; when using a 115/230 Vac
power source, connect a 110 Vac power cable to the PRC-PS J3 connector
and a 115/230 Vac power source.
3. Power on the PRC-PS and observe the indicator lights:
• Fault indicator light, illuminates if the battery is not connected
properly or is shorted.
• Charging indicator light, illuminates during normal charge cycle
• Ready indicator light, illuminates when the battery is fully charged.
4. Leave the PRC1077 powered off unless it needs to be operated while
being recharged.
PRC-BC4
Multiple Battery
Charger
5. Connect a BB-LA6 battery directly to the PRC-PS J4 connector.
6. Allow about 6 hours to recharge a battery discharged to 20% of capacity.
The PRC-BC4 battery charger can charge up to four BB-LA6 sealed
lead-calcium batteries simultaneously.
BB-LA6
J4
AC
INPUT
PRC-PS
DC
INPUT
C991609
C991610
C991610
C991610
BB-LA6BB-LA6BB-LA6
J1
SET
PWR
J3 J2
Figure 2-12. PRC-BC4 Multiple Battery Charger
2-20 PRC1077-MSOP
to
115/230 Vac
to
24 Vdc
source
Page 33

2: Installation
To recharge up to four BB-LA6 batteries (refer to the figure on page 2-20):
1. Connect a C991610 cable to each battery pack to be charged (not installed
in PRC1077 transceivers).
2. Connect the PRC-BC4 to either a 24 Vdc or 115/230 Vac power source.
3. Power on the PRC-BC4 and observe the indicator lights:
• Fault indicator light, illuminates if the battery is not connected
properly or is shorted.
• Charging indicator light, illuminates during normal charge cycle.
• Ready indicator light, illuminates when the battery is fully charged.
4. Allow about 6 hours to recharge a battery discharged to 20% of capacity.
PRC-HC-30
Hand Crank
Generator
PRC-HC-30
Figure 2-13. PRC-HC-30 Hand Crank Generator with Battery Installed
The PRC-HC-30 Hand Crank Generator can recharge a BB-LA6 battery
directly or while installed in a PRC1077. As the name indicates, the
PRC-HC-30 is a mechanical hand-crank recharging device.
BB-LA6
J4
C991611
PRC1077
POWER
To recharge a BB-LA6 battery:
1. Connect the C991618 cable to the PRC-HC-30 hand crank generator and
to the BB-LA6 battery (refer to the figure on page 2-22) or connect a
C991611 cable to the PRC-HC-30 and to a PRC1077 with a BB-LA6
battery installed (refer to the figure above).
2. Mount the PRC-HC-30 to a secure surface that facilitates convenient
cranking.
3. Rotate the handles to generate energy to the battery.
PRC1077-MSOP 2-21
Page 34

2: Installation
BB-LA6
PRC-HC-30
C991618
Figure 2-14. PRC-HC-30 Hand Crank Generator with Battery Connected Directly
PRC-SPU-10
Solar Power
The PRC-SPU-10 Solar Power Generator can recharge a BB-LA6 battery
directly or while installed in a PRC1077.
Generator
PRC1077
PRC-SPU-10
C991613
POWER
BB-LA6
J4
Figure 2-15. PRC-SPU-10 Solar Power Generator with Battery Installed
To recharge a BB-LA6 battery:
1. Unfold the PRC-SPU-10 Solar power generator and position it for
maximum exposure to the sun.
2. Connect the C991613 cable to the PRC-SPU-10 and to the PRC1077 with
a BB-LA6 battery installed (refer to the figure above) or connect a
C991617 to the PRC-SPU-10 and directly to a BB-LA6 battery (refer to
the figure on page 2-23).
3. Allow several hours for charging a fully depleted battery.
2-22 PRC1077-MSOP
Page 35

2: Installation
BB-LA6
PRC-SPU-10
C991617
Figure 2-16. PRC-SPU-10 Solar Power Generator with Battery Connected Directly
PRC1077-MSOP 2-23
Page 36

Page 37

CHAPTER 3
S
OPERATION
Quick Start
For basic operation, the PRC1077 needs a battery, an antenna, and a handset. To
operate the PRC1077:
1. Install a fully charged battery.
2. Install an antenna.
3. Install a handset.
Power
Connector
Antenna
Mount
Antenna
Connector
POWER
ANT
ANT
Channel
Set
CHAN
SET
MHz
HI
MED
LO
OFF
Power
Switch
Tuning
Control
MHz
MHz KHz
4
3
2
1
MAN
CHANNEL
Tuning
Control
kHz
5
6
7
8
9
Channel
witch
Connectors
KHz
RETX
TONE
SQUELCH
Function
Figure 3-1. Front Panel Controls
4. Turn the Power switch to the desired power level:
Audio
AUDIO
LITE
Switch
5
0
VOLUME
RX TEST
10
Volume
Control
• LO (0.5W)
• MED (2.0W)
• HIGH (5.0W)
PRC1077-MSOP 3-1
Page 38

3: Operation
5. Turn the Function switch to the desired function:
• RX TEST
• SQUELCH
•TONE
•RETX
•LITE
6. Turn the Channel switch to the desired channel:
•MAN
• Preset Channels (1 to 9)
7. Set the VOLUME control knob to the desired level (0 to 10).
Settings, Indications and Connections
Power Knob The Power switch sets the transmitted output power.
Position Description
OFF Turns transceiver off.
LO Turns transceiver on; sets output power to 0.5W.
MED Turns transceiver on; sets output power to 2.0W.
HI Turns transceiver on; sets output power to 5.0W.
Function knob The Function knob sets the various radio functionality.
Position Description
RX TEST No receiver noise - background noise in receiver.
SQUELCH Receiver squelched - no background noise, audio only when
signal is received.
TONE Receiver squelched - no background noise, audio only on
150-MHz tone. Transmitter is modulated with 150 MHz
tone.
RETX Permits radio retransmission operation.
LITE Momentarily back-lights frequency display. This lever
3-2 PRC1077-MSOP
position is spring loaded.
Page 39

3: Operation
Channel Knob The Channel knob sets the transmit and receive frequency.
Position Description
MAN Manual tune channel
1 to 9 Preset channels
Tuning Knobs The two Tuning knobs adjust the preset channel frequencies (1 to 9) or the
manual (MAN) channel.
Position Description
UP Increments frequency higher in 1 MHz steps. Lever is
spring-loaded.
DOWN Increments frequency lower in 1 MHz steps. Lever is
spring-loaded.
UP Increments frequency higher in 25 kHz steps. Lever is
spring-loaded.
DOWN Increments frequency lower in 25 kHz steps. Lever is
spring-loaded.
CHAN SET
Button
The CHAN SET button works in conjunction with the Tuning knobs to
change the preset channel frequencies.
Position Description
Pressed Allows the preset channel frequencies to be changed with
the Tuning knobs.
Released Prevents the preset channel frequencies from being
accidentally changed.
LCD Display The LCD displays the selected channel frequency in MHz and kHz.
Vo lu me The VOLUME knob sets the audio level for received signals (0 to 10).
Connectors Connectors provide connections for handsets and antennas.
Connector Function/Action
AUDIO Provides connection for handset or retransmission cable to
transceiver.
ANT Provides connection for AT-271A/U or AT-892/U antenna.
ANT (BNC) Provides connection for a fixed base or vehicular antenna.
PRC1077-MSOP 3-3
Page 40

3: Operation
Connector Function/Action
POWER Provides connection for external power supply when the
PRC1077 is used in a vehicular radio set configuration.
When the connector cover is removed, the PRC1077 is
disconnected from the battery pack so the radio will not
operate. Rechargeable batteries can be recharged through
this connector.
Presetting Channel Frequencies
The PRC1077 stores up to 10 different frequencies. These frequencies remain
in memory even if the battery pack is disconnected. Channels 1 to 9 are preset
channels; however, the last frequency entered in the MAN channel is also
retained in memory.
Presetting
Channels 1 to 9
Presetting the
MAN Channel
To preset memory channels 1 to 9 (refer to the figure on page 3-1):
1. Turn the Power switch to the LOW, MED, or HIGH position.
2. Turn the CHANNEL switch to the desired channel number (1 to 9).
3. Press the CHAN SET button and hold it down while setting the new
frequency (next step). This button prevents accidental preset channel
frequency changes during normal transceiver operation.
4. Turn the Tuning control (MHz) switch to either UP or DN until the two
right digits (MHz) in the LCD indicate the desired frequency.
5. Turn the Tuning control kHz switch to either UP or DN until the three left
digits (kHz) in the LCD indicate the desired frequency.
6. Release the CHAN SET button. The new preset frequency is now entered
into memory.
To set the MAN channel:
1. Turn the POWER switch to the LOW, MED, or HIGH position.
2. Turn the CHANNEL switch to MAN.
3. Turn the MHz switch to either UP or DN until the first two digits in the
LCD (MHz) indicate the desired frequency.
4. Turn the kHz switch to either UP or DN until the last three digits in the
LCD (MHz) indicate the desired frequency.
5. The new frequency is now entered into memory.
3-4 PRC1077-MSOP
Page 41

3: Operation
Erasing
Frequencies
Setting Different
Transmit and
Receive
Frequencies
To erase all the frequencies stored in memory (the Power switch is in the OFF
position):
1. Press and hold the CHAN SET button; turn and hold the Tuning control
MHz switch up
2. Turn the Power switch from the OFF position to the LOW position. This
causes the radio to reset all programmed frequencies to 00.000 MHz.
3. Release the Tuning control MHz and the CHAN SET button.
Semi-duplex operation is when the PRC1077 transmits and receives on
different frequencies. This type of setup is typically used for operating
through a repeater system (refer to "Repeater Operation" on page A-2).
To set the PRC1077 to semi-duplex operation:
1. Turn the Power switch to the LOW, MED, or HIGH position.
2. With the Channel switch, select one of the preset channels and set it to the
desired receive frequency (refer to "Presetting Channels 1 to 9" on page
3-4).
3. Press and hold the CHAN SET button.
4. Press and hold the handset PTT button.
5. With the CHAN SET button and handset PTT button still pressed, adjust
either Tuning control knob (MHz or kHz) up or down to set the transmit
frequency. The transmit frequency is displayed in the LCD.
6. Release PTT and CHAN SET button (sequence is not important).
Once the transmit frequency is set, and PTT is pressed, the transmit frequency is displayed in the LCD. When PTT is released, the receive frequency is displayed.
Jamming Recognition and Identification
Jamming refers to the transmission of radio signals that disrupt or interfere
with communications within a radio system. The source of the jamming
signals can be from an enemy radio, or it can be unusual channel noise or
interference from a local noise source. It is also possible that a faulty receiver
can cause internal interference to the received signal.
To determine the source of the interference, perform the following checks:
Action Indication
Remove the antenna. If the noise continues, the receiver is the probable
PRC1077-MSOP 3-5
noise source.
Page 42

3: Operation
Action Indication
Switch to several
different channels.
If the interference is present on all channels,
interference is from a local noise source.
Anti-Jamming When jamming is first detected, try the following checks to reduce the effects:
Action
Position the PRC1077 to make use of nearby obstructions to act as a screen
against the jamming source. Experiment with different locations as the
interference signal strength may vary substantially over very short
distances.
Operate at the minimum power level that still provides adequate
communications. This makes it difficult for the jamming source to intercept
transmissions and determine the jamming frequency.
Change the channel frequency. With multiple preset channels, the PRC1077
is capable of changing frequencies quickly, so unless the jammer is using
very advanced jamming equipment, it will take some time to find the
operating frequency and resume jamming.
Set up predetermined time slots for communications using specified
channels at specified times, for example, channel 1 used from 00 minutes to
15 minutes past the hour; channel 2 used from 15 minutes to 30 minutes
past the hour; etc.
Set up frequency change schedule. When jamming is detected, operators
switch to the next frequency in the schedule. This arrangement is
particularly effective when only two stations are communicating.
Use split-frequency operation. This configuration uses different transmit
and receive frequencies.
Radio Set Compatibility
The PRC1077 can communicate with most frequency-modulated (FM) radio
sets. The PRC1077 is compatible with the AN/PRC77 and PRC28 radio sets,
however, incompatibilities do exist that impose limitations, for example, the
PRC1077 has a higher frequency range and smaller frequency spacing than
the PRC77 and PRC28 radio sets.
Frequency
Range
The PRC1077 has a operational frequency range from 30 MHz to
87.975 MHz whereas the PRC77 transceiver has a frequency range from
30 MHz to 75 MHz, leaving a range of frequencies from 76 MHz to
87.975 MHz that the PRC1077 cannot use when communicating with a
PRC77.
3-6 PRC1077-MSOP
Page 43

3: Operation
The PRC28 operates from 30 MHz to 42 MHz, leaving the PRC1077 with an
unusable frequency range from 43 MHz to 87.975 MHz when communicating
with the PRC28 transmitter.
These unusable frequencies can provide security and protection from jamming
if an enemy is using a PRC77 or PRC28 transmitter.
Frequency
Spacing
The PRC1077 provides frequency spacing of 25 MHz whereas the PRC77 has
50 MHz frequency spacing so the PRC1077 cannot use frequencies ending in
25 kHz and 75 kHz when communicating with a PRC77 transceiver. The
PRC28 has 100 kHz frequency spacing, limiting the usable frequencies to
even 100 kHz frequencies. Again, these unused frequencies can provide both
security and protection.
Squelch System Some transceivers do not include 150 Hz tone in the squelch mode. The
PRC1077 can receive transmissions with or without 150 Hz tone in squelch
mode. If a station does not respond to transmission with the Function switch
set to SQUELCH, set the Function switch to TONE to transmit 150 Hz tone
signal.
Voice Security
The PRC1077 can be fitted with an optional TACSEC-II device to provide
embedded tactical voice security. The TACSEC-II voice security module is
mounted underneath the Audio board.
PRC1077-MSOP 3-7
Page 44

Page 45

CHAPTER 4
MAINTENANCE
Preventative Maintenance
Preventative maintenance is the systematic care, inspection, and servicing of
equipment to prevent problems and reduce down time. This ensures the
equipment remains serviceable.
Scheduled
Maintenance
The following is a recommended procedure for daily preventative maintenance
to keep the PRC1077 and accessories in good working condition.
• Make sure the PRC1077 transceiver is complete with all accessories.
• Remove all dust, dirt, and moisture from all exterior surfaces and clean the
display with a soft cloth. Check all surfaces for rust, corrosion, and fungus.
Remove and spot paint any exposed metal surfaces.
• Check all control knobs for looseness or damage. During the operational
check, note the mechanical action of each control.
• Inspect the battery for leakage, corrosion and swelling.
Note: Remove the battery if the transceiver is not used for one or more
days.
• Perform the Operational Checklist.
The following is a recommended procedure for weekly preventative
maintenance to keep the PRC1077 and accessories in good working condition.
• Inspect the handset cable for fraying, cuts, kinks and broken insulation.
• Inspect all cloth items for fraying and tears.
• Inspect the antenna for damage, loose fit and corrosion.
• Inspect the battery box gasket for damage.
Cleaning Radio equipment needs to be cleaned daily when in use or weekly when in
standby condition. Use the following procedure for cleaning the PRC1077
transceiver and accessories.
• Inspect the transceiver exterior. Make sure the exterior surfaces are free
from dirt, grease, and fungus.
PRC1077-MSOP 4-1
Page 46

4: Maintenance
• Remove dust and loose dirt with a clean, soft cloth.
• Remove grease, fungus, and ground-in dirt from the case using a cloth
dampened with trichlorethane.
CAUTION: TRICLORETHANE fumes are toxic. Make sure the area
of use has adequate ventilation. Exposure to open flame converts
TRICLORETHANE to a highly toxic and dangerous gas.
• Remove dust and dirt from plugs and receptacles.
• Clean the front panel and control knobs using a soft clean cloth. If the dirt
is difficult to remove, dampen the cloth with mild detergent and water.
Operational
Checklist
Make the following operational checks before and after using the PRC1077. If
the PRC1077 or any accessory fails to function correctly report the failure to
technical personnel.
1. Connect the handset.
2. Install the antenna.
3. Set the Volume knob to 5.
4. Set the Channel switch to any channel.
5. Set the Power knob to LO, MED or HIGH. The frequency displayed in
the LCD should match the frequency of the channel to which the Channel
switch is set. If the displayed frequency does not match the frequency of
the channel, reset the channel frequency. If the displayed frequency is still
not correct, replace the battery.
6. Set the Function switch to LITE. The LCD should be backlit. If the LCD
does become backlit, notify technical personnel
7. Set the Function switch to SQUELCH. The background noise should
stop. If the background noise does not stop, notify technical personnel
8. Listen to test signals transmitted from a nearby radio set operating at the
frequency (simplex operation) displayed on the LCD. If the transmissions
are not heard clearly, check the antenna connection for looseness. If the
audio is still not clear, notify technical personnel.
9. Transmit a test signal to a nearby radio set. If you do not hear a side tone
or get a response from the test radio:
• Check the antenna connection for looseness
• Replace the battery
• Notify technical personnel
10. With the Function knob set to TONE, repeat steps 8 and 9.
4-2 PRC1077-MSOP
Page 47

11. The PRC1077 is designed with four internal test bands selected
B
Transceiver
Case
4: Maintenance
automatically by the microprocessor. Perform steps 8 and 9 in each of the
four frequency band ranges listed below:
• 30 MHz to 39 MHz
• 40 MHz to 51.975 MHz
• 52 MHz to 67.975 MHz
• 68 MHz to 87.975 MHz
attery
Box
Protective
BNC Cap
Protective
Power
Cap
Tuning
Knob
(MHz)
Protective
Antenna
Cap
Hinge
Captive
Screw
Tuning
Tuning
Knob
Knob
(kHz)
(kHz)
Power
Knob
Channel
Knob
Volume
Knob
Function
Knob
Protective
(kHz)
Dual Audio
Cap
Figure 4-1. PRC1077 Replacement Parts
PRC1077-MSOP 4-3
Page 48

4: Maintenance
Replacement Parts
If a PRC1077 part is damaged, the following table provides a list of parts and
part numbers for ordering replacement parts.
Part Number Description
610080-A Protective dual audio connector cap
610085 Protective BNC cap
610087-A Protective antenna cap
610088 Protective power cap
819909 Captive screw
891027 Tuning knob (MHz) (kHz)
891028 Volume knob
894102 Battery box (CY-2562)
Power knob
Function knob
894104 Transceiver case
919107 Hinge
4-4 PRC1077-MSOP
Page 49

APPENDIX A
RADIO RELAY AND REPEATERS
Introduction
The PRC1077 Radio Set is typically limited by line-of-sight range. In flat
country, the typical range is five miles (eight kilometers), however, if the
transceivers are located on elevated sites with line-of-sight, ranges of 20 or 30
miles are easily achievable. Unfortunately, locating transceivers on elevated
sites is not always possible. A relay system uses two PRC1077 positioned on
elevated sites to relay signals. The two transceivers are connected using the
MK-456/GRC Retransmission Cable Kit.
The PRC1077 can also operate in semi-duplex mode through a repeater, which
offers the advantage of a wider area of coverage with greater flexibility over the
relay system.
Radio Relay Operation
An easy way to demonstrate radio relay operation is to examine a manually
operated system. A transceiver and operator (station A) are located at an
elevated site in line of sight range of the two stations (station B and station C)
that want to communicate. Stations B and C cannot communicate directly
because of obstructions in the line-of-sight path between each other. As an
alternative, station B can get a message to station C, using station A as a relay.
Station B transmits a message to station A, who writes down the message, then
transmits the message to station C. This process can be reversed to get a
response back to station B.
This process can be automated using two transceivers connected together with
the retransmission cable kit so that the audio output of the first transceiver is
directly connected to the microphone input of the second transceiver. The
second transceiver is assigned a different frequency from the first transceiver so
it will not interfere with reception. The retransmission cable is 50 feet long
providing adequate distance between the two transceivers to prevent
overloading.
This relay system is effective in extending the communications range between
two transceivers. It is not a suitable system for operating a network of stations
because different frequencies must be used by stations at each end of the relay.
PRC1077-MSOP A-1
Page 50

A: Radio Relay and Repeaters
Repeater Operation
The repeater system extends the range of radio coverage with greater
flexibility than the relay system. In the repeater system, all stations in the
network can communicate with each other using the same semi-duplex
frequencies. The repeater system is limited in that each stations must be in
line-of-sight of the repeater, however, if the repeater transceiver is located on
a mountain top, the range of coverage could be hundreds of square miles.
The repeater system consists of a radio receiver and transmitter operating on
separate frequencies. The audio output from the receiver is connected to the
microphone input of the transmitter. The repeater system can be a receiver and
transmitter specially designed for repeater operation. Two PRC1077s can be
used to create a simple repeater system.
To communicate through a repeater, the transceiver is programmed so the
transmitter frequency is the same as the repeater receiver frequency. The
receiver frequency must be the same as the transmitter frequency. The repeater
will rebroadcast any signal it receives on the transmit frequency to any station
within reception range enabling two-way communications between any two
stations on the network.
The PRC1077 can be programmed with separate transmit and receive
frequencies making it capable of semi-duplex operation through a repeater.
Radio Relay Procedures
For radio relay operation, use the MK-456 Retransmission Cable Kit to
connect to the relay transceiver and follow the same procedures as used with
the PRC77 transceiver. Since the PRC1077 has fewer spurious frequencies
than the PRC77, use the revised procedure to select frequencies.
The two frequencies used in a radio relay system must be separated by at least
5 MHz to eliminate the possibility of mutual interference. It is prudent to
experiment with frequency combinations to make sure the two frequencies do
not cause interference (refer to the Frequency Interference Chart on page
A-4).
The PRC1077 transmitter is compatible with the PRC77, so both types of
transmitters can be used to create a radio relay system.
Dedicated Receiver
A dedicated repeater is a receiver/transmitter combination specifically
designed to be used in a repeater system. The transmitter and receiver are
carefully shielded and can be operated in the same enclosure. Frequently the
repeater uses a duplexer that enables the transmitter and receiver to share the
same antenna.
A-2 PRC1077-MSOP
Page 51

The dedicated repeater is preferred for permanent repeater applications
because it is specifically designed for continuous service with higher power
output. The receiver has a high sensitivity and high rejection of spurious
responses and the antenna is designed for maximum efficiency on the
operating frequency. These factors help ensure the best service area coverage.
PRC1077 Repeater Installation
When using the PRC1077 in a repeater system, use the 1077 Retransmission
Repeater Cable Kit to connect the two radio sets. The 1077RETRAN includes
a 50-foot cable with connectors to connect two PRC1077 transceivers
together.
1. Select transmit and receive frequencies that are separated by at least
5 MHz. Some combinations of frequencies may cause interference, so it
is prudent to experiment with various frequency combinations to
determine which are compatible with the repeater system (refer to
Frequency Interference Chart figure on page A-4).
2. Program the PRC1077s to be used in the repeater system with reciprocal
frequencies of the repeater frequencies, that is, the receiver frequency is
the same as the repeater transmit frequency and the transmitter frequency
is the same as the repeater receiver frequency.
A: Radio Relay and Repeaters
3. Program a different channel with the same frequencies as the repeater,
that is, the transmit and receive frequencies are exactly the same as the
repeater. This channel can be used to contact other stations directly,
instead of going through the repeater.
4. Position the two repeater transceivers 50 feet apart, at as high an
elevation as possible. Use the AT-892/U Antenna for maximum range.
Remember that the separation between the transceivers is essential to
prevent receiver overload. Choose the locations carefully to provide
optimum service coverage. Remember that there is no advantage to
locating the transmitter or receiver in a better location as this results in
either the transmitter outperforming the receiver or the receiver
outperforming the transmitter.
5. Connect the PRC1077 transceivers together with the 1077
Retransmission Repeater Cable Kit (refer to Transceiver Connections -
Relay System figure on page A-4). Switch both transceivers to RETX.
6. If the repeater is used for extended service, use a heavy-duty battery to
power the transmitter, as the repeater transmitter operates continuously
while stations are communicating. The 1077 Retransmission Repeater
Cable Kit includes an external battery cable. A 12 V automobile battery
makes an excellent power source for sustaining a repeater system.
PRC1077-MSOP A-3
Page 52

A: Radio Relay and Repeaters
88 MHz
80 MHz
TRANSMITTING
FREQUENCY
F1
(see NOTE 2)
70 MHz
60 MHz
50 MHz
40 MHz
30 MHz
30 MHz 40 MHz 50 MHz 60 MHz 70 MHz 80 MHz 88MHz
RECEIVE FREQUENCY
Figure A-1. Frequency Interference Chart
PRC1077
RADIO SET
#1
RELAY SITE
CX-4656/GRC (see NOTES 1 and 4)
PRC1077
RADIO SET
#2
AUDIO
NOTES:
1. Part of MK-456/GRC.
2. Frequencies F1 and F2 selected for non-interference.
3. Connect cable to Audio connector.
4. Radio sets #2 and #3 at relay site are separated by full
length (50 ft.) of CX-4656/GRC.
5. Switch positions required for radios in t he radio relay net.
Radio Set #1, #4: tone position or RETEX.
Radio Set #2, #3: RETEX position.
NETWORK
BOX
Figure A-2. Transceiver Connections - Relay System
A-4 PRC1077-MSOP
50 FT.
SHIELDED CABLE
48 FT.
HANDSET OR AUDIO
ACCESSORY
(FOR MONITORING)
CHOKE
BOX
CONNECTOR
(see NOTE 3)
PRC1077
RADIO SET
#3
F2
(see NOTE 2)
PRC1077
RADIO SET
#4
 Loading...