

Page 1
. . . . . . . . . . . . . . . . . . . . . .
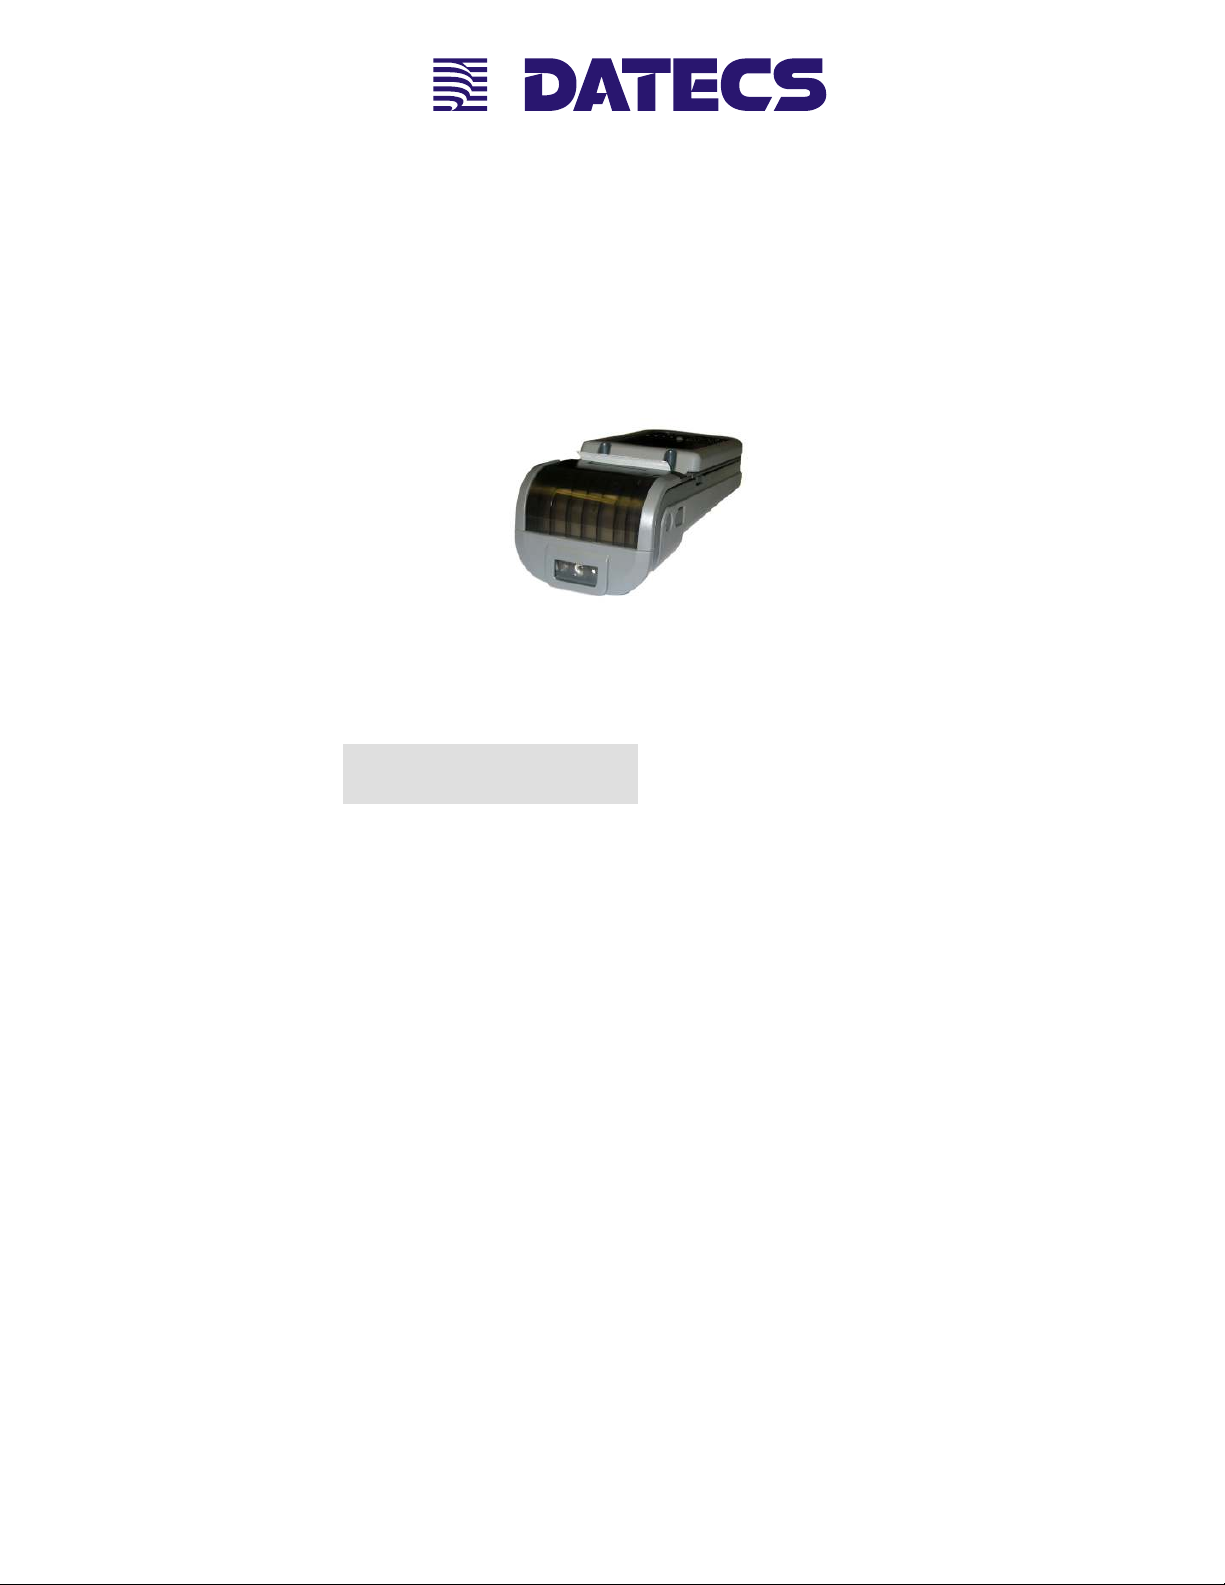
PP-60
Thermal Printer
User Manual
Datecs Ltd.
www.datecs.bg
PP-60 User Manual v1.00
Page 2

. . . . . . . . . . . . . . . . . . . . . .
Contents
Contents ...............................................................................................2
Technical Data .....................................................................................3
Box Contents .......................................................................................4
Compatible Devices............................................................................. 5
Getting Started .....................................................................................6
About Your PP-60 ................................................................................6
Status & Operating Modes ................................................................10
Loading Paper ....................................................................................11
PDA Installation .................................................................................12
Diagnostic Information...................................................................... 13
Self-test............................................................................................... 14
Dip Switch Settings ...........................................................................15
Memory Switch Settings ...................................................................17
Loading Drivers .................................................................................20
Magnetic Card Reader .......................................................................21
1D Barcode Scanning........................................................................ 22
2D Barcode Scanning........................................................................ 23
Replacing Battery ..............................................................................24
Developing Solution ..........................................................................25
Troubleshooting.................................................................................26
Contact Information........................................................................... 27
Datecs Ltd.
www.datecs.bg Page 2
PP-60 User Manual v1.0
Page 3
. . . . . . . . . . . . . . . . . . . . . .
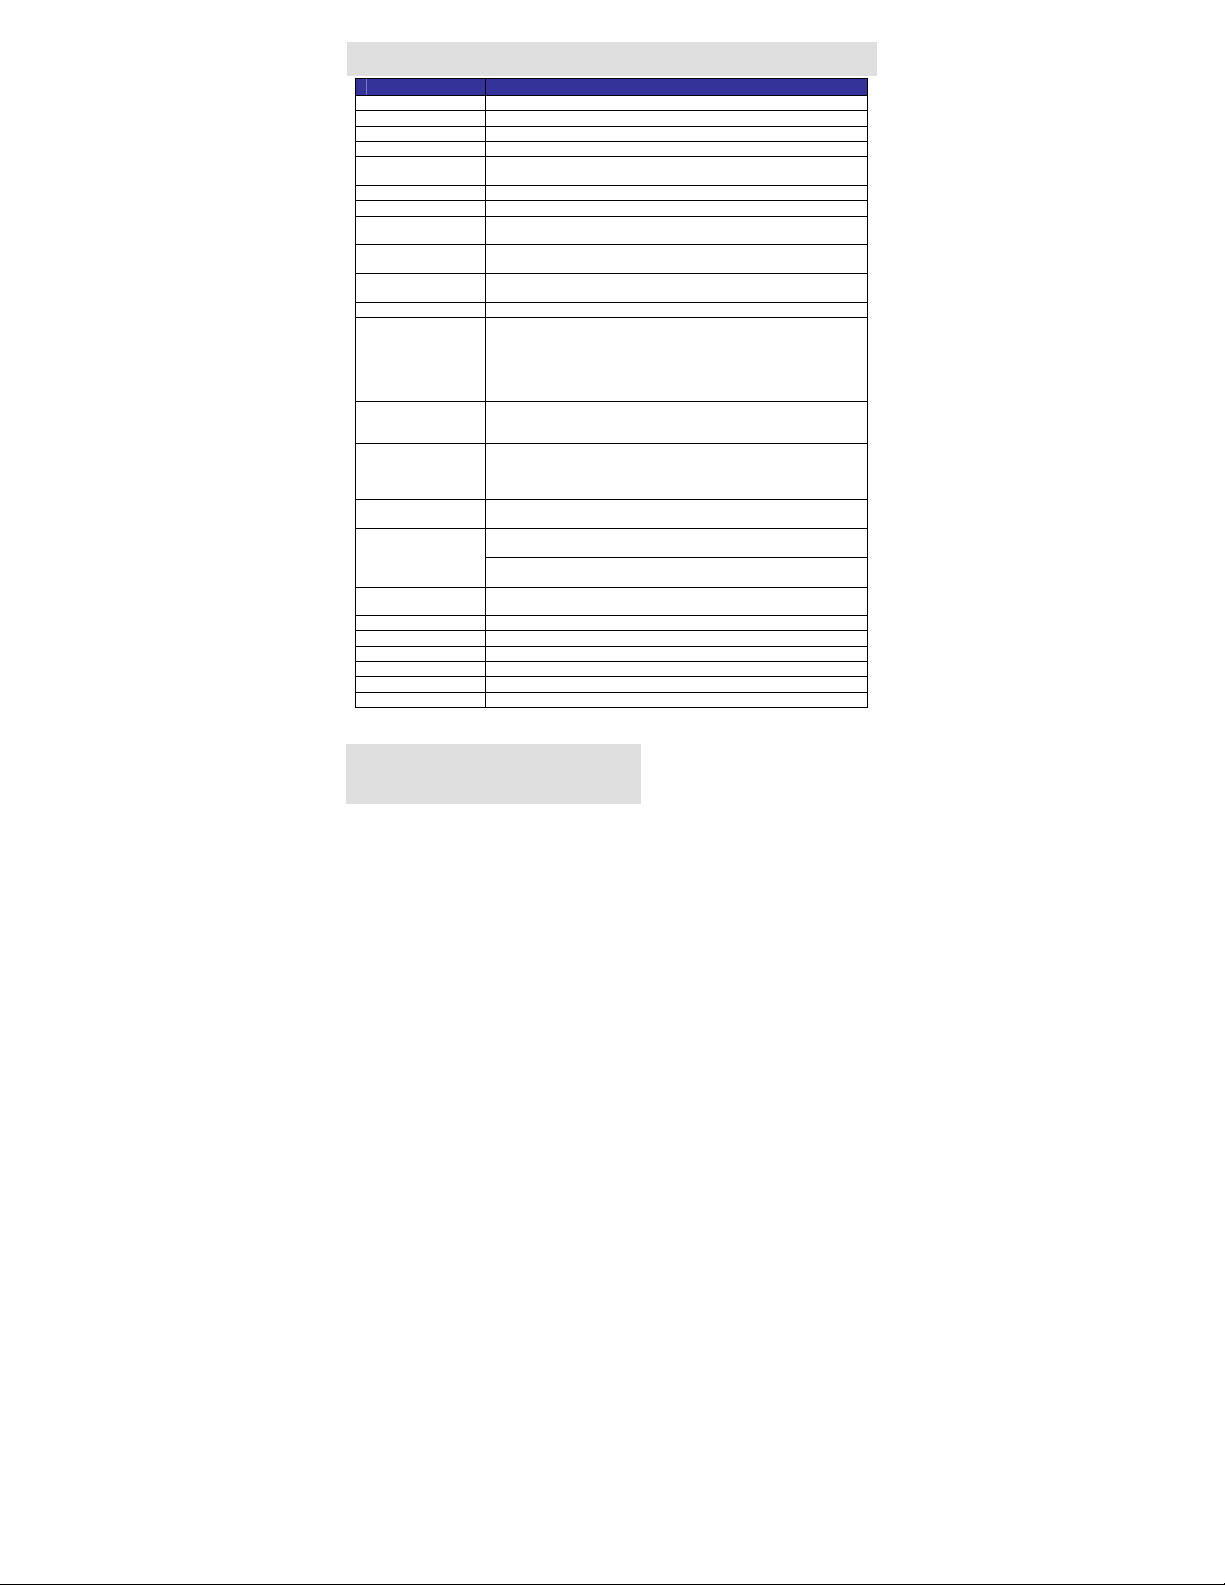
Technical Data
Feature Specifications
Printing method Line thermal dot printing
Printing speed 60 mm/s (480 dots/sec) at Full charged battery
Print Width 48 mm / 384 dots per line
Resolution 203 dpi (8 x 8 dots/mm)
Dot pitch
Resident fonts A: 12 x 24 dots B: 9 x 16 dots
Loadable fonts C: 12 x 24 dots D: 9 x 16 dots
Resident Fonts
Loadable Fonts
Logo Registration
Input Buffer 128 KB (131072 bytes)
Resident Barcodes
Communications
Readers
Emulation
Power supply
Environment
Reliability (MTBF) 50km (printing rate 25% max)
Dimensions 80 (W) X 198 (D) Х 56.3 (H) mm
Weight 258 g (without paper); 328 g (with paper)
Thermal paper 58mm +0/-1mm X 45mm diameter, thickness 60 µm
Cables Standard USB A to B cable; RS 232 cable
PDA device IPhone; Blackberry; Pocket PC
Horizontal – 0.125 mm (8 dots/mm)
Vertical – 0.125 mm (8 dots/mm)
Font А: 12 х 24 dots (32 char. per line);
Font B: 9 х 16 dots (42 char. per line);
Font C: 12 х 24 dots (32 char. per line);
Font D: 9 х 16 dots (42 char. per line);
1 Black & White BMP format ( 1-bit per pixel)
Size: 384 x 248
UCC/EAN 128, EAN 13, EAN 8, UPC A, UPC E, UPC E1, Code 11,
Code 39, Code 93, Code 128, GS1, Matrix 2 to 5, Code 11,2 of 5
industrial, 2 of 5 interleaved, Codebar, MSI/Plessey, UK/Plessey,
IATA,ISBN, ISMN, ISSN, S-code, Telepen, RSS 14, RSS Limited,
RSS- Expanded, PDF417 (2D Barcode: microPDF417, Data
Matrix, QR code, Aztec code, Maxi code, Micro QR code)
RS232 C – max. 115200 bps,
USB v 1.1, compatible with 2.0 (Host&Slave)
Bluetooth (Optional)
Magnetic Card Reader - 3 track head, ISO7811 (optional)
Barcode scan engine (optional): 1D - MDL 1000/2000
2D - MDI 1000/2000
EA 15
ESC/POS
Label/Black Mark Mode
Rechargeable Li-ion battery (7,4 V / 1100 mAh)
Battery capacity: Per Charge (~20,000 lines)
AC adapter – DC 9 V, 1 A
AC 100 – 240 V, 1,3 A, 50/60 Hz
Operating temp. +0°C to +45°C @ 35 to 85 % RH
Storage temp. -20°C to +60°C @ 10 to 90% RH
Table 1
Datecs Ltd.
www.datecs.bg Page 3
PP-60 User Manual v1.0
Page 4
. . . . . . . . . . . . . . . . . . . . . .
Box Contents
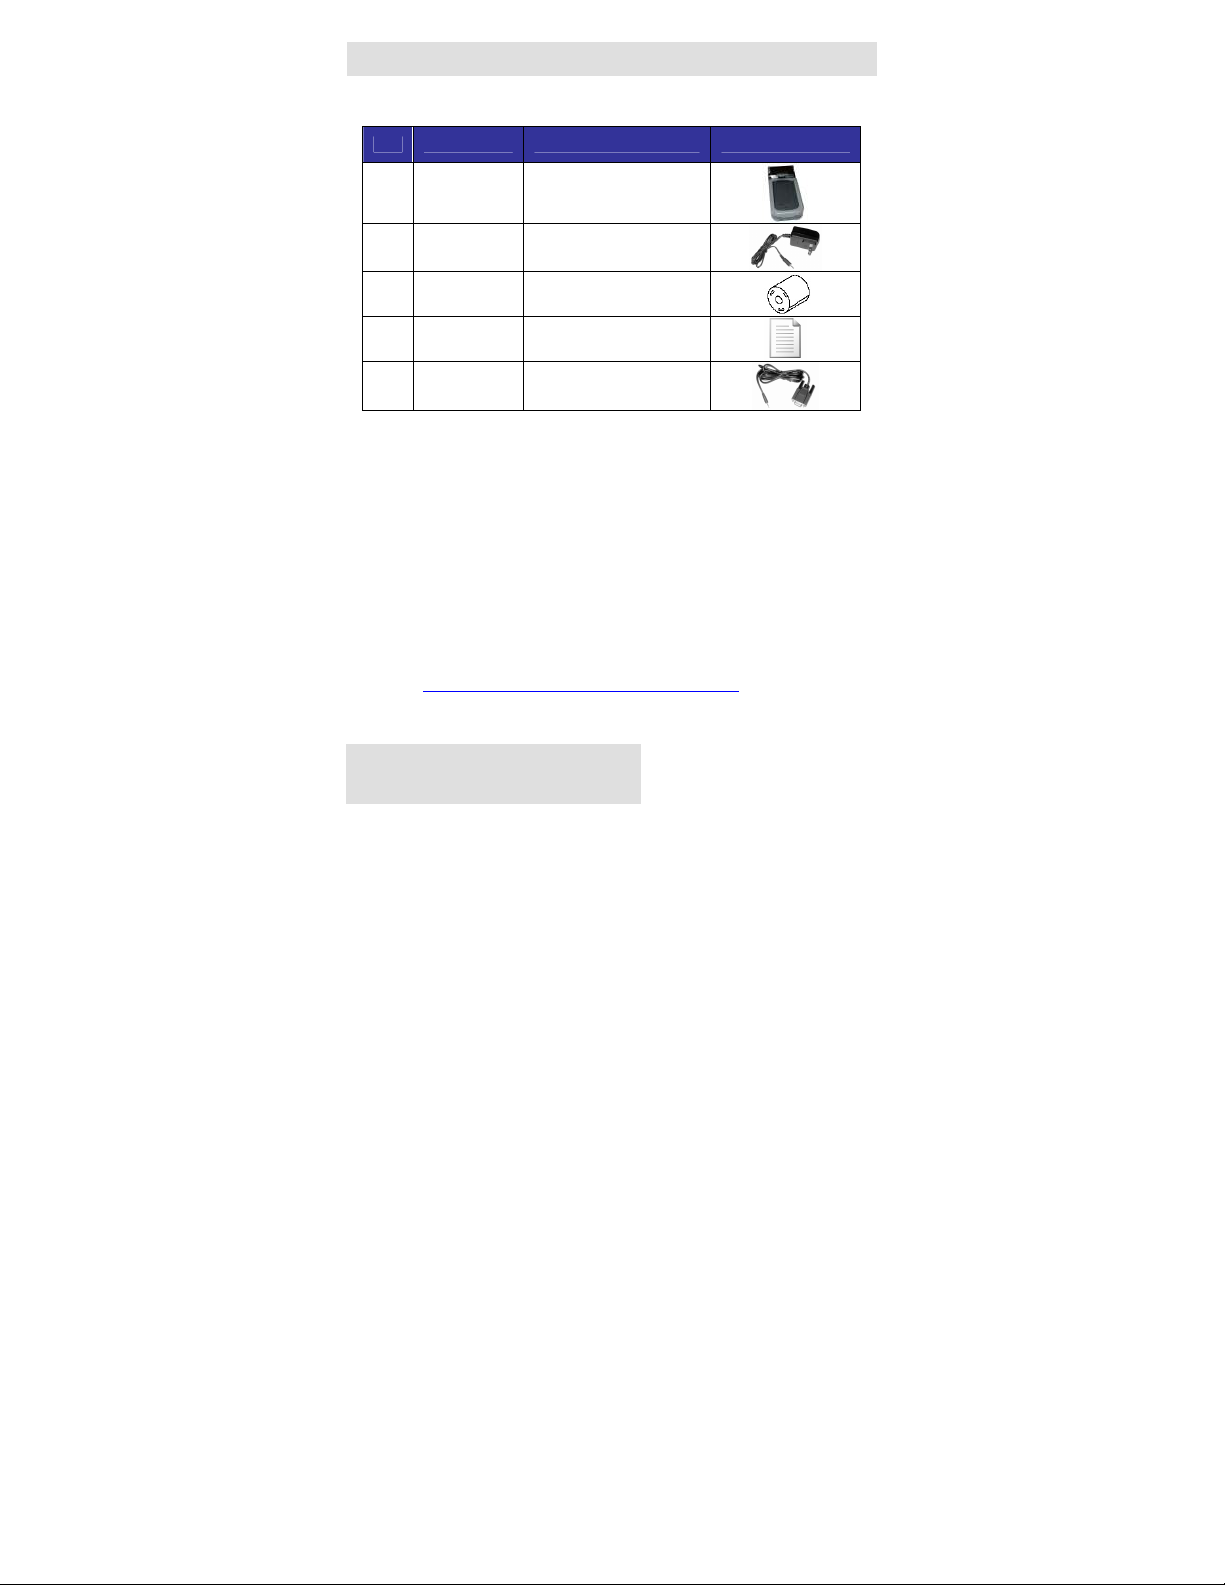
Your PP-60 comes with the following items listed below:
Item Part Number Descriptions Image
Software ( Drivers & SDK ):
Because of the continually evolving Driver & SDK to support new
mobile devices, Drivers & SDK are distributed online and is
available for download at our website indicated below. For details
on using the PP-60 Drivers & SDK, please refer to the SDK’s
documentation.
1 PP-60xx PP-60 Thermal printer
2 - AC charger
3 - 1 Roll of thermal paper
4 - User's manual
5 - RS-232 interface cable
Table 2
For the latest PP-60 SDK’s, visit our developer web site at:
http://www.datecs.bg/support.php?cat=4
Datecs Ltd.
www.datecs.bg Page 4
PP-60 User Manual v1.0
Page 5

. . . . . . . . . . . . . . . . . . . . . .
Compatible Devices
The PP-60 portable thermal printer is designed specifically for use
with many PDA & Smartphone devices.
The PP-60 can be used in a variety of applications where Printing /
Card Reading / Barcode Scanning are required.
User Notes:
Compatibility depends on the type of communication method your
PDA or Smartphone supports and the availability of PP-60 driver for
your device.
Determine the method of communications your device supports.
Next determine if your device is supported by the PP-60 Drivers
Compatible devices are added continually. Visit our web site at:
Because of the continually evolving Driver & SDK to support new
mobile devices, visit our developer web site at:
& SDKs.
www.datecs.bg
http://www.datecs.bg/support.php?cat=4
Datecs Ltd.
www.datecs.bg Page 5
PP-60 User Manual v1.0
Page 6

. . . . . . . . . . . . . . . . . . . . . .
Getting Started
Charge the PP60 rechargeable
1
battery pack as
recommended in
this manual.
Load PP-60 print
2
media (Thermal
Paper)
Connecting PDA
3
to PP-60.
Install PP-60
4
Software
Where to find more
The Lithium Ion
battery pack
should be fully
charged before
use to ensure
long battery life.
PP-60 requires
Thermal paper for
printing.
Attaching the
PDA to the PP-60
and securely
locking PDA
cover in place.
To print
information from
your device,
software needs to
be installed onto
your device.
Table 3
information
Charging Battery, Page 10
Loading Paper, Page 12
PDA Installation, Page 13
Printing software is not
provided by Datecs.
Please contact your PP-60
reseller or Datecs Ltd. for
recommendations on
Third-Party solutions.
Developers should refer to
the section in this manual
on “Developing Solutions”.
The PP-60 allows you to printer information from your PDA &
Smartphone. Before using the PP-60 thermal printer the battery
should be properly charged. The following Quick Start guide will
help to get your PP-60 ready for use.
Quick Start:
Steps What to do Purpose
Datecs Ltd.
www.datecs.bg Page 6
PP-60 User Manual v1.0
Page 7
. . . . . . . . . . . . . . . . . . . . . .
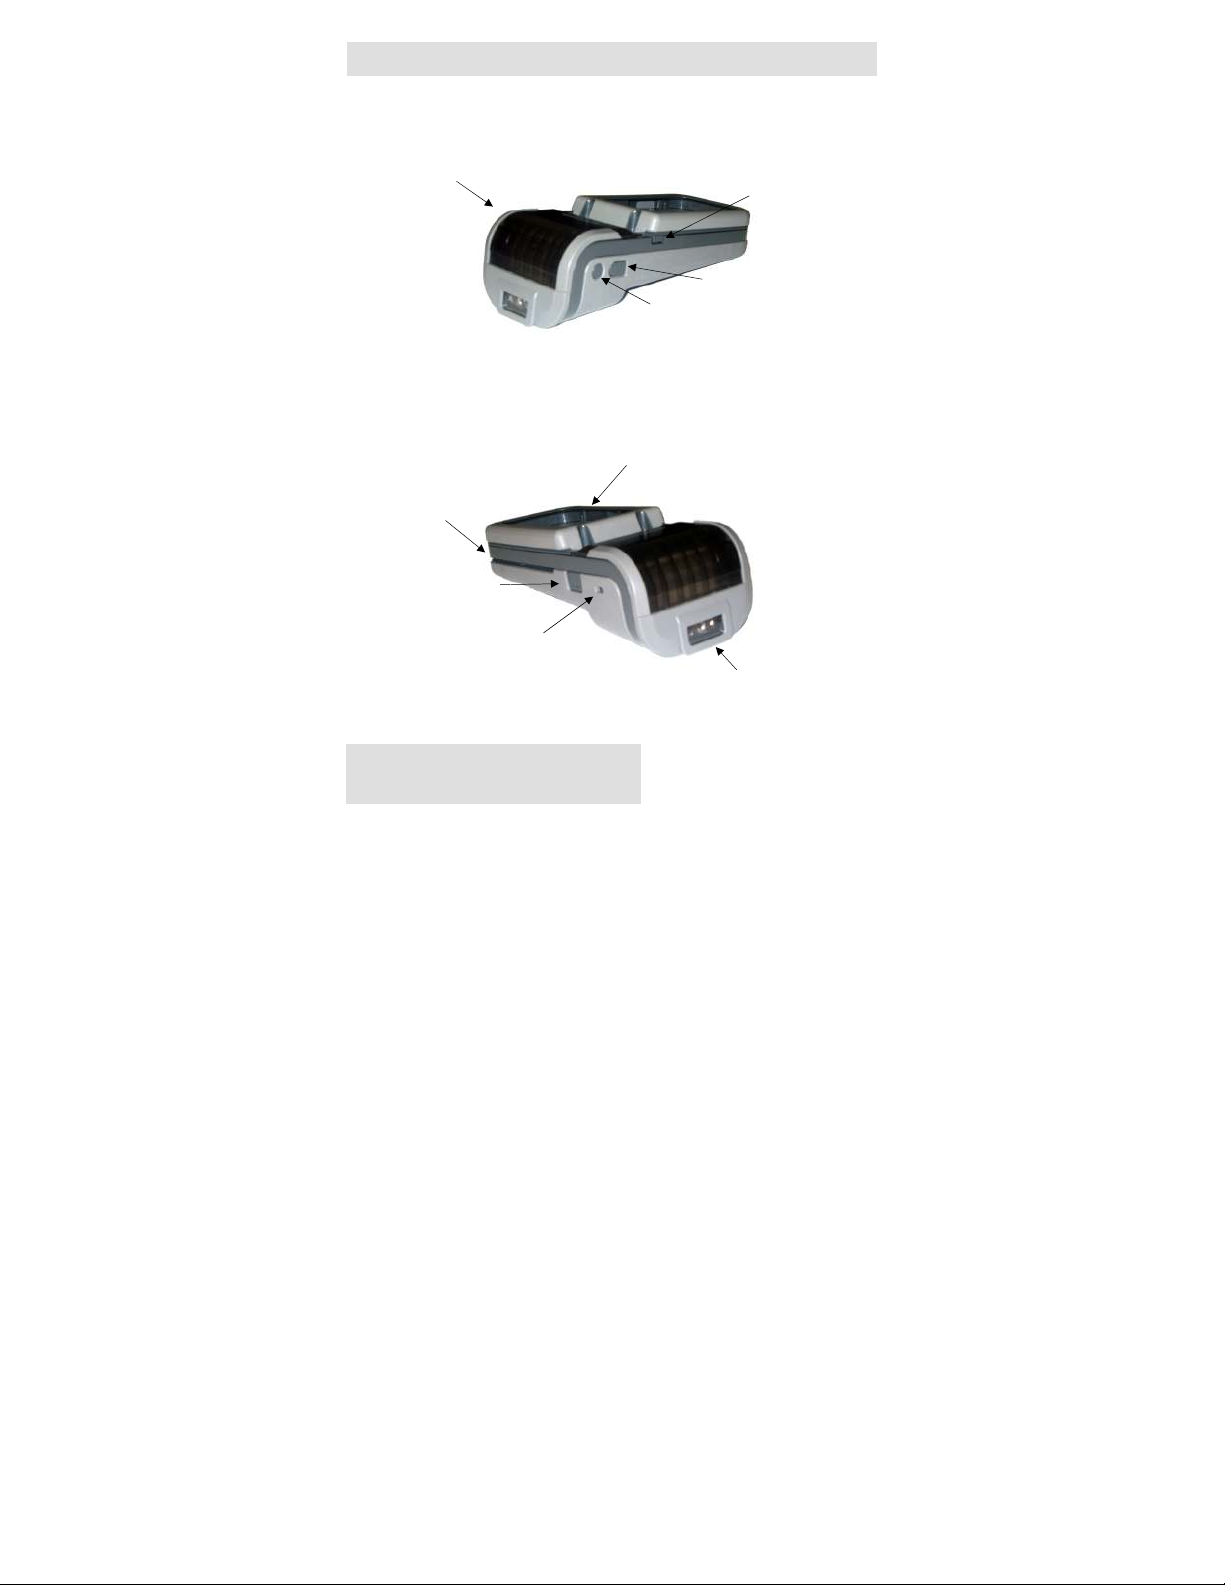
About Your PP-60
Paper Feed
1D / 2D Scanner
PDA Cover
Paper Cover
Power
/Scan Button
Se
curity Lock
PP-60 left view
PP-60 right view
Paper Cover
Card Reader
Scan Button
Figure 1
Figure 2
Lock
Datecs Ltd.
www.datecs.bg Page 7
PP-60 User Manual v1.0
Page 8

. . . . . . . . . . . . . . . . . . . . . .
About Your PP-60
USB Port
Paper Cover Lever
Charger Input
Battery Cover
PP-60 left view
Datecs Ltd.
www.datecs.bg Page 8
PP-60 User Manual v1.0
Figure 3
Page 9
. . . . . . . . . . . . . . . . . . . . . .
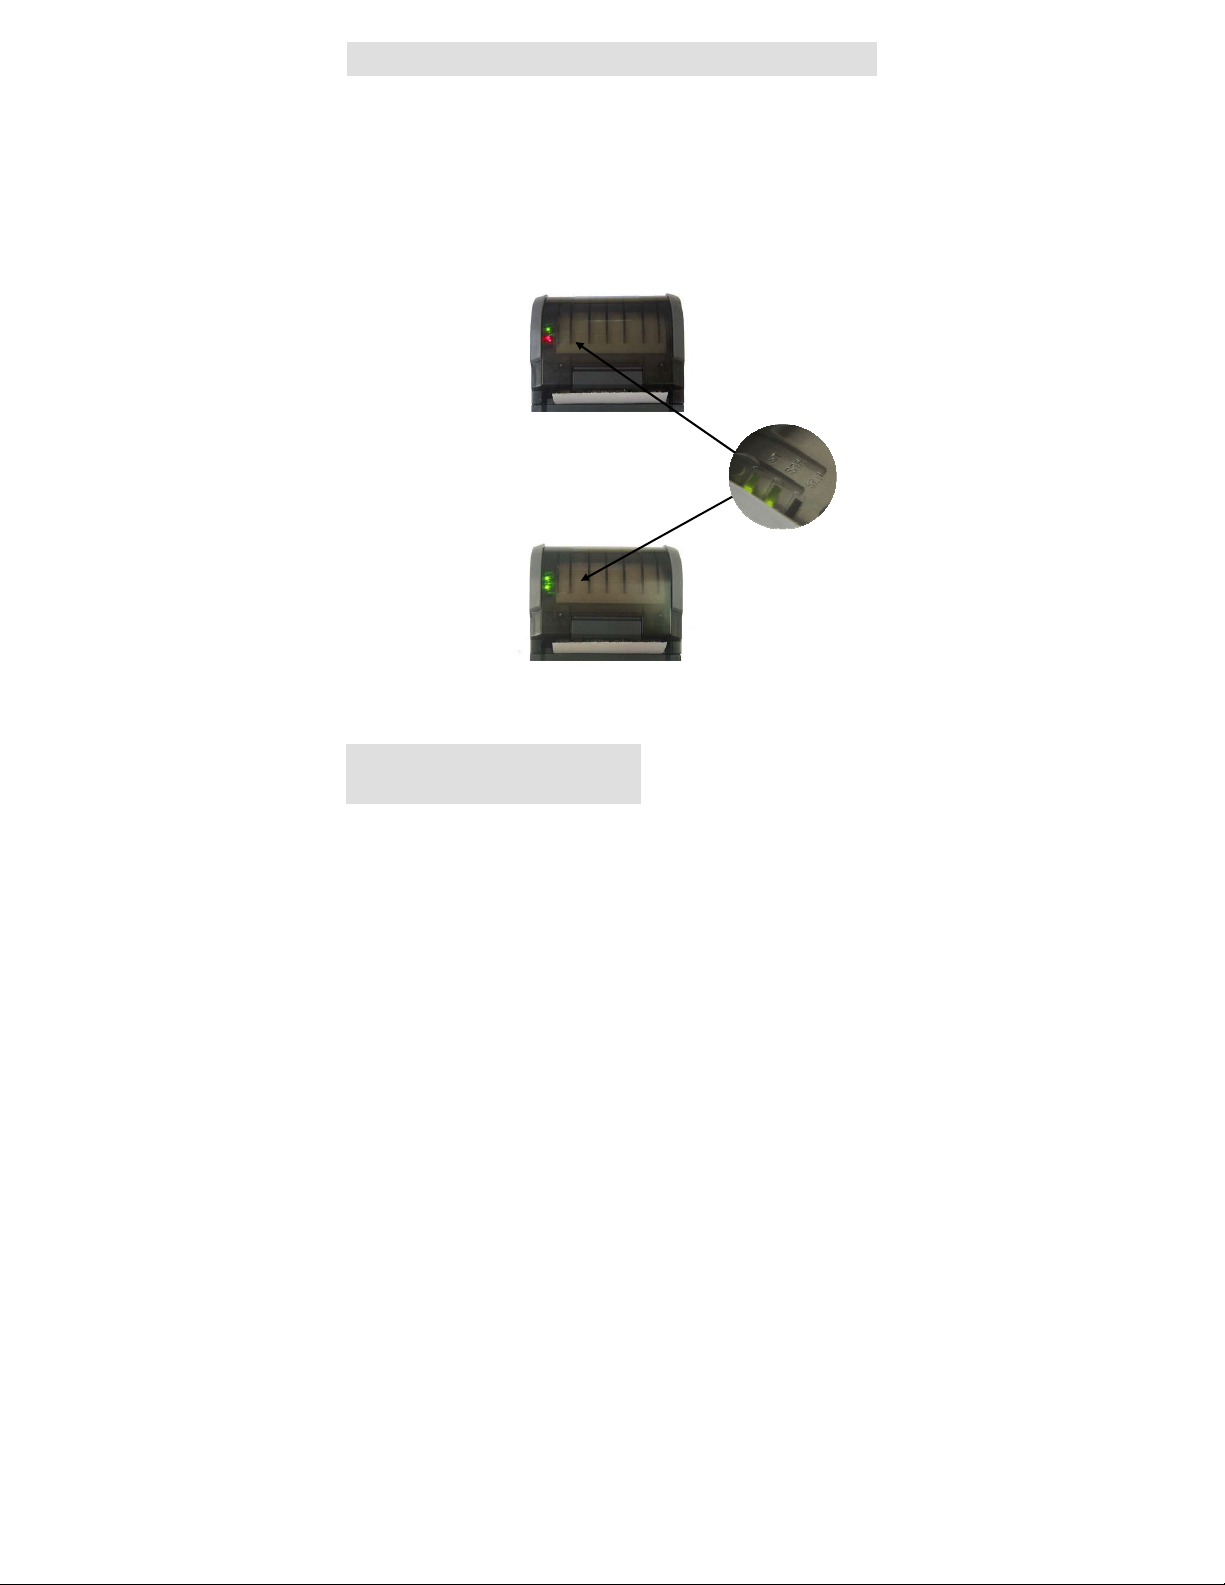
Charging the PP-60
The PP-60 uses a Lithium Ion rechargeable battery pack. Before
first use, the PP-60 battery pack should be charged for at least 12
hours.
To prevent electrical damage to the PP-60 and/or battery pack,
please use approved AC Charger only.
PP-60 Charging
ERR LED solid Red
indicates charging
PP-60 Full Charge
ERR LED solid Green
indicate full charge
Figure 4
Figure 5
Datecs Ltd.
www.datecs.bg Page 9
PP-60 User Manual v1.0
Page 10

. . . . . . . . . . . . . . . . . . . . . .
Status & Operating Modes
The PP-60 uses LEDs to indicate various conditions of operation.
This may be charging, active or online, battery low conditions. The
following explains these conditions and LED indication.
LED Function
STAT
Green – the printer power is on.
Red – no paper or cover open.
Charging Green – charge ready
BT
Red – charging
Green blinking - MSR
Green lighting – Barcode
Blue blinking - Bluetooth
Table 4
Datecs Ltd.
www.datecs.bg Page 10
PP-60 User Manual v1.0
Page 11
. . . . . . . . . . . . . . . . . . . . . .
Loading Paper
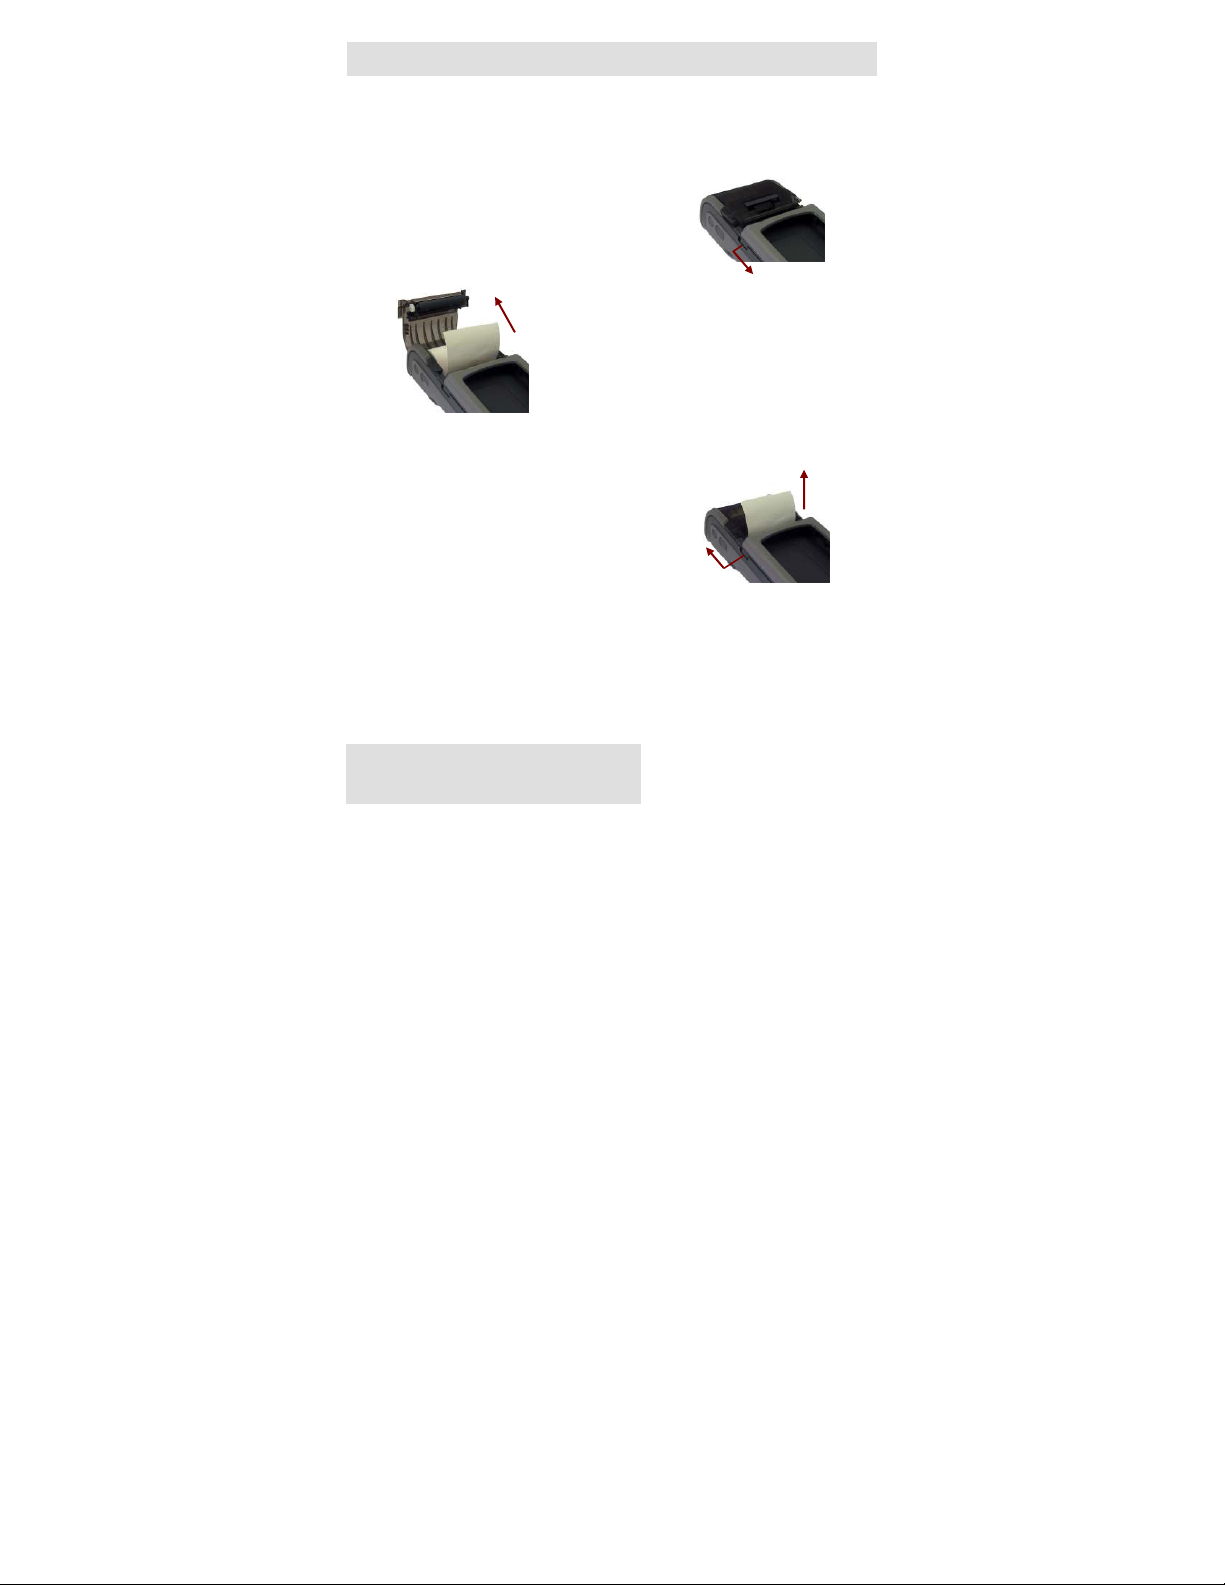
The PP-60 uses a drop-and-load design making paper loading easy
and trouble free. To load paper, simply lift up the paper cover
latch and drop in the new roll as shown in the steps below.
1. Slide the paper cover latch to
Figure 7
3. Be sure to pull at lease ½ inch or
4. Close the paper cover until it snaps lock.
5. Slide paper cover latch to lock the cover in place.
Datecs Ltd.
www.datecs.bg Page 11
PP-60 User Manual v1.0
unlock the paper cover as shown in
the figure on the right.
Figure 6
2. Lift the paper cover lever and open
the cover to its fully opened position.
Insert paper roll as shown in the
figure on the left.
more of media above the top of the
paper cover before closing cover.
Figure 8
Page 12
. . . . . . . . . . . . . . . . . . . . . .
PDA Installation
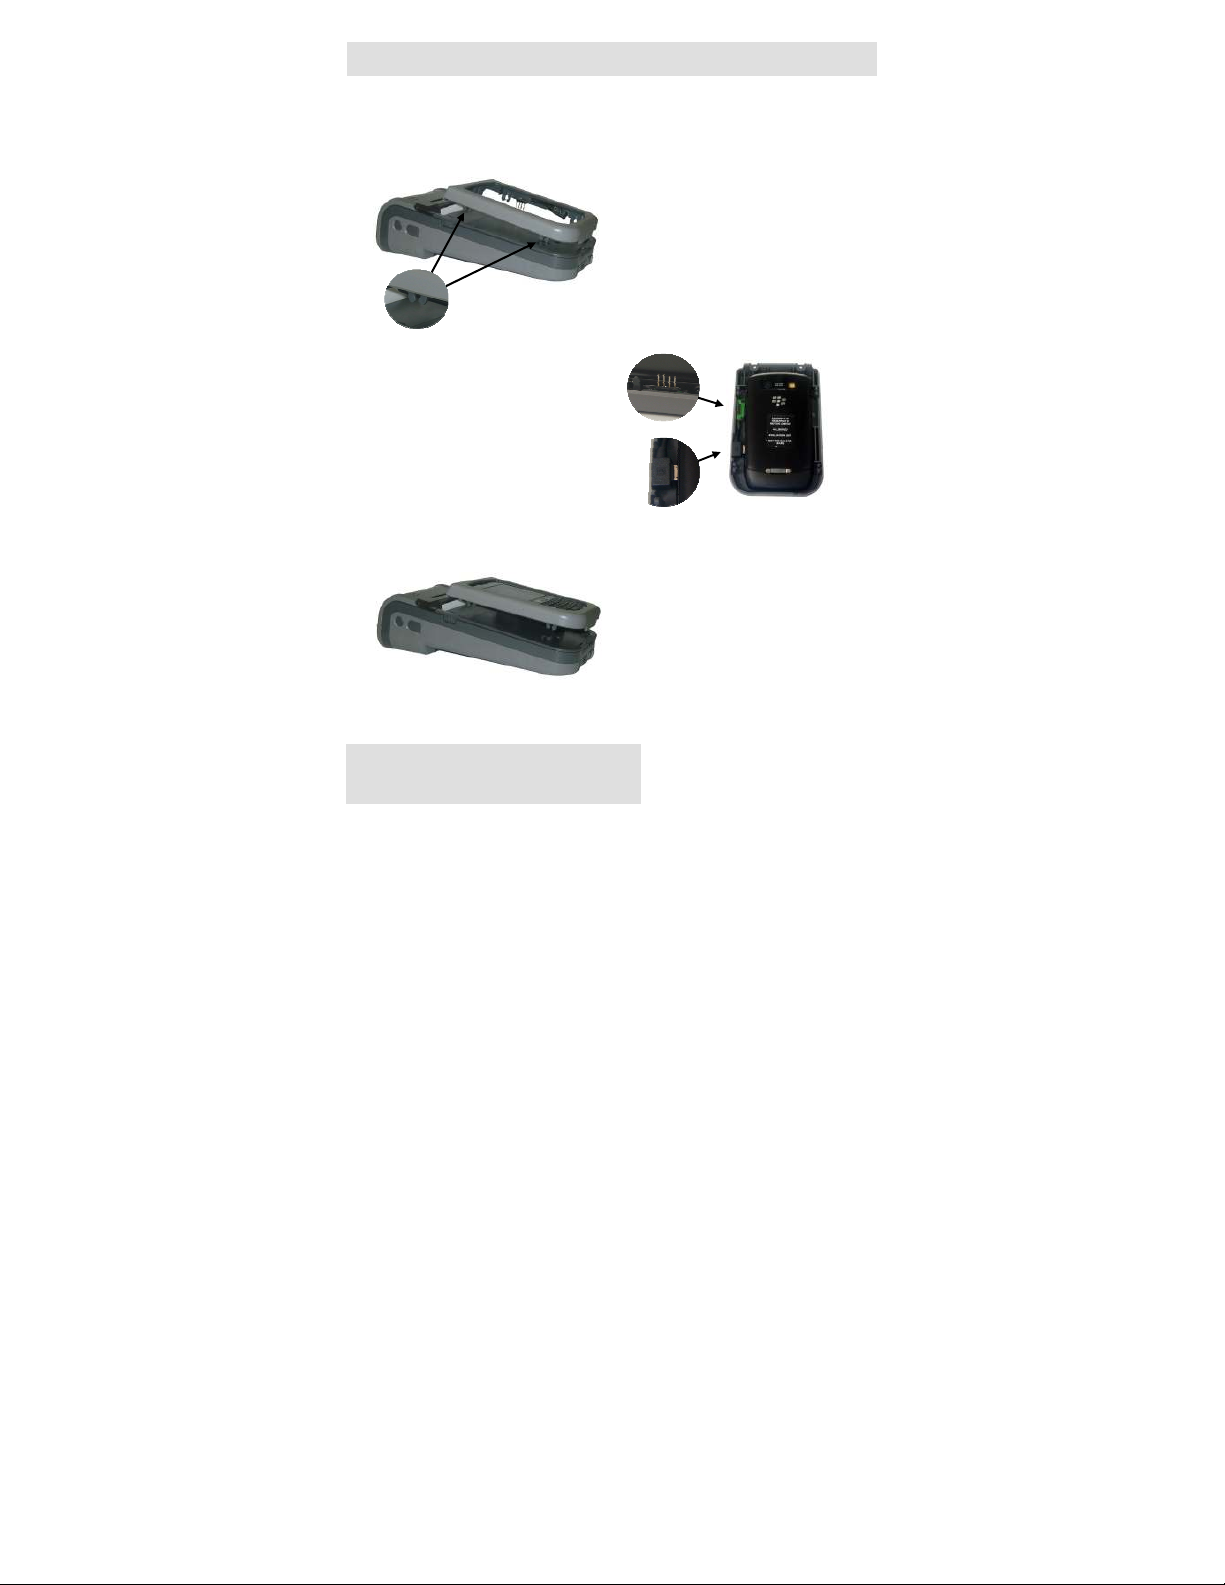
place as shown in the
The PP-60 uses a top cover PDA snap/locking mechanism to hold
the PDA securely in place. Care must be taken when installing the
PDA to PP-60.
2. Flip the PDA cover and take
Figure 9
care not to damage the 4pins. Insert the USB connector
into the PDA as shown in the
figure on the right.
1. Remove the PDA cover as
shown in the figure on the
right. There are 4-snap
locking mechanisms on
each corner of the cover.
Figure 10
3. Flip cover over then insert
the 4-pin header into the
connector before securely
snapping the cover back in
Figure 11
figure on the left.
Datecs Ltd.
www.datecs.bg Page 12
PP-60 User Manual v1.0
Page 13

. . . . . . . . . . . . . . . . . . . . . .
Diagnostic Information
The PP-60’s FEED switch/button is used for entering various printer
modes. These modes can be used to assist developers in
debugging problems related to programming and communication.
The following explain how to access the various operating modes.
Step #1: Make sure the printer is OFF (BT LED is OFF) before
performing step #2 or step #3.
Step #2: Press and hold the Feed Button (FB). While pressing
Step #3: Press and hold (POWER) button and release when one
Note: Care must be taken when entering operating modes to prevent the
Datecs Ltd.
www.datecs.bg Page 13
PP-60 User Manual v1.0
the (FB) button, press the (POWER) button momentarily.
of the conditions bellow.
Feed Button Operation Modes
Holding Feed button while power on
for ~ 0.5 sec and releasing it
after 1-beep.
Holding Feed button while power on
for ~ 2.5 sec and releasing it after 2-beep.
Holding Feed button while power on
for ~ 4.5 sec and releasing it after 3-beep.
Holding Feed button while power on
for more than 8.5 sec and releasing it after
the 5-beep 4-tone beep.
Holding Power button while power on
for ~ 4 sec and releasing it after 1-beep.
Holding Power button while power on
for ~ 6 sec.
clearing of factory preset configuration information.
Table 5
SHORT SELF TEST print.
Hex DUMP mode. All
input data are printed as
hexadecimal.
LONG SELF TEST print.
Program mode –
loading the printer
firmware.
Temporary forcing
9600 bps serial speed or
clearing Bluetooth pair
info.
Hardware Setup Mode.
Page 14
. . . . . . . . . . . . . . . . . . . . . .
Self-test
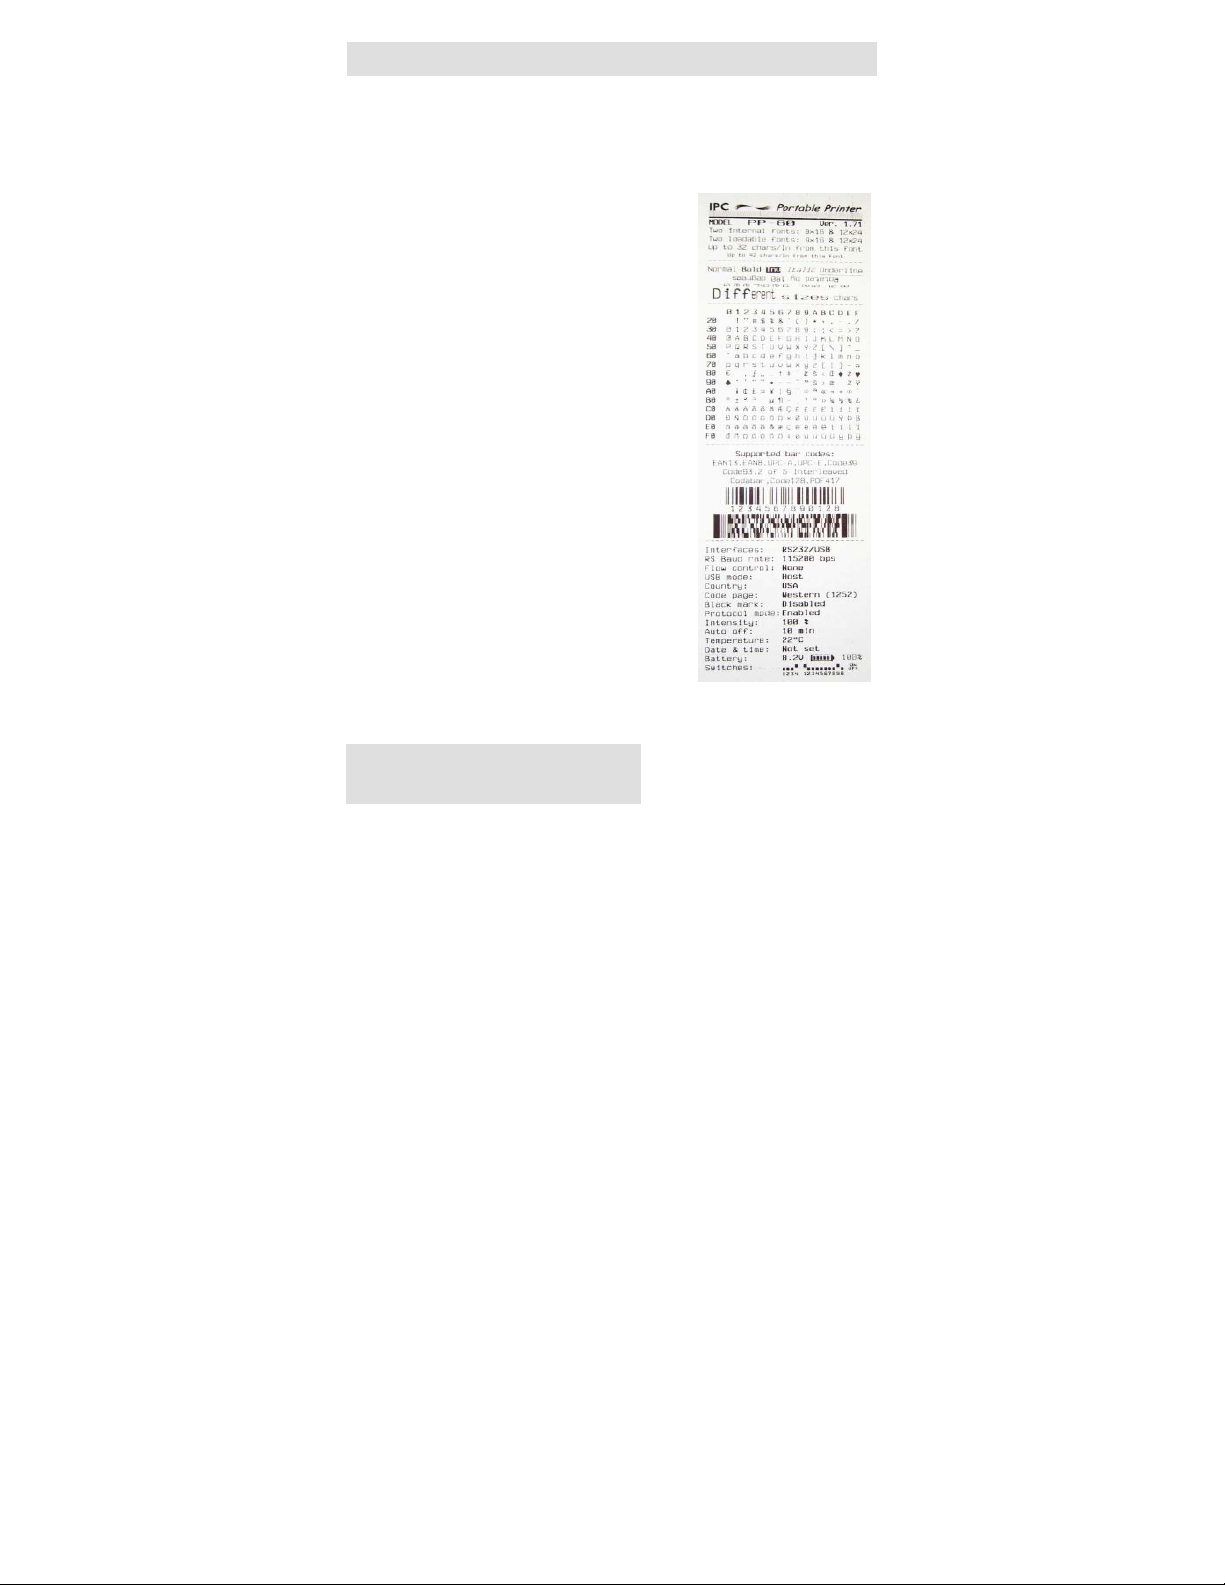
The PP-60 has a built-in test pattern that shows the printer’s
current configuration as well as the various resident printer fonts.
The self-test can also be used as a troubleshooting tool to
determine printing problems or battery level. The steps below
show how the self-test is printed activated.
• Resident font sizes
• Characters per line
• Text formatting
• Resident character set
• Resident barcode symbols
• Printer’s Configuration
Figure 12
Datecs Ltd.
www.datecs.bg Page 14
PP-60 User Manual v1.0
Page 15

. . . . . . . . . . . . . . . . . . . . . .
Dip Switch Settings
The PP-60 is designed to use different methods of communications.
Care must be taken to ensure that the DIP Switches are not
changed from its default factory configuration unless required.
DIP SWITCH SETTINGS:
The printer has two absolutely different operation modes.
They are determined by the state of switch Sw2:
These two modes detect paper present conditions differently. The
black mark searching mode is designed for proper alignment of the
starting print position on indexed media with printed information.
Switch
Continuous Paper mode
Black Mark mode
OFF ON
Sw1 Bluetooth enabled Bluetooth disabled
Sw2 Normal Black Mark mode
Sw3 None Xon/Xoff Flow protocol
Sw4 Normal operation mode Protocol mode
Table 6
Datecs Ltd.
www.datecs.bg Page 15
PP-60 User Manual v1.0
Page 16
. . . . . . . . . . . . . . . . . . . . . .
DIP Switch Location
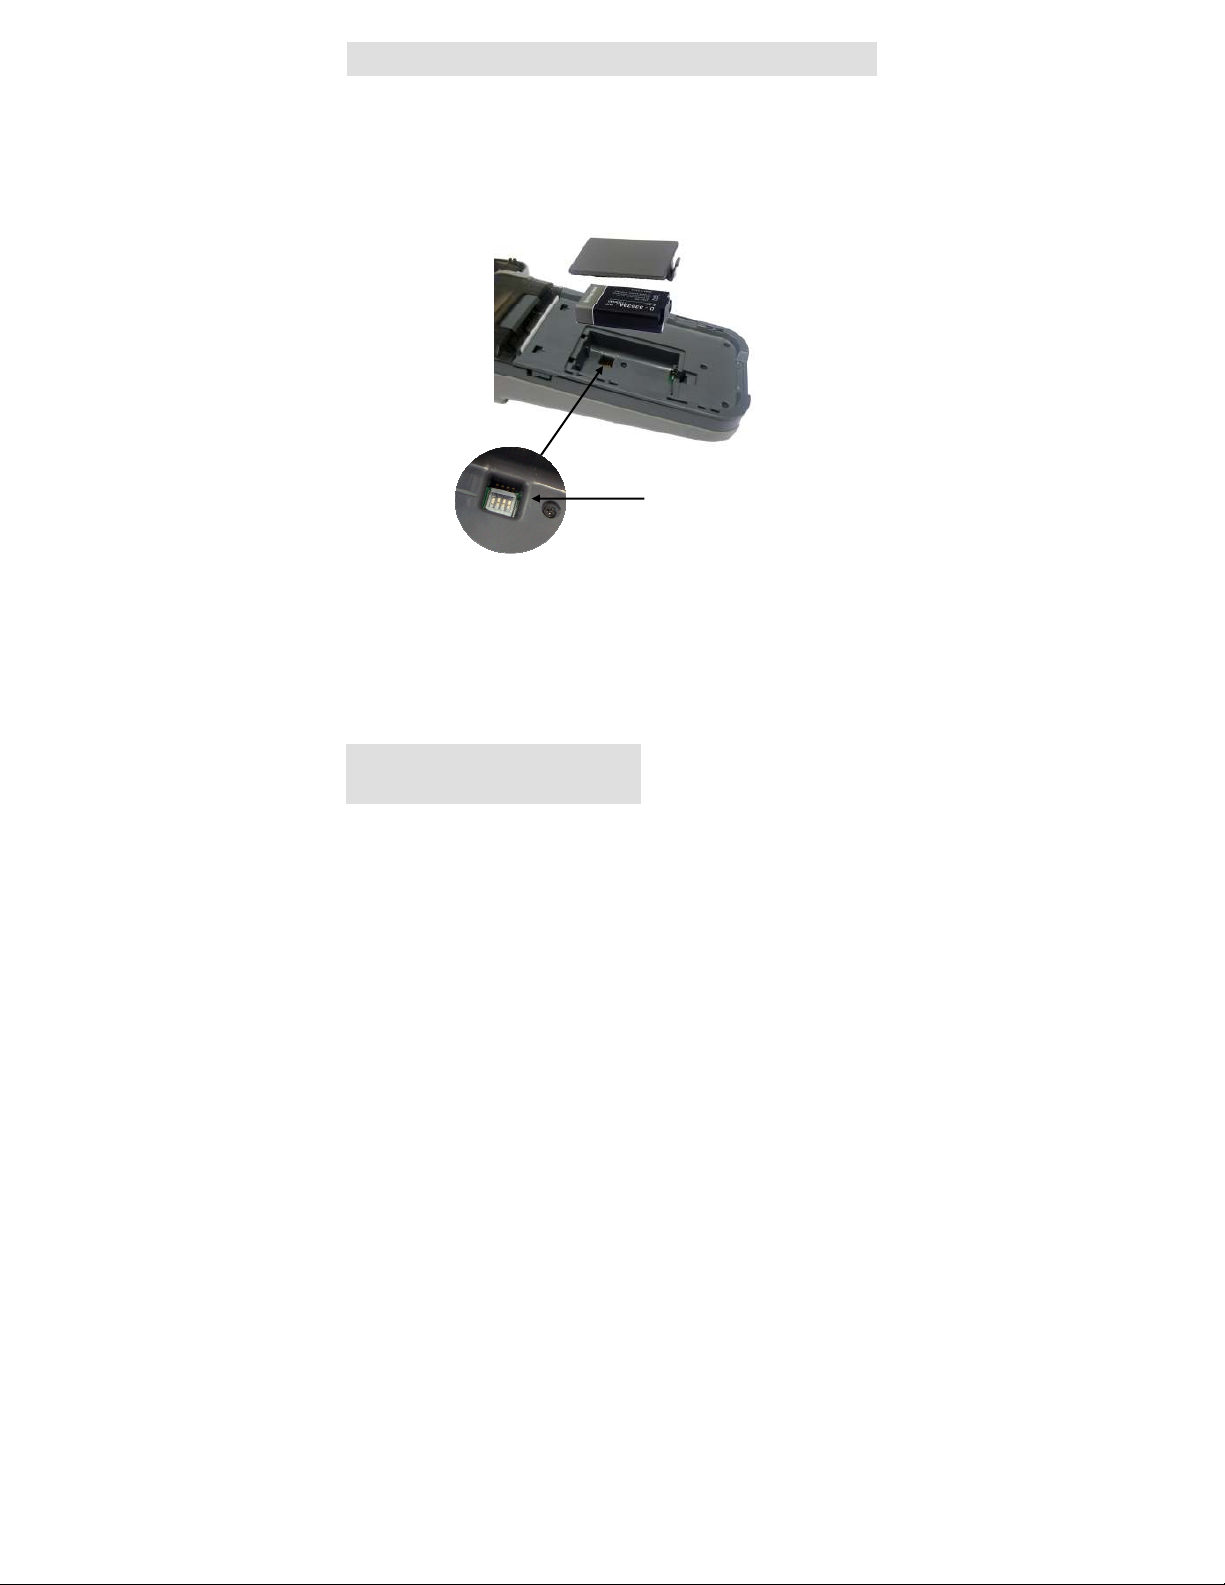
The DIP Switch is located under the PP-60 battery. Follow the steps
below to locate the switch.
# 1 - Remove battery cover
# 2 - Remove battery
DIP Switch
Figure 13
Datecs Ltd.
www.datecs.bg Page 16
PP-60 User Manual v1.0
Page 17

. . . . . . . . . . . . . . . . . . . . . .
Memory Switch Settings
The PP-60 uses nonvolatile memory for storing some of the printer
default configuration. The following table shows the available
options.
Memory Switch Options
Memory Switch
(see command reference GS command)
BAUD RATE 115200 bps
POWER OFF TIME 10 minutes
PRINT DENSITY 100%
CHARACTER TABLE WESTERN (1252)
1000000011
Table 7
Datecs Ltd.
www.datecs.bg Page 17
PP-60 User Manual v1.0
Page 18
. . . . . . . . . . . . . . . . . . . . . .
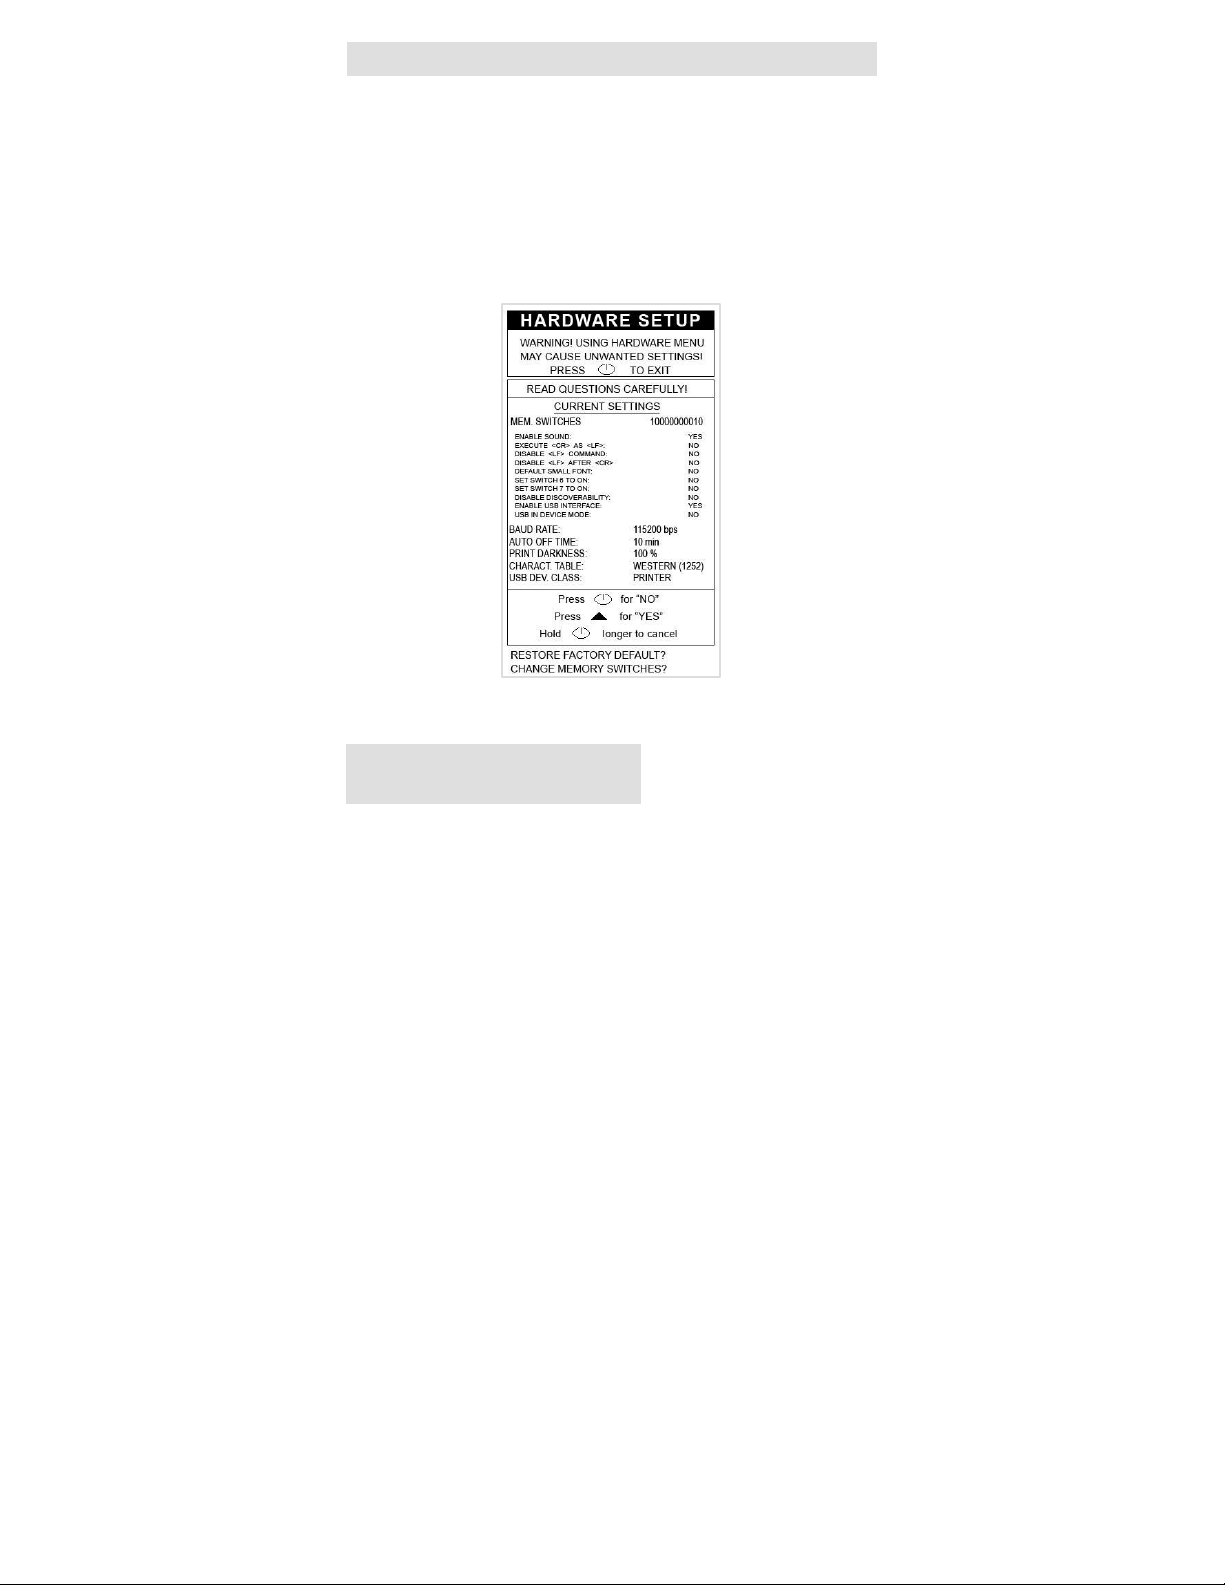
Setting Memory Switch
MEMORY SWITCH SETTINGS:
Step #1: Make sure the printer is OFF (STATUS LED is OFF) before
performing step #2.
Step #2: Press and hold the line feed button (LF). While pressing the
(LF) button, press and hold the (ON) button until the status
Step #3: Release the (ON) button and count (2) Beeps or until the next
Note: Care must be taken when changing factory preset
configuration information.
status LED display solid RED.
solid RED LED is displayed. Release LF button and follow and
the instruction printed.
Figure 14
Datecs Ltd.
www.datecs.bg Page 18
PP-60 User Manual v1.0
Page 19
. . . . . . . . . . . . . . . . . . . . . .
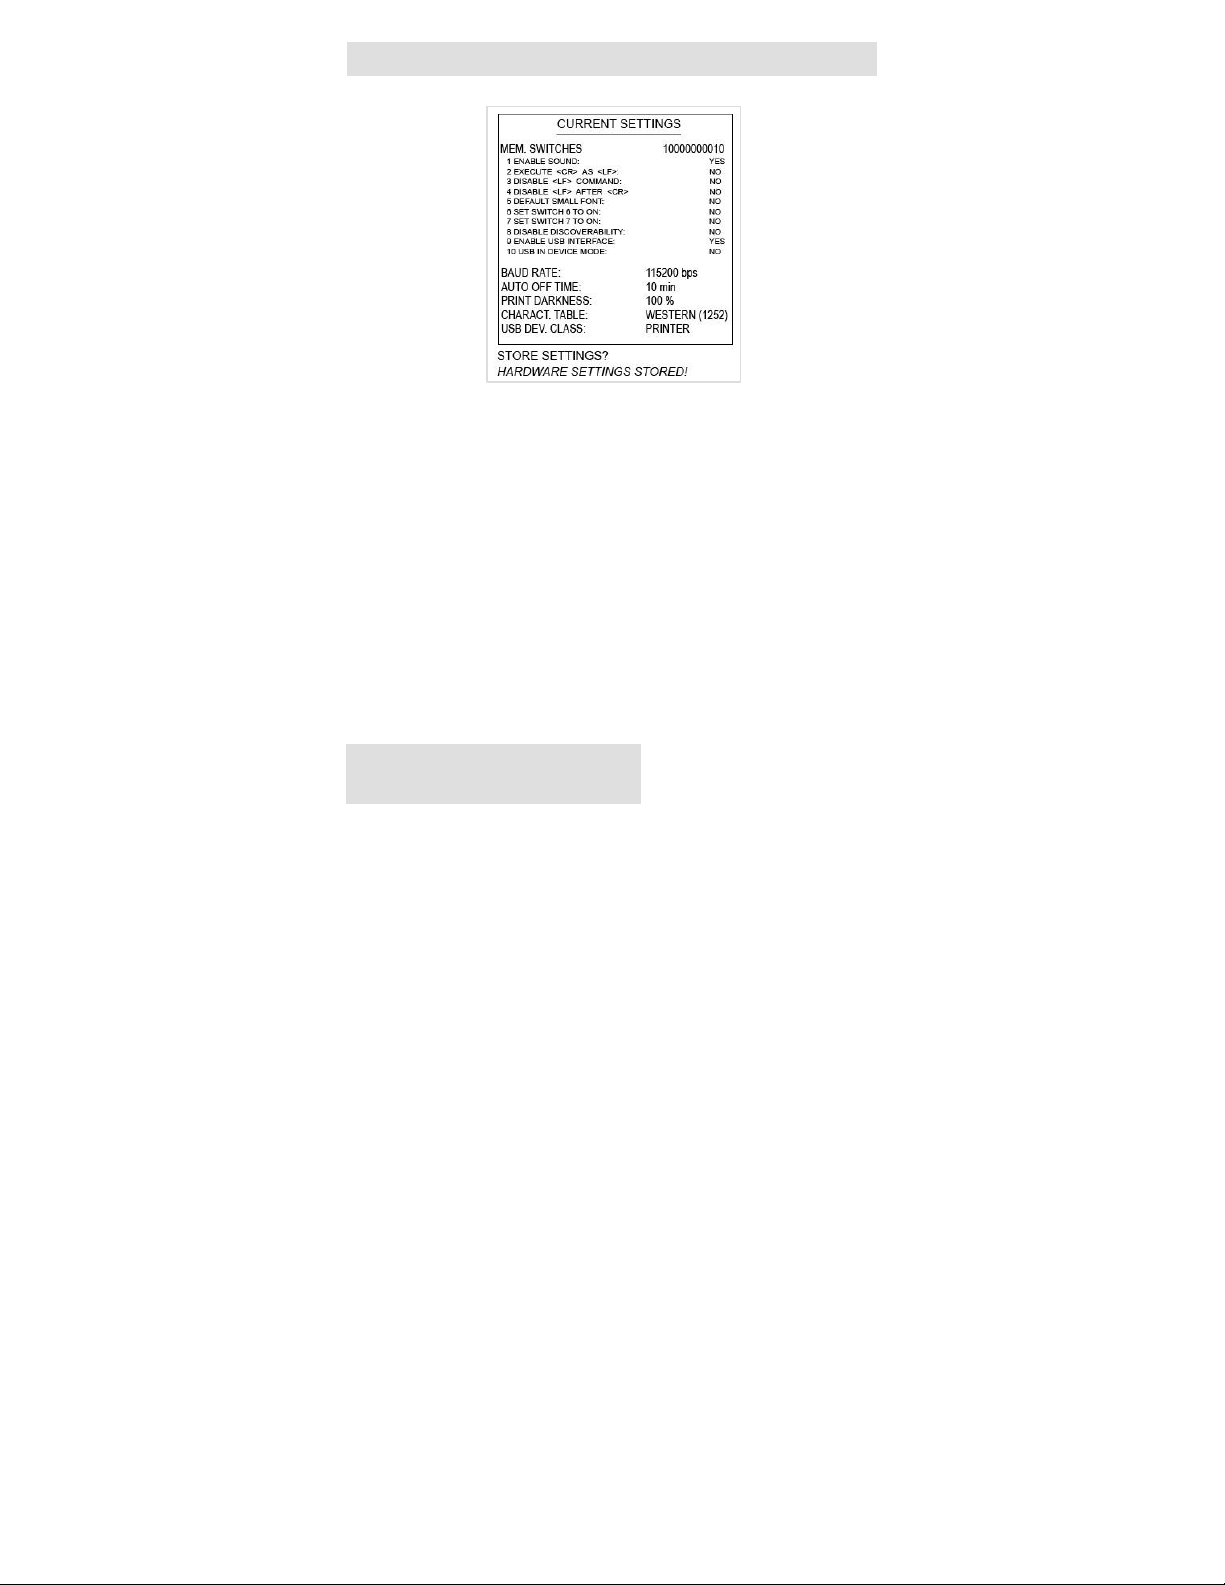
Memory Switch Details
SW1: Enable/Disable buzzer.
SW2: Execute Carriage Return as Line Feed command.
SW3: Disable/Ignores Line Feed commands.
SW4: Disables Line Feed command after Carriage Return command.
SW5: Set small font as default character size.
SW6: Reserved.
SW7: Reserved.
SW8: Prevents others from discovering printer when set to ENABLE. Must
be set after pairing is completed.
SW9: Allow the use of USB port for communications.
SW10: (OFF) set USB as the host mode.
Datecs Ltd.
www.datecs.bg Page 19
PP-60 User Manual v1.0
Figure 15
Page 20

. . . . . . . . . . . . . . . . . . . . . .
Loading Drivers
Loading PP-60 drivers for you’re PDA or Smartphones.
BlackBerry Devices:
Blackberry Desktop Manager shown in the
figure on the right is used to load third
party software on to your device.
Please review your device’s documentation
on how to use the Application Loader
Option to load software on to your device.
Windows Mobile Devices:
Active Sync shown in the figure on the
right is used to install third party
applications on to your mobile device.
Please review your device’s documentation
on how to use the Active Sync Manager to
load new software on to your device.
In most cases you only need to run the
PP-60 installer to start the installation.
Apple Devices:
Apple iTunes Application shown in the
figure on the right is used to install third
party applications on to your device.
Please review your device’s
documentation on how to use the Apple
iTunes Application to load new software
on to your device. In most cases you
only need to drag & drop PP-60 iOS files
into iTunes and sync.
Datecs Ltd.
www.datecs.bg Page 20
PP-60 User Manual v1.0
Page 21

. . . . . . . . . . . . . . . . . . . . . .
Magnetic Card Reader
The PP-60 has a built-in magnetic card reader. The card reader
incorporates a (3)-track magnetic read head requiring a single
swipe to read field data from all three tracks.
The reader’s magnetic head faces towards the bottom of the
printer. When placing the card into the reader, the magnetic strip
must be facing as show in the figure above. Keep the inner edge
of the card flat on the inner base of the reader to ensure that the
magnetic strip passes over the read head evenly.
When swiping the card through the reader, use an even consistent
motion from start to finish.
The speed of swiping can vary however the speed must be
consistent from start to finish of the swipe in order to accurately
read card data.
User Notes:
To use the magnetic card reader feature, special software must be
used to read and process the card information. If you do not have
card reading software, please consult your reseller to find out if
this software is available or contact Datecs Ltd. for
recommendations on compatible third party software solutions.
Magnetic Strip
( face down direction )
Card Swipe Direction
Figure 16
Datecs Ltd.
www.datecs.bg Page 21
PP-60 User Manual v1.0
Page 22
. . . . . . . . . . . . . . . . . . . . . .
1D Barcode Scanning
Using the 1D barcode scanner:
The PP-60 uses a scan engine that supports one-dimensional (1D)
barcode symbols. The effective reading distance of the barcode reader
varies depending on the barcode size.
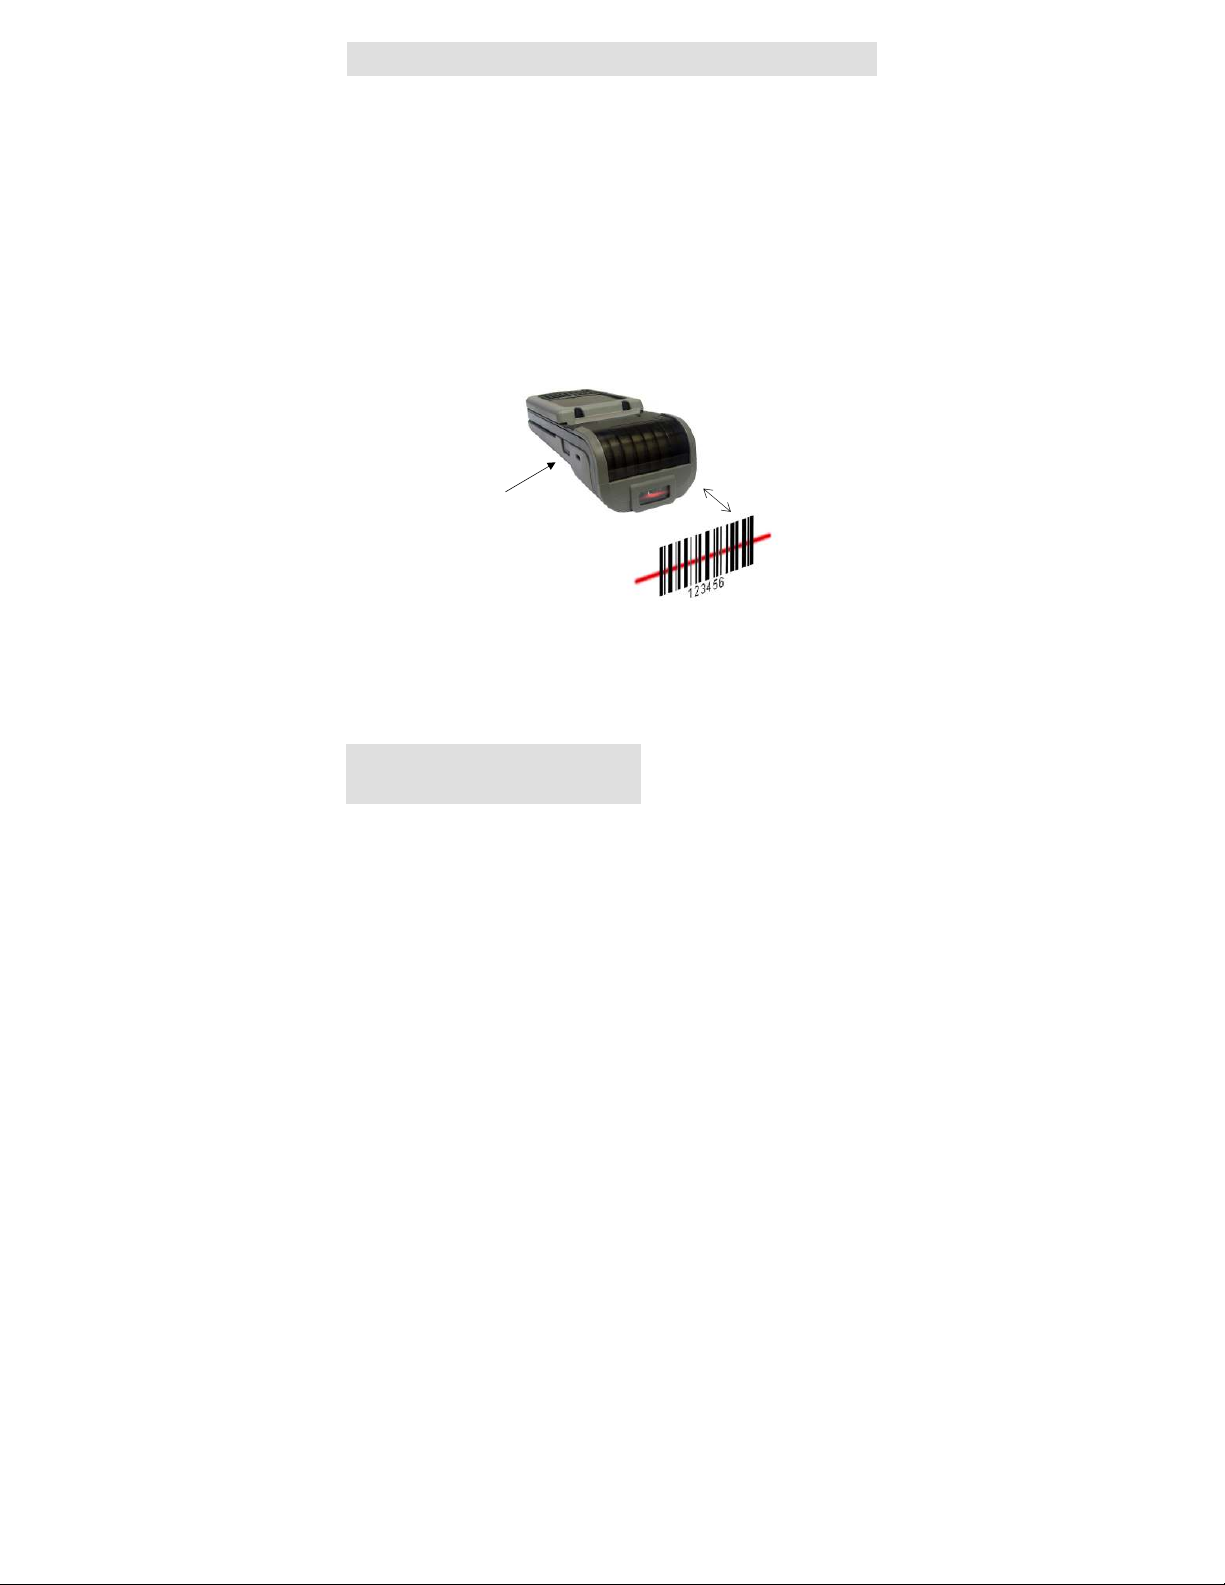
Scanning 1D Barcodes:
To scan a 1D barcode fist activate the scanner. Then position the scan
head as close to the barcode label as possible so that the scan line
crosses both ends of the barcode as shown in the figure below.
Slowly pull back the unit increasing the distance between the barcode
and scan head until the barcode has been read by the scanner.
~ 15-20 cm
Scan button
Figure 17
Datecs Ltd.
www.datecs.bg Page 22
PP-60 User Manual v1.0
Page 23
. . . . . . . . . . . . . . . . . . . . . .
2D Barcode Scanning
Using the 2D barcode scanner:
The PP-60 uses a scan engine that supports one-dimensional (1D)
barcode symbols. The effective reading distance of the barcode reader
varies depending on the barcode size.
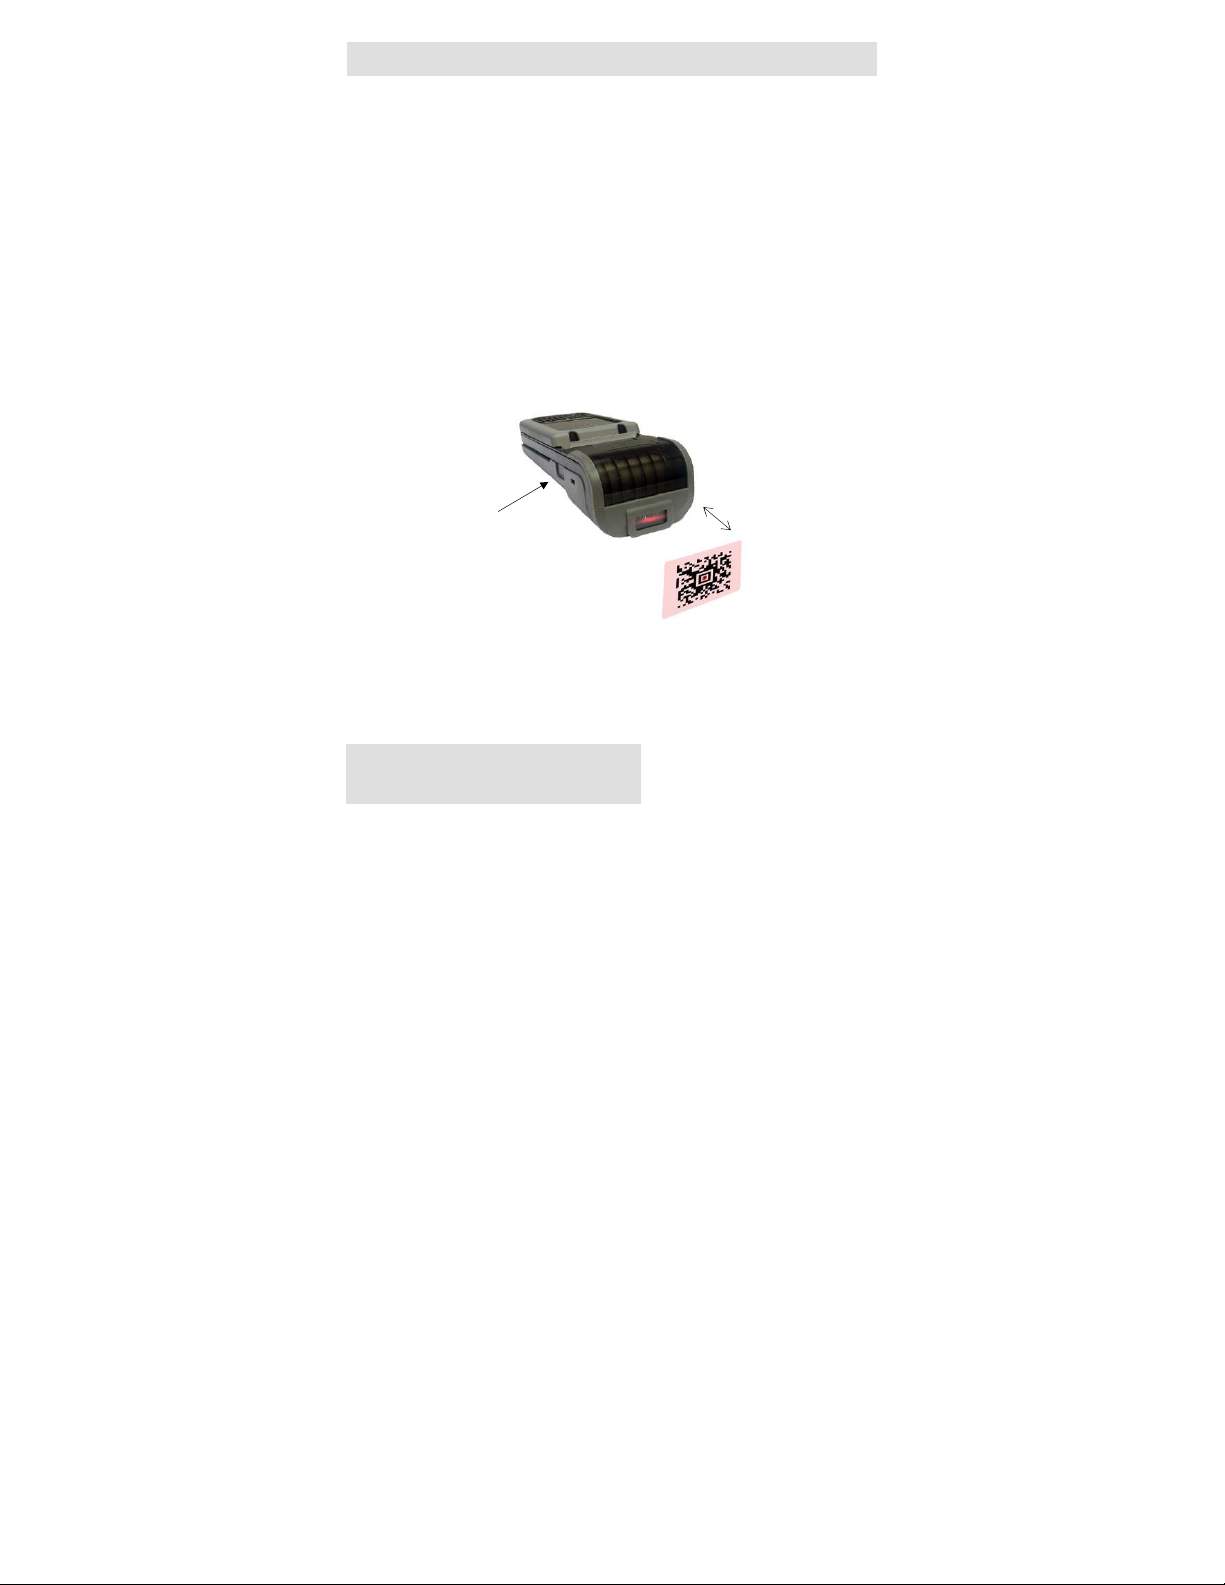
Scanning 2D Barcodes:
To scan a 2D barcode fist activate the scanner. Then position the scan
head to center the red aiming dot near the center of the barcode and the
scan box is over the outer edges of the barcode as shown in the figure
below.
Slowly pull back the unit increasing the distance between the barcode
and scan head until the barcode has been read by the scanner.
~ 15-20 cm
Scan button
Figure 18
Datecs Ltd.
www.datecs.bg Page 23
PP-60 User Manual v1.0
Page 24
. . . . . . . . . . . . . . . . . . . . . .
Replacing Battery
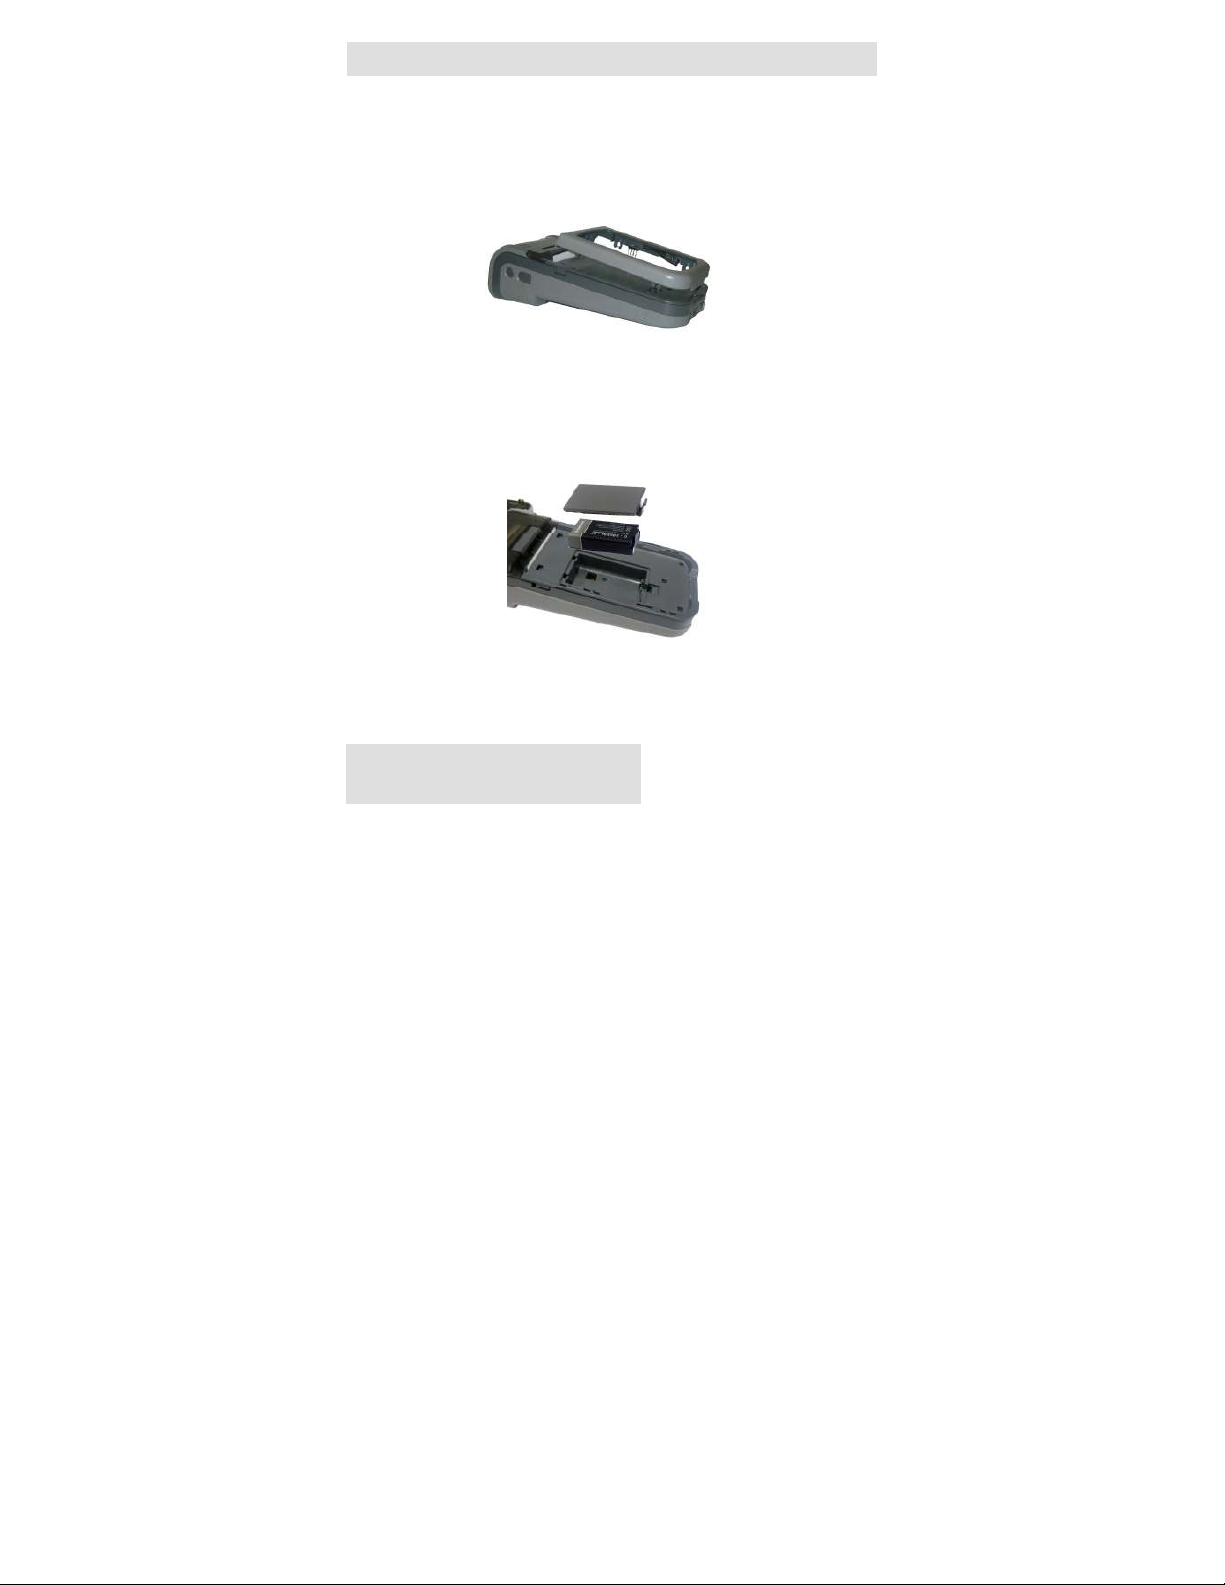
To replace the battery in the PP-60 thermal printer follow the
steps below.
Steps:
1. Remove the PDA cover as shown in the figure below.
2. Lift the battery cover and battery as showed in the figure
below.
3. Replace the new battery and cover.
Datecs Ltd.
www.datecs.bg Page 24
PP-60 User Manual v1.0
Figure 19
Figure 20
Page 25

. . . . . . . . . . . . . . . . . . . . . .
Developing Solution
Integrating the PP-60 into your mobile solution requires the use of
the PP-60 PDA & Smartphone SDK. The SDK incorporates API
specific to developing printing applications and using the integrated
Magnetic Card Reader / Smart Card Reader capability of the PP-60.
The table below shows the SDKs currently available for PDA &
Smartphone devices.
Android Java Eclipse
BlackBerry Java
iOS Object C Xcode
Windows
Mobile
For details on using the PP-60 SDK, please refer to the SDK’s
documentation.
For the latest PP-60 SDK’s, visit our developer web site at:
http://www.datecs.bg/support.php?cat=4
OS Language SDK - IDE
RIM BlackBerry Java JDE 4.3 and
higher/Eclipse
VB.Net Microsoft Visual Studio 2005 (.Net)
C ++ Microsoft Visual Studio 2005 (.Net)
C Sharp Microsoft Visual Studio 2005 (.Net)
Table 8
Datecs Ltd.
www.datecs.bg Page 25
PP-60 User Manual v1.0
Page 26
. . . . . . . . . . . . . . . . . . . . . .
Troubleshooting
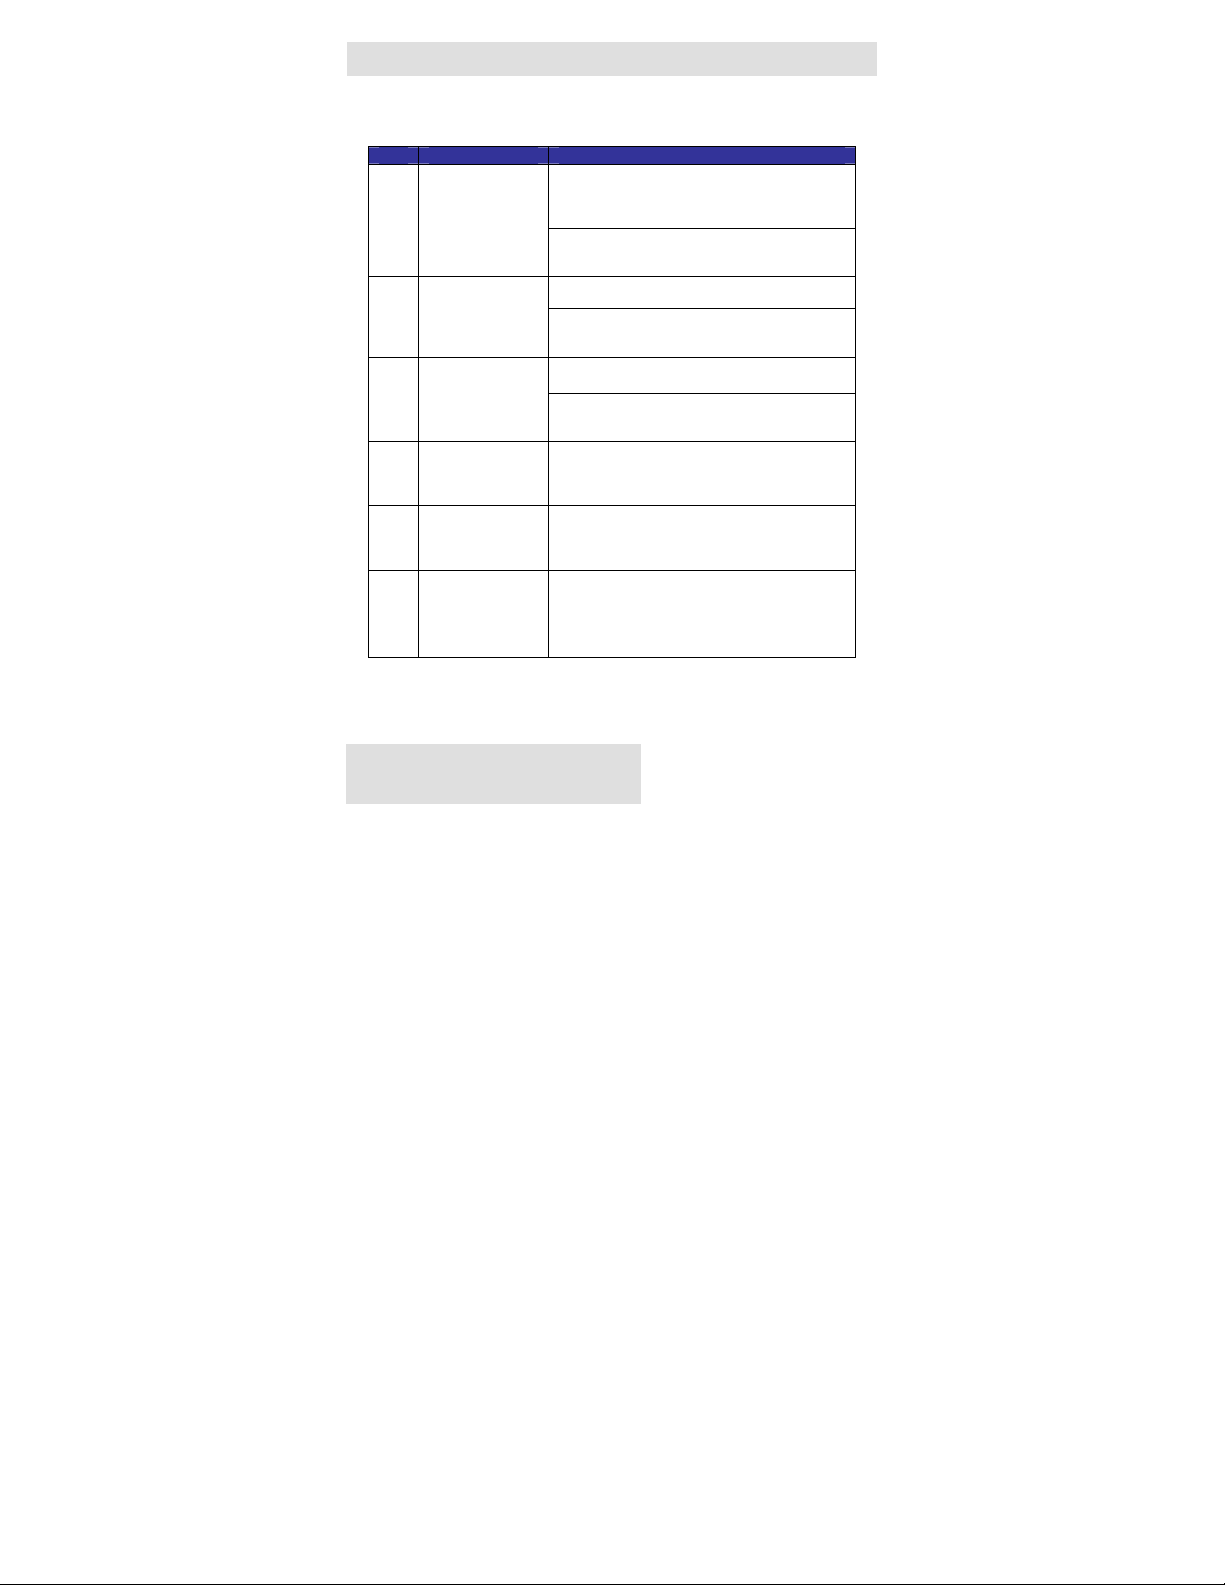
If you’re having problems capturing signatures refer to the table
below for possible causes.
Item Problem Possible Cause
Paper feeds
after issuing a
1
print job but no
printed text
visible on paper.
On-line LED
2
blinks RED
continuously.
Text and/or
graphics are
3
printed very
light.
Strange
characters are
4
printed when
printing.
Printer stops
responding to
5
print and paper
feed commands.
Printing is light
or missing only
6
on half of the
print width.
Thermal media is specially coated on
outside of roll. Remove paper roll and
reload properly. See section “Loading
Paper” for details on loading paper.
Paper cover not installed properly. See
section “Loading Paper” for details on
replacing paper cover.
Battery voltage low.
Printer out of paper or Paper not properly
loaded. See section “Loading Paper” for
details on loading paper.
Battery voltage low. See section on
charging battery pack.
Thermal media not imaging correctly.
Verify that you are using the
recommended thermal media.
Battery voltage low. See section on
charging battery pack.
Remove battery for 5 seconds and
reconnect battery.
Paper cover not properly installed. See
section on loading paper.
Mechanism jarred loose. Contact technical
support.
Table 9
Datecs Ltd.
www.datecs.bg Page 26
PP-60 User Manual v1.0
Page 27

. . . . . . . . . . . . . . . . . . . . . .
Contact Information
National Sales Headquarter: Datecs Ltd.
115A Tzarigradsko Shosshe bul.
Sofia, Bulgaria
Phone: +359 2 974 00 55
Fax: +359 2 974 11 00
www.datecs.bg
[email protected]
Datecs Ltd.
www.datecs.bg Page 27
PP-60 User Manual v1.0
 Loading...