

Page 1
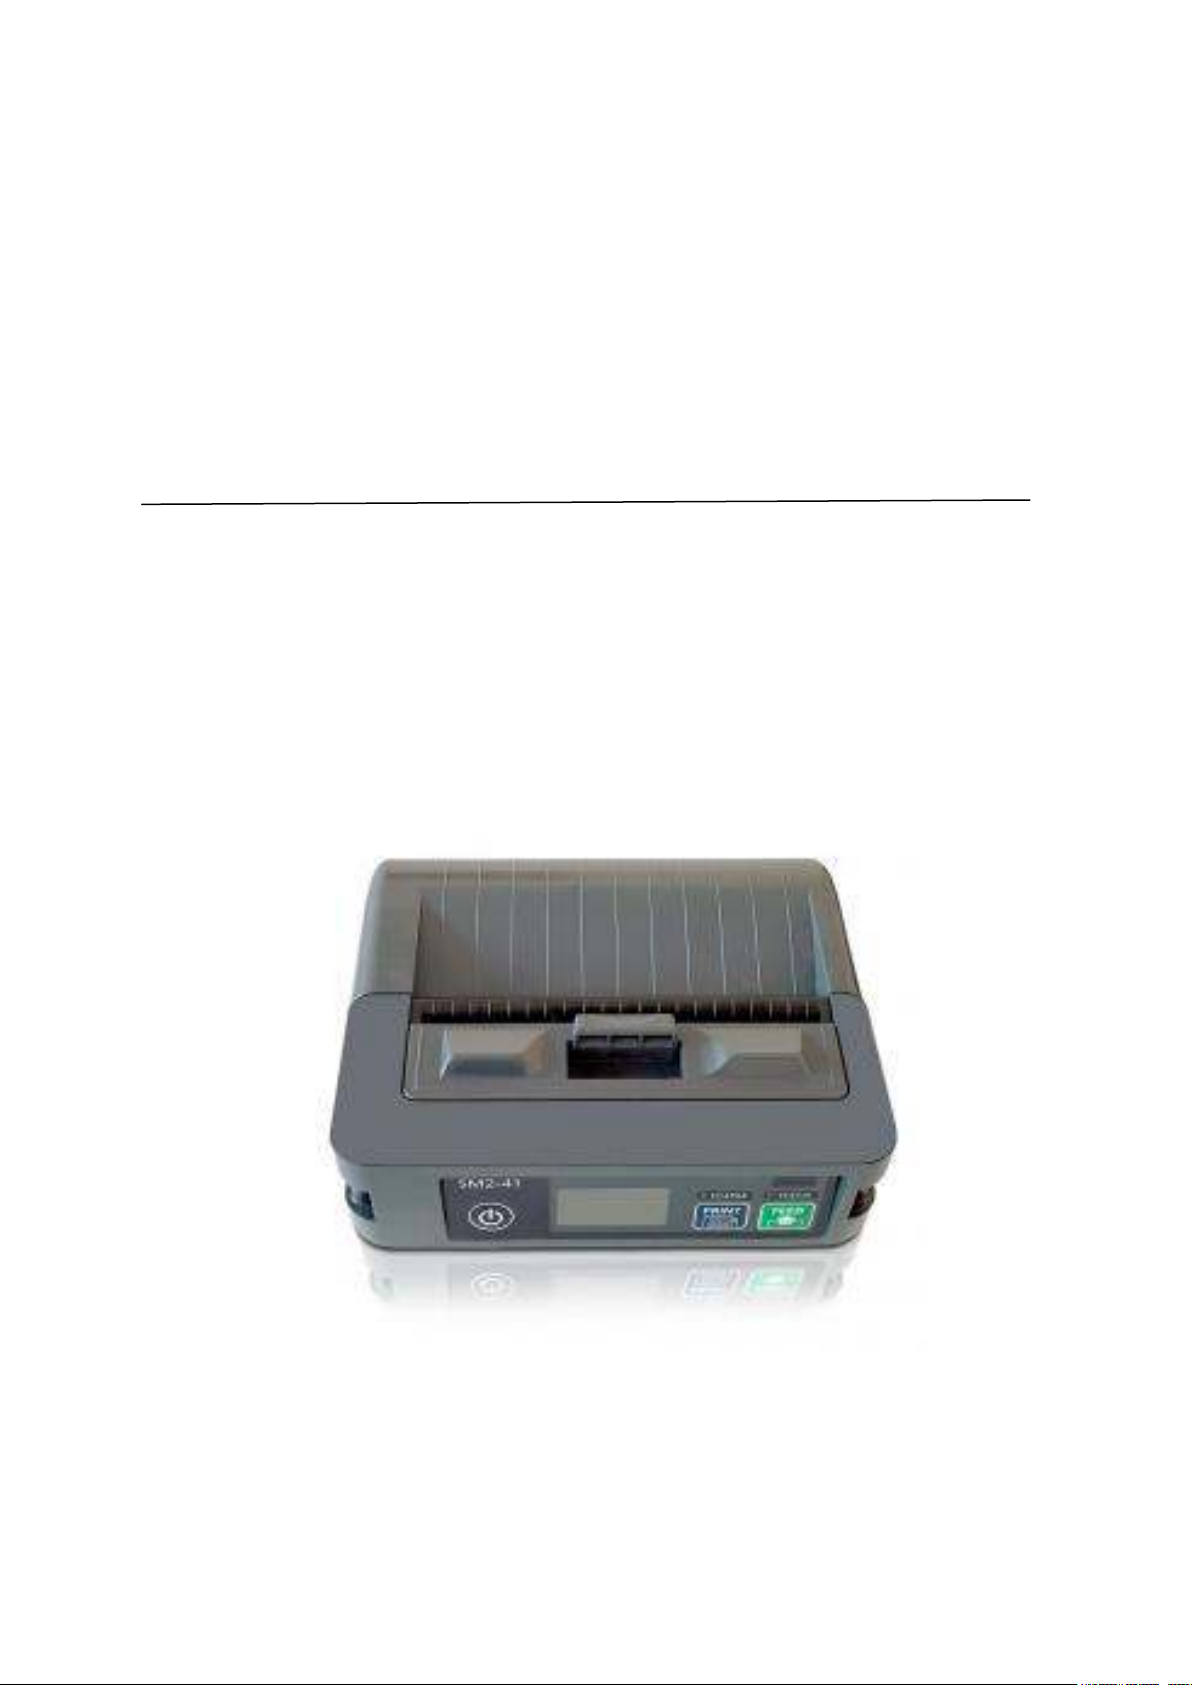
User Manual
ESC/POS PRINTER
DPP-450
Page 2

1 DATECS DPP-450 User manual
THE INFORMATION IN THIS DOCUMENT CANNOT BE REPRODUCED IN ANY MECHANICAL, ELECTRICAL
OR ELECTRONIC WAY AND UNDER ANY CIRCUMSTANCES WITHOUT THE WRITTEN CONSENT FROM DATECS LTD.
VERSION: June 2014
2
Page 3

1 DATECS DPP-450 User manual
Legal Notice
“Made for iPod,” “Made for iPhone,” and Made for iPad” mean that an electronic accesory has been
designed to connect specifically to iPod, iPhone, or iPad, respectively, and has been certified by the
developer to meet Apple performance standards. Apple is not responsible fort he operation of this
device or its compliance with safety and regulatory standards. Please note that the use of this
accesory with iPod, iPhone, or iPad may affect wireless performance.
Compatability
Made for
iPhone 5
iPhone 5S
iPhone 5C
iPhone 4S
iPhone 4
iPod touch (5th generation)
iPod touch (4th generation)
iPod touch (3rd generation)
iPad (4th generation)
iPad mini
iPad (3rd generation)
iPad 2
iPad, iPhone, iPod touch are trademarks of Apple Inc., registered in the U.S. and other countries. Lightning is a
trademark of Apple Inc.
3
Page 4

1 DATECS DPP-450 User manual
This equipment has been tested and found to comply with the limits for a Class B digital device, pursuant
to part 15 of the FCC Rules. These limits are designed to provide reasonable protection against harmful
interference in a residential installation. This equipment generates, uses and can radiate radio frequency energy
and, if not installed and used in accordance with the instructions, may cause harmful interference to radio
communications. However, there is no guarantee that interference will not occur in a particular installation. If this
equipment does cause harmful interference to radio or television reception, which can be determined by turning
the equipment off and on, the user is encouraged to try to correct the interference by one or more of the following
measures:
—Reorient or relocate the receiving antenna.
—Increase the separation between the equipment and receiver.
—Connect the equipment into an outlet on a circuit different from that to which the receiver is connected.
—Consult the dealer or an experienced radio/TV technician for help.
CAUTION: Use shielded cables to connect this device to computers.
Any changes or modifications not expressly approved by the grantee of this device could void the user’s authority
to operate the equipment.
4
Page 5

1 DATECS DPP-450 User manual
CONTENTS
1. Introduction............................................................................................................. 6
2. Features ................................................................................................................. 6
3. Technical specification............................................................................................ 7
4. General view........................................................................................................... 7
4.1 Dimensions and outlook ................................................................................. 10
4.2 Box Contents.................................................................................................. 11
5. Getting started ...................................................................................................... 12
5.1 Charge DPP-450 ............................................................................................ 13
5.2 Diagnostic information.................................................................................... 14
5.3 Loading paper ................................................................................................ 14
5.4 Mounting belt clip ........................................................................................... 18
5.5 Self-Test ......................................................................................................... 18
5.6 Page Mode ..................................................................................................... 20
5.7 Ruled lines...................................................................................................... 20
5.8 Protocol mode ................................................................................................ 20
5.9 Hardware setup .............................................................................................. 22
5.10 List of commands ......................................................................................... 26
5.11 Connecting Device ....................................................................................... 28
5.12 Mount Strap.................................................................................................. 30
5
Page 6

1 DATECS DPP-450 User manual
1. Introduction
DATECS DPP-450 is a mobile ESC/POS and LABEL thermal printer. It can be
used in dynamic working conditions and its abundant built-in features allow it to be
widely used for different applications. Printer can quickly and easily print text and/or
graphics, depending on customer’s needs – barcodes, logo, etc.
2. Features
The DPP-450 is a mobile line thermal printer, applicable for different applications
as shown below:
• Mobile
• Label Peeler
• traveling sales
• Retail
• Transportation
• Receipts
• Point of sales
• Distribution
6
Page 7
1 DATECS DPP-450 User manual
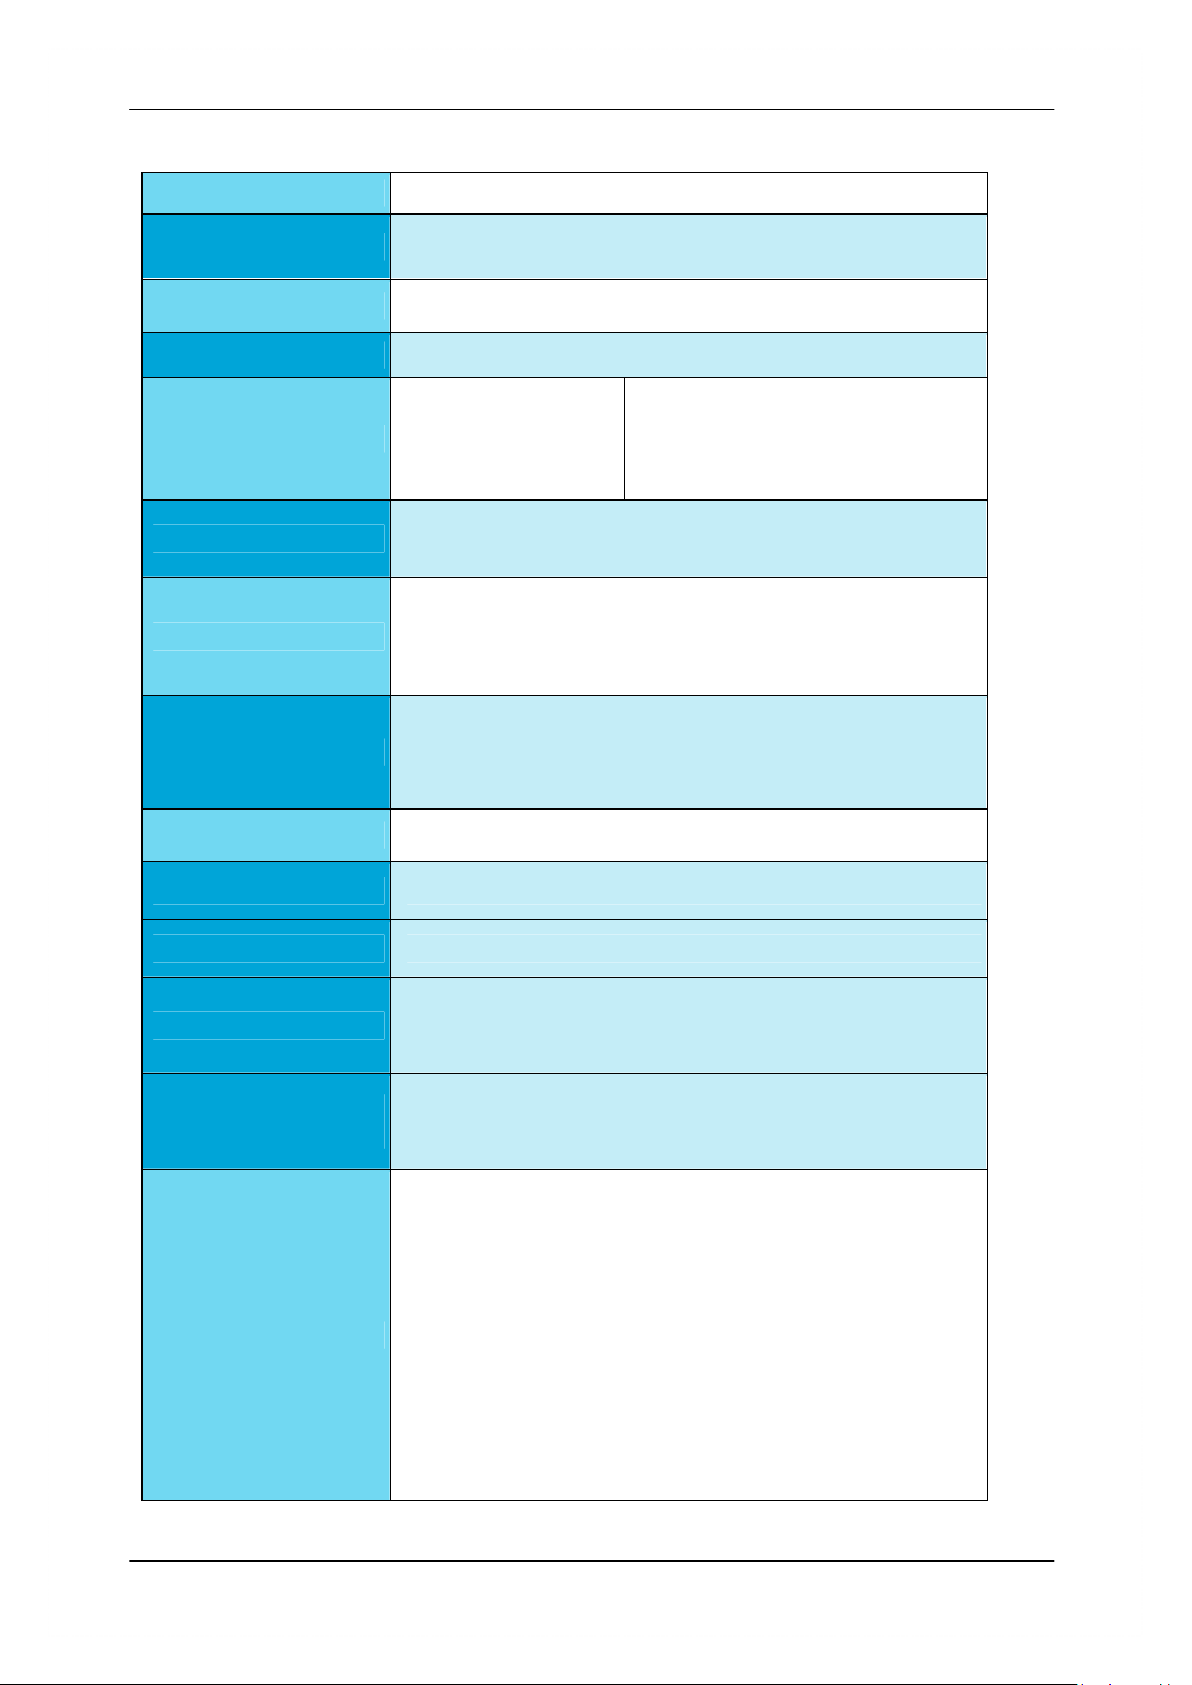
3. Technical specification
Printing Method
Print Width
Dot Density
Print Speed
Fonts
Graphic Logo
Barcode Types
Paper spec:
Direct line thermal
104mm, 832 dots/line
8 x 8 dots/mm (203 dpi x 203 dpi)
150mm/sec max
Resident Fonts
Font A: 48 characters/line
Font B: 64 characters/line
1 x Black & White , Size: 832 x 248 dots
: EAN 13, EAN 8, UPC A, UPC E, Code 39, Code 93, Code 128,
1D
Codabar, 2 of 5 interleaved,
: PDF417, QR code
2D
Width: 50-115mm
•
Paper roll: φ58mm or less
•
Thickness: 59-154µm
•
:
Loadable Fonts
Font C: 48 characters/line
Font D: 64 characters/line
:
Paper Loading
Paper Feed System
Paper Type
Paper sensor
Post Printing Paper
Treatment
Connectivity
Easy paper loading
Step
Label/Receipt
• PE sensor
• BM sensor
• Label Gap sensor
Peeler for Labels
Cutter for Receipts
• RS-232C – max 115200bps
• mini USB 2.0 (only device)
• BT 2.0 Class 2 (option)
- SPP - Serial Port Profile
• BT 3.0 Class 2 (option)
- SPP - Serial Port Profile
- iAP - iPod Accessory Protocol
• Wi-Fi 802.11b (option)
- BSS and IBSS network mode
• IrDA
7
Page 8

1 DATECS DPP-450 User manual
• Paper end or paper out
LED Indication
• Cover open
• Low battery
• Print head overheating
• Battery charging
Audio Indications
Display
Buttons
Memory
Buffer Size
Periphery
Emulation
Electro-magnetic buzzer
• LCD 128 x 64 dots
• LED backlight
• Power button
• Print button
• Feed button
4MB Flash(option)
up to 128 kB
• RFID card reader:
• MiFARE Mini • ISO 14443
• MiFARE Classic 1K / 4K • ISO 15693
• MiFARE Ultra-Light / UltraLight-C
• ESC/POS
• Eltron
• ZEBRA*
• FeliCa
• MiFARE Plus 2K / 4K
Power Supply
Battery
Reliability
Weight, kg
Dimensions,
Environmental
(WxDxH) mm
AC Adapter
• Input:
•
Rechargeable Li-Ion battery 14.4V / 2200mAh
Battery charge time – 2.5 hours
Battery capacity per charge ~ 20 000 lines
Thermal head life: 50km
Mechanism(MCBF): 15 000 000 lines
0.785(w/o paper, include battery)
0.850 (with paper, include battery)
157 x 138 x 67
• Operating: -15°C to +50°C / 30 to 85% RH
• Storage: -20°C to +60°C / 10 to 90% RH
AC: 100-240V~, 50/60Hz
Output: DC1
9V, 5.2A
8
Page 9

1 DATECS DPP-450 User manual
Height: 1m
Drop Test
3 times on each of the 6 faces
3 times on each of the 4 edges
OS compatibility
Accessories
iOS, Android OS, BlackBerry OS, Windows OS, Win CE, Windows
Mobile, Windows Phone
• Neck strap
• Metal belt clip
• Carrying case
• Single battery charger
9
Page 10
1 DATECS DPP-450 User manual
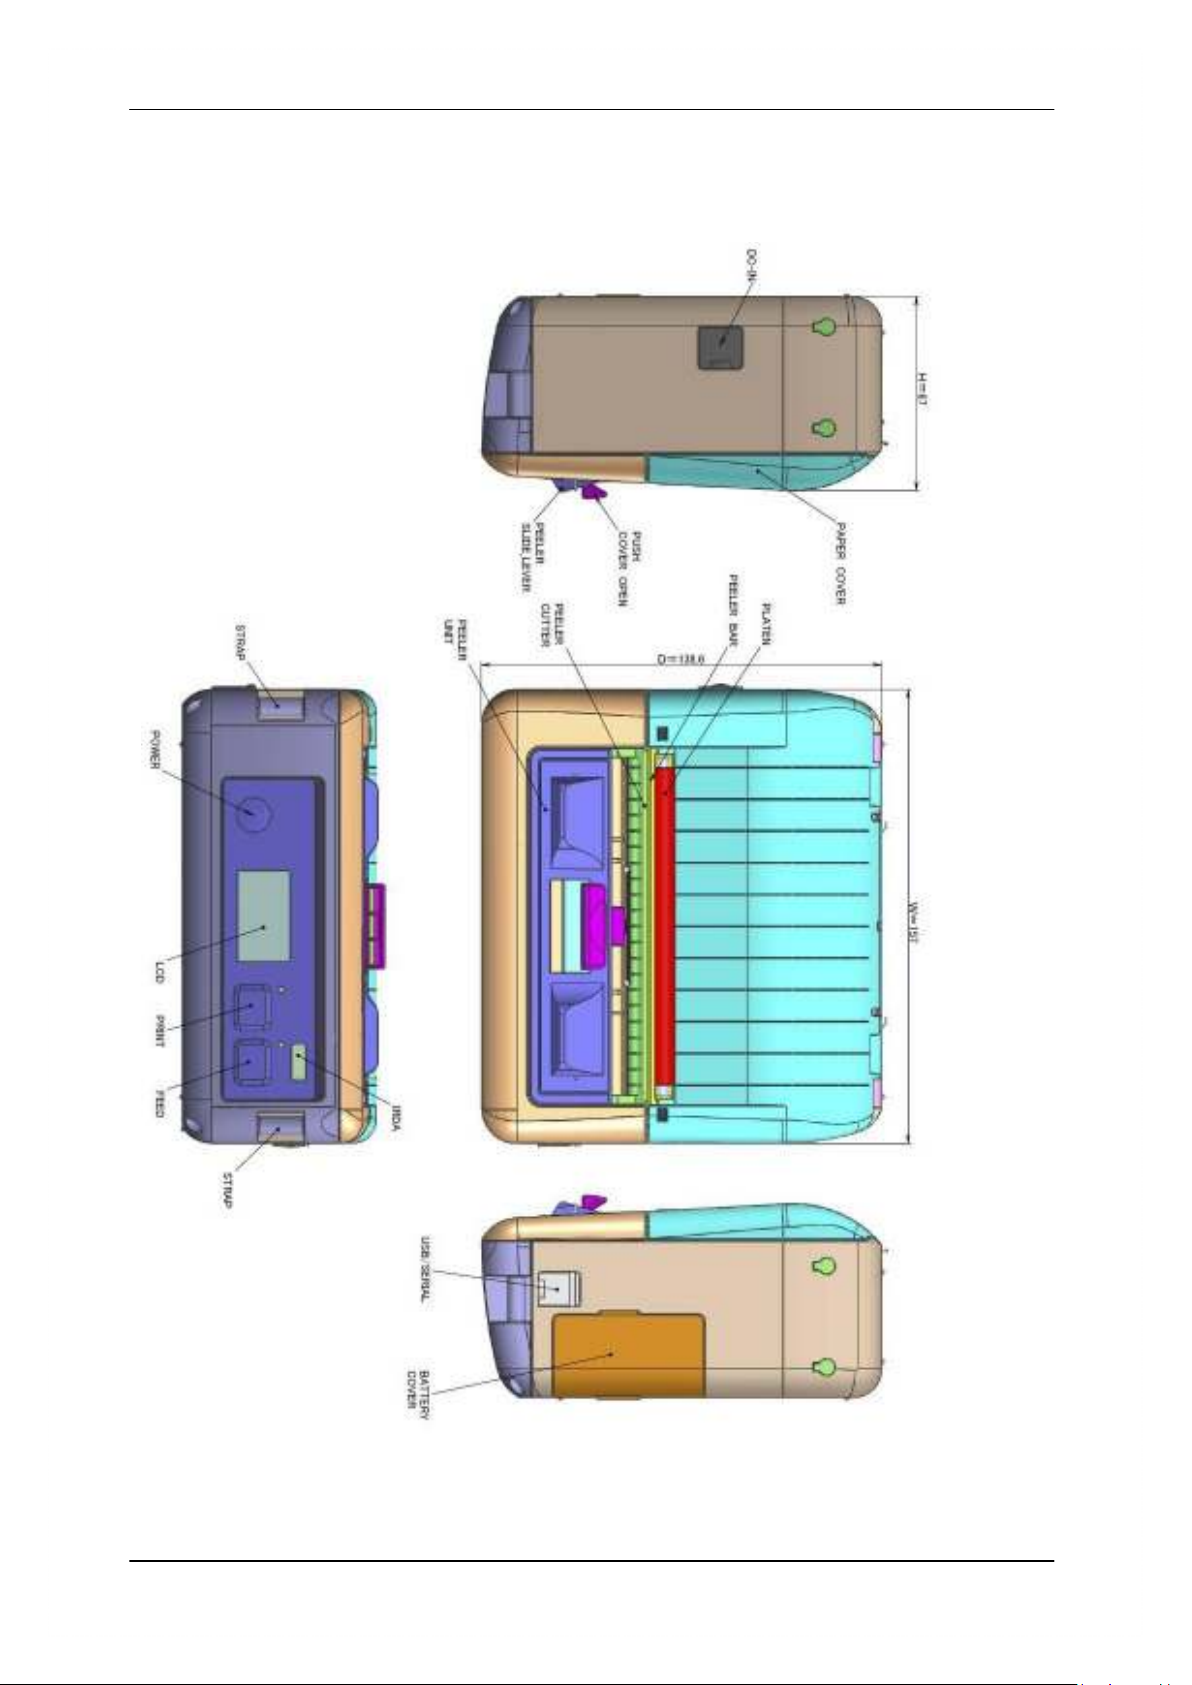
4. General view
4.1 Dimensions and outlook
10
Page 11
1 DATECS DPP-450 User manual
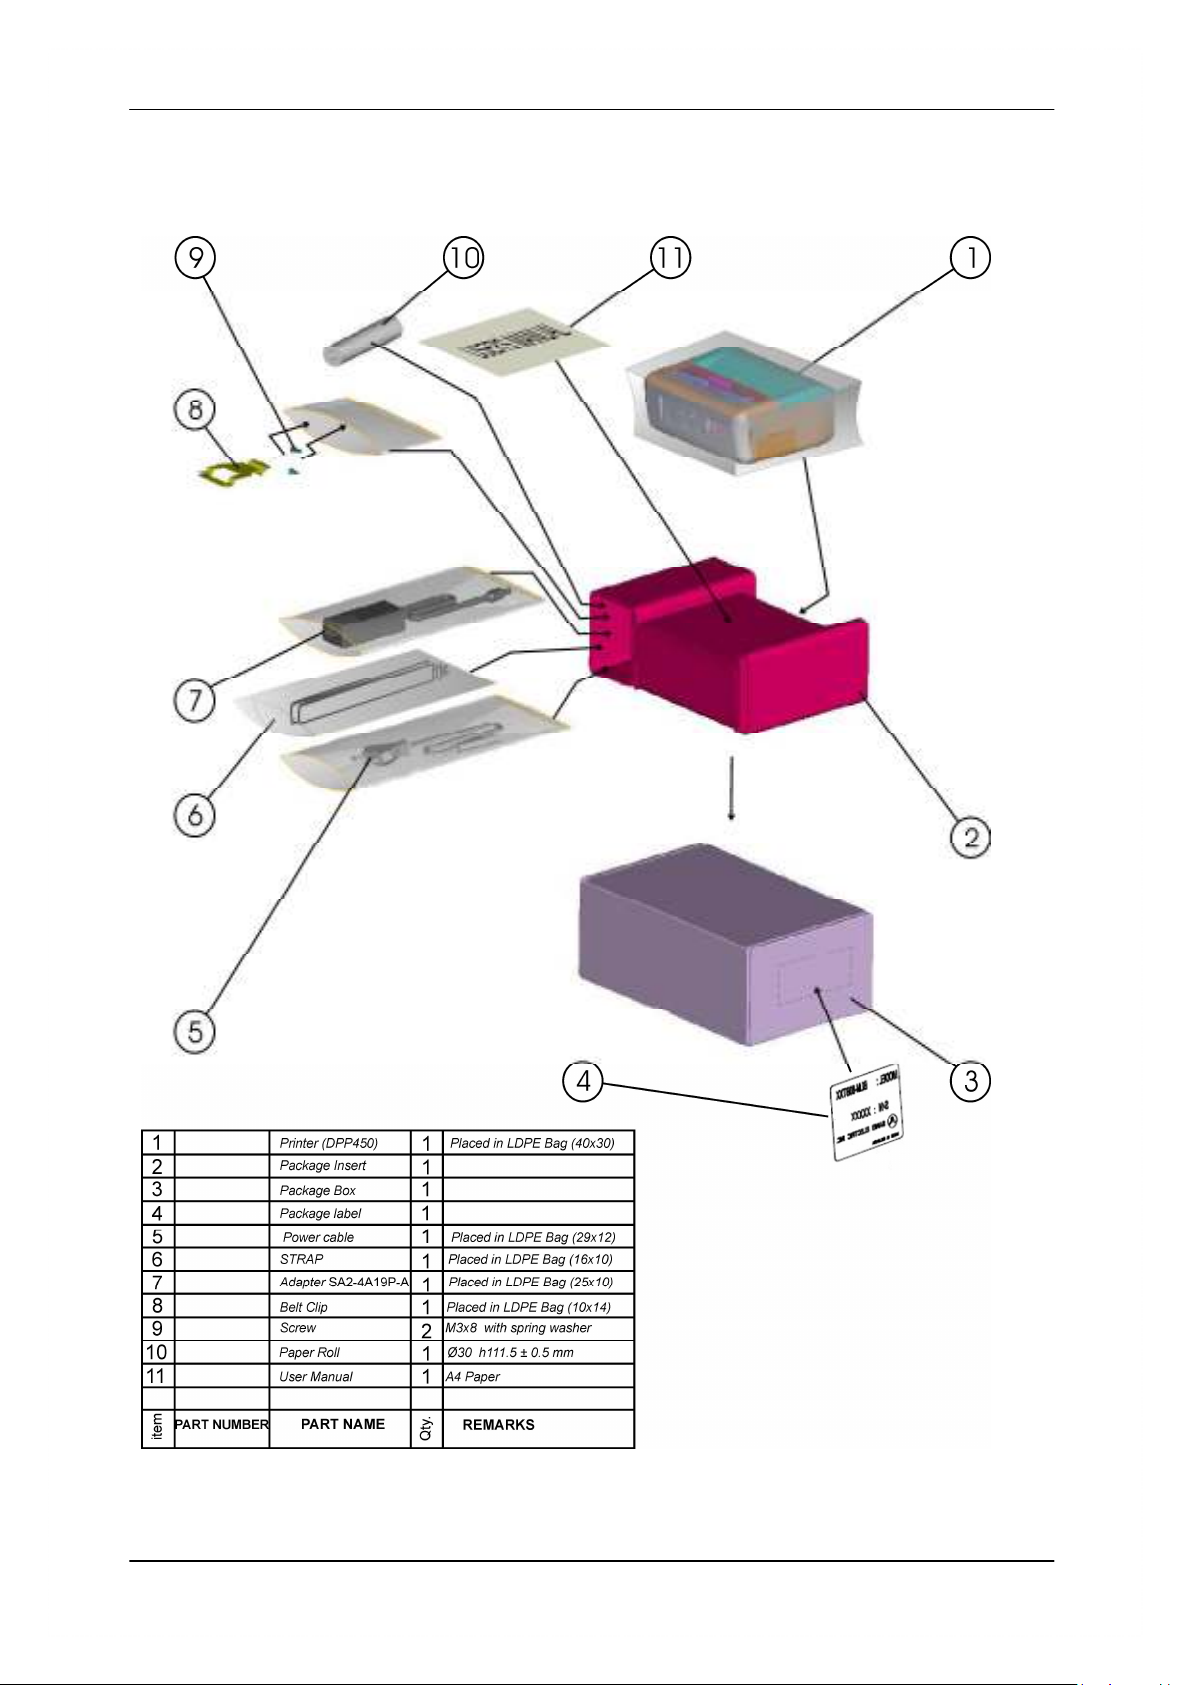
4.2 Box Contents
11
Page 12

1 DATECS DPP-450 User manual
Software (Drivers & SDK ):
Because of the continually evolving Driver & SDK to support new mobile devices,
Drivers & SDK are distributed online and is available for download at our website
indicated below. For details on using the DPP-450 Drivers & SDK, please refer to the
SDK’s documentation.
http://www.datecs.bg/en/products/DPP-450/2/264#
5. Getting started
The DPP-450 allows you to printer information from your PDA & Smart
phone. Before using the DPP-450 thermal printer the battery should be properly
charged. The following Quick Start guide will help to get your DPP-250 ready
for use.
Steps What to do Purpose
1
2.1
2.2
3
4
Charge the DPP-450
rechargeable battery
pack as
recommended in this
manual
Load DPP-450 print
media(Thermal paper
roll)
Load DPP-450 print
media(Thermal label
paper)
Setup Bluetooth
Paring
Install DPP-450
Software
The Lithium Ion battery
pack should be fully
charged before use to
ensure long battery life.
DPP-450 requires Thermal
paper for printing.
DPP-450 requires Thermal
label paper.
Setup Bluetooth pairing to
allow DDP-450 to
communicate with
Bluetooth devices.
To print information from
your device, software
needs to be installed onto
your device.
Where to find more
information
Charging Battery,
Page 9
Loading Paper, Page
10
Loading Paper, Page
10
Bluetooth Setup,
Page 24
Install DPP-450
Software, Page 8
12
Page 13
1 DATECS DPP-450 User manual
5.1 Charge DPP-450
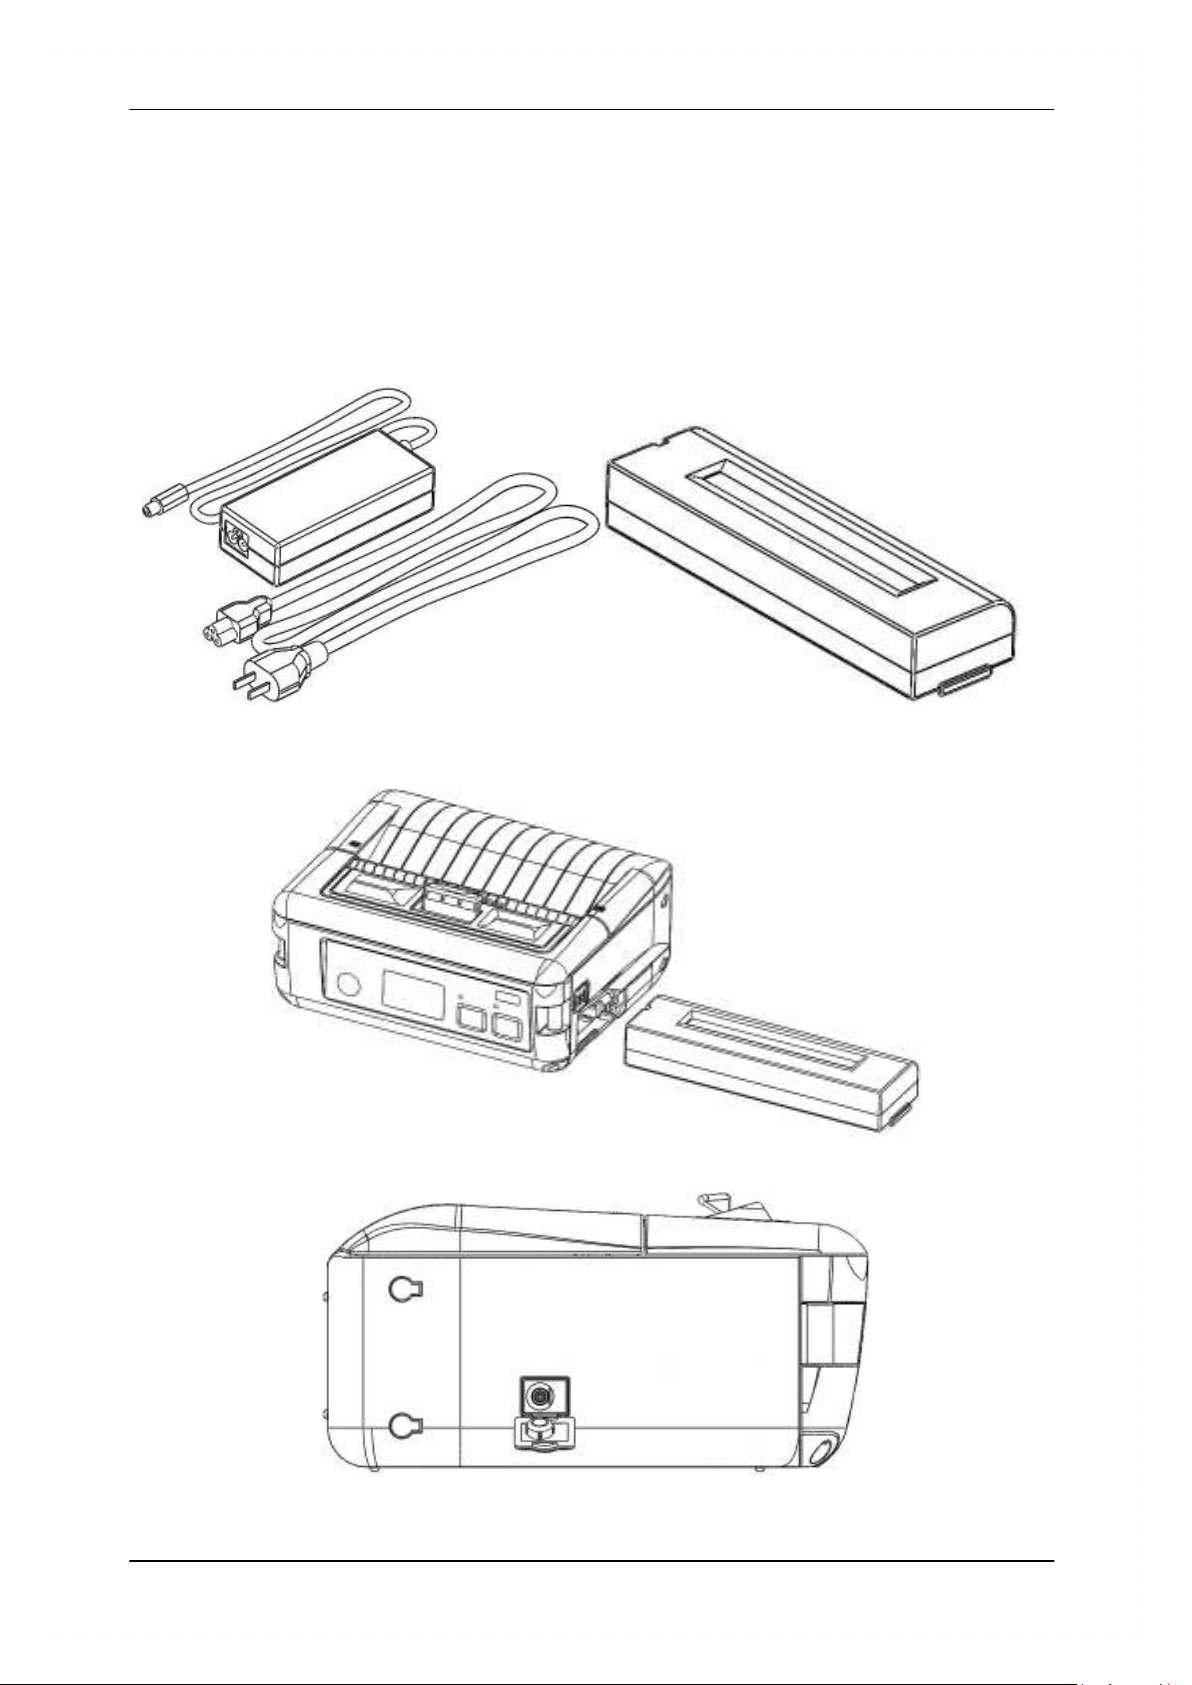
To prevent electrical damage to the DPP-450 and/or battery pack, please use
approved AC Charger only.
Charging time is 3 hours from empty to full charge. When the battery is fully
charged the device can print 150m paper roll, this is 3.5 rolls standart for DPP-450.
The DPP-450 uses a Lithium-Ion rechargeable battery pack.
AC adapter and power cord Battery
DPP-450 and battery
DPP-450 DC jack
13
Page 14
1 DATECS DPP-450 User manual
ECS/POS Ready
CHG
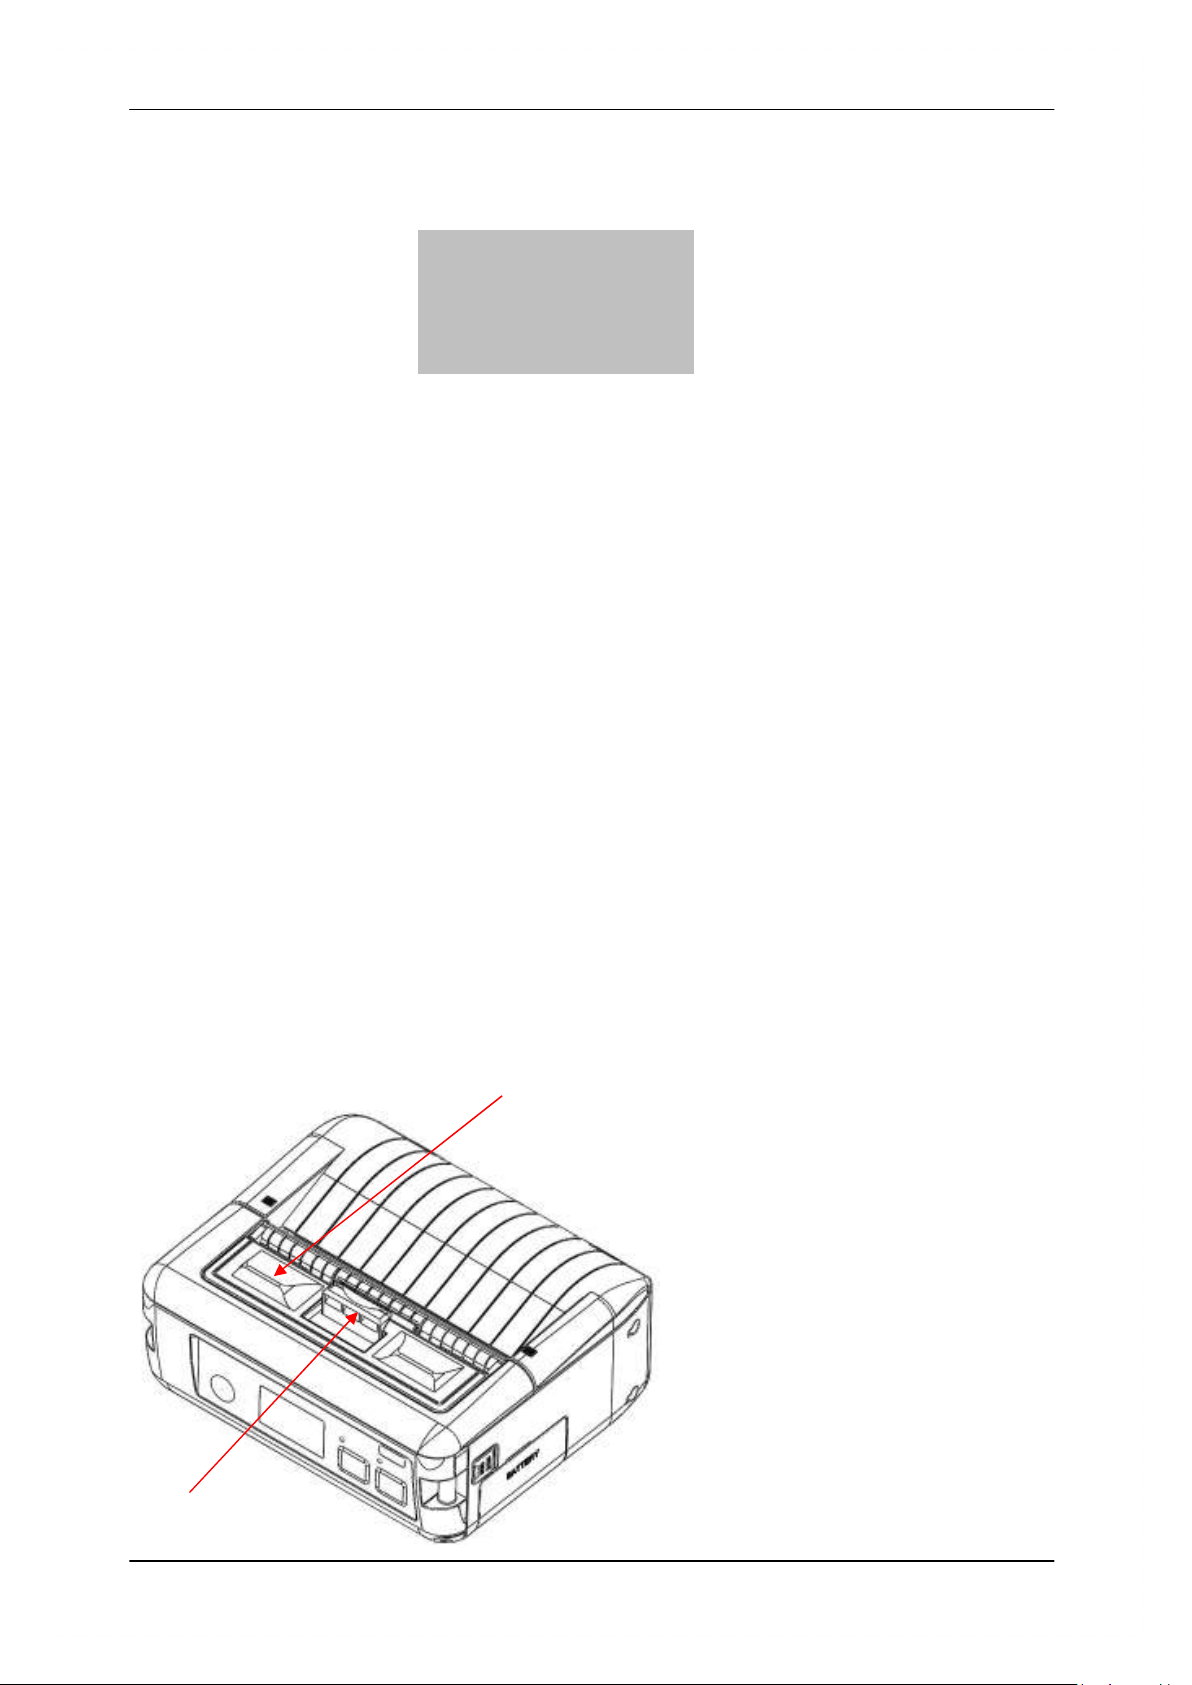
Insert cable to dc jack to start charging.
When the device is turn on(holding turn on/off button), in display will show “CHG”
text and greed led “CHARGE” is blink.
5.2 Diagnostic information
• Holding <LF> button while power on for ~ 0.5 sec (first sound signal) – short selftest.
• Holding <LF> button while power on for ~ 2.5 sec (second sound signal) – start
dump mode. All input data are printed hexadecimal and as text.
• Holding <LF> button while power on for more than 8.5 sec (fifth 4-tone sound
signal) – enter firmware
updating mode.
• Holding <ON/OFF> button while power on for ~ 4 sec (first sound signal):
- If serial cable is connected (RS232 communication) – temporary forcing 9600
bps serial
speed.
- If no serial cable connected (Bluetooth or USB communication) – starting a
hardware menu
for fast Bluetooth pairing info reset.
• Holding <ON/OFF> button while power on for more than 6 sec – enter hardware
setup mode.
• Holding <ON/OFF> button while power off for more than ~ 1sec.
• Holding <ON/OFF> button while less than ~ 1sec, backlight is turn on for short time.
• Holding <ON/OFF> button and press <LF> button – printing WIFI info.
5.3 Loading paper
Push to open
paper cover
14
First slide peeler to position
show on the picture. After this
push to open paper cover.
Page 15
1 DATECS DPP-450 User manual
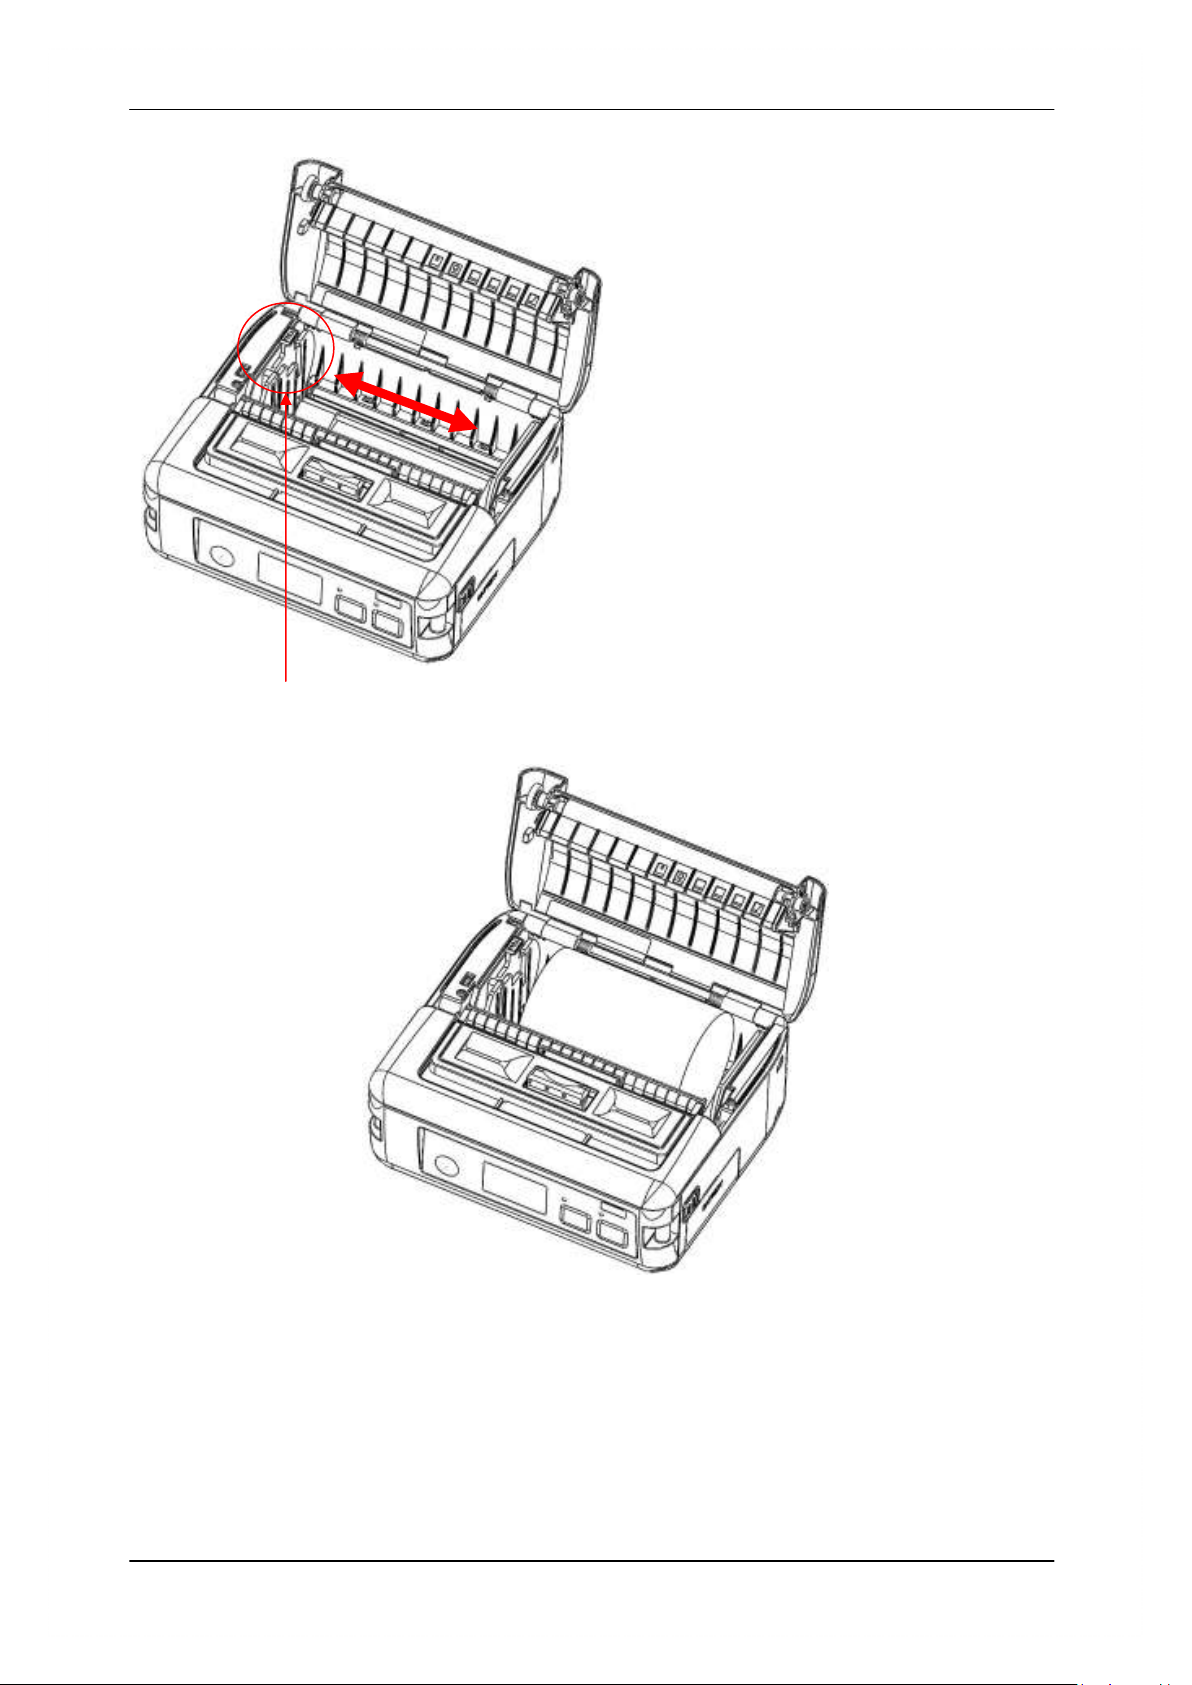
When the paper cover is open
drop the new roll of thermal media. With
green lever can choose size of thermal
paper.
To choose paper size – pull up
lever and push on right for small paper
or left for big. When lever is in max. left
position insert new paper(if size is
different from last one) and pull up lever
and push right until reach paper, then
release lever.
Lever for paper size
Insert new paper
15
Page 16
1 DATECS DPP-450 User manual
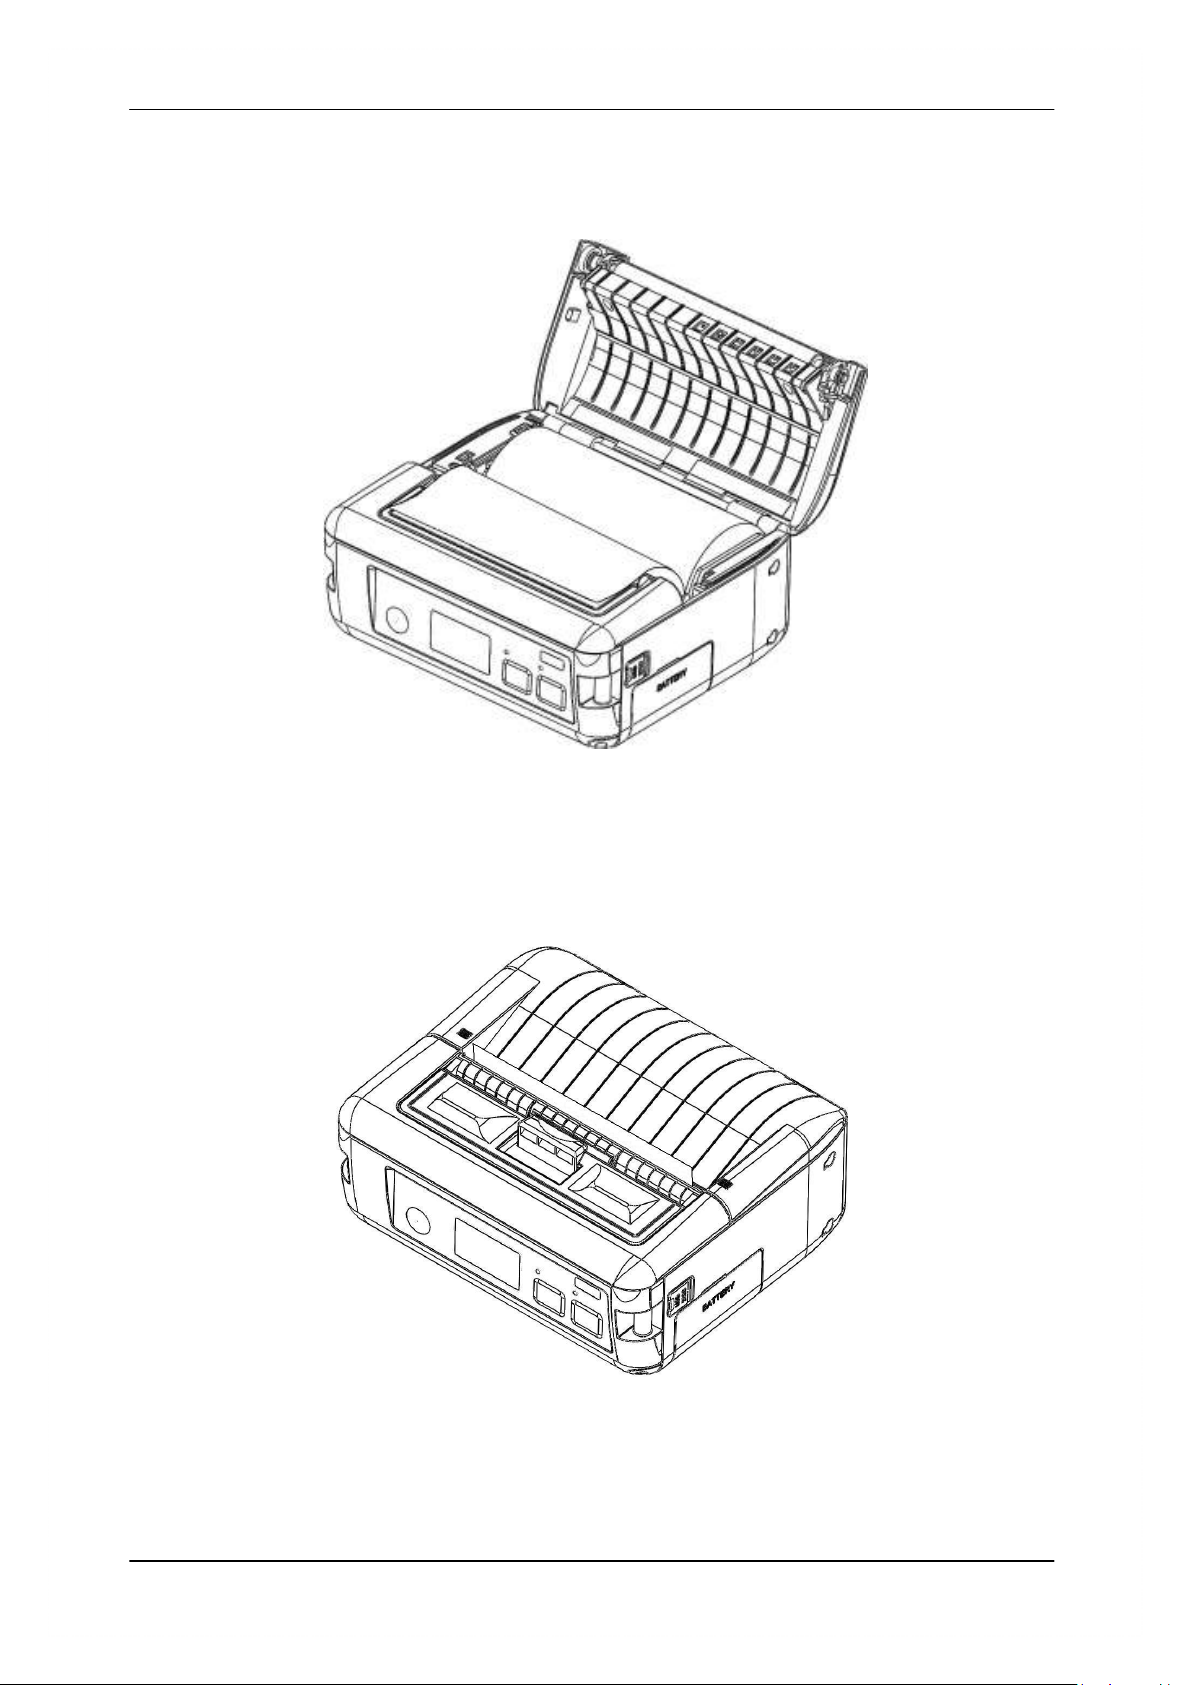
Right paper position
Close paper cover
16
Page 17
1 DATECS DPP-450 User manual
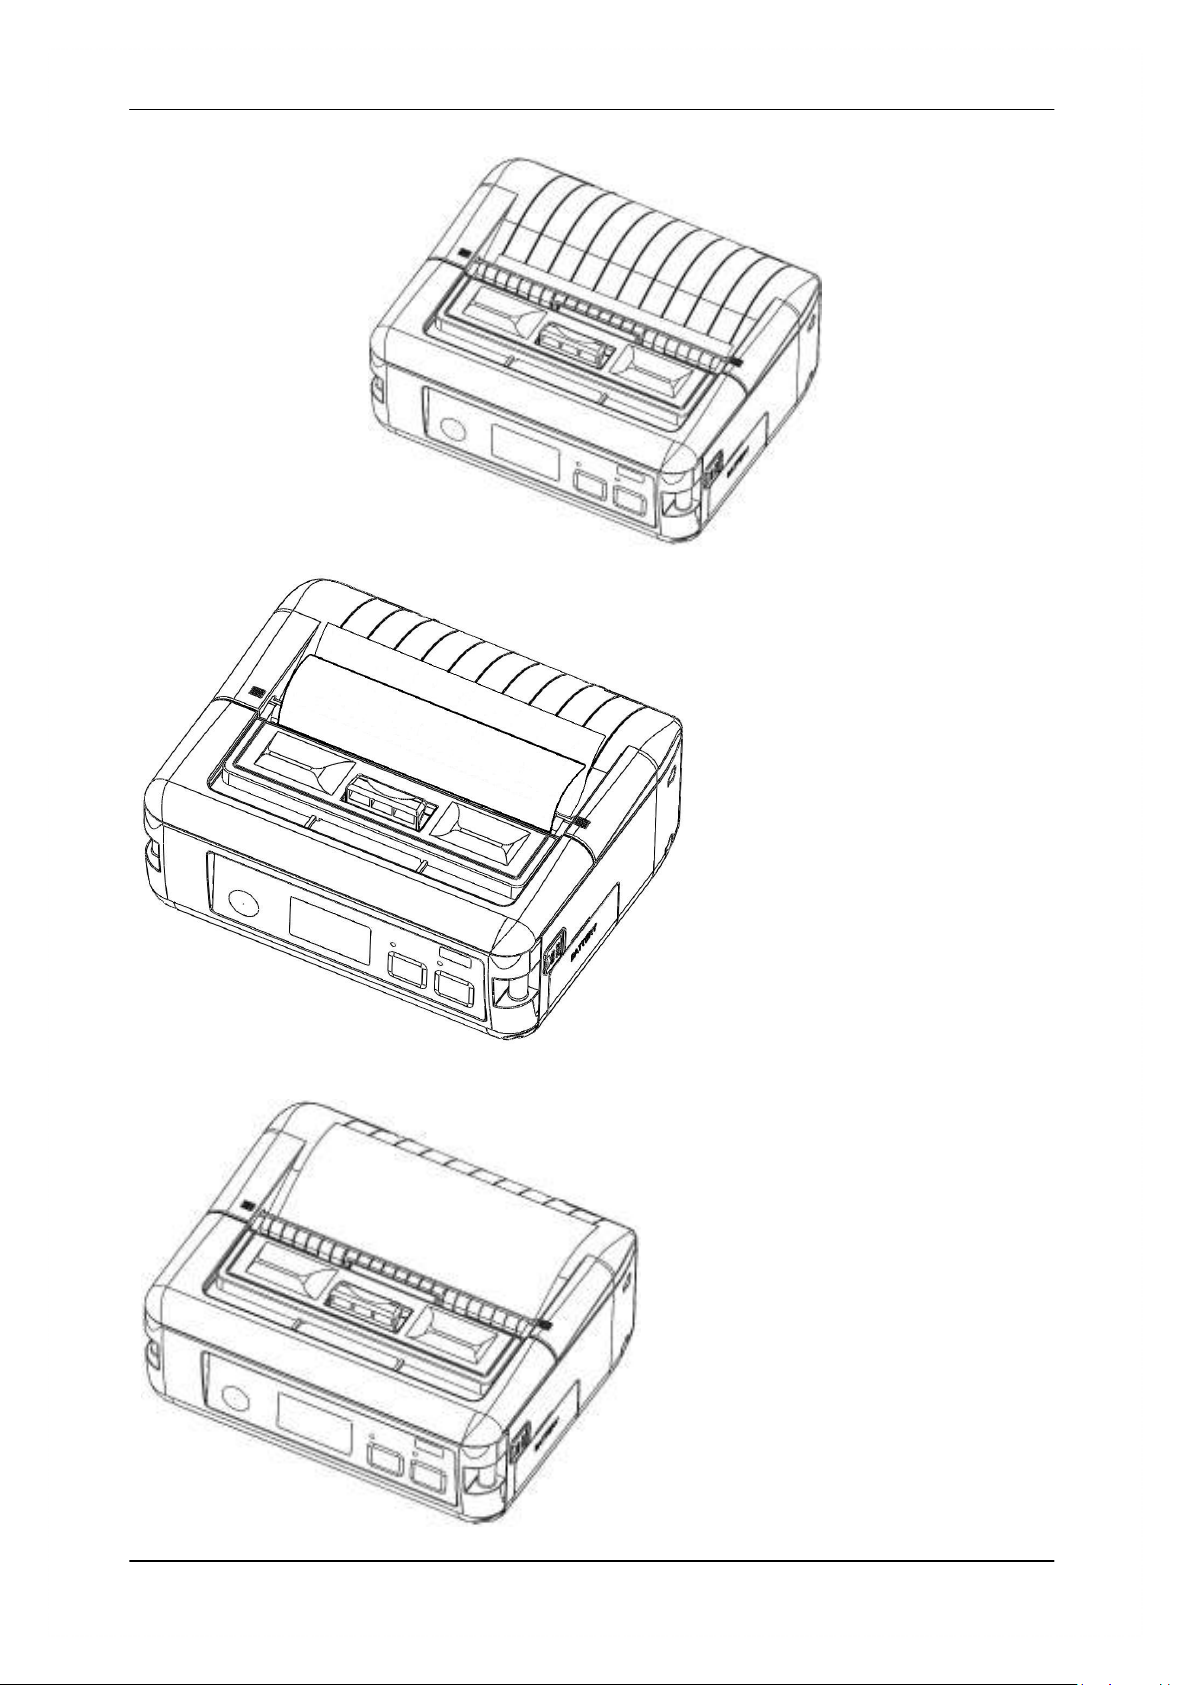
Slide peeler
Peeler setting for label
paper.
Peeler setting for paper roll.
17
Page 18
1 DATECS DPP-450 User manual
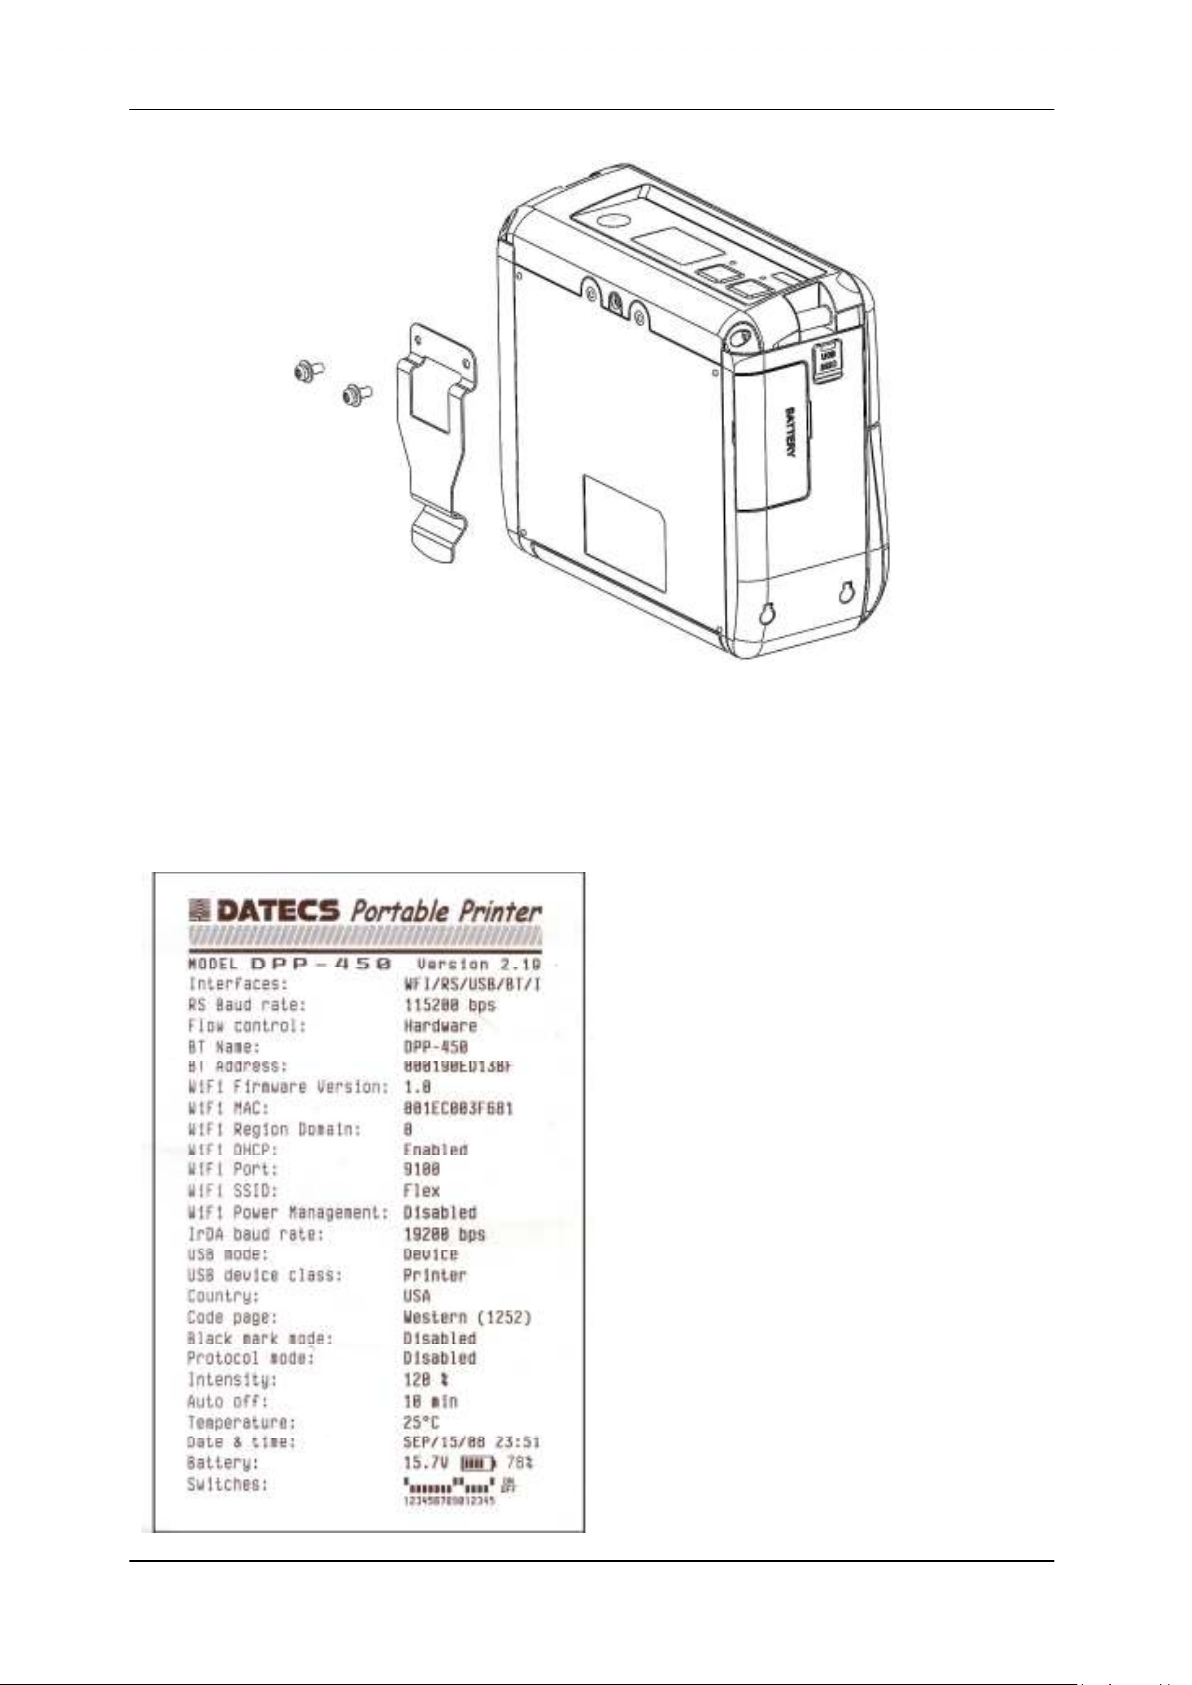
5.4 Mounting belt clip
Using two screws.
5.5 Self-Test
• Holding <LF> button while power on for ~ 0.5 sec (first sound signal) – short selftest.
The DPP-450 has a built-in test
pattern that shows the printer’s current
configuration as well as the various
resident printer fonts. The self-test can
also be used as a troubleshooting tool to
determine printing problems or battery
level. The steps below show how the
self-test is printed activated.
18
Page 19
1 DATECS DPP-450 User manual
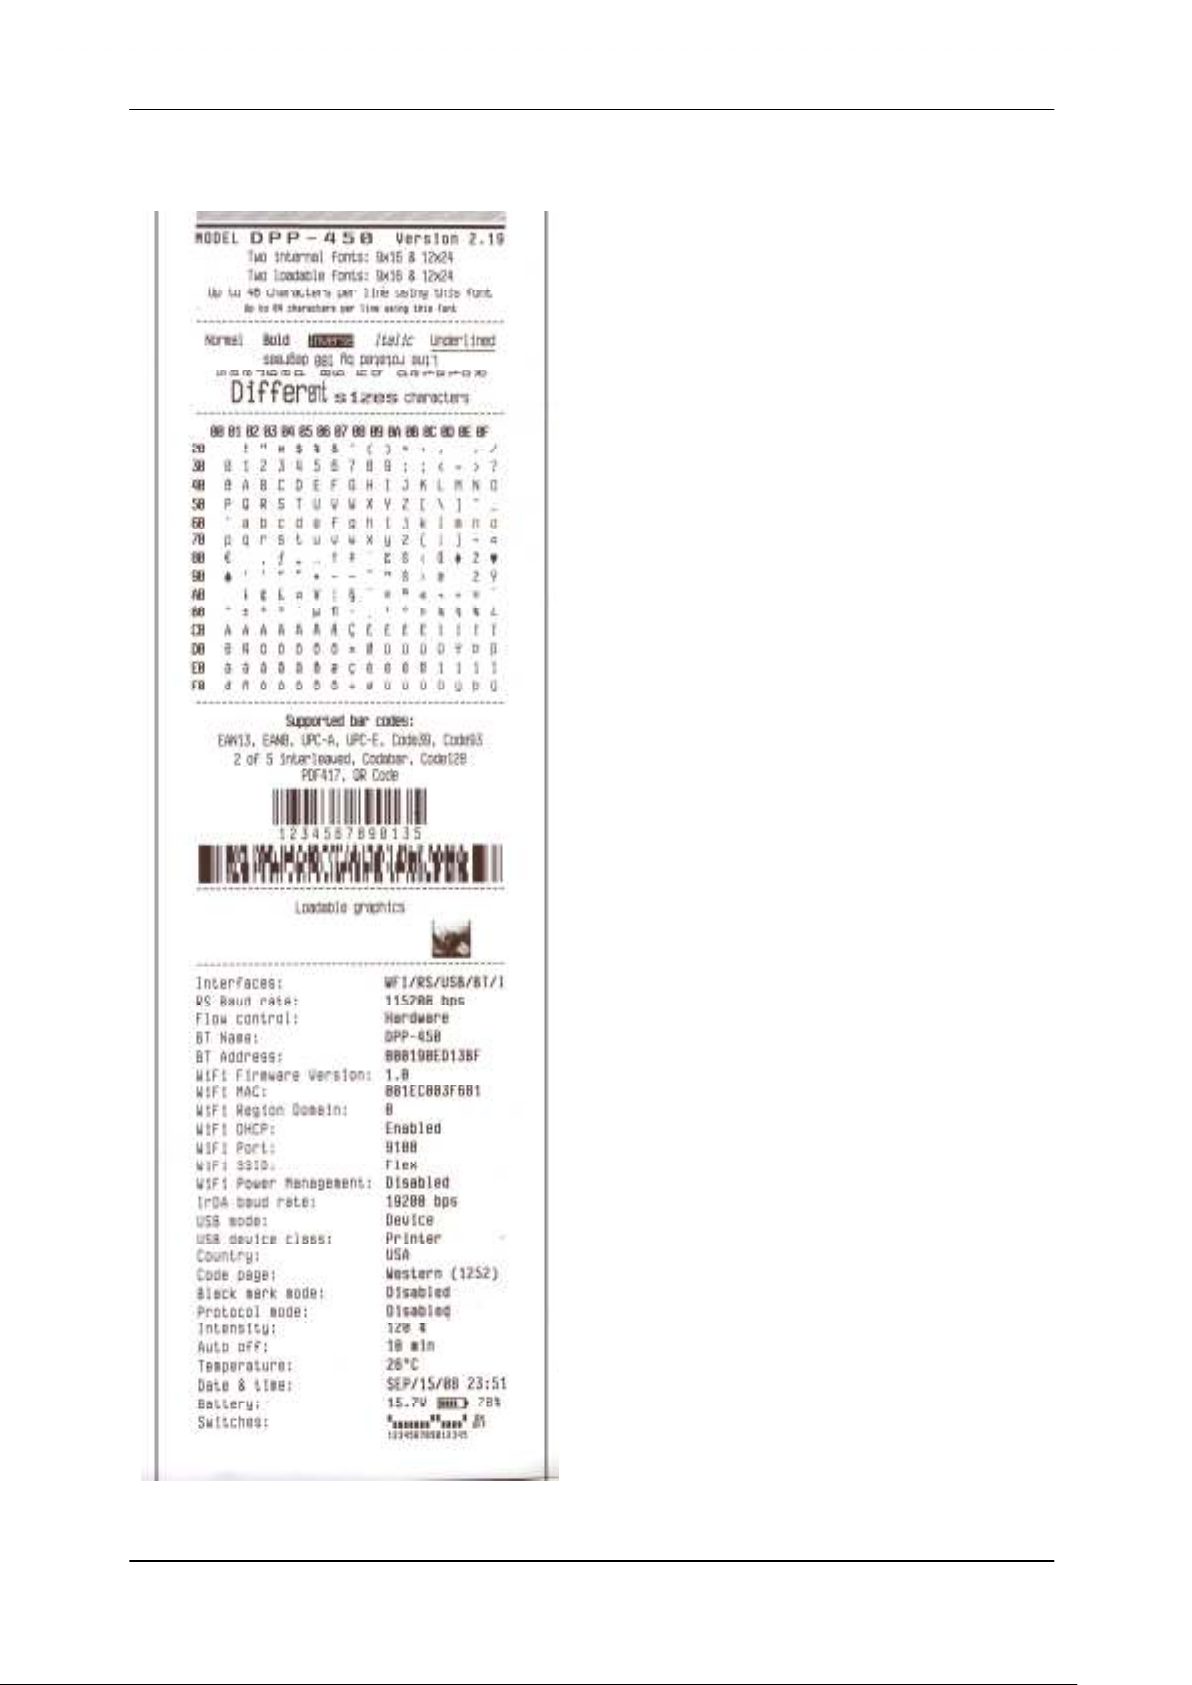
• Holding <LF> button while power on for ~ 5.5 sec (third sound signal) – self-test.
Resident font sizes
Characters per line
Text formatting
Resident character set
Resident barcode symbols
Printer’s configuration
19
Page 20

1 DATECS DPP-450 User manual
5.6 Page Mode
In page mode the result of incoming commands is forwarded to a reserved
memory area (page). The page place and size is defined using command ESC W.
Command GS T selects the print direction in this page. At the end the collected
information is printed using one of the commands, provided for this. Commands ESC
FF and GS FF print only the currently defined page, but command ESC Z prints the
area between the first and last line containing at least one black point.
All commands except GS L and GS W work in page mode. The centering and
right alignment
(command ESC a) is working in the currently defined page width.
5.7 Ruled lines
The printer has two line buffers with size the maximum printing width (paper
width in standard mode or the selected page width in page mode). When ruled lines
are active, then every horizontal line of the text line is combined with the selected
ruled line buffer. Bit ‘1’ in the ruled line buffer is a black dot in OR mode and inverts
the color of the dot in XOR mode. Two commands allow the ruled line buffers to be
printed without combining with a text line.
When pressing the FEED button, no ruled lines buffer is applied.
All ruled lines commands start with symbol DC3 (ASCII code 13h). Please see
command DC2 = , too .
Warning!
The ruled lines print position depends not on GS L and GS W (left margin
and line width) and is always at the beginning of the line (or at the beginning of
the printable area in page mode). The printed text and graphic change their
position according these commands.
When printing 180 degrees rotated lines (command ESC { 1) ruled lines
buffers are not rotated!
5.8 Protocol mode
Protocol mode is active when hardware switch 11 is on. The purpose of this
mode is to give stronger real time access to the printer. All input data are sent in
packets as described below. The printer returns an answer to the packet
immediately.
Output packet format: Channel Command LenHi LenLo Data
Answer format: Channel Status LenHi LenLo Data
Channel: One byte:
Bits 0 – 6 Channel number (Device type)
Bit 7 0: Send data; 1: Response
Command: One byte with possible value:
0: Open channel (No action – all channels always open)
1: Close channel (No action – all channels always open)
20
Page 21

1 DATECS DPP-450 User manual
2: Send data
3: Request data
>4: Application specific
Status: One byte:
0 1
Bit 0
Bit 1
Bit 2
Bit 3
Bit 4
Bit 5
Bit 6
Bit 7
LenHi: High byte of data length of data. 00h to 08h.
LenLo: Low byte of data length of data. 00h to FFh.
Data: 256*LenHi +LenLo data bytes.
The maximum packet length is 2048 bytes.
The answer differs from the command by bit 7 (MSB) in the channel number. If
bit 7 is 0 then it is a command, if it is 1 then it is a response. Bit 0 in the status
byte shows if there was an error accepting or processing the data block. If this bit
is 1 the other bits show the type of the error.
The printer never issues a transmission by itself. It always responds as an
answer to a command. The communication goes like this:
Host – command, Printer – answer; Host – command, Printer – answer; etc.
The defined channels are:
1 Printer.
16 (10h) Optional card reader.
Commands for the printer channel (1):
Command 2 Send data
enough space into the print buffer the packet is rejected, and a status
byte with value 3 is returned in the answer.
Command 3 Receive data
transmitted in the data field of the packet, otherwise an empty packet
is received. The application must take care to get the data fast enough
from the output buffer or the data may be corrupt.
No error Error occured
ACK (Packet accepted) NACK (Packed not accepted)
Channel and command OK Wrong channel or command
Battery OK Low battery
Printing head OK Printing head too hot
Paper OK Out of paper
Not defined
Printer ready Printer busy
Bit 7 is set, if:
• There are unprinted lines in the print buffer.
• There are bytes in the print buffer.
• The printer is executing a macro.
• The printer is executing selftest.
• The button <LF> is pressed – feeding paper.
The data is copied into the printer’s print buffer. If there’s not
If there is data to be transmitted from the printer to the host, it is
21
Page 22

1 DATECS DPP-450 User manual
Command 4 Get printer status. 5 data bytes returned in response:
BufferHi BufferLo PrStatus Volt Temperature
BufferHi High byte of the count of free bytes in input
buffer.
BufferLo Low byte of the count of free bytes in input
buffer.
PrStatus Printer status. The following bits defined:
Bit 0 Battery low
Bit 1 Too hot
Bit 2 No paper
Volt The battery voltage in units 0.1V
Temperature The head temperature in degrees Celsius.
If free bytes in input buffer are more than 65535 (FFFFh), then
FFFFh is returned.
Using channel 16 is the only way for full control over the optional card
reader.
Communication example (all bytes hexadecimal):
Send data:
>>> 01 02 00 05 11 22 33 44 55
<<< 81 00 00 00
Send data with error:
>>> 01 02 00 05 11 22 33 44 55
<<< 81 01 00 00
>>> 01 02 00 05 11 22 33 44 55
<<< 81 01 00 00
>>> 01 02 00 05 11 22 33 44 55
<<< 81 00 00 00
Receive data:
>>> 01 03 00 00
<<< 81 00 00 00
>>> 01 03 00 00
<<< 81 00 00 04 11 22 33 44
>>> 01 03 00 00
<<< 81 00 00 00
Get status:
>>> 01 04 00 00
<<< 81 00 00 05 3F F8 01 49 27
5.9 Hardware setup
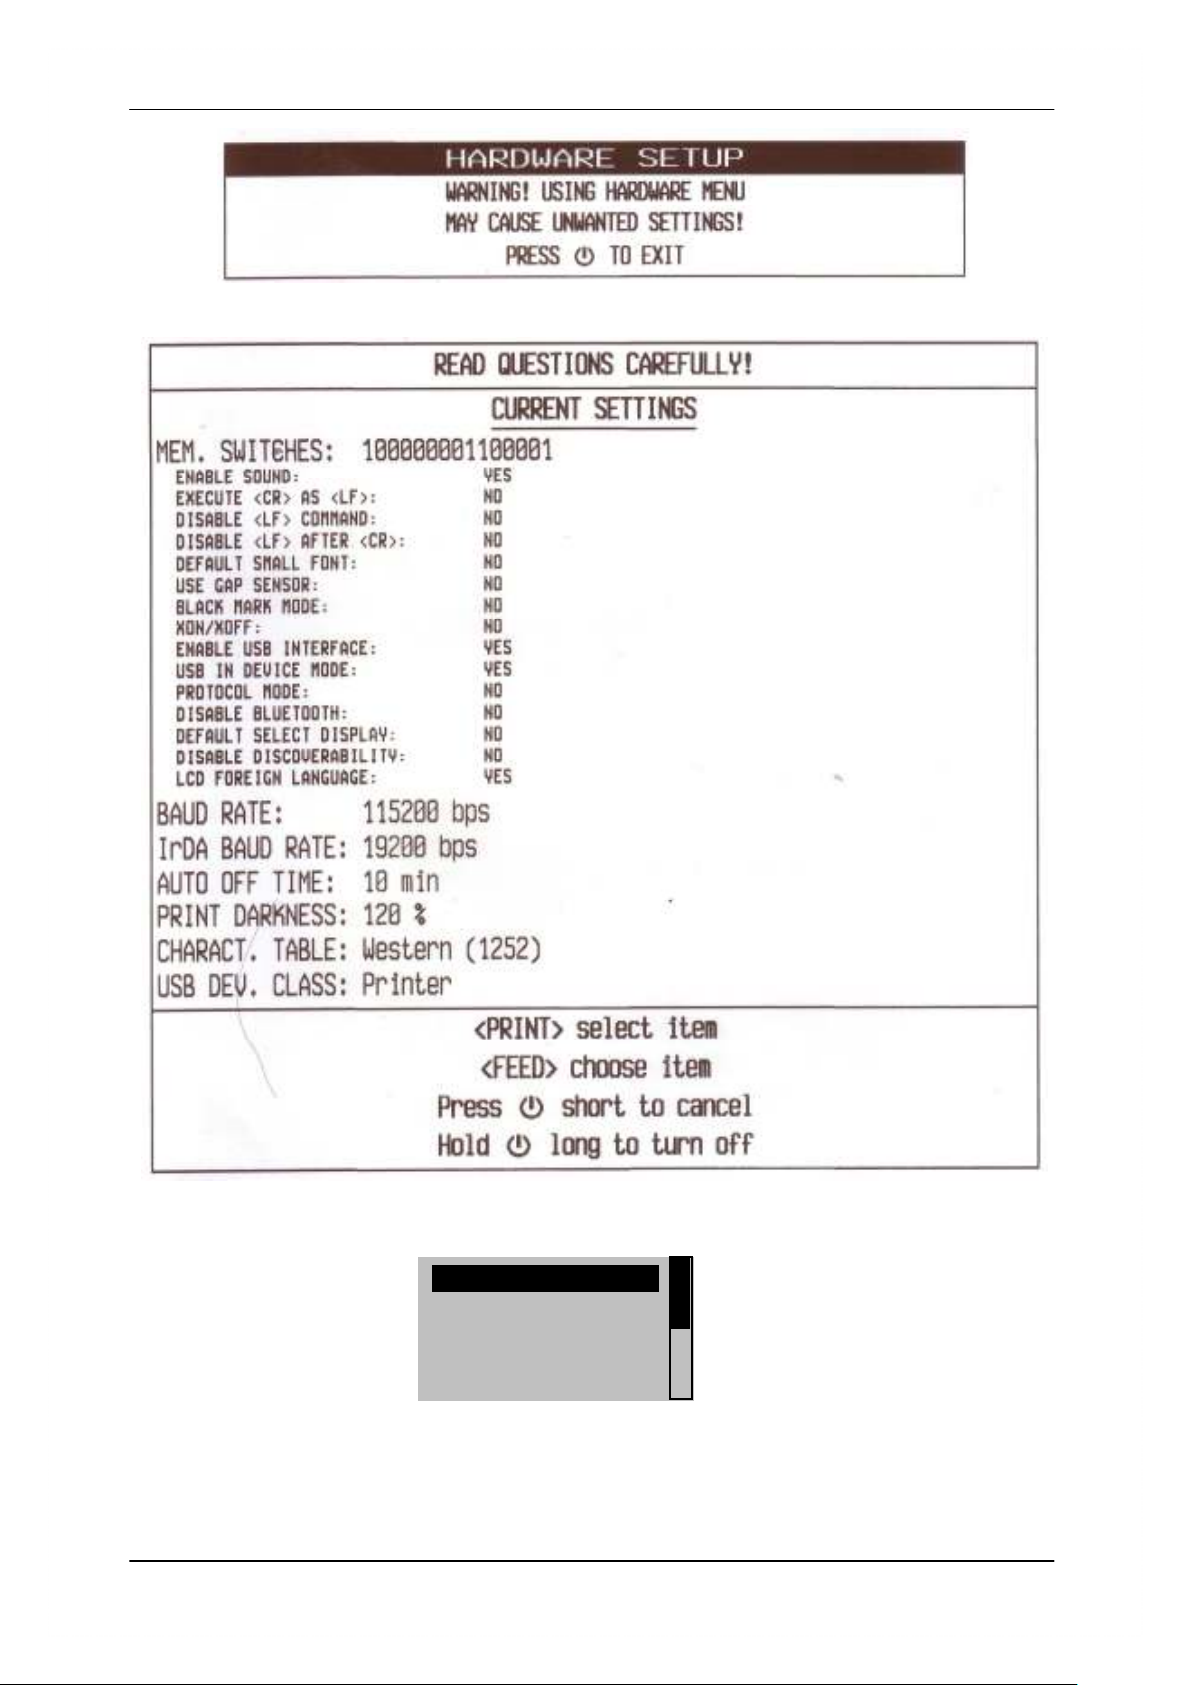
Holding <ON/OFF>button while power on for more than 6sec. – enter
hardware setup mode. “STATUS”(red led) will blink once, after this device is printing
message:
22
Page 23
1 DATECS DPP-450 User manual
Then press FEED button, to enter Hardware menu. Device will prining current
settings.
The LCD in hardware configuration menu:
With button “PRINT” can move down and with “FEED” can enter in selected.
Hardware menu tree:
23
FACTORY DEFAULT
MEM. SWITCHES:
BAUD RATE:
IrDA BAUD RATE:
Page 24

1 DATECS DPP-450 User manual
FACTORY DEFAULT
YES
NO
MEM. SWITCHES
ENABLE SOUND Enable/Disable printer's buzzer
EXECUTE <CR> AS <LF> Disable CR/CR is executed as LF
DISABLE <LF> COMMAND Enable/Disable LF
DISABLE<LF>AFTER Disable LF immediately after CR
DEFAULT SMALL FONT Set the small font as default
USE GAP SENSOR Enable/Disable the GAP sensor
BLACK MARK MODE Enable/Disable the black mark sensor
XON/XOFF Enable/Disable XON/XOFF protocol
ENABLE USB INTERFACE Enable/Disable USB communication port
USB IN DEVICE MODE Changing the USB HOST/DEVICE mode
PROTOCOL MODE Enable/Disable Protocol mode
DISABLE BLUETOOTH Enable/Disable Bluethooth communication
DEFAULT SELECT DISP Set the main display as default
DISABLEDISCOVERABILITY Enable/Disable printer's discoverability
LCD FOREIGN LANGUAGE
DISCARD Exit without saving configuration
ACCEPT Exit with saving configuration
BAUDRATE
• 115200 bps
• 38400 bps
• 31200 bps
• 2400 bps
• 4800 bps
• 9600 bps
• 19200 bps
• 57600 bps
IrDA BAUD RATE
• 19200 bps
• 9600 bps
• 38400 bps
• 57600 bps
• 115200 bps
AUTO OFF TIME
• 10 min.
• 15 min.
• 20 min.
• 30 min.
• 45 min.
• 60 min.
• 0 min
Changing the printer communication speed (RS)
Changing the IrDA communication speed
Changing the printer's auto OFF time
24
Page 25

1 DATECS DPP-450 User manual
• 2 min.
• 5 min.
PRINT DARKNESS
• 120 %
• 140 %
• 160 %
• 60 %
• 75 %
• 90 %
• 100 %
CHARACTER TABLE
• Western (1252)
• CE (1250)
• Turkish (1254)
• Baltic (1257)
• Cyrillic (1251)
• Greek (1253)
• Hebrew ( 1255)
• Katakana
• Arabic
• Arabic (1256)
• Arabic (1256A)
• Arabic (1256F)
• Thai (874)
• VISCII
• English (437)
• Latin 1 (850)
• Portuguese (860)
• Lithuanian
• Latin 2 (852)
• Polish
• Turkish (857)
• Baltic (775)
• Bulgarian (856)
• Russian (866)
• Latvian
• Greek (737)
• Hebrew (862)
PAIRING INFO
• Disable authentication
• Change pairing info
• Save pairing info
Changing the printing darkness
Changing the printer's character table
Resetting pairing info // Enable/Disable saving pairing info
25
Page 26

1 DATECS DPP-450 User manual
USB DEV. CLASS
• Printer
• Serial
SAVE & EXIT MENU
Changing the USB device class of the printer Printer/Serial
5.10 List of commands
1 BEL Sounds the buzzer
2 HT Horizontal Tab command configuration flags 2, 3 and 4
3 LF Printing а line and Paper Feeding command
4 FF Printing and paper feeding to the black mark position
5 CR The operation of the command depends on the state of the
6 DC2 = Image LSB/MSB select
7 DC3 ( DC3 (Ruled line) commands sequence start
8 DC3 + Sets the ruled line ON
9 DC3 - Sets the ruled line off
10 DC3 A Selects ruled line A
11 DC3 B Selects ruled line B
12 DC3 C Clears selected ruled line buffer
13 DC3 D Sets a single dot in selected ruled line buffer
14 DC3 F Ruled line pattern set
15 DC3 L Ruled line line set
16 DC3 M Selects ruled line combine mode
17 DC3 P Ruled line 1 dot line print
18 DC3 p Ruled line n dots line print
19 DC3 v Ruled line image write
20 CAN Canceling print data in page mode
21 ESC FF Printing data in page mode
22 ESC RS Sounds the buzzer
23 ESC SP Setting character spacing
24 ESC # Setting EURO symbol position
25 ESC $ Specifying the absolute horizontal position of printing
26 ESC % Selecting/Canceling the printing of downloaded user character
sets
27 ESC & Selecting user character set
28 ESC ! Specifying printing mode of text data
29 ESC * Printing graphical data
30 ESC + Switchs OFF the printer
31 ESC - Selecting/Canceling underlining
32 ESC . Printing self test/diagnostic information
33 ESC 2 Specifying 1/6-inch line feed rate
34 ESC 3 Specifying line feed rate n/203 inches
35 ESC < Changes print direction to opposite
36 ESC = Data input control
37 ESC > Selecting print direction
39 ESC @ Initializing the printer
40 ESC CAL Black mark mode sensor calibration
26
Page 27

1 DATECS DPP-450 User manual
41 ESC D Setting horizontal tab position
42 ESC E Specifying/Canceling highlighting
43 ESC F Filling or inverting the page area in page mode
44 ESC G Specifying/Canceling highlighting
45 ESC I Specifying/Canceling Italic print
46 ESC J Printing and Paper feed n/203 inches
47 ESC L Selecting page mode
48 ESC N Reading programmed serial number
49 ESC R Selecting country
50 ESC S Specifying speed (bps) of the serial port
51 ESC T Printing short self test
52 ESC U Selecting/Canceling underlined printing
53 ESC V Selecting/Canceling printing 90°- right turned characters
54 ESC W Defining the print area in page mode
55 ESC X Specifying max printing speed
56 ESC Y Selecting intensity level
57 ESC Z Returning diagnostic information
58 ESC \ Specifying relative horizontal position
59 ESC ] Loading the default settings stored in Flash memory
60 ESC ^ Saving current settings in Flash memory
61 ESC _ Loading factory settings
62 ESC ` Reading the Battery Voltage and Thermal head temperature
63 ESC a Aligning the characters
64 ESC b Increasing text line height
65 ESC c5 Enabling/Disabling the functioning of the button LF
66 ESC d Printing and feeding paper by n- lines
67 ESC i Feeding paper backwards
68 ESC o Temporarily feeding paper forward
69 ESC pair= Enabling/Disabling PAIRING info saving in Bluetooth mode
70 ESC pwd= Programming a new Bluetooth password (PIN)
71 ESC r Full command for sounding buzzer
72 ESC s Reading printer settings
73 ESC u Selecting code table
74 ESC v Transmitting the printer status
75 ESC x Setting the time interval for automatically switching Off the
printer
76 ESC y Setting USB response strings
77 ESC { Enabling/Canceling printing of 180° turned characters
78 GS FF Printing in page mode and returning to standard mode
79 GS $ Specifying the absolute vertical position in page mode
80 GS ) Setting printer flags (memory switches)
81 GS * Defining a Downloaded Bit Image (logo)
82 GS / Printing a Downloaded Bit Image
83 GS : Starting/ending macro definitions
84 GS B Enabling/Disabling inverse printing (white on black)
85 GS C Read the Real Time Clock
86 GS H Selecting printing position of HRI Code
87 GS L Setting the left margin
88 GS Q Printing 2-D barcodes
27
Page 28
1 DATECS DPP-450 User manual
89 GS R Filling or inverting a rectangle in page mode
90 GS S Selecting 2-D barcode cell size
91 GS T Selecting the print direction in page mode
92 GS U Selecting standard mode
93 GS W Setting the print area width
94 GS X Drawing a rectangular box with selected thickness in page
mode
95 GS Z Printing the non blank page area only in page mode
96 GS \ Specifying the relative vertical position in page mode
97 GS ^ Executing macro
98 GS c Setting the Real Time Clock
99 GS f Setting the font of HRI characters of the barcode
100 GS h Setting the height of the barcode
101 GS k Printing a barcode
102 GS p Settings for 2D barcode PDF417
103 GS q Selecting the height of the module of 2D barcode PDF417
104 GS w Selecting the horizontal size (Scale factor) of the barcode
105 GS x Direct text print in page mode
106 FS ! Specifying printing mode of two-byte text data
107 FS & Selecting two-byte text mode (JIS or GB2312)
108 FS - Selecting/Canceling underline mode for two-byte text mode
109 FS . Canceling two-byte text mode
110 FS C Selecting Shift-JIS mode (Japanese version only)
111 FS S Specifying character spacing for two-byte text mode
112 FS W Selecting double size characters for two-byte text mode
113 ESC y WAN WAN
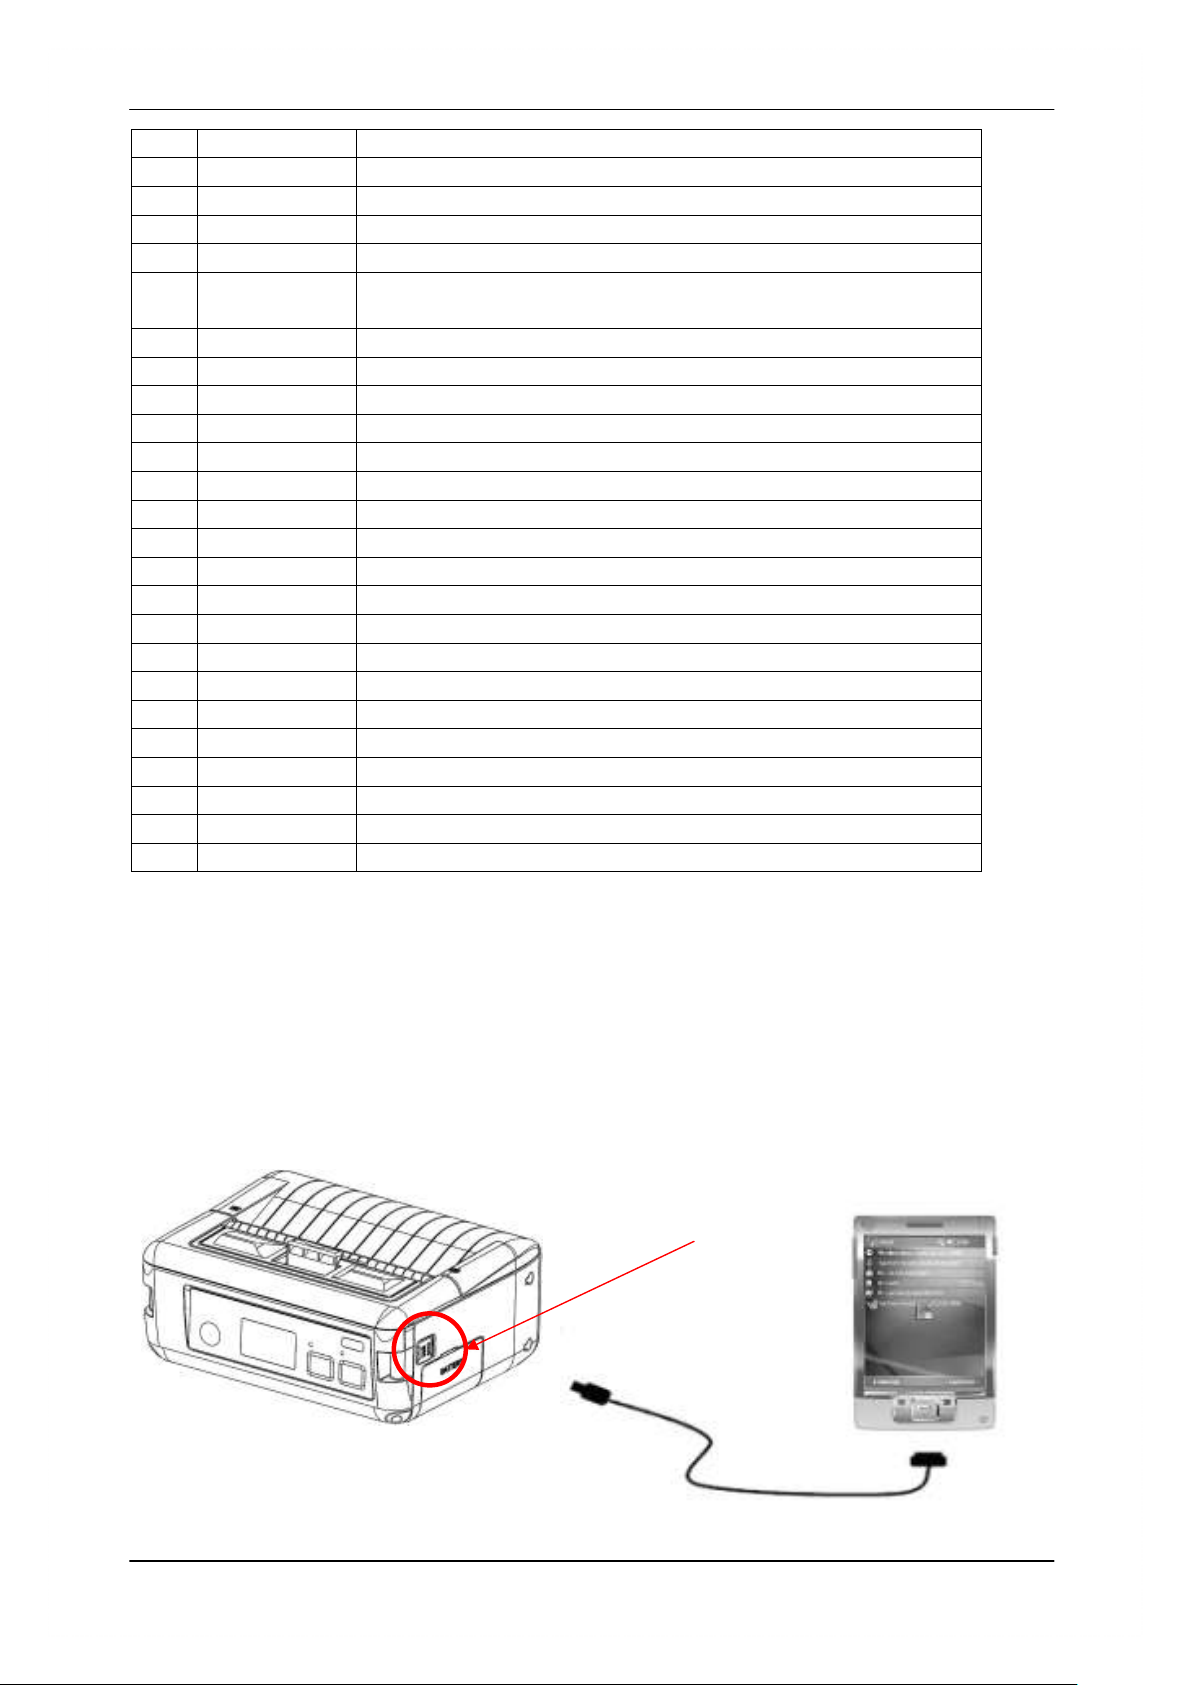
5.11 Connecting Device
The DPP-450 is designed to use different methods of communications. Care
must be taken to ensure that the DPP-450 USB/RS 232 connector and PDA &
Smartphone connector are not accidentally damaged. The figures below show how to
attach the different device to the DPP-450.
USB ( Cabled ) Version:
Connect the DPP-450 using Mini USB cable is shown in the figure below.
USB/RS 232
connector
28
Page 29
1 DATECS DPP-450 User manual
S Ready
BTH
Bluetooth version:
The DPP-450 Bluetooth version uses Bluetooth® wireless technology to connect to
Bluetooth enable devices.
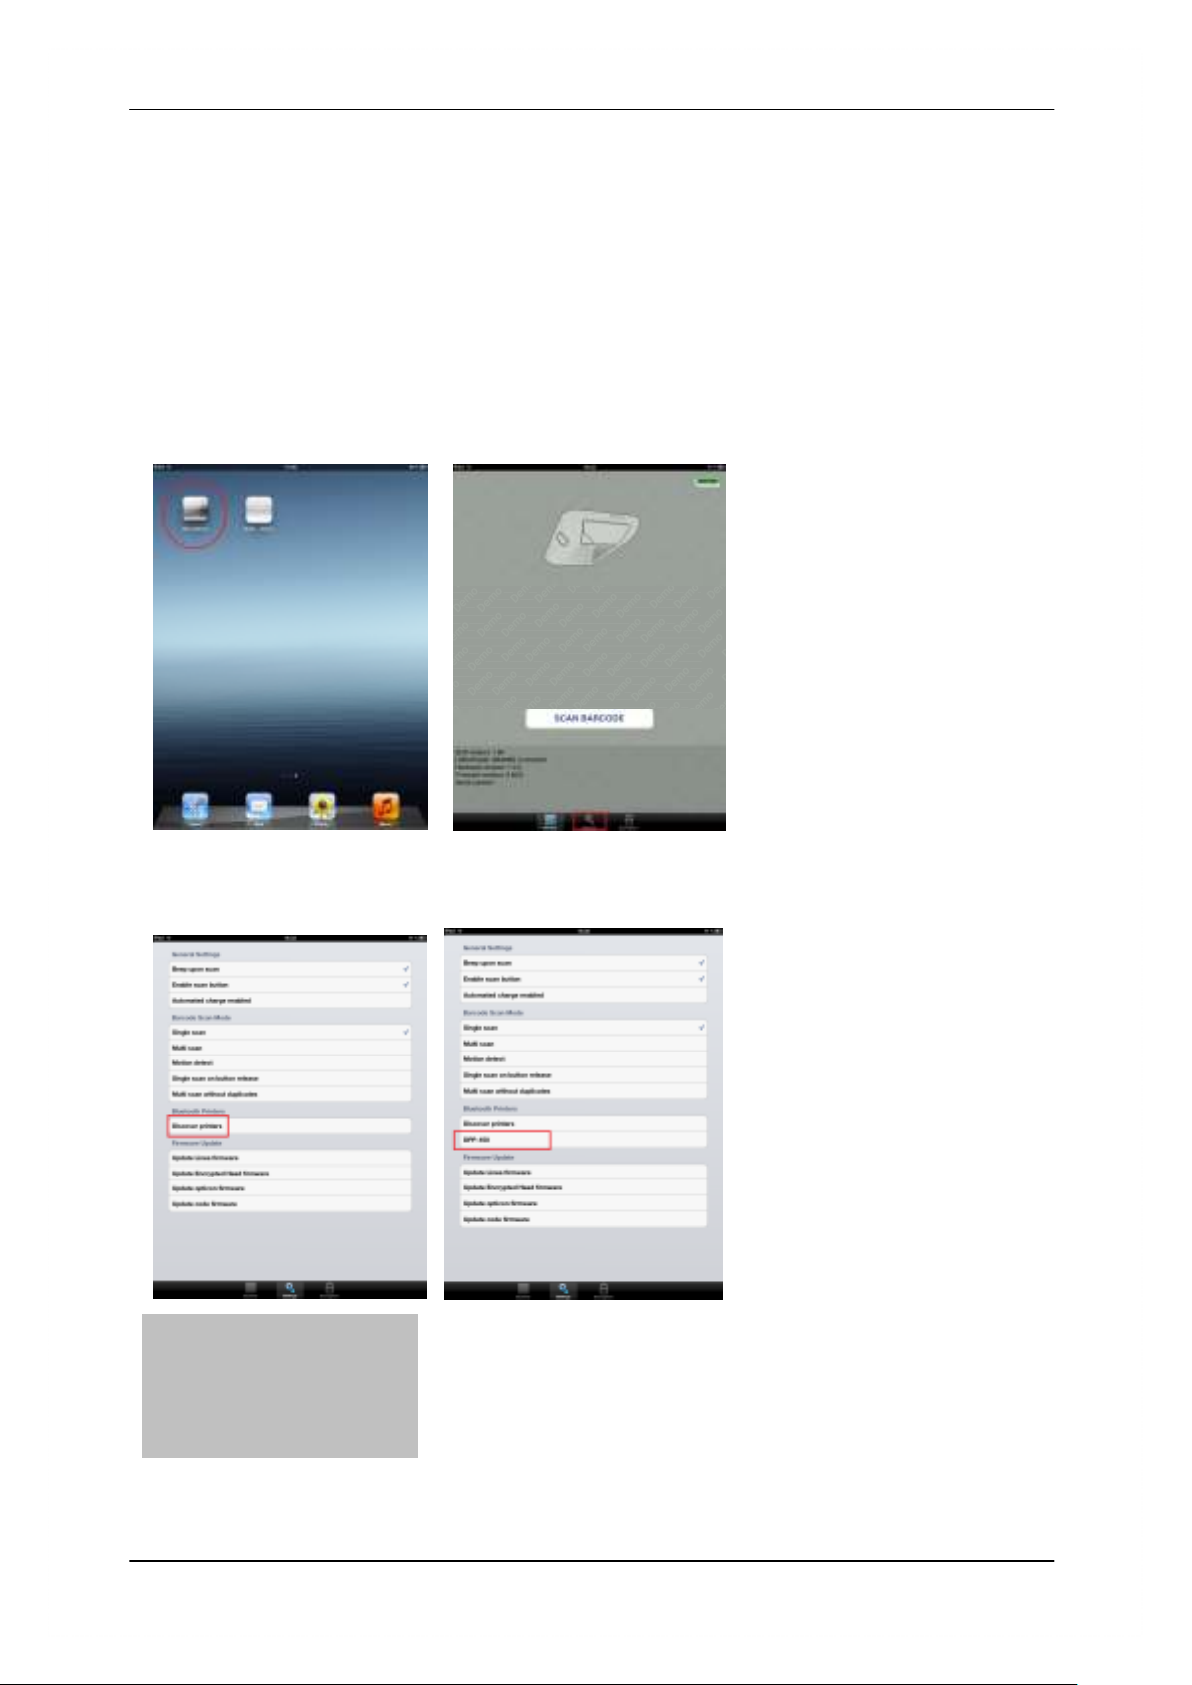
iOS devices:
Connect to LineaTAB.
Start – LibraryDemo on iPad. Connect LineaTab to iPad(Figure 4). After this press
settings button.
Turn on DPP-450 Bluetooth printer. From setting menu press Discover printers, and
wait to find printers. When is found press on selected printer and wait connect.
ECS/PO
On DPP-450 LCD screen is show message “BTH”, when is connected.
Press on LineaTAB “Print “ button:
29
Page 30
1 DATECS DPP-450 User manual
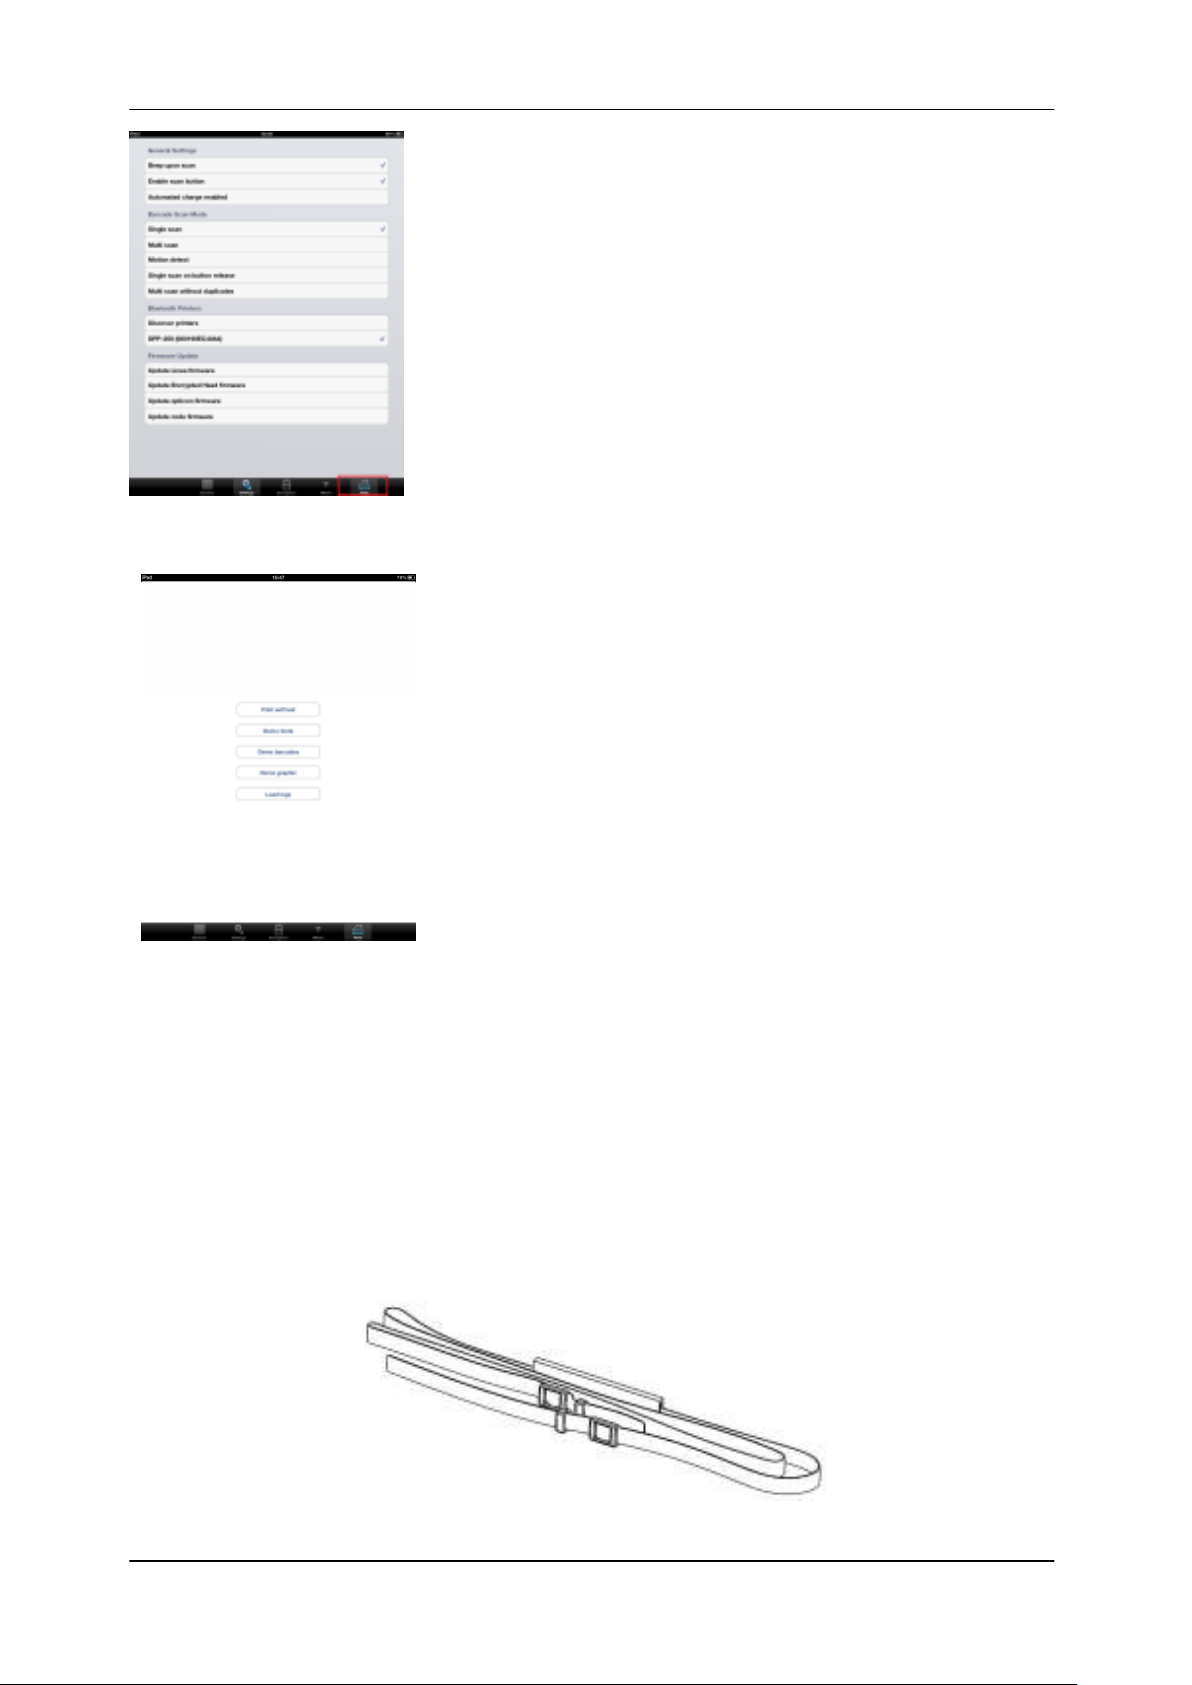
On “Print” menu can printing via Bluetooth connection:
- Print Self-test
- Demo fonts
- Demo barcodes
- Demo graphics
To terminate the BT connection, press settings menu and name of printer. When is
close connection the “tick” will disappearing.
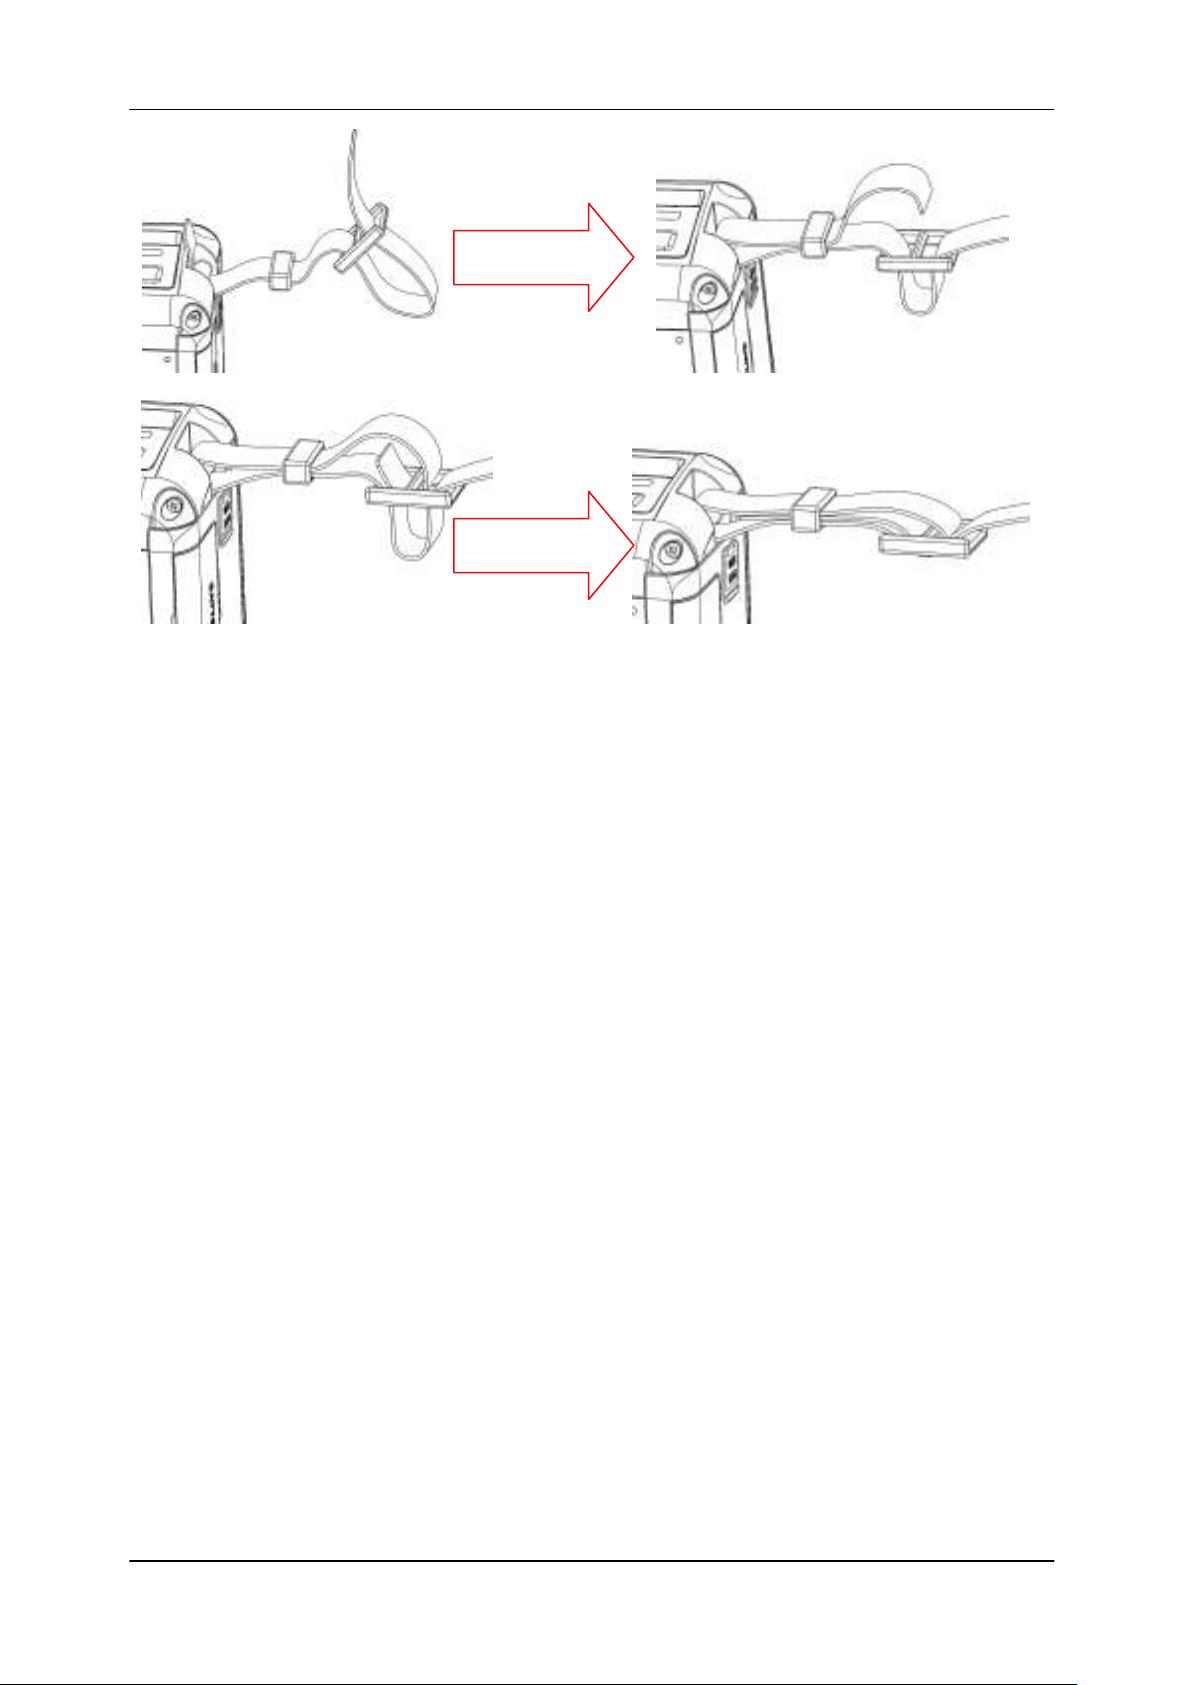
5.12 Mount Strap
Strap
30
Page 31
1 DATECS DPP-450 User manual
31
 Loading...