

Page 1
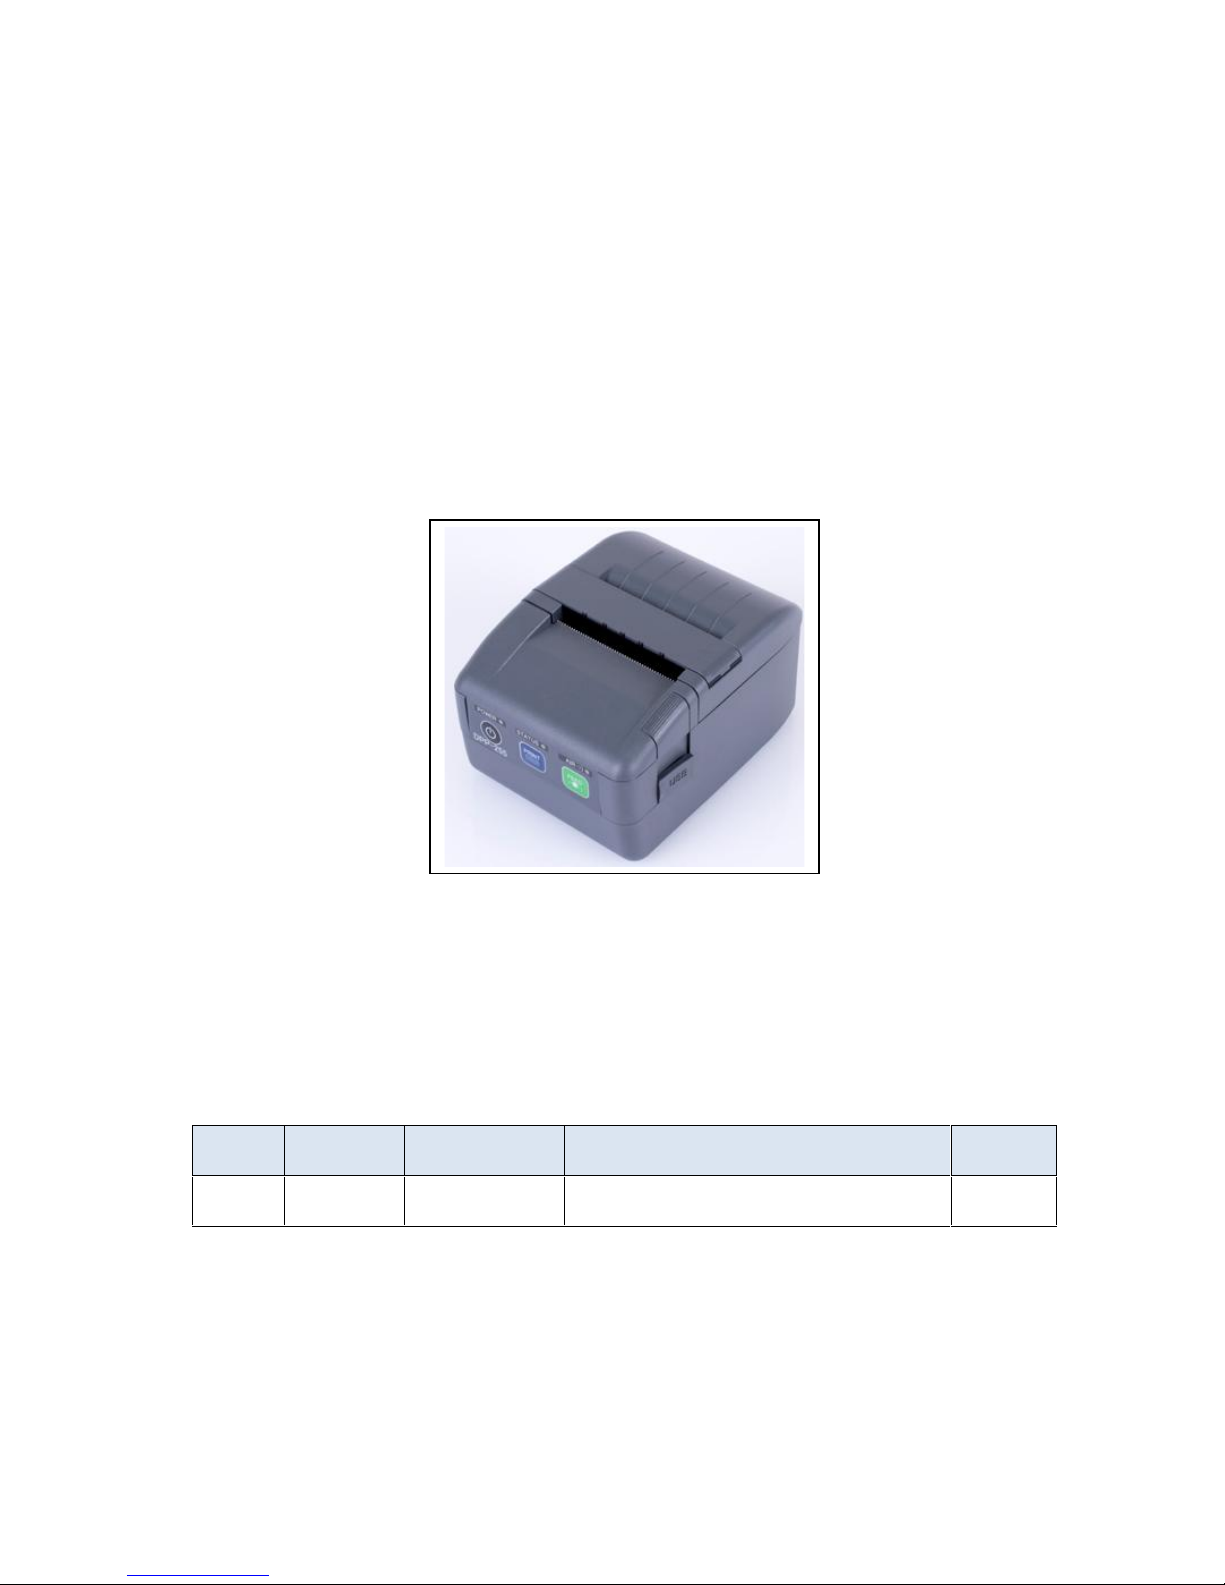
1 DATECS
DPP-255 User Manual
Version
Data
Range
Change description
Author
1.0.0
20.01.2016
All document
First release
Viktor
Kochev
Page 2

1 DATECS DPP-255 User’s Manual
UM 07.01.01/v1.0.0 2
Content:
THE INFORMATION IN THIS DOCUMENT CANNOT BE REPRODUCES IN ANY MECHANICAL, ELECTRICAL OR ELECTRONIC
WAY AND UNDER ANY CIRCUMSTANCES WITHOUT THE WRITTEN CONSENT FROM DATECS LTD.
This mark is an indication for separate collection of waste electrical and electronic equipment
(WEEE).
It is prohibited the disposal of WEEE containers for mixed waste
(Pursuant to Ordinance requirements for marketing of electrical and electronic
equipment and transportation and disposal of waste electrical and electronic equipment,
adopted by Decree № 82 of 10.04.2006)
Page 3

1 DATECS DPP-255 User’s Manual
UM 07.01.01/v1.0.0 3
Legal Notice
“Made for iPod,” “Made for iPhone,” and Made for iPad” mean that an electronic accesory has been
designed to connect specifically to iPod, iPhone, or iPad, respectively, and has been certified by the
developer to meet Apple performance standards. Apple is not responsible fort he operation of this
device or its compliance with safety and regulatory standards. Please note that the use of this
accesory with iPod, iPhone, or iPad may affect wireless performance.
Compatibility
Made for iPhone, Made for iPod, Made for iPad
iPad, iPhone, iPod touch are trademarks of Apple Inc., registred in the U.S. and other countries.
Lightning is a trademark of Apple Inc.
Page 4

1 DATECS DPP-255 User’s Manual
UM 07.01.01/v1.0.0 4
This equipment has been tested and found to comply with the limits for a Class B digital device,
pursuant to part 15 of the FCC Rules. These limits are designed to provide reasonable protection
against harmful interference in a residential installation. This equipment generates, uses and can
radiate radio frequency energy and, if not installed and used in accordance with the instructions, may
cause harmful interference to radio communications. However, there is no guarantee that
interference will not occur in a particular installation. If this equipment does cause harmful
interference to radio or television reception, which can be determined by turning the equipment off
and on, the user is encouraged to try to correct the interference by one or more of the following
measures:
—Reorient or relocate the receiving antenna.
—Increase the separation between the equipment and receiver.
—Connect the equipment into an outlet on a circuit different from that to which the receiver is
connected.
—Consult the dealer or an experienced radio/TV technician for help.
CAUTION: Use shielded cables to connect this device to computers.
Any changes or modifications not expressly approved by the grantee of this device could void the
user’s authority to operate the equipment.
Page 5

1 DATECS DPP-255 User’s Manual
UM 07.01.01/v1.0.0 5
CONTENTS
1. INTRODUCTION .................................................................................................................................... 6
2. FEATURES ............................................................................................................................................. 6
3. TECHNICAL SPECIFICATION .................................................................................................................. 7
4. GENERAL VIEW..................................................................................................................................... 8
5. GETTING STARTED................................................................................................................................ 9
5.1. CHARGE DPP-255............................................................................................................................. 9
5.2. DIAGNOSTIC INFORMATION ................................................................................................................ 10
5.4. LOADING PAPER ............................................................................................................................... 10
5.5 REPLACE BATTERY.............................................................................................................................. 12
5.6. MOUNT BELT CLIP............................................................................................................................. 12
6. FUNCTIONS......................................................................................................................................... 13
6.1. SELF TEST........................................................................................................................................ 13
6.2. PAGE MODE .................................................................................................................................... 14
6.3 RULED LINES..................................................................................................................................... 14
6.4. PROTOCOL MODE ............................................................................................................................. 14
6.5. HARDWARE SETUP ............................................................................................................................ 15
6.6. DIP SWITCHES ................................................................................................................................. 18
6.7. LED DISPLAY ................................................................................................................................... 19
7. INTERFACES ........................................................................................................................................ 20
7.1. USB .............................................................................................................................................. 20
7.2. SERIAL............................................................................................................................................ 20
7.3. BLUETOOTH..................................................................................................................................... 20
7.4. WI-FI............................................................................................................................................. 21
8. MAINTAINS......................................................................................................................................... 22
Page 6

1 DATECS DPP-255 User’s Manual
UM 07.01.01/v1.0.0 6
1. Introduction
Datecs DPP-250 is a mobile ESC/POS and LABEL thermal printer. It can be used in dynamic
working conditions and its abundant built-in features allow it to be widely used for different
applications. Printer can quickly and easily print text and/or graphics, depending on customer needs
– barcodes, logo, etc.
2. Features
The DPP-255 is a mobile line thermal printer, applicable for different applications as shown
below:
Mobile
Label Peeler
Traveling sales
Retail
Transportation
Receipts
Point of sale
Distribution
Page 7

1 DATECS DPP-255 User’s Manual
UM 07.01.01/v1.0.0 7
3. Technical specification
DPP-255 Specification
Printing Method
Direct line thermal printer
Total Dots
384 dots / line
Dot Density
8 dots / mm (203 dpi)
Print Speed
100 mm / sec
Print Width
48 mm
Characters per Line
Font A: 48 characters / line
Font B: 64 characters / line
Font C: 48 characters / line (loadable)
Font D: 64 characters / line (loadable)
Roll Max Diameter
58
Interfaces
- RS-232C port (max 115200 bps)
- mini USB 2.0 port(device)
- Bluetooth 2.0 class 2 (Serial Port Profile) (optional)
- Bluetooth 3.0 class 2(Serial Port Profile, iPod Accessory
Protocol) (optional)
- Wireless LAN 802.11b (optional)
Paper Feed system
Step
Logo Registration
1 Black & White 384 x 248 dots
Emulation
ESC/POS /
Eltron
ZPL
Resident Barcodes
1 D: EAN 13, EAN 8, UPC A, UPC E, Code 39, Code 93, Code
128, Codabar, 2 of 5 interleaved
2 D:PDF417, QR code
Power Supply
AC 100 to 240 V, 50 to 60 Hz, DC 9V/1A
Battery
Rechargeable Li-Ion battery 7.4V/2000 mA
20 000 lines per fully charged battery
LED indication
- Battery low
- Battery charging
- Paper end
- Cover open
- Overheating
Reliability
50 km (Thermal head)
15,000,000 lines( Mechanism MCBF)
Weight, kg
420 grams (with battery)
Dimension (W x D x H), mm
88 x 120 x 64
Environment
Operating: -10 to 50oC, 30 to 50 % RH
Storage: -20 to 60oC, 10 to 90 % RH
OS Compatibility
iOS, Android OS, Black Berry OS, Windows OS, Win CE,
Windows Mobile, Windows Phone 8.x
Accessories
Wearable built-in metal belt hook
Page 8
1 DATECS DPP-255 User’s Manual
UM 07.01.01/v1.0.0 8
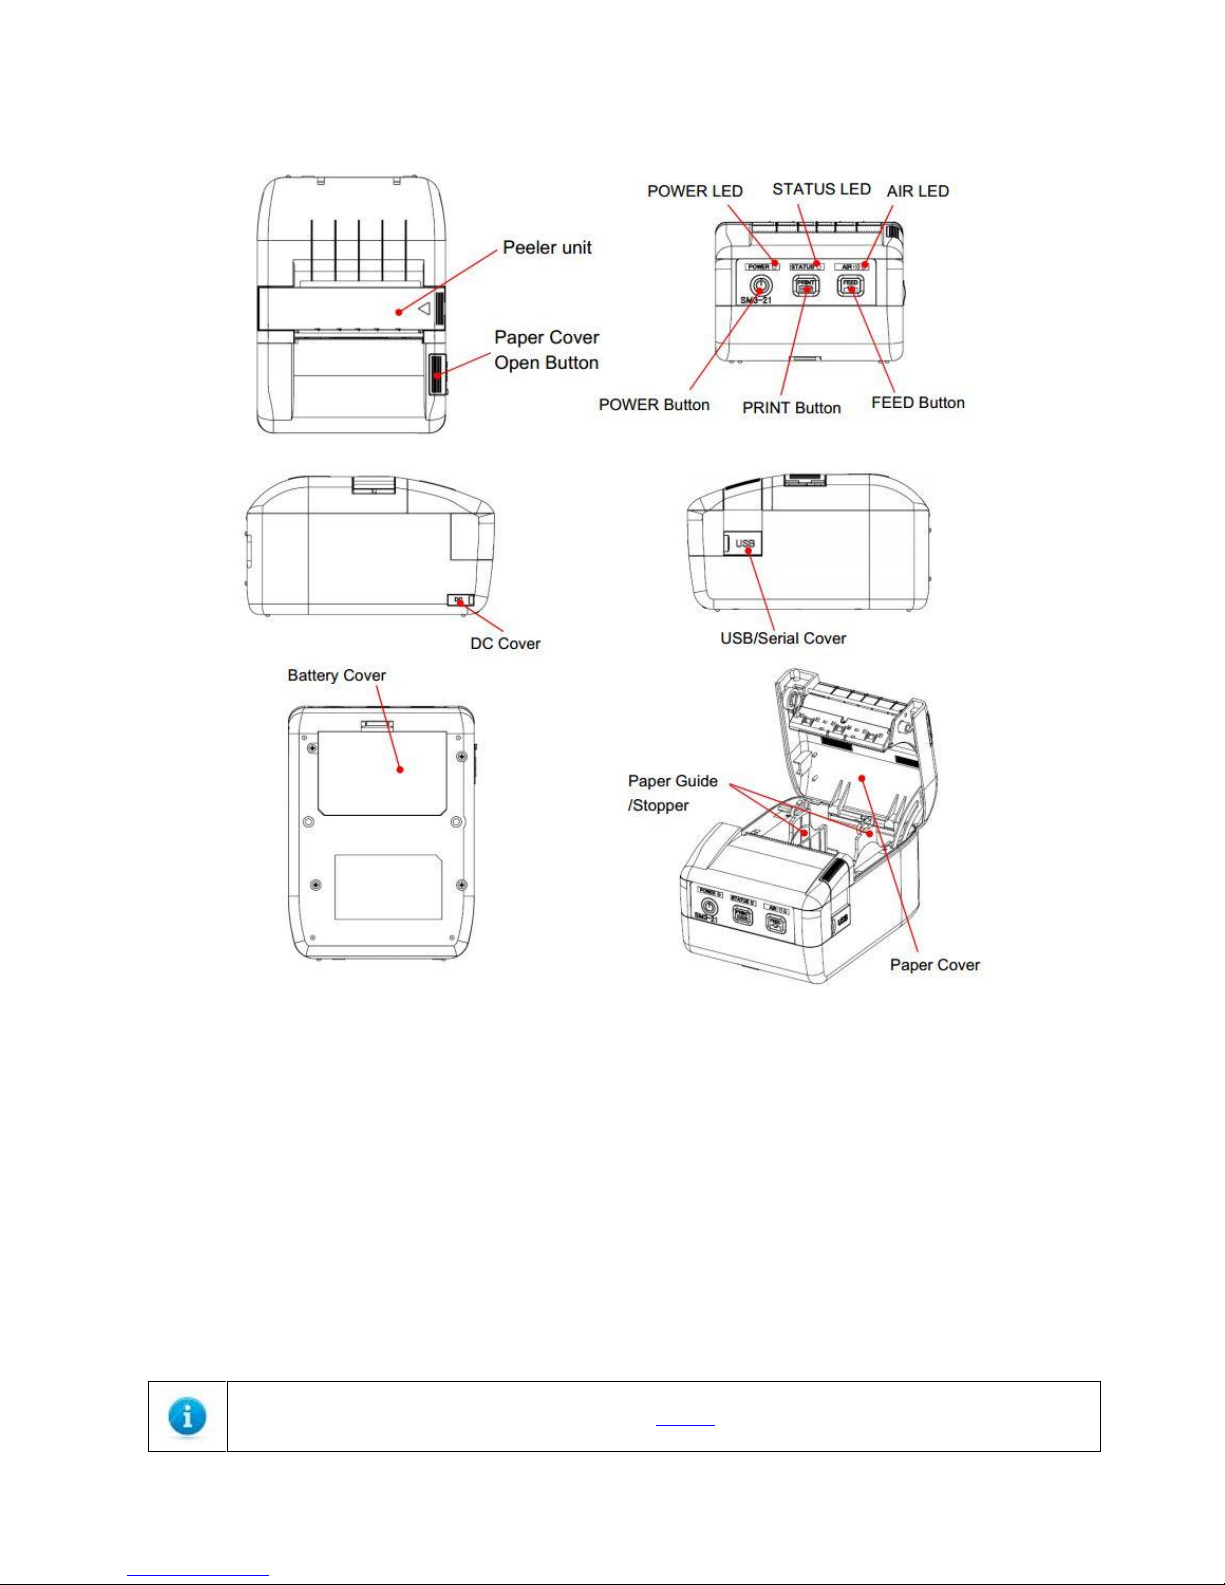
4. General view
POWER Button: Turn power on or off
FEED Button: Feed paper during pressing this button
PRINT Button: Select button to configure settings
POWER LED: Indicate status of power and battery
STATUS LED: Indicate status of printer
AIR LED: Indicate status of the Bluetooth connection
USB/Serial Cover: Cover for wired interface.
Battery Cover: Cover of battery
DC Cover: Cover for adapter and DC jack
Paper Cover Open Button: Open paper cover
Paper Guide: Move guide to fit paper width
Stopper: Stopper for paper guide
Peeler unit: Peel label
Because of the continually evolving Driver and SDK to support new mobile devices, Drivers and SKDs are
distributed online and is available for download at our website. For details on using the DPP-255 Drivers and
SKDs, please refer to the SKD’s documentation.
Page 9
1 DATECS DPP-255 User’s Manual
UM 07.01.01/v1.0.0 9
5. Getting started
The DPP-255 allows you to print information from your PDA and Smart phone. Before using the
DPP-255 thermal printer, the battery should be properly charged. The following Quick Start guide will
help to get your DPP-255 ready for use.
Steps
What to do
Purpose
Where to find more
information
1
Charge the DPP-255
rechargeable battery pack
as recommended in this
manual
The Lithium Ion battery
pack should be fully
charged before use to
ensure long battery life
Charge DPP-255
2.1
Load the DPP-255 print
media(Thermal paper roll)
DPP-255 requires Thermal
paper for printing
Loading paper
2.2
Load the DPP-255 print
media(Thermal label paper
DPP-255 requires Thermal
label paper
Fixing peeler
3
Setup Bluetooth Paring
Setup: Bluetooth pairing to
allow DPP-255 to
communicate with
Bluetooth devices
Bluetooth
4
Install DPP-255 Software
To print information from
your device, software needs
to be installed onto your
device
Datecs website
5.1. Charge DPP-255
Charging time is 3 hours from empty to full charge. When the battery is fully charged the
device can print 100 m paper roll.
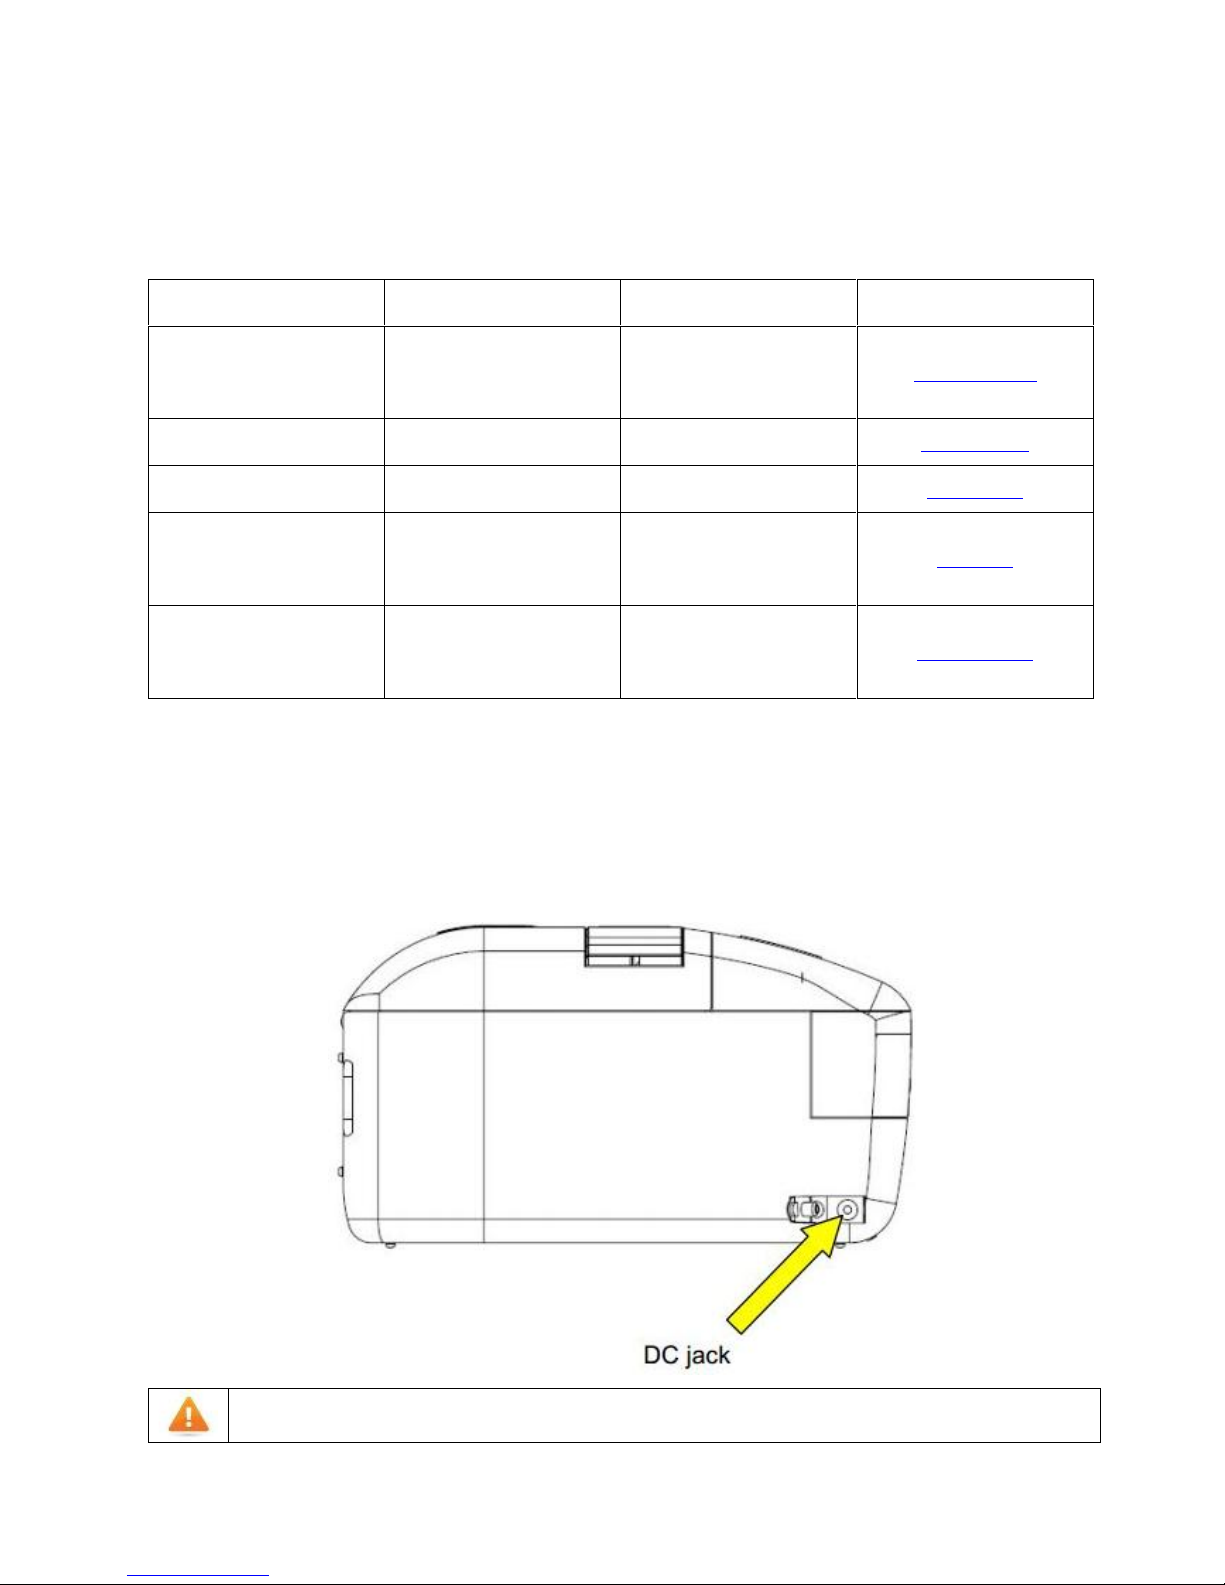
Insert AC adapter to DC jack and plug to consent to start the charge.
The DPP-255 uses a Lithium-Ion rechargeable battery pack. To prevent electrical damage to the DPP -255
and/or battery pack, please use approved AC Charger only.
Page 10
1 DATECS DPP-255 User’s Manual
UM 07.01.01/v1.0.0 10
5.2. Diagnostic information
Holding FEED button while power on for ~ 0.5 sec (STATUS LED lights) – short self test
Holding FEED button while power on for ~2.5 sec (one beep and POWER LED turns green) –
start DUMP mode. All input data are printed hexadecimal and as text.
Holding FEED button while power on for ~8.5 sec (4 tone sound signal) – enter firmware
updating mode
Holding POWER button while power on for ~2.5 sec (one beep):
If cable is connected (RS232 communication) – temporary forcing bps serial speed to 9600
If no cable is connected (Bluetooth communication) – starting a hardware menu for fast
Bluetooth pairing info reset.
Holding POWER button while power on for more than 6 sec(printer prints) – enter hardware
menu
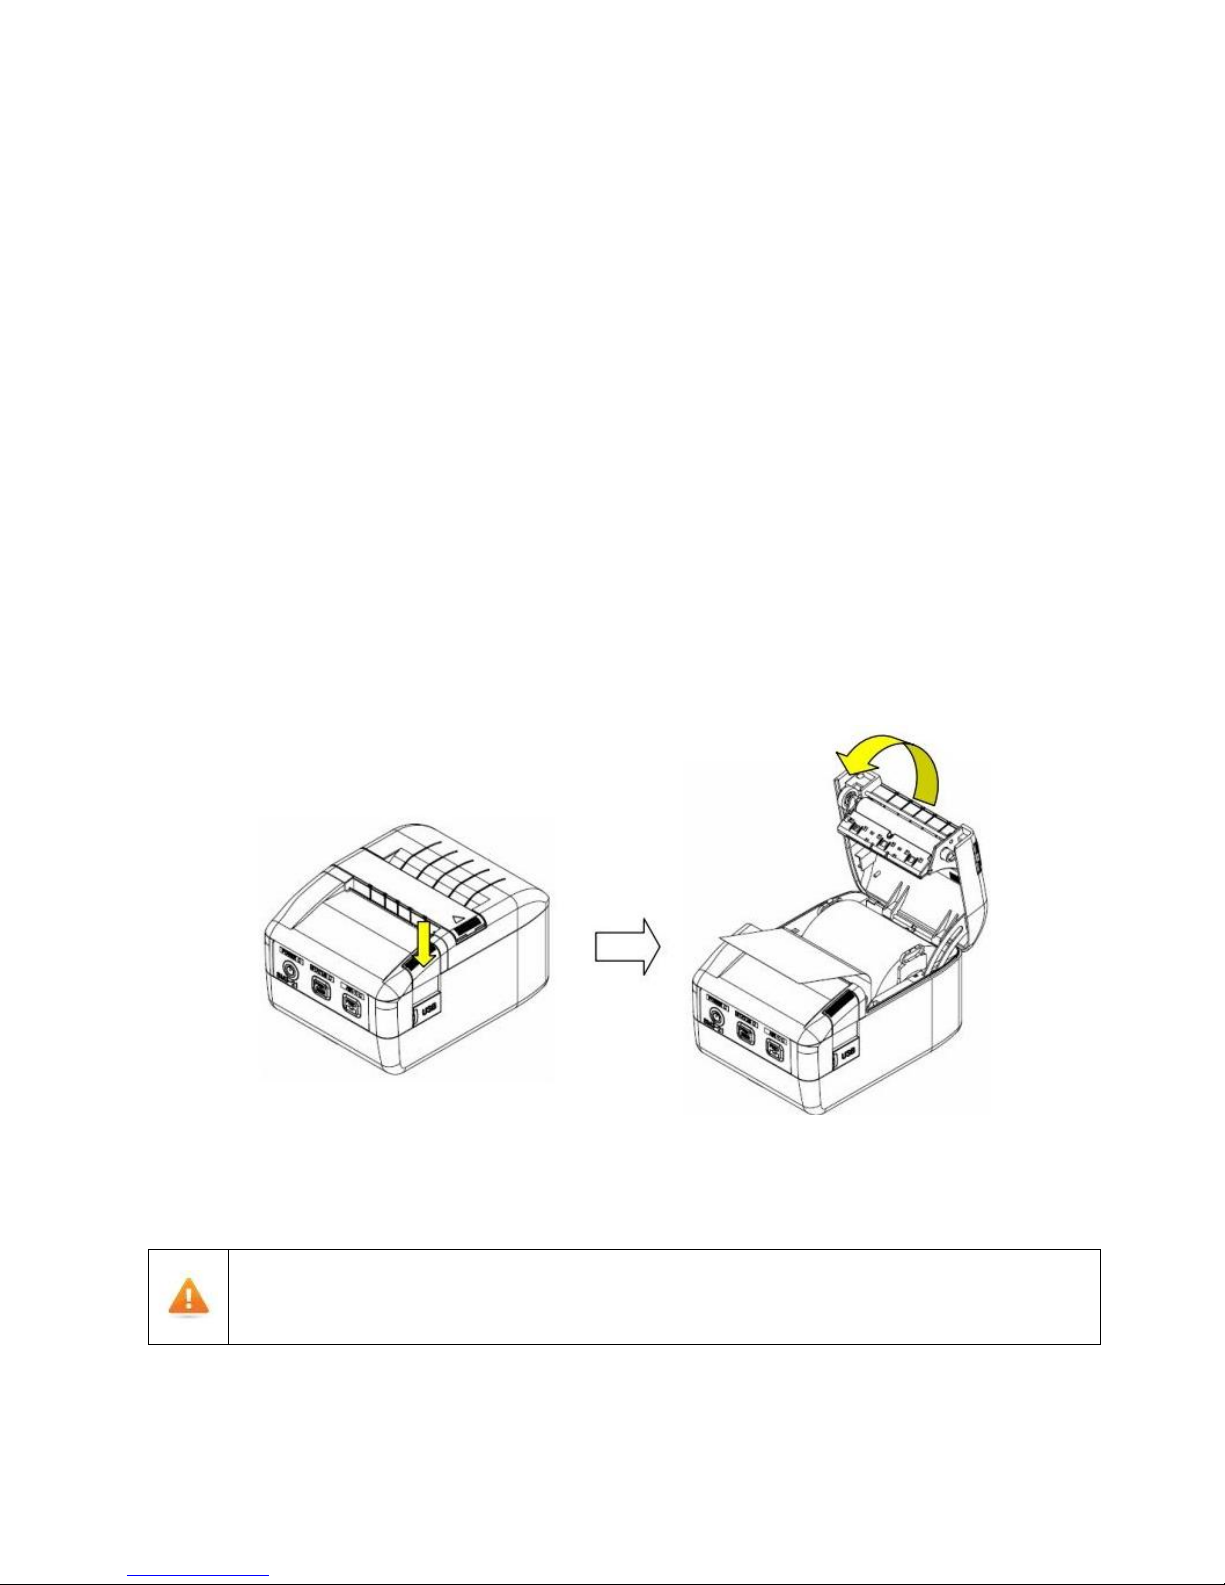
5.4. Loading paper
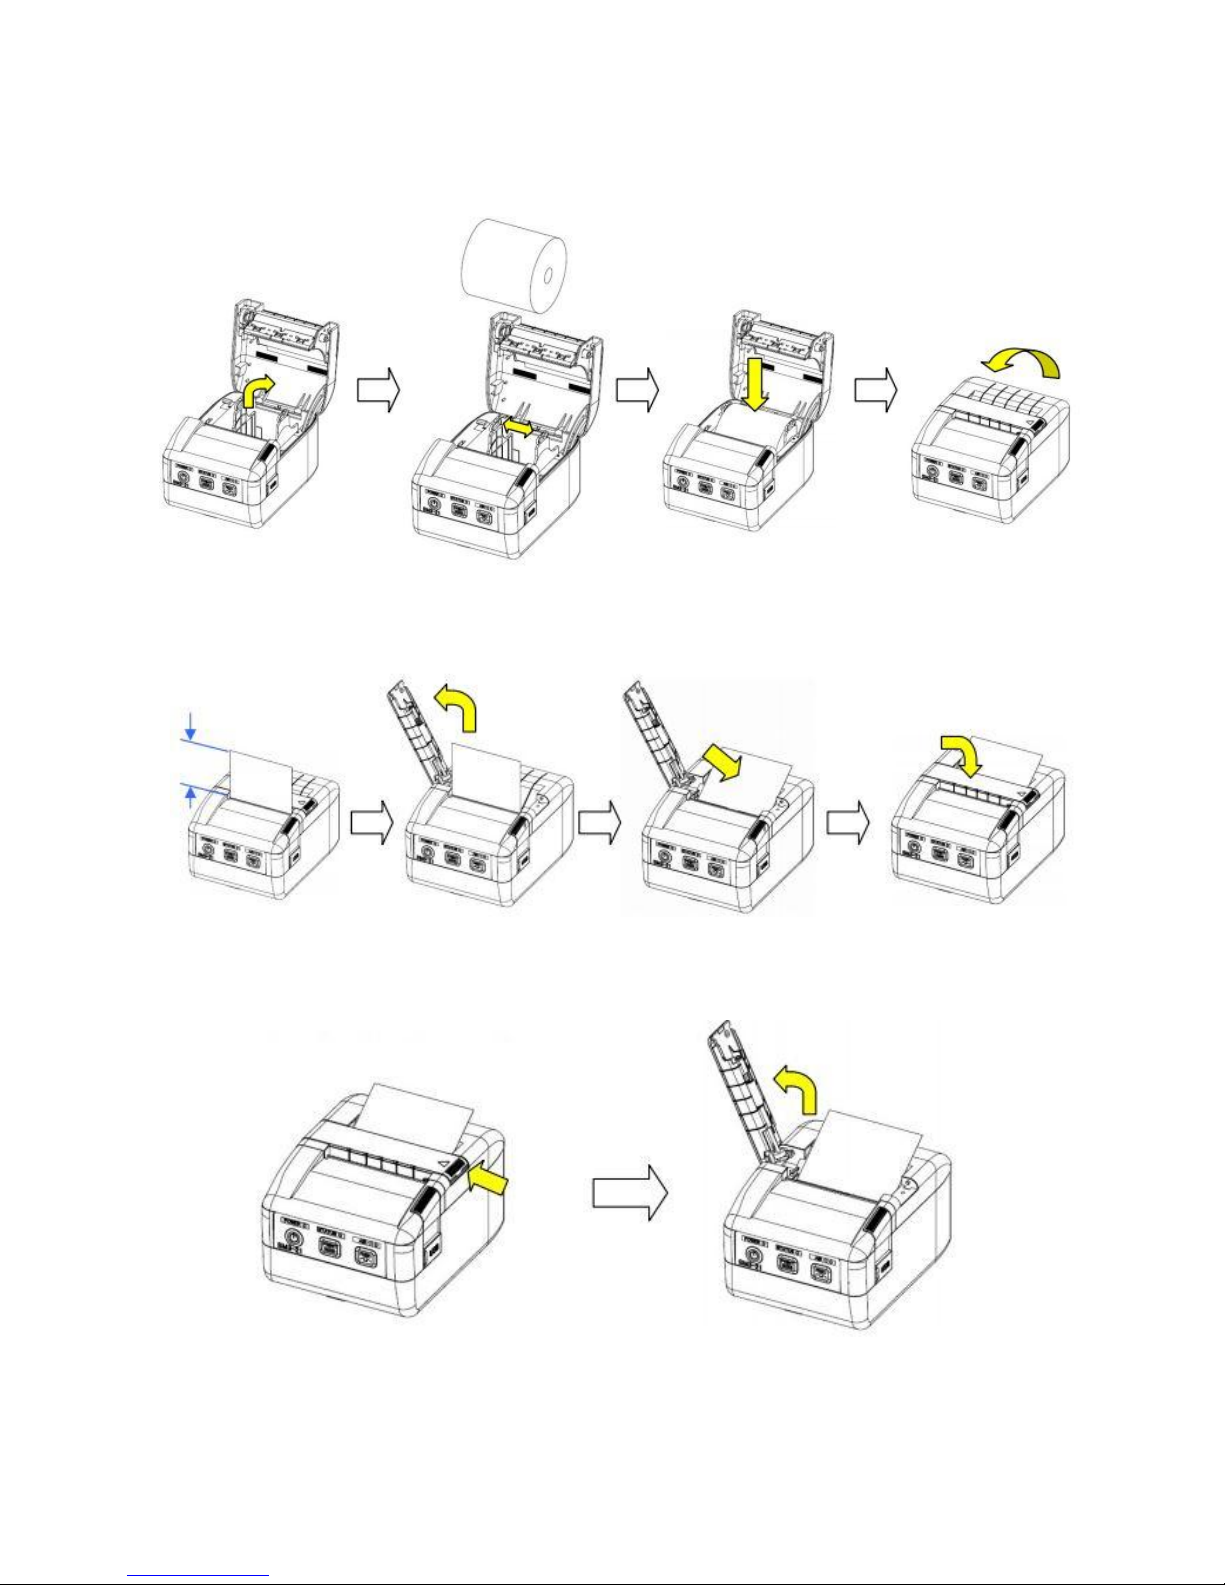
Press the cover open button to open the paper cover
Handle the paper cutter carefully so as not to injure fingers or hand
As the thermal head may be very hot immediately after printing, do not touch it to avoid burning your
fingers.
Be sure that the thermal head is cool before replacing a paper
Page 11
1 DATECS DPP-255 User’s Manual
UM 07.01.01/v1.0.0 11
Load the paper roll. Move paper guide to fit paper width
Fixing peeler unit (if loading a thermal label roll)
Removing peeler unit
Page 12
1 DATECS DPP-255 User’s Manual
UM 07.01.01/v1.0.0 12
5.5 Replace battery
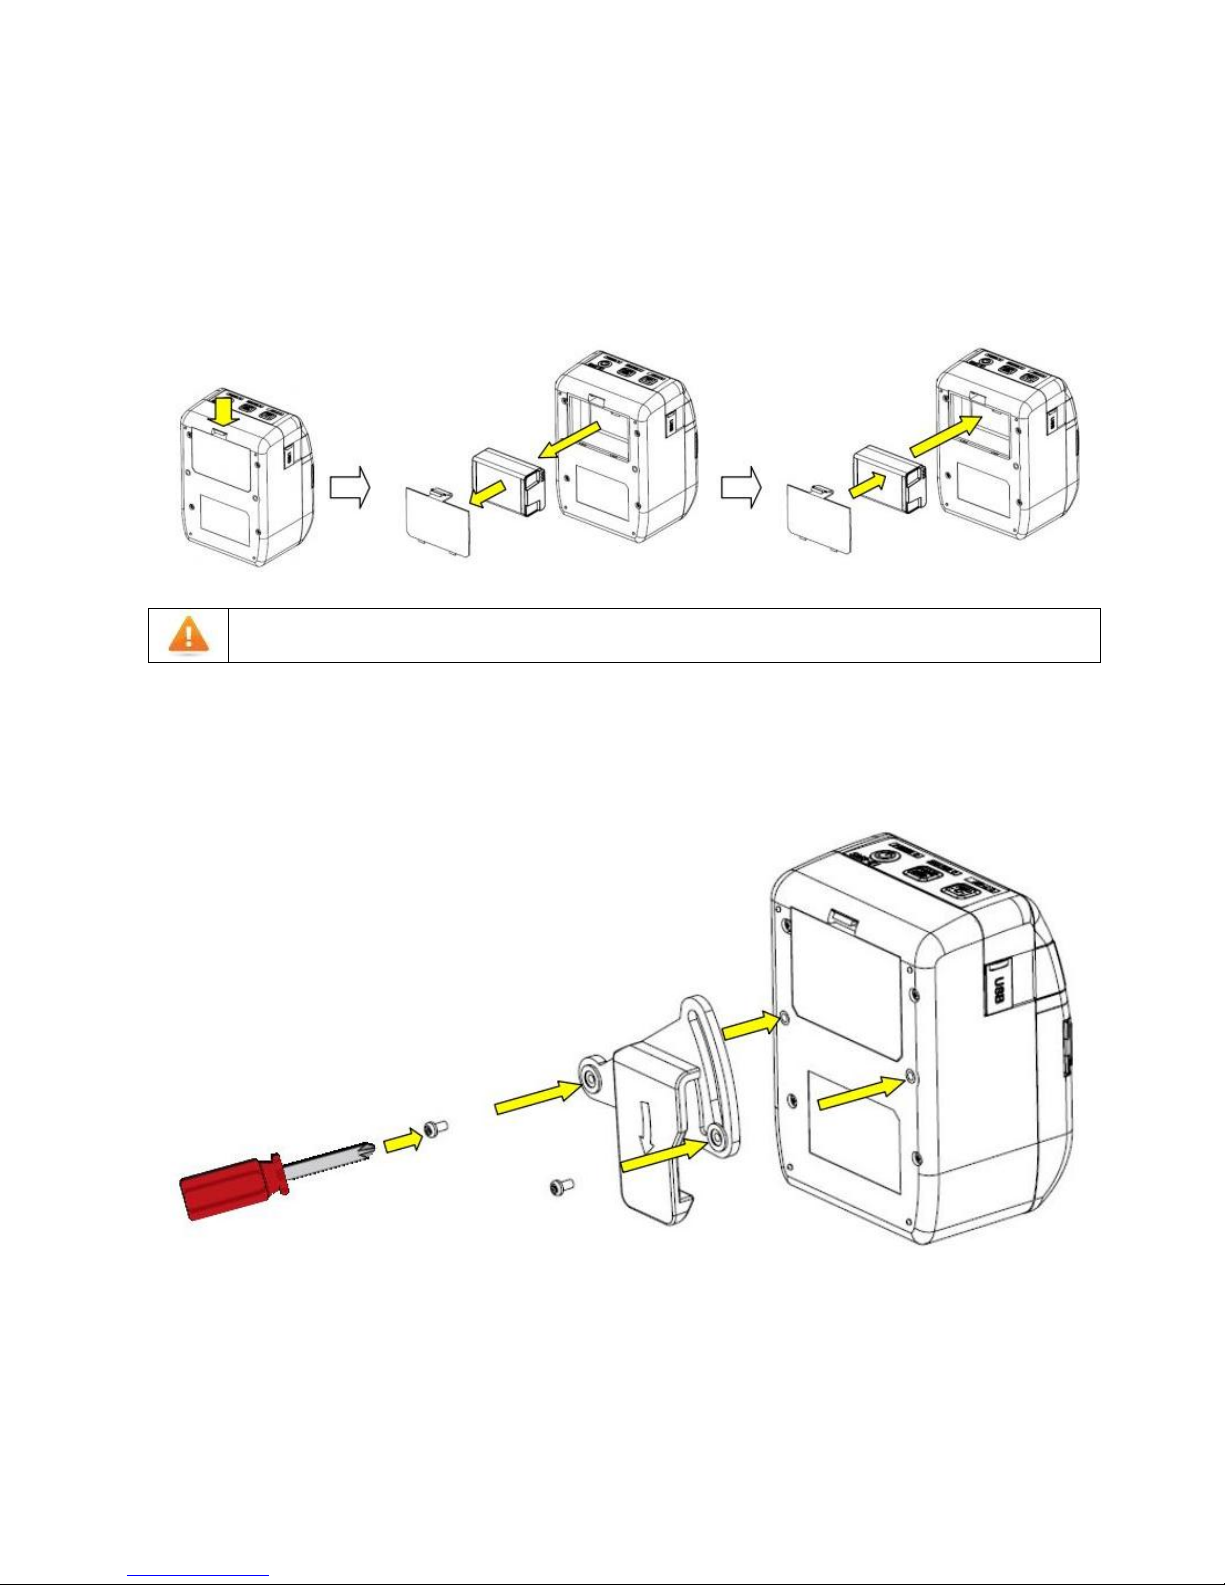
Open battery cover.
Eject battery.
Put new battery pack in battery holder and close battery cover.
Battery pack no longer required mustn’t be waste but be brought it to nearest electric store to recycle
5.6. Mount belt clip
Put screws through the holes of belt clip and fix it by screwdriver.
Page 13
1 DATECS DPP-255 User’s Manual
UM 07.01.01/v1.0.0 13
6. Functions
6.1. Self test
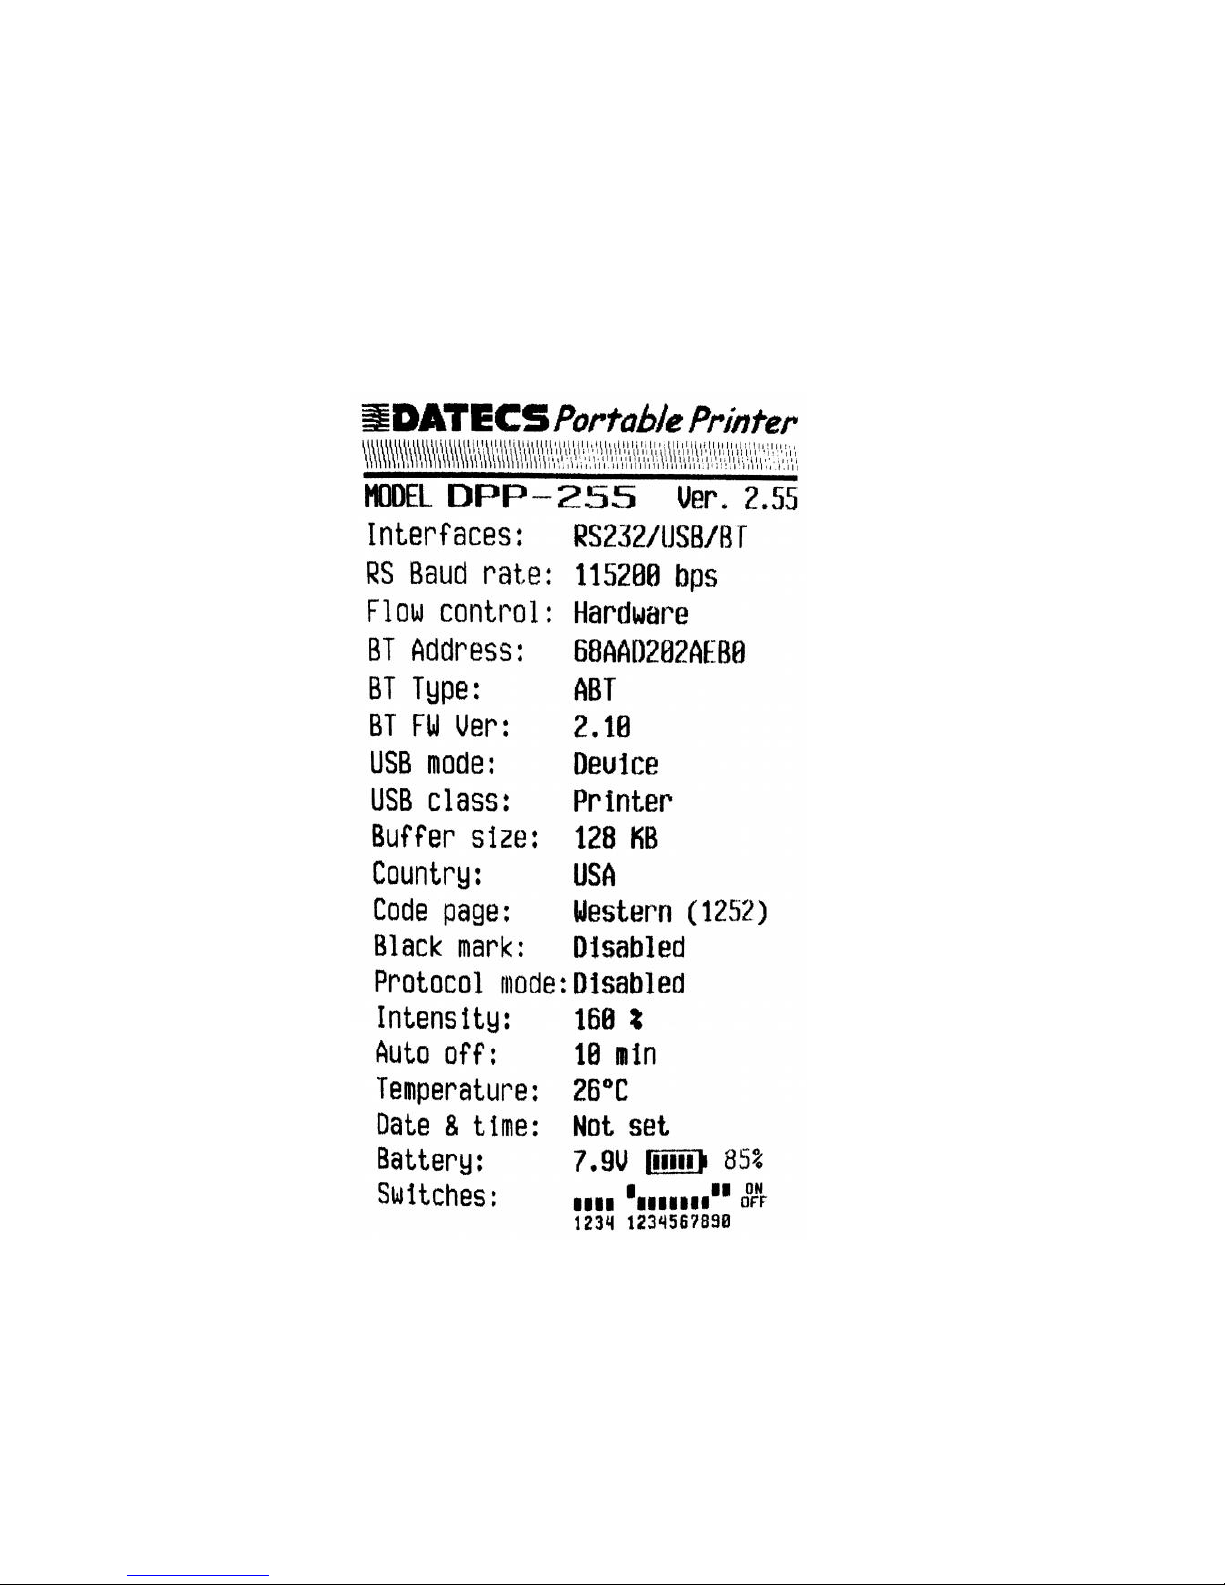
The DPP-255 has a built-in test pattern that shows the printer’s current configuration as well as the
various resident printer fonts. The self-test can also be used as a troubleshooting tool to determinate
problems or battery level.
Holding FEED button while power on for ~ 0.5 sec (STATUS LED lights)
Page 14

1 DATECS DPP-255 User’s Manual
UM 07.01.01/v1.0.0 14
6.2. Page mode
In page mode the result the result of incoming commands is forwarded to a reserved memory
area (page). The page place and size is defined using commands ESC W. Command GS T selects the
print direction in this page. At the end the collected information is printed using one of the
commands, provided for this. Commands ESC FF and GS FF print only the currently defined page, but
command ESC Z prints the area between the first and last line containing at least one black point.
All commands except GS L and GS W work in page mode. The centering and right alignment
(command ESC a) id working in the currently defined page width.
6.3 Ruled lines
The printer has two line buffers with size the maximum printing width (paper width in standard
mode or the selected page width in page mode). When ruled lines are active, then every horizontal
line of the text line is combined with the selected ruled line buffer. Bit ‘1’ in the ruled line buffer is a
black dot in OR mode and inverts the color of the dot in XOR mode. Two commands allow the ruled
line buffers to be printed without combining with a text line.
When pressing the FEED button, no ruled lines buffer is applied.
All ruled lines commands start with symbol DC3 (ASCII code 13h). Please see command DC2 =, too
6.4. Protocol mode
The purpose of this mode is to give stronger real time access to the printer. All input data are
sent in packets. The printer returns an answer to the packet immediately.
Page 15
1 DATECS DPP-255 User’s Manual
UM 07.01.01/v1.0.0 15
6.5. Hardware setup
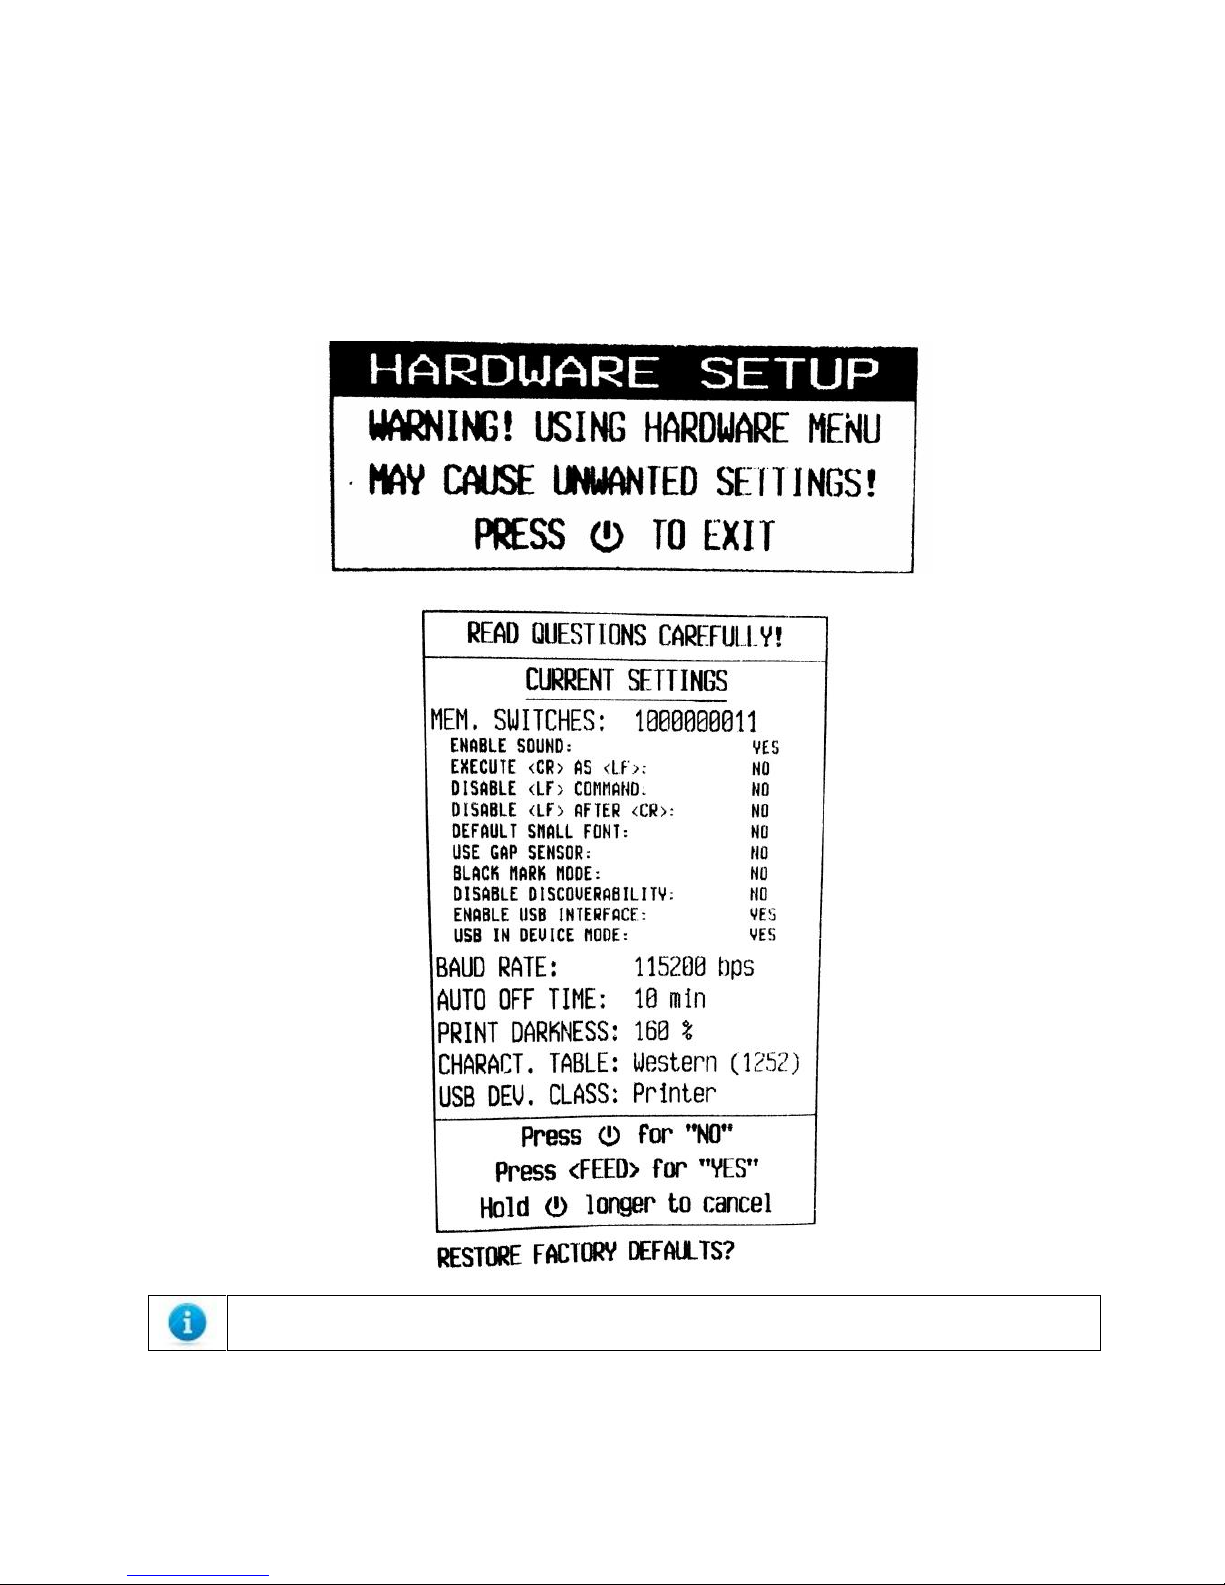
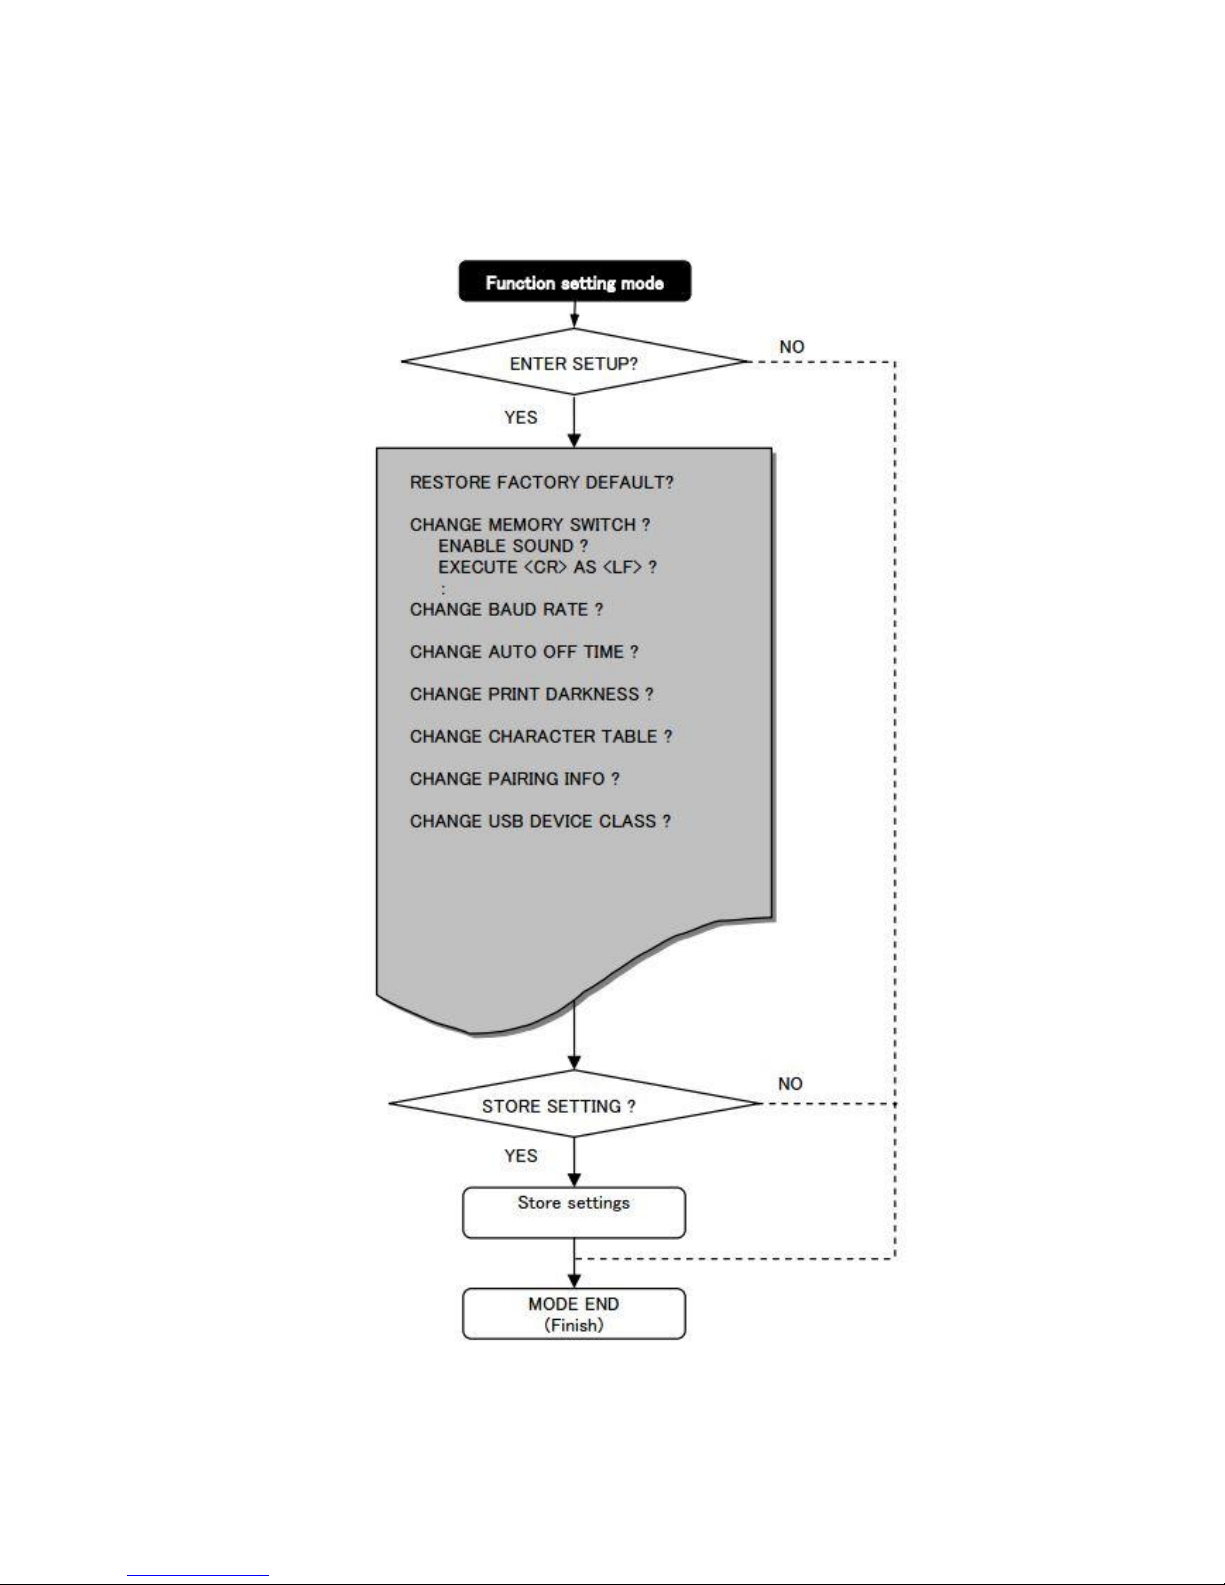
Hardware setup allows you to switch register functions in the memory manually. Function are
called up by the POWER and FEED buttons and the printer prints registered functions.
Hold POWER button while power on for more than 6 sec(printer prints)
Content of memory switch is printed by pressing FEED button
YES: FEED button Decide
NO: POWER button Move to next
Page 16
1 DATECS DPP-255 User’s Manual
UM 07.01.01/v1.0.0 16
Follow the flow chart to change the parameter. As the setting parameter is printed, choose the
right parameter by manipulating the FEED and POWER buttons.
After completing the parameters set up, data are stored and the printer turn off.
Page 17

1 DATECS DPP-255 User’s Manual
UM 07.01.01/v1.0.0 17
Setting Memory switches (Default settings)
RESTORE FACTORY DEFAULTS?
Select reset memory switches as factory default.
YES: Returns to the default memory
NO: No action
CHANGE MEMORY SWITCHES?
SWITCH NO
NO (Value: 0)
YES (Value: 1)
ENABLE SOUND
Buzzer OFF
Buzzer ON
EXECUTE <CR> AS <LF>
Disable CR
Enable CR
DISABLE <LF> COMMAND
Enable LF
Disable LF
DISABLE <LF> AFTER <CR>
Enable LF after CR
(Only the SWITCH NO 3 = 0)
Disable LF after CR
DEFAULT SMALL FONT
FONT A(24 x 12)
FONT B (16 x 9)
USE GAP SENSOR
BM sensor
GAP sensor
BLACK MARK MODE
Disable black mark detection
Enable black mark detection
DISABLE DISCOVERABILITY
Bluetooth discovery mode
NOT Bluetooth discovery mode
ENABLE USB INTERFACE
Disable USB function
Enable USB function
USB IN DEVICE MODE
Inhibit setting
Use as a USB device
CHANGE BAUD RATE?
Select baud rate
Value: 1200bps, 2400 bps, 4800bps, 9600bps, 38400bps, 57600bps, 115200bps
CHANGE AUTO OFF TIME?
Select auto off time from stand by.
Value: 2min, 5min, 10min, 15min, 20min, 30min, 45min, 60min, never(disable)
CHANGE PRINT DARKNESS?
Specifies the printing density.
Value: 60%, 75%, 90%, 100%, 120%, 140%, 160%
CHANGE CHARACTER TABLE?
Select the ASCII character table.
Value: English(437), Latin 1(850), Portuguese(860), Lithuanian, Latin 2(852), Polish,
Turkish(857), Baltic(775), Bulgarian(856), Russian(866), Latvian, Greek, Hebrew(862), Western(1252),
CE(1250), Turkish(1254), Baltic(1257), Cyrillic(1251), Greek(1253), Hebrew(1255), Katakana, Arabic,
Arabic(1256), Arabic(1256A), Arabic(1256F), Thai(874), VISCII, Azeri(1254), UTF-8, UTF-8(BiDi >>),
UTF-8(BiDi <<)
DISABLE AUTHENTICATION?
Select disable or enable of Bluetooth authentication.
YES: Disable authentication.
NO: Enable authentication
Page 18
1 DATECS DPP-255 User’s Manual
UM 07.01.01/v1.0.0 18
CHANGE PAIRING INFO?
Select the setting for Bluetooth Pairing key
After selected “YES” key, goes to the settings items “SAVE PAIRING INFO”.
There is a possible to set up this item when “DISABLE AUTHENTICATION” is set “NO”.
SAVE PAIRING INFO?
Select whether the pairing info key is saved or not.
YES: Save pairing key.
NO: Not save pairing key.
CHANGE USB DEVICE CLAS?
SELECTS device operation USB mode.
Value: Printer, Serial
STORE SETTIGNS?
Confirm settings and selct.
YES: Save and exit
NO: Discard and exit
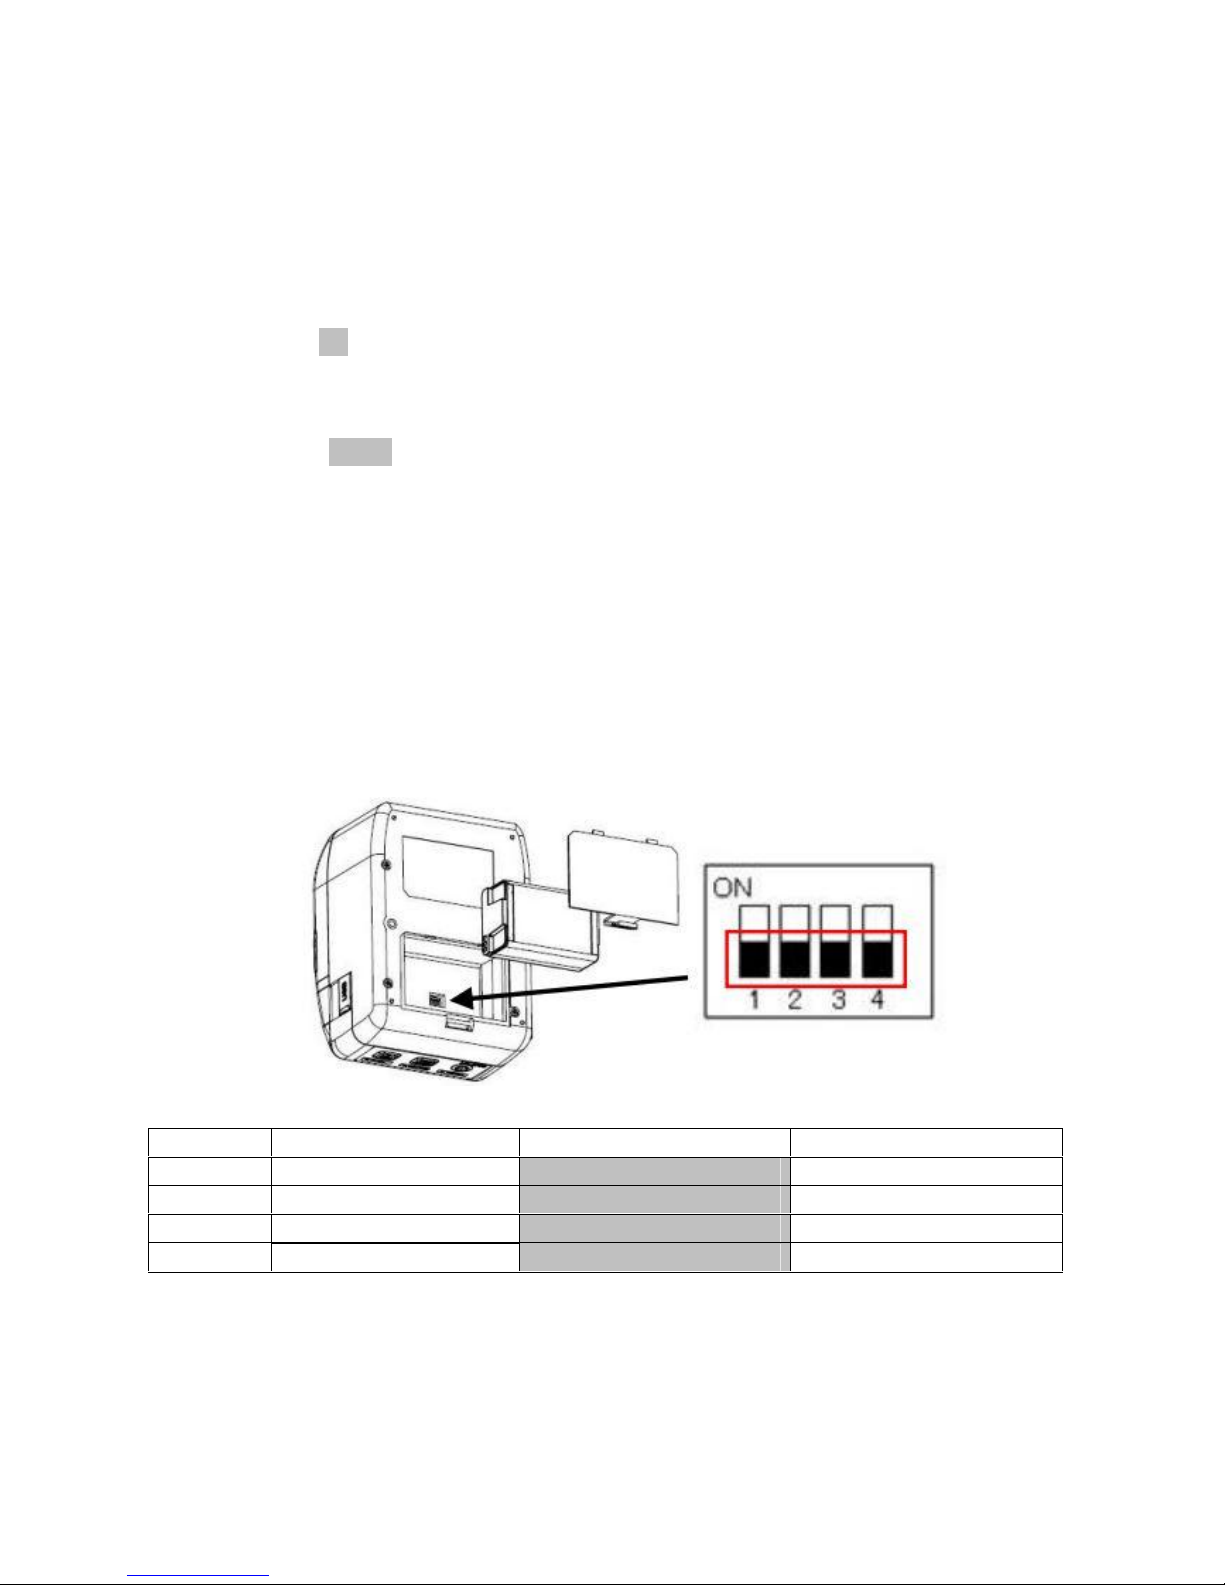
6.6. DIP switches
To use DIP-switches, it can be set to default information with hardware.
When the power supply turns ON, the printer reflects the default data to standby mode.
Number
Function
OFF
ON
1
DISABLE BLUETOOTH
Enable Bluetooth function
Disable Bluetooth function
2
PEELER MODE
Standard mode
Peeler mode
3
Xon/Xoff
Disable
Enable
4
PROTOCOL MODE
Disable
Enable
Page 19

1 DATECS DPP-255 User’s Manual
UM 07.01.01/v1.0.0 19
6.7. LED display
No error signal Is detected
- Standby – It is possible to print and the printer waits for printing data
- Initialization – Initialize printer memories. The printer goes OFFLINE during
initialization. After completing initialization, the printer goes stanby.
- Status of waiting error cancellation – Printer status move to this status when some
error factors like paper end etc. is removed. OFFLINE status and STATUS LED remain its
status. Printer becomes standby when FEED button is pressed.
Status of detecting errors
- Temperature – The print head temperature is increased when heavy-duty printing is
continuous. If the print head temperature exceeds 70 degreesoC, operation of the
print head is automatically stopped to prevent overheating. The printer goes OFFLINE.
- Paper empty – Detect the paper empty through paper end sensor. Paper runs out and
the printer detects paper empty, the status LED turns On and the printer goes OFFLINE
- Paper cover open – When the Paper cover open, the status LED turns ON ant the
printer goes OFFLINE
Status Display
LED: “GREEN” – Turn On green/ “RED” – Turn on red/ ● – Turn OFF
- No error signal is detected
LED
STATUS
POWER LED
STATUS LED
Standby●GREEN
Initializing
GREEN
RED
Waiting error
cancellation
●
RED
- Error signal is detected
LED
STATUS
POWER LED
STATUS LED
Temperature Error
(70oC or more)
GREEN /●
RED
Battery low
●
● or GREEN (Standby) or RED (Paper empty)
Paper empty
●
RED
Paper Cover Open●RED
- Charge
LED
STATUS
POWER LED
STATUS LED
Charging
GREEN / GREEN /●
● or GREEN (Standby) or RED (Paper empty)
Initializing
GREEN
● or GREEN (Standby) or RED (Paper empty)
Page 20
1 DATECS DPP-255 User’s Manual
UM 07.01.01/v1.0.0 20
7. Interfaces
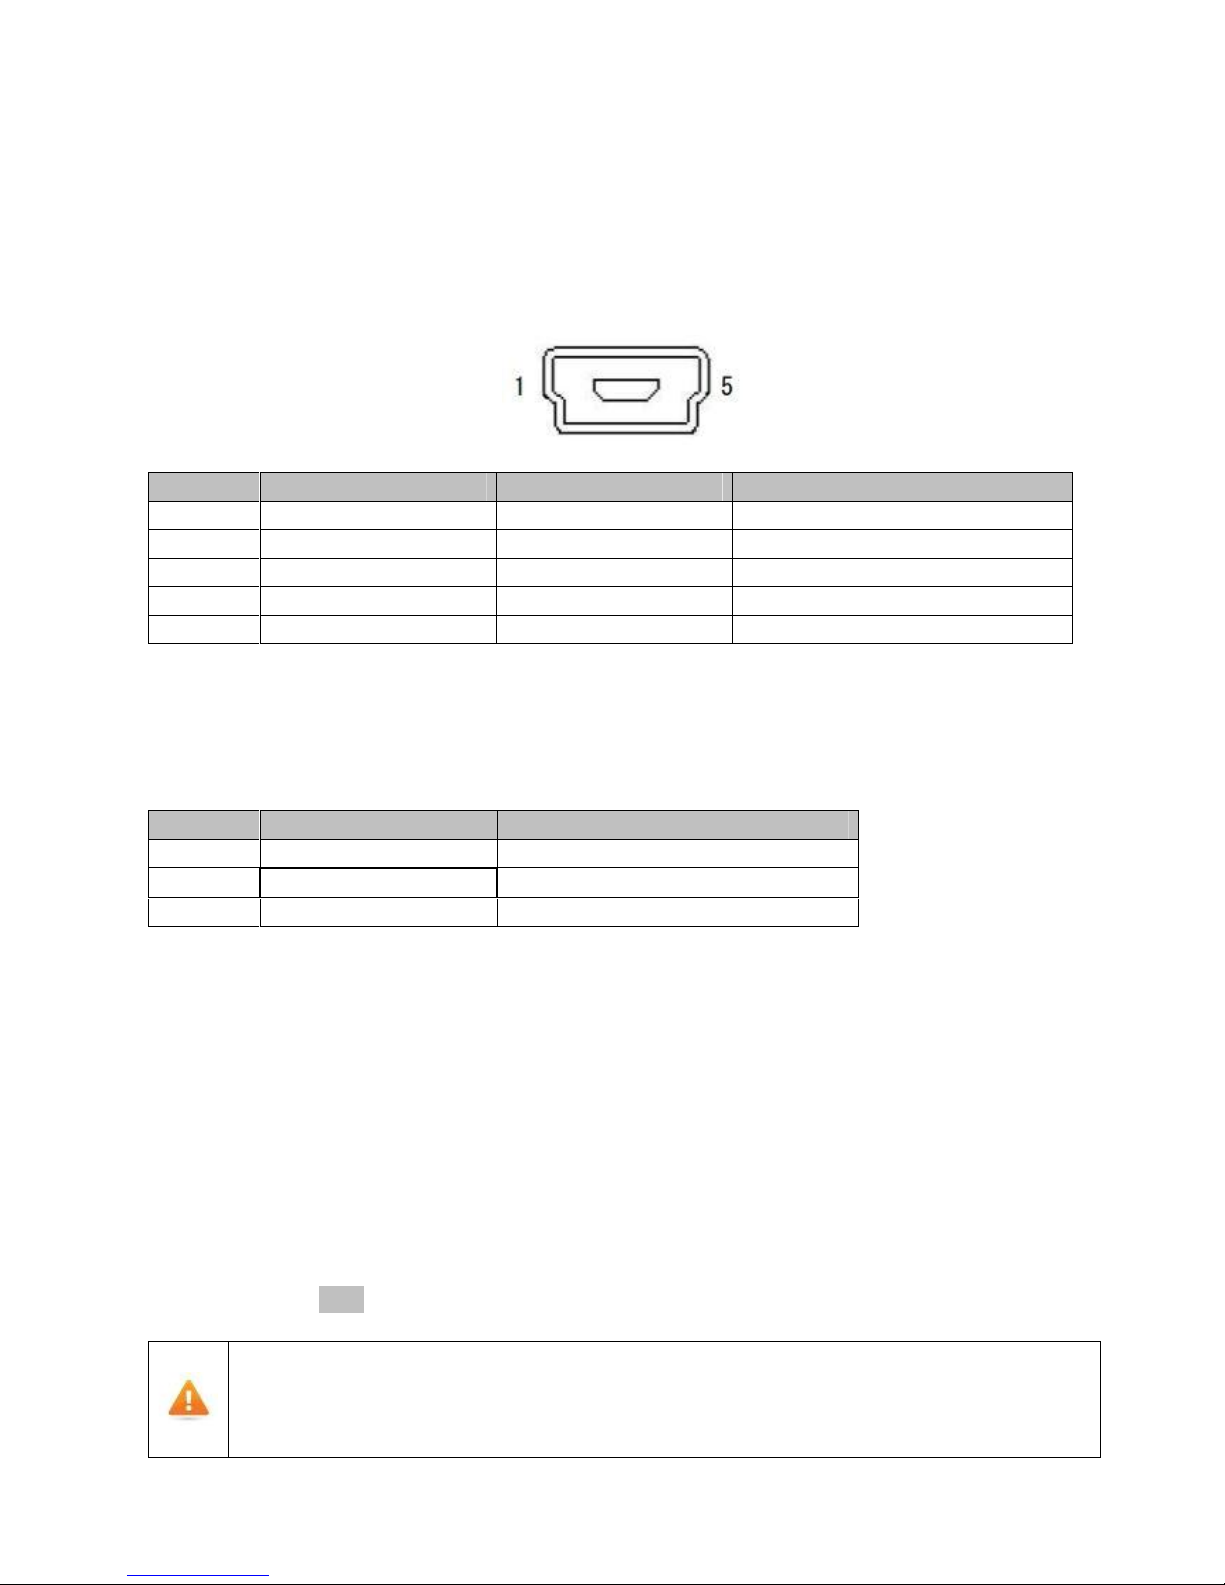
7.1. USB
The DPP-255 is equipped with USB version 2.0 for high speed data transfer. The device class is
“Printing Device Class”
Pin
Signal
Direction
Function
1
VBUS
-
Detect connect/disconnect of USB
2
D-
I/O
USB data (-)
3
D+
I/O
USB (+)
4
N/A
5
GND-GND
7.2. Serial
Connector: Mini-B type 10-PIN
Cable: Use specified serial cable
Pin
Signal
Function
RxD
Input
Serial data input
TxD
Output
Serial data output
GND
GND
Baud rate: 1200 to 115200bps
Parity: None
Bit length: 8 bit
Busy control: Software control(XON/XOFF)/None
7.3. Bluetooth
The DPP-255 printer is equipped with Bluetooth module obtained MFi license which can be
communicated with the device of iOS including iPhone, iPod, and iPad. Besides iOS devices, Android
and PC terminals can be communicated through SPP profile and the printer is widely used for
electronic equipment.
PIN code: 0000
1) If 1Mbites or larger data are sent to the printer during BT communications, the printer buffer becomes over
loaded and it causes the printer not to print properly.
2)It is recommended to change the default PIN code of the printer.
3) In case of interference occurred at the circumstance, turn off the power of interrupted devices ot move the
place where is not influences.
Page 21
1 DATECS DPP-255 User’s Manual
UM 07.01.01/v1.0.0 21
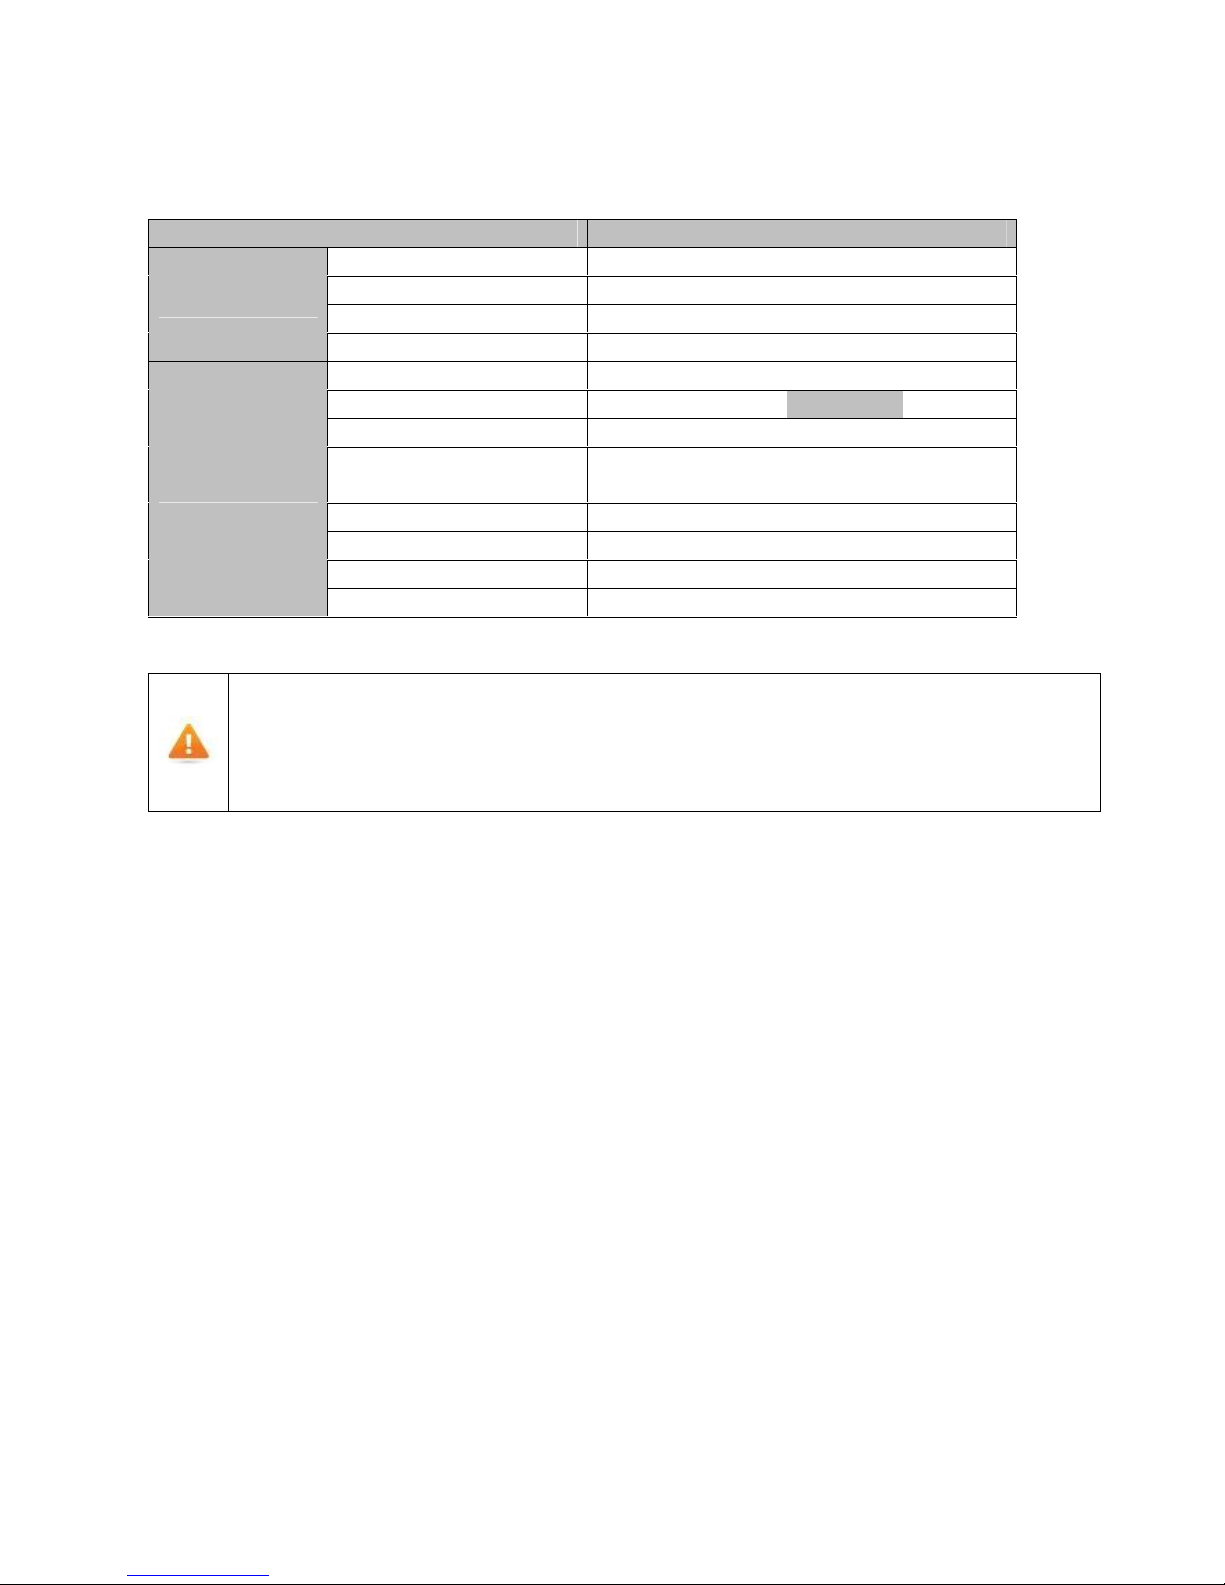
7.4. Wi-Fi
Contents
Items
Wi-Fi standard
IEEE 802.11b
Speed rate
Max. 11Mbps
Chanel
CH 1 to 13
Hardware
Security
64/128 WEP, WPA-PSK, WPA2-PSK
Wi-Fi protocol
TCP, IP, SOCKET, ARP, RAPP
Port
1 to 9999(default 9100)
Mode
Infrastructure, Adhoc
SSID
Alphanumeric character, SP, -, _,
Max 32 columns of character string
IP address setting
Fixed IP or DHCP
IP address
0.0.0.0 to 255.255.255.255
Subnet Mask
0.0.0.0 to 255.255.255.255
Software
Gateway
0.0.0.0 to 255.255.255.255
1) If 270 Kbites or larger data are sent to the printer during Wi-Fi communications at once, the printer buffer
becomes over loaded and it may not be printed properly.
2) For secure the system, set up WPA2 or other setting for security.
3) Refer to the setting guide for communication and security
4) In case of interference occurred at the circumstance, turn off the power of interrupted devices ot move the
place where is not influences.
Page 22
1 DATECS DPP-255 User’s Manual
UM 07.01.01/v1.0.0 22
8. Maintains
Periodically clean the printer to maintain the printing quality and avoid failures.
Roll Paper: It is recommended to maintain the printer every 6 months or 1 million lines of printing.
Label Paper: It is recommended to clean up the printer head and roller everyday or every five rolls.
Thermal head
When cleaning the thermal dot line on the print head, use a cotton swab with alcohol (ethanol,
methanol or Isopropyl alcohol) and wipe off stains and dust.
Paper feed roller
When cleaning the paper feed roller and peeler roller, use a cotton swab with alcohol (ethanol,
methanol or Isopropyl alcohol) and wipe off stains and dust while rolling the roller. Isopropyl alcohol
is available to wipe deposited dirt.
Sensor and peripherals
Clean the stain, dust and paper powder on the paper empty sensor and paper cover sensor.
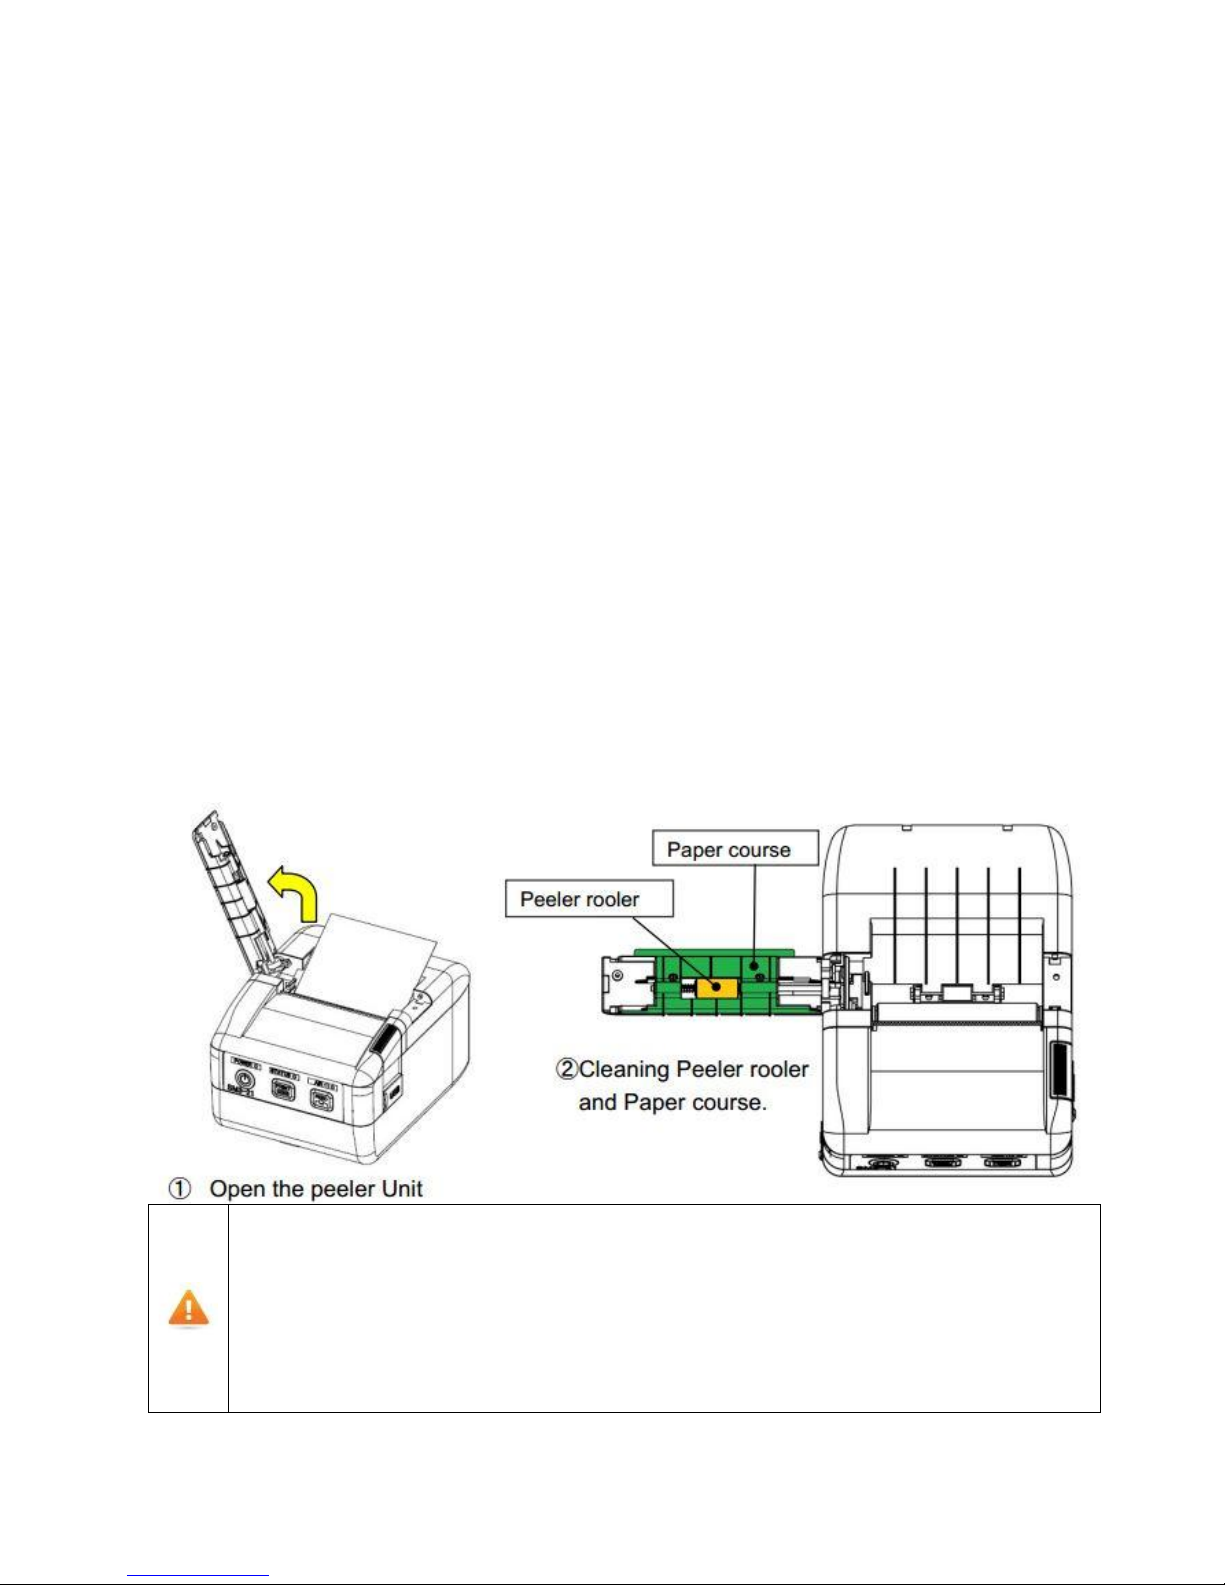
Peeler Unit
It’s necessary for using continuously and smoothly to clean accumulated residue of paste from
peeler unit as shown below, or the unit won’t work because of the residue.
If the sign appeared, please clean up peeler unit.
Indication of regular cleaning is once per five rolls.
o Prior to maintenance work, be sure to turn OFF the printer.
o Avoid cleaning the print head immediately because the print head is hot. Start maintenance work
after the thermal head becomes cool.
o Do not touch the print head with fingers directly. It may cause damage by electrostatic discharge and
contamination.
o Do not touch the thermal head dot line with bare hands or metal objects.
o Do not use volatile chemical agents, such as thinner and benzene.
o Do not get moisture or spill liquids inside of the printer.
o Turn ON printer only after alcohol is completely dried.
For maintenance and service, please contact you Datecs local distributor.
 Loading...