

Page 1

User Manual
ESC/POS PRINTER
DPP-250
Page 2

1 DATECS DPP-250 User manual
THE INFORMATION IN THIS DOCUMENT CANNOT BE REPRODUCED IN ANY MECHANICAL, ELECTRICAL
OR ELECTRONIC WAY AND UNDER ANY CIRCUMSTANCES WITHOUT THE WRITTEN CONSENT FROM DATECS LTD.
VERSION: April 2013
2
Page 3

1 DATECS DPP-250 User manual
Legal Notice
“Made for iPod,” “Made for iPhone,” and Made for iPad” mean that an electronic accesory has been
designed to connect specifically to iPod, iPhone, or iPad, respectively, and has been certified by the
developer to meet Apple performance standards. Apple is not responsible fort he operation of this
device or its compliance with safety and regulatory standards. Please note that the use of this
accesory with iPod, iPhone, or iPad may affect wireless performance.
Compatability
Made for
iPhone 5
iPhone 5S
iPhone 5C
iPhone 4S
iPhone 4
iPod touch (5th generation)
iPod touch (4th generation)
iPod touch (3rd generation)
iPad (4th generation)
iPad mini
iPad (3rd generation)
iPad 2
iPad, iPhone, iPod touch are trademarks of Apple Inc., registered in the U.S. and other countries. Lightning is a
trademark of Apple Inc.
3
Page 4

1 DATECS DPP-250 User manual
This equipment has been tested and found to comply with the limits for a Class B digital device, pursuant
to part 15 of the FCC Rules. These limits are designed to provide reasonable protection against harmful
interference in a residential installation. This equipment generates, uses and can radiate radio frequency energy
and, if not installed and used in accordance with the instructions, may cause harmful interference to radio
communications. However, there is no guarantee that interference will not occur in a particular installation. If this
equipment does cause harmful interference to radio or television reception, which can be determined by turning
the equipment off and on, the user is encouraged to try to correct the interference by one or more of the following
measures:
—Reorient or relocate the receiving antenna.
—Increase the separation between the equipment and receiver.
—Connect the equipment into an outlet on a circuit different from that to which the receiver is connected.
—Consult the dealer or an experienced radio/TV technician for help.
CAUTION: Use shielded cables to connect this device to computers.
Any changes or modifications not expressly approved by the grantee of this device could void the user’s authority
to operate the equipment.
4
Page 5

1 DATECS DPP-250 User manual
CONTENTS
Legal Notice............................................................................................................................................. 3
Compatability ........................................................................................................................................... 3
1. Technical specification ........................................................................................................................ 6
2. Box Contents ....................................................................................................................................... 8
3. Compatible Devices............................................................................................................................. 8
4. Getting Started .................................................................................................................................... 9
5. About Your DPP-250 ......................................................................................................................... 10
5.1 DPP-250 right view 1.................................................................................................................. 10
5.2 DPP-250 right view 2.................................................................................................................. 10
6. Charging the DPP-250 ...................................................................................................................... 10
6.1 DPP-250 Charging ..................................................................................................................... 11
6.1 DPP-250 Full Charge ................................................................................................................. 11
7. Status & Operating Modes ................................................................................................................ 11
8. Loading Paper ................................................................................................................................... 12
9. Diagnostic Information....................................................................................................................... 13
10. DIP Switch Settings ......................................................................................................................... 15
10.1 DIP SWITCH SETTINGS: ........................................................................................................ 15
10.2 Dip switch Location .................................................................................................................. 15
10.3 Memory Switch Settings........................................................................................................... 16
10.4 Setting Memory Switch............................................................................................................. 16
10.5 Memory Switch Details ............................................................................................................. 17
11. Pairing Info Details .......................................................................................................................... 18
11. Communications Configuration ....................................................................................................... 18
12. Connecting Device .......................................................................................................................... 19
12.1 Serial / USB ( Cabled ) Version:............................................................................................... 20
12.2 BLUETOOTH® Version: .......................................................................................................... 20
12.3 BLUETOOTH® Version with iOS Bluetooth............................................................................. 20
13. Bluetooth® Setup ............................................................................................................................ 21
14. Loading Drivers ............................................................................................................................... 23
15. Magnetic Card Reader (MS Version only)....................................................................................... 25
16. Smart Card Reader (SC Version only)............................................................................................ 25
17. Replacing Battery ............................................................................................................................ 26
18. Developing Solutions....................................................................................................................... 27
19. Troubleshooting............................................................................................................................... 28
20. List of commands for ESC/POS mode ............................................................................................ 29
5
Page 6

1 DATECS DPP-250 User manual
1. Technical specification
Printing Method
Direct line thermal
Print Width
Dot Density
Print Speed
Fonts
Graphic Logo
Barcode Types
Paper spec:
48mm, 384 dots/line
8 x 8 dots/mm (203 dpi x 203 dpi)
60mm/sec max
Resident Fonts
Font А: 12 х 24 dots
(32 characters/line)
Font B: 9 х 16 dots
(42 characters/line)
1x Black & White, Size: 384 x 248 dots
: EAN 13, EAN 8, UPC A, UPC E, Code 39, Code 93, Code 128,
1D
Codabar, 2 of 5 interleaved,
: PDF417, QR code
2D
Width: 58mm
•
Paper roll: φ45mm or less
•
Thickness: 60-65µm
•
Loadable Fonts
:
Font C: 12 х 24 dots (32 characters/line)
Font D: 9 х 16 dots (42 characters/line)
Font E: 24 х 24 dots (16 characters/line) Japanese vers. only (option)
Font F: 24 х 24 dots (16 characters/line) Chinese vers. only (option)
:
Paper Loading
Paper Feed System
Connectivity
LED Indication
Audio Indications
Buttons
Easy paper loading
Step
• RS-232C – max 115200bps
• Mini USB 2.0 (device)
• BT 2.0 Class 2 (option)
- SPP - Serial Port Profile
• BT 3.0 Class 2 (option)
- SPP - Serial Port Profile
- iAP - iPod Accessory Protocol
• Paper end or paper out
• Cover open
• Low battery
• Print head overheating
Electro-magnetic buzzer
• Power button
• Feed button
• Battery charging
• Bluetooth connection
• Reading Magnetic card
6
Page 7

1 DATECS DPP-250 User manual
Buffer Size
Periphery
Emulation
Power Supply
Battery
Reliability
up to 128 kB
• Magnetic Stripe Reader
- 3-track bi-directional reading
- Compliant with ISO 7810, 7811 and 7813
• Smart Card Reader
- Compliant with ISO7816
• ESC/POS
AC Adapter
• Input:
•
Output: DC
Rechargeable Li-Ion battery 7.4V / 1150mAh
Battery charge time - 2 hours
Battery capacity per charge ~ 20 000 lines
• Thermal head: 50 000 000 pulses or 50km
• Chip card: 500 000 cycles
• Magnetic card:1 000 000 swipes
AC 100-240V~, 50/60Hz, 0.3A
9V, 1A
Weight, kg
Dimensions,
Environmental
Drop Test
OS compatibility
Accessories
(WxDxH) mm
0.295 (w/o paper, include battery)
0.350 (with paper, include battery)
86 x 113 x 57 (with magnetic stripe reader)
• Operating: +0°C to +40°C / 30 to 85% RH
• Storage: -20°C to +60°C / 0 to 90% RH
Height: 1.2m
3 times on each of the 6 faces
3 times on each of the 4 edges
iOS, Android OS, BlackBerry OS, Windows OS, Win CE, Windows
Mobile, Windows Phone
Metal belt clip
Table 1
7
Page 8

1 DATECS DPP-250 User manual
2. Box Contents
Your DPP-250 comes with the following items listed below:
Item Part Number Descriptions Image
1. DPP-250xx DPP-250 Thermal Printer
2. - AC charger
3. - 1 Roll of thermal paper
4. -
5. - RS-232 interface cable
Software (Drivers & SDK):
Because of the continually evolving Driver & SDK to support
new mobile devices, Drivers & SDK are distributed online and is
available for download at our website indicated below. For details on
using the DPP-250 Drivers & SDK, please refer to the SDK’s
documentation.
For the latest DPP-250 SDK’s, visit our developer web site at:
User's manual, CD with
Datecs Software
Table 2
http://www.datecs.bg
3. Compatible Devices
The DPP-250 (Serial & USB) / DPP-250 (Bluetooth®) portable
thermal printer is designed specifically for use with most PDA &
Smartphone devices.
The DPP-250 can be used in a variety of applications where
Printing/Card Reading is required.
8
Page 9

1 DATECS DPP-250 User manual
User Notes:
Compatibility depends on the type of communication method
“Serial / USB / Bluetooth®” your PDA or Smartphone supports and
the availability of DPP-250 driver for your device.
Determine the method of communications your device supports.
Next determine if your device is supported by the DPP-250 Drivers &
SDKs.
Because of the continually evolving Driver & SDK to support new
mobile devices, visit our developer web site at:
http://www.datecs.bg
4. Getting Started
The DPP-250 allows you to printer information from your PDA &
Smartphone. Before using the DPP-250 thermal printer the battery should
be properly charged. The following Quick Start guide will help to get
your DPP-250 ready for use.
Quick Start:
Steps What to do Purpose Where to find more
Charge the DPP250 Rechargeable
1
2
3
4
battery pack as
recommended in
this manual
Load DPP-250
print media
(Thermal Paper)
Setup Bluetooth
Pairing
Install DPP-250
Software
The Lithium Ion battery pack
should be fully charged before use
to ensure long battery life.
DPP-250 requires Thermal paper
for printing.
Setup Bluetooth® pairing to allow
DPP-250 to communicate with
Bluetooth®
To print information from
your device, software needs to
be installed onto your device.
Table 3
Charging Battery, Page 8
Loading Paper, Page 9
Bluetooth® Setup, Page 19
Printing software is not
provided by Datecs.
Please contact your
DPP-250 reseller for
recommendations on
Third-Party solutions.
Developers should refer to
the section in this manual
on “Developing Solutions”.
9
Page 10

1 DATECS DPP-250 User manual
5. About Your DPP-250
5.1 DPP-250 right view 1
Figure 1
5.2 DPP-250 right view 2
Figure 2
6. Charging the DPP-250
The DPP-250 uses a Lithium Ion rechargeable battery pack. Before first
use, the DPP-250 battery pack should be charged for at least 12
hours.
To prevent electrical damage to the DPP-250 and/or battery
pack, please use approved AC Charger only.
10
Page 11
1 DATECS DPP-250 User manual
6.1 DPP-250 Charging
Figure 3
6.1 DPP-250 Full Charge
Figure 4
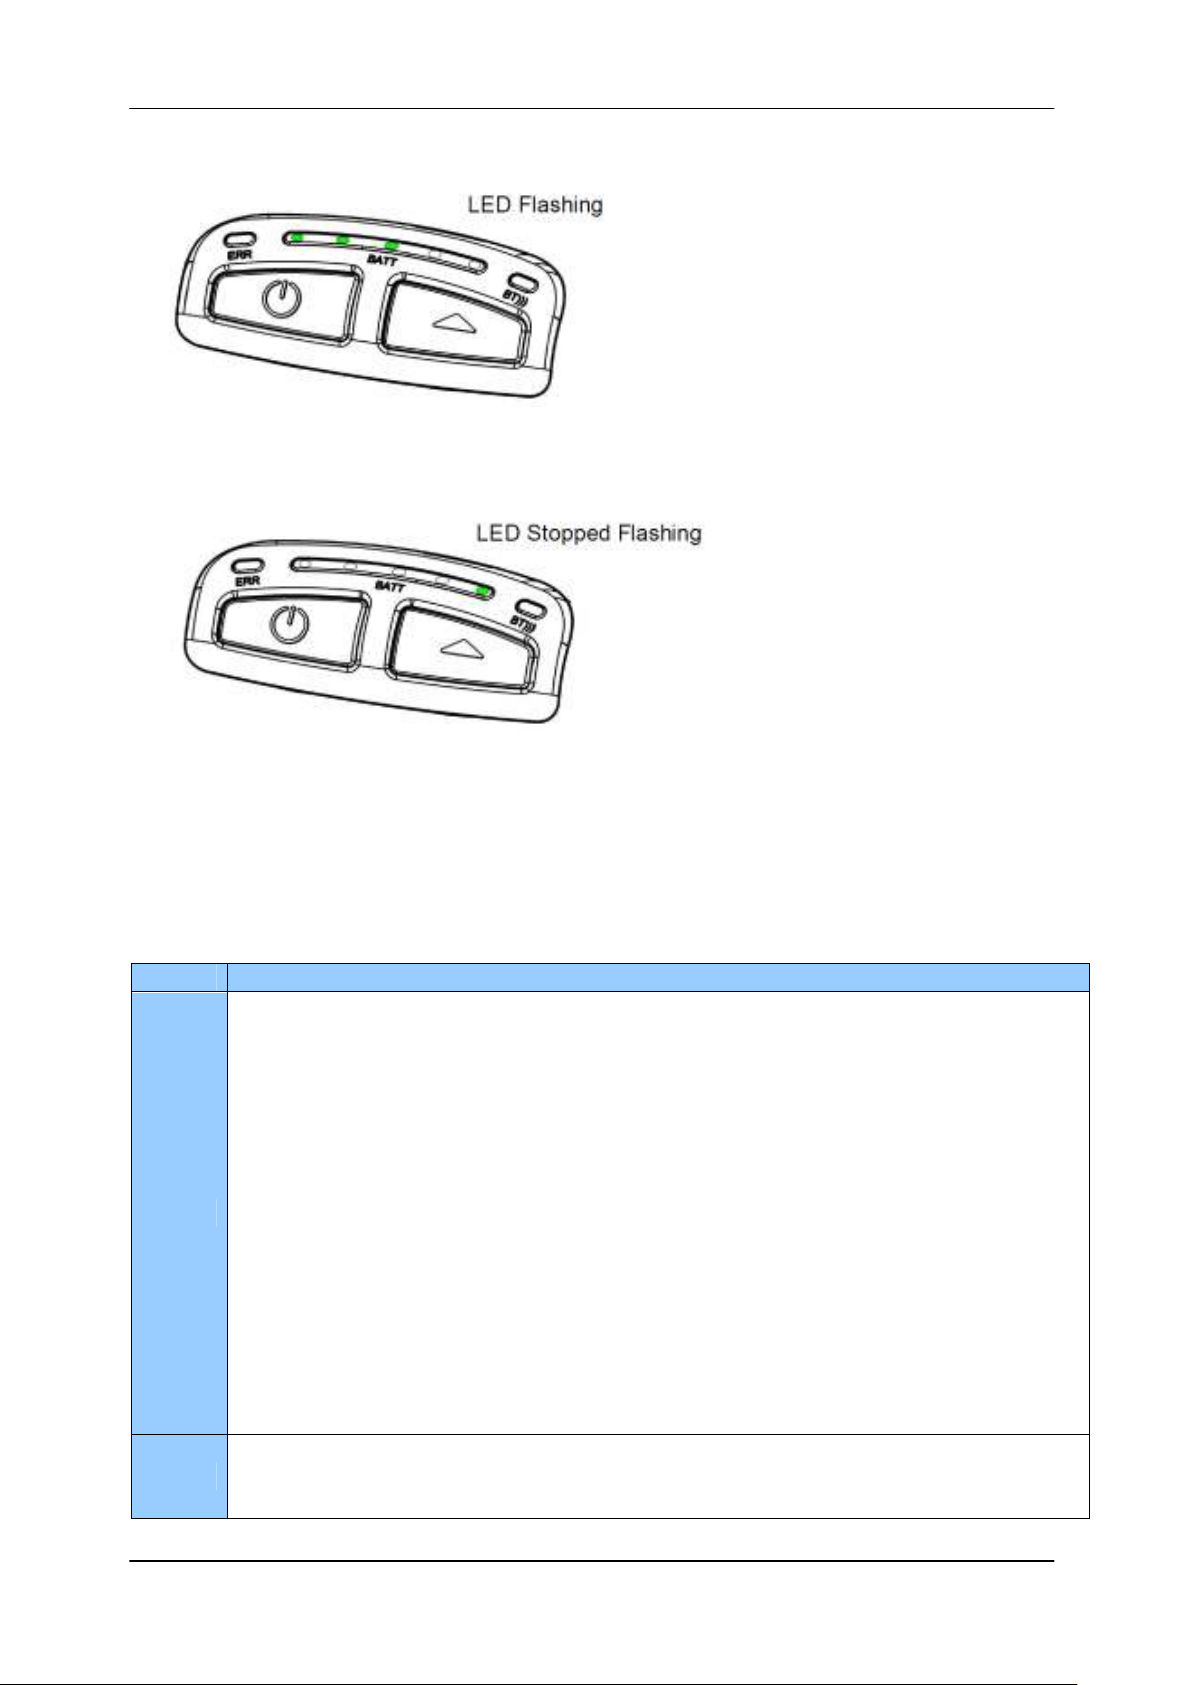
7. Status & Operating Modes
The DPP-250 uses LEDs to indicate various conditions of operation. This
may be charging, active or online, battery low conditions. The following
explains these conditions and LED indication.
LED Function
1. It lights in green – the printer power is on.
2. It lights in red – end of the paper or paper out. After the loading a new paper roll,
LED turns green.
3. It flashes green/red – the printer thermal head is overheating. The printer stops
printing. When the printer head temperature returns to normal the ERR LED lights
ERR
BATT
green and the printer continues to print.
4. It flashes green – low battery.
5. When switching ON the printer, while the LF button is pressed, red and green
lights are rotated after every beep (up to the fifth).
6. While long pressing the ON/OFF button it flashes green/red after a beep. After
releasing the ON/OFF button it lights green.
1. When the adapter is switched ON only one of the BATT LED diodes is lighting
green, depending on the battery status (from left to right - low battery to fully
charged battery). For details see Section "Charging the Battery".
11
Page 12
1 DATECS DPP-250 User manual
2. When the adapter is switched ON the BATT LED diodes are lighting as shown on
the illustration in Section "Charging the Battery", up to full battery charging.
3. When reading a Magnetic Card, the BATT LED are lighting simultaneously in both
directions – from the middle outwards to the left and right.
BT
1. It lights blue when PAIRING.
Table 4
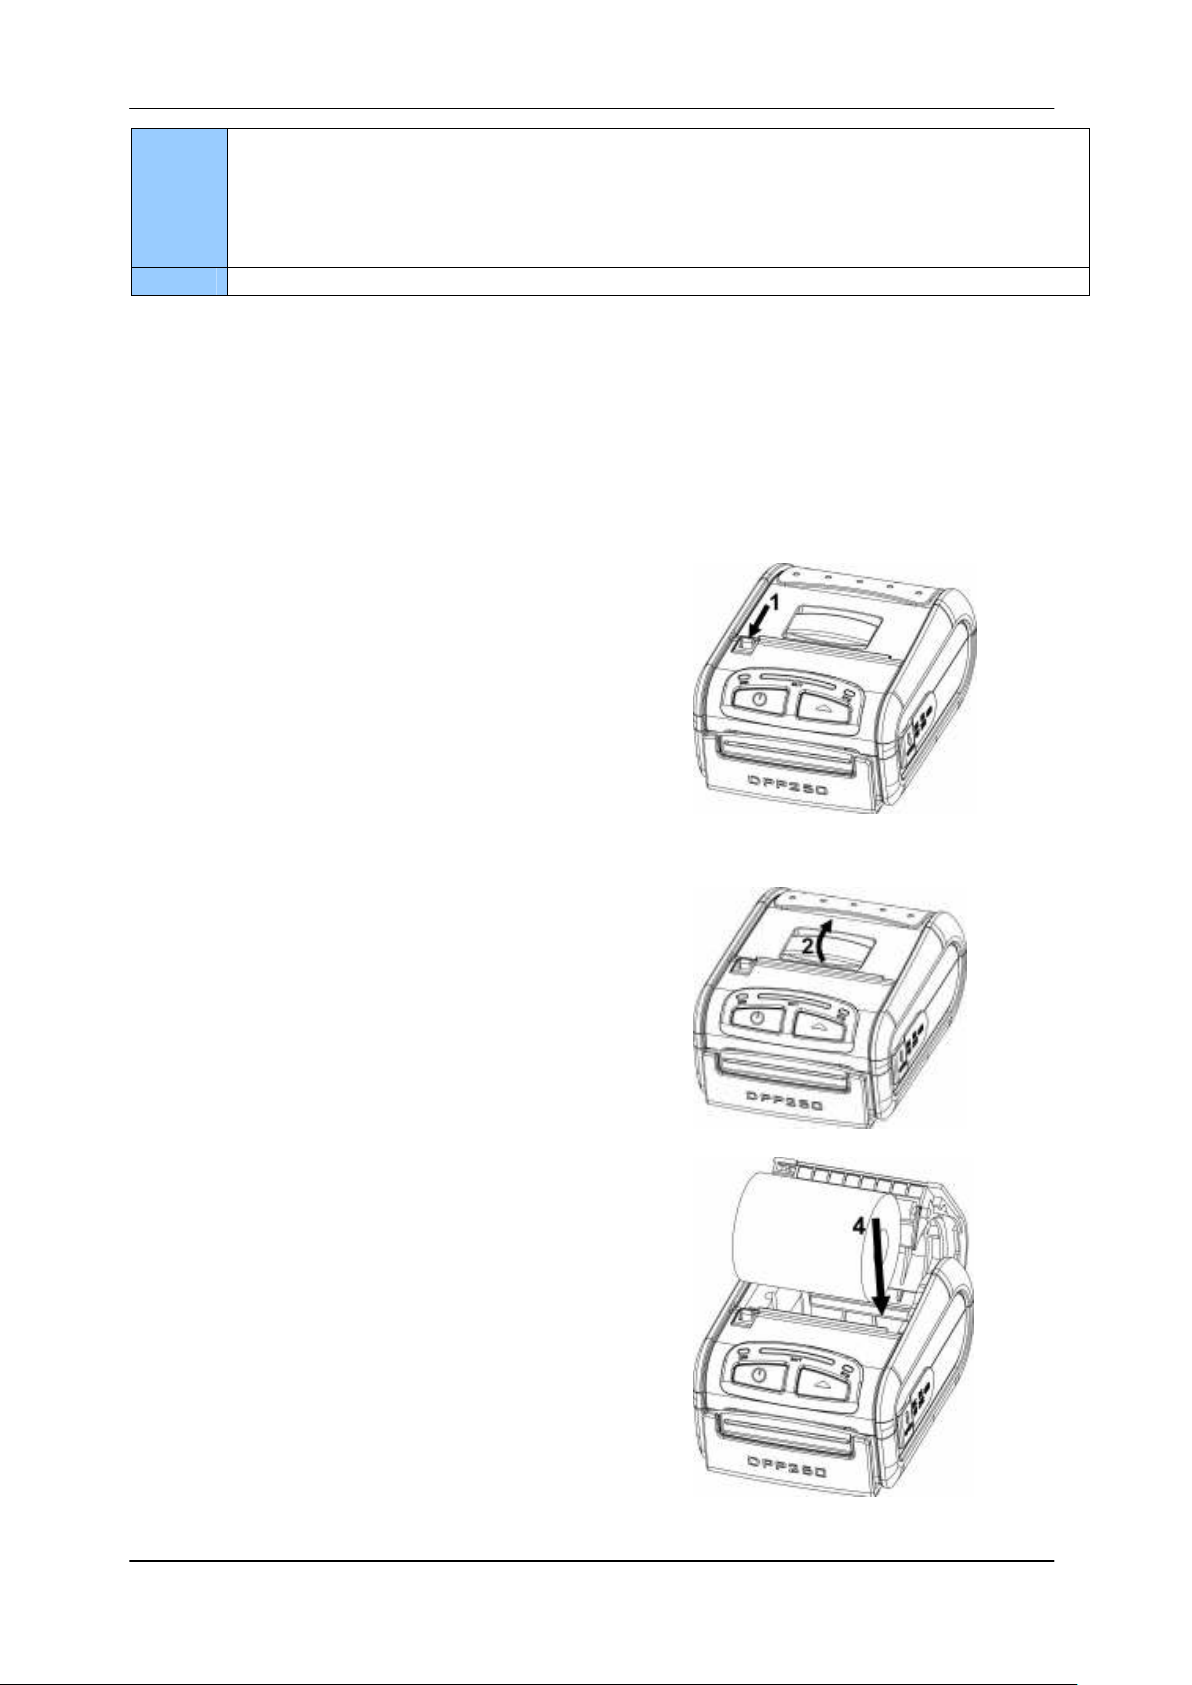
8. Loading Paper
The DPP-250 uses a drop-and-load design making paper loading
easy and trouble free. To load paper, simply lift up the paper cover latch
and drop in the new roll as shown in the steps below.
1. Slide the paper cover latch to unlock
the paper cover as shown in the
figure on the right.
2. Lift the paper cover latch to open the
paper cover as shown in the figure on
the left.
3. Drop in the new roll of thermal
media as shown in the figure on the
right.
Be sure to pull at lease 12 mm or
more of media above the top
of the printer before closing.
4. Close the paper cover until it snaps lock.
5. Slide paper cover latch to lock the cover in place.
12
Page 13

1 DATECS DPP-250 User manual
9. Diagnostic Information
The DPP-250’s LF switch/button is used for entering various printer
modes. These modes can be used to assist developers in debugging
problems related to programming and communication. The following
explain how to access the various operating modes.
Step #1: Make sure the printer is OFF (On-line LED is OFF) before
performing step #2.
Step #2: Press and hold the line feed button (LF). While pressing
the (LF) button, press the (POWER) button momentarily
and release when one of the conditions below:
LF Button Operation Modes
Holding LF button while power on
for ~ 0.5 sec and releasing it
after 1-beep.
Holding LF button while power on
for ~ 2.5 sec and releasing it after
2-beep.
Holding LF button while power on
for ~ 4.5 sec and releasing it after
3-beep.
Holding LF button while power on
for more than 8.5 sec and releasing
it after the 5-beep (long 4-tone)
beep.
Holding ON button while power on
for ~ 4 sec and releasing it after 1-
beep.
Holding ON button while power on
for ~ 6 sec.
Table 5
Note: Care must be taken when entering operating modes to prevent the
clearing of factory preset configuration information.
Self-test
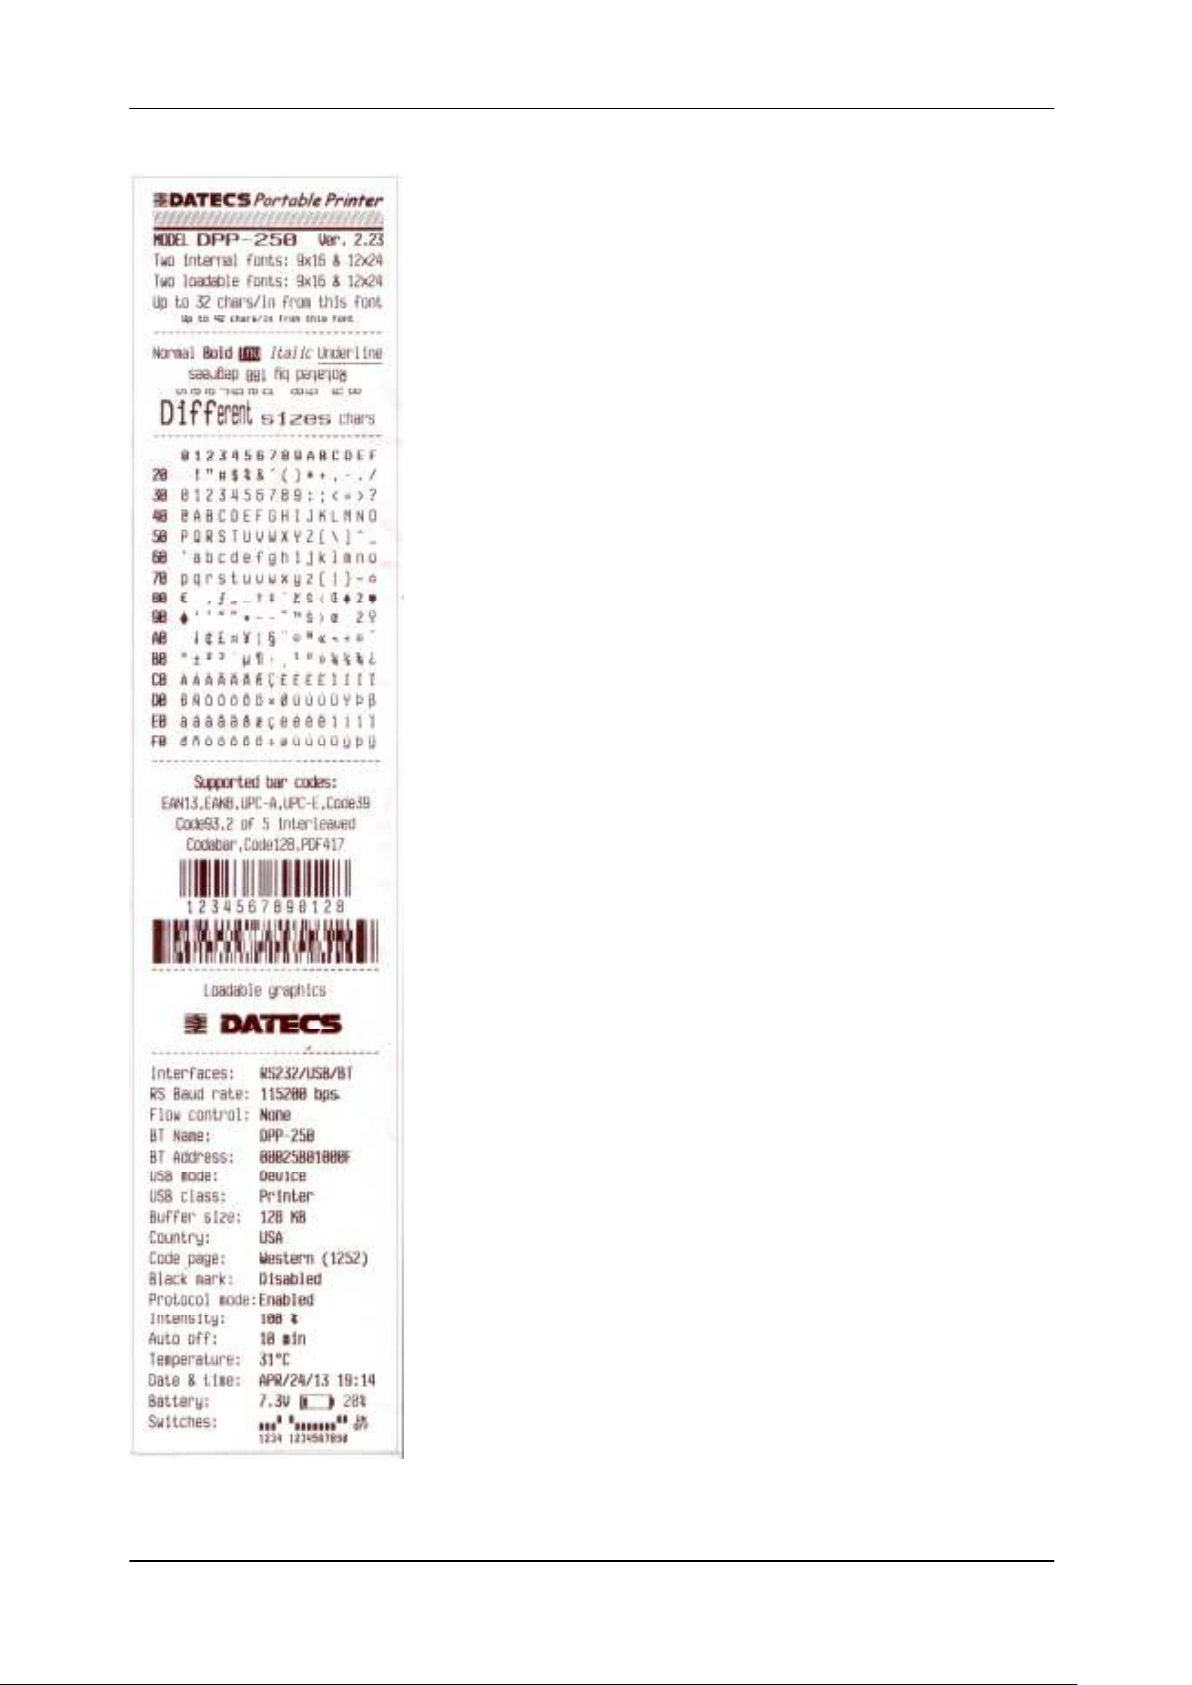
The DPP-250 has a built-in test pattern that shows the printer’s current
configuration as well as the various resident printer fonts. The self-test
can also be used as a troubleshooting tool to determine printing
problems or battery level. The steps below show how the self-test is
printed activated.
13
SHORT SELF TEST print.
Hex DUMP mode. All
input data are printed as
hexadecimal.
LONG SELF TEST print.
Program mode –
loading the printer
firmware.
Temporary forcing
9600 bps serial speed.
Hardware Setup Mode.
Page 14
1 DATECS DPP-250 User manual
• Resident font sizes
• Characters per line
• Text formatting
• Resident character set
• Resident barcode symbols
• Printer’s Configuration
14
Page 15
1 DATECS DPP-250 User manual
10. DIP Switch Settings
The DPP-250 is designed to use different methods of
communications. Care must be taken to ensure that the DIP
Switches are not changed from its default factory configuration unless
required.
10.1 DIP SWITCH SETTINGS:
The printer has two absolutely different operation modes.
They are determined by the state of switch Sw2:
•Continuous Paper mode
•Black Mark mode
These two modes detect paper present conditions differently. The black
mark searching mode is designed for proper alignment of the starting
print position on indexed media with printed information.
Switch
SW1 Enable BT Disable BT
SW2 Continuous Paper mode Black Mark mode
SW3 None Xon/Xoff protocol
SW4 Normal operation mode Protocol mode
OFF ON
Table 6
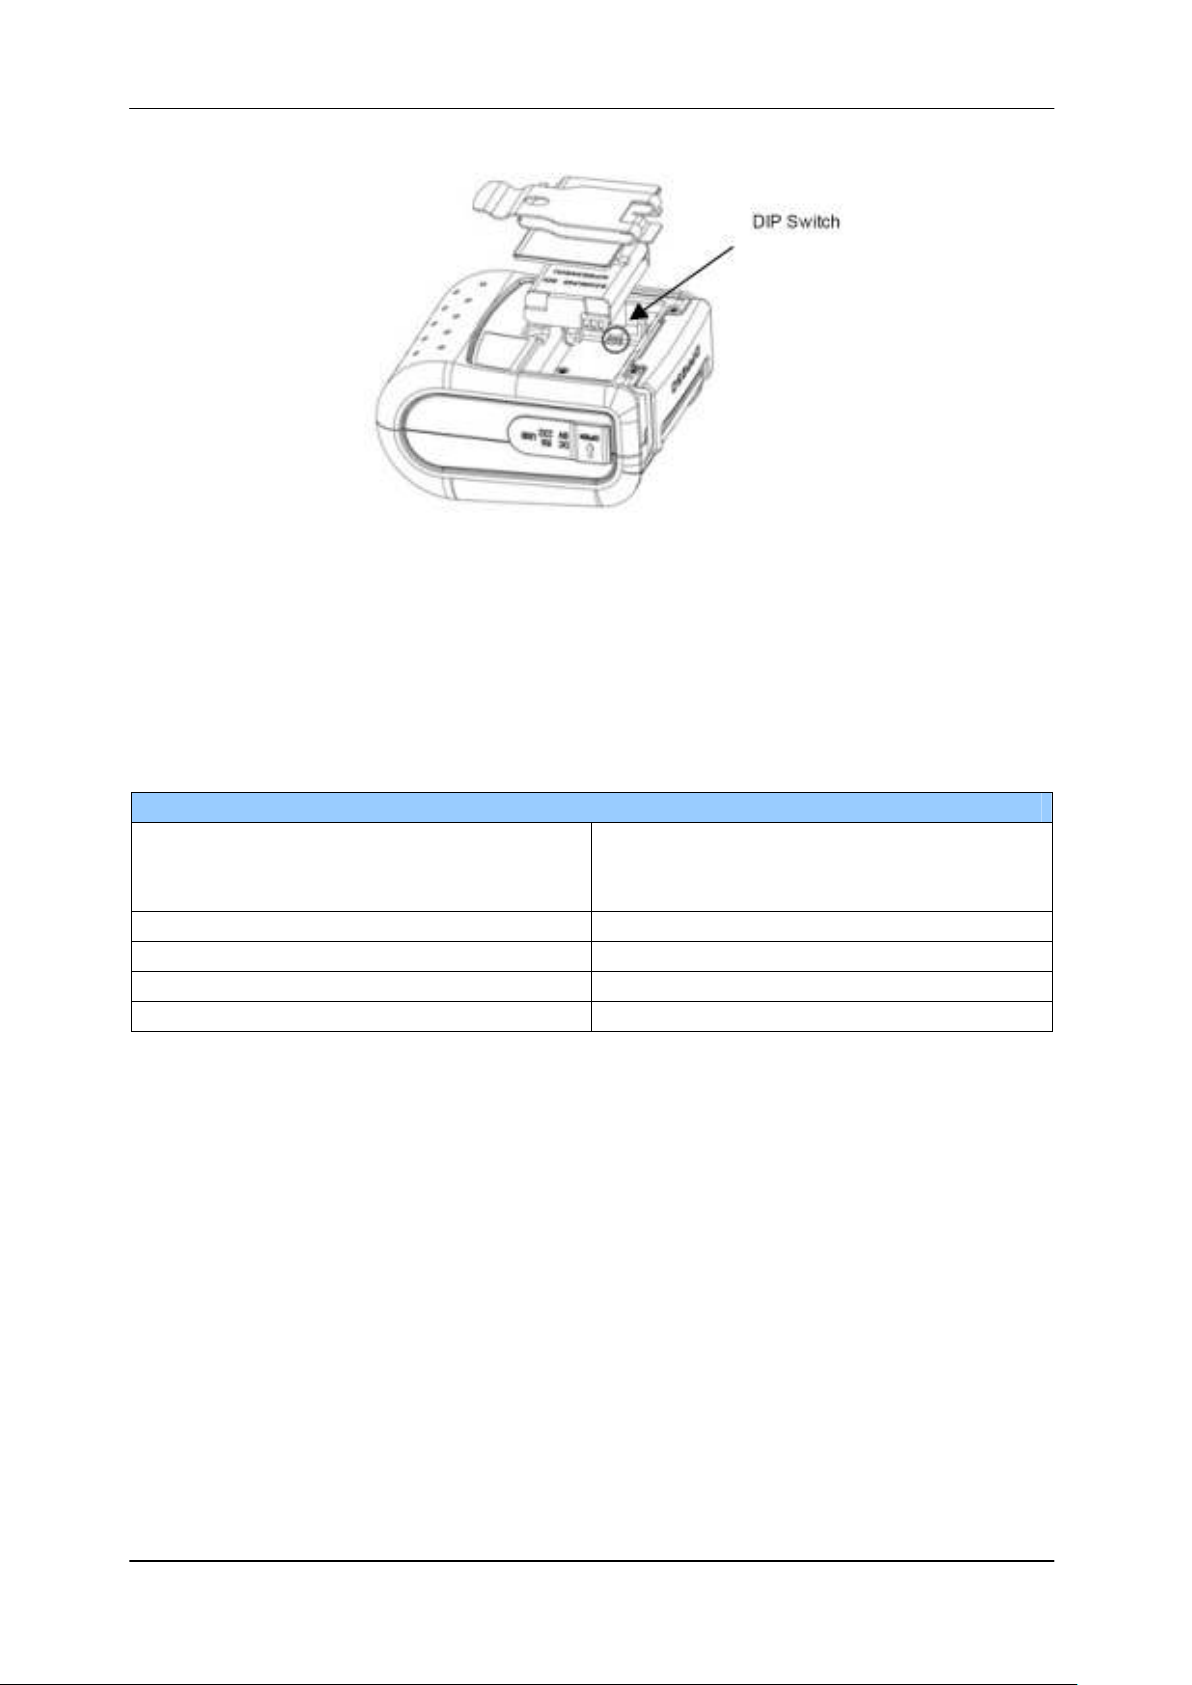
10.2 Dip switch Location
# 1 - Remove battery cover # 2 - Remove battery
Figure 9
15
Page 16
1 DATECS DPP-250 User manual
Figure 10
10.3 Memory Switch Settings
The DPP-250 uses nonvolatile memory for storing some of the
printer default configuration. The following table shows the available
options.
Memory Switch Options
Memory Switch
(see command reference GS
command)
BAUD RATE 115200 bps
POWER OFF TIME 10 minutes
PRINT DENSITY 100%
CHARACTER TABLE WESTERN (1252)
1000000010
Table 7
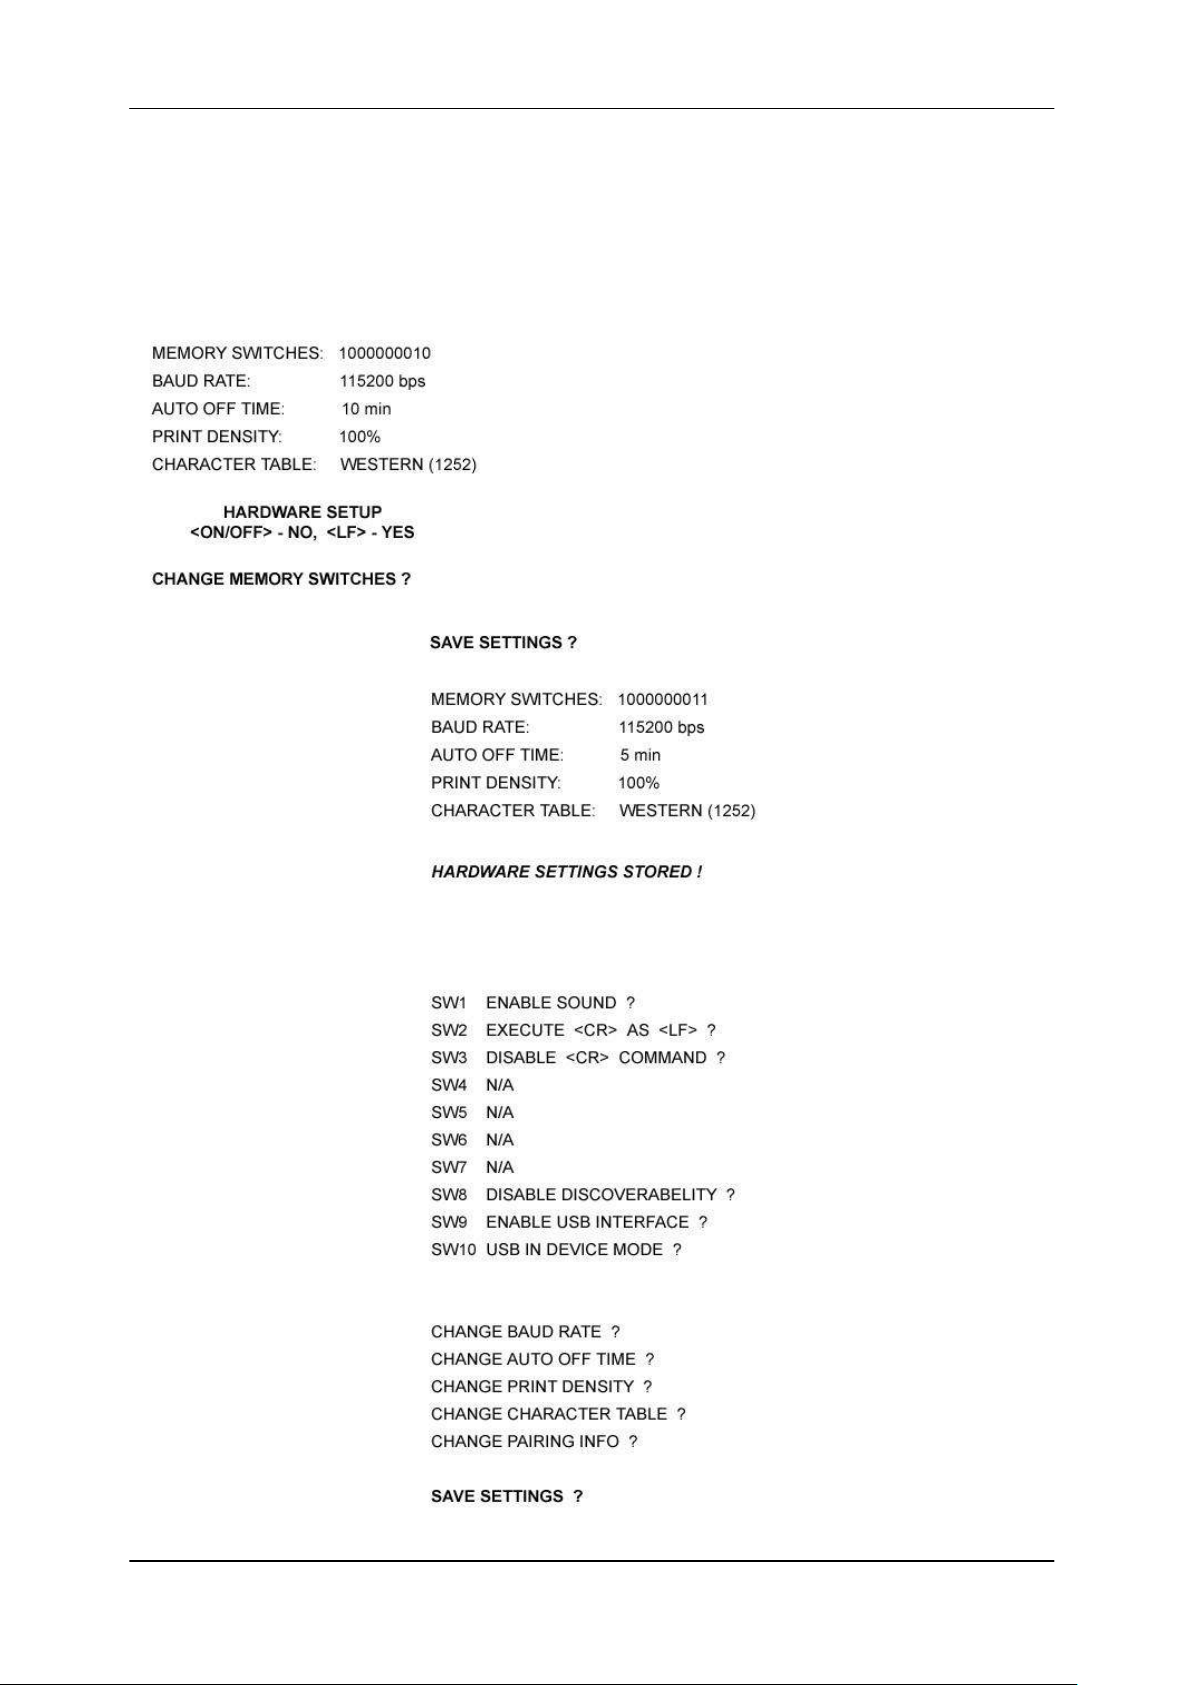
10.4 Setting Memory Switch
MEMORY SWITCH SETTINGS:
Step #1: Make sure the printer is OFF (ERR LED is OFF) before
performing step #2.
Step #2: Press and hold the power (LF) button. The ERR LED
flashes red / green every second.
Step #3: Release the (ON) button in about 6 sec. and wait
for the printer to print out the current memory settings.
Follow the printer instructions to make the necessary changes.
16
Page 17
1 DATECS DPP-250 User manual
The pressing LF (YES) – confirms changes.
The pressing ON/OFF (No) – cancels changes.
Note: Care must be taken when changing factory preset
configuration information.
10.5 Memory Switch Details
•SW1: Enable/Disable buzzer.
17
Page 18

1 DATECS DPP-250 User manual
•SW2: Disable CR / CR is executed as LF
•SW3: Enable/Disable LF
•SW4: LF immediately after CR/ Disable LF immediately after CR
•SW5: Font A (12x24)/ Font B (9x16)
•SW6-7: Reserved for future features.
•SW8: Prevents others from discovering printer when set to ENABLE.
Must be set after pairing is completed.
•SW9: Disable/Enable USB. Allow the use of USB port for communications.
•SW10: (OFF) set USB as the host mode. Host/Device
11. Pairing Info Details
BAUD RATE: Default is 115200
AUTO OFF TIME: Default is 5 minutes
PRINT DENSITY: Default is 100%
CHARACTER TABLE: Default is WESTERN (1252)
PAIRING INFO: Default is (SAVE=No)
Notes:
When saving pairing information, the printer remembers Bluetooth
information of the last device connected (paired) to the printer.
Saving pairing info prevents the printer from asking for passkey
upon initialization. The process for using this option is described
below. "To speed this programming process, you may bypass the memory
switch settings by indicating "NO" via pressing of the <ON/OFF>
button when the printer prints "CHANGE MEMORY SWITCHES" as
shown on page 17. This will advance you to the next level of
setting where pairing can be found".
1. Following instruction on page-13, change the Pairing Info option to
[Save = Yes].
2. Turn the printer on and pair the printer to your Bluetooth device.
3. The printer will now remember the pairing information and not
prompt user for a passkey on every printer initialization.
Clearing Pairing Info:
1. Following instruction on page-13, change the Pairing Info option to
[Save = No].
2. Turn on the printer and pair the new Bluetooth device to the printer.
3. The printer will prompt user for a passkey on every printer
initialization.
11. Communications Configuration
18
Page 19

1 DATECS DPP-250 User manual
The following default configurations are used for the different
communication methods.
• Communication with PDA device
• Via Bluetooth/ USB/ Serial:
Memory Switch Options
Memory Switch ( 1 thru 10 ) *******010
Physical Switch Options
DIP Switch (1, 2, 3 ,4) *, OFF, OFF, ON
Table 8
• Communication with PC (using windows printer driver)
• Via Bluetooth/ USB/ Serial:
Memory Switch Options
Memory Switch ( 1 thru 10 ) *******011
Physical Switch Options
DIP Switch (1, 2, 3 ,4) *, OFF, OFF, OFF
Table 9
• Service mode (changing printer settings, loading firmware)
communication with PC
• Via Serial
Memory Switch Options
Memory Switch ( 1 thru 10 ) *******011
Physical Switch Options
DIP Switch (1, 2, 3 ,4) *, OFF, *, ON
Table 10
* - depending on user requirements can be 1 or 0
Notes: When not using Driver/SDK developer tools, set DIP Switch 4
to OFF.
12. Connecting Device
The DPP-250 is designed to use different methods of
communications. Care must be taken to ensure that the DPP-250
USB or Serial connector and PDA & Smartphone connector are not
accidentally damaged. The figures below show how to attach the
different device to the DPP-250.
19
Page 20
1 DATECS DPP-250 User manual
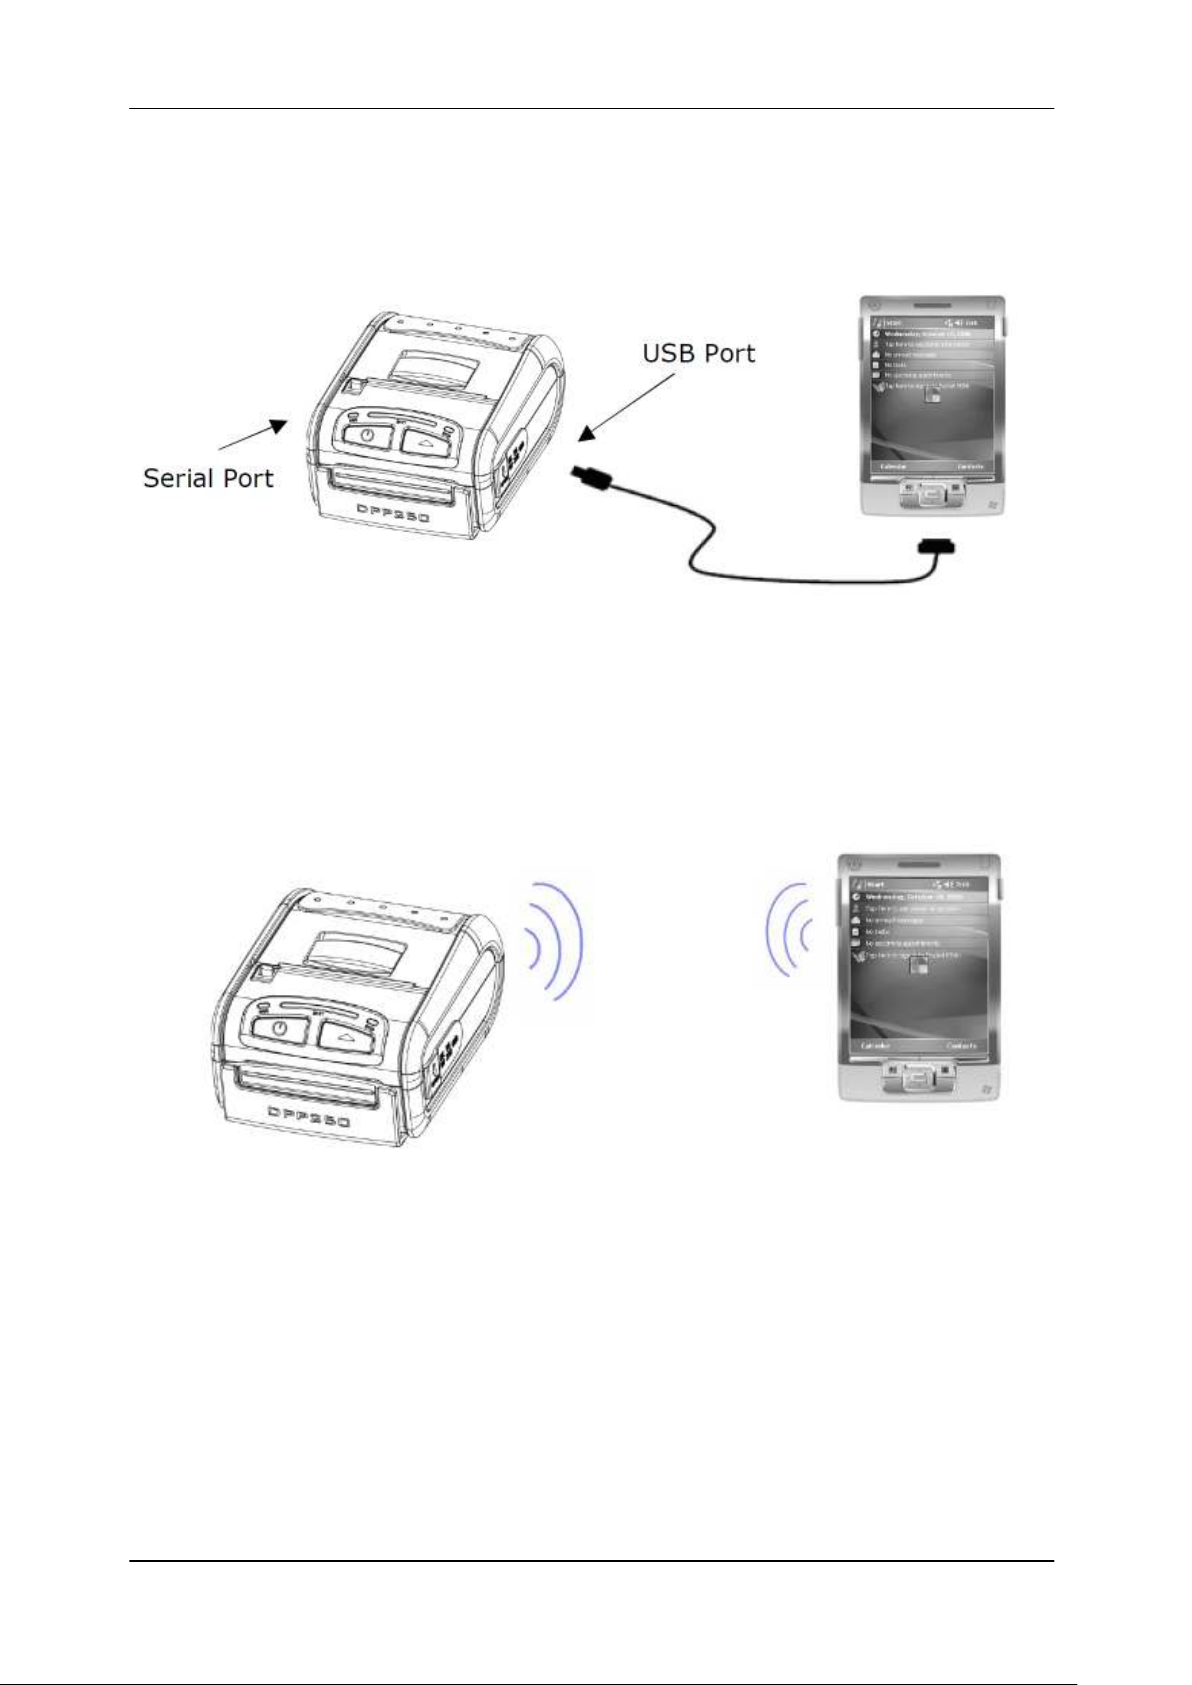
12.1 Serial / USB ( Cabled ) Version:
• Connect the DPP-250 using Mini USB or Serial cable is shown in
the figure below.
Figure 11
12.2 BLUETOOTH® Version:
The DPP-250 Bluetooth® version uses Bluetooth® wireless
technology to connect to Bluetooth® enable devices. See page 19 for
details on Bluetooth® setup.
Figure 12
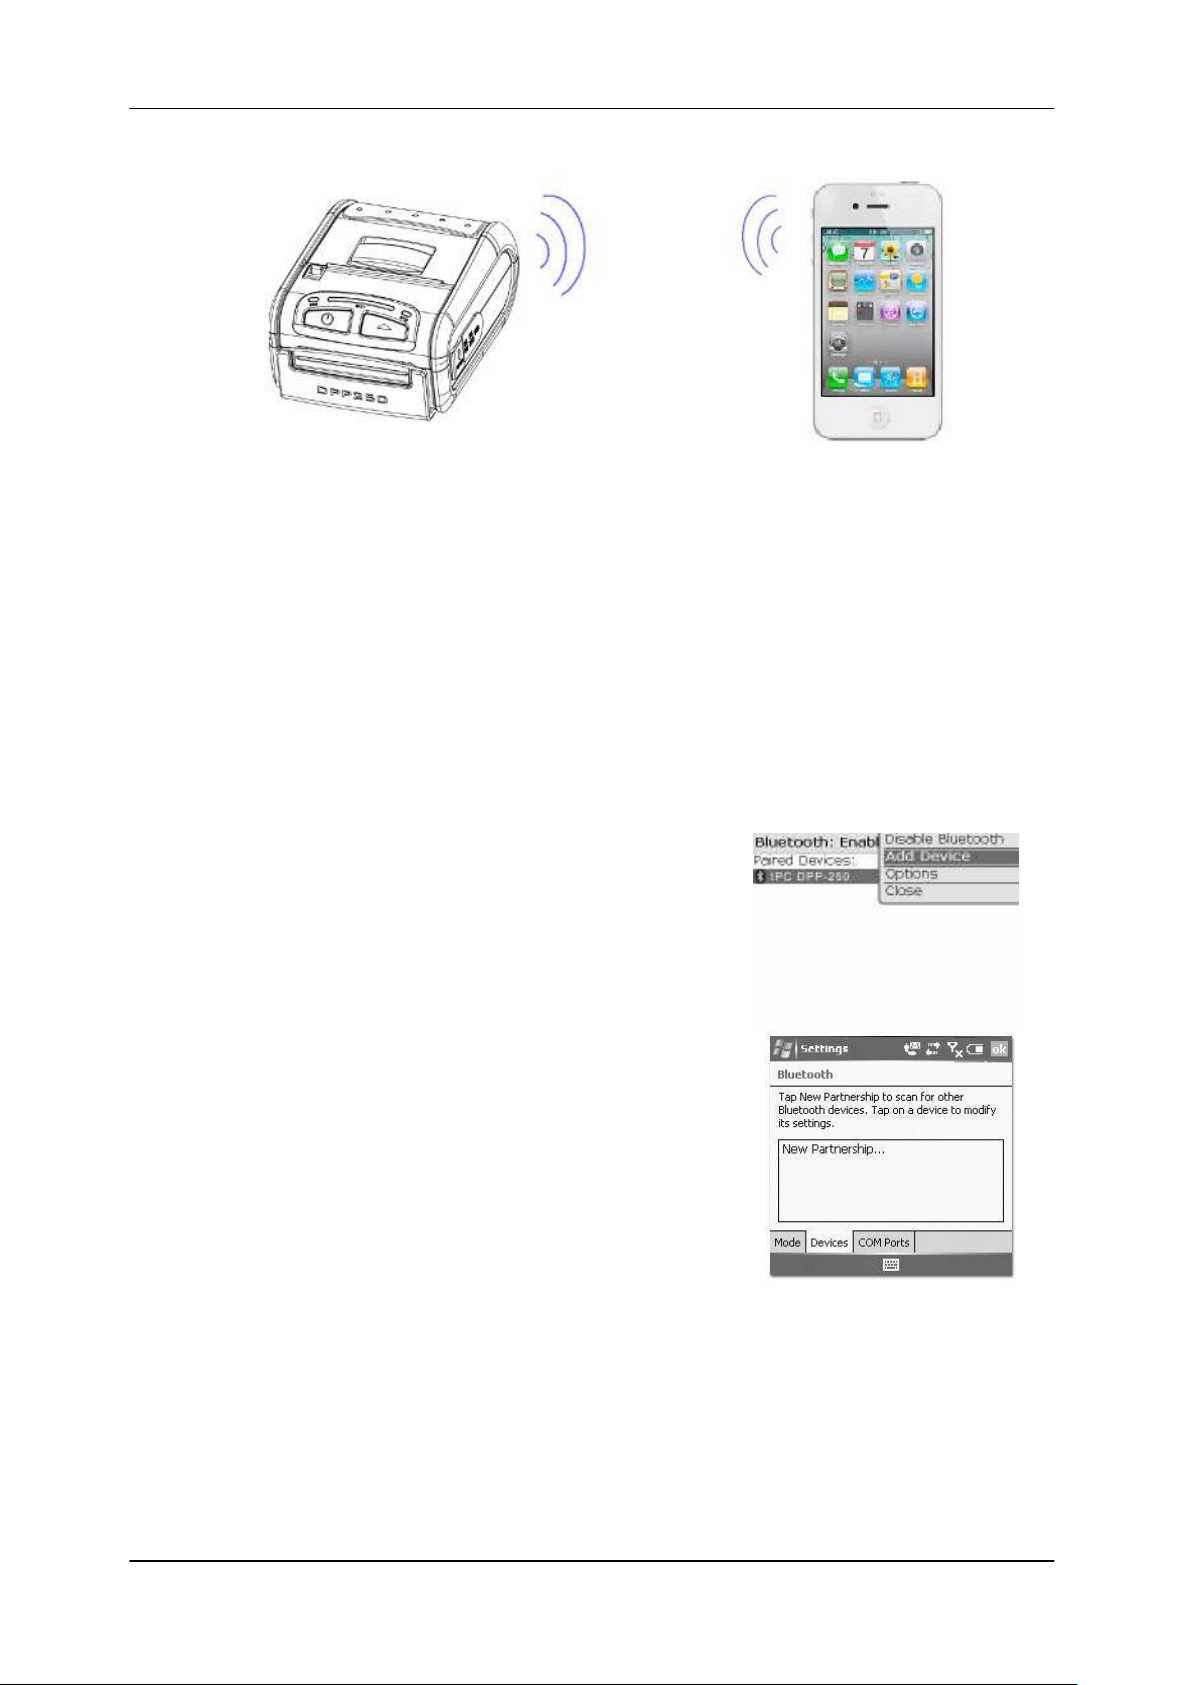
12.3 BLUETOOTH® Version with iOS Bluetooth
The DPP-250 Bluetooth® version uses Bluetooth® wireless
technology to connect to iOS devices with Bluetooth®.
- iPod 4, iPhone 4, iPhone 4S
- iPod 5, iPhone 5, iPhone 5S
- iPad versions
- iPad mini
20
Page 21
1 DATECS DPP-250 User manual
More information on page 20.
Figure 13
13. Bluetooth® Setup
Adding New Bluetooth® Device to PDA or Smartphones
The following is a brief explanation on how to [Pair] your Bluetooth®
DPP-250 to PDA, Smartphones and iOS device.
BlackBerry Devices:
Add Device or Pairing Bluetooth®
peripherals to BlackBerry devices require
the use of the device Bluetooth® manager.
Image on the right shows a typical
Blackberry Bluetooth® manager. When
adding / pairing the DPP-250, use the
[0000] pairing key when prompted.
Windows Mobile Devices:
Creating a New Partnership or Pairing
Bluetooth® peripherals to your Windows
Mobile devices require the use of the
device Bluetooth® manager. Image on the
right shows a typical Windows Mobile
Bluetooth® manager. When adding/pairing
the DPP-250, use the [0000] pairing key
when prompted.
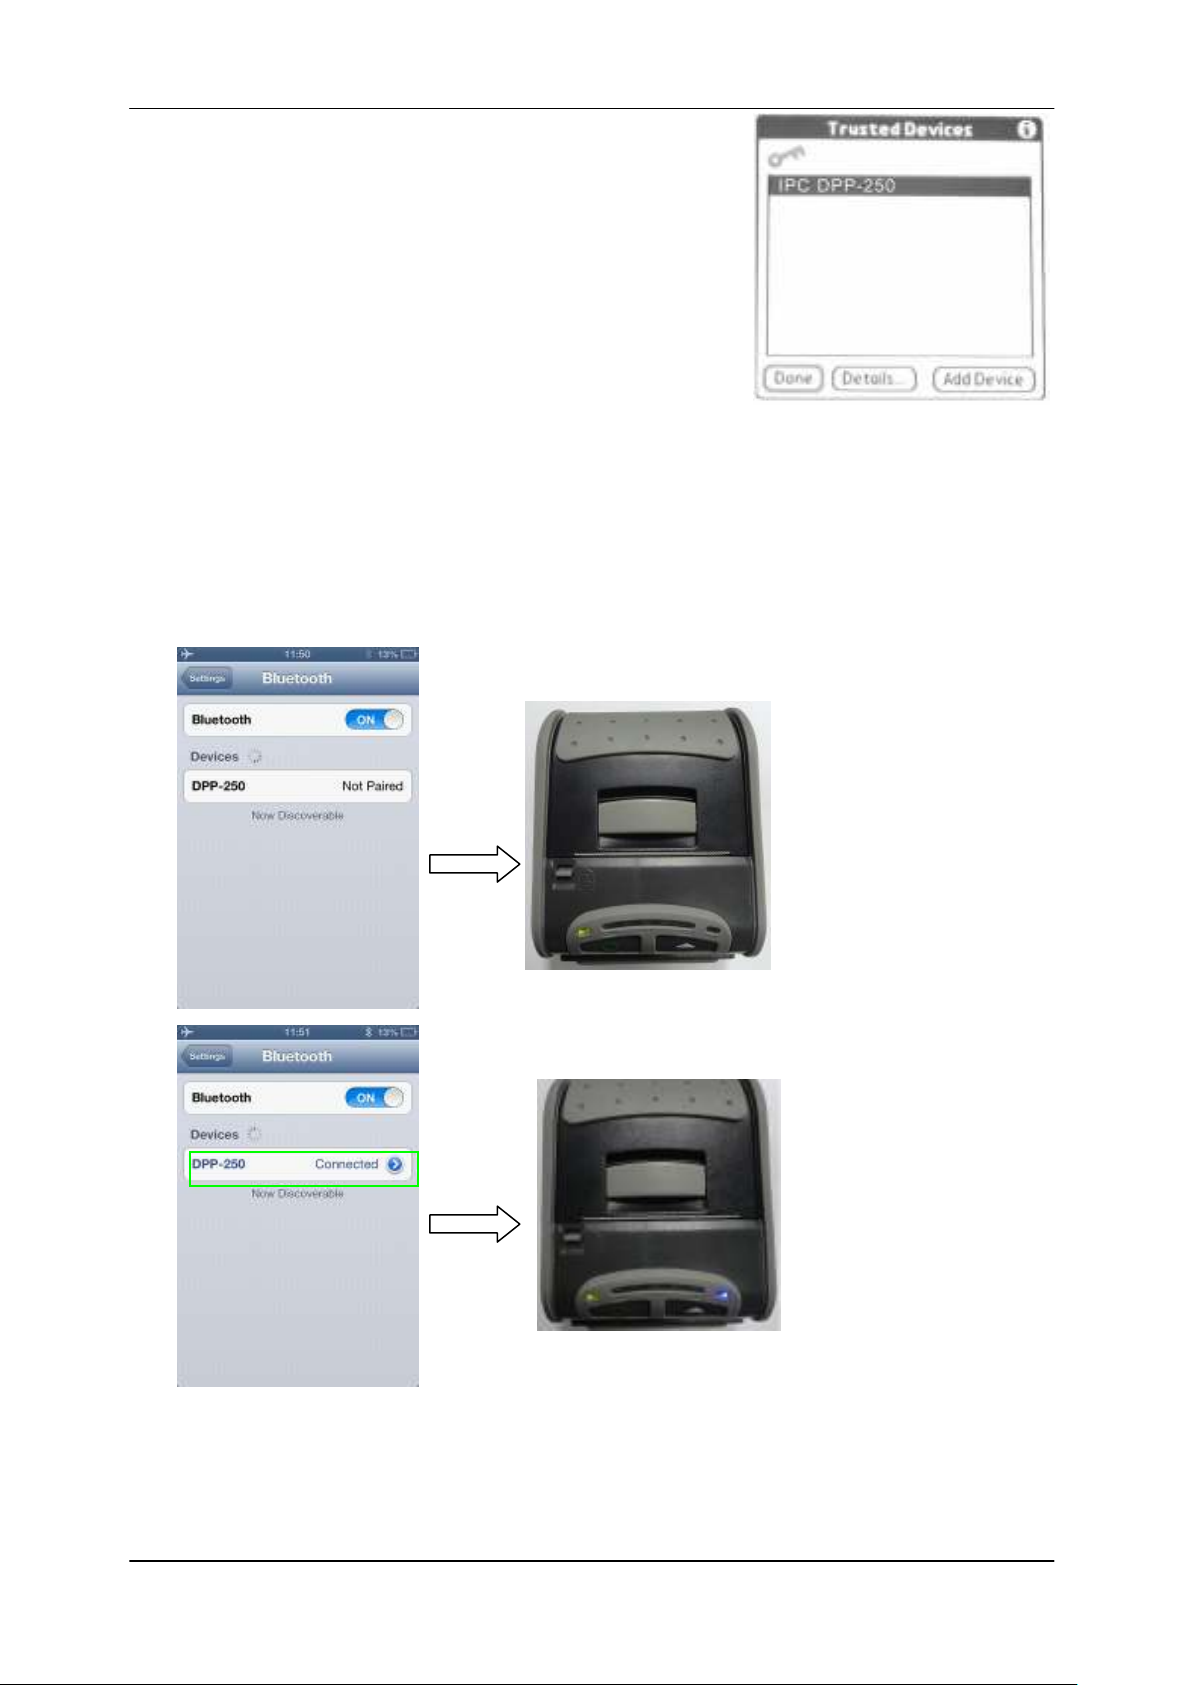
Palm Devices:
Add Device or Pairing Bluetooth®
21
Page 22
1 DATECS DPP-250 User manual
peripherals to your Palm devices require
the use of the device Bluetooth® manager.
Image on the right shows a typical Palm
Bluetooth® manager. When adding/pairing
the DPP-250, use the [0000] pairing key
when prompted.
iOS Devices:
Enable Bluetooth on iOS device. Select Bluetooth device, after this Pair
to DPP-250. When is connected DPP-250 to iOS device, blue LED on
DPP-250 will start blinking. Start app “Library Demo” and select “Print”.
22
Page 23
1 DATECS DPP-250 User manual
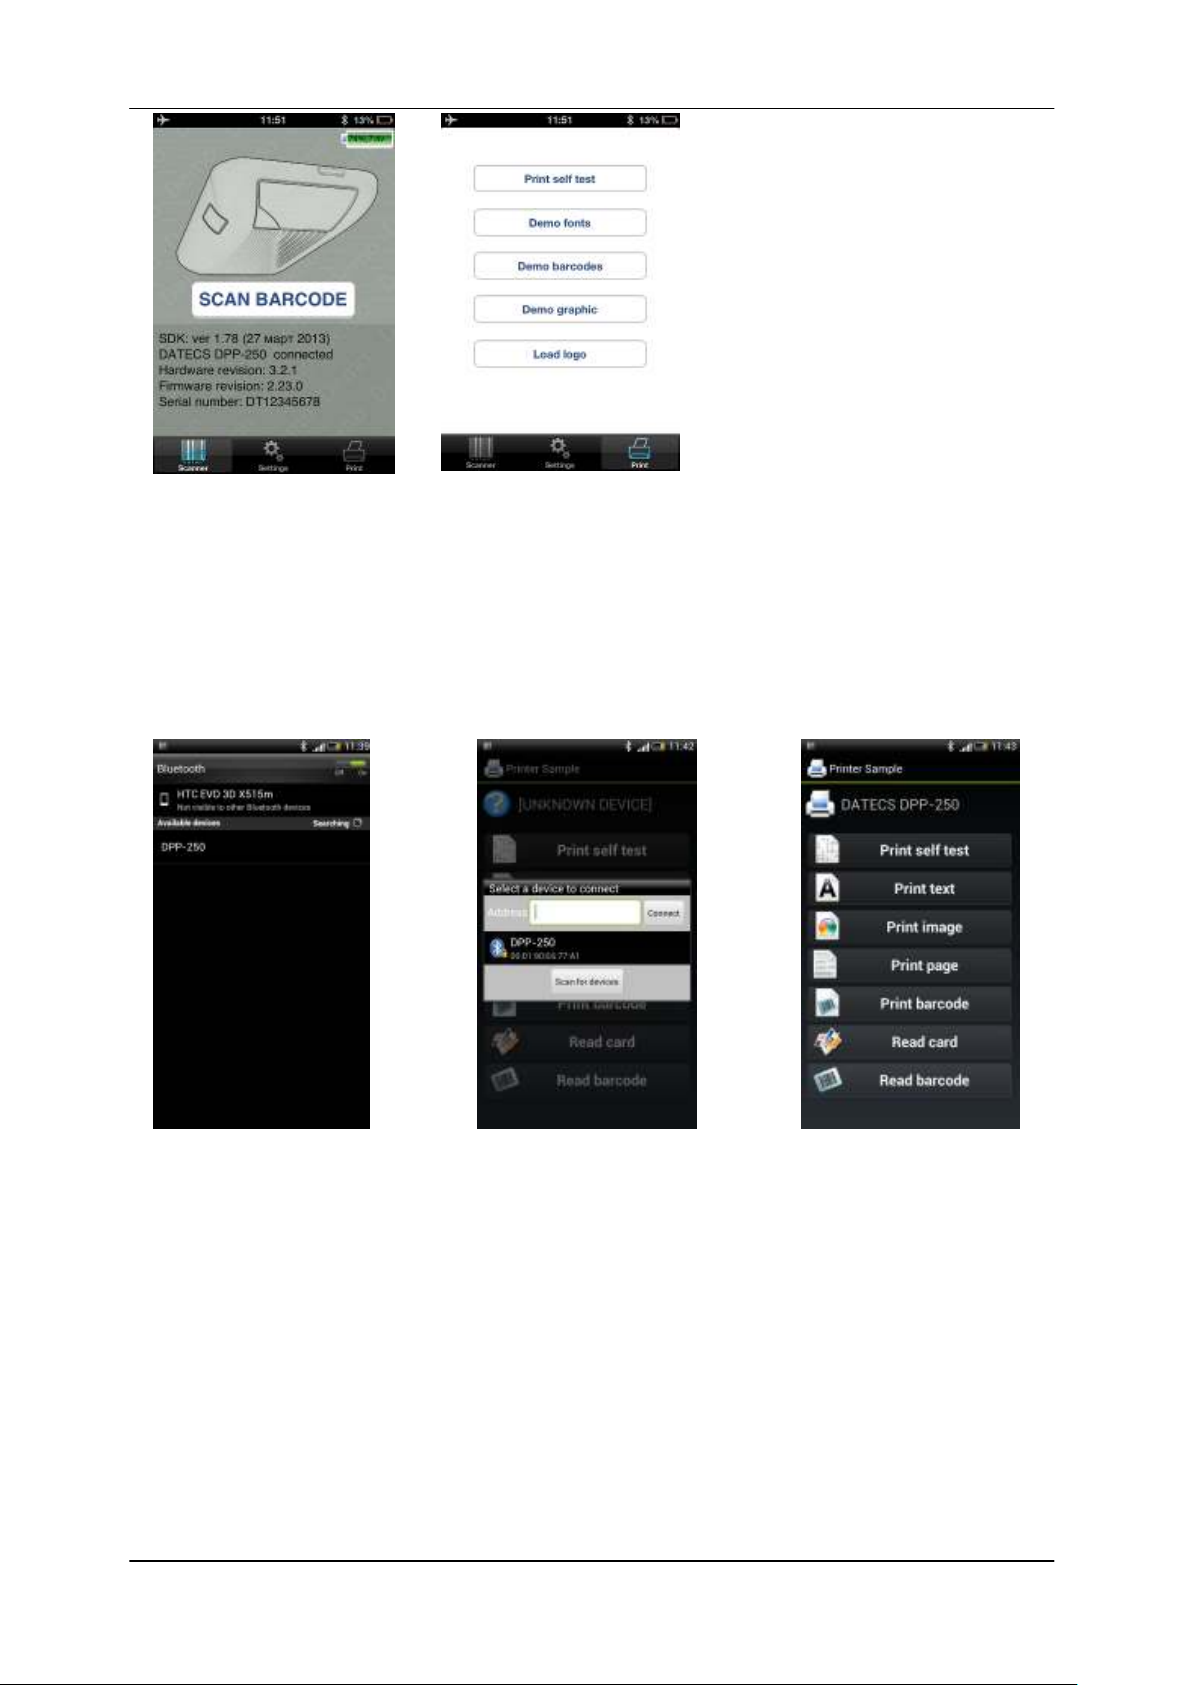
You can select “Print self test” to test Bluetooth connection.
Android devices:
Enable Bluetooth and press search device. On the list with available device
will show “DDP-250”, pair device. Default PIN is “0000”. When is paired
open application “Printer Sample”. Select a device to connect “DPP-250”.
For test Bluetooth connection press “Print self test”.
14. Loading Drivers
Loading DPP-250 drivers on your PDA or Smartphone.
23
Page 24
1 DATECS DPP-250 User manual
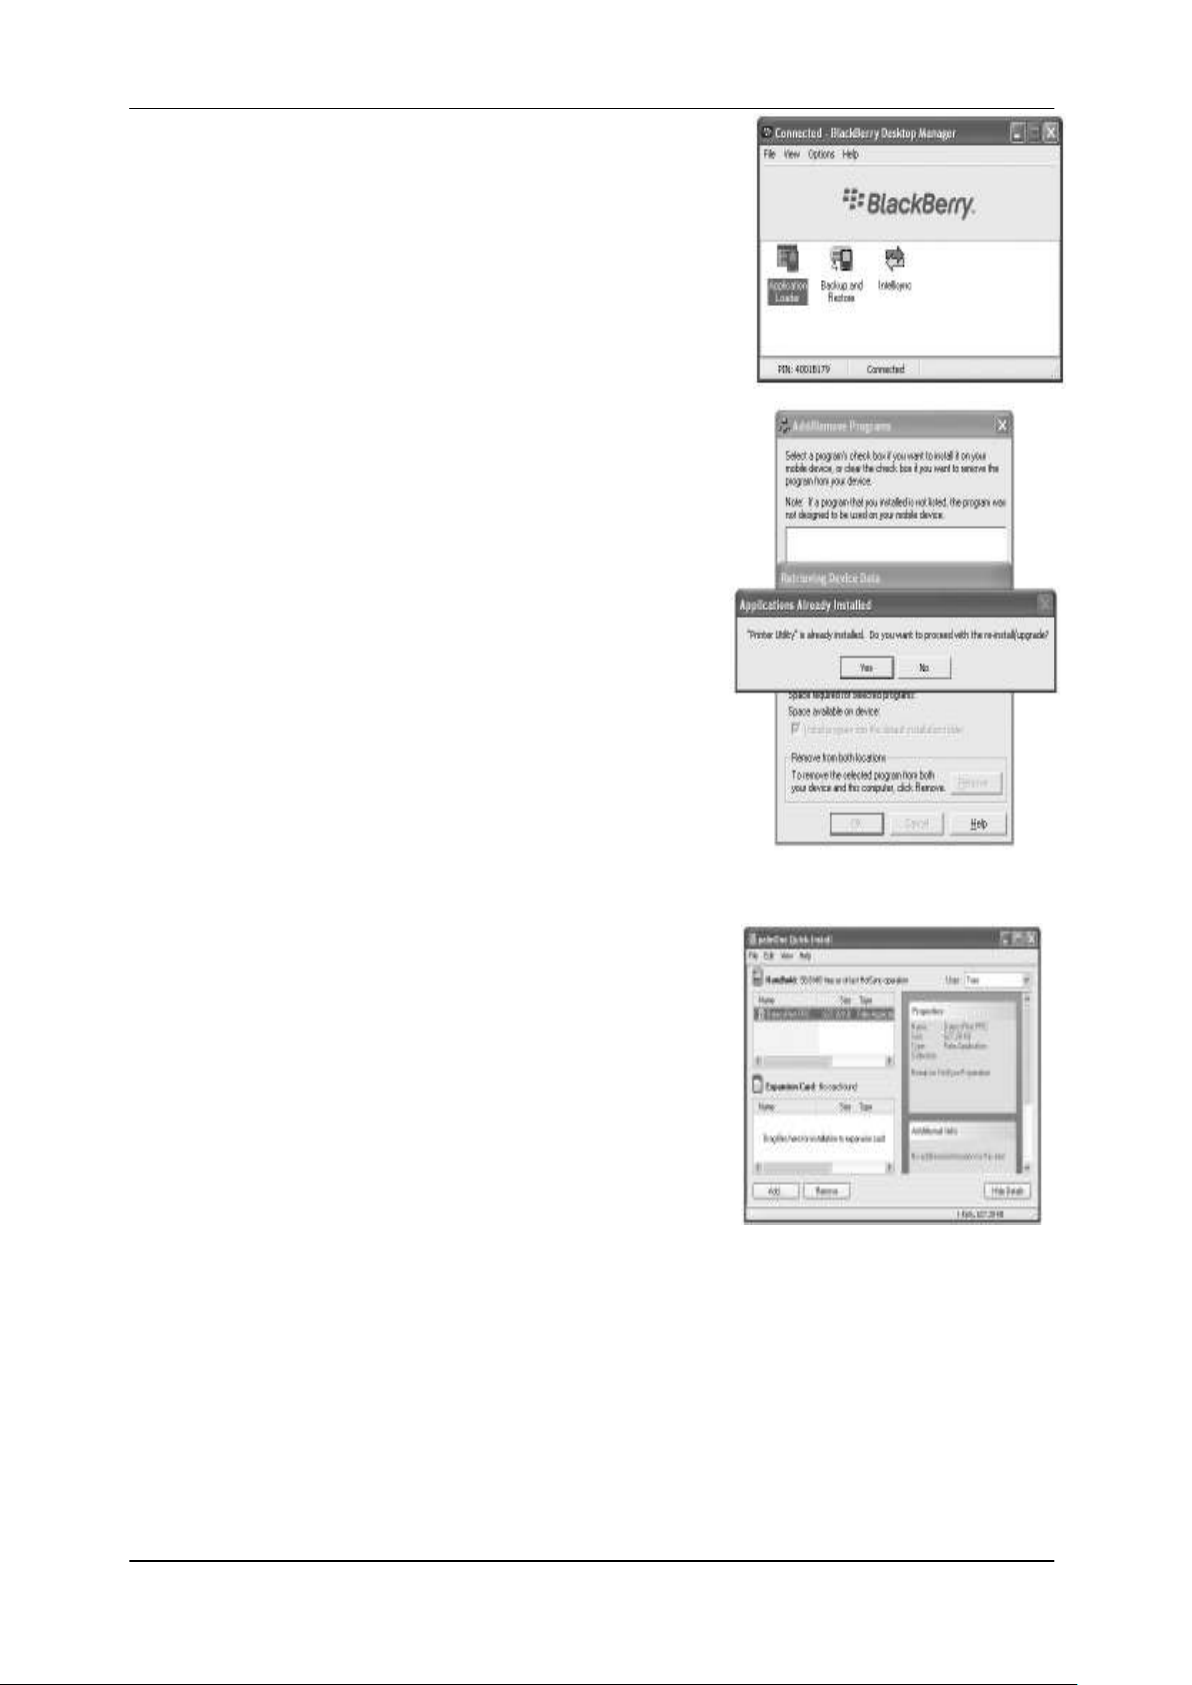
BlackBerry Devices:
Blackberry Desktop Manager shown in the
figure on the right is used to load third
party software on to your device.
Please review your device’s documentation
on how to use the Application Loader
Option to load software on to your device.
Windows Mobile Devices:
Active Sync shown in the figure on the
right is used to install third party
applications on to your mobile device.
Please review your device’s documentation
on how to use the Active Sync Manager to
load new software on to your device.
In most cases you only need to run the
DPP-250 installer to start the installation.
Palm Devices:
Palm Install Manager Application shown in
the figure on the right is used to install third
party applications on to your device.
Please review your device’s documentation
on how to use the Palm Install Manager
Application to load new software on to your
device. In most cases you only need to drag
& drop DPP-250 PRC files in installer and
click Add.
24
Page 25
1 DATECS DPP-250 User manual
15. Magnetic Card Reader (MS Version only)
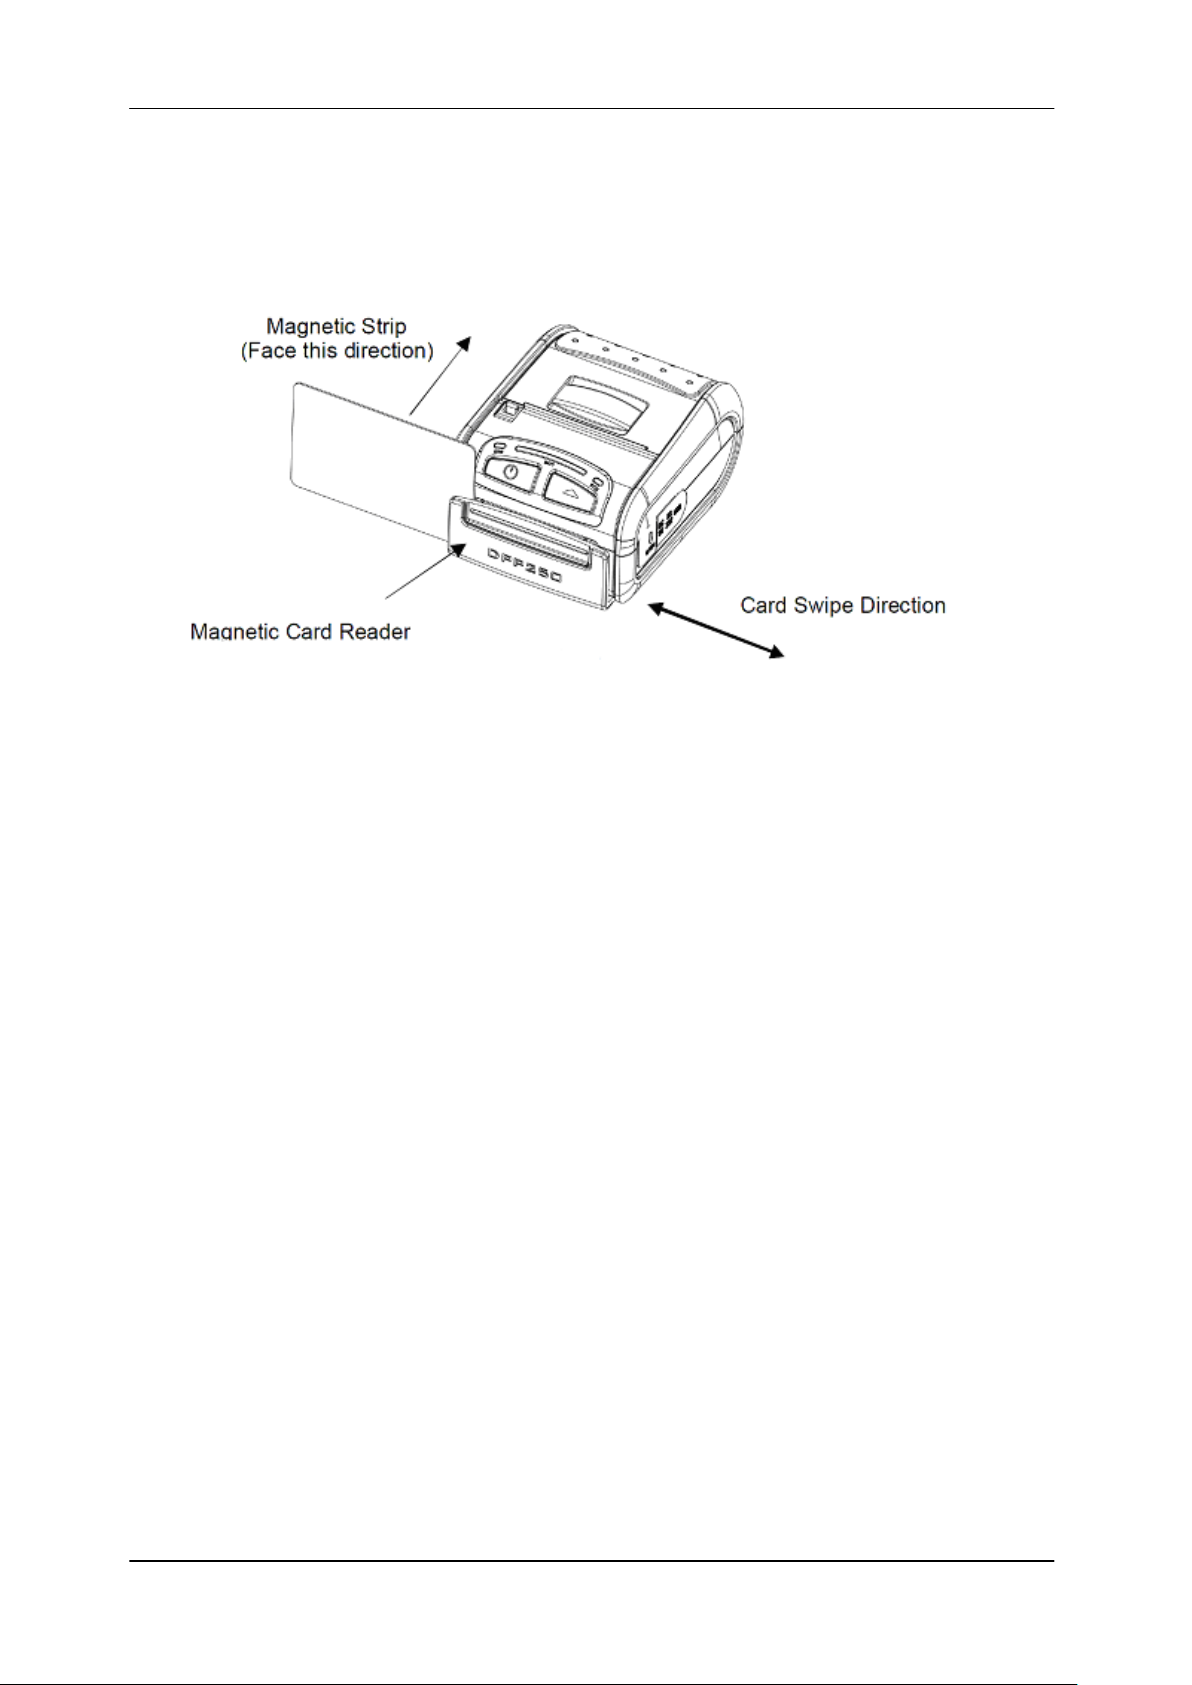
The DPP-250 has a built-in magnetic card reader. The card
reader incorporates a (3)-track magnetic read head requiring a
single swipe to read field data from all three tracks.
The reader’s magnetic head faces towards the front of the
printer. When placing the card into the reader, the magnetic strip
must be facing as show in the figure above. Keep the bottom
edge of the card flat on the inner base of the reader to ensure
that the magnetic strip passes over the read head evenly.
When swiping the card through the reader, use an even consistent
motion from start to finish. The speed of swiping can vary
however the speed must be consistent from start to finish of the
swipe in order to accurately read card data.
User Notes:
To use the magnetic card reader feature, special software must be
used to read and process the card information. If you do not have
card reading software, please consult your reseller to find out if this
software is available or contact DATECS for recommendations on
compatible third party software solutions.
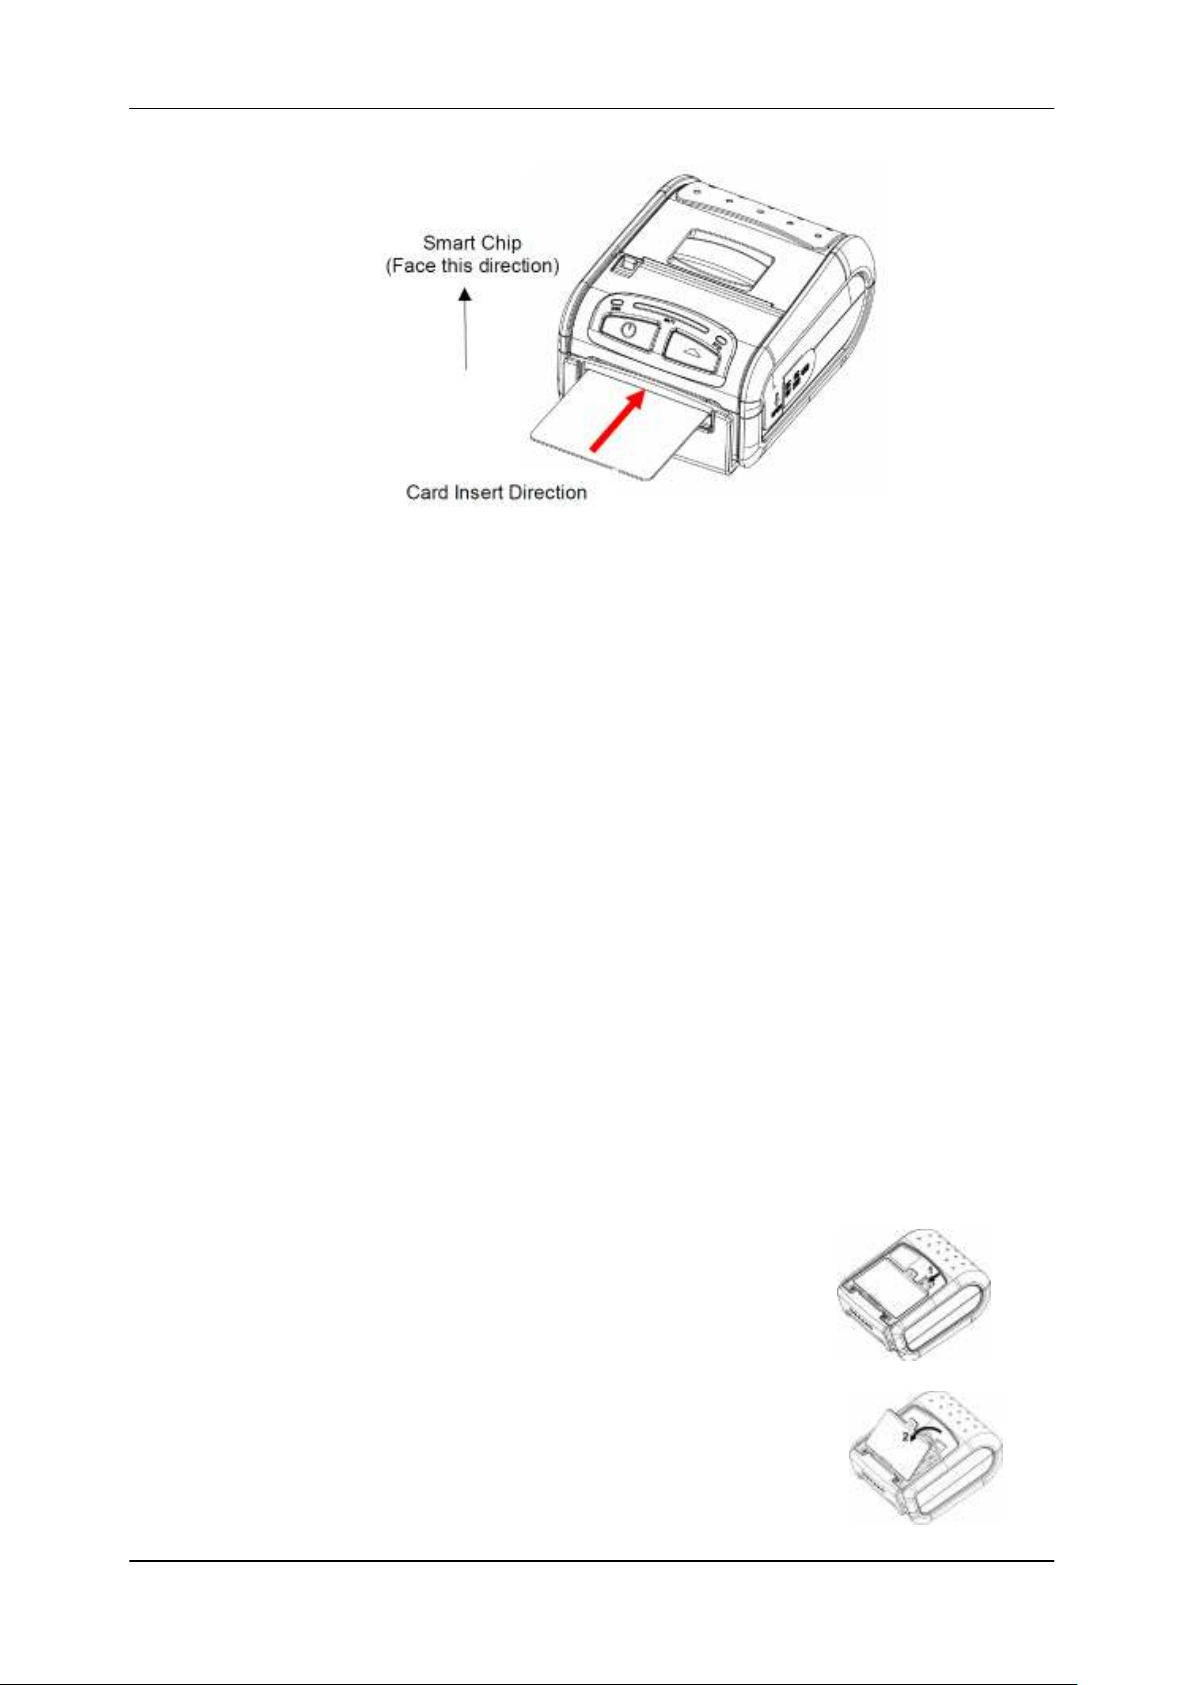
16. Smart Card Reader (SC Version only)
The DPP-250 has a built-in smart card reader (optional). The smart
card reader is designed to read information stored embedded on
smart chips and process the information using device side
software.
25
Page 26
1 DATECS DPP-250 User manual
When placing the card into the reader, the smart chip must
be facing to the front of the printer as show in the figure
above. Insert the card in to the reader until the card stops.
User Notes:
To use the smart card reader feature, special software must
be used to read and process the smart chip information. Please
consult your reseller if this software is available or contact DATECS
for recommendations on compatible third party software solutions.
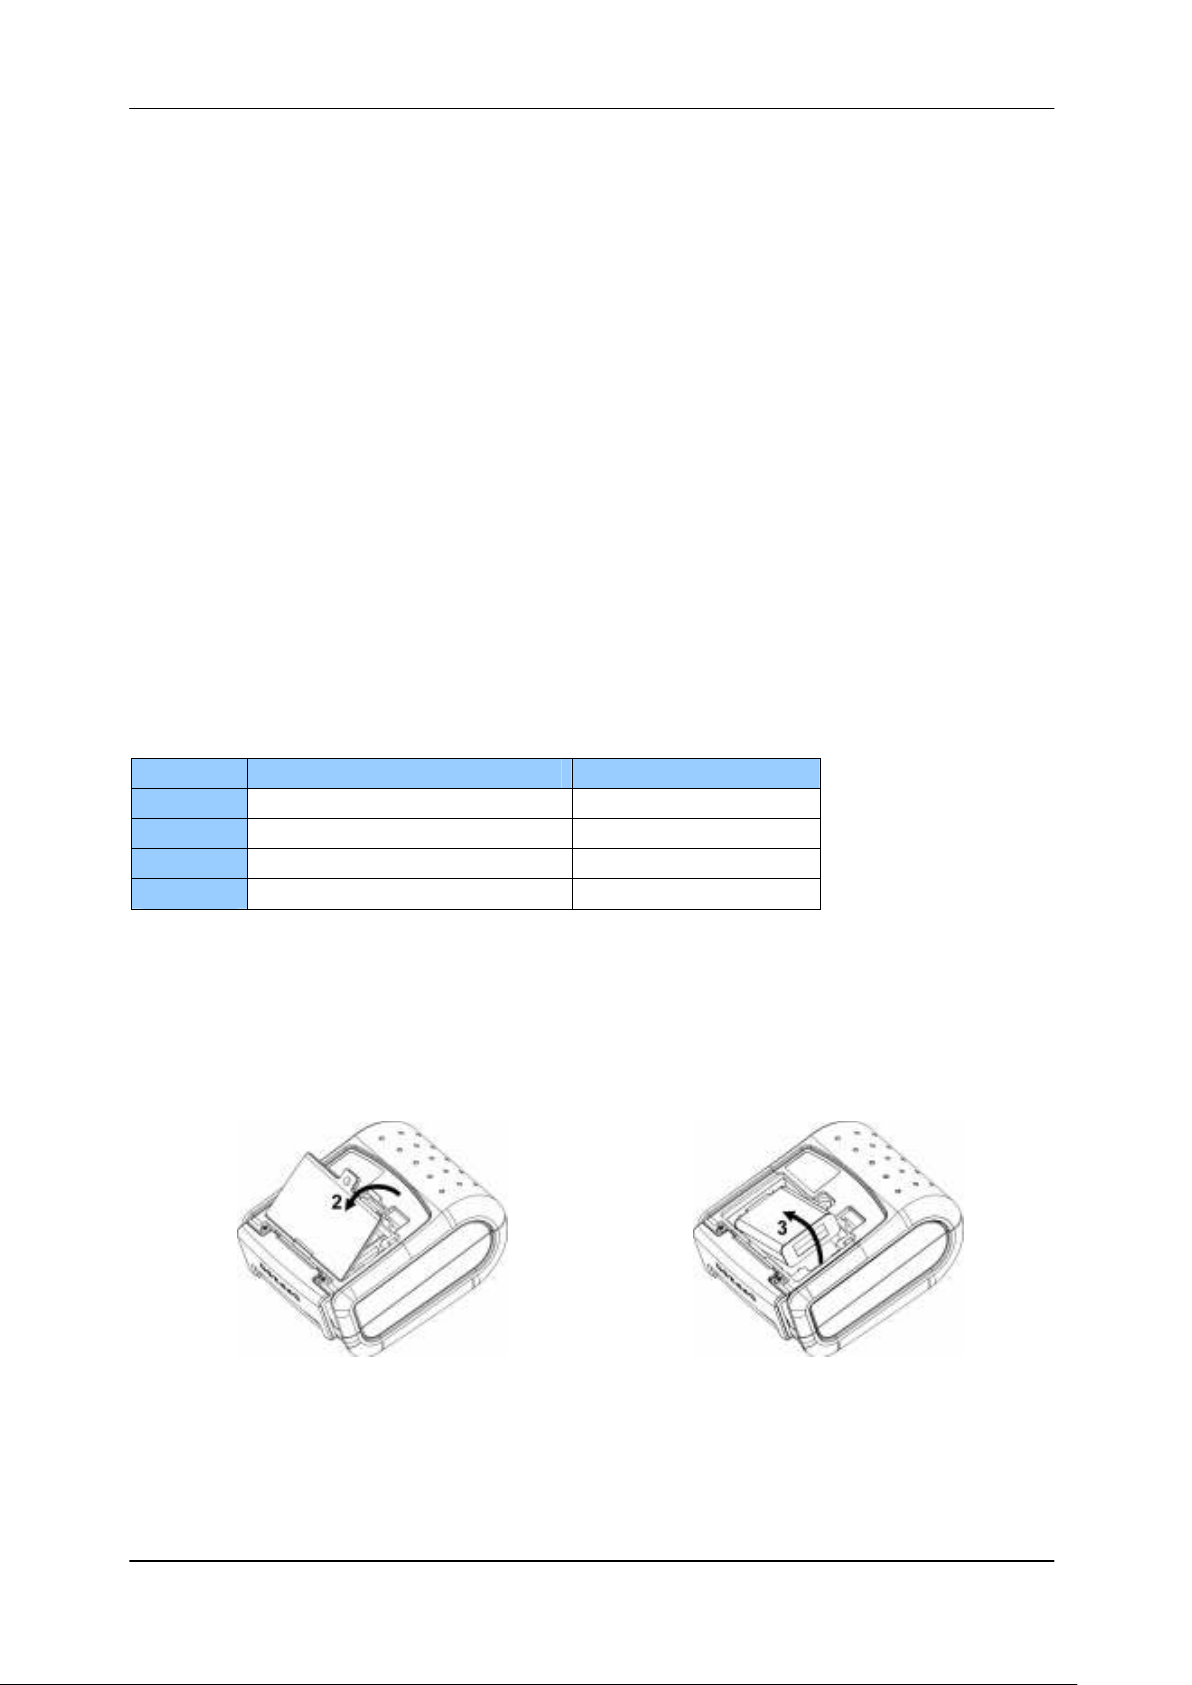
17. Replacing Battery
To replace the battery in the DPP-250 thermal printer follow
the steps below.
Steps:
1. Turn over the DPP-250 and place on a flat
surface. Rotate the (2) locking levers as
shown in the figure on the right.
2. Lift the battery cover as showed in the
figure on the right.
26
Page 27

1 DATECS DPP-250 User manual
3. Lift the battery as shown in the figure on
the right.
4. Detach the battery connector as shown in
the figure on the right. Reverse Steps 1-4
to install the new battery pack.
18. Developing Solutions
Integrating the DPP-250 into your mobile solution requires the use
of the DPP-250 PDA & Smartphone SDK. The SDK incorporates API
specific to developing printing applications and using the integrated
Magnetic Card Reader / Smart Card Reader capability of the
DPP-250.
The table below shows the SDKs currently available for
PDA & Smartphone devices.
OS Language SDK-IDE
Android Java Eclipse
BlackBerry Java RIM BlackBerry Java JDE 4.1 and higher
iOS Objective-C Xcode (Objective-C)
Palm One
Windows
Mobile
For details on using the DPP-250 SDK, please refer to the SDK’s
documentation.
For the latest DPP-250 SDK’s, visit our developer web site at:
C ++ Code Warrior
Basic Satellite Forms
Basic NS Basic
VB.Net Microsoft Visual Studio 2005 (.Net)
C ++ Microsoft Visual Studio 2005 (.Net)
C Sharp Microsoft Visual Studio 2005 (.Net)
http://www.datecs.bg
27
Page 28

1 DATECS DPP-250 User manual
19. Troubleshooting
If you’re having problems capturing signatures refer to the
table below for possible causes.
Item
2
3
4
5
6
Problem Possible Cause
Thermal media is specially coated on
Paper feeds
after issuing a
print job but no
printed text
visible on paper.
On-line LED
blinks RED
continuously.
Text and/or
graphics are
printed very light.
Strange
characters are
printed when
printing.
Printer stops
responding to
print and paper
feed commands.
Printing is light
or missing only
on half of the
print width.
outside of roll. Remove paper roll and
reload properly. See section “Loading
Paper” for details on loading paper. 1
Paper cover not installed properly. See
Section “Loading Paper” for details on
replacing paper cover.
Battery voltage low.
Printer out of paper or Paper not
properly loaded. See section “Loading
Paper” for details on loading paper.
Battery voltage low. See section on
charging battery pack.
Thermal media not imaging correctly.
Verify that you are using the
recommended thermal media.
Battery voltage low. See section on
charging battery pack.
Remove battery for 5 seconds and
reconnect battery.
Paper cover not properly installed. See
section on loading paper.
Mechanism jarred loose. Contact technical
support.
28
Page 29

1 DATECS DPP-250 User manual
20. List of commands for ESC/POS mode
№ Command Description
1 BEL Sounds the buzzer
2 HT Horizontal Tab command
3 LF Printing а line and Paper Feeding command
4 FF Printing and paper feeding to the black mark position
The operation of the command depends on the state
5 CR
6 DC2 = Image LSB/MSB select
7 DC3 ( DC3 (Ruled line) commands sequence start
8 DC3 + Sets the ruled line ON
9 DC3 - Sets the ruled line off
10 DC3 A Selects ruled line A
11 DC3 B Selects ruled line B
12 DC3 C Clears selected ruled line buffer
13 DC3 D Sets a single dot in selected ruled line buffer
14 DC3 F Ruled line pattern set
15 DC3 L Ruled line set
16 DC3 M Selects ruled line combine mode
17 DC3 P Ruled line 1 dot line print
18 DC3 p Ruled line n dots line print
19 DC3 v Ruled line image write
20 CAN Canceling print data in page mode
21 ESC FF Printing data in page mode
22 ESC RS Sounds the buzzer
23 ESC SP Setting character spacing
24 ESC # Setting EURO symbol position
25 ESC $ Specifying the absolute horizontal position of printing
26 ESC %
27 ESC & Selecting user character set
28 ESC ! Specifying printing mode of text data
29 ESC * Printing graphical data
30 ESC + Switch’s OFF the printer
31 ESC - Selecting/Canceling underlining
32 ESC . Printing self test/diagnostic information
33 ESC 2 Specifying 1/6-inch line feed rate
34 ESC 3 Specifying line feed rate n/203 inches
35 ESC < Changes print direction to opposite
36 ESC = Data input control
37 ESC > Selecting print direction
38 ESC ? Reading magnetic stripe card
39 ESC @ Initializing the printer
40 ESC CAL Black mark mode sensor calibration
of the
configuration flags 2, 3 and 4
Selecting/Canceling the printing of downloaded user
character set
29
Page 30

1 DATECS DPP-250 User manual
41 ESC D Setting horizontal tab position
42 ESC E Specifying/Canceling highlighting
43 ESC F Filling or inverting the page area in page mode
44 ESC G Specifying/Canceling highlighting
45 ESC I Specifying/Canceling Italic print
46 ESC J Printing and Paper feed n/203 inches
47 ESC L Selecting page mode
48 ESC N Reading programmed serial number
49 ESC R Selecting country
50 ESC S Specifying speed (bps) of the serial port
51 ESC T Printing short self test
52 ESC U Selecting/Canceling underlined printing
53 ESC V
54 ESC W Defining the print area in page mode
55 ESC X Specifying max printing speed
56 ESC Y Selecting intensity level
57 ESC Z Returning diagnostic information
58 ESC \ Specifying relative horizontal position
59 ESC ] Loading the default settings stored in Flash memory
60 ESC ^ Saving current settings in Flash memory
61 ESC _ Loading factory settings
62 ESC `
63 ESC a Aligning the characters
64 ESC b Increasing text line height
65 ESC c5 Enabling/Disabling the functioning of the button LF
66 ESC d Printing and feeding paper by n- lines
67 ESC i Feeding paper backwards
68 ESC o Temporarily feeding paper forward
69 ESC pair=
70 ESC pwd= Programming a new Bluetooth password (PIN)
71 ESC r Full command for sounding buzzer
72 ESC s Reading printer settings
73 ESC u Selecting code table
74 ESC v Transmitting the printer status
75 ESC x
76 ESC y Setting USB response strings
77 ESC {
78 GS FF
79 GS $
80 GS ) Setting printer flags (memory switches)
30
Selecting/Canceling printing 90°- right turned
characters
Reading the Battery Voltage and Thermal head
temperature
Enabling/Disabling PAIRING info saving in Bluetooth
mode
Setting the time interval for automatically switching
Off the printer
Enabling/Canceling printing of 180° turned
characters
Printing in page mode and returning to standard
mode
Specifying the absolute vertical position in page
mode
Page 31

1 DATECS DPP-250 User manual
81 GS * Defining a Downloaded Bit Image (logo)
82 GS / Printing a Downloaded Bit Image
83 GS : Starting/ending macro definitions
84 GS B Enabling/Disabling inverse printing (white on black)
85 GS C Read the Real Time Clock
86 GS H Selecting printing position of HRI Code
87 GS L Setting the left margin
88 GS Q Printing 2-D barcodes
89 GS R Filling or inverting a rectangle in page mode
90 GS S Selecting 2-D barcode cell size
91 GS T Selecting the print direction in page mode
92 GS U Selecting standard mode
93 GS W Setting the print area width
Drawing a rectangular box with selected thickness in
94 GS X
page
mode
95 GS Z Printing the non blank page area only in page mode
96 GS \ Specifying the relative vertical position in page mode
97 GS ^ Executing macro
98 GS c Setting the Real Time Clock
99 GS f Setting the font of HRI characters of the barcode
100
101
102
103
104
105
GS h Setting the height of the barcode
GS k Printing a barcode
GS p Settings for 2D barcode PDF417
GS q
GS w
Selecting the height of the module of 2D barcode
PDF417
Selecting the horizontal size (Scale factor) of the
barcode
GS x Direct text print in page mode
Asian Languages Support
106
107
108
109
110
111
112
FS ! Specifying printing mode of two-byte text data
FS & Selecting two-byte text mode (JIS or GB2312)
FS -
Selecting/Canceling underline mode for two-byte text
mode
FS . Canceling two-byte text mode
FS C Selecting Shift-JIS mode (Japanese version only)
FS S Specifying character spacing for two-byte text mode
FS W
Selecting double size characters for two-byte text
mode
31
 Loading...