

Page 1

Waveform Monitor / Vectorscope
VS-150
Instruction Manual
www.datavideo-tek.com
Page 2

1
Warnings and Precautions
1. Read all of these warnings and save them for later reference.
2. Follow all warnings and instructions marked on this unit.
3. Unplug this unit from the wall outlet before cleaning. Do not use liquid or aerosol cleaners. Use a damp cloth for
cleaning.
4. Do not use this unit in or near water.
5. Do not place this unit on an unstable cart, stand, or table. The unit may fall, causing serious damage.
6. Slots and openings on the cabinet top, back, and bottom are provided for ventilation. To ensure safe and reliable
operation of this unit, and to protect it from overheating, do not block or cover these openings. Do not place this
unit on a bed, sofa, rug, or similar surface, as the ventilation openings on the bottom of the cabinet will be
blocked. This unit should never be placed near or over a heat register or radiator. This unit should not be placed
in a built-in installation unless proper ventilation is provided.
7. This product should only be operated from the type of power source indicated on the marking label of the AC
adapter. If you are not sure of the type of power available, consult your Datavideo dealer or your local power
company.
8. Do not allow anything to rest on the power cord. Do not locate this unit where the power cord will be walked on,
rolled over, or otherwise stressed.
9. If an extension cord must be used with this unit, make sure that the total of the ampere ratings on the products
plugged into the extension cord do not exceed the extension cord’s rating.
10. Make sure that the total amperes of all the units that are plugged into a single wall outlet do not exceed 15
amperes.
11. Never push objects of any kind into this unit through the cabinet ventilation slots, as they may touch dangerous
voltage points or short out parts that could result in risk of fire or electric shock. Never spill liquid of any kind onto
or into this unit.
12. Except as specifically explained elsewhere in this manual, do not attempt to service this product yourself.
Opening or removing covers that are marked “Do Not Remove” may expose you to dangerous voltage points or
other risks, and will void your warranty. Refer all service issues to qualified service personnel.
13. Unplug this product from the wall outlet and refer to qualified service personnel under the following conditions:
a. When the power cord is damaged or frayed;
b. When liquid has spilled into the unit;
c. When the product has been exposed to rain or water;
d. When the product does not operate normally under normal operating conditions. Adjust only those controls
that are covered by the operating instructions in this manual; improper adjustment of other controls may
result in damage to the unit and may often require extensive work by a qualified technician to restore the
unit to normal operation;
e. When the product has been dropped or the cabinet has been damaged;
f. When the product exhibits a distinct change in performance, indicating a need for service.
14. Due to the general consumer usage behavior, efficient power distribution on the field, corporate environment
responsibility by eliminating harmful substances such as carbon dioxide, sulphur dioxide, etc, and other
unexpected risks, this product does not provide standby power option
Page 3

2
Warranty
Standard Warranty
Datavideo equipment is guaranteed against any manufacturing defects for one year from the date of purchase.
The original purchase invoice or other documentary evidence should be supplied at the time of any request for
repair under warranty.
Damage caused by accident, misuse, unauthorized repairs, sand, grit or water is not covered by this warranty.
All mail or transportation costs including insurance are at the expense of the owner.
All other claims of any nature are not covered.
Cables & batteries are not covered under warranty.
Warranty only valid within the country or region of purchase.
Your statutory rights are not affected.
Two Year Warranty
All Datavideo products purchased after 01-Oct.-2008 qualify for a free one year extension to the standard Warranty,
providing the product is registered with Datavideo within 30 days of purchase. For information on how to register
please visit www.datavideo-tek.com or contact your local Datavideo office or authorized Distributors
Certain parts with limited lifetime expectancy such as LCD Panels, DVD Drives, Hard Drives are only covered for
the first 10,000 hours, or 1 year (whichever comes first).
Any second year warranty claims must be made to your local Datavideo office or one of its authorized Distributors
before the extended warranty expires.
Disposal
For EU Customers only - WEEE Marking
This symbol on the product indicates that it will not be treated as household
waste. It must be handed over to the applicable take back scheme for the
recycling of electrical and electronic equipment. For more detailed
information about the recycling of this product, please contact your local
Datavideo office.
Page 4

3
Index
Warnings and Precautions .............................................................................................................. 1
Warranty ......................................................................................................................................... 2
Disposal .......................................................................................................................................... 2
Introduction ..................................................................................................................................... 4
Features .......................................................................................................................................... 4
Supported SDI / HD-SDI Input Video Formats ................................................................................ 5
Packing List ..................................................................................................................................... 5
Connections & Controls .................................................................................................................. 6
Front & Rear Panels ................................................................................................................ 6
VS-150 Output Display ................................................................................................................... 9
Menu Control and Options ............................................................................................................ 10
VS-150 Quick Start Guide ............................................................................................................. 13
Application Diagram ...................................................................................................................... 21
Dimensions ................................................................................................................................... 22
Specifications ................................................................................................................................ 23
Service & Support ......................................................................................................................... 24
Page 5

4
Introduction
Video image quality is often determined by a combination of multiple factors such as camera
alignment and calibration. The location of the production and the brands of connected video
devices especially under Electronic Field Production (EFP) conditions can cause variable image
quality in terms of brightness, colour saturation, and white balance between different video sources.
Traditionally, experienced camera operators would align equipment before a production in order to
avoid too much time and resources being spent on adjusting images in post production.
In order to make this alignment process easier and more efficient, Datavideo presents the VS-150,
a cost-effective waveform monitor & vectorscope. This unit provides quick, accurate and standardized ways
to calibrate and align signals from cameras and other video equipment.
The VS-150 can be used to test and compare the accuracy of incoming video signals from
cameras and/or connected equipment. The VS-150 can accept either SDI or HD-SDI input for
signal analysis. The VS-150 can be set up to provide a clean video loop through on SDI/HD-SDI
whilst still allowing video analysis views on its HDMI outp ut. Alternatively the scope view can also be
displayed as a 1280 x 720 HD-SDI output.
Features
• Rugged and compact single unit that requires only an HD-SDI or HDMI monitor
• Menu choice of Vectorscope, Histogram, Waveform and Parade displays as well as clean
Video Display output (SDI to HDMI conversion)
• SDI / HD-SDI input
• SDI / HD-SDI loop through – can provide clean pictures or video analysis view
• Automatically detects and locks to NTSC, PAL or HD signals
• Embedded SDI audio peak meter with selectable monitoring for four stereo pairs
• Switchable 4:3 / 16:9 video thumbnail when input signal is SD-SDI
• Headphone jack audio monitoring socket with menu based volume control
• Save
• Parade Display can be toggled between RGB and YCbCr
and Recall trace menu options for quick and easy overlay comparison of video traces
• Vectorscope can be toggled between 75% and 100% graticules/bars
• Waveform detail can be zoomed 20%, 40%, 60% and 100% - various parts of the waveform
can then viewed by changing the X Delay value
• Capture sampling can be by Field1, Field 2 or Frame
• DC 12V operation makes the unit ideal for field or studio operation
Page 6

5
Supported SDI / HD-SDI Input Video Formats
- 720 x 576i / 50 Hz (PAL)
- 720 x 480i / 60 Hz (NTSC)
- 1280 x 720P / 29.97Hz
- 1280 x 720p / 50 Hz
- 1280 x 720p / 60 Hz
- 1920 x 1080i / 50 Hz
- 1920 x 1080i / 59.94 Hz
- 1920 x 1080i / 60 Hz
- 1920 x 1080P / 30Hz
Packing List
1 x AD Switch 12V 500mA
1 x VS-150 QSG
Page 7
6
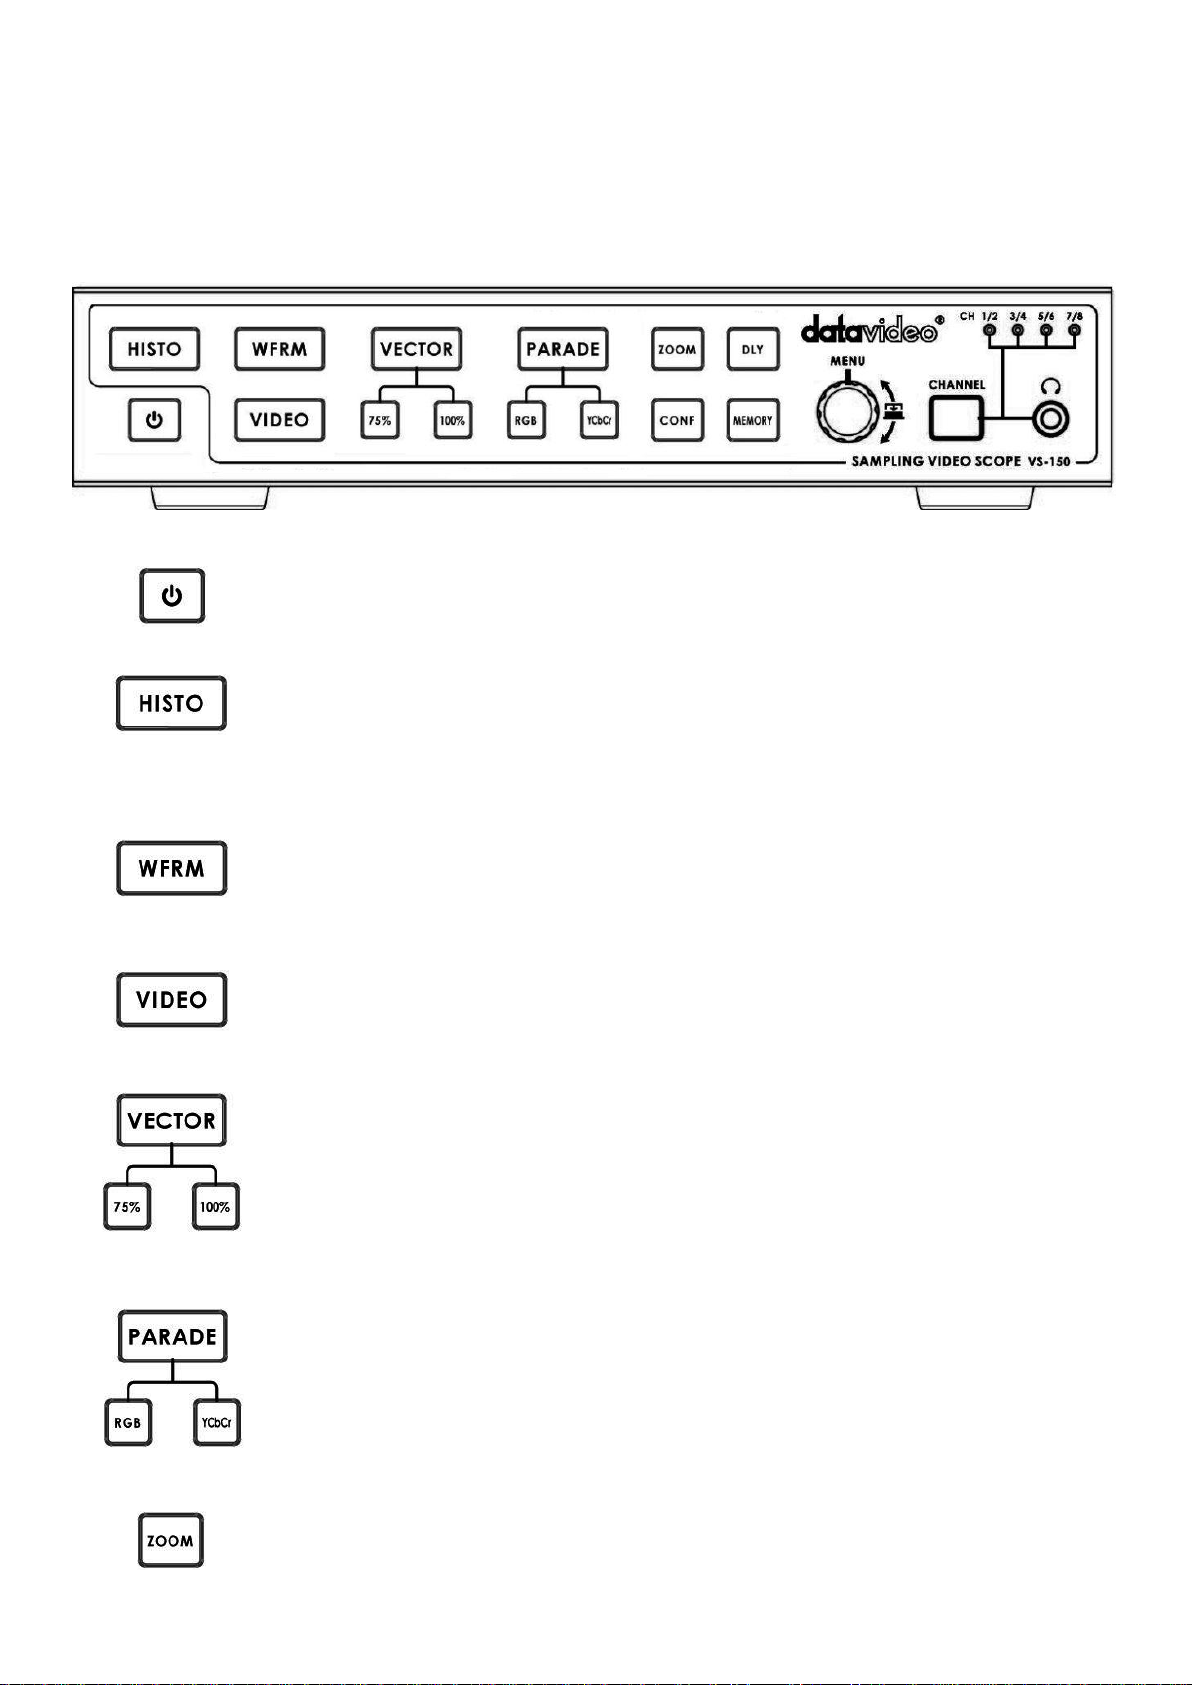
POWER SWITCH
Switches the power On / Off.
HISTOGRAM
HISTOGRAM is used to detect the overall brightness of a location. Through VS-150 to detect
light sources from all directions reading by the camera, one can individually adjust each
camera to the desired state.
WAVEFORM MONITOR
Waveform monitor is used as a reference to adjust the brightness of a camera. One can
accompany grayscale chart to better distinguish the color level of the adjusting camera.
VIDEO DISPLAY
Display the SDI Input video source.
VECTOR
Applied a 75% or 100% color bar signal.
PARADE CALIBRATION
Parade calibration on RGB or YCbCr mode.
Aim the camera to take the entire test chart as a sample image. This step is necessary to
make sure that the color saturation of an image reproduced from the camera is consistent and
does not tint to any particular color that can cause color cast.
X ZOOM
To adjust the brightness of an area in detail, one can monitor a selected spot by choosing
Connections & Controls
Front & Rear Panels
Page 8
7
display graph from 20%~100%.
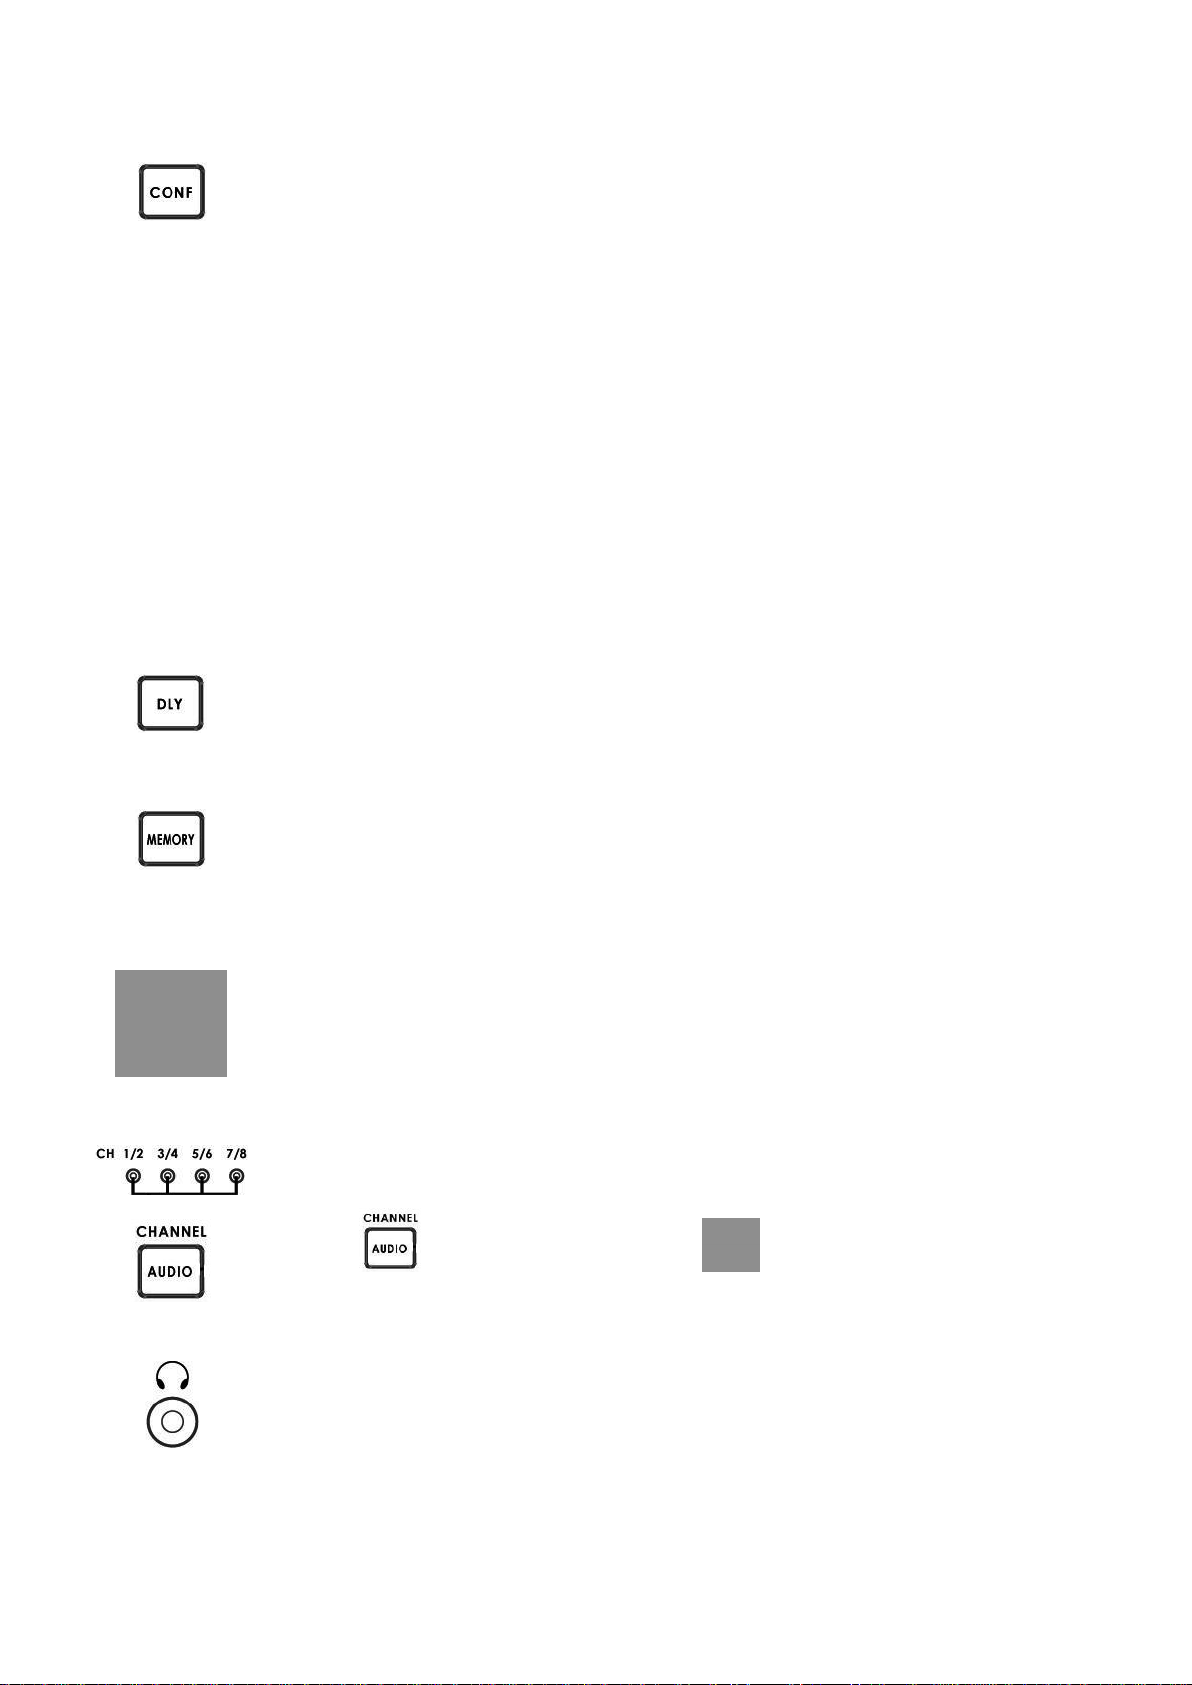
CONFIGURATION
576i THUMBNAIL
Set the display monitor at the lower left hand corner to 16:9 or 4:3 when the signal is 576i.
SDI LOOPTHROUGH
Set loop through on / off mode
CAPTURE
Set sampling mode FRAME: Capture the entire frame as a sample.
FIELD1: Capture FIELD 1 as a sample only.
FIELD2: Capture FIELD 2 as a sample only.
FIRMWARE REVISION
Display current software version
X DELA
This is used by adjusting the position of the matrix.
Set delay time from 0 ~ 17.0235uS
TRACE MEMORY
This mode is allowed you save trace, recall trace or clear trace.
To recall the saved camera signals, the camera signals are consistent when camera signals
(displaying in various colors) are overlapping with the one another.
MENU
Menu dial and push to select button
Turn the knob to select the options or adjust the parameter.
Push the knob to select the options.
AUDIO CHANNEL
Setting & display the audio channels 1,2 / 3,4 / 5,6 or 7,8 CH.
Push the button, and then turn the MENU knob to select audio channels.
STEREO MINI JACK PLUG
3.5mm jack socket for audio monitoring
Page 9

8
REMOTE:
Switch to REMOTE for control VS-150 mode.
LOCAL:
For firmware update mode; if you want upgrade VS-150 firmware please switch to LOCAL
and via USB cable connect to PC for firmware update
Mini USB
USB interface for firmware update
HD/SD-SDI INPUT
BNC connector for SDI input.
HD/SD-SDI OUTPUT
BNC connector for SDI output.
HDMI OUTPUT
HDMI digital signal output connecter.
DC in socket
Connect the supplied 12V PSU to this socket. The connection can be secured by screwing the
outer fastening ring of the DC In plug to the socket.
Grounding Terminal
When connecting this unit to any other component, make sure that it is properly grounded by
connecting this terminal to an appropriate point. When connecting, use the socket and be
sure to use wire with a cross-sectional area of at least 1.0 mm2.
Page 10

9
VS-150 Output Display
Page 11

10
Menu Control and Options
The VS-150 is a menu driven unit. The menu is viewed as part of the output display when it has been connected to a
HDMI / SDI monitor.
The menu options are scrolled by turning the Menu Dial to the left or right (See item 1 on page 8). A pointer ( >) to the
left of the menu options indicates which item is currently selected. To change / select a value gently press the Menu
Dial in towards the VS-150 case, like a button.
If there are more options in the curr
To g
o back to an earlier menu select EXIT from the current options list.
The Main Menu options are:
TOOLS
NEXT MODE
VIDEO DISPLAY
AUDIO VOLUME
AUDIO CHANNEL
CONFIGURATION
NEXT MODE
When first switched on the VS-150 will display in the Vectorscope mode. Selecting NEXT MODE and pressing in the
Menu Dial will cause the unit to display the next mode in the following order.
VECT
ORSCOPE
PA
RADE
WAVEFORM MONITOR
HISTOGRAM
NOTE: All scope views are displayed at 1280 x 720 regardless of input video format.
VIDEO DISPLAY
When this option is selected the VS-150 will display only the incoming video. All audio and scope views will be
hidden when this option is active. This option affects both the SDI loop through and the HDMI output. To return to a
scope view once more press in or rotate the Menu Dial on the VS-150.
ent menu then an arrow up or down may be displayed to the right of the Menu Area.
Page 12

11
TOOLS
The TOOLS option is only available with certain VS-150 output displays. These are VECTORSCOPE, PARADE and
WAVEFORM MONITOR.
VECTORSCOPE related TOOLS: TRACE MEMORY
SET BANDWIDTH
SET UP BARS
PARADE related TOOLS: TRACE MEMORY
SET RGB / YCbCr
WAVEFORM related TOOLS: TRACE MEMORY
X ZOOM
X DELAY
TRACE MEMORY
This option allows the current VS-150 scope trace to be saved, recalled or cleared within the unit’s memory. A saved or
recalled trace will be displayed in green sample points and the live or current signals will be displayed in white sample
points. Where the saved and current traces match sample points are displayed in blue. In this way two sources can be
compared or a single source can be checked to see if its output drifts during extended use.
SET BANDWIDTH (VECTORSCOPE TOOLS)
This option can be changed between LOW or FULL bandwidth. The LOW bandwidth option results in fewer sample
points being displayed but still allows a good read of the incoming signals. The FULL bandwidth option results in all
sample points being displayed.
SET UP BARS (VECTORSCOPE TOOLS)
This option allows the Vectorscope Graticule targets for each colour to be switched between the 75% and 100% colour
bar positions. For most TV broadcast situations the Graticule targets should be set for 75% bars.
SET RGB / YCbCr (PARADE TOOLS)
This setting allows the parade displayed to be switched between RGB and component YCbCr values.
X ZOOM (WAVEFORM TOOLS)
This option allows the waveform display to be zoomed on the X Axis so a specific area can be examined in more detail.
X ZOOM options are:
100% = The whole width of the waveform is displayed (normal view).
60% = Only 60% of the whole waveform is shown on the display. In this setting X DELAY can be used to scroll left and
right across the waveform.
In this way the rest of the waveform can be viewed at the same level of detail.
40% = Only 40% of the whole waveform is shown on the display. In this setting X DELAY can be used to scroll left and
right across the waveform. In this way the rest of the waveform can be viewed at the same level of detail.
20% = Only 20% of the whole waveform is shown on the display. In this setting X DELAY can be used to scroll left and
right across the waveform. In this way the rest of the waveform can be viewed at the same level of detail.
Page 13

12
X DELAY (WAVEFORM TOOLS)
This feature allows the waveform display to be panned right or left at the chosen level of X ZOOM detail. A low delay
value relates to the left hand side of the vision raster and a high delay value relates to the right hand side of the vision
raster.
AUDIO VOLUME
Audio embedded into the SDI / HD-SDI signal can be monitored by plugging headphones into the 3.5mm jack socket
on the VS-150 front panel. Using the AUDIO VOLUME option, the Menu Dial can be used to increase or reduce the
volume at the connected headphones, so it is monitored at a comfortable level.
AUDIO CHANNEL
The first 8 audio channels embedded into an SDI / HD-SDI signal can be monitored by the VS-150. Using the AUDIO
CHANNEL option allows selected stereo pairs to be chosen for monitoring with the headset socket. The chosen pair is
underlined on the VS-150 output display also.
CONFIGURATION
This option in the VS-150 Main Menu allows set up of Video Thumbnail, SDI loopthrough, Capture setting and
confirmation of the VS-150 firmware revision.
VIDEO THUMBNAIL
Allows the option to switch the video thumbnail on the scope display between 4x3 (4:3) or 16x9 (16:9) aspect ratio
when working with Standard Definition inputs. A HD input should be viewed in its native 16x9 aspect ratio.
SDI LOOPTHROUGH
Allows the SDI output of the VS-150 to be used as:
ON = A clean video loop through – SD or HD
OFF = A secondary scope output – HD-SDI 1280x720
OFF is the default option at power on
NOTE: This setting can be over-ridden by the VIDEO DISPLAY setting in the VS-150 main menu.
CAPTURE
The VS-150 scope displays can be set to sample FIELD1, FIELD2 or FRAME depending on the users requirement.
This choice is confirmed in the top right hand corner of the current scope display.
DSC labs camera alignment tools
Camera alignment tools such as DSC labs’ Cam Align Books and Chroma Du Monde can help speed up the camera
alignment process by introducing known calibrated constants into the sampled video that should produce a standard
VS-150 Waveform, Parade or Vectorscope pattern. The live lighting and camera settings can then be adjusted to
produce a VS-150 pattern that matches a calibrated pattern.
For more information on these tools visit http://www.dsclabs.com/
Page 14

13
VS-150 Quick Start Guide
Correctly centered samples
Incorrect points towards blue
Black and White Balance Adjustment (VECTORSCOPE)
1. Aim the camera at a solid white background or white reference card.
2. Turn on any set lights and ensure any coloured filters are removed. We want an evenly lit white reference card or
background with only true white light.
3. Select VECTORSCOPE mode on the VS-150 using the NEXT MODE option.
4. Use the camera’s auto white balance feature to white balance against the solid white background or reference white
card.
5. If necessary adjust R (Red) or B (Blue) GAIN of the camera to move the shown sample points for white video into the
center graticule box of the VS-150 Vectorscope.
6. Once white balancing is complete cap the camera lens to produce black video. The sample points should only
appear in the same center graticule box of the VS-150 Vectorscope.
7. If necessary adjust R (Red) or B (Blue) GAIN of the camera to move the shown sample points for black video into the
center graticule box of the VS-150 Vectorscope.
8. Remove the lens cap and continue to Luminance Adjustment.
Page 15

14
Luminance Adjustment (HISTOGRAM)
1. Under the same on set lighting conditions aim the camera back to the white background or ideally a grayscale
reference chart which includes 100% white and absolute black.
2. Select HISTOGRAM mode on the VS-150 using the NEXT MODE option.
3. Adjust the camera’s IRIS and Neutral Density Filter to reach the desired maximum white level state. If the camera
has a Zebra function you can use this to identify areas of under or over exposure too.
4. If aiming at a precise grayscale chart, the VS-150 histogram output may resemble evenly spaced vertical sample
bars in line with the grayscale chart. However, if the pattern is distributed towards the right (100), it can mean the
camera is over exposed. If the pattern is distributed towards the left (0), it can mean the camera is under exposed.
5. If there are readings below zero the black levels will be crushed or too black. Use the master pedestal setting on the
camera to set the lowest black level at or slightly above 0.
6. Once the first camera is correctly calibrated select TOOLS> TRACE MEMORY> SAVE TRACE to save the
calibrated matrix levels from the first camera.
7. Now connect VS-150 to the second camera on the set. Adjust the white and black balance on the next camera as
described earlier.
8. Now adjust the grayscale reading from second camera output so that it matches the saved output from first camera
to align the cameras. The same procedure can be repeated for any remaining cameras.
Page 16

15
Luminance Adjustment (WAVEFORM MONITOR)
The grayscale matrix image above is not evenly stepped and shows there are four over-exposed white areas
1. Under the same on set lighting conditions aim the camera back to the white background or ideally a grayscale
reference chart.
2. Select WAVEFORM mode on the VS-150 using the NEXT MODE option.
3. Adjust the camera’s IRIS and matrix to reach the desired maximum white level state. There may be a pre-selected
level, such as 600mv as a standard for consistency in brightness.
4. If aiming at a precise grayscale chart, the VS-150 waveform output may resemble an X shaped matrix. The steps in
this matrix should be evenly distributed in line with the grayscale chart. However, if the matrix is not evenly
distributed, it means that the Gamma is not correctly set, and will lead to further adjustment of the camera.
5. Once the first camera is correctly calibrated select TOOLS> TRACE MEMORY> SAVE TRACE to save the
calibrated matrix levels from the first camera.
6. Now connect VS-150 to the second camera on the set. Adjust the white and black balance on the next camera as
described earlier.
7. Now adjust the grayscale matrix reading from second camera output so that it matches the saved matrix from first
camera to align the cameras. The same procedure can be repeated for any remaining cameras.
Page 17

16
Colour /Hue Adjustment (PARADE RGB / YCbCr)
1. Under the same on set lighting conditions aim the camera at a colour reference chart (such as DSC labs’ Chroma Du
Monde).
2. Adjust the colour level of the camera to give its image the required warmer or colder look according to your
preference.
3. Select PARADE mode (RGB or YCbCr) on the VS-150 using the NEXT MODE option.
4. PARADE displays the characteristic colour levels on a scale. If the camera is pointed at the Chroma Du Monde
reference chart, the operator can now set the camera to standardised colour levels such as R:650mv G:600mv
B:600mv. These adopted set reference points can then ensure image consistency in future production runs and any
post production grading.
5. Once the first camera is correctly set for colour select TOOLS> TRACE MEMORY> SAVE TRACE to save the
current parade trace from the first camera.
6. Now connect VS-150 to the second camera on the set. Adjust the white, black balance and luminance on the next
camera as described earlier.
7. Now adjust the colour on the second camera output so that it matches the saved Parade from the first camera. The
same procedure can be repeated for any remaining cameras.
Set your own standard (The colour of the image above is leaning toward red)
Page 18

17
Camera output after adjustments (VECTORSCOPE)
1. Under the same on set lighting conditions aim the camera at a colour reference chart (such as DSC labs’ Chroma Du
Monde).
2. Select VECTORSCOPE mode on the VS-150 using the NEXT MODE option.
3. Now, the VECTORSCOPE displays the analyzed colour components. If the white balance of one camera had been
altered, the VECTORSCOPE matrix can be used as a check point to ensure all cameras have been correctly
aligned.
4. Feeding camera output of 75% colour bars into a Video Switcher confirms if the colour image is correct after the
switcher too.
Page 19

18
VS-150 Advanced Application
RGB PARADE and White Balance Adjustment
i. Select PARADE mode on the VS-150 using the NEXT MODE option. Then point the camera at the white background
or white reference card.
ii. When the white balance is correctly adjusted, The RGB traces should be flat, balanced, and parallel to one another
in a straight line.
iii. When White balance is not correctly adjusted, the PARADE will show unbalanced trace.
iv. When the lighting is not evenly spread-out, the PARADE will show traces which deviate from the straight line.
v. If one of the RGB trace has one end higher than another, it means that the colour has lost its fidelity.
This undesired situation will occur if the camera is not adjusted correctly or you have an uneven colour temperature/
lighting on the background during white balancing.
Page 20

19
Camera Noise
i. Adjust the IRIS of the camera to minimum or cap the lens.
ii. Select PARADE mode on the VS-150 using the NEXT MODE option.
iii. The noise value will be displayed on the chart. The thicker the value on the line chart, the greater the noise level.
The thinner the trace on the chart, the less the noisy it is
Page 21

20
Comparing colour saturation among cameras
i. Aiming the camera at Chroma Du Monde (Set camera to AUTO).
ii. Select VECTORSCOPE mode on the VS-150 using the NEXT MODE option.
iii. The VECTORSCOPE matrix displaying on VS-150 represents the colour components from the camera.
iv. Use the SAVE TRACE feature under TOOLS to compare the colour components between cameras.
v. The matrix indicates the current colour components of the camera by showing the positioning of the dots. When two
cameras have aligned luminance, the larger the VECTORSCOPE matrix, the more colour saturation it represents.
Page 22

21
Application Diagram
Page 23

22
Dimensions
Page 24

23
Specifications
Interface
1x SDI/HD-SDI input
(HD-SDI SMPTE 292M 1.5Gbps, SD-SDI SMPTE 259M-C 270Mbps with Embedded
Audio)
1x SDI/HD-SDI Loop through output
1x HDMI Output
HD/SD-SDI Spec
SMPTE 259M-C (270Mbps - 525/625 Component Video)
and SMPTE 292M (1.485/1.001 Gbps) Connector BNC (IEC 169-8) Impedance 75 Ω
Return Loss HD > 10 dB (1.5 GHz)
SD > 15 dB (270 MHz)
Equalization 200 m Belden 8281 cable at 270 Mbps;
100 m (typical) of Belden 1694A at 1.485 Gbps
HDMI
Supports HDMI v1.1
Operating Temperature
0°C to 50°C (32°F to 102°F)
Humidity
10% to 90% (non condensing)
Dimensions
220mm (W) x 47mm (H) x 221.3mm (D)
Weight
Gross, packed = 2.2 Kg
Power
DC 12V / 0.5A (3.6W)
Page 25

24
Service & Support
Tel: +1 562 696 2324
Fax: +1 562-698-6930
E-Mail: contactus@datavideo.us
Tel: +31-30-261-96-56
Fax: +31-30 261-96-57
E-Mail: service@datavideo.nl
Tel: +44 1457 851 000
Fax: +44 1457 850 964
E-Mail: sales@datavideo.co.uk
Tel: +886 2 8227 2888
Fax: +886-2-8227-2777
E-mail: service@datavideo.com.tw
Tel: +86 21-5603 6599
Fax:+86 21-5603 6770
E-mail: service@datavideo.cn
Tel: +65-6749 6866
Fax: +65-6749 3266
E-mail: service@datavideo.sg
Tel: +852 2833 1981
Fax: +852-2833-9916
E-mail: info@datavideo.com.hk
Tel: +33 1 60 37 02 46
Fax: +33 1 60 37 67 32
E-Mail: info@datavideo.fr
Tel: +91 120 4309120
Fax: +91 120 4309121
E-Mail: sales@datavideo.in
It is our goal to make your products ownership a satisfying experience. Our supporting staff is available to assist you in
setting up and operating your system. Please refer to our web site www.datavideo-tek.com for answers to common
questions, support requests or contact your local office below.
Datavideo Global Website: www.datavideo-tek.com
Datavideo Corporation
Datavideo Technologies Europe BV
Datavideo UK Limited
Datavideo Technologies Co., Ltd
Datavideo Technologies China Co., Ltd
Datavideo Technologies (S) PTE LTD
Datavideo HK Limited.
Datavideo France
Datavideo India
All the trademarks are the properties of their respective owners.
Datavideo Technologies Co., Ltd. All rights reserved 2018
G082060644B1
 Loading...