

Page 1

LARGE SCREEN PROMPTER
KIT FOR ENG CAMERAS
TP-650
Instruction manual
Page 2

PROMPTER KIT FOR ENG CAMERAS TP-650
Contents
FCC COMPLIANCE STATEMENT ..................................................................................................................................... 3
WARNINGS AND PRECAUTIONS .................................................................................................................................... 3
GLASS – HANDLE WITH CARE .................................................................................................................................................. 3
WARRANTY .................................................................................................................................................................. 4
STANDARD WARRANTY ........................................................................................................................................................... 4
REGISTER FOR 3 YEAR WARRANTY ............................................................................................................................................. 4
DISPOSAL ............................................................................................................................................................................. 4
PACKING LIST ........................................................................................................................................................................ 5
PRODUCT OVERVIEW ................................................................................................................................................... 6
FEATURES ............................................................................................................................................................................. 6
ASSEMBLY – TP-650 ...................................................................................................................................................... 7
CAMERA EXPOSURE AND THE 60/40 MIRROR GLASS ................................................................................................................. 10
CLEANING THE 60/40 GLASS ................................................................................................................................................. 11
FREE APP DOWNLOAD FROM THE APP STORE™ .......................................................................................................... 12
FREE ANDROID APP DOWNLOAD FROM GOOGLE PLAY™ ............................................................................................ 12
OPTIONAL REMOTE CONTROL MANUAL .................................................................................................................................... 12
OPTIONAL BLUETOOTH TELEPROMPTER REMOTE CONTROL ....................................................................................... 13
REMOTE STARTS IN WIRED MODE ........................................................................................................................................... 13
BLUETOOTH MODE – PAIRING TO YOUR TABLET DEVICE ............................................................................................................... 13
RESET – Return the Remote to Wired Mode ............................................................................................................... 14
CONTROL BUTTONS .............................................................................................................................................................. 15
REMOTE ACCESSORIES .......................................................................................................................................................... 15
Lanyard Necklace ........................................................................................................................................................ 15
CR2032 Battery ........................................................................................................................................................... 15
OPTIONAL HC-600 HARD CASE ..................................................................................................................................... 17
HC-600 FEATURES .............................................................................................................................................................. 17
HC-600 SPECIFICATIONS ....................................................................................................................................................... 17
ADJUSTABLE TABLET HOLDER RAIL – ITEM B ............................................................................................................... 18
SPECIFICATIONS ........................................................................................................................................................... 18
NOTE ........................................................................................................................................................................... 19
SERVICE AND SUPPORT ............................................................................................................................................... 20
Disclaimer of Product and Services
The information offered in this instruction manual is intended as a guide only. At all times, Datavideo Technologies will try
to give correct, complete and suitable information. However, Datavideo Technologies cannot exclude that some
information in this manual, from time to time, may not be correct or may be incomplete. This manual may contain typing
errors, omissions or incorrect information. Datavideo Technologies always recommend that you double check the
information in this document for accuracy before making any purchase decision or using the product. Datavideo
Technologies is not responsible for any omissions or errors, or for any subsequent loss or damage caused by using the
information contained within this manual. Further advice on the content of this manual or on the product can be obtained
by contacting your local Datavideo Office or dealer.
2
Page 3

PROMPTER KIT FOR ENG CAMERAS TP-650
FCC Compliance Statement
This device complies with part 15 of the FCC rules. Operation is subject to the following two conditions:
1. This device may not cause harmful interference, and
2. This device must accept any interference received, including interference that may cause undesired
operation.
Warnings and Precautions
1. Read all of these warnings and save them for later reference.
2. Follow all warnings and instructions marked on this unit.
3. Unplug this unit f rom the wall outlet befor e cleaning. Do not use liquid or aerosol clean ers. Use a damp
cloth for cleaning.
4. Do not use this unit in or near water.
5. Do not place this unit on an unstable cart, stand, or table. The unit may fall, causing serious damage.
6. Slots and openings o n the cabinet top, bac k, and bottom are provided for venti lation. To ens ure safe and
reliable operation of this unit, a nd to protect it f rom over heating, do not block or cover t hese ope nings . Do
not place this unit on a b ed, sof a, rug, or s im ilar surface, as the vent ilation openin gs on the bottom of the
cabinet will be block ed. T his unit s hou ld ne ver be p lac ed near or over a heat r egi ster or radiator . This unit
should not be placed in a built-in installation unless proper venti lat ion is pro vided .
7. This product shou ld only be oper ated from the t ype of power sour ce indicat ed on the mark ing label of the
AC adapter. If you are not sur e of the t ype of power ava ilable, c onsult your Datavideo dea ler or your loc al
power company.
8. Do not allow anything to rest on the power cord. Do not locate this unit where the power cord will be
walked on, rolled over, or otherwise stressed.
9. If an extension cord m ust be used with this unit, make s ure that the total of the ampere ratings on the
products plugged into the extension cord do not exceed the extension cord rating.
10. Make sure that the total amperes of all the units that are plugged into a single wall outlet do not exceed 15
amperes.
11. Never push objects of any kind into this unit through the cabinet ventilation slots, as they may touch
dangerous voltage points or short out parts that cou ld result in risk of fire or el ectric shock. Never spill
liquid of any kind onto or into this unit.
12. Except as sp ecifical ly expl ained else where in this m anual, do n ot attem pt to ser vice this pr oduct yourself .
Opening or removin g covers that are marked “Do N ot Remove” may expose you to dangerous voltage
points or other risks, and will void your warranty. Refer all service issues to qualified service personnel.
13. Unplug this product from the wall outlet and refer to qualified service personnel under the following
conditions:
a. When the power cord is damaged or frayed;
b. When liquid has spilled into the unit;
c. When the product has been exposed to rain or water;
d. When the product does not operate normally under normal operating conditions. Adjust only those
controls that are covered by the operating instructions in this manual; improper adjustment of other
controls may result in damage to the unit and may often require extensive work by a qualified
technician to restore the unit to normal operation;
e. When the product has been dropped or the cabinet has been damaged;
f. When the product exhibits a distinct change in performance, indicating a need for service.
GLASS – Handle with care
This product contains a sheet of 60/40 mirror glass please handle it with care.
To avoid a risk of damage or injury please follow this instruction manual and use
caution when transport ing, un-pac king, cleaning, assembling or dis-as sembling this part
of the product.
3
Page 4

PROMPTER KIT FOR ENG CAMERAS TP-650
Warranty
Standard Warranty
• Datavideo equipment are guaranteed against any
manufacturing defects for one year from the date of
purchase.
• The original purchase invoice or other documentary
evidence should be supplied at the time of any
request for repair under warranty.
• The product warranty period begins on the purchase
date. If the purchase date is unknown, the product
warranty period begins on the thirtieth day after
shipment from a Datavideo office.
• All non-Datavideo manufactured products (product
without Datavideo logo) have only one year warranty
from the date of purchase.
• Damage caused by accident, misuse, unauthorized
repairs, sand, grit or water is not covered under
warranty.
• Viruses and malware infections on the computer
systems are not covered under warranty.
• Any errors that are caused by unauthorized third-
party software installations, which are not required by
Disposal
For EU Customers only - WEEE Marking
This symbol on the product or on its packaging indicates that this product must not be disposed of with
your other household waste. Instead, it is your responsibility to dispose of your waste equipment by
handing it over to a designated collection point for the recycling of waste electrical and electronic
equipment. The separate collection and recycling of your waste equipment at the time of disposal will
help to conserve natural resources and ensure that it is recycled in a manner that protects human health
and the environment. For more information about where you can drop off your waste equipment for
recycling, please contact your local city office, your household waste disposal service or the shop where
you purchased the product.
CE Marking is the symbol as shown on the left of this page. The letters "CE" are the abbreviation of
French phrase "Conformité Européene" which literally means "European Conformity". The term initially
used was "EC Mark" and it was officially replaced by "CE Marking" in the Directive 93/68/EEC in 1993.
"CE Marking" is now used in all EU official documents.
our computer systems, are not covered under
warranty.
• All mail or transportation costs including ins uran ce
are at the expense of the owner.
• All other claims of any nature are not covered.
• All accessories including headphones, cables, and
batteries are not covered under war ranty .
• Warranty only valid in the country or region of
purchase.
• Your statutory rights are not affected.
Register for 3 year Warranty
• All Datavideo products purchased after July 1st,
2017 are qualified for a free two years extension to
the standard warranty, providing the product is
registered with Datavideo within 30 days of purchase.
• Certain parts with limited lifetime expectancy such as
LCD panels, DVD drives, Hard Drive, Solid State
Drive, SD Card, USB Thumb Drive, Lighting, Camera
module, PCIe Card are covered for 1 year.
• The three-year warranty must be registered on
Datavideo's official website or with your local
Datavideo office or one of its authorized distributors
within 30 days of purchase.
4
Page 5
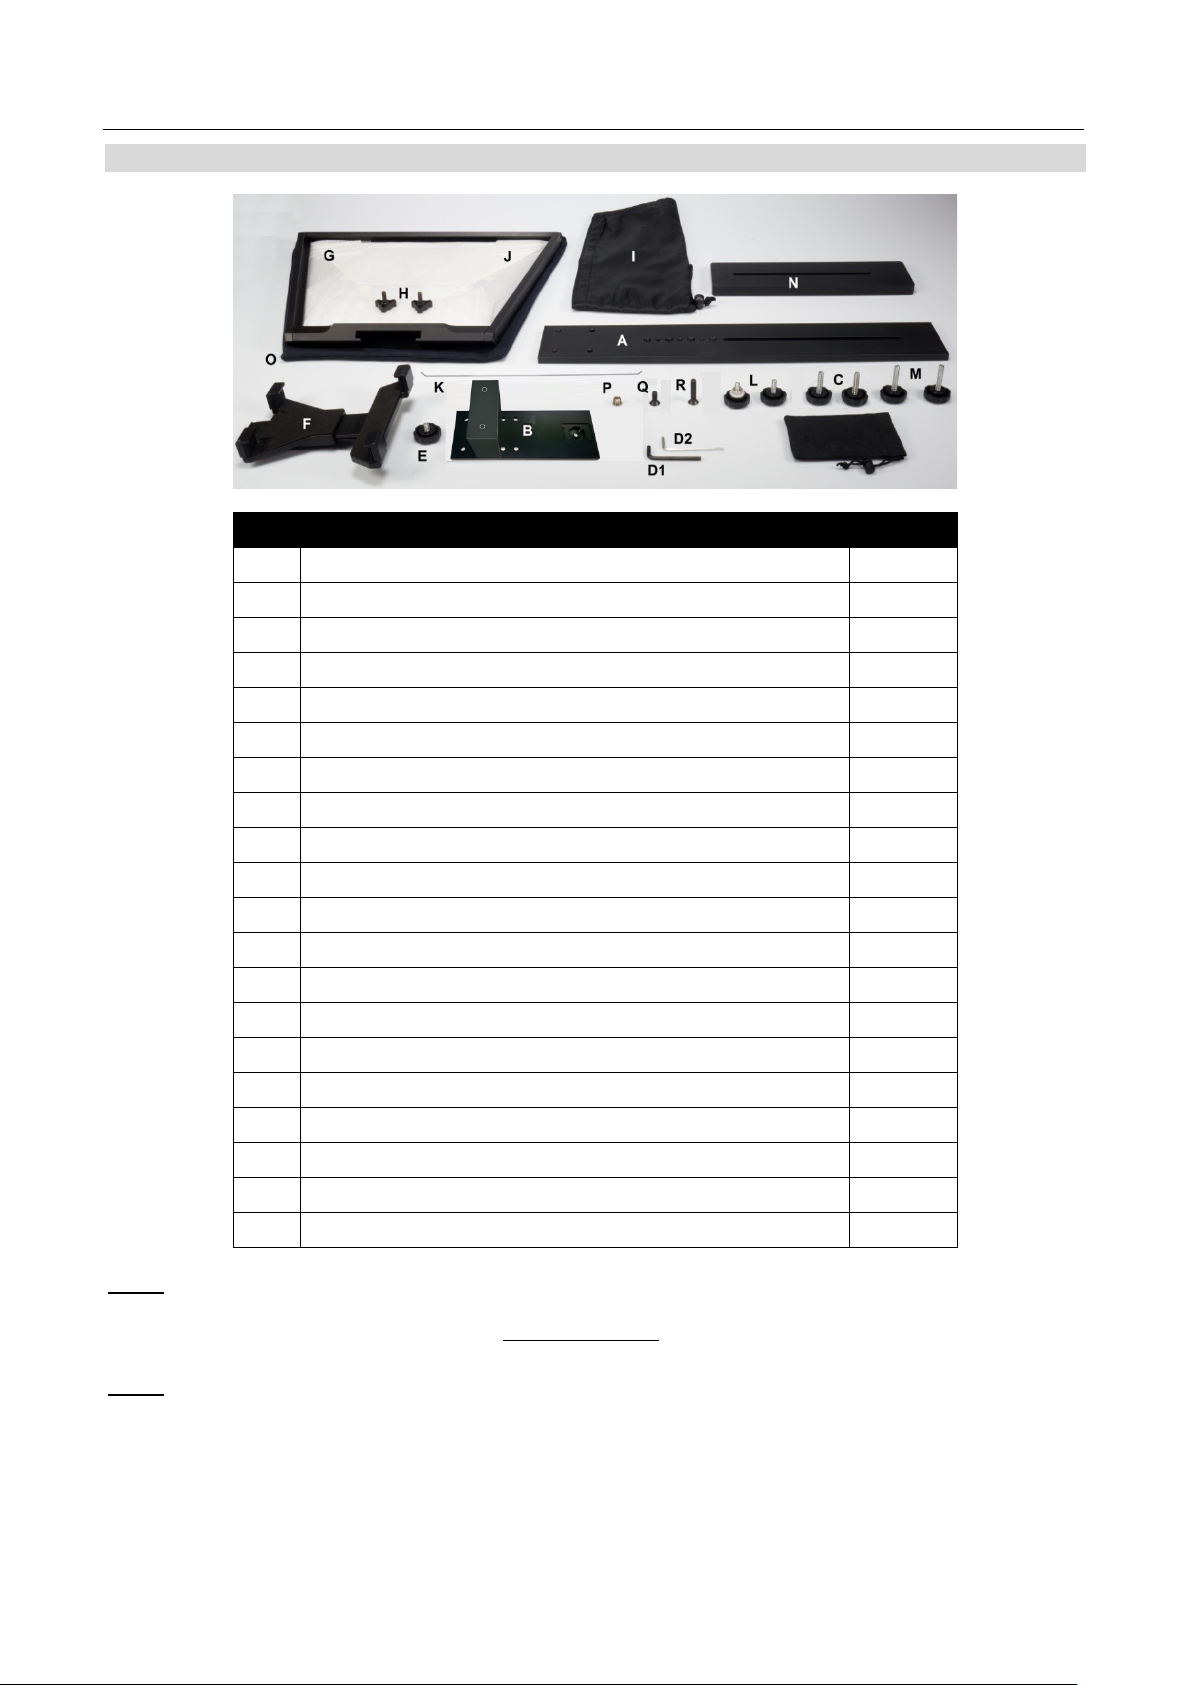
Wing nut screws ¼” Length 16mm secures item G to A
Camera riser block 15mm thick
Packing List
PROMPTER KIT FOR ENG CAMERAS TP-650
Item Description Quantity
A
Main TP-650 ENG prompter rail
B
Smaller rail with spacer block for mounting bracket
C
¼” Screws Length 27mm secures item B to A
D1
Hex Tool (Black) for counter sunk Hex head screws
D2
Hex Tool (Silver) for Glass Frame Hex screws
E
¼” Screw Length 8mm secures item F to B
F
Adjustable Mounting Bracket with locking lever
G
Glass frame with 4 Velcro straps
H
I
Cloth Snood/Hood with Velcro straps
J
60/40 Glass sheet with Green and Red stickers
K
Snood/Hood support wire
L
¼” Camera securing screws length 16mm
1
1
2
1
1
1
1
1
2
1
1
1
2
M ¼” Camera securing screws length 31mm 2
N
1
O
Cloth case for Snood, Mirror Glass and Glass frame
P
Adapter screw to convert 3/8” hole to ¼” hole
Q
¼” Counter sunk hex head screw length 16mm
R
¼” Counter sunk hex head screw length 31mm
plus
Retail carton with protective foam packing
NOTE: Depending on your order, your TP-650 kit could have been supplied with one of a range of wired or
Bluetooth remote controls – for more information on the remote controls please speak with your local
Datavideo supplier or check our website
NOTE: The foam packing within this products retail carton has been designed so that it can be easily transferred to
an optional hard case, called HC-600, for this kit. See page 16 for more information.
Please speak with your supplier if you wish to purchase an optional remote control or hard case for your
prompter kit.
1
1
1
1
1 set
www.datavideo.info for details.
5
Page 6
PROMPTER KIT FOR ENG CAMERAS TP-650
takes, on stage talent
designed to help you overcome these problems by
sheets can be easily copied and pasted into the DV
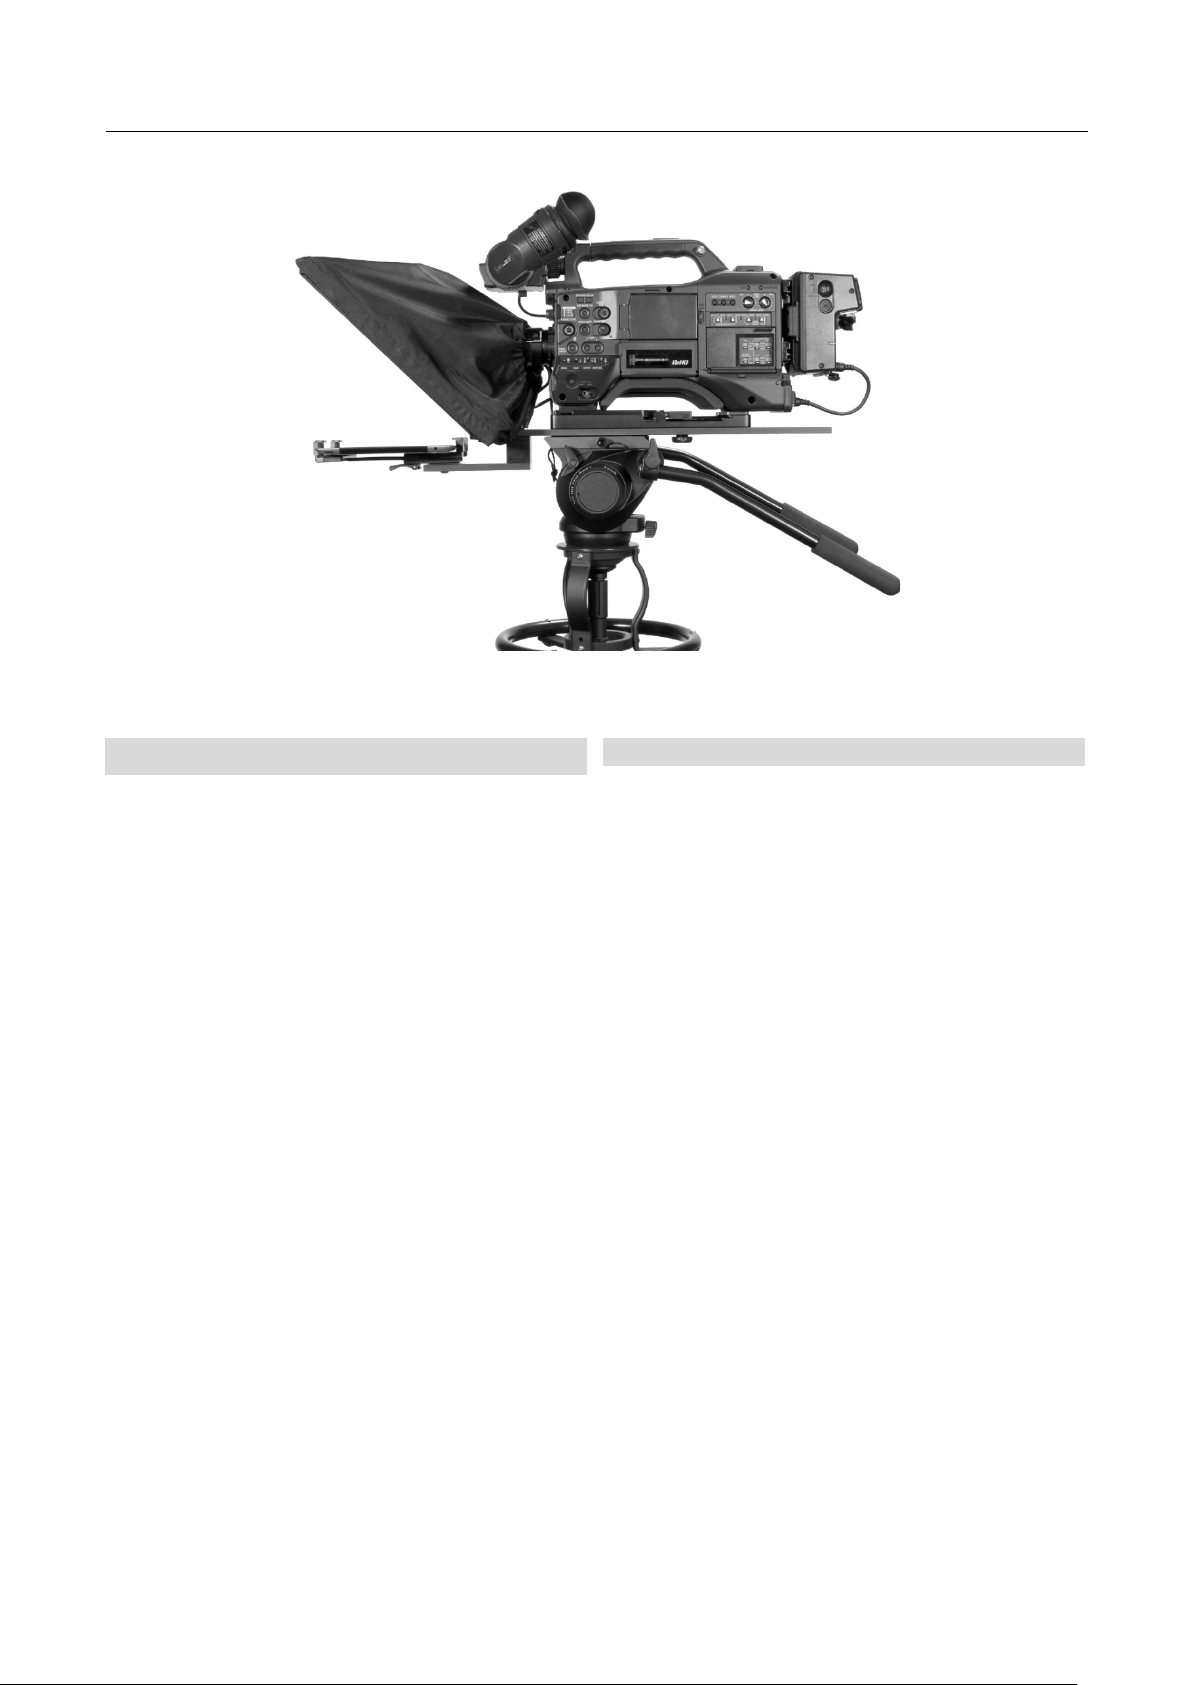
Shown with Panasonic AG-HPX371E and SHAN-TM700
Product Overview
Why struggle with expensive redrifting off script or a presenters’ loss of eye contact with
the viewing audience? This Datavideo Prompter Kit is
converting a tablet computer (not supplied) into a low cost
and effective prompter.
The Datavideo Prompter Kit, TP-650, can be used in either
a theatre setting, or a video studio. Prepared scripts or cue
prompter app software from email and scrolled at a set
automatic rate or controlled by a user with the optional
wired / wireless remote for a more natural result. A number
of clear fonts, colours and text sizes are available making
reading comfortable from a variety of distances.
That’s Datavideo, sharing the value !
Features
• Simple software and rem ote al low users to
produce professional results at low cost.
• Special 60/40 Glass allows the presenter to read
the script and the camera to see the subject.
• Strong and rigid prompter frame fixes securely to
any standard tripod quick release plate.
• The prompter frame is designed to allow in front of
camera lens prompting.
• The black camera snood/hood is adjustable to
adapt for a wide variety of cameras.
• Quick and simple assembly that requires no
special tooling.
• Expandable mounting bracket system allows
simple but secure installation of tablet.
• An optional remote control is available.
6
Page 7

PROMPTER KIT FOR ENG CAMERAS TP-650
position and the four holes in the rail will be
Now slide and secure the tripod plate, with
3. Use the hand screws item C, to secure the lower
4. There are four adhesive Velcro straps packed
Apply the two long Velcro strips to the Glass
Assembly – TP-650
1. Attach/screw the tripod’s own quick release plate
to the screw holes on the base of the TP-650
ENG Prompter rail, item A.
The long slot will be to the rear of the camera
towards the lens of the camera.
Tip: Add a second screw (not supplied) through
the quick release plate. This to stop the Prompter
Frame from being able to spin on top of the quic k
release plate.
2.
prompter rail, item A, onto the head of the tripod
or dolly.
part of the ENG Prompter Frame item B in place
using the counter sunk holes in the main part of
the frame item A.
Note: There should be two holes left free in front
of this mounting position for the Glass frame.
inside the Snood/Hood, item I. Peel off the white
paper backing before applying these straps to the
Glass Frame, item G.
Frame edges on the Left side and Right side.
Then apply the two smaller Velcro strips to the
Bottom Left and Right sides of the Glass Frame
edge.
Be careful not to cover any screws and keep
them straight.
7
Page 8

PROMPTER KIT FOR ENG CAMERAS TP-650
5. Slide the G lass frame, item G, on to the front of
leaning away from the camera position and
Ideally you want the lens of your camera
the TP-650 ENG prompter rail, item A. Ensure
the upper part of the Glass Frame, Item G, is
secure with the two wing nut screws, item H.
6. There are two slots on the inside left and right of
the Glass Frame, Item G. Guide/slide 60/40
Mirror Glass sheet, item J, into these slots from
above.
The Red circle sticker on the Mirror Glass, item
J, should be facing camera position / lens.
The Green circle sticker on item J should be
facing toward the on screen talent /
commentator.
7. Secure the glass sheet within the frame using the
cross head screws at the top of each frame slot.
8. Fit the adjustable mounting bracket with locking lever, item F, to the lower prompter rail item B.
Marry the mounting hooks in item B in the holes in the bottom of item F to secure item F to B.
It should slide and click into place.
9. Decide if you need to use the TP-650 ENG
camera riser block or not.
positioned as close to the centre of the 60/40
mirror glass as possible.
In some cases depending on your camera and its
ENG camera plate the camera lens may already
be high enough.
8
Page 9

PROMPTER KIT FOR ENG CAMERAS TP-650
Secure the ENG tripod adapter plate (not
prompter rail and into the base of the tripod
16mm long) when just
adapter plate and riser block need to be
11. You can now mount the ENG camera to the
to protect the
camera lens and the 60/40 mirror glass. If
necessary slide everything further along the
12. Fit the Snood / Hood support wire, item K.. This
stops the cloth Snood / Hood from dipping in
10.
supplied) and riser block item N (if required) to
the prompter rail item A using two of the riser
screws provided, items L or M. These screws
go through the long slot on the riser block and
adapter plate.
Two screw sets are provided, the long set (Item
M 31mm long) is for when using the riser block.
The short set (Item L
SHAN-TM700 tripod adapter plate shown
without riser block
using the camera plate on its own.
Items Q and R are provided i n case the tripod
positioned over the tripod head.
tripod adapter plate. Take care
prompter frame.
The tip of the lens should be about 1 to 2 cm
away from the centre of the 60/40 Mirror Glass.
It may be a good idea to remove the lens
sun hood if this is possible.
front of the camera lens. There are two sets of
holes in the glass frame for this Snood / Hood
support wire.
13. Fit the cloth Snood / Hood, item I, around the
lens and to t he G las s Fr am e ed ge s, item G. The
Velcro strips marry the Snood/Hood to the Glass
Frame.
9
Page 10

PROMPTER KIT FOR ENG CAMERAS TP-650
15. Turn on the tablet being used, install and launch the
software then prepare the prompting text
19. Adjust the camera exposure settings as necessary. See Camera Exposure below.
20. Read the section regarding your chosen remote control.
14. Pull the draw cord to secure the cloth Snood /
Hood, item I, around the camera lens and to
shut out light from the camera side.
DV Prompter
to be used. Then set up for the optional remote control. A separate manual is available for DV Prompter and
the chosen remote control.
16. Put the configured tablet into the mounting
bracket and ensure it is held securely by
adjusting the size of the bracket holders for a
snug fit and locking them in place. Use locking
lever on the bottom of item F.
17. If required adjust the position of the tablet
holder using the information on page 17.
18. Adjust the prompting settings where necessary.
Camera Exposure and the 60/40 Mirror Glass
After setting up the camera with the 60/40 glass in front of the lens adjust the camera set up and white balance. This is
because the 60/40 Glass affects the camera exposure by approximately 1 stop almost like the effect of a neutral density
filter. Consult your camera manual for further help and advice with its exposure and white balance settings.
10
Page 11

PROMPTER KIT FOR ENG CAMERAS TP-650
Cleaning the 60/40 Glass
This product contains a sheet of 60/40 glass please handle it with care.
To avoid a risk of dam age or inj ury please f ollow this instr uction m anual and use cautio n
when transporting, un-packing, cleaning, assem bling or dis-assembling this part of the
product.
Datavideo recommend cleaning the glass regu lar l y to r emove dust and finger print marks.
This will ensure the best image quality is recorded when the camera is looking through the glass.
Never attempt to clean the glass whilst it is mounted in the prompter instead remove it carefully from the
prompter, clean th e glass and then re-i nstall it into the prom pter frame. Handle the glass carefull y using the
cloth covered edges of the glass at all times.
To retain the required qualities of the glass and to avoid scratching the glass during cleaning.
• Never use abrasive cloths, pads or abrasive based cleaning fluids on the glass.
• Never use cleaning fluids based on an acid or vinegar solution.
Place the glass on a s oft, stable, dirt and lint free w ork
surface such as a tab le wit h a c l ean c loth already laid out
on it. Then use a second clean, lint free, soft cloth to
clean the glass.
Do not apply clean ing fluids to t he glass direc tly, instead
apply or spray a sm all amount of the cleaning f luid onto
the cloth. Proceed to clean the glass a nd work in a light
circular motion with the clot h. Ensure all finger marks and streak s are gone before tur ning the glass over and
repeating with the other side.
Once finished re-install the glass back into the prompter hood, again using the cloth covered edges only.
Ensure the green circle sticker on the glass is facing you and the r ed circle s ticker is f acing the cam era
lens. Reseat/secure the camera hood if necessary.
11
Page 12

PROMPTER KIT FOR ENG CAMERAS TP-650
Free app download from the
Free Android App download
App Store™
Ensure your tablet has internet access via your cellular
service provider or a secure wireless connection.
Tap the App Store™ icon on the devi ce Home S cree n
to download apps wherever you are.
Browse the section of the store that
features apps designed specifically for
these devices or tap on the Search bar
at the top/bottom of the screen and type in Datavideo or
DV Prompter. Then execute the search by tapping on
the Search icon to the right. You will see this software as
a result listed, simply tap on the Free icon and then
Install.
The App Store icon on your device will show you when
an update is available for any app that
you already have. Install the updates
with a tap, and you’ll always have the
latest version of your favourite apps like
DV Prompter.
from Google play™
Ensure your tablet has internet access via your cellular
service provider or a secure wireless connection.
Tap on the Google play
Screen to see the latest or popular App downloads.
Browse for Apps or tap on the magnifying glass icon to
show the Search bar.
When searching type in DV Prompter then execute the
search by tapping on the search icon again. You will see
our app as a result listed, simp ly tap on DV Prompter
and choose install.
Android and Google play are trademarks of Google Inc.
™ icon on the device Home
Optional remote control manual
See the following section, Optional Bluetooth Teleprompter Remote Control, which covers how to use the remote
control. There is also a separate manual supplied with the remote control and can also be downloaded as a PDF
document from your local Datavideo office website.
12
Page 13

PROMPTER KIT FOR ENG CAMERAS TP-650
Optional Bluetooth Teleprompter Remote Control
This WR-500 rem ote control is designed to be used w ith Datavideo’s teleprompter produc ts, DV Prompter
and DVP-100.
DV Prompter app is a FREE download from the Apple app store for iOS devices and also from Google Play
for Android devices. DVP-100 is a synchronised, multi tablet / camera, teleprompting product.
A separate manual i s provid ed for DVP-100 and the DV Prompter app. For further details please v isit o ur
website www.datavideo.com
Remote starts in Wired Mode
When first removed f rom the retail pack age the WR-500 rem ote is already in wired mode. W hen a button is
pressed a RED LED will flash. The WR-500 can be switched to Bluetooth mode if required.
In wired mode, the rem ote needs t o be physical ly cabled to the tablet it is controll ing. A four po le jack to j ack
plug cable is provided with this remote.
One end of the cable fits into the tablet’s headset socket. The other end plu g s into th e j ack socket on the
WR-500 remote.
NOTE: W hen us ing this r em ote in wired m ode t he DV Prompter app s hould als o be set to Wired – WR-500
in the Remote menu option.
Bluetooth Mode – Pairing to your tablet device
Switch the Bluetooth function ON within the tablet device settings.
Open the DV Prompter app on the same tablet device and choose Bluetooth – WR-500 in the Remote
Control menu.
Select and start the required script within the DV Prompter app.
13
Page 14

PROMPTER KIT FOR ENG CAMERAS TP-650
To switch the rem ote into Bluetooth pairing m ode press and hold t he centre Play / Pause button for 3 to 4
seconds.
The GREEN LED will now blink on / off repeatedly to indicate it is ready to pair with a Bluetooth device.
Once paired a Bluetooth icon will be shown in th e top right hand corner of the main app screen and bot tom
right corner of the script.
Note: T he remote will sl eep after 5 m inutes of inac tivity to sav e battery lif e. Press the pla y / pause button to
wake the remote and it will automatically try to re-pa ir with the tab let previously used.
RESET – Return the Remote to Wired Mode
To return the W R-500 remote t o wired m ode from Bluetooth mode sim ply press and hold the Play / Pause
button until the GREEN LED stops flashing and becomes a steady GREEN light.
When a RED LED is shown on button presses the remote is in wired mode.
14
Page 15

PROMPTER KIT FOR ENG CAMERAS TP-650
Button
Whilst
scrolling text
Whilst
text paused
LED Indicators
Control Buttons
Speed up text scroll Next Break Marker
Slow down text scroll Previous Break Marker
Pause text Play text
Reduce font size Load previous script
Increase font size Load next script
RED LED Wired Mode
GREEN LED Bluetooth 4
Remote Accessories
Lanyard Necklace
Plug the lanyard necklace into the jack plug socket.
CR2032 Battery
A CR2032 button battery is installed inside this remote. The original battery supplied (when new) is expected
to last for 3 years under average / normal use.
15
Page 16

PROMPTER KIT FOR ENG CAMERAS TP-650
This button battery can be replaced b y the us er when it dies. Please remov e the back case cover carefully
to avoid user damage to the PCB or case. Then slide the old battery out.
Please ensure the new button battery is installed with the positive (+) side of the cell facing the (+) sign on the
PCB battery slot.
16
Page 17

PROMPTER KIT FOR ENG CAMERAS TP-650
Optional HC-600 Hard Case
The foam packaging of the TP-650 kit has been designed so that customers who buy the optional hard case can simply lift
the foam out from the retail carton and insert it directly into the optional HC-600 hard case.
As standard, the HC-600 hard case is supplied with the usual diced, pick & pluck foam so these cases can also be used
as optional carrying cases for a variety of equipment – not just the TP-650 kit.
HC-600 Features
• Press & pull latches
• Secure impact resistant hinges with integrated feet
• Case can stand upright and level on hinge spine
• Solid core handle is both comfortable and durable
• Shock proof, vibration proof, dust proof and rust proof
• Low temperature (-25C / -13F) resista nce tes ted
• Sealable for moisture protection
• Pressure release valve
• Stackable
Please speak with your supplier or dealer if you wish to purchase an optional HC-600 hard case.
HC-600 specifications
Dimensions: External H 410mm x W 515mm x D 200mm
Dimensions: Internal base H 352mm x W 481mm x D 100mm without foam
Dimensions: Internal lid H 352mm x W 481mm x D 70mm without foam
Weight: 4.15 Kg ( 9.15 lbs ) with pick and pluck foam only
Weight: 7.70 Kg ( 16.98 lbs ) Including TP-650 kit and foam
17
Page 18

PROMPTER KIT FOR ENG CAMERAS TP-650
Normal Position
Adjusted
Adjustable tablet holder rail – Item B
Item B in th is kit has two counter s unk hex head sc rews. If these sc rews are rem oved the hori zontal rail can
be moved and re-secured to the vertical block using different holes. T his will change position of the tablet
holder and where the tex t is reflected on t he 60/40 Mirr or glass. In this way you can adjus t the reflected read
position (up or down) for your preferred tablet.
Specifications
Prompter Size (Max)
Width: 415 mm (16.34 inches)
Height: 290 mm (11.42 inches)
Length: 750 mm (29.53 inches)
Expandable Mounting Bracket
Sizes: 145 mm (Minimum tablet width)
265 mm (Maximum tablet width)
Nett Weight: Kit: 3.28 Kg (7.23 lbs)
Packed weight: (Gross) Kit: 4.45 Kg (9.81 lbs)
18
Page 19

PROMPTER KIT FOR ENG CAMERAS TP-650
NOTE
19
Page 20

DATAVIDEO WORLDWIDE OFFICES
Service & Support
It is our goal to make owning and using Datavideo products a satisfying experience. Our support sta is available
to assist you to set up and operate your system. Contact your local office for specific support requests. Plus,
please visit www.datavideo.com to access our FAQ section.
China Shanghai
Datavideo Technologies China Co
601,Building 10,No.1228,
Rd.Jiangchang,
Jingan District,Shanghai
Tel: +86 21-5603 6599
Fax:+ 86 21-5603 6770
E-mail: service@datavideo.cn
China Beijing
Datavideo Technologies China Co
No. 812, Building B, Wankai Center,
No.316, Wan Feng Road, Fengtai District,
Beijing, China
Tel: +86 10-8586 9034
Fax:+86 10-8586 9074
E-mail: service@datavideo.cn
China Chengdu
Datavideo Technologies China Co
B-823,Meinian square,No.1388,
Middle of Tianfu Avenue,Gaoxin District,
Chengdu,Sichuan
Tel: +86 28-8613 7786
Fax:+86 28-8513 6486
E-mail: service@datavideo.cn
China Fuzhou
Datavideo Technologies China Co
A1-2318-19 Room,No.8, Aojiang Road,
Taijiang District,Fuzhou,Fujian,China
Tel: 0591-83211756,0591-83210187
Fax:0591-83211262
E-mail: service@datavideo.cn
China Jinan
Datavideo Technologies China Co
902, No. 1 business building,
Xiangtai Square, No. 129,
Yingxiongshan Road, Shizhong District,
Jinan City, Shandong Province, China
Tel: +86 531-8607 8813
E-mail: service@datavideo.cn
Hong Kong
Datavideo Hong K ong Ltd
G/ F.,26 Cross Lane
Wanchai, Hong Kong
Tel: +852-2833-1981
Fax:+ 852-2833-9916
E-mail: info@datavideo.com.hk
India Noida
Datavideo India Noida
A-132, Sec-63,Noida-201307,
India
Tel: +91-0120-2427337
Fax:+91-0120-2427338
E-mail: sales@datavideo.in
India Kochi
Datavideo India Kochi
2nd Floor- North Wing, Govardhan Building,
Opp. NCC Group Headquaters, Chittoor Road,
Cochin- 682035
Tel: +91 4844-025336
Fax:+91 4844-047696
Netherlands
Data video Technologies Europe BV
Floridadreef 106
3565 AM Ut recht ,
Th e Netherlands
Tel: +31-30-261-9 6-56
Fa x:+ 31-30-261-96-57
E-mail: info@data video.n l
Singapore
Datavideo Visual Technology(S) Pte Ltd
No. 178 Paya Lebar Road #06-07
Singapore 409030
Tel: +65-6749 6866
Fa x:+65-6749 3266
E-mail:info@datavideovirtualset.com
Singapore
Data video Technologies (S) PTE L td
No. 178 Paya Lebar Road #06-03
Singapore 409030
Tel: +65-6749 6866
Fa x:+65-6749 3266
E-mail:s ales@data video.sg
Taiwan
Datavideo Technologies Co. Lt d
10F. No. 176, Jian 1st Rd.,Chung Ho
District, New Taipei City 235, Taiwan
Tel: +886-2-8227-2888
Fax:+886-2-8227-2777
E-mail:service@dat avideo.com.tw
United States
Datavideo Corporat ion
7048 Elmer Avenue.
Whittier, C A 90602,
U.S.A.
Tel: +1-562-696 2324
Fax:+1-562-698 6930
E-mail:sales@datavideo.comE-mail: sales@datavideo.in
United Kingdom
Data video UK Lim ite d
Brookfield House, Brookfield Industrial
Estate, Peakdale Road, Glossop,
Derbyshire, SK13 6LQ
Tel: +44-1457 851 000
Fa x:+ 44-1457 850 964
E-mail: sales@datavideo.co .uk
France
Datavideo France s.a.r.l.
Cité Descartes 1, rue Albert Einstein
Champs sur Marne 774477 –
Marne la Vallée cedex 2
Tel: +33-1-60370246
Fa x:+33-1-60376732
E-mail: info@datavideo.fr
Please visit our website for latest manual update.
www.datavideo.com/product/TP-650
All the trademarks are the properties of their respective owners. Datavideo Technologies Co., Ltd. All rights reserved 2018
Jan-19.2018
Version : E3
 Loading...