

Page 1
Page 2

Warranty
Standard Warranty
Datavideo equipment is guaranteed against any manufacturing defects
for one year from the date of purchase.
The original purchase invoice or other documentary evidence should
be supplied at the time of any request for repair under warranty.
Damage caused by accident, misuse, unauthorized repairs, sand, grit
or water is not covered by this warranty.
All mail or transportation costs including insurance are at the expense
of the owner.
All other claims of any nature are not covered.
Cables & batteries are not covered under warranty.
Warranty only valid within the country or region of purchase.
Your statutory rights are not affected.
Two Year Warranty
All Datavideo products purchased after 01-Oct.-2008 qualify for a free
one year extension to the standard Warranty, providing the product is
registered with Datavideo within 30 days of purchase. For information
on how to register please visit www.datavideo-tek.com or contact your
local Datavideo office or authorized Distributors
Certain parts with limited lifetime expectancy such as LCD Panels,
DVD Drives, Hard Drives are only covered for the first 10,000 hours, or
1 year (whichever comes first).
Any second year warranty claims must be made to your local Datavideo
office or one of its authorized Distributors before the extended warranty
expires.
Disposal
For EU Customers only - WEEE Marking
This symbol on the product indicates that it will not be
treated as household waste. It must be handed over to
the applicable take back scheme for the recycling of
electrical and electronic equipment. For more detailed
information about the recycling of this product, please
contact your local Datavideo office.
2
Page 3

Packing List
1 x DAC-60
1 x Switching Adaptor 12V/500mA
1 x DAC-60 Quick Start Guide
1 x User Adjust Tool CD
Front Panel
HD/SD - SDI IN / OUT
HD/SD - SDI input and pass-through output connectors.
Power Switch
Switches the power On / Off.
DC In Socket
Connects the supplied 12V PSU to this socket. The
connection can be secured by screwing the outer
fastening ring of the DC In plug to the socket.
USB
Upgrades Firmware/ Control Box by PC
3
Page 4
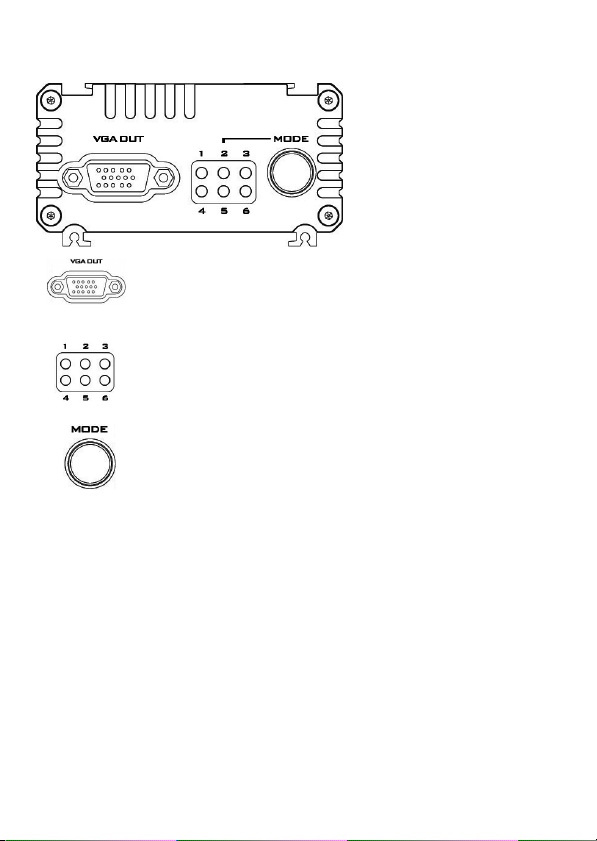
Rear Panel
VGA Output
Connects your VGA equipment to this connector
LED
The LEDs indicate VGA output format
Mode Select
Selects VGA Output Format (Please see the Page 9 for
more details).
Press and hold down this button for 3 second into TV
SCREEN MODE, and then press this button again to
switch screen ratio mode.
Note: OPTIMAL RATIO = 16:9 mode
4
Page 5

DAC-60 has Full Screen, Dot by Dot and Optimal Ratio
3 kind aspect ratio modes
(Mini Switch).
Source = 1920x1080 (16:9)
1. Full Screen Mode
Source = 1920x1080 (16:9)
Output = 800x600 (4:3)
5
Page 6

2. Dot by Dot Mode
A. Source = 1920 x 1080 (16:9)
Output = 800 x 600 (4:3)
B. Source = 720 x 480i 60
Output = 800 x 600 (4:3)
6
Page 7

3. Optimal Ratio Mode
Source = 1920 x 1080 (16:9)
Output = 800 x 600 (4:3)
7
Page 8

DAC-60 installation
1. First make sure your equipment is not connected to power or disconnect
all power connectors before connecting the video equipment.
2. Connect Video Source (SDI) to the BNC input connector.
3. Connect VGA equipment to the VGA connector.
4. Connect optional SDI equipment to the BNC output connector.
5. Connect the +12V DC power adapter to the converter.
8
Page 9

LED Indication
DAC-60 can work with nine presets, which can be selected by pressing the
menu button.
Resolution
800 x 600 60Hz
1024 x 768 60Hz
1280 x 800
1280 x 1024
1366 x 768
1400 x 1050
1600 x 1200 60Hz
1920 x 1080 60Hz
1920 x 1200 60Hz
LED Indication
●○○
○○○
○●○
○○○
60Hz
60Hz
60Hz
60Hz
○○●
○○○
○○○
●○○
○○○
○●○
○○○
○○●
●●○
○○○
○●●
○○○
○○●
●○○
●: LED ON ○: LED OFF
9
Page 10

Firmware Upgrade
Firmware is upgradable in the field using the integrated USB
Step 1- Connect DAC-60 to PC by USB cable. Connects the supplied
12V PSU to DC in socket and turn off power.
Step 2- Open upload firmware program tools.exe and turn on DAC-
60 power.
port.
Step 3 - press the Connect button.
10
Page 11

Step 4 - Press Open File button to select firmware.
Step 5 - Press Start button to update the firmware.
Step 6 - close upload firmware program tools
Note: The latest Firmware updates and Software
applications for DAC-60 can be obtained by
contacting your local Datavideo office or dealer.
A list of regional Datavideo offices is provided at
the rear of this manual.
11
Page 12

DAC-60 Center Utility features
Please copy the DAC-60 Center.exe utility software from the
supplied CD to your Windows computer. Now connect the DAC-60
by USB cable to the same computer. Switch on the DAC-60 and then
launch the DAC-60 Center utility software.
Note: When the application is on, the first priority is PC.
Control Priority
1 PC controller
2 Box Controller
Function
(Application)
(Button)
1. Click on the Information tab to display the input format & firmware
version.
12
Page 13

2.1 Click on the Video tab to enter the video setup.
2.2 Set the aspect ratio and output format then click Appl y.
3.1 Click the Proc AMP tab to adjust the picture settings.
3.2 Set the Brightness, Contrast, Hue and Saturation values.
13
Page 14

4.1 Click the Setting tab to access the restore factory defaults window.
4.2 Set the OSD Hide Function Enable/ Disable.
4.3 Click the Factory Default button to reset the DAC-60 to factory
defaults.
14
Page 15

Specifications
Supported Input
Video Formats
SDI Formats
VGA Output Formats
Re-clock Function
Firmware Updates
Software Support
Coaxial Cable Type
Cable Equalization
Input Connections
Output Connections
BNC Connectors
Button
Power Source
i
SD - 720 x 480 i / 720 x 576
HD -
1280 x 720 50p/60p/59.94p
1920 x 1080 50i/60i/59.94i
1920 x 1080 24p/25p/30p
3G - 1920 x 1080 50p/60p/59.94p
SD-SDI (SMPTE 259M)
HD-SDI (SMPTE 292M)
3G-SDI (SMPTE 494M/495M)
800 x 600
1024 x 768(XGA projector)
1280 x 800(WXGA projector)
1280 x 1024
1366 x 768
1400 x1050
1600 x 1200
1920 x 1080
1920 x 1200(WUXGA projector)
Yes (Default)
Via USB
Yes (OS: Windows XP/ Windows 7)
RG6/RG59 (75Ω)
3G: 140m of RG6/ 100m of RG59
HD: 200m of RG6/ 140m of RG59
SD: 400m of RG6/ 280m of RG59
1 x BNC [SDI]
1 x VGA
1 x BNC [SDI]
3G 75 Ω inter-locked socket
Switch VGA Format
AC 100 ~ 240 V / DC (12V/3.6W)
15
Page 16

 Loading...