

Page 1
Page 2
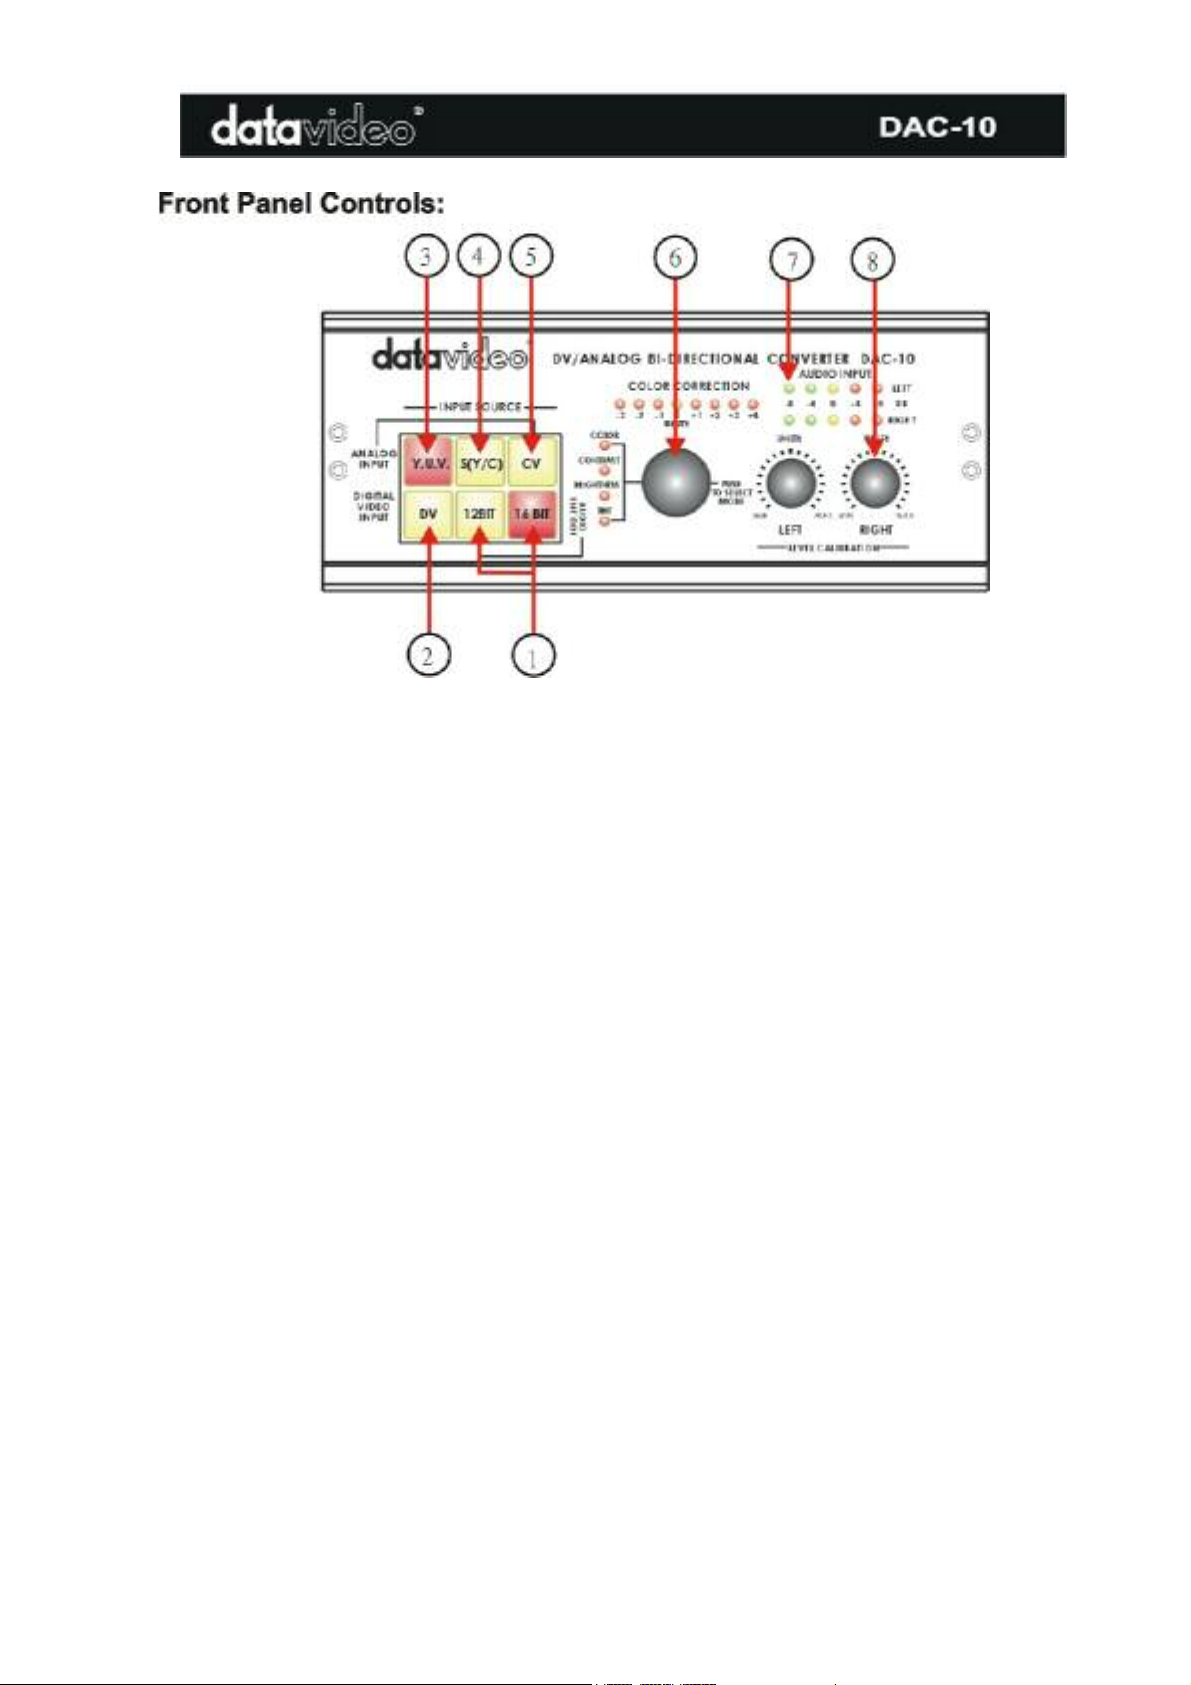
1.AUDIO ENCODE
Encode analog audio to DV with your choice of 12 bit/32Khz or
16bit/48Khz. 12 Bit/32khz is suggested for most DV Camcorders.
input is
Analog
is enabled. When another input is enabled this switch
video input is enabled When another input is enabled this switch
Analog
input is enabled When another input is enabled this
Note: Press the knob and hold for two seconds for resetting all
10.
nnel one) and right
indicating in between yellow (0dB) and
16bit/48Khz is suggested for DVD and DV Capture cards.
2. DV INPUT
3. ANALOG YUV VIDEO
INPUT
4. ANALOG S (Y/C)
VIDEO INPUT
5. ANALOG COMPOSITE
VIDEO INPUT
6. COLOR PROCESSOR This control will adjust the color of both analog or DV input sources.
7. AUDIO LEVEL
INDICATORS
This switch will turn red when you press it. When it is red, the DV
enabled. When another input is enabled this switch will turn green.
This switch will turn red when you press it. When it is red, the
YUV video input
will turn green.
This switch will turn red when you press it. When it is red, the Analog
S (Y/C)
will turn green.
This switch will turn red when you press it. When it is red, the
Composite video
switch will turn green.
Press the knob to select Contrast, color or tint (NTSC only).
Rotate the knob to change the amount.
adjustments back to default (unity) setting
These meters show the audio INPUT level from the incoming source
8. AUDIO INPUT LEVEL
CALIBRATION
Turn these knobs to adjust the Audio OUTPUT level of the DAC-
Adjust the audio level controls for each left (cha
(channel 2) to let level LED’s
first red LED (+4dB).
1
Page 3
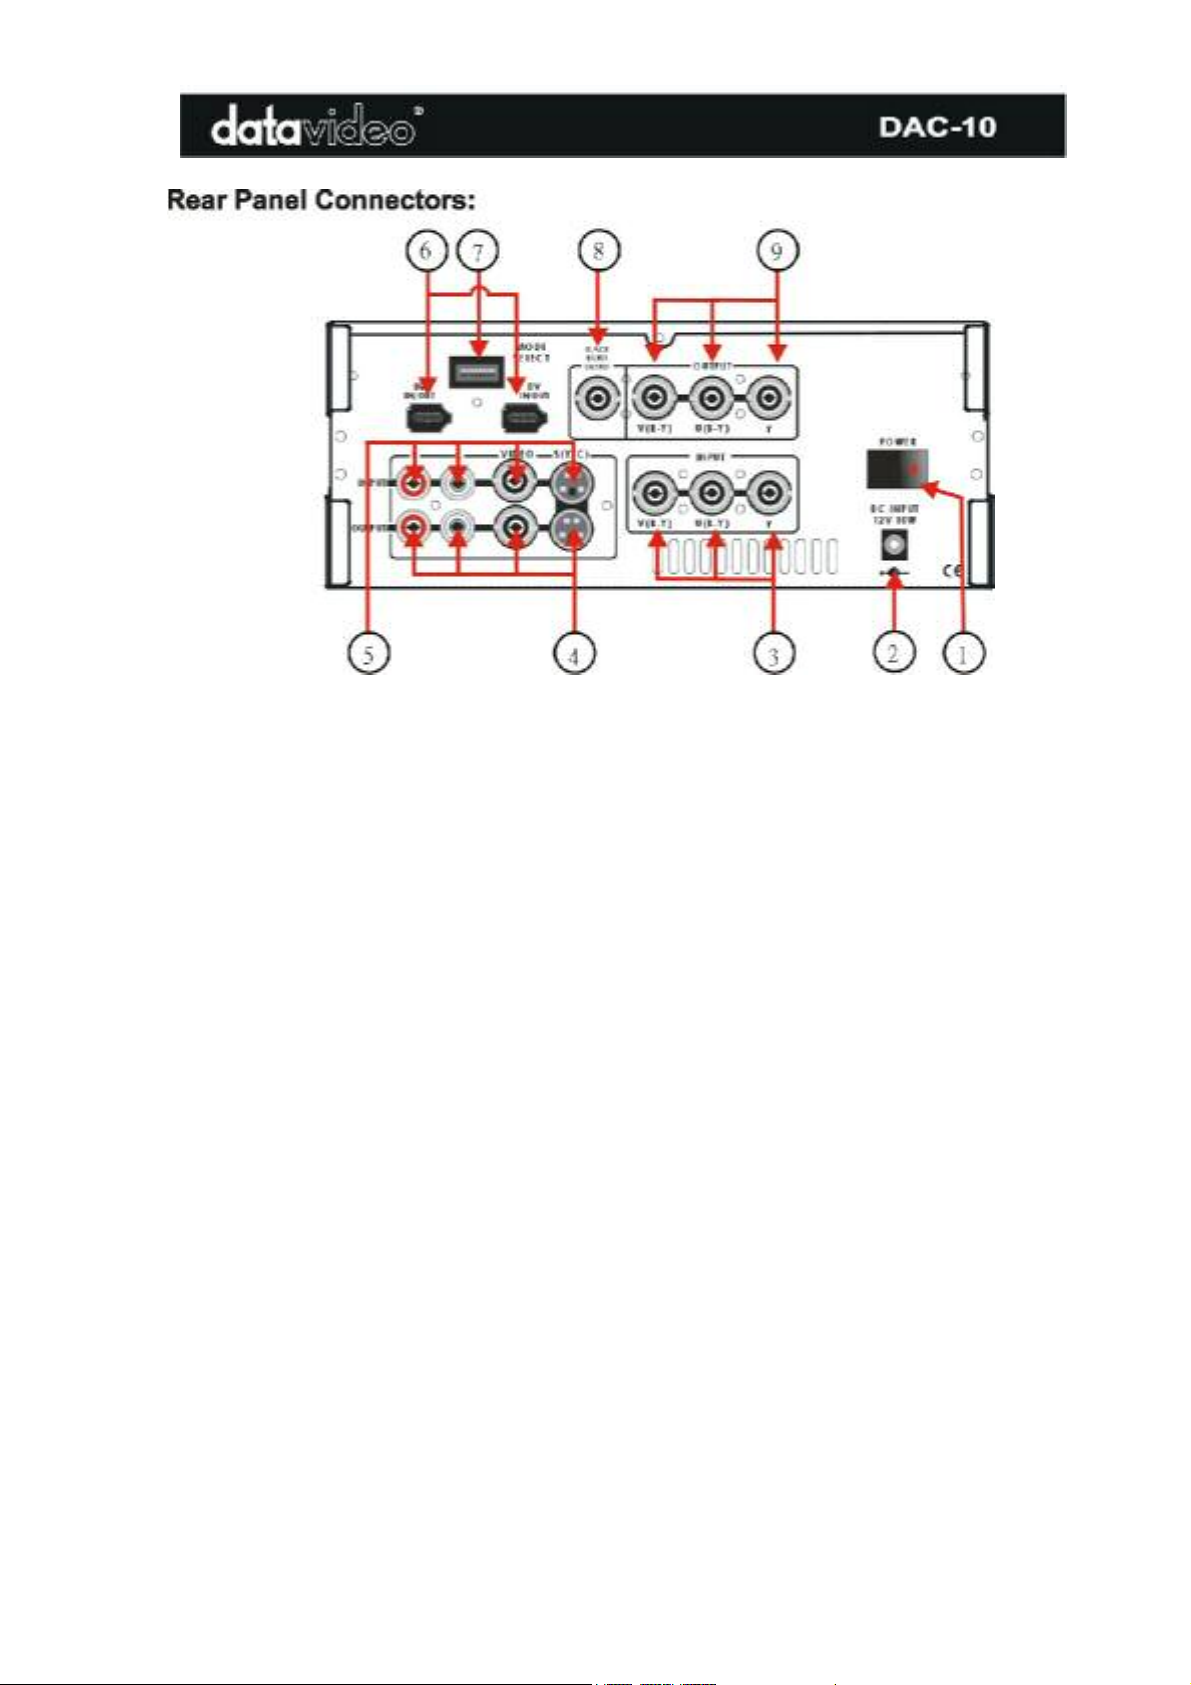
1. POWER ON/OFF SWITCH
Turns main power on or off
2. POWER INPUT JACK
Connects to the supplied 12VDC 10 watt power supply
3. COMPONENT Y.U.V. VIDEO INPUT JACKS
Input for Y.U.V. component video from Betacam, DVCPro, DVCam, some DVD players, etc.
4. AUDIO/VIDEO INPUT JACK
Analog Audio/Video input convert to DV output.
Note: You can hook up all the cables onto all video/audio input connectors at same time without
conflicting to each connection
5. AUDIO/VIDEO OUTPUT JACKS
Analog Audio/Video signal output which is converted from DV input.
Note: You can hook up all the cables onto all video/audio output connectors at same time without
conflicting to each connection
6. DV IN/OUT JACKS (Two)
6 pin DV (FireWire, iLink, IEEE 1394) cable, from the DV port of a camcorder, DV Bank,
DV deck, etc.
7. DIP SWITCH MODE SETTING
Please refer to next page the DIP Switch setting.
8. BLACK BURST SIGNAL OUTPUT
Video Black Burst Signal to be used as a sync reference source
9. COMPONENT Y.U.V. OUTPUT JACKS
PLA Mode: Comply to SMPTE spec
NTSC Mode: Comply to Sony Betacam spec
2
Page 4

Dip Switch Setting for Mode Select:
*. Note1:Mode DIP switch (Reboot the DAC-10 if you change a DIP Switch)
S1. PAL or NTSC (PAL-ON, NTSC-OFF)
S2. 7.5 IRE / 0 IRE (0 IRE-ON, 7.5 IRE-OFF). (NTSC mode only)
*. Note2: 0 IRE is most often used in Japan. 7.5 IRE is used elsewhere.
S3. Locked Audio Mode
S3 -- OFF: Locked Audio
S3 – ON: Unlocked Audio
S4 & S5 for NTSC and PAL video system
ON
S5
OFF
S5
*. Please refer to next page for more detail information
S6. Factory setting (OFF), please do not change.
*. Note3: Turn-on the DAC-10 before launching any editing software.
ON MAC OS
S4
OFF Windows 2000 and Windows 98
ON Windows XP and Windows ME
S4
OFF
Camera
*. Note4: To work with a MAC with Final Cut Pro:
1). Select "Preferences" from Final Cut Pro menu
2). Select "General" page
3). Uncheck "Abort capture on dropped frame"
4). Uncheck "Abort capture on time code break" for Final cut pro 3.0
5). Click OK button
3
Page 5

Dip Switch Setting to work with Windows & MAC Operation system
The DAC-10 has dip switches 4 and 5 that control the clocking frequency when it is converting video,
if the dip switches are not configured for your operating system or type of device, a loss in video can
occur. Please refer to dip switch chart below and make sure that your DAC-10 is setup correctly.
TSC System (USA)
N
MAC OS
NTSC System (USA)
Windows XP and Windows ME
PAL System (USA)
MAC OS
TSC System (USA)
N
Windows 2000 and Windows 98
NTSC System (USA)
Camera
PAL System (USA)
Windows 2000 and Windows 98
PAL System (USA)
Windows XP and Windows ME
PAL System (USA)
Camera
4
Page 6

5
Page 7

Operation Procedure:
Step_1. Select the desired mode by setting the dip switches. Reboot the DAC-10 after changing
the dip switches
Step_2. Install the equipment as shown in installation diagrams
Step_3. Ensure that all equipment is turned on
Step_4. Select the video source. If the video source is analog, select the desired audio sampling Rate
Step_5. Playback the source video
Step_6. If needed, calibrate the playback video and audio output level
Step_7. To generate an analog Color Bar output, under the DV mode, press on the “16 BIT” key. The
Color Bar will output from YUV,S(Y/C) and Composite video jacks at the same time. Press on the “16 BIT”
key again back to normal operation.
6
Page 8

INPUTS SPECIFICATION
Decoder (DV In)
S-VHS Video Source
Composite Video Sources
Component YUV Video
DV (iLink)Source
Outputs
S-VHS Video Source
Composite Video Source
Component YUV Video
Black Burst Video
Video Frequency Response
(DV input)
Differential Gain
Differential Phase
Video S/N Ratio
Encoder (A/V In)
Audio Sampling Rate
Audio Level
Audio THD
Audio Frequency Response
Audio S/N Ratio
Y/C in: 4--pin 75 ohm DIN connector
1.0 Vp-p 75 ohm BNC connector
Betacam standard,Y, R-Y, B-y 75 ohm BNC connectors
Data Transfer Rate 25Mbps,
PAL: 4:2:0 NTSC: 4:1:1
Y/C out 4-pin 75 ohm DIN connector
1.0 Vp-p 75 ohm BNC connector
Betacam standard, Y, R-Y, B-y 75 ohm BNC connectors
75 ohm BNC connector
5.0 MHz +/- 3 dB
+/- 3 %
< 3
> 50 dB
> 48 dB
12 bit/32KHz and 16bit/48KHz optional
Unity +/- 1.0dB
< 0.5%
20 ~ 20KHz +/- 3dB
> 65dB
GENERAL
Power Input
Ambient Temperature
Ambient Humidity
Dimensions
Weight
Accessories
DC 12V 1.0A AC Adaptor (included)
o
o
32
~ 130
F (0 o~ 55 o C)
Less than 90 %
210 (W) x 240 (D) x 88(H) mm (without rubber feet)
8.3"(W) x 9.45"(D) x 3.5" (H) (without rubber feet)
1.8 Kg/4.0lbs
BNC, S-Video and DV cables (included)
7
Page 9

Service and Support
It is our goal to make your products ownership a satisfying experience. Our supporting staff
is available to assist you in setting up and operating your system. Please refer to our web site
www.datavideo-tek.com for answers to common questions, support requests or contact your
local office below.
Datavideo Corporation (USA)
12300-U East Washington Blvd., Whittier, CA 90606 USA
Tel: +1 562 696 2324 www.datavideo.us
Datavideo Technologies Europe BV
Californiedreef 263565 BL Utrecht, The Netherlands
Tel: +31 30 261 9656 www.datavideo.info
Datavideo UK Limited
Unit 2 Waterside Business Park, Hadfield, Glossop, Derbyshire SK131BE UK
Tel: +44 1457 851000 www.datavideo.info
Datavideo Technologies Co., Ltd.
10F, 176 Jian-Yi Rd, Chung Ho City, Taipei Hsien, Taiwan 235
Tel: +886 2 8227 2888 www.datavideo.com.tw
Datavideo Technologies China Co.
2F-D, 2 Lane 777, West Guangzhong Rd, Zhabei District, Shanghai, China
Tel: +86 21 5603 6599 www.datavideo.cn
Datavideo Technologies (S) PTE Ltd.
100 Lor 23, Geylang Rd, #01-03 D’Centennial, Singapore 388398
Tel: +65 6749 6866 www.datavideo.sg
8
Page 10

All the trademarks are the properties of their respective owners.
Datavideo Technologies Co., Ltd. All rights reserved 2003
9
P/N: 082060351E2
 Loading...