

Page 1
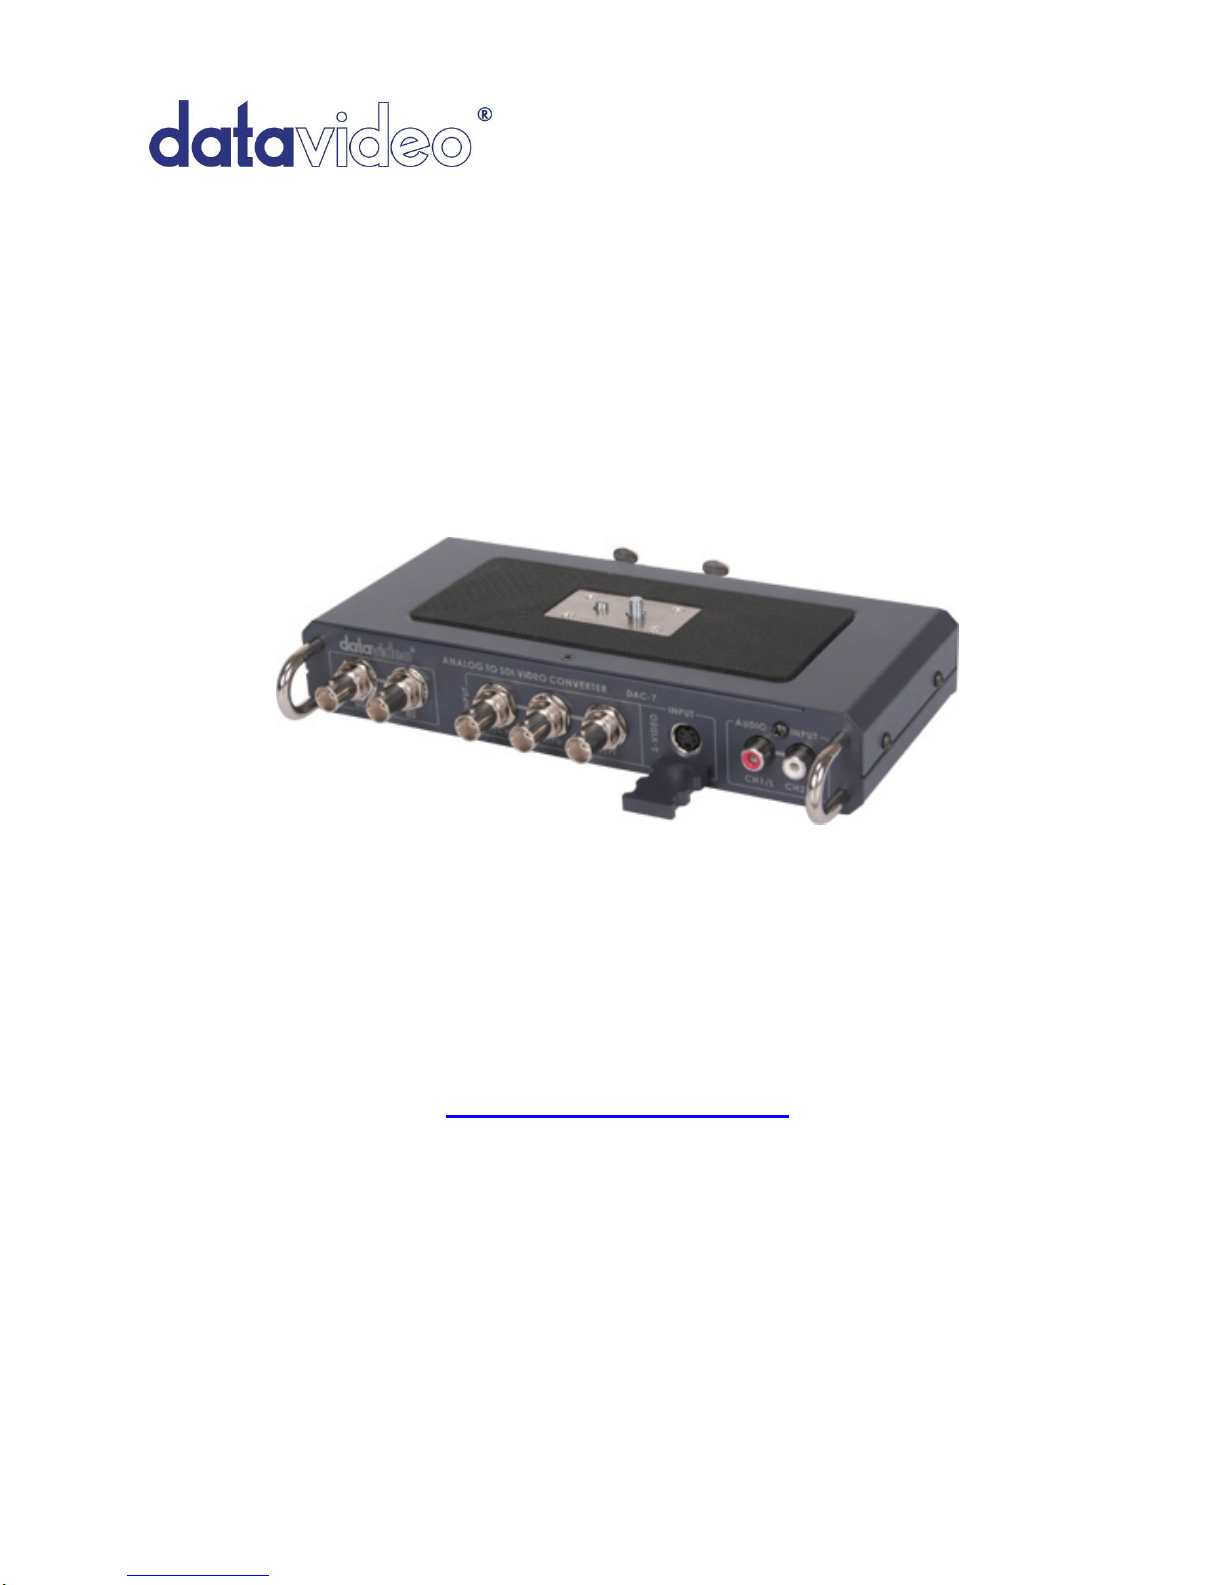
DAC-07
INSTRUCTION MANUAL
www.datavideo-tek.com
Rev 100309
Page 2

2
Table of Contents
Warnings and Precautions ............................................................................................................ 3
Warranty ........................................................................................................................................ 4
Disposal ......................................................................................................................................... 4
Packing List ................................................................................................................................... 4
Features ......................................................................................................................................... 4
Product Overview .......................................................................................................................... 5
Front Panel .................................................................................................................................... 5
Output Connections ............................................................................................................. 5
Front Input Connections ...................................................................................................... 5
Rear Panel ..................................................................................................................................... 6
Power .................................................................................................................................. 6
Dip Switch Settings ............................................................................................................. 6
Rear Connections ................................................................................................................ 6
Top Plate ....................................................................................................................................... 7
Base Plate ..................................................................................................................................... 7
Securing to a Video Camera ......................................................................................................... 7
Securing to a Video Camera ......................................................................................................... 8
Securing to a Tripod ...................................................................................................................... 8
Example Set Ups ........................................................................................................................... 9
SD-SDI Cabling Advice ............................................................................................................... 10
How to avoid problems with SD-SDI ........................................................................................... 10
Datavideo Related Product .......................................................................................................... 11
Specifications ............................................................................................................................... 12
Service & Support ........................................................................................................................ 13
Page 3

3
Warnings and Precautions
1. Read all of these warnings and save them for later reference.
2. Follow all warnings and instructions marked on this unit.
3. Unplug this unit from the wall outlet before cleaning. Do not use liquid or aerosol cleaners. Use a
slightly damp cloth for cleaning.
4. Do not use this unit in or near water.
5. Do not place this unit on an unstable surface, cart, stand, or table. The unit may fall, causing
serious damage.
6. Any slots and openings on the case top, back, and bottom are provided for ventilation. To ensure
safe and reliable operation of this unit, and to protect it from overheating, do not block or cover
these openings. Do not place this unit on a bed, sofa, rug, or similar surface, as the ventilation
openings may become blocked. This unit should never be placed near or over a heat source or
radiator. This unit should not be placed in a built-in installation unless proper ventilation is provided.
7. This product should only be operated from the type of power source indicated on the marking label
of the AC adapter. If you are not sure of the type of power available, consult your Datavideo dealer
or your local power company.
8. Do not allow anything to rest on the power cord. Do not locate this unit where the power cord will be
walked on, rolled over, damaged or otherwise stressed.
9. If an extension cord must be used with this unit, make sure that the total of the ampere ratings on
the products plugged into the extension cord do not exceed the extension cord’s rating.
10. Make sure that the total amperes of all the units that are plugged into a single wall outlet do not
exceed 15 amperes.
11. Never push objects of any kind into this unit through the case ventilation slots, as they may touch
dangerous voltage points or short out parts that could result in risk of fire or electric shock. Never
spill liquid of any kind onto or into this unit.
12. Except as specifically explained elsewhere in this manual, do not attempt to service this product
yourself. Opening or removing covers that are marked “Do Not Remove” may expose you to
dangerous voltage points or other risks, and will void your warranty. Refer all service issues to
qualified service personnel.
13. Unplug this product from the wall outlet and refer to qualified service personnel under the following
conditions:
a. When the power cord is damaged or frayed;
b. When liquid has spilled into the unit;
c. When the product has been exposed to rain or water;
d. When the product does not operate normally under normal operating conditions. Adjust
only those controls that are covered by the operating instructions in this manual; improper
adjustment of other controls may result in damage to the unit and may often require
extensive work by a qualified technician to restore the unit to normal operation;
e. When the product has been dropped or the case has been damaged;
f. When the product exhibits a distinct change in performance, indicating a need for service.
14. Ensure the dip switch settings match the video signal being fed into the DAC-07.
15. Connecting both XLR and RCA/Phono audio sources at the same time is not recommended.
16. A separate Time Base Corrector may be required if the unit is fed poor AV signals from tape.
17. Before operating this device please also refer to the section marked SD-SDI Cabling Advice.
Page 4
4
Warranty
Datavideo warrants that the equipment it manufactures shall be free from defects in material and
workmanship for a period of 12 months from the date of product purchase. If this equipment fails due to
such defects, Datavideo will, at its option, repair or provide a replacement for the defective part or product.
Equipment that fails after the warranty period, has been operated or installed in a manner other than that
specified by Datavideo, or has been subjected to abuse or modification, will be repaired for time and
material charges at the Buyer’s expense.
This warranty does not affect your statutory rights within the Country of purchase.
Disposal
For EU Customers only - WEEE Marking.
This symbol on the product indicates that it should not be treated as household waste. It
must be handed over to the applicable take-back scheme for the recycling of waste
electrical and electronic equipment. For more detailed information about the recycling of
this product, please contact your local Datavideo office
.
Packing List
Items Description Q’ty
1 DAC-07 1
2 Switching Adaptor DC 12V 1.5A 1
3
Instruction Manual 1
Features
Video input connections include
1x Composite (CVBS), 1x S-Video (Y/C) and 1x Component Y.U.V. (Y,Pb,Pr)
2x SD-SDI (BNC) outputs both with embedded 2 channel audio
SD-SDI output signal that complies with the SMPTE259M-C standard at 270 Mbps
Connections for CH1/L and CH2/R on unbalanced RCA/Phono cabling
Connections for CH1/L and CH2/R on balanced XLR cabling
12 and 16 bit audio auto recognition
Space saving - camera and tripod mountable
Rugged case design with easy access to Audio and Video connections
12 Volt DC 1.5A input connector
Page 5

5
Product Overview
Thank you for purchasing the DAC-07 Analogue to SD-SDI converter.
The DAC-07 is designed to be an affordable bridge between existing cameras with SD Analogue Video
outputs and SD-SDI equipment or mixers such as the Datavideo SE-900 and SE-1000.
Due to the nature of SD-SDI signals, single BNC SD-SDI cable runs of up to 120m should be possible with
this unit before the signal would need to be re-clocked or repeated.
The DAC-07 also has the ability to embed two channels of audio (or 1 stereo pair) into the SD-SDI signal
from either unbalanced RCA/Phono connections or balanced 3pin XLR connections.
NB: Ensure the dip switch settings match the video signal being fed into the DAC-07.
Connecting both XLR and RCA/Phono audio sources at the same time is not recommended.
A separate Time Base Corrector may be required if the unit is fed poor AV signals from tape.
Before operating this device please also refer to the section marked SD-SDI Cabling Advice.
Front Panel
Output Connections
SDI – Serial Digital Interface on BNC terminals.
4:2:2 SDI Video data supports SMPTE 259 M-C standard at 270 Mbps.
Front Input Connections
Component Y.U.V. (Y.Pb.Pr.) video input on BNC terminals.
S-Video (Y/C) on 4-Pin Mini Din Input.
Unbalanced RCA/Phono audio connections for CH1/L and CH2/R.
Page 6

6
Rear Panel
Power
DC IN socket
Connect the supplied 12V 1.5A PSU to this socket. The power connection
can be secured by screwing the outer fastening ring of the DC In plug to
the socket.
Power On/Off switch
An LED confirms that the unit is switched ON or OFF.
Dip Switch Settings
Select a video input connection or colour bars by setting the dip switches.
DIP Switch Modes:
Dip1 Dip2 Function
ON ON Internal colour bars
ON OFF CV Input
OFF ON YUV Input
OFF OFF S-Video Input
Rear Connections
XLR Balanced Audio Input connections for CH1/L and CH2/R.
RS-232 Interface
9-pin serial port standard RS-232 interface.
Used to update firmware.
For details of firmware updates please check with your local Datavideo
Office.
Page 7

7
Top Plate
With locking pin and screw thread. Secure the base of the video camera to this plate.
Base Plate
Secure the quick release plate from your tripod head to the base of the DAC-07.
Page 8

8
Securing to a Video Camera
Use a coin or flat head screwdriver to secure the base of the video camera to the top of the DAC-07.
Securing to a Tripod
Secure the quick release plate from your tripod head to the base of the DAC-07.
Secure the quick release camera plate to the tripod head with DAC-07 and Camera attached.
Page 9

9
Typical Set Up
NB: DAC-7 handle SDI with or without embedded two channel audio
Page 10

10
SD-SDI Cabling Advice
How to avoid problems with SD-SDI
Start with good cabling. BNC cables and connectors are not all made to the same standard. From the
thickness and grade of the centre conductor to the type of dielectric, all these factors contribute to its
impedance, attenuation and Return Loss (RL).
RL is the portion of the transmitted signal that is not admitted to the receiver and is then reflected back
along the cable toward the transmitter (DAC-07). Reflections in the transmission path will cause attenuation
as well as distortion of the signal received. The signal is attenuated because part of it is reflected back and
does not make it to the receiver; it is also distorted because the reflected signal mixes with the original
signal causing it to distort as well as adding to the noise floor.
A 75 Ohm (Ω) impedance must be maintained throughout the DAC-07 SD-SDI signal/cable path.
Always
use patch bays, hubs and repeaters that match the data rate and impedance you are working with.
Care must also be taken with cable length, as it will affect the error rate in the SD-SDI signal. Cable lengths
beyond acceptable limits will see error rates reach a tipping point and this will bring about a total loss of
picture also known as the Cliff Effect.
Always check with your supplier for cabling advice on the maximum distance for a particular signal and data
rate, in this case an SD-SDI signal that complies with the SMPTE259M-C standard at 270 Mbps. Datavideo
have determined that single BNC SD-SDI cable runs of up to 120m should be possible with this unit before
the signal would need to be re-clocked or repeated.
Here is a basic list of other things to avoid
• Do not step on or rest equipment on the cables.
• Do not roll dollies or trolleys over the cables.
• Do not put kinks or sharp bends in the cables.
• Do not exceed the minimum bend radius of the cable.
The general rule for an acceptable bend radius is 10 times the diameter of the cable.
• Cable pulls should be done carefully – do not jerk or stretch the cable(s).
Do not exceed the cable’s maximum pulling tension.
(call the cable supplier / manufacturer for this information.)
• Do not pull cable ties too tight on cable looms.
If you cannot move any cable inside a loom tie, the tie is too tight.
Put an extra piece of cable in when tightening loom ties - then remove it afterwards for space.
• Do not put cable management fixings at standard distances apart.
This can lead to deformity at a given wavelength, which can increase RL.
Place your loom cable ties at random distances for the same reason.
Page 11

11
Datavideo Related Product
Datavideo have determined that single BNC SD-SDI cable runs of up to 120m should be possible with the
DAC-07 unit before the signal would need to be re-clocked or repeated.
The Datavideo VP-445 is one way of re-clocking the DAC-07 SD-SDI signal so that it can be fed over
longer distances.
The VP-445 has 1 input and 4 identical outputs. This provides a way of distributing a single SDI signal to 4
pieces of SDI equipment such as a mixer, a recording device and or monitor (TLM-170D).
Page 12

12
Specifications
Video inputs
1 X CVBS, BNC connector 75 Ohm (Ω)
1 X S-Video (Y/C) 4pin Mini Din connector
1 X YUV (3 x BNC connectors, 75 Ω)
Audio inputs
2 x balanced stereo audio, XLR connectors
2 x unbalanced stereo audio, RCA / Phono sockets
Signal Outputs
2 x BNC connectors, 75 Ω for SD-SDI signal
4:2:2 SDI Video data supports SMPTE 259 M-C standard at 270 Mbps
Video Spec
Composite Video (CVBS): 75Ω 1.0 V p-p
S-Video (Y/C): 4 Pin Mini Din 75Ω Y: 1.0 V p-p, C: 0.627 mV p-p
Bandwidth: > 5.0mHz
S/N Ratio > 48 dB
Differential of Gain(DG)<3%
Differential of Phase(DP)<3°
Audio Spec
Bandwidth 20~20KHz < +/- 3dB
S/N Ratio > 70 dB
THD. < 0.1%
(This spec must use precision to analyze data inside of signal)
Others
RS-232 protocol for PC firmware update
Dimension
215mm (W) x 115mm (H) x 44mm (D)
Weight
1.3 Kg
Power
DC 12V 500mA
Specifications are subject to change without notice.
Page 13

13
Service & Support
It is our goal to make your products ownership a satisfying experience. Our support staffs are available to
assist you in setting up and operating your product. Please refer to our web site www.datavideo-tek.com
for
answers to common questions, support requests or contact your local Datavideo office below.
Datavideo Corporation (USA)
7048 Elmer Avenue. Whittier, CA 90602 USA
Tel: +1 562 696 2324 contactus@datavideo.us
www.datavideo.us
Datavideo Technologies Europe BV
Floridadreef 106, 3565 AM Utrecht, The Netherlands
Tel: +31 30 261 9656 info@datavideo.nl
www.datavideo.info
Datavideo UK Limited
Unit 2 Waterside Business Park, Hadfield, Glossop, Derbyshire SK13 1BE UK
Tel: +44 1457 851000 sales@datavideo.co.uk
www.datavideo.info
Datavideo Technologies Co., Ltd.
10F, 176 Jian-Yi Rd, Chung Ho City, Taipei Hsien, Taiwan 235
Tel: +886 2 8227 2888 service@datavideo.com.tw
www.datavideo.com.tw
Datavideo Technologies China Co.
2F-D, 2 Lane 777, West Guangzhong Rd, Zhabei District, Shanghai, China
Tel: +86 21 5603 6599 service@datavideo.cn
www.datavideo.cn
Datavideo Technologies (S) PTE Ltd.
No. 22 Lorong 21A Geylang, #09-02 Prosper Industrial Building, Singapore 388431
Tel: +65 6749 6866 info@datavideo.sg
www.datavideo.sg
Datavideo Hong Kong Limited
G/F., 26 Cross Lane, Wanchai, HK
Tel: +852 2833 1981 info@datavideohk.com
www.datavideohk.com
P/N: G082060419B1
All the trademarks are the properties of their respective owners.
Datavideo Technologies Co., Ltd. All rights reserved 2018.
 Loading...