

Page 1
CG-500 Editor
G082060666B1
Datavideo Technologies Co., Ltd. 1
Page 2

Contents
Contents ............................................................................................................................................ 2
Installation and Quick Star ................................................................................................................ 8
Installation..................................................................................................................................... 8
Quick Star ...................................................................................................................................... 8
Overview of functions ....................................................................................................................... 8
Start Project Screen ....................................................................................................................... 8
Select Format Screen .................................................................................................................. 10
The Menu Bar .............................................................................................................................. 12
File Menu ................................................................................................................................ 12
Edit Menu ................................................................................................................................ 13
Object Menu ........................................................................................................................... 13
Options Menu ......................................................................................................................... 14
Roll/Crawl Menu ..................................................................................................................... 14
Effect Menu ............................................................................................................................. 14
Text Editor Toolbar ...................................................................................................................... 15
Layout List ................................................................................................................................... 16
Graphics (still) Editing Mode ....................................................................................................... 17
Control Panel ............................................................................................................................... 19
Effect Editing Screen .................................................................................................................... 20
Properties Window ..................................................................................................................... 25
Property Tab ............................................................................................................................ 25
Shader Tab ............................................................................................................................... 26
Effect Tab ................................................................................................................................. 28
Text Tab ................................................................................................................................... 29
Roll/Crawl Tab ......................................................................................................................... 32
CG Property Tab ...................................................................................................................... 33
Timeline Window ........................................................................................................................ 34
Template Library .......................................................................................................................... 38
System Library ............................................................................................................................. 40
Create Object .................................................................................................................................. 42
Operation flow ............................................................................................................................ 42
Shapes ......................................................................................................................................... 43
Bezier Curve ................................................................................................................................ 46
Paintstroke .................................................................................................................................. 47
Image........................................................................................................................................... 48
Animation .................................................................................................................................... 51
Horizontal/Vertical Text ............................................................................................................... 52
Morph Text .................................................................................................................................. 55
Curve Text .................................................................................................................................... 58
Clock Object ................................................................................................................................ 59
Number Object ............................................................................................................................ 61
Timecode ..................................................................................................................................... 62
Datavideo Technologies Co., Ltd. 2
Page 3

Date Object ................................................................................................................................. 64
Flag .............................................................................................................................................. 66
Object Group ............................................................................................................................... 68
Path Group .................................................................................................................................. 69
Applying Shader .............................................................................................................................. 72
Shader Properties........................................................................................................................ 72
Colors ...................................................................................................................................... 73
Texture..................................................................................................................................... 78
Linear Sheen ............................................................................................................................ 79
Bitmap Sheen .......................................................................................................................... 79
Bump Bitmap .......................................................................................................................... 80
Concave ................................................................................................................................... 81
Bevel ........................................................................................................................................ 81
Face ............................................................................................................................................. 82
Edge ............................................................................................................................................. 82
Shadow ........................................................................................................................................ 83
Depth........................................................................................................................................... 84
Frame .......................................................................................................................................... 85
Advanced properties ................................................................................................................... 86
Editing properties ........................................................................................................................ 88
Combinations .......................................................................................................................... 88
Preset Styles ............................................................................................................................ 91
Shader Template Library ............................................................................................................. 91
Render Text ................................................................................................................................. 94
Render Image .............................................................................................................................. 95
Graphics (Still) Editing Mode ........................................................................................................... 96
Position, Scale, Rotate ................................................................................................................. 96
Make Group, Ungroup ................................................................................................................ 98
Boolean ..................................................................................................................................... 100
Object level ............................................................................................................................... 101
Mix Option ................................................................................................................................ 102
Align .......................................................................................................................................... 104
Smart Borders ........................................................................................................................... 110
Applying effects ............................................................................................................................. 112
3D Transform ............................................................................................................................. 112
Displacement ........................................................................................................................ 113
Scale ...................................................................................................................................... 114
Rotate .................................................................................................................................... 114
Pivot ...................................................................................................................................... 114
Transparency ......................................................................................................................... 115
Applying 3D Transform .............................................................................................................. 115
Creating Keyframes ............................................................................................................... 118
Effect composition .................................................................................................................... 121
Effect Templates Library ............................................................................................................ 122
Datavideo Technologies Co., Ltd. 3
Page 4

Text effect .................................................................................................................................. 123
Setting play area .................................................................................................................... 123
Play Frequency and Duration ................................................................................................ 124
Play Whole Text ..................................................................................................................... 126
Play In/Out by Letter ............................................................................................................. 126
Play In/Out by Line ................................................................................................................ 127
Random In/Out Text .............................................................................................................. 127
Object Group Effect ................................................................................................................... 129
Setting Play Area ................................................................................................................... 130
Play as Group......................................................................................................................... 132
Play as Child .......................................................................................................................... 132
Setting Stay Area ....................................................................................................................... 132
Setting Stay Area for Title ...................................................................................................... 132
Create Subtitle............................................................................................................................... 134
Create Roll/Crawl .......................................................................................................................... 136
Operation flow .......................................................................................................................... 136
Create 3D roll\crawl .................................................................................................................. 139
Other parameters ...................................................................................................................... 140
Fade In/Out ........................................................................................................................... 140
Mask ...................................................................................................................................... 140
Slow-Motion .......................................................................................................................... 141
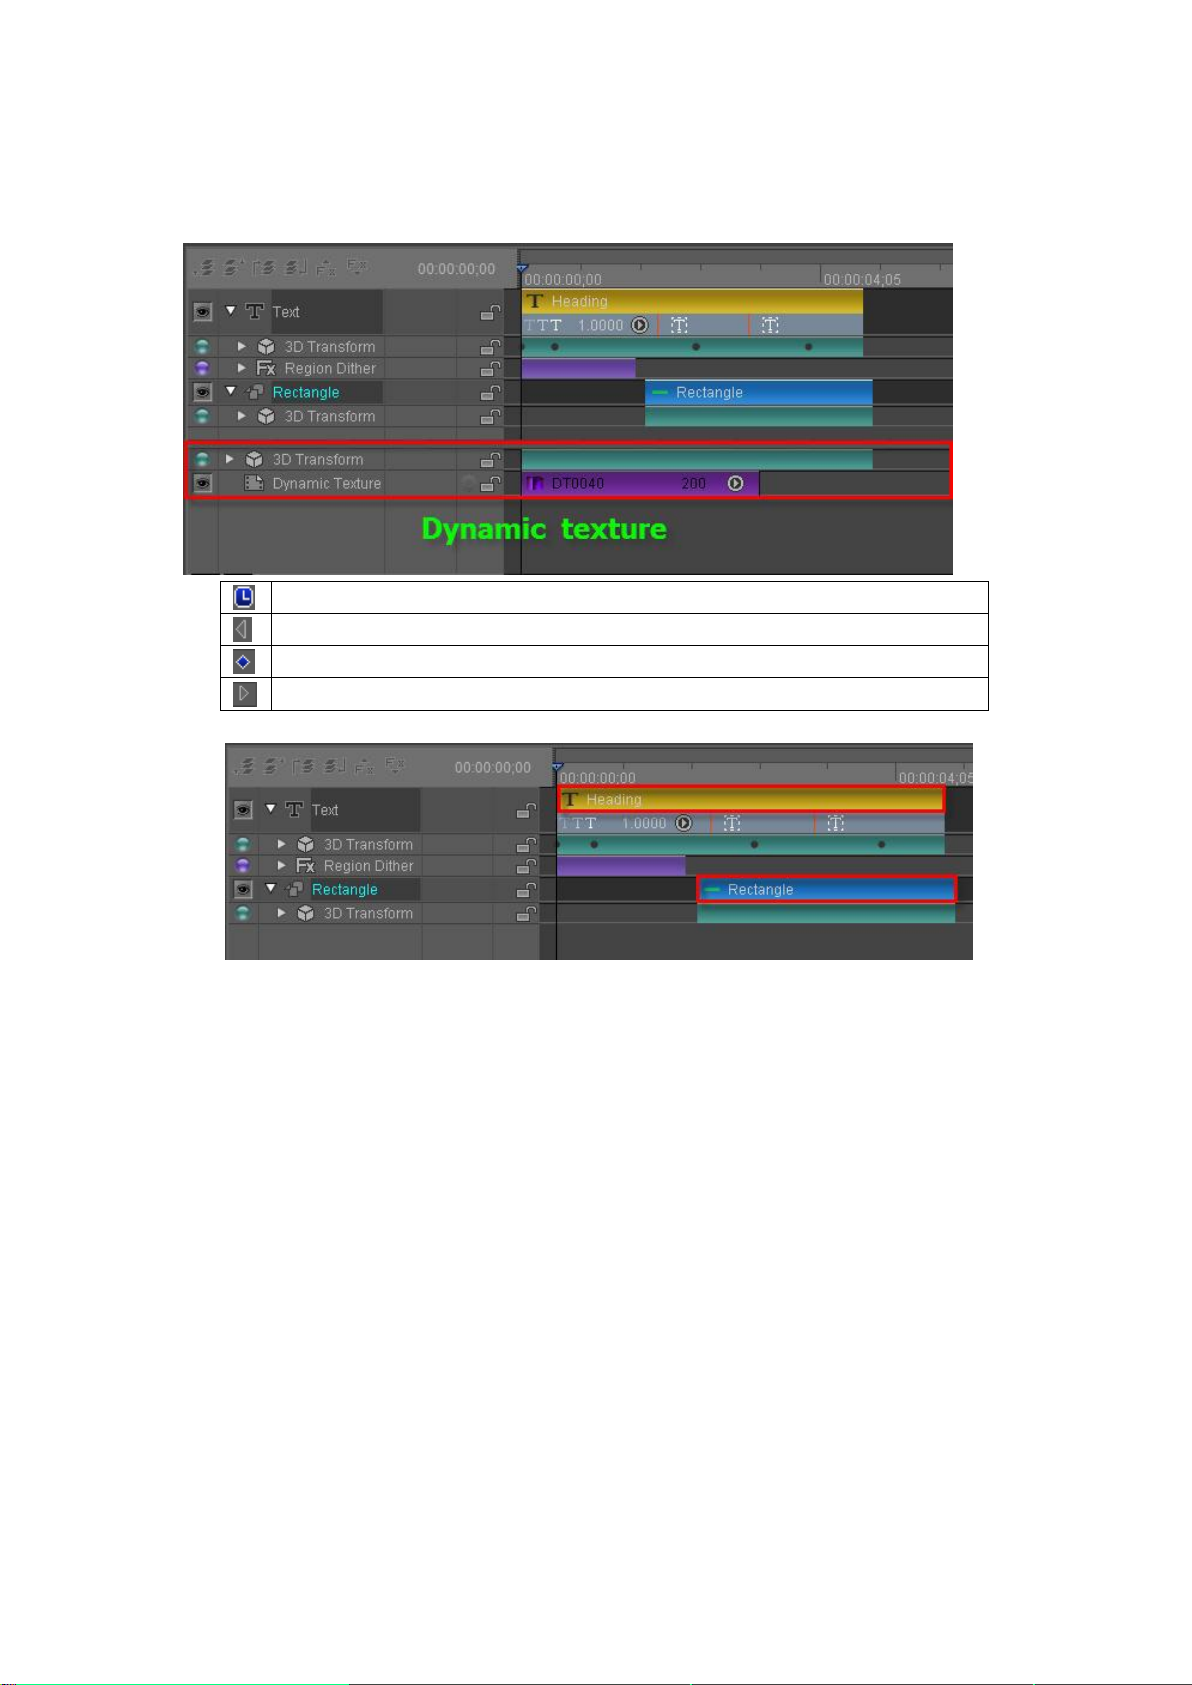
Dynamic Texture............................................................................................................................ 141
Applying Dynamic Texture ......................................................................................................... 141
Rendering .................................................................................................................................. 144
Examples ................................................................................................................................... 144
Applying Settings ........................................................................................................................... 145
Background Setting ................................................................................................................... 146
Solid Color ............................................................................................................................. 147
Grid Color .............................................................................................................................. 147
Image Background ................................................................................................................. 147
Background Template ............................................................................................................ 147
Keyboard Shortcut .................................................................................................................... 148
User Interface ............................................................................................................................ 148
Default Setting .......................................................................................................................... 150
Text Setting ................................................................................................................................ 151
File Path Settings ....................................................................................................................... 152
Auto Save .................................................................................................................................. 152
3D View Edit Settings ................................................................................................................ 153
Export ............................................................................................................................................ 153
Export Current Layout as Picture .............................................................................................. 154
Export Current Frame as Picture ............................................................................................... 155
Export Current Layout as Movie ................................................................................................ 155
Export Current Layout as Image Sequence ............................................................................... 158
Export Current Layout as QuickTime Movie.............................................................................. 159
Datavideo Technologies Co., Ltd. 4
Page 5

Export all Layouts as Pictures .................................................................................................... 160
Export Project include reference files ....................................................................................... 161
Example ......................................................................................................................................... 162
Create Title ................................................................................................................................ 162
1. Text ............................................................................................................................... 162
2. Liner .............................................................................................................................. 169
3. Make Group .................................................................................................................. 172
4. Fade In/Out Animation ................................................................................................. 172
5. Preview ......................................................................................................................... 177
Create Effect Title ...................................................................................................................... 177
1. Text ............................................................................................................................... 177
2. Liner .............................................................................................................................. 178
3. Make Group .................................................................................................................. 180
4. Create Effect Animation ............................................................................................... 181
5. Preview ......................................................................................................................... 189
Create Button ............................................................................................................................ 189
1. Draw Circle ................................................................................................................... 190
2. Draw Reflection ............................................................................................................ 192
Create Custom Shape ................................................................................................................ 194
1. Draw Leaf ...................................................................................................................... 194
2. Draw Apple ................................................................................................................... 196
3. Shader .......................................................................................................................... 198
Create Play by Character ........................................................................................................... 200
1. Enter Text and Shader .................................................................................................. 200
2. Add Area ....................................................................................................................... 201
3. Set Keyframe in 3D Transform ...................................................................................... 204
4. Preview ......................................................................................................................... 207
Create Play by Line .................................................................................................................... 207
1. Enter Text and Shader .................................................................................................. 208
2. Add area ....................................................................................................................... 209
3. Set Keyframe in 3D Transform ...................................................................................... 211
4. Preview ......................................................................................................................... 213
Create Mixed Play by Character/Line ........................................................................................ 214
1. Enter Text and Shader .................................................................................................. 214
2. Add area ....................................................................................................................... 215
3. Set Keyframe in 3D Transform ...................................................................................... 216
4. Preview ......................................................................................................................... 220
Create Advanced Animation Keyframe ..................................................................................... 220
1. Create Cloud ................................................................................................................. 220
2. Create Raindrop ............................................................................................................ 224
3. Set Raindrop Animation Keyframe ............................................................................... 225
4. Preview ......................................................................................................................... 228
Create Progress Bar ................................................................................................................... 229
1. Liner .............................................................................................................................. 229
Datavideo Technologies Co., Ltd. 5
Page 6

2. Color ............................................................................................................................. 229
3. Merge progress bar and high-light ............................................................................... 230
4. Percentage Animation .................................................................................................. 232
5. Preview Animation ....................................................................................................... 233
Create Roll Up ........................................................................................................................... 233
Create Crawl .............................................................................................................................. 233
1. Crawl Left ...................................................................................................................... 233
2. Create Text .................................................................................................................... 233
3. Set Parameters .................................................................................................................. 234
Render Image ............................................................................................................................ 236
Create Crawl with Liner ............................................................................................................. 241
Crawl ..................................................................................................................................... 241
Liner ...................................................................................................................................... 243
Edit Crawl Group ................................................................................................................... 245
Create Flip Stock ........................................................................................................................ 248
Stock Price Goup Group ........................................................................................................ 248
Stock Price Drop Group ......................................................................................................... 250
Stock Price Stop Group .......................................................................................................... 251
Edit Stock Flip Group ............................................................................................................. 252
Preview .................................................................................................................................. 253
Create Crawl Stock .................................................................................................................... 253
Using 3ds max animation in CG-500 ......................................................................................... 260
1. Set Frame Rate and Time ............................................................................................. 260
2. Choose Field Order ....................................................................................................... 261
3. Render Setting .............................................................................................................. 262
4. Save Setting .................................................................................................................. 264
5. Render Animation ........................................................................................................ 265
6. Change Format ............................................................................................................. 266
7. Using in CG-500 ............................................................................................................ 268
After Effect Animation in CG-500.............................................................................................. 269
1. New Composition and Composition Setting ................................................................ 269
2. Render Area .................................................................................................................. 270
3. Render Setting .............................................................................................................. 271
4. Change Format ............................................................................................................. 274
5. Using in CG-500 ............................................................................................................ 275
Combine Animation with CG-500 Animated Header ................................................................ 276
1. Set Keyframe positions ................................................................................................. 276
2. Background and Text .................................................................................................... 278
3. Set position ................................................................................................................... 282
4. Animation Preview ....................................................................................................... 282
Operation Flow of Plugins ............................................................................................................. 282
Operation Flow of Magic Composite ........................................................................................ 282
Operation Flow of Text Kerning/Leading Animation ................................................................. 286
Kerning Animation ................................................................................................................ 286
Datavideo Technologies Co., Ltd. 6
Page 7

Leading Animation ................................................................................................................ 288
Operation Flow of Image Slide Show ........................................................................................ 290
Operation Flow of 2D Stroke Animation ................................................................................... 294
Operation Flow of Image Four-point Deformation ................................................................... 300
Operation Flow of Text Path Animation .................................................................................... 305
Operation Flow of Shadow ........................................................................................................ 307
Back Shadow ......................................................................................................................... 307
Mirror shadow....................................................................................................................... 311
Slant Shadow ......................................................................................................................... 316
Keyboard Shortcuts ....................................................................................................................... 322
CG-500 Shortcut Keys ................................................................................................................ 322
Some Questions and the Answers ................................................................................................ 326
How to Change Parameter Value .............................................................................................. 326
How to Enter Special Characters ............................................................................................... 327
How to Convert Character Case ................................................................................................ 328
How to Scale Shader Style Parameter ....................................................................................... 329
Scale Object Data When Video Resolution Is Changed ............................................................. 331
How to Hotkey Process Special Language ................................................................................. 332
Datavideo Technologies Co., Ltd. 7
Page 8

Installation and Quick Star
Installation
Please refer to <CG-500 Quick Guide> to install the software.
Quick Star
After successfully installing the software, double-click on the CG-500 icon to launch the program.
Please Note:
1. Please ensure that the dongle is properly connected to the computer. When using
CG-500 the dongle must be connected at all times, otherwise the software will not
function correctly.
2. When EDIUS is running, it is not possible to launch CG-500 independently.
3. It is not possible to launch multiple CG-500 at the same time.
Overview of functions
Start Project Screen
Open CG-500 independently, Start Project screen will appear.
Datavideo Technologies Co., Ltd. 8
Page 9
Functions:
1) History Project
Show latest project.
2) Layout List
Show layout list of the selected history project.
Datavideo Technologies Co., Ltd. 9
Page 10

3) Buttons
New Project: click the button to open System Format Select screen
Browse Project: allows you to browse and open local project
Open Project: allows you to open the selected history project
Close: exit CG-500 software
Select Format Screen
Click on the “New Project” button, System Format Select screen will appear.
Three functions can be performed:
1) Choosing a format.
For example, PAL D1 50i or PAL Full HD 1080/50i 16:9.
Note: if one format is frequently used it can be set as the default format.
2) Add custem format
Choose “Custom” format.
Datavideo Technologies Co., Ltd. 10
Page 11

Set format parameters then click the “Add” button marked in red in the image above.
3) Set Title parameters.
Custom parameters can be set by clicking on "Custom", setting parameters, and then clicking
on “Save as Default Parameters”.
Note: If, once in CG-500, the format needs to be changed, you can:
1. Use the shortcut Ctrl+Shift+P
2. Click on the “Document Settings” button. Once the format has been chosen,
click on “OK” to proceed.
Datavideo Technologies Co., Ltd. 11
Page 12

The Main Interface screen is divided into the following parts:
Undo: undoes action
Redo: restores undone action
Start Project
New Project: creates new project
Open Project: opens existing project
Save: saves project
Save As: saves project as “new name”
Import Layout
Menu Bar - this is the main tool bar
Layout List- lists all layouts
Edit Screen - allows you to directly edit objects and text
Timeline Window - shows duration items in every layout page
Properties Window - allows you to edit the properties of objects and text
Status Bar - provides basic layout information and interface tools
The Menu Bar
File Menu
Datavideo Technologies Co., Ltd. 12
Page 13

Export Layout
Add Layout
Insert Layout
Remove Layout
Document Settings: set project
settings
Edit Menu
Copy
Paste
Cut Delete
Align
Align Range
Screen Arrangement
Move Level: adjust object level
Group: creates a group of objects
Ungroup: separates a group of
objects
Boolean: Boolean operations
Select: choose an item
Shape: create object of certain
shape
Line: create lines
Bezier: create Bezier curves
Text: create text
Morph Text: create
multidimensional text
Curve Text: create curved text
Flag: create flag object
Image: create image
Clock: create clock
Title PlugIn:Create PlugIn object
Object Menu
Datavideo Technologies Co., Ltd. 13
Page 14

Options Menu
Show/Hide Ruler
Show/Hide Grid
Show/Hide Safe Area
Show/Hide Crossline
Background: choose background
System Options: choose background and other settings
Still: set as still
Roll up
Crawl left
Crawl right
Add One: adds one screen
Add Half: adds half a screen
Delete One: deletes one screen
Delete Half: deletes half a
screen
Show/Hide Roll/Crawl Line
Go to screen: quickly go to
the desired roll/crawl screen
Roll/Crawl Menu
Effect Menu
Datavideo Technologies Co., Ltd. 14
Page 15

Select
Translate: move the object
Rotate: rotate the object
Scale: adjust size
Transparency
3D View
pivot
3d Horizon
Camera Output Window
This menu will appear when shifting to Effect Mode (shortcut F10).
Enter left-right
Enter right-left
Enter top-down
Enter bottom-up
Font Mode
Fill Mode
Set vertical shear effect
Set horizontal shear effect
Small Caps
Unconstraint
Text Editor Toolbar
The Text Editor Toolbar allows you to set text parameters:
Font
Italics
Bold
Underline
Height
Width
Lock: lock height-width ratio
Align Left
Align Center
Align Right
Line Range
Character Range
Arrange: present text horizontally or vertically
Render: apply effects to whole text or to individual characters
Show/Hide Text Editor advanced functions
Datavideo Technologies Co., Ltd. 15
Page 16

Constraint
Offset punctuation for vertical text
Donot offset punctuation for vertical text
Layout List
Use the Layout List to quickly edit several titles.
Frequent operations are:
View: click on a Layout to make it appear on the
Edit Screen
Add Layout: right click on a layout and choose
“Add”
Delete Layout: rightclick on layout and choose
“Delete”
Layout List right-click context menu:
Datavideo Technologies Co., Ltd. 16
Page 17

Append: adds layout
Insert: inserts layout
Delete: deletes layout
Rename: changes layout name
Copy: copy layout
Cut: cut layout
Paste: paste layout
Move Up
Move Down
Move Top: move layout to front
Move Bottom: move layout to end
Prev Screen: show previous screen
Next Screen: show next screen
Head Screen: show first screen
Tail Screen: show final screen
Graphics (still) Editing Mode
Right-click on the Edit Screen
1. The following context menu will appear
Datavideo Technologies Co., Ltd. 17
Page 18

View Ruler
View Grid
View Safe Area
View Cross Line
Enable Guideline
Fit Window Size
Show Full Color
Show Alpha Only
Show Fill Color
Paste
Save Layout to Image File
2. Object context menu
Datavideo Technologies Co., Ltd. 18
Page 19
Make Group
Ungroup
Move Up
Move Down
Move Top
Move Bottom
Lock/Unlock
Visible/Invisible
Edit
Cut
Copy
Paste
Delete
Paste To Group
Delete
Copy Shader Style
Paste Shader Style
Scale ShaderStyle Parameter
Boolean
Mix Option
Align Objects
Center Object Pivot
Mirror Vertical
Mirror Horizontal
Reset morph Text
Text Block
Save Object to Image File
Control Panel
The Control Panel is used to operate items placed in the timeline tracks. Functions from left
to right:
Fit Window
Actual Size
Custom Size
Choice Head - move to the start of chosen track
Datavideo Technologies Co., Ltd. 19
Page 20
Choice Tail - move to the end of chosen track
Play Start
Play
Loop - continuously replay
CG Preview Play
Show Full color
Show Alpha Only
Show Fill Color
Shift between 2D/3D Effect
Left Time Code: current play time
Right Time Code: total play time.
Effect Editing Screen
Press the “Effects Editing Screen” button (or type F10) to shift from the Graphics (Still) Editing
Screen. Here you can set object keyframes.
Adjusting screen angle:
a. To change angle, hold “Alt”, left click and drag mouse.
b. To reset angle, hold “Alt’ and double click.
When using the blank function, right click for the following context menu:
Datavideo Technologies Co., Ltd. 20
Page 21
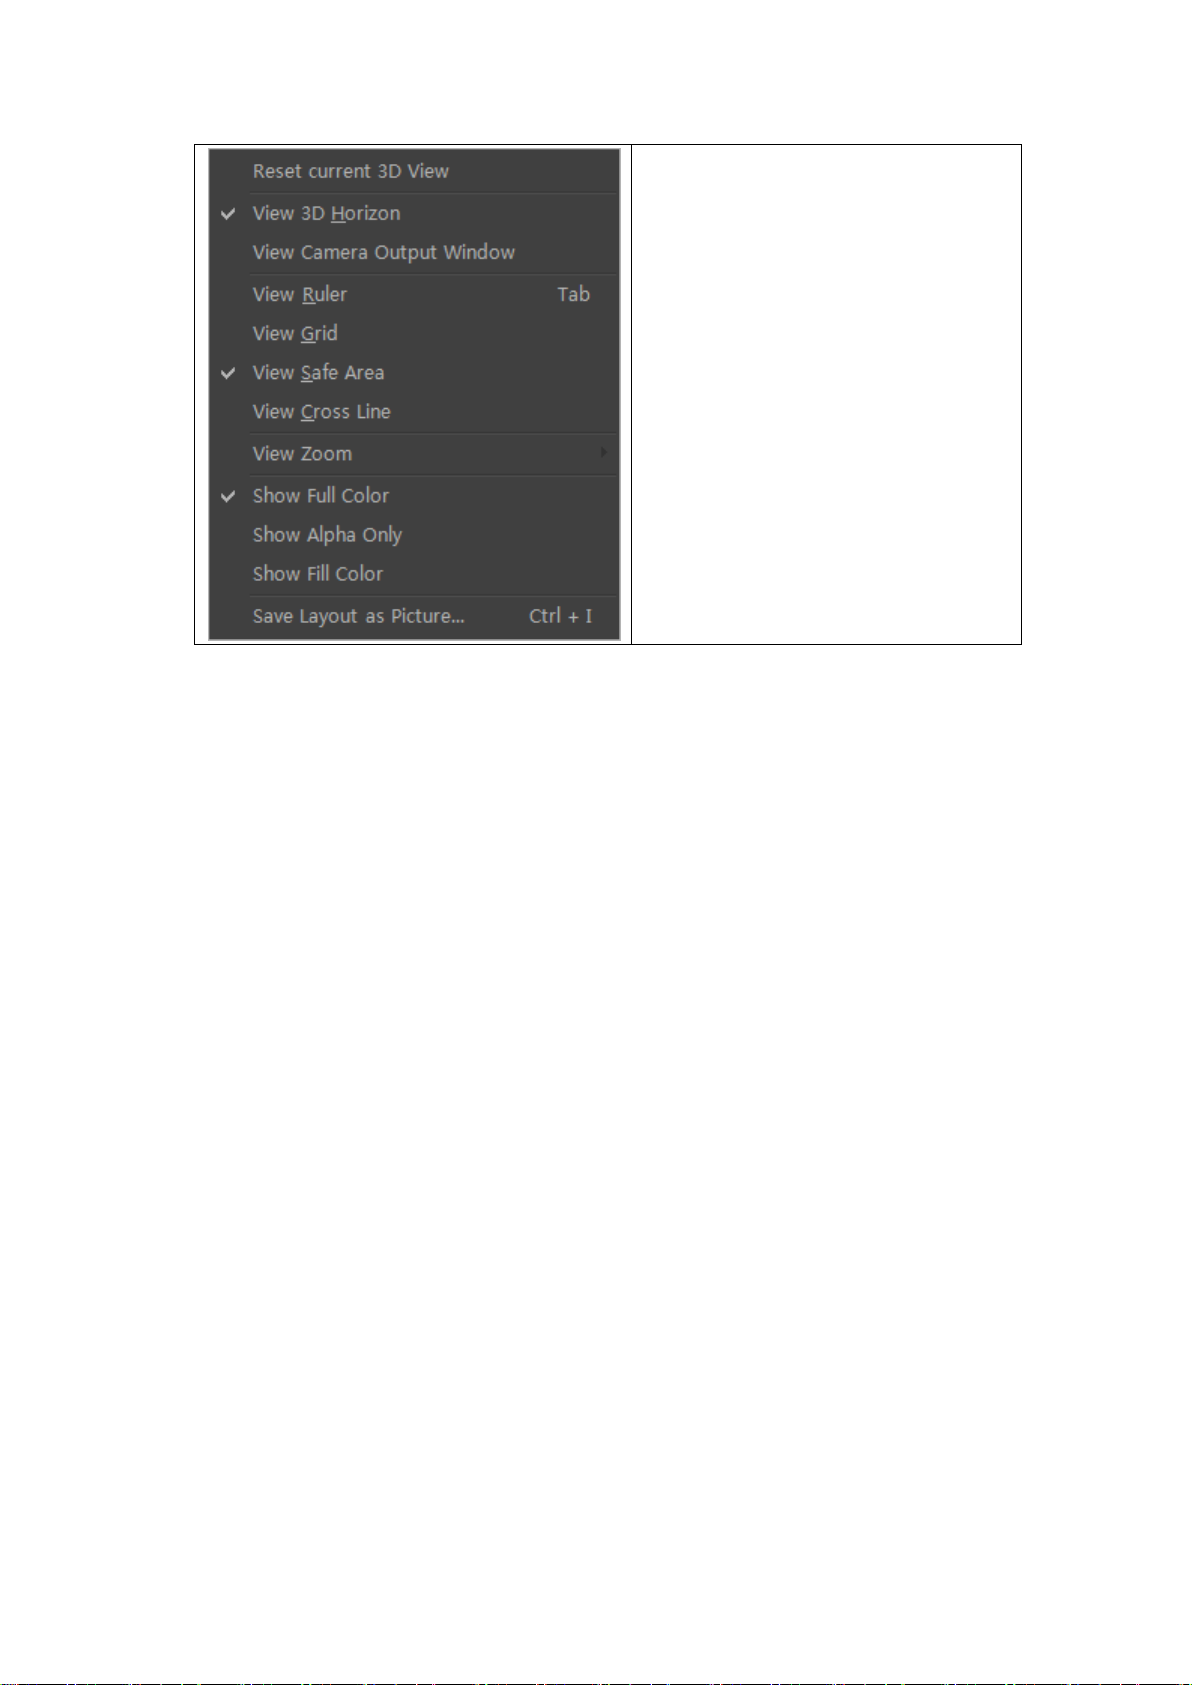
Reset Current 3D View
View 3D Horizon
View Camera Output Window
View Ruler
View Grid
View Safe Area
View Cross Line
View Zoom
Show Full Color
Show Alpha Only
Show Fill Color
Save Layout as Picture
When using the displacement function, right click for the following context menu:
Datavideo Technologies Co., Ltd. 21
Page 22
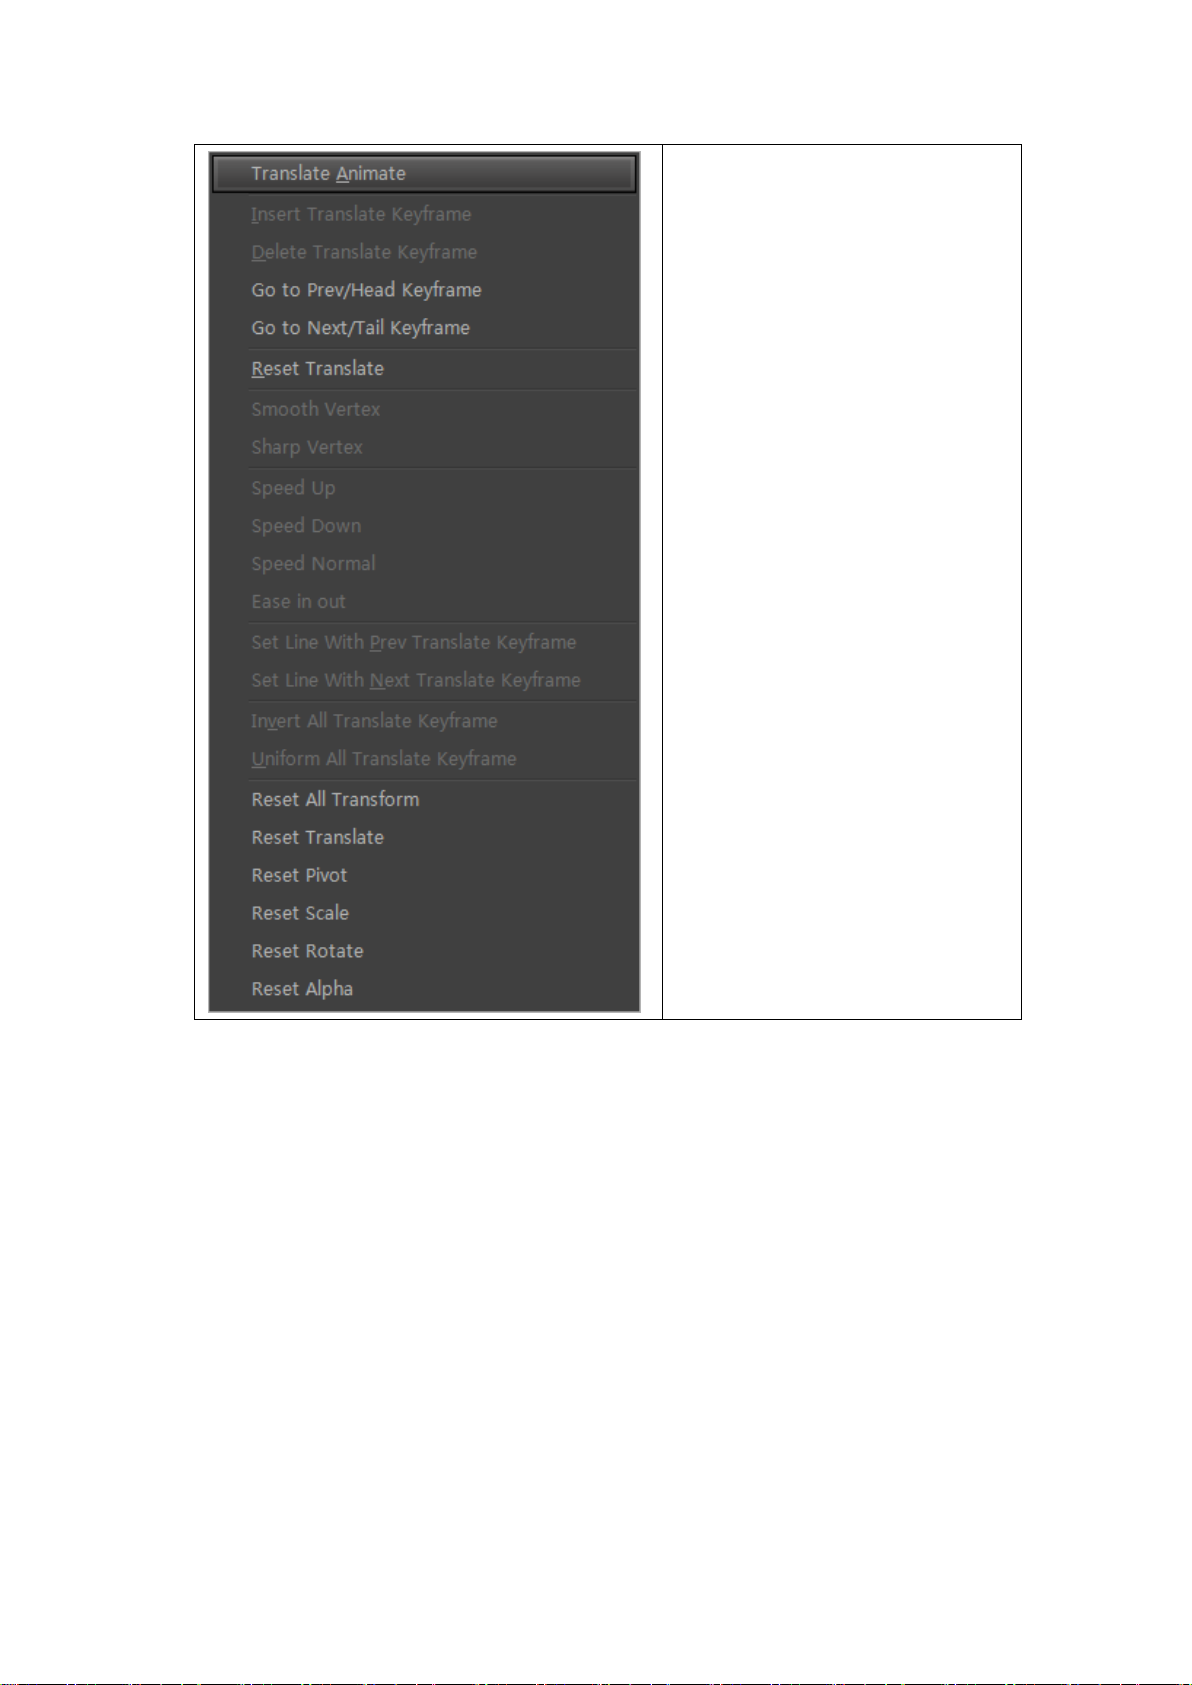
Translate Animation
Insert Translate Keyframe
Delete Translate Keyframe
Go to Previous/Head Keyframe
Go to Next/Tail Keyframe
Reset Translate
Smooth Vertex
Sharp Vertex
Speed Up
Slow Down
Speed Normal
Ease in out
Set Line With Prev Translate Keyframe
Set Line With Next Translate Keyframe
Invert All Translate Keyframe
Uniform All Translate Keyframe
Reset All Transform
Reset Translate
Reset Pivot
Reset Scale
Reset Rotate
Reset Alpha
When using the pivot function, right click to see the following context menu:
Datavideo Technologies Co., Ltd. 22
Page 23
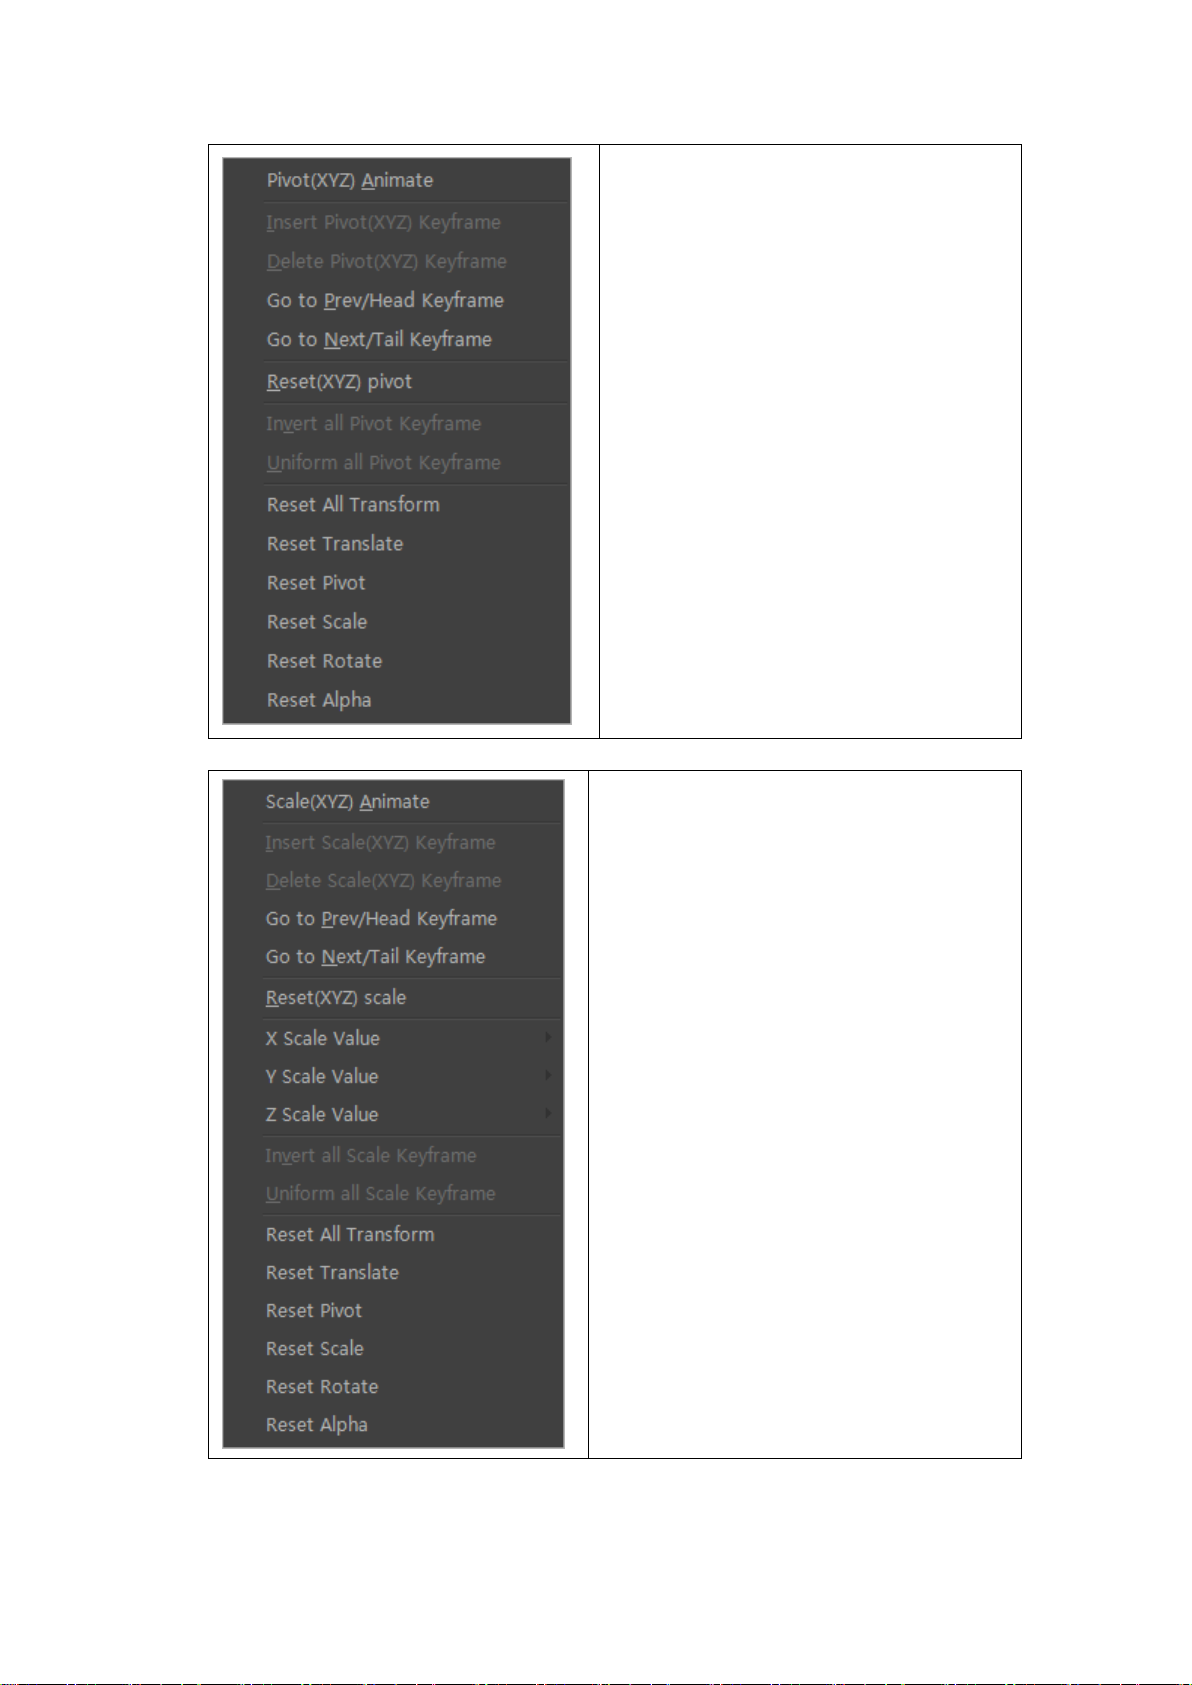
Pivot (XYZ) Animate
Insert Pivot Keyframe
Delete Pivot Keyframe
Go to Previous/Head Keyframe
Go to Next/Tail Keyframe
Reset Pivot
Invert All Pivot Keyframe
Uniform All Pivot Keyframe
Reset All Transform
Reset Translate
Reset Pivot
Reset Scale
Reset Rotate
Reset Alpha
When using the scale function, right click to see the following context menu:
Scale(XYZ) Animate
Insert Scale Keyframe
Delete Scale Keyframe
Go to Previous/Head Keyframe
Go to Next/Tail Keyframe
Reset Scale
X scale value
Y scale value
Z scale value
Invert All Scale Keyframe
Uniform All Scale Keyframe
Reset All Transform
Reset Translate
Reset Pivot
Reset Scale
Reset Rotate
Reset Alpha
When using the rotate function, right click for the following context menu:
Datavideo Technologies Co., Ltd. 23
Page 24
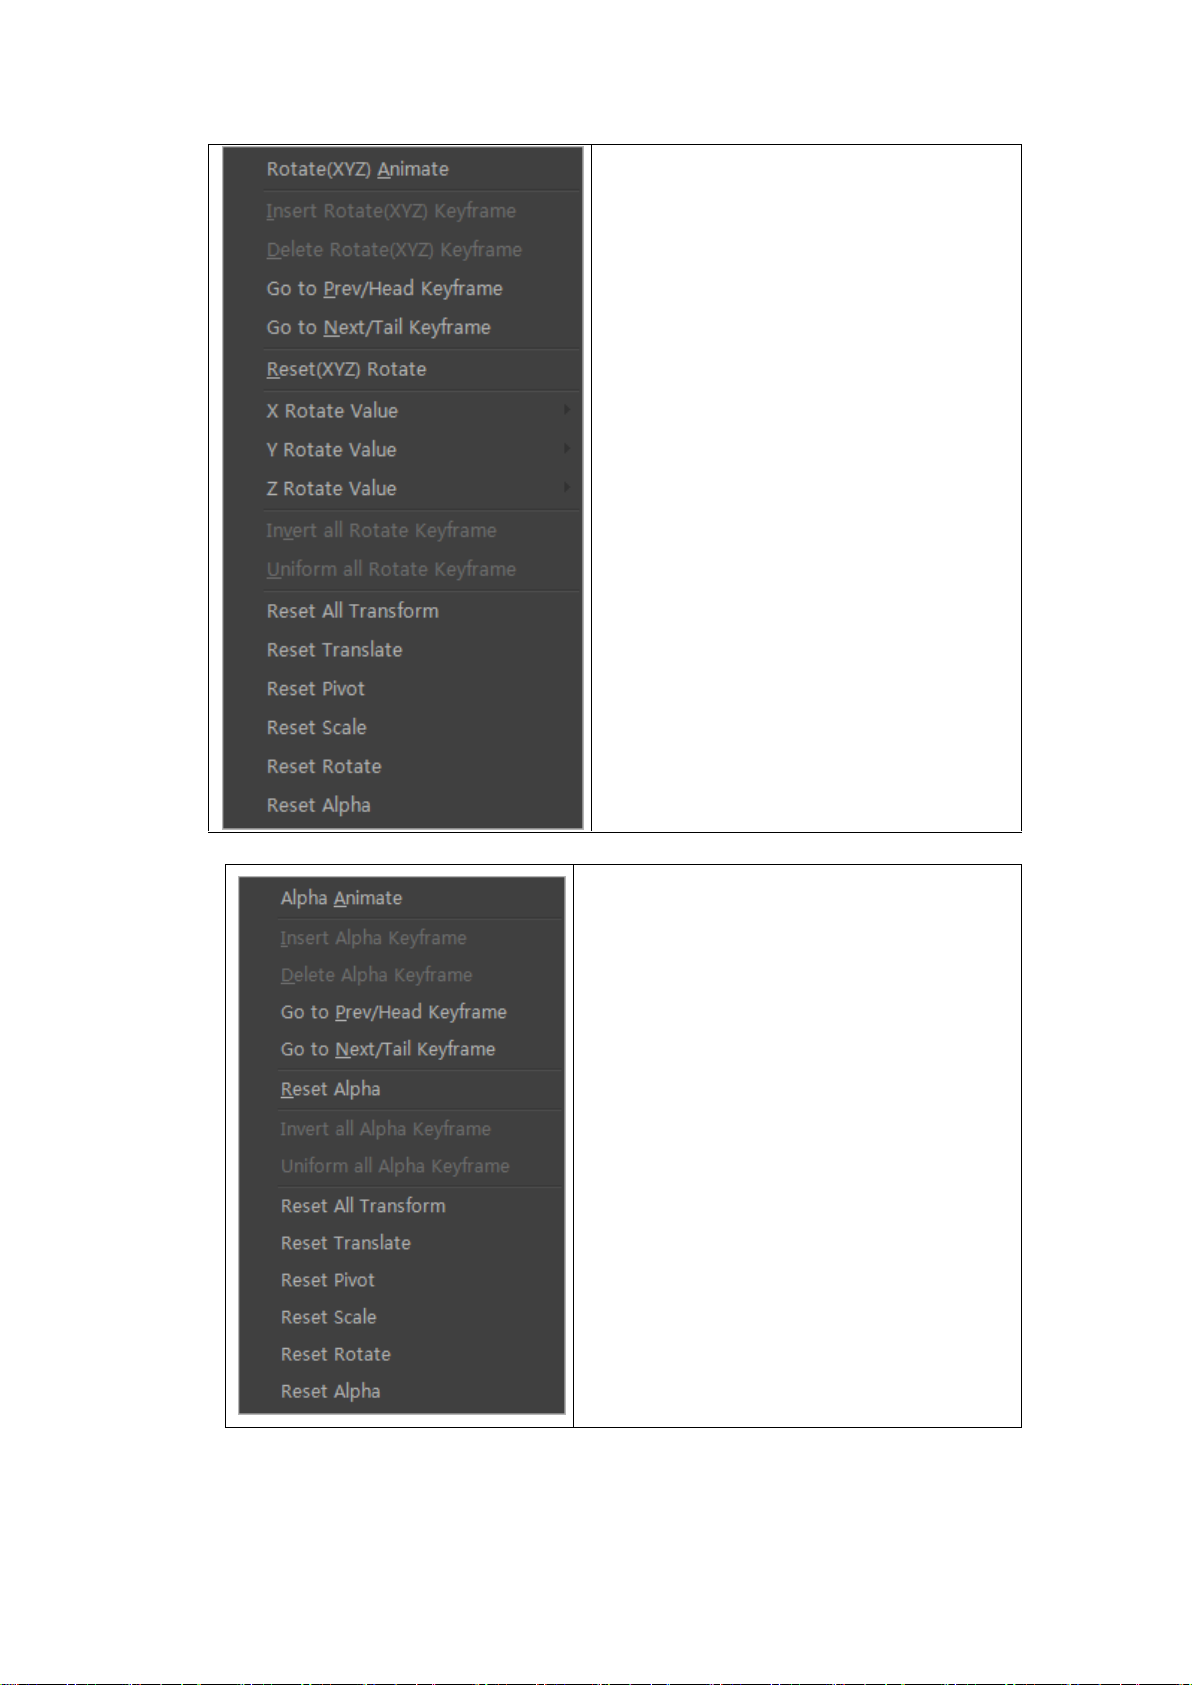
Rotate(XYZ) Animate
Insert Rotate Keyframe
Delete Rotate Keyframe
Go to Previous/Head Keyframe
Go to Next/Tail Keyframe
Reset Rotate
X rotate value
Y rotate value
Z rotate value
Invert All Rotate Keyframe
Uniform All Rotate Keyframe
Reset All Transform
Reset Translate
Reset Pivot
Reset Scale
Reset Rotate
Reset Alpha
When using the transparency function, right click for the following context menu:
Alpha Animate
Insert Alpha Keyframe
Delete Alpha Keyframe
Go to Previous/Head Keyframe
Go to Next/Tail Keyframe
Reset Alpha
Invert All Alpha Keyframe
Uniform All Alpha Keyframe
Reset All Transform
Reset Translate
Reset Pivot
Reset Scale
Reset Rotate
Reset Alpha
Keyframe context menu
Datavideo Technologies Co., Ltd. 24
Page 25
Reset Translate
Delete this Keyframe
Smooth Vertex
Sharp Vertex
Speed Up
Slow Down
Speed Normal
Ease in out
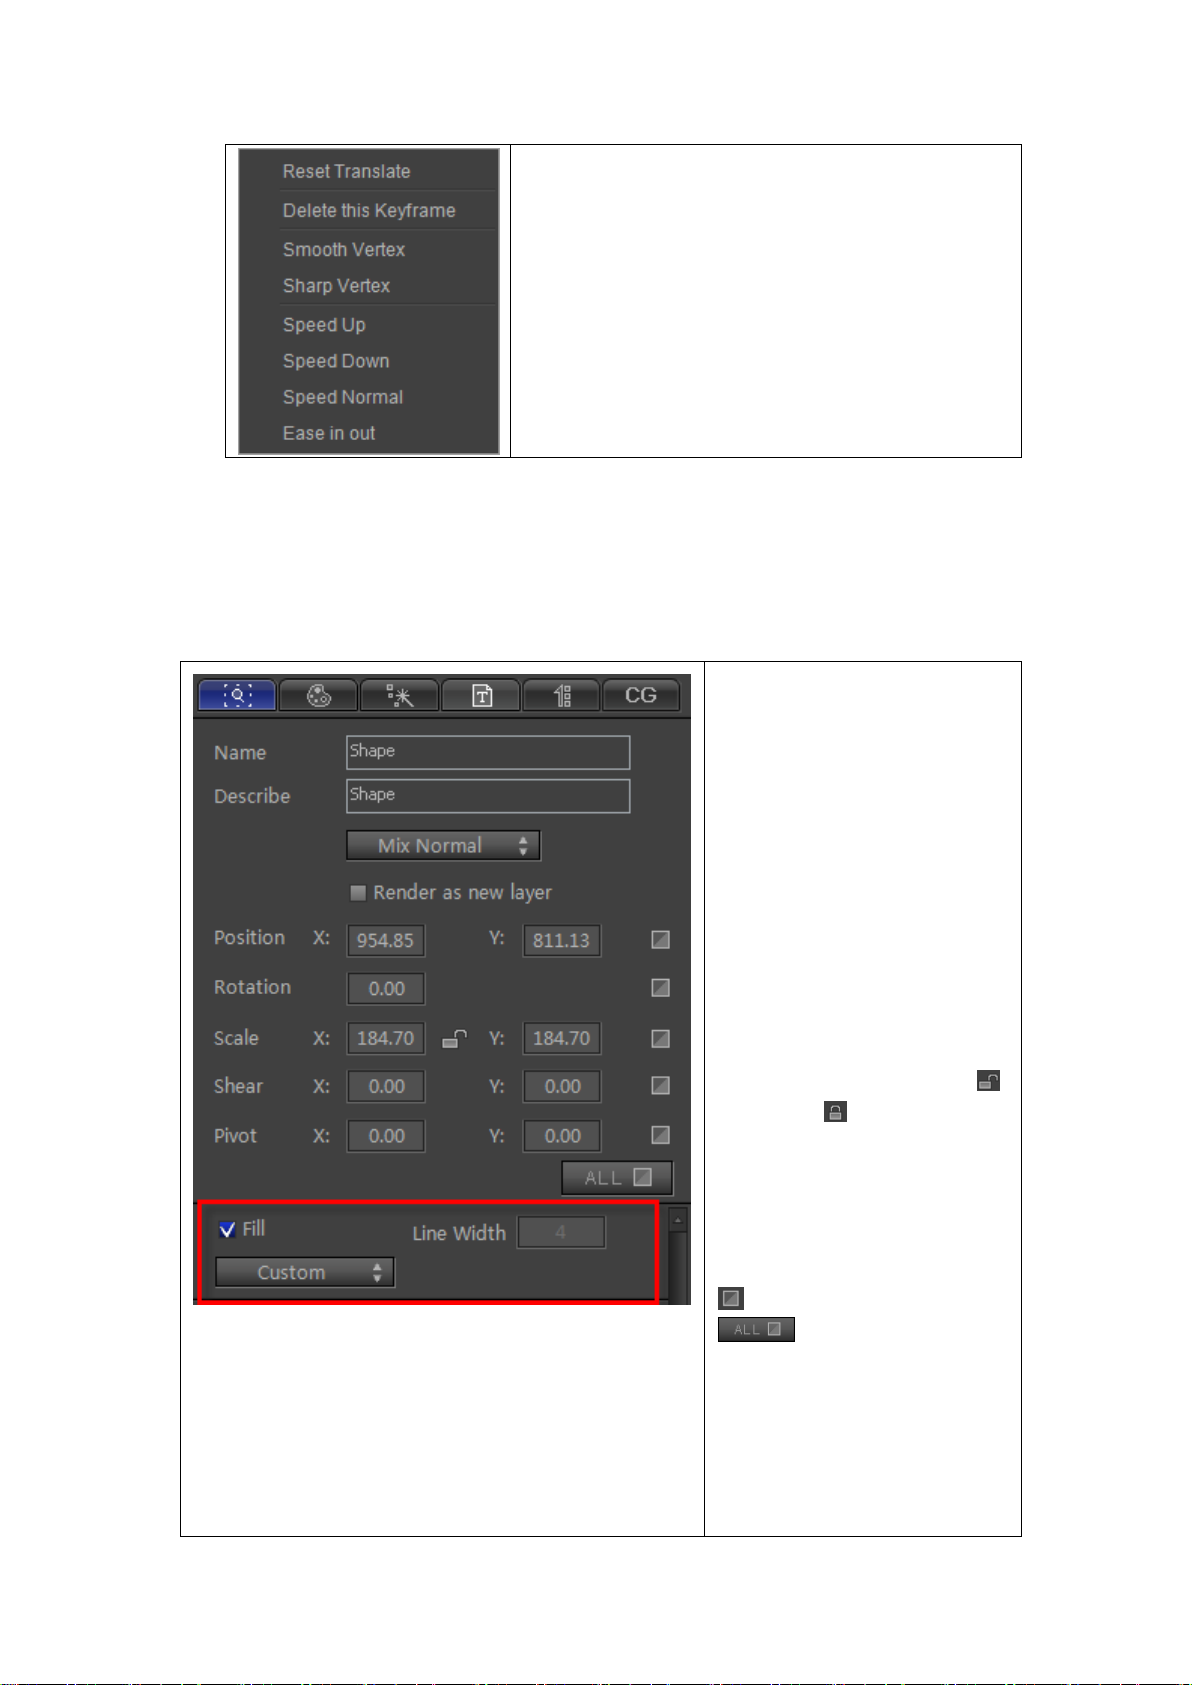
Properties Window
The Properties Window has five
tabs: Property, Shader, Effect, Text
and Roll/Crawl and CG property.
Name/Describe: view selected
object and describe
Mix Style: select Mix Normal/Mix
Penetrate
Render as new layer
Position: view position, make
change
Rotate: view rotate angle, make
change.
Scale: view scale parameters, or
change value. Left-click on ,
changing to , scale XY change
simultaneously.
Shear: view shear value, or
change.
Pivot: view pivot position, or
make change.
Reset: reset selected value.
Reset: reset all. By
clicking on it will reset all values,
but doesn't affect values in sub
screen.
Sub Window: marked place in the
picture left.
If choosing different object, sub
Property Tab
Datavideo Technologies Co., Ltd. 25
Page 26

window will appear different
accordingly.
Set parameters by:
Shader preview
Shader Style drop-down list
Properties list: Face, Edge,
Shadow, Depth
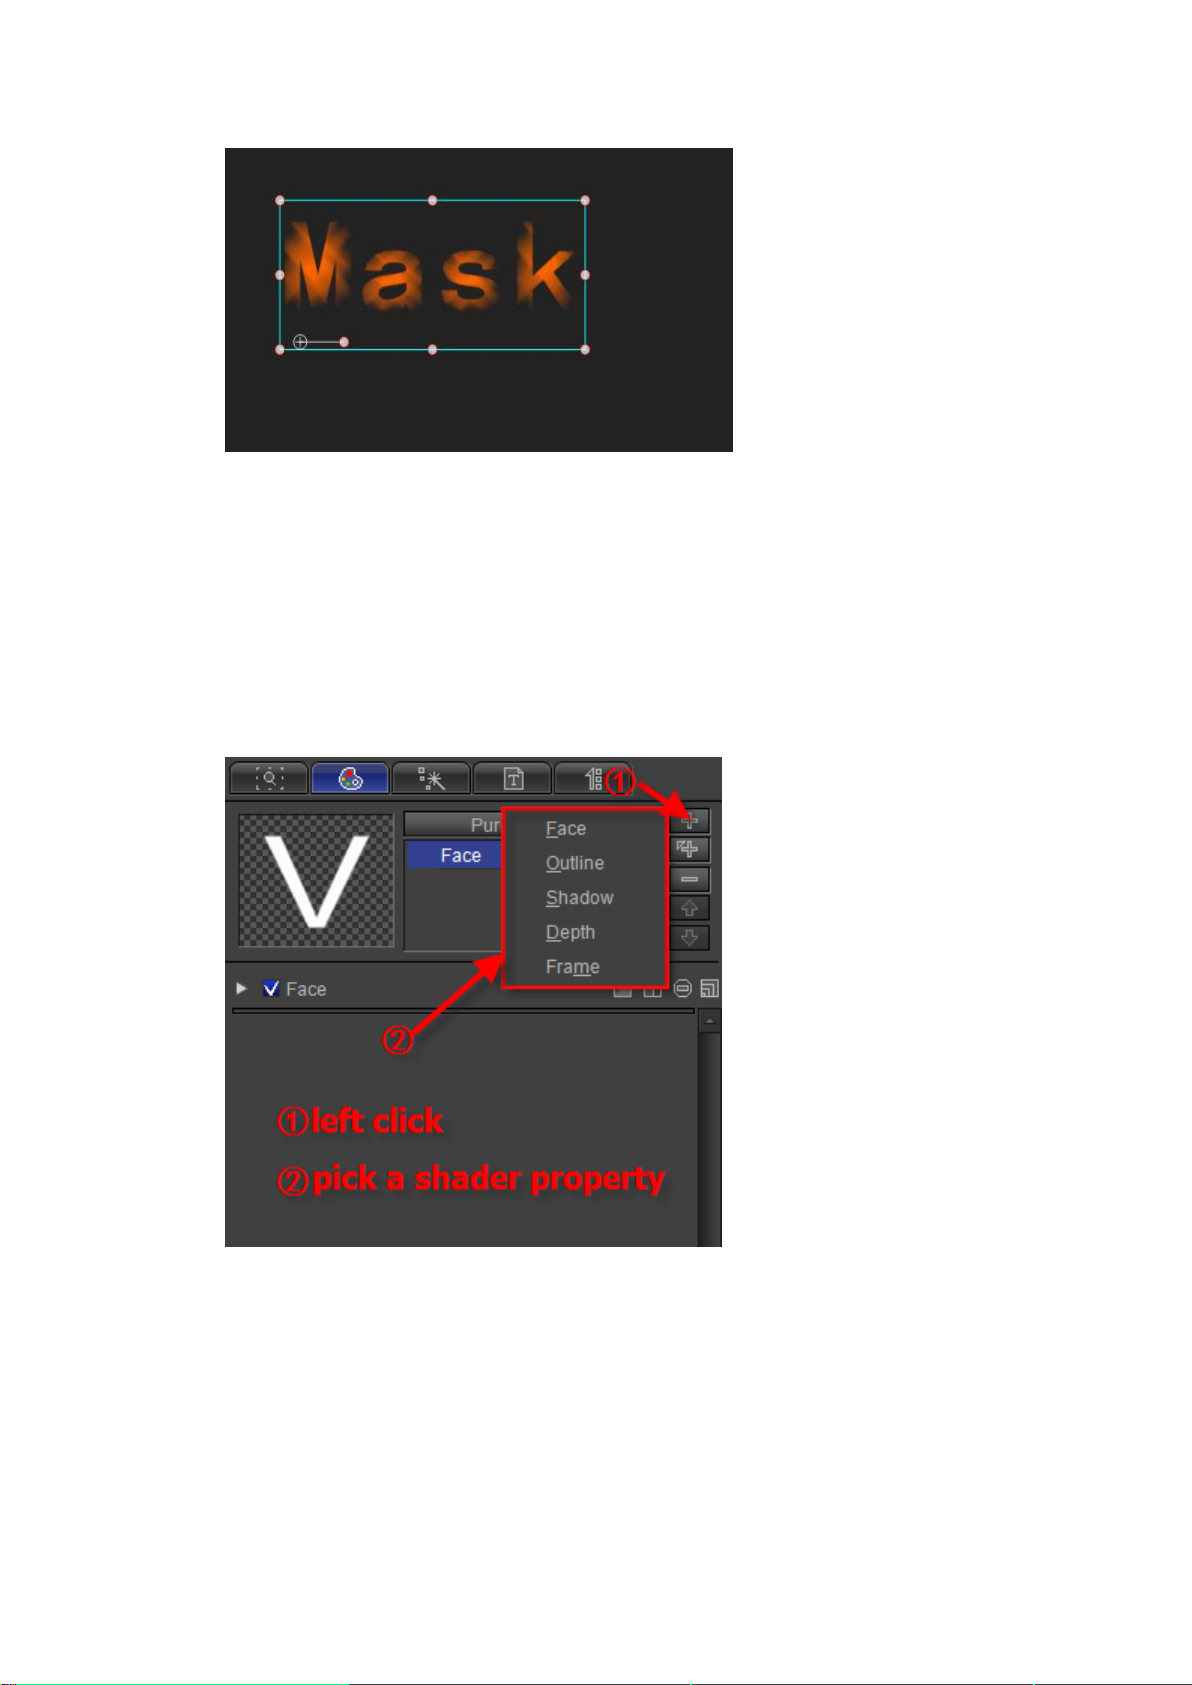
Add
Insert
Delete
Move Up
Move Down
You can set specific parameters in the
properties list.
You can also use preset Shader templates
Set Dynamic Texture and Masking, found at
the lower half of the tab.
a. Clicking on the field and typing in the numbers
b. Dragging the cursor over the field
Shader Tab
Use the or button to add Face, Edge, Shadow or Depth,
Datavideo Technologies Co., Ltd. 26
Page 27

Use the button to remove Face, Edge, Shadow or Depth,
Set order by clicking on the and buttons,
Set Shader style by choosing from the drop-down list.
Datavideo Technologies Co., Ltd. 27
Page 28

Effect Tab
To the left: 3D Transform, 2D Pan
and Screen In/Out areas
Expand
Reset
Fold/Expand
Delete
Save
Screen In/Out area
Choose In method
Choose Stay method
Choose Out method
Add Effect
Delete Effect
Refresh
Show Text List
Setting screen In effect:
Click , choose an effect from the templates, then click .
Datavideo Technologies Co., Ltd. 28
Page 29

Use the same method to apply “Stay” and “Out” effects.
Whole text
Line by line text
Text Tab
Datavideo Technologies Co., Ltd. 29
Page 30

Edit text options:
Whole text
Line by line text
Create new
Open existing file
Save
Save As
Find and Replace
Create text
Create line by line text
Create single-line text
Replace All
Replace
Subtitle Setting
Font Style
Roll/Crawl text editor menu:
Set Heading: sets chosen text as heading
Datavideo Technologies Co., Ltd. 30
Page 31

Set Content: sets chosen text as content
Select Heading: pick out headings
Select Content: pick out content
Heading-Content: sets space between heading and content
Content-Heading: sets space between content and heading
Content-Content: sets space between content and content
Apply Horizontally: applies horizontally
Apply Vertically: applies vertically
At the bottom of the tab you can see the list of texts that are in the Edit Screen.
Left-click to edit.
Datavideo Technologies Co., Ltd. 31
Page 32
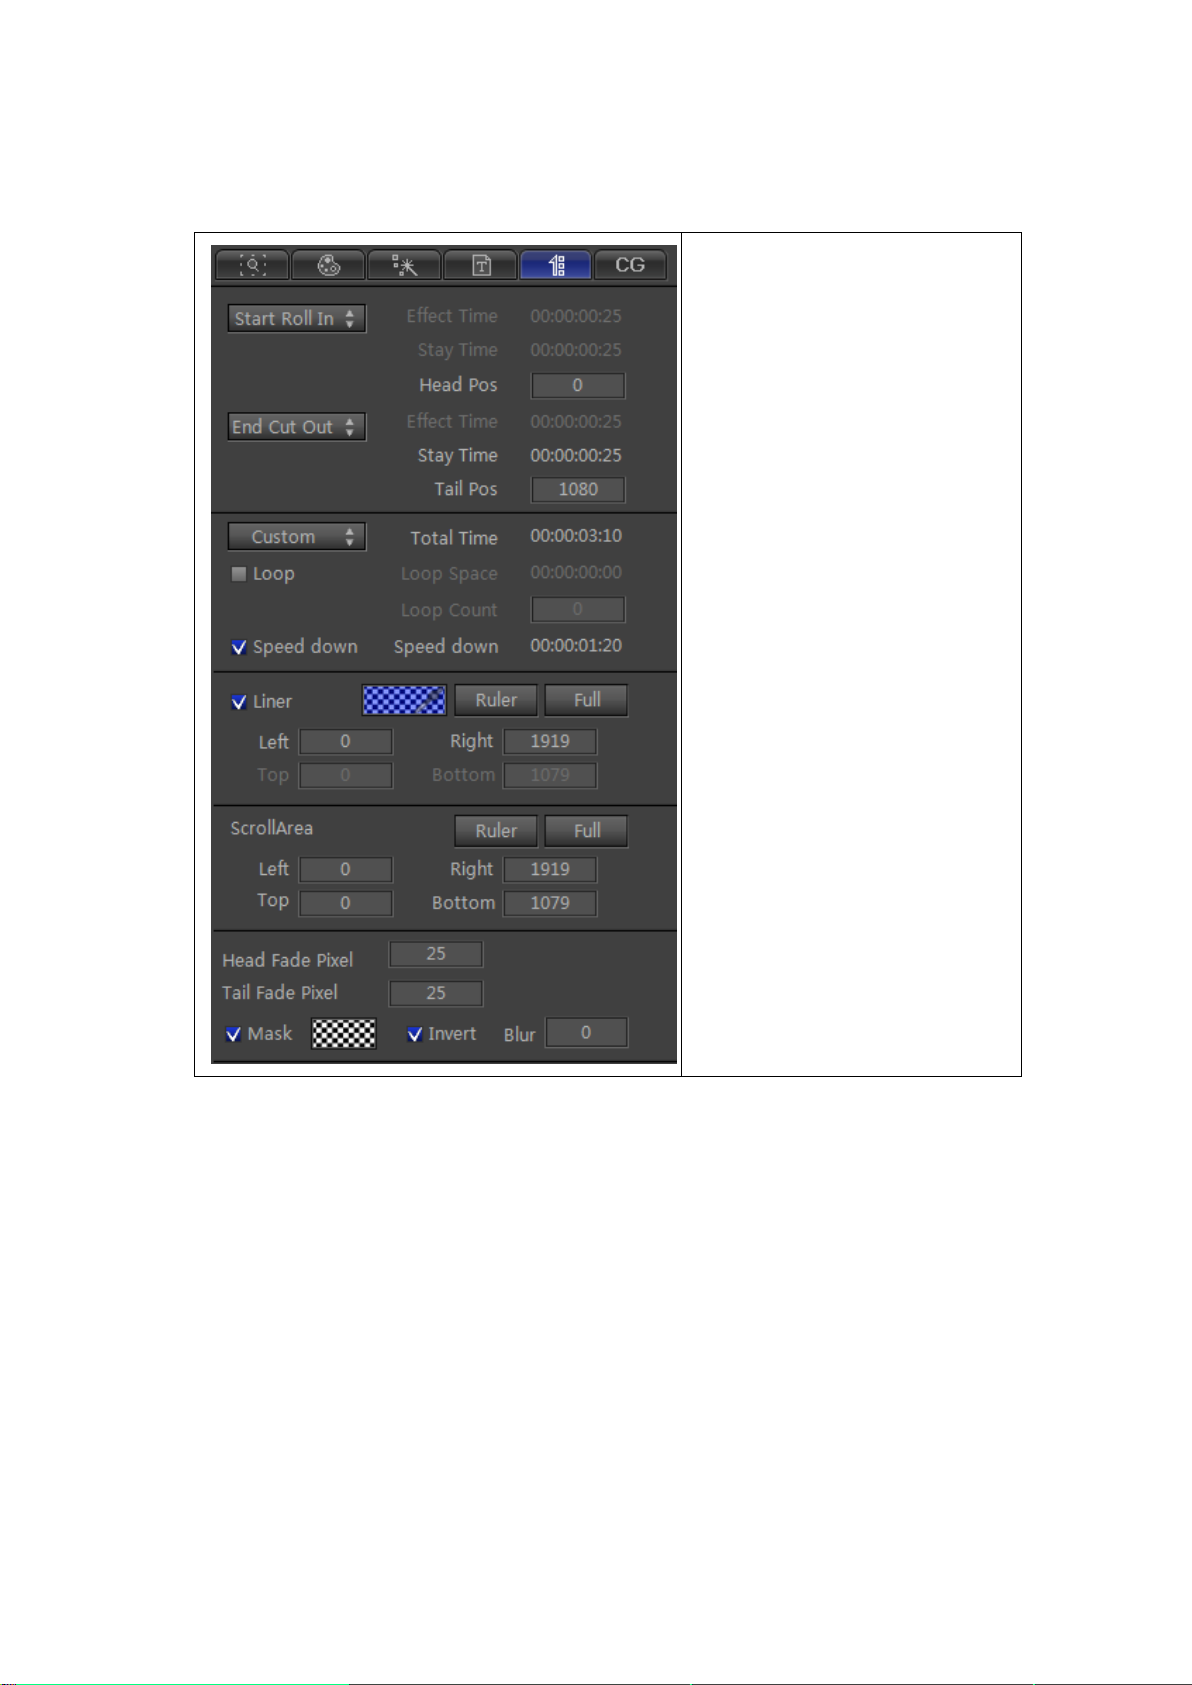
Roll/Crawl Tab
Roll In: set role in method
Roll Out: set roll out method
Custom: set roll time
Loop: set loop time and count
Speed Down: reduce roll speed.
Liner: apply liner effect
Ruler: set ruler size
Full: restore liner to full screen
Roll Area:
Ruler: set roll limits
Full: set ruler to full screen
Left/Right/Top/Bottom: set roll
limits
Start/End Fade: set head/tail in/out
position
Mask: apply mask effect
Invert: apply invert effect
Blur: set blur parameters
Datavideo Technologies Co., Ltd. 32
Page 33
CG Property Tab
Object Type: choose object type
ID Class: choose ID class
ID: show ID
Direction: choose roll/crawl method
Speed: choose roll/crawl speed
Interval: set interval
Head Fade Pixel: set head fade pixel
Tail Fade Pixel: set tail fade pixel
Effect Option: choose effect
method
Duration: change effect duration
Data Source: choose data source
Text File: browse text file
Edit: edit file
Invalid File: show invalid file
Loop Play
Loop Count: set loop count
Has play title text: enable “Has play
title text” to use head symbol and
tail symbol
Data Field Mapping Option:
use/unused source field and target
field
If choosing different data source, the tab will appear different accordingly.
CSV File
Set field counts and field symbol
Datavideo Technologies Co., Ltd. 33
Page 34
ODBC Dtabase
Move object up
Move object down
Move object to top
Move object to bottom
Move effect up
Move effect down
Render as new layer
Normal object/replaceable object
Show animation track only
Show all tracks name
Set track as Visible/Invisible
Show/Hide object effect tracks
Enable 3D transform
Lock object to prevent editing
Enable Timeline Autosnap
Expand all tracks
Set DNS, SQL and edit SQL
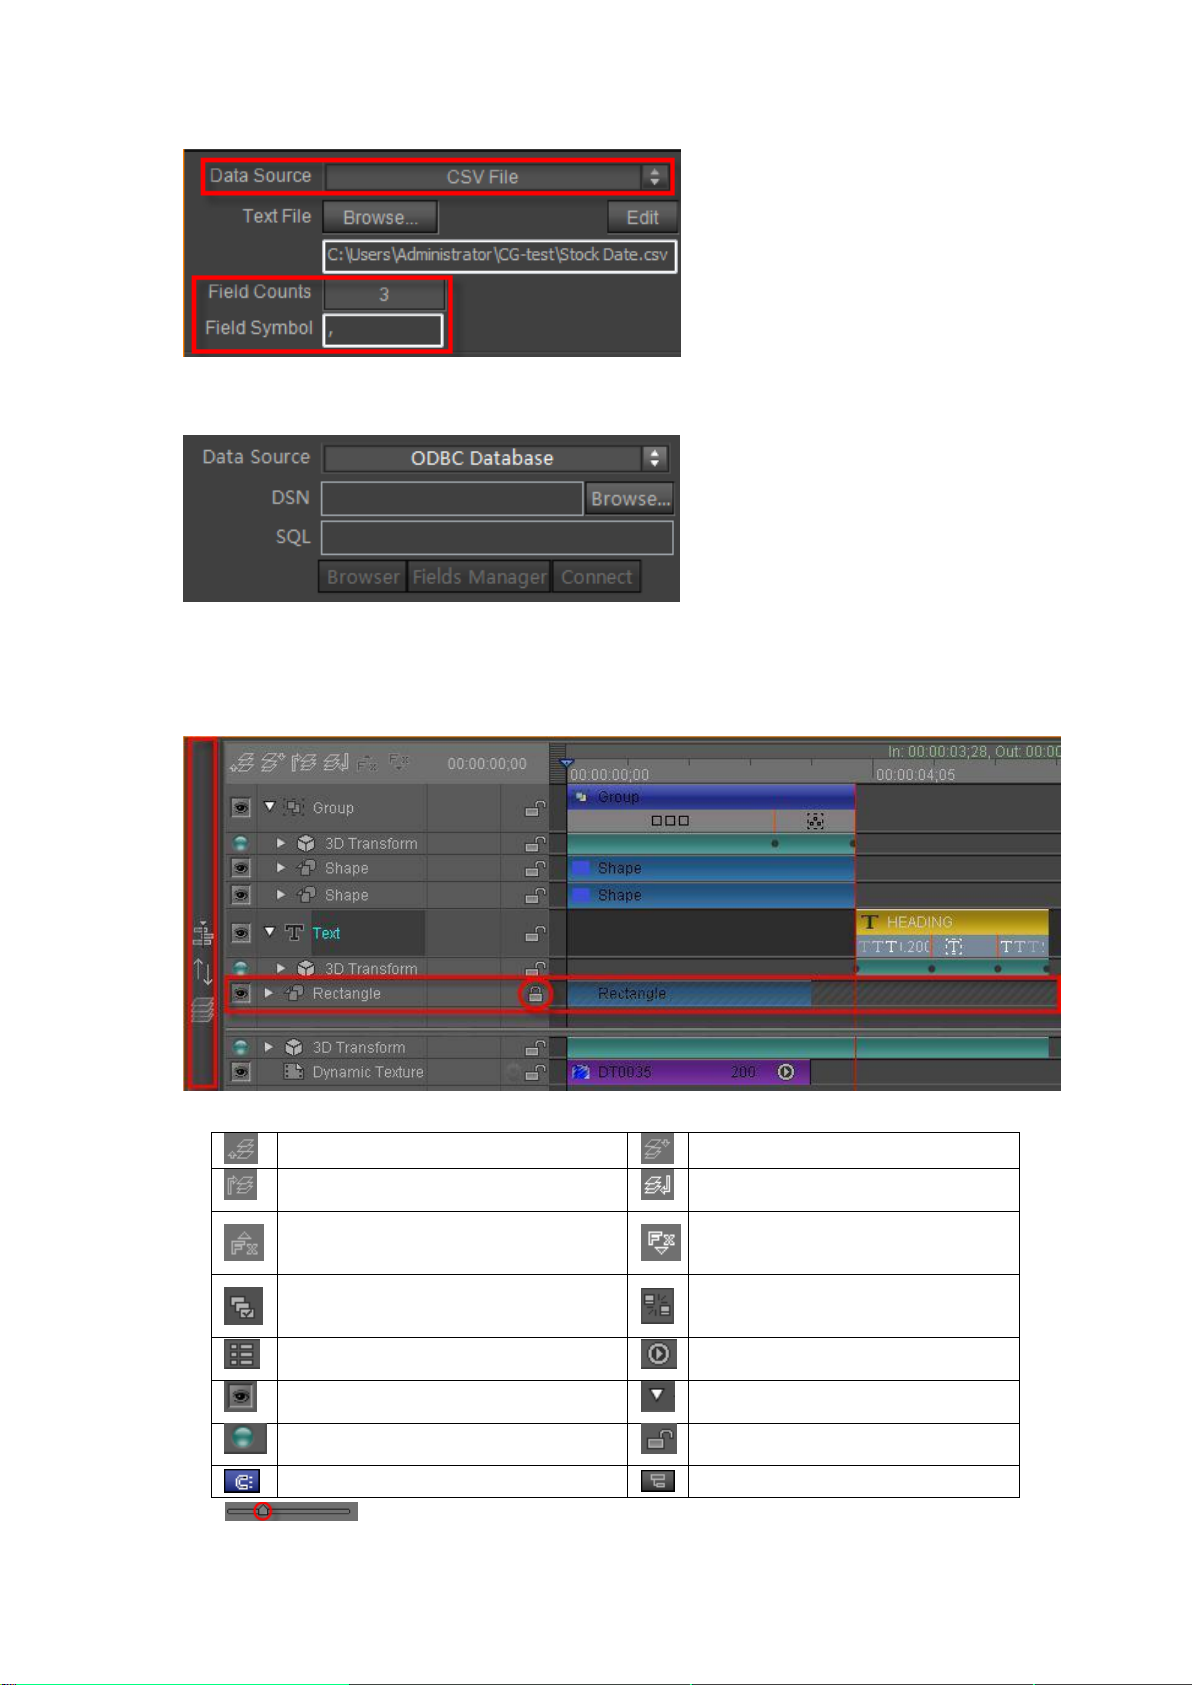
Timeline Window
Timeline Window options:
:
Datavideo Technologies Co., Ltd. 34
Page 35
Adjust the Timeline using the bar shown or right click on the timeline, then drag the cursor.
Enable/Disable 3D Transform Keyframe points.
Go to previous Keyframe
Add/Remove Keyframe
Go to next Keyframe
Click on the bar-button at the very left of the Timeline to open the Templates Library.
3D Transform and Dynamic Texture tracks:
Right click on an object track to see the context menu:
Datavideo Technologies Co., Ltd. 35
Page 36
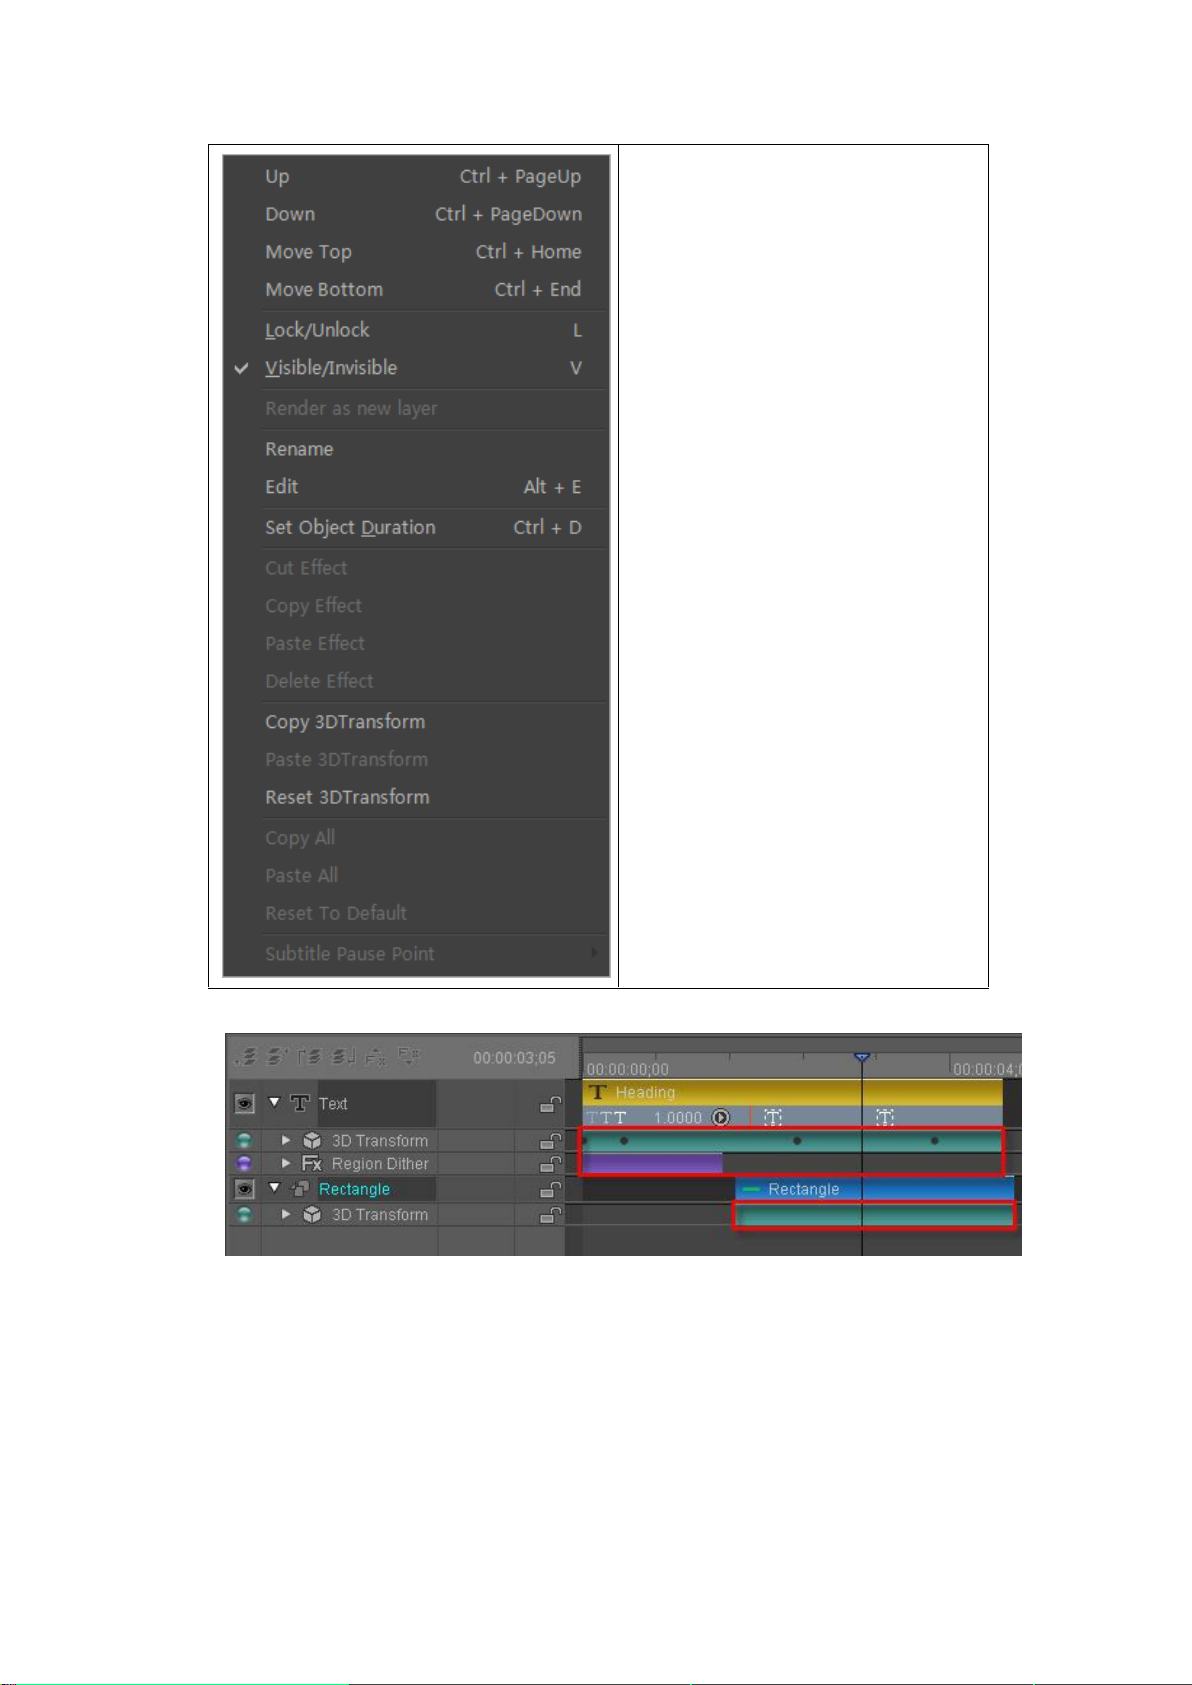
Move Up
Move Down
Move Top
Move Bottom
Lock/Unlock
Visible/Invisible
Render as new layer
Rename
Edit
Set Object Duration
Cut effect
Copy effect
Paste effect
Delete effect
Copy 3D Transform
Paste 3D Transform
Reset 3D Transform
Copy All
Paste all
Reset to default
Set subtitle pause point
Right click on an effect track to see the context menu:
Datavideo Technologies Co., Ltd. 36
Page 37
Lock/Unlock
Enable/Disable
Show animation track only
Cut effect
Copy effect
Paste effect
Overlay effect
Delete effect
Reset effect
Invert all keyframe
Uniform all keyframe
Set as Fade In point
Set as Fade Out point
Fade In/Out
Right click on a text effect track to see the context menu:
Enable area
Add area
Delete area
Play by character (In)
Play by character (Out)
Play by line (In)
Play by line (Out)
Play by text
Frequency value
Uniform area
Reset area
Right-click the Dynamic Texture track to see the context menu:
Datavideo Technologies Co., Ltd. 37
Page 38
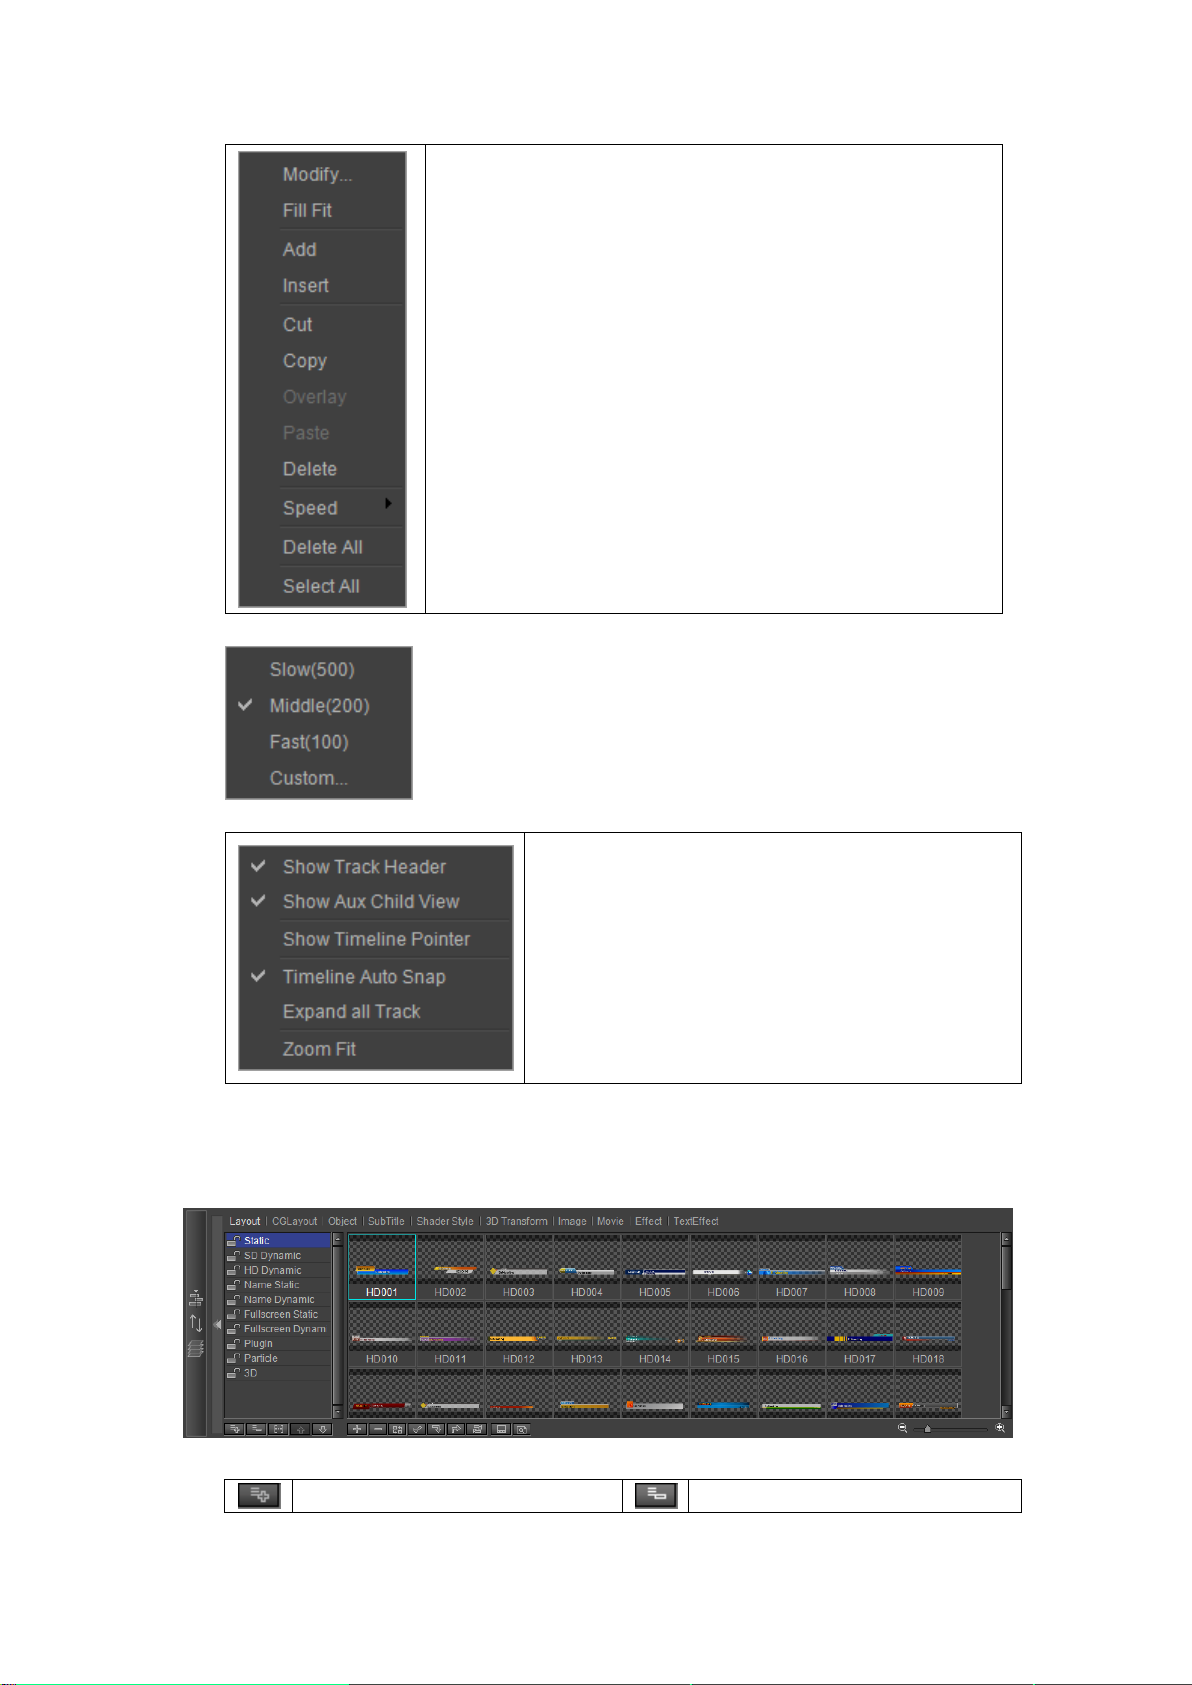
Modify
Fill Fit
Add
Insert
Cut
Copy
Overlay
Paste
Delete
Set speed
Delete all
Select all
Set Dynamic Texture speed by choosing from the speed list.
Show/Hide track header
Show/Hide Aux child view
Show Timeline Pointer
Timeline Auto Snap
Expand all tracks
Zoom fit (you can also double click on the timeline)
Add list
Delete list
Right click on an empty track in the Timeline to see the context menu:
Template Library
Template Library options:
Datavideo Technologies Co., Ltd. 38
Page 39

Rename
Move up
Move down
Add template
Delete template
Apply template
Import template
Export template
Refresh template library
Show/Hide template name
Replace Selected Template
Quick View
Use the Zoom In/Out bar or “Zoom In/Out” buttons to zoom in/out of the template library.
From the template Menu Bar you can choose different template catalogues, such as Shader
Templates or Image Templates.
Changing template name:
Method 1: double click on the template name, enter a new name and then click on “OK”
Method 2: right click on the template and choose "Rename" from the context menu
Datavideo Technologies Co., Ltd. 39
Page 40
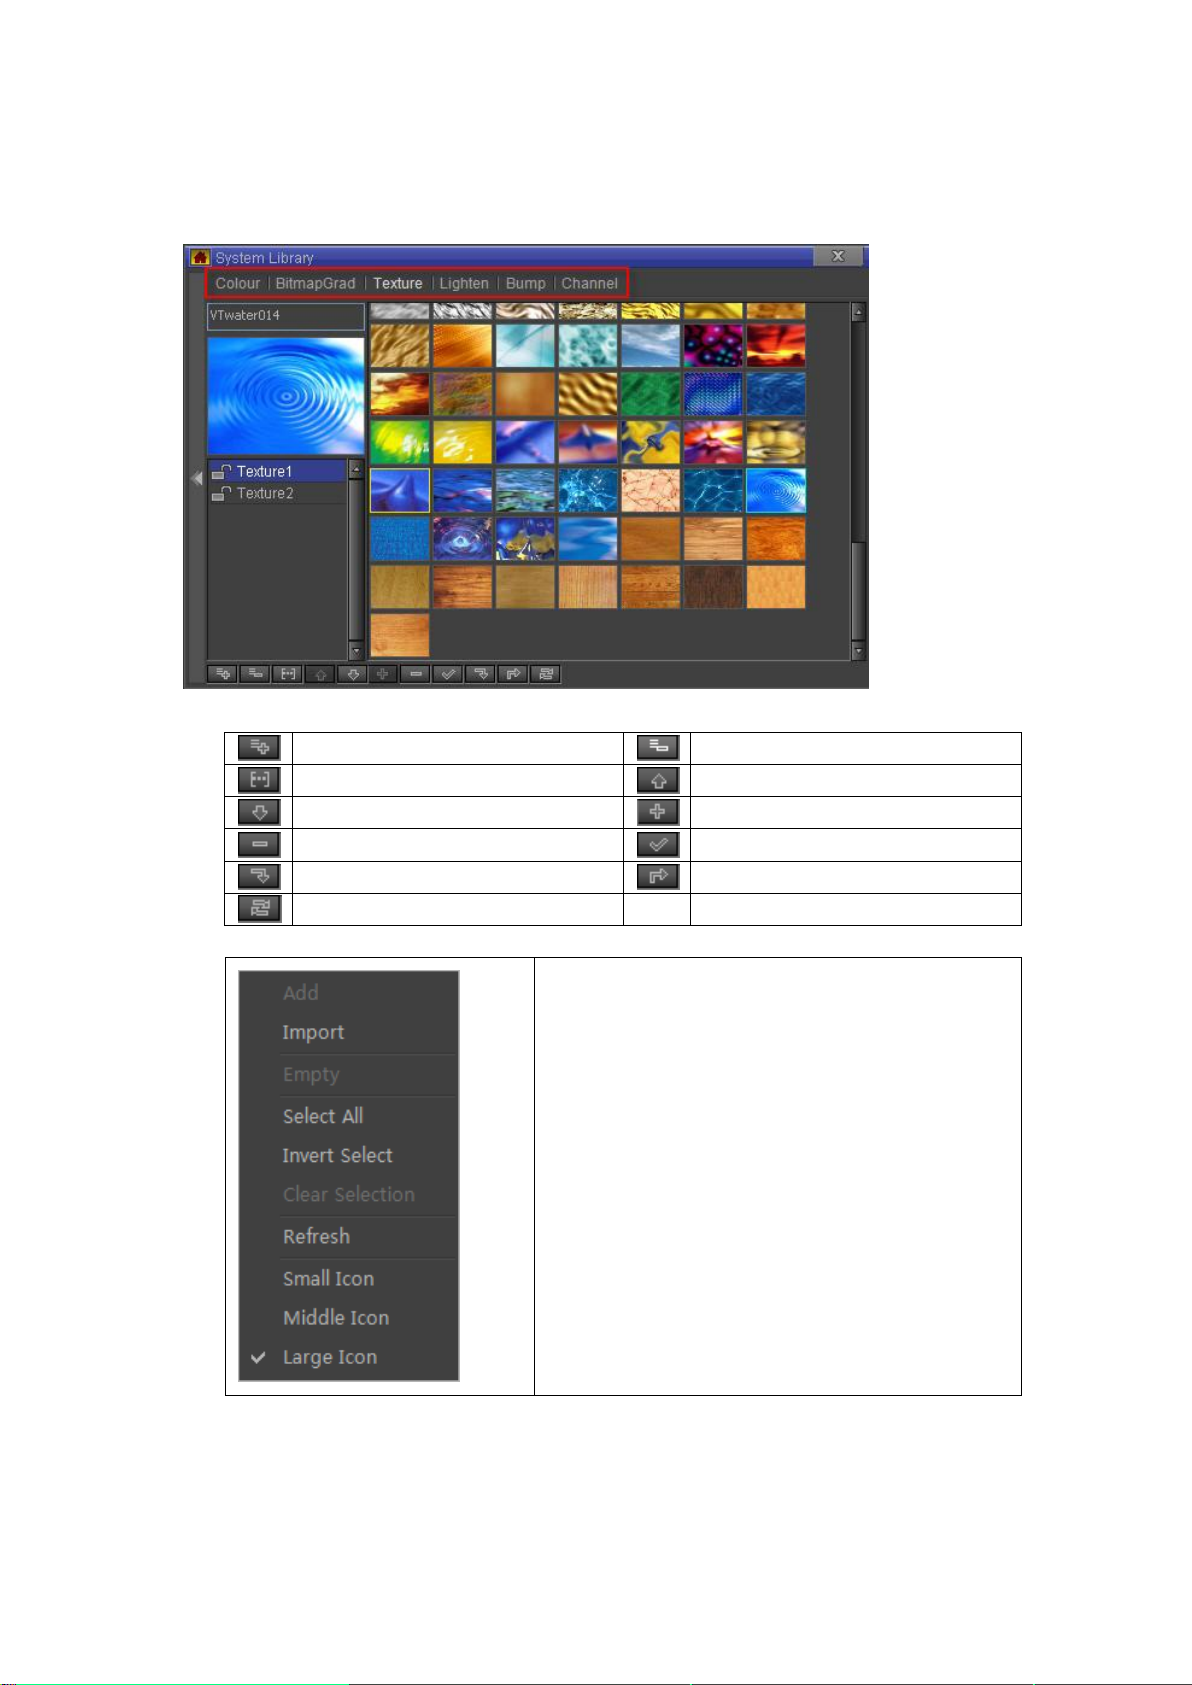
System Library
Add list
Delete list
Rename
Move up
Move down
Add file
Delete file
Apply file
Import file
Export file
Refrest System Library
Add file
Import file
Empty file
Select all
Invert selection
Clear selection
Refresh
Small icon
Middle icon
Large icon
System Library options:
Right click on an empty space:
Right click on a file:
Datavideo Technologies Co., Ltd. 40
Page 41

Delete file
Rename
Apply file
Export file
Local file in explorer
Move to previous file position
Move next file position
Move selection to
Copy selection to
To delete a file either:
a. Select a file, then press Delete on the keyboard or right click and choose “Delete”
from the context menu.
b. Select a file and press the button.
To add a file either:
a. Press on , or double click and choose a location to import from.
b. Right click, then choose "Import" from the context menu.
To edit a template name:
1. Choose a catalogue
2. Press on the “Rename” button, then enter a new name
3. Press “OK” to confirm. Press “Cancel” to exit without changing name.
Datavideo Technologies Co., Ltd. 41
Page 42

Create Object
CG-500 provides a large number of default objects, including shapes, Bezier shapes,
horizontal/morph/curve titles, images, animation, clock object, etc.
Operation flow
Most object creation follows the same basic operation flow:
1) Click on the object toolbar and select object type
2) In Still Mode, click on the object and adjust size.
Note: Hold Ctrl when adjusting to keep vertical/horizontal size proportional.
3) Release object.
Datavideo Technologies Co., Ltd. 42
Page 43

In the lower half of the Properties
Window you can find the shape's
special properties.
Activate/Deactivate the “Fill” option
to set Line Width.
Choose object shape in the drop-down
list. Changes will also take effect in the
Edit Screen.
Shapes
Following the basic operation flow, other shapes can be created.
Shape properties
Shapes with Fill mode deactivated.
Datavideo Technologies Co., Ltd. 43
Page 44

1) In the Edit Screen, click on the
rectangle.
2) In the Properties Window
drop-down list, select Triangle
3) Object becomes triangle.
Changing shapes: rectangle to triangle
Shapes with special properties:
1. Round Rectangle: set Radius parameters
2. Parallelogram: set Incline parameters
3. Star
Datavideo Technologies Co., Ltd. 44
Page 45

Depth: set Depth between points
Face: set number of points
Reset Parameters: resets all parameters
Different Face parameters
Angle: set Pie angle and angle size
Change angle
Different Depth parameters
4. Polygon: Face parameters set the number of sides
5. Pie Shape
Example
Datavideo Technologies Co., Ltd. 45
Page 46

Change angle size
6. Line: set Line Width
Bezier Curve
The way to create a Bezier Curve and a shape is not the same as for other objects.
1) In the Object Menu Bar click on “Bezier”
Note: The "Bezier Curve" icon is a drop-down button, click and select "PaintStroke" to create
hand-drawn objects. For more complete instructions please see the " PaintStroke " Chapter.
2) In Still Mode, set the Bezier Curve Anchor Points.
Note:
a. If you release the left mouse button straight away, both the Anchor and Control Points
will be created
b. If you keep the left mouse button pressed, you can first set the Control Points, and then
Datavideo Technologies Co., Ltd. 46
Page 47

create the Anchor Point.
Smooth: smoothen lines between points
Sharp: sharpen lines between points
Delete: delete point
Lock/Unlock: prevents point from being edited
Set Start: set as start point
Enable: you can disable the point
Combine Move: move Control Points together or
seperately
Close: close/open curve
3) Join the last Anchor Point to the Start Point to complete the shape, or double click/press
ESC to finish editing.
4) Double click on the Bezier Curve to resume editing.
5) In edit mode, right click to see the following context menu
Paintstroke
Operation flow
1) Click “PaintStroke” in the Object tab.
2) In the Editor Screen (still), left click, and drag.
3) Release left mouse button, press ESC to exit.
Datavideo Technologies Co., Ltd. 47
Page 48

Example:
Image
The operation flow for images and objects is similar, the only difference is that an image file
needs to be chosen in the Properties Window.
1) In the Object Menu Bar choose “Image”
2) Set position and size in Still Mode. Release mouse cursor.
3) In the Properties Window select an image file (and Mask if needed).
Datavideo Technologies Co., Ltd. 48
Page 49
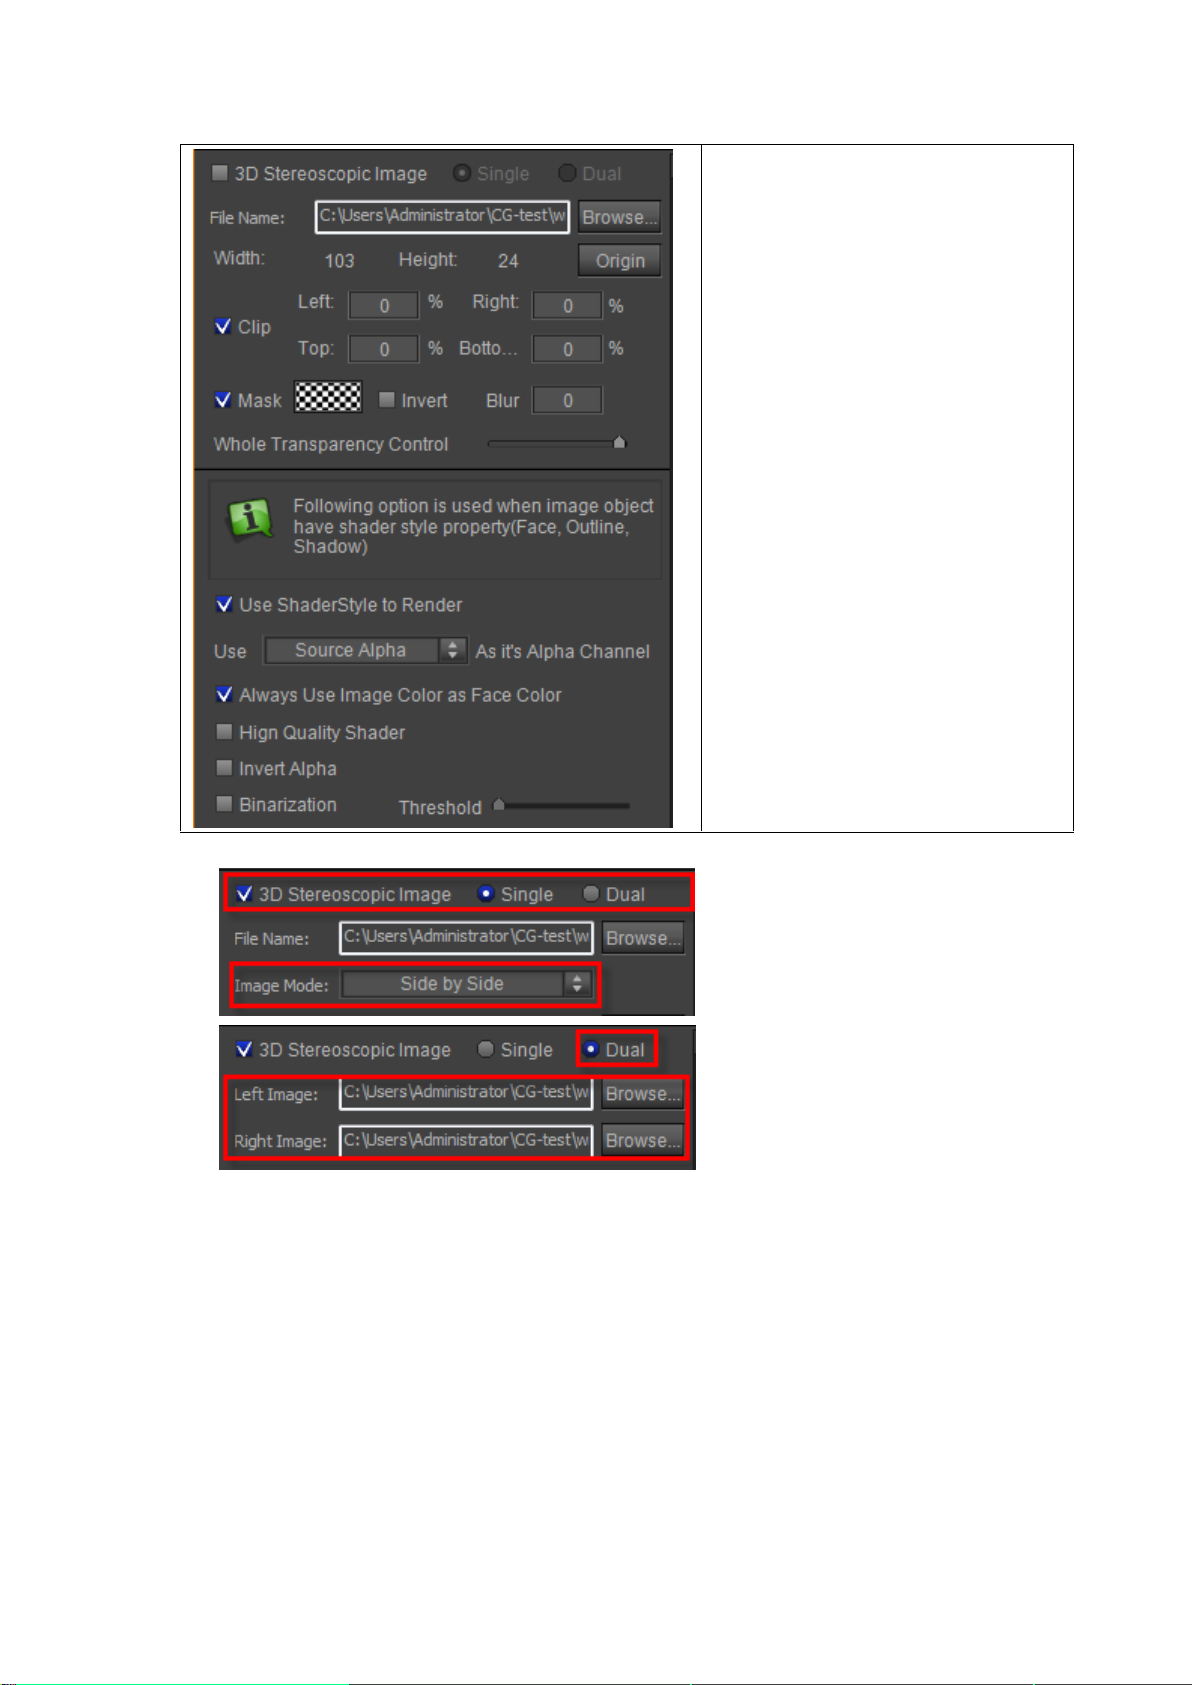
Enable “3D Stereoscopic Image” and
select “Single/Dual”
Browse and select file and show file
name
Show image height and width and
enable/disable “Origin”
Clip image
Set mask parameters and blur
parameters
Whole Transpatency Control: Set whole
transpatency (disable when enabling “3D
Stereoscopic Image”)
The options are used when image object
have shader style property(Face, Outline,
Shadow)
Specific Properties of 3D Stereoscopic Image
4) Example.
Datavideo Technologies Co., Ltd. 49
Page 50

5) Double click to Crop
6) The selected area will expand to the original image size
Datavideo Technologies Co., Ltd. 50
Page 51

Present: set start frame
Time In: set start time point
Time Out: set end time point
Repeat: set repetitions
Origin: go to animated object
original position
7) Press ESC to exit
Animation
Create Animation and Create Image operation flows are similar.
1) In the Object Menu Bar click “Movie Video”.
2) In Still Mode, adjust size and position.
3) Release mouse cursor
4) In Properties Window select animation file and set parameters.
5) Create complete
Using animation templates
A large number of preset animated objects are provided. Go to the templates library and
double click on them to use them.
Datavideo Technologies Co., Ltd. 51
Page 52
Note: If you double click on an animation in the templates library when an animation has
been selected in the Edit Screen, it will be replaced.
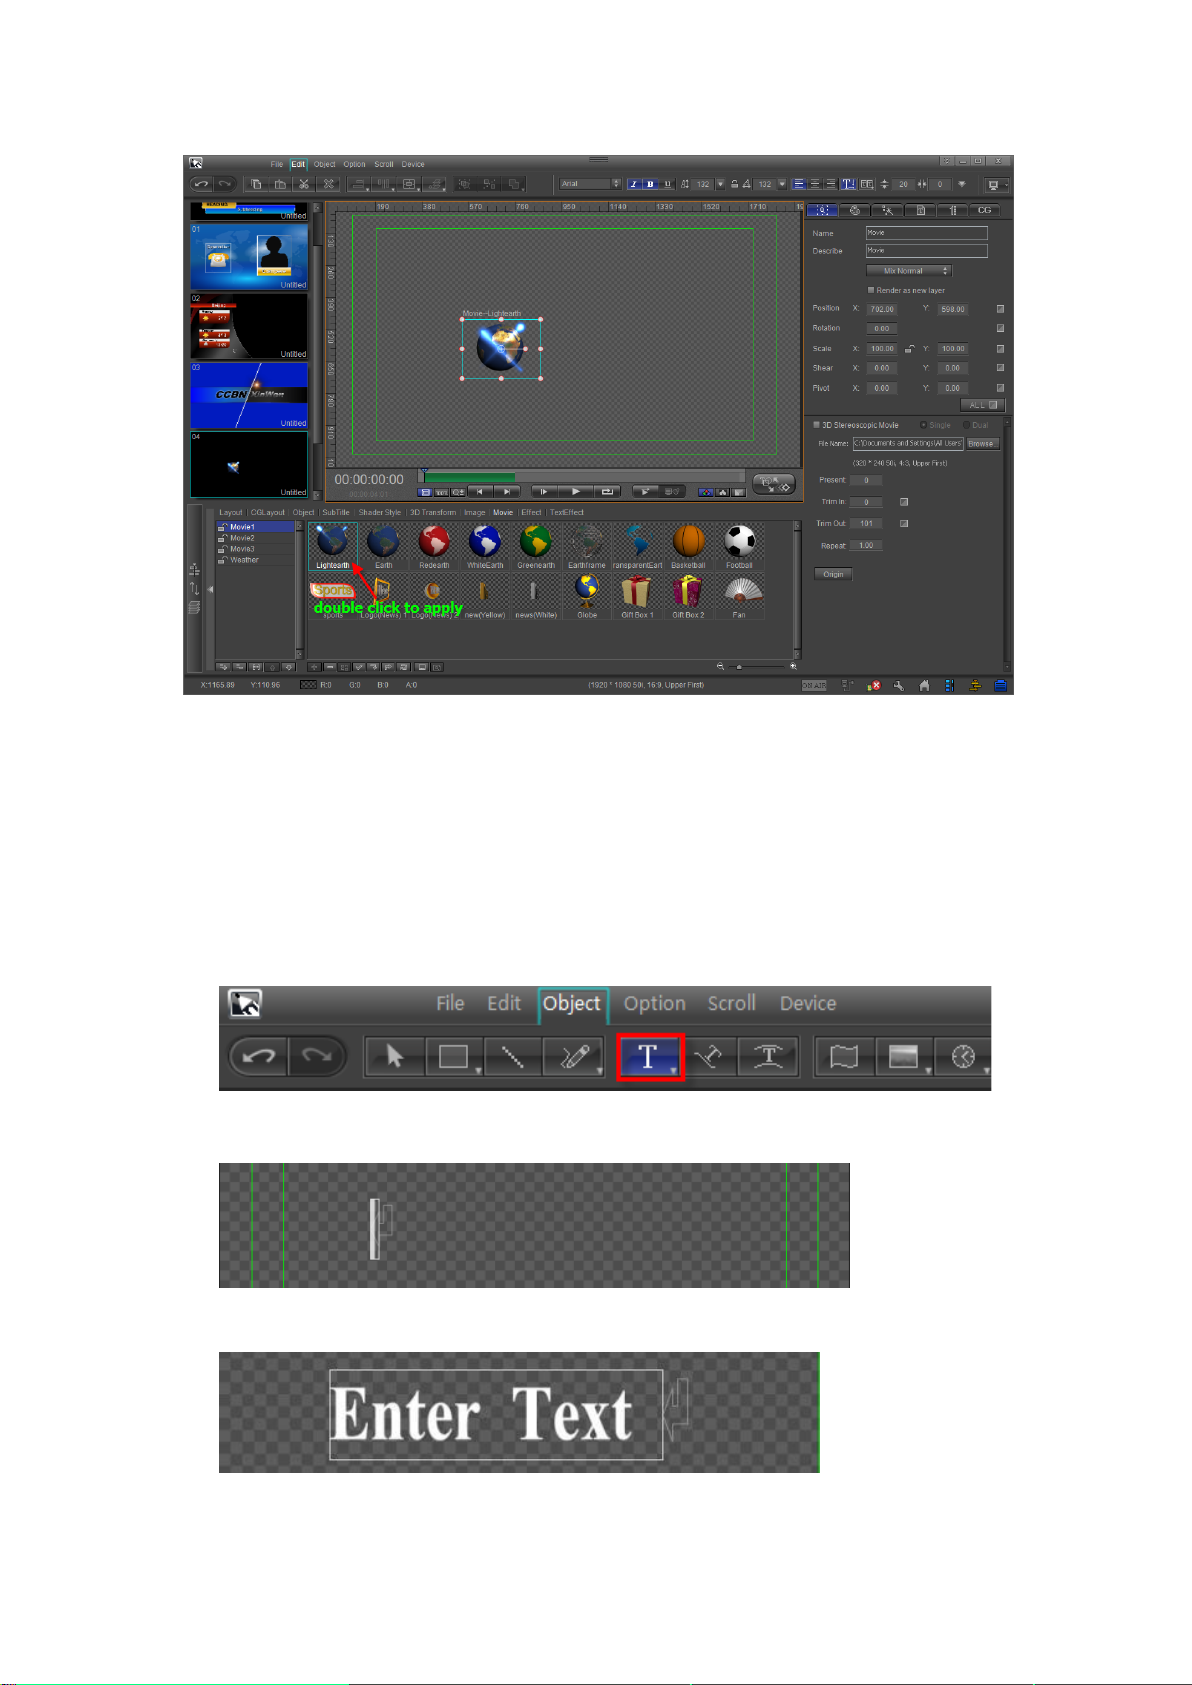
Horizontal/Vertical Text
Normal-frame and Set-frame Text options are possible.
Create Normal Text
1) In Object Menu Bar choose “Horizontal Text”,
Note: hold cursor to choose “Vertical Text”
2) In Still Mode, adjust text size and position,
3) Enter text,
Method 1: enter text
Method 2: copy and paste
Datavideo Technologies Co., Ltd. 52
Page 53
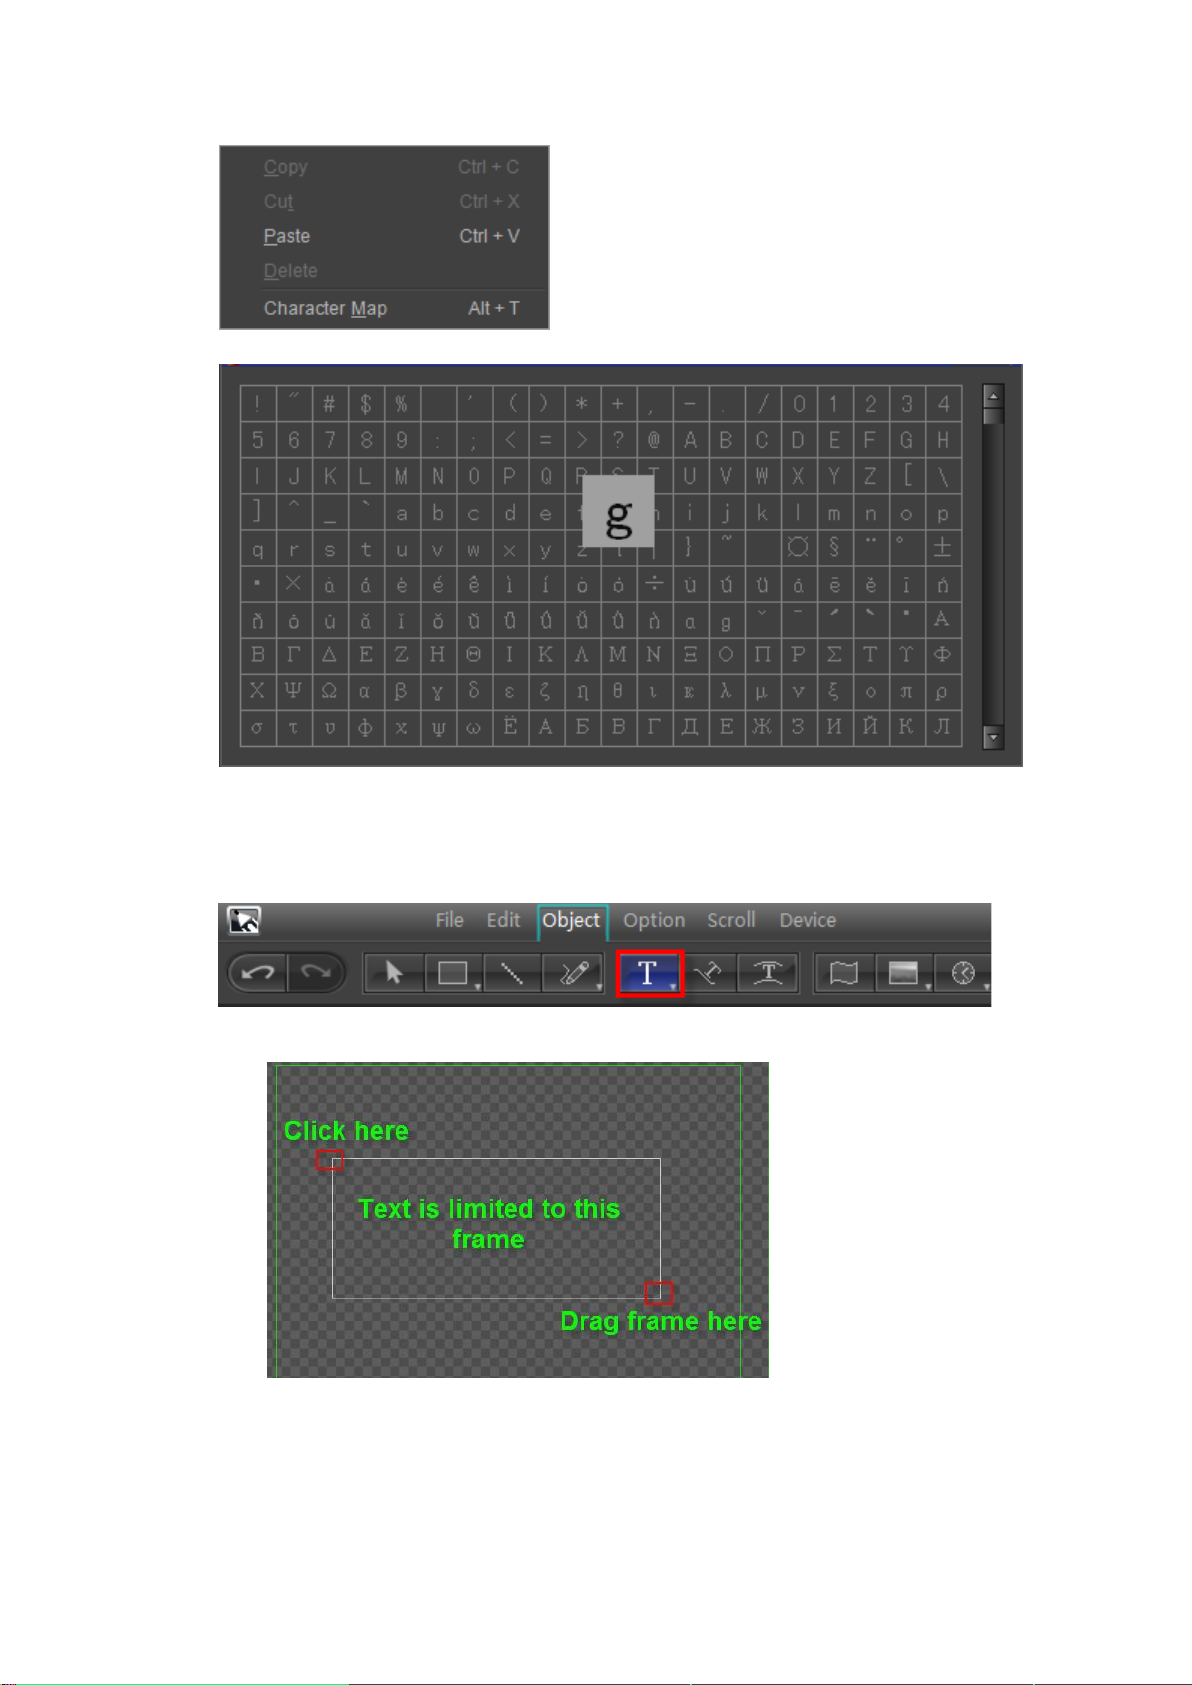
Right click in text editing state and choose “Character Map” from the context menu.
4) Press ESC or double click to exit
5) Double click on text to continue editing
Create Set-Frame Text
1) In Object Menu Bar choose “Horizontal Text”
2) In Still Mode drag cursor to desired frame size
3) Enter text. If text exceeds frame it will automatically move to the next line.
Datavideo Technologies Co., Ltd. 53
Page 54
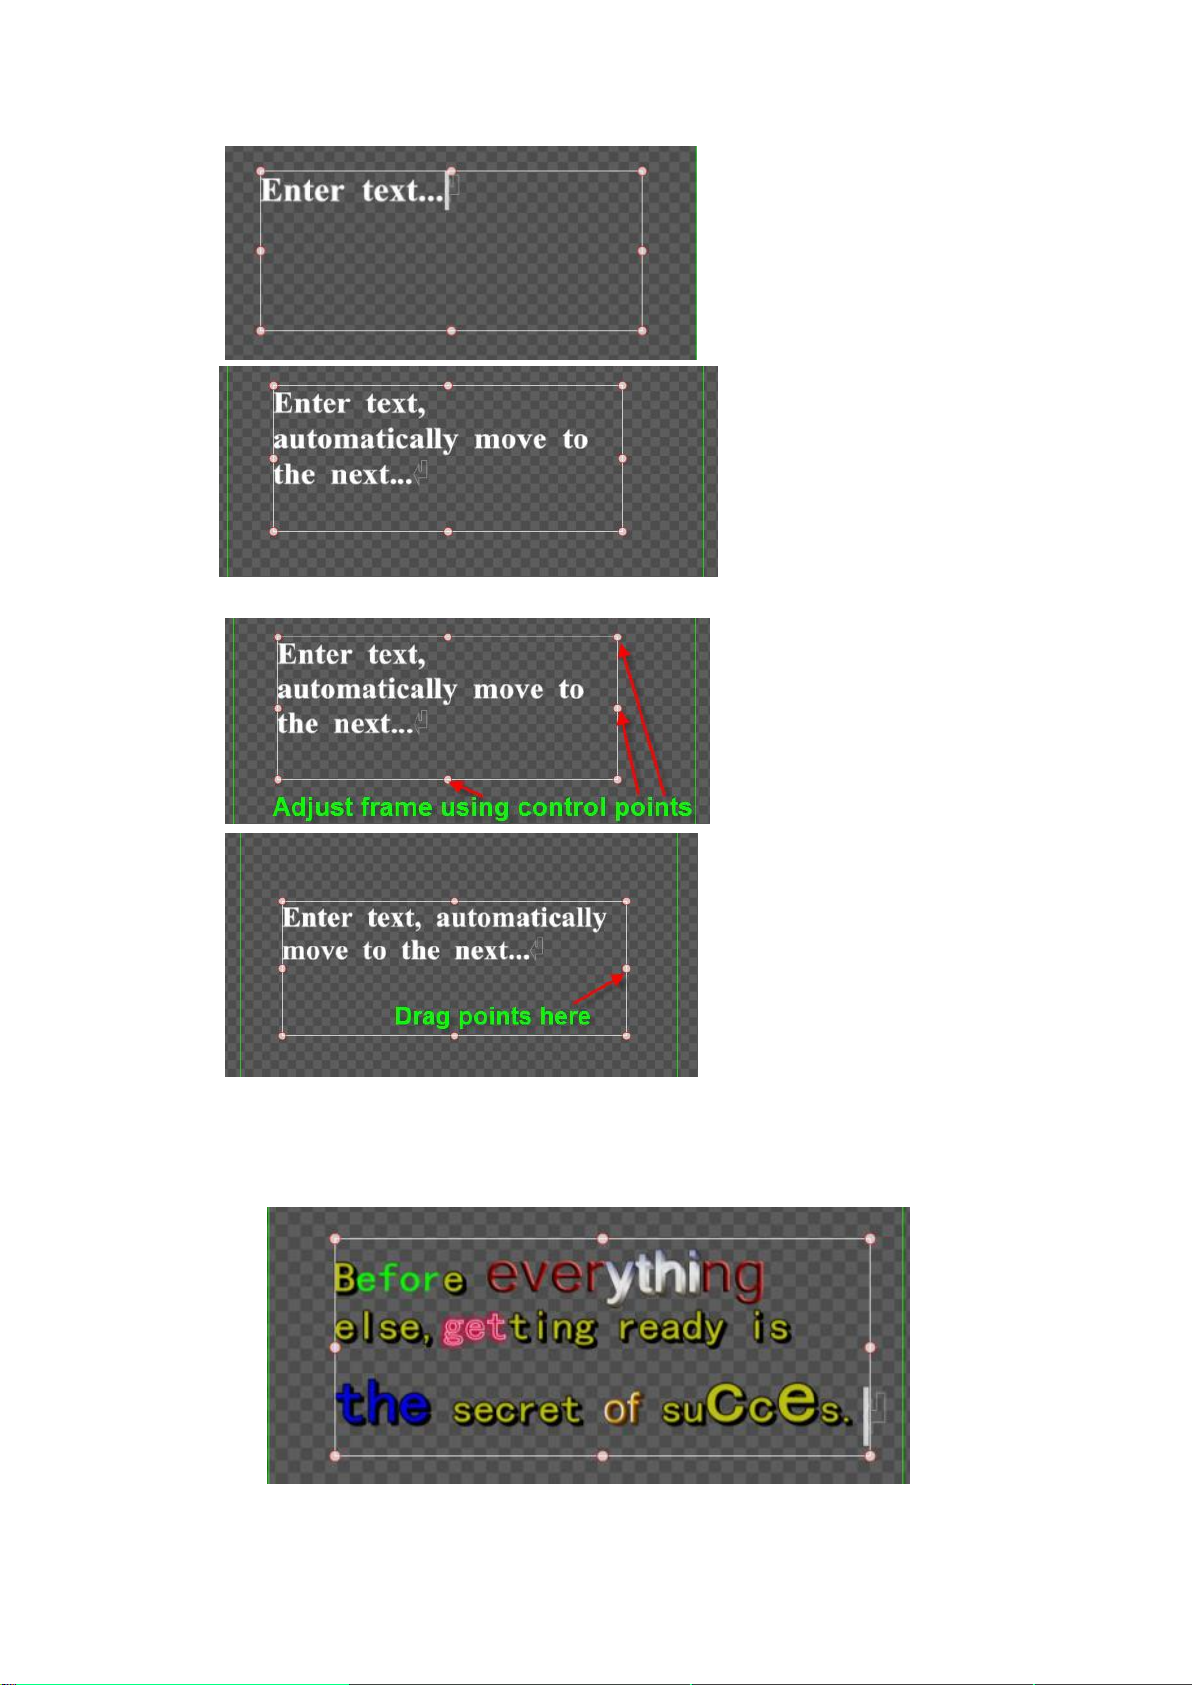
Text will automatically adjust when frame is shifted.
4) Press ESC or double click to exit
5) Double click on the text to continue editing.
Properties
Text Titles have many properties. Simply double click on the desired text to start editing.
Datavideo Technologies Co., Ltd. 54
Page 55

Morph Text
Creating Morph Text uses the same operation flow as Normal Text.
1) In the Object Menu Bar select “Morph Text”
2) In Still Mode adjust text position, then enter text
3) Edit Morph Text curves (see also Bezier curve editor)
4) You can choose a morph text template from the Properties Window
Datavideo Technologies Co., Ltd. 55
Page 56
5) Press ESC to exit. Example:
6) Double click on text to resume editing.
Morph Text control curves have three settings:
Separate - control curves independently
Same - control curves together
Inverse - curves do the inverse of each other
Set in two ways
1) Right click on the text and then choose from the context menu
Datavideo Technologies Co., Ltd. 56
Page 57
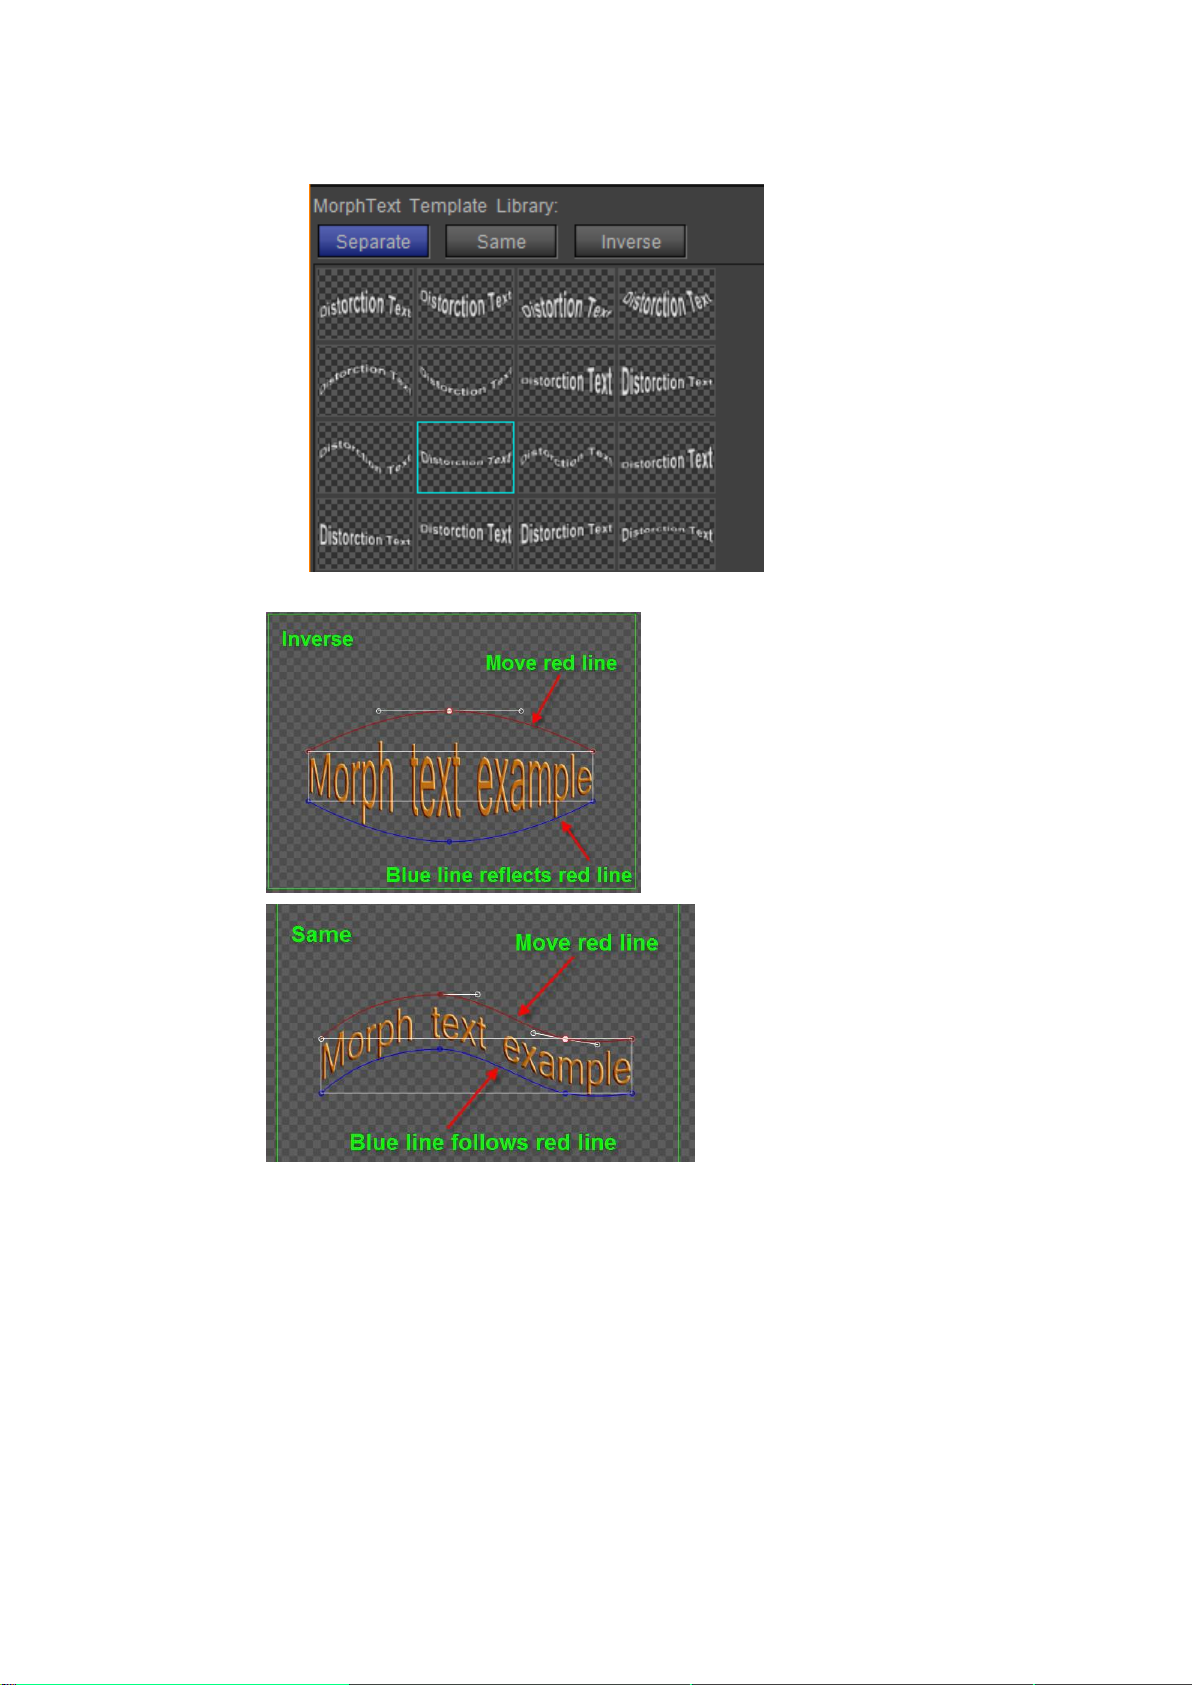
2) Select in the Properties Window
Example:
Datavideo Technologies Co., Ltd. 57
Page 58

Curve Text
Operation flow similar to Normal Text
1) In Object Menu Bar select “Curve Text”,
2) In Still mode use the Bezier curve method to create curves.
3) Enter text
Datavideo Technologies Co., Ltd. 58
Page 59

4) You can also choose preset Curve Text styles from the template library.
5) Press ESC to exit. Example:
6) To resume editing, double click on the text.
Clock Object
To create:
1) In the Object menu bar, click on the "Clock" button.
Note: The "Clock" button offers various choices, from the drop-down menu you can select
Datavideo Technologies Co., Ltd. 59
Page 60

"Number" or "Time Code".
2) In the still editor window click on the starting position, then left click to drag the object
to the appropriate size.
3) Release the mouse button to complete operation.
4) Setting clock time parameters:
1. Using the system time, the default length can be adjusted freely, with the default set at
4 seconds.
2. Set countdown time as shown below. Default is set at 4 seconds.
Enter start time values. The default time is set as 0:00
Clock object parameters:
Datavideo Technologies Co., Ltd. 60
Page 61
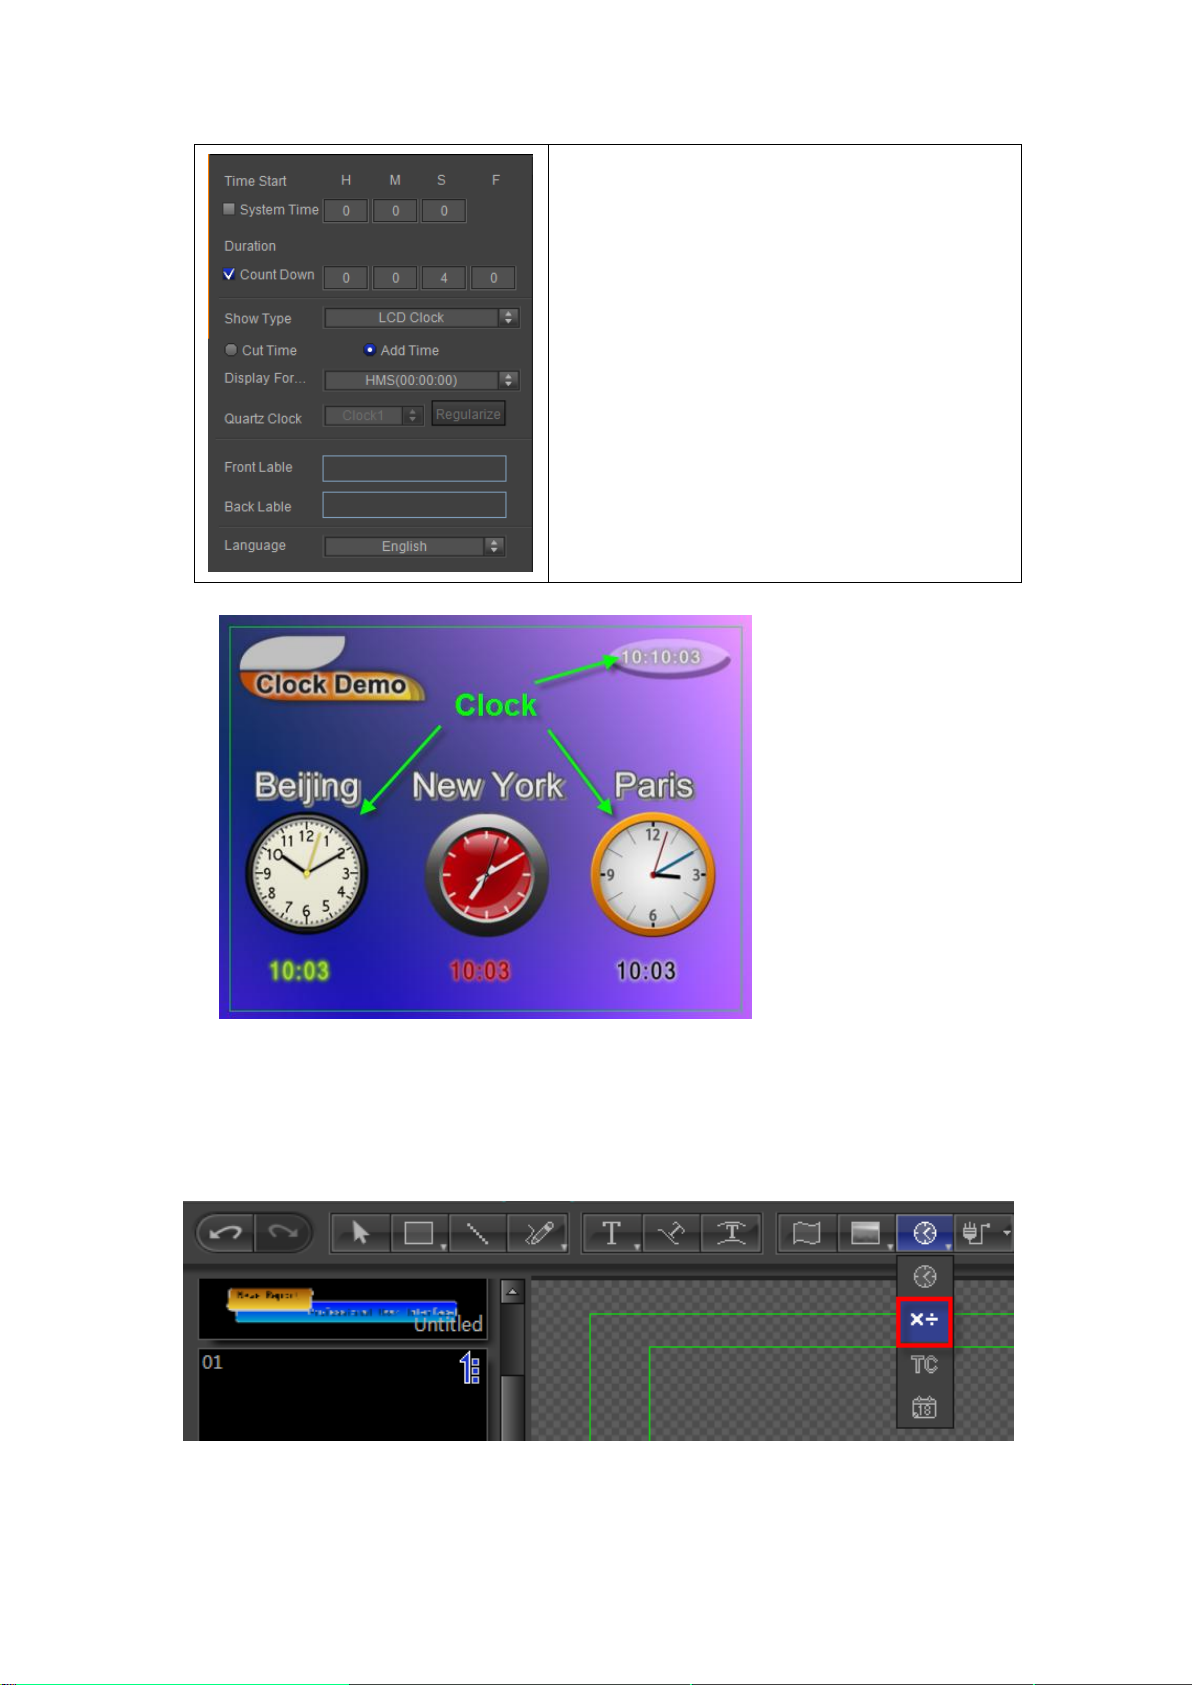
Start time: set the start time. Select system time to
set the current system time as start time.
Default length: Set playback time. After setting the
countdown, the duration will be shown.
Display Type: Select digital clock or dial clock.
Cut-time: switch to cut-time mode
Accumulate-time: switch to accumulate-time mode
Display Format: Select the time display format
Dial clock: use dial clock
Straighten: square shaped dial clock
Label front: enter text before the clock
Label back: enter text after the clock
Language: Select language
Example:
Number Object
To create:
1) In the Object menu bar, click on the "Number" button.
2) In the still editor window click on the starting position, then left click to drag the object
to the appropriate size.
3) Release the mouse button to complete operation.
Datavideo Technologies Co., Ltd. 61
Page 62

Number object parameters
Initial value: Set start numerical value
End value: Set end value
Keyframe interpolation: Enable/Close key frame
interpolation functions
Decimal: set decimal number values
Minimun digit: set smallest whole number
Display Format: Select the display format,
including numerical values, spelling, percentage,
etc.
Three units: three separate digital units to be
displayed
Label front: text to the left
Label back: text to the right
Language: Select language
Examples:
Timecode
To create:
1) In the Object menu bar, click on the "TimeCode" button.
Datavideo Technologies Co., Ltd. 62
Page 63

2) In the still editor window click on the starting position, then left click to drag the object
Start Time code and Current Time Code will be
discussed later.
View Format: select format.
Discard Frame: discard format
Frame Rate: select frame rate.
Front Marker: enter time code left text.
Back Marker: enter time code right text.
to the appropriate size.
3) Release the mouse button to complete operation.
Time code object parameters
Set start time code:
1. Current Time Code mode: set Current Time Code mode, modulate deviance, but default
length are unchangeable.
2. Start Time Value mode:
Datavideo Technologies Co., Ltd. 63
Page 64

When selecting Default Length, default length can be changed.
3. When selecting Keyframe Interpolation, end time code can change.
Examples:
Date Object
To create:
1) In the Object menu bar, click on the "Date" button.
2) In the still editor window click on the starting position, then left click to drag the object
to appropriate size.
Datavideo Technologies Co., Ltd. 64
Page 65
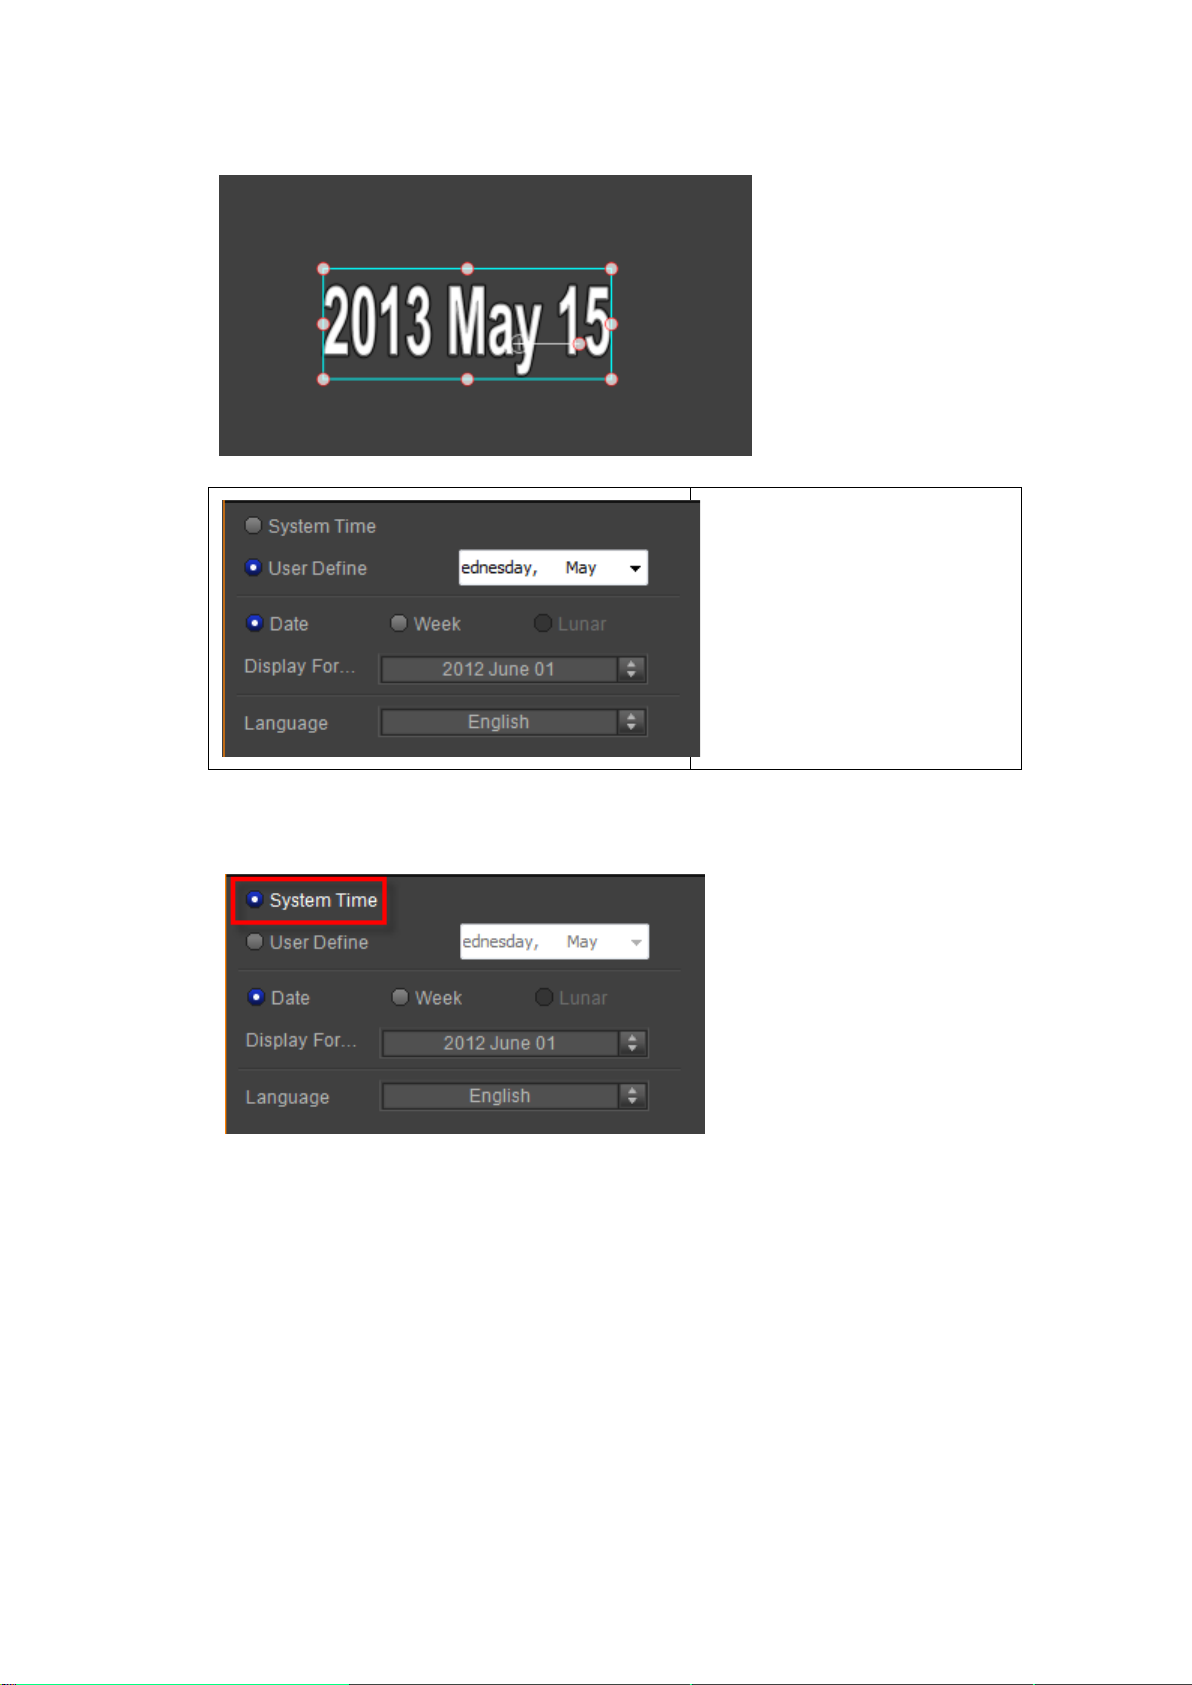
3) Release the mouse button to complete operation.
Select “System Time” to set the
current system time as start time.
Select “User Define” to set time as
needed.
Select the display format
Display Format: select date format
Language: Select language
Date Object Parameters
Set Date
System time code:
Set to system date, and default date is unchangeable.
Define date code:
When selecting “User Define”, date can change.
Datavideo Technologies Co., Ltd. 65
Page 66

Display Format
Choose a date format from the drop down list.
Examples:
Flag
The create flag operation flow is similar to that of objects, and will not be presented
here.
Datavideo Technologies Co., Ltd. 66
Page 67
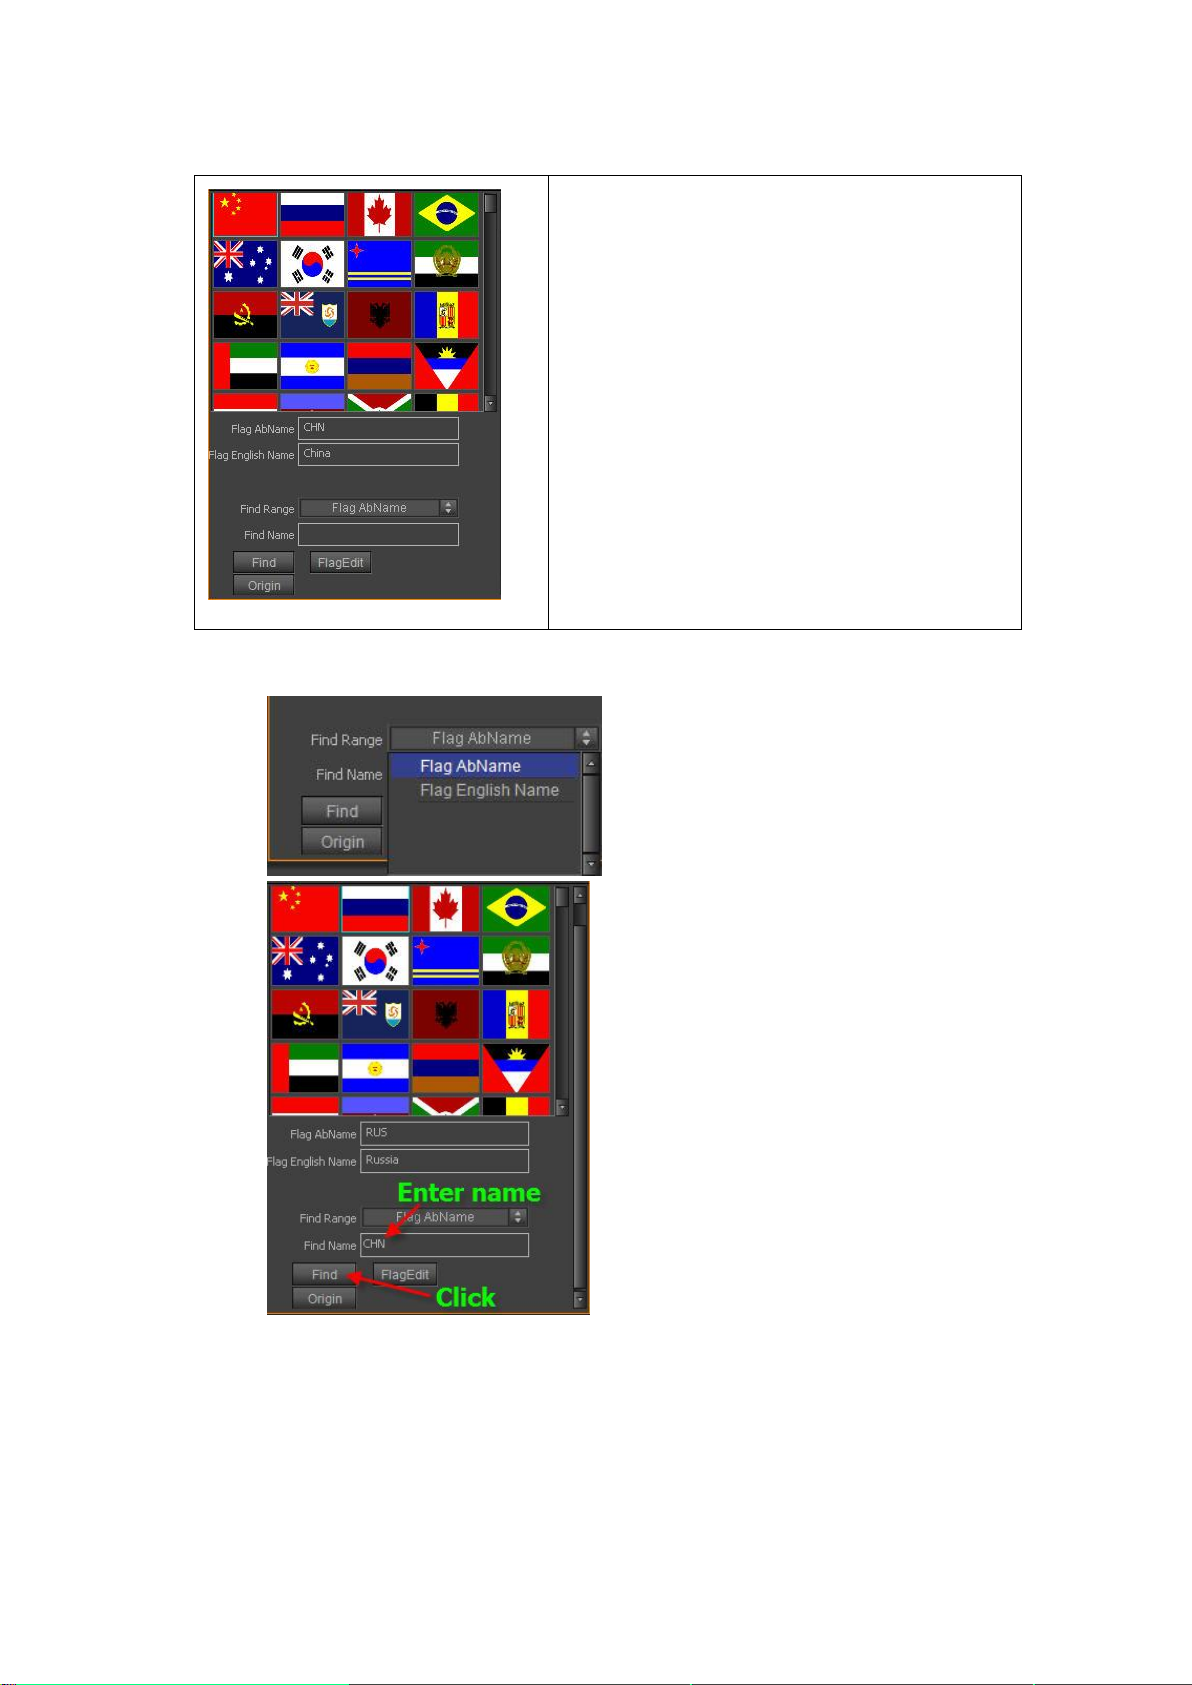
Choose a flag from the Properties Window
The flag name and abbreviation will be shown
below.
To find a flag, enter the full name or abbreviation
into the "Find Name" field, then press “Search”.
Press “Origin” to place the flag in its default position.
To find a flag, enter the full name or abbreviation into the "Find Name" field, then press
“Find”.
Edit flag:
In Flag Library left click, select desired flag, then click “Edit”.
Datavideo Technologies Co., Ltd. 67
Page 68

In the pop-out Edit Frame, enter property parameters, click “OK”.
Object Group
Objects groups can be used to quickly manipulate multiple objects. Use groups to:
1) Rescale, rotate, etc., whole groups simultaneously
2) Use object groups' properties to produce different play effects.
Make Group:
a. In the Edit Screen select multiple objects/text, then use the shortcut Ctrl+G
b. In the Edit Menu Bar choose “Make Group”
c. In the Edit Screen, right click, then choose “Make Group” from the context menu
Undo Group:
a. In the Edit Screen select the group, then use the shortcut Ctrl+U
b. In the Edit Menu Bar choose “Undo Group”
c. In the Edit Screen, right click, then choose “Un Group” from the context menu
Datavideo Technologies Co., Ltd. 68
Page 69
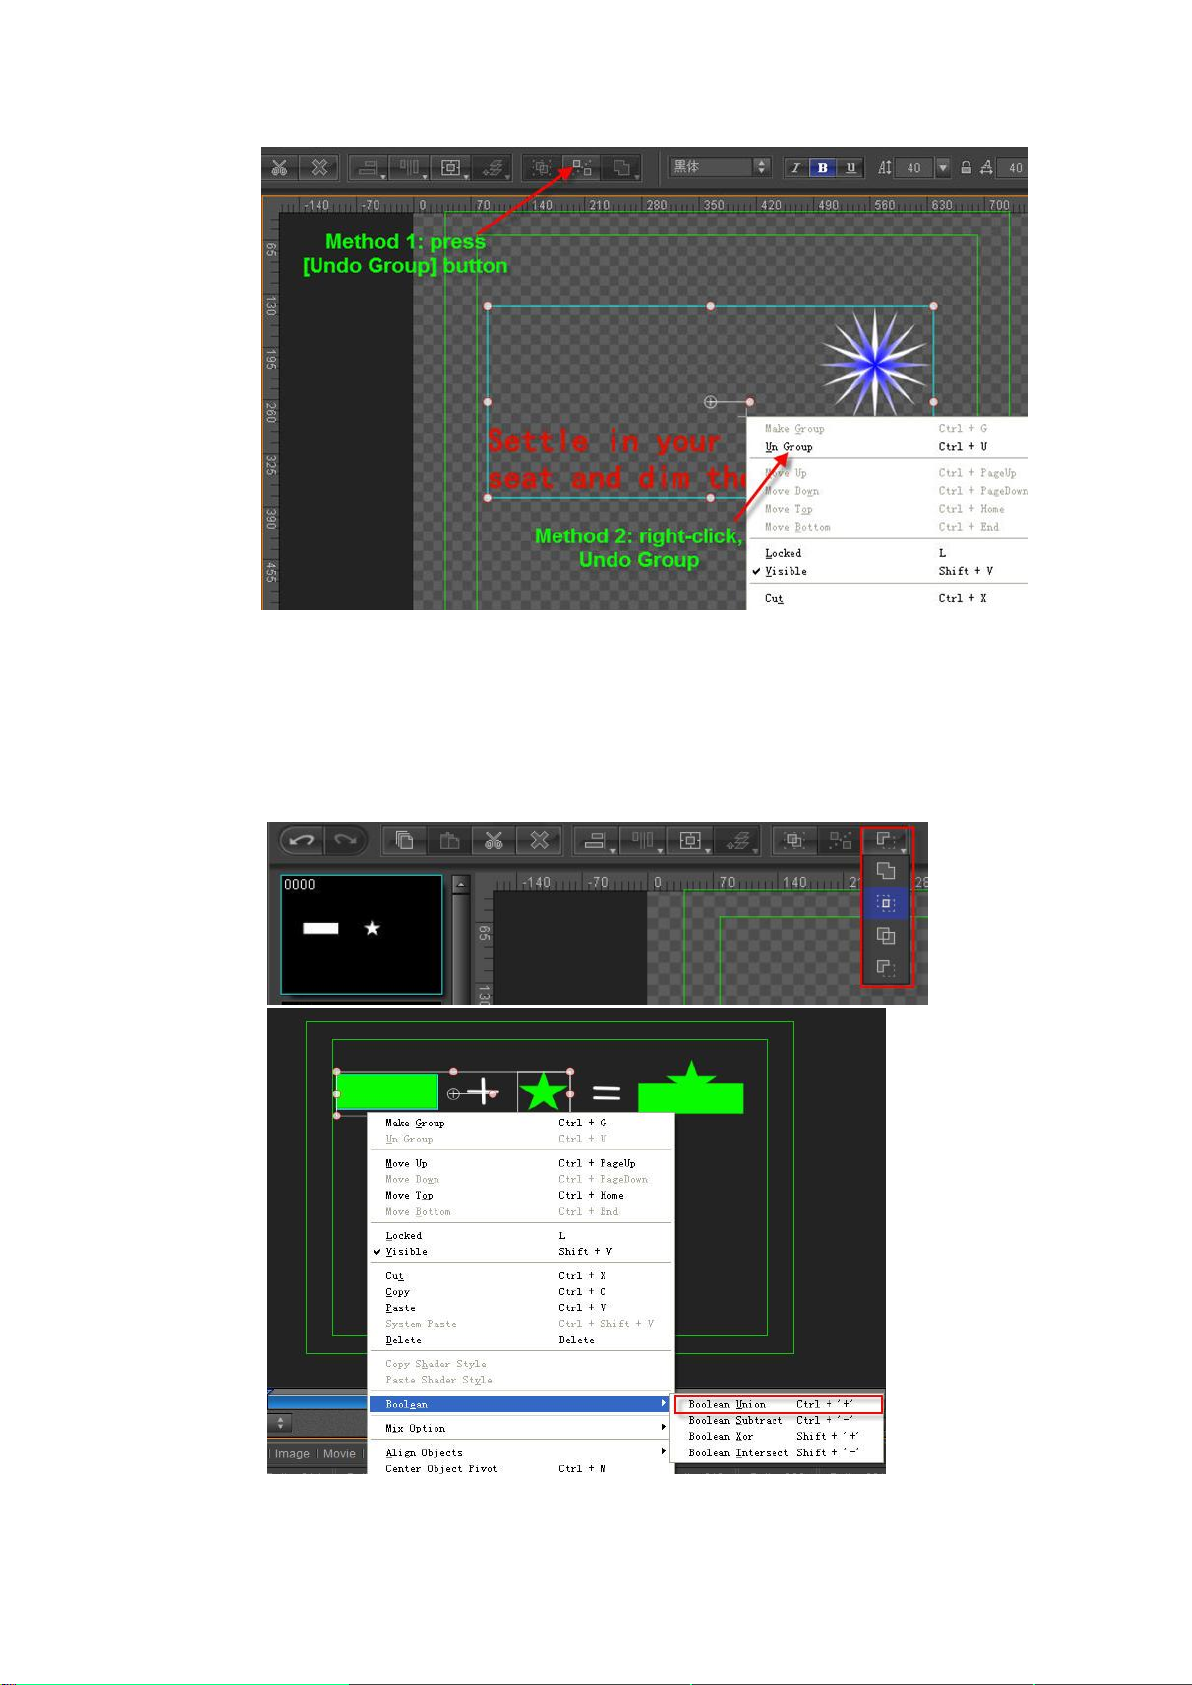
Path Group
Path Groups use Boolean editing to create new, individualised object types.
Choose multiple objects, then right click, use shortcut key or Edit Menu Bar to
apply Boolean
Boolean Union (Ctrl +'+') - merges two objects
Boolean Subtract (Ctrl +'-') - subtracts one object from the other
Datavideo Technologies Co., Ltd. 69
Page 70
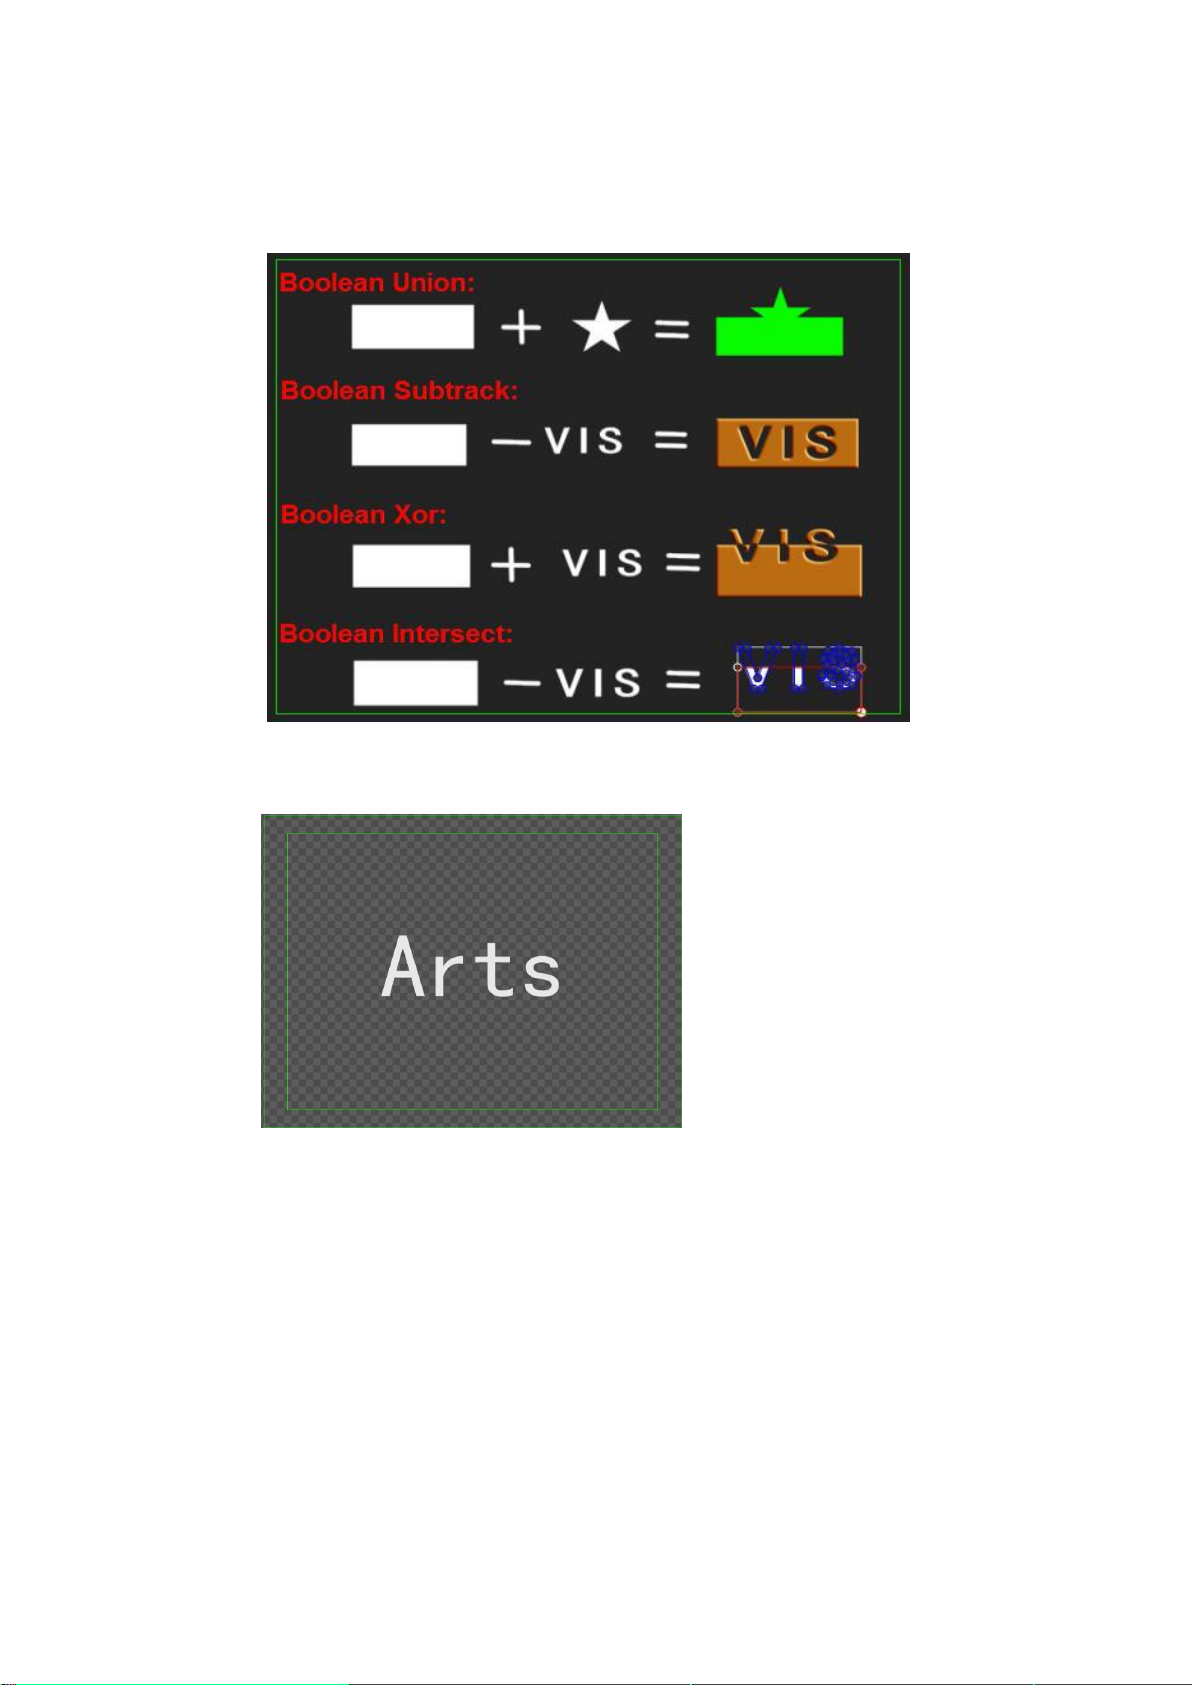
Boolean Intersect (Shift +'-') -intersect between objects remains
Boolean Xor (Shift +'+') - intersect between objects is removed
Example:
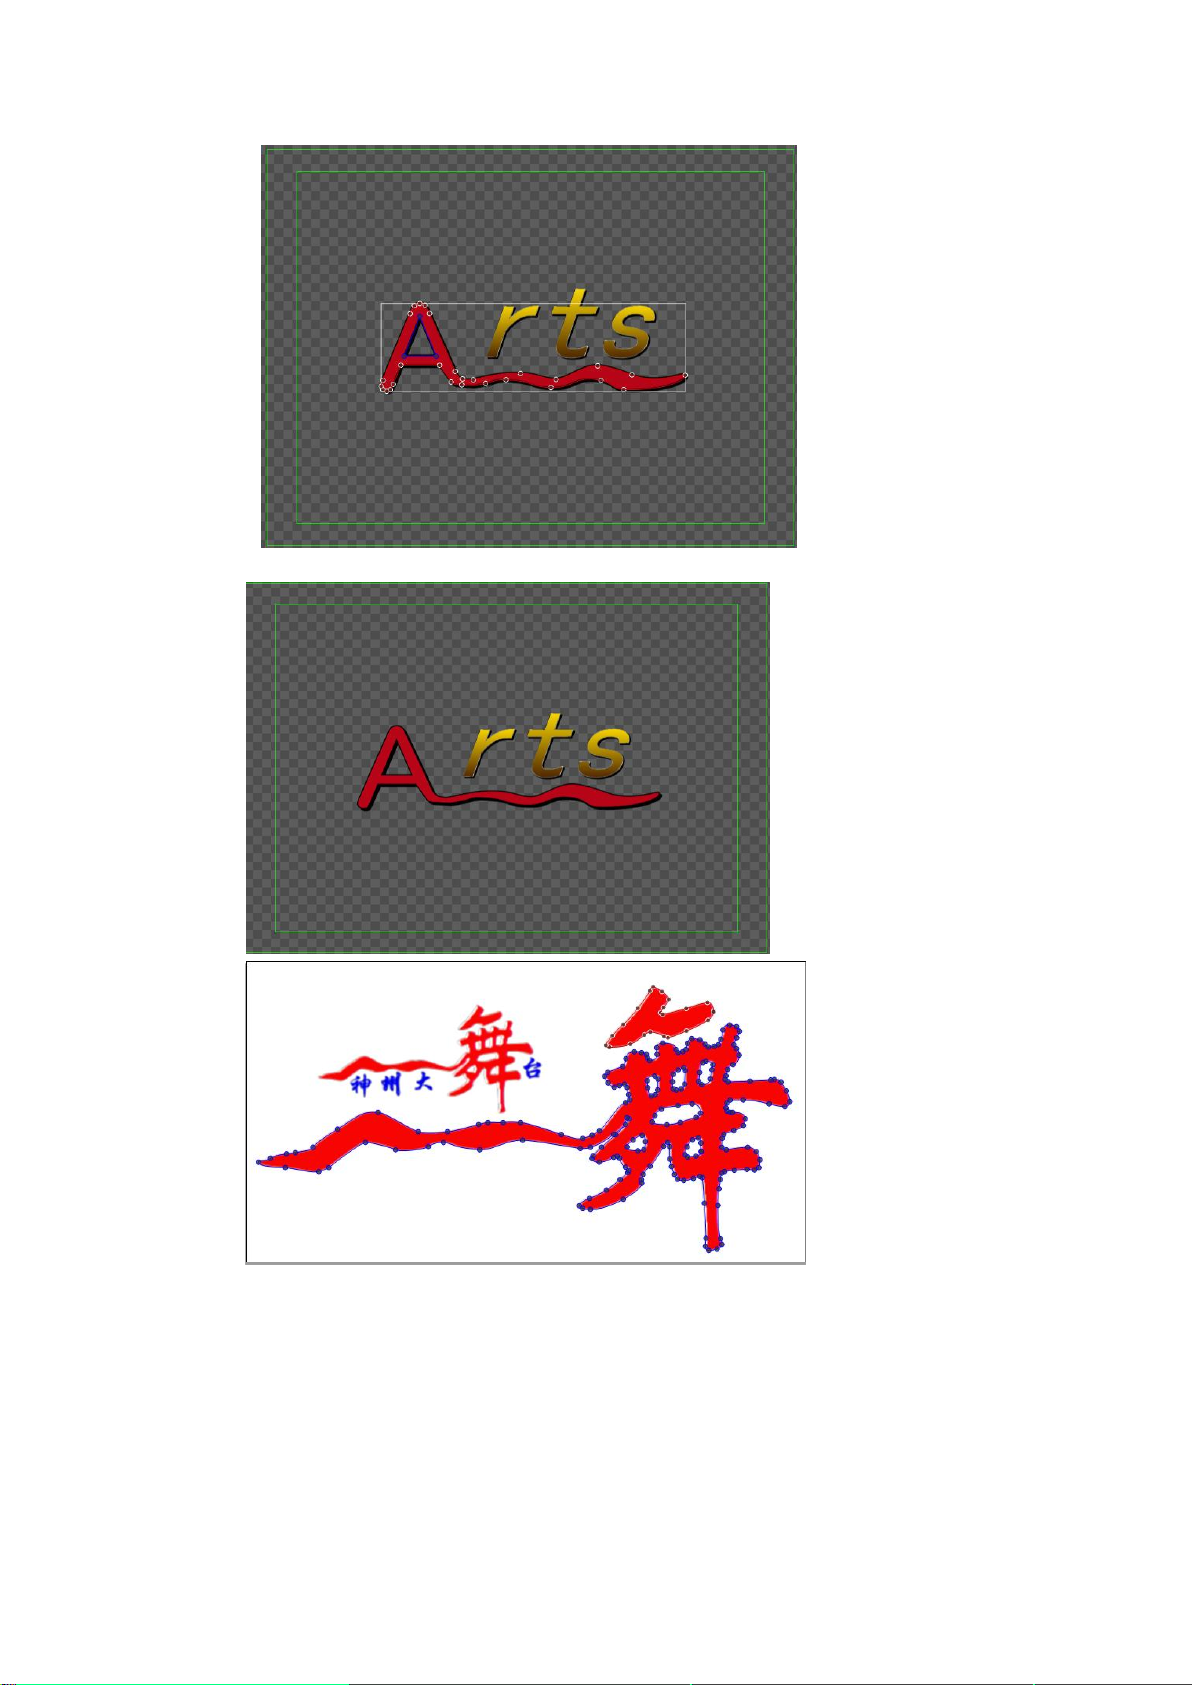
To apply artistic effects to normal text, you can turn it into a Path Group.
1) Create normal text
2) Transform normal text into Path Group by typing Ctrl+P or right click then choose
"Text Block"- "Text Block to Path Group"
Datavideo Technologies Co., Ltd. 70
Page 71

3) Double click on the Path Group to edit
Datavideo Technologies Co., Ltd. 71
Page 72
Example
Applying Shader
Shader Properties
Shader properties incluce: Color, Texture, Linear sheen, Bitmat sheen, Bump bitmap,
Datavideo Technologies Co., Ltd. 72
Page 73
Concave, and Bevel. An object's Face, Edge, Shadow and Depth have similar properties,
Reset
Set single
color. Click to see
colors library.
RGB format
HSB format
Gradient preview
Under gradient preview,
select gradient type,
count and angle.
Different parameters
can be set depending on
gradient type.
allowing for different combinations.
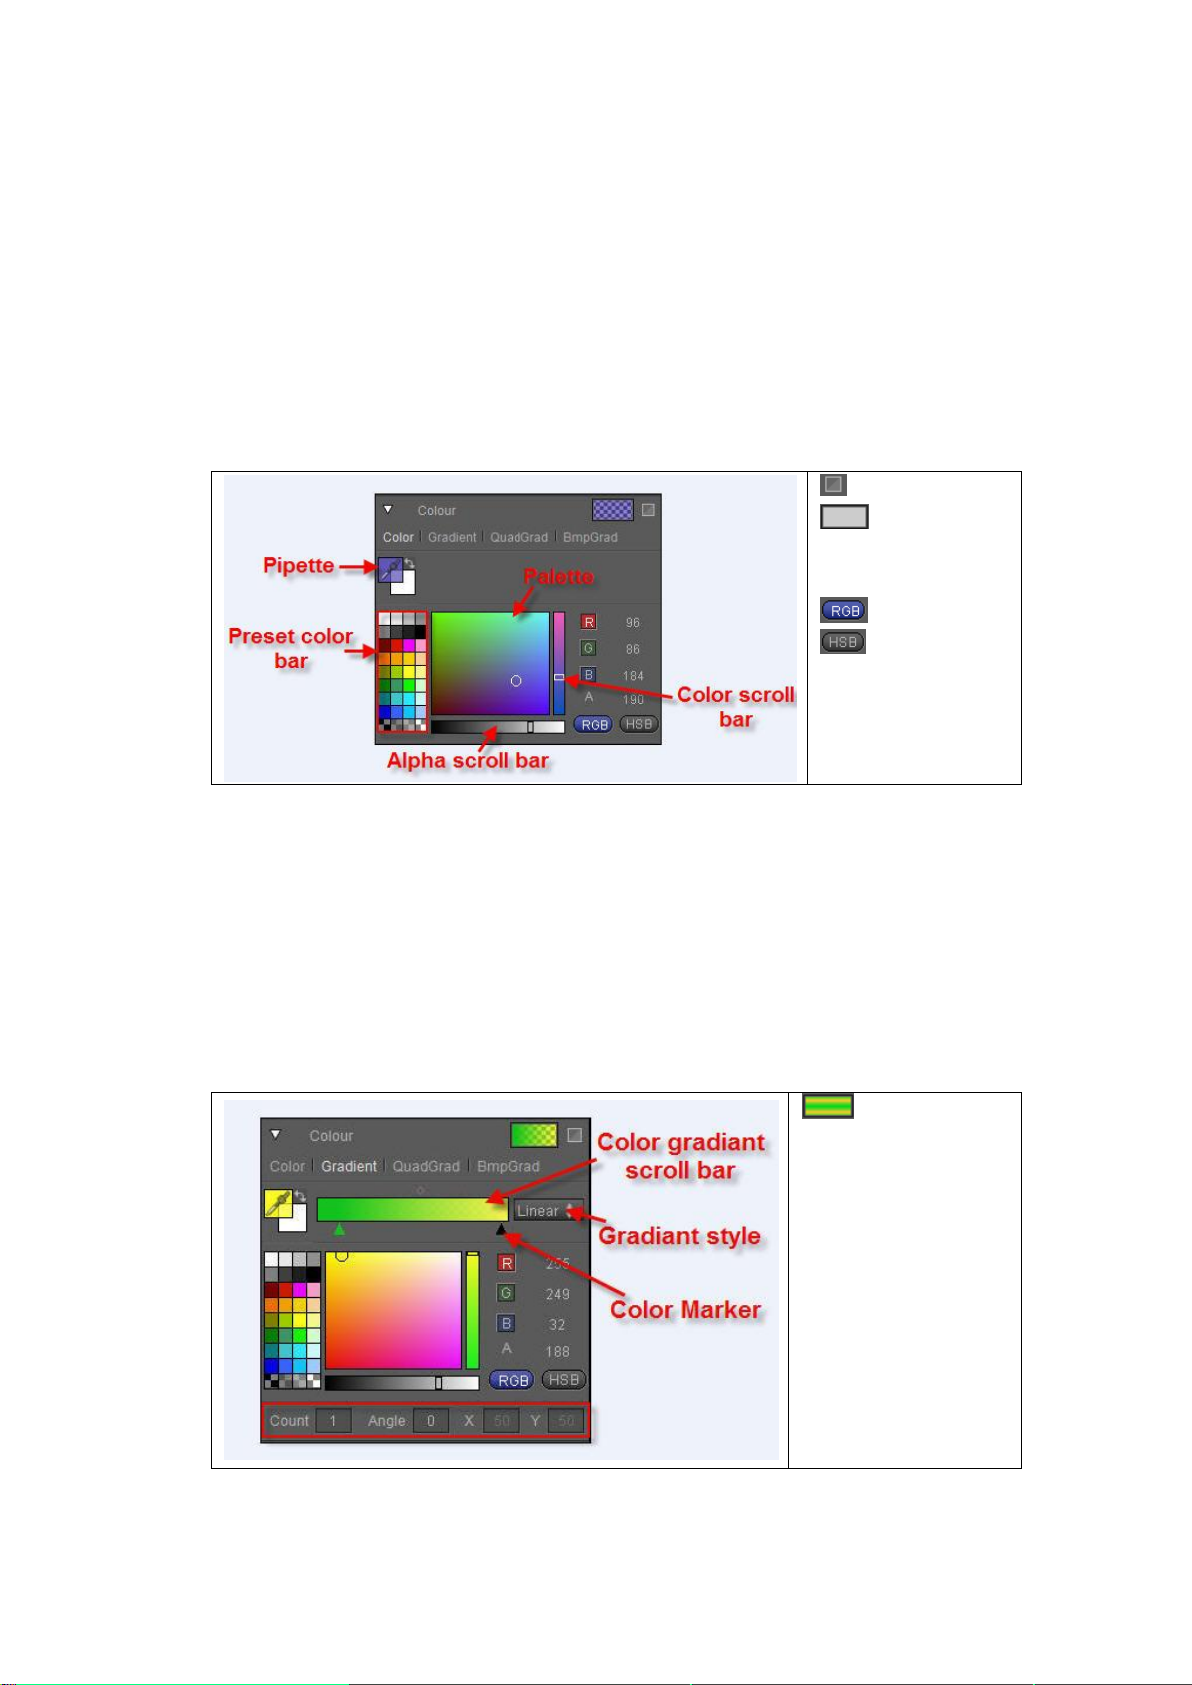
Colors
You can set Colors as: Color, Gradient, QuadGradient, BmpGradient.
Color
Gradient Color
Datavideo Technologies Co., Ltd. 73
The "Color" section has 32 preset colors, and 8 RGB Alpha combinations. To set color:
1. Choose one of the 32 preset colors
2. Use the cursor to pick a color from the palette
3. Set parameters in the RGB Alpha fields
4. Use the scroll bar
5. Use the pipette
Set gradient
Page 74

Fisrt click on Color Marker, then
pick color.
Use the same method as with
single color to set any color on
each Marker.
Adding, deleting and moving Color Markers:
Click under the gradient color bar to add a
Marker, drag to set position. Press Delete to
remove Marker.
Set the central position between colors
using the blured block over the gradient
color bar.
Change Count, Angle, and XY parameters by
imputing numbers directly or dragging the
cursor left-right.
Choose gradient type from the drop down
list: linear, circle, clock, rose line or
rectangle.
In Linear you can only set color, count and
angle. Use angle to set the direction of
colors.
Gradient type
Linear gradient
Example
Datavideo Technologies Co., Ltd. 74
Page 75

In Circle you can only set the X, Y parameters
for effect.
Divisions between colors are like clock needles.
All parameters can be changed.
Circle gradient
Example
Clock gradient
Example:
Datavideo Technologies Co., Ltd. 75
Page 76

As with Clock and Rose Line, all parameters
can be changed
Rose Line gradient
Example:
Example:
Datavideo Technologies Co., Ltd. 76
Page 77

QuadGradient
QuadGradient: four colors are chosen at four
points
Setting QuadGradient: as with single colors,
choose color for each point.
Choose a Bitmap Gradient from the System
Templates Library, double-click to apply. Then
set colors.
Example:
BumpGradient
Datavideo Technologies Co., Ltd. 77
Page 78

Library: choose a template from the
library
Reset: resete parameters
XY Scale: set block size
XY Offset: set block position
Strenght: set texture strength/visibility
Texture
Datavideo Technologies Co., Ltd. 78
Page 79

Colors: set linear sheen colors
Reset: reset parameters
Position: set linear sheen position
Angle: set linear sheen angle
Width: set linear sheen width
Strength: set linear sheen strength/visibility
Colors: choose bitmap sheen color
Library: choose a style from the
template library
Reset: reset parameters
Blur: blur bitmat sheen
Strength: set bitmap sheen strength
Linear Sheen
Bitmap Sheen
Addlight Type
You can pick between Addlight Type and Mixlight Type
Datavideo Technologies Co., Ltd. 79
Page 80
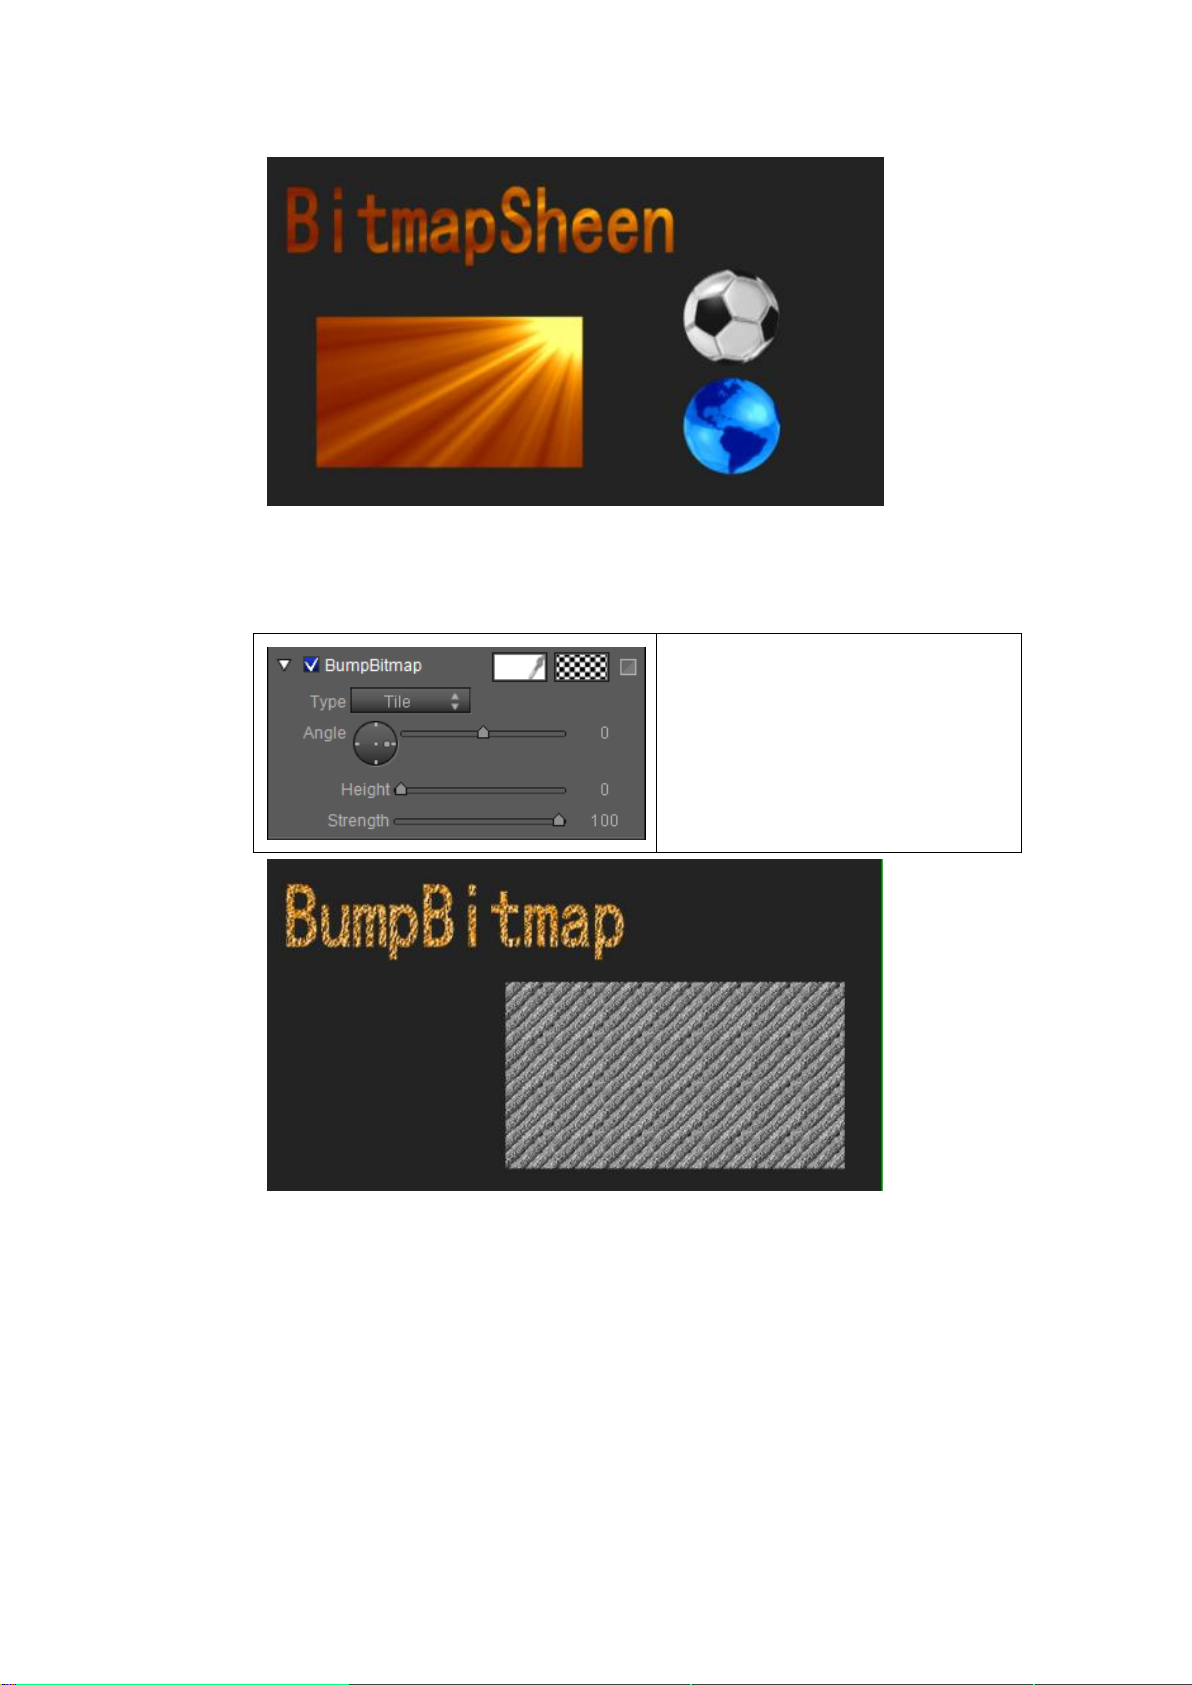
Set Colors, Angle, Height, Strength and
Type (Tile/Stretch)
You can pick a preset template from the
library.
Press Reset to delete set parameters.
Bump Bitmap
Datavideo Technologies Co., Ltd. 80
Page 81
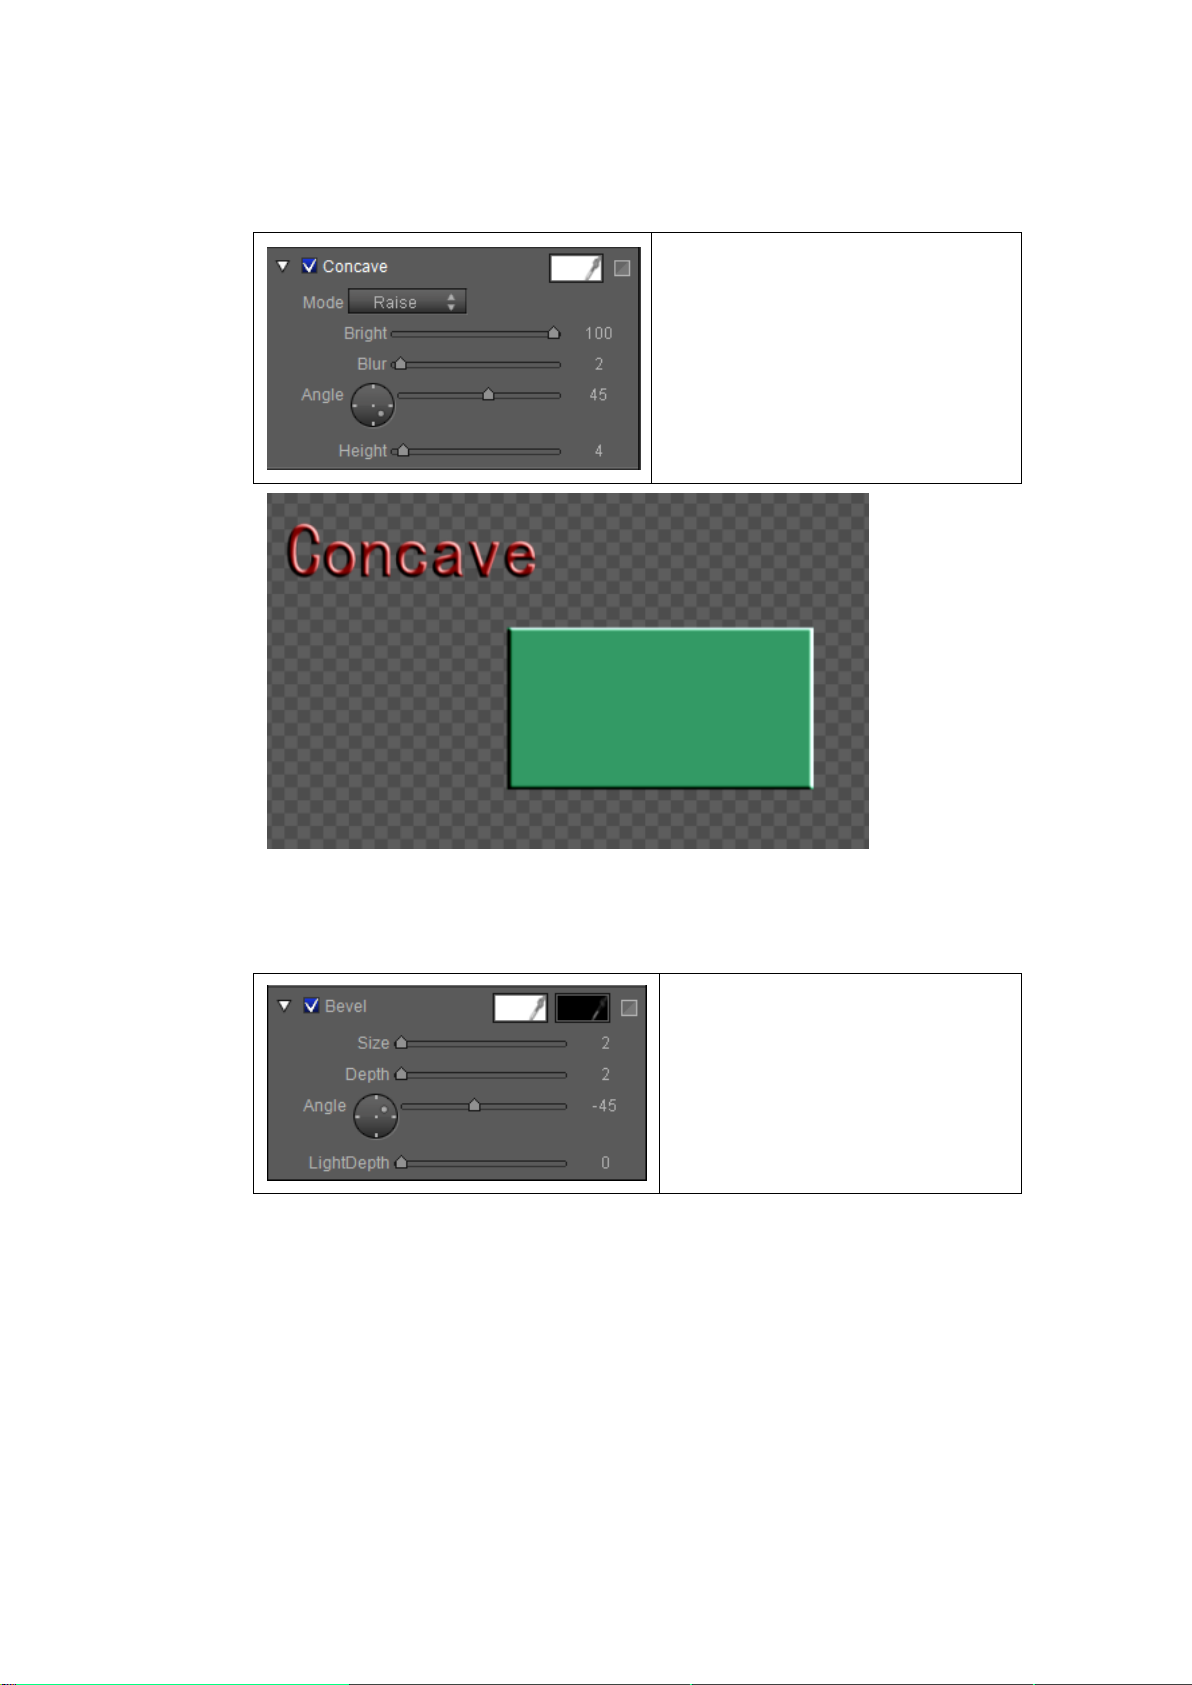
Concave
Set Colors, Style
(Raise/Convave/Lightborder),
Brightness, Blur, Angle and Height.
Press Reset to delete set parameters.
Set Colors, Size, Depth, Angle and Light
Depth.
Press Reset to delete set parameters.
Bevel
Datavideo Technologies Co., Ltd. 81
Page 82

Reset: resets all parameters to their
original values.
Delete: deletes Face
Fold/Expand: Folds/Expands all
Face properties
Fold/Expand: Folds/Expands Face,
Edge, Shadow, Depth properties
Face
In Face you can set the following properties: Color, Texture, Linear Sheen, Bitmap Sheen,
Bump Sheen, Concave and Bevel
Edge
In Edge you can set the following properties: Color, Texture, Linear Sheen, Bitmap Sheen,
Bump Sheen, Convave, Bevel
Datavideo Technologies Co., Ltd. 82
Page 83

As with Face you have Reset, Delete and
Fold/Expand properties.
Unique to Edge: Width and Blur
Edge has different effect types.
Shadow
In Shadow you can set the following properties: Color, Texture, Linear Sheen and Bitmap
Sheen
Datavideo Technologies Co., Ltd. 83
Page 84
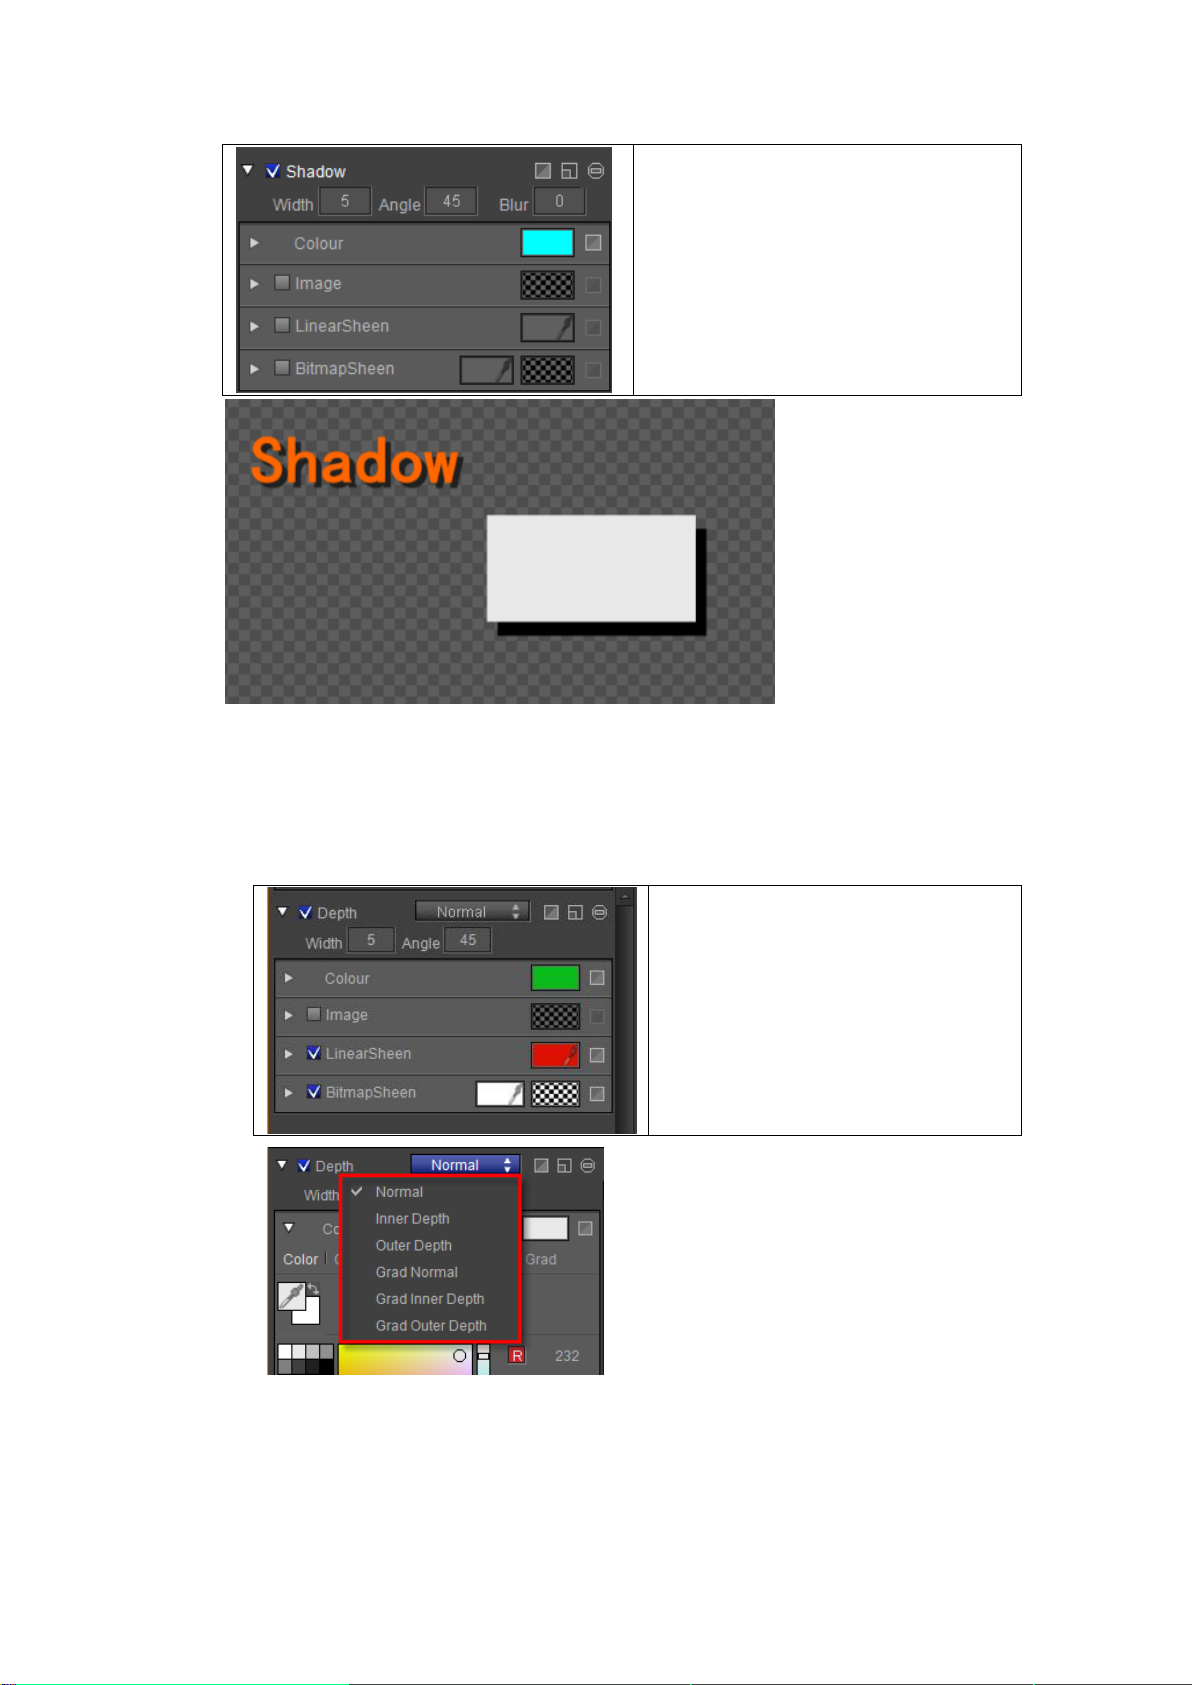
As with Face you have Reset, Delete and
Fold/Expand properties.
Unique to Shadow: Width, Angle and Blur
properties.
As with Face you have Reset, Delete and
Fold/Expand properties.
As with Shadow you have Width and
Angle properties.
You can set Shadow type by clicking on
the drop down list.
Depth
In Depth you can set the following properties: Color, Texture, Linear Sheen and Bitmap
Sheen.
Example
Datavideo Technologies Co., Ltd. 84
Page 85
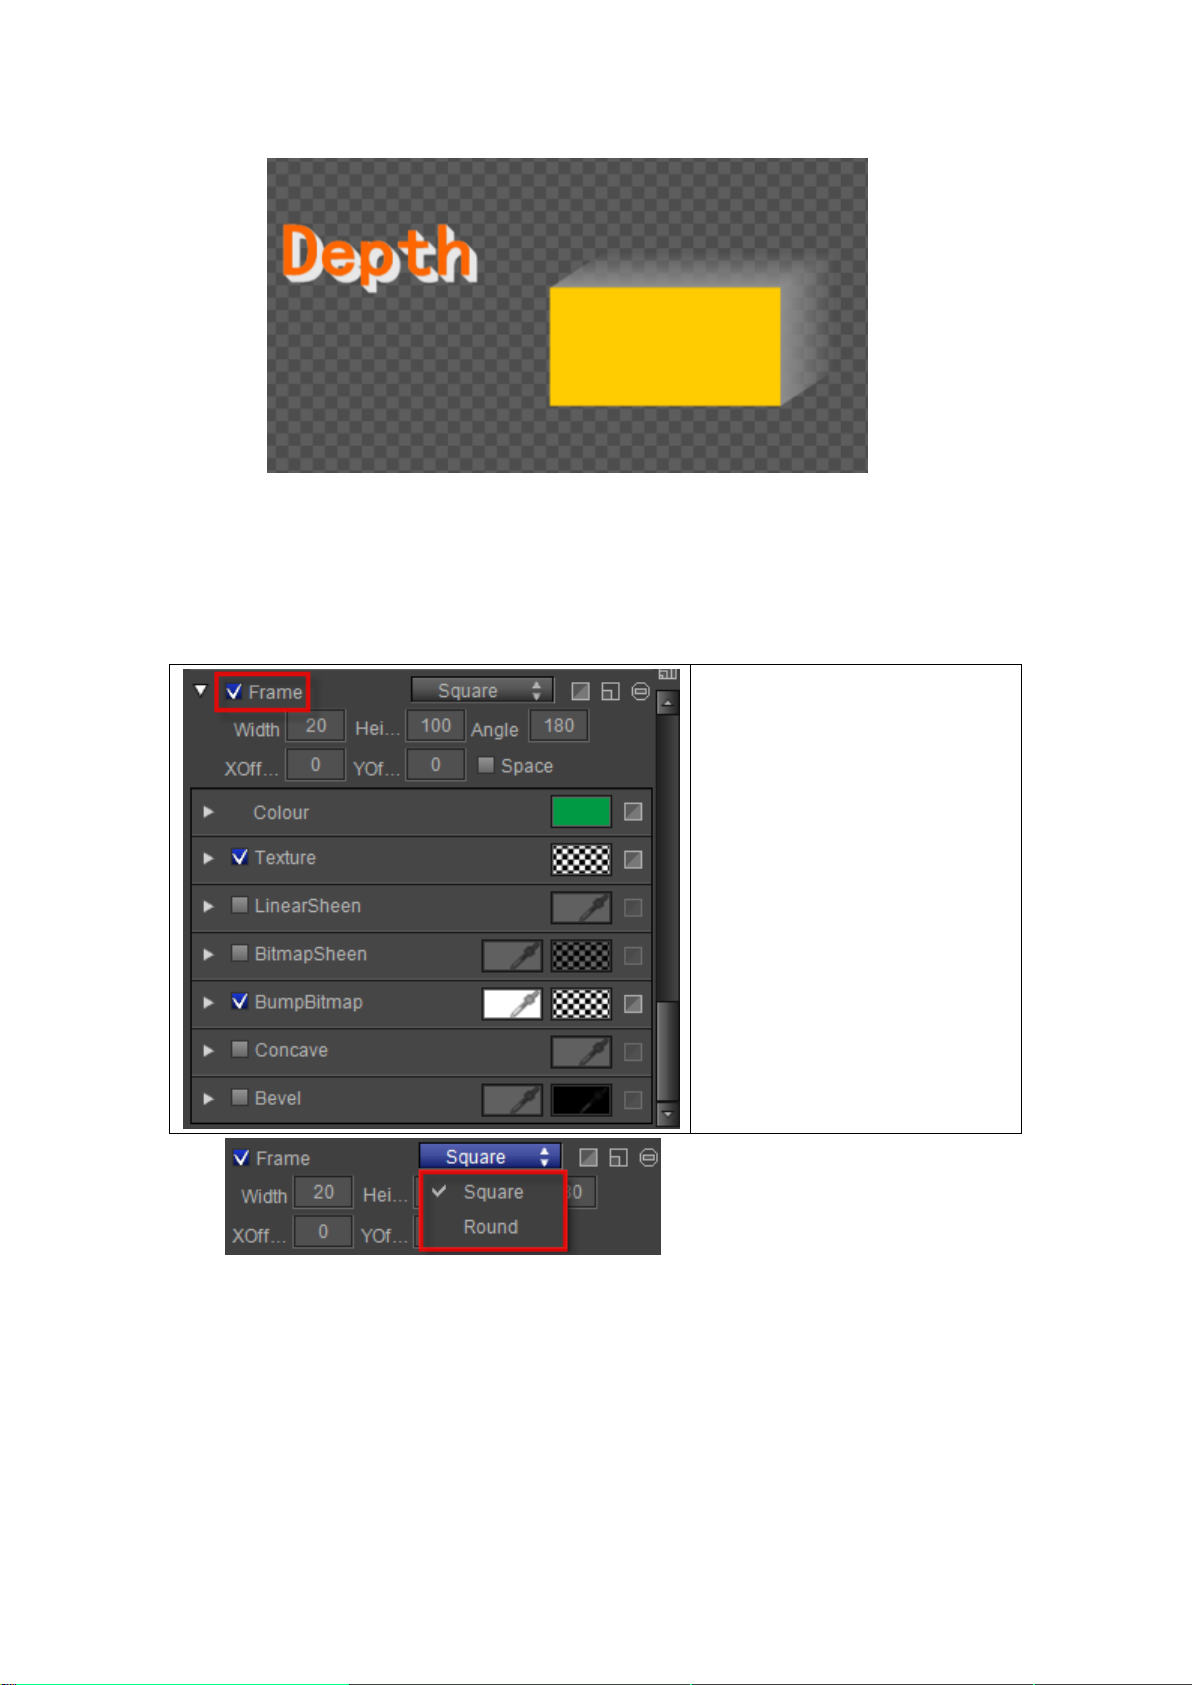
As with Face you have Reset, Delete
and Fold/Expand properties.
As with Shadow you have Width
and Angle properties.
Unique to Shadow: Height, Offset
and Space properties.
You can set Frame type by clicking
on the drop down list.
Frame
In Frame you can set the following properties: Color, Texture, Linear Sheen and Bitmap
Sheen, Bump Sheen, Convave, Bevel.
Example
Datavideo Technologies Co., Ltd. 85
Page 86
Advanced properties
You can apply Mask effects by going to the bottom of
the Shader Tab. Here you can apply a Mask from the
template library, set the blur level and
activate/deactivate the Inverse option.
Setting Mask
1) Enter a text in the Edit Screen, then choose from the Shader Tab.
Datavideo Technologies Co., Ltd. 86
Page 87
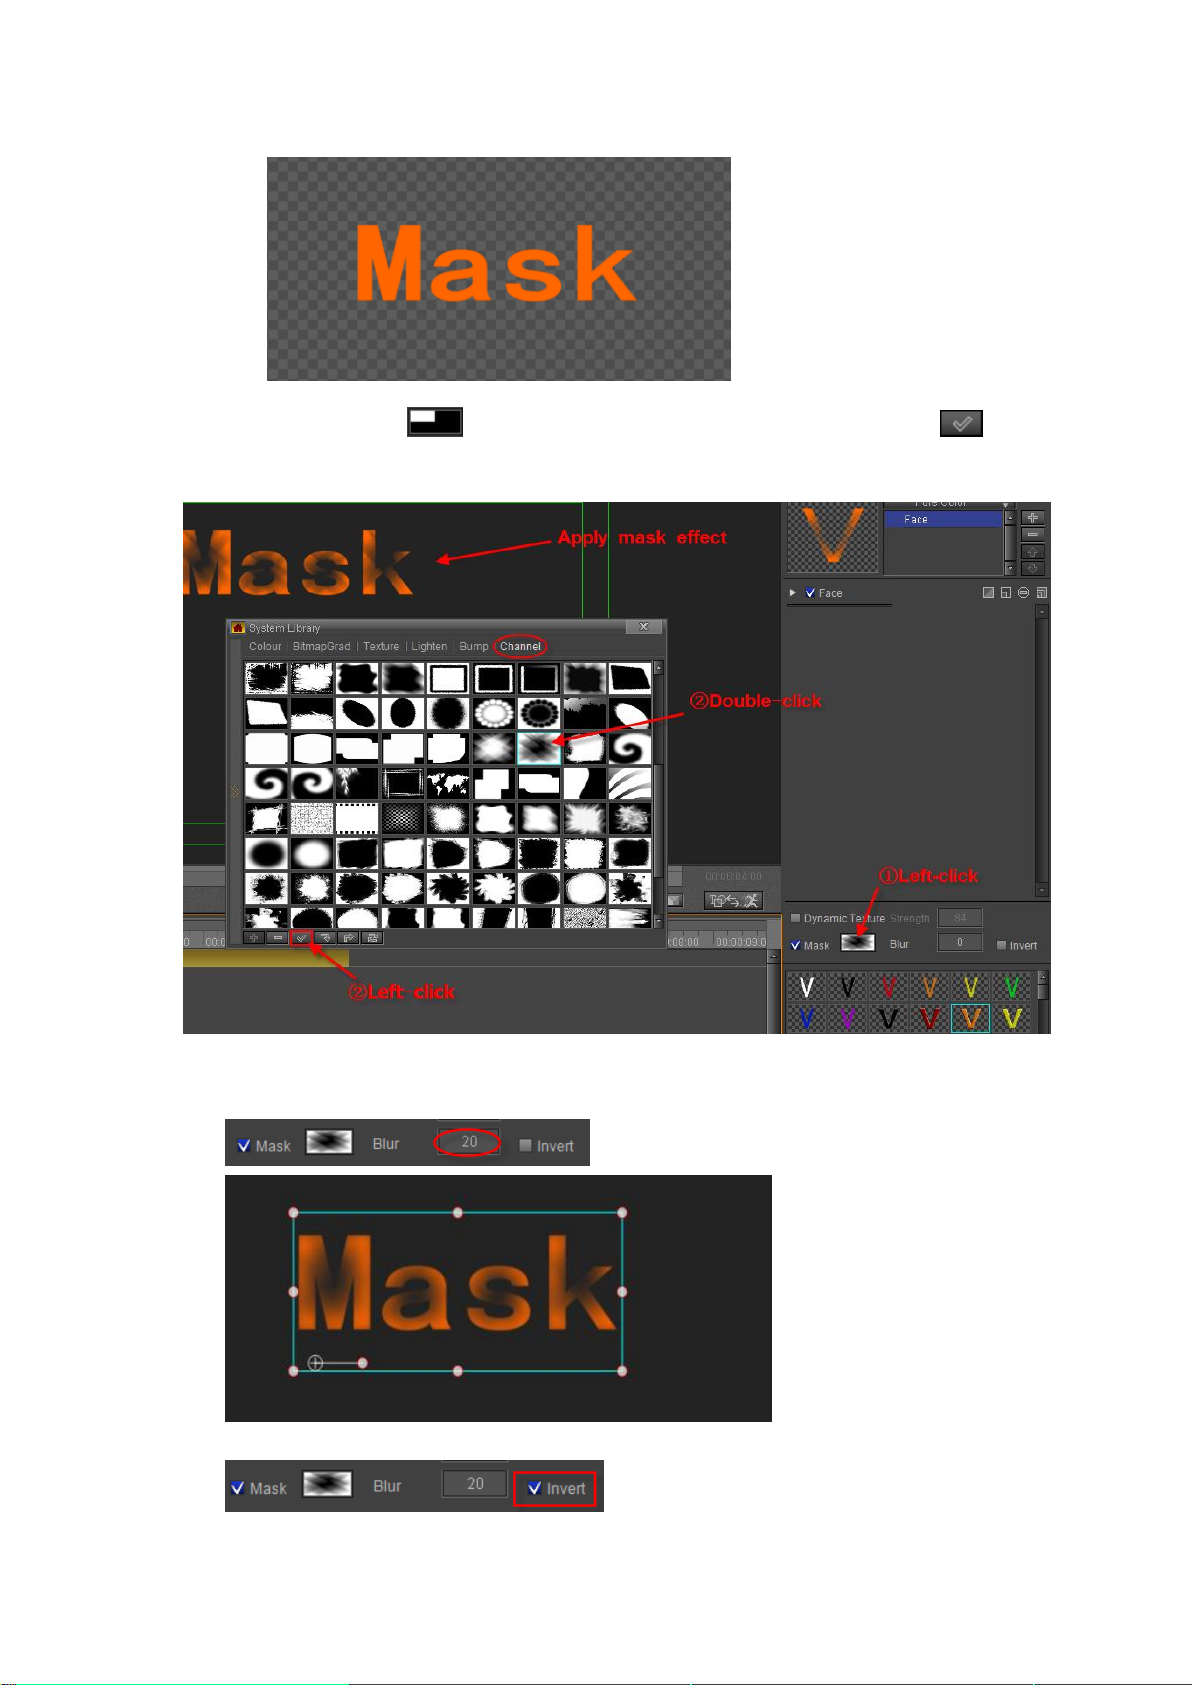
2) Click on the button to choose a template. Double-click or press to
apply.
Set Mask Blur parameters
Example
Use Inverse option to inverse effect.
Datavideo Technologies Co., Ltd. 87
Page 88
Editing properties
Combinations
Enter text/object on the Edit Screen, open Shader, and then pick Face, Edge and Shadow.
You can also pick Shader properties first and then input text/object.
By default, when you first enter text only Face is opened. Add other properties.
Click the “Insert” button to add Outline over Face.
Datavideo Technologies Co., Ltd. 88
Page 89
Note: you can click the “Insert” button to insert a shader property over the selected
property.
The text add a Outline property:
To delete a property, choose the unwanted property and then click on either of the “Delete”
buttons shown in the screen below.
Example
Step 1
Step 2
Datavideo Technologies Co., Ltd. 89
Page 90

Move between properties by using the mouse cursor or the / buttons,
Example
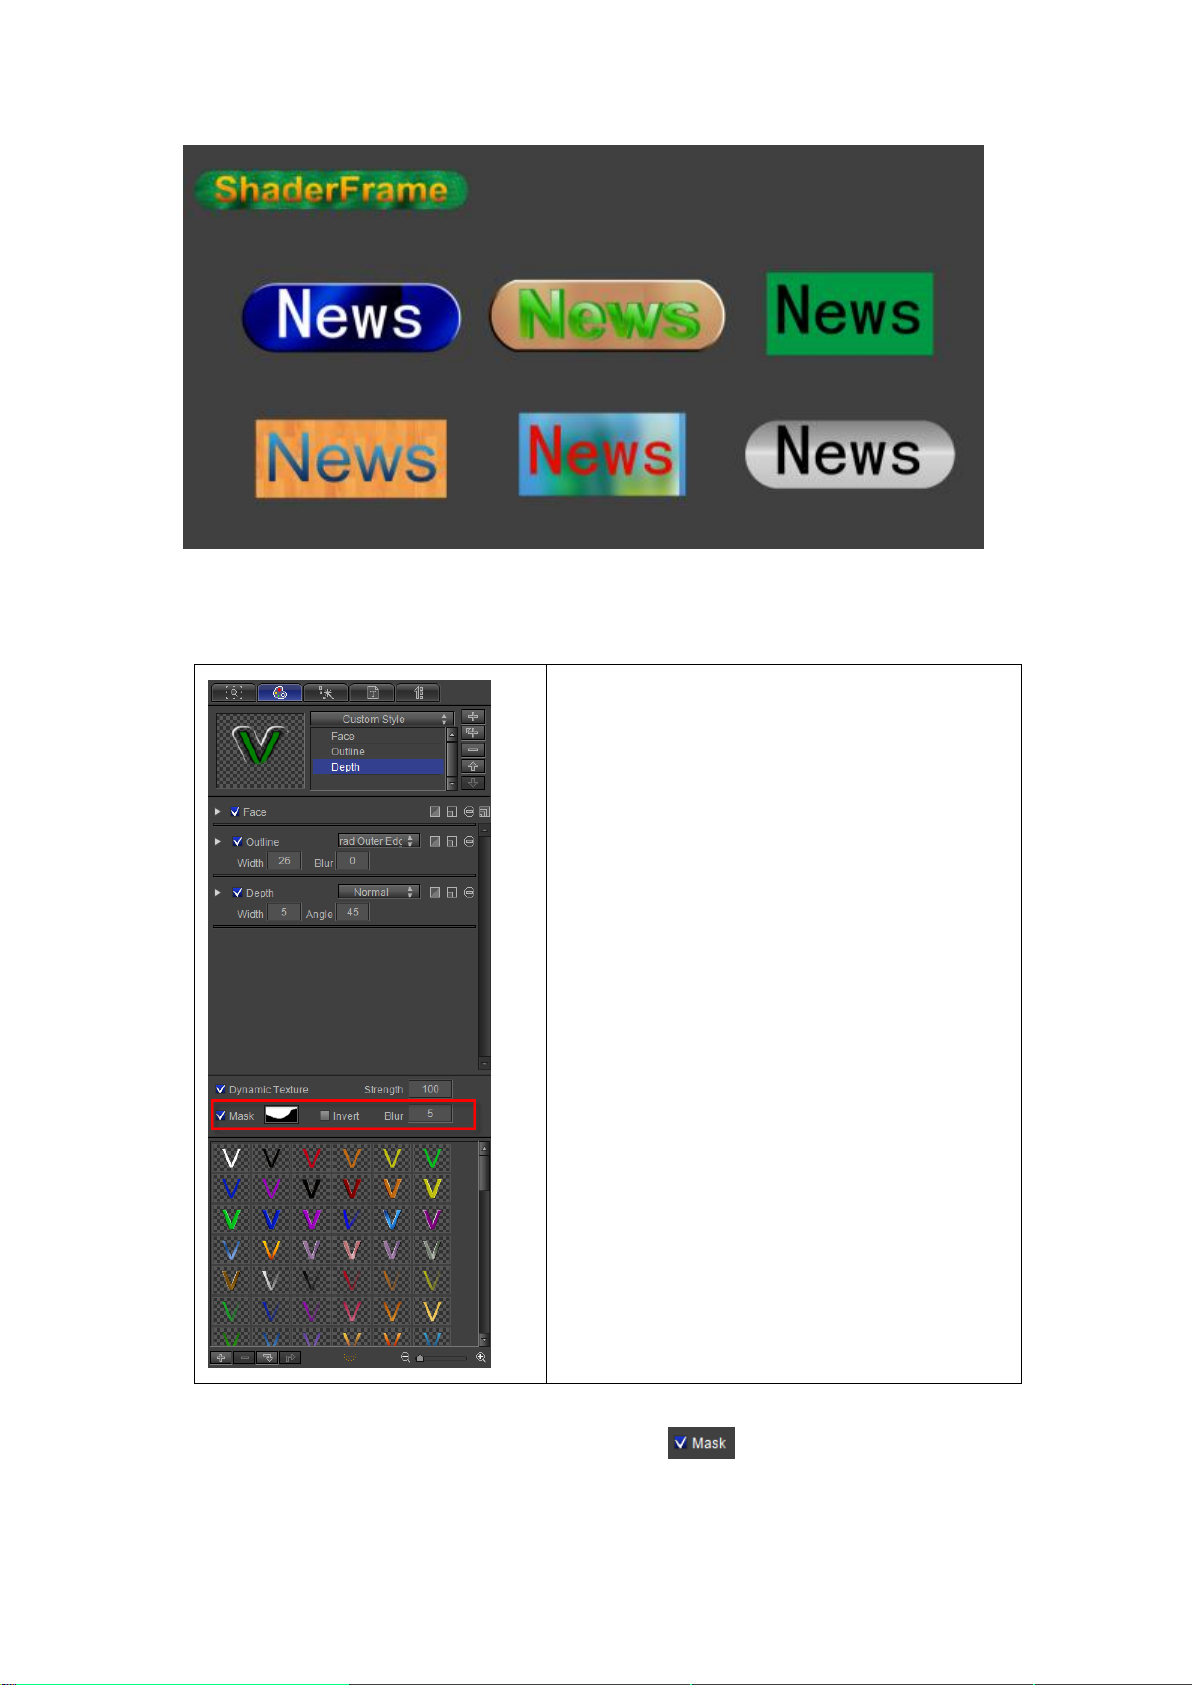
Using different properties combinations you can produce all sorts of Title effects. Example:
Datavideo Technologies Co., Ltd. 90
Page 91

Preset Styles
Use the “Add/Delete” buttons to
add/delete templates to/from the library.
Hide the library by clicking on the “Hide
Library” button.
You can choose a Preset Style by clicking on the drop-down list shown below.
Below: neon style.
Shader Template Library
At the bottom of the Shader tab you can open the Templates Library by clicking the
button.
Right-click on a template to see the context menu:
Datavideo Technologies Co., Ltd. 91
Page 92

Apply All: applies shader and format properties to
current text
Apply Shader: applies shader properties to current
text
Delete
Apply all except font height
Export template
Locate file in explorer
Move previous
Move next
Right-click on an empty space in the library to see the context menu:
Add
Import
Empty
Choose all
Invert selection
Clear selection
Refresh
To add a template you can:
1. Press the button in the library
2. Choose Add from the options context menu.
Datavideo Technologies Co., Ltd. 92
Page 93

To delete a template either:
1. Press the button in the library
2. Choose Delete from the context menu
After creating text in the Edit Screen, the easiest way to apply template properties is to
double-click on the desired template.
To apply Shader properties only, press Ctrl and Double-click on the template. Example
Datavideo Technologies Co., Ltd. 93
Page 94

Render Text
As part of the shader properties, you can choose to render the text as a whole or letter by
letter.
Render All: applies Shading effects to the text as a whole.
Individual Render: applies Shading effects letter by letter.
Set the Render format by clicking on the button in the Text Editing Bar
Example
Datavideo Technologies Co., Ltd. 94
Page 95

Render Image
Specific properties of render image are shown below.
Note: the options are used when image object has shader style property (Face, Outline,
Shadow).
Example:
Datavideo Technologies Co., Ltd. 95
Page 96
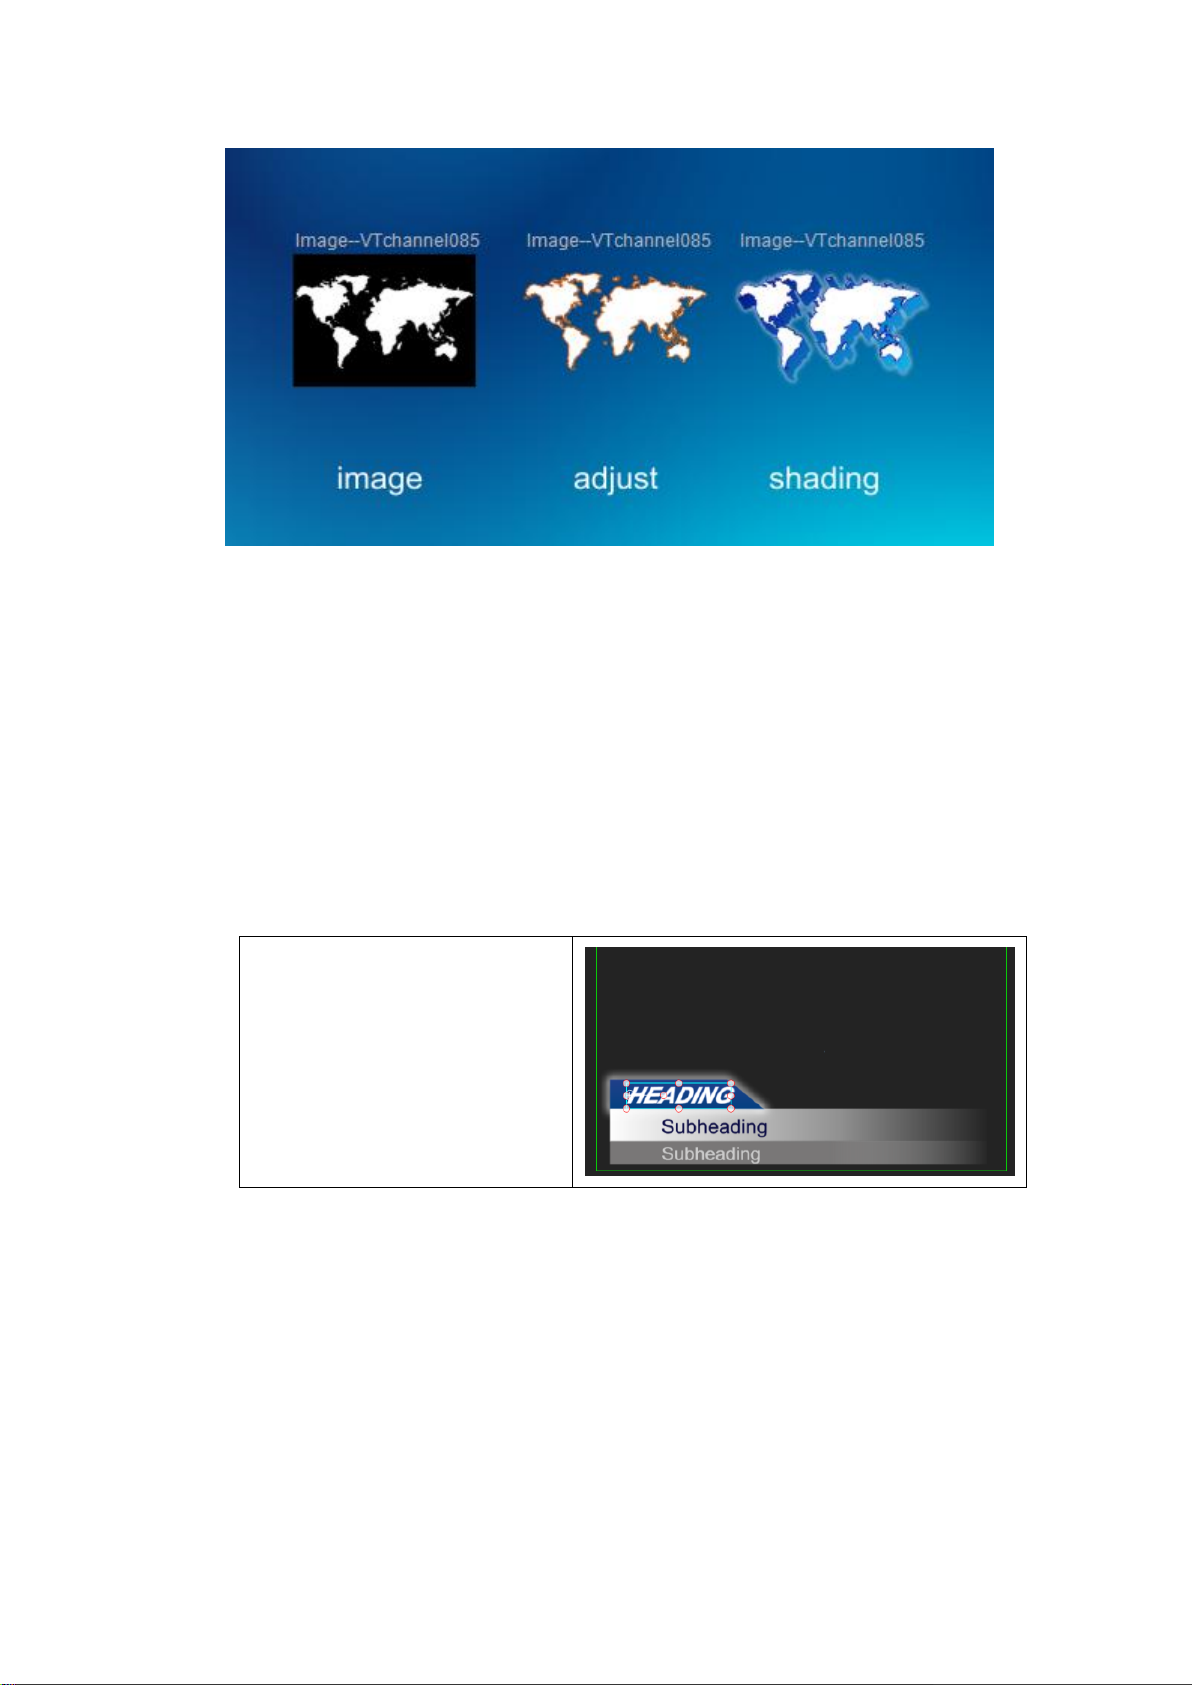
Graphics (Still) Editing Mode
Step 1:Click on the object in the Edit
Screen
Position, Scale, Rotate
To move an object:
1. In the Edit Screen drag the object to the desired position.
2. Click on an object and use the arrow keys on the keyboard. Press Ctrl to increase
speed.
3. Enter co-ordinates in the properties tab.
Datavideo Technologies Co., Ltd. 96
Page 97
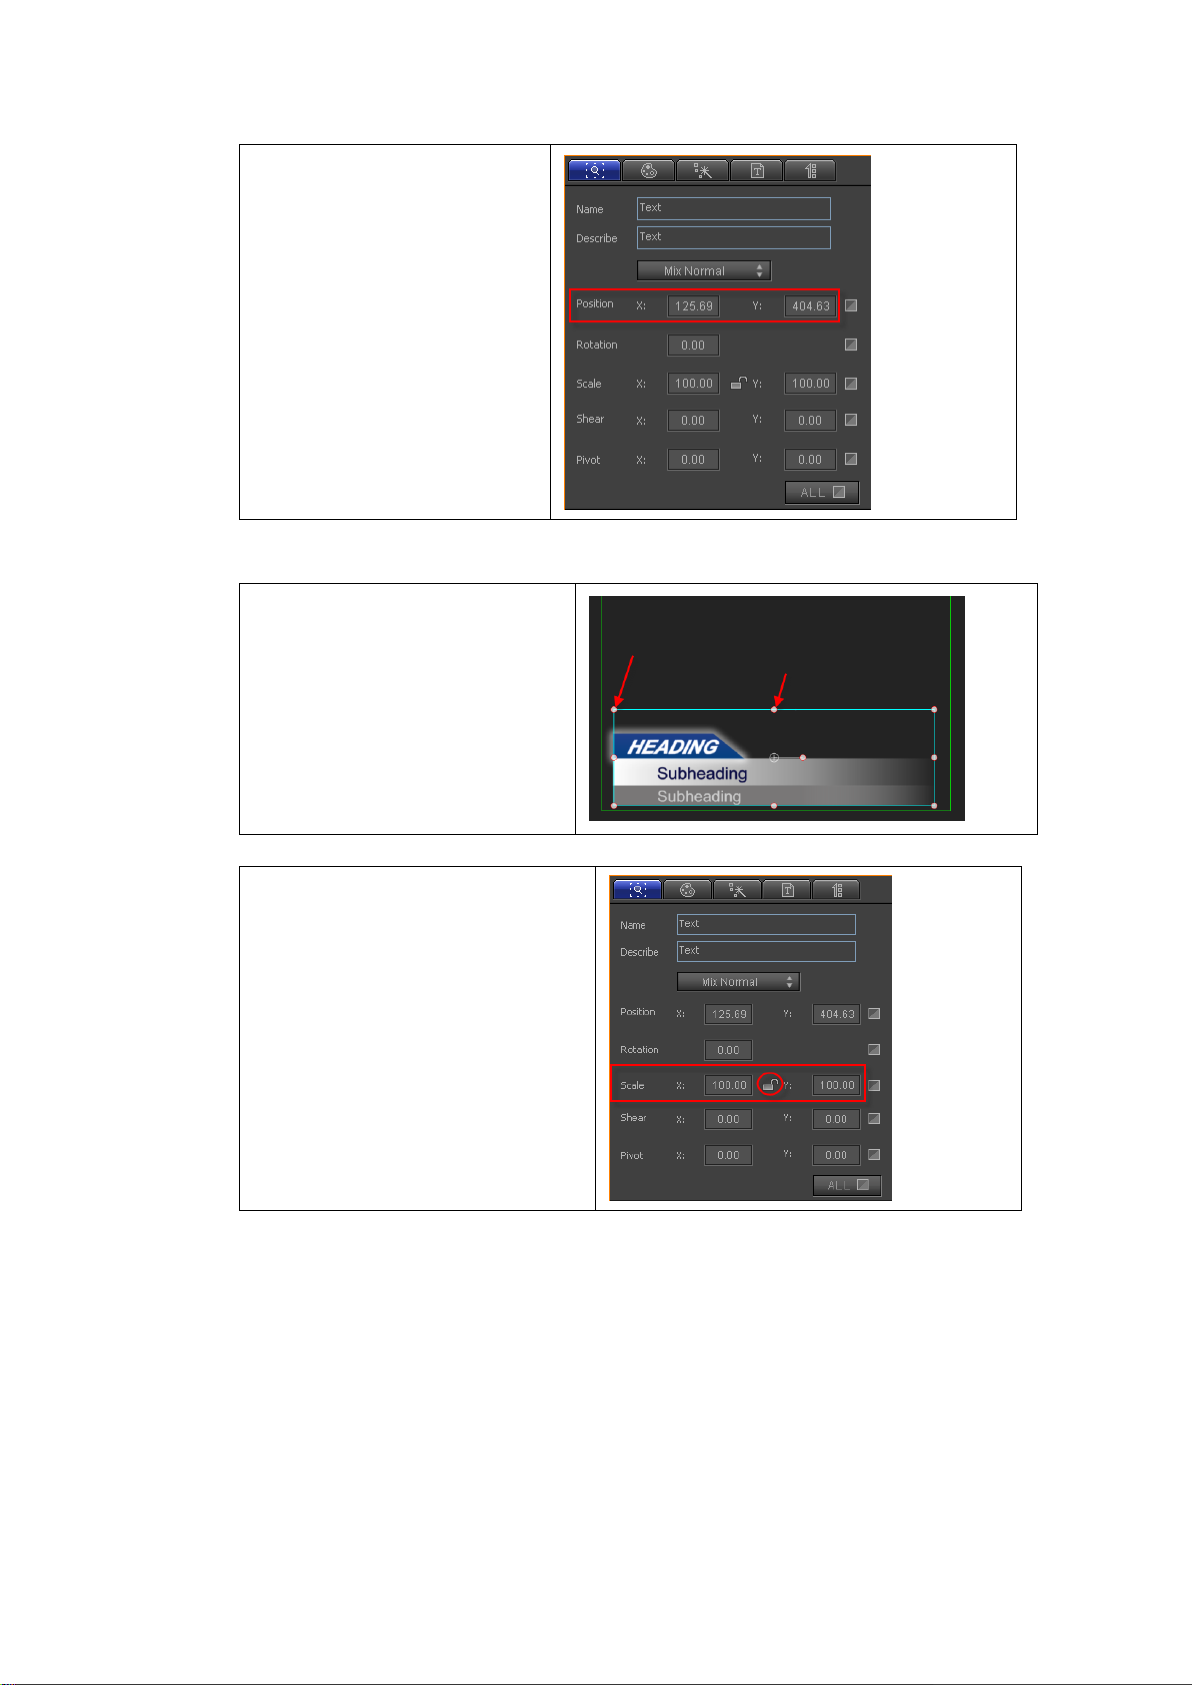
Step 2:Enter XY coordinates
Zoom Object:
Drag the markers surrounding the
object. Hold Shift to keep XY scale
constant.
Enter XY scale in the Properties tab.
Press on the lock to keep XY scale
constant.
Method 1:
Method 2:
Rotate object:
Method 1: On the keyboard, hold Shift, then use the Up/Down arrow keys to rotate 45
degrees. Use Right/Left arrow keys to rotate 1 degree.
Method 2:
Datavideo Technologies Co., Ltd. 97
Page 98
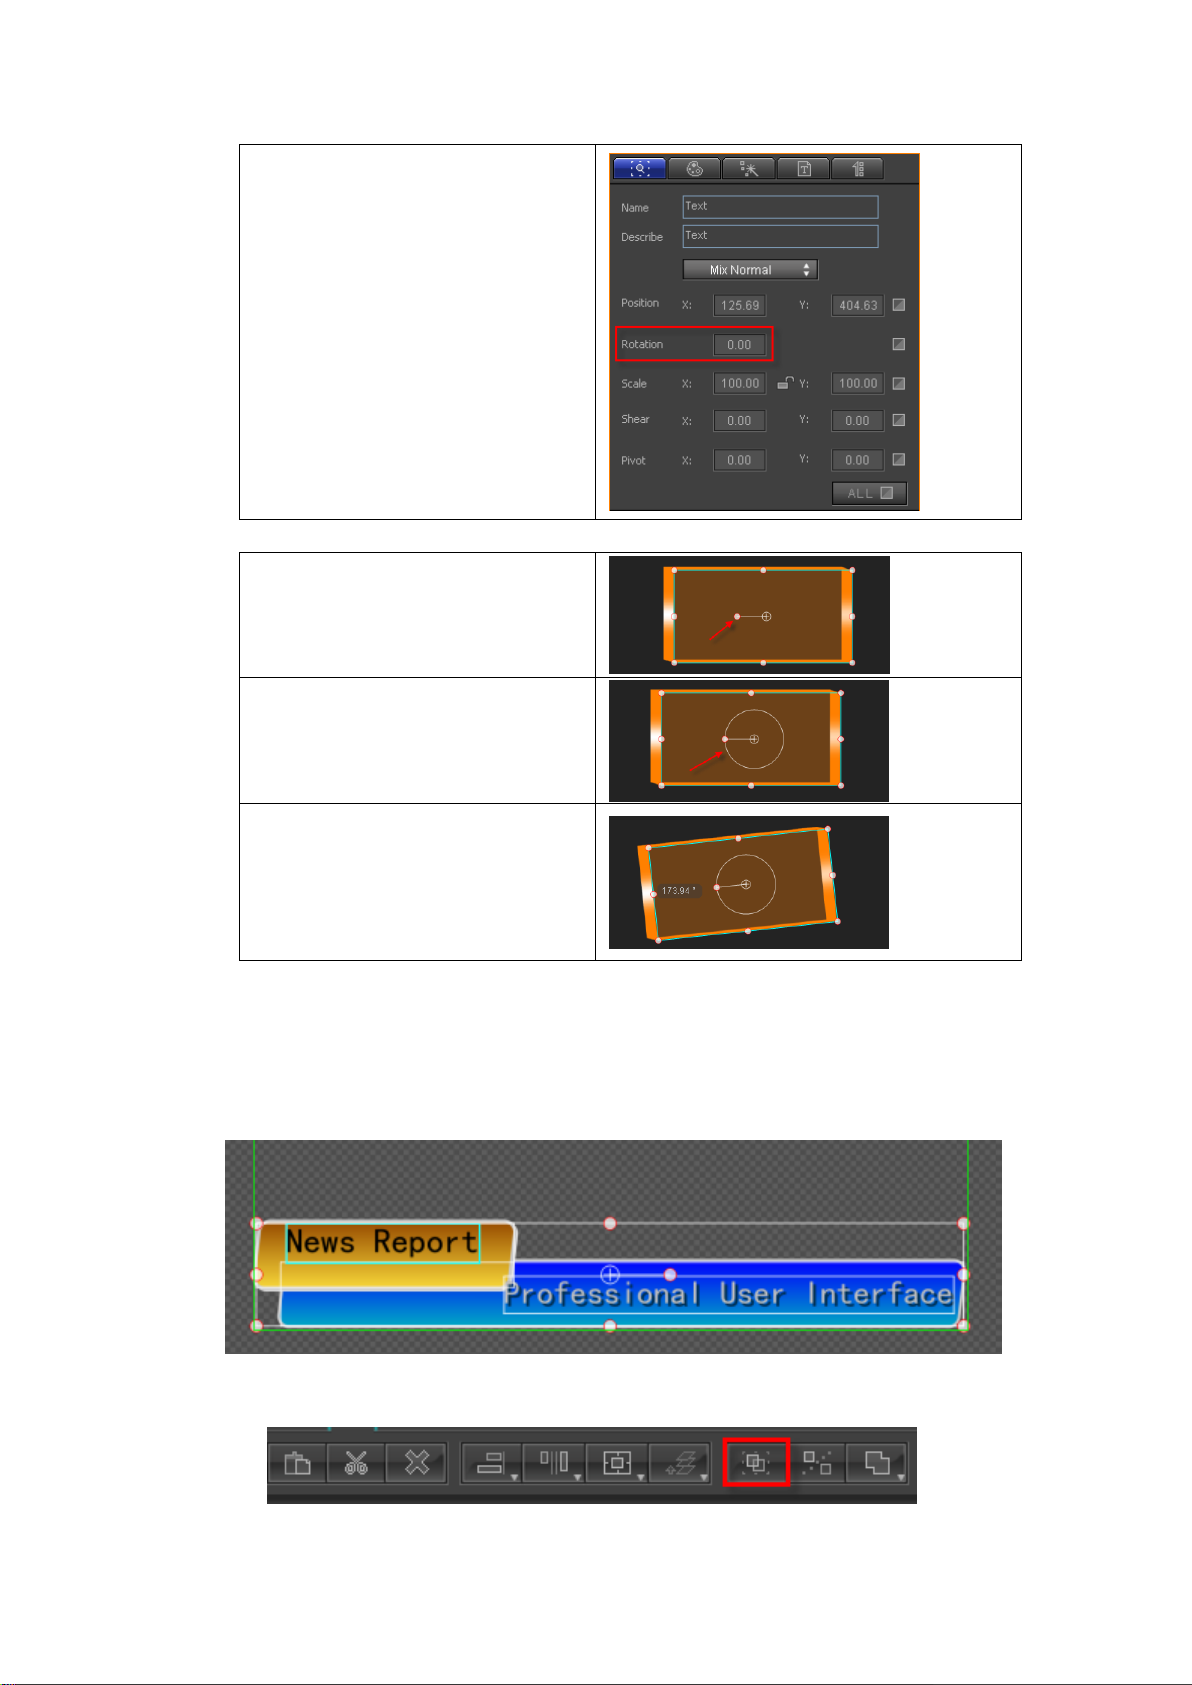
Enter numbers in the Properties tab
Rotation field.
Method 3:
Move the cursor to the marker in the
centre of the object
A circle will appear
Drag the marker around the circle to
perform rotation
Make Group, Ungroup
Make Group will turn many objects into one. To make a group:
1. Hold Ctrl and choose objects, or press Ctrl+A to choose all objects in Edit Screen.
Datavideo Technologies Co., Ltd. 98
2. Press Ctrl+G or right-click and choose “Make Group” from the context menu. You
can also press on “Make Group” in the Edit Menu Bar.
Page 99
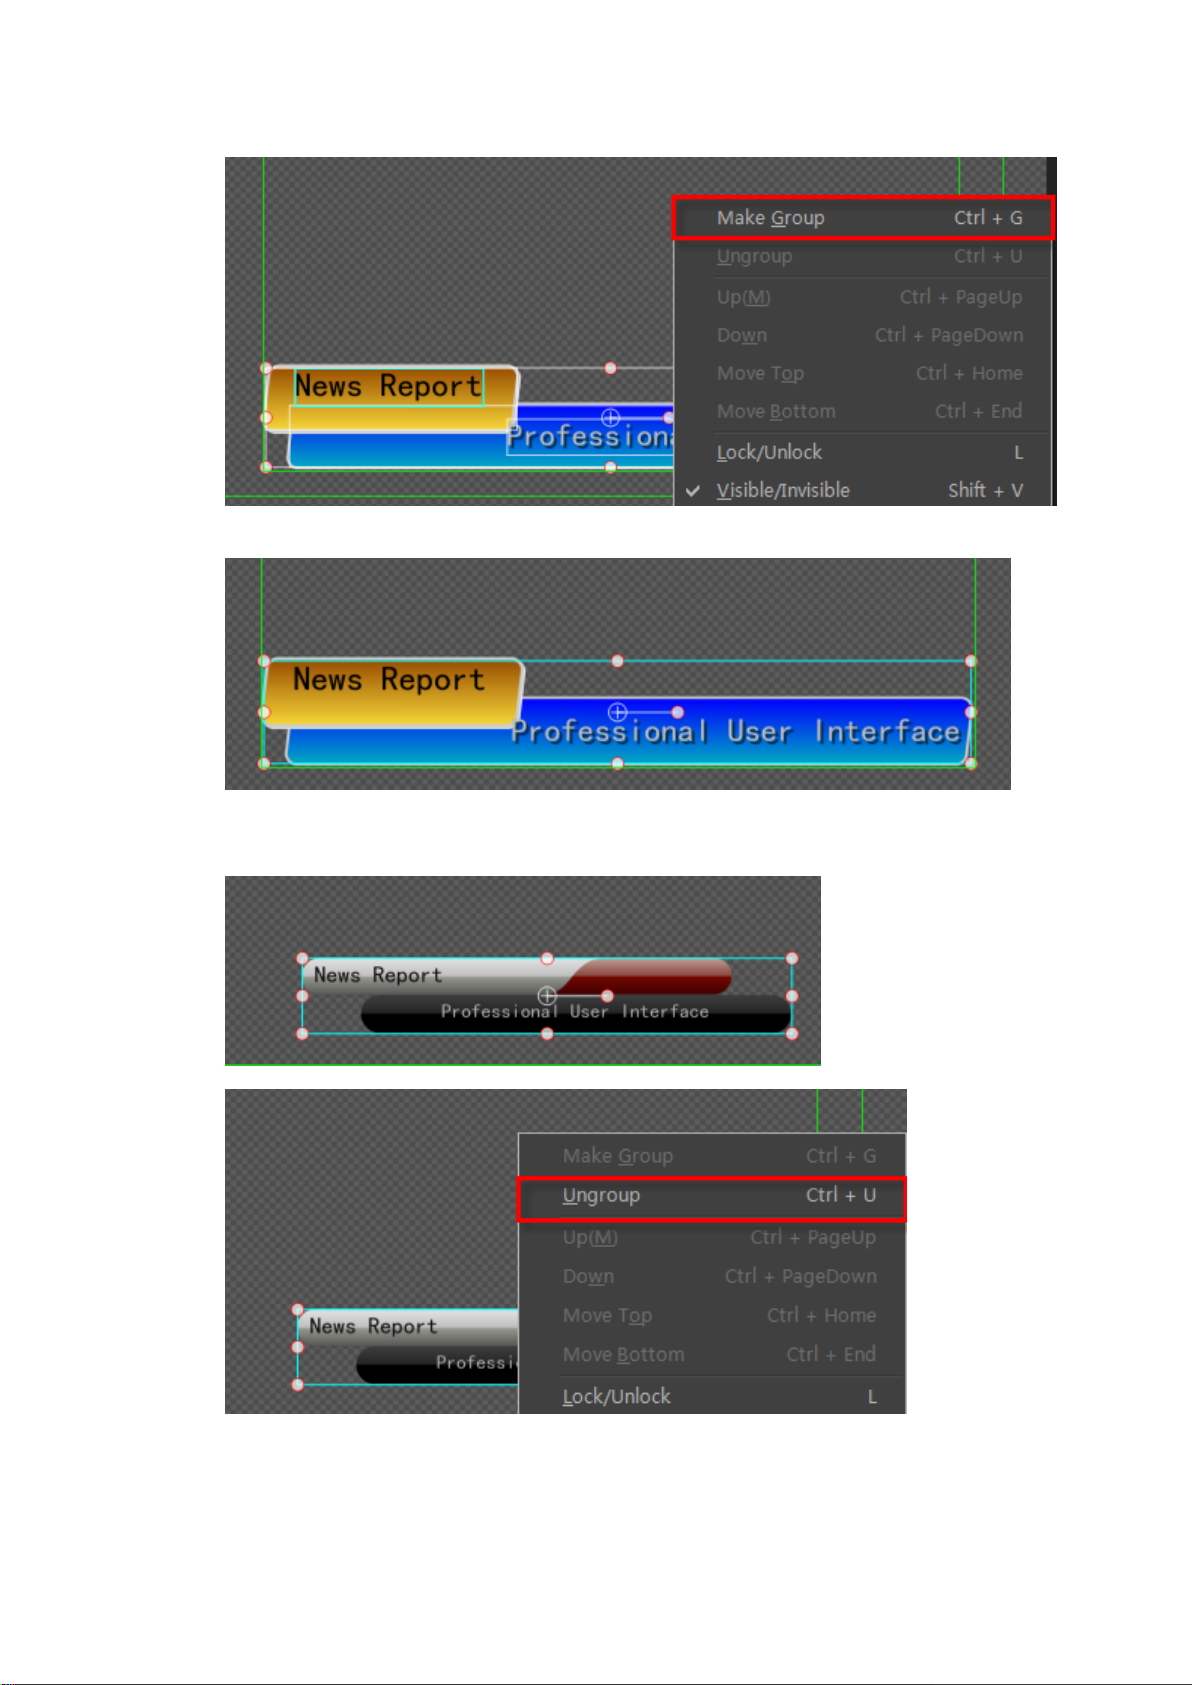
Example
To Ungroup press Ctrl+U, right-click and choose “Ungroup”, or press “Ungroup” in the Edit
Menu Bar.
Example
Datavideo Technologies Co., Ltd. 99
Page 100

Boolean
Boolean is a special form of grouping and includes: Union, Subtract, Intersect and Xor.
To perform Boolean grouping, choose objects then:
1. Use the keyboard shortcuts (Shift+'+', Shift+'-', Ctrl+'+' or Ctrl+'-')
2. Right-click and choose from the context menu.
3. Press “Boolean” in the Edit Menu Bar
Datavideo Technologies Co., Ltd. 100
 Loading...