

Page 1

®
DSVII-SC
User’s Manual
Part Number 4040-00701-00
Version 1.11
Page 2

DSVII-SC® User Manual, Version 1.11
Disclaimer Notice:
Datastrip Inc., Datastrip Ltd., Datastrip Products Inc., and related operating companies (hereafter
collectively referred to as Datastrip) reserve the right to change options, features, specifications, policies,
pricing and availability at any time. Datastrip is not liable for errors or omissions in any product related
documentation, specifications or software. Datastrip make no claims of suitability for any particular
application. Datastrip will not be held liable for direct or indirect damages or other losses due to loss of data,
reliability or performance issues relating to Datastrip-provided equipment or software.
Copyright Notice:
No part of this publication may be reproduced, stored in a retrieval system or transmitted in any form or by
any means, electronic, mechanical, photocopying, recording, scanning, or otherwise, except as permitted
under section 107 or 108 of the 1976 United States Copyright Act, without the prior written permission from
Datastrip International Ltd. or a subsidiary company. Requests to Datastrip for permission should be
addressed to Datastrip Inc. 211 Welsh Pool Road., Suite 100., Exton, PA 19341-1321 USA, or Datastrip Ltd.
Unit 7, Thame Park Business Centre, Wenman Road, Thame, Oxon, OX9 3XA UK.
Acknowledgements:
• DSVII-SC® is a registered trademark of Datastrip.
• Windows and WinCE are registered trademarks of Microsoft Corporation.
• All other trademarked or copyrighted names mentioned herein are the property of their respective
owners.
Revision History:
1.00 5/25/2004 Preliminary Draft
1.10 2/16/2006 Revisions to Regulatory Statements
1.11 4/26/2006 Added DS AC Adapter and Linecord Req’mt.
Copyright © 2006 by Datastrip, Inc. All rights reserved.
Reproduction in whole or in part is prohibited.
2
Page 3

DSVII-SC® User Manual, Version 1.11
Table of Contents
1 Overview..............................................................................................................................4
2 Unpacking & Inventory.......................................................................................................4
3 Initial Setup.........................................................................................................................6
4 Approved Uses.....................................................................................................................6
5 Third Party Software...........................................................................................................6
6 Operation.............................................................................................................................7
7 Battery Charging and Replacement.....................................................................................7
8 Cleaning............................................................................................................................10
9 Troubleshooting.................................................................................................................11
10 Hardware Specifications................................................................................................12
11 Hardware Features.........................................................................................................13
11.1 Keypad................................................................................................................................13
11.2 Fingerprint Sensor, LCD & Indicators..............................................................................13
11.3 Serial Ports.........................................................................................................................13
11.4 External Compact Flash Slot.............................................................................................15
11.5 USB Ports...........................................................................................................................15
11.6 Smart Card Slot..................................................................................................................15
12 Regulatory Compliance Statement.................................................................................16
13 Service & Support...........................................................................................................17
14 Available Parts, Supplies and Accessories......................................................................18
Copyright © 2006 by Datastrip, Inc. All rights reserved.
Reproduction in whole or in part is prohibited.
3
Page 4
DSVII-SC® User Manual, Version 1.11
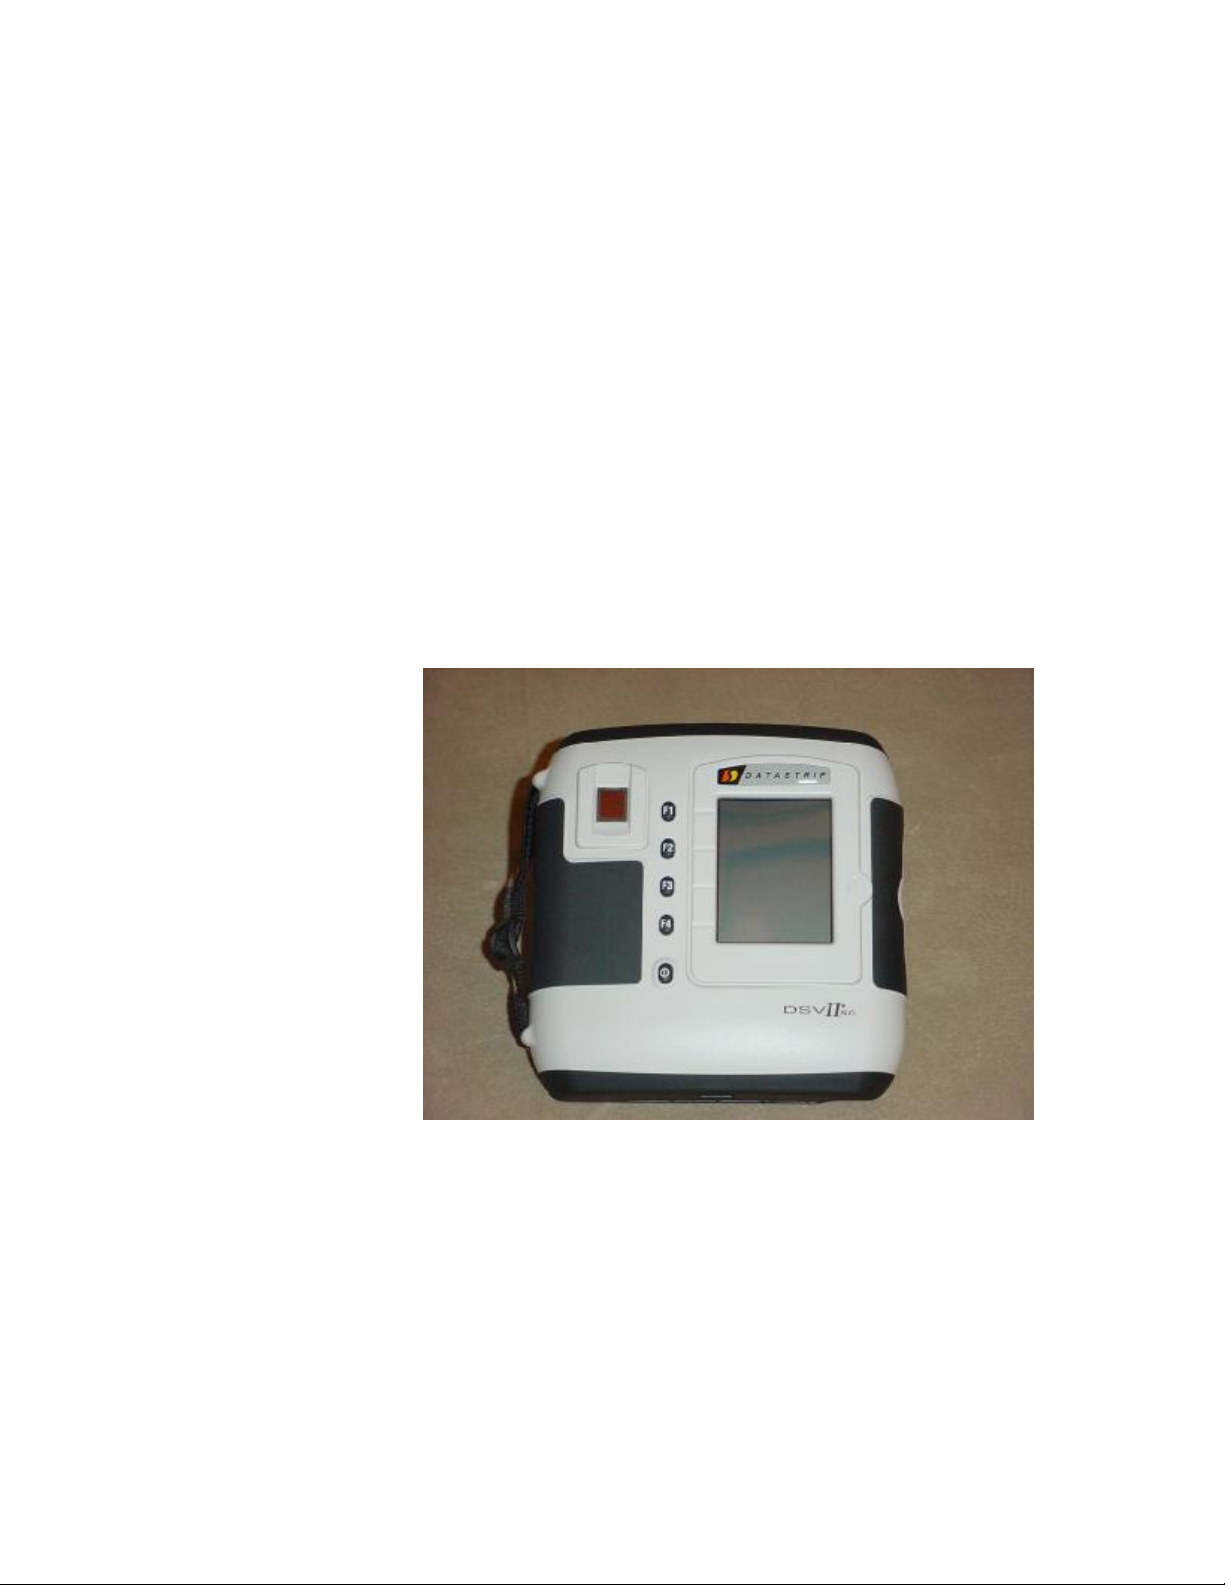
1 Overview
The DSVII-SC® (Figure 1) is a portable, handheld computer specifically designed for security, law enforcement,
border control and positive I.D. verification applications. It features the ability to interface with both contact and
Contactless SmartCard and wireless networking. An integrated fingerprint sensor enables biometric verification of
identity. Please refer to the following for general specifications:
• Integrated 500 DPI fingerprint sensor.
• Color LCD display, 3.5” (88.9mm) diagonal measure. LED backlighting.
• Integrated Smart Card (ISO-7816) card reader.
• Integrated Contactless Smart Card reader (ISO-14443A/B).
• Built-in Windows-CE.net-4.2 operating system.
• CPU: 198MHz Hitachi SH4 processor.
• Memory: 64Mbytes SDRAM, 128Mbytes FLASH.
• One external Type-I/II Compact Flash slot.
• One RS-232 serial port (full handshaking control signals).
• One 10/100BaseT Ethernet port.
• Two USB-1.1 “host” ports, for an external keyboard, mouse or other peripherals.
• Internal, replaceable dual Lithium-Ion battery pack, external DC-power & charging jack.
Figure 1: DSVII-SC®
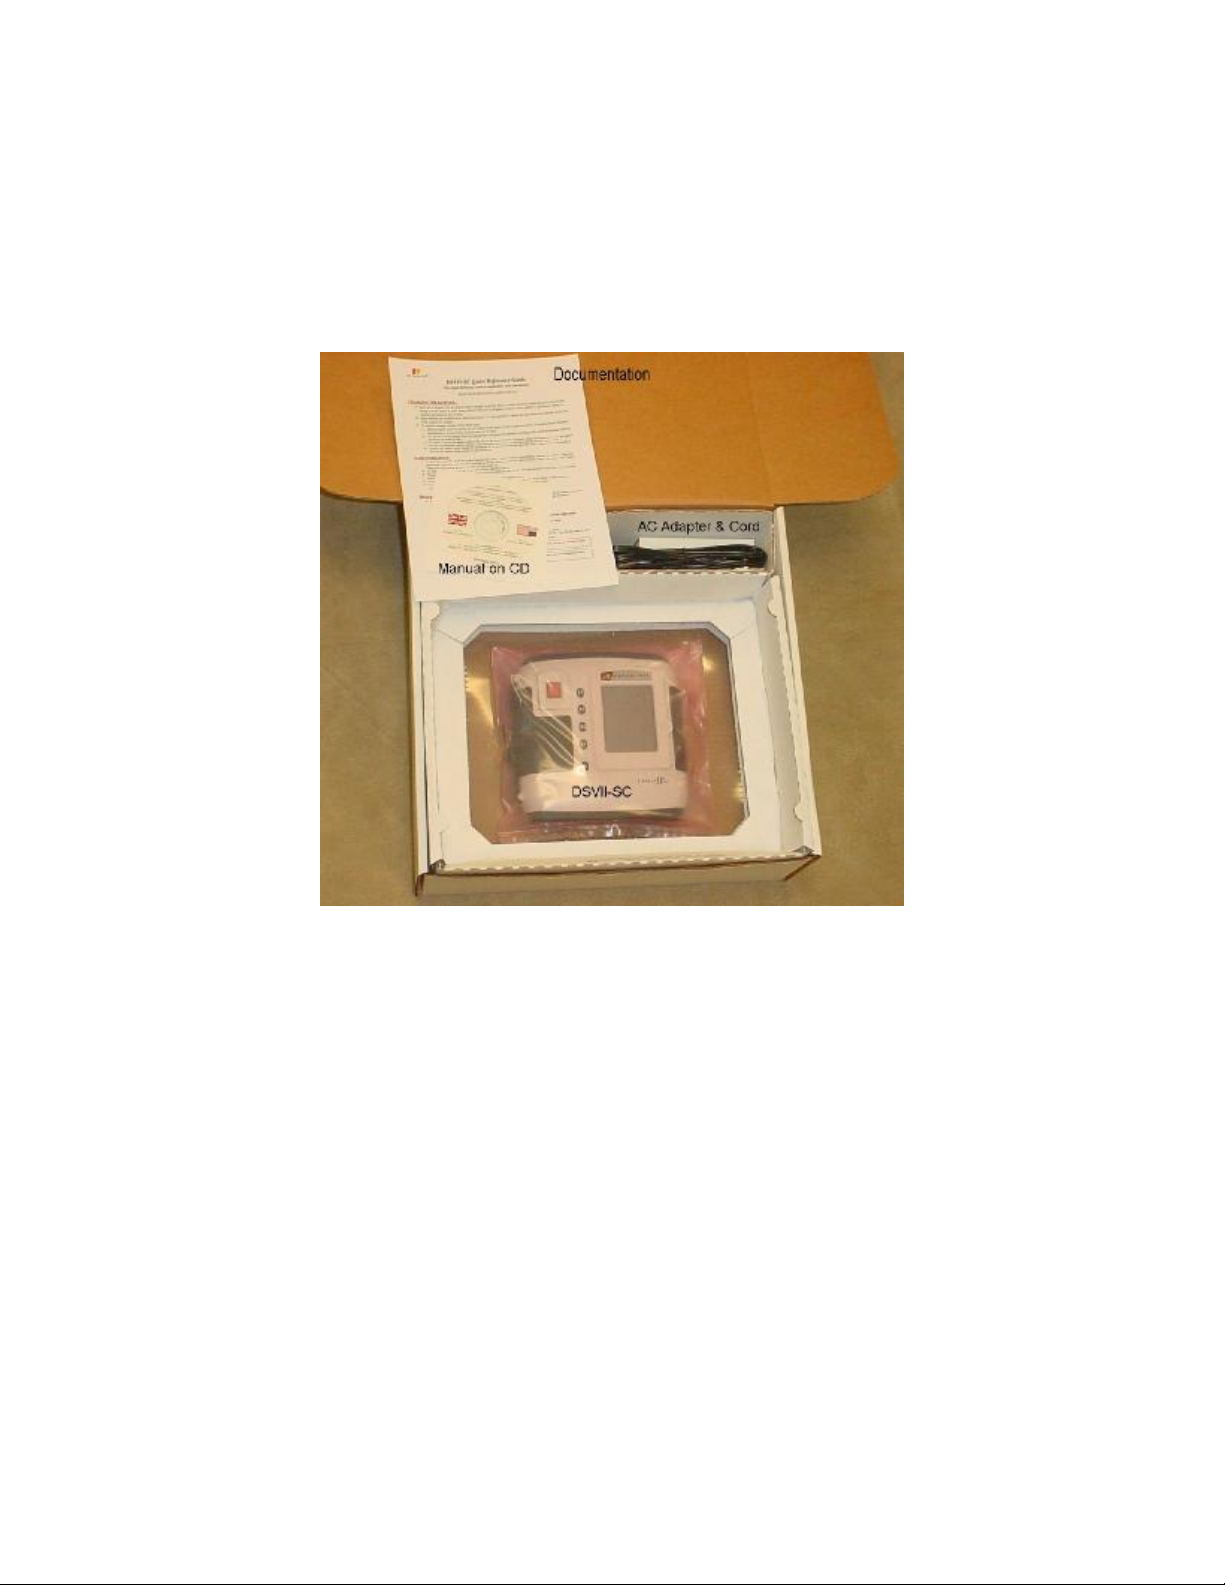
2 Unpacking & Inventory
Referring to Figure 2, carefully open the shipping box and use the following checklist to verify the contents. Please
note that there is a variation in the models of some of the items depending on the battery supplied and the country of
destination. Therefore, Figure-2 may not correspond exactly to the shipping box contents.
Copyright © 2006 by Datastrip, Inc. All rights reserved.
Reproduction in whole or in part is prohibited.
4
Page 5
DSVII-SC® User Manual, Version 1.11
Inventory:
• DSVII-SC® (one Li-Ion battery already installed).
• External 110/220VAC power adapter.
• AC-mains power cord for external power adapter. (Plug depends on country of destination)
• Documentation, including: User Manual (on CD), Release Notes, End User License Agreement, and Quick-Reference Guide.
Figure 2: Shipping Box Contents
+ Please retain the shipping box in the event you need to return your product for service.
Copyright © 2006 by Datastrip, Inc. All rights reserved.
Reproduction in whole or in part is prohibited.
5
Page 6

DSVII-SC® User Manual, Version 1.11
3 Initial Setup
• Each unit is shipped with one Li-Ion battery installed, though disconnected. To enable the battery, you will need
to remove the rear cover and plug the battery connector into the mating connector on the DSVII-SC®.
• The battery is shipped fully charged, however, there is a small amount of self-discharge even when the battery
is disconnected. It is highly recommended that you fully charge the internal battery before use to maximize
operating time before recharging is required. The unit will operate when connected via an external power
supply regardless of the state of the internal battery.
• The DSVII-SC® contains an integrated charging circuit. No external charger for batteries is provided nor
required.
+ Please refer to Section 7, “Battery Charging and Replacement”, for additional instructions and safety
information.
4 Approved Uses
x The DSVII-SC
be put at risk.
®
is NOT APPROVED for use in any life-support capacity, or applications where lives may
5 Third Party Software
The software packaged loaded into each DSVII-SC® may contain software modules (for example: WindowsCE.net-
4.2, fingerprint-matching algorithms, image-compression algorithms, etc.) which are licensed from 3rd-party
developers. These modules are licensed as-is. As such, Datastrip makes no representation, neither expressed nor
implied, about the reliability, performance or suitability of these licensed software components.
Copyright © 2006 by Datastrip, Inc. All rights reserved.
Reproduction in whole or in part is prohibited.
6
Page 7

DSVII-SC® User Manual, Version 1.11
DSVII
-
SC® Battery
6 Operation
Startup Sequence:
• To begin operation, depress and hold the power button on the front of the DSVII-SC® unit.
• Release the button when a single beep is heard.
• Two additional beeps acknowledge that power has been activated. The keypad and LCD backlights will turn on.
• The on-board firmware performs self-tests prior to loading WinCE and the application software.
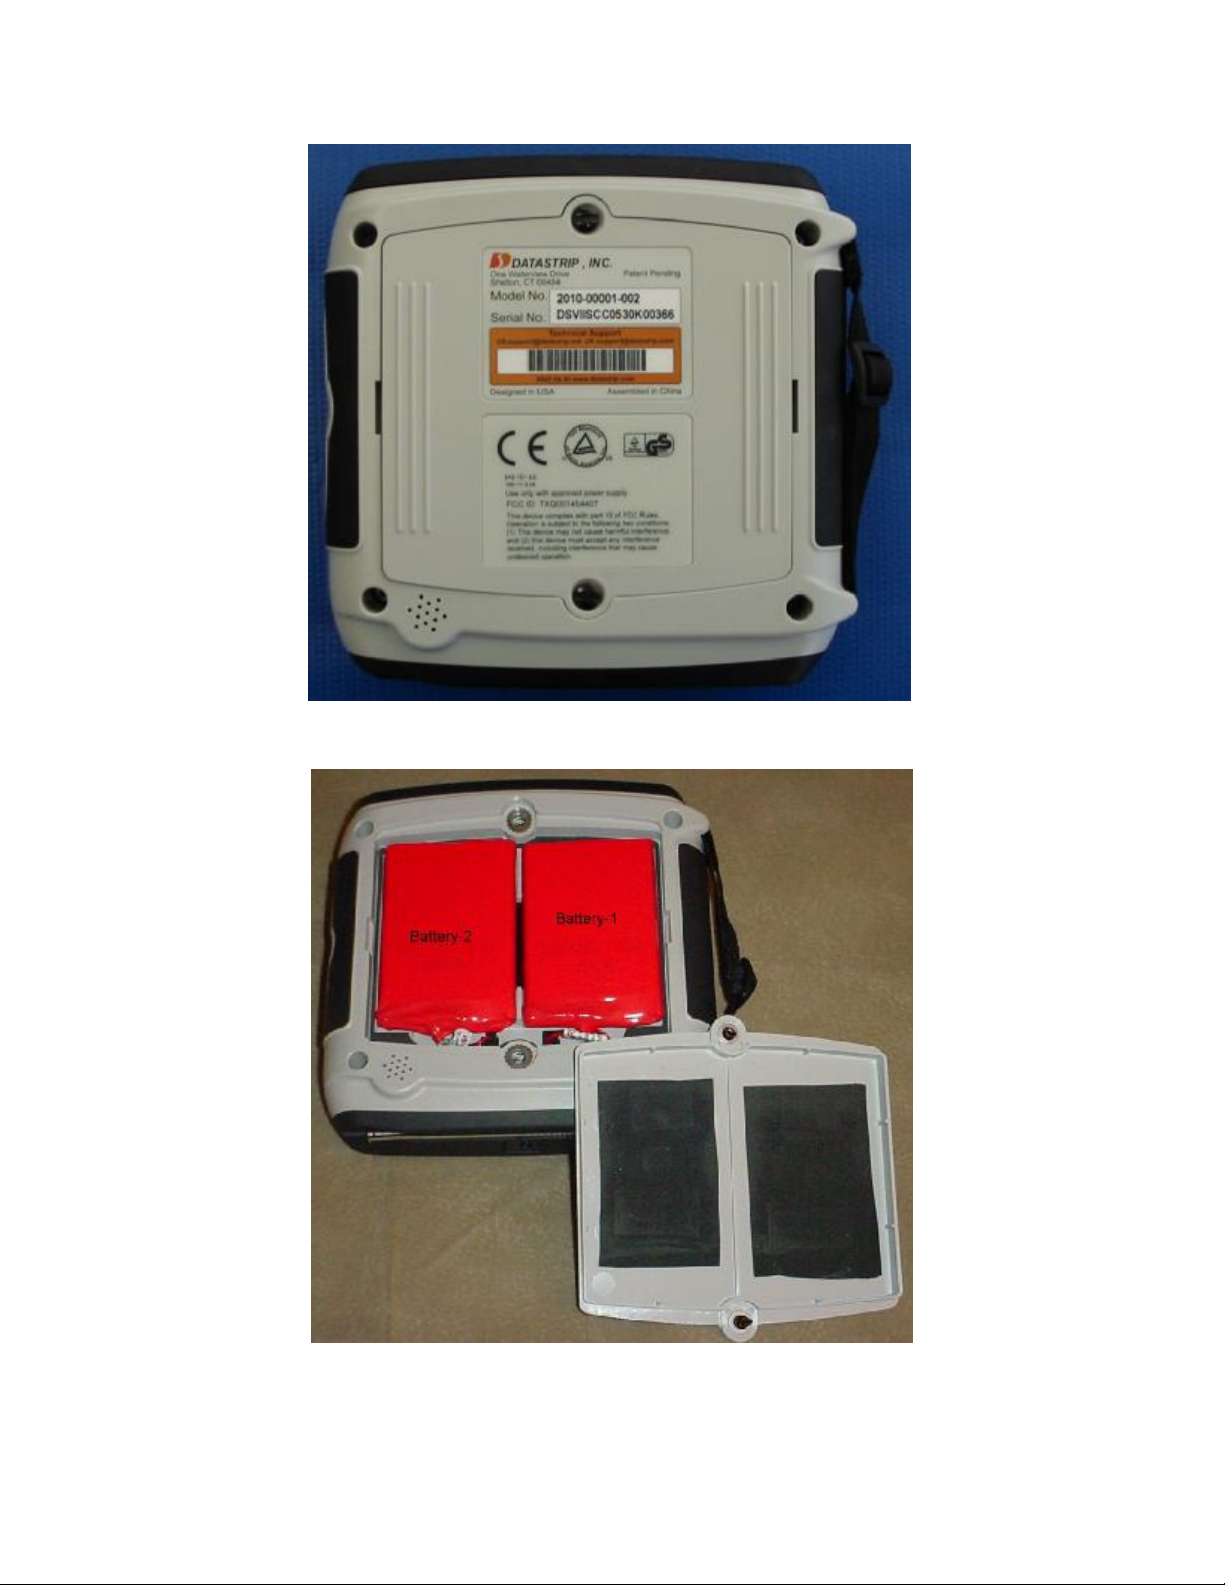
7 Battery Charging and Replacement
The DSVII-SC® has internal space for up to two Li-Ion battery packs. Each pack provides
3000mAh of capacity. The unit can be operated with none, one, or two batteries installed.
One battery is standard.
Under normal operating conditions, the battery does not need to be removed. The DSVIISC® has an internal charging circuit that can maintain a proper charge on the batteries
whenever the unit is connected to the external power supply.
The batteries may be replaced by opening a battery-access cover on the rear of the DSVIISC®. A slotted screwdriver or almost any coin can be used to operate the ¼ turn fasteners
holding the battery compartment cover in place.
When replacing the battery, ensure that the battery contacts are aligned with the battery
terminals inside the unit. Replace the battery cover and tighten the screw (do not over-
tighten). Incorrect battery installation will render the unit inoperable until the battery is
properly re-installed.
+ Note: The charging time for a fully discharged battery will be approximately
2 hours (or 4 hours for two batteries).
Copyright © 2006 by Datastrip, Inc. All rights reserved.
Reproduction in whole or in part is prohibited.
7
Page 8
DSVII-SC® User Manual, Version 1.11
Copyright © 2006 by Datastrip, Inc. All rights reserved.
Reproduction in whole or in part is prohibited.
8
Page 9

DSVII-SC® User Manual, Version 1.11
Once the cover is removed, unplug either battery by squeezing the connector at the end of the battery cable. This
will unlock the connector allowing it to be withdrawn.
Note the battery contacts within the battery compartment. Ensure that these contacts are aligned with the battery’s
contacts when replacing the battery:
N CAUTION! Use ONLY approved replacement batteries and power adapters as provided by
Datastrip.
N CAUTION! Battery has a risk of FIRE, EXPLOSION or BURNS. DO NOT: short-circuit the battery
terminals; crush, puncture, disassemble or otherwise damage the battery’s case; operate, charge or
store the battery at temperatures above 100ºC; incinerate or immerse in water.
+ DISPOSAL: Always consult and obey all international, federal, provincial/state, and local hazardous
waste disposal laws. Certain jurisdictions require recycling of this spent product.
Copyright © 2006 by Datastrip, Inc. All rights reserved.
Reproduction in whole or in part is prohibited.
9
Page 10

DSVII-SC® User Manual, Version 1.11
8 Cleaning
The LCD screen and fingerprint sensor may need periodic cleaning to ensure continued performance. Use only the
Datastrip-approved cleaning-kit, to remove dirt, oils, grease, dust and foreign matter.
To clean the LCD display or fingerprint sensor:
Make sure the DSVII-SC
• Power is OFF.
• Unplug the unit from any external power source.
• Using the cleaning wipes from the cleaning kit, wipe the surface of the LCD screen and fingerprint sensor.
Allow the cleaning solvent to dry completely
®
Copyright © 2006 by Datastrip, Inc. All rights reserved.
Reproduction in whole or in part is prohibited.
10
Page 11

DSVII-SC® User Manual, Version 1.11
9 Troubleshooting
• UNIT DOES NOT POWER UP – The battery may be not plugged in, or is completely discharged. Open the
battery access cover and verify that at least one battery is properly installed. Additionally, use the external AC
power adapter to operate the unit and simultaneously charge the battery. Please refer to Section 7 Battery
Charging and Replacement on Page 7.
• Unit generates a single “error” beep tone, and the power LED flashes RED once. – This is an indication
that the internal battery is very low, and does not have sufficient charge to run the unit at all. Plug in the AC
power adapter to change the battery.
Copyright © 2006 by Datastrip, Inc. All rights reserved.
Reproduction in whole or in part is prohibited.
11
Page 12

DSVII-SC® User Manual, Version 1.11
10 Hardware Specifications
• Physical:
o Weight: Under 3 lbs. 5 oz. (1.375 Kg), including internal battery.
o Overall size: 11.5” x 5.5” x 2.1” (293.3mm x 139.4mm x 53.3mm).
• Integrated Fingerprint Sensor:
o Solid-state capacitive technology sensor. Approximately 500 DPI resolution.
• Display:
o Type: High-brightness color LCD display panel, 240H x 320V (pixels) resolution.
o Size: 3.5” (88.9 mm) diagonal measure.
o Backlight: White LED backlight. Adjustable.
• Built-in Software:
o Operating System: Windows-CE.net-4.2, stored on an internal FLASH memory CF card.
o File Storage: Internal FLASH memory CF card.
• Processor: Hitachi SH4 processor, 66 MHz bus, 198 MHz core speed.
• Memory:
o 64Mbytes SDRAM.
o 32Mbytes boot-FLASH.
o 128Mbytes internal FLASH memory CF card (standard).
• Expansion Slots:
o One external Type-I/II Compact Flash slot.
o Compatible with networking, ATA-Flash storage cards, and other peripherals.
• Serial Interfaces:
o One RS-232 serial port (full handshaking control signals).
• USB: Two USB-1.1 “host” ports, for an external keyboard, mouse or other peripherals.
• Smart Card:
o Integrated Smart Card slot, compatible with ISO-7816 (6-contact) type cards.
o Integrated Contactless (ISO-14443-A/B) transceiver.
• Keypad:
o F1 through F4, Power.
o Rubber-membrane, green LED backlight (adjustable).
• Speaker: Integrated 23mm diameter speaker.
• Power Source:
o Internal, user-replaceable dual Lithium-Ion battery packs, rated at 7.4 VDC @ 3000 mAH each.
o External DC-power & charging jack. Input = 12-24VDC range, 2 Amps max.
• AC Power adapter:
o 100-240 VAC, 50/60 Hz universal input.
o 12 VDC @ 2.5 Amps maximum output.
• Environmental:
o Temperature: +5ºC to +40ºC (operating), -25ºC to +75ºC (storage).
o Humidity: 95% RH, non-condensing at +40ºC.
Copyright © 2006 by Datastrip, Inc. All rights reserved.
Reproduction in whole or in part is prohibited.
12
Page 13
DSVII-SC® User Manual, Version 1.11
11 Hardware Features
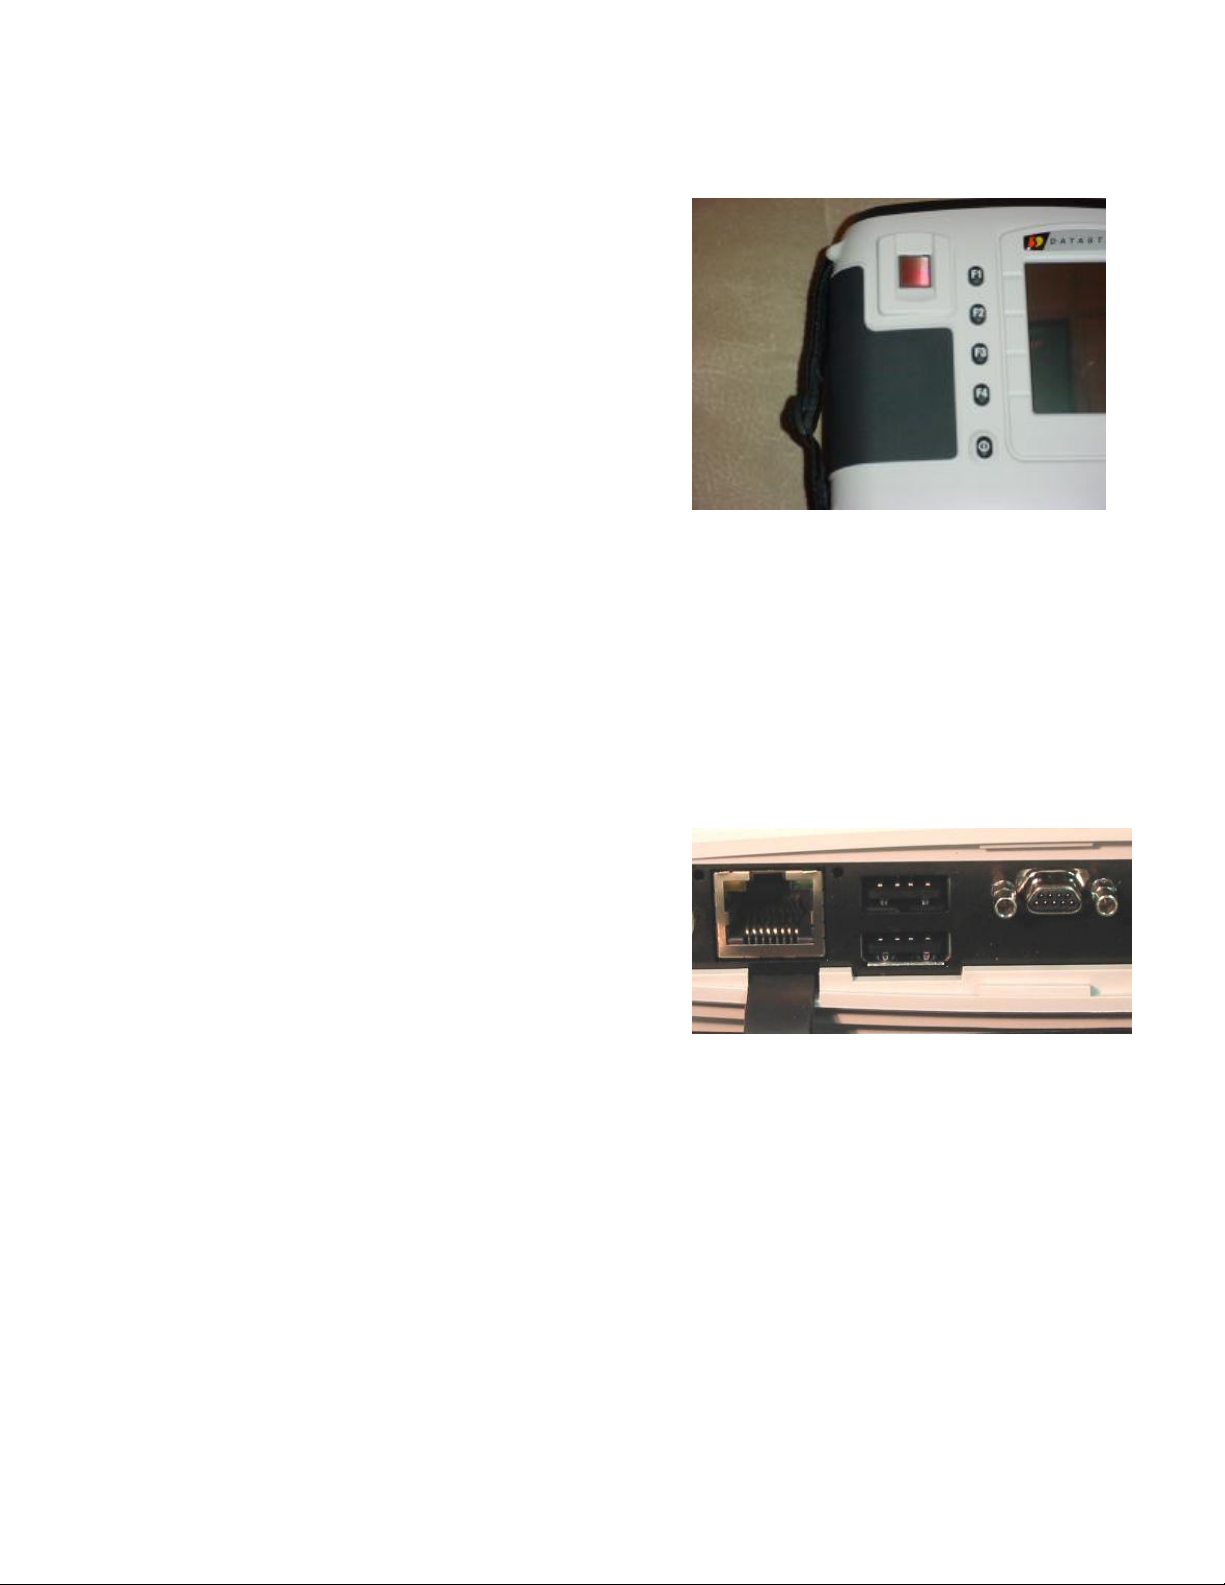
11.1 Keypad
The DSVII-SC® comes equipped with an intuitive 4-function
keypad, shown at right. The keys are vertically aligned along the
left side of the LCD display, enabling application software to
position virtual “buttons” appropriately. These keys are
programmed as WinCE standard “F1” through “F4” keys, though
this can be changed by a registry setting.
Below the function keys is the power switch. You must depress
and hold it until a single beep is heard, then immediately release
it for an additional two beeps. Holding the button too long will
cause an “error” type beep sound and the system will not be
powered up or down, as the case may be. This procedure helps to
guard against accidental activation or shutdown of the system.
11.2 Fingerprint Sensor, LCD & Indicators
The top of the front case features the fingerprint sensor (upper left) and LCD display. The LCD is color, and comes
with white-LED backlighting that can be adjusted through a control-panel setting.
The power switch has a bi-color (red/green) backlight indicator, which identifies whether the system is on, charging,
or running low on battery power.
11.3 Serial Ports
The DSVII-SC® has one external serial port available for
interfacing to a host computer or other external equipment. Shown
here is the I/O connector panel, which includes the serial port,
USB ports, CF-slot (not visible) and 10/100 LAN port.
+ NOTE: For developers, establishing an “ActiveSync”
serial connection with a host-PC will require a Datastrip serial-port cable plus a null-modem cable. These are
available through Datastrip Inc., Datastrip Ltd, or your authorized Datastrip reseller. The serial cable and
null-modem cable is supplied free with Datastrip2D SDK.
Serial port electrical specifications
• Signaling type: RS-232 compatible.
• Output signals: TXD, RTS, DTR.
• Input signals: RXD, CTS, DSR, DCD, RI.
• Interface chip: Maxim MAX3243 or equivalent.
If a specific application requires detailed knowledge of the interface drive capability, latch-up immunity, safety, or
other signaling level information, please refer to manufacturer datasheets for the interface chips listed above.
Copyright © 2006 by Datastrip, Inc. All rights reserved.
Reproduction in whole or in part is prohibited.
13
Page 14

DSVII-SC® User Manual, Version 1.11
(This view is looking into the connector
To connect the DSVII-SC® to an external device, use the DSVII-SC® Serial Interface Cable (optional). It is
configured to look like a typical “COM:” port on a desktop-PC. The cable is pictured below:
5
9
4
8
3
7
2
6
1
5
9
4
8
3
7
2
6
1
Datastrip P/N 3008-xxxxx-xx
on the cable)
x WARNING: External equipment should connect only to the 9D-Subminiature male connector –
NEVER directly to the 9-pin connector on the DSVII-SC® unit.
The following table details the signal configuration that exists when this cable is used on the COM1: port of the
DSVII-SC®:
COM1: Signal Connections
DSVII-SC®
9-Pin
Connector
1 çè 1
2 ç 2 RXD
3 è 3 TXD
4 4
5 çè 5 Sig. Gnd
6 6
7 7
8 8
9 ç 9 RI
Shell çè Shell Shield
Signal
Direction
9D-Sub
Male
Connector
RS-232 Signal
Name
14
Copyright © 2006 by Datastrip, Inc. All rights reserved.
Reproduction in whole or in part is prohibited.
Page 15

DSVII-SC® User Manual, Version 1.11
11.4 External Compact Flash Slot
The DSVII-SC® has one Type-I/II Compact Flash slot. It is compatible with “ATA-Flash” storage cards, NE-2000compatible network adapters, and various modem and serial interface devices.
11.5 USB Ports
The DSVII-SC® supports two standard USB ports (Ver-1.1), compatible with either low (1.5Mbps) or high (12Mbps)
speed devices. These are “host” type ports, compatible with peripheral devices only (keyboard, mouse, etc.). DO
NOT connect this directly to a USB port on a host-PC.
11.6 Smart Card Slot
The DSVII-SC® has an integrated Smart Card reader. It is compatible with contact-type SmartCard (ISO-7816, 6contact style). Cards need to be inserted with the contacts facing UP.
In addition, there is an integrated Contactless SmartCard transceiver and antenna. The antenna is positioned in a
place perpendicular to the LCD screen, on the same side of the unit as the SmartCard slot. The typical operating
range is 0 to 3 cm.
Copyright © 2006 by Datastrip, Inc. All rights reserved.
Reproduction in whole or in part is prohibited.
15
Page 16

DSVII-SC® User Manual, Version 1.11
12 Regulatory Compliance Statement
The DSVII-SC is in conformity with the requirements of the Low Voltage Directive (72/73/EEC), EMC directive
(89/336/EEC) as amended by (93/68/EEC) and R&TTE Directive (1995/5/EC).
FCC Declaration:
This equipment has been tested and found to comply with the limits for a Class B digital device, pursuant to
part 15 of the FCC Rules. These limits are designed to provide reasonable protection against harmful interference in
a residential installation. This equipment generates, uses, and can radiate radio frequency energy and, if not installed
and used in accordance with the instructions, may cause harmful interference to radio communications. However,
there is no guarantee that interference will not occur in a particular installation. If this equipment does cause harmful
interference to radio or television reception, which can be determined by turning the equipment off and on, the user
is encouraged to try to correct the interference by one or more of the following measures:
• Reorient or relocate the receiving antenna
• Increase the separation between the equipment and the receiver
• Connect the equipment into an outlet on a circuit different from that to which the receiver is connected.
• Consult the dealer or an experienced radio/TV technician for help
Note: The DSVII-SC is fully compliant with the requirements of FCC Part 15 and the EU Low Voltage Directive
(72/73/EEC) for Conducted Emissions only when used with the Datastrip-supplied External Power Supply (DS P/N
3090-01225-02) and External Power Supply AC Linecord (DS P/N 3008-60163-01).
Copyright © 2006 by Datastrip, Inc. All rights reserved.
Reproduction in whole or in part is prohibited.
16
Page 17

DSVII-SC® User Manual, Version 1.11
13 Service & Support
Technical support is available through the following contacts:
Home page: www.datastrip.com for Datastrip corporate information
Tech Support: www.datastrip.com Extranet for tips, news, documentation and software downloads.
For customers inside North and South America:
Address: Datastrip, Inc.
211 Welsh Pool Road, Suite 100
Exton, PA 19341
E-mail: support@datastrip.net
Phone: (610) 594-6130
Fax: (610) 594-6065
Office Hours: 8:30 a.m. to 5:30 p.m. EST/EDT
For Customers outside North and South America:
Address: Datastrip Ltd.
Unit 7, Thame Park Business Centre
Wenman Road
Thame
Oxon
OX9 3XA
E-mail: support@datastrip.com
Phone: +44 (0) 1844 215668
Fax: +44 (0) 1844 215669
Licensing: +44 (0) 1844 215668
Office Hours: 0900 to 1730 GMT/BST.
+ To return your DSVII-SC
department by email or telephone. An RMA will be issued, and should be clearly marked on the
outside of your shipping carton. Please be certain to provide adequate shipping insurance to
safeguard the contents. For international shipments, please include a declaration of value, or other
relevant legal documents that are required for shipment of this type of equipment.
®
for service, upgrade or repairs, please contact the tech-support
+ Please use the original shipping carton and packing materials whenever possible.
+ Please ensure you send your package PREPAID or it will not be accepted. Do not ship collect.
Datastrip will return all RMA equipment shipping-prepaid as well. Failure to follow this
requirement will result in LENGTHY delays while your package is held by Customs.
+ For parts, supplies and accessories, place your order through your authorized Datastrip reseller, or
by contacting Datastrip Limited.
Datastrip thanks you for purchasing this DSVII-SC®. If you have any comments, suggestions, questions or problems
we would like to hear from you.
Copyright © 2006 by Datastrip, Inc. All rights reserved.
Reproduction in whole or in part is prohibited.
17
Page 18

DSVII-SC® User Manual, Version 1.11
14 Available Parts, Supplies and Accessories
The following replacement parts and supplies are available through the technical-support contacts given above, or
through your authorized Datastrip reseller:
Description Datastrip P/N
DSVII-SC® Serial Interface Cable:
Battery Pack, Lithium-Ion, Polymer Gel, 7.4V, 3000
mAH
DSVII-SC ®External Power Supply:
(Universal 90-240VAC 50/60Hz input)
3008-00005-01
3091-03000-01
3090-01225-02
External power supply AC line-cord:
(USA):
Copyright © 2006 by Datastrip, Inc. All rights reserved.
Reproduction in whole or in part is prohibited.
18
3008-60162-02
Page 19

DSVII-SC® User Manual, Version 1.11
Description Datastrip P/N
Battery Compartment Cover and Endcap
Screws and Retaining Clips
Cleaning Kit:
Stud 2010-55022
Wash 7246-57038-017
Wash 7200-62050-060
2000-82001
Please contact Datastrip Ltd or an authorized reseller for a complete list of options and accessories, pricing and
availability information.
DSVII-SC®
Copyright © 2006 by Datastrip, Inc. All rights reserved.
Reproduction in whole or in part is prohibited.
19
 Loading...