

Page 1
NOTE:-
- PBE = Phoenix BIOS Editor
1) Create a working directory, let say: C:\BIOS_MOD
2) Download & extract the BIOS image (.ROM or .WPH) from the compress file or EXE file (BIOS
self-update software) to working directory.
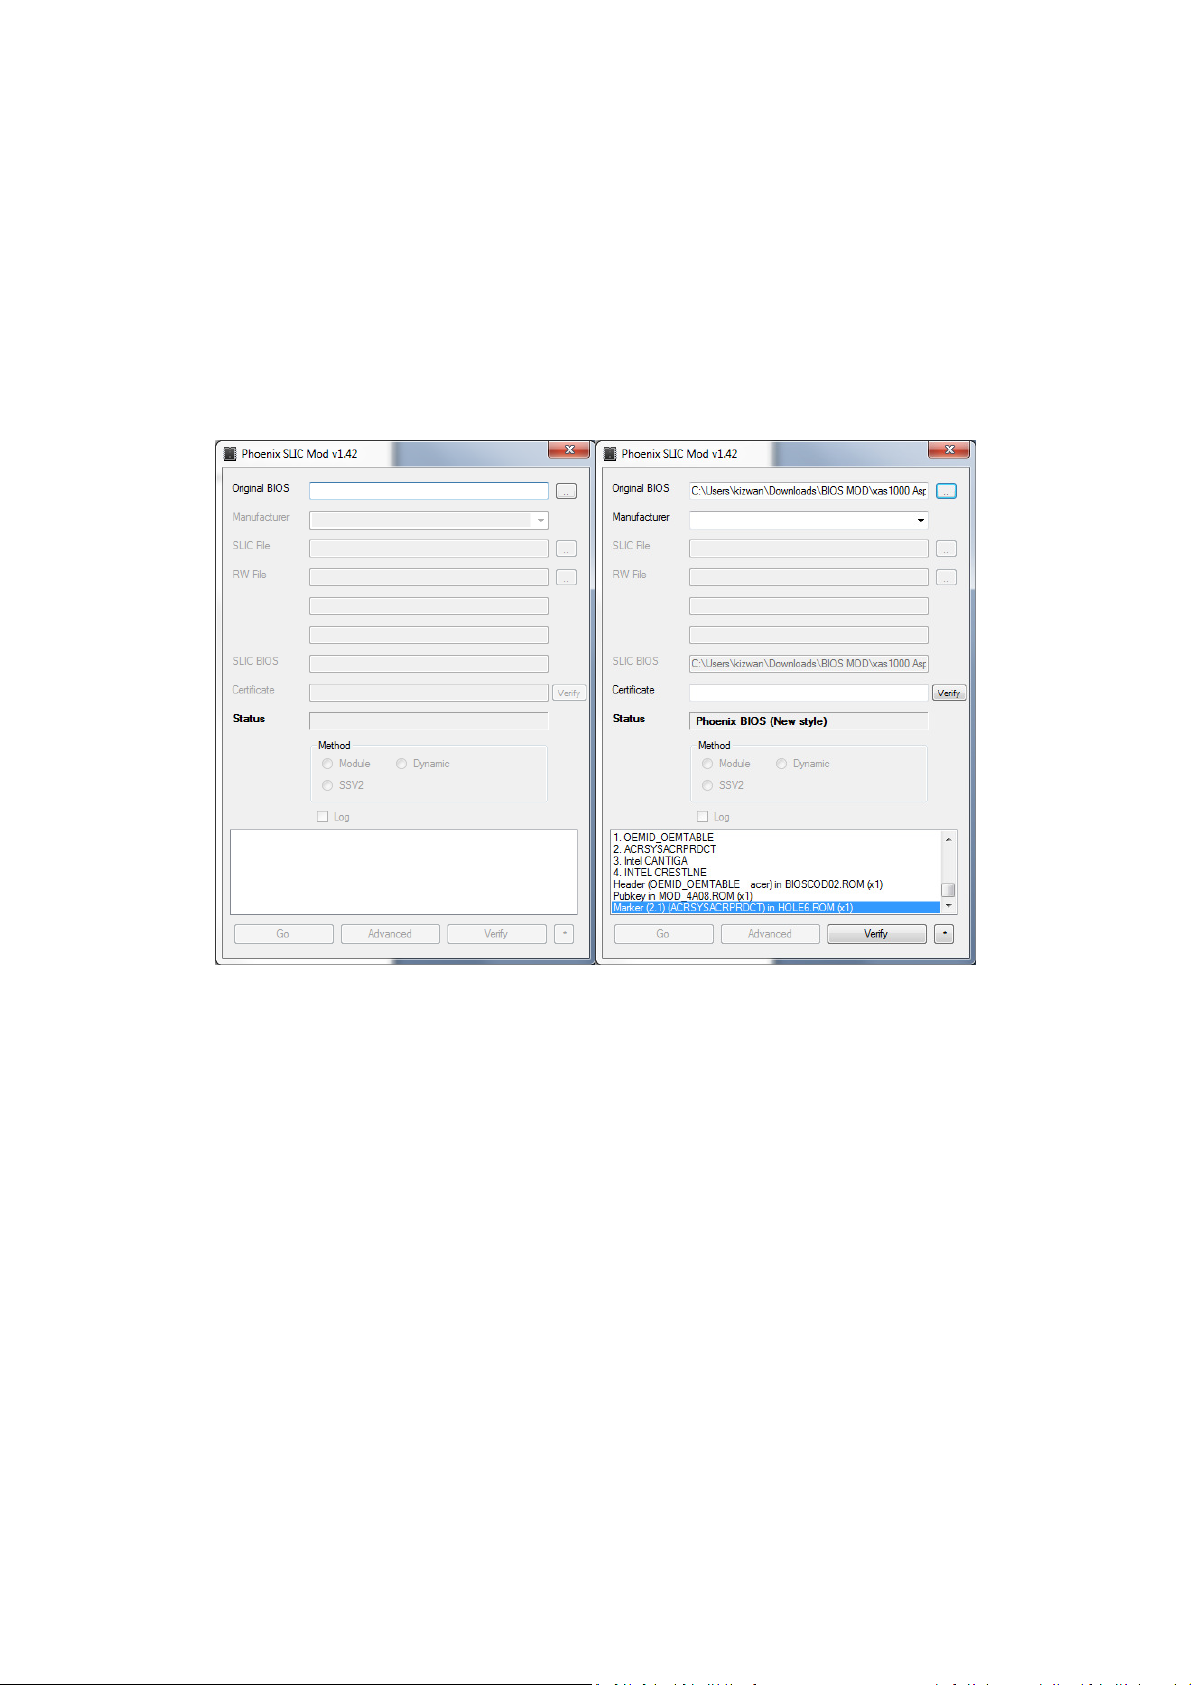
3) Decompress the BIOS image (.ROM or .WPH file) using Phoenix SLIC Tool/Mod (current
version at time of writing this tutorial is 1.42):-
- All extracted files will be located in DUMP folder.
- The extracted files are useful if PBE produced error(s) while re-building the modified
BIOS image.
- PBE have known issue where it (sometime) unable to extract the BIOS image properly &
this will lead to bad BIOS image after re-build.
4) Open the BIOS image with PBE:-
Page 2
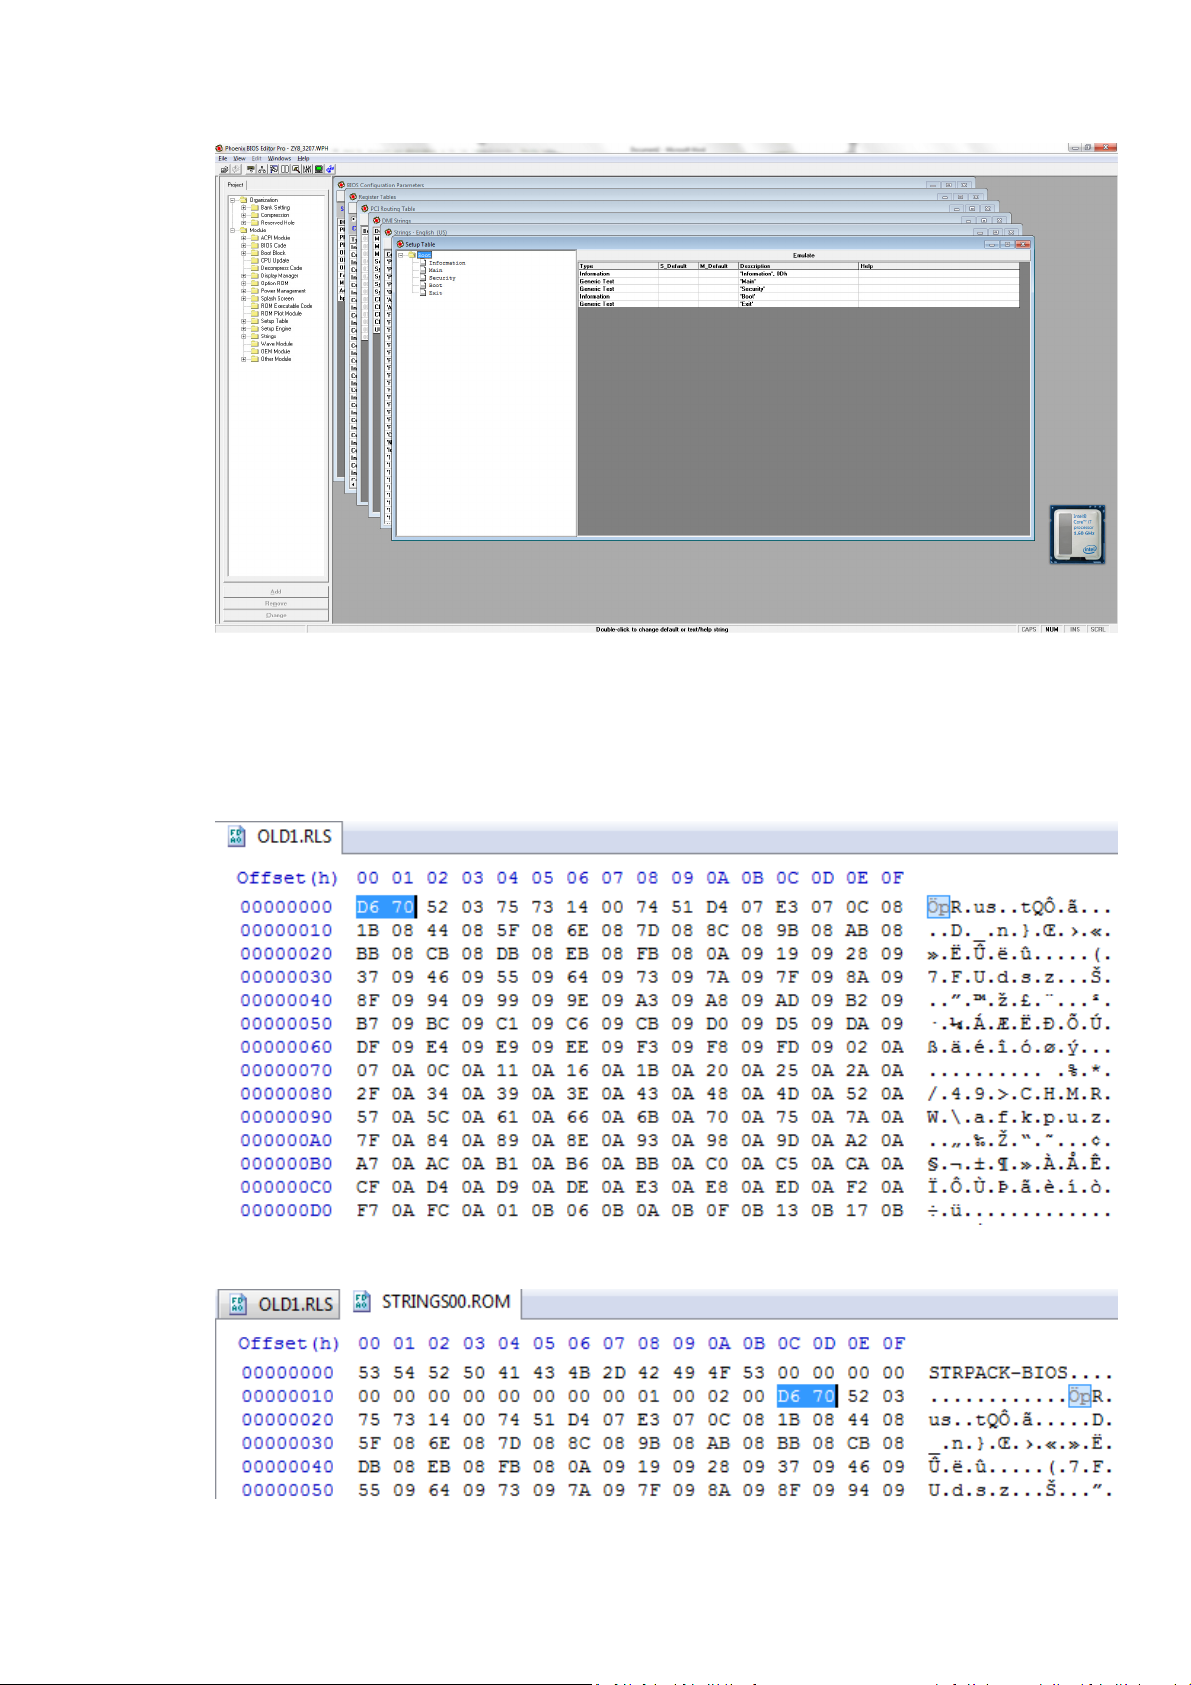
5) Go to PBE’s TEMP folder:-
- 64bit OS: C:\Program Files (x86)\Phoenix Technologies Ltd\BIOS Editor\TEMP
- 32bit OS: C:\Program Files\Phoenix Technologies Ltd\BIOS Editor\TEMP
6) Copy OLD1.RLS, STRINGS0.ROM (or STRINGS00.ROM) & TEMPLAT0.ROM (or
TEMPLAT00.ROM) files from PBE’s TEMP folder to working directory.
7) Open OLD1.RLS with HEX editor & copy the first two bytes:-
8) Open STRINGS0.ROM with HEX editor & search for the two bytes, copied from the OLD1.RLS
file above. In this example, the two bytes are D6 70:-
- The 01 00 02 00 means there is one language in this file which is EN (US).
Page 3
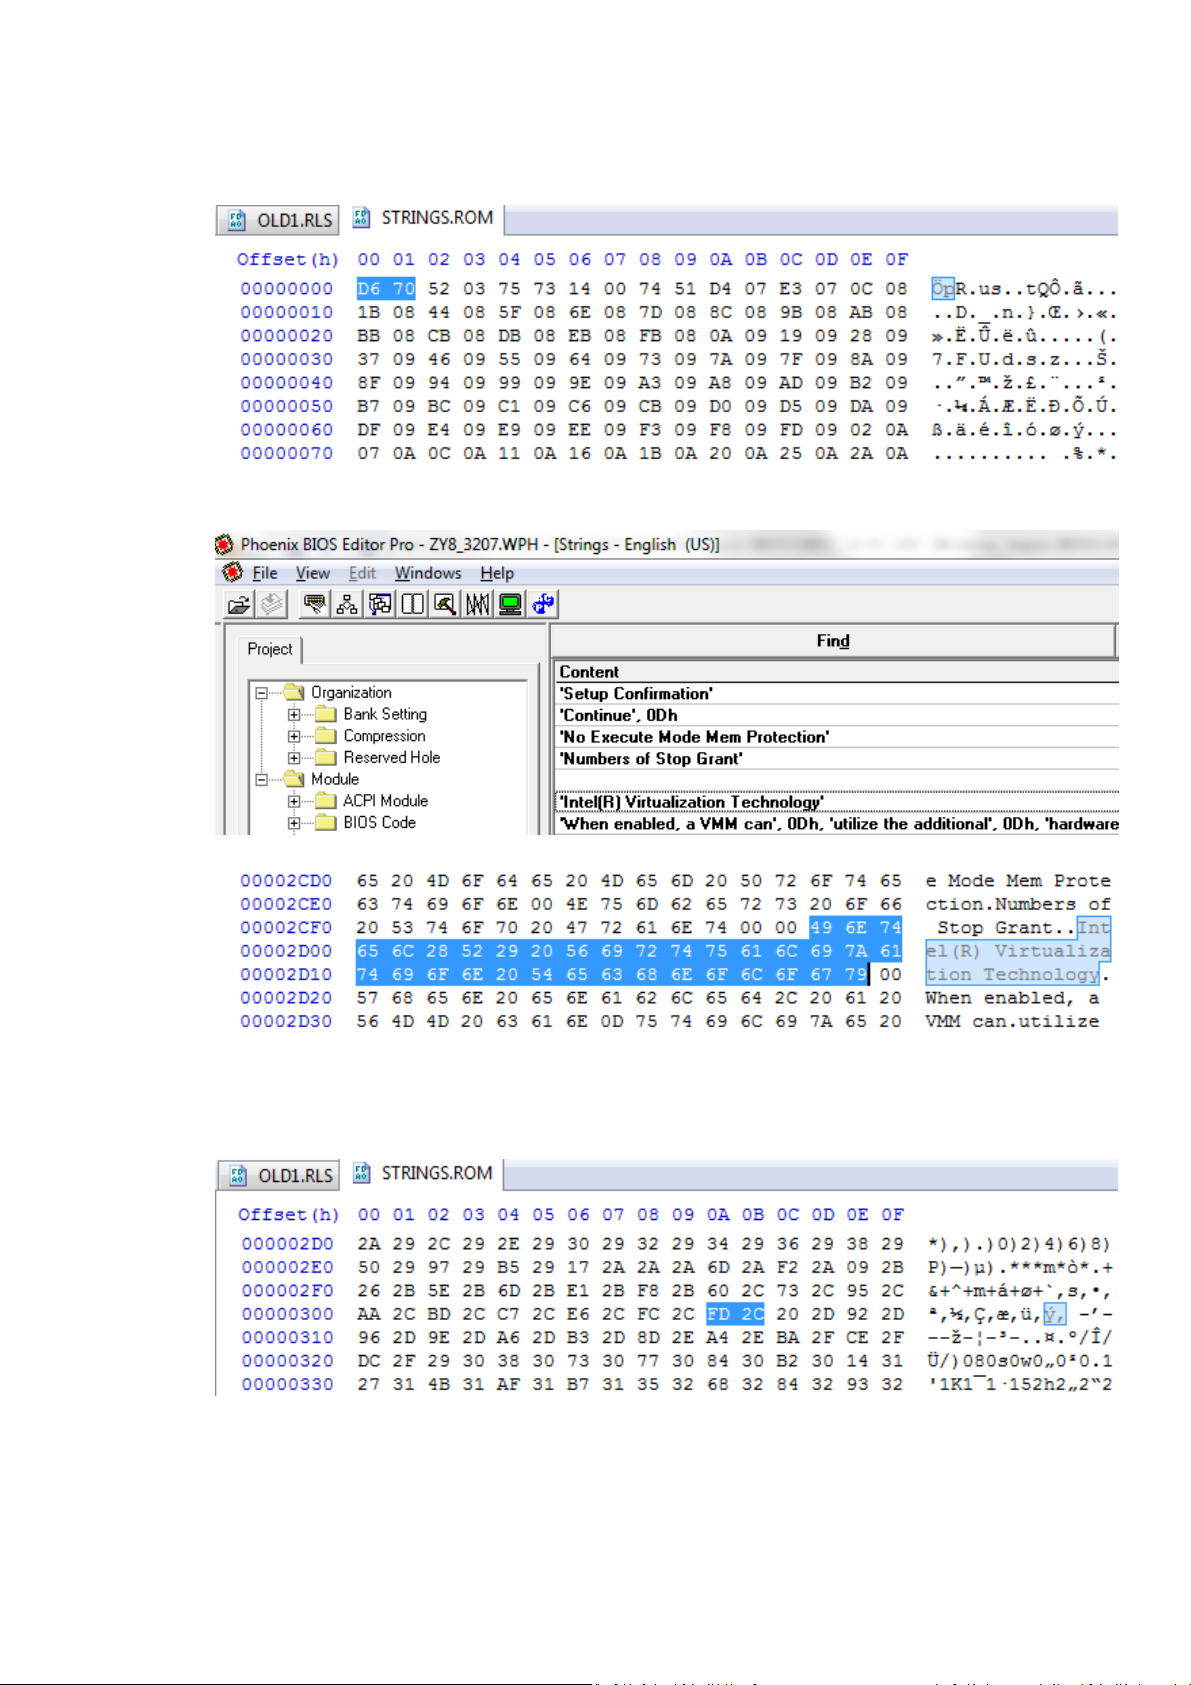
9) All of the bytes before D6 70 are called header. The length of the header should be 0x1C.
Delete the header & save it as STRINGS.ROM:-
10) Search for “Intel(R) Virtualization Technology” or “VT Feature” or just “Virtualization” in the
STRINGS window in PBE. In this example, we will found “Intel(R) Virtualization Technology”:-
11) Search for “Intel(R) Virtualization Technology” in the STRINGS.ROM file:-
- In this example, we found out that the offset or location of the “Intel(R) Virtualization
Technology” string or text is 2CFD.
12) Now search for “FD 2C” (2CFD in endian format) in the STRINGS.ROM file. Make sure search
from the beginning of the file:-
- In this example, the offset for “FD 2C” will be 030A.
- Remember, the first result is what we are looking for.
Page 4
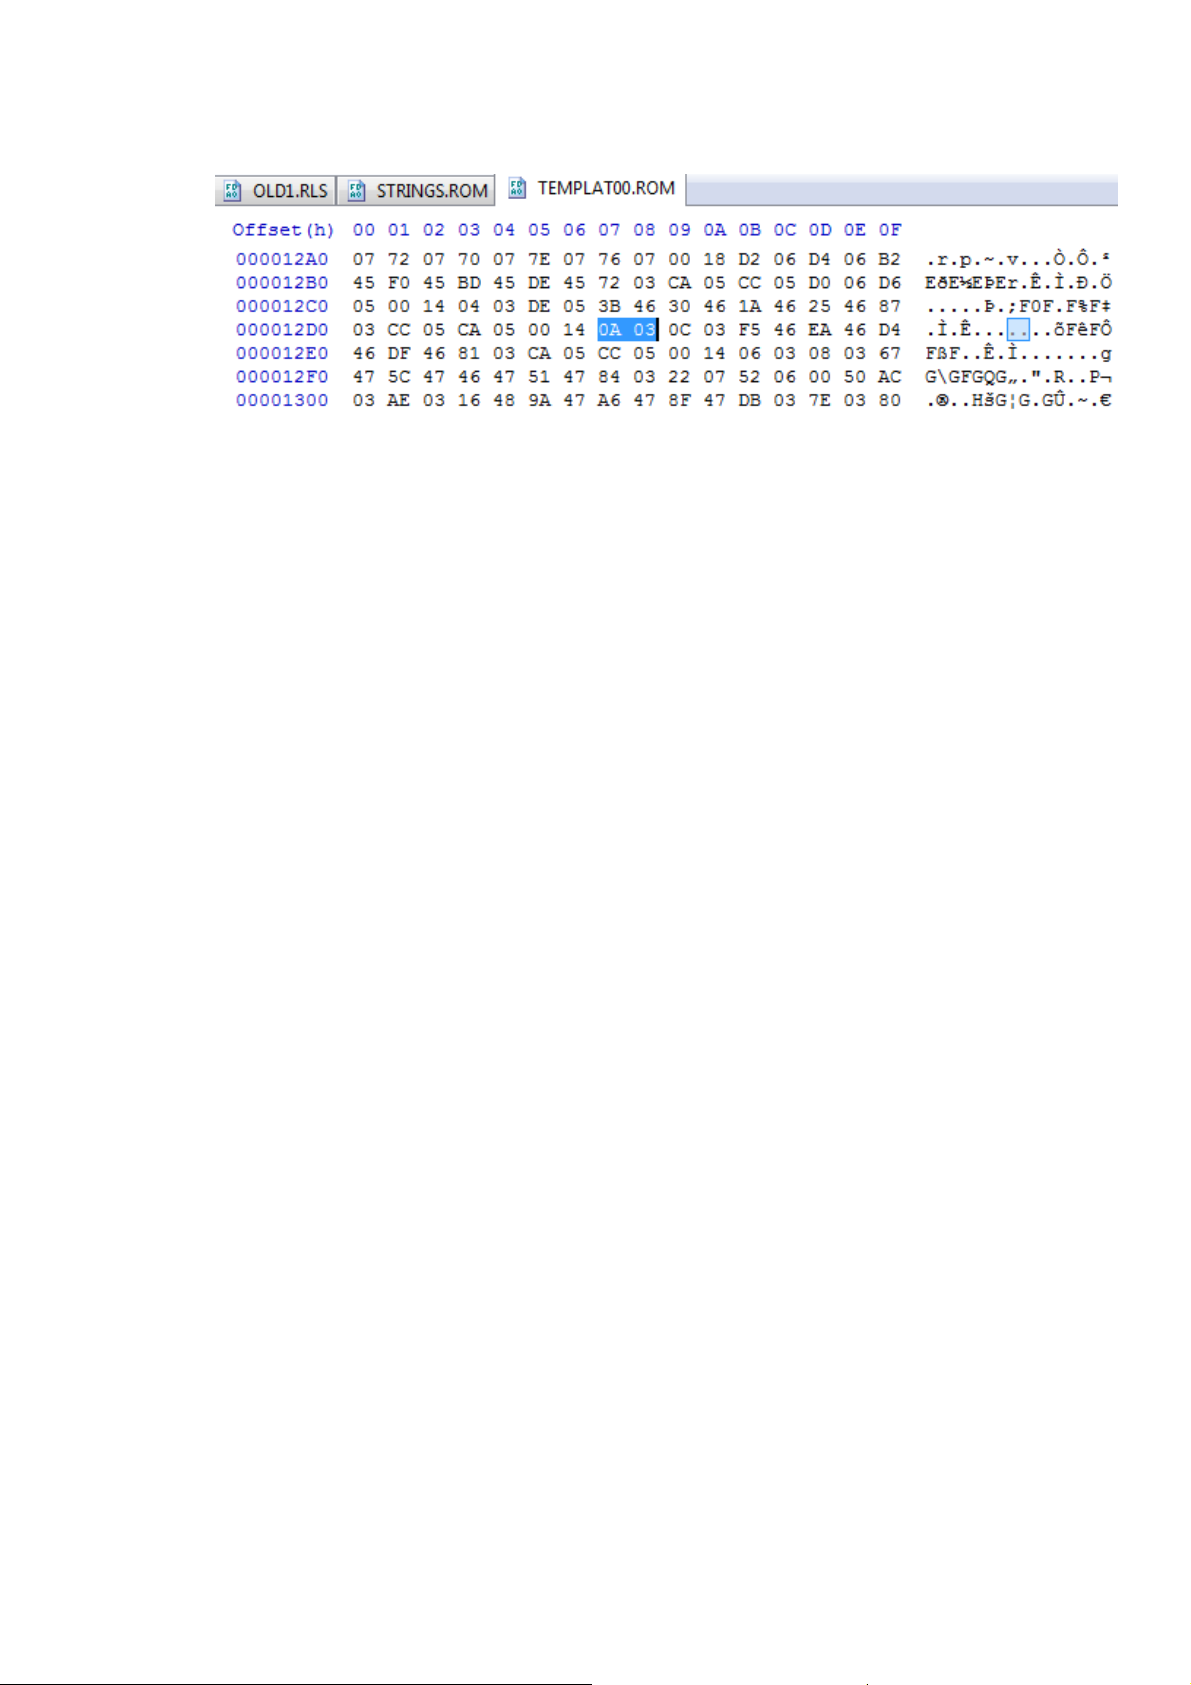
13) Open TEMPLAT0.ROM with HEX editor & search for “0A 03” (030A in endian format):-
Note:00 = Pick Field
01 = Pick Field
10 = Generic Text
11 = Information
21 = Time
22 = Date
23 = Free form Hex
- Depend on the type of the menu we’re going to unlock or unhidden but usually we’re
going to unlock or unhidden two types of menu. The two bytes before “0A 03” will
determine which type of menu it is & we will call it menu header to differentiate it from
others:a) Pick Field type of menu. This type of menu allowed us to change the value such as
enable/disable or change it to another value. In this example, it is clearly we’re going
to unlock or unhidden Pick Field type of menu. In this example, we found the menu
header is “00 14”; 00 = Pick Field & 14 = Length. The Length value can be different.
As I mention earlier, it is clearly “Intel(R) Virtualization Technology” menu is Pick
Field type of menu, so if the first result have different pattern (menu header),
continue the search until you found the right pattern.
b) Information type of menu. I usually use this type of menu if I want to unlock hidden
menu where it have sub-menus in it. It is a little bit complex to unlock this kind of
menu but if you understand the process, it will be easy. The menu header will be
look like this – “11 0C”; 11 = Information & 0C = Length. The Length value can be
different.
- Including the menu header, the offset for “Intel(R) Virtualization Technology” menu is
12D5.
- Before we proceed, let us investigate more. Let us extract the 20 bytes, starting from the
menu header:-
000012D5 00 14 0A 03 0C 03 F5 46 EA 46 D4 46 DF 46 81 03
000012E5 CA 05 CC 05
00 = Pick field & 14 = Length
0A 03 - Offset in strings
0C 03 - Offset in strings
TOKEN ID 0381 (81 03 in endian format)
CA 05 - Offset in strings
CC 05 - Offset in strings
Page 5
- Token ID = 0381 is actually the register which responsible in enabling or disabling the
Virtualization feature. This is useful if we want to enable the Virtualization feature using
SYMCMOS.EXE tool. Please visit these threads for more information:-
http://forum.notebookreview.com/sony/189228-how-enable-intel-vt-ahci-napa-santarosa-platform-phoenix-bios-vaio-laptop.html#post2678924
http://forum.notebookreview.com/acer/465936-acer-laptop-phoenix-bios-enablevirtualization-test-machine-acer-aspire-9420-a.html#post5991508
14) Now we have to decide where we want to put the “Intel(R) Virtualization Technology”
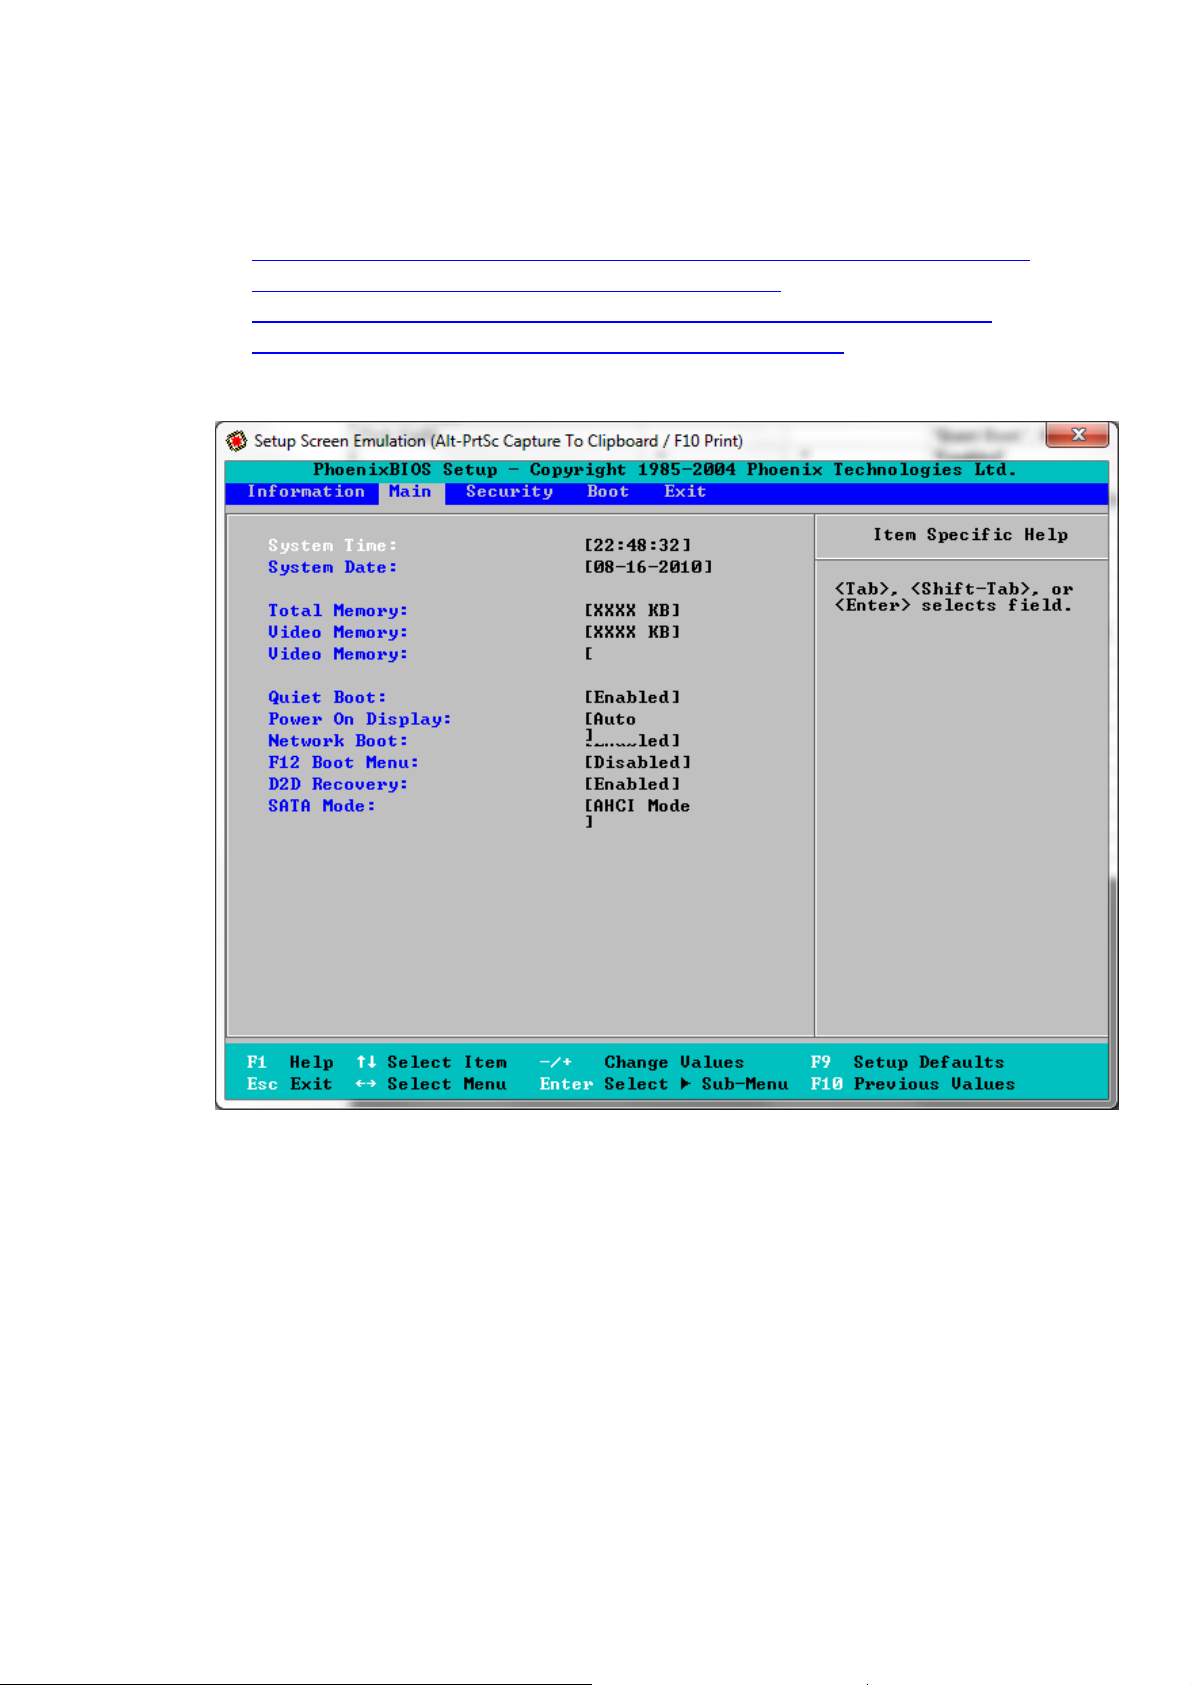
menu. We can decide this by looking at the emulated BIOS Setup Menu in PBE.
- Referring to the screenshot above, the best place is to put it in Main section.
- Sometime there is another section called Advanced or Intel but it doesn’t visible in real
BIOS Setup Menu. So far there is no way to unhidden this section. The best way is to
move the menu from the Advanced or Intel to Main section.
- Remember, the numbers of menu we can unhide are depending on the space available
in the target section. Sometime we need to sacrifice other menu for more important
menu.
- The most important rule that need to be follow & can’t be broken is the size of the
TEMPLAT0.ROM file must remain the same.
Page 6
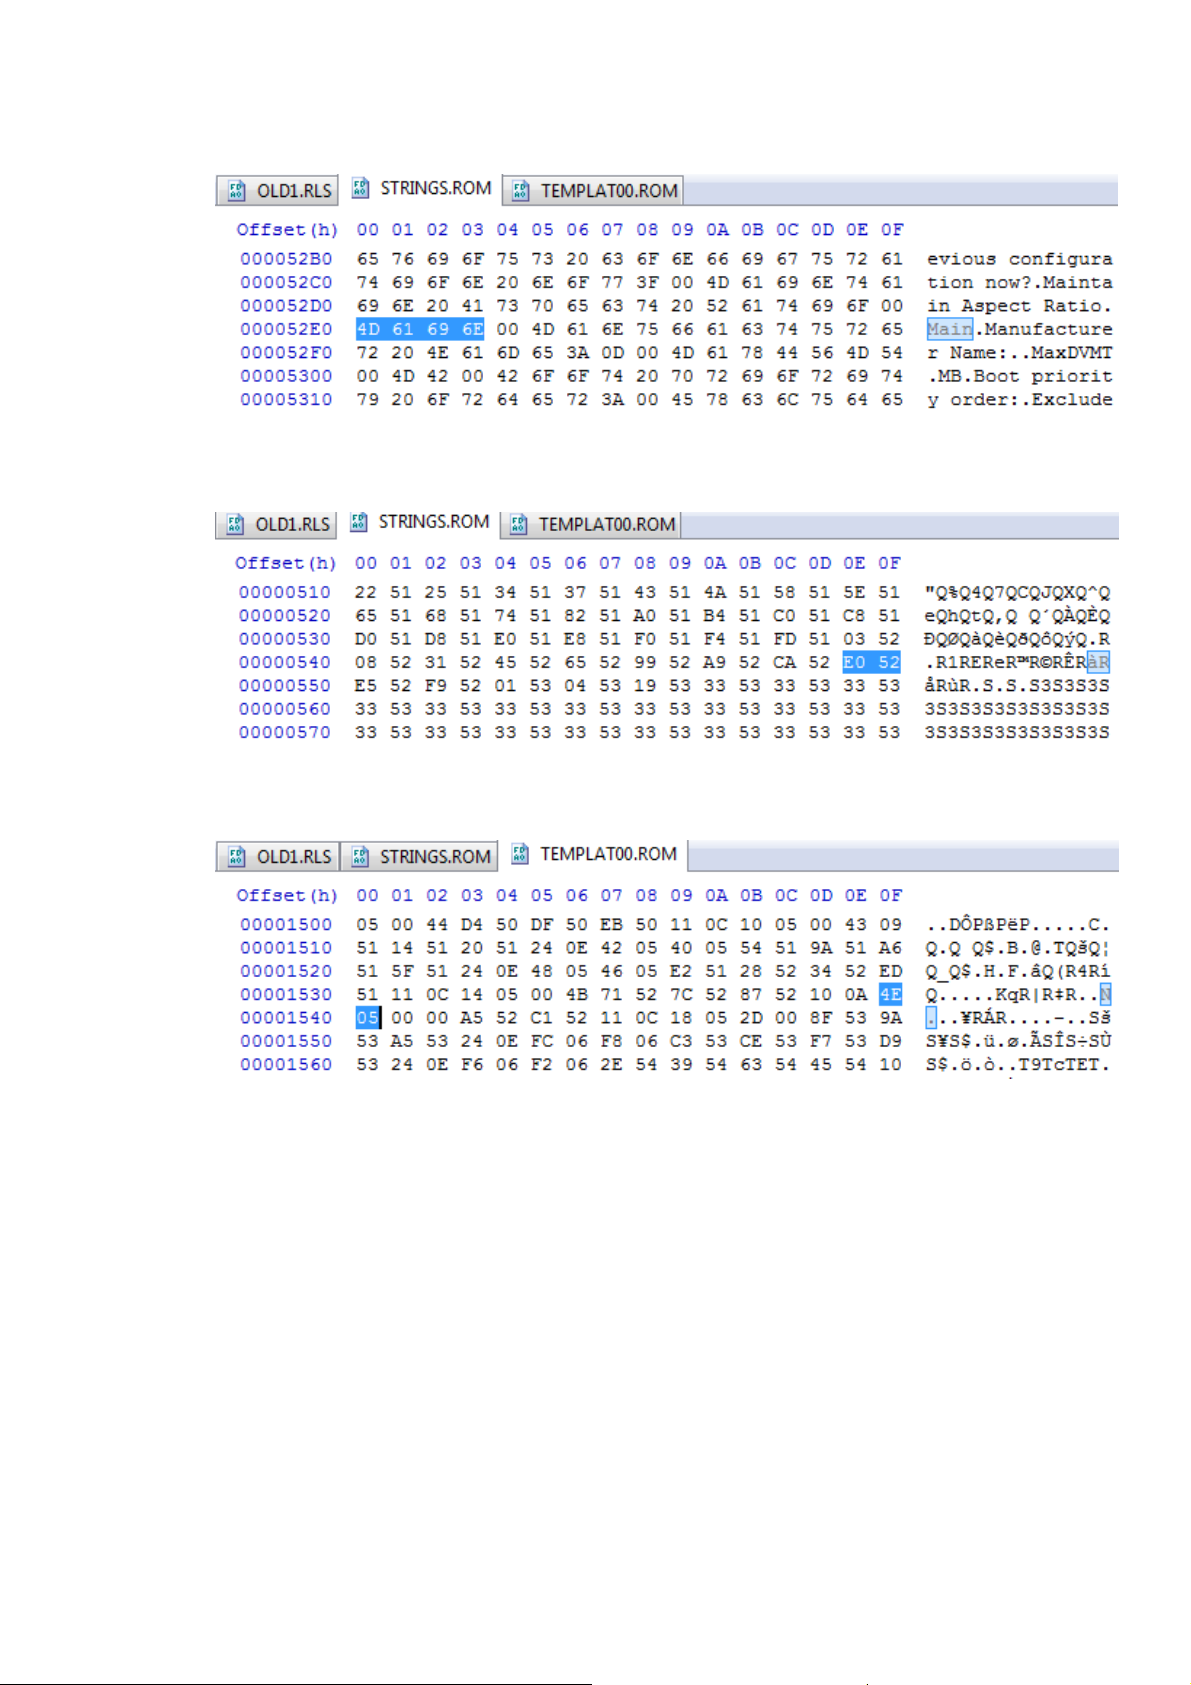
15) Search for “Main” string or text in STRINGS.ROM file:-
- The offset or location of the “Main” string or text is 52E0.
16) Now search for “E0 52” (52E0 in endian format) in the STRINGS.ROM file. Make sure search
from the beginning of the file:-
- In this example, the offset for “E0 52” is 054E.
- Remember, the first result is what we are looking for.
17) Search for “4E 05” (054E in endian format) in the TEMPLAT0.ROM file:-
Note:00 = Pick Field
01 = Pick Field
10 = Generic Text
11 = Information
21 = Time
22 = Date
23 = Free form Hex
- The menu header is “10 0A”; 10 = Generic Text & 0A = Length. The Length value can be
different.
- The offset for “Main” section is 153D.
Page 7
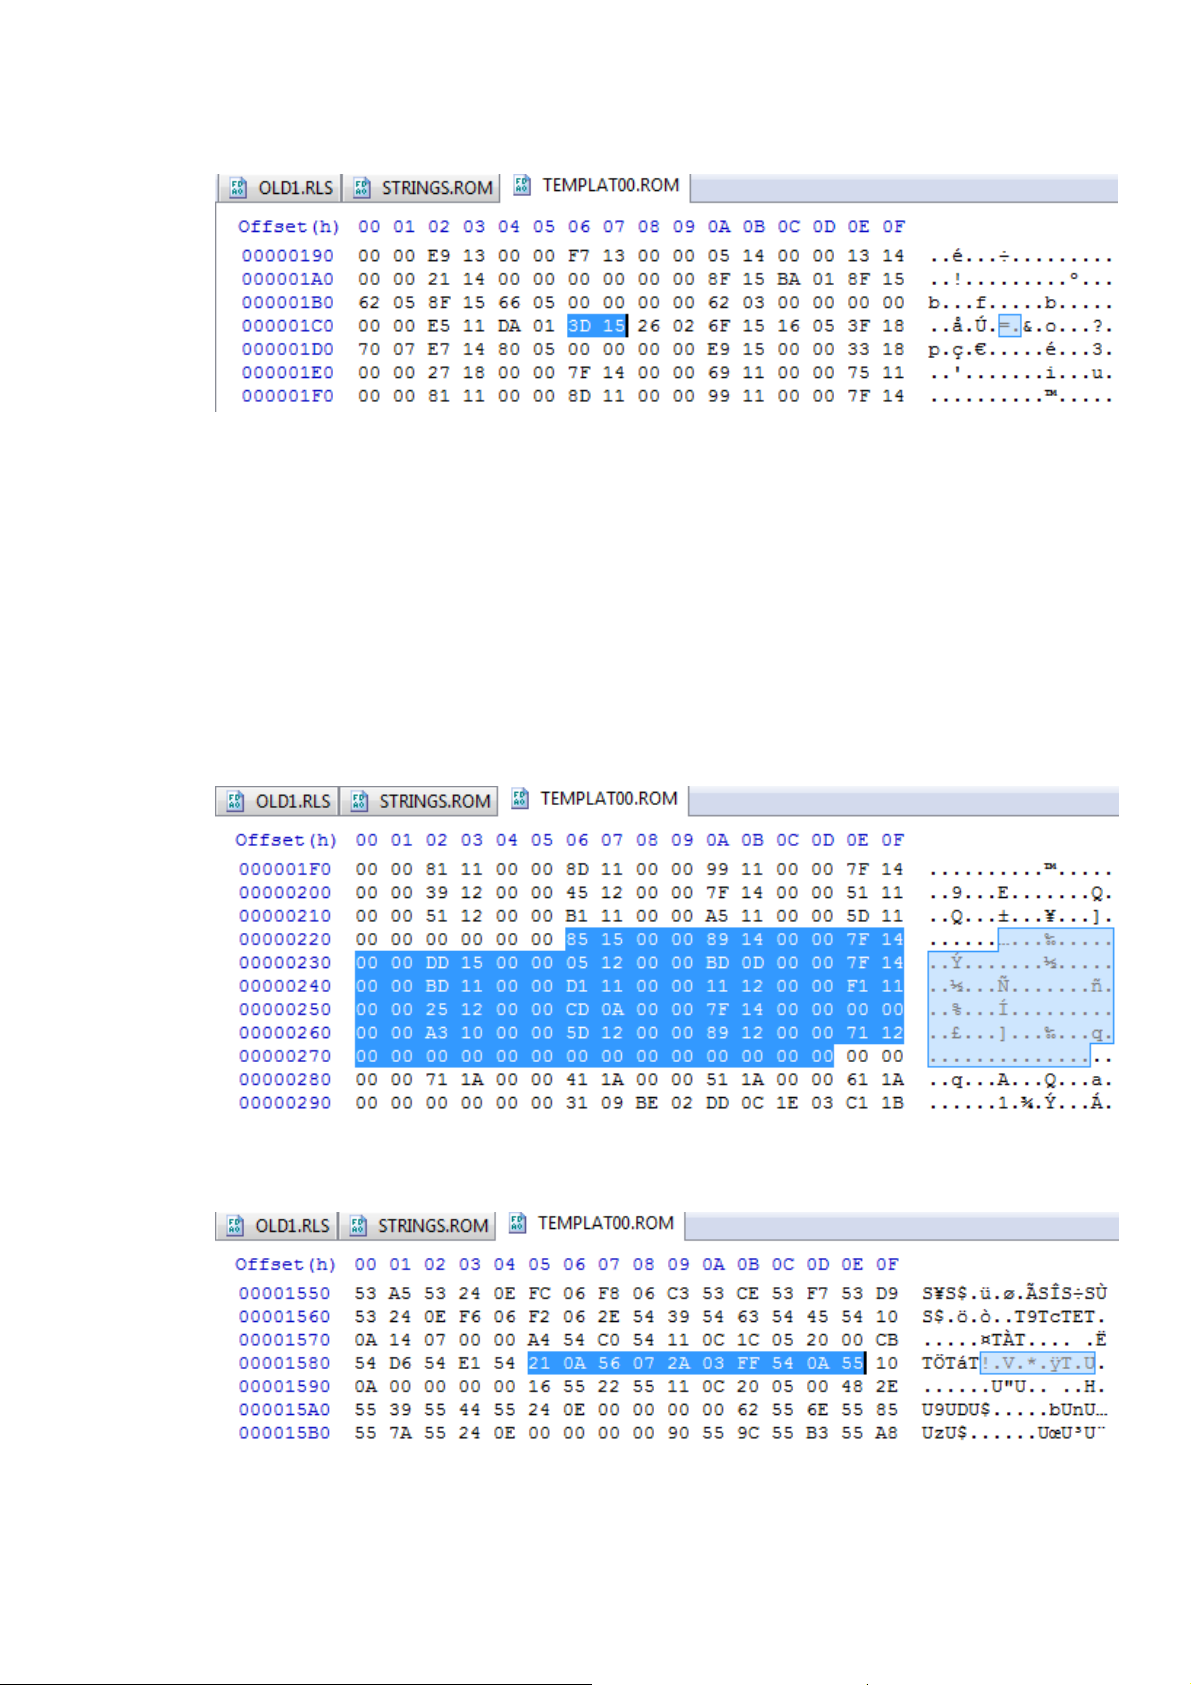
18) Search for “3D 15” (153D in endian format) in the TEMPLAT0.ROM file:-
- This is where the Information, Main, Security, Boot & Exit section are arranged & linked
to their respective setup menu:-
000001C0 00 00 E5 11 DA 01 3D 15 26 02 6F 15 16 05 3F 18
000001D0 70 07 E7 14 80 05 00 00 00 00
(In endian format)
11E5 = Information
153D = Main
156F = Security
183F = Boot
14E7 = Exit
19) Referring to the above information, the Main (3D 15) section is linked to “26 02”. This is
actually the offset for the Main setup menu. Jump to offset 0226:-
- By referring to a screenshot of Main setup menu (at #14), we know that “85 15” is the
“System Time” menu. The offset for “System Time” menu is 1585.
- To confirm this, jump to offset 1585:-
00001585 21 0A 56 07 2A 03 FF 54 0A 55
- Type =
54FF & 550A are fillers
21 (Time), Length = 0A, 1st offset in strings = 0756, 2nd offset in strings = 032A
Page 8
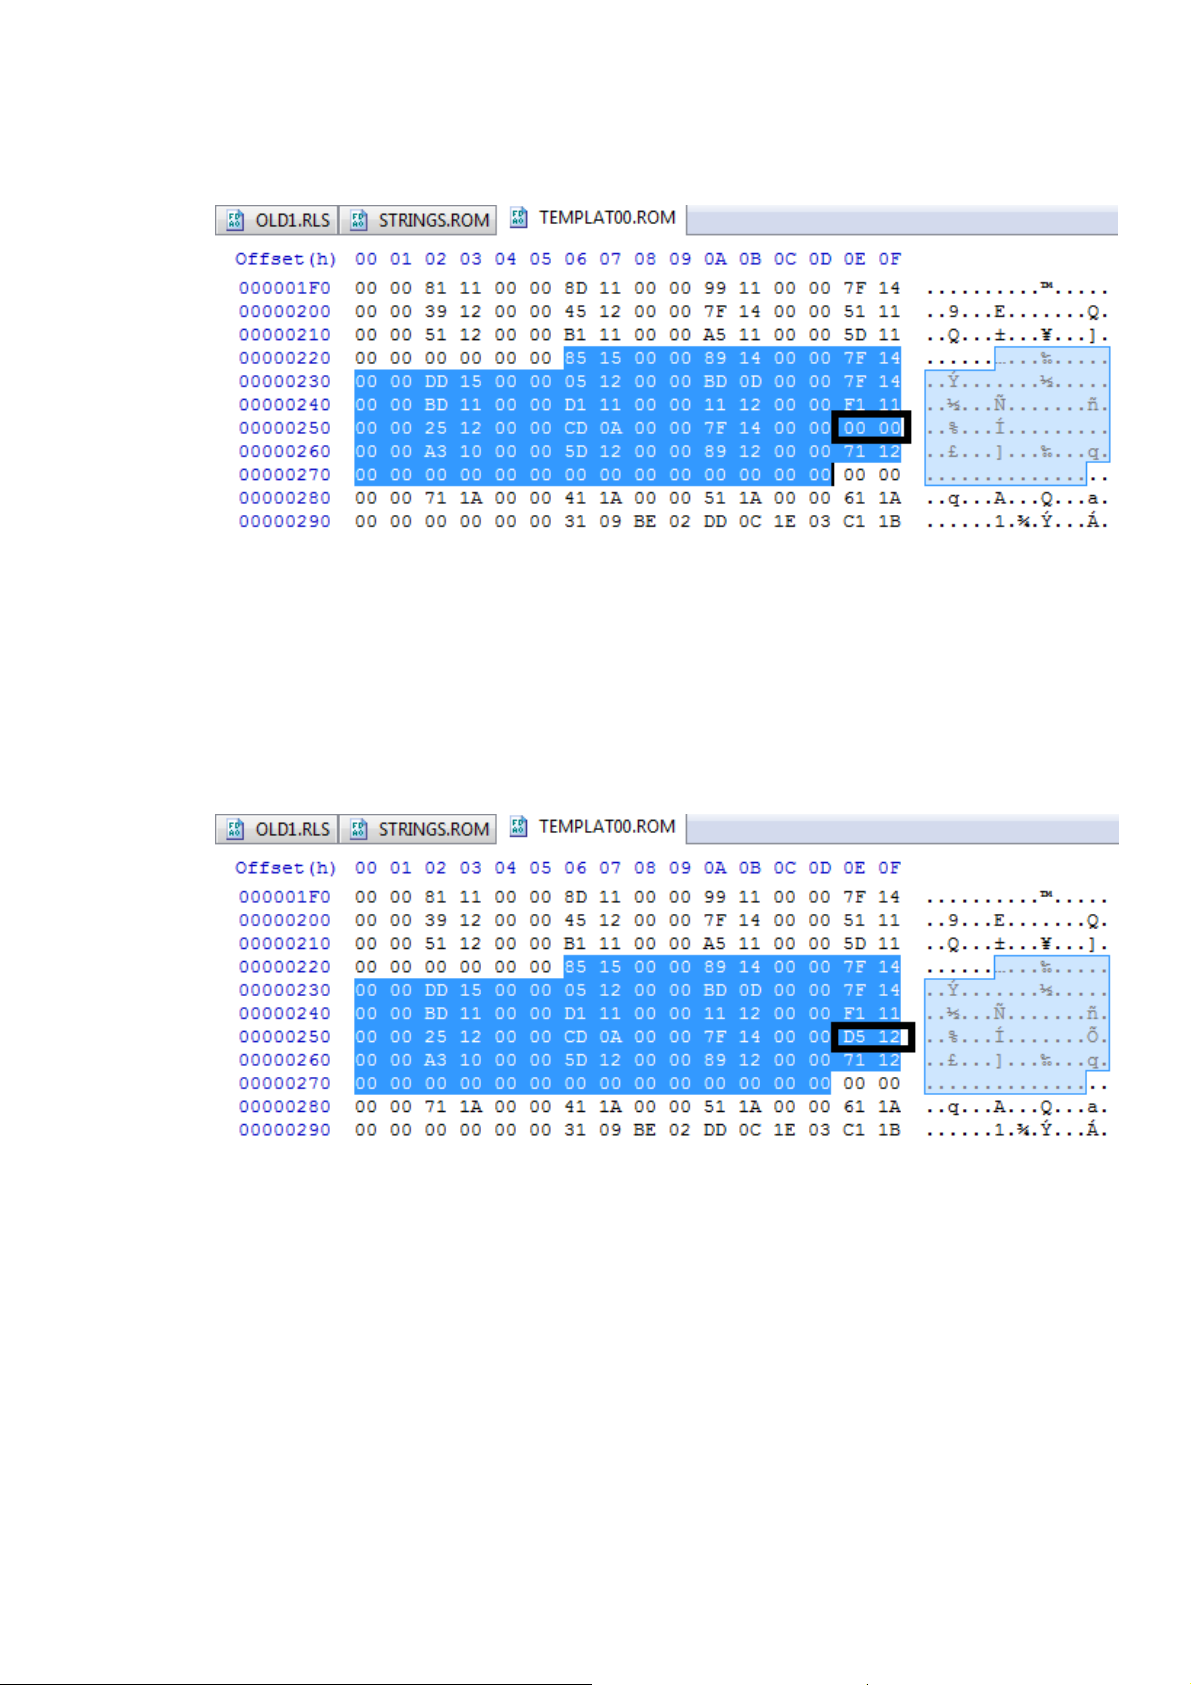
20) Now we will need to put the “Intel(R) Virtualization Technology” menu in Main setup menu.
First, we need to identify where is the best place to put the new menu:-
- Since we have plenty empty space, we will use offsets 025E & 025F. This is where we will
put the “Intel(R) Virtualization Technology” menu.
- Remember, each menu is separated with “00 00”. If, let say, “Menu A” & “Menu B”
menu are separated with four bytes or more of 00 (e.g. “00 00 00 00”), the two menu
are considered disconnected which means “Menu B” will not appear or visible in the
setup menu.
- Referring to #13, we know the offset for “Intel(R) Virtualization Technology” menu is
12D5. So, we will need to replace the “00 00” at offset 025E & 025F with “D5 12” (12D5
in endian format):-
- Save the modified TEMPLAT0.ROM file.
21) Copy the modified TEMPLAT0.ROM file back to PBE’s TEMP folder:-
- 64bit OS: C:\Program Files (x86)\Phoenix Technologies Ltd\BIOS Editor\TEMP
- 32bit OS: C:\Program Files\Phoenix Technologies Ltd\BIOS Editor\TEMP
Page 9
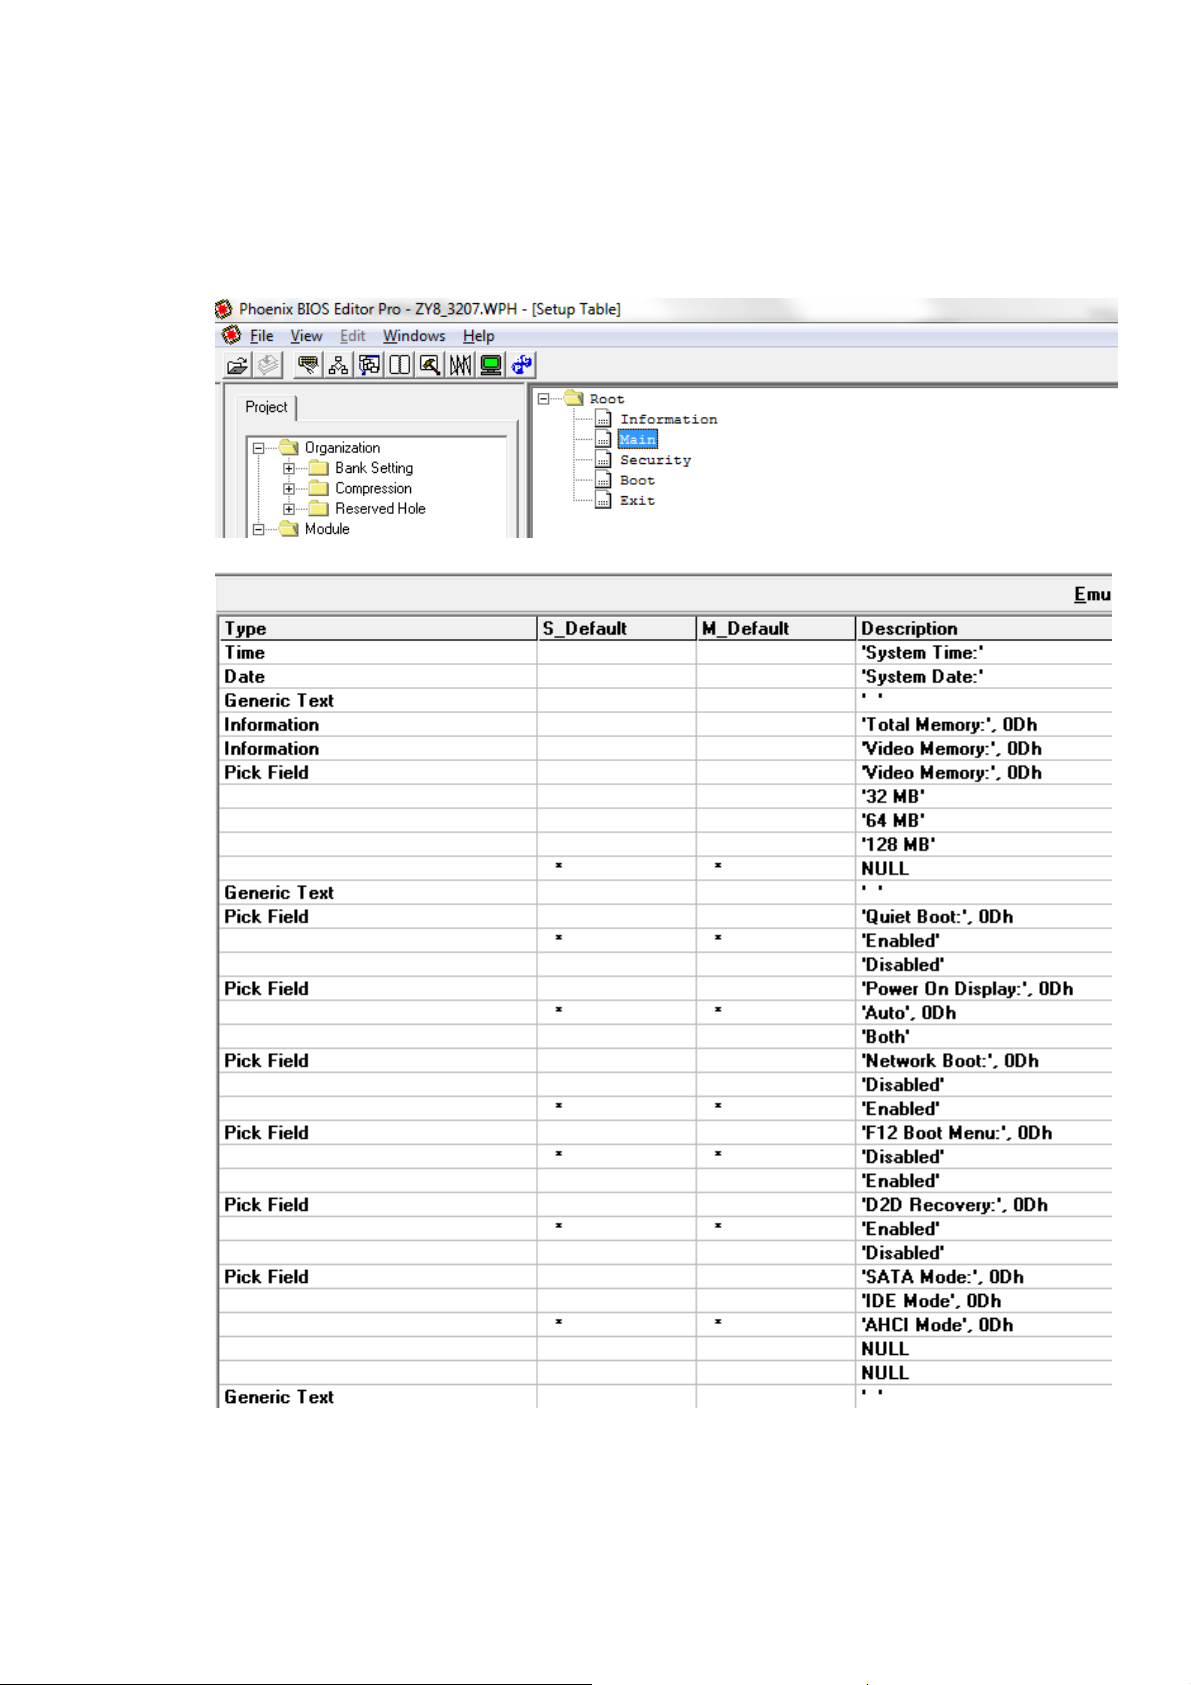
22) Finally, use PBE to re-build the modified BIOS image. The Build BIOS button is not enabled
by default which will prevent us from re-building the modified BIOS image. The button will
only enable if PBE detect modification to the original BIOS image. So, the solution is we’ll
need to do some changes.
- At PBE, go to Setup Table & click Main:-
- We should see something like this:-
- As we can see, there are a lot of “*” character in S_Default & M_Default column. It is
indicating the default value or setting for the specified menu. We’re not going to change
it though. Just double click at any “*” character & PBE will detect it like we just do a
modification to the original value.
Page 10
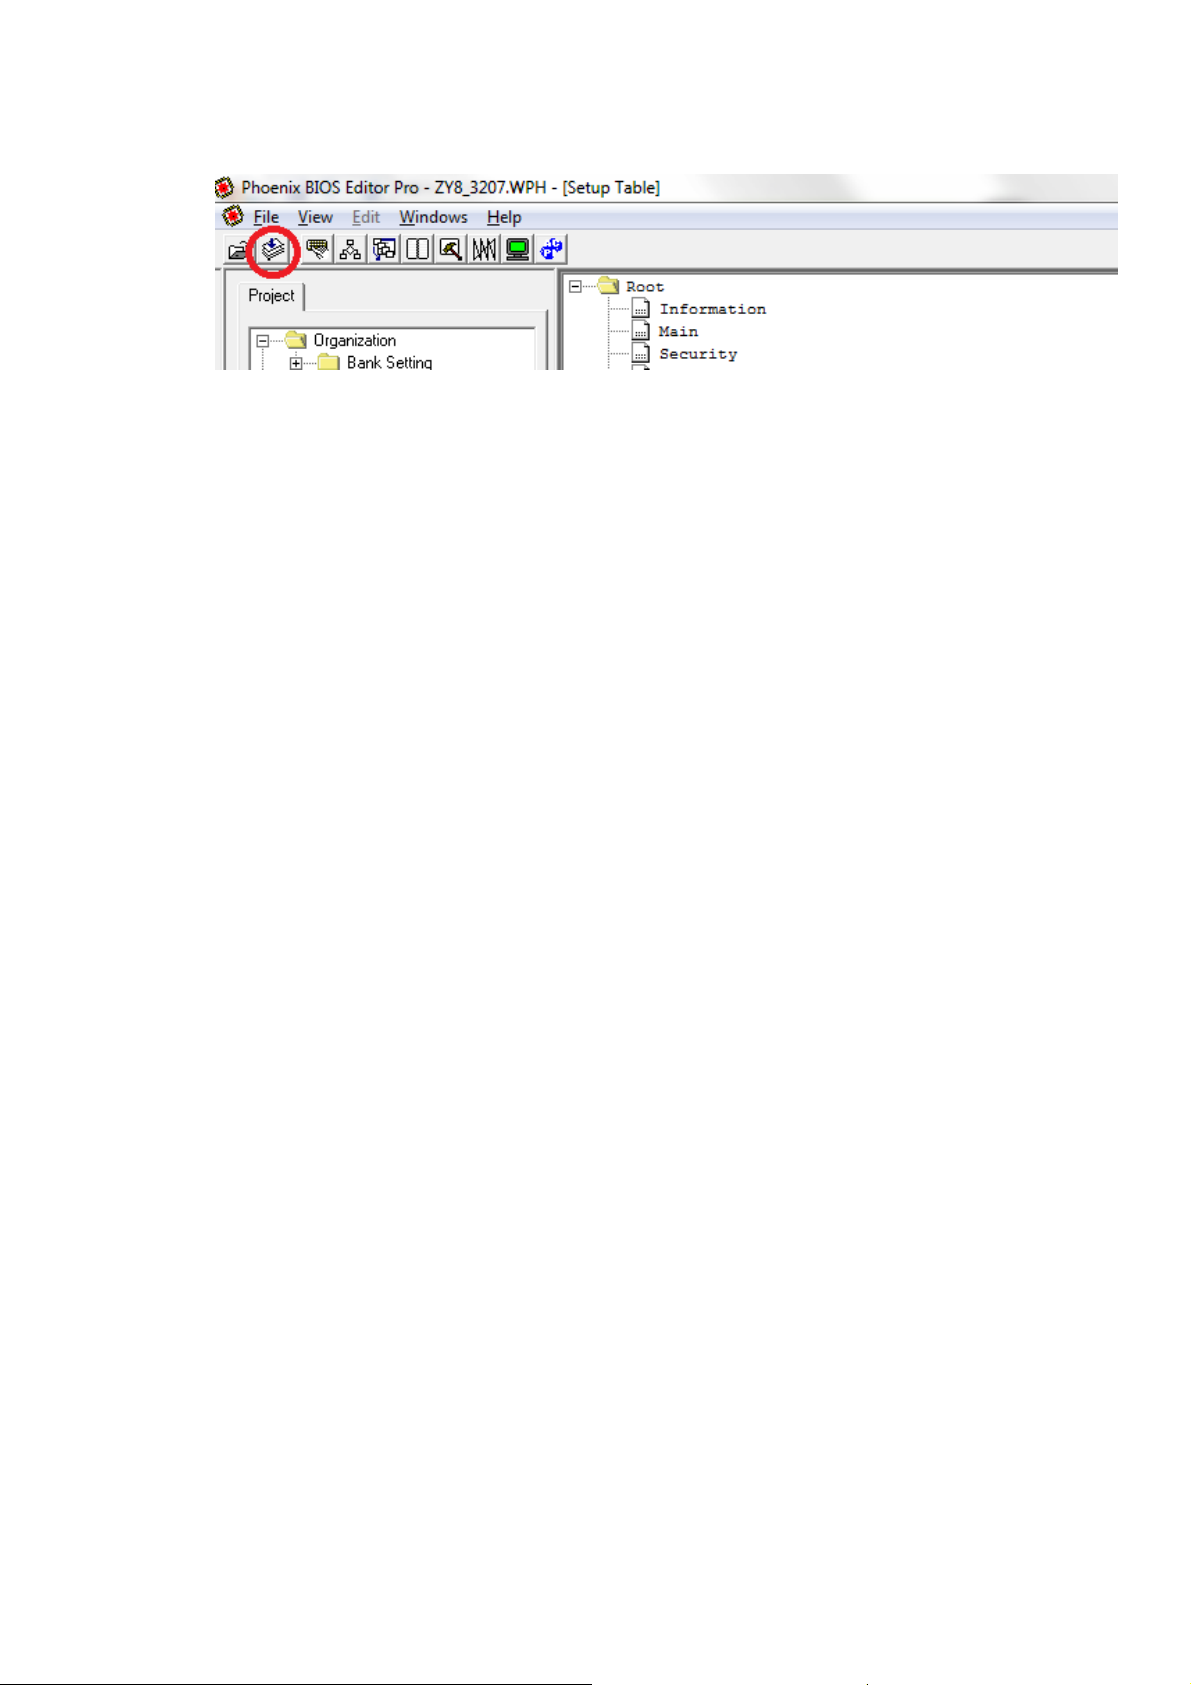
- This will enable the Build BIOS button:-
- Now we can proceed to re-build the modified BIOS image.
23) A little list of DO’s & DON’T’s & also notes:-
- Make sure to compare the modified BIOS image with the original image.
- Pay attention to anything out of the ordinary or weird like there is a lot of FF at the
beginning of the modified BIOS image. If so, repeat the BIOS re-building process.
- Just to make sure, repeat the process two to three time & compare the modified BIOS
image with the one we re-build before. If we get identical modified BIOS image each
time, repeatedly, the modified BIOS image was re-build properly but this doesn’t mean
the modified BIOS image won’t brick our computer.
- Sometime, manufacturers tend to put a header or footer, like a signature, to the BIOS
image. If we forgot to reintegrate it with the modified BIOS image, when we try to flash
BIOS with it, depend on the type of the signature, sometime the BIOS flash program will
abort the process.
- As I mention earlier, do not change the size of the files or BIOS image. If we do, there is
high possibility it will brick our computer. I’m 100% sure about it.
- Make sure to master the BIOS recovery technique.
As usual, I will not responsible for any problem including the problem caused by the
information provided in this tutorial.
Good luck. :D
/* kizwan */
 Loading...