

Page 1
Evaluation Board User Guide
UG-344
10359-001
One Technology Way • P. O. Box 9106 • Norwood, MA 02062-9106, U.S.A. • Tel: 781.329.4700 • Fax: 781.461.3113 • www.analog.com
Evaluating the SSM2804 Audio Subsystem
FEATURES
Accepts either differential or single-ended inputs
Full featured evaluation board for the SSM2804
PCB footprint for optional EMI filter
Includes USB hardware interface for plug-and-play
operation
Microsoft Windows-based evaluation software with
simple graphical user interface
EQUIPMENT NEEDED
Audio source with ⅛" male stereo plug or 0.100" header
Power supply (5.0 V, 2.0 A recommended)
EVAL-SSM2804Z board
PC running Windows XP or later; USB 2.0 port required
Stereo speakers, headphones, or other load
DOCUMENTS NEEDED
SSM2804 data sheet
SOFTWARE NEEDED
SSM2804 evaluation software
GENERAL DESCRIPTION
The SSM2804 evaluation board is a complete solution for
driving two loudspeakers as well as a set of stereo headphones.
It includes the SSM2804 amplifier IC and the additional
components needed to connect the I
computer using a universal serial bus (USB) connection.
The SSM2804 features an I
tings. Using the I
input stage can be adjusted over a 30 dB range in steps of 1 dB.
Other features available when using the I
full volume control of the Class-D amplifier output stage and
the Class G headphone amplifier output stage, independent
functional block shutdown, input channel routing and mixing
through the subsystem, EMI emission control modes, speaker
protection including automatic level control (ALC), and
headphone output power limiting.
This user guide describes how to use the EVA L -SSM2804Z to
test the features of the SSM2804 stereo amplifier. It describes
the hardware and software of the SSM2804 evaluation board,
including detailed schematics and PCB layout artwork.
The SSM2804 data sheet, available at www.analog.com/SSM2804,
provides detailed information about the specifications, internal
block diagrams, and application guidance for the amplifier IC.
The SSM2804 evaluation software can be downloaded from
www.analog.com/SSM2804. Click Evaluation Boards & Kits
and choose the appropriate Windows® version (32-bit or 64-bit).
2
C control interface, the gain of the SSM2804
2
C interface with many useful set-
2
C bus to a personal
2
C interface include
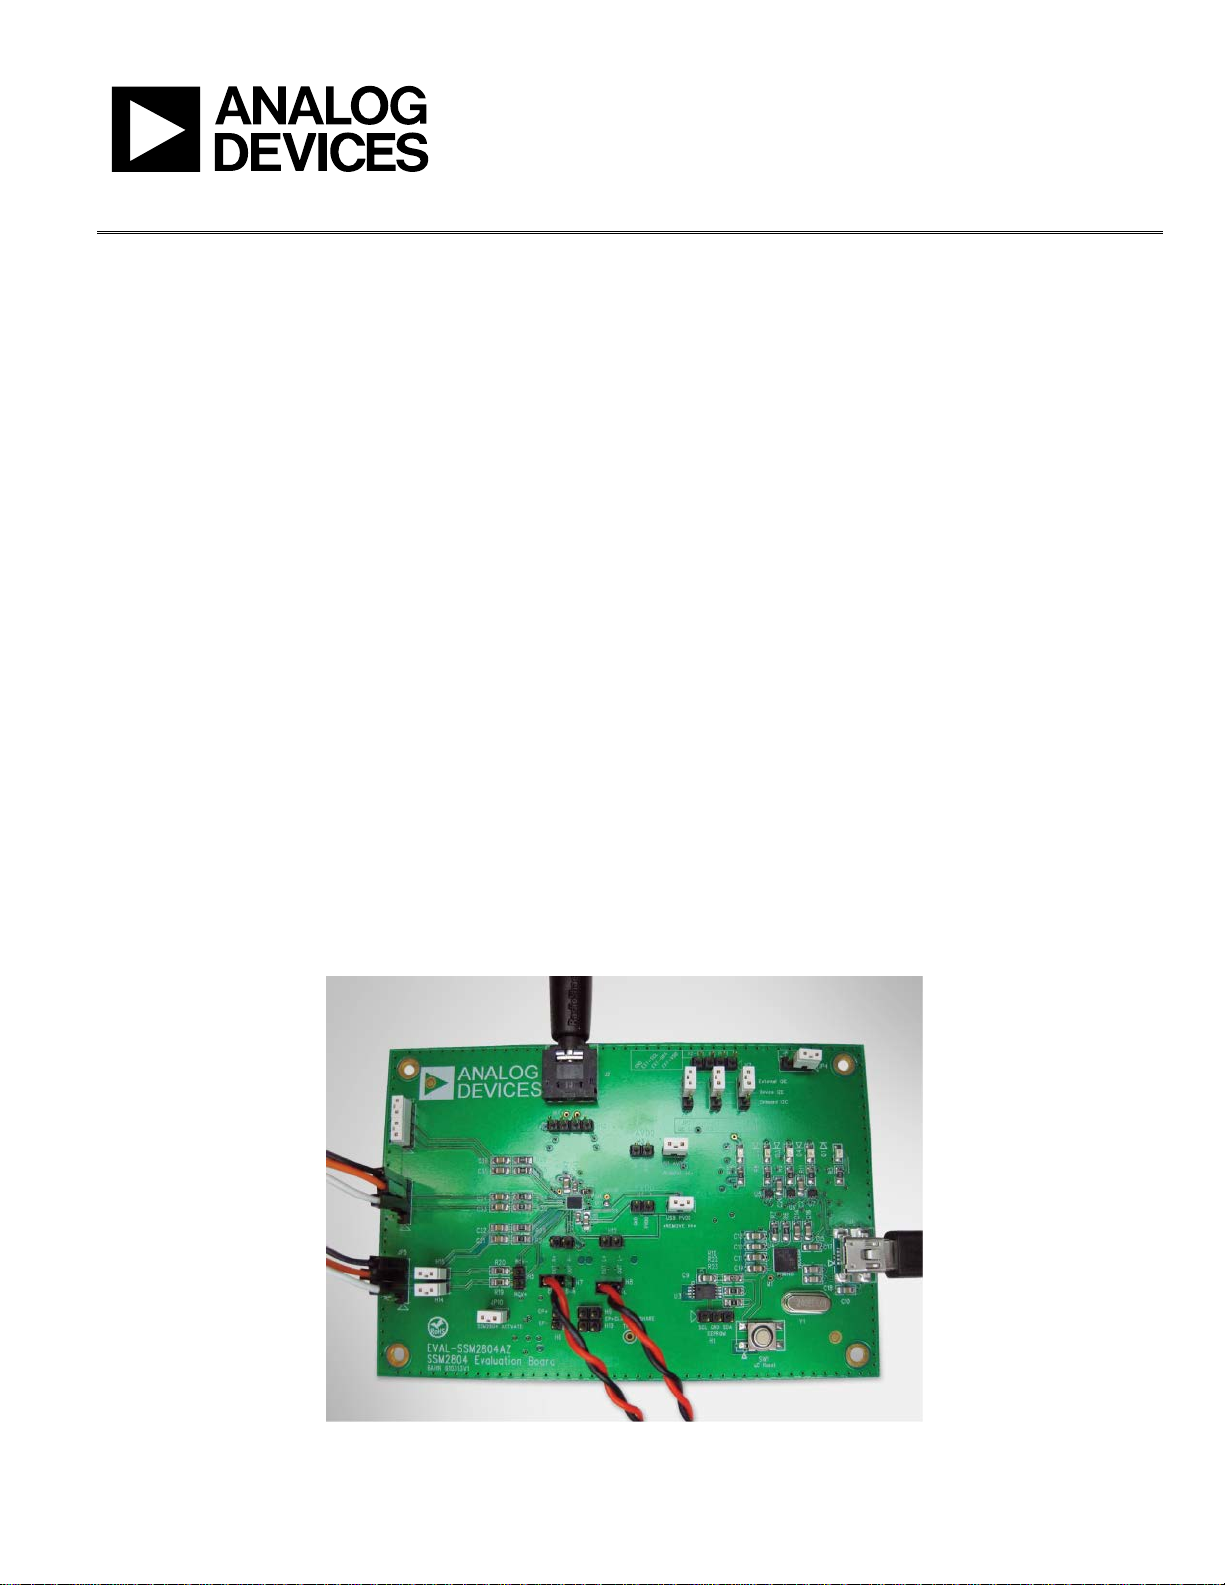
Figure 1. Typical Configuration with USB Interface, USB Power, Two Inputs, and Headphone and Class-D Outputs
PLEASE SEE THE LAST PAGE FOR AN IMPORTANT
WARNING AND LEGAL TERMS AND CONDITIONS.
TYPICAL CONFIGURATION
Rev. 0 | Page 1 of 20
Page 2

UG-344 Evaluation Board User Guide
TABLE OF CONTENTS
Features .............................................................................................. 1
Equipment Needed ........................................................................... 1
Documents Needed .......................................................................... 1
Software Needed ............................................................................... 1
General Description ......................................................................... 1
Revision History ............................................................................... 2
Evaluation Board Hardware ............................................................ 3
Power Supplies .............................................................................. 3
Input Signals .................................................................................. 3
Output Signals............................................................................... 3
Shutdown and Mode Jumpers .................................................... 3
Receiver Switch ............................................................................. 3
LEDs ............................................................................................... 4
EEPROM ....................................................................................... 4
USB Power Switch ........................................................................ 4
I2C Source Jumpers ...................................................................... 4
Evaluation Board Software Quick Start Procedures .................... 5
SSM2804 Control Software Setup .............................................. 5
Initial SSM2804 Hardware Setup ............................................... 5
SSM2804 GUI Functional Blocks ................................................... 7
Input Control ................................................................................ 7
Class-D Control .............................................................................7
Speaker Protection Control .........................................................8
Headphone Control ......................................................................8
Auxiliary Functions.......................................................................9
Quick Set Buttons ..........................................................................9
Direct I2C Register Access ......................................................... 10
USB Power ................................................................................... 10
USB—I2C Interface ......................................................................... 11
General Description ................................................................... 11
USB Connector ........................................................................... 11
Power Regulator ......................................................................... 11
Cypress USB Interface ............................................................... 11
Crystal Oscillator ........................................................................ 11
Passive Component Selection ....................................................... 12
Input Coupling Capacitor Selection (C31 to C36) ............... 12
Output Ferrite Beads (B1 to B4) ............................................... 12
Output Shunting Capacitors (C43, C45, C47, and C49) ....... 12
Evaluation Board Schematics and Artwork ................................ 13
Ordering Information .................................................................... 18
Bill of Materials ........................................................................... 18
REVISION HISTORY
1/12—Revision 0: Initial Version
Rev. 0 | Page 2 of 20
Page 3
Evaluation Board User Guide UG-344
10359-002
JP8
JP9
EVALUATION BOARD HARDWARE
The SSM2804 evaluation board provides all of the support
circuitry required to operate the SSM2804 amplifier, including
a computer interface for the I
bench characterization setup used to evaluate the audio performance of the SSM2804. See the Evaluation Board Software
Quick Start Procedures section to get started.
2
C bus. Figure 1 shows the typical
POWER SUPPLIES
The SSM2804 requires two external dc power supplies: PVDD
and AVDD. PVDD voltages between 2.7 V and 5.5 V and
AVDD supply voltages between 2.5 and 3.6 V are accepted.
Note that PVDD supply currents may exceed 1 A, depending on
supply voltage and load impedance.
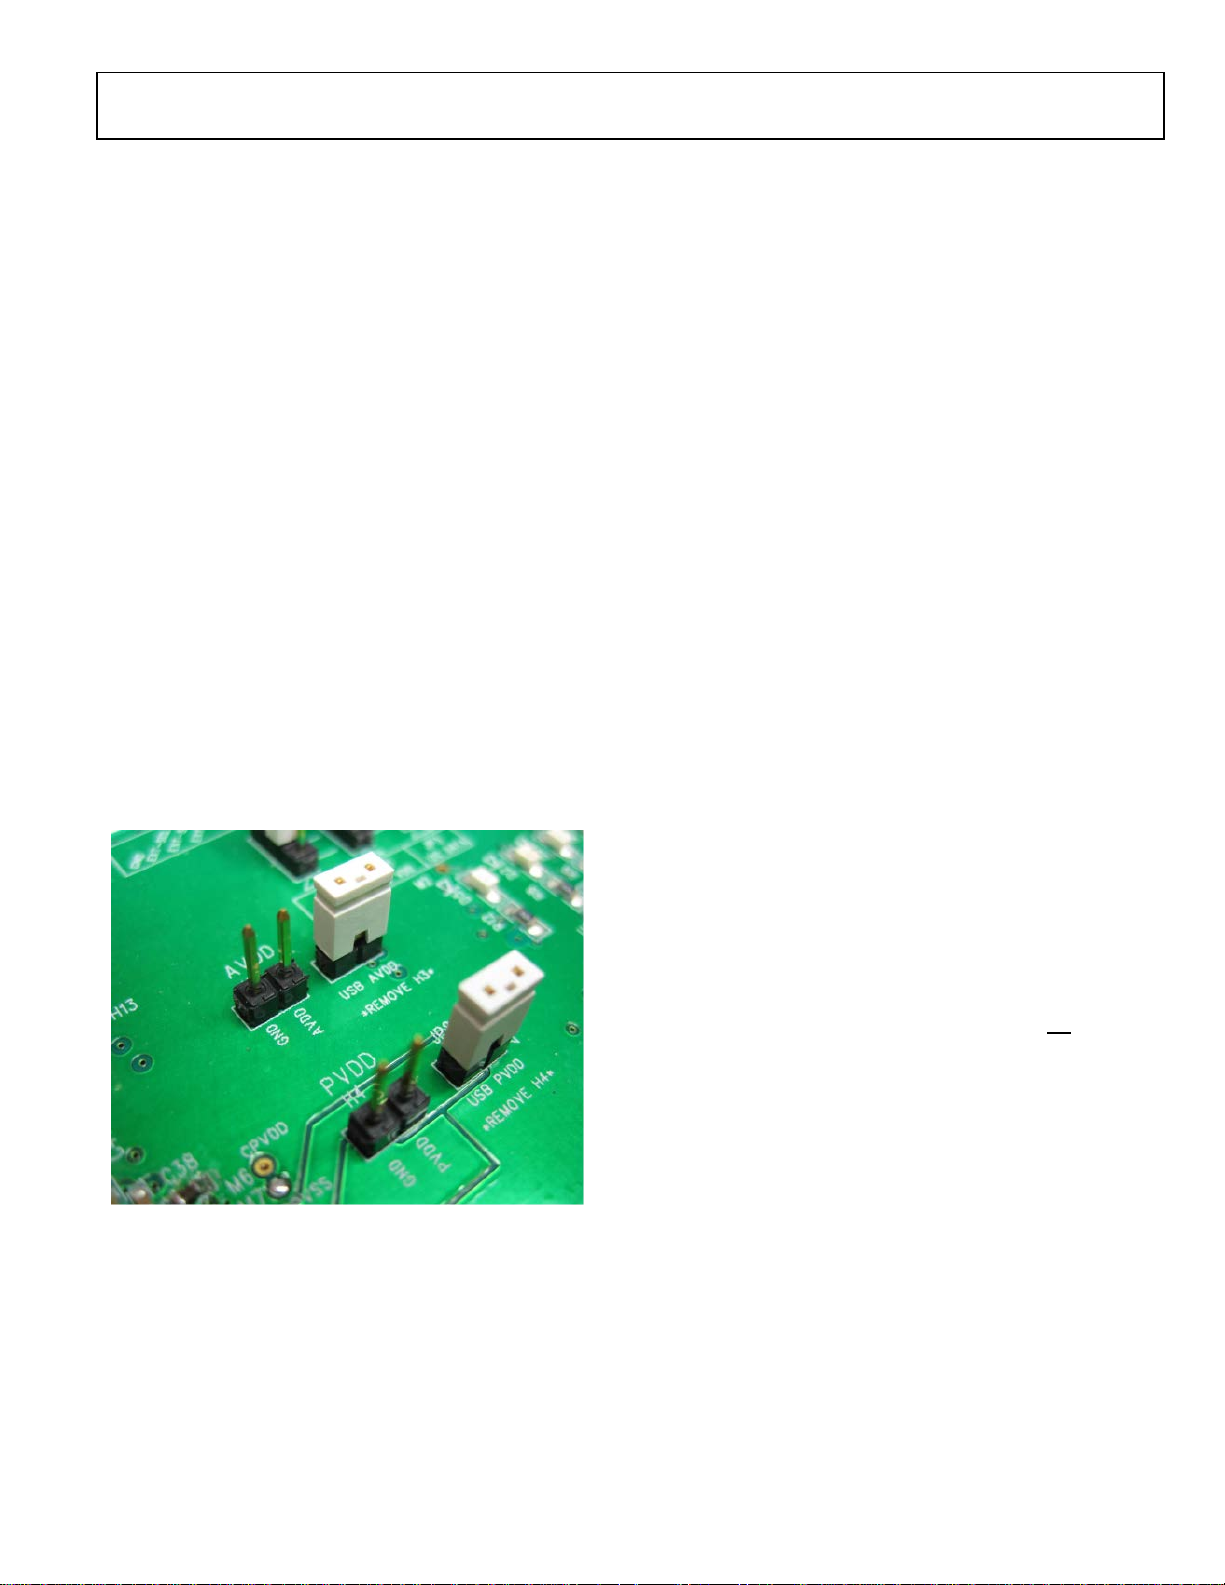
H3 and H4, 2-pin 0.100" male headers, are provided to connect
external supplies to the PVDD and AVDD supply rails.
Alternatively, a 5 V USB power supply can be used to power the
chip, although the USB 2.0 specification only allows a total
current draw of up to 500 mA. JP8 is used to connect USB
power to the PVDD rail, and JP9 is used to connect USB power
to the AVDD rail. These jumpers are shown in Figure 2.
Be sure to remove JP8 when using an external power supply,
because this shorts the USB voltage to the external supply.
Conversely, be sure to remove the external supply from H4
when using USB power. Be cautious of supplying any significant
amount of power when using the USB port.
For single-ended audio inputs, each channel can be used as a
stereo input. In this configuration, the signals on the INA1
and INA2 pins are called INAL and INAR, respectively. These
signals are referred to a source ground, which should be connected to the top or bottom GND pin of the header.
OUTPUT SIGNALS
Each channel of the amplifier output is available at two 2-pin
0.100" headers: H8 and H12 for the left channel, and H7 and
H11 for the right channel. The speakers are connected in
bridge-tied load (BTL) configuration, and the output pins are
labeled with their polarity; for example, OUT L+ indicates the
left channel noninverting terminal.
In the standard filterless configuration, the two headers on
each channel are connected with 0 Ω links on the pads marked
B1 to B4. In this case, the two headers on each channel are tied
together and can be used interchangeably as attachment points
for the load and an audio analyzer. The EMI filtering is not
populated on the SSM2804 evaluation board to allow proper
measurement of key parameters such as SNR and THD.
A ferrite bead-based EMI filter can be implemented using the
B1 to B4 and C43 to C50 footprints on the secondary side. If
this filtering is used, only H7 and H8 connect at the proper
location with respect to the filter components—the load must
be connected to these headers. Measurements of the unfiltered
waveform can be taken at H11 and H12.
Finally, a ground-referred Class-G headphone output is available on J2 and H13. J2 is an ordinary 0.125" headphone jack, and
H13 is a 4-pin 0.100" header connected to the same signals. The
left and right channels are connected to the center pins; the
outer pins connect to the headphone common.
Figure 2. Connecting USB Power Supply to AVDD and PVDD
INPUT SIGNALS
On the left side of the PCB are three 4-pin headers: JP5, JP6, and
JP7. These are used to connect the input audio signals to the
amplifier. If the input audio signal is differential, use the two
center pins (for example, INA1 and INA2) for the inverting and
noninverting signals. For clarity, in this configuration, the two
signals are called INA+ and INA− to emphasize their differential
nature. Connect either the top or the bottom pin to the
source/signal ground.
Rev. 0 | Page 3 of 20
SHUTDOWN AND MODE JUMPERS
A 2-pin jumper, JP10, is used to enable and disable the SSM2804
SD
amplifier. Inserting a jumper across JP10 pulls the
SPKVDD supply rail, activating the amplifier. Removing the
jumper from JP8 shuts down both channels of the SSM2804 so that
minimal current (about 20 nA) is drawn from the power supply.
pin to the
RECEIVER SWITCH
The SSM2804 includes an integrated receiver bypass switch that
can be configured to pass an audio signal directly from the
input to the output.
The switch inputs, RCV+ and RCV−, are connected to the 2-pin
header, H5. In addition, the receiver inputs can be connected to
the INA1 and INA2 input headers by shorting across H14 and
H15 with two jumpers. To protect the switch in the case of a
short circuit or other fault condition,12 Ω series resistors (R19
and R20) are included in the signal path
The switch outputs, EP+ and EP−, are connected to the 2-pin
header, H6. Alternatively, the outputs can be tied directly to the
Page 4

UG-344 Evaluation Board User Guide
D1
Red
5 V power is supplied over the USB bus
10359-003
right channel Class-D outputs (H7 and H11) by shorting across
H9 and H10 with two jumpers.
LEDS
The LEDs provide feedback to the user about the status of the
Cypress USB microcontroller. The function of each LED is
shown in Tab le 1.
Table 1. LED Functions
Reference
Designator Color Function
D2 Yellow I2C mode is active
D3 Blue GPIO LED, for firmware debug purposes
D4 Yellow SPI mode is active
D5 Blue USB power switch enabled (USB_PWR_ON)
EEPROM
The USBi has an EEPROM on the I2C bus at Address 0x51, which
it uses to indicate its vendor ID and product ID to the PC, as
well as to boot its internal program. The EEPROM is an
important system element that identifies the board to the host
PC and stores the firmware for the Cypress USB interface. The
EEPROM is programmed during manufacturing via the H1
connector.
Avoid having any other EEPROMs in your system design at
this address. This EEPROM is not write-protected; therefore,
an attempt to write to Address 0x51 overwrites the USBi’s
on-board EEPROM, and the USBi will cease to function. The
USBi cannot be reprogrammed without returning it to Analog
Devices, Inc.
I2C SOURCE JUMPERS
If an external I2C source is to be used, place the JP1, JP2, and
JP3 jumpers such that they connect the device I
external I
2
I
C lines to the on-board I2C lines, as shown in the red rectangular
area of Figure 3. If an external I
2
C lines. Otherwise, they should connect the device
2
C is used, an external I2C source
can be attached to H2, following the silkscreen labels displayed
on the board.
The voltage of the external I
2
C interface should match the value
set on JP4; the two voltages are taken from two separate on-board
regulators. The on-board I
2
C interface works properly in either
configuration.
For the Cypress USB microcontroller to boot properly from the
EEPROM, it may be necessary to power down (or disconnect)
any other devices from the I
2
C bus, including the SSM2804.
In this case, remove the external 5 V supply while the USB
connection is first established, or remove the JP2 and JP3
jumpers and replace them only after the connection is activated.
Figure 3. Jumpers as Configured for On-Board I
2
C lines to the
2
C Operation
USB POWER SWITCH
The SSM2804 evaluation board is capable of taking 5 V power
from the USB port after the Cypress USB microcontroller has
finished its boot-up process. The USB_PWR_ON signal, which
can be set in the SSM2804 software, appears on one pin of the
Cypress microcontroller. This signal controls Q1 and Q2, which
create a connection between USB power and the supply rail. D5,
a blue LED, lights up when this supply is activated. Note that
the current available from the USB bus is limited; therefore, the
amplifier power stage may not drive low impedance loads
properly.
Rev. 0 | Page 4 of 20
Page 5

Evaluation Board User Guide UG-344
EVALUATION BOARD SOFTWARE QUICK START PROCEDURES
SSM2804 CONTROL SOFTWARE SETUP
Do not connect the evaluation board until software is installed.
The SSM2804 software interface requires Microsoft® .NET
Framework (Version 2.0 or later). The installer automatically
downloads it if .NET Version 2.0 is not already installed.
To install the control software, use the following steps:
1. Go to www.analog.com/SSM2804.
2. Click Evaluation Boards & Kits.
3. Choose the appropriate Windows version (32-bit or 64-bit)
to download.
4. Extract the SSM2804 zipped installation file to a
convenient location and double-click setup.exe to begin
the installation process. Follow the installation instructions
when prompted.
5. The software and USB drivers are installed in C:\Program
Files\Analog Devices Inc\SSM2804.
SSM2804 USB Driver Installation
Before connecting the SSM2804 evaluation board to a PC or
notebook, the following procedure may need to be completed.
(This procedure only needs to be executed once on each computer that uses the SSM2804 software. This procedure can be
skipped if the user has previously installed any SigmaStudio
or USBi related drivers from Analog Devices.)
1. Exit the SSM2804 user interface software.
2. Remove jumpers from JP1, JP2, and JP3, located at the top
of the evaluation board, to completely isolate the Cypress
USB driver from the SSM2804.
3. Connect JP4 in the 3.3 V location as shown in the blue
circled area of Figure 3. The purpose of this is to power
the Cypress USB controller to establish communication
between the software and the board.
4. Make sure the software is closed. Connect the SSM2804
evaluation board to the PC via the USB cable.
5. The PC recognizes the new hardware. When the hardware
is recognized, a prompt asks to let Windows find the
proper drivers for the hardware. Do not let Windows
install the drivers.
6. You must direct the driver installation to the following
path by clicking the Browse tab:
C:\Program Files\Analog Devices Inc\SSM2804\
7. After the path has been properly selected, you can continue
with the driver installation process. Windows properly
establishes the link between the Cypress USB controller
and the PC.
8. After the previous steps are followed, you can run the
SSM2804 control software. The software is located at the
following path: C:\Program Files\Analog Devices
Inc\SSM2804\SSM2804.exe.
9. For quick access to this software, the installer creates a
shortcut from the SSM2804.exe file to the desktop.
10. If all steps were properly followed, at the top of the
SSM2804
onnected appears. If the installation was not successful,
C
a message of USBi – Cannot Find Device appears.
11. After a successful installation, the SSM2804 software
recognizes a connection from the PC to the SSM2804
evaluation board. There is no need to adjust the jumper
positions of JP1, JP2, and JP3, but they should be
connected as shown in Figure 3.
software window, a status message of USBi
Uninstall SSM2804 Control Software
To uninstall the software, follow these steps:
1. Locate the directory where the SSM2804 zipped installer
file was extracted.
2. Double-click setup.exe. Simply select Uninstall to remove
the software from the host PC.
INITIAL SSM2804 HARDWARE SETUP
To allow the SSM2804 software to control the SSM2804
evaluation board, you must make a few simple jumper
connections:
1. Connect the bottom and middle terminals of each jumper
(JP1, JP2, and JP3). The purpose of this is to connect the
on-board Cypress USB-I
signals connected are I
2. Connect JP4 in one of two positions, 1.8 V or 3.3 V, to
choose an I
separate on-board LDOs. The SSM2804 control interface
works well under either of these I
conditions.
2
C supply rail. These two voltages come from
2
C interface to the SSM2804. The
2
C VDD, I2C CLK, and I2C DATA.
2
C supply voltage
Rev. 0 | Page 5 of 20
Page 6
UG-344 Evaluation Board User Guide
10359-004
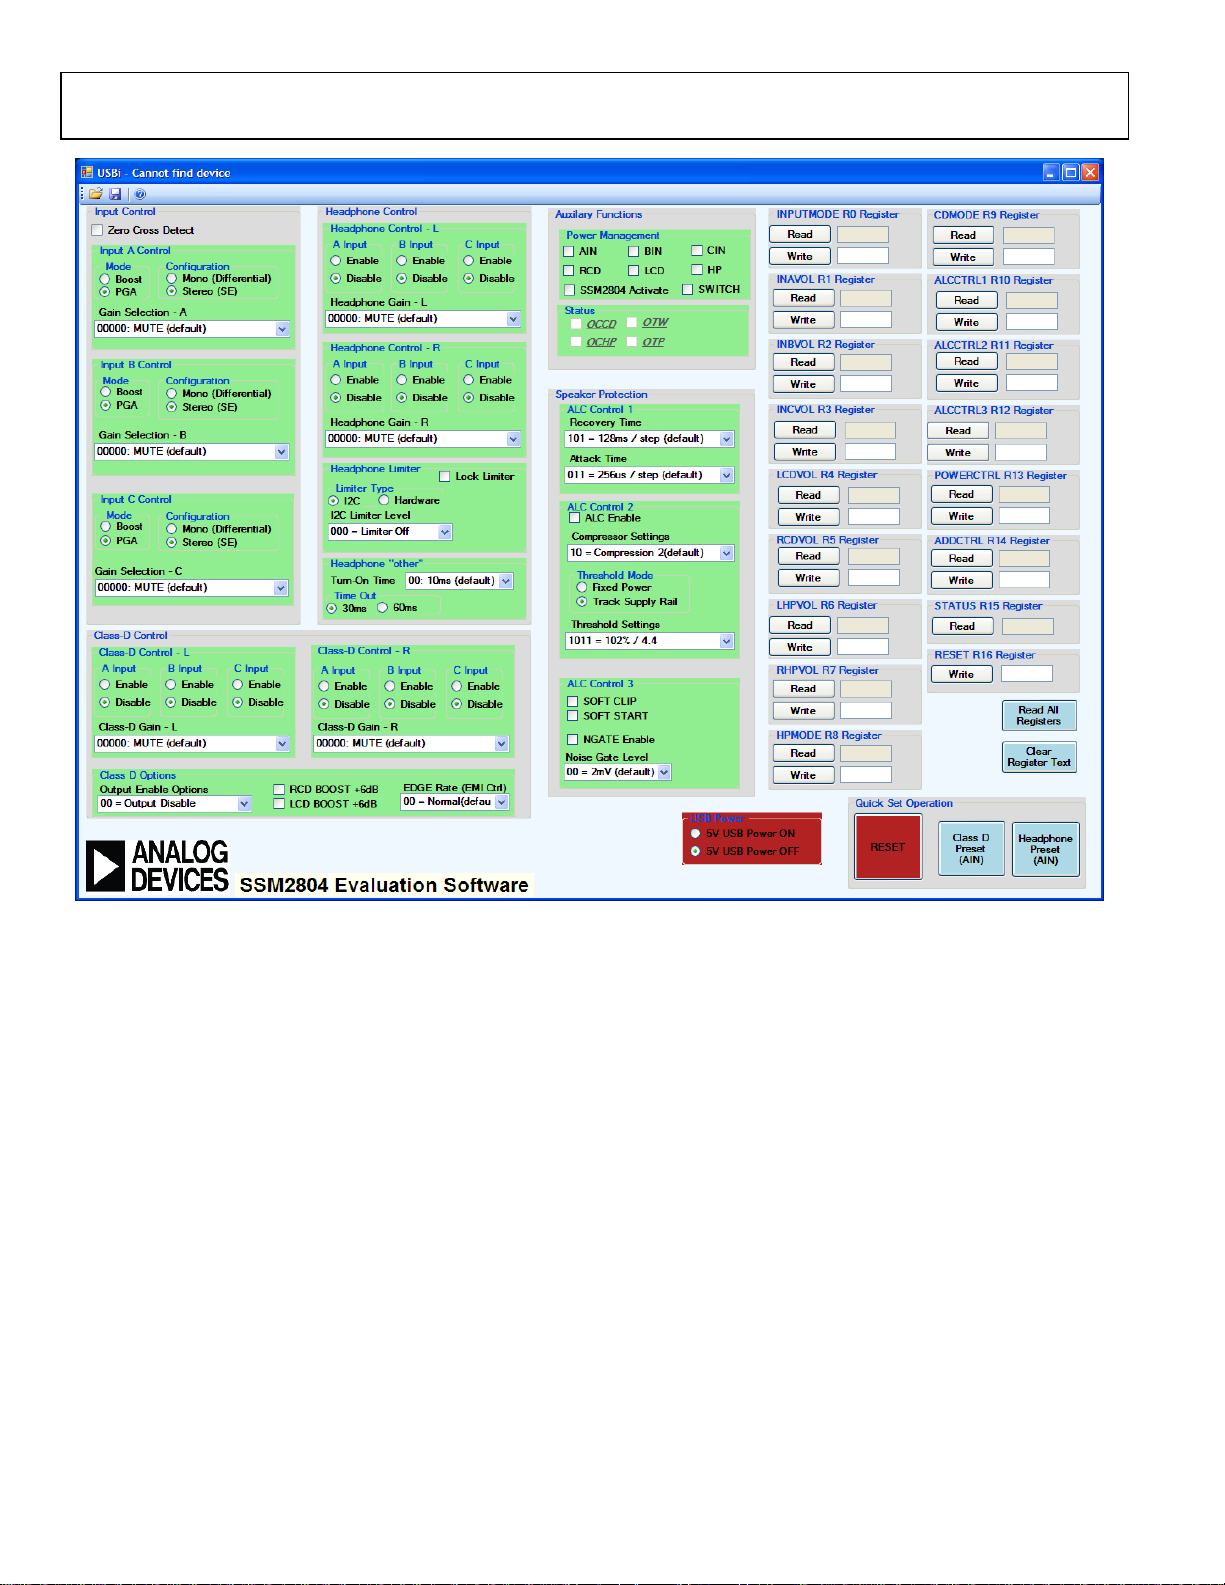
Figure 4. SSM2804 Evaluation Software
Rev. 0 | Page 6 of 20
Page 7

Evaluation Board User Guide UG-344
10359-005
10359-006
SSM2804 GUI FUNCTIONAL BLOCKS
The SSM2804 control software is logically split into several
different functional blocks. Each functional block is split into
individual subsections. For details of the individual register
functions, refer to the SSM2804 data sheet.
Note that when the power supply of the SSM2804 is interrupted,
you must reset the SSM2804 software to synchronize with the
device. Simply click the red RESET button at the bottom-right
corner of the software window (see Figure 4).
INPUT CONTROL
This section controls the gain and configuration of the three
input channels.
Channel A, Channel B, and Channel C Input Volume (Register 0x01, Register 0x02, Register 0x03)
These registers are used to adjust the gain for each input stage.
If PGA mode is selected using the appropriate bit in Register R0
(0x00), this control offers gain adjustments with 1 dB resolution
between −12 dB and +18 dB. If boost mode is selected, the gain
is restricted to three preset values.
CLASS-D CONTROL
This section contains the channel mixing, gain, and EMI
control settings for the Class-D speaker driver.
Figure 5. Input Control Section of SSM2804 GUI
Input Channel Mode Control (Register 0x00)
This allows independent selection of the various operating
modes for each of the three input channels. The configuration
can be set to either Mono (Differential) or Stereo (SE), and
either the fixed-impedance Boost mode or the adjustable
impedance PGA mode can be chosen.
This register also controls the zero-cross detector, which forces
gain changes to occur at a zero-crossing event to reduce the
audible pop caused by a discontinuity in the audio signal.
Figure 6. Class-D Control Section of SSM2804 GUI
Class-D Gain—Left/Right (Register 0x04, Register 0x05)
These registers provide independent 32-level volume controls
for each channel. The gain reduction ranges from 0 dB to
−75 dB, plus a mute setting.
Class-D Enable and Mixer (Register 0x08)
Input A, Input B, and Input C can be individually mixed into
the two channels of the Class-D output by setting the
appropriate bits in Register 0x08.
Class D Boost (Register 0x0C) and EMI Control (Register 0x0E)
An additional 6 dB boost is available on each Class-D output
channel, if needed. The left and right channel boost can be
enabled by selecting the RCD BOOST and LCD BOOST
options.
In addition, four levels of edge rate control for the Class-D
output are available, allowing for improved electromagnetic
interference (EMI) reduction. Slow, Slow −, and Slow −−
represent progressively slower transitions in the output stage,
which correspond to decreased EMI emissions.
Rev. 0 | Page 7 of 20
Page 8

UG-344 Evaluation Board User Guide
10359-007
10359-008
SPEAKER PROTECTION CONTROL
This section controls the automatic level control (ALC) of the
SSM2804.
HEADPHONE CONTROL
This section controls the auto level control (ALC) of the
SSM2804.
Figure 7. Output Control Section of SSM2804 GUI
ALC Control 1 (Register 0x0A)
This section allows you to adjust the attack and recovery time
for the ALC. For details, see the SSM2804 data sheet.
ALC Control 2 (Register 0x0B)
This section allows you to enable ALC operation, to set the
compressor operation mode (light to heavy compression and
limiting), to set the limiter level, and to set the limiter mode.
There are two limiter modes: fixed power and supply tracking.
Fixed power mode sets the output limiter level to a fixed value,
independent of the power supply rail. Supply tracking mode
sets the limiter as a percentage of SPKVDD.
Note that, if you intend to change the gain setting register, R0 or
R1, you must toggle the ALC Enable check box to allow the
new gain settings to take effect.
ALC Control 3 (Register 0x0C)
This section controls the soft clip and soft start modes, the
noise gate enable, and the noise gate level.
Rev. 0 | Page 8 of 20
Figure 8. Headphone Control Section of SSM2804 GUI
Headphone Gain—Left/Right (Register 0x06, Register 0x07)
These registers provide independent 32-level volume controls
for each channel. The gain reduction ranges from 0 dB to
−75 dB, plus a mute setting.
Headphone Mixer (Register 0x08)
Input A, Input B, and Input C can be individually mixed into the
headphone output by setting the appropriate bits in Register 0x08.
Headphone Turn-on Time and Timeout (Register 0x08)
The headphone turn-on time controls the duration of the soft
turn-on when the headphone output is enabled. This is related
to the amplitude of the pop-click discontinuity when the
headphone output is enabled.
Page 9

Evaluation Board User Guide UG-344
10359-009
10359-010
AUXILIARY FUNCTIONS
This section allows user access to the power management
control registers, current/thermal fault recovery, mixing
operation, and edge rate control.
QUICK SET BUTTONS
The GUI includes a collection of buttons to switch to several
predefined configurations quickly. See Figure 10 and the
following three sections for details.
Figure 9. Auxiliary Function Section of SSM2804 GUI
Power Management (Register 0x0D)
To enable the SSM2804, select the SSM2804 Activate option.
Individual blocks can be enabled as needed.
Status (Register 0x0F)
This section is associated with Control Register R6 (0x06). Each
box is a read-only indicator that is activated when a particular
fault condition is encountered. It does not update unless the R6
Read button is clicked, as detailed in the Direct I
2
C Register
Access section. This feature is only active if the fault recovery
options (overcurrent autorecovery and overtemperature
autorecovery) are enabled.
Figure 10. Preset Button Section of SSM2804 GUI
RESET
RESET first initializes the SSM2804 by writing all 0s to
Control Register R8 (0x08). It then clears all previously stored
read/write windows and ensures that all registers are set
to the proper default value. The RESET button should be
clicked every time power is disrupted from the SSM2804
to synchronize the SSM2804 to the control software.
Class-D Preset (AIN)
By clicking the Class D Preset button, the following occurs:
• Input A is enabled as a stereo, single-ended PGA input.
The gain is set to 0 dB.
• Stereo Class-D output is enabled, and the mixer is
configured to pass Input A to both channels. The Class-D
gain is set to 12 dB.
• In the Power Management section, the SSM2804 is
activated. Input A and both channels of the Class-D output
are enabled.
Headphone Preset (AIN)
By clicking the Headphone Preset button, the following occurs:
• Input A is enabled as a stereo, single-ended PGA input.
The gain is set to 0 dB.
• Stereo headphone output is enabled, and the mixer is
configured to pass Input A to both channels. The
headphone gain is set to −3 dB.
• In the Power Management section, the SSM2804 is
activated. Input A and the headphone amplifier are
enabled.
Rev. 0 | Page 9 of 20
Page 10

UG-344 Evaluation Board User Guide
10359-011
10359-012
DIRECT I2C REGISTER ACCESS
Within each subsection is direct access to the associated I2C
control register. Data can be directly written to the control
register by typing the register data byte in hexadecimal format
in the desired register write box (see Figure 11). Click the Writ e
button when you are ready to send this data to the SSM2804. The
associated subsection options from the main GUI section are
also updated. You can also check the register contents by
clicking the Read button. The register contents are displayed in
the box next to each button.
USB POWER
The 5 V power switch, described in the USB Power Switch
section, is activated by clicking 5V USB Power ON as shown
in Figure 12.
Figure 12. USB Power Control
Figure 11. I2C Register Direct Control of SSM2804 GUI
Rev. 0 | Page 10 of 20
Page 11

Evaluation Board User Guide UG-344
USB—I2C INTERFACE
GENERAL DESCRIPTION
The EVAL-ADUSB2EBZ, also known as the USBi, is a standalone communications interface adapter and programmer used
in the evaluation of SigmaDSP® systems. It translates USB
control commands from SigmaStudio to the I
communications protocols.
To simplify bench evaluation, an interface based on the USBi
adapter is included on the SSM2804 evaluation board. This
eliminates the need for a separate interface board and 10-pin
ribbon cable; only a USB mini-B cable is required. This
interface is shown in Figure 13.
2
C and SPI
USB CONNECTOR
The connection between the host PC and the Cypress USB
interface device is via a standard USB cable that carries D+ and
D− signals for data communications, a 5 V power supply, and
ground. The D+ and D− lines are a 1-wire communication
interface carried by half-duplex differential signals on a twisted
pair. The clock is embedded in the data using the nonreturn-tozero inverted (NRZI) line code. These signal lines connect
directly to pins on the Cypress USB interface.
A surface-mounted USB miniature Type B jack was selected
for its low profile and increasing popularity in consumer
electronics.
POWER REGULATOR
The Cypress USB interface I/O ports are capable of operating
in both 1.8 V and 3.3 V modes, depending on the target device
in the system. Two regulators, U1 for 5 V to 3.3 V regulation
and U2 for 5 V to 1.8 V regulation, run simultaneously when
the board is powered. A jumper (JP4) is provided to easily
switch the IOVDD supply between the two regulators. D1
provides visual feedback that the board is being supplied with
5 V power from the PC USB port.
The position of Jumper JP4 should not be changed when the
board is connected to the USB bus.
10359-013
Figure 13. USB to I
2
C Microcontroller and USB Interface
The on-board regulators enable both 1.8 V and 3.3 V IOVDD
operation, allowing for increased testing flexibility.
The USBi interface can also control SigmaDSP systems in
real time via SigmaStudio, and it is capable of programming
an EEPROM in self-boot systems. It is an ideal solution for
in-circuit programming and tuning of prototype systems.
The USBi only supports USB Version 2.0 interfaces; it does not
work with PCs that only support USB Version 1.0 and
USB Version 1.1.
CYPRESS USB INTERFACE
The Cypress USB interface is the core of the system, including
all of the necessary functionality to convert USB commands
into corresponding I
2
C or SPI read/write transfers, and acts as a
FIFO to route data between the host PC and the target device.
CRYSTAL OSCILLATOR
The Cypress USB interface is its own clock master, and the board
includes a crystal oscillator circuit with a 24 MHz crystal resonator
to provide stability to the oscillator circuit. The crystal resonator is driven by the XTALOUT and XTALIN pins of the Cypress
USB interface.
Rev. 0 | Page 11 of 20
Page 12

UG-344 Evaluation Board User Guide
PASSIVE COMPONENT SELECTION
Although the evaluation board is preloaded with the passive
components required for a basic configuration, the same circuit
can be evaluated with different component values or filter
designs. Selecting the proper components is the key to
achieving the performance required at the budgeted cost.
INPUT COUPLING CAPACITOR SELECTION (C31 TO C36)
The input coupling capacitors, C31 to C36, should be large
enough to couple the low frequency signal components in the
incoming signal but small enough to filter out unnecessary
low frequency signals. For music signals, the cutoff frequency
chosen is often between 20 Hz and 30 Hz to preserve the low
frequency components of the signal; for applications with small
speakers, a higher cutoff frequency is often chosen to reduce
the power wasted on audio that cannot be reproduced by the
speaker.
The value of each input capacitor is calculated by
C = 1/(2πR
where:
R
is the sum of the amplifier’s input resistance and any
IN
external series resistor.
f
is the cutoff frequency.
C
The SSM2804 has two input modes: PGA mode and boost
mode. In boost mode, three gain settings are available, and the
input impedance is fixed at 20 kΩ.
In PGA mode, the system gain is adjustable in 31 steps from
−12 dB to +18 dB; however, the input impedance is not
constant. Because R
entire gain range of the SSM2804, this calculation must be
performed carefully to ensure that the low frequency
performance is acceptable at all gain levels.
As an example calculation, suppose that the low frequency
cutoff is to be no higher than 200 Hz and that the amplifier gain
Table 2. Suggested Output Beads
Part No. Manufacturer Z (Ω) I
BLM18PG121SN1D Murata 120 2000 0.05 1.6 × 0.8 × 0.8
MPZ1608S101A TDK 100 3000 0.03 1.6 × 0.8 × 0.8
MPZ1608S221A TDK 220 2000 0.05 1.6 × 0.8 × 0.8
BLM18EG221SN1D Murata 220 2000 0.05 1.6 × 0.8 × 0.8
)
INfC
varies with amplifier gain value over the
IN
varies between −12 dB and +18 dB. In the worst case, the input
resistance is as low as 4.5 kΩ. Because the cutoff frequency is
highest when the input resistance is small, the calculation should
be performed using this minimum resistance value—in this
case, giving a minimum capacitance of approximately 180 nF.
Use a larger standard value (perhaps 220 nF) to account for the
ordinary variation due to, for example, tolerance and temperature coefficient.
OUTPUT FERRITE BEADS (B1 TO B4)
The output beads, B1 to B4, are suggested components for
filtering out the EMI caused at the switching output nodes. The
penalty for using ferrite beads for EMI filtering is slightly worse
noise and distortion performance at the system level due to the
nonlinearity of the beads. Ensure that these beads have enough
current conducting capability while providing sufficient EMI
attenuation. The current rating needed for an 8 Ω load is approximately 420 mA, and impedance at 100 MHz must be ≥120 Ω. In
addition, the lower the dc resistance (DCR) of these beads, the
better for minimizing their power consumption. Ta ble 2 describes
suggested beads.
OUTPUT SHUNTING CAPACITORS (C43, C45, C47, AND C49)
There are four output shunting capacitors, C43, C45, C47, and
C49, that work with the B1 to B4 ferrite beads, if they are used.
Use small size (0603 or 0402), multilayer ceramic capacitors that
are made of X7R or C0G (NP0) materials. Note that the capacitors can be used in pairs: a capacitor with small capacitance (up
to 100 pF) plus a capacitor with a larger capacitance (less than
1 nF). This configuration provides thorough EMI reduction for
the entire frequency spectrum. Alternatively, a single capacitor of
approximately 470 pF can be used if reducing the bill of materials is
a priority.
(mA) DCR (Ω) Size (mm)
MAX
Rev. 0 | Page 12 of 20
Page 13

Evaluation Board User Guide UG-344
SPKVDD CONNECTO R
Merge all grounds here.
SPKG
USB POWER
**Warning:
IF USB POWER, REM OVE SPKVDD POWER
SPKG
SPKG
NO POP
NO POP
NO POP
NO POP
NO POP
SPKG
**Warning:
IF USB POWER, REM OVE AVDD POWER
AVDD CONNECTOR
USB POWER
SPKG
INPUT CAPS: COG/NPO 50V
OUT_L+
OUT_R-
OUT_R+
OUT_L-
SDA
SVDD
SCL
A
AVDD
S
SPKVDD
A
5V0DD_USB
A
A
AA
AVDD
A
AVDD3V3DD_USB
A
A
H8
HDR1X
2
C41
0.1uF
B2
MPZ1608S121A
C39
2.2uF
C30
1uF
H15
HDR1X2
C50
1nF
R26
0
R18
47K
H5
HDR1X2
R13
0
H3
HDR1X2
C52
220PF
JP5
HDR1X4
123
4
H13
HDR1X4
123
4
JP8
HDR1X2
H7
HDR1X
2
C51
220PF
C29
0.1uF
C33
0.22uF
C45
510pF
C38
1uF
R29
0
C26
10uF
R27
0
C36
0.22uF
R14
0
R30
0
M4
U9
SSM2804
A3
E2
B2
A2
A6
B3
B6
E4
C6
C5
D3
E5
E3
C4
D4
C3
D6
D5
A5
B5
A4
B4
A1
B1
D1
E6
D2
C2
E1
C1
RSPKP
HPVDD
PGND
PVDD
INA1
RSPKNINA2
AGND
INB1
INB2
HPR
AVDD
HPL
SDIN
STDN
SCLK
INC1
INC2
RCVP
RCVN
EPP
EPN
LSPKP
LSPKN
HPGND
BIAS
CPVDD
CPVSS
CF1
CF2
C37
0.1uF
M5
C47
510pF
C32
0.22uF
H11
HDR1X2
H9
HDR1X2
B1
MPZ1608S121A
R19
12
C46
1nF
B3
MPZ1608S121A
R21
0
R28
0
M6
JP6
HDR1X4
123
4
C40
2.2uF
H14
HDR1X2
R24
0
C28
10uF
C49
510pF
JP9
HDR1X2
H4
HDR1X2
C27
0.1uF
C42
10uF
M7
C44
1nF
JP7
HDR1X4
123
4
R20
12
H6
HDR1X2
H12
HDR1X2
J2
PHONE JACK STEREO
3
2
1
H10
HDR1X2
R16
4.99k
JP10
HDR1X2
M3
C31
0.22uF
C48
1nF
C35
0.22uF
R25
0
R17
47K
B4
MPZ1608S121A
C43
510pF
R15
4.99k
C34
0.22uF
10359-014
EVALUATION BOARD SCHEMATICS AND ARTWORK
Figure 14. SSM2804 evaluation board schematic
Rev. 0 | Page 13 of 20
Page 14

UG-344 Evaluation Board User Guide
POSITION OF JUMPERS:
1-2: INTERNAL I2C CONTROLLER
2-3: EXTERNAL I2C C O NTR O LLER
External I2C
Port
USBi Volatge
Selector
EEPROM
Connector
Reset
POWER BOTH AVDD and SPKVDD, USB_PWR_ON
USB_PWR_ON
SDA1
SCL1
1LCSDDVOI
EXVDD
SDA2
SCL2
EXVDD
SDA1
SDA2
SCL1
SDA1
5V0DD
SVDD
SCL
SDA
IOVDD
3V3DD
IOVDD 3V3DD
IOVDD
3V3DD
5V0DD_USB
3V3DD
IOVDD
3V3DD
IOVDD
3V3DD
IOVDD
IOVDD
IOVDD
1V8DD
1V8DD
IOVDD
3V3DD
1V8DD
3V3DD
3V3DD_USB
C17
22pF
SW1
PUSHBTN
JP1
HDR1X3
123
JP3
HDR1X3
123
M1
C13
0.1uF
U7
FXLP34P5X
1
2
3
4
5
VCC1
A
GND
Y
VCC
JP2
HDR1X3
1
2
3
U5
FXLP34P5X
1
2
3
4
5
VCC1
A
GND
Y
VCC
C1
1uF
D4
YELLOW
C16
0.1uF
C8
10nF
U1
ADP1711-3.3
1
3
2
4
5
IN
EN
GND
BYP
OUT
U6
FXLP34P5X
1
2
3
4
5
VCC1
A
GND
Y
VCC
C23
10nF
H1
HDR1X3
1
2
3
C25
10uF
R11
475
R1
100k
Q1
FZT705/SOT
C9
0.1uF
C7
10nF
R8
475
U4
CY7C68053-56BAXI
2E
1E
3F
3G
1A
1B
7H
7G
8H
2B
2G
2C
1C
7B
8B
8G6G8F
7F
6F
8C
7C
6C
3H
4F
4H4G5H
5G
5F
6H8A7A
6B6A3B3A3C
2A
2D
1D
5A
5B
7E
8E
5C
1G
1F
2F
1H
2H
4A
4B
4C
7D
8D
DPLUS
DMINUS
SCL
SDA
RDY0/SLRD
RDY1/SLWR
CTL0/FLAGA
CTL1/FLAGB
CTL2/FLAGC
CLKOUT
IFCLK
XTALOUT
XTALIN
WAKEUP
RESET
PA0/INT0
PA1/INT1
PA2/SLOE
PA3/WU2
PA4/FIFOADR0
PA5/FIFOADR1
PA6/PKTEND
PA7/FLAGD/SLCS
PB0/FD[0]
PB1/FD[1]
PB2/FD[2]
PB3/FD[3]
PB4/FD[4]
PB5/FD[5]
PB6/FD[6]
PB7/FD[7]
PD0/FD[8]
PD1/FD[9]
PD2/FD[10]
PD3/FD[11]
PD4/FD[12]
PD5/FD[13]
PD6/FD[14]
PD7/FD[15]
AVCC
AVCC
VCC_IO
VCC_IO
VCC_IO
VCC_IO
VCC_D
VCC_A
AGND
AGND
GND
GND
GND
GND
GND
GND
GND
D1
RED
Y1
24MHz
U2
ADP1711-1.8
1
3
2
4
5
IN
EN
GND
BYP
OUT
C11
10uF
D2
YELLOW
U3
24AA256
1
2
3
4 5
678
A0A1A2
GND
SCL
WP
VCC
R9
475
H2
HDR1X4
123
4
M2 U8
ADP1711-3.3
1
3
2
4
5
IN
EN
GND
BYP
OUT
C3
10uF
C5
1uF
J1
USB_MINI
1
2
3
4
5
6
7
8
9
10
11
VBUS
DM
DP
ID
GND
678
9
10
11
C19
1uF
Q2
MMBT3904LT1G
R6
4.99k
C15
0.1uF
R12
475
R3
475
R5
10k
C2
1uF
C18
22pF
C22
1uF
C20
0.1uF
C10
10uF
C4
1uF
R10
100k
C6
10uF
C12
0.1uF
D3
BLUE
R4
10k
R2
2k
R7
4.99k
R23
0
C24
1uF
C14
0.1uF
C21
0.1uF
JP4
HDR1X3
1
2
3
D5
BLUE
R22
0
SDA
SCL2
10359-015
Figure 15. SSM2804 evaluation board schematic (continued)
Rev. 0 | Page 14 of 20
Page 15

Evaluation Board User Guide UG-344
10359-016
10359-017
Figure 16. Evaluation Board Layout, Primary Side (Layer 1)
Figure 17. Evaluation Board Layout, Ground Plane (Layer 2)
Rev. 0 | Page 15 of 20
Page 16

UG-344 Evaluation Board User Guide
10359-018
10359-019
Figure 18. Evaluation Board Layout, Power Plane (Layer 3)
Figure 19. Evaluation Board Layout, Secondary Side (Layer 4)
Rev. 0 | Page 16 of 20
Page 17

Evaluation Board User Guide UG-344
10359-020
10359-021
Figure 20. Evaluation Board Layout, Top Silkscreen
Figure 21. Evaluation Board Layout, Bottom Silkscreen
Rev. 0 | Page 17 of 20
Page 18

UG-344 Evaluation Board User Guide
32 1 SW1
Switch tactile SPST-NO 0.05 A, 24 V
Omron Electronics,
B3SN-3012
ORDERING INFORMATION
BILL OF MATERIALS
Table 3.
Item Qty Reference Designator Description Manufacturer Mfg Part Number
1 4 B1, B2, B3, B4 Resistor, 0.0 Ω, 1/10 W, 0603 Panasonic—ECG ERJ-3GEY0R00V
2 7 C1, C2, C4, C5, C19, C22, C24 Capacitor ceramic, 1 µF, 10 V, 10%, X7R,
0805
3 8 C3, C6, C10, C11, C25, C26,
C28, C42
4 3 C7, C8, C23 Capacitor ceramic, 10000 pF, 50 V, 10%,
5 8 C9, C12, C13, C14, C15, C16,
C20, C21
6 2 C17, C18 Capacitor ceramic, 22 pF, 50 V, 0603 Panasonic—ECG ECJ-1VC1H220J
7 4 C27, C29, C37,1 C41 Capacitor ceramic, 0.10 µF, 25 V, X5R, 0603 Taiyo Yuden TMK107BJ104KA-T
8 2 C30, C38 Capacitor ceramic, 1 µF, 10 V, 1%, X7R, 0805 Venkel, Ltd. C0805X7R100-105KNE
9 6 C31, C32, C33, C34, C35, C36 Capacitor ceramic, 0.22 µF, 50 V, X7R, 10%,
10 2 C39, C40 Capacitor ceramic, 2.2 µF, 16 V, X5R, 0603 Murata Electronics
11 4 C43, C45, C47, C492 Capacitor ceramic, 510 pF, 50 V, 5%, C0G,
12 4 C44, C46, C48, C503 Capacitor ceramic, 1000 pF, 25 V, 5%, C0G,
13 2 C51, C52 Capacitor ceramic, 22 pF, 50 V, 0603, SMD Panasonic—ECG ECJ-1VC1H220J
14 1 D1 LED mini SMD red, 7.5 MCD, GAASP/GAP Vishay TLMS2100-GS08
15 2 D2, D4 LED mini SMD yellow, 7.5 MCD, GAASP/GAP Vishay TLMY2100-GS08
16 2 D3, D5 LED blue, 471 nm, clear SMD OSRAM Opto
17 5 JP1, H1, JP2, JP3, JP4 Connector header BR KWAY , 0.100,
18 5 H2, JP5, JP6, JP7, H13 Connector header BRKWAY, 0.100,
19 15 H3, H4, H5, H6, H7, JP8, H8,
JP9, H9, JP10, H10, H11,
H12, H14, H15
20 1 J1 Connector mini USB RCPT, RA Type B SMD TE Connectivity 1734035-2
21 1 J2 Connector jack stereo R/A 3-pin, 3.5 mm CUI, Inc SJ1-3523N
22 1 Q1 Trans PNP, −120 V, −2000 mA, SOT-223 Diodes/Zetex FZT705TA
23 1 Q2 Transistor GP NPN, amp SOT-23 Fairchild
24 2 R1, R10 Resistor, 100 kΩ, 1/8 W, 1%, 0805, SMD Panasonic—ECG ERJ-6ENF1003V
25 1 R2 Resistor, 2.00 kΩ, 1/8 W, 1%, 0805, SMD Yageo RC0805FR-072KL
26 5 R3, R8, R9, R11, R12 Resistor, 475 Ω, 1/8 W, 1%, 0805, SMD Panasonic—ECG ERJ-6ENF4750V
27 2 R4, R5 Resistor, 10.0 kΩ, 1/8 W, 1% 0805 SMD Yageo RC0805FR-0710KL
28 4 R6, R7, R15, R16 Resistor, 4.99 kΩ, 1/8 W, 1%, 0805, SMD Yageo RC0805FR-074K99L
29 12 R13, R14, R21, R22, R23, R24,
R25, R26, R27, R28, R29, R30
30 2 R17, R18 Resistor, 47 kΩ, 1/10 W, 1%, 0805, SMD Venkel, Ltd. CR0805-10W-4702FT
31 2 R19, R20 Resistor, 12.0 Ω, 1/8 W, 1%, 0805, SMD Rohm
Capacitor ceramic, 10 µF, 10 V, 10%, X5R,
0805
X7R, 0603
Capacitor ceramic, 0.10 µF, 25 V, X5R, 0603 Taiyo Yuden TMK107BJ104KA-T
0805
0603
0603
3-position, STR
4-position, STR
Connector header BRK WAY, 0.100,
2-position, STR
Resistor, 0.0 kΩ, 1/8 W, 0805, SMD Panasonic—ECG ERJ-6GEY0R00V
Kemet C0805C105K8RACTU
Murata Electronics
North America
AVX Corporation 06035C103KAT2A
TDK Corporation C2012X7R1H224K
North America
Murata Electronics
North America
Venkel, Ltd. C0603COG500-102JNE
Semiconductors,
Inc.
TE Connectivity 4-103747-0-03
TE Connectivity 4-103747-0-04
TE Connectivity 4-103747-0-02
Semiconductor
Semiconductor
GRM21BR61A106KE19L
GRM188R61C225KE15D
GRM1885C1H511JA01D
LB M673-L1M2-35-Z
MMBT3904FSCT-ND
MCR10EZHF12R0
33 2 U1, U8 IC REG LDO, 150 mA, 3.3 V, 5-lead TSOT Analog Devices ADP1711AUJZ-3.3-R7
34 1 U2 IC REG LDO, 150 mA 1.8 V, 5-lead TSOT Analog Devices ADP1711AUJZ-1.8-R7
Inc, EMC Div
Rev. 0 | Page 18 of 20
Page 19

Evaluation Board User Guide UG-344
Item Qty Reference Designator Description Manufacturer Mfg Part Number
35 1 U3 IC EEPROM 256 kB, 400 kHz, 8TSSOP Microchip
Technology
36 1 U4 IC MCU MOBL-USB 56-VFBGA Cypress
Semiconductor
Corp
37 3 U5, U6, U7 Translator, 1-bit, unidirect, SC70-5 Fairchild
Semiconductor
38 1 U9 Audio subsystem 30-ball WLCSP Analog Devices SSM2804CBZ-RL
39 1 Y1 Crystal, 24.00014 MHz, 18 pF, HC49/U Citizen Finetech
Miyota
1
C37 is not populated.
2
C43, C45, C47, and C49 are not populated.
3
C44, C46, C48, and C50 are not populated.
24AA256-I/ST
CY7C68053-56BAXI
FXLP34P5X
HC49US-24.00014MABJ
Rev. 0 | Page 19 of 20
Page 20

UG-344 Evaluation Board User Guide
MERCHANTABILITY, TITLE, FITNESS FOR A PARTICULAR PURPOSE OR NONINFRINGEMENT OF INTELLECTUAL
nd construed in accordance with the substantive laws of the Commonwealth of
NOTES
I2C refers to a communications protocol originally developed by Philips Semiconductors (now NXP Semiconductors).
ESD Caution
ESD (electrostatic discharge) sensitive device. Charged devices and circuit boards can discharge without detection. Although this product features patented or proprietary protection
circuitry, damage may occur on devices subjected to high e nergy ESD. Therefore, proper ESD precaution s should be taken to avoid per formance degradation or loss of functionality.
Legal Terms and Conditions
By using t he evaluation board discussed herein (together with any tools, components documentation or support materials, the “Evaluation Board”), you are agreeing to be bound by the terms and conditions
set forth below (“Agreement”) unless you have purchased the Evaluation Board, in which case the Analog Devices Standard Terms and Conditions of Sale shall govern. Do not use the Evaluation Board until you
have read and agreed to the Agreement. Your use of the Evaluation Board shall signify your acceptance of the Agreement. This Agreement is made by and between you (“Customer”) and Analog Devices, Inc.
(“ADI”), with its principal place of business at One Technology Way, Norwood, MA 02062, USA. Subject to the terms and conditions of the Agreement, ADI hereby grants to Customer a free, limited, personal,
temporary, non-exclusive, non-sublicensable, non-transferable license to use the Evaluation Board FOR EVALUATION PURPOSES ONLY. Customer understands and agrees that the Evaluation Board is provided
for the sole and exclusive purpose referenced above, and agrees not to use the Evaluation Board for any other purpose. Furthermore, the license granted is expressly made subject to the following additional
limitations: Customer shall not (i) rent, lease, display, sell, transfer, assign, sublicense, or distribute the Evaluation Board; and (ii) permit any Third Party to access the Evaluation Board. As used herein, the term
“Third Party” includes any entity other than ADI, Customer, their employees, affiliates and in-house consultants. The Evaluation Board is NOT sold to Customer; all rights not expressly granted herein, including
ownership of the Evaluation Board, are reserved by ADI. CONFIDENTIALIT Y. This Agreement and the Evaluation Board shall all be considered the confidential and propriet ary information of ADI. Customer may
not disclose or transfer any portion of the Evaluation Board to any other party for any reason. Upon discontinuation of use of the Evaluation Board or termination of this Agreement, Customer agrees to
promptl y return the Evaluation Board to ADI. ADDITIONAL RESTRICTIONS. Customer may not disassemble, decompile or reverse engineer chips on the Evaluation Board. Customer shall inform ADI of any
occurred damages or any modifications or alterations it makes to the Evaluation Board, including but not limited to soldering or any other activity that affects the material content of the Evaluation Board.
Modifications to the Evaluation Board must comply with applicable law, inclu ding but not limited to the RoHS Directive. TERMINAT ION . ADI may terminate this Agreement at any time upon giving written notice
to Customer. Customer agrees to return to ADI the Evaluation Board at that time. LIMITATION OF LIABILITY. THE EVALUATION BOARD PROVIDED HEREUNDER IS PROVIDED “AS IS” AND ADI MAKES NO
WARRANTIES OR REPRESEN TATIONS OF ANY KIN D WITH RESPECT TO IT. ADI S PECIFICALLY DISCLAIMS ANY REPRESENTATIONS, ENDORS EMENTS, GUARANTEES, OR WARRANTIES, EXPRES S OR IMPLIED, RELATED
TO THE EVALUATION BOARD INCLUDING, BUT NOT LIMITED TO, THE IMPLIED WARRANTY OF
PROPERTY RIGHTS. IN NO EVENT WILL ADI AND ITS LICENSORS BE LIABLE FOR ANY INCIDENTAL, SPECIAL, INDIRECT, OR CONSEQUENTIAL DAMAGES RESULTING FROM CUSTOMER’S POSSESSION OR USE OF
THE EVALUATION BOARD, INCLUD ING BUT NOT LIMITED TO LOST PROFITS, DE LAY COSTS, LABOR COSTS OR LOSS OF GOODWI LL. ADI’S TOTAL LIABILITY FROM ANY AND ALL CAUSES SHALL BE LIMITED TO THE
AMOUNT OF ONE HUNDRE D US DOLLARS ($100.00). EXPORT. Customer agrees that it will not directly or indirectly export the Evaluation Board to another countr y, and that it will comply with all applicable
United States federal laws and regulations relating to exports. GOVERNING LAW. This Agreement shall be governed by a
Massachusetts (excluding conflict of law rules). Any legal action regarding this Agreement will b e heard in the state or federal courts having jurisdiction in Suffolk County, Massachusetts, and Customer hereby
submits to the personal jurisdiction and venue of such courts. The United Nations Convention on Contracts for the International Sale of Goods shall not apply to this Agreement and is expressly disclaimed.
©2012 Analog Devices, Inc. All rights reserved. Trademarks and
registered trademarks are the property of their respective owners.
UG10359-0-1/12(0)
Rev. 0 | Page 20 of 20
 Loading...