

Page 1

Application Note
AN-xxxx
Setup of an Ad-Hoc network using UAY-
MMC85M wireless cards
(A How to Guide)
Documentation No. ____
Marvell Semiconductor Inc.
Marvell® Semiconductor Corporation
5488 Marvell Lane
Santa Clara, CA 95054
Copyright © 2006 Marvell® Semiconductor Corporation. All rights reserved.
Page 2

Setup of an Ad-Hoc network using UAY-
MMC85M wireless cards
Revision History
Date Author Revision Description
5/9/07 Nishant Sabadra 1.0 Draft for Review
Marvell AppNote
AN -xxxx
Page 2 Marvell® Proprietary. V 1.0
Page 3

Setup of an Ad-Hoc network using UAY-
MMC85M wireless cards
Marvell AppNote
AN -xxxx
Table of Content
Table of Content ................................................................................................................. 3
How to: Setup of an Ad-Hoc network using UAY-MMC85M wireless cards................... 4
Overview......................................................................................................................... 4
Ad-Hoc test Setup........................................................................................................... 4
1] Marvell Configuration Utility..................................................................................... 9
1.1] Overview ............................................................................................................. 9
1.2] Settings on the Marvell Client Configuration Utility........................................ 10
2] Bringing up the Setup............................................................................................... 23
This section provides the details on.......................................................................... 23
2.1] Driver for UAY-MMC85M cards ..................................................................... 23
2.2] Dbgview Utility................................................................................................. 23
2.3] Ad-Hoc Setup bring up...................................................................................... 27
3] Debugging Ad-Hoc Setup ........................................................................................ 39
3.1] Slave does not associate with the Master..........................................................39
3.2] Link Instability .................................................................................................. 40
3.3] Video cannot be played ..................................................................................... 40
APPENDIX A............................................................................................................... 44
Federal Communications Commission (FCC) Compliance ......................................... 44
APPENDIX B............................................................................................................... 45
Setting up UAY-MMC85M.......................................................................................... 45
1] UAY-MMC85M Driver Installation .................................................................... 45
2] Configuration Utility Installation......................................................................... 51
APPENDIX C............................................................................................................... 58
Disabling Windows Zero Config.................................................................................. 58
1] Disabling Windows Zero Configuration Utility...................................................58
Page 3 Marvell® Proprietary. V 1.0
Page 4
Setup of an Ad-Hoc network using UAY-
MMC85M wireless cards
Marvell AppNote
AN -xxxx
How to: Setup of an Ad-Hoc network using UAYMMC85M wireless cards
Overview
This document describes the procedure of setting up an ad-hoc network using Marvell
UAY-MMC85M PCI Express WLAN client mini cards. Marvell configuration utility is
used to configure and setup the Ad-Hoc network for testing purposes.
Ad-Hoc test Setup
The Ad-Hoc test setup consists of two laptops Master and Slave.
Page 4 Marvell® Proprietary. V 1.0
Page 5

Setup of an Ad-Hoc network using UAY-
y
MMC85M wireless cards
Marvell AppNote
AN -xxxx
Slave
laptop
Master
laptop
MC85 extender assembl
Each laptop uses a MC85 extender assembly. The MC85 extender assembly consists of:
1. MC85 PCIe card
2. PCIe extender adapter
Antenna
Connector
Direction of plugging
the extender adapter
Page 5 Marvell® Proprietary. V 1.0
Page 6

Setup of an Ad-Hoc network using UAY-
MMC85M wireless cards
Marvell AppNote
AN -xxxx
MC85 extender assembly
Page 6 Marvell® Proprietary. V 1.0
Page 7

Setup of an Ad-Hoc network using UAY-
MMC85M wireless cards
Marvell AppNote
AN -xxxx
MC85 card
Page 7 Marvell® Proprietary. V 1.0
Page 8

Setup of an Ad-Hoc network using UAY-
MMC85M wireless cards
Marvell AppNote
AN -xxxx
PCIe extender adapter
The PCIe extender adapter is plugged in both the laptops to create an Ad-Hoc network.
Page 8 Marvell® Proprietary. V 1.0
Page 9

Setup of an Ad-Hoc network using UAY-
MMC85M wireless cards
Marvell AppNote
AN -xxxx
1] Marvell Configuration Utility
1.1] Overview
The Marvell Client Card Configuration utility is a Windows based application that allows
configuration and management of the Marvell high throughput client cards. The
configuration utility sets up profiles, and performs other wireless network management
tasks. The Marvell Client card configuration utility comes in an executable file. Running
the executable file opens up the setup window. Following the instructions on screen will
install the configuration utility. For details on installing the Marvell Client card
configuration utility, please refer page 41.
Note:
For windows XP and Windows Server 2003, it is preferable to use the Marvell
configuration utility when using Marvell client cards. Windows Zero Config and Marvell
Configuration Utility cannot be used at the same time. In such a case, it is preferable to
disable or manually stop the services running Windows Zero Config utility. Please refer
page 54, on how to manually stop the Windows Zero Config service.
Page 9 Marvell® Proprietary. V 1.0
Page 10

Setup of an Ad-Hoc network using UAY-
MMC85M wireless cards
Marvell AppNote
1.2] Settings on the Marvell Client Configuration Utility
1.2.1] About tab details
The About tab in the Configuration utility should display the same settings on both
the Master and Slave laptops, as seen in the snap shot below, except for the MAC
address.
AN -xxxx
Page 10 Marvell® Proprietary. V 1.0
Page 11

Setup of an Ad-Hoc network using UAY-
MMC85M wireless cards
Marvell AppNote
AN -xxxx
1.2.2] Creating the Profile
This section provides the requisite settings to bring up the Ad-Hoc setup using UAYMMC85M cards. The profile is created with the proper settings for the Ad-Hoc setup.
This is done using the Profile Manager tab in the Marvell GUI. Following steps provide
the details on creating a new profile.
Please note that the profile dfs120 and dfs60 have already been created. Please refer
pages 10 - 13 and 20 on how to select the pre-configured profile.
Note: The steps below help you to create a new profile only if needed.
1. Double click on the Marvell GUI icon (encircled) on the desktop.
Page 11 Marvell® Proprietary. V 1.0
Page 12

Setup of an Ad-Hoc network using UAY-
MMC85M wireless cards
2. The Network Status tab shows status as Card unplugged.
Marvell AppNote
AN -xxxx
Page 12 Marvell® Proprietary. V 1.0
Page 13

Setup of an Ad-Hoc network using UAY-
MMC85M wireless cards
3. Plug in the extender adapter card. The Network Status tab now shows No
connection.
Marvell AppNote
AN -xxxx
Page 13 Marvell® Proprietary. V 1.0
Page 14

Setup of an Ad-Hoc network using UAY-
4. Click on the Profile Manager tab.
MMC85M wireless cards
Marvell AppNote
AN -xxxx
Page 14 Marvell® Proprietary. V 1.0
Page 15

5. Click Create button.
Setup of an Ad-Hoc network using UAY-
MMC85M wireless cards
Marvell AppNote
AN -xxxx
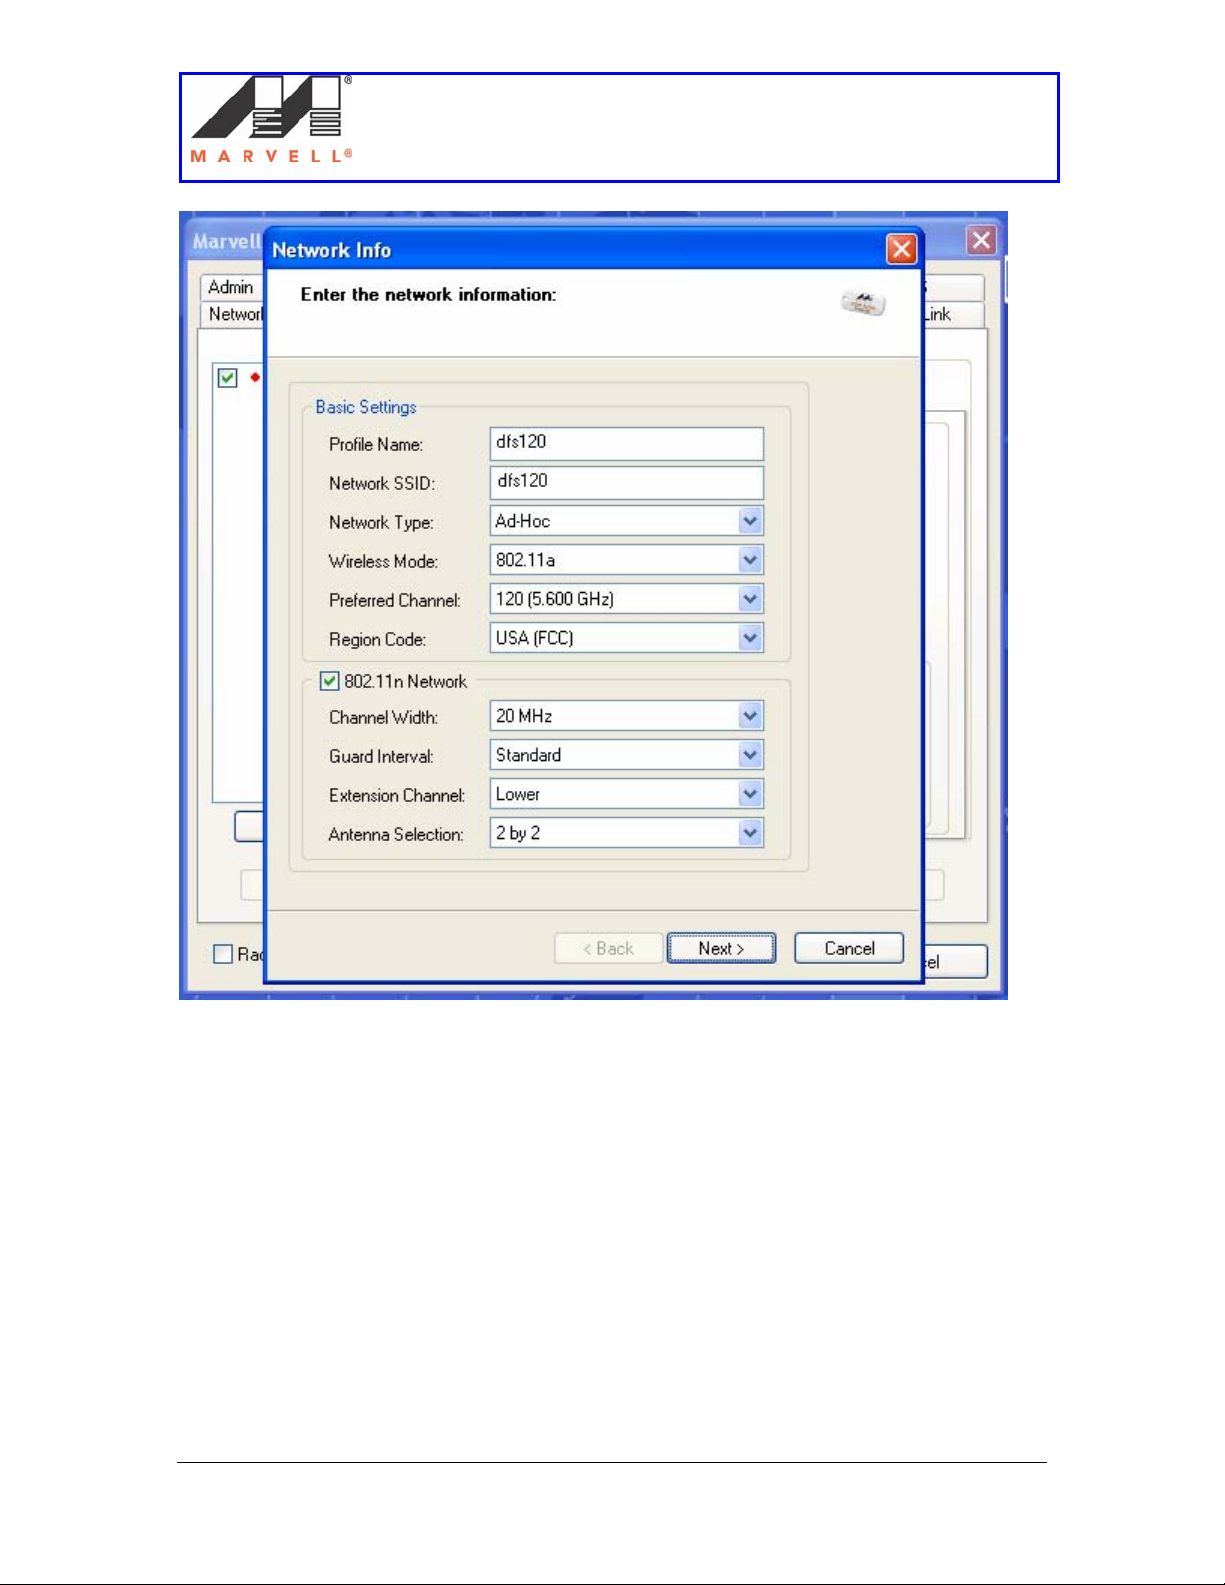
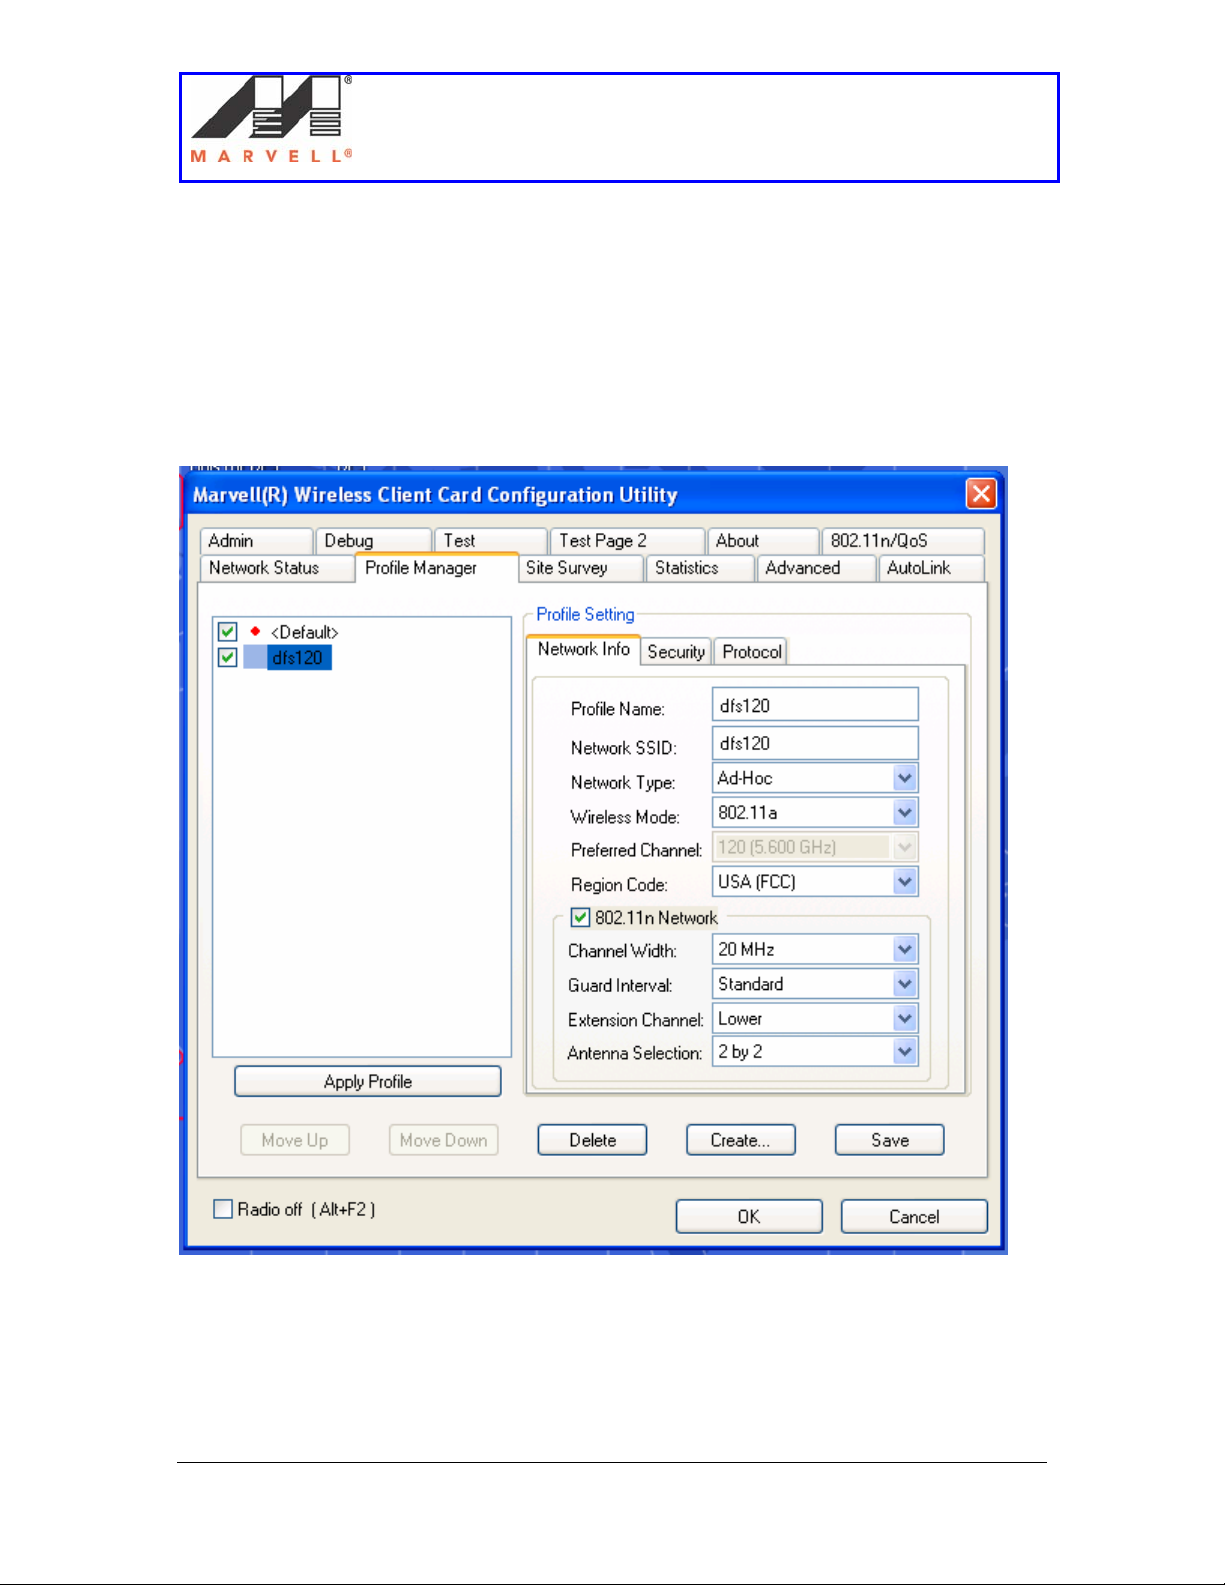
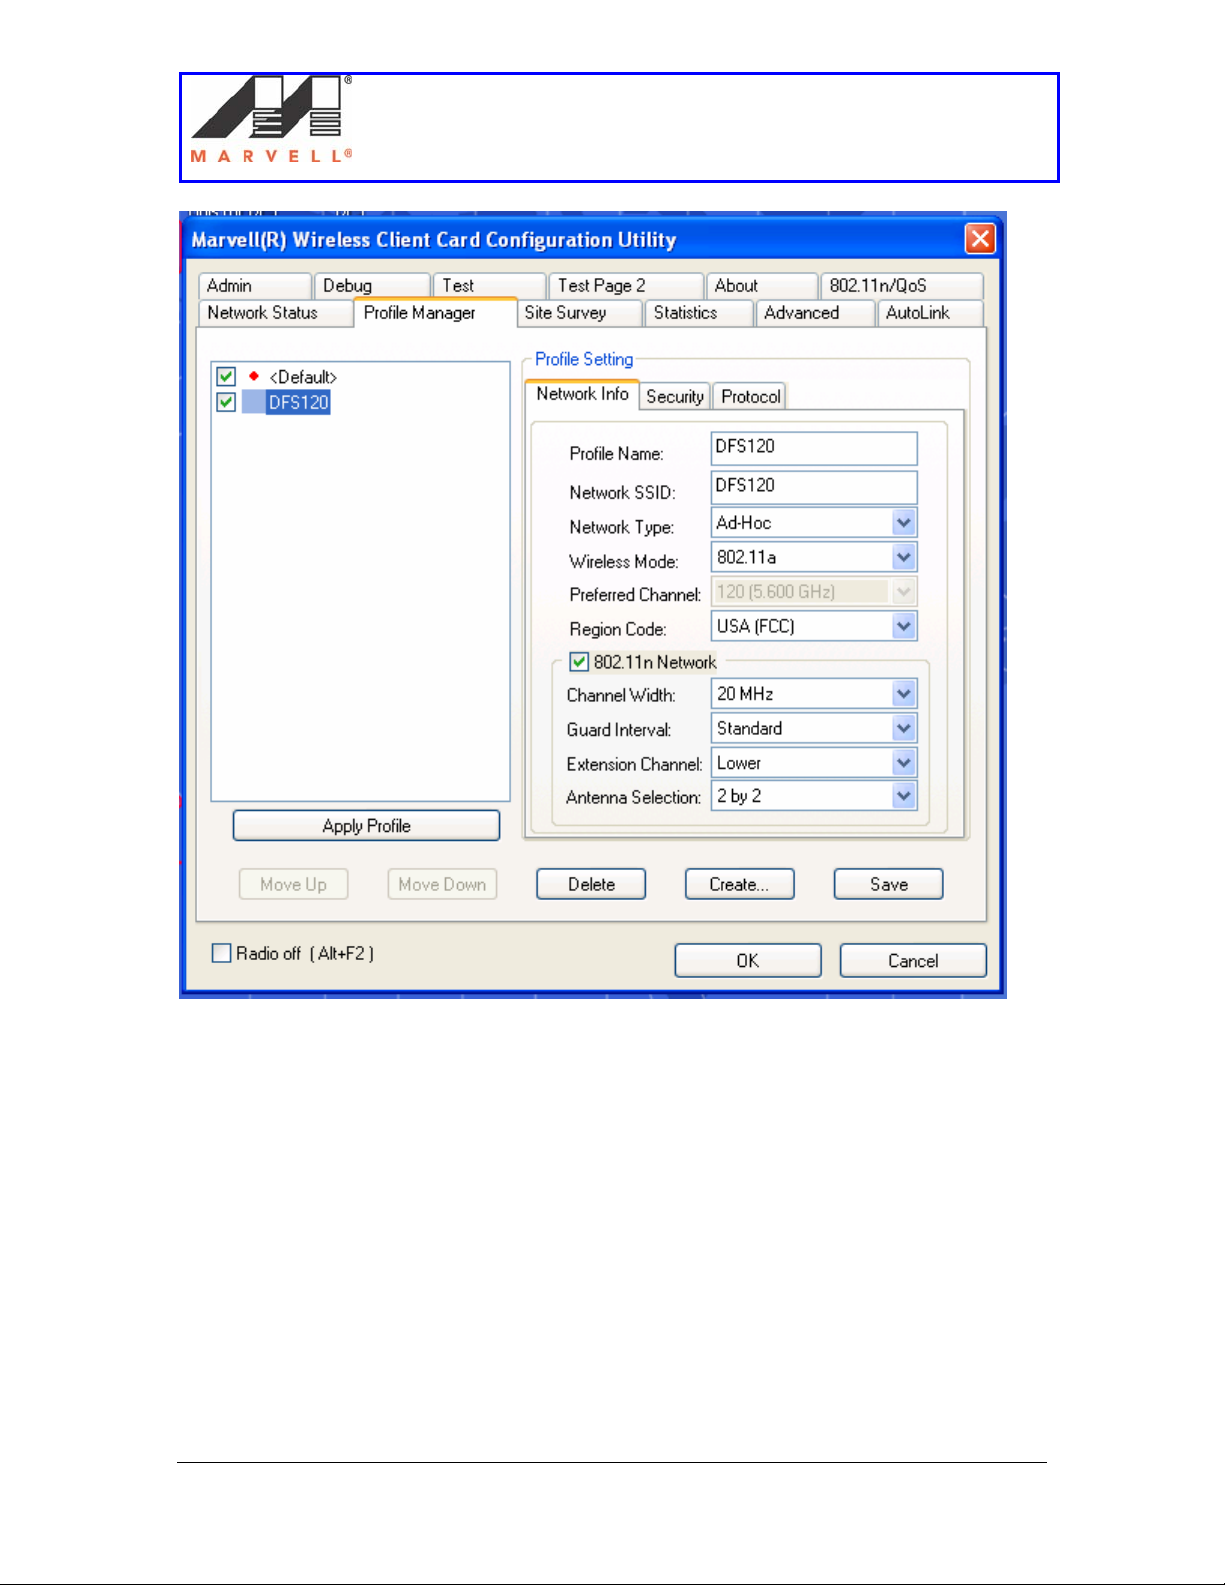
6. Enter the following information in Basic Settings
a. Profile Name: dfs120
The profile name should be changed to dfs60, when testing is carried out on
channel 60
b. Network SSID: dfs120
The network SSID should be set to dfs60, when testing is carried out on channel
60.
c. Network Type: Ad-Hoc
Page 15 Marvell® Proprietary. V 1.0
Page 16

Setup of an Ad-Hoc network using UAY-
MMC85M wireless cards
d. Wireless Mode: 802.11a
e. Preferred Channel: 120
The preferred channel should be set to channel 60 when testing is carried out on
channel 60.
f. Region Code: USA (FCC)
g. Channel Width: 20 MHz
Channel width should be set to 40 MHz, when testing the 40MHz test cases.
h. Guard Interval: Standard
i. Extension Channel: Lower
The extension channel should set to upper, when channel 60 is being used.
j. Antenna Selection: 2 by 2
Marvell AppNote
AN -xxxx
Page 16 Marvell® Proprietary. V 1.0
Page 17
Setup of an Ad-Hoc network using UAY-
MMC85M wireless cards
Marvell AppNote
AN -xxxx
7. Click Next.
Page 17 Marvell® Proprietary. V 1.0
Page 18
Setup of an Ad-Hoc network using UAY-
MMC85M wireless cards
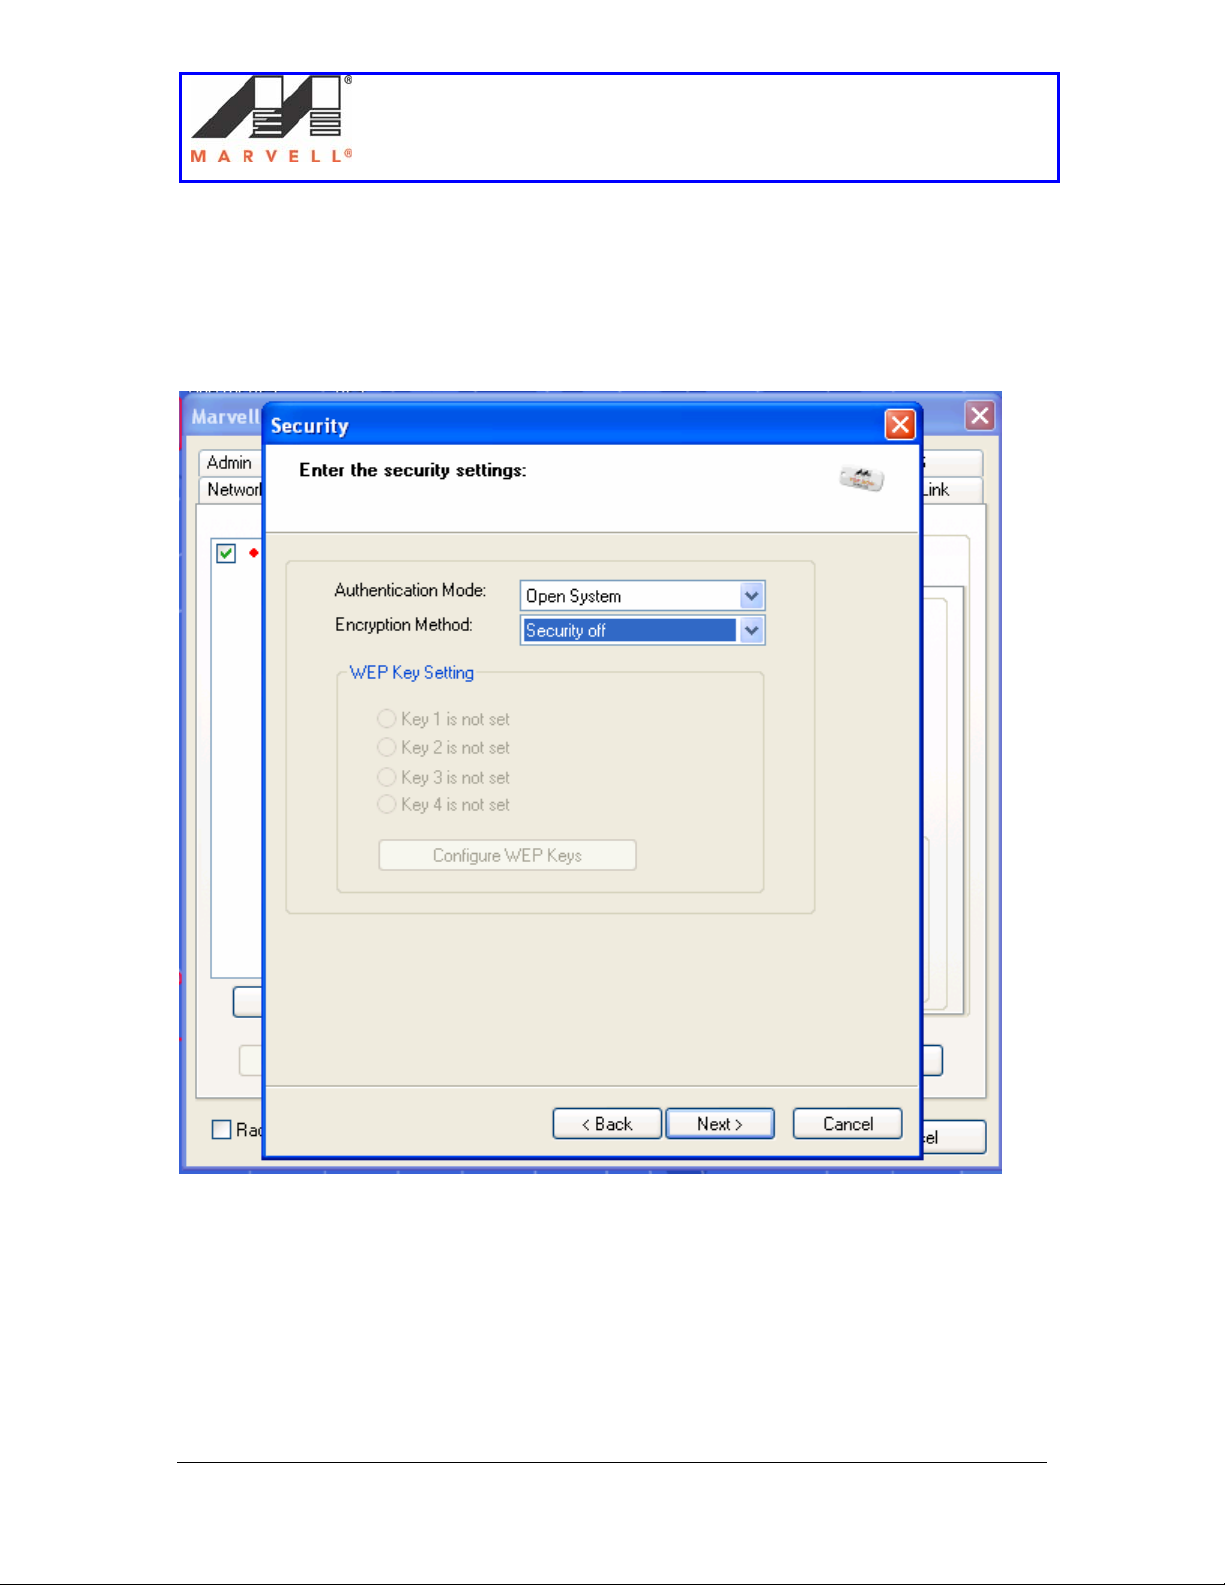
8. On the Security window, leave the settings to default.
a. Authentication Mode: Open System
b. Encryption Method: Security Off
Marvell AppNote
AN -xxxx
9. Click Next.
Page 18 Marvell® Proprietary. V 1.0
Page 19
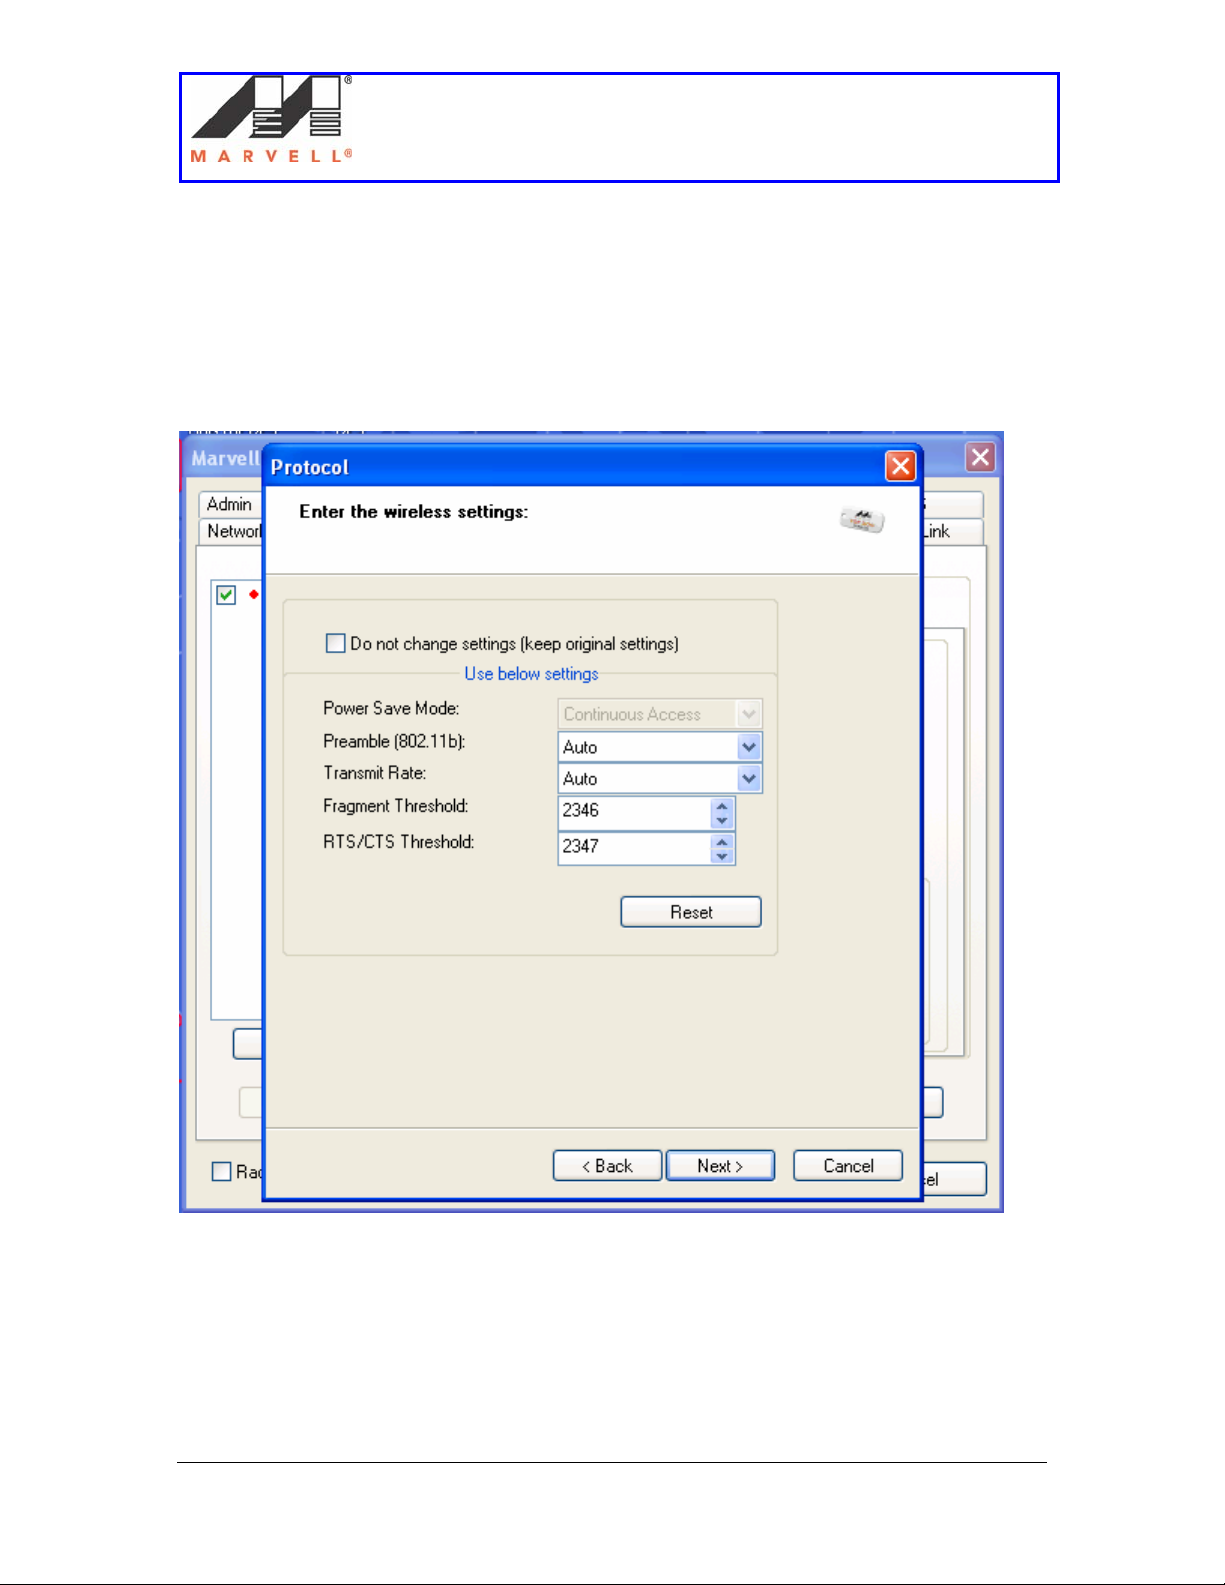
10. On the Protocol window
a. Uncheck the Do not change settings (keep original settings) box.
b. Leave rest of the settings as default.
Setup of an Ad-Hoc network using UAY-
MMC85M wireless cards
Marvell AppNote
AN -xxxx
11. Click Next.
Page 19 Marvell® Proprietary. V 1.0
Page 20

12. Click Finish.
Setup of an Ad-Hoc network using UAY-
MMC85M wireless cards
Marvell AppNote
AN -xxxx
Page 20 Marvell® Proprietary. V 1.0
Page 21
Setup of an Ad-Hoc network using UAY-
MMC85M wireless cards
13. The new profile dfs120 is seen in the left hand column.
14. Select the profile dfs120 by clicking on it.
Marvell AppNote
AN -xxxx
15. Click on Apply Profile button to apply the dfs120 profile.
16. Click on the Network Status tab, to see the selected profile.
Page 21 Marvell® Proprietary. V 1.0
Page 22

Setup of an Ad-Hoc network using UAY-
MMC85M wireless cards
Marvell AppNote
17. The Status field in the Link Information section shows “Waiting for Peer.”
AN -xxxx
18. Unplug the card from the laptop.
19. Follow the steps 1 - 18 to create the profile on Slave laptop.
Page 22 Marvell® Proprietary. V 1.0
Page 23

Setup of an Ad-Hoc network using UAY-
MMC85M wireless cards
Marvell AppNote
AN -xxxx
2] Bringing up the Setup
This section provides the details on
1. Drivers for UAY-MMC85M cards
2. Steps to use the Dbgview.exe utility to see radar detection and other logs.
3. Steps to bring up the Ad-Hoc setup
2.1] Driver for UAY-MMC85M cards
The UAY-MMC85M has two versions of the same driver. These drivers are used for the
following purpose:
1. To detect the radar in test mode
This driver version is used to detect the radar pulses, but not switch channels. This
mode is known as test mode and used to count the number of radar pulses detected.
2. To detect the radar and switch channel
This driver version is used to detect the radar pulses and switch to a new channel.
In this case the UAY-MMC85M switches channels anytime it detects radar. This is
used to determine the moving and closing time of the channel switching.
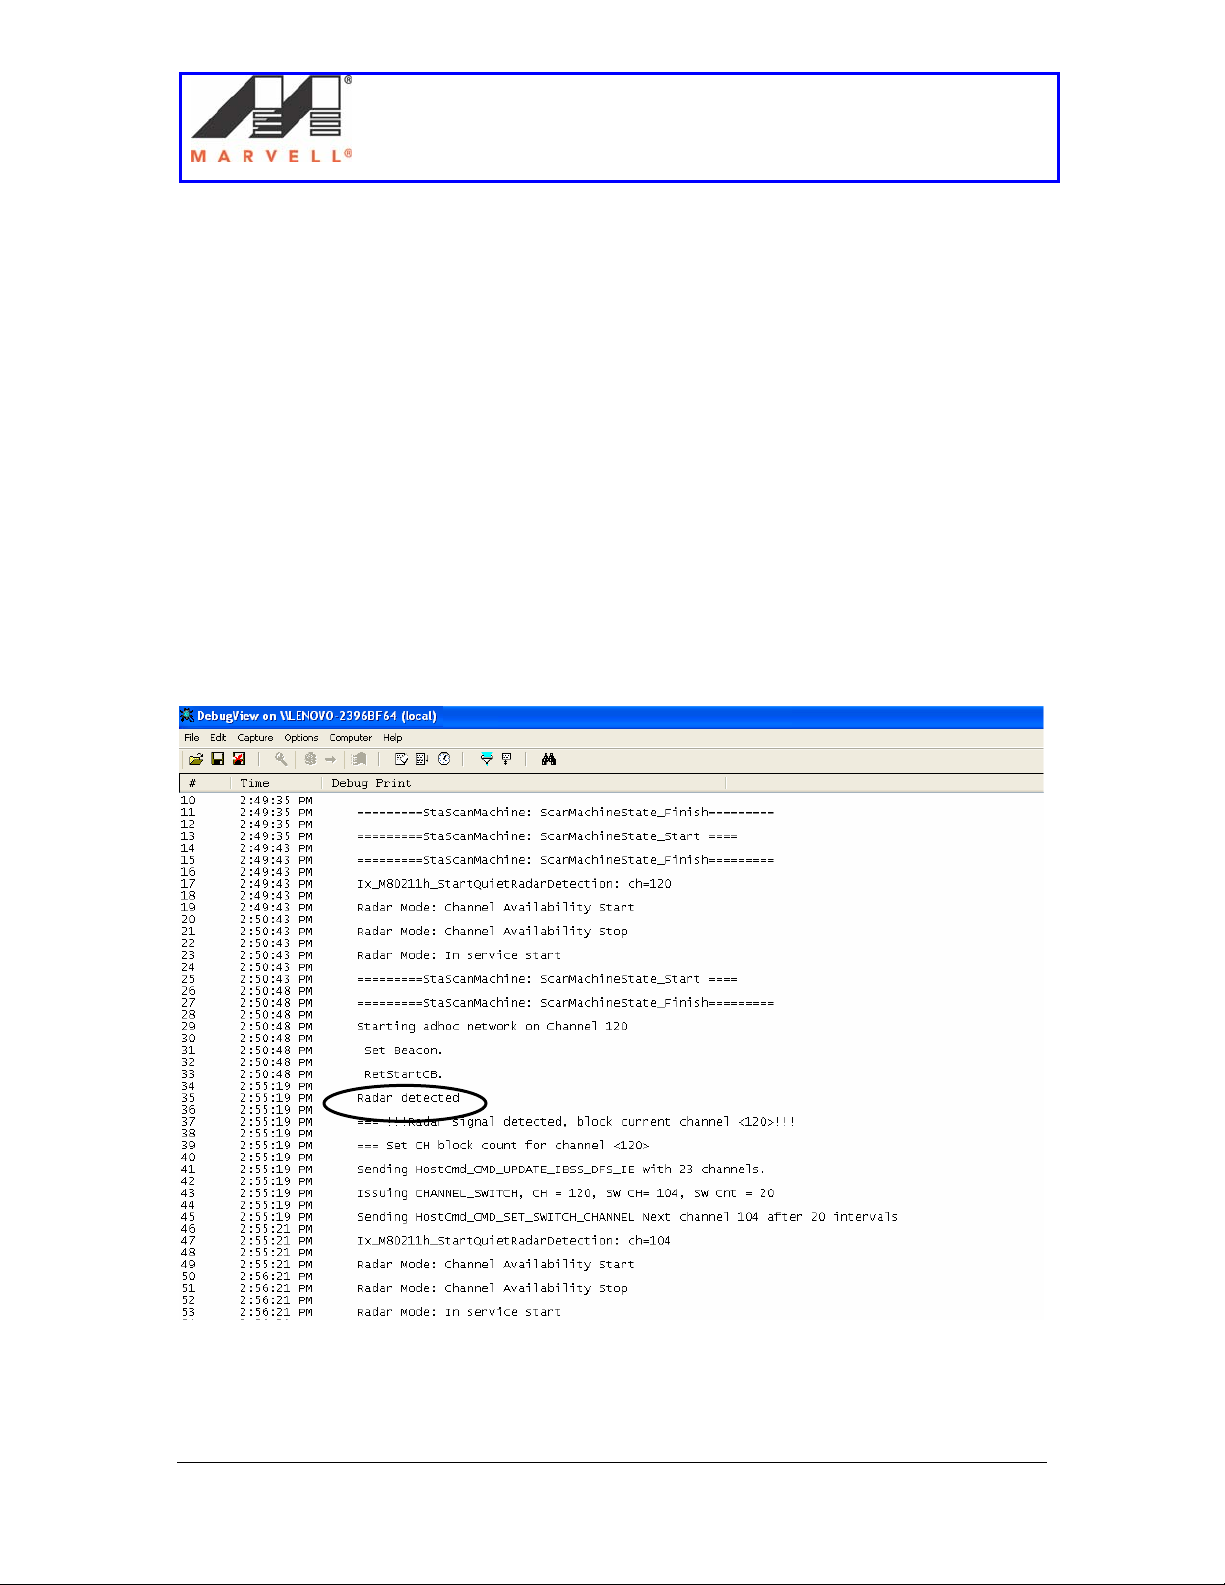
2.2] Dbgview Utility
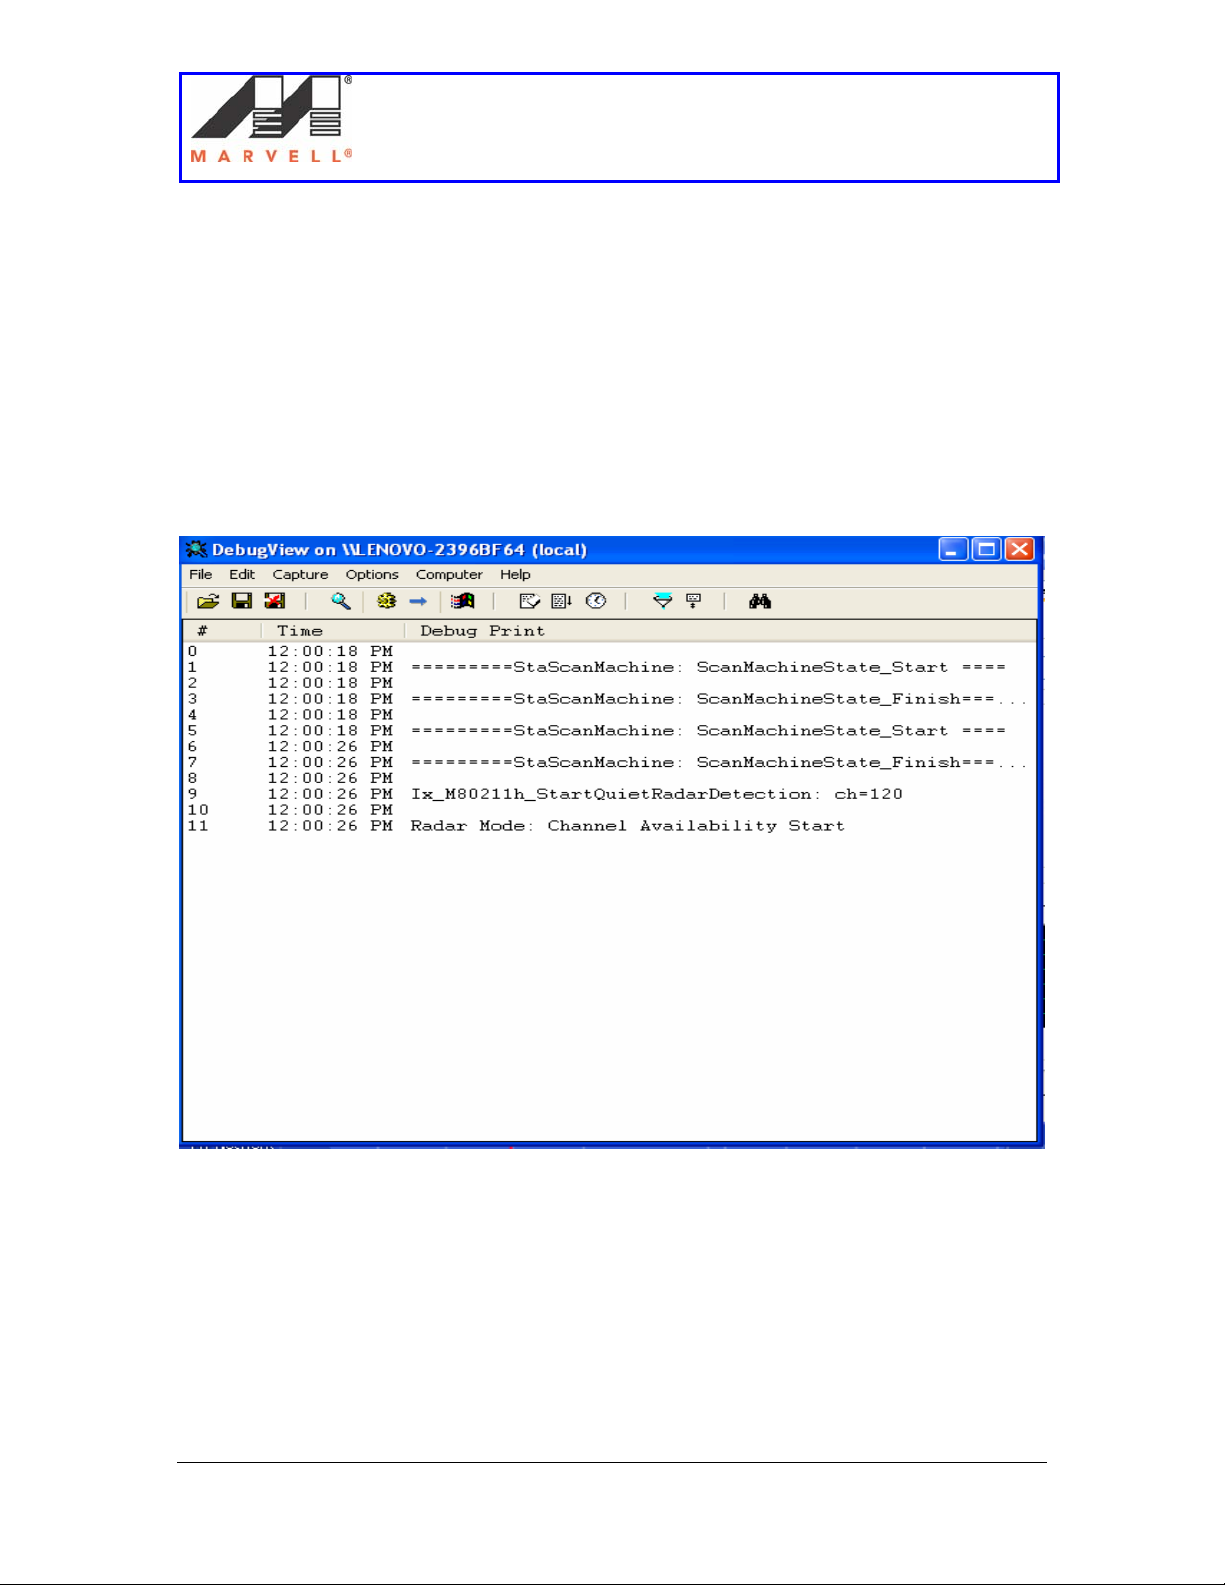
The current logs of the setup are displayed in the Dbgview utility window. It displays
when the channel availability check has started on a particular channel and whether it has
detected the radar or not. It also displays the channel switching process on the master and
the new channel, the master has switched to. The Dbgview icon is encircled below.
Page 23 Marvell® Proprietary. V 1.0
Page 24

Setup of an Ad-Hoc network using UAY-
MMC85M wireless cards
Marvell AppNote
AN -xxxx
Page 24 Marvell® Proprietary. V 1.0
Page 25
Setup of an Ad-Hoc network using UAY-
MMC85M wireless cards
Marvell AppNote
AN -xxxx
When the radar is detected the Dbgview window shows the Radar detected message on
the master.
Page 25 Marvell® Proprietary. V 1.0
Page 26

Setup of an Ad-Hoc network using UAY-
MMC85M wireless cards
Marvell AppNote
AN -xxxx
After the radar detection, the master switches to a new channel and starts the Ad-Hoc
network on the new channel. The message Starting adhoc network on channel will be
seen in the Dbgview window.
Page 26 Marvell® Proprietary. V 1.0
Page 27

Setup of an Ad-Hoc network using UAY-
2.3] Ad-Hoc Setup bring up
MMC85M wireless cards
Marvell AppNote
AN -xxxx
2.3.1] Using UAY-MMC85M switch mode driver
The following section provides steps to bring up the setup to test the master for radar
detection purposes. Please remember to use the test mode driver for these detections. In
case of finding the channel move time, the closing time, it is advised to use the channel
switch mode driver. The procedure below describes the steps to change the drivers.
1. On the Master laptop, double click on the Dbgview.exe icon to open it.
2. Double click on the Marvell GUI icon to open the GUI window.
3. Plug in the UAY-MMC85M master PCIe extender assembly in the laptop. The
laptop screen should look like below.
Page 27 Marvell® Proprietary. V 1.0
Page 28

Setup of an Ad-Hoc network using UAY-
MMC85M wireless cards
Marvell AppNote
AN -xxxx
4. The UAY-MMC85M driver starts the CAC and after a period of at least 60
seconds, brings up the UAY-MMC85M card, if no radar activity is seen in the
channel 120. The Waiting for peer status is seen in the Marvell GUI.
Page 28 Marvell® Proprietary. V 1.0
Page 29

Setup of an Ad-Hoc network using UAY-
MMC85M wireless cards
Marvell AppNote
AN -xxxx
5. Now follow steps 1, 2 and 3 on Slave laptop to bring up the slave UAY-
MMC85M.
6. The association between the master and slave takes place. The Network Status
tab shows the Status as Connected.
The status on the Marvell GUI should be seen as below. Please refer the page 37,
section 3.1, in chapter Debugging Ad-Hoc Setup if there are problems in
association.
Page 29 Marvell® Proprietary. V 1.0
Page 30

Setup of an Ad-Hoc network using UAY-
MMC85M wireless cards
Marvell AppNote
AN -xxxx
7. Once the Ad-Hoc network is created, ping the Master laptop from the Slave
laptop. The ping should succeed.
8. On the Slave laptop’s desktop, double click on the Shortcut to mplayerc to run
it.
Page 30 Marvell® Proprietary. V 1.0
Page 31

Setup of an Ad-Hoc network using UAY-
MMC85M wireless cards
Marvell AppNote
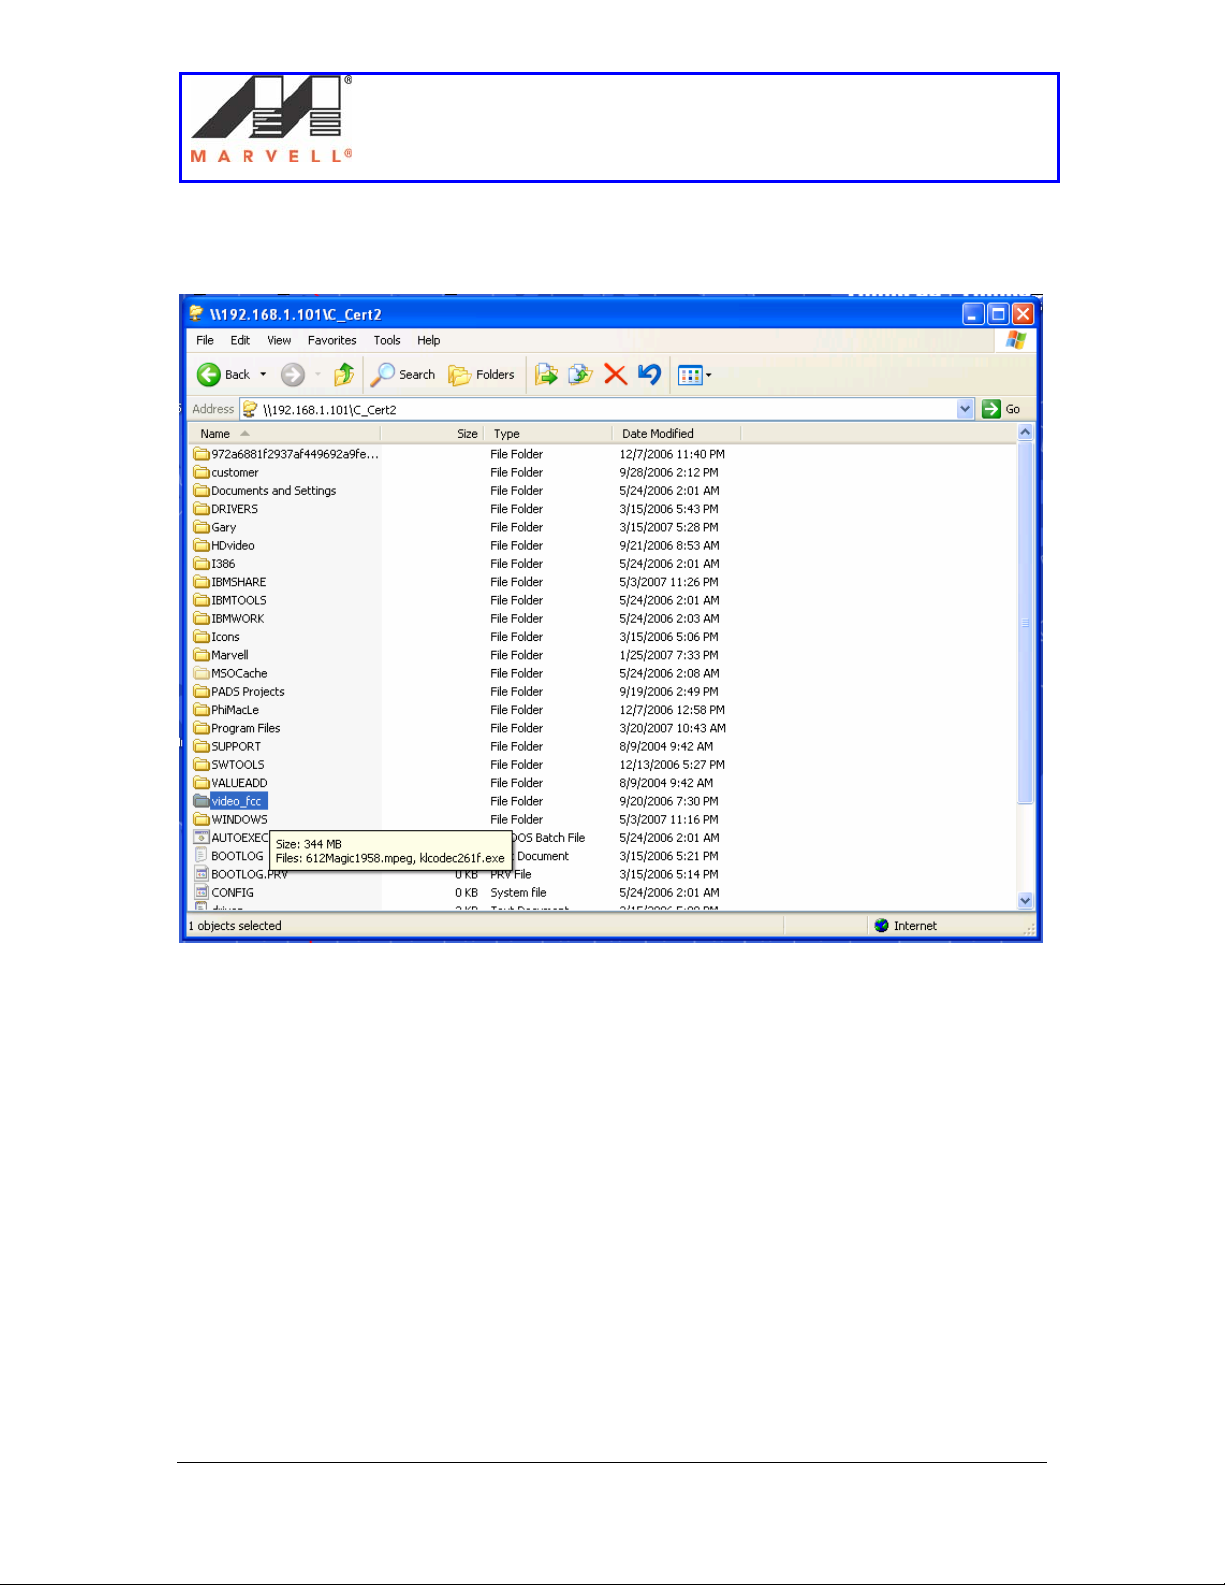
9. On the slave laptop, go to Start -> Run and type the Ip address of the master.
This will enable the slave’s access to the hard drive of the master.
AN -xxxx
10. Select the C-Cert folder and double click on it to open it.
Page 31 Marvell® Proprietary. V 1.0
Page 32

Setup of an Ad-Hoc network using UAY-
MMC85M wireless cards
Marvell AppNote
AN -xxxx
11. Select video_fcc folder and double click on it to open it.
Page 32 Marvell® Proprietary. V 1.0
Page 33
Setup of an Ad-Hoc network using UAY-
MMC85M wireless cards
Marvell AppNote
AN -xxxx
Page 33 Marvell® Proprietary. V 1.0
Page 34

Setup of an Ad-Hoc network using UAY-
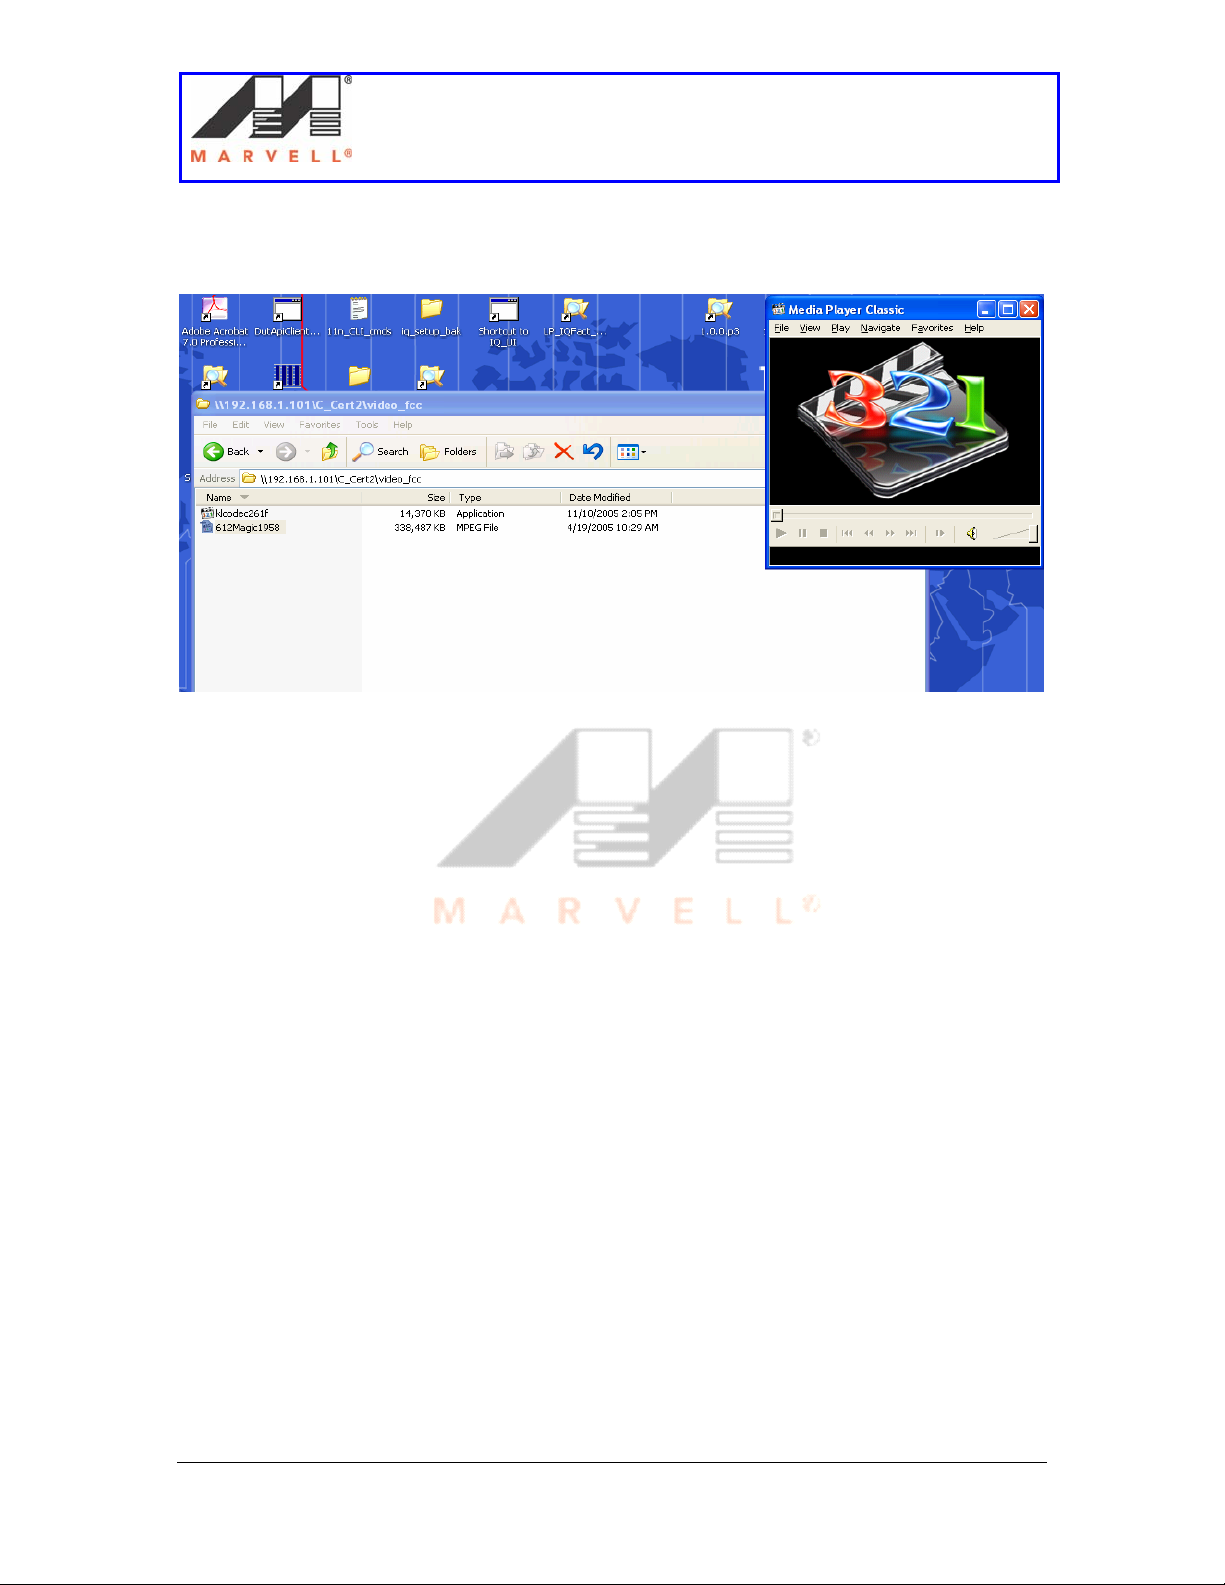
12. Select the file 612Magic1958.
MMC85M wireless cards
Marvell AppNote
AN -xxxx
Page 34 Marvell® Proprietary. V 1.0
Page 35
Setup of an Ad-Hoc network using UAY-
MMC85M wireless cards
13. Drag and drop the file on the opened media player window.
Marvell AppNote
AN -xxxx
Page 35 Marvell® Proprietary. V 1.0
Page 36
Setup of an Ad-Hoc network using UAY-
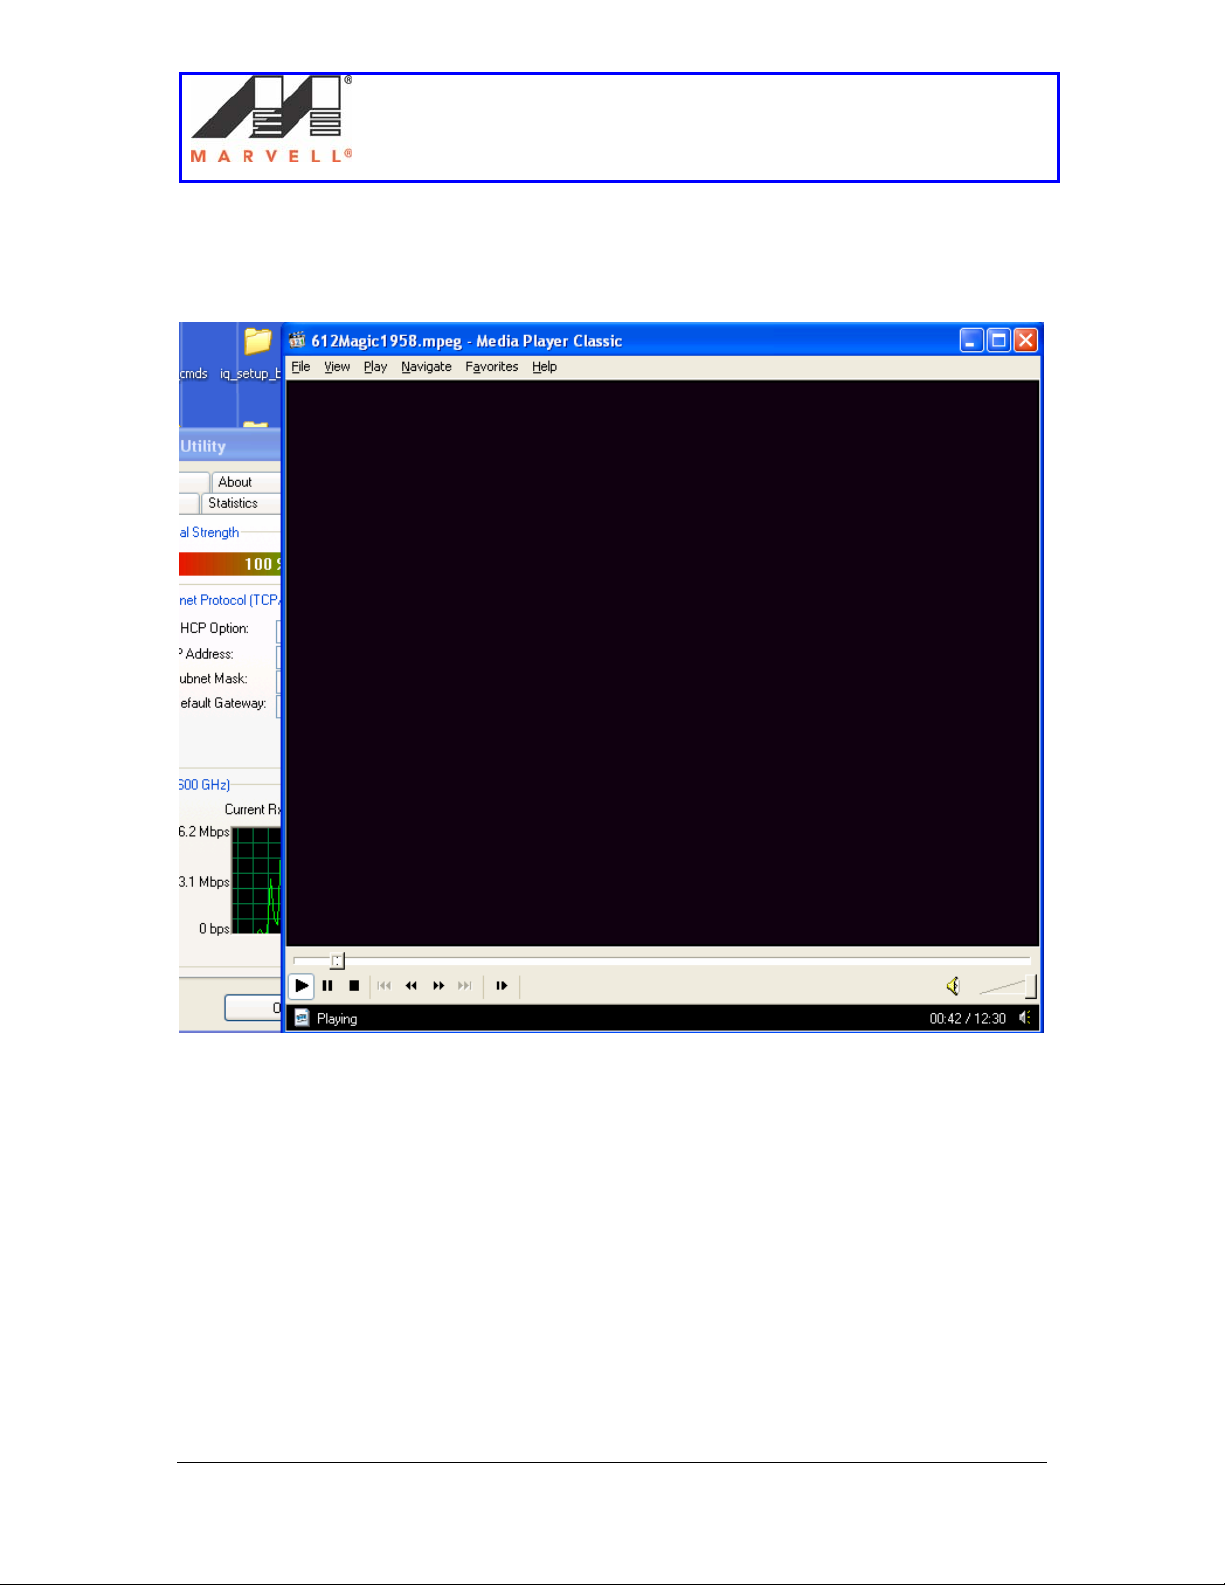
14. The video clip should start playing.
MMC85M wireless cards
Marvell AppNote
AN -xxxx
15. Now all the requisite tests in which the master has to switch channel can be
performed.
Page 36 Marvell® Proprietary. V 1.0
Page 37

Setup of an Ad-Hoc network using UAY-
MMC85M wireless cards
Marvell AppNote
AN -xxxx
2.3.2] Changing UAY-MMC85M driver
In the previous section, the UAY-MMC85M would switch channel whenever radar was
detected in the operating channel. The following section provides steps to change the
driver so that the master/slave would just detect the radar. This means that UAYMMC85M will not switch the channel and give a count of the number of radar
detections. The procedure below describes the steps to change the drivers.
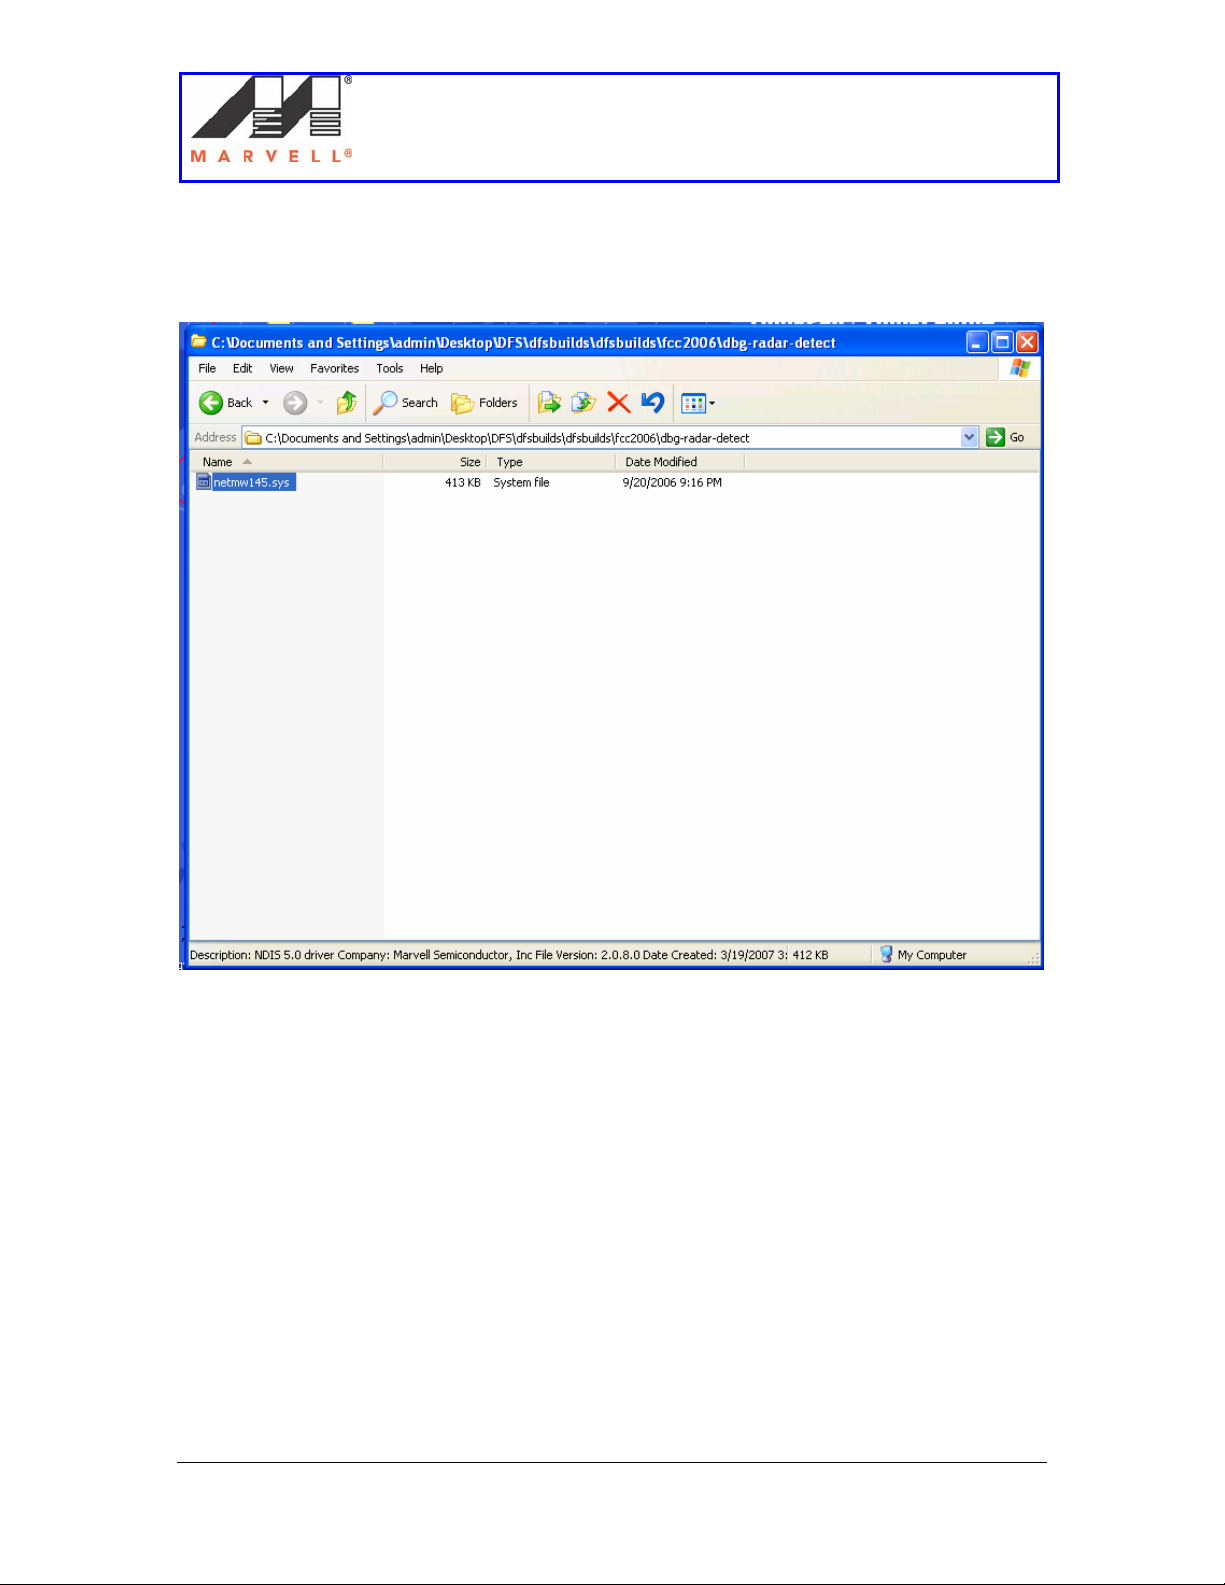
1. Open the folder C:\Documents and
Settings\admin\Desktop\DFS\dfsbuilds\fcc2006.
Page 37 Marvell® Proprietary. V 1.0
Page 38
Setup of an Ad-Hoc network using UAY-
2. Open the folder dbg-radar-detect.
MMC85M wireless cards
Marvell AppNote
AN -xxxx
3. Select the file netmw145.sys and press Ctrl C to coy the file.
4. Go to C:\Windows\system32\drivers and paste the copied file.
5. Unplug and plug the UAY-MMC85M master assembly. The UAY-MMC85M
master / slave now has the test mode driver.
6. All the tests to count the number of radar detects can be carried out. The radar
detection count and logs will be seen on the Dbgview.exe window.
Page 38 Marvell® Proprietary. V 1.0
Page 39
Setup of an Ad-Hoc network using UAY-
MMC85M wireless cards
Marvell AppNote
AN -xxxx
3] Debugging Ad-Hoc Setup
3.1] Slave does not associate with the Master
Sometimes the Slave would not join the Ad-Hoc network and would start the radar mode
channel availability process. This can be seen when a message shown below is seen in
the Dbgview window.
When such messages are seen in the Dbgview window on the slave, do the following:
1. Unplug the Master and the Slave UAY-MMC85M assemblies.
2. Plug in the Master assembly first.
3. Wait for the CAC time period, until the Dbgview window in Master shows the
message Starting adhoc network on channel.
4. Plug back the Slave assembly and wait for association to take place.
Page 39 Marvell® Proprietary. V 1.0
Page 40

Setup of an Ad-Hoc network using UAY-
MMC85M wireless cards
Marvell AppNote
AN -xxxx
5. Please follow the steps 1-4 a couple of times, in case association does not take
place.
3.2] Link Instability
Sometimes the link between the Master and Slave can be quite unstable. In such a case,
please look for any loose connections in the setup. Please confirm that all the pads have
correct attenuation.
3.3] Video cannot be played
This can happen due to improper channel loading. In such cases, look at the Tx/Rx Rates
as seen in the Network Status tab below. If the rates stabilize around 6Mbps, the video
file cannot be played, even though the ping between the master and slave is successful. It
is preferred to unplug both the UAY-MMC85M extender assemblies and plug them back
starting with the Master assembly.
Page 40 Marvell® Proprietary. V 1.0
Page 41

Setup of an Ad-Hoc network using UAY-
MMC85M wireless cards
Marvell AppNote
AN -xxxx
In case unplugging and plugging the assemblies does not increase the Tx/Rx Rates, do
the following:
1. Go to the Profile manager tab on the Master.
2. Select the Default profile and click Apply.
3. Select the dfs120 profile.
Page 41 Marvell® Proprietary. V 1.0
Page 42
Setup of an Ad-Hoc network using UAY-
MMC85M wireless cards
Marvell AppNote
AN -xxxx
4. Click on the Protocol tab.
5. From the drop down menu of Transmit Rate, select MCS12.
Page 42 Marvell® Proprietary. V 1.0
Page 43

Setup of an Ad-Hoc network using UAY-
MMC85M wireless cards
Marvell AppNote
AN -xxxx
6. Click on Save.
7. Click on Apply Profile.
8. Follow steps 1 – 7 on the Slave.
Page 43 Marvell® Proprietary. V 1.0
Page 44

Setup of an Ad-Hoc network using UAY-
MMC85M wireless cards
Marvell AppNote
AN -xxxx
APPENDIX A
Federal Communications Commission (FCC) Compliance
This device complies with Part 15 of the FCC Rules and Regulations. Operation is
subject to the following two conditions: (1) This device may not cause harmful
interference, and (2) this device must accept interference received, including interference
that may cause undesired operation.
This equipment has been tested and found to comply with the limits for a Class B digital
device, pursuant to Part 15 of the FCC Rules. These limits are designed to provide
reasonable protection against harmful interference in a residential installation. This
equipment generates, uses, and can radiate radio-frequency energy and, if not installed
and used in accordance with these instructions, may cause harmful interference to radio
communications. However, there is no guarantee that interference will not occur in any
particular installation. If this equipment does cause harmful interference to radio or
television reception, which can be determined by turning the equipment off and on, the
user is encouraged to correct the interference by one of more of the following measures:
1) Reorient the antenna.
2) Increase the separation between the affected equipment and the unit.
3) Connect the affected equipment to a power outlet on a different circuit from that
which the receiver is connected to.
4) Consult the dealer and/or experienced radio/TV technician for help.
FCC ID: UAY-MMC85M
MODEL: MC-85
IMPORTANT NOTE:
Intentional or unintentional changes or modifications must not be made unless under the
express consent of the party responsible for compliance. Any such modifications could
void the user’s authority to operate the equipment and will void the manufacturer’s
warranty. To comply with FCC RF exposure requirements, the following antenna
installation and device operating configurations must be satisfied. The antenna for this
unit must have a separation distance of at least 20 cm from all persons. Furthermore, it
must not be co-located or operating in conjunction with any other antenna or transmitter.
Page 44 Marvell® Proprietary. V 1.0
Page 45

Setup of an Ad-Hoc network using UAY-
MMC85M wireless cards
Marvell AppNote
AN -xxxx
APPENDIX B
Setting up UAY-MMC85M
This section provides step by step procedure on how to install the UAY-MMC85M
driver, the Marvell Client Configuration Utility (Marvell GUI) and the settings required
on the Marvell GUI in order to set up the UAY-MMC85M to operate in Ad-Hoc mode.
The UAY-MMC85M apparatus consists of a PCIe card (UAY-MMC85M) and a PCIe
extender adapter board. The UAY-MMC85M is a PCIe card. This card is plugged into
the PCMCIA slot with PCIe interface of the laptop using a PCIe-to-PCIe adapter
extender card. The figure below shows the assembly.
1] UAY-MMC85M Driver Installation
This section explains how to install both the UAY-MMC85M client card and the driver
for Marvell high throughput client cards in a client card slot of a Windows XP based PC
computer. The client card driver must be installed before installing the Marvell
Configuration Utility.
1.1 Installing the Client Card
To install the client card:
1. Turn the computer off.
2. Insert the extender adapter (connector end toward the computer) into an available
client card slot
3. Turn the computer on.
1.2 Installing the Windows XP driver
When the computer detects the client card extender, the Found Hew Hardware Wizard
dialog box is displayed.
Page 45 Marvell® Proprietary. V 1.0
Page 46

Setup of an Ad-Hoc network using UAY-
MMC85M wireless cards
Marvell AppNote
AN -xxxx
1. Select Install from a list or specific location (Advanced).
2. Click Next to continue.
The Please choose your search and installation options dialog box is
displayed.
Page 46 Marvell® Proprietary. V 1.0
Page 47

Setup of an Ad-Hoc network using UAY-
MMC85M wireless cards
Marvell AppNote
AN -xxxx
3. Enter the path of the directory that contains the driver.
4. Click Next to continue
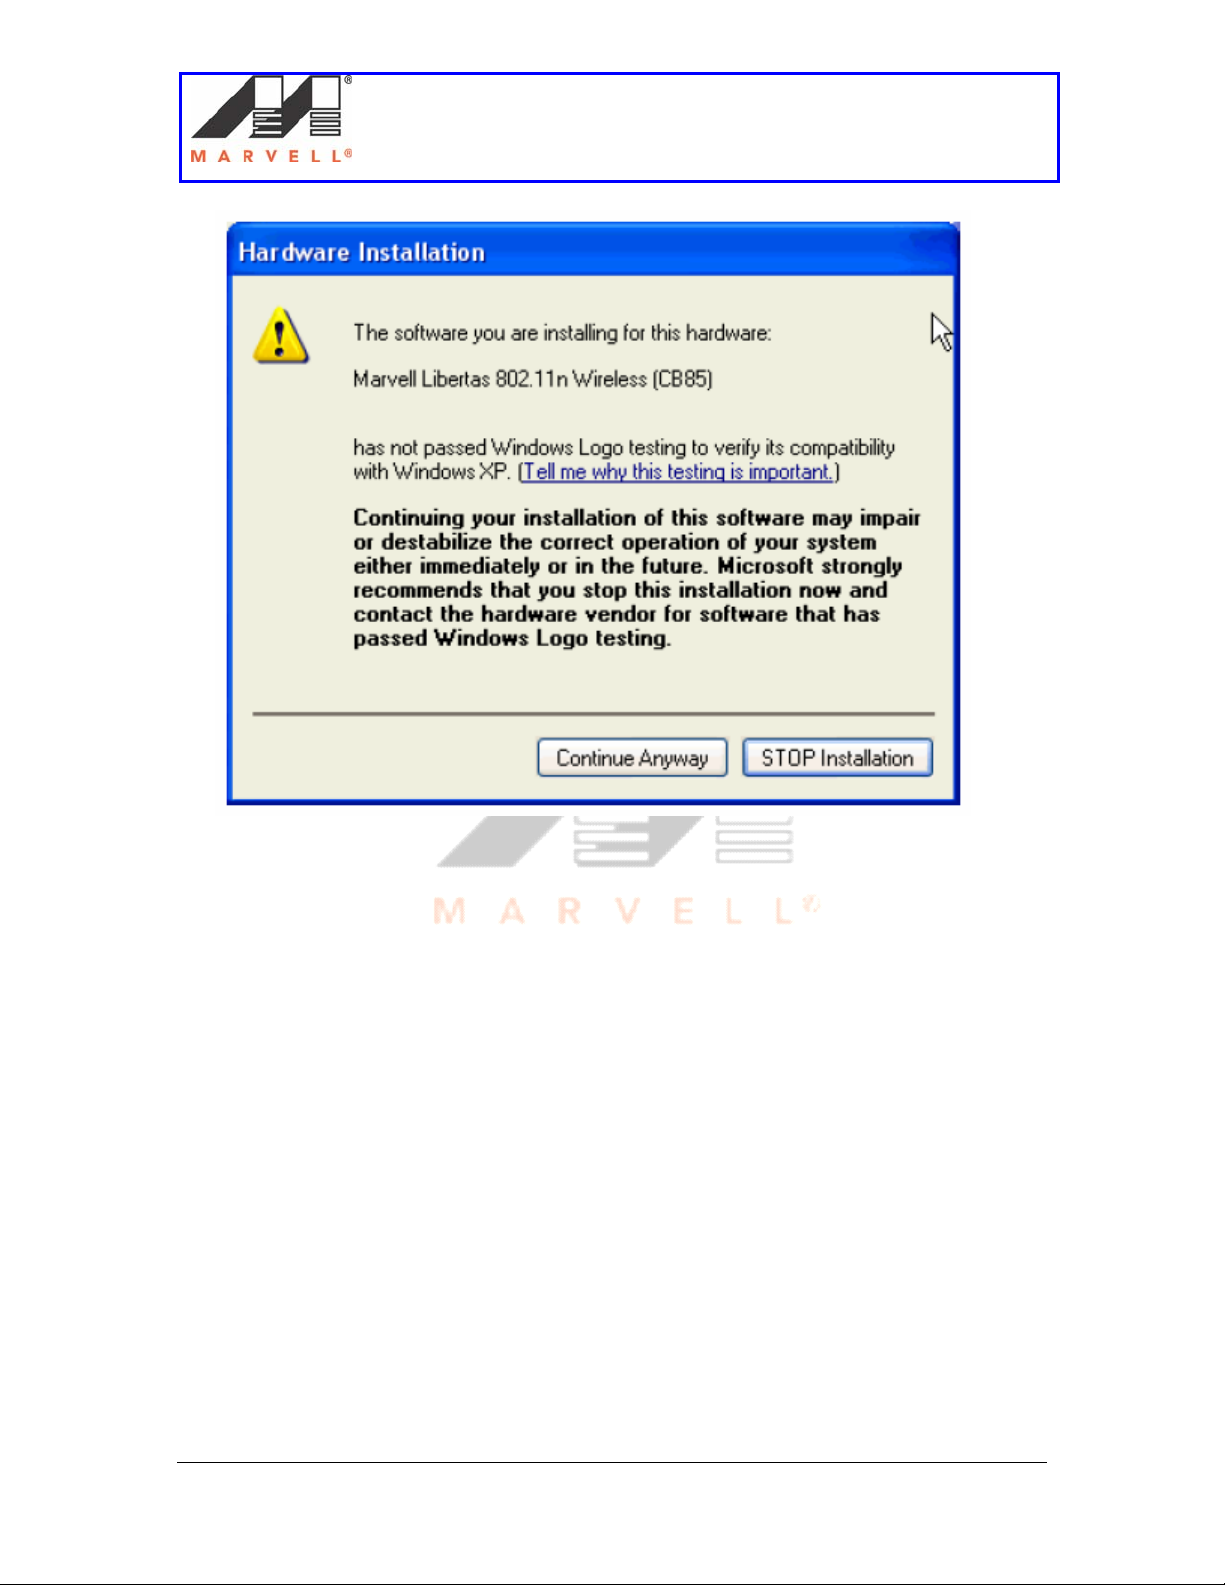
5. If the Hardware Installation dialog box displays a warning that the software
has not passed Windows Logo Testing, click Continue Anyway.
Page 47 Marvell® Proprietary. V 1.0
Page 48
Setup of an Ad-Hoc network using UAY-
MMC85M wireless cards
Marvell AppNote
AN -xxxx
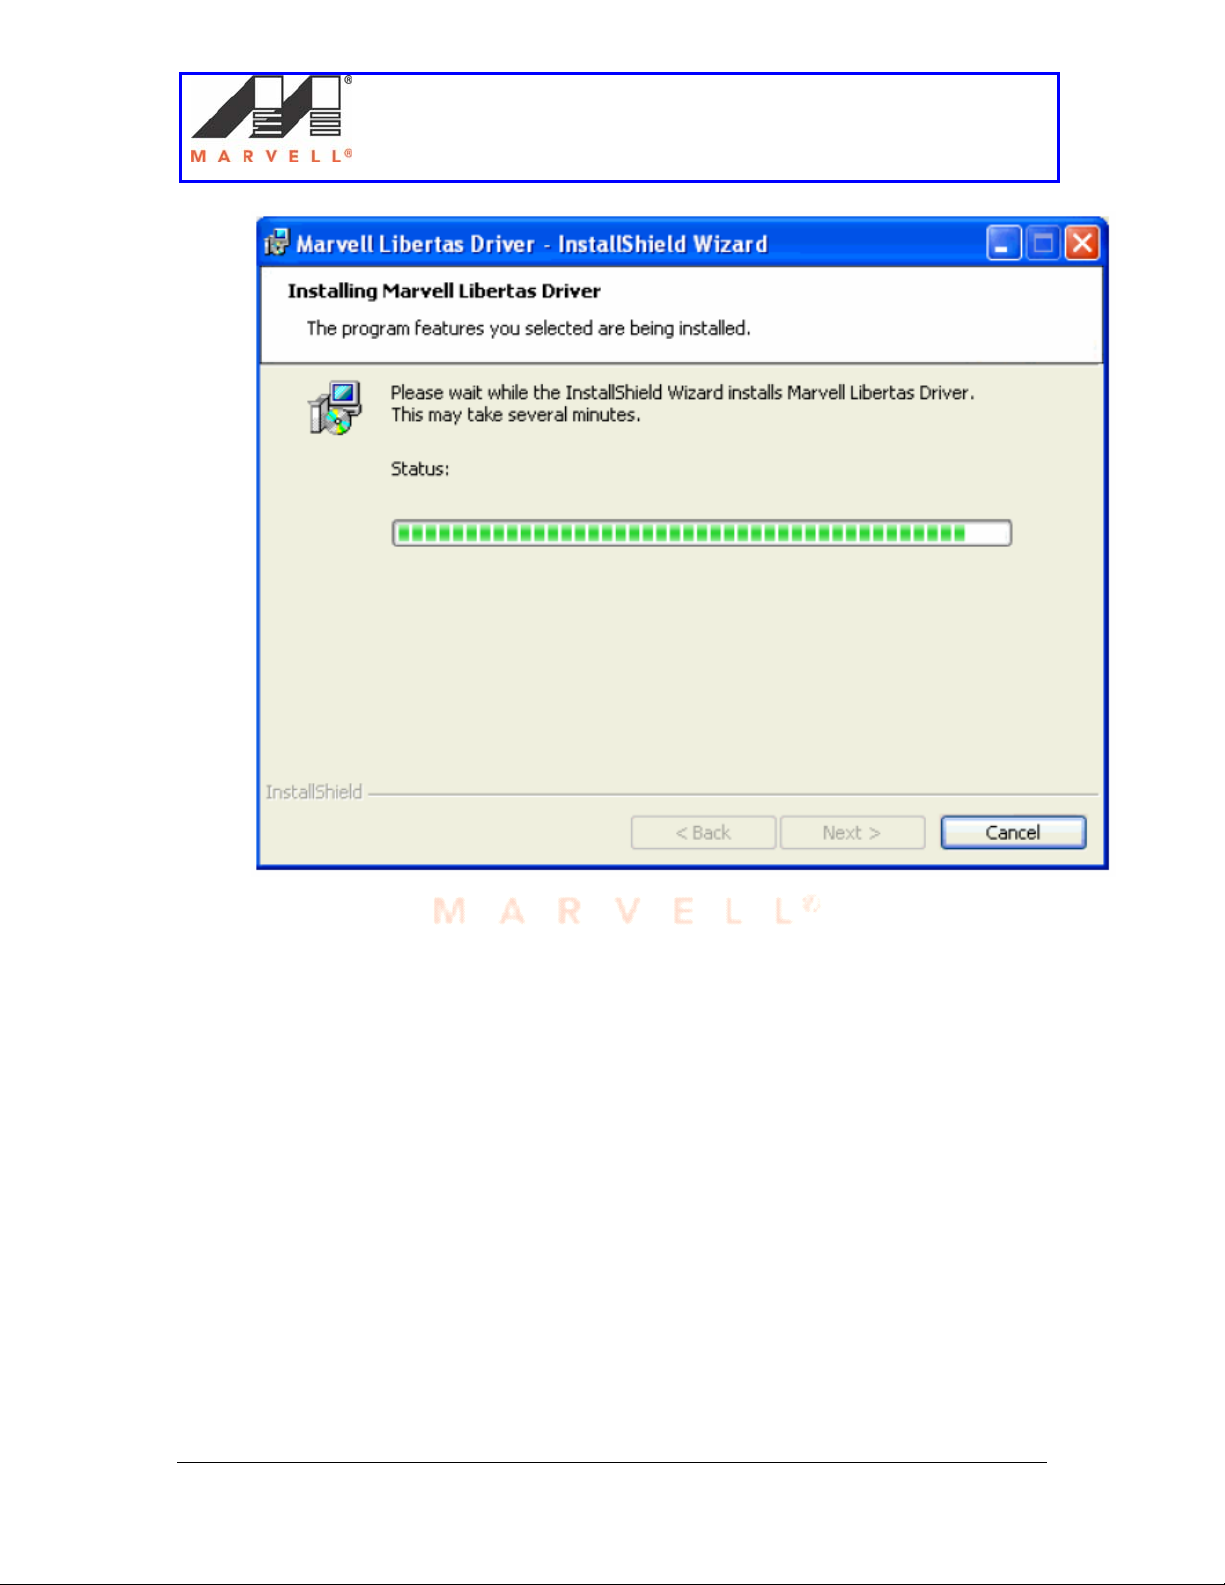
The Please wait while wizard installs the software dialog box is displayed.
Page 48 Marvell® Proprietary. V 1.0
Page 49

Setup of an Ad-Hoc network using UAY-
MMC85M wireless cards
Marvell AppNote
AN -xxxx
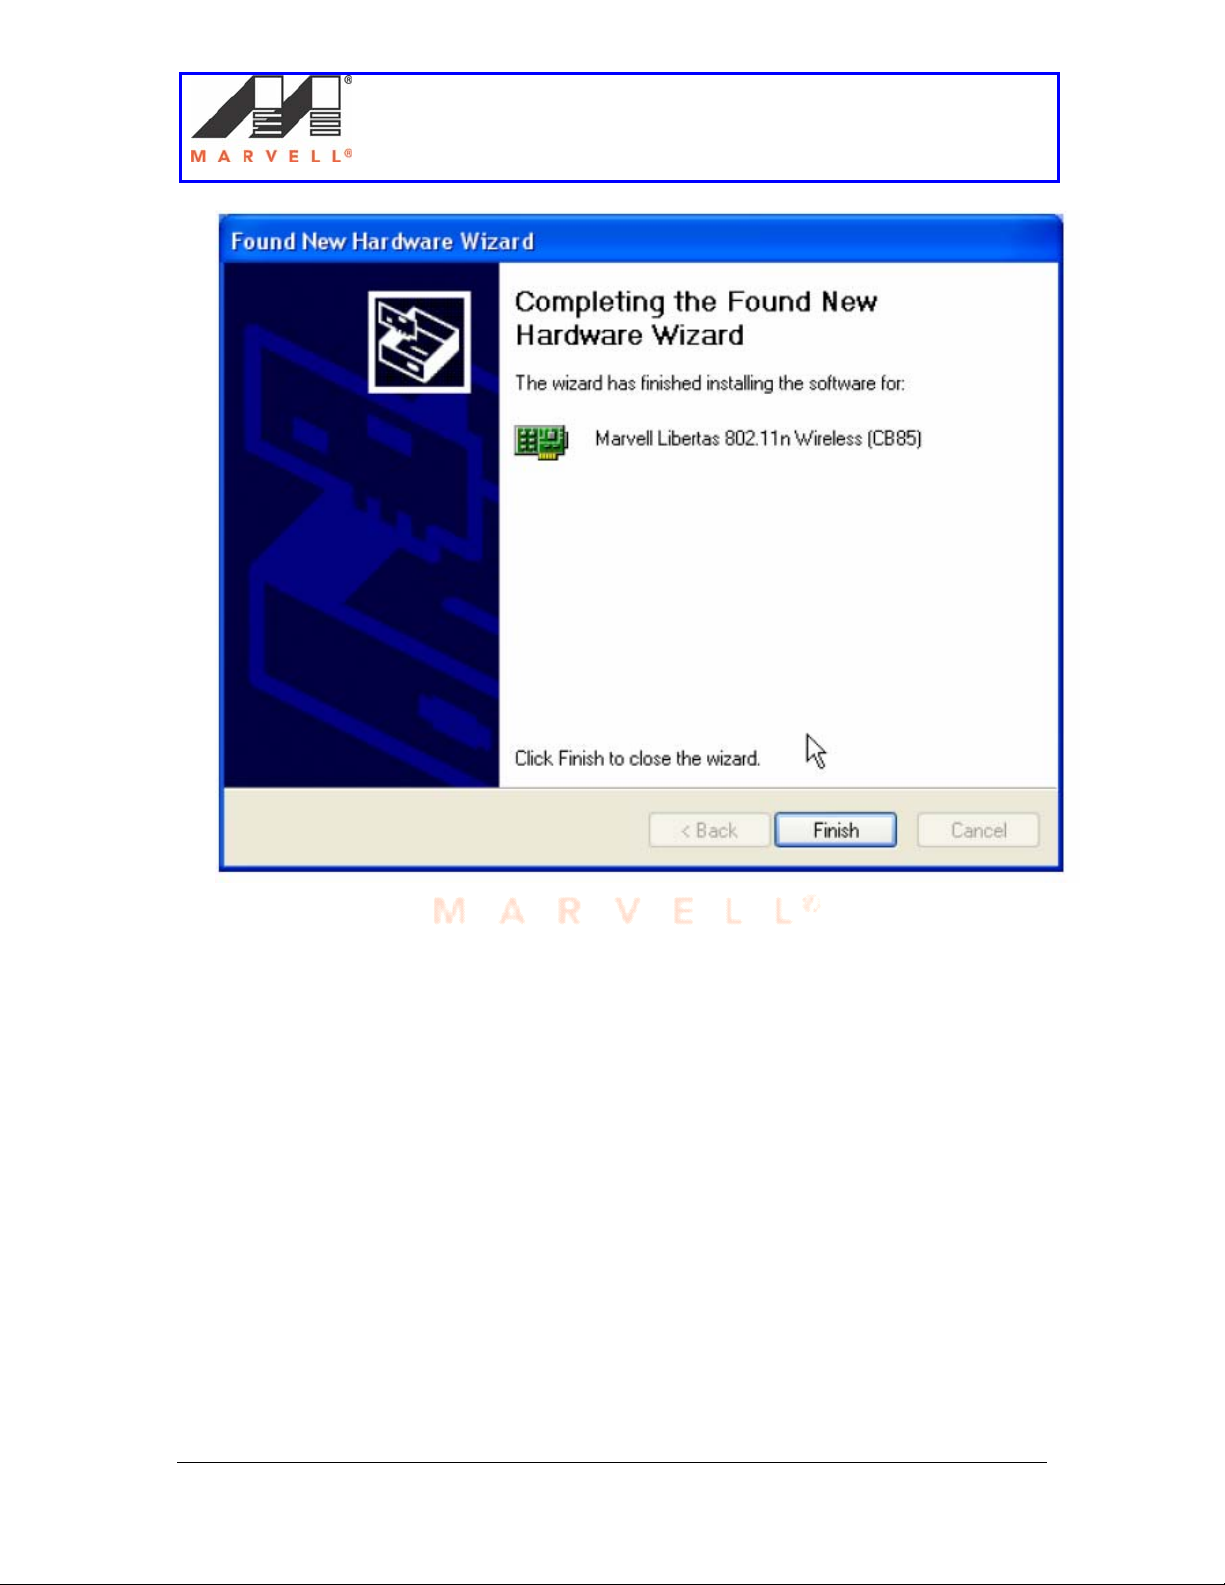
6. Click Next to continue.
The Completing the Found New Hardware Wizard dialog box is displayed.
Page 49 Marvell® Proprietary. V 1.0
Page 50
Setup of an Ad-Hoc network using UAY-
MMC85M wireless cards
Marvell AppNote
AN -xxxx
7. Click Finish to complete the installation.
Page 50 Marvell® Proprietary. V 1.0
Page 51

Setup of an Ad-Hoc network using UAY-
MMC85M wireless cards
Marvell AppNote
2] Configuration Utility Installation
This section provides a step by step procedure to install the configuration utility.
1. Power on the computer
2. Navigate the drive where the Marvell Client Card Configuration Utility files are
located.
3. Change to the directory \Utils.
4. Double-click Setup.exe.
Windows starts the utility setup program.
AN -xxxx
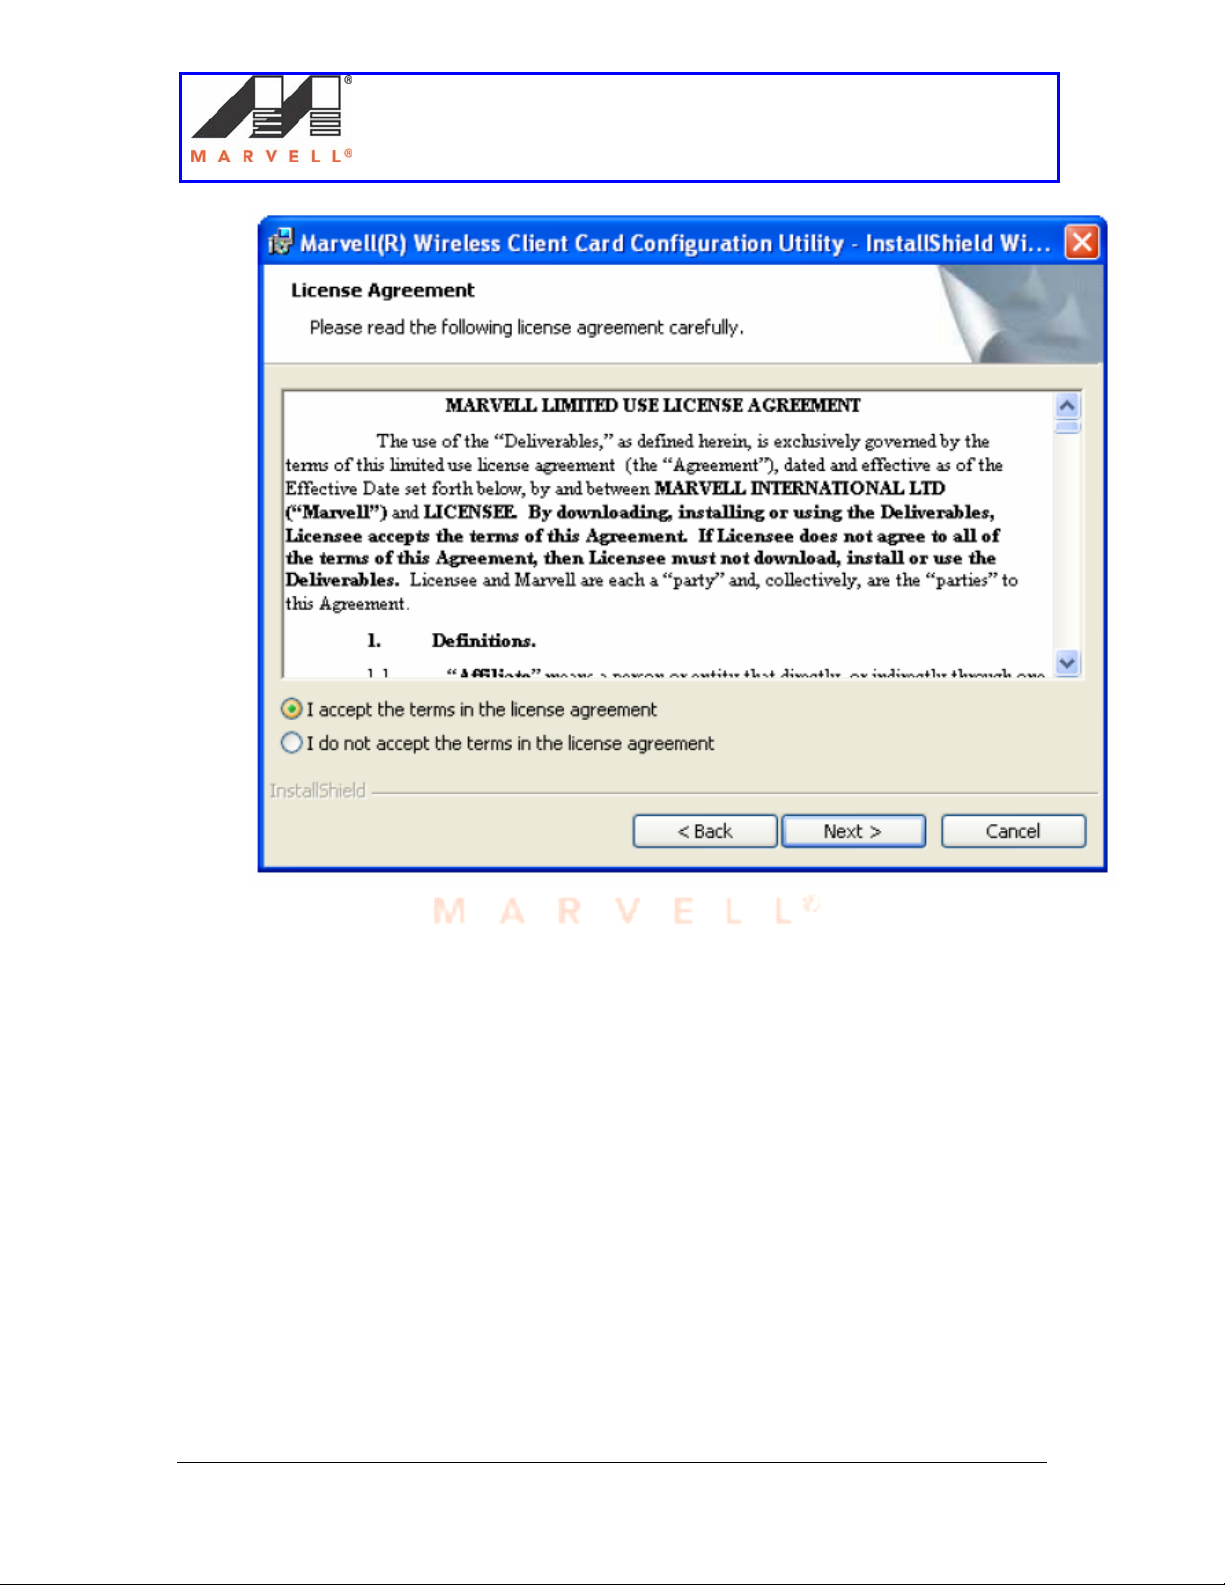
5. Click Next to continue.
The License Agreement dialog box is displayed.
Page 51 Marvell® Proprietary. V 1.0
Page 52
Setup of an Ad-Hoc network using UAY-
MMC85M wireless cards
Marvell AppNote
AN -xxxx
6. Select I accept the terms in the license agreement.
7. Click Next to continue.
The Customer Information dialog box is displayed.
Page 52 Marvell® Proprietary. V 1.0
Page 53

Setup of an Ad-Hoc network using UAY-
MMC85M wireless cards
Marvell AppNote
AN -xxxx
8. Enter User Name and Organization.
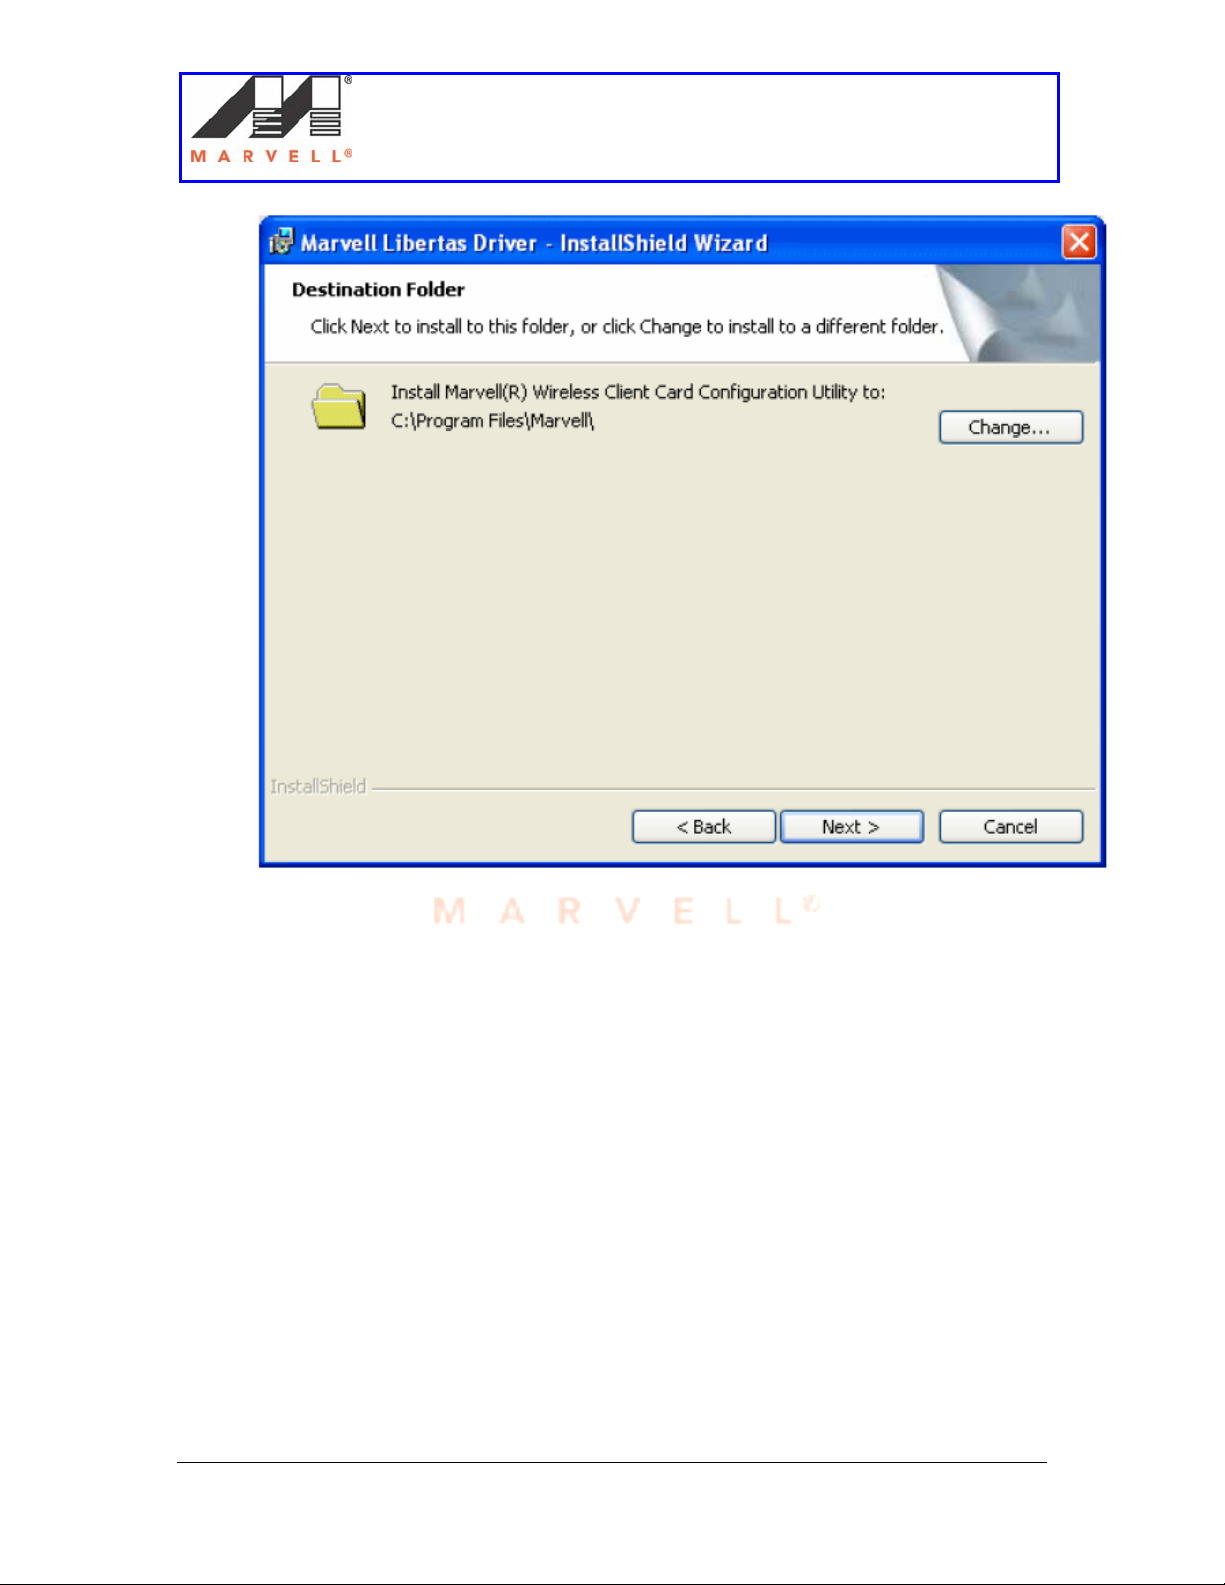
9. Click Next.
The Destination Folder dialog box is displayed.
Page 53 Marvell® Proprietary. V 1.0
Page 54
Setup of an Ad-Hoc network using UAY-
MMC85M wireless cards
Marvell AppNote
AN -xxxx
10. Click Next to install the Marvell Configuration Utility in the default folder or
enter a different path before clicking Next.
The Ready to Install the Program dialog box is displayed.
Page 54 Marvell® Proprietary. V 1.0
Page 55

Setup of an Ad-Hoc network using UAY-
MMC85M wireless cards
Marvell AppNote
AN -xxxx
11. Click Install to start the installation.
The Installing Configuration Utility dialog box is displayed.
Page 55 Marvell® Proprietary. V 1.0
Page 56
Setup of an Ad-Hoc network using UAY-
MMC85M wireless cards
Marvell AppNote
AN -xxxx
Installation is in progress.
When the Setup Wizard finishes, the Installation Complete dialog box is
displayed.
Page 56 Marvell® Proprietary. V 1.0
Page 57
Setup of an Ad-Hoc network using UAY-
MMC85M wireless cards
Marvell AppNote
AN -xxxx
12. Click Finish to complete the installation of the Marvell Configuration Utility.
The installation program for the Marvell Odyssey Client launches automatically.
Page 57 Marvell® Proprietary. V 1.0
Page 58

Setup of an Ad-Hoc network using UAY-
MMC85M wireless cards
Marvell AppNote
AN -xxxx
APPENDIX C
Disabling Windows Zero Config
For windows XP and Windows Server 2003, it is preferable to use the Marvell
configuration utility when using Marvell client cards. Windows Zero Config and Marvell
Configuration Utility cannot be used at the same time. In such a case, it is preferable to
disable or manually stop the services running Windows Zero Config utility. The
snapshots below show how to manually stop the Windows Zero Config service.
1] Disabling Windows Zero Configuration Utility
To disable the Windows Zero Configuration Utility (if not disabled previously):
1. From the Control Panel, click Network Connections.
2. Right-click the icon for the Marvell client card and select Properties.
3. Click the Wireless Networks tab.
4. Clear the Use Windows to configure my wireless settings check box to disable
the Windows Zero Configuration Utility.
Page 58 Marvell® Proprietary. V 1.0
 Loading...