

Page 1

2
Chapter
Installation and Upgrade
2.1 Overview
This chapter provides guidelines on installing the device drivers for the built -in features of the
A360. Most of the driver installation procedures mentioned here are only for Windows 98 /
Me and Windows 2000. This chapter also includes procedures on how to upgrade major
internal system components like CPU, memory, hard disk, and feature card modules.
2.2 Notebook Drivers and Utilities
The notebook requires several device drivers that you need to install and setup before you can
fully operate the notebook. These are:
• Phoenix PHDISK Suspend-to-Disk Utility – DOS
• S3 Savage4 (Integrated in Twister) VGA Driver – Windows 98 / Me / 2000
• VIA PCI audio (Integrated in VT82C686B) Driver – Windows 98 / Me / 2000
• Synaptics Touch Pad Driver – Windows 98 / Me / 2000
• O2Micro OZ6933 PCMCIA Driver – Windows 98
• VIA Twister chipset Driver – Windows 98 / Me / 2000
• Easy Button Driver – Windows 98 / Me / 2000
• Easy Mail Driver – Windows 98 / Me / 2000
The notebook also comes with other option devices that requires driver installation:
• Askey 1456VQL19R-4 Data Fax Modem – Windows 98 / Me / 2000
• Ambit Intel 82562EH LAN – Windows 98 / Me / 2000
• Askey Combo Modem / LAN – Windows 98 / Me / 2000
i Visit FIC Support website ftp://pcg.fic.com.tw/NBTECH/ for the latest driver
updates.
2.2.1 Running the PHDISK STD Utility
The PHDISK utility (version: 4 .32) of the notebook allows you to create a suspend-to-disk
(STD) file or partition that is used to save the opened files when you activate STD mode and
power off the computer. If you want to make use of the STD feature under Windows 98, you
need first to run the PHDISK utility.
i Since Windows Me, Windows 2000, or above version would be enabled
Hibernate Mode in place of suspend-to-disk (STD) Mode, it’s not necessarily to
run the PHDISK utility.
Running the PHDISK STD Utility
Load the notebook driver CD, look for the PHDISK program file, and run PHDISK under
Safe mode command prompt only in windows system. When you execute “PHDisk.exe”
first time, the program will ask you to choose one action from (1,2,3,4). Action 1 is “Create
partition”. Action 2 is “Create File”. Action 3 is “Reboot”. Action 4 is “Exit”. You can use
either of the following two options for executing PHDISK utility:
FIC A360 Service Manual 2-1
Page 2

Installation and Upgrade
1. PHDISK /Create /Partition - you can choose to run Suspend-to-Disk and save your
work into an allocated fixed disk partition. This option should be done before
partitioning and formatting your hard disk. The advantage of this option is that it is
more secure since the files are saved in a separate partition and has no risk of being
deleted. The disadvantage of this is that you need to allocate enough disk partition for
future memory upgrade. The STD partition should always be larger than the system
memory RAM.
2. PHDISK /Create /File - you can also choose to run Suspend-to-Disk and save your
work into a STD file. You do not need to allocate an extra disk partition when running
this option. The advantage of this is that you do not need to allocate or waste extra disk
partition. The disadvantage of this option is that it is less secure since there is risk of
deleting the STD file although the file is hidden.
It’s better to choose action 2 to create the SAVE2DSK.BIN file. The program will ask you to
input the size of this file. You just only input the value according to the suggestion. After
executing “PHDisk.exe”, you will get some information about the SAVE2DSK.BIN file
created by PHDISK program. The size of this file will depend on the installed RAM memory
of your computer. This file also is hidden and has read-only attributes.
After doing so or executing it next time, the program will ask you to choose one action from
(1,2,3,4). Action 1 is “Create File”. Action 2 is “Delete File”. Action 3 is “Reboot”. Action 4
is “Exit”. Choose action 1 to create another SAVE2DSK.BIN file or action 2 to delete it.
After PHDISK has completed the STD partition, you will be prompted to reboot the system.
i Whenever you upgrade the memory, you need to delete the existing STD file and
create a new one according to the new memory size. Run PHDISK and choose
action 2 to delete existing STD file.
2.2.2 Installing Windows 98 / Me / 2000 from CD / DVD ROM
This section provides Windows 98 / Me / 2000 installation guide from the CD-ROM or DVDROM device.
Installing Windows 98 / Me from CD-ROM / DVD-ROM
The easiest way to install Windows 98 / Me is to boot from Windows 98 start-up disk. With
Windows 98 / Me start-up disk, you don't need to install CD-ROM driver since the start-up
disk can support virtually all CD-ROM device. Insert Windows 98 / Me Installation CD into
CD-ROM drive and run "setup.exe ".
If you don't have Windows 98 / Me start-up disk, you need to install CD-ROM /DVD -ROM
driver under DOS. Then, insert Windows 98 / Me Installation CD into CD-ROM drive and
run "setup.exe " .
Installing Windows 2000 from CD-ROM / DVD-ROM
To install Windows 2000 directly from your CD-ROM, insert the Windows 2000 installation
CD into CD-ROM drive with following the instructions on the screen to finish the installation.
You could go to Boot menu of BIOS setup menu to confirm the priority of boot device. Use
arrow key to select "ATAPI CD -ROM Drive", and then use "+" or "-" to move it to the top.
Go to Exit menu and select “Exit Saving Changes”.
2-2 FIC A360 Service Manual
Page 3

Installation and Upgrade
2.2.3 Installing the VGA Device Driver
Your notebook computer uses the high-performance S3 Savage4 VGA controller, which is an
AGP 4x video local bus, 2D/3D Graphic Engine. Following is the procedure for installing the
VGA Driver for Windows 98, Windows Me and Windows 2000:
Installing VGA Driver for Windows 98
1. Boot Windows 98 from your hard disk and insert the disc containing the VGA driver for
Windows 98.
2. Click the Start button, then click Settings, and Control Panel. Double click System and
click Device Manager tab. Under Display Adapters, you'll see Standard PCI Graphics
Adapter (VGA). Select it and double click it.
3. Choose Driver button and then click Update Driver, Next, and Next again to search for
the driver.
4. Tick Specify a location and click Browse button. Then, navigate to
" \Drivers\Win98\VGA" and click Next.
5. Click Next to accept the updated driver for S3 Graphics Inc Twister driver.
6. Click Next to continue with VGA driver installation.
7. Click Finish to complete installation.
8. Restart Computer to finish setting up VGA.
Installing VGA Driver for Windows Me
1. Boot Windows Me from your hard disk and insert the disc containing the VGA driver for
Windows Me.
2. Click the Start button, then click Settings, and Control Panel. Double click System and
click Device Manager tab. Under Display Adapters, you'll see Standard PCI Graphics
Adapter (VGA). Select it and double click it.
3. Choose Driver button and then click Update Driver, Next, and Next again to search for
the driver.
4. Select "Specify the location of the driver" and click Next to continue.
5. Tick on "Specify a location box". Then, click Next and Browse buttons and navigate to
the VGA driver location as "\Drivers \ WinMe\VGA". Click OK and Next to begin
searching the driver.
6. The Update Device Driver Wizard will found S3 Graphics Inc. Twister. Click Next to
continue installing the driver.
7. Click Finish button to finish installing VGA driver and Yes to restart the computer.
Installing VGA Driver for Windows 2000
1. Click the Start button, then point to Settings, and click Control Panel.
2. Double-click on the System icon, Hardware, and then click on the Device Manager
folder tab.
3. Under the Other Devices line, you will find the Video Controller (VGA compatible),
and then Scan for Hardware Changes buttons to appear the New Hardware Found
Message Box.
4. In the Found New Hardware Wizard message box which shows searching Video
Controller (VGA compatible) driver. Click Next to proceed the further step.
5. Select "Search for a suitable driver for my device", and click Next.
6. Tick on "Specify a location box", then, click Next and Browse buttons, and then
navigate to the VGA driver location as "\Drivers \ Win2K\VGA".
7. Click OK and Next to begin searching the driver. The Add New Hardware will found S3
Graphics Inc. Twister.
FIC A360 Service Manual 2-3
Page 4

Installation and Upgrade
8. Click Next to continue ins talling the driver.
9. Click Finish button to finish installing VGA driver and Click Yes to restart the computer.
2.2.4 Installing the Audio Device Driver
Your notebook computer uses AD1886 AC97 Codec 2.1 Audio controller.
Installing Audio Driver for Windows 98
1. Boot Windows 98 from your hard disk and insert the disc containing the Audio driver for
Windows 98.
2. Click Start, Settings, and Control Panel. Double click System and click Device
Manager tab. Under Other Devices, you'll see PCI Multimedia Audio Device.
3. Click Refresh button. The Add New Hardware Wizard will detect PCI Multimedia
Audio Device.
4. Click Next to search for the driver. Click Next to continue.
5. Tick Specify a location and click Browse button. Then, navigate to
" \Drivers\Win98\Audio " and click Next.
6. Click Next to accept the updated driver for SoundMAX Integrated Digital Audio driver.
7. Click Finish to complete installation. Restart Computer to finish setting up Audio.
Installing Audio Driver for Windows Me
1. Boot Windows Me from your hard disk and insert the disc containing the Audio driver for
Windows Me.
2. Click Start, Settings, and Control Panel. Double click System and click Device
Manager tab. Under Other Devices, you'll see PCI Multimedia Audio Device.
3. Click Refresh button. The Add New Hardware Wizard will detect PCI Multimedia
Audio Device. Click Next to search for the driver.
4. Select "Specify the location of the driver" and click Next to continue.
5. Tick on "Specify a location box", then click Next and Browse buttons and navigate to
the Audio driver location as "\Drivers \WinMe\ Audio".
6. Click OK and Next to begin searching the driver. The Update Device Driver Wizard
will found SoundMAX Integrated Digital Audio. Click Next to continue installing the
driver.
7. Click Finish button to finish installing Audio driver and Yes to restart the computer.
Installing Audio Driver for Windows 2000
1. Click the Start button, then point to Settings, and click Control Panel.
2. Double-click on the System icon, Hardware and then click on the Device Manager
folder tab.
3. Under the Other Devices line, you will find the Multimedia Audio Controller, and then
Scan for hardware changes buttons to appear the New Hardware Found Message Box.
4. In the Found New Hardware Wizard message box which shows searching Multimedia
Audio Controller driver. Click Next to proceed to the next step.
5. Select "Search for a suitable driver for my device", and click Next.
6. Tick on "Specify a location box", then click Next and Browse buttons, and navigate to
the Audio driver location as "\Drivers \ Win2K\Audio".
7. Click OK and Next to begin searching the driver. The Add New Hardware will found
SoundMAX Integrated Digital Audio.
8. Click Yes to continue installing the driver.
9. Click Finish button to finish installing Audio driver.
2-4 FIC A360 Service Manual
Page 5

Installation and Upgrade
2.2.5 Installing Touch Pad Driver
Following is the procedure for installing Synaptics touch pad driver.
Installing Touch Pad Driver for Windows 98 / Me / 2000
1. Boot Windows from your hard disk and insert the diskette containing touch pad driver.
2. Click the Start button, then click Run. In the Run dialog box, click Browse button and
navigate to the directory as "\Driver\Win98\Touch Pad\setup.exe", "WinMe", or
"Win2K" path according to your Operating System and run "Setup.exe".
3. Execute the setup program and then select the language for this installation. After that, a
Welcome dialog box appears.
4. Click Next continuously three times when the screen appears the Next button.
5. Click OK to restart your system.
2.2.6 Installing PCMCIA Driver
Following is the procedure for installing O2Micro OZ6933 CardBus driver on Windows 98.
Under Windows Me or Windows 2000, you could use the built-in driver for OZ6933 CardBus
contoller without any upgrade.
Installing PCMCIA Driver for Windows 98
1. Boot Windows from your hard disk and insert the disc containing the chip driver for
Windows.
2. Click the Start button and then click Run. In the Run dialog box, click Browse button
and navigate to the directory as "\Drivers \Win98\PCMCIA\O2setup.exe" where the
chip driver is located.
3. Execute the setup program and then the dialog box appears. Click OK to copy necessary
files to the system.
4. Finally click Yes to restart the computer to finish the installation.
2.2.7 Installing Twister Driver
VIA Video Accelerator 3D Adapter (English version) provides better video performance to
your computer. For installing the chip driver, please follow the procedures indicated below:
Installing Twister Driver for Windows 98 / Me / 2000
1. Boot Windows from your hard disk and insert the disc containing the chip driver for
Windows.
2. Click the Start button and then click Run. In the Run dialog box, click Browse button
and navigate to the directory as "\Drivers \Twis-chip\setup.exe" where the chip driver is
located.
3. The system may prompt you the message to restart the computer to finish the installation.
FIC A360 Service Manual 2-5
Page 6
Installation and Upgrade
2.2.8 Installing Internal Modem Device Driver
Your notebook computer may come with an optional internal modem. The internal modem is
a 56K ps V.90 Askey Data Fax modem.
Installing Internal Modem for Windows 98 / Me / 2000
Œ/•
Ž
‘
Tilt Foot
Battery Release Latch
Mini-PCI Socket Compartment
Memory Compartment
•
•
Battery Bay
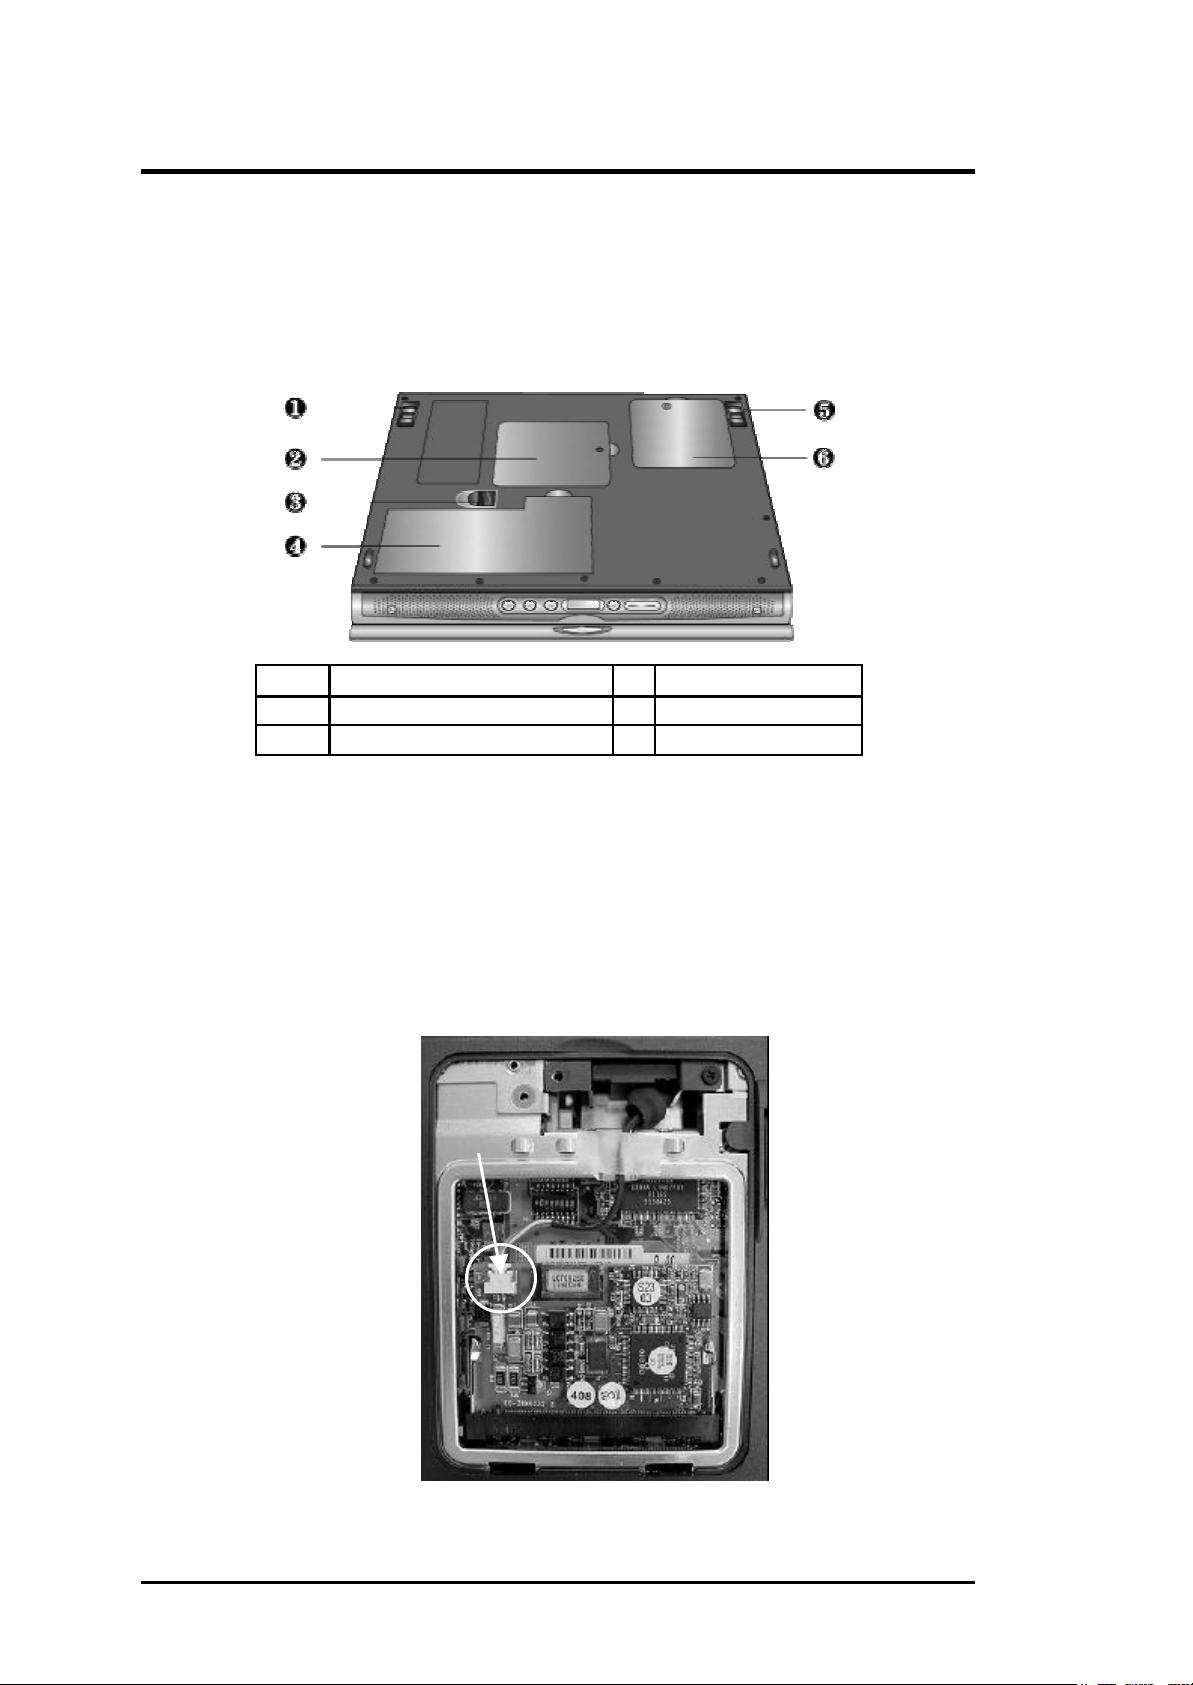
Figure 2-1 Mini-PCI Socket Compartment Door
1. Locate the modem module socket. Align the notch with the notch in the socket
connector and insert the module as follows:
− Insert the cable into the modem module.
− Hold the modem module at an angle and align the modem module connector with
the socket in the system. Push the connector into the socket.
− Press down on the edge of the modem module until the locking tabs on the sides
snap into place, securing the module.
Cable
Figure 2-2 Mini-PCI Socket Compartment
2-6 FIC A360 Service Manual
Page 7

Installation and Upgrade
2. To remove the modem module, press the locking tabs away from the sides of the module
until the module pops up. Then, remove the modem module.
3. Reassemble the notebook components as follows:
− Put the Mini -PCI Socket Compartment door back.
− Replace the screw.
− Turn the system over.
4. Boot Windows from your hard disk and insert the disc containing the Modem driver for
Windows.
5. Click the Start button and then click Run. In the Run dialog box, click Browse button
and navigate to the directory as "\driver\Win98\MODEM\setup.exe" where the
modem driver is located. . Please change "Win98" to other path named as WinMe,
Win2K … to fit the operating system you are using.
6. Click OK to process the installation of modem driver. Follow the instruction to finish
the installation.
7. With “Yes, I want to restart my computer now” selected, click Finish to complete the
modem installation.
2.2.9 Installing Internal LAN Device Driver
Your notebook computer may come with an optional internal LAN, which uses the Intel
82559 chip. Please follow the procedures below for installing the LAN driver:
Installing Internal LAN for Windows 98
1. Boot Windows 98 from your hard disk and insert the disc containing the LAN driver for
Windows 98.
2. Click the Start button, then click Settings, and Control Panel. Double click System and
click Device Manager tab. Under Other Devices, you'll see PCI Ethernet Controller.
3. Click Refresh button. The Add New Hardware Wizard will detect PCI Ethernet
Controller. Click Next to search for the driver.
4. Click Next to continue.
5. Tick Specify a location and click Browse button. Then, navigate to
" \Drivers\Win98\LAN" and click Next.
6. Click Next to accept the updated driver for Intel 82559 Fast Ethernet LAN driver.
7. Click Next to continue with LAN driver installation.
8. Insert the disk labeled "Windows 98 Second Edition CD-ROM ", and then click OK.
9. Type "\Win98", then click "OK".
10. Click Finish to complete installation.
11. Restart Computer to finish setting up LAN.
Installing Internal LAN for Windows Me
1. Boot WinMe from your hard disk and insert the disc containing the LAN driver for
WinMe. The New Hardware Found Message box appears.
2. You will find the message stated searching PCI Ethernet Controller Device driver
showed in the Add New Hardware Wizard message box.
3. Select "Specify the location of the driver", and click Next.
4. Tick on "Specify a location box". Then, click Browse button and navigate to the LAN
FIC A360 Service Manual 2-7
Page 8

Installation and Upgrade
driver location as "\Drivers \WinMe\LAN". Click Next to begin searching the driver.
5. The Add New Hardware will found Intel PRO PCI Adapter... Click Next to continue
the driver installation.
6. Click Finish button to finish installing LAN driver.
7. Click Yes to restart the computer
Installing Internal LAN for Windows 2000
1. Click the Start button, then point to Settings, and click Control Panel.
2. Double-click on the System icon, Hardware and then click on the Device Manager
folder tab.
3. Under the Other Devices line, you will find the Ethernet Controller, then Scan for
hardware changes buttons to appear the New Hardware Found Message Box.
4. In the Found New Hardware Wizard message box which shows searching Ethernet
Controller driver. Click Next to proceed to the next step.
5. Select "Search for a suitable driver for my device", and click Next.
6. Tick on "Specify a location box". Then, click Next and Browse buttons and navigate to
the LAN driver location as "\Drivers \Win2K\LAN". Click OK and Next to begin
searching the driver.
7. The Add New Hardware will found Intel (R) PRO 100B PCI Adapter. Click Yes to
continue installing the driver.
8. Click Finish button to finish installing LAN driver.
2.2.10 Installing Internal Modem and LAN Combo Device Driver
If your notebook has installed two-in-one combo card for enabling both Modem and LAN
function, please install Modem and LAN drivers, respectively.
For Modem driver, please follow the procedures below for installing the Lucent Data Fax
Modem driver:
Installing Modem Driver of Combo Device for Windows 98 / Me / 2000
1. Boot Windows from your hard disk and insert the disc containing the Modem driver for
Windows.
2. Click the Start button and then click Run. In the Run dialog box, click Browse button
and navigate to the directory as "\driver\Win98\MODEM\setup.exe" where the
modem driver is located. . Please change "Win98" to other path named as WinMe,
Win2K … to fit the operating system you are using.
3. Click OK to process the installation of modem driver. Follow the instruction to finish
the installation.
4. With “Yes, I want to restart my computer now” selected, click Finish to complete the
modem installation.
2-8 FIC A360 Service Manual
Page 9

Installation and Upgrade
For LAN, please follow the procedures below for installing the Askey 10/100 Mini PCI
Ethernet LAN of Combo card:
Installing LAN Driver of Combo Device for Windows 98
1. Boot Windows 98 from your hard disk and insert the disc containing the LAN driver for
Windows 98.
2. Click the Start button, then click Settings, and Control Panel. Double click System and
click Device Manager tab. Under Other devices, you'll see PCI Ethernet Controller.
3. Click Refresh button. The Add New Hardware Wizard will detect PCI Ethernet
Controller. Click Next to search for the driver.
4. Click Next to continue.
5. Tick Specify a location and click Browse button. Then, navigate to
" \Drivers\Win98\Combo\LAN" and click Next.
6. Click Next to accept the updated driver for Accton EN2242 Series Mini PCI Fast
Ethernet Adapter. Ethernet LAN driver.
7. Click Next to continue with LAN driver installation.
8. Insert the disk labeled " Accton EN2242 Series Mini PCI Fast Ethernet Adapter", and
then click OK.
9. Type "\Win98", then click "OK".
10. Click Finish to complete installation and restart Computer to finish setting up LAN.
Installing LAN Driver of Combo Device for Windows Me
1. Boot WinMe from your hard disk and insert the disc containing the LAN driver for
Wi nMe. The New Hardware Found Message box appears.
2. You will find the message stated searching PCI Ethernet Controller Device driver
showed in the Add New Hardware Wizard message box.
3. Select "Specify the location of the driver", and click Next.
4. Tick on "Specify a location box". Then, click Browse button and navigate to the LAN
driver location as "\Drivers \WinMe\Combo\LAN". Click Next to begin searching the
driver.
5. The Add New Hardware will found Accton EN2242 Series Mini PCI Fast Ethernet
Adapter. Click Next to continue the driver installation.
6. Click Finish button to finish installing LAN driver and click Yes to restart the computer.
Installing LAN Driver of Combo Device for Windows 2000
1. Click the Start button, then point to Settings, and click Control Panel.
2. Double-click on the System icon, Hardware and then click on the Device Manager
folder tab.
3. Under the Other Devices line, you will find Ethernet Controller. Click Scan for
hardware changes buttons to appear New Hardware Found Message Box.
4. In the Found New Hardware Wizard message box which shows searching Ethernet
Controller driver. Click Next to proceed to the next step.
5. Select "Search for a suitable driver for my device", and click Next.
6. Tick on "Specify a location box". Then, click Next and Browse buttons and navigate to
the LAN driver location as "\Drivers \Win2K\Combo\LAN". Click OK and Next to
begin searching the driver.
7. The Add New Hardware will found Accton EN2242 Series Mini PCI Fast Ethernet
Adapter. Click Yes to continue installing the driver.
8. Click Finish button to finish installing LAN driver.
FIC A360 Service Manual 2-9
Page 10

Installation and Upgrade
2.2.11 Installing Easy Button Driver
Following is the procedure for installing Easy Button driver.
Installing Easy Button driver for Windows 98 / Me / 2000
1. Boot Windows from your hard disk and insert the dis c containing the Easy Button driver.
2. Click the Start button, then click Run. In the Run dialog box, click Browse button and
navigate to the directory as "\Drivers \Win98\Easy Button\Ez Button V1.01.exe",
"\Drivers \WinMe\Easy Button\Ez Button V1.01.exe ", or "\Drivers \Win2K\Easy
Button\Ez Button V1.01.exe".
3. Run the execution file for installing the Easy Button driver, and then click Finish after
complete the installing procedure.
2.2.12 Installing EzMail Driver
Following is the procedure for installing EzMail driver.
Installing EzMail driver for Windows 98 / Me / 2000
1. Boot Windows from your hard disk and insert the disc containing the Easy Button driver.
2. Click the Start button, then click Run. In the Run dialog box, click Browse button and
navigate to the directory as "\Drivers \Win98\EzMail\Ez Mail V1.01.exe",
"\Drivers \WinMe\ EzMail\Ez Mail V1.01.exe", or "\Drivers \Win2K\ EzMail\Ez Mail
V1.01.exe".
3. Run the execution file for installing the Easy Button driver, and then click Finish after
complete the installing procedure.
2.2.13 Enabling DMA Channel for Best Performance
This Notebook supports DMA function for fastest data bus transmission. The Windows
system does not enable this function after you had installed the Windows system. You must
enable this function manually to make this notebook running smoothly, especially in music
listening and DVD, VCD playback.
Enabling DMA channel for Windows 98 / Me
1. Please click the following buttons with the procedure Start à Setting à Control
Panelà System à Device Manager.
2. Select and click CD-ROM, then point to the name of CD-ROM/DVD-ROM/CD-RW.
3. Click Setting tab and tick the DMA function
4. Return to previous level (Device Manager), select and click Disk Drives, under the Disk
Drives level, click the name of Hard Disk (For example "Generic IED Disk Tupe 01").
5. Please change the setting of Disk Drives as above.
6. Restart your notebook to let the setting take effect.
2-10 FIC A360 Service Manual
Page 11

Installation and Upgrade
Enabling DMA channel for Windows 2000
1. Please click the following buttons with the procedure Start à Settingà Control Panel
à System à Hardware à Device Manager.
2. Select and click IDE ATA/ATAPI Controller, you will find Primary IDE Channel and
Secondary IDE channel. Please click Primary IDE Channel first.
3. Click Advanced setting Tab. Please change the selection of Transfer Mode to DMA if
available on both Device 0 and Device 1.
4. Return to previous level, please change the setting of Secondary IDE Channel as above.
5. Restart your notebook to let the setting take effect.
FIC A360 Service Manual 2-11
Page 12

Installation and Upgrade
2.3 System Upgrades
This section provides an easy step in doing system upgrades for your notebook computer.
2.3.1 Jumper Settings
This section provides a jumper setting lists of configuring the notebook.
Keyboard Type Select
K/B Type Pos #1 POS #2
US KEYBOARD OFF OFF
RESERVE OFF ON
JP KEYBOARD ON OFF
UK KEYBOARD ON ON
Logo Select
Logo Pos #3
RESERVE OFF
RESERVE ON
Password Override ( CMOS / RTC Data ) Jumper Setting
Password Override Pos#4
RTC Battery Normal OFF
Clear (RTC) DATA ON
i Before doing password override, take off AC adapter and battery first.
Main Board ID Select
Main Board ID Pos #5 POS #6
RESERVE OFF OFF
RESERVE OFF ON
RESERVE ON OFF
RESERVE ON ON
CD-ROM Master / Slave Select
CD-ROM Pos #7
Master ON
Slave OFF
i Pos # 8 is N/A Pin for reserve
2-12 FIC A360 Service Manual
Page 13

Installation and Upgrade
2.3.2 CPU Upgrade Procedure
The A360 features Intel Pentium III and Celeron FC-PGA Processors. It is located on the
upper-left side of the system motherboard.
How to Access the CPU Socket
To install or replace the CPU, follow the steps below:
1. Turn off the system and remove both AC adapter and the battery pack from the notebook
unit.
2. Remove keyboard cover by gently bending it and sliding it towards in front of you.
Keyboard Cover
Bend Up
Figure 2-3 Remove keyboard cover
3. Lift the keyboard and tilt it towards the LCD panel.
4. Release keyboard cable by sliding the ZIF connector towards up direction.
Figure 2-4 Remove keyboard
FIC A360 Service Manual 2-13
Page 14

Insert flat screw driver into
CPU, Tilt it in front of you.
CPU Protective
screws
Installation and Upgrade
5. Release seven screws as shown in the picture below, and then remove heat sink plate by
slightly lifting it up.
Figure 2-5 Remove heat sink plate
6. Use a flat screw driver and insert it into the CPU socket and tilt it towards in front of you
to unlock CPU from the socket. It’s recommended to use the protective tooling securing
CPU against damage.
the CPU socket. To unlock
Tooling
2-14 FIC A360 Service Manual
Figure 2-6 Remove CPU
Page 15
Installation and Upgrade
7. Remove CPU and insert the preferred CPU.
8. Use a flat screw driver and insert it into the other side of CPU socket and tilt it towards
LCD panel to unlock CPU from the socket. It’s recommended to use the protective
tooling securing CPU against damage.
9. Place back the heat plate and keyboard cover. Boot on the computer, and then BIOS will
automatically detect the type of the CPU which just be installed.
2.3.3 Memory Upgrade Procedure
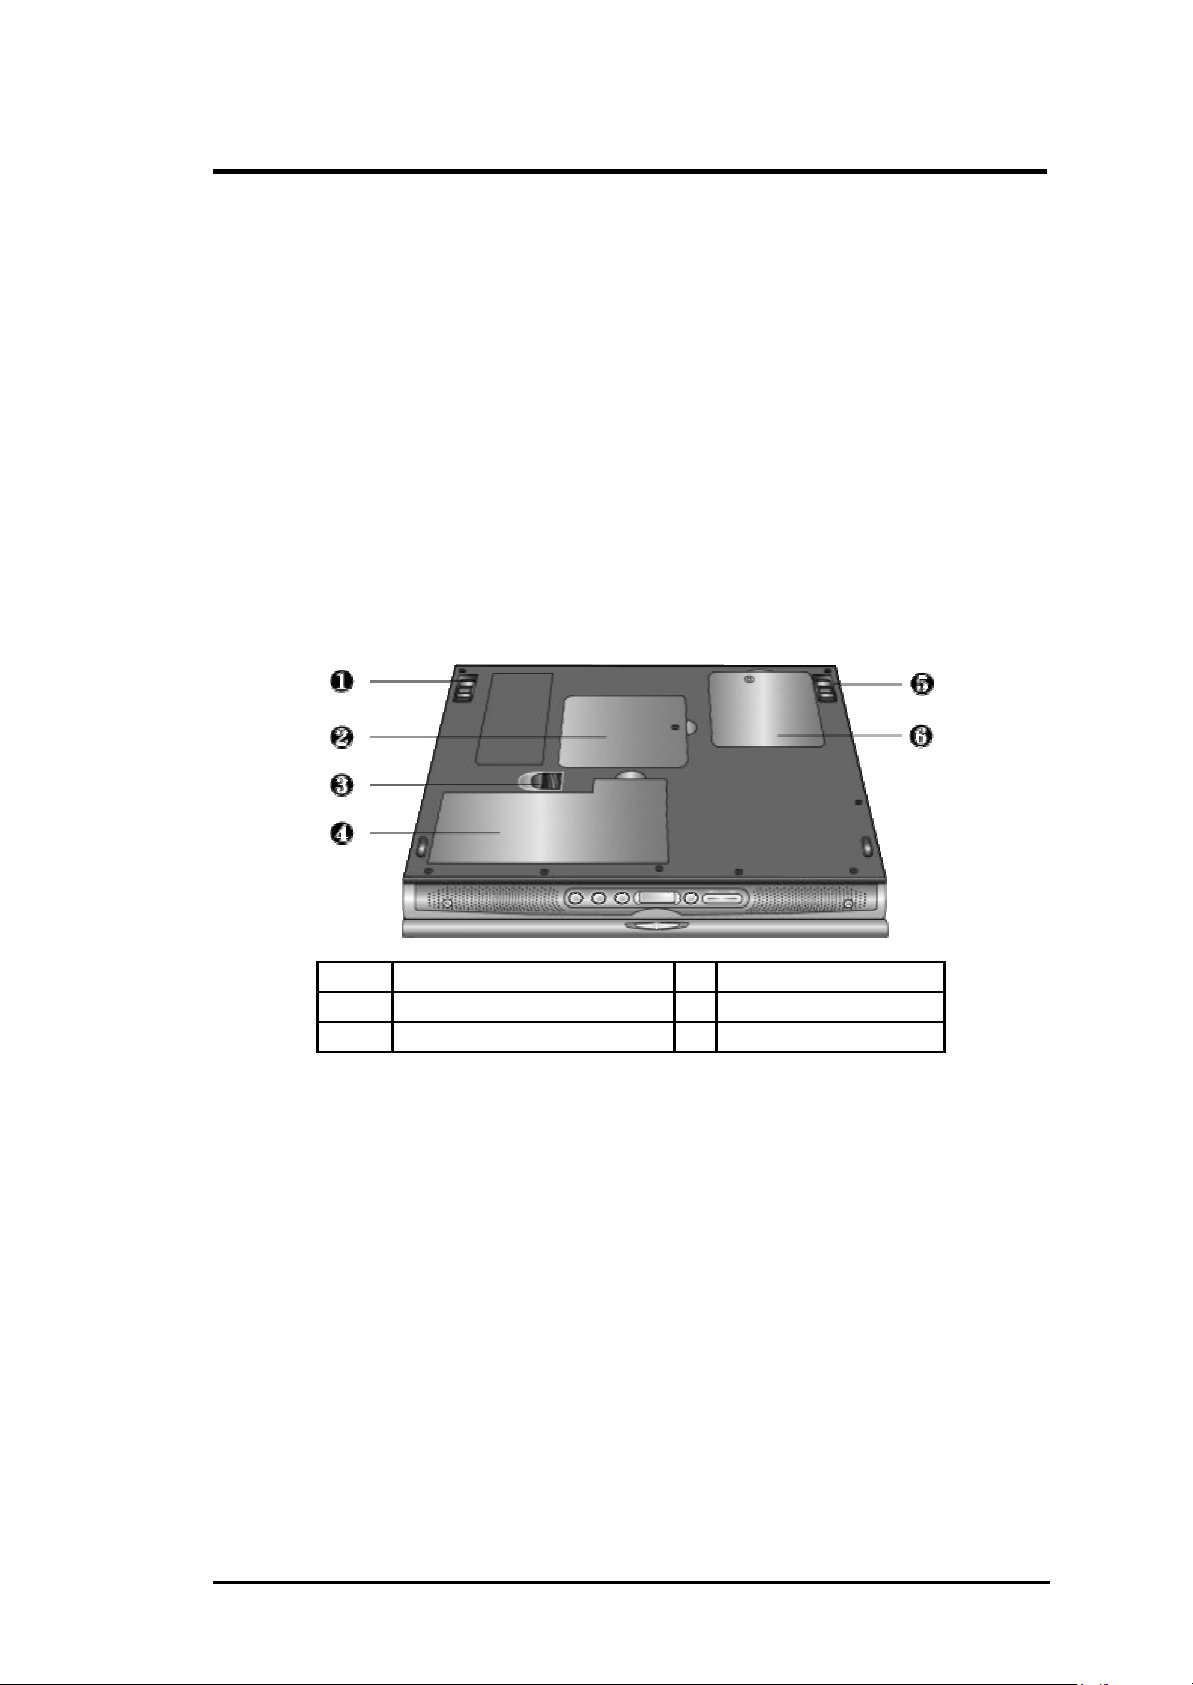
The notebook computer offers two 64-bit memory slot using 144-pin SODIMM (Small
Outline Dual Inline Memory Module) at 64MB, 128MB, and 256MB SDRAM. Two memory
slots are found inside the memory compartment. The memory compartment is located on the
underside of your computer inside the memory compartment. The notebook has no memory
on-board so you should have at least one SODIMM module inserted. With two memory slots,
you can have several combinations up to 512MB.
Œ/•
Ž
‘
Tilt Foot
Battery Release Latch
Mini-PCI Socket Compartment
Memory Compartment
•
•
Battery Bay
Figure 2-7 Memory Compartment Door
Using the Memory Slot inside the Memory Compartment
Follow the steps below on how to upgrade the memory modules:
1. Make sure the system is powered off and that no peripheral devices are attached.
2. Turn the system over and locate the screw on the memory compartment.
3. Remove the screw and open the memory compartment. Locate the alignment notch on the
module.
4. Locate the memory module socket. Align the notch with the notch in the socket connector
and insert the module as follows:
− Hold the SODIMM at a 60-degree angle and align the SODIMM connector with
the socket in the system. Push the connector into the socket.
− Press down on the edge of the SODIMM until the locking tabs on the sides snap
into place, securing the module.
FIC A360 Service Manual 2-15
Page 16

30 degrees
screws
Installation and Upgrade
Figure 2-8 Insert Memory Module
5. To remove a SODIMM, press the locking tabs away from the sides of the module until
the module pops up. Then, remove the SODIMM.
6. Reassemble the notebook components as follows.
− Put the DIMM door back.
− Replace the screw and turn the system over.
2.3.4 Hard Disk Upgrade Procedure
The notebook provides a built -in hard disk for the primary IDE controller. The HDD is an
industry standard 2.5” IDE disk drive and can be upgraded with another standard 2.5” HDD.
1. Make sure the system is powered off and that no peripheral devices are attached.
2. Remove the five screws securing the palm-rest cover underneath the system base unit.
Figure 2-9 Remove Palm Reset
3. Remove the palm-rest cover by slowly unsnapping each section of the palm-rest cover
from the base unit.
4. When you have remove the entire palm-rest cover, simply flip over the touchpad panel to
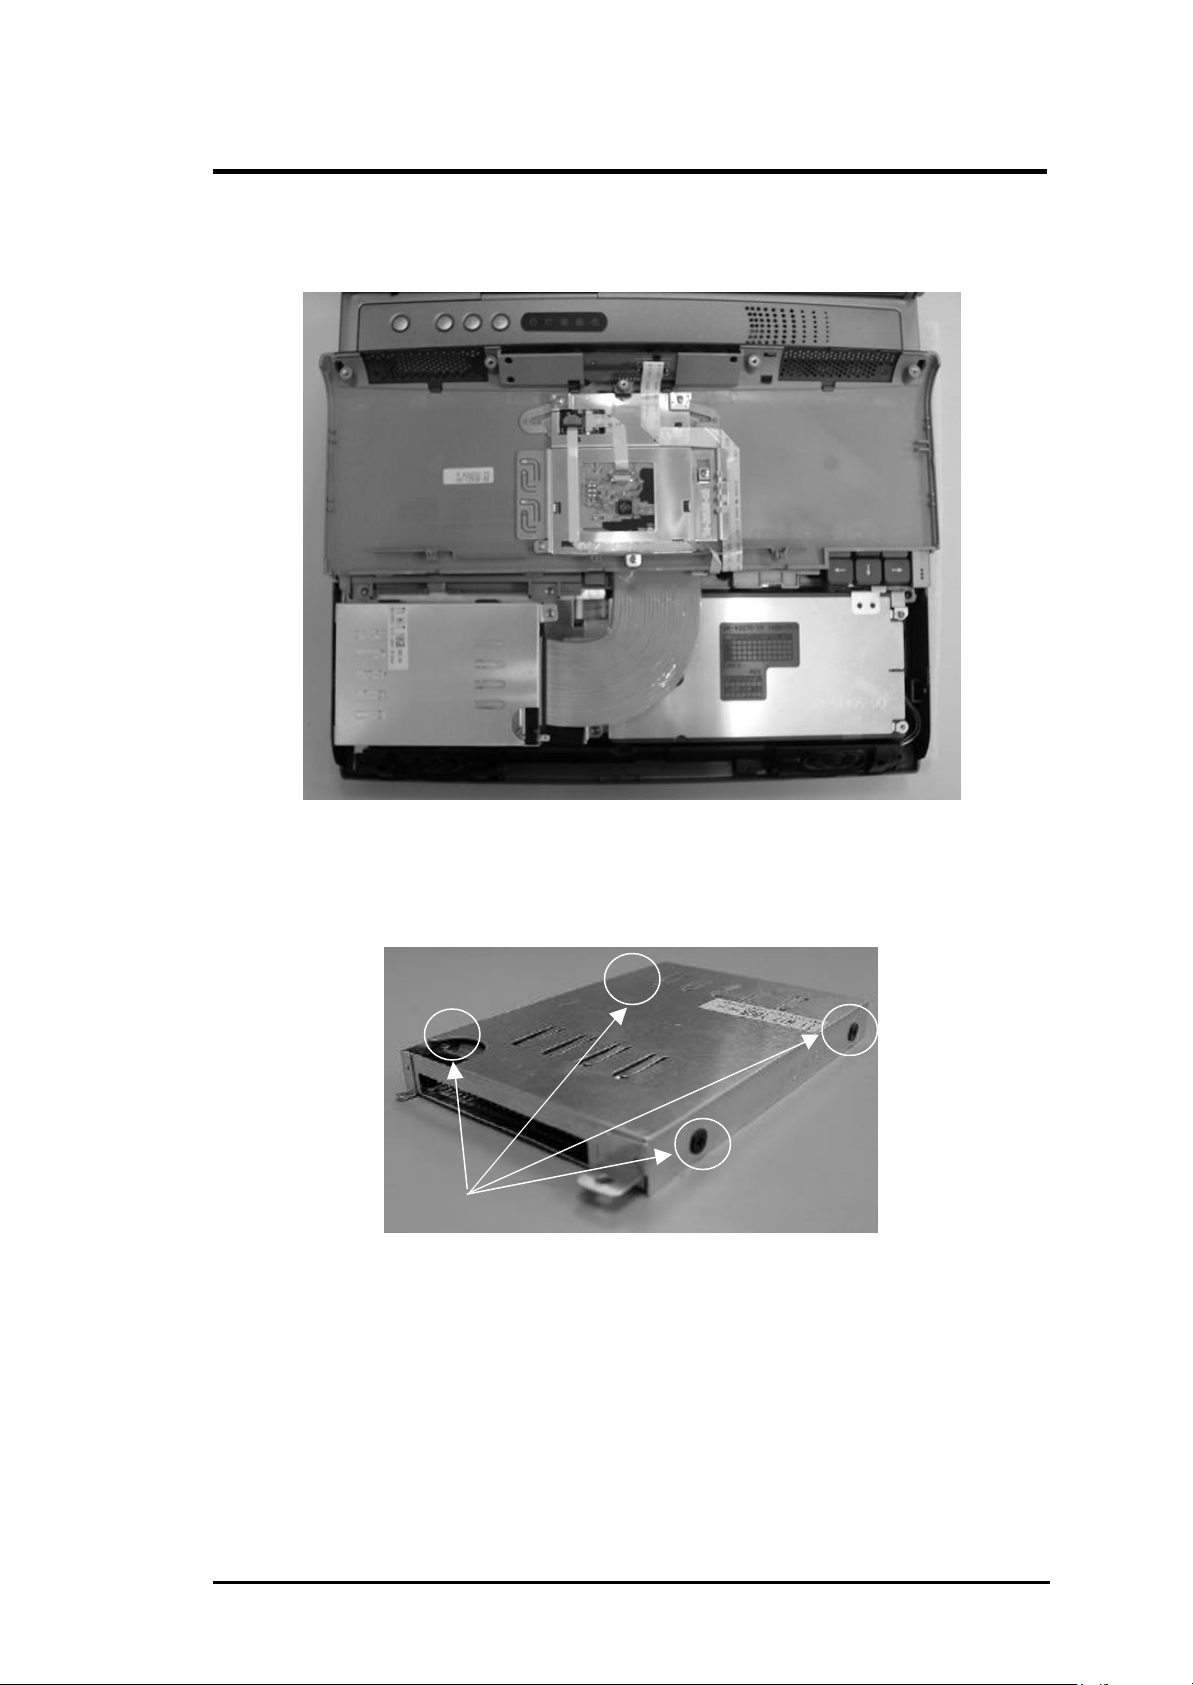
the keyboard. You will find the built -in hard disk secured with one screw at the upper
2-16 FIC A360 Service Manual
Page 17
screws
Installation and Upgrade
right corner of the hard disk. Remove this screw and carefully pull the hard disk module
from the connector.
Figure 2-10 The disassembly of Hard Disk Drive
5. Remove four screws of frame HDD bracket plate. Two ones of them are at the same side,
and others are at the other sides.
Figure 2-11 Screws Locations of the frame HDD bracket plate
6. Plug in the hard disk module to the connector and secure the screw on the upper right
corner of the hard disk.
7. Place back the palm rest and secure those screws
FIC A360 Service Manual 2-17
Page 18

Installation and Upgrade
2.3.5 System BIOS Upgrade Procedure
The notebook supports EPROM Flash BIOS that allows you to easily update the system BIOS
using the Phoenix BIOS Flash utility program called “PHLASH.COM”. This program runs
under MS-DOS and requires the system not to load high memory like HIMEM.SYS. It also
needs the “PLATFORM.BIN” file in order to activate.
Follow the steps below on how to update the system BIOS:
1. Prepare a clean bootable diskette without loading the HIMEM.SYS. Copy the files
PHLASH.COM and PLATFORM.BIN into the diskette along with the BIOS ROM file.
2. Restart the computer and boot from the diskette. At the DOS prompt, type the command
“PHLASH <BIOSfile.ROM>” to activate Flash BIOS programming utility. The
computer will then start to update the system BIOS inside the notebook.
3. After programming is complete, the system will prompt you to press any key to shutdown
the computer. The BIOS version is displayed inside the BIOS Setup Main menu. Press
<F2> after power on to run CMOS Setup program.
BIOS Version : 1.0A-0004-3430
i It is very important not to power off the system whenever the FLASH BIOS
program is running. Otherwise, the system may not be able to power on and you
need to replace the BIOS EPROM chip from another working notebook.
i Always plug in the AC adapter when updating the BIOS.
2-18 FIC A360 Service Manual
 Loading...