

Page 1

AT25080B/AT25160B/
AT25320B/AT25640B
SPI Automotive Temperature Serial EEPROM
8 Kbits (1,024 x 8), 16 Kbits (2,048 x 8),
32 Kbits (4,096 x 8) and 64 Kbits (8,192 x 8)
Features
• Serial Peripheral Interface (SPI) Compatible
• Supports SPI Modes 0 (0,0) and 3 (1,1):
– Data sheet describes mode 0 operation
• Low-Voltage and Medium-Voltage Operation:
– Grade 1, VCC = 2.5V to 5.5V
– Grade 3, VCC = 1.7V to 5.5V
• Extended Temperature Range (Grade 1 and Grade 3 as defined in AEC-Q100):
– Grade 1 Temperature Range: -40°C to +125°C
– Grade 3 Temperature Range: -40°C to +85°C
• 5 MHz Clock Rate (5V)
• 32‑Byte Page Mode
• Block Write Protection:
– Protect 1/4, 1/2 or entire array
• Write-Protect (WP) Pin and Write Disable Instructions for Both Hardware and Software Data Protection
• Self-Timed Write Cycle within 5 ms Maximum
• Automotive AEC-Q100 Qualified
• High Reliability:
– Endurance: 1,000,000 write cycles
– Data retention: 100 years
• Green (Lead-free/Halide-free/RoHS Compliant) Package Options
Packages
• 8-Lead SOIC, 8-Lead TSSOP and 8-Pad UDFN
© 2020 Microchip Technology Inc.
DS20006310A-page 1
Page 2

AT25080B/AT25160B/AT25320B/AT25640B
Table of Contents
Features......................................................................................................................................................... 1
Packages........................................................................................................................................................1
1. Package Types (not to scale)..................................................................................................................4
2. Pin Description........................................................................................................................................ 5
2.1. Chip Select (CS)...........................................................................................................................5
2.2. Serial Data Output (SO)............................................................................................................... 5
2.3. Write-Protect (WP)....................................................................................................................... 5
2.4. Ground (GND).............................................................................................................................. 5
2.5. Serial Data Input (SI)....................................................................................................................6
2.6. Serial Data Clock (SCK)...............................................................................................................6
2.7. Suspend Serial Input (HOLD).......................................................................................................6
2.8. Device Power Supply (VCC)......................................................................................................... 6
3. Description.............................................................................................................................................. 7
3.1. SPI Bus Master Connections to Serial EEPROMs.......................................................................7
3.2. Block Diagram.............................................................................................................................. 8
4. Electrical Characteristics.........................................................................................................................9
4.1. Absolute Maximum Ratings..........................................................................................................9
4.2. DC and AC Operating Range.......................................................................................................9
4.3. DC Characteristics....................................................................................................................... 9
4.4. AC Characteristics......................................................................................................................10
4.5. SPI Synchronous Data Timing....................................................................................................11
4.6. Electrical Specifications..............................................................................................................11
5. Device Operation.................................................................................................................................. 13
5.1. Interfacing the AT25080B/AT25160B/AT25320B/AT25640B on the SPI Bus.............................13
5.2. Device Opcodes......................................................................................................................... 14
5.3. Hold Function............................................................................................................................. 14
5.4. Write Protection..........................................................................................................................15
6. Device Commands and Addressing......................................................................................................16
6.1. STATUS Register Bit Definition and Function............................................................................ 16
6.2. Read STATUS Register (RDSR)..................................................................................................17
6.3. Write Enable (WREN) and Write Disable (WRDI)......................................................................... 17
6.4. Write STATUS Register (WRSR)..................................................................................................18
7. Read Sequence.................................................................................................................................... 21
8. Write Sequence.....................................................................................................................................22
8.1. Byte Write...................................................................................................................................22
8.2. Page Write..................................................................................................................................22
8.3. Polling Routine........................................................................................................................... 23
9. Packaging Information.......................................................................................................................... 24
© 2020 Microchip Technology Inc.
DS20006310A-page 2
Page 3

AT25080B/AT25160B/AT25320B/AT25640B
9.1. Package Marking Information.....................................................................................................24
10. Revision History.................................................................................................................................... 33
The Microchip Website.................................................................................................................................34
Product Change Notification Service............................................................................................................34
Customer Support........................................................................................................................................ 34
Product Identification System.......................................................................................................................35
Microchip Devices Code Protection Feature................................................................................................ 36
Legal Notice................................................................................................................................................. 36
Trademarks.................................................................................................................................................. 36
Quality Management System....................................................................................................................... 37
Worldwide Sales and Service.......................................................................................................................38
© 2020 Microchip Technology Inc.
DS20006310A-page 3
Page 4

8-Lead SOIC/TSSOP
(Top View)
CS 1
2
3
4
8
7
6
5
SO
WP
GND
Vcc
HOLD
SCK
SI
CS
SO
WP
GND
Vcc
HOLD
SCK
SI
8-Pad UDFN
(Top View)
1
2
3
4 5
6
7
8
AT25080B/AT25160B/AT25320B/AT25640B
1. Package Types (not to scale)
Package Types (not to scale)
© 2020 Microchip Technology Inc.
DS20006310A-page 4
Page 5

2. Pin Description
The descriptions of the pins are listed in Table 2-1.
Table 2-1. Pin Function Table
Name 8-Lead SOIC 8-Lead TSSOP 8-Pad UDFN
CS 1 1 1 Chip Select
SO 2 2 2 Serial Data Output
(2)
WP
GND 4 4 4 Ground
SI 5 5 5 Serial Data Input
SCK 6 6 6 Serial Data Clock
(2)
HOLD
V
CC
Note:
1. The exposed pad on this package can be connected to GND or left floating.
2. The Write-Protect (WP) and Hold (HOLD) pins should be driven high or low as appropriate.
AT25080B/AT25160B/AT25320B/AT25640B
Pin Description
(1)
3 3 3 Write-Protect
7 7 7 Suspends Serial Input
8 8 8 Device Power Supply
Function
2.1 Chip Select (CS)
The AT25080B/AT25160B/AT25320B/AT25640B is selected when the Chip Select (CS) pin is low. When the device is
not selected, data will not be accepted via the Serial Data Input (SI) pin, and the Serial Output (SO) pin will remain in
a high‑impedance state.
To ensure robust operation, the CS pin should follow VCC upon power-up. It is therefore recommended to connect CS
to VCC using a pull-up resistor (less than or equal to 10 kΩ). After power-up, a low level on CS is required prior to any
sequence being initiated.
2.2 Serial Data Output (SO)
The Serial Data Output (SO) pin is used to transfer data out of the AT25080B/AT25160B/AT25320B/AT25640B.
During a read sequence, data is shifted out on this pin after the falling edge of the Serial Data Clock (SCK).
2.3 Write-Protect (WP)
The Write-Protect (WP) pin will allow normal read/write operations when held high. When the WP pin is brought low
and the WPEN bit is set to a logic ‘1’, all write operations to the STATUS register are inhibited. WP going low while
CS is still low will interrupt a write operation to the STATUS register. If the internal write cycle has already been
initiated, WP going low will have no effect on any write operation to the STATUS register. The WP pin function is
blocked when the WPEN bit in the STATUS register is set to a logic ‘0’. This will allow the user to install the
AT25080B/AT25160B/AT25320B/AT25640B in a system with the WP pin tied to ground and still be able to write to the
STATUS register. All WP pin functions are enabled when the WPEN bit is set to a logic ‘1’.
2.4 Ground (GND)
The ground reference for the Device Power Supply (VCC). The Ground (GND) pin should be connected to the system
ground.
© 2020 Microchip Technology Inc.
DS20006310A-page 5
Page 6

AT25080B/AT25160B/AT25320B/AT25640B
2.5 Serial Data Input (SI)
The Serial Data Input (SI) pin is used to transfer data into the device. It receives instructions, addresses and data.
Data is latched on the rising edge of the Serial Data Clock (SCK).
2.6 Serial Data Clock (SCK)
The Serial Data Clock (SCK) pin is used to synchronize the communication between a master and the AT25080B/
AT25160B/AT25320B/AT25640B. Instructions, addresses or data present on the Serial Data Input (SI) pin is latched
in on the rising edge of SCK, while output on the Serial Data Output (SO) pin is clocked out on the falling edge of
SCK.
2.7 Suspend Serial Input (HOLD)
The Suspend Serial Input (HOLD) pin is used in conjunction with the Chip Select (CS) pin to pause the AT25080B/
AT25160B/AT25320B/AT25640B. When the device is selected and a serial sequence is underway, HOLD can be
used to pause the serial communication with the master device without resetting the serial sequence. To pause, the
HOLD pin must be brought low while the Serial Data Clock (SCK) pin is low. To resume serial communication, the
HOLD pin is brought high while the SCK pin is low (SCK may still toggle during HOLD). Inputs to the Serial Data
Input (SI) pin will be ignored while the Serial Data Output (SO) pin will be in the high‑impedance state.
Pin Description
2.8 Device Power Supply (VCC)
The Device Power Supply (VCC) pin is used to supply the source voltage to the device. Operations at invalid V
voltages may produce spurious results and should not be attempted.
CC
© 2020 Microchip Technology Inc.
DS20006310A-page 6
Page 7

SPI Master:
Microcontroller
Slave 0
AT25XXX
Data Clock (SCK)
Data Output (SO)
Data Input (SI)
CS3 CS2 CS1 CS0
SI SO SCK
CS
Slave 1
AT25XXX
SI SO SCK
Slave 2
AT25XXX
SI SO SCK
Slave 3
AT25XXX
SI SO SCK
CS
CSCS
AT25080B/AT25160B/AT25320B/AT25640B
3. Description
The AT25080B/AT25160B/AT25320B/AT25640B provides 8,192/16,384/32,768/65,536 bits of Serial Electrically
Erasable and Programmable Read-Only Memory (EEPROM) organized as 1,024/2,048/4,096/8,192 words of 8 bits
each. The device is optimized for use in many industrial and commercial applications where low‑power and
low‑voltage operation are essential. The device is available in space-saving 8‑lead SOIC, 8‑lead TSSOP and 8‑pad
UDFN packages. All packages operate from 1.7V to 5.5V.
3.1 SPI Bus Master Connections to Serial EEPROMs
Description
© 2020 Microchip Technology Inc.
DS20006310A-page 7
Page 8

3.2 Block Diagram
GND
Memory
System Control
Module
High-Voltage
Generation
Circuit
Address Register
and Counter
Write Protection
Control
VCC
SCK
SI
Power-on
Reset
Generator
Row Decoder
Data Register
SO
Pause
Operation
Control
Register Bank:
STATUS Register
Data Output
Buffer
CS
WP
HOLD
1 page
EEPROM Array
Column Decoder
AT25080B/AT25160B/AT25320B/AT25640B
Description
© 2020 Microchip Technology Inc.
DS20006310A-page 8
Page 9

AT25080B/AT25160B/AT25320B/AT25640B
4. Electrical Characteristics
4.1 Absolute Maximum Ratings
Operating temperature -40°C to +125°C
Storage temperature -65°C to +150°C
Voltage on any pin with respect to ground -1.0V to +7.0V
V
CC
DC output current 5.0 mA
ESD protection > 2 kV
Note: Stresses above those listed under “Absolute Maximum Ratings” may cause permanent damage to the device.
This is a stress rating only and functional operation of the device at these or any other conditions above those
indicated in the operation listings of this specification is not implied. Exposure to absolute maximum rating conditions
for extended periods may affect device reliability.
Electrical Characteristics
6.25V
4.2 DC and AC Operating Range
Table 4-1. DC and AC Operating Range
AT25080B/AT25160B/AT25320B/AT25640B Automotive Grade 1 Automotive Grade 3
Operating Temperature (Case) -40°C to +125°C -40°C to +85°C
VCC Power Supply 2.5V to 5.5V 1.7V to 5.5V
4.3 DC Characteristics
CC1
CC2
CC1
CC2
CC3
SB1
SB2
SB3
IL
OL
IL
(2)
(1)
2.5 — 5.5 V Grade 1
1.7 — 5.5 V Grade 3
-3.0 — 3.0 µA VIN = 0V to V
-3.0 — 3.0 µA VIN = 0V to V
-0.6 — VCC x 0.3 V
Table 4-2. DC Characteristics
Parameter Symbol Minimum Typical Maximum Units Conditions
Supply Voltage V
Supply Voltage V
Supply Current I
Supply Current I
Supply Current I
Standby Current I
Standby Current I
Standby Current I
Input Leakage I
Output Leakage I
Input Low‑Voltage V
— — 6.0 mA VCC = 5.0V at 5 MHz,
SO = Open, Read
— — 3.0 mA VCC = 5.0V at 1 MHz
— — 7.0 mA VCC = 5.0V at 5 MHz,
SO = Open, Read, Write
— 0.1 9.0 µA VCC = 1.7V, CS = V
— 0.2 10.0 µA VCC = 2.5V, CS = V
— 2.0 13.0 µA VCC = 5.0V, CS = V
CC
CC
CC
CC
CC
© 2020 Microchip Technology Inc.
DS20006310A-page 9
Page 10
...........continued
Parameter Symbol Minimum Typical Maximum Units Conditions
Input High‑Voltage V
Output Low‑Voltage V
Output High‑Voltage V
Output Low‑Voltage V
Output High‑Voltage V
Note:
1. Applicable over recommended operating range from: TA1 = -40°C to +125°C, V
to +85°C, V
= 1.7V to 5.5V.
CC2
2. VIL min and VIH max are reference only and are not tested.
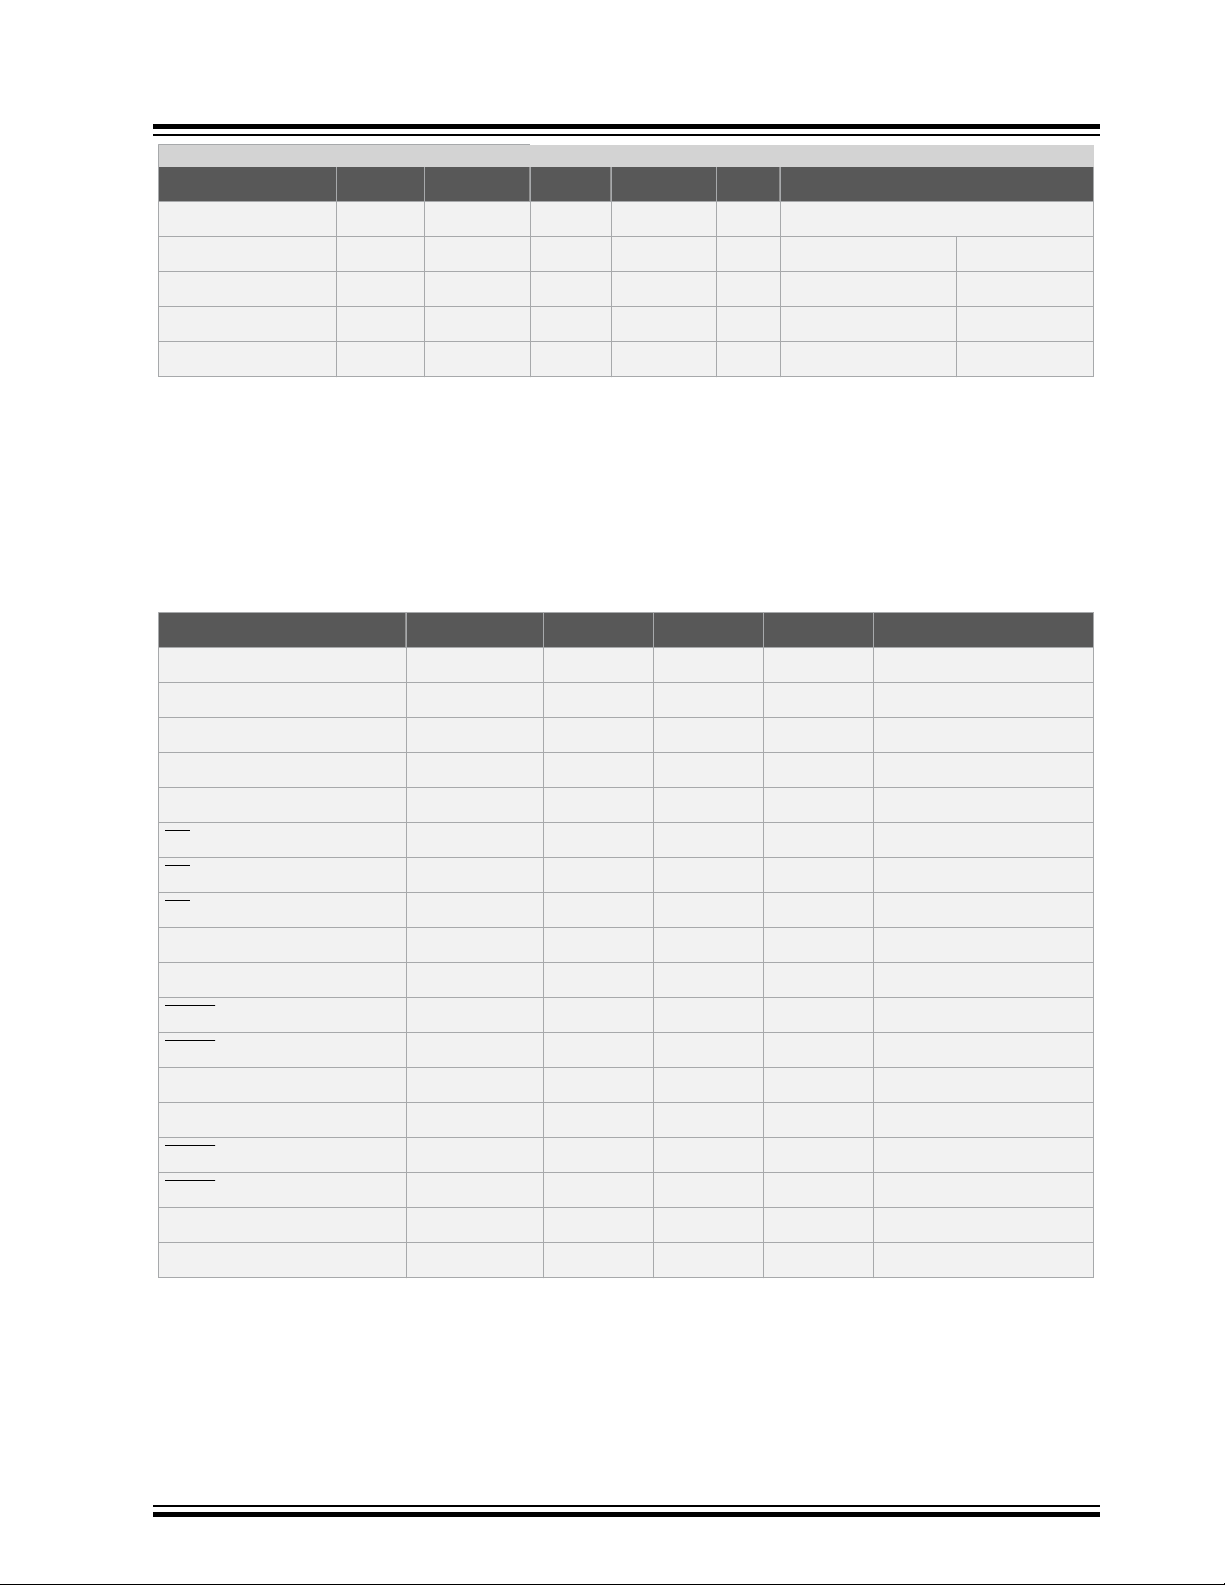
4.4 AC Characteristics
Table 4-3. AC Characteristics
Parameter Symbol Minimum Maximum Units Conditions
IH
OL1
OH1
OL2
OH2
AT25080B/AT25160B/AT25320B/AT25640B
Electrical Characteristics
(2)
VCC x 0.7 — VCC + 0.5 V
— — 0.4 V 2.5V ≤ VCC ≤ 5.5V IOL = 3.0 mA
VCC - 0.8 — — V 2.5V ≤ VCC ≤ 5.5V IOH = -1.6 mA
— — 0.2 V 1.7V ≤ VCC ≤ 5.5V IOL = 0.15 mA
VCC - 0.2 — — V 1.7V ≤ VCC ≤ 5.5V IOH = -100 µA
= 2.5V to 5.5V, TA2 = -40°C
CC1
(1)
SCK Clock Frequency f
Input Rise Time t
Input Fall Time t
SCK High Time t
SCK Low Time t
CS High Time t
CS Setup Time t
CS Hold Time t
Data In Setup Time t
Data In Hold Time t
HOLD Setup Time t
HOLD Hold Time t
Output Valid t
Output Hold Time t
HOLD to Output Low Z t
HOLD to Output High Z t
Output Disable Time t
Write Cycle Time t
SCK
RI
FI
WH
WL
CS
CSS
CSH
SU
H
HD
CD
V
HO
LZ
HZ
DIS
WC
0 5 MHz
— 2000 ns
— 2000 ns
40 — ns
40 — ns
80 — ns
80 — ns
80 — ns
5 — ns
20 — ns
40 — ns
40 — ns
0 40 ns
0 — ns
0 40 ns
— 80 ns
— 80 ns
— 5 ms
Note:
1. Applicable over recommended operating ranges from TA1 = -40°C to +125°C, V
TA2 = -40°C to +85°C, V
© 2020 Microchip Technology Inc.
= 1.7V to 5.5V, CL = 1 TTL Gate and 100 pF (unless otherwise noted).
CC2
= 2.5V to 5.5V and
CC1
DS20006310A-page 10
Page 11
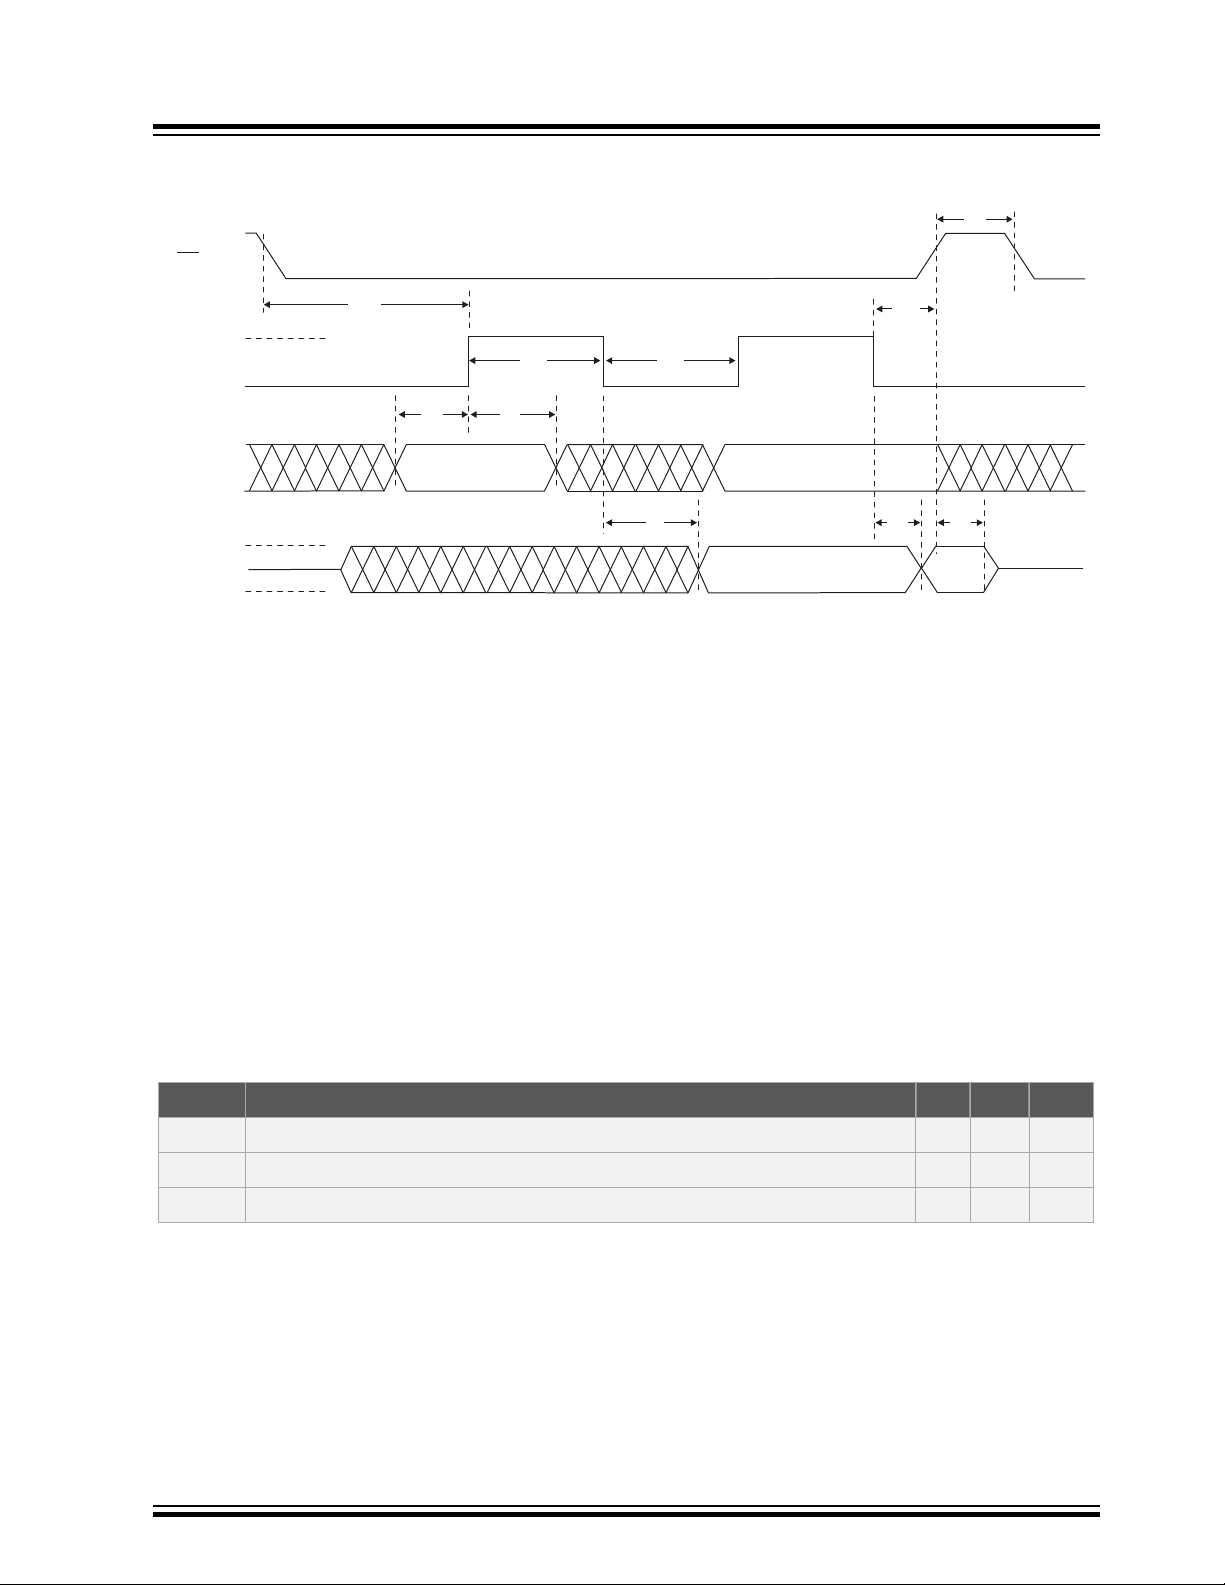
t
DIS
t
HO
t
CSH
t
CS
t
V
t
H
V
OH
V
OL
High
Impedance
Valid Data In
t
WH
V
IH
V
IH
V
IL
t
CSS
t
WL
SCK
SI
SO
CS
V
IL
V
IH
V
IL
t
SU
High
Impedance
AT25080B/AT25160B/AT25320B/AT25640B
4.5 SPI Synchronous Data Timing
Electrical Characteristics
4.6 Electrical Specifications
4.6.1 Power-Up Requirements and Reset Behavior
During a power-up sequence, the VCC supplied to the AT25080B/AT25160B/AT25320B/AT25640B should
monotonically rise from GND to the minimum VCC level, as specified in Table 4-1, with a slew rate no faster than
0.1 V/µs.
4.6.1.1 Device Reset
To prevent inadvertent write operations or any other spurious events from occurring during a power-up sequence, the
AT25080B/AT25160B/AT25320B/AT25640B includes a Power-on Reset (POR) circuit. Upon power-up, the device will
not respond to any instructions until the VCC level crosses the internal voltage threshold (V
out of Reset and into Standby mode.
The system designer must ensure the instructions are not sent to the device until the VCC supply has reached a
stable value greater than or equal to the minimum VCC level. Additionally, once the VCC is greater than or equal to the
minimum VCC level, the bus master must wait at least t
4-4 for the values associated with these power-up parameters.
(1)
level specified, it is recommended that a full-power cycle sequence be performed by
POR
Table 4-4. Power-Up Conditions
Symbol Parameter Min. Max. Units
t
PUP
V
POR
t
POFF
Time required after VCC is stable before the device can accept instructions 100 - µs
Power-on Reset Threshold Voltage - 1.5 V
Minimum time at VCC = 0V between power cycles 500 - ms
Note:
1. These parameters are characterized but they are not 100% tested in production.
If an event occurs in the system where the VCC level supplied to the AT25080B/AT25160B/AT25320B/AT25640B
drops below the maximum V
first driving the VCC pin to GND in less than 1 ms, waiting at least the minimum t
power-up sequence in compliance with the requirements defined in this section.
© 2020 Microchip Technology Inc.
) that brings the device
POR
before sending the first instruction to the device. See Table
PUP
time and then performing a new
POFF
DS20006310A-page 11
Page 12

4.6.2 Pin Capacitance
Table 4-5. Pin Capacitance
Symbol Test Condition Max. Units Conditions
AT25080B/AT25160B/AT25320B/AT25640B
Electrical Characteristics
(1,2)
C
C
OUT
IN
Output Capacitance (SO) 8 pF V
Input Capacitance (CS, SCK, SI, WP, HOLD) 6 pF VIN = 0V
Note:
1. This parameter is characterized but is not 100% tested in production.
2. Applicable over recommended operating range from: TA = 25°C, f
noted).
4.6.3 EEPROM Cell Performance Characteristics
Table 4-6. EEPROM Cell Performance Characteristics
Operation Test Condition Min. Max. Units
Write Endurance
(1)
TA = 25°C, VCC = 3.3V,
Page Write mode
Data Retention
(1)
TA = 55°C 100 — Years
Note:
1. Performance is determined through characterization and the qualification process.
4.6.4 Software Reset
The SPI interface of the AT25080B/AT25160B/AT25320B/AT25640B can be reset by toggling the CS input. If the CS
line is already in the Active state, it must complete a transition from the Inactive state (≥VIH) to the Active state (≤VIL)
and then back to the Inactive state (≥VIH) without sending clocks on the SCK line. Upon completion of this sequence,
the device will be ready to receive a new opcode on the SI line.
= 0V
OUT
= 1.0 MHz, VCC = 5.0V (unless otherwise
SCK
1,000,000 — Write Cycles
4.6.5 Device Default State at Power-Up
The AT25080B/AT25160B/AT25320B/AT25640B default state upon power-up consists of:
• Standby Power mode
• A high-to-low-level transition on CS is required to enter Active state
• Write Enable Latch (WEL) bit in the STATUS register = 0
• Ready/Busy bit in the STATUS register = 0, indicating the device is ready to accept a new command
• Device is not selected
• Not in Hold condition
• WPEN, BP1 and BP0 bits in the STATUS register are unchanged from their previous state due to the fact that
they are nonvolatile values
4.6.6 Device Default Condition
The AT25080B/AT25160B/AT25320B/AT25640B is shipped from Microchip to the customer with the EEPROM array
set to an all FFh data pattern (logic ‘1’ state). The Write-Protect Enable bit in the STATUS register is set to logic ‘0’
and the Block Write‑Protect bits in the STATUS register are set to logic ‘0’.
© 2020 Microchip Technology Inc.
DS20006310A-page 12
Page 13

5. Device Operation
SO
SI
SCK
CS
MS
b
LSb
MS
b
LSb
Mode 0
Mode 3
Mode 0
Mode 3
The AT25080B/AT25160B/AT25320B/AT25640B is controlled by a set of instructions that are sent from a host
controller, commonly referred to as the SPI Master. The SPI Master communicates with the AT25080B/AT25160B/
AT25320B/AT25640B via the SPI bus which is comprised of four signal lines: Chip Select (CS), Serial Data Clock
(SCK), Serial Data Input (SI) and Serial Data Output (SO).
The SPI protocol defines a total of four modes of operation (Mode 0, 1, 2 or 3) with each mode differing in respect to
the SCK polarity and phase and how the polarity and phase control the flow of data on the SPI bus. The AT25080B/
AT25160B/AT25320B/AT25640B supports the two most common modes, SPI Modes 0 and 3. With SPI Modes 0 and
3, data is always latched in on the rising edge of SCK and always output on the falling edge of SCK. The only
difference between SPI Modes 0 and 3 is the polarity of the SCK signal when in the Inactive state (when the SPI
Master is in Standby mode and not transferring any data). SPI Mode 0 is defined as a low SCK while
asserted (at VCC) and SPI Mode 3 has SCK high in the Inactive state. The SCK Idle state must match when the CS is
deasserted both before and after the communication sequence in SPI Mode 0 and 3. The figures in this document
depict Mode 0 with a solid line on SCK while CS is inactive and Mode 3 with a dotted line.
Figure 5-1. SPI Mode 0 and Mode 3
AT25080B/AT25160B/AT25320B/AT25640B
Device Operation
CS is not
5.1 Interfacing the AT25080B/AT25160B/AT25320B/AT25640B on the SPI Bus
Communication to and from the AT25080B/AT25160B/AT25320B/AT25640B must be initiated by the SPI Master
device, such as a microcontroller. The SPI Master device must generate the serial clock for the AT25080B/
AT25160B/AT25320B/AT25640B on the Serial Data Clock (SCK) pin. The AT25080B/AT25160B/AT25320B/
AT25640B always operates as a slave due to the fact that the SCK is always an input.
5.1.1 Selecting the Device
The AT25080B/AT25160B/AT25320B/AT25640B is selected when the Chip Select (CS) pin is low. When the device is
not selected, data will not be accepted via the Serial Data Input (SI) pin, and the Serial Data Output (SO) pin will
remain in a high‑impedance state.
5.1.2 Sending Data to the Device
The AT25080B/AT25160B/AT25320B/AT25640B uses the SI pin to receive information. All instructions, addresses
and data input bytes are clocked into the device with the Most Significant bit (MSb) first. The SI pin samples on the
first rising edge of the SCK line after the CS has been asserted.
5.1.3 Receiving Data from the Device
Data output from the device is transmitted on the SO pin, with the MSb output first. The SO data is latched on the first
falling edge of SCK after the instruction has been clocked into the device, such as the Read from Memory Array
(READ) and Read STATUS Register (RDSR) instructions. See Read Sequence for more details.
© 2020 Microchip Technology Inc.
DS20006310A-page 13
Page 14
5.2 Device Opcodes
HOLD
SCK
CS
Hold HoldHold
5.2.1 Serial Opcode
After the device is selected by driving CS low, the first byte will be received on the SI pin. This byte contains the
opcode that defines the operation to be performed. Refer to Table 6-1 for a list of all opcodes that the AT25080B/
AT25160B/AT25320B/AT25640B will respond to.
5.2.2 Invalid Opcode
If an invalid opcode is received, no data will be shifted into AT25080B/AT25160B/AT25320B/AT25640B and the SO
pin will remain in a high-impedance state until the falling edge of CS is detected again. This will reinitialize the serial
communication.
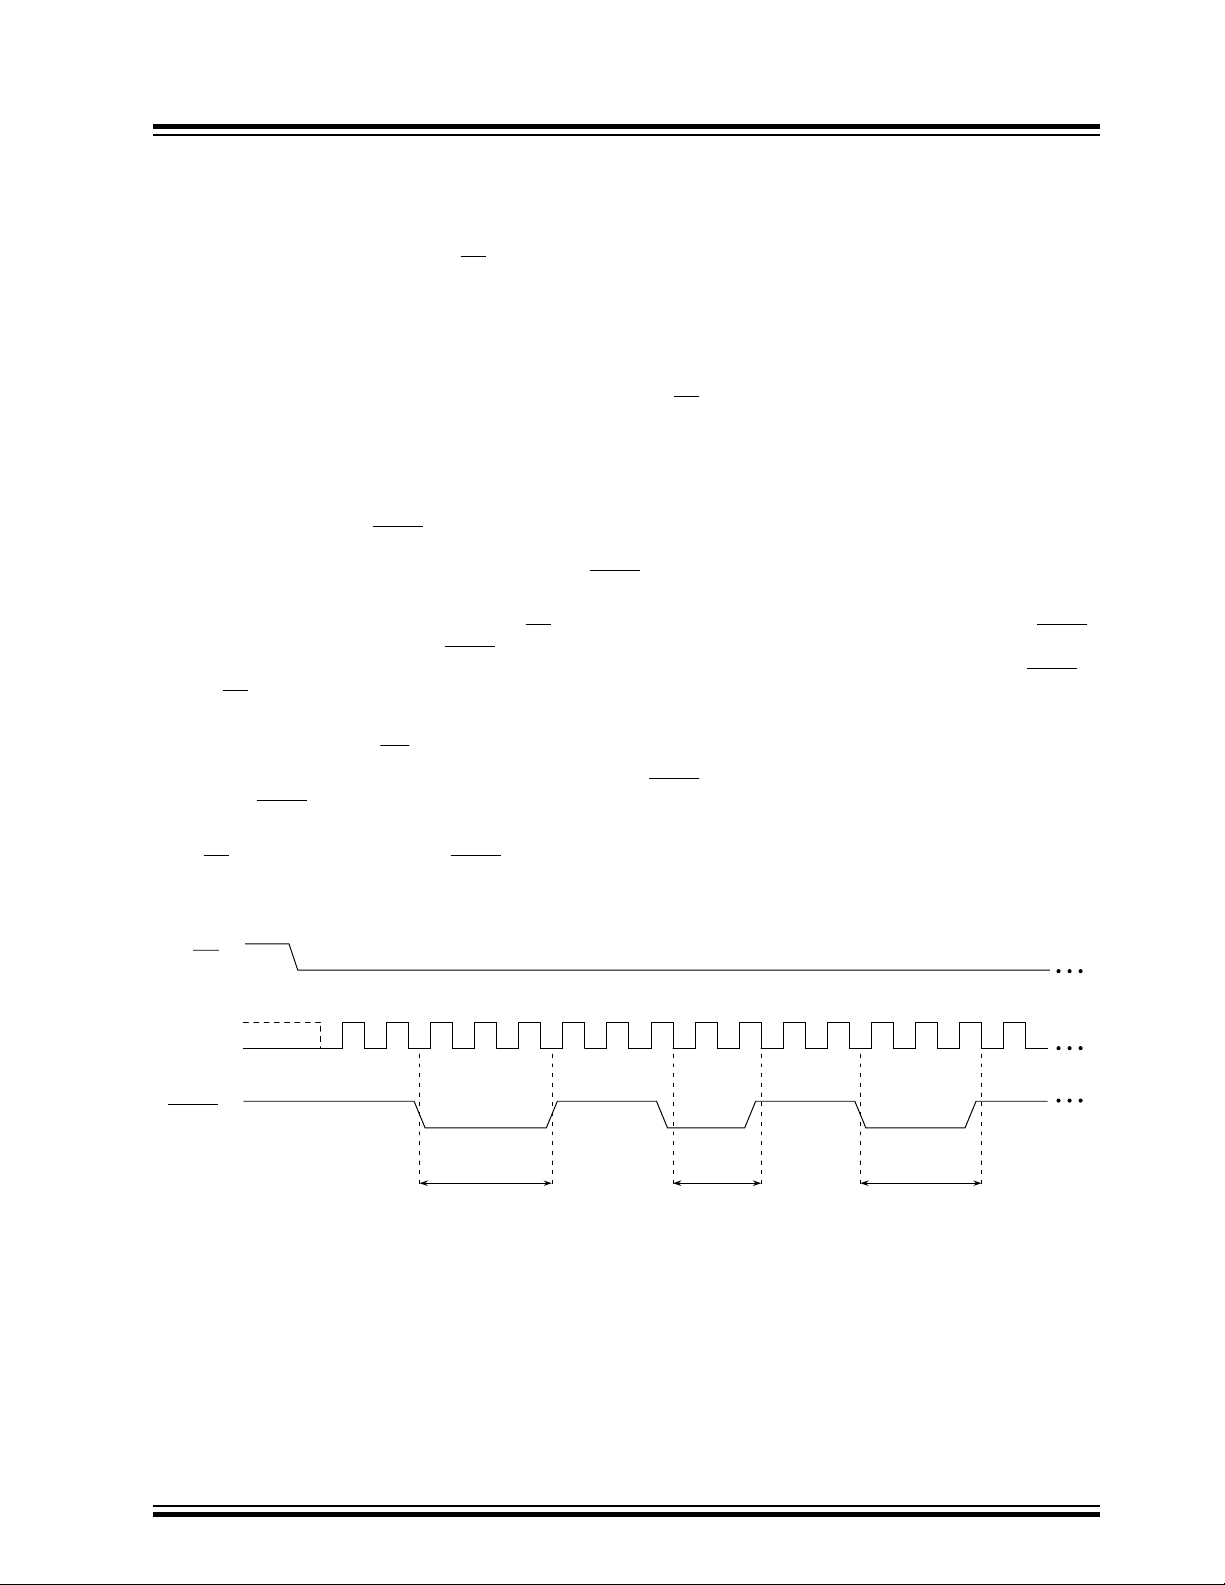
5.3 Hold Function
The Suspend Serial Input (HOLD) pin is used to pause the serial communication with the device without having to
stop or reset the clock sequence. The Hold mode, however, does not have an effect on the internal write cycle.
Therefore, if a write cycle is in progress, asserting the HOLD pin will not pause the operation and the write cycle will
continue to completion.
The Hold mode can only be entered while the
pin during the SCK low pulse. If the HOLD pin is asserted during the SCK high pulse, then the Hold mode will not be
started until the beginning of the next SCK low pulse. The device will remain in the Hold mode as long as the HOLD
pin and CS pin are asserted.
While in Hold mode, the SO pin will be in a high-impedance state. In addition, both the SI pin and the SCK pin will be
ignored. The Write-Protect (WP) pin, however, can still be asserted or deasserted while in the Hold mode.
To end the Hold mode and resume serial communication, the
pulse. If the HOLD pin is deasserted during the SCK high pulse, then the Hold mode will not end until the beginning
of the next SCK low pulse.
If the CS pin is deasserted while the HOLD pin is still asserted, then any operation that may have been started will be
aborted and the device will reset the WEL bit in the STATUS register back to the logic ‘0’ state.
Figure 5-2. Hold Mode
AT25080B/AT25160B/AT25320B/AT25640B
Device Operation
CS pin is asserted. The Hold mode is activated by asserting the HOLD
HOLD pin must be deasserted during the SCK low
© 2020 Microchip Technology Inc.
DS20006310A-page 14
Page 15

Figure 5-3. Hold Timing
HOLD
SO
SCK
CS
t
CD
t
CD
t
HD
t
HD
t
LZ
t
HZ
5.4 Write Protection
The Write-Protect (WP) pin will allow normal read and write operations when held high. When the WP pin is brought
low and WPEN bit is a logic ‘1’, all write operations to the STATUS register are inhibited. The WP pin going low while
CS is still low will interrupt a Write STATUS Register (WRSR). If the internal write cycle has already been initiated, WP
going low will have no effect on any write operation to the STATUS register. The WP pin function is blocked when the
WPEN bit in the STATUS register is a logic ‘0’. This will allow the user to install the AT25080B/AT25160B/AT25320B/
AT25640B device in a system with the WP pin tied to ground and still be able to write to the STATUS register. All WP
pin functions are enabled when the WPEN bit is set to a logic ‘1’.
AT25080B/AT25160B/AT25320B/AT25640B
Device Operation
© 2020 Microchip Technology Inc.
DS20006310A-page 15
Page 16

AT25080B/AT25160B/AT25320B/AT25640B
6. Device Commands and Addressing
The AT25080B/AT25160B/AT25320B/AT25640B is designed to interface directly with the synchronous Serial
Peripheral Interface (SPI). The AT25080B/AT25160B/AT25320B/AT25640B utilizes an 8‑bit instruction register. The
list of instructions and their operation codes are contained in Table 6-1. All instructions, addresses and data are
transferred with the MSb first and start with a high‑to‑low
Table 6-1. Instruction Set for the AT25080B/AT25160B/AT25320B/AT25640B
Instruction Name Instruction Format Operates On Operation Description
WREN 0000 X110
WRDI 0000 X100
RDSR 0000 X101
WRSR 0000 X001
READ 0000 X011
WRITE 0000 X010
STATUS Register Set Write Enable Latch (WEL)
STATUS Register Reset Write Enable Latch (WEL)
STATUS Register Read STATUS Register
STATUS Register Write STATUS Register
Memory Array Read from Memory Array
Memory Array Write to Memory Array
Device Commands and Addressing
CS transition.
6.1 STATUS Register Bit Definition and Function
The AT25080B/AT25160B/AT25320B/AT25640B includes an 8‑bit STATUS register. The STATUS register bits
modulate various features of the device as shown in Table 6-2 and Table 6-3. These bits can be changed by specific
instructions that are detailed in the following sections.
Table 6-2. STATUS Register Format
Bit 7 Bit 6 Bit 5 Bit 4 Bit 3 Bit 2 Bit 1 Bit 0
WPEN X X X BP1 BP0 WEL RDY/BSY
Table 6-3. STATUS Register Bit Definition
Bit Name Type Description
7 WPEN Write-Protect Enable R/W
6:4 RFU Reserved for Future Use R
3:2 BP1
BP0
1 WEL Write Enable Latch R
0 RDY/BSY Ready/Busy Status R
Block Write Protection R/W
0
See Table 6-5 (Factory Default)
1
See Table 6-5 (Factory Default)
0
Reads as zeros when the device is not in a write cycle
1
Reads as ones when the device is in a write cycle
00
No array write protection (Factory Default)
01
Quarter array write protection (see Table 6-4)
10
Half array write protection (see Table 6-4)
11
Entire array write protection (see Table 6-4)
0
Device is not write enabled (Power-up Default)
1
Device is write enabled
0
Device is ready for a new sequence
1
Device is busy with an internal operation
© 2020 Microchip Technology Inc.
DS20006310A-page 16
Page 17

SO
SCK
CS
0 1 2 3 4 5 6 7 8 9 10 11 12 13 14 15
High-Impedance
SI
MSb
RDSR Opcode (05h)
0 0 0 0 0 1 0 1
D7 D6 D5 D4 D3 D2 D1 D0
MSb
STATUS Register Data Out
AT25080B/AT25160B/AT25320B/AT25640B
6.2 Read STATUS Register (RDSR)
The Read STATUS Register (RDSR) instruction provides access to the STATUS register. The ready/busy and write
enable status of the device can be determined by the RDSR instruction. Similarly, the Block Write-Protect (BP1, BP0)
bits indicate the extent of memory array protection employed. The STATUS register is read by asserting the CS pin,
followed by sending in a 05h opcode on the SI pin. Upon completion of the opcode, the device will return the 8‑bit
STATUS register value on the SO pin.
Figure 6-1. RDSR Waveform
Device Commands and Addressing
6.3 Write Enable (WREN) and Write Disable (WRDI)
Enabling and disabling writing to the STATUS register and EEPROM array is accomplished through the Write Enable
(WREN) instruction and the Write Disable (WRDI) instruction. These functions change the status of the WEL bit in the
STATUS register.
6.3.1 Write Enable Instruction (WREN)
The Write Enable Latch (WEL) bit of the STATUS register must be set to a logic ‘1’ prior to each Write STATUS
Register (WRSR) and Write to Memory Array (WRITE) instructions. This is accomplished by sending a WREN (06h)
instruction to the AT25080B/AT25160B/AT25320B/AT25640B. First, the CS pin is driven low to select the device and
then a WREN instruction is clocked in on the SI pin. Then the CS pin can be driven high and the WEL bit will be
updated in the STATUS register to a logic ‘1’. The device will power‑up in the Write Disable state (WEL = 0).
© 2020 Microchip Technology Inc.
DS20006310A-page 17
Page 18

SO
SCK
CS
High-Impedance
SI
MS
b
WREN Opcode (06h)
0 0 0 0 0 1 1 0
0 1 2 3 4 5 6 7
SO
SCK
CS
High-Impedance
SI
MS
b
WRDI Opcode (04h)
0 0 0 0 0 1 0 0
0 1 2 3 4 5 6 7
AT25080B/AT25160B/AT25320B/AT25640B
Figure 6-2. WREN Timing
6.3.2 Write Disable Instruction (WRDI)
To protect the device against inadvertent writes, the Write Disable (WRDI) instruction (opcode 04h) disables all
programming modes by setting the WEL bit to a logic ‘0’. The WRDI instruction is independent of the status of the WP
pin.
Figure 6-3. WRDI Timing
Device Commands and Addressing
6.4 Write STATUS Register (WRSR)
The Write STATUS Register (WRSR) instruction enables the SPI Master to change selected bits of the STATUS
register. Before a WRSR instruction can be initiated, a WREN instruction must be executed to set the WEL bit to
logic ‘1’. Upon completion of a WREN instruction, a WRSR instruction can be executed.
Note: The WRSR instruction has no effect on bit 6, bit 5, bit 4, bit 1 and bit 0 of the STATUS register. Only bit 7, bit 3
and bit 2 can be changed via the WRSR instruction. These modifiable bits are the Write-Protect Enable (WPEN) and
Block Protect (BP1, BP0) bits. These three bits are nonvolatile bits that have the same properties and functions as
regular EEPROM cells. Their values are retained while power is removed from the device.
The AT25080B/AT25160B/AT25320B/AT25640B will not respond to commands other than a RDSR after a WRSR
instruction until the self‑timed internal write cycle has completed. When the write cycle is completed, the WEL bit in
the STATUS register is reset to logic ‘0’.
© 2020 Microchip Technology Inc.
DS20006310A-page 18
Page 19

Figure 6-4. WRSR Waveform
SCK
CS
0 1 2 3 4 5 6 7 8 9 10 11 12 13 14 15
STATUS Register Data In
High-Impedance
MSb
WRSR Opcode (01h)
0 0 0 0 0 0 0 1
MSb
D7 X X X D3 D2 X
X
SO
SI
t
WC
(1)
Note:
1. This instruction initiates a self-timed internal write cycle (tWC) on the rising edge of CS after a valid sequence.
6.4.1 Block Write-Protect Function
The WRSR instruction allows the user to select one of four possible combinations as to how the memory array will be
inhibited from writing through changing the Block Write-Protect bits (BP1, BP0). The four levels of array protection
are:
• None of the memory array is protected.
• Upper quarter (¼) address range is write-protected meaning the highest order address bits are read-only.
• Upper half (½) address range is write-protected meaning the highest order address bits are read-only.
• All of the memory array is write-protected meaning all address bits are read-only.
The Block Write Protection levels and corresponding STATUS register control bits are shown in Table 6-4.
Table 6-4. Block Write-Protect Bits
AT25080B/AT25160B/AT25320B/AT25640B
Device Commands and Addressing
Level STATUS Register Bits Write-Protected/Read‑Only Address Range
BP1 BP0 AT25080B AT25160B AT25320B AT25640B
0
1(1/4)
2(1/2)
3(All)
0 0
0 1
1 0
1 1
6.4.2 Write-Protect Enable Function
The WRSR instruction also allows the user to enable or disable the Write-Protect (WP) pin through the use of the
Write-Protect Enable (WPEN) bit. When the WPEN bit is set to logic ‘0’, the ability to write the EEPROM array is
dictated by the values of the Block Write-Protect (BP1, BP0) bits. The ability to write the STATUS register is
controlled by the WEL bit. When the WPEN bit is set to logic ‘1’, the STATUS register is read-only.
Hardware Write Protection is enabled when both the WP pin is low and the WPEN bit has been set to a logic ‘1’.
When the device is Hardware Write‑Protected, writes to the STATUS register, including the Block Write‑Protect, WEL
and WPEN bits and to the sections in the memory array selected by the Block Write‑Protect bits are disabled. When
Hardware Write Protection is enabled, writes are only allowed to sections of the memory that are not block‑protected.
Hardware Write Protection is disabled when either the WP pin is high or the WPEN bit is a logic ‘0’. When Hardware
Write Protection is disabled, writes are only allowed to sections of the memory that are not block‑protected. Refer to
Table 6-5 for additional information.
None None None None
0300h-03FFh 0600h-07FFh 0C00h-0FFFh 1800h-1FFFh
0200h-03FFh 0400h-07FFh 0800h-0FFFh 1000h-1FFFh
0000h-03FFh 0000h-07FFh 0000h-0FFFh 0000h-1FFFh
© 2020 Microchip Technology Inc.
DS20006310A-page 19
Page 20

AT25080B/AT25160B/AT25320B/AT25640B
Device Commands and Addressing
Note: When the WPEN bit is Hardware Write‑Protected, it cannot be set back to a logic ‘0’ as long as the WP pin is
held low.
Table 6-5. WPEN Operation
WPEN WP Pin WEL Protected Blocks Unprotected Blocks STATUS Register
0 x 0
0 x 1
1
1
x
x
Low
Low
High
High
0
1
0
1
Protected Protected Protected
Protected Writable Writable
Protected Protected Protected
Protected Writable Protected
Protected Protected Protected
Protected Writable Writable
© 2020 Microchip Technology Inc.
DS20006310A-page 20
Page 21

7. Read Sequence
SO
SI
SCK
MSb
A A A A A A
MSb
2 310
0 0 0 0 0 0 1 1
6 754 10 1198 12 27 2823 26252421 2219 20 29 30 31
READ Opcode (03h)
A A A
D D D D D D D D D D
MSb MSb
Address Bits A15-A0
Data Byte 1
High-Impedance
CS
—
Reading the AT25080B/AT25160B/AT25320B/AT25640B via the SO pin requires the following sequence. After the
CS line is pulled low to select a device, the READ (03h) instruction is transmitted via the SI line followed by the 16‑bit
address to be read. Refer to Table 7-1 for the address bits for AT25080B/AT25160B/AT25320B/AT25640B.
Table 7-1. AT25080B/AT25160B/AT25320B/AT25640B Address Bits
Address AT25080B AT25160B AT25320B AT25640B
AT25080B/AT25160B/AT25320B/AT25640B
Read Sequence
A
N
Don’t Care Bits A15-A
A9-A
0
10
A10-A
A15-A
0
11
A11-A
A15-A
0
12
A12-A
A15-A
0
13
Upon completion of the 16‑bit address, any data on the SI line will be ignored. The data (D7‑D0) at the specified
address is then shifted out onto the SO line. If only one byte is to be read, the CS line should be driven high after the
data comes out. The read sequence can be continued since the byte address is automatically incremented and data
will continue to be shifted out. When the highest‑order address bit is reached, the address counter will rollover to the
lowest‑order address bit allowing the entire memory to be read in one continuous read cycle regardless of the starting
address.
Figure 7-1. Read Waveform
© 2020 Microchip Technology Inc.
DS20006310A-page 21
Page 22

8. Write Sequence
SO
SI
SCK
CS
MSb
A A A A A A
MSb
2 310
0 0 0 0 0 0 1 0
6 754 10 1198 12 3129 3025 28272623 2421 22
WRITE Opcode (02h)
High-Impedance
A A A
D7 D6 D5 D4 D3 D2 D1 D0
MSb
Address Bits A15-A0 Data In
t
WC
(1)
In order to program the AT25080B/AT25160B/AT25320B/AT25640B, two separate instructions must be executed.
First, the device must be write enabled via the Write Enable (WREN) instruction. Then, one of the two possible write
sequences described in this section may be executed.
Note: If the device is not Write Enabled (WREN), the device will ignore the WRITE instruction and will return to the
standby state when
The address of the memory location(s) to be programmed must be outside the protected address field location
selected by the block write protection level. During an internal write cycle, all commands will be ignored except the
RDSR instruction. Refer to Table 8-1 for the address bits for AT25080B/AT25160B/AT25320B/AT25640B.
Table 8-1. AT25080B/AT25160B/AT25320B/AT25640B Address Bits
Address AT25080B AT25160B AT25320B AT25640B
CS is brought high. A new CS assertion is required to re‑initiate communication.
AT25080B/AT25160B/AT25320B/AT25640B
Write Sequence
A
N
Don’t Care Bits A15-A
8.1 Byte Write
A byte write requires the following sequence and is depicted in Figure 8-1. After the CS line is pulled low to select the
device, the WRITE (02h) instruction is transmitted via the SI line followed by the 16‑bit address and the data (D7‑D0)
to be programmed. Programming will start after the CS pin is brought high. The low‑to‑high transition of the CS pin
must occur during the SCK low time (Mode 0) and SCK high time (Mode 3) immediately after clocking in the D0
(LSB) data bit. The AT25080B/AT25160B/AT25320B/AT25640B is automatically returned to the Write Disable state
(STATUS register bit WEL = 0) at the completion of a write cycle.
Figure 8-1. Byte Write
A9-A
0
10
A10-A
A15-A
0
11
A11-A
A15-A
0
12
A12-A
A15-A
0
13
Note:
1. This instruction initiates a self-timed internal write cycle (tWC) on the rising edge of CS after a valid sequence.
8.2 Page Write
A page write sequence allows up to 32 bytes to be written in the same write cycle, provided that all bytes are in the
same row of the memory array. Partial page writes of less than 32 bytes are allowed. After each byte of data is
received, the five lowest order address bits are internally incremented following the receipt of each data byte. The
higher order address bits are not incremented and retain the memory array page location. If more bytes of data are
transmitted than will fit to the end of that memory row, the address counter will rollover to the beginning of the same
row. Nevertheless, creating a rollover event should be avoided as previously loaded data in the page could become
unintentionally altered. The AT25080B/AT25160B/AT25320B/AT25640B is automatically returned to the Write Disable
state (WEL = 0) at the completion of a write cycle.
© 2020 Microchip Technology Inc.
DS20006310A-page 22
Page 23

Figure 8-2. Page Write
SO
SI
SCK
MSb MSb
2 310
0 0 0 0 0 0 1 0
6 754 98 3129 3025 28272623 2421 22
WRITE Opcode (02h)
High-Impedance
A A A A AA
D D D D D D D D
MS
b
Address Bits A15-A0 Data In Byte 1
D D D D D D D D
MSb
Data In Byte 64
CS
t
WC
(1)
Send Valid
Write
Protocol
Deassert
CS to V
CC
to
Initiate a
Write Cycle
Send RDSR
Instruction
to the Device
Continue to
Next Operation
NO
YES
Does
RDY/BSY
= 0?
Note:
1. This instruction initiates a self‑timed internal write cycle (tWC) on the rising edge of CS after a valid sequence.
8.3 Polling Routine
A polling routine can be implemented to optimize time‑sensitive applications that would not prefer to wait the fixed
maximum write cycle time (tWC). This method allows the application to know immediately when the write cycle has
completed to start a subsequent operation.
Once the internally-timed write cycle has started, a polling routine can be initiated. This involves repeatedly sending a
Read STATUS Register (RDSR) instruction to determine if the device has completed its self-timed internal write cycle.
If the RDY/BSY bit (bit 0 of STATUS register) = 1, the write cycle is still in progress. If bit 0 = 0, the write cycle has
ended. If the RDY/BSY bit = 1, repeated RDSR commands can be executed until the RDY/BSY bit = 0, signaling that
the device is ready to execute a new instruction. Only the Read STATUS Register (RDSR) instruction is enabled
during the write cycle.
Figure 8-3. Polling Flowchart
AT25080B/AT25160B/AT25320B/AT25640B
Write Sequence
© 2020 Microchip Technology Inc.
DS20006310A-page 23
Page 24

AT25080B, AT25160B, AT25320B and AT25640B: Package Marking Information
Catalog Number Truncation
AT25080B Truncation Code ###: 58B
AT25160B Truncation Code ###: 5AB
AT25320B Truncation Code ###: 5BB
AT25640B Truncation Code ###: 5CB
Date Codes Product Variantion
YY = Year Y = Year WW = Work Week of Assembly %% = Product Variantion
16: 2016 20: 2020 6: 2016 0: 2020 02: Week 2 GV:
GV Product Variation
17: 2017 21: 2021 7: 2017 1: 2021 04: Week 4
18: 2018 22: 2022 8: 2018 2: 2022 ...
19: 2019 23: 2023 9: 2019 3: 2023 52: Week 52
Country of Origin $ = Device Grade Atmel Truncation
CO = Country of Origin P: Automotive Grade 1, 2.5V min. AT: Atmel
9: Automotive Grade 3, 1.7V min. ATM: Atmel
ATML: Atmel
Lot Number or Trace Code
NNN = Alphanumeric Trace Code (2 Characters for Small Packages)
YYWWNNN
###%% CO
ATML$YWW
8-Lead SOIC
8-Lead TSSOP
YYWWNNN
###%%
AT$YWW
Note 2: Package drawings are not to scale
Note 1: designates pin 1
8-Pad UDFN
###
$%%
NNN
2.0 x 3.0 mm Body
AT25080B/AT25160B/AT25320B/AT25640B
Packaging Information
9. Packaging Information
9.1 Package Marking Information
© 2020 Microchip Technology Inc.
DS20006310A-page 24
Page 25

0.25 C A–B D
C
SEATING
PLANE
TOP VIEW
SIDE VIEW
VIEW A–A
0.10
C
0.10
C
Microchip Technology Drawing No. C04-057-SN Rev F Sheet 1 of 2
8X
For the most current package drawings, please see the Microchip Packaging Specification located at
http://www.microchip.com/packaging
Note:
8-Lead Plastic Small Outline (SN) - Narrow, 3.90 mm (.150 In.) Body [SOIC]
R
1
2
N
h
h
A1
A2
A
A
B
e
D
E
E
2
E1
2
E1
NOTE 5
NOTE 5
NX b
0.10
C A–B
2X
H 0.23
(L1)
L
R0.13
R0.13
VIEW C
SEE VIEW C
NOTE 1
D
0.10
C A–B
2X
0.10
C A–B
2X
AT25080B/AT25160B/AT25320B/AT25640B
Packaging Information
© 2020 Microchip Technology Inc.
DS20006310A-page 25
Page 26

Microchip Technology Drawing No. C04-057-SN Rev F Sheet 2 of 2
8-Lead Plastic Small Outline (SN) - Narrow, 3.90 mm (.150 In.) Body [SOIC]
For the most current package drawings, please see the Microchip Packaging Specification located at
http://www.microchip.com/packaging
Note:
R
Foot Angle 0° - 8°
15°-5°
Mold Draft Angle Bottom
15°-5°
Mold Draft Angle Top
0.51-0.31
b
Lead Width
0.25-0.17
c
Lead Thickness
1.27-0.40LFoot Length
0.50-0.25hChamfer (Optional)
4.90 BSCDOverall Length
3.90 BSCE1Molded Package Width
6.00 BSCEOverall Width
0.25-0.10
A1
Standoff
--1.25A2Molded Package Thickness
1.75--AOverall Height
1.27 BSC
e
Pitch
8NNumber of Pins
MAXNOMMINDimension Limits
MILLIMETERSUnits
protrusions shall not exceed 0.15mm per side.
3. Dimensions D and E1 do not include mold flash or protrusions. Mold flash or
REF: Reference Dimension, usually without tolerance, for information purposes only.
BSC: Basic Dimension. Theoretically exact value shown without tolerances.
1. Pin 1 visual index feature may vary, but must be located within the hatched area.
2. § Significant Characteristic
4. Dimensioning and tolerancing per ASME Y14.5M
Notes:
§
Footprint
L1 1.04 REF
5. Datums A & B to be determined at Datum H.
AT25080B/AT25160B/AT25320B/AT25640B
Packaging Information
© 2020 Microchip Technology Inc.
DS20006310A-page 26
Page 27

RECOMMENDED LAND PATTERN
Microchip Technology Drawing C04-2057-SN Rev F
BSC: Basic Dimension. Theoretically exact value shown without tolerances.
Notes:
Dimensioning and tolerancing per ASME Y14.5M1.
For the most current package drawings, please see the Microchip Packaging Specification located at
http://www.microchip.com/packaging
Note:
R
Dimension Limits
Units
CContact Pad Spacing
Contact Pitch
MILLIMETERS
1.27 BSC
MIN
E
MAX
5.40
Contact Pad Length (X8)
Contact Pad Width (X8)
Y1
X1
1.55
0.60
NOM
E
X1
C
Y1
SILK SCREEN
8-Lead Plastic Small Outline (SN) - Narrow, 3.90 mm (.150 In.) Body [SOIC]
AT25080B/AT25160B/AT25320B/AT25640B
Packaging Information
© 2020 Microchip Technology Inc.
DS20006310A-page 27
Page 28

M
Packaging Diagrams and Parameters
8-Lead Plastic Thin Shrink Small Outline (ST) – 4.4 mm Body [TSSOP]
Notes:
1. Pin 1 visual index feature may vary, but must be located within the hatched area.
2. Dimensions D and E1 do not include mold flash or protrusions. Mold flash or protrusions shall not exceed 0.15 mm per side.
3. Dimensioning and tolerancing per ASME Y14.5M.
BSC: Basic Dimension. Theoretically exact value shown without tolerances.
REF: Reference Dimension, usually without tolerance, for information purposes only.
Note: For the most current package drawings, please see the Microchip Packaging Specification located at
http://www.microchip.com/packaging
Units MILLIMETERS
Dimension Limits MIN NOM MAX
Number of Pins N 8
Pitch e 0.65 BSC
Overall Height A – – 1.20
Molded Package Thickness A2 0.80 1.00 1.05
Standoff A1 0.05 – 0.15
Overall Width E 6.40 BSC
Molded Package Width E1 4.30 4.40 4.50
Molded Package Length D 2.90 3.00 3.10
Foot Length L 0.45 0.60 0.75
Footprint L1 1.00 REF
Foot Angle
φ 0° – 8°
Lead Thickness c 0.09 – 0.20
Lead Width b 0.19 – 0.30
D
N
E
E1
NOTE 1
1 2
b
e
c
A
A1
A2
L1
L
φ
Microchip Technology Drawing C04-086B
AT25080B/AT25160B/AT25320B/AT25640B
Packaging Information
© 2020 Microchip Technology Inc.
DS20006310A-page 28
Page 29

M
Packaging Diagrams and Parameters
Note: For the most current package drawings, please see the Microchip Packaging Specification located at
http://www.microchip.com/packaging
AT25080B/AT25160B/AT25320B/AT25640B
Packaging Information
© 2020 Microchip Technology Inc.
DS20006310A-page 29
Page 30

B
A
0.10 C
0.10 C
(DATUM B)
(DATUM A)
C
SEATING
PLANE
12
N
2X
TOP VIEW
SIDE VIEW
NOTE 1
12
N
0.10 C A B
0.10 C A B
0.10
C
0.08 C
Microchip Technology Drawing C04-21355-Q4B Rev A Sheet 1 of 2
2X
8X
For the most current package drawings, please see the Microchip Packaging Specification located at
http://www.microchip.com/packaging
Note:
8-Lead Ultra Thin Plastic Dual Flat, No Lead Package (Q4B) - 2x3 mm Body [UDFN]
Atmel Legacy YNZ Package
D
E
D2
E2
K
L
8X b
e
e
2
0.10 C A B
0.05 C
A
(A3)
A1
BOTTOM VIEW
AT25080B/AT25160B/AT25320B/AT25640B
Packaging Information
© 2020 Microchip Technology Inc.
DS20006310A-page 30
Page 31

REF: Reference Dimension, usually without tolerance, for information purposes only.
BSC: Basic Dimension. Theoretically exact value shown without tolerances.
1.
2.
3.
Notes:
Pin 1 visual index feature may vary, but must be located within the hatched area.
Package is saw singulated
Dimensioning and tolerancing per AS ME Y14.5M
For the most current package drawings, please see the Microchip Packaging Specification located at
http://www.microchip.com/packaging
Note:
Number of Terminals
Overall Height
Terminal Width
Overall Width
Terminal Length
Exposed Pad Width
Terminal Thickness
Pitch
Standoff
Units
Dimension Limits
A1
A
b
E2
A3
e
L
E
N
0.50 BSC
0.152 REF
1.20
0.35
0.18
0.50
0.00
0.25
0.40
1.30
0.55
0.02
3.00 BSC
MILLIMETERS
MIN
NOM
8
1.40
0.45
0.30
0.60
0.05
MAX
K-0.20 -Terminal-to-Exposed-Pad
Overall Length
Exposed Pad Length
D
D2 1.40
2.00 BSC
1.50 1.60
Microchip Technology Drawing C04-21355-Q4B Rev A Sheet 2 of 2
8-Lead Ultra Thin Plastic Dual Flat, No Lead Package (Q4B) - 2x3 mm Body [UDFN]
Atmel Legacy YNZ Package
AT25080B/AT25160B/AT25320B/AT25640B
Packaging Information
© 2020 Microchip Technology Inc.
DS20006310A-page 31
Page 32

RECOMMENDED LAND PATTERN
Dimension Limits
Units
Optional Center Pad Width
Optional Center Pad Length
Contact Pitch
Y2
X2
1.40
1.60
MILLIMETERS
0.50 BSC
MIN
E
MAX
Contact Pad Length (X8)
Contact Pad Width (X8)
Y1
X1
0.85
0.30
NOM
12
8
CContact Pad Spacing 2.90
Contact Pad to Center Pad (X8) G1 0.20
Thermal Via Diameter V
Thermal Via Pitch EV
0.30
1.00
BSC: Basic Dimension. Theoretically exact value shown without tolerances.
Notes:
Dimensioning and tolerancing per ASME Y14.5M
For best soldering results, thermal vias, if used, should be filled or tente d to avoid solder loss dur in g
reflow process
1.
2.
For the most current package drawings, please see the Microchip Packaging Specification located at
http://www.microchip.com/packaging
Note:
Microchip Technology Drawing C04-21355-Q4B Rev A
8-Lead Ultra Thin Plastic Dual Flat, No Lead Package (Q4B) - 2x3 mm Body [UDFN]
Atmel Legacy YNZ Package
X2
Y2
Y1
SILK SCREEN
X1
E
C
EV
G2
G1
ØV
Contact Pad to Contact Pad (X6) G2 0.33
AT25080B/AT25160B/AT25320B/AT25640B
Packaging Information
© 2020 Microchip Technology Inc.
DS20006310A-page 32
Page 33

10. Revision History
Revision A (February 2020)
Updated to Microchip template. Microchip DS20006310 replaces Atmel document 8803. Updated Part Marking
Information. Added ESD rating. Removed lead finish designation. Removed the Automotive Grade 2 option.
Corrected operating ranges for Table 4-3. Updated POR recommendations section. Updated trace code format in
package markings. Updated formatting throughout for clarification. Updated the SOIC, TSSOP and UDFN package
drawings to the Microchip equivalents.
Atmel Document 8803 Revision E (September 2016)
Added the Automotive Grade 2 and 3 options and UDFN options.
Atmel Document 8803 Revision D (June 2015)
Updated ordering codes tables and Section 7.1, part marking information, 8S1 and 8X package drawings, footers and
reorganized the document.
Atmel Document 8803 Revision C (December 2012)
Condensed and updated ordering code table.
AT25080B/AT25160B/AT25320B/AT25640B
Revision History
Atmel Document 8803 Revision B (August 2012)
Removed preliminary status. Updated Atmel logos and disclaimer/copy page.
Atmel Document 8803 Revision A (February 2012)
Initial document release.
© 2020 Microchip Technology Inc.
DS20006310A-page 33
Page 34

AT25080B/AT25160B/AT25320B/AT25640B
The Microchip Website
Microchip provides online support via our website at http://www.microchip.com/. This website is used to make files
and information easily available to customers. Some of the content available includes:
• Product Support – Data sheets and errata, application notes and sample programs, design resources, user’s
guides and hardware support documents, latest software releases and archived software
• General Technical Support – Frequently Asked Questions (FAQs), technical support requests, online
discussion groups, Microchip design partner program member listing
• Business of Microchip – Product selector and ordering guides, latest Microchip press releases, listing of
seminars and events, listings of Microchip sales offices, distributors and factory representatives
Product Change Notification Service
Microchip’s product change notification service helps keep customers current on Microchip products. Subscribers will
receive email notification whenever there are changes, updates, revisions or errata related to a specified product
family or development tool of interest.
To register, go to http://www.microchip.com/pcn and follow the registration instructions.
Customer Support
Users of Microchip products can receive assistance through several channels:
• Distributor or Representative
• Local Sales Office
• Embedded Solutions Engineer (ESE)
• Technical Support
Customers should contact their distributor, representative or ESE for support. Local sales offices are also available to
help customers. A listing of sales offices and locations is included in this document.
Technical support is available through the website at: http://www.microchip.com/support
© 2020 Microchip Technology Inc.
DS20006310A-page 34
Page 35

Product Family
25 = Standard SPI
Serial EEPROM
Device Density
Shipping Carrier Option
Device Grade
Package Option
080 = 8-Kilobit
160 = 16-Kilobit
320 = 32-Kilobit
640 = 64-Kilobit
T = Tape and Reel, Standard Quantity Option
E = Tape and Reel, Extended Quantity Option
Operating Voltage
M = 1.7V to 5.5V
D = 2.5V to 5.5V
P = Automotive Grade 1 (-40°C to +125°C)
9 =
Automotive Grade 3 (-40°C to +85°C)
SS = SOIC
X = TSSOP
MA = 2.0mm x 3.0mm UDFN
AT25080B-SSPDxx-T
Device Revision
Product Variation
GV = GV Product Variation
AT25080B/AT25160B/AT25320B/AT25640B
Product Identification System
To order or obtain information, e.g., on pricing or delivery, refer to the factory or the listed sales office.
Examples:
Device Package Package
Drawing
Package
Option
Shipping Carrier
Option
Automotive Grade
Code
AT25080B‑SSPDGV‑T SOIC SN SS Tape and Reel Grade 1
AT25160B‑SSPDGV‑T SOIC SN SS Tape and Reel Grade 1
AT25320B‑SS9MGV‑T SOIC SN SS Tape and Reel Grade 3
AT25640B‑SS9MGV‑T SOIC SN SS Tape and Reel Grade 3
AT25320B‑XPDGV‑T TSSOP ST X Tape and Reel Grade 1
AT25640B‑XPDGV‑T TSSOP ST X Tape and Reel Grade 1
AT25080B‑X9MGV‑T TSSOP ST X Tape and Reel Grade 3
AT25160B‑X9MGV‑T TSSOP ST X Tape and Reel Grade 3
AT25160B‑MAPDGV‑T UDFN Q4B MA Tape and Reel Grade 1
AT25320B‑MAPDGV‑T UDFN Q4B MA Tape and Reel Grade 1
AT25640B‑MAPDGV‑E UDFN Q4B MA Extended Qty.
Tape and Reel
Grade 1
AT25080B‑MA9MGV‑T UDFN Q4B MA Tape and Reel Grade 3
AT25320B‑MA9MGV‑E UDFN Q4B MA Extended Qty.
AT25640B‑MA9MGV‑T UDFN Q4B MA Tape and Reel Grade 3
Tape and Reel
Grade 3
© 2020 Microchip Technology Inc.
DS20006310A-page 35
Page 36

AT25080B/AT25160B/AT25320B/AT25640B
Microchip Devices Code Protection Feature
Note the following details of the code protection feature on Microchip devices:
• Microchip products meet the specification contained in their particular Microchip Data Sheet.
• Microchip believes that its family of products is one of the most secure families of its kind on the market today,
when used in the intended manner and under normal conditions.
• There are dishonest and possibly illegal methods used to breach the code protection feature. All of these
methods, to our knowledge, require using the Microchip products in a manner outside the operating
specifications contained in Microchip’s Data Sheets. Most likely, the person doing so is engaged in theft of
intellectual property.
• Microchip is willing to work with the customer who is concerned about the integrity of their code.
• Neither Microchip nor any other semiconductor manufacturer can guarantee the security of their code. Code
protection does not mean that we are guaranteeing the product as “unbreakable.”
Code protection is constantly evolving. We at Microchip are committed to continuously improving the code protection
features of our products. Attempts to break Microchip’s code protection feature may be a violation of the Digital
Millennium Copyright Act. If such acts allow unauthorized access to your software or other copyrighted work, you
may have a right to sue for relief under that Act.
Legal Notice
Information contained in this publication regarding device applications and the like is provided only for your
convenience and may be superseded by updates. It is your responsibility to ensure that your application meets with
your specifications. MICROCHIP MAKES NO REPRESENTATIONS OR WARRANTIES OF ANY KIND WHETHER
EXPRESS OR IMPLIED, WRITTEN OR ORAL, STATUTORY OR OTHERWISE, RELATED TO THE INFORMATION,
INCLUDING BUT NOT LIMITED TO ITS CONDITION, QUALITY, PERFORMANCE, MERCHANTABILITY OR
FITNESS FOR PURPOSE. Microchip disclaims all liability arising from this information and its use. Use of Microchip
devices in life support and/or safety applications is entirely at the buyer’s risk, and the buyer agrees to defend,
indemnify and hold harmless Microchip from any and all damages, claims, suits, or expenses resulting from such
use. No licenses are conveyed, implicitly or otherwise, under any Microchip intellectual property rights unless
otherwise stated.
Trademarks
The Microchip name and logo, the Microchip logo, Adaptec, AnyRate, AVR, AVR logo, AVR Freaks, BesTime,
BitCloud, chipKIT, chipKIT logo, CryptoMemory, CryptoRF, dsPIC, FlashFlex, flexPWR, HELDO, IGLOO, JukeBlox,
KeeLoq, Kleer, LANCheck, LinkMD, maXStylus, maXTouch, MediaLB, megaAVR, Microsemi, Microsemi logo, MOST,
MOST logo, MPLAB, OptoLyzer, PackeTime, PIC, picoPower, PICSTART, PIC32 logo, PolarFire, Prochip Designer,
QTouch, SAM-BA, SenGenuity, SpyNIC, SST, SST Logo, SuperFlash, Symmetricom, SyncServer, Tachyon,
TempTrackr, TimeSource, tinyAVR, UNI/O, Vectron, and XMEGA are registered trademarks of Microchip Technology
Incorporated in the U.S.A. and other countries.
APT, ClockWorks, The Embedded Control Solutions Company, EtherSynch, FlashTec, Hyper Speed Control,
HyperLight Load, IntelliMOS, Libero, motorBench, mTouch, Powermite 3, Precision Edge, ProASIC, ProASIC Plus,
ProASIC Plus logo, Quiet-Wire, SmartFusion, SyncWorld, Temux, TimeCesium, TimeHub, TimePictra, TimeProvider,
Vite, WinPath, and ZL are registered trademarks of Microchip Technology Incorporated in the U.S.A.
Adjacent Key Suppression, AKS, Analog-for-the-Digital Age, Any Capacitor, AnyIn, AnyOut, BlueSky, BodyCom,
CodeGuard, CryptoAuthentication, CryptoAutomotive, CryptoCompanion, CryptoController, dsPICDEM,
dsPICDEM.net, Dynamic Average Matching, DAM, ECAN, EtherGREEN, In-Circuit Serial Programming, ICSP,
INICnet, Inter-Chip Connectivity, JitterBlocker, KleerNet, KleerNet logo, memBrain, Mindi, MiWi, MPASM, MPF,
MPLAB Certified logo, MPLIB, MPLINK, MultiTRAK, NetDetach, Omniscient Code Generation, PICDEM,
PICDEM.net, PICkit, PICtail, PowerSmart, PureSilicon, QMatrix, REAL ICE, Ripple Blocker, SAM-ICE, Serial Quad
I/O, SMART-I.S., SQI, SuperSwitcher, SuperSwitcher II, Total Endurance, TSHARC, USBCheck, VariSense,
ViewSpan, WiperLock, Wireless DNA, and ZENA are trademarks of Microchip Technology Incorporated in the U.S.A.
and other countries.
SQTP is a service mark of Microchip Technology Incorporated in the U.S.A.
© 2020 Microchip Technology Inc.
DS20006310A-page 36
Page 37

AT25080B/AT25160B/AT25320B/AT25640B
The Adaptec logo, Frequency on Demand, Silicon Storage Technology, and Symmcom are registered trademarks of
Microchip Technology Inc. in other countries.
GestIC is a registered trademark of Microchip Technology Germany II GmbH & Co. KG, a subsidiary of Microchip
Technology Inc., in other countries.
All other trademarks mentioned herein are property of their respective companies.
©
2020, Microchip Technology Incorporated, Printed in the U.S.A., All Rights Reserved.
ISBN: 978-1-5224-5686-5
AMBA, Arm, Arm7, Arm7TDMI, Arm9, Arm11, Artisan, big.LITTLE, Cordio, CoreLink, CoreSight, Cortex, DesignStart,
DynamIQ, Jazelle, Keil, Mali, Mbed, Mbed Enabled, NEON, POP, RealView, SecurCore, Socrates, Thumb,
TrustZone, ULINK, ULINK2, ULINK-ME, ULINK-PLUS, ULINKpro, µVision, Versatile are trademarks or registered
trademarks of Arm Limited (or its subsidiaries) in the US and/or elsewhere.
Quality Management System
For information regarding Microchip’s Quality Management Systems, please visit http://www.microchip.com/quality.
© 2020 Microchip Technology Inc.
DS20006310A-page 37
Page 38

Worldwide Sales and Service
AMERICAS ASIA/PACIFIC ASIA/PACIFIC EUROPE
Corporate Office
2355 West Chandler Blvd.
Chandler, AZ 85224-6199
Tel: 480-792-7200
Fax: 480-792-7277
Technical Support:
http://www.microchip.com/support
Web Address:
http://www.microchip.com
Atlanta
Duluth, GA
Tel: 678-957-9614
Fax: 678-957-1455
Austin, TX
Tel: 512-257-3370
Boston
Westborough, MA
Tel: 774-760-0087
Fax: 774-760-0088
Chicago
Itasca, IL
Tel: 630-285-0071
Fax: 630-285-0075
Dallas
Addison, TX
Tel: 972-818-7423
Fax: 972-818-2924
Detroit
Novi, MI
Tel: 248-848-4000
Houston, TX
Tel: 281-894-5983
Indianapolis
Noblesville, IN
Tel: 317-773-8323
Fax: 317-773-5453
Tel: 317-536-2380
Los Angeles
Mission Viejo, CA
Tel: 949-462-9523
Fax: 949-462-9608
Tel: 951-273-7800
Raleigh, NC
Tel: 919-844-7510
New York, NY
Tel: 631-435-6000
San Jose, CA
Tel: 408-735-9110
Tel: 408-436-4270
Canada - Toronto
Tel: 905-695-1980
Fax: 905-695-2078
Australia - Sydney
Tel: 61-2-9868-6733
China - Beijing
Tel: 86-10-8569-7000
China - Chengdu
Tel: 86-28-8665-5511
China - Chongqing
Tel: 86-23-8980-9588
China - Dongguan
Tel: 86-769-8702-9880
China - Guangzhou
Tel: 86-20-8755-8029
China - Hangzhou
Tel: 86-571-8792-8115
China - Hong Kong SAR
Tel: 852-2943-5100
China - Nanjing
Tel: 86-25-8473-2460
China - Qingdao
Tel: 86-532-8502-7355
China - Shanghai
Tel: 86-21-3326-8000
China - Shenyang
Tel: 86-24-2334-2829
China - Shenzhen
Tel: 86-755-8864-2200
China - Suzhou
Tel: 86-186-6233-1526
China - Wuhan
Tel: 86-27-5980-5300
China - Xian
Tel: 86-29-8833-7252
China - Xiamen
Tel: 86-592-2388138
China - Zhuhai
Tel: 86-756-3210040
India - Bangalore
Tel: 91-80-3090-4444
India - New Delhi
Tel: 91-11-4160-8631
India - Pune
Tel: 91-20-4121-0141
Japan - Osaka
Tel: 81-6-6152-7160
Japan - Tokyo
Tel: 81-3-6880- 3770
Korea - Daegu
Tel: 82-53-744-4301
Korea - Seoul
Tel: 82-2-554-7200
Malaysia - Kuala Lumpur
Tel: 60-3-7651-7906
Malaysia - Penang
Tel: 60-4-227-8870
Philippines - Manila
Tel: 63-2-634-9065
Singapore
Tel: 65-6334-8870
Taiwan - Hsin Chu
Tel: 886-3-577-8366
Taiwan - Kaohsiung
Tel: 886-7-213-7830
Taiwan - Taipei
Tel: 886-2-2508-8600
Thailand - Bangkok
Tel: 66-2-694-1351
Vietnam - Ho Chi Minh
Tel: 84-28-5448-2100
Austria - Wels
Tel: 43-7242-2244-39
Fax: 43-7242-2244-393
Denmark - Copenhagen
Tel: 45-4450-2828
Fax: 45-4485-2829
Finland - Espoo
Tel: 358-9-4520-820
France - Paris
Tel: 33-1-69-53-63-20
Fax: 33-1-69-30-90-79
Germany - Garching
Tel: 49-8931-9700
Germany - Haan
Tel: 49-2129-3766400
Germany - Heilbronn
Tel: 49-7131-72400
Germany - Karlsruhe
Tel: 49-721-625370
Germany - Munich
Tel: 49-89-627-144-0
Fax: 49-89-627-144-44
Germany - Rosenheim
Tel: 49-8031-354-560
Israel - Ra’anana
Tel: 972-9-744-7705
Italy - Milan
Tel: 39-0331-742611
Fax: 39-0331-466781
Italy - Padova
Tel: 39-049-7625286
Netherlands - Drunen
Tel: 31-416-690399
Fax: 31-416-690340
Norway - Trondheim
Tel: 47-72884388
Poland - Warsaw
Tel: 48-22-3325737
Romania - Bucharest
Tel: 40-21-407-87-50
Spain - Madrid
Tel: 34-91-708-08-90
Fax: 34-91-708-08-91
Sweden - Gothenberg
Tel: 46-31-704-60-40
Sweden - Stockholm
Tel: 46-8-5090-4654
UK - Wokingham
Tel: 44-118-921-5800
Fax: 44-118-921-5820
© 2020 Microchip Technology Inc.
DS20006310A-page 38
 Loading...