

Page 1
Compact, 1.5 A Linear Charger
4
FEATURES
Simple, safe linear charger for single cell lithium battery
4.5 V to 12 V input voltage range
Adjustable charging current up to 1.5 A
Low cost PNP external pass element
Automatic reverse isolation with no external blocking diode
Output overshoot protection
Deep discharge precharge mode
Thermal shutdown
Automatic recharge
Programmable termination timer
LED charging status indicator
4.2 V output voltage with ±1% accuracy over line and
temperature
1 µA shutdown supply current
Small, 8-pin MSOP and 3 × 3 mm LFCSP packages
APPLICATIONS
Wireless handsets
Smart handhelds and PDAs
Digital cameras
Single cell lithium ion-powered systems
Cradle chargers
for Single-Cell Li+ Battery
ADP2291
GENERAL DESCRIPTION
The ADP2291 is a constant-current/constant-voltage linear
charger for a single cell lithium ion battery, requiring just a few
components to provide a simple and safe charging system that
operates from a wide 4.5 V to 12 V input voltage range. It
features an internally controlled, multistep charging cycle that
improves battery life.
An external, low cost, PNP provides the charging current to the
battery and an external resistor sets the maximum charge
current. A small external capacitor programs the maximum
charge time. The controller includes an LED driver to indicate
the battery charging status.
Safety features include charging stop mode for battery faults,
output overshoot protection, and thermal shutdown. The
ADP2291 also features automatic reverse isolation, which does
not require an additional blocking diode.
The multistep charge cycle optimizes the battery charging time
in a safe manner. It features a trickle charge mode for a deeply
discharged cell and a fast charging mode with a maximum
current of 1.5 A. The ADP2291 controls the end of charge with
a 4.2 V output voltage that is 1% accurate over line and temperature. It automatically recharges the battery if the cell voltage
drops. When the input supply is removed, the part enters a low
current state and reduces the current drawn from the battery to
below 1 µA.
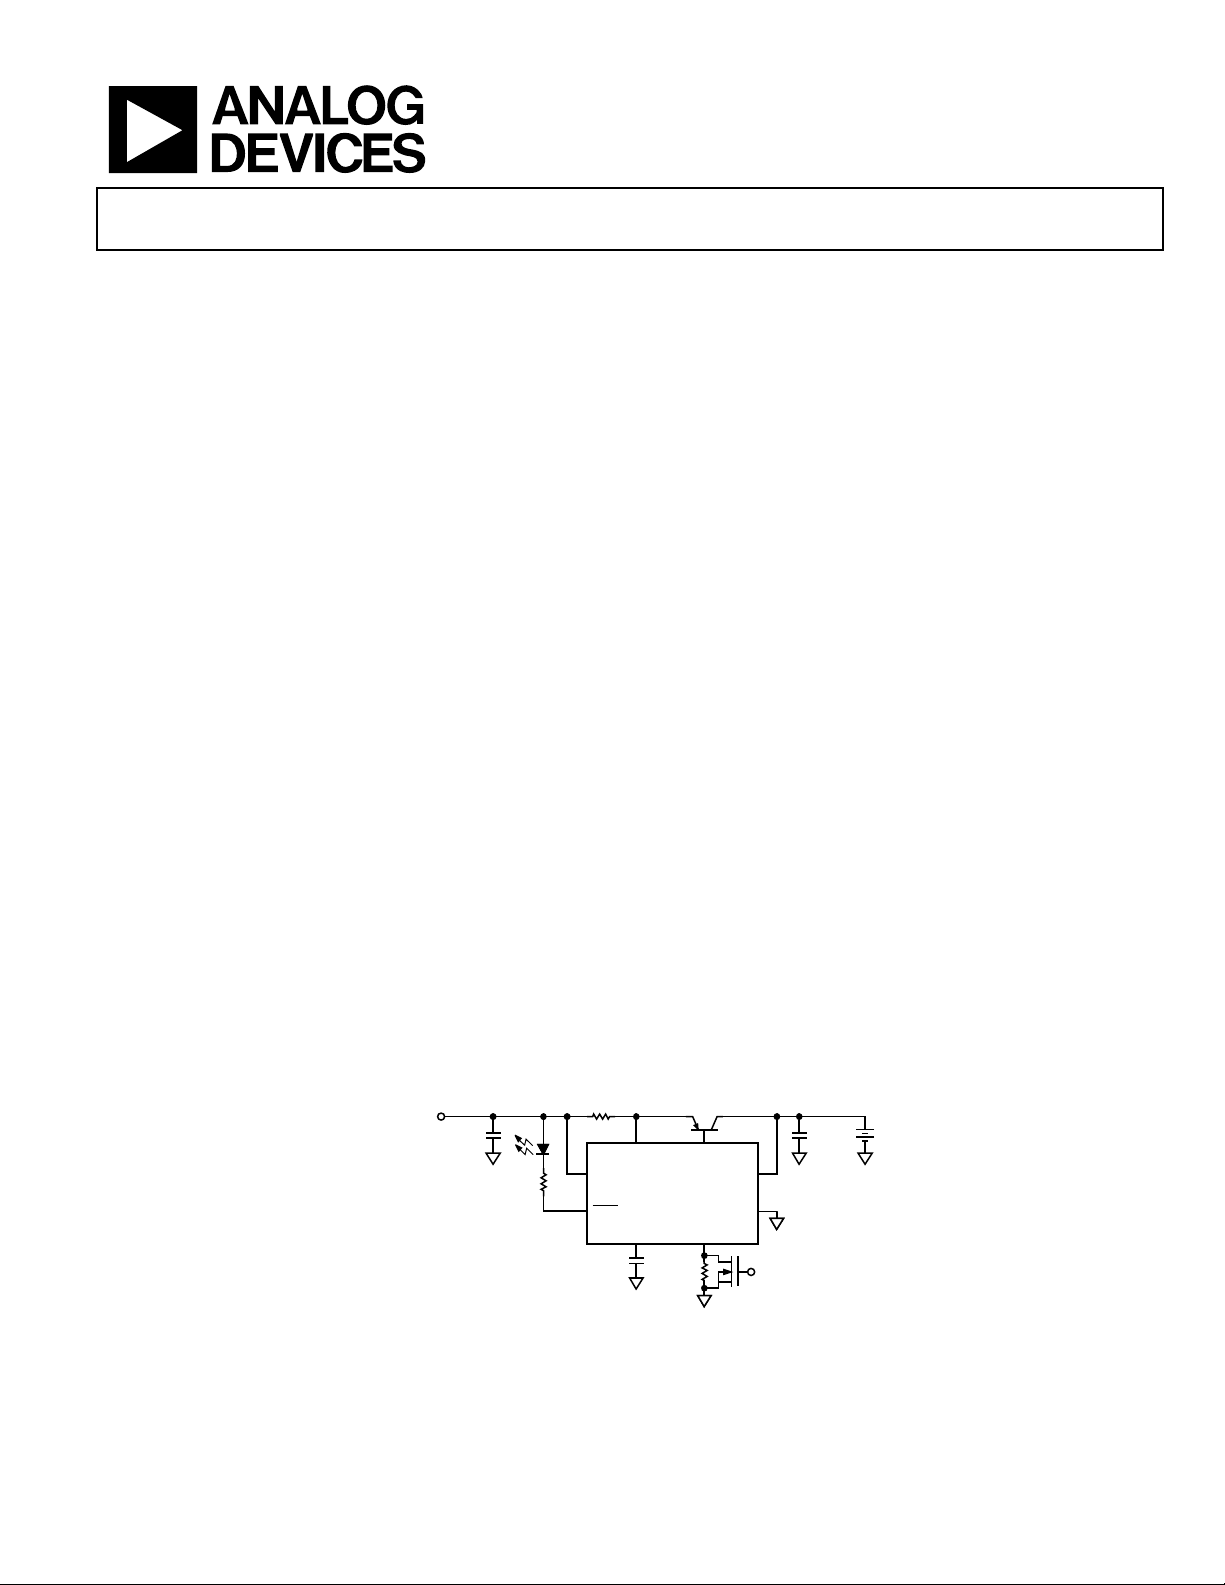
TYPICAL OPERATING CIRCUIT
INPUT
.6V–12V
Rev. 0
Information furnished by Analog Devices is believed to be accurate and reliable.
However, no responsibility is assumed by Analog Devices for its use, nor for any
infringements of patents or other rights of third parties that may result from its use.
Specifications subject to change without notice. No license is granted by implication
or otherwise under any patent or patent rights of Analog Devices. Trademarks and
registered trademarks are the property of their respective owners.
CIN
CTIMER
Figure 1. Basic Circuit Configuration
The ADP2291 is available in both a small, 8-pin MSOP package
and a 3 × 3 mm LFCSP package that is ideally suited for small,
portable applications.
RS Q1
CS DRV
IN
ADP2291
CHG
TIMER ADJ
One Technology Way, P.O. Box 9106, Norwood, MA 02062-9106, U.S.A.
Tel: 781.329.4700
Fax: 781.326.8703 © 2004 Analog Devices, Inc. All rights reserved.
+
COUT
BAT
GND
SHUTDOWN
04873-0-001
www.analog.com
Page 2

ADP2291
TABLE OF CONTENTS
Specifications..................................................................................... 3
Absolute Maximum Ratings............................................................ 5
ESD Caution.................................................................................. 5
Pin Configuration And Functional Descriptions......................... 6
Typical Performance Characteristics............................................. 7
Theory of Operation ...................................................................... 10
Precharge Mode.......................................................................... 10
End-of-Charge Mode................................................................. 10
Shutdown Mode.......................................................................... 10
Charge Restart............................................................................. 10
Programmable Timer................................................................. 10
Charge Status Indicator ............................................................. 10
Automatic Reverse Isolation ..................................................... 10
Overshoot Protection................................................................. 10
Power Supply Checks ................................................................. 10
Thermal Shutdown .................................................................... 11
Application Information................................................................ 12
Setting the Maximum Charge Current.................................... 12
Setting the Maximum Charge Time ........................................ 12
External Capacitors.................................................................... 12
Reverse Input Protection ........................................................... 12
External Pass Transistor ............................................................ 13
Typical Application Circuit ....................................................... 14
EOC Terminates Charging........................................................ 14
Selectable Charge Current......................................................... 14
Thermal Protection .................................................................... 14
Printed Circuit Board Layout Considerations........................ 16
LFSCP Layout Considerations.................................................. 16
Outline Dimensions....................................................................... 18
Ordering Guide .......................................................................... 18
REVISION HISTORY
10/04—Initial Version: Revision 0
Rev. 0 | Page 2 of 20
Page 3

ADP2291
SPECIFICATIONS
VIN = 5.5 V, V
= 4.2 V, R
BAT
open, TA = –40°C to +85°C, typical values are at 25°C unless otherwise noted.
ADJ
Table 1. Electrical Characteristics
Parameter Conditions Min Typ Max Unit
Power Supply, IN
Input Voltage 4.5 12 V
Current Draw
Fast charge/precharge/end-of-charge modes
Timeout/shutdown/battery fault
Battery Voltage, BAT
Voltage Accuracy, End-of-charge (V
Load Regulation, No Battery VIN – VCS = 0 to VRS
Current Draw
Current Draw
Reverse Leakage Current
BAT, EOC
)
= 0°C to +50°C
T
A
= 4.5 V to 12 V
V
IN
V
– VCS = VRS/10
IN
Timeout mode
= 4.5 V to 12 V
V
IN
Battery fault/shutdown mode
= 4.5 V to 12 V
V
IN
Power-down mode
= float, V
V
IN
BAT
= 4.2 V
Fast Charge Mode
Sense Voltage Setpoint (VRS)
Sense Voltage Setpoint (VRS)
Current Regulation Adjustment per V of (3 V – V
– VCS, R
V
IN
V
IN
V
BAT
V
IN
V
IN
V
BAT
ADJ
= 4.5 V to 12 V
= 3.6 V
– VCS, R
ADJ
= 4.5 V to 12 V
= 3.6 V
= open
= 100 kΩ
) 67 mV/V
ADJ
Precharge Mode
Sense Voltage Setpoint (VRS)
Sense Voltage Setpoint (VRS)
BAT Precharge Threshold V
– V
V
IN
= 4.5 V to 12 V
V
IN
V
= 2 V
BAT
– VCS, R
V
IN
V
= 4.5 V to 12 V
IN
= 2 V
V
BAT
rising 2.65 2.85 V
BAT
CS, RADJ
ADJ
= open
= 100 kΩ
Hysteresis 70 mV
Shutdown Mode
ADJ Shutdown Threshold V
falling, VIN = 4.5 V 0.30 0.45 V
ADJ
Hysteresis 40 mV
Pullup current from ADJ V
= 0 40 µA
ADJ
Power-Down Mode
VIN Powerdown Threshold VIN rising 3.6 4 V
Hysteresis 220 mV
VIN_Good Comparator
Threshold (VIN > V
) VIN rising 125 170 220 mV
BAT
Hysteresis 110 mV
EOC Comparator
Current Threshold VIN – VCS falling, R
Current Threshold VIN – VCS falling, R
= open, relative to VRS 7 10 13 %
ADJ
= 100 kΩ, relative to VRS 6 10 16 %
ADJ
Hysteresis 12 mV
Restart Comparator
BAT Restart Threshold VIN > 4.5 V, V
falling, relative to V
BAT
BAT, EOC
1
6
1.4 9 1.8
mA
mA
4.158 4.2 4.242 V
–80 mV
45 µA
0.1 1 µA
0.1 µA
140 150 160 mV
40 50 60 mV
10 15 20 mV
5 10 15 mV
–170 mV
Rev. 0 | Page 3 of 20
Page 4

ADP2291
Parameter Conditions Min Typ Max Unit
Battery Charge Timer
Charge/Discharge TIMER Current 21.0 24.0 27.0 µA
Low Threshold 1.2 V
High Threshold 2.0 V
High-Low Threshold Delta
Overshoot Protection
BAT Threshold 4.7 5 5.3 V
Current Sink <2 ms duration 1.5 A
CHG Output
Output Voltage Low Current = 20 mA 0.45 V
Output Leakage Current V
Base Drive Capability
Max Base Drive Current 40 mA
Thermal Shutdown
Shutdown Threshold TA rising 135 °C
Hysteresis 35 °C
1
All limits at temperature extremes are guaranteed via correlation using standard statistical quality control (SQC). Typical values are at TA = 25° C.
2
Guaranteed by design, not tested in production.
2
750 850 mV
= 5 V 0.1 1 µA
CHG
Rev. 0 | Page 4 of 20
Page 5

ADP2291
ABSOLUTE MAXIMUM RATINGS
Table 2.
Parameter Rating
IN, DRV1, CS, CHG, to GND
BAT, ADJ, TIMER to GND −0.3 V to (VIN + 0.3 V)
Operating Ambient Temperature −40°C to +85°C
Operating Junction Temperature −40°C to +125°C
θJA, 2-layer MSOP-8 220ºC/W
θJA, 4-layer MSOP-8 158ºC/W
θJA, 2-layer LFCSP-8 62ºC/W
θJA, 4-layer LFCSP-8 48ºC/W
Storage Temperature −65°C to +150°C
Lead Temperature Range Soldering
(10 sec)
−0.3 V to +13.5 V
300°C
ESD CAUTION
ESD (electrostatic discharge) sensitive device. Electrostatic charges as high as 4000 V readily accumulate on
the human body and test equipment and can discharge without detection. Although this product features
proprietary ESD protection circuitry, permanent damage may occur on devices subjected to high energy
electrostatic discharges. Therefore, proper ESD precautions are recommended to avoid performance
degradation or loss of functionality.
Stresses above those listed under Absolute Maximum Ratings
may cause permanent damage to the device. This is a stress
rating only and functional operation of the device at these or
any other condition s above those indicated in the operational
section of this specification is not implied. Exposure to absolute
maximum rating conditions for extended periods may affect
device reliability. Absolute maximum ratings apply individually
only, not in combination. Unless otherwise specified all other
voltages referenced to GND.
1
Pulling current from the DRV pin by driving it below ground, while VIN is
applied, may cause permanent damage to the device.
Rev. 0 | Page 5 of 20
Page 6

ADP2291
PIN CONFIGURATION AND FUNCTIONAL DESCRIPTIONS
DRV
1
CS
ADP2291
2
TOP VIEW
3
(Not to Scale)
4
GND
BAT
Figure 2. 8-Lead MSOP
Table 3. Pin Function Descriptions
Pin No. Mnemonic Description
1 DRV Base Driver Output. Controls the base of an external PNP pass transistor.
2 GND Ground.
3 BAT Battery Voltage Sense Input.
4 CS Current Sense Resistor Negative Input.
5 ADJ Charging Current Adjust and Charger Shutdown Input.
6 IN Power Input and Current-Sense Resistor Positive Input.
7 TIMER Timer Programming Input/Disable.
8
CHG
CHG
8
TIMER
7
6
IN
ADJ
5
04873-0-002
LED Charge-Status Indicator. This is an open-collector output.
PIN 1
1DRV
INDICATOR
2GND
ADP2291
3BAT
TOP VIEW
(Not to Scale)
4CS
Figure 3. 8-Lead LFCSP
8 CHG
7 TIMER
6IN
5 ADJ
04873-0-003
Rev. 0 | Page 6 of 20
Page 7

ADP2291
TYPICAL PERFORMANCE CHARACTERISTICS
4.21
800.0
700.0
4.205
(V)
4.20
BAT
V
4.195
4.19
46 108
Figure 4. Battery Voltage vs. Input Voltage
4.21
4.205
(V)
4.20
BAT
V
VIN (V)
04873-0-004
12
600.0
500.0
(mA)
400.0
CHG
I
300.0
200.0
100.0
0.0
2.50 3.00 4.504.003.50
Figure 7. Charge Current vs. Battery Voltage,
RS = 200 mΩ, V
250
200
150
(nA)
100
REVERSE
I
I
BAT
(V)
ADJ
04873-0-007
= 3 V
4.195
4.19
–50 – 25 250 1251007550
TEMPERATURE (°C)
Figure 5. Battery Voltage vs. Temperature
4.22
4.21
(V)
4.20
BAT
V
4.19
4.18
0 200 800600400
Figure 6. Battery Voltage vs. Charge Current,
RS = 200 mΩ, V
I
CHG
(mA)
ADJ
= 3 V
04873-0-005
04873-0-006
50
0
–50 –25 0 12575 1005025
TEMPERATURE (°C)
Figure 8. Battery Reverse Current vs. Temperature
V
4.10
4.09
4.08
(V)
RESTART
4.07
V
4.06
4.05
–40 –20 0 10060 804020
= float, V
IN
TEMPERATURE (°C)
= 4.2 V
BAT
Figure 9. Restart Threshold
04873-0-008
04873-0-009
Rev. 0 | Page 7 of 20
Page 8

ADP2291
16.0
153
15.8
15.6
(mV)
RS
V
15.4
15.2
15.0
46 108
Figure 10. Precharge V
15.5
15.4
15.3
(mV)
RS
V
VIN (V)
vs. Input Voltage
RS
04873-0-010
12
152
151
(mV)
RS
V
150
149
148
46810
Figure 13. Fast Charge V
152
151
150
(mV)
RS
V
VIN (V)
vs. Input Voltage
RS
04873-0-013
12
15.2
15.1
–50 –25 0 25 50 75 100 125
Figure 11. Precharge V
16
14
(mV)
12
RS
V
10
8
100 1k 10k
TEMPERATURE (°C)
vs. Temperature
RS
R
(kΩ)
ADJ
04873-0-011
04873-0-012
149
148
–50 –25 0 25 50 75 100 125
Figure 14. Fast Charge V
160
140
120
(mV)
100
RS
V
80
60
40
100 1k 10k
TEMPERATURE (°C)
vs. Temperature
RS
R
(kΩ)
ADJ
04873-0-014
04873-0-015
Figure 12. Precharge V
RS
vs. R
ADJ
Figure 15. Fast Charge V
RS
vs. R
ADJ
Rev. 0 | Page 8 of 20
Page 9

ADP2291
135
CH1 = V
BAT
4.18V OFFSET
130
125
BASE DRIVE (mA)
120
115
46 108
VIN (V)
04873-0-016
12
1
2
CH1 10.0mV CH2 1.00V
B
W
CH2 = V
IN
5V OFFSET
= 5V TO 8V
V
IN
B
M200µs CH2 6.18V
W
04873-0-018
122
120
118
116
114
112
BASE DRIVE (mA)
110
108
106
104
–40 –20 10040 60 80200
Figure 16. Base Drive vs. Input Voltage
TEMPERATURE (°C)
Figure 17. Base Drive vs. Temperature
= 5 V
V
IN
04873-0-017
1
3
CH1 20.0mV
CH3 10.0mVΩ
Figure 18. Line Transient Response
I
= 350 mA
BAT
CH1 = V
BAT
4.18V OFFSET
CH3 = I
BAT
200mA/DIV
I
= 70mA TO 700mA
BAT
B
W
M100µs CH3 10.0mV
Figure 19.Load Transient Response
= 5 V
V
IN
04873-0-019
Rev. 0 | Page 9 of 20
Page 10

ADP2291
THEORY OF OPERATION
The ADP2291 is intended to charge a single cell, lithium battery
from a supply voltage or wall adapter providing 4.5 V to 12 V.
The charge controller adjusts the base current of an external
PNP transistor to optimize current and voltage applied to the
battery during charging. A low value resistor placed in series
with the battery charging current provides current measurement for the ADP2291.
To assure safety and long battery lifetime, the ADP2291 charges
the battery using a simple step-by-step cycle, as shown in the
state diagram of Figure 26. The normal charge cycle begins by
measuring the battery voltage to determine charge level. If the
battery is deeply discharged, then low current precharge is
initiated. Once precharge is complete, normal fast charge at the
maximum current (denoted as I
current can be adjusted by varying the sense resistor value or by
varying the voltage at the adjust pin. As the battery approaches
full capacity, the charging current is reduced until the end-ofcharge condition is reached. Batteries that are not deeply
discharged skip the precharge mode and immediately begin fast
charging. Each of these modes and associated fault conditions
are discussed in detail.
PRECHARGE MODE
For deeply-discharged cells, the ADP2291 charges at a reduced
rate when the battery voltage V
/10 when the ADJ pin voltage is 3 V, and I
I
MAX
ADJ pin voltage is 1.5 V. For ADJ pin voltages in between, the
charge current can be interpolated. If the battery voltage does
not increase past 2.8 V before the precharge timer elapses
(typically 30 minutes), a battery fault is assumed and the
ADP2291 shuts down and does not restart until the input
voltage is cycled OFF and then back ON. Note that in this mode
shutdown commands are ignored.
END-OF-CHARGE MODE
Once the voltage loop reduces the charge current to 1/10 of its
nominal value, I
(irrespective of the ADJ voltage), the
MAX
ADP2291 detects the end-of-charge (EOC) state and the charge
status indicator becomes high-impedance.
Low level charging continues until the timer terminates the
charge (nominally 30 minutes).
SHUTDOWN MODE
When the ADJ input is pulled below 0.4 V, the ADP2291 is put
into shutdown mode. When in this mode, the charger is
disabled, the current drawn from the battery falls to less than
1 µA and the current drawn from IN falls to 0.7 mA.
When the charger is re-enabled, the charger returns to the
START state but quickly sequences through the states until the
proper charge mode is reached.
) begins. This maximum
MAX
< 2.8 V. This reduced rate is
BAT
/5 when the
MAX
CHARGE RESTART
Once charge is complete in end-of-charge or timeout modes,
the ADP2291 continually monitors the cell voltage and charge
current. When the cell voltage falls by 100 mV or the charge
current increases beyond the EOC hysteresis, the ADP2291
initiates another charge cycle to keep the cell fully charged. See
the state diagram in Figure 26.
PROGRAMMABLE TIMER
The on-chip timer, controlled by an external capacitor
CTIMER, determines the timeout intervals of the various
charger modes. For example, a CTIMER value of 0.1 µF results
in a precharge timeout interval of 30 minutes, a fast charge
timeout of 3 hours, and an end-of-charge timeout of 30
minutes. The ratio between precharge and end-of-charge to fast
charge time-out is always 1/6. All these time intervals are
proportional to the CTIMER capacitor value, allowing them to
be adjusted over a wide range. Connecting the TIMER pin to
ground disables the timer.
CHARGE STATUS INDICATOR
The ADP2291 contains a charge status output,
current when the ADP2291 is charging the battery. This output
can be used as a visual signal by connecting it to an LED, or it
may be used to generate a logic-level charge status signal by
connecting a resistor between
CHG
and logic high.
CHG
, that sinks
AUTOMATIC REVERSE ISOLATION
When the voltage on the BAT pin is higher than the voltage on
IN, the ADP2291 automatically connects the base of the pass
device to BAT. This removes the necessity of having an external
diode between the pass device and battery, further reducing the
charger’s footprint and component count.
OVERSHOOT PROTECTION
In the event of a battery disconnect during charging, a voltage
overshoot condition on BAT could occur. The ADP2291
includes an overshoot protection circuit that activates when
rises to 5 V and sinks up to 1.5 A to protect the external
V
BAT
components.
POWER SUPPLY CHECKS
To assure proper operation, the ADP2291 checks the absolute
voltage level of the input supply and the supply voltage relative
to the battery. When the supply IN is below 3.8 V, the chip is
internally powered down and does not respond to external
control. In this power-down mode, the device draws less than
1 µA from the battery. The V
if the supply voltage is less than 165 mV above the battery
voltage, insuring that charging only occurs if the supply voltage
is sufficient.
good comparator halts operation
IN
Rev. 0 | Page 10 of 20
Page 11

ADP2291
THERMAL SHUTDOWN
In the event that the ADP2291 junction temperature rises above
135°C, thermal shutdown occurs. Extreme junction temperatures may be the result of excessive current operation and/or
high ambient temperatures. A 35°C temperature hysteresis is
3V
ADJ
GM
GM GM
included so that the ADP2291 does not return to operation
during thermal shutdown until the on-chip temperature drops
below 100°C.
BATDRVCSIN
5V
1.2V
VOLTAGE
REFERENCE
TEMP
0.4V
BAT
3.8V
IPNP
C/10
SHUTDOWN
IN
IN
VIN_GOOD
POWER_DOWN
END_OF_CHARGE
CONTROL
LOGIC
TIMER
TIMER
RESTART
PRECHARGE
BAT
4.1V
BAT
2.5V
CHG
04873-0-020
Figure 20. Functional Block Diagram
Rev. 0 | Page 11 of 20
Page 12

ADP2291
APPLICATION INFORMATION
SETTING THE MAXIMUM CHARGE CURRENT
The maximum charge current is set by choosing the proper
current sense resistor, RS, and the voltage on the ADJ input. The
charger nominally regulates its output current at the point
where the voltage across the current sense resistor V
(defined as VRS) is 150 mV. This setpoint voltage can be adjusted
by pulling down on the ADJ input, which is internally attached
through a 100 k
from 3 V will reduce V
minimum of 50 mV is reached when a 100 k
Ω pull-up resistor to 3 V. Each volt of pull-down
by 67 mV during fast charge. A
RS
Ω resistor is
attached between ADJ and ground. During slow charge the
voltage across the current sense resistor is 15 mV with no
connection to ADJ and drops to 10 mV with a 100 k
attached to ground. Therefore the maximum charge rate I
can be calculated as
IN–VCS
Ω resistor
MAX
SETTING THE MAXIMUM CHARGE TIME
The maximum charge time is intended as a safety mechanism to
prevent the charger from trickle charging the cell indefinitely. It
does not terminate charging under normal charging conditions,
but only when there is a failure to reach end-of-charge. A typical
cell charges at a 1 C rate in about 1.5 hours, depending on the
cell type, temperature, and manufacturer. Generally, a three
hour time limit is sufficient to prevent a normal charge cycle
from being interrupted by the charge timer. It is recommended
that the cell manufacturer be consulted for timing details.
The maximum charge time is set by selecting the value of the
CTIMER capacitor. Calculate the timer capacitance using
CTIMER = t
(minutes) ×
CHG
1 Fµ
minutes1800
(4)
I =
V
MAX
where 50 mV ≤ V
After determining suitable values for V
V
ADJ
and R
R
can be calculated as
ADJ
V
V
= (2)
ADJ
= 100 kΩ ×
ADJ
RS
R
S
RS
)mV(
(1)
)mΩ(
≤ 150 mV
RS
and RS, the value of
RS
mV50)mV( +
mV7.66
⎛
⎜
⎝
V
ADJ
⎞
(3)
⎟
ADJ
VVV3
−
⎠
Examples of resistor combinations are shown in Table 4.
Table 4. Examples of RS and R
I
MAX
1.5 A 100 mΩ 150 mV 3 V Open
1 A 100 mΩ 100 mV 2.25 V 300 K
750 mA 100 mΩ 75 mV 1.87 V 167 K
500 mA 100 mΩ 50 mV 1.5 V 100 K
750 mA 200 mΩ 150 mV 3 V Open
500 mA 200 mΩ 100 mV 2.25 V 300 K
375 mA 200 mΩ 75 mV 1.87 V 167 K
250 mA 200 mΩ 50 mV 1.5 V 100 K
500 mA 300 mΩ 150 mV 3 V Open
333 mA 300 mΩ 100 mV 2.25 V 300 K
250 mA 300 mΩ 75 mV 1.87 V 167 K
167 mA 300 mΩ 50 mV 1.5 V 100 K
R
S
Selection
ADJ
VRS V
ADJ
R
ADJ
The precharge and end-of-charge periods are 1/6 the duration
of the fast charge time limit. The charge timers are completely
disabled by connecting the TIMER pin to ground. If the timers
are disabled, the FAULT and TIMEOUT states are never
reached, so the timers should only be disabled if charging is
monitored and controlled externally.
EXTERNAL CAPACITORS
Use an input supply capacitor (CIN) with a value in the
1 µF to 10 µF range and place it close to the ADP2291. This
should provide adequate input bypassing, but the selected
capacitor should be checked in the actual application circuit.
Check that the input voltage does not droop or overshoot
excessively during the start-up transient.
Use a battery output capacitor (COUT) with a value of at least
10 µF. This capacitance provides compensation when no battery
load is present. In addition, the battery and interconnections
appear inductive at high frequencies and must be accounted for
when the charger is operated with a battery load. Therefore, a
small amount of output capacitance is necessary to compensate
for the inductive nature of the battery and connections. Use a
minimum output capacitance value of 1 µF for applications
where the battery cannot be removed.
REVERSE INPUT PROTECTION
The diode, D1, shown in Figure 22 through Figure 25 is
optional. It is only required if the input adapter voltage can
be applied with a reverse polarity.
If the adapter voltage is high enough, a Schottky diode is recommended to minimize the voltage difference from the adapter to
the charger input and the power dissipation. Choose a diode
with a continuous current rating high enough to handle battery
charging current at the maximum ambient temperature. Use a
diode whose voltage rating is greater than the maximum
adapter voltage.
Rev. 0 | Page 12 of 20
Page 13

ADP2291
I
I
In cases where the voltage drop across the protection device
must be kept low, a P MOSFET is recommended. Connect the
MOSFET as shown in Figure 21.
INPUT
4.6V–12V
CIN
Figure 21. Reverse Input Protection
RS
IN
CHG
CS DRV
ADP2291
04873-0-021
EXTERNAL PASS TRANSISTOR
Choose the external PNP pass transistor based on the given
operating conditions and power handling capabilities. The pass
device is determined by the base drive available, the input and
output voltage, and the maximum charge current.
Select the pass transistor with a collector-emitter breakdown
voltage that exceeds the maximum adapter voltage. A V
rating of at least 15 V is recommended.
CEO
The power handling capabilities of the PNP pass transistor is
another important parameter. The maximum power dissipation
of the pass transistor is estimated using
P
(W)
=
I
DISS
where
VRS =
= 50 mV
V
at V
=
2.8 V, the lowest cell voltage where fast charge can occur
BAT
× (V
MAX
150 mV
= 1.5 V
ADJ
ADAPTER(MAX)
at V
ADJ
= 3.0 V
− V
PROTECT
− VRS − V
BAT
)
(7)
It should be noted that the adapter voltage can be either preregulated or unregulated. In the preregulated case the difference
between the maximum and minimum adapter voltage is small.
In this case use the maximum regulated adapter voltage to
determine the maximum power dissipation. In the unregulated
case, the adapter voltage can have a wide range specified. However, the maximum voltage specified is usually with no load
applied. Therefore, the worst-case power dissipation calculation
often leads to an over-specified pass device. In either case, it is
best to determine the load characteristics of the adapter to
optimize the charger design.
To provide a charge current of
I
with a minimum base drive
MAX
of 40 mA requires a PNP beta of at least
I
β
=
MIN
MAXMAX
I
=
Β
(5)
mA
40
Note that the beta of a transistor drops off with collector
current. Therefore, make sure the beta at
I
meets the
MAX
minimum requirement.
For cases where the adapter voltage is low (less than 5.5 V)
calculate the saturation voltage using the following equation:
V
=
CE(SAT)
V
ADAPTER(MIN)
−
V
PROTECT
−
V
−
V
RS
(6)
BAT
For example:
V
ADAPTER(MIN)
V
ADAPTER(MAX)
I
MAX
V
PROTECT
V
ADJ
V
= 150 mV
RS
β
MIN
V
CE(SAT)
= 5.0 V
= 6.0 V
= 500 mA
= 0.2 V at 500 mA
= 3 V
500
I
MAX
=
=
40
Β
V
ADAPTER(MIN)
mA
mA
= 5.0 V − 0.2 V − 0.15 V − 4.2 V
−
==
V
5.12
PROTECT
−
V
−
V
RS
BAT
= 0.45 V
where
V
protection.
= the forward drop of the reverse input
PROTECT
P
(W
) =
I
× (
DISS
MAX
V
ADAPTER(MAX)
−
V
PROTECT
−
V
−
RS
= 0.50 A × (6.0 V − 0.2 V − 0.15 V − 2.8 V)
= 1.4 W
A guide for selecting the PNP transistor is given in Table 5.
Table 5. PNP Pass Transistor Selection Guide
Vendor Part Number Package Max PD@ 25°C Beta @1A VCE (SAT)
Fairchild
ON Semi
FSB6726
NZT45H8
MTB35200
BCP53T1
MMJT9435
SuperSOT
SOT223
TSOP-6
SOT223
SOT223
0.5 W
1.5 W
0.625 W
1.5 W
1.6 W
150
110
200
35
200
0.5 V
0.1 V
0.175 V
0.3 V
0.18 V
Philips BCP51 SOT223 1.3 W 50 0.5 V
ZETEX
ZXT10P20DE6
ZXT2M322
FZT549
FMMT549
SOT23-6
2 mm × 2 mm MLP
SOT223
SOT23
1.1 W
1.5 W
2 W
0.5 W
270
270
130
130
0.17 V
0.17 V
0.25 V
0.25 V
V
)
BAT
Rev. 0 | Page 13 of 20
Page 14

ADP2291
4
TYPICAL APPLICATION CIRCUIT
A typical application circuit is shown in Figure 22. The circuit is
capable of a 750 mA charge current for an input voltage of 4.5 V
to 6 V. Higher input voltages can be used, but the increased
power dissipation of the pass device must be taken into account.
INPUT
.6V–12V
D1
BAT1000
CIN
2.2µF
Figure 22. Typical Application Circuit
RS
200mΩ
IN
CHG
CTIMER
100nF
Q1
FZT549
CS DRV
ADP2291
TIMER ADJ
BAT
GND
COUT
10µF
+
04873-0-022
EOC TERMINATES CHARGING
In some applications, the charger is required to terminate
charging when the EOC threshold is reached. Automatic
charger restart is not desired. Adding components R1, C1, and
Q2 terminates charging when the
CHG
pin opens and prevents
further charging until the adapter is removed and reasserted.
INPUT
4.6V–12V
D1
BAT1000
CIN
2.2µF
500kΩ
R1
RS
200mΩ
IN
CHG
CTIMER
100nF
TIMER ADJ
100nF
Q1
FZT549
CS DRV
ADP2291
C1
BAT
GND
Q2
2N7002
Figure 23. Self-Termination Circuit
COUT
10µF
+
LI-ION
CELL
SELECTABLE CHARGE CURRENT
In applications where the charge current needs to be selectable,
use the circuit shown in Figure 24. This circuit allows a
processor to determine if the charge current needs to be
reduced due to an input source limitation or a different battery
capacity option, or simply to reduce the stress on the pass
transistor. R2 and Q2 allow the charge current to be selected
between HIGH—750 mA, and LOW—250 mA.
04873-0-023
INPUT
4.6V–12V
D1
BAT1000
CIN
2.2µF
LOW/HIGH
RS
200mΩ
IN
CHG
CTIMER
100nF
Q1
FZT549
CS DRV
ADP2291
TIMER ADJ
BAT
GND
R2
100kΩ
Q2
2N7002
COUT
10µF
+
LI-ION
CELL
Figure 24. Selectable Charge Current Circuit
THERMAL PROTECTION
In applications where the overall size must be small or the input
voltage range is wide, adding thermal regulation is suggested.
This allows the charger to monitor the temperature of the pass
device and decrease the charge current as the temperature
increases. By adding a NTC thermistor to the ADJ pin it is
possible to accomplish this; however, care is still required to
ensure that the power dissipation of the pass device is not
exceeded.
D1
BAT1000
INPUT
4.6V–12V
CIN
2.2µF
Figure 25. Thermal Regulation Circuit
Some suggested NTC thermistor suppliers are listed in Table 6.
Table 6. NTC Thermistor Manufacturers
Vendor Part Number Website
BetaTherm SMD2500KJ435J www.betatherm.com
Murata NCP18WM474J www.murata .com
Panasonic ERTJ0EV474J www.panasonic.com
Vishay 2322 615 1.474 www.vishay.com
RS
200mΩ
IN
CHG
CTIMER
100nF
Q1
FZT549
CS DRV
ADP2291
TIMER ADJ
BAT
GND
R1
470k
NTC LOCATED
NEAR Q1
R2
100k
COUT
10µF
+
LI-ION
CELL
04873-0-024
04873-0-025
Rev. 0 | Page 14 of 20
Page 15

ADP2291
A
Y
VIN < 3.8V
FROM ANYWHERE
SYNCHRONOUSL
POWER-DOWN
VRS = 0mV
CHG = OPEN
VIN > 3.8V
START
VRS = 0mV
CHG = OPEN
START SEQUENCE ENDS
PRECHARGE
VRS = 15mV
CHG = LOW
T = 30 MIN
BATTERY
FAULT
VRS = 0mV
CHG = OPEN
VADJ > 0.4V AND TEMP < 100°C VADJ < 0.4V
SHUTDOWN
VRS = 0mV
CHG = OPEN
TEMP > 135°C
FROM ANYWHERE
ASYNCHRONOUSLY
VBAT > 2.8V
VBAT < 2.8V
FAST CHARGE
VADJ < 0.4V
VRS = 150mV
CHG = LOW
T = 3 HOUR
TIME OUT
VRS = 0mV
CHG = OPEN
IPNP < C/10 AND
VBAT > 4.1V
END OF
CHARGE
VRS = 150mV
CHG = OPEN
T = 30 MIN
VBAT < 4.1V OR
IPNP > C/10
VBAT < 4.1VVADJ < 0.4V
04873-0-026
Figure 26. State Diagram for the ADP2291,
CTIMER = 0.1µF
Rev. 0 | Page 15 of 20
Page 16

ADP2291
PRINTED CIRCUIT BOARD LAYOUT CONSIDERATIONS
Use the following general guidelines when designing printed
circuit boards:
• Keep the output capacitor as close to the BAT and GND
pins as possible.
• Keep the input capacitor as close to the IN and GND pins
as possible.
Note that the thermal pad is attached to the die substrate,
so the thermal planes that the vias attach the package to
must be electrically isolated or connected to GND.
• The solder mask opening should be about 120 microns
(4.7 mils) larger than the pad size, resulting in a minimum
of 60 microns (2.4 mils) clearance between the pad and the
solder mask.
• PC board traces with larger cross-sectional areas remove
more heat from the pass transistor. For optimum heat
transfer, specify thick copper and use wide traces.
• Use additional copper layers or planes to reduce the
thermal resistance. When connecting to other layers, use
multiple vias if possible.
LFSCP LAYOUT CONSIDERATIONS
The CSP package has an exposed die paddle on the bottom that
efficiently conducts heat to the PCB. In order to achieve the
optimum performance from the CSP package, give special
consideration to the layout of the PCB. Use the following layout
guidelines for the CSP package:
• The pad pattern is shown in Figure 27. Follow the pad
dimension closely for reliable solder joints while
maintaining reasonable clearances to prevent solder
bridging.
• The thermal pad of the CSP package provides a low
thermal impedance path (approximately 20°C/W) to the
PCB. Therefore a properly designed PCB effectively conducts the heat away from the package. This is achieved by
adding thermal vias to the PCB that provide a thermal path
to the inner or bottom layers. Note that the via diameter is
small to prevent the solder from flowing through the via
and leaving voids in the thermal pad solder joint.
• The paste mask opening is typically designed to match the
pad size used on the peripheral pads of the LFCSP package.
This should provide a reliable solder joint as long as the
stencil thickness is about 0.125 mm. The paste mask for the
thermal pad needs to be designed for the maximum coverage to effectively remove the heat from the package. However, due to the presence of thermal vias and the size of the
thermal pad, eliminating voids may not be possible.
• The recommended paste mask stencil thickness is
0.125 mm. Use a laser cut stainless steel stencil with
trapezoidal walls.
• Use a no clean, Type 3 solder paste for mounting the
LFCSP package. A nitrogen purge during the reflow
process is recommended.
• The package manufacturer recommends that the reflow
temperature not exceed 220°C and the time above liquidus
is less than 75 seconds. Make sure the preheat ramp is
3°C/second or lower. The actual temperature profile
depends on the board’s density and should be determined
by the assembly house.
Rev. 0 | Page 16 of 20
Page 17

ADP2291
2× VIAS, 0.250∅
35µm PLATING
0.73
0.30
0.50
1.80
0.90
2.36
1.40
1.90
3.36
04873-0-027
Figure 27. 3 mm × 3 mm LFCSP Pad Pattern
(Dimensions in mm)
Table 7. Variables Description
Variable
Name Description
V
X
V
RS
The voltage on Pin X
The regulation setpoint for the voltage across the
sense resistor (RS)
V
BAT, EOC
The battery voltage at the point charging current is
1/10 the current setpoint
I
MAX
The charge current corresponding to VRS,
including the effects of ADJ pin voltage
I
MAX0
The charge current corresponding to the VRS
setpoint, ignoring ADJ effects (i.e. C0 = 150 mV/RS)
C rate
The charge current (mA) expressed as a multiple of
the nominal battery capacity (mAh). A 900 mAh
capacity battery charged at a 1/10 C rate, is
equivalent to a 90 mA charge current.
Rev. 0 | Page 17 of 20
Page 18

ADP2291
R
OUTLINE DIMENSIONS
INDICATO
PIN 1
3.00
BSC SQ
TOP
VIEW
2.75
BSC SQ
0.45
0.50
BSC
0.60 MAX
8
EXPOSED
PAD
(BOTT OMVIEW)
5
0.50
0.40
0.30
4
PIN 1
INDICATOR
1
1.90
1.50
1.75
REF
1.60
0.90
0.85
0.80
SEATING
PLANE
12° MAX
0.30
0.23
0.18
0.80 MAX
0.65TYP
0.05 MAX
0.02 NOM
0.20 REF
0.25
MIN
1.60
1.45
1.30
Figure 28. 8-lead 3 × 3 LFCSP Package
(CP-8)
Dimensions Shown in Millimeters
3.00
BSC
85
3.00
BSC
PIN 1
0.65 BSC
0.15
0.00
0.38
0.22
COPLANARITY
0.10
COMPLIANT TO JEDEC STANDARDS MO-187AA
4.90
BSC
4
1.10 MAX
8°
0°
SEATING
PLANE
0.23
0.08
Figure 29. 8-Lead MSOP Package
(RM-8)
Dimensions Shown in Millimeters
0.80
0.60
0.40
ORDERING GUIDE
Models Temperature Range Package Description Package Option Branding
ADP2291ARMZ-R7
ADP2291ACPZ-R71 –40°C to +85°C 8-Lead LFCSP CP-8 P08
1
Z = Pb-free part.
1
–40°C to +85°C 8-Lead MSOP RM-8 P08
Rev. 0 | Page 18 of 20
Page 19

ADP2291
NOTES
Rev. 0 | Page 19 of 20
Page 20

ADP2291
NOTES
© 2004 Analog Devices, Inc. All rights reserved. Trademarks and
registered trademarks are the property of their respective owners.
D04873-0-10/04(0)
Rev. 0 | Page 20 of 20
 Loading...