

Page 1
PWM, DC-to-DC Switching Converter
ADP1614
Rev. 0
Information furnished by Analog Devices is believed to be accurate and reliable. However, no
Trademarks and registered trademarks are the property of their respective owners.
Fax: 781.461.3113 ©2012 Analog Devices, Inc. All rights reserved.
ADP1614
8
3
9
10
6
2
1
VIN
EN
CLRES
SS
SW
7
SW
FB
COMP
ON
OFF
5
GND
4
GND
11
EP
V
OUT
V
IN
L1
C
IN
C
SS
C
OUT
C
COMP
R
COMP
R
CL
R1
R2
D1
10293-001
Data Sheet
FEATURES
Adjustable current limit, up to 4 A
2.5 V to 5.5 V input voltage range
650 kHz or 1.3 MHz fixed frequency option
Adjustable output voltage, up to 20 V
Adjustable soft start
Undervoltage lockout
Thermal shutdown
3 mm × 3 mm, 10-lead LFCSP
Supported by ADIsimPower design tool
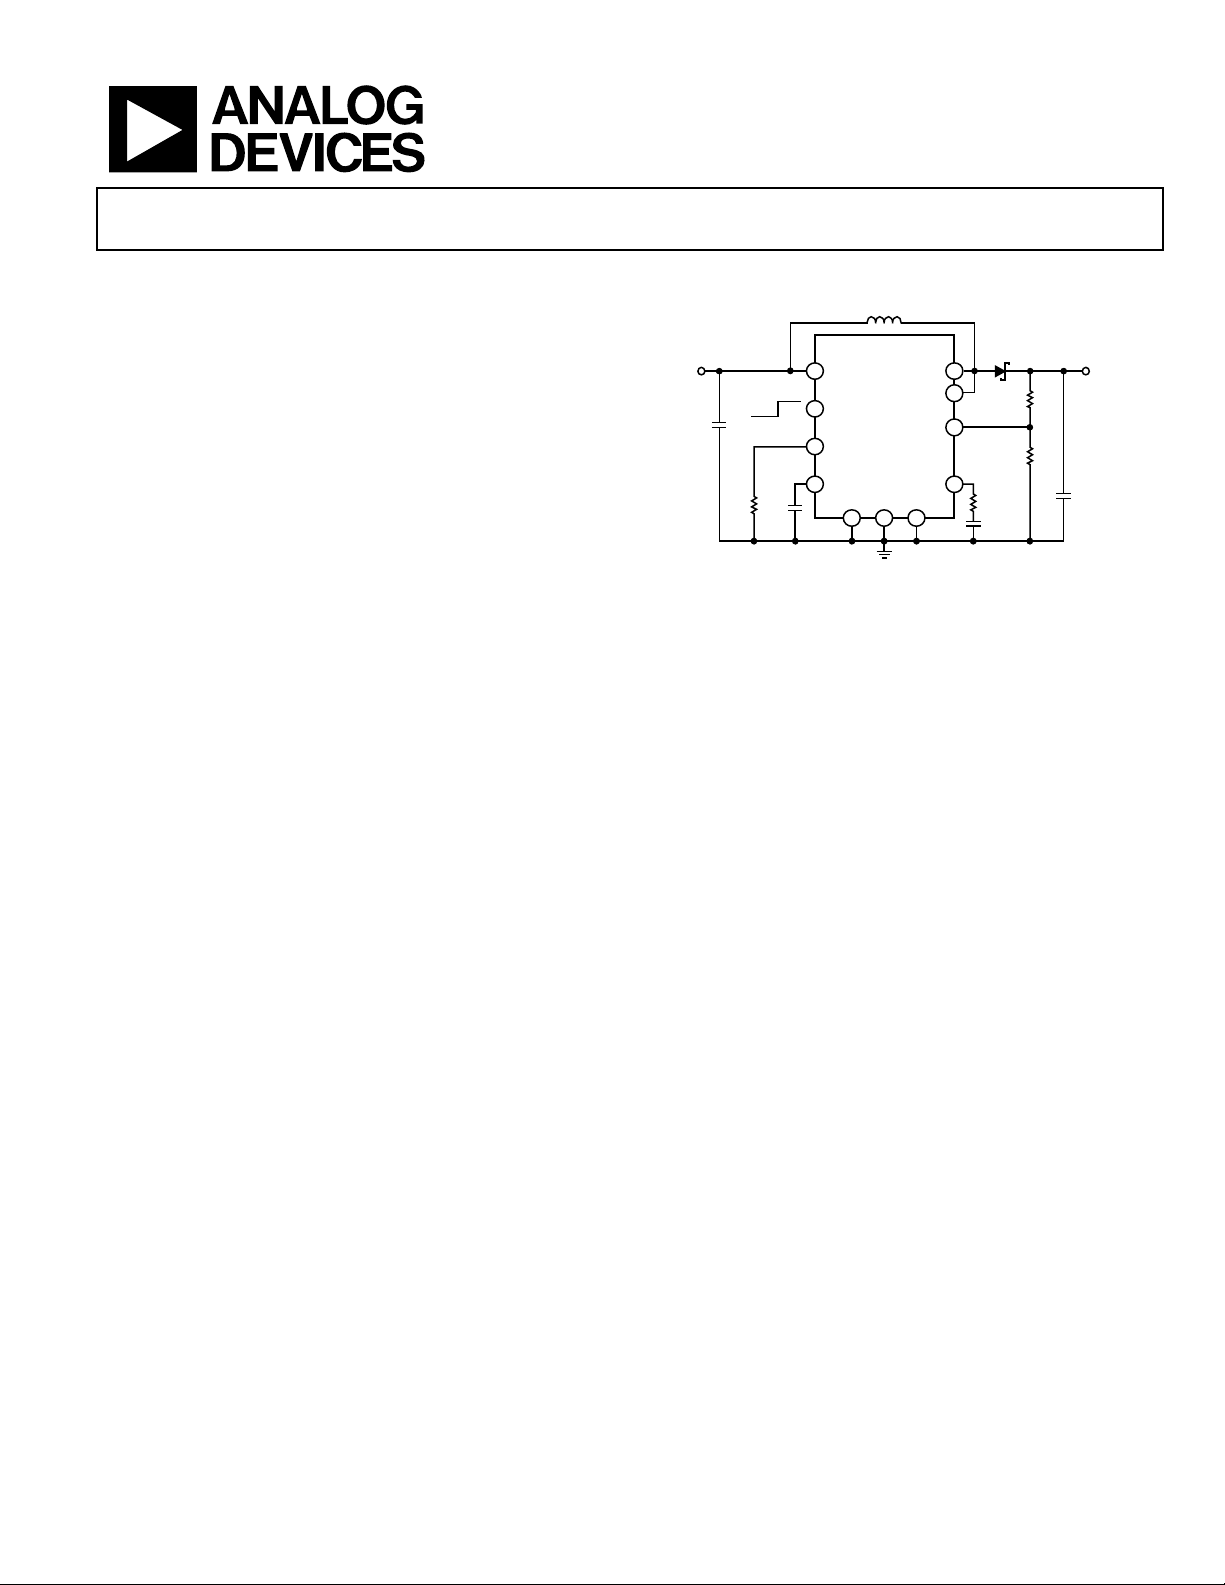
650 kHz/1.3 MHz, 4 A, Step-Up,
TYPICAL APPLICATIONS CIRCUIT
APPLICATIONS
TFT LCD bias supplies
Portable applications
Industrial/instrumentation equipment
GENERAL DESCRIPTION
The ADP1614 is a step-up, dc-to-dc switching converter with
an integrated power switch capable of providing an output
voltage as high as 20 V. The ADP1614 is available with a pinadjustable current limit that is set via an external resistor. The
boost switching frequency is fixed to either 650 kHz or 1.3 MHz.
With a package height of 0.8 mm, the ADP1614 is optimal for
space constrained applications, such as portable devices or thin
film transistor (TFT) liquid crystal displays (LCDs).
The ADP1614 operates in current-mode pulse-width modulation
(PWM) with up to 94% efficiency. Adjustable soft start prevents
inrush currents when the part is enabled. The PWM current-mode
architecture allows excellent transient response, easy noise filtering,
and the use of small, cost-saving external inductors and capacitors.
Other key features include undervoltage lockout (UVLO), thermal
shutdown (TSD), and logic controlled enable.
The ADP1614 is available in a Pb-free, 10-lead lead frame chip
scale package (LFCSP).
Figure 1. Step-Up Regulator Configuration
responsibility is assumed by Analog Devices for its use, nor for any infringements of patents or other
rights of third parties that may result from its use. Specifications subject to change without notice. No
license is granted by implication or otherwise under any patent or patent rights of Analog Devices.
One Technology Way, P.O. Box 9106, Norwood, MA 02062-9106, U.S.A.
Tel: 781.329.4700
www.analog.com
Page 2

ADP1614 Data Sheet
TABLE OF CONTENTS
Features .............................................................................................. 1
Applications ....................................................................................... 1
General Description ......................................................................... 1
Typical Applications Circuit ............................................................ 1
Revision History ............................................................................... 2
Specifications ..................................................................................... 3
Absolute Maximum Ratings ............................................................ 4
Thermal Resistance ...................................................................... 4
ESD Caution .................................................................................. 4
Pin Configuration and Function Descriptions ............................. 5
Typical Performance Characteristics ............................................. 6
Theory of Operation ...................................................................... 10
Current-Mode PWM Operation .............................................. 11
Adjustable Current Limit .......................................................... 11
Frequency Selection ................................................................... 11
Soft Start ...................................................................................... 11
Thermal Shutdown (TSD) ........................................................ 11
Undervoltage Lockout (UVLO) ............................................... 11
Shutdown Mode ......................................................................... 11
Applications Information .............................................................. 12
ADIsimPower Design Tool ....................................................... 12
Setting the Output Voltage ........................................................ 12
Inductor Selection ...................................................................... 12
Choosing the Input and Output Capacitors ........................... 13
Diode Selection ........................................................................... 13
Loop Compensation .................................................................. 13
Soft Start Capacitor .................................................................... 14
PCB Layout Guidelines .................................................................. 15
Outline Dimensions ....................................................................... 16
Ordering Guide .......................................................................... 16
REVISION HISTORY
6/12—Revision 0: Initial Version
Rev. 0 | Page 2 of 16
Page 3

Data Sheet ADP1614
Peak Current Limit2
RCL = 154 kΩ, duty cycle = 70%
0.95
1.3
1.65
A
ADP1614ACPZ-650-R7
500
650
720
kHz
THERMAL SHUTDOWN
SPECIFICATIONS
VIN = 3.6 V, unless otherwise noted. Minimum and maximum values are guaranteed for TJ = −40°C to +125°C. Typical values specified
are at T
control (SQC), unless otherwise noted.
Table 1.
Parameter Symbol Test Conditions/Comments Min Typ Max Unit
SUPPLY
UNDERVOLTAGE LOCKOUT (UVLO)
OUTPUT
REFERENCE
ERROR AMPLIFIER
SWITCH (SW)
= 25°C. All limits at temperature extremes are guaranteed by correlation and characterization using standard statistical quality
J
Input Voltage VIN 2.5 5.5 V
Quiescent Current
Shutdown I
VEN = 0 V 0.25 1.5 µA
QSHDN
Nonswitching State IQ VFB = 1.3 V, fSW = 1.3 MHz and 650 kHz 700 1100 µA
Switching State1 I
fSW = 1.3 MHz, no load 5.5 7 mA
QSW
fSW = 650 kHz, no load 3 4.5 mA
Enable Pin Bias Current IEN VEN = 3.6 V 3.4 7 µA
Undervoltage Lockout Threshold VIN rising 2.33 2.5 V
VIN falling 2.0 2.20 V
Output Voltage V
Load Regulation V
VIN 20 V
OUT
= 10 V, I
OUT
= 1 mA to 1 A 0.005 mV/mA
LOAD
Feedback Voltage VFB −1.6% 1.245 +1.6% V
Line Regulation VIN = 2.5 V to 5.5 V 0.02 0.2 %/V
Transconductance G
MEA
ΔI = 4 µA 150 µA/V
Voltage Gain AV 80 dB
FB Pin Bias Current VFB = 1.245 V 1 50 nA
On Resistance R
ISW = 1.0 A 50 100 mΩ
DSON
Leakage Current VSW = 20 V 0.1 10 µA
Maximum Peak Current Limit3 RCL = 61.9 kΩ, VIN = 3.6 V, V
CLRES VOLTAGE4 I
I
= 5 µA 1.225 1.27 1.315 V
CLRES
= 20 µA 1.18 1.22 1.25 V
CLRES
= 15 V 4 A
OUT
OSCILLATOR
Oscillator Frequency fSW ADP1614ACPZ-1.3-R7 1.1 1.3 1.4 MHz
Maximum Duty Cycle D
COMP = open, VFB = 1 V, fSW = 1.3 MHz and 650 kHz 88 92 %
MAX
EN LOGIC THRESHOLD VIN = 2.5 V to 5.5 V
Input Voltage Low VIL 0.3 V
Input Voltage High VIH 1.6 V
SOFT START (SS)
Charging Current ISS VSS = 0 V 3.4 5.5 7 µA
Pin Voltage VSS VFB = 1.3 V 1.17 1.23 1.29 V
Thermal Shutdown Threshold 150 °C
Thermal Shutdown Hysteresis 20 °C
1
This parameter specifies the average current when the device switches internally with the SW pins (Pin 6 and Pin 7) floating.
2
Current limit is a function of duty cycle. For the adjustable current limit versions, it is also a function of the resistor on the CLRES pin. See Figure 9 through Figure 12.
3
Guaranteed by design.
4
The CLRES pin cannot be controlled with a current source. An equivalent resistance should be used.
Rev. 0 | Page 3 of 16
Page 4
ADP1614 Data Sheet
Soldering Conditions
JEDEC J-STD-020
10-Lead LFCSP
47
7.22
°C/W
ABSOLUTE MAXIMUM RATINGS
Table 2.
Parameter Rating
VIN, EN, FB to GND −0.3 V to +6 V
CLRES to GND −0.3 V to VIN
COMP to GND 1.0 V to 1.6 V
SS to GND −0.3 V to +1.3 V
SW to GND 21 V
Operating Junction Temperature Range −40°C to +125°C
Storage Temperature Range −65°C to +150°C
Stresses above those listed under Absolute Maximum Ratings
may cause permanent damage to the device. This is a stress
rating only; functional operation of the device at these or any
other conditions above those indicated in the operational
section of this specification is not implied. Exposure to absolute
maximum rating conditions for extended periods may affect
device reliability.
Absolute maximum ratings apply individually only, not in
combination.
THERMAL RESISTANCE
The junction-to-ambient thermal resistance (θJA) of the package
is specified for the worst-case conditions, that is, a device soldered
in a circuit board for surface-mount packages. The θ
is highly
JA
dependent on the application and board layout. In applications
where high maximum power dissipation exists, attention to
thermal board design is required. The value of θ
may vary,
JA
depending on the printed circuit board (PCB) material, layout,
and environmental conditions.
The boundary conditions for the thermal resistance of the
ADP1614 are modeled under natural convection cooling at
25°C ambient temperature, JESD 51-9, and 1 W power input on a
4-layer board.
Table 3. Thermal Resistance
Package Type θJA θJC Unit
1
Thermal numbers per JEDEC standard JESD 51-9.
1
ESD CAUTION
Rev. 0 | Page 4 of 16
Page 5
Data Sheet ADP1614
1COMP
2FB
3EN
4GND
5GND
10 SS
9 CLRES
8 VIN
7 SW
6 SW
ADP1614
TOP VIEW
(Not to S cale)
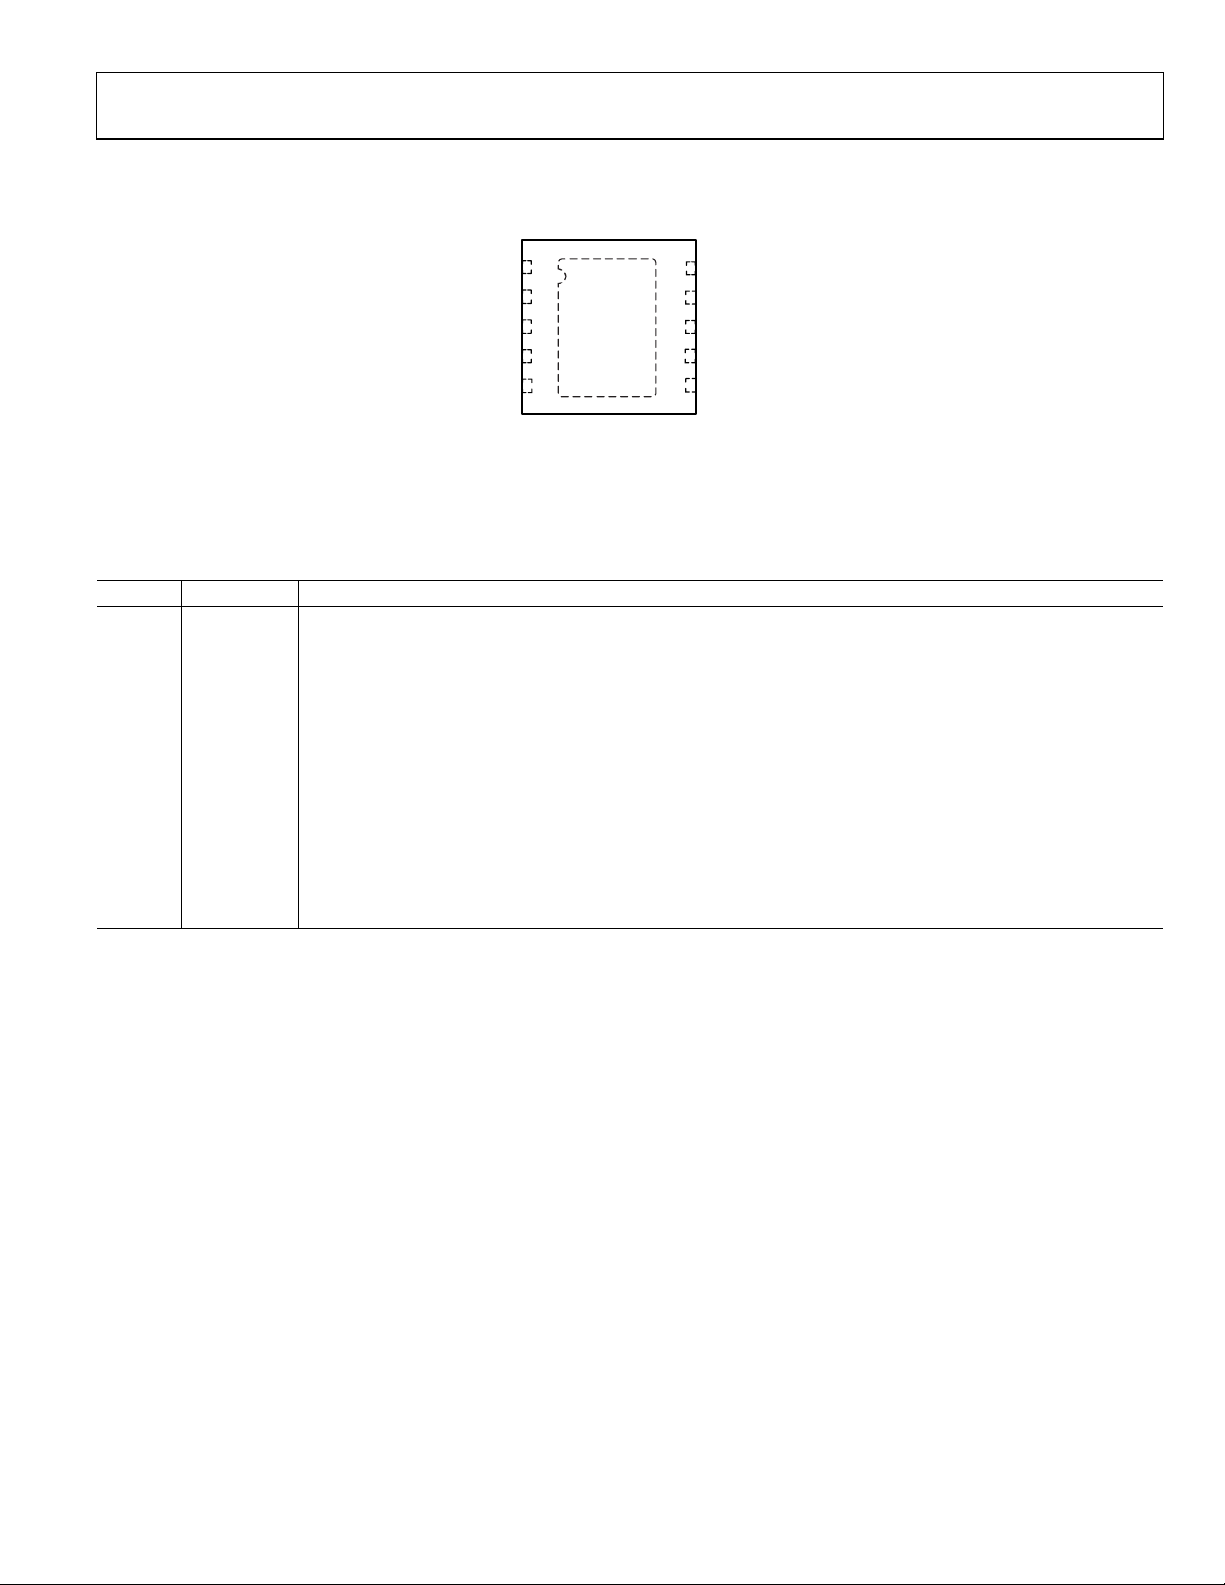
NOTES
1. THE EXPOSED PAD IS NOT ELECTRICALLY
CONNECTED; CONNECT THIS P AD TO A GROUND
PLANE FOR BETTER HEAT DISTRI BUTION.
10293-002
3
EN
Enable Input. Drive EN low to shut down the regulator; drive EN high to turn on the regulator.
PIN CONFIGURATION AND FUNCTION DESCRIPTIONS
Figure 2. Pin Configuration
Table 4. Pin Function Descriptions
Pin No. Mnemonic Description
1 COMP Compensation Input. Connect a series resistor-capacitor network from COMP to GND to compensate the regulator.
2 FB Output Voltage Feedback Input. Connect a resistive voltage divider from the output voltage to FB to set the
regulator output voltage.
4, 5 GND Ground.
6, 7 SW Switching Output. Connect the power inductor from the input voltage to SW and connect the external rectifier
from SW to the output voltage to complete the step-up converter.
8 VIN Main Power Supply Input. VIN powers the ADP1614 internal circuitry. Connect VIN to the input source voltage.
Bypass VIN to GND with a 10 µF or greater capacitor as close to the ADP1614 as possible.
9 CLRES Connect a resistor to GND to set the peak inductor current.
10 SS Soft Start. A capacitor connected from SS to GND brings up the output slowly at power-up and reduces inrush
current.
11 EP Exposed Die Attach Pad. The exposed pad is not electrically connected; connect this pad to a ground plane for
better heat distribution.
Rev. 0 | Page 5 of 16
Page 6

ADP1614 Data Sheet
1 10 100 1k 10k
EFFICIENCY (%)
LOAD CURRENT ( mA)
0
10
20
30
40
50
60
70
80
90
100
VIN = 3.6V
f
SW
= 650kHz
R
CL
= 71.5kΩ
V
OUT
= 5V
V
OUT
= 10V
V
OUT
= 15V
10293-003
1 10 100 1k 10k
EFFICIENCY (%)
LOAD CURRENT ( mA)
0
10
20
30
40
50
60
70
80
90
100
V
IN
= 3.6V
f
SW
= 1.3MHz
R
CL
= 71.5kΩ
V
OUT
= 5V
V
OUT
= 10V
V
OUT
= 15V
10293-004
1 10 100 1k 10k
EFFICIENCY (%)
LOAD CURRENT ( mA)
0
10
20
30
40
50
60
70
80
90
100
VIN = 5V
f
SW
= 650kHz
R
CL
= 71.5kΩ
V
OUT
= 10V
V
OUT
= 15V
V
OUT
= 20V
10293-005
1 10 100 1k 10k
EFFICIENCY (%)
LOAD CURRENT ( mA)
0
10
20
30
40
50
60
70
80
90
100
V
IN
= 5V
f
SW
= 1.3MHz
R
CL
= 71.5kΩ
V
OUT
= 10V
V
OUT
= 15V
V
OUT
= 20V
10293-006
4.0
0
0.5
1.0
1.5
2.0
2.5
3.0
3.5
60 75 90 105 120 135 150
MAXIMUM O UTPUT CURRENT (A)
RCL (kΩ)
10293-100
V
OUT
= 5V
V
IN
= 2.5V
V
IN
= 3.5V
V
IN
= 4.5V
1.4
0
0.2
0.4
0.6
0.8
1.0
1.2
60 75 90 105 120 135 150
MAXIMUM O UTPUT CURRENT (A)
RCL (kΩ)
10293-101
V
OUT
= 15V
V
IN
= 2.5V
V
IN
= 3.5V
V
IN
= 4.5V
V
IN
= 5.5V
TYPICAL PERFORMANCE CHARACTERISTICS
Figure 3. Efficiency vs. Load Current, VIN = 3.6 V, fSW = 650 kHz
Figure 4. Efficiency vs. Load Current, VIN = 3.6 V, fSW = 1.3 MHz
Figure 6. Efficiency vs. Load Current, VIN = 5 V, fSW = 1.3 MHz
Figure 7. Typical Maximum Continuous Output Current vs. RCL, V
OUT
= 5 V
Figure 5. Efficiency vs. Load Current, VIN = 5 V, fSW = 650 kHz
Figure 8. Typical Maximum Continuous Output Current vs. RCL, V
Rev. 0 | Page 6 of 16
OUT
= 15 V
Page 7

Data Sheet ADP1614
4.0
1.0
1.5
2.0
2.5
3.0
3.5
60 75 90 105 120 135 150
CURRENT LIM IT (A)
RCL (kΩ)
10293-104
V
OUT
= 5V
V
IN
= 2.5V
V
IN
= 3.5V
V
IN
= 4.5V
3.90
3.85
3.80
3.75
3.70
3.65
3.60
2.5 3.0 3.5 4.0 4.5
CURRENT LIM IT (A)
INPUT VOLTAGE (V)
10293-102
V
OUT
= 5V
R
CL
= 71.5kΩ
TA = –40°C
T
A
= +25°C
T
A
= +85°C
4.0
3.5
3.0
2.5
2.0
1.5
1.0
60 75 90 105 120 135 150
CURRENT LIM IT (A)
RCL (kΩ)
10293-105
V
OUT
= 15V
V
IN
= 2.5V
V
IN
= 3.5V
V
IN
= 4.5V
V
IN
= 5.5V
3.60
3.15
3.20
3.25
3.30
3.35
3.40
3.45
3.50
3.55
2.5 3.0 3.5 4.0 5.54.04.5
CURRENT LIM IT (A)
INPUT VOLTAGE (V)
10293-103
TA = +85°C
TA = –40°C
T
A
= +25°C
V
OUT
= 15V
R
CL
= 71.5kΩ
2.5 5.55.04.54.03.53.0
SWITCH ON RESISTANCE (mΩ)
INPUT VOLTAGE (V)
30
40
50
60
70
80
ISW = 1A
T
A
= +125°C
T
A
= +25°C
T
A
= –40°C
10293-008
2.5 5.55.04.54.03.53.0
MAXIMUM DUTY CYCLE (%)
INPUT VOLTAGE (V)
TA = +25°C
T
A
= –40°C
T
A
= +125°C
91.0
91.5
92.0
92.5
93.0
93.5
94.0
94.5
10293-015
Figure 9. Peak Current Limit of Switch vs. RCL, V
OUT
= 5 V
Figure 10. Peak Current Limit of Switch vs. VIN over Temperature, V
OUT
= 5 V
Figure 12. Peak Current Limit of Switch vs. VIN over Temperature, V
Figure 13. Switch On Resistance vs. Input Voltage
OUT
= 15 V
Figure 11. Peak Current Limit of Switch vs. RCL, V
OUT
= 15 V
Figure 14. Maximum Duty Cycle vs. Input Voltage
Rev. 0 | Page 7 of 16
Page 8

ADP1614 Data Sheet
2.5 5.55.04.54.03.53.0
NONSWITCHING QUIE S CE NT CURRENT (µA)
INPUT VOLTAGE (V)
TA = +125°C
T
A
= +25°C
T
A
= –40°C
580
600
620
640
660
680
700
720
740
760
780
10293-009
2.5 5.55.04.54.03.53.0
SWITCHING QUIESCE NT CURRENT (mA)
INPUT VOLTAGE (V)
T
A
= +125°C
T
A
= +25°C
T
A
= –40°C
2.0
4.5
4.0
3.5
3.0
2.5
fSW = 650kHz
10293-011
2.5 5.55.04.54.03.53.0
SWITCHING QUIESCE NT CURRENT (mA)
INPUT VOLTAGE (V)
TA = +25°C
T
A
= –40°C
3
9
8
7
6
5
4
f
SW
= 1.3MHz
T
A
= +125°C
10293-012
EN PIN CURRENT ( µ A)
EN PIN VOLTAGE (V)
T
A
= +25°C
T
A
= –40°C
T
A
= +125°C
0
1
2
3
4
5
6
7
0 0.5 1.0 1.5 2.0 2.5 3.0 3.5 4.0 4.5 5.0 5.5
10293-016
SS PIN CURRENT ( µ A)
TEMPERATURE (°C)
4.8
5.0
5.2
5.4
5.6
5.8
6.0
–40 –10 20 50 80 110
VIN = 5.5V
V
IN
= 3.6V
V
IN
= 2.5V
10293-017
10293-106
TIME (4ms/DIV)
1
2
3
4
VIN = 3.6V
V
OUT
= 15V
I
LOAD
= 60Ω
C
SS
= 68nF
f
SW
= 1.3MHz
OUTPUT VOLTAGE (5V/DIV)
INDUCTOR CURRENT (500mA/DIV)
SWITCH VOLTAGE (10V/DIV)
EN PIN VOLTAGE (5V/DIV)
Figure 15. Nonswitching Quiescent Current vs. Input Voltage
Figure 16. Switching Quiescent Current vs. Input Voltage, fSW = 650 kHz
Figure 18. EN Pin Current vs. EN Pin Voltage
Figure 19. SS Pin Current vs. Temperature
Figure 17. Switching Quiescent Current vs. Input Voltage, fSW = 1.3 MHz
Figure 20. Startup, C
= 68 nF
SS
Rev. 0 | Page 8 of 16
Page 9

Data Sheet ADP1614
10293-020
TIME (200µ s/DIV)
1
3
LOAD CURRENT ( 50mA/DIV)
OUTPUT VOLTAGE (100mV/DIV)
AC-COUPLED
V
IN
= 3.6V
V
OUT
= 5V
f
SW
= 650kHz
L = 4.7µH
10293-021
TIME (200µ s/DIV)
1
3
LOAD CURRENT ( 50mA/DIV)
OUTPUT VOLTAGE (100mV/DIV)
AC-COUPLED
V
IN
= 3.6V
V
OUT
= 5V
f
SW
= 1.3MHz
L = 4.7µH
10293-022
TIME (200µ s/DIV)
1
3
LOAD CURRENT ( 50mA/DIV)
OUTPUT VOLTAGE (100mV/DIV)
AC-COUPLED
V
IN
= 5V
V
OUT
= 15V
f
SW
= 650kHz
L = 15µH
10293-023
TIME (200µ s/DIV)
1
3
LOAD CURRENT ( 50mA/DIV)
OUTPUT VOLTAGE (200mV/DIV)
AC-COUPLED
V
IN
= 5V
V
OUT
= 15V
f
SW
= 1.3MHz
L = 10µH
Figure 21. 50 mA to 150 mA Load Transient,
V
= 3.6 V, V
IN
= 5 V, fSW = 650 kHz
OUT
Figure 22. 50 mA to 150 mA Load Transient,
V
= 3.6 V, V
IN
= 5 V, fSW = 1.3 MHz
OUT
Figure 23. 50 mA to 150 mA Load Transient,
V
= 5 V, V
IN
= 15 V, fSW = 650 kHz
OUT
Figure 24. 50 mA to 150 mA Load Transient,
V
= 5 V, V
IN
= 15 V, fSW = 1.3 MHz
OUT
Rev. 0 | Page 9 of 16
Page 10

ADP1614 Data Sheet
SW
PWM
COMPARATOR
UVLO
COMPARATOR
TSD
COMPARATOR
OSCILLATOR
S
R
Q
D
COMPARATOR
D
REF
+
+
VIN
VIN
CURRENT
SENSING
DRIVER
BAND GAP
N1
BG
RESET
1.1MΩ
AGND
V
IN
UVLO
REF
T
SENSE
T
REF
ERROR
AMPLIFIER
V
BG
2
1
5.5µA
V
SS
R
COMP
C
COMP
COMP
SS
FB
C
SS
R1
R2
R
CL
C
IN
V
OUT
8
L1
D1
A
V
OUT
C
OUT
6
SW
7
39 5
GND
4
GND
11
EP
AGND
ENCLRES
ADP1614
10
V
IN
>1.6V
<0.3V
SOFT
START
10293-024
THEORY OF OPERATION
The ADP1614 current-mode, step-up switching converter
boosts a 2.5 V to 5.5 V input voltage to an output voltage as
high as 20 V. The internal switch allows a high output current,
and the 650 kHz/1.3 MHz switching frequency allows the use of
tiny external components. The switch current is monitored on a
pulse-by-pulse basis to limit the current to the value set by the
R
resistor on the CLRES pin.
CL
Figure 25. Block Diagram with Step-Up Regulator Application Circuit
Rev. 0 | Page 10 of 16
Page 11

Data Sheet ADP1614
60 1501351201059075
CURRENT LIM IT (A)
RCL (kΩ)
1.0
4.0
3.5
3.0
2.5
2.0
1.5
V
IN
= 3.5V
10293-007
V
OUT
= 15V
V
OUT
= 5V
CURRENT-MODE PWM OPERATION
The ADP1614 utilizes a current-mode PWM control scheme to
regulate the output voltage over all load conditions. The output
voltage is monitored at FB through a resistive voltage divider. The
voltage at FB is compared with the internal 1.245 V reference by
the internal transconductance error amplifier to create an error
voltage at COMP. The current of the switch is internally measured
and added to the stabilizing ramp. The resulting sum is compared
with the error voltage at COMP to control the PWM modulator.
This current-mode regulation system allows fast transient response
while maintaining a stable output voltage. By selecting the proper
resistor-capacitor network from COMP to GND, the regulator
response is optimized for a wide range of input voltages, output
voltages, and load conditions.
ADJUSTABLE CURRENT LIMIT
A key feature of the ADP1614 is a pin-adjustable peak current
limit of up to 4 A (see Figure 9 to Figure 12 and Figure 26). This
adjustable current limit allows the other external components to
be selected specifically for the application. The current limit is set
via an external resistor connected from Pin 9 (CLRES) to ground.
SOFT START
To preve nt input inrush current to the converter when the part
is enabled, connect a capacitor from SS to GND to set the soft
start period. After the ADP1614 is turned on, SS sources 5 µA
(typical) to the soft start capacitor (C
) until it reaches 1.23 V
SS
at startup. As the soft start capacitor charges, it limits the peak
current allowed by the part. By slowly charging the soft start
capacitor, the input current ramps slowly to prevent it from
overshooting excessively at startup. When the ADP1614 is
disabled, the SS pin is internally shorted to GND to discharge
the soft start capacitor.
THERMAL SHUTDOWN (TSD)
The ADP1614 includes TSD protection. If the die temperature
exceeds 150°C (typical), TSD turns off the NMOS power device,
significantly reducing power dissipation in the device and
preventing output voltage regulation. The NMOS power device
remains off until the die temperature is reduced to 130°C (typical).
The soft start capacitor is discharged during TSD to ensure low
output voltage overshoot and inrush currents when regulation
resumes.
UNDERVOLTAGE LOCKOUT (UVLO)
If the input voltage is below the UVLO threshold, the ADP1614
automatically turns off the power switch and places the part
into a low power consumption mode. This prevents potentially
erratic operation at low input voltages and prevents the power
device from turning on when the control circuitry cannot
operate it. The UVLO levels have ~100 mV of hysteresis to
ensure glitch-free startup.
SHUTDOWN MODE
The EN pin turns the ADP1614 regulator on or off. Drive EN
low to shut down the regulator and reduce the input current to
0.25 µA (typical). Drive EN high to turn on the regulator.
Figure 26. Peak Current Limit of Switch vs. R
CL
FREQUENCY SELECTION
The ADP1614 is internally programmed to operate at either
650 kHz or 1.3 MHz. Operation of the ADP1614 at 650 kHz
(ADP1614ACPZ-650-R7) optimizes the efficiency of the device,
whereas operation of the ADP1614 at 1.3 MHz (ADP1614ACPZ-
1.3-R7) enables the device to be used with smaller external
components.
When the converter is in shutdown mode (EN ≤ 0.3 V), there is a
dc path from the input to the output through the inductor and
output rectifier. This causes the output voltage to remain slightly
below the input voltage by the forward voltage of the rectifier,
preventing the output voltage from dropping to ground when the
regulator is shut down.
Regardless of the state of the EN pin, when a voltage is applied to
the VIN pin, a large current spike occurs due to the nonisolated
path through the inductor and diode between V
and V
IN
OUT
. The
high current is a result of the output capacitor charging. The
peak value is dependent on the inductor, output capacitor, a nd
any load active on the output of the regulator.
Rev. 0 | Page 11 of 16
Page 12

ADP1614 Data Sheet
−
×=
245.1
245.1
OUT
V
R2R1
OUT
IN
OUT
V
VVD−
=
SW
ON
f
D
t =
L
tV
I
ON
IN
L
×
=∆
L
ON
IN
I
tV
L
∆
×
=
SW
INOUT
MIN
f
VV
LL
×
×−
=>
8
)2(
TOKO Inc.
FDV06xx, DG6045C, FDSD0630, DEM8045C,
APPLICATIONS INFORMATION
ADIsimPower DESIGN TOOL
The ADP1614 is supported by the ADIsimPower™ design toolset.
ADIsimPower is a collection of tools that produce complete
power designs that are optimized for a specific design goal. The
tools enable the user to generate a full schematic and bill of
materials and to calculate performance in minutes. ADIsimPower
can optimize designs for cost, area, efficien c y, and parts count
while taking into consideration the operating conditions and
limitations of the IC and the external components. For more
information about the ADIsimPower design tools, visit
www.analog.com/ADIsimPower. The toolset is available from
this website, and users can request an unpopulated board.
SETTING THE OUTPUT VOLTAGE
The ADP1614 features an adjustable output voltage range of VIN
to 20 V. The output voltage is set by the resistor voltage divider,
R1 and R2 (see Figure 25), from the output voltage (V
OUT
) to the
1.245 V feedback input at FB. Use the following equation to
determine the output voltage:
V
= 1.245 × (1 + R1/R2) (1)
OUT
Choose R1 based on the following equation:
(2)
INDUCTOR SELECTION
The inductor is an essential part of the step-up switching
converter. It stores energy during the on time of the power
switch and transfers that energy to the output through the
output rectifier during the off time. To balance the trade-offs
between small inductor current ripple and efficiency, inductance values in the range of 4.7 µH to 22 µH are recommended.
In general, lower inductance values have higher saturation
current and lower series resistance for a given physical size.
However, lower inductance values result in higher peak current,
which can lead to reduced efficiency and greater input and/or
output ripple and noise. A peak-to-peak inductor ripple current
close to 30% of the maximum dc input current typically yields
an optimal compromise.
For determining the inductor ripple current in continuous
operation, the input (V
the switch duty cycle (D) as follows:
) and output (V
IN
) voltages determine
OUT
(3)
The duty cycle and switching frequency (f
determine the on time:
(4)
The inductor ripple current (∆I
) in steady state is calculated by
L
(5)
Solve for the inductance value (L) as follows:
(6)
Ensure that the peak inductor current (the maximum input
current plus half the inductor ripple current) is below the rated
saturation current of the inductor. Likewise, make sure that the
maximum rated rms current of the inductor is greater than the
maximum dc input current to the regulator.
For continuous current-mode (CCM) duty cycles greater than
50% that occur with input voltages less than one-half the output
voltage, slope compensation is required to maintain stability of
the current-mode regulator. For stable current-mode operation,
ensure that the selected inductance is equal to or greater than
the minimum calculated inductance, L
parameters in the following equation:
(7)
Inductors smaller than the 4.7 µH to 22 µH recommended
range can be used as long as Equation 7 is satisfied for the given
application. For input/output combinations that approach the
90% maximum duty cycle, doubling the inductor is recommended to ensure stable operation. Table 5 suggests a series
of inductors for use with the ADP1614.
Table 5. Suggested Inductors
Manufacturer Part Series
Coilcraft XAL40xx, XAL50xx, XAL6060, DO3316P
FDVE1040
Würth Elektronik WE-HCI, WE-TPC, WE-PD, WE-PD2, WE -PDF
Vishay Dale IHLP-2020, IHLP-2525, IHLP-3232, IHLP-4040
TDK Components SPM6530, VLP8040, VLF10040, VLF10045
Taiyo Yuden NRS8030, NRS8040
) can be used to
SW
, for the application
MIN
Rev. 0 | Page 12 of 16
Page 13

Data Sheet ADP1614
OUT
ONOUT
OUT
C
OUT
C
tI
C
Q
V
×
==∆
SW
ON
f
D
t =
OUT
IN
OUT
V
VVD−
=
OUTOUTSW
INOUTOUT
OUT
VVf
VVI
C
∆××
−×
≥
)(
OUT
MAXIN
OUT
MIN
V
VV
D
)(
−
=
L
R
V
V
RHPF
LOAD
OUT
IN
Z
×π
×
=2)(
2
OUTCSCOMPOUTMEA
OUT
IN
OUT
FB
VL
ZGZRG
V
V
V
V
A ×××××=
CHOOSING THE INPUT AND OUTPUT CAPACITORS
The ADP1614 requires input and output bypass capacitors to
supply transient currents while maintaining constant input
and output voltages. Use low equivalent series resistance (ESR)
capacitors of 10 µF or greater to prevent noise at the ADP1614
input. Place the capacitor between VIN and GND, as close as
possible to the ADP1614. Ceramic capacitors are preferable
because of their low ESR characteristics. Alternatively, use a
high value, medium ESR capacitor in parallel with a 0.1 µF low
ESR capacitor, placed as close as possible to the ADP1614.
The output capacitor maintains the output voltage and supplies
current to the load while the ADP1614 switch is on. The value
and characteristics of the output capacitor greatly affect the
output voltage ripple and stability of the regulator. A low ESR
ceramic dielectric capacitor is preferable. The output voltage
ripple (∆V
where:
Q
is the charge removed from the capacitor.
C
C
is the output capacitance.
OUT
I
is the output load current.
OUT
t
is the on time of the switch.
ON
The on time of the switch is determined as follows:
The input (V
switch duty cycle (D) as follows:
Choose the output capacitor based on the following equation:
) is calculated as follows:
OUT
(8)
(9)
) and output (V
IN
) voltages determine the
OUT
(10)
diode is rated to handle the average output load current with
the minimum duty cycle. The minimum duty cycle in CCM of
the ADP1614 is
(12)
where V
is the maximum input voltage.
IN(MAX)
The following are suggested Schottky diode manufacturers:
• ON Semiconductor
• Diodes, Inc.
• Toshiba
• ROHM Semiconductor
LOOP COMPENSATION
The ADP1614 uses external components to compensate the
regulator loop, allowing optimization of the loop dynamics for a
given application.
The step-up converter produces an undesirable right-half plane
zero in the regulation feedback loop. This requires compensating
the regulator such that the crossover frequency occurs well below
the frequency of the right-half plane zero. The right-half plane
zero is determined by the following equation:
(13)
where:
(RHP) is the right-half plane zero.
F
Z
R
is the equivalent load resistance or the output voltage
LOAD
divided by the load current.
To stabilize the regulator, ensure that the regulator crossover
frequency is less than or equal to one-fifth of the right-half
plane zero.
The regulator loop gain is
(11)
Multilayer ceramic capacitors are recommended for this
application.
DIODE SELECTION
The output rectifier conducts the inductor current to the output
capacitor and load while the switch is off. For high efficiency,
minimize the forward voltage drop of the diode. For this reason,
using Schottky rectifiers is recommended. However, for high
voltage, high temperature applications, where the Schottky
rectifier reverse leakage current becomes significant and can
degrade efficiency, use an ultrafast junction diode.
Many diode manufacturers derate the current capability of the
diode as a function of the duty cycle. Verify that the output
where:
A
is the loop gain.
VL
V
is the feedback regulation voltage, 1.245 V.
FB
V
is the regulated output voltage.
OUT
V
is the input voltage.
IN
G
is the error amplifier transconductance gain.
MEA
R
= 67 MΩ.
OUT
Z
is the impedance of the series RC network from COMP
COMP
to GND.
G
is the current sense transconductance gain (the inductor
CS
current divided by the voltage at COMP), which is internally
set by the ADP1614.
Z
is the impedance of the load in parallel with the output
OUT
(14)
capacitor.
Rev. 0 | Page 13 of 16
Page 14

ADP1614 Data Sheet
1
2
1
=
××
π
×××××=
OUT
C
CSCOMPMEA
OUT
IN
OUT
FB
VL
Cf
GRG
V
V
V
V
A
CSMEA
INFB
OUTOUT
C
COMP
GGVV
VCf
R
×××
×××π
=
2
)(2
IN
OUTOUTC
COMP
V
VCf
R
2
)(4806 ×××
=
COMPC
COMP
RfC××π
=
2
R
COMP
C
COMP
C2
1
COMP
g
m
ERROR
AMPLIFIER
2
FB
V
BG
10293-026
COMP
OUT
R
CESRC2×
=
SS
SSSS
V
tIC∆
=
To determine the crossover frequency, it is important to note that
at the crossover frequency the compensation impedance (Z
is dominated by a resistor, and the output impedance (Z
OUT
COMP
) is
dominated by the impedance of an output capacitor. Therefore,
when solving for the crossover frequency, the equation (by definition of the crossover frequency) is simplified to
(15)
where:
is the compensation resistor.
R
COMP
f
is the crossover frequency.
C
Solve for R
as follows:
COMP
(16)
where:
VFB = 1.245 V.
G
= 150 µA/V.
MEA
G
= 7 A/V.
CS
Therefore,
)
Capacitor C2 is chosen to cancel the zero introduced by the ESR
of the output capacitor.
Solve for C2 as follows:
(19)
COMP
, C2 is
OUT
and C
COMP
If a low ESR, ceramic output capacitor is used for C
optional. For optimal transient performance, R
might need to be adjusted by observing the load transient response
of the ADP1614. For most applications, the compensation resistor
should be within the range of 1 kΩ to 100 kΩ, and the compensation capacitor should be within the range of 100 pF to 10 nF.
SOFT START CAPACITOR
Upon startup (EN ≥ 1.6 V) or fault recovery, the voltage at SS
ramps up slowly by charging the soft start capacitor (C
an internal 5.5 µA current source (I
). As the soft start
SS
capacitor charges, it limits the peak current allowed by the part
to prevent excessive overshoot at startup. Use the following
equation to determine the necessary value of the soft start
capacitor (C
) for a specific overshoot and start-up time when
SS
the part is at the current limit with maximum load:
(20)
) with
SS
(17)
After the compensation resistor is known, set the zero formed
by the compensation capacitor and resistor to one-fourth of the
crossover frequency, or
(18)
where C
is the compensation capacitor.
COMP
Figure 27. Compensation Components
where:
I
= 5.5 μA (typical).
SS
Δt is the start-up time at the current limit.
V
= 1.23 V (typical).
SS
If the applied load does not place the part at the current limit,
the value of C
can be reduced. A 68 nF soft start capacitor
SS
results in negligible input current overshoot at startup and,
therefore, is suitable for most applications. If an unusually large
output capacitor is used, a longer soft start period is required to
prevent input inrush current.
However, if fast startup is required, the soft start capacitor can
be reduced or removed, which allows the ADP1614 to start
quickly but with greater peak switch current.
Rev. 0 | Page 14 of 16
Page 15

Data Sheet ADP1614
10293-027
10293-028
PCB LAYOUT GUIDELINES
For high efficiency, good regulation, and stability, a well designed
PCB layout is required.
Use the following guidelines when designing PCBs (see Figure 25
for a block diagram and Figure 2 for a pin configuration).
• Keep the low ESR input capacitor (C
C4 in Figure 28, close to VIN and GND. This minimizes
noise injected into the part from board parasitic inductance.
• Keep the high current path from C
to SW and GND as short as possible.
• Keep the high current path from VIN through the inductor
(L1), the rectifier (D1), and the output capacitor (C
which is labeled as C7 in Figure 28, as short as possible.
• Keep high current traces as short and as wide as possible.
• Place the feedback resistors as close to FB as possible to
prevent noise pickup. Connect the ground of the feedback
network directly to an AGND plane that makes a Kelvin
connection to the GND pin.
• Place the compensation components as close as possible to
COMP. Connect the ground of the compensation network
directly to an AGND plane that makes a Kelvin connection
to the GND pin.
• Connect the soft start capacitor (C
C1 in Figure 28, as close as possible to the device. Connect
the ground of the soft start capacitor to an AGND plane
that makes a Kelvin connection to the GND pin.
• Connect the current limit set resistor (R
labeled as R4 in Figure 28, as close as possible to the device.
Connect the ground of the CL resistor to an AGND plane
that makes a Kelvin connection to the GND pin.
• The PCB must be properly designed to conduct the heat
away from the package. This is achieved by adding thermal
vias to the PCB, which provide a thermal path to the inner
or bottom layers. Thermal vias should be placed on the
PCB underneath the exposed pad of the LFCSP and in the
GND plane around the ADP1614 package to improve
thermal performance of the package.
Avoid routing high impedance traces from the compensation
and feedback resistors near any node connected to SW or near
the inductor to prevent radiated noise injection.
), which is labeled as
IN
through the L1 inductor
IN
OUT
), which is labeled as
SS
), which is
CL
),
Figure 28. ADP1614 Recommended Top Layer Layout for Boost Application
Figure 29. ADP1614 Recommended Bottom Layer Layout for Boost Application
Rev. 0 | Page 15 of 16
Page 16

ADP1614 Data Sheet
2.48
2.38
2.23
0.50
0.40
0.30
121009-A
TOP VIEW
10
1
6
5
0.30
0.25
0.20
BOTTOM VIEW
PIN 1 INDEX
AREA
SEATING
PLANE
0.80
0.75
0.70
1.74
1.64
1.49
0.20 REF
0.05 MAX
0.02 NOM
0.50 BSC
EXPOSED
PAD
3.10
3.00 SQ
2.90
PIN 1
INDICATOR
(R 0.15)
FOR PROPER CONNECTION OF
THE EXPOSED PAD, REFER TO
THE PIN CONFIGURATION AND
FUNCTION DESCRIPTIONS
SECTION OF THIS DATA SHEET.
ADP1614ACPZ-1.3-R7
−40°C to +125°C
1.3 MHz
10-Lead Lead Frame Chip Scale Package [LFCSP_WD]
CP-10-9
LM4
©2012 Analog Devices, Inc. All rights reserved. Trademarks and
OUTLINE DIMENSIONS
Figure 30. 10-Lead Lead Frame Chip Scale Package [LFCSP_WD]
3 mm × 3 mm Body, Very Very Thin, Dual Lead
(CP-10-9)
Dimensions shown in millimeters
ORDERING GUIDE
Temperature
Model1
Range
ADP1614ACPZ-650-R7 −40°C to +125°C 650 kHz 10-Lead Lead Frame Chip Scale Package [LFCSP_WD] CP-10-9 LM5
ADP1614-1.3-EVALZ 1.3 MHz Evaluation Board, 15 V Output Voltage Configuration
ADP1614-650-EVALZ 650 kHz Evaluation Board, 5 V Output Voltage Configuration
1
Z = RoHS Compliant Part.
Switching
Frequency
Package Description
Package
Option
Branding
registered trademarks are the property of their respective owners.
D10293-0-6/12(0)
Rev. 0 | Page 16 of 16
 Loading...