

Page 1
A
A
Six Degrees of Freedom Inertial Sensor
FEATURES
Tri-axis digital gyroscope with digital range scaling
±300°/sec, ±600°/sec, ±1200°/sec settings
Tight orthogonal alignment: 0.05°
Tri-axis digital accelerometer: ±18 g
Autonomous operation and data collection
No external configuration commands required
Start-up time: 180 ms
Sleep mode recovery time: 4 ms
Factory-calibrated sensitivity, bias, and axial alignment
Calibration temperature range: −40°C to +85°C
SPI-compatible serial interface
Wide bandwidth: 330 Hz
Embedded temperature sensor
Programmable operation and control
Automatic and manual bias correction controls
Bartlett window, FIR filter length, number of taps
Digital I/O: data ready, alarm indicator, general-purpose
Alarms for condition monitoring
Sleep mode for power management
DAC output voltage
Enable external sample clock input: up to 1.2 kHz
Single-command self-test
Single-supply operation: 4.75 V to 5.25 V
2000 g shock survivability
Operating temperature range: −40°C to +105°C
APPLICATIONS
Medical instrumentation
Robotics
Platform controls
Navigation
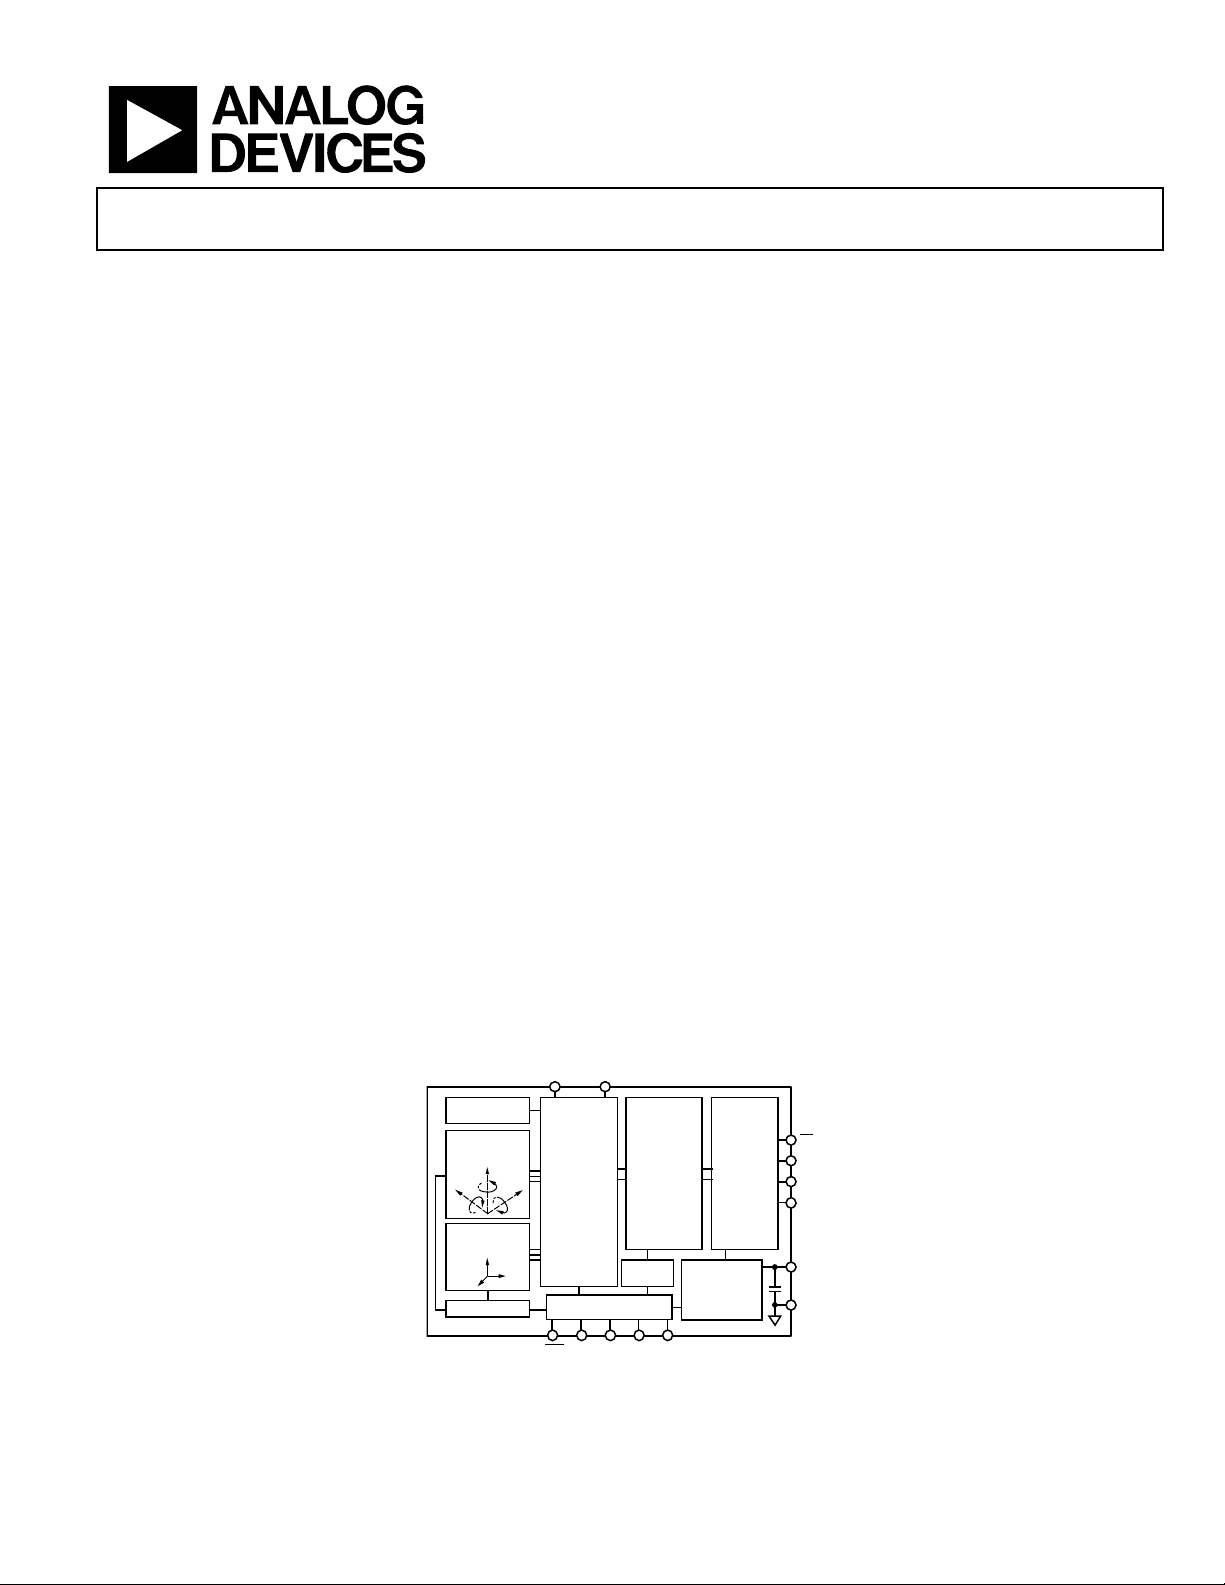
FUNCTIONAL BLOCK DIAGRAM
TEMPERATURE
SENSOR
MEMS
ANGULAR RATE
SENSOR
TRI-AXIS MEMS
ACCELERATIO N
SENSOR
SELF-TEST
ADIS16367
Rev. A
Information furnished by Analog Devices is believed to be accurate and reliable. However, no
responsibility is assumed by Anal og Devices for its use, nor for any infringements of patents or ot her
rights of third parties that may result from its use. Specifications subject to change without notice. No
license is granted by implication or otherwise under any patent or patent rights of Analog Devices.
Trademarks and registered trademarks are the property of their respective owners.
UX_
ADC
SIGNAL
CONDITIONI NG
AND
CONVERSIO N
CONTROL
RST
UX_
DAC
DIGI TAL
Figure 1.
ADIS16367
GENERAL DESCRIPTION
The ADIS16367 iSensor® is a complete inertial system that includes
a tri-axis gyroscope and tri-axis accelerometer. Each sensor in
the ADIS16367 combines industry-leading iMEMS® technology
with signal conditioning that optimizes dynamic performance.
The factory calibration characterizes each sensor for sensitivity,
bias, alignment, and linear acceleration (gyro bias). As a result, each
sensor has its own dynamic compensation formulas that provide
accurate sensor measurements over a temperature range of
−40°C to +85°C.
The ADIS16367 provides a simple, cost-effective method for
integrating accurate, multiaxis inertial sensing into industrial
systems, especially when compared with the complexity and
investment associated with discrete designs. All necessary motion
testing and calibration are part of the production process at the
factory, greatly reducing system integration time. Tight orthogonal
alignment simplifies inertial frame alignment in navigation
systems. An improved SPI interface and register structure provide
faster data collection and configuration control.
The ADIS16367 uses a compatible pinout and the same package
as the ADIS1635x family. Therefore, systems that currently use
the ADIS1635x family can upgrade their performance with minor
firmware adjustments in their processor designs.
This compact module is approximately 23 mm × 23 mm × 23 mm
and provides a flexible connector interface that enables multiple
mounting orientation options.
CALIBRATI ON
AND
DIGI TAL
PROCESSING
ALARMS
DIO4/
DIO3DIO2DIO1
CLKIN
One Technology Way, P.O. Box 9106, Norwood, MA 02062-9106, U.S.A.
Tel: 781.329.4700 www.analog.com
Fax: 781.461.3113 ©2010–2011 Analog Devices, Inc. All rights reserved.
OUTPUT
REGISTERS
AND SPI
INTERFACE
POWER
MANAGEMENT
CS
SCLK
DIN
DOUT
VCC
GND
08398-001
Page 2

ADIS16367
TABLE OF CONTENTS
Features.............................................................................................. 1
Applications....................................................................................... 1
General Description ......................................................................... 1
Functional Block Diagram .............................................................. 1
Revision History ............................................................................... 2
Specifications..................................................................................... 3
Timing Specifications .................................................................. 5
Timing Diagrams.......................................................................... 5
Absolute Maximum Ratings............................................................ 6
ESD Caution.................................................................................. 6
Pin Configuration and Function Descriptions............................. 7
Typical Performance Characteristics ............................................. 8
Theory of Operation ........................................................................ 9
Basic Operation ............................................................................ 9
Reading Sensor Data.................................................................... 9
Device Configuration .................................................................. 9
Memory Map .............................................................................. 10
Burst Read Data Collection ...................................................... 11
Output Data Registers ............................................................... 11
Calibration................................................................................... 12
Operational Control................................................................... 12
Input/Output Functions............................................................ 14
Diagnostics.................................................................................. 15
Product Identification................................................................ 16
Applications Information.............................................................. 17
Installation/Handling................................................................. 17
Gyroscope Bias Optimization................................................... 17
Input ADC Channel................................................................... 17
Interface Printed Circuit Board (PCB).................................... 17
Outline Dimensions....................................................................... 18
Ordering Guide .......................................................................... 18
REVISION HISTORY
2/11—Rev. 0 to Rev. A
Changes to Gyroscopes Misalignment and Accelerometers
Misalignment Test Conditions/Comments, Table 1 .................... 3
Changes to Table 30 and Table 31 ................................................ 16
1/10—Revision 0: Initial Version
Rev. A | Page 2 of 20
Page 3

ADIS16367
SPECIFICATIONS
TA = 25°C, VCC = 5.0 V, angular rate = 0°/sec, dynamic range = ±300°/sec ± 1 g, unless otherwise noted.
Table 1.
Parameter Test Conditions/Comments Min Typ Max Unit
GYROSCOPES
Dynamic Range ±1200 ±1400 °/sec
Initial Sensitivity Dynamic range = ±1200°/sec 0.198 0.2 0.202 °/sec/LSB
Dynamic range = ±600°/sec 0.1 °/sec/LSB
Dynamic range = ±300°/sec 0.05 °/sec/LSB
Sensitivity Temperature Coefficient −40°C ≤ TA ≤ +85°C ±40 ppm/°C
Misalignment Axis-to-axis ±0.05 Degrees
Axis-to-frame (package) ±0.5 Degrees
Nonlinearity Best-fit straight line ±0.1 % of FS
Initial Bias Error ±1 σ ±3 °/sec
In-Run Bias Stability 1 σ, SMPL_PRD = 0x0001 0.013 °/sec
Angular Random Walk 1 σ, SMPL_PRD = 0x0001 2.0 °/√hr
Bias Temperature Coefficient −40°C ≤ TA ≤ +85°C ±0.01 °/sec/°C
Linear Acceleration Effect on Bias Any axis, 1 σ (MSC_CTRL[7] = 1) 0.075 °/sec/g
Bias Voltage Sensitivity VCC = 4.75 V to 5.25 V ±0.3 °/sec/V
Output Noise ±1200°/sec range, no filtering 0.8 °/sec rms
Rate Noise Density f = 25 Hz, ±1200°/sec range, no filtering 0.044 °/sec/√Hz rms
3 dB Bandwidth 330 Hz
Sensor Resonant Frequency 14.5 kHz
Self-Test Change in Output Response ±1200°/sec range setting ±170 ±350 ±625 LSB
ACCELEROMETERS Each axis
Dynamic Range ±18
Initial Sensitivity 3.285 3.33 3.38 mg/LSB
Sensitivity Temperature Coefficient −40°C ≤ TA ≤ +85°C ±50 ppm/°C
Misalignment Axis-to-axis 0.2 Degrees
Axis-to-frame (package) ±0.5 Degrees
Nonlinearity Best-fit straight line 0.1 % of FS
Initial Bias Error ±1 σ ±50 mg
In-Run Bias Stability 1 σ 0.2 mg
Velocity Random Walk 1 σ 0.2 m/sec/√hr
Bias Temperature Coefficient −40°C ≤ TA ≤ +85°C ±0.3 mg/°C
Bias Voltage Sensitivity VCC = 4.75 V to 5.25 V 2.5 mg/V
Output Noise No filtering 9 mg rms
Noise Density No filtering 0.5 mg/√Hz rms
3 dB Bandwidth 330 Hz
Sensor Resonant Frequency 5.5 kHz
Self-Test Change in Output Response X-axis and y-axis 59 151 LSB
TEMPERATURE SENSOR
Scale Factor Output = 0x0000 at 25°C (±5°C) 0.136 °C/LSB
ADC INPUT
Resolution 12 Bits
Integral Nonlinearity ±2 LSB
Differential Nonlinearity ±1 LSB
Offset Error ±4 LSB
Gain Error ±2 LSB
Input Range 0 3.3 V
Input Capacitance During acquisition 20 pF
g
Rev. A | Page 3 of 20
Page 4

ADIS16367
Parameter Test Conditions/Comments Min Typ Max Unit
DAC OUTPUT 5 kΩ/100 pF to GND
Resolution 12 Bits
Relative Accuracy 101 LSB ≤ input code ≤ 4095 LSB ±4 LSB
Differential Nonlinearity ±1 LSB
Offset Error ±5 mV
Gain Error ±0.5 %
Output Range 0 3.3 V
Output Impedance 2 Ω
Output Settling Time 10 μs
LOGIC INPUTS1
Input High Voltage, VIH 2.0 V
Input Low Voltage, VIL 0.8 V
CS Wake-Up Pulse Width
Logic 1 Input Current, IIH V
Logic 0 Input Current, IIL V
All Pins Except RST
RST Pin
signal to wake up from sleep mode
CS
20 μs
= 3.3 V ±0.2 ±10 μA
IH
= 0 V
IL
40 60 μA
1 mA
Input Capacitance, CIN 10 pF
DIGITAL OUTPUTS1
Output High Voltage, VOH I
Output Low Voltage, VOL I
= 1.6 mA 2.4 V
SOURCE
= 1.6 mA 0.4 V
SINK
FLASH MEMORY Endurance2 10,000 Cycles
Data Retention3 T
= 85°C 20 Years
J
FUNCTIONAL TIMES4 Time until data is available
Power-On, Start-Up Time Normal mode, SMPL_PRD ≤ 0x09 180 ms
Low power mode, SMPL_PRD ≥ 0x0A 250 ms
Reset Recovery Time Normal mode, SMPL_PRD ≤ 0x09 60 ms
Low power mode, SMPL_PRD ≥ 0x0A 130 ms
Sleep Mode Recovery Time Normal mode, SMPL_PRD ≤ 0x09 4 ms
Low power mode, SMPL_PRD ≥ 0x0A 9 ms
Flash Memory Test Time Normal mode, SMPL_PRD ≤ 0x09 17 ms
Low power mode, SMPL_PRD ≥ 0x0A 90 ms
Automatic Self-Test Time SMPL_PRD = 0x0001 12 ms
CONVERSION RATE SMPL_PRD = 0x0001 to 0x00FF 0.413 819.2 SPS
Clock Accuracy ±3 %
Sync Input Clock5 0.8 1.2 kHz
POWER SUPPLY Operating voltage range, VCC 4.75 5.0 5.25 V
Power Supply Current Low power mode 24 mA
Normal mode 49 mA
Sleep mode 500 μA
1
The digital I/O signals are driven by an internal 3.3 V supply, and the inputs are 5 V tolerant.
2
Endurance is qualified as per JEDEC Standard 22, Method A117, and measured at −40°C, +25°C, +85°C, and +125°C.
3
The data retention lifetime equivalent is at a junction temperature (TJ) of 85°C as per JEDEC Standard 22, Method A117. Data retention lifetime decreases with junction
temperature.
4
These times do not include thermal settling and internal filter response times (330 Hz bandwidth), which may affect overall accuracy.
5
The sync input clock functions below the specified minimum value, at reduced performance levels.
0.55 V
Rev. A | Page 4 of 20
Page 5
ADIS16367
TIMING SPECIFICATIONS
TA = 25°C, VCC = 5 V, unless otherwise noted.
Table 2.
Normal Mode
(SMPL_PRD ≤ 0x09)
Parameter Description Min1 Typ Max Mi n1 Typ Max Min1 Typ Max Unit
f
Serial clock 0.01 2.0 0.01 0.3 0.01 1.0 MHz
SCLK
t
Stall period between data 9 75 1/f
STALL
t
Read rate 40 100 μs
READRATE
tCS Chip select to clock edge 48.8 48.8 48.8 ns
t
DOUT valid after SCLK edge 100 100 100 ns
DAV
t
DIN setup time before SCLK rising edge 24.4 24.4 24.4 ns
DSU
t
DIN hold time after SCLK rising edge 48.8 48.8 48.8 ns
DHD
t
, t
SCLKR
SCLK rise/fall times 5 12.5 5 12.5 5 12.5 ns
SCLKF
tDR, tDF DOUT rise/fall times 5 12.5 5 12.5 5 12.5 ns
t
SFS
t
1
high after SCLK edge
CS
Input sync positive pulse width 5 5 μs
5 5 5 ns
tx Input sync low time 100 100 μs
t
2
t
3
1
Guaranteed by design and characterization, but not tested in production.
Input sync to data-ready output 600 600 μs
Input sync period 833 833 μs
Low Power Mode
(SMPL_PRD ≥ 0x0A) Burst Read
μs
SCLK
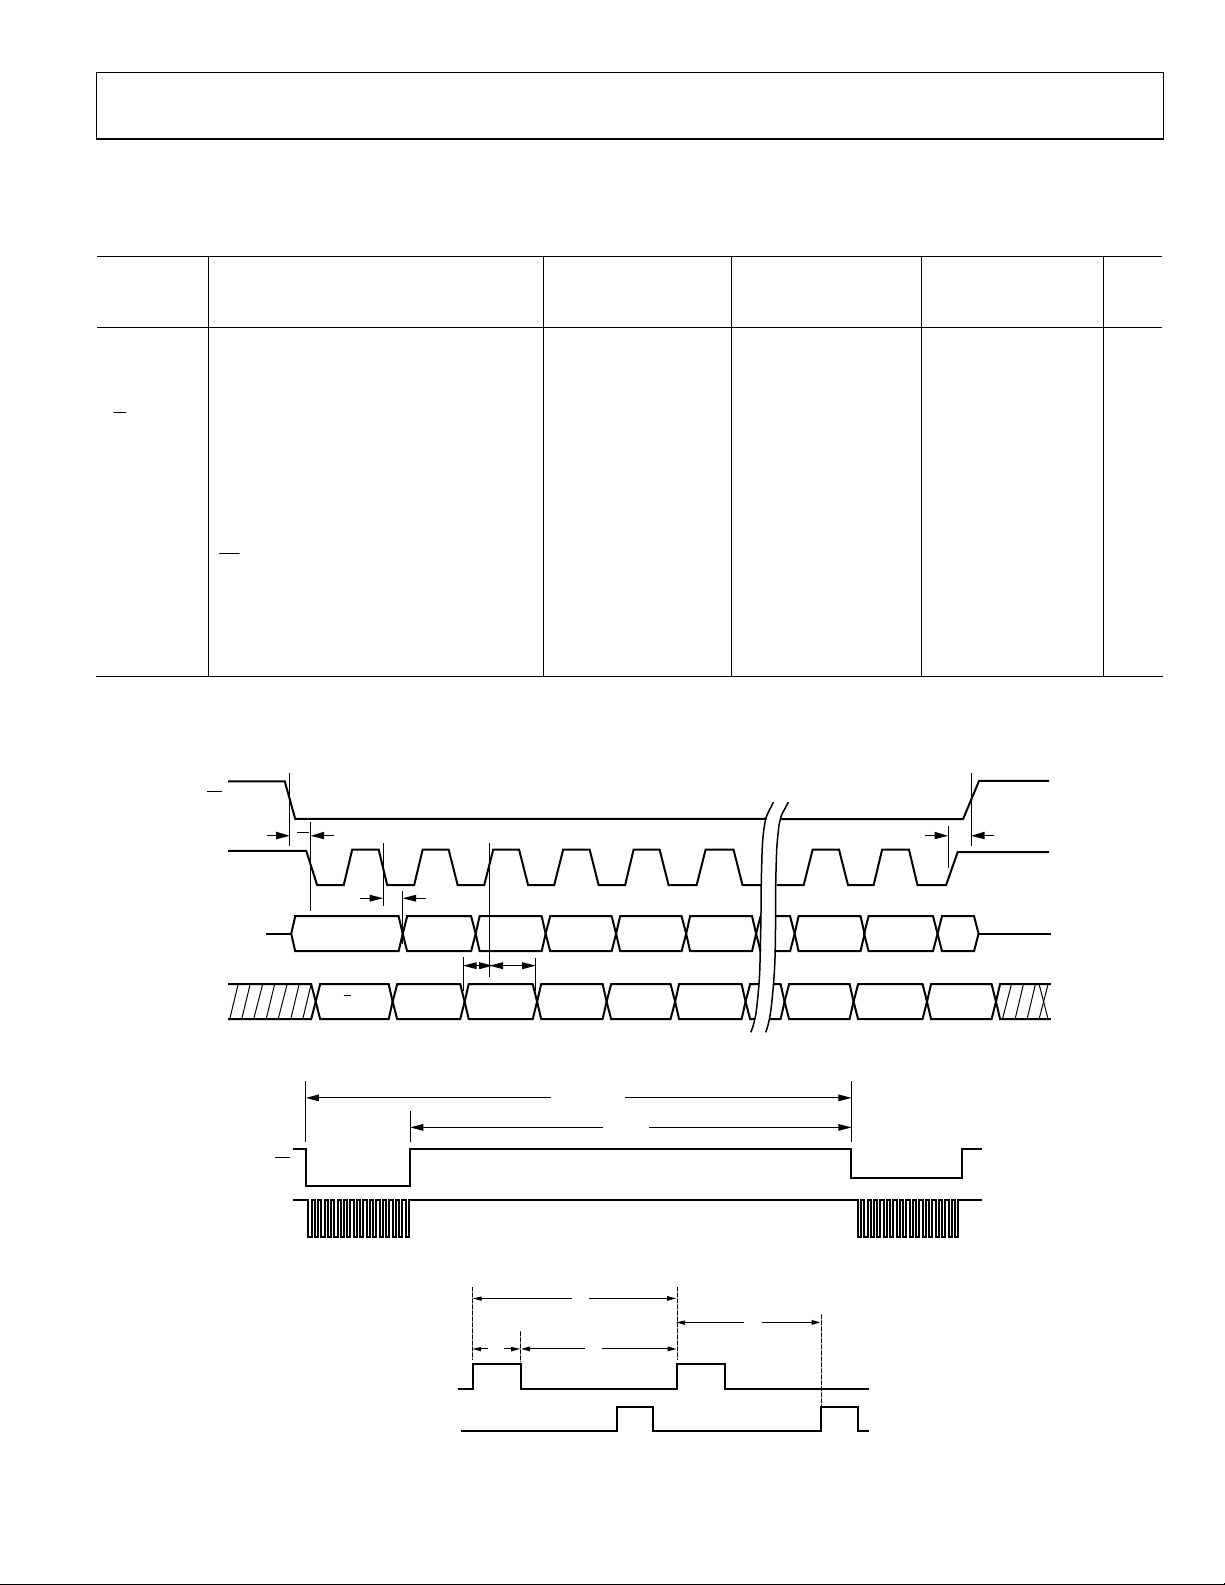
TIMING DIAGRAMS
CS
SCLK
DOUT
DIN
CS
SCLK
t
CS
1 2 3 4 5 6 15 16
t
DAV
MSB DB14
R/W A5A6 A4 A3 A2
DB13 DB12 DB10DB11 DB2 L SBDB1
t
DSU
t
DHD
D2
Figure 2. SPI Timing and Sequence
t
READRATE
t
STALL
Figure 3. Stall Time and Data Rate
t
3
t
2
t
X
SYNC
CLOCK (DIO 4)
DATA
READY
t
1
Figure 4. Input Clock Timing Diagram
Rev. A | Page 5 of 20
D1 LSB
08398-004
t
SFS
08398-002
08398-003
Page 6
ADIS16367
ABSOLUTE MAXIMUM RATINGS
Table 3.
Parameter Rating
Acceleration
Any Axis, Unpowered 2000 g
Any Axis, Powered 2000 g
VCC to GND −0.3 V to +6.0 V
Digital Input Voltage to GND −0.3 V to +5.3 V
Digital Output Voltage to GND −0.3 V to VCC + 0.3 V
Analog Input to GND −0.3 V to +3.6 V
Operating Temperature Range −40°C to +105°C
Storage Temperature Range −65°C to +125°C
1
Extended exposure to temperatures outside the specified temperature
range of −40°C to +105°C can adversely affect the accuracy of the factory
calibration. For best accuracy, store the parts within the specified operating
range of −40°C to +105°C.
2
Although the device is capable of withstanding short-term exposure to
150°C, long-term exposure threatens internal mechanical integrity.
1, 2
Stresses above those listed under Absolute Maximum Ratings
may cause permanent damage to the device. This is a stress
rating only; functional operation of the device at these or any
other conditions above those indicated in the operational
section of this specification is not implied. Exposure to absolute
maximum rating conditions for extended periods may affect
device reliability.
Table 4. Package Characteristics
Package Type θJA θ
24-Lead Module (ML-24-2) 39.8°C/W 14.2°C/W 16 grams
ESD CAUTION
Device
JC
Weight
Rev. A | Page 6 of 20
Page 7

ADIS16367
PIN CONFIGURATION AND FUNCTION DESCRIPTIONS
DIO3
SCLK
DIN
DIO1
DIO2
VCC
GND
GND
DNC
DNC
AUX_ADC
DNC
1
23456789101112131415161718192021222324
CS
RST
VCC
VCC
DNC
DNC
DNC
AUX_DAC
DNC
08398-005
DOUT
DIO4/CLKIN
NOTES
1. THIS REPRESENTATION DISPLAYS THE TOP VIEW PINOUT
FOR THE MATI NG SOCKET CONNECTOR.
2. THE ACTUAL CONNECTOR PINS ARE NOT VISIBLE FROM THE TOP VIEW.
3. MATING CONNECTOR: SAMTEC CLM-112-02 OR EQUI VALENT.
4. DNC = DO NOT CONNECT.
GND
ADIS16367
TOP VIEW
(Not to Scale)
Figure 5. Pin Configuration
Z-AXIS
a
Z
g
Z
Y-AXIS
a
Y
g
Y
PIN 23
PIN 1
NOTES
1. ACCELERATI ON (
INDICATE THE DIRECTION OF MOT ION THAT P RODUCES
A POSITIVE OUTPUT.
ORIGIN ALIGNMENT REFERENCE POINT
SEE MSC_CTRL[ 6].
a
,
a
,
a
) AND ROTATIO NAL (
X
Y
Z
g
,
g
,
g
) ARROWS
X
Y
Z
X-AXIS
a
X
g
X
08398-006
Figure 6. Axial Orientation
Table 5. Pin Function Descriptions
Pin No. Mnemonic Type1 Description
1 DIO3 I/O Configurable Digital Input/Output.
2 DIO4/CLKIN I/O Configurable Digital Input/Output or Sync Clock Input.
3 SCLK I SPI Serial Clock.
4 DOUT O SPI Data Output. Clocks output on SCLK falling edge.
5 DIN I SPI Data Input. Clocks input on SCLK rising edge.
6
CS
I SPI Chip Select.
7, 9 DIO1, DIO2 I/O Configurable Digital Input/Output.
8
RST
I Reset.
10, 11, 12 VCC S Power Supply.
13, 14, 15 GND S Power Ground.
16, 17, 18, 19, 22, 23, 24 DNC N/A Do Not Connect.
20 AUX_DAC O Auxiliary, 12-Bit DAC Output.
21 AUX_ADC I Auxiliary, 12-Bit ADC Input.
1
I/O is input/output, I is input, O is output, S is supply, and N/A is not applicable.
Rev. A | Page 7 of 20
Page 8

ADIS16367
A
TYPICAL PERFORMANCE CHARACTERISTICS
0.1
0.01
+1σ
MEAN
–1σ
)
g
0.01
0.001
LLAN VARIANCE (°/sec)
ROOT
0.001
0.1 1 10 100 1k 10k
Tau (Seconds)
Figure 7. Gyroscope Allan Variance
ROOT ALL AN VARIANCE (
0.0001
0.1 1 10 100 1k 10k
08398-007
Tau (S econds)
Figure 8. Accelerometer Allan Variance
+1σ
–1σ
MEAN
08398-008
Rev. A | Page 8 of 20
Page 9

ADIS16367
THEORY OF OPERATION
BASIC OPERATION
The ADIS16367 is an autonomous sensor system that starts up
after it has a valid power supply voltage and begins producing
inertial measurement data at the factory default sample rate
setting of 819.2 SPS. After each sample cycle, the sensor data is
loaded into the output registers, and DIO1 pulses high, which
provides a new data-ready control signal for driving systemlevel interrupt service routines. In a typical system, a master
processor accesses the output data registers through the SPI
interface, using the connection diagram shown in Figure 9.
Tabl e 6 provides a generic functional description for each pin
on the master processor. Ta b le 7 describes the typical master
processor settings that are normally found in a configuration
register and used for communicating with the ADIS16367.
I/O LI NES ARE COMPATI BLE WIT H
3.3V OR 5V LOGIC LEVELS
VDD
SYSTEM
PROCESSOR
SPI MASTER
SS
SCLK
MOSI
MISO
IRQ DIO1
6
3
5
4
7
Figure 9. Electrical Connection Diagram
Table 6. Generic Master Processor Pin Names and Functions
Pin Name Function
SS
Slave select
SCLK Serial clock
MOSI Master output, slave input
MISO Master input, slave output
IRQ Interrupt request
Table 7. Generic Master Processor SPI Settings
Processor Setting Description
Master The ADIS16367 operates as a slave
SCLK Rate ≤ 2 MHz1 Normal mode, SMPL_PRD[7:0] ≤ 0x09
SPI Mode 3 CPOL = 1 (polarity), CPHA = 1 (phase)
MSB First Mode Bit sequence
16-Bit Mode Shift register/data length
1
For burst read, SCLK rate ≤ 1 MHz. For low power mode, SCLK rate ≤ 300 kHz.
CS
SCLK
DIN
DOUT
NOTES
1. THE DOUT BIT PATT ERN REFLECT S THE ENTI RE CONTENT S OF T HE REGIST ER IDENTIFIED BY [A6:A0] AND [R/W = 0]
IN THE PREVIOUS SEQUENCE.
2. IF R/W = 1 DURING T HE PREVIOUS SEQUENCE, DOUT IS NO T DEFINED.
R/W
A6 A5 A4 A3 A2 A1 A0 DC7 DC6 DC5 DC4 DC3 DC2 DC1 DC0
D14
D15
10
CS
SCLK
DIN
DOUT
13 14 15
5V
11 12
ADIS16367
SPI SLAVE
08398-009
Figure 11. SPI Communication Bit Sequence
Rev. A | Page 9 of 20
The user registers provide addressing for all input/output
operations on the SPI interface. Each 16-bit register has two
7-bit addresses: one for its upper byte and one for its lower byte.
Tabl e 8 lists the lower byte address for each register, and Figure 10
shows the generic bit assignments.
15 14 13 12 11 10 9 8 7 6 5 4 3 2 1 0
UPPER BYTE
LOWER BYTE
Figure 10. Generic Register Bit Assignments
READING SENSOR DATA
Although the ADIS16367 produces data independently, it
operates as a SPI slave device that communicates with system
(master) processors using the 16-bit segments displayed in
Figure 11. Individual register reads require two of these 16-bit
sequences. The first 16-bit sequence contains the read command
R
bit (
/W = 0) and the target register address (A6 to A0); the last
eight bits are “don’t care” bits when requesting a read. The second
16-bit sequence transmits the register contents (D15 to D0) on
the DOUT line. For example, if DIN = 0x0A00, the contents of
XACCL_OUT are shifted out on the DOUT line during the
next 16-bit sequence.
The SPI operates in full-duplex mode, which means that the master
processor can read the output data from DOUT while using the
same SCLK pulses to transmit the next target address on DIN.
DEVICE CONFIGURATION
The user register memory map (see Tabl e 8) identifies
configuration registers with either a W or R/W. Configuration
commands also use the bit sequence shown in Figure 11. If the
MSB = 1, the last eight bits (DC7 to DC0) in the DIN sequence
are loaded into the memory address associated with the address
bits (A6 to A0). For example, if DIN = 0xA11F, 0x1F is loaded
into Address 0x21 (XACCL_OFF, upper byte) at the conclusion
of the data frame.
The master processor initiates the backup function by setting
GLOB_CMD[3] = 1 (DIN = 0xBE04). This command copies
the user registers into their assigned flash memory locations
and requires the power supply to stay within its normal operating
range for the entire 50 ms process. The FLASH_CNT register
provides a running count of these events for monitoring the
long-term reliability of the flash memory.
R/W
A6 A5
D0D1D2D3D4D5D6D7D8D9D10D11D12D13
D13D14D15
08398-011
08398-010
Page 10

ADIS16367
MEMORY MAP
Table 8. User Register Memory Map
Name User Access Flash Backup Address1 Default Register Description Bit Function
FLASH_CNT Read only Yes 0x00 N/A Flash memory write count N/A
SUPPLY_OUT Read only No 0x02 N/A Power supply measurement See Table 9
XGYRO_OUT Read only No 0x04 N/A X-axis gyroscope output See Table 9
YGYRO_OUT Read only No 0x06 N/A Y-axis gyroscope output See Table 9
ZGYRO_OUT Read only No 0x08 N/A Z-axis gyroscope output See Table 9
XACCL_OUT Read only No 0x0A N/A X-axis accelerometer output See Table 9
YACCL_OUT Read only No 0x0C N/A Y-axis accelerometer output See Table 9
ZACCL_OUT Read only No 0x0E N/A Z-axis accelerometer output See Table 9
XTEMP_OUT Read only No 0x10 N/A X-axis gyroscope temperature output See Table 9
YTEMP_OUT Read only No 0x12 N/A Y-axis gyroscope temperature output See Table 9
ZTEMP_OUT Read only No 0x14 N/A Z-axis gyroscope temperature output See Table 9
AUX_ADC Read only No 0x16 N/A Auxiliary ADC output See Table 9
Reserved N/A N/A 0x18 N/A Reserved N/A
XGYRO_OFF Read/write Yes 0x1A 0x0000 X-axis gyroscope bias offset factor See Table 15
YGYRO_OFF Read/write Yes 0x1C 0x0000 Y-axis gyroscope bias offset factor See Table 15
ZGYRO_OFF Read/write Yes 0x1E 0x0000 Z-axis gyroscope bias offset factor See Table 15
XACCL_OFF Read/write Yes 0x20 0x0000 X-axis acceleration bias offset factor See Table 16
YACCL_OFF Read/write Yes 0x22 0x0000 Y-axis acceleration bias offset factor See Table 16
ZACCL_OFF Read/write Yes 0x24 0x0000 Z-axis acceleration bias offset factor See Table 16
ALM_MAG1 Read/write Yes 0x26 0x0000 Alarm 1 amplitude threshold See Table 27
ALM_MAG2 Read/write Yes 0x28 0x0000 Alarm 2 amplitude threshold See Table 27
ALM_SMPL1 Read/write Yes 0x2A 0x0000 Alarm 1 sample size See Table 28
ALM_SMPL2 Read/write Yes 0x2C 0x0000 Alarm 2 sample size See Table 28
ALM_CTRL Read/write Yes 0x2E 0x0000 Alarm control See Table 29
AUX_DAC Read/write No 0x30 0x0000 Auxiliary DAC data See Table 23
GPIO_CTRL Read/write No 0x32 0x0000 Auxiliary digital input/output control See Table 21
MSC_CTRL Read/write Yes 0x34 0x0006 Data-ready, self-test, miscellaneous See Table 22
SMPL_PRD Read/write Yes 0x36 0x0001 Internal sample period (rate) control See Table 18
SENS_AVG Read/write Yes 0x38 0x0402 Dynamic range and digital filter control See Table 20
SLP_CNT Write only No 0x3A 0x0000 Sleep mode control See Table 19
DIAG_STAT Read only No 0x3C 0x0000 System status See Table 26
GLOB_CMD Write only N/A 0x3E 0x0000 System command See Table 17
Reserved N/A N/A 0x40 to 0x51 N/A Reserved N/A
LOT_ID1 Read only Yes 0x52 N/A Lot Identification Code 1 See Table 32
LOT_ID2 Read only Yes 0x54 N/A Lot Identification Code 2 See Table 32
PROD_ID Read only Yes 0x56 0x3FEF Product identification See Table 32
SERIAL_NUM Read only Yes 0x58 N/A Serial number See Table 32
1
Each register contains two bytes. The address of the lower byte is displayed. The address of the upper byte is equal to the address of the lower byte plus 1.
Rev. A | Page 10 of 20
Page 11

ADIS16367
BURST READ DATA COLLECTION
Burst read data collection is a process-efficient method for
collecting data from the ADIS16367. In the burst read, all
output registers are clocked out on DOUT, 16 bits at a time, in
sequential data cycles (each separated by one SCLK period). To
start a burst read sequence, set DIN = 0x3E00. The contents of
each output register are then shifted out on DOUT, starting
with SUPPLY_OUT and ending with AUX_ADC (see Figure 13)
according to their address (see Table 8 ).
OUTPUT DATA REGISTERS
Each output data register uses the format in Figure 12 and Tabl e 9 .
Figure 6 shows the positive direction for each inertial sensor. The
ND bit is equal to 1 when the register contains unread data. The EA
bit is high when any error/alarm flag in the DIAG_STAT register is
equal to 1.
MSB FOR 14-BIT OUTPUT
ND EA
MSB FOR 12-BIT OUTPUT
Figure 12. Output Data Register Bit Assignments
Table 9. Output Data Register Formats
Register Bits Scale Reference
SUPPLY_OUT 12 2.418 mV See Table 10
XGYRO_OUT1 14 0.2°/sec See Table 11
YGYRO_OUT1 14 0.2°/sec See Table 11
ZGYRO_OUT1 14 0.2°/sec See Table 11
XACCL_OUT 14 3.333 mg See Table 12
YACCL_OUT 14 3.333 mg See Table 12
ZACCL_OUT 14 3.333 mg See Table 12
XTEMP_OUT2 12 0.136°C See Table 13
YTEMP_OUT2 12 0.136°C See Table 13
ZTEMP_OUT2 12 0.136°C See Table 13
AUX_ADC 12 805.8 μV See Table 14
1
Assumes that the scaling is set to ±1200°/sec. This factor scales with the range.
2
0x0000 = 25°C (±5°C).
Table 10. Power Supply, Offset Binary Format
Supply Voltage Decimal Hex Binary
5.25 V 2171 LSB 0x87B XXXX 1000 0111 1011
5.002418 V 2069 LSB 0x815 XXXX 1000 0001 0101
5 V 2068 LSB 0x814 XXXX 1000 0001 0100
4.997582 V 2067 LSB 0x813 XXXX 1000 0001 0011
4.75 V 1964 LSB 0x7AC XXXX 0111 1010 1100
123 12
8398-013
Table 11. Rotation Rate, Twos Complement Format
Rotation Rate Decimal Hex Binary
+1200°/sec +6000 LSB 0x1770 XX01 0111 0111 0000
+0.4°/sec +2 LSB 0x0002 XX00 0000 0000 0010
+0.2°/sec +1 LSB 0x0001
0°/sec 0 LSB 0x0000
−0.2°/sec −1 LSB 0x3FFF
−0.4°/sec −2 LSB 0x3FFE
XX00 0000 0000 0001
XX00 0000 0000 0000
XX11 1111 1111 1111
XX11 1111 1111 1110
−1200°/sec −6000 LSB 0x2890 XX10 1000 1001 0000
Table 12. Acceleration, Twos Complement Format
Acceleration Decimal Hex Binary
+18 g +5401 LSB 0x1519 XX01 0101 0001 1001
+6.667 mg +2 LSB 0x0002 XX00 0000 0000 0010
+3.333 mg +1 LSB 0x0001
0 g 0 LSB 0x0000
−3.333 mg −1 LSB 0x3FFF
−6.667 mg −2 LSB 0x3FFE
XX00 0000 0000 0001
XX00 0000 0000 0000
XX11 1111 1111 1111
XX11 1111 1111 1110
−18 g −5401 LSB 0x2AE7 XX10 1010 1110 0111
Table 13. Temperature, Twos Complement Format
Temperature Decimal Hex Binary
+105°C +588 LSB 0x24C XXXX 0010 0100 1100
+85°C +441 LSB 0x1B9 XXXX 0001 1011 1001
+25.272°C +2 LSB 0x002
+25.136°C +1 LSB 0x001
+25°C 0 LSB 0x000
+24.864°C −1 LSB 0xFFF
+24.728°C −2 LSB 0xFFE
XXXX 0000 0000 0010
XXXX 0000 0000 0001
XXXX 0000 0000 0000
XXXX 1111 1111 1111
XXXX 1111 1111 1110
−40°C −478 LSB 0xE22 XXXX 1110 0010 0010
Table 14. Analog Input, Offset Binary Format
Input Voltage Decimal Hex Binary
3.3 V 4095 LSB 0xFFF XXXX 1111 1111 1111
1 V 1241 LSB 0x4D9 XXXX 0100 1101 1001
1.6116 mV 2 LSB 0x002
805.8 μV 1 LSB 0x001
XXXX 0000 0000 0010
XXXX 0000 0000 0001
0 V 0 LSB 0x000 XXXX 0000 0000 0000
45CS
SCLK
DIN
DOUT
NOTES
1. THE DOUT LINE HAS BEEN SI MPLIF IED FOR SPACE CONSTRAINT S BUT, IDEALLY, S HOULD INCLUDE ALL REGI STERS FRO M SUPPLY_O UT
THROUGH AUX_ADC.
0x3E00
PREVIOUS
DON’T CARE
SUPPLY_OUT XGYRO_OUT
Figure 13. Burst Read Sequence
Rev. A | Page 11 of 20
YGYRO_OUT ZGYRO_OUT
AUX_ADC
08398-012
Page 12

ADIS16367
CALIBRATION
Manual Bias Calibration
The bias offset registers in Tabl e 15 and Tabl e 1 6 provide a
manual adjustment function for the output of each sensor. For
example, if XGYRO_OFF = 0x1FF6 (DIN = 0x9B1F, 0x9AF6),
the XGYRO_OUT offset shifts by −10 LSBs, or −0.5°/sec.
Table 15. XGYRO_OFF, YGYRO_OFF, ZGYRO_OFF
Bit Descriptions
Bit Description (Default = 0x0000)
[15:13] Not used.
[12:0]
Table 16. XACCL_OFF, YACCL_OFF, ZACCL_OFF
Bit Descriptions
Bit Description (Default = 0x0000)
[15:12] Not used.
[11:0]
Gyroscope Automatic Bias Null Calibration
Set GLOB_CMD[0] = 1 (DIN = 0xBE01) to execute the automatic
bias null calibration function. This function measures all three
gyroscope output registers and then loads each gyroscope offset
register with the opposite value to provide a quick bias calibration.
All sensor data is then reset to 0, and the flash memory is
updated automatically within 50 ms (see Tabl e 17 ).
Gyroscope Precision Automatic Bias Null Calibration
Set GLOB_CMD[4] = 1 (DIN = 0xBE10) to execute the precision
automatic bias null calibration function. This function takes the
sensor offline for 30 sec while it collects a set of data and calculates
more accurate bias correction factors for each gyroscope. After
this function is executed, the newly calculated correction factor
is loaded into the gyroscope offset registers, all sensor data is
reset to 0, and the flash memory is updated automatically within
50 ms (see Tabl e 1 7 ).
Data bits. Twos complement, 0.05°/sec per LSB.
Typical adjustment range = ±200°/sec.
Data bits. Twos complement, 3.333 mg/LSB.
Typical adjustment range = ±6.75 g.
Restoring Factory Calibration
Set GLOB_CMD[1] = 1 (DIN = 0xBE02) to execute the factory
calibration restore function. This function resets each user
calibration register to 0x0000 (see Tab l e 1 5 and Tab l e 1 6 ), resets
all sensor data to 0, and automatically updates the flash memory
within 50 ms (see Table 1 7).
Linear Acceleration Bias Compensation (Gyroscope)
Set MSC_CTRL[7] = 1 (DIN = 0xB486) to enable correction for
low frequency acceleration influences on gyroscope bias. The
DIN sequence also preserves the factory default condition for
the data-ready function (see Tabl e 22 ).
OPERATIONAL CONTROL
Global Commands
The GLOB_CMD register provides trigger bits for several useful
functions. Setting the assigned bit to 1 starts each operation,
which returns the bit to 0 after completion. For example, set
GLOB_CMD[7] = 1 (DIN = 0xBE80) to execute a software reset,
which stops the sensor operation and runs the device through
its start-up sequence. This sequence includes loading the control
registers with the data in their respective flash memory locations
prior to producing new data. Reading the GLOB_CMD register
(DIN = 0x3E00) starts the burst read sequence.
Table 17. GLOB_CMD Bit Descriptions
Bits Description
[15:8] Not used
[7] Software reset command
[6:5] Not used
[4] Precision autonull command
[3]
[2] Auxiliary DAC data latch (see Table 24)
[1] Factory calibration restore command
[0] Autonull command
Flash update command (see the Device Configuration
section)
Rev. A | Page 12 of 20
Page 13

ADIS16367
Internal Sample Rate
The SMPL_PRD register provides discrete sample rate settings
using the bit assignments in Tabl e 18 and the following equation:
t
= tB × (NS + 1)
S
For example, when SMPL_PRD[7:0] = 0x0A, the sample rate is
149 SPS.
Table 18. SMPL_PRD Bit Descriptions
Bits Description (Default = 0x0001)
[15:8] Not used
[7] Time base (tB)
0 = 0.61035 ms, 1 = 18.921 ms
[6:0] Increment setting (NS)
Internal sample period = tS = tB × (NS + 1)
The default sample rate setting of 819.2 SPS preserves the sensor
bandwidth and provides optimal performance. For systems that
value slower sample rates, keep the internal sample rate at
819.2 SPS. Use the programmable filter (SENS_AVG) to reduce
the bandwidth, which helps to prevent aliasing. The data-ready
function (MSC_CTRL) can drive an interrupt routine that uses
a counter to help ensure data coherence at the reduced rates.
Power Management
Setting SMPL_PRD ≥ 0x0A also sets the sensor to low power
mode. For systems that require lower power dissipation, insystem characterization helps users to quantify the associated
performance trade-offs. In addition to sensor performance, this
mode affects SPI data rates (see Tab l e 2 ). Set SLP_CNT[8] = 1
(DIN = 0xBB01) to start the indefinite sleep mode, which requires
CS
a
assertion (high to low), reset, or power cycle to wake up.
Use SLP_CNT[7:0] to put the device into sleep mode for a
specified period. For example, SLP_CNT[7:0] = 0x64
(DIN = 0xBA64) puts the ADIS16367 to sleep for 50 sec.
Digital Filtering
The N blocks in Figure 14 are part of the programmable low-pass
filter, which provides additional noise reduction on the inertial
sensor outputs. This filter contains two cascaded averaging filters
that provide a Bartlett window, FIR filter response (see Figure 15).
For example, set SENS_AVG[2:0] = 100 (DIN = 0xB804) to set
each stage to 16 taps. When used with the default sample rate
of 819.2 SPS, this value reduces the sensor bandwidth to
approximately 16 Hz.
0
–20
–40
–60
–80
MAGNITUDE (dB)
–100
N = 2
–120
–140
N = 4
N = 16
N = 64
0.001 0.01 0.1 1
Figure 15. Bartlett Window, FIR Filter Frequency Response
FREQUENCY (Rat io)
(Phase Delay = N Samples)
08398-015
Dynamic Range
The SENS_AVG[10:8] bits provide three dynamic range settings
for this gyroscope. The lower dynamic range settings (±300°/sec
and ±600°/sec) limit the minimum filter tap sizes to maintain
resolution. For example, set SENS_AVG[10:8] = 010 (DIN =
0xB902) for a measurement range of ±600°/sec. Because this
setting can influence the filter settings, program SENS_AVG[10:8]
and then SENS_AVG[2:0] if more filtering is required.
Table 19. SLP_CNT Bit Descriptions
Bits Description
[15:9] Not used
[8] Indefinite sleep mode; set to 1
[7:0] Programmable sleep time bits, 0.5 sec/LSB
Sensor Bandwidth
The signal chain for each MEMS sensor has several filter stages,
which shape their frequency response. Figure 14 provides a
block diagram for both gyroscope and accelerometer signal
paths. Tab l e 2 0 provides additional information for digital filter
configuration.
FROM
GYROSCOPE
SENSOR
ACCELERATION
LPF LPF
404Hz
FROM
SENSOR
Figure 14. MEMS Analog and Digital Filters
757Hz
LPF
330Hz
N N
N N
m
N = 2
m = SENS_AVG[2:0]
Rev. A | Page 13 of 20
Table 20. SENS_AVG Bit Descriptions
Bits Description (Default = 0x0402)
[15:11] Not used
[10:8] Measurement range (sensitivity) selection
100 = ±1200°/sec (default condition)
010 = ±600°/sec, filter taps ≥ 4 (Bits[2:0] ≥ 0x02)
001 = ±300°/sec, filter taps ≥ 16 (Bits[2:0] ≥ 0x04)
[7:3]
[2:0] Number of taps in each stage; value of m in N = 2
08398-022
Not used
m
Page 14

ADIS16367
INPUT/OUTPUT FUNCTIONS
General-Purpose I/O
DIO1, DIO2, DIO3, and DIO4 are configurable, general-purpose
I/O lines that serve multiple purposes according to the following
control register priority: MSC_CTRL, ALM_CTRL, and
GPIO_CTRL. For example, set GPIO_CTRL = 0x080C
(DIN = 0xB308, and then 0xB20C) to configure DIO1 and
DIO2 as inputs and DIO3 and DIO4 as outputs, with DIO3
set low and DIO4 set high.
In this configuration, read GPIO_CTRL (DIN = 0x3200). The
digital state of DIO1 and DIO2 is in GPIO_CTRL[9:8].
Table 21. GPIO_CTRL Bit Descriptions
Bits Description (Default = 0x0000)
[15:12] Not used
[11] General-Purpose I/O Line 4 (DIO4) data level
[10] General-Purpose I/O Line 3 (DIO3) data level
[9] General-Purpose I/O Line 2 (DIO2) data level
[8] General-Purpose I/O Line 1 (DIO1) data level
[7:4] Not used
[3]
[2]
[1]
[0]
Input Clock Configuration
The input clock function allows for external control sampling in
the ADIS16367. Set GPIO_CTRL[3] = 0 (DIN = 0xB200) and
SMPL_PRD[7:0] = 0x00 (DIN = 0xB600) to enable this
function. See Tab l e 2 and Figure 4 for timing information.
Data Ready I/O Indicator
The factory default sets DIO1 as a positive data-ready indicator
signal. The MSC_CTRL[2:0] bits provide configuration options
for changing the default. For example, set MSC_CTRL[2:0] =
100 (DIN = 0xB404) to change the polarity of the data ready
signal on DIO1 for interrupt inputs that require negative logic
inputs for activation. The pulse width is between 100 μs and
200 μs over all conditions.
General-Purpose I/O Line 4 (DIO4) direction control
(1 = output, 0 = input)
General-Purpose I/O Line 3 (DIO3) direction control
(1 = output, 0 = input)
General-Purpose I/O Line 2 (DIO2) direction control
(1 = output, 0 = input)
General-Purpose I/O Line 1 (DIO1) direction control
(1 = output, 0 = input)
Table 22. MSC_CTRL Bit Descriptions
Bits Description (Default = 0x0006)
[15:12] Not used
[11]
[10]
[9]
[8]
[7]
[6]
[5:3] Not used
[2] Data-ready enable (1 = enabled, 0 = disabled)
[1] Data-ready polarity (1 = active high, 0 = active low)
[0] Data-ready line select (1 = DIO2, 0 = DIO1)
Memory test (cleared upon completion)
(1 = enabled, 0 = disabled)
Internal self-test enable (cleared upon completion)
(1 = enabled, 0 = disabled)
Manual self-test, negative stimulus
(1 = enabled, 0 = disabled)
Manual self-test, positive stimulus
(1 = enabled, 0 = disabled)
Linear acceleration bias compensation for gyroscopes
(1 = enabled, 0 = disabled)
Linear accelerometer origin alignment
(1 = enabled, 0 = disabled)
Auxiliary DAC
The 12-bit AUX_DAC line can drive its output to within 5 mV
of the ground reference when it is not sinking current. As the
output approaches 0 V, the linearity begins to degrade (~100 LSB
starting point). As the sink current increases, the nonlinear range
increases. The DAC latch command moves the values of the
AUX_DAC register into the DAC input register, enabling both
bytes to take effect at the same time.
Table 23. AUX_DAC Bit Descriptions
Bits Description (Default = 0x0000)
[15:12] Not used
[11:0] Data bits, scale factor = 0.8059 mV/LSB
Offset binary format, 0 V = 0 LSB
Table 24. Setting AUX_DAC = 1 V
DIN Description
0xB0D9 AUX_DAC[7:0] = 0xD9 (217 LSB)
0xB104 AUX_DAC[15:8] = 0x04 (1024 LSB)
0xBE04
GLOB_CMD[2] = 1; move values into the DAC input
register, resulting in a 1 V output level
Rev. A | Page 14 of 20
Page 15

ADIS16367
DIAGNOSTICS
Self-Test
The self-test function allows the user to verify the mechanical
integrity of each MEMS sensor. It applies an electrostatic force to
each sensor element, which results in mechanical displacement that
simulates a response to actual motion. Tab le 1 lists the expected
response for each sensor, which provides pass/fail criteria.
Set MSC_CTRL[10] = 1 (DIN = 0xB504) to run the internal
self-test routine, which exercises all inertial sensors, measures
each response, makes pass/fail decisions, and reports them to
error flags in the DIAG_STAT register. MSC_CTRL[10] resets
itself to 0 after completing the routine. The MSC_CTRL[9:8] bits
provide manual control over the self-test function for
investigation of potential failures. Tab l e 2 5 outlines an example
test flow for using this option to verify the x-axis gyroscope
function.
Table 25. Manual Self-Test Example Sequence
DIN Description
0xB601 SMPL_PRD[7:0] = 0x01, sample rate = 819.2 SPS
0xB904 SENS_AVG[15:8] = 0x04, gyro range = ±1200°/sec
0xB802 SENS_AVG[7:0] = 0x02, four-tap averaging filter
Delay = 50 ms
0x0400 Read XGYRO_OUT
0xB502 MSC_CTRL[9] = 1, gyroscope negative self-test
Delay = 50 ms
0x0400 Read XGYRO_OUT
0xB501
Delay = 50 ms
0x0400 Read XGYRO_OUT
0xB500 MSC_CTRL[15:8] = 0x00
Determine whether the bias in the gyroscope
output change according to the self-test response
specified in Table 1
MSC_CTRL[9:8] = 01, gyroscope/accelerometer
positive self-test
Determine whether the bias in the gyroscope
output changed according to the self-test
response specified in Table 1
Memory Test
Setting MSC_CTRL[11] = 1 (DIN = 0xB508) performs a
checksum verification of the flash memory locations. The
pass/fail result is loaded into DIAG_STAT[6].
Status
The error flags provide indicator functions for common system
level issues. All of the flags are cleared (set to 0) after each
DIAG_STAT register read cycle. If an error condition remains,
the error flag returns to 1 during the next sample cycle. The
DIAG_STAT[1:0] bits do not require a read of this register to
return to 0. If the power supply voltage goes back into range,
these two flags are cleared automatically.
Table 26. DIAG_STAT Bit Descriptions
Bit Description (Default = 0x0000)
[15] Z-axis accelerometer self-test failure (1 = fail, 0 = pass)
[14] Y-axis accelerometer self-test failure (1 = fail, 0 = pass)
[13] X-axis accelerometer self-test failure (1 = fail, 0 = pass)
[12] Z-axis gyroscope self-test failure (1 = fail, 0 = pass)
[11] Y-axis gyroscope self-test failure (1 = fail, 0 = pass)
[10] X-axis gyroscope self-test failure (1 = fail, 0 = pass)
[9] Alarm 2 status (1 = active, 0 = inactive)
[8] Alarm 1 status (1 = active, 0 = inactive)
[7] Not used
[6] Flash test, checksum flag (1 = fail, 0 = pass)
[5] Self-test diagnostic error flag (1 = fail, 0 = pass)
[4] Sensor overrange (1 = fail, 0 = pass)
[3] SPI communication failure (1 = fail, 0 = pass)
[2] Flash update failure (1 = fail, 0 = pass)
[1]
[0]
Power supply > 5.25 V (1 = power supply > 5.25 V,
0 = power supply ≤ 5.25 V)
Power supply < 4.75 V (1 = power supply < 4.75 V,
0 = power supply ≥ 4.75 V)
Zero motion provides results that are more reliable. The settings
in Tab l e 2 5 are flexible and allow for optimization around speed
and noise influence. For example, using fewer filtering taps decreases
delay times but increases the possibility of noise influence.
Rev. A | Page 15 of 20
Page 16

ADIS16367
Alarm Registers
The alarm function provides monitoring for two independent
conditions. The ALM_CTRL register provides control inputs
for data source, data filtering (prior to comparison), static
comparison, dynamic rate-of-change comparison, and output
indicator configurations. The ALM_MAGx registers establish
the trigger threshold and polarity configurations. Tab l e 3 0 gives
an example of how to configure a static alarm. The ALM_SMPLx
registers provide the numbers of samples to use in the dynamic
rate-of-change configuration. The period equals the number in
the ALM_SMPLx register multiplied by the sample period time,
which is established by the SMPL_PRD register. See Tab le 3 1 for
an example of how to configure the sensor for this type of function.
Table 27. ALM_MAG1, ALM_MAG2 Bit Descriptions
Bits Description (Default = 0x0000)
[15] Comparison polarity (1 = greater than, 0 = less than)
[14] Not used
[13:0]
Data bits that match the format of the trigger
source selection
Table 28. ALM_SMPL1, ALM_SMPL2 Bit Descriptions
Bits Description (Default = 0x0000)
[15:8] Not used
[7:0] Data bits: number of samples (both 0x00 and 0x01 = 1)
Table 29. ALM_CTRL Bit Descriptions
Bits Description (Default = 0x0000)
[15:12] Alarm 2 source selection
0000 = disable
0001 = power supply output
0010 = x-axis gyroscope output
0011 = y-axis gyroscope output
0100 = z-axis gyroscope output
0101 = x-axis accelerometer output
0110 = y-axis accelerometer output
0111 = z-axis accelerometer output
1000 = x-axis gyroscope temperature output
1001 = y-axis gyroscope temperature output
1010 = z-axis gyroscope temperature output
1011 = auxiliary ADC input
[11:8] Alarm 1 source selection (same as Alarm 2)
[7]
[6]
[5] Not used
[4]
[3] Not used
[2] Alarm output enable (1 = enabled, 0 = disabled)
[1] Alarm output polarity (1 = active high, 0 = active low)
[0] Alarm output line select (1 = DIO2, 0 = DIO1)
Rate-of-change enable for Alarm 2 (1 = rate of change,
0 = static level)
Rate-of-change enable for Alarm 1 (1 = rate of change,
0 = static level)
Comparison data filter setting (1 = filtered data,
0 = unfiltered data)
Table 30. Alarm Configuration Example 1
DIN Description
0xAF55,
0xAE17
Alarm 2 input = XACCL_OUT
Static level comparison, filtered data
DIO2 output indicator, positive polarity
0xA700,
0xA696
0xA937,
0xA86A
ALM_CTRL = 0x5517
Alarm 1 input = XACCL_OUT
ALM_MAG1 = 0x8096
Alarm 1 is true if XACCL_OUT > +0.5 g
ALM_MAG2 = 0x376A
Alarm 2 is true if XACCL_OUT < −0.5 g
Table 31. Alarm Configuration Example 2
DIN Description
0xAF76,
0xAEC7
Alarm 2 input = ZACCL_OUT
0xB601 SMPL_PRD = 0x0001
Sample rate = 819.2 SPS
0xAA08 ALM_SMPL1 = 0x0008
Alarm 1 rate-of-change period = 9.77 ms
0xAC50 ALM_SMPL2 = 0x0050
Alarm 2 rate-of-change period = 97.7 ms
0xA700,
0xA696
0xA937,
0xA86A
ALM_CTRL = 0x76C7
Alarm 1 input = YACCL_OUT
Rate-of-change comparison, unfiltered data
DIO2 output indicator, positive polarity
ALM_MAG1 = 0x8096
Alarm 1 is true if YACCL_OUT increases by more than
0.5 g in 9.77 ms.
ALM_MAG2 = 0x376A
Alarm 2 is true if ZACCL_OUT decreases by more
than 0.5 g in 97.7 ms.
PRODUCT IDENTIFICATION
Tabl e 3 2 provides a summary of the registers that identify
the product: PROD_ID, which identifies the product type;
LOT_ID1 and LOT_ID2, the 32-bit lot identification code;
and SERIAL_NUM, which displays the 12-bit serial number.
All four registers are two bytes in length. When using the
SERIAL_NUM value to calculate the serial number, mask
off the upper four bits and convert the remaining 12 bits to a
decimal number.
Table 32. Identification Registers
Register Name Address Description
LOT_ID1 0x52 Lot Identification Code 1
LOT_ID2 0x54 Lot Identification Code 2
PROD_ID 0x56
SERIAL_NUM 0x58 Serial number
Product identification = 0x3FEF
(hexadecimal number for 16,367)
Rev. A | Page 16 of 20
Page 17

ADIS16367
V
APPLICATIONS INFORMATION
INSTALLATION/HANDLING
For ADIS16367 installation, use the following two-step process:
1. Secure the baseplate using machine screws.
2. Press the connector into its mate.
For removal,
1. Gently pry the connector from its mate using a small slot
screwdriver.
2. Remove the screws and lift the part up.
Never attempt to unplug the connector by pulling on the plastic
case or baseplate. Although the flexible connector is very reliable
in normal operation, it can break when subjected to unreasonable
handling. When broken, the flexible connector cannot be repaired.
The AN-1041 Application Note, iSensor® IMU Quick Start
Guide and Bias Optimization Tips, provides more information
about developing an appropriate mechanical interface design.
GYROSCOPE BIAS OPTIMIZATION
The factory calibration addresses initial bias errors along with
temperature-dependent bias behaviors. Installation and certain
environmental conditions can introduce modest bias errors.
The precision autonull command (GLOB_CMD[4]) provides
a simple predeployment method for correcting these errors to
an accuracy of approximately 0.013°/sec, using an average of
30 sec. Averaging the sensor output data for 100 sec can provide
incremental performance gains, as well. Controlling device
rotation, power supply, and temperature during these averaging
times helps to ensure optimal accuracy during this process.
Refer to the AN-1041 Application Note for more information
about optimizing performance.
INPUT ADC CHANNEL
The AUX_ADC register provides access to the auxiliary ADC
input channel. The ADC is a 12-bit successive approximation
converter that has an input circuit equivalent to the one shown
in Figure 16. The maximum input is 3.3 V. The ESD protection
diodes can handle 10 mA without causing irreversible damage.
The on resistance (R1) of the switch has a typical value of 100 Ω.
The sampling capacitor, C2, has a typical value of 16 pF.
CC
INTERFACE PRINTED CIRCUIT BOARD (PCB)
The ADIS16367/PCBZ includes one ADIS16367BLMZ and
one interface PCB. The interface PCB simplifies the process
of integrating the ADIS16367BMLZ into an existing processor
system.
J1 and J2 are dual-row, 2 mm (pitch) connectors that work with
a number of ribbon cable systems, including 3M Part Number
152212-0100-GB (ribbon crimp connector) and 3M Part Number
3625/12 (ribbon cable). Figure 17 provides a hole pattern design
for installing the ADIS16367BMLZ and the interface PCB onto
the same surface. Figure 18 provides the pin assignments for each
connector. The pin descriptions match those listed in Tab le 5 .
The ADIS16367 does not require external capacitors for normal
operation; therefore, the interface PCB does not use the C1/C2
pads (not shown in Figure 17).
23.75
J2
21
30.10 27.70
NOTES
1. DIMENSIONS IN MILLIMETERS.
11 12
J1
1
11 12
2
Figure 17. Physical Diagram for the ADIS16367/PCBZ
J1
RST
CS
DNC
GND
GND
VCC
1
3
5
7
9
11
2
SCLK
DOUT
4
DIN
6
8
GND
10
VCC
12
VCC
Figure 18. J1/J2 Pin Assignments
21.24
AUX_ADC
AUX_DAC
GND
DNC
DNC
DIO2
1.20
1 2
3 4
5 6
7 8
9 10
11 12
08398-020
J2
GND
DIO3
DIO4
DNC
DNC
DIO1
08398-021
D
C1
D
C2
R1
08398-014
Figure 16. Equivalent Analog Input Circuit
(Conversion Phase: Switch Open, Track Phase: Switch Closed)
Rev. A | Page 17 of 20
Page 18

ADIS16367
OUTLINE DIMENSIONS
31.900
31.700
31.500
23.454
23.200
22.946
2.382
BSC
9.464
9.210
8.956
(2×)
4.20
4.00
3.80
(2×)
BOTTOM VIEW
2.660
2.500
2.340
1.588
BSC
10.60
BSC
1.588
14.950
14.550
14.150
N
I
1
P
DETAIL A
BSC
23.504
23.250
22.996
BSC (24×)
22.964
22.710
22.456
0.305
DETAIL A
14.00 BSC
TOP VIEW
4
2
P
N
I
10.50
BSC
FRONT VIEW
17.41
17.21
17.01
(2×)
1.00
BSC (22×)
5.20
5.00
4.80
(2×)
1.65 BSC
1.00
BSC
0.05
BSC
4.162 BSC
12.10
BSC
SIDE VIEW
7.18
BSC
2.00 BSC
4.330
BSC
21.410
21.210
21.010
CASTING
FEATURE
122208-C
Figure 19. 24-Lead Module with Connector Interface
(ML-24-2)
Dimensions shown in millimeters
ORDERING GUIDE
Model1 Temperature Range Package Description Package Option
ADIS16367BMLZ −40°C to +105°C 24-Lead Module with Connector Interface ML-24-2
ADIS16367/PCBZ Interface Board
1
Z = RoHS Compliant Part.
Rev. A | Page 18 of 20
Page 19

ADIS16367
NOTES
Rev. A | Page 19 of 20
Page 20

ADIS16367
NOTES
©2010–2011 Analog Devices, Inc. All rights reserved. Trademarks and
registered trademarks are the property of their respective owners.
D08398-0-2/11(A)
Rev. A | Page 20 of 20
 Loading...