

Page 1
for LCD Backlight Applications
ADD5207
Rev. A
Information furnished by Analog Devices is believed to be accurate and reliable. However, no
Trademarks and registered trademarks are the property of their respective owners.
Fax: 781.461.3113 ©2009–2012 Analog Devices, Inc. All rights reserved.
08350-101
L1
10µH
VIN
R
C
6.8kΩ
C
C
2.2nF
R
SET
180kΩ
C2
OPEN
C
IN
10µF
V
IN
ISET COMP GND
SW
D1
OVP
FB1
FB2
FB3
FB4
14 13
4
5
6
7
12113
1
+
–
PWM
9
R
F
100kΩ
FSLCT
2
C
BYPASS
1µF
VDD
8
C
OUT
4µF
ADD5207
C
IN2
0.1µF
SHDN
OFF ON
10
Data Sheet
FEATURES
White LED driver based on inductive boost converter
Integrated 40 V MOSFET with 1.5 A peak current limit
Input voltage range: 6 V to 21 V
Maximum output adjustable up to 36 V
600 kHz to 1 MHz adjustable operating frequency
Typical 39 V fixed overvoltage protection (OVP)
Built-in soft start for boost converter
Drives up to 4 LED current strings
LED current adjustable up to 25 mA for each channel
Headroom control to maximize efficiency
Fixed LED dimming frequency: 8 kHz
LED open fault protection
Brightness control with PWM input
Dimming controls
4-channel operation: 90 degree phase shift between
channels
3-channel operation: 120 degree phase shift between
channels
General
Thermal shutdown
Undervoltage lockout
14-lead, 4 mm × 3 mm LFCSP
APPLICATIONS
Notebook PCs, UMPCs, and monitor displays
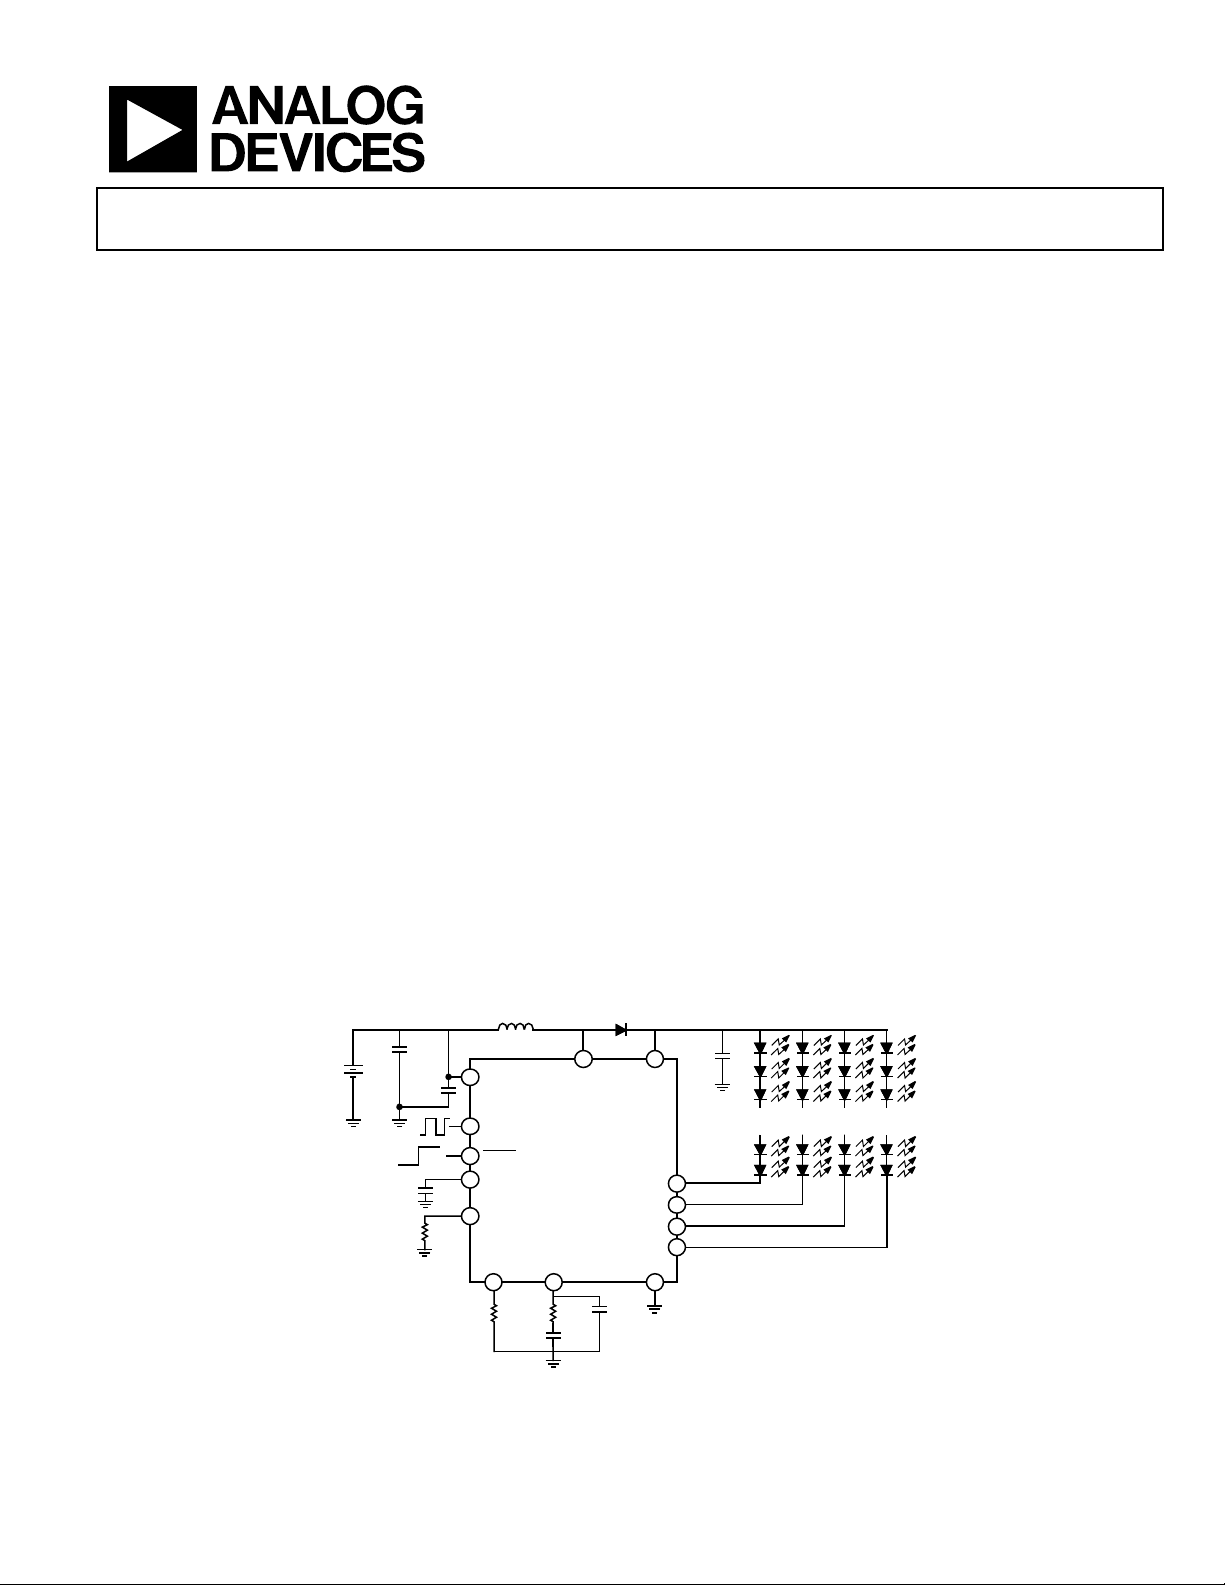
Four-String, White LED Driver
GENERAL DESCRIPTION
The ADD5207 is a white LED driver for backlight applications
based on high efficiency, current mode, step-up converter technology. It is designed with a 0.15 Ω, 1.5 A internal switch and a
pin-adjustable operating frequency between 600 kHz and 1 MHz.
The ADD5207 contains four regulated current sources for
uniform LED brightness. Each current source can drive up to
25 mA and the LED-driving current is pin adjustable by an
external resistor. The ADD5207 drives up to four parallel
strings of multiple series-connected LEDs with a ±1.5% current
matching between strings.
The ADD5207 provides phase shift PWM brightness control
methods. LED dimming control is achieved through the PWM
input. The device includes an 8 kHz LED-dimming oscillator
for driving each current source. The ADD5207 operates over an
input voltage range of 6 V to 21 V, but the device can function
with a voltage as low as 5.6 V.
The ADD5207 also has multiple safety protection features to
prevent damage during fault conditions. If any LED is open, the
device automatically disables the faulty current source. The
internal soft start circuit prevents a high inrush current during
startup. Thermal shutdown protection prevents thermal damage.
The ADD5207 is available in a low profile, thermally enhanced,
4 mm × 3 mm × 0.75 mm, 14-lead, RoHS-compliant lead frame
chip scale package (LFCSP) and is specified over the industrial
temperature range of −25°C to +85°C.
responsibility is assumed by Analog Devices for its use, nor for any infringements of patents or other
rights of third parties that may result from its use. Specifications subject to change without notice. No
license is granted by implication or otherwise under any patent or patent rights of Analog Devices.
TYPICAL APPLICATION CIRCUIT
Figure 1.
One Technology Way, P.O. Box 9106, Norwood, MA 02062-9106, U.S.A.
Tel: 781.329.4700
www.analog.com
Page 2

ADD5207 Data Sheet
TABLE OF CONTENTS
Features .............................................................................................. 1
Applications ....................................................................................... 1
General Description ......................................................................... 1
Typical Application Circuit ............................................................. 1
Revision History ............................................................................... 2
Functional Block Diagram .............................................................. 3
Specifications ..................................................................................... 4
Step-Up Switching Regulator Specifications ............................. 4
LED Current Regulation Specifications .................................... 5
General Specifications ................................................................. 6
Absolute Maximum Ratings ............................................................ 7
Thermal Resistance ...................................................................... 7
ESD Caution .................................................................................. 7
Pin Configuration and Function Descriptions ............................. 8
Typical Performance Characteristics ..............................................9
Theory of Operation ...................................................................... 11
Current Mode, Step-Up Switching Regulator Operation ..... 11
Internal 3.3 V Regulator ............................................................ 11
Boost Converter Switching Frequency .................................... 11
Dimming Frequency (f
Current Source ............................................................................ 11
PWM Dimming Mode .............................................................. 11
Safety Features ............................................................................ 11
External Component Selection Guide ..................................... 12
Layout Guidelines....................................................................... 13
Typical Application Circuits ......................................................... 15
Outline Dimensions ....................................................................... 16
Ordering Guide .......................................................................... 16
) ...................................................... 11
PWM
REVISION HISTORY
2/12—Rev. Sp0 to Rev. A
Replaced Block Diagram with Typical Application Circuit ........ 1
Changes to Features Section and General Description Section . 1
Changes to Current Mode, Step-Up Switching Regulator
Operation Section, Boost Converter Switching Frequency
Section, PWM Dimming Mode Section, Phase Shift PWM
Dimming Section, and Safety Features Section .......................... 11
Changes to Overvoltage Protection (OVP) Section .................. 11
Changes to Open-Loop Protection (OLP) Section,
Undervoltage Lockout (UVLO) Section, and Thermal
Protection Section .......................................................................... 12
Changes to Layout Guidelines Section ........................................ 13
7/09—Revision Sp0: Initial Version
Rev. A | Page 2 of 16
Page 3
Data Sheet ADD5207
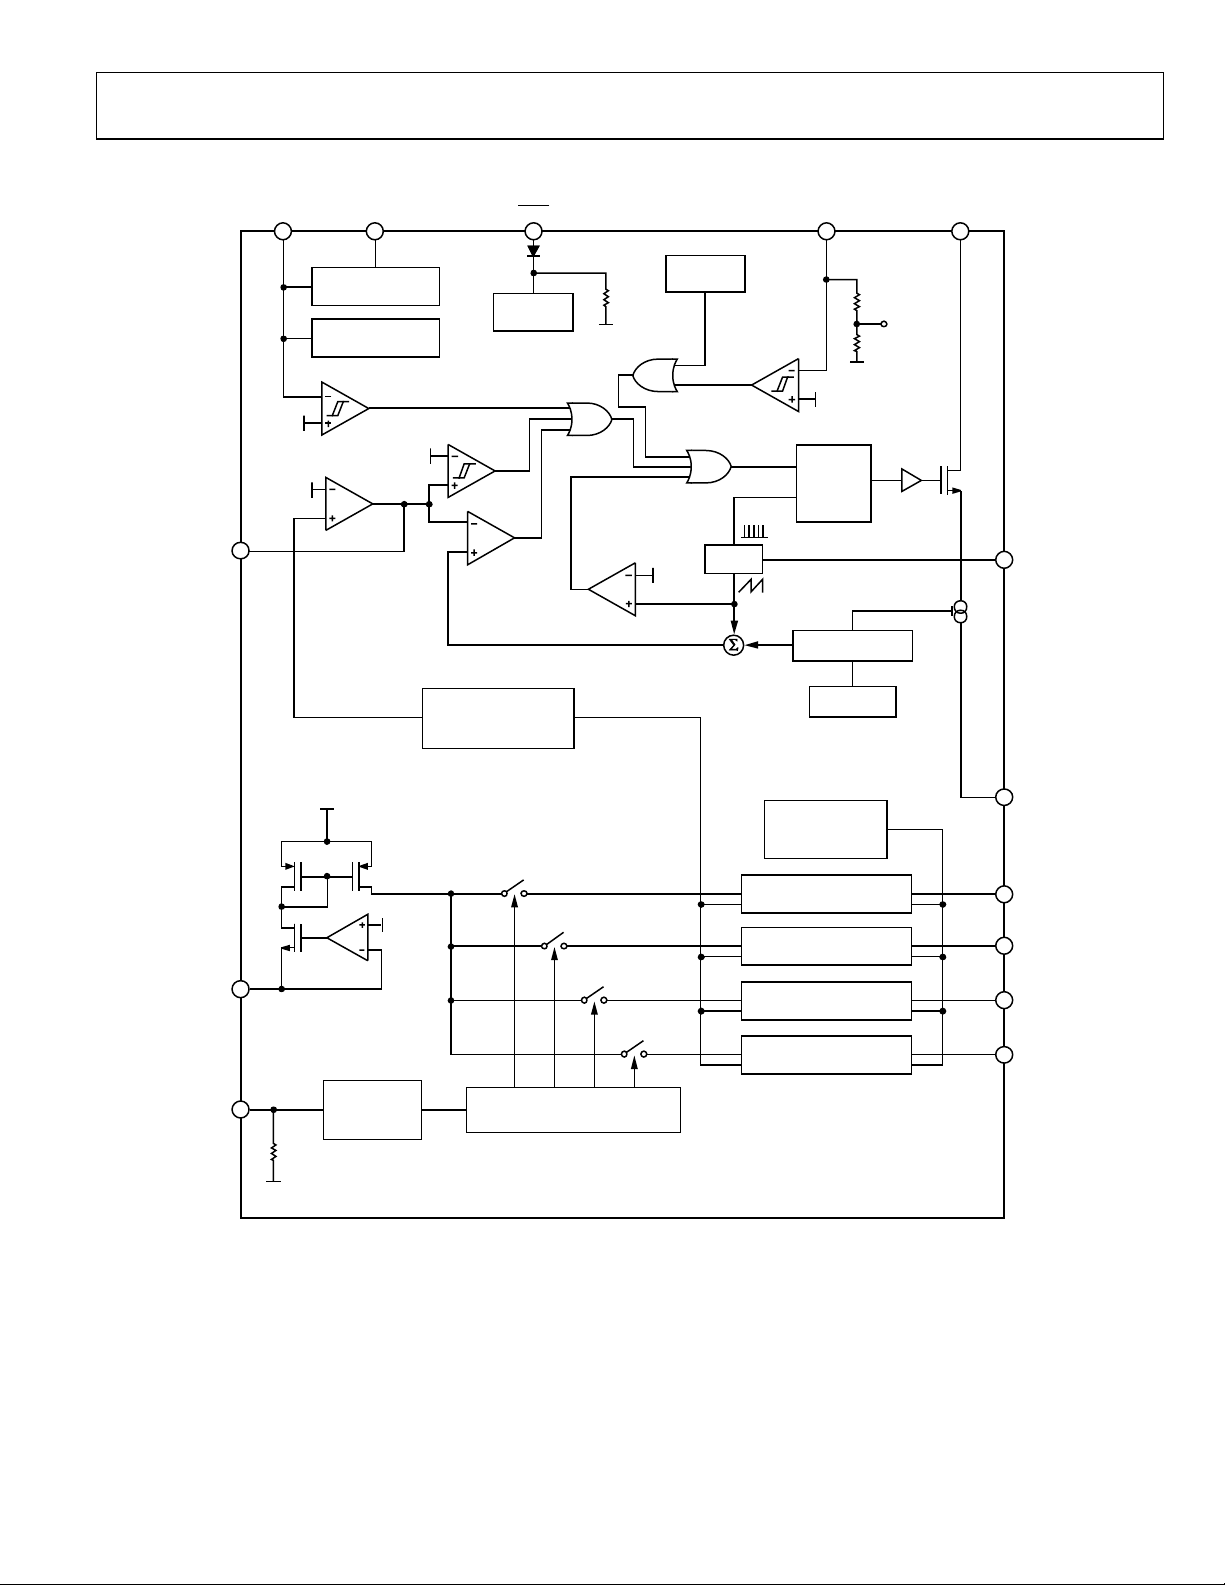
ADD5207
VIN VDD SHDN OVP
VOUT_FB
SW
LINEAR
REGULATOR
VOLTAGE
REFERENCE
SHUTDOWN
ERROR
AMP
UVP
COMP
PWM
COMP
UVP
REF
g
m
LL
REF
VOUT_FB
LL COMP
DCOMP
HEADROOM CO NTROL
CURRENT SOURCE 1
CURRENT SOURCE 2
CURRENT SOURCE 3
CURRENT SOURCE 4
PWM
500kΩ
ISET
REF
VDD
GND
500kΩ
GND
COMP
PWM
DUTY
EXTRACTOR
SOFT START
CURRENT SENSE
OSC
LED OPEN/SHORT
FAULT DETECTOR
DREF
OVP
REF
GND
THERMAL
SHUTDOWN
R
S
Q
FSLCT
GND
FB1
FB2
CURRENT SOURCE DRIVER
FPWM OSCILLATOR
1 108 13 14
2
12
4
5
FB3
6
FB4
7
9
3
11
08350-002
+
+
FUNCTIONAL BLOCK DIAGRAM
Figure 2. Functional Block Diagram
Rev. A | Page 3 of 16
Page 4

ADD5207 Data Sheet
Parameter
Symbol
Test Conditions/Comments
Min
Typ
Max
Unit
SPECIFICATIONS
STEP-UP SWITCHING REGULATOR SPECIFICATIONS
VIN = 12 V,
Table 1.
SUPPLY
Input Voltage Range VIN 6 21 V
BOOST OUTPUT
Output Voltage V
SWITCH
On Resistance R
Leakage Current I
Peak Current Limit ICL Duty cycle (D) = D
OSCILLATOR
Switching Frequency fSW RF = 97 kΩ 800 1000 1200 kHz
Maximum Duty Cycle D
SOFT START
Soft Start Time tSS 1.1 ms
OVERVOLTAGE PROTECTION
Overvoltage Rising Threshold on OVP Pin V
Overvoltage Hysteresis on OVP Pin V
SHDN
= high, TA = −25°C to +85°C, unless otherwise noted. Typical values are at TA = +25°C.
36 V
OUT
DS(ON)
1 µA
LKG
RF = 97 kΩ 84 90 %
MAX
36.5 39 40 V
OVPR
OVP_HYS
VIN = 12 V, ISW = 100 mA 150 300 mΩ
MAX
0.1 0.7 1.4 V
1.5 A
Rev. A | Page 4 of 16
Page 5

Data Sheet ADD5207
Current Matching Between Strings2
R
= 180 kΩ
−1.5 +1.5
%
LED CURRENT REGULATION SPECIFICATIONS
VIN = 12 V,
Table 2.
Parameter Symbol Test Conditions/Comments Min Typ Max Unit
CURRENT SOURCE
ISET Pin Voltage V
Adjustable LED Current1 I
Constant Current Sink of 20 mA2 I
Minimum Headroom Voltage2 V
LED Current Accuracy2 R
Current Source Leakage Current 1 µA
FPWM GENERATOR
Dimming Frequency f
LED FAULT DETECTION
Open Fault Delay1 t
1
This electrical specification is guaranteed by design.
2
Tested at TA = +25°C.
SHDN
= high, TA = −25°C to +85°C, unless otherwise noted. Typical values are at TA = +25°C.
6 V ≤ VIN ≤ 21 V 1.14 1.18 1.22 V
SET
0 25 mA
LED
R
LED20
R
HR20
PWM
D_OPENFAULT
6.5 µs
= 180 kΩ 19.4 20 20.6 mA
SET
= 180 kΩ 0.66 0.9 V
SET
SET
= 180 kΩ −3 +3 %
SET
6.8 8.0 9.2 kHz
Rev. A | Page 5 of 16
Page 6

ADD5207 Data Sheet
VIN Rising Threshold
V
VIN rising
5.0
5.6
V
GENERAL SPECIFICATIONS
VIN = 12 V,
Table 3.
Parameter Symbol Test Conditions/Comments Min Typ Max Unit
SUPPLY
Input Voltage Range VIN 6 21 V
Quiescent Current IQ 6 V ≤ VIN ≤ 21 V,
Shutdown Supply Current ISD 6 V ≤ VIN ≤ 21 V,
VDD REGULATOR
VDD Regulated Output V
PWM INPUT
PWM Voltage High V
PWM Voltage Low V
PWM Input Range 100 10,000 Hz
THERMAL SHUTDOWN
Thermal Shutdown Threshold1 TSD
Thermal Shutdown Hysteresis1 T
UVLO
VIN Falling Threshold V
SHDN
Input Voltage High VIH 2.5 5.5 V
Input Voltage Low VIL 0.5 V
SHDN
1
This electrical specification is guaranteed by design.
SHDN
= high, TA = −25°C to +85°C, unless otherwise noted. Typical values are at TA = +25°C.
= high 3.5 7 mA
SHDN
= low 2 µA
SHDN
6 V ≤ VIN ≤ 21 V 3.1 3.3 3.5 V
VDD_REG
2.0 5.5 V
PWM_HIGH
0.8 V
PWM_LOW
160 °C
30 °C
SDHYS
VIN falling 4 4.2 V
UVLO F
UVLOR
CONTROL
Pin Input Current
I
SHDN
SHDN
= 3.3 V 6 µA
Rev. A | Page 6 of 16
Page 7

Data Sheet ADD5207
FB1, FB2, FB3, FB4
−0.3 V to +40 V
Package Type
θJA
θJC
Unit
ABSOLUTE MAXIMUM RATINGS
TA = 25°C, unless otherwise noted.
Table 4.
Parameter Rating
VIN −0.3 V to +23 V
SW −0.3 V to +40 V
, PWM −0.3 V to +6 V
SHDN
ISET, FSLCT, COMP −0.3 V to +3.5 V
VDD −0.3 V to +3.7 V
OVP −0.3 V to +40 V
Maximum Junction Temperature (TJ max) 150°C
Operating Temperature Range (TA) −25°C to +85°C
Storage Temperature Range (TS) −65°C to +150°C
Reflow Peak Temperature (20 sec to 40 sec) 260°C
Stresses above those listed under Absolute Maximum Ratings
may cause permanent damage to the device. This is a stress
rating only; functional operation of the device at these or any
other conditions above those indicated in the operational
section of this specification is not implied. Exposure to absolute
maximum rating conditions for extended periods may affect
device reliability.
THERMAL RESISTANCE
θJA is specified for the worst-case conditions, that is, a device
soldered in a circuit board for surface-mount packages.
Table 5. Thermal Resistance
14-Lead LFCSP 33.24 2.42 °C/W
ESD CAUTION
Rev. A | Page 7 of 16
Page 8

ADD5207 Data Sheet
PIN CONFIGURATION AND FUNCTION DESCRIPTIONS
1
VIN
2
FSLCT
3
ISET
FB1
FB2
FB3
FB4
NOTES
1. CONNECT THE EXPOSED PADDLE
ADD5207
4
5
6
7
(Not to Scale)
TO GROUND.
TOP VIEW
14
SW
13
OVP
12
GND
11
COMP
10
SHDN
9
PWM
8
VDD
08350-003
Figure 3. Pin Configuration
Table 6. Pin Function Descriptions
Pin No. Mnemonic Description
1 VIN Supply Input. Must be locally bypassed with a capacitor to ground.
2 FSLCT Frequency Select. A resistor from this pin to ground sets the boost switching frequency from 600 kHz to 1 MHz.
3 ISET Full-Scale LED Current Set. A resistor from this pin to ground sets the LED current up to 25 mA.
4 FB1 Regulated Current Sink. Connect the bottom cathode of the LED string to this pin.
5 FB2 Regulated Current Sink. Connect the bottom cathode of the LED string to this pin.
6 FB3 Regulated Current Sink. Connect the bottom cathode of the LED string to this pin.
7 FB4 Regulated Current Sink. Connect the bottom cathode of the LED string to this pin. If unused, connect FB4 to GND.
8 VDD Internal Linear Regulator Output. This regulator provides power to the ADD5207.
9 PWM PWM Signal Input.
10
SHDN
11 COMP
Shutdown Control for PWM Input Operation Mode. Active low.
Compensation for the Boost Converter. Two capacitors and a resistor are connected in series between ground and
this pin for stable operation.
12 GND Ground.
13 OVP Overvoltage Protection. The boost converter output is connected to this pin directly.
14 SW Drain Connection of the Internal Power FET.
EP Exposed Paddle. Connect the exposed paddle to ground.
Rev. A | Page 8 of 16
Page 9

Data Sheet ADD5207
80
78
5 10 15
INPUT VOLTAGE (V)
BOOST CONVERTER EFFICIENCY (V)
20
84
82
88
86
90
I
LED
= 20mA
f
SW
= 800kHz
BRIGHTNES S = 100%
LEDs = 10 SERIE S × 4 P ARALLEL
08350-004
28
26
24
22
20
LED CURRENT (mA)
18
1
6
14
12
10
6
8
4
135 150 165 180 195 210 225 240 255 270
R
SET
(kΩ)
08350-005
LED CURRENT (mA)
PWM DUTY CYCLE (%)
08350-006
0
5
10
15
20
0
5.08
10.16
15.23
20.31
25.39
30.47
35.55
40.63
45.70
50.78
55.86
60.94
66.02
71.09
76.17
81.25
86.33
91.41
96.48
25
20
15
10
5
0
5 10 15 20
INPUT VOLTAGE (V)
LED CURRENT (mA)
08350-007
1.5
1.2
0.9
0.6
0.3
0
–0.3
–0.6
–0.9
–1.5
–1.2
6 10 14 188 12 16 20 22
LED CURRENT MATCHING (%)
INPUT VOLTAGE (V)
BRIGHTNES S = 100%
LEDs = 10 SERIE S × 4 P ARALLEL
I
LED
= 20mA
08350-008
5ms/DIV
0V
0V
0V
0A
V
OUT
20V/DIV
V
SW
20V/DIV
SHDN
5V/DIV
I
L
600mA/DIV
V
IN
= 12V
BRIGHTNES S = 100%
LEDs = 10 SERIE S × 4 PARALLEL
08350-009
TYPICAL PERFORMANCE CHARACTERISTICS
Figure 4. Boost Converter Efficiency vs. Input Voltage
Figure 7. LED Current vs. Input Voltage (I
= 20 mA)
LED
Figure 5. LED Current vs. R
Figure 6. LED Current vs. PWM Input Duty Cycle
SET
Figure 8. LED Current Matching vs. Input Voltage
Figure 9. Start-Up Waveforms (Brightness = 100%)
Rev. A | Page 9 of 16
Page 10

ADD5207 Data Sheet
1µs/DIV
0V
0V
0A
V
OUT
100mV/DIV
AC
V
SW
20V/DIV
I
L
500mA/DIV
V
IN
= 6V,
f
SW
= 800kHz
BRIGHTNES S = 100%
LEDs = 10 SERIE S × 4 PARALLEL
08350-010
0V
0V
0A
V
OUT
100mV/DIV
AC
V
SW
20V/DIV
I
L
500mA/DIV
VIN = 21V,
f
SW
= 800kHz
BRIGHTNES S = 100%
LEDs = 10 SERIE S × 4 PARALLEL
1µs/DIV
08350-011
0V
0V
0A
PWM
2V/DIV
FB1
5V/DIV
I
FB1
10mA/DIV
V
IN
= 12V
BRIGHTNES S = 1.5%
LEDs = 10 SERIE S × 4 PARALLEL
100µs/DIV
08350-012
0V
0V
0V
0V
FB1
7V/DIV
FB2
7V/DIV
FB3
7V/DIV
FB4
7V/DIV
VIN = 12V
BRIGHTNES S = 25%
LEDs = 10 SERIE S × 4 PARALLEL
50µs/DIV
08350-013
Figure 10. Switching Waveforms (VIN = 6 V)
Figure 11. Switching Waveforms (VIN = 21 V)
Figure 12. LED Current Waveforms (Brightness = 1.5%)
Figure 13. LED FBx Waveforms (Brightness = 25%)
Rev. A | Page 10 of 16
Page 11

Data Sheet ADD5207
1000
900
800
700
600
SWITCHING FREQUE NCY ( kHz )
500
400
300
80 100 120 140 160 180 200 220
R
F
(kΩ)
08350-014
SET
THEORY OF OPERATION
CURRENT MODE, STEP-UP SWITCHING REGULATOR OPERATION
The ADD5207 uses a current mode PWM boost regulator to
generate the minimum voltage needed to drive the LED string
at the programmed LED current. The current mode regulation
system allows a fast transient response while maintaining a
stable output voltage. By selecting the proper resistor-capacitor
network from COMP to GND, the regulator response is
optimized for a wide range of input voltages, output voltages,
and load conditions. The ADD5207 can provide a 36 V maximum output voltage and drive up to 10 LEDs (3.4 V/25 mA
type of LEDs) for each channel.
INTERNAL 3.3 V REGULATOR
The ADD5207 contains a 3.3 V linear regulator that
is used for biasing internal circuitry. The internal regulator
requires a 1 μF bypass capacitor. Place this bypass capacitor
between Pin VDD (Pin 8) and GND, as close as possible to
Pin VDD.
BOOST CONVERTER SWITCHING FREQUENCY
The ADD5207 boost converter switching frequency is user
adjustable, between 600 kHz to 1 MHz, by using an external
resistor, R
ize the regulator for high efficiency, and a frequency of 1 MHz
is recommended to minimize the size of external components.
See Figure 14 for considerations when selecting a switching
frequency and an adjustment resistor (R
. A frequency of 600 kHz is recommended to optim-
F
).
F
CURRENT SOURCE
The ADD5207 contains four current sources to provide accurate current sinking for each LED string. String-to-string
tolerance is kept within ±1.5% at 20 mA. Each LED string
current is adjusted up to 25 mA using an external resistor.
The ADD5207 contains an LED open fault protection circuit
for each channel. If the headroom voltage of the current source
remains below 150 mV while the boost converter output reaches
the OVP level, the ADD5207 recognizes that the current source
has an open-load fault for the current source, and the current
source is disabled.
If an application requires three LED strings, each LED string
should be connected using FB1 to FB3. The unused FB4 pin
should be tied to GND.
The ADD5207 contains hysteresis to prevent the LED current
change that is caused by a ±0.195% jitter of the PWM input.
Programming the LED Current
As shown in the Figure 2, the ADD5207 has an LED current set
pin (ISET). A resistor (R
) from this pin to ground adjusts the
SET
LED current up to 25 mA. LED current level can be set with
following equation:
3600
I
LED
=
R
)(
A
PWM DIMMING MODE
The ADD5207 supports 8-bit resolution to control brightness.
Howeve r, each current source has a minimum on time requirement for LED current regulation such that the dimming is in
the range of 1.5% to 100%. Accordingly, even when the PWM
input duty cycle is more than 0% and less than 1.5%, the LED
duty cycle is held at 1.5%.
Phase Shift PWM Dimming
There is a phase delay between each current source channel that is
programmed by the number of current sources in operation. If the
application requires four separate LED strings, each string has a
90 degree phase delay between channels. If three LED strings are
connected at the FB1 to FB3 pins (FB4 = GND), each string has a
120 degree phase delay.
Figure 14. Switching Frequency vs. R
DIMMING FREQUENCY (f
The ADD5207 contains an internal oscillator to generate the
PWM dimming signal for LED brightness control. The LED
dimming frequency (f
PWM
F
)
PWM
) is fixed at 8 kHz internally.
SAFETY FEATURES
The ADD5207 contains several safety features to provide stable
and reliable operation.
Soft Start
The ADD5207 contains an internal soft start function to reduce
inrush current at startup. The soft start time is typically 1.1 ms.
Overvoltage Protection (OVP)
The ADD5207 contains OVP circuits to prevent boost converter
damage if the output voltage becomes excessive for any reason.
To keep a safe output level, the integrated OVP circuit monitors
Rev. A | Page 11 of 16
Page 12

ADD5207 Data Sheet
OUT
IN
OUT
V
VVD−
=
SW
ON
f
D
t =
L
tV
I
IN
L
ON
×
=∆
L
tV
×
OUT
ON
L
OUT
C
OUT
C
tI
C
Q
V
×
==∆
the output voltage. When the OVP pin voltage reaches the OVP
rising threshold, the boost converter stops switching, which causes
the output voltage to drop. When the OVP pin voltage drops below
the OVP falling threshold, the boot converter begins switching
again, causing the output to rise. There is about 0.8 V hysteresis
between the rising and falling thresholds. The OVP level is fixed
at 39 V (typical).
Open-Load Protection (OLP)
The ADD5207 contains a headroom control circuit to minimize
power loss at each current source. Therefore, the minimum
feedback voltage is achieved by regulating the output voltage of
the boost converter. If any LED string is open circuit during
normal operation, the current source headroom voltage (V
pulled to GND. In this condition, OLP is activated if V
is less
HR
) is
HR
than 150 mV until the boost converter output voltage rises up to
the OVP level.
Undervoltage Lockout (UVLO)
An undervoltage lockout circuit is included with built-in hysteresis.
The ADD5207 turns on when V
shuts down when V
falls below 4.2 V (typical).
IN
rises above 5.0 V (typical) and
IN
Thermal Protection
Thermal overload protection prevents excessive power dissipation from overheating and damaging the ADD5207. When the
junction temperature (T
) exceeds 160°C, a thermal sensor
J
immediately activates the fault protection, which shuts down
the device and allows it to cool. The device self-starts when the
junction temperature (T
) of the die falls below 130°C.
J
EXTERNAL COMPONENT SELECTION GUIDE
Inductor Selection
The inductor is an integral part of the step-up conver t e r. It stores
energy during the switch’s on time and transfers that energy to
the output through the output diode during the switch’s off
time. An inductor in the range of 4.7 µH to 22 µH is
recommended. In general, lower inductance values result in
higher saturation current and lower series resistance for a given
physical size. However, lower inductance results in higher peak
current, which can lead to reduced efficiency and greater input
and/or output ripple and noise. Peak-to-peak inductor ripple
current at close to 30% of the maximum dc input current
typically yields an optimal compromise.
The input (V
switch duty cycle (D), which, in turn, is used to determine the
inductor ripple current.
) and output (V
IN
) voltages determine the
OUT
The inductor ripple current (ΔI
Solve for the inductance value (L):
IN
ON
L
=
∆
I
Make sure that the peak inductor current (that is, the maximum
input current plus half of the inductor ripple current) is less
than the rated saturation current of the inductor. In addition,
ensure that the maximum rated rms current of the inductor is
greater than the maximum dc input current to the regulator.
For duty cycles greater than 50% that occur with input voltages
greater than half the output voltage, slope compensation is required
to maintain stability of the current mode regulator. The inherent
open-loop stability causes subharmonic instability when the
duty ratio is greater than 50%. To avoid subharmonic instability,
the slope of the inductor current should be less than half of the
compensation slope.
Inductor manufacturers include: Coilcraft, Inc., Sumida
Corporation, and Toko.
Input and Output Capacitor Selection
The ADD5207 requires input and output bypass capacitors to
supply transient currents while maintaining a constant input
and output voltage. Use a low effective series resistance (ESR)
10 μF or greater capacitor for the input capacitor to prevent noise
at the ADD5207 input. Place the input between VIN and GND,
as close as possible to the ADD5207. Ceramic capacitors are
preferred because of their low ESR characteristics. Alternatively,
use a high value, medium ESR capacitor in parallel with a
0.1 μF low ESR capacitor as close as possible to the ADD5207.
The output capacitor maintains the output voltage and supplies
current to the load while the ADD5207 switch is on. The value
and characteristics of the output capacitor greatly affect the
output voltage ripple and stability of the regulator. Use a low
ESR output capacitor; ceramic dielectric capacitors are preferred.
For very low ESR capacitors, such as ceramic capacitors, the
ripple current due to the capacitance is calculated as follows.
Because the capacitor discharges during the on time (t
charge removed from the capacitor (Q
multiplied by the on time. Therefore, the output voltage ripple
(ΔV
) is
OUT
) in a steady state is:
L
) is the load current
C
ON
), the
Use the duty cycle and switching frequency (f
the on time.
) to determine
SW
where:
C
OUT
I
is the average inductor current.
L
Rev. A | Page 12 of 16
is the output capacitance.
Page 13

Data Sheet ADD5207
SW
ON
f
D
t =
OUT
IN
OUT
V
VVD−
=
( )
OUTOUT
SW
IN
OUT
L
OUT
VVf
VVI
C
∆××
−×
≥
OUT
IN_MAX
OUT
MIN
V
VVD−
=
R
C
g
m
C
C
C2
VOUT_FB
HEADROOM CONTROL
08350-015
C
OUT
R
CESRC2×
=
Using the duty cycle and switching frequency (fSW), users can
determine the on time with the following equation:
The input (V
) and output (V
IN
) voltages determine the
OUT
switch duty cycle (D) with the following equation:
Choose the output capacitor based on the following equation:
Loop Compensation
The external inductor, output capacitor, and the compensation
resistor and capacitor determine the loop stability. The inductor and output capacitor are chosen based on performance, size,
and cost. The compensation resistor (R
capacitor (C
) at COMP are selected to optimize control loop
C
) and compensation
C
stability. For typical LED application of the ADD5207, a 6.8 kΩ
compensation resistor in series with a 2.2 nF compensation
capacitor at COMP is adequate.
Capacitor manufacturers include: Murata Manufacturing Co.,
Ltd., AV X, Sanyo, and Taiyo Yuden Co., Ltd.
Diode Selection
The output diode conducts the inductor current to the output
capacitor and loads while the switch is off. For high efficiency,
minimize the forward voltage drop of the diode. Schottky diodes
are recommended. However, for high voltage, high temperature
applications, where the Schottky diode reverse leakage current
becomes significant and degrades efficiency, use an ultrafast
junction diode. The output diode for a boost regulator must be
chosen depending on the output voltage and the output current.
The diode must be rated for a reverse voltage equal to or greater
than the output voltage used. The average current rating must
be greater than the maximum load current expected, and the peak
current rating must be greater than the peak inductor current.
Using Schottky diodes with lower forward voltage drop decreases
power dissipation and increases efficiency. The diode must be
rated to handle the average output load current. Many diode
manufacturers derate the current capability of the diode as a
function of the duty cycle. Verify that the output diode is rated
to handle the average output load current with the minimum
duty cycle.
The minimum duty cycle of the ADD5207 is:
where V
For example, D
is the maximum input voltage.
IN_MAX
is 0.5 when V
MIN
OUT
is 30 V and V
IN_MAX
is 15 V.
Schottky diode manufacturers include ON Semiconductor,
Diodes Incorporated, Central Semiconductor Corp., and Sanyo.
Figure 15. Compensation Components
A step-up converter produces an undesirable right-half plane
zero in the regulation feedback loop. Capacitor C2 is chosen
to cancel the zero introduced by output capacitance ESR.
Solving for C2,
For low ESR output capacitance, such as with a ceramic
capacitor, C2 is optional.
LAYOUT GUIDELINES
When designing a high frequency, switching, regulated power
supply, layout is very important. Using a good layout can solve
many problems associated with these types of supplies. The
main problems are loss of regulation at high output current
and/or large input-to-output voltage differentials, excessive
noise on the output and switch waveforms, and instability.
Using the following guidelines helps minimize these problems.
Make all power (high current) traces as short, direct, and thick
as possible. It is good practice on a standard printed circuit
board (PCB) to make the traces an absolute minimum of 15 mil
(0.381 mm) per ampere. The inductor, output capacitors, and
output diode should be as close to each other as possible. This
helps reduce EMI radiated by the power traces that carry high
switching currents. Close proximity of the components also
reduces lead inductance and resistance, which in turn reduce noise
spikes, ringing, and resistive losses that produce voltage errors.
Rev. A | Page 13 of 16
Page 14

ADD5207 Data Sheet
The grounds of the IC, input capacitors, output capacitors, and
output diode (if applicable), should be connected close together,
and directly to a ground plane. It is also a good idea to have a
ground plane on both sides of the PCB. This reduces noise by
reducing ground loop errors and by absorbing more of the EMI
radiated by the inductor.
For multilayer boards of more than two layers, a ground plane
can be used to separate the power plane (power traces and components) and the signal plane (feedback, compensation, and
components) for improved performance. On multilayer boards,
the use of vias is required to connect traces and different planes.
If a trace needs to conduct a significant amount of current from
one plane to the other, it is good practice to use one standard
via per 200 mA of current. Arrange the components so that the
switching current loops curl in the same direction.
Due to how switching regulators operate, there are two power
states: one state when the switch is on, and one when the switch
is off. During each state, there is a current loop made by the
power components currently conducting. Place the power
components so that the current loop is conducting in the same
direction during each of the two states. This prevents magnetic
field reversal caused by the traces between the two half cycles
and reduces radiated EMI.
Layout Procedure
To achieve high efficiency, good regulation, and stability, a good
PCB layout is required. It is recommended that the reference
board layout be followed as closely as possible because it is
already optimized for high efficiency and low noise.
Use the following general guidelines when designing PCBs:
• Keep C
• Keep the high current path from C
close to the VIN and GND leads of the ADD5207.
IN
(through L1) to the
IN
SW and GND leads as short as possible.
• Keep the high current path from C
C
as short as possible.
OUT
(through L1), D1, and
IN
• Keep high current traces as short and as wide as possible.
• Keep nodes connected to SW away from sensitive traces,
such as COMP, to prevent coupling of the traces. If such
traces must be run near each other, place a ground trace
between the two as a shield.
• Place the compensation components as close as possible to
the COMP pin.
• Place the LED current setting resistors as close as possible
to each pin to prevent noise pickup.
• Avoid routing noise-sensitive traces near high current
traces and components, especially the LED current setting
node (I
SET
).
• Use a thermal pad size that is the same dimension as the
exposed pad on the bottom of the package.
Heat Sinking
When using a surface-mount power IC or external power
switches, the PCB can often be used as the heat sink. This is
done by using the copper area of the PCB to transfer heat from
the device. Users should maximize this area to optimize thermal
performance.
Rev. A | Page 14 of 16
Page 15

Data Sheet ADD5207
L1
10µH
SHDN
VIN
OFF ON
R
F
100kΩ
R
SET
180kΩ
R
C
6.8kΩ
C
C
2.2nF
C2
OPEN
C
IN
10µF
V
IN
C
BYPASS
1µF
VDD
PWM
ISET COMP GND
SW
D1
OVP
FB1
FB2
FB3
FB4
FSLCT
10
9
2
14 13
4
5
6
7
12113
1
+
–
8
C
OUT
4µF
ADD5207
C
IN2
0.1µF
08350-016
L1
10µH
SHDN
VIN
OFF ON
C
IN2
0.1µF
R
F
100kΩ
R
SET
180kΩ
R
C
6.8kΩ
C
C
2.2nF
C
2
OPEN
C
IN
10µF
C
BYPASS
1µF
VDD
PWM
ISET COMP GND
SW
D1
OVP
FB1
FB2
FB3
FB4
FSLCT
ADD5207
10
9
2
14 13
4
5
6
7
12113
1
8
C
OUT
4µF
08350-017
+
–
TYPICAL APPLICATION CIRCUITS
Figure 16. Typical Four-String Application Circuit
Figure 17. Typical Three-String Application Circuit
Rev. A | Page 15 of 16
Page 16

ADD5207 Data Sheet
OUTLINE DIMENSIONS
3.40
4.00 BSC
PIN 1
INDICATOR
0.80
0.75
0.70
SEATING
PLANE
0.30
0.25
0.20
TOP VIEW
0.50 BSC
COMPLIANTTOJEDEC STANDARDS MO-220-WGED
3.00 BSC
0.15 REF
0.50
0.40
0.30
0.05 MAX
0.02 NOM
COPLANARITY
0.08
Figure 18. 14-Lead Lead Frame Chip Scale Package [LFCSP_WD]
4 mm × 3 mm Body, Very Very Thin Dual
(CP-14-1)
Dimensions shown in millimeters
3.30
3.15
8
EXPOSED
7
BOTTOM VIEW
14
PAD
1
FOR PROPER CONNECTION OF
THE EXPOSED PAD, REFER TO
THE PIN CONFIGURATION AND
FUNCTION DESCRIPTIONS
SECTION OF THIS DATA SHEET.
0.20 MIN
P
N
I
N
I
D
0
R
(
1
I
.
1.80
1.70
1.55
C
A
0
2
R
O
T
)
052509-A
ORDERING GUIDE
Model1 Temperature Range Package Description Package Option
ADD5207ACPZ-RL −25°C to +85°C 14-Lead LFCSP_WD CP-14-1
1
Z = RoHS Compliant Part.
©2009–2012 Analog Devices, Inc. All rights reserved. Trademarks and
registered trademarks are the property of their respective owners.
D08350-0-2/12(A)
Rev. A | Page 16 of 16
 Loading...