

Page 1
6-5
Features
• 80C48 and 80C80/85 Bus Compatible - No Interfacing
Logic Required
• Conversion Time < 100µs
• Easy Interface to Most Microprocessors
• Will Operate in a “Stand Alone” Mode
• Differential Analog Voltage Inputs
• Works with Bandgap Voltage References
• TTL Compatible Inputs and Outputs
• On-Chip Clock Generator
• 0V to 5V Analog Voltage Input Range (Single + 5V Supply)
• No Zero-Adjust Required
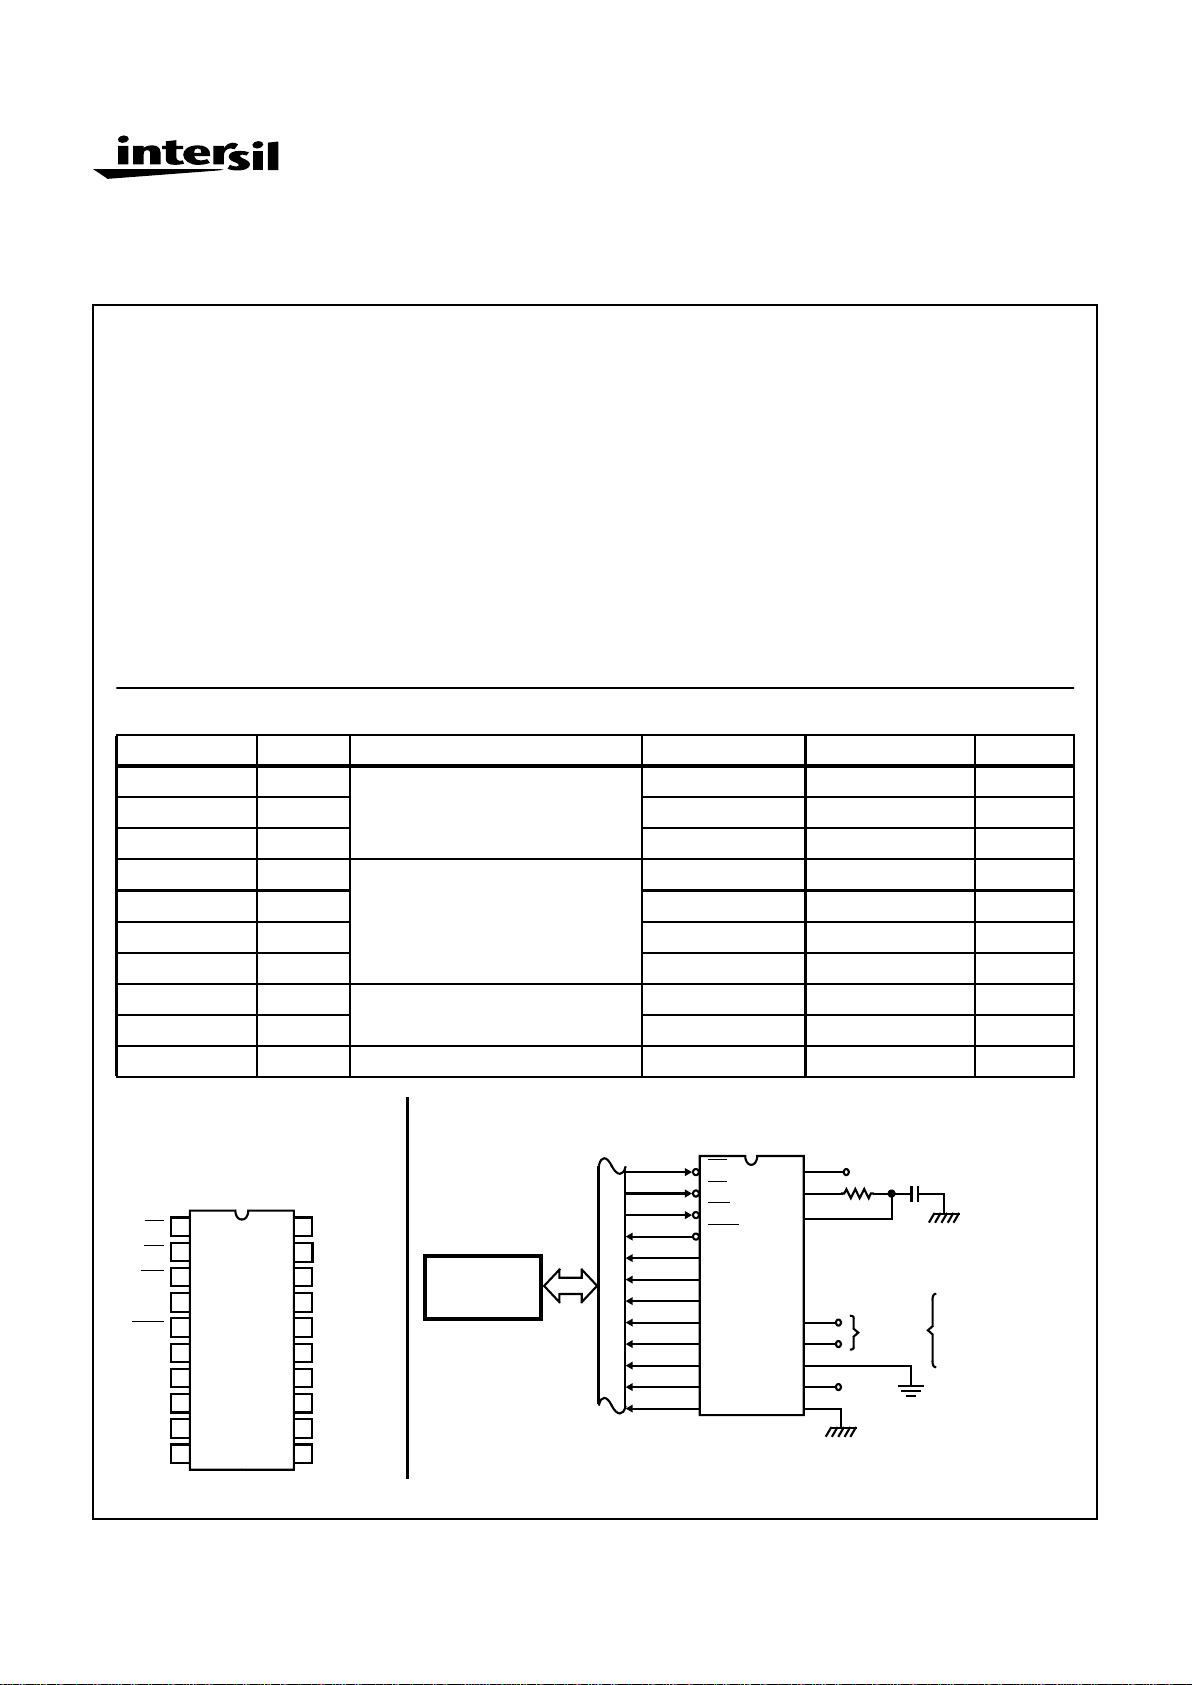
Description
The ADC0802 family are CMOS 8-Bit, successive-approximation A/D converters which use a modified potentiometric
ladder and are designed to operate with the 8080A control
bus via three-state outputs. These converters appear to the
processor as memory locations or I/O ports, and hence no
interfacing logic is required.
The differential analog voltage input has good commonmode-rejection and permits offsetting the analog zero-inputvoltage value. In addition, the voltage reference input can be
adjusted to allow encoding any smaller analog voltage span
to the full 8 bits of resolution.
Ordering Information
PART NUMBER ERROR EXTERNAL CONDITIONS TEMP. RANGE (oC) PACKAGE PKG. NO
ADC0802LCN ±1/2 LSB V
REF
/2 = 2.500VDC(No Adjustments) 0 to 70 20 Ld PDIP E20.3
ADC0802LCD ±3/4 LSB -40 to 85 20 Ld CERDIP F20.3
ADC0802LD ±1 LSB -55 to 125 20 Ld CERDIP F20.3
ADC0803LCN ±1/2 LSB V
REF
/2 Adjusted for Correct Full Scale
Reading
0 to 70 20 Ld PDIP E20.3
ADC0803LCD ±3/4 LSB -40 to 85 20 Ld CERDIP F20.3
ADC0803LCWM ±1 LSB -40 to 85 20 Ld SOIC M20.3
ADC0803LD ±1 LSB -55 to 125 20 Ld CERDIP F20.3
ADC0804LCN ±1 LSB V
REF
/2 = 2.500VDC(No Adjustments) 0 to 70 20 Ld PDIP E20.3
ADC0804LCD ±1 LSB -40 to 85 20 Ld CERDIP F20.3
ADC0804LCWM ±1 LSB -40 to 85 20 Ld SOIC M20.3
Pinout
ADC0802, ADC0803, ADC0804
(PDIP, CERDIP)
TOP VIEW
Typical Application Schematic
11
12
13
14
15
16
17
18
20
19
10
9
8
7
6
5
4
3
2
1
WR
RD
CS
CLK IN
INTR
V
IN
(-)
VIN (+)
DGND
V
REF
/2
AGND
V+ OR V
REF
CLK R
DB
0 (LSB)
DB
1
DB
2
DB
3
DB
4
DB
5
DB
6
DB
7 (MSB)
3
2
1
12
11
5
15
14
13
18
17
16
7
6
10
9
8
4
19
20
WR
RD
CS
DB
6
DB
7
INTR
DB
3
DB
4
DB
5
DB
0
DB
1
DB
2
CLK IN
CLK R
V+
V
IN
(-)
V
IN
(+)
DGND
V
REF
/2
AGND
ANY
µPROCESSOR
8-BIT RESOLUTION
OVER ANY
DESIRED
ANALOG INPUT
VOLTAGE RANGE
DIFF
INPUTS
10K
150pF
V
REF
/2
µP BUS
+5V
August 1997
ADC0802, ADC0803
ADC0804
8-Bit, Microprocessor-
Compatible, A/D Converters
File Number 3094.1
CAUTION: These devices are sensitive to electrostatic discharge; follow proper IC Handling Procedures.
1-888-INTERSIL or 321-724-7143 | Copyright © Intersil Corporation 1999
Page 2
6-6
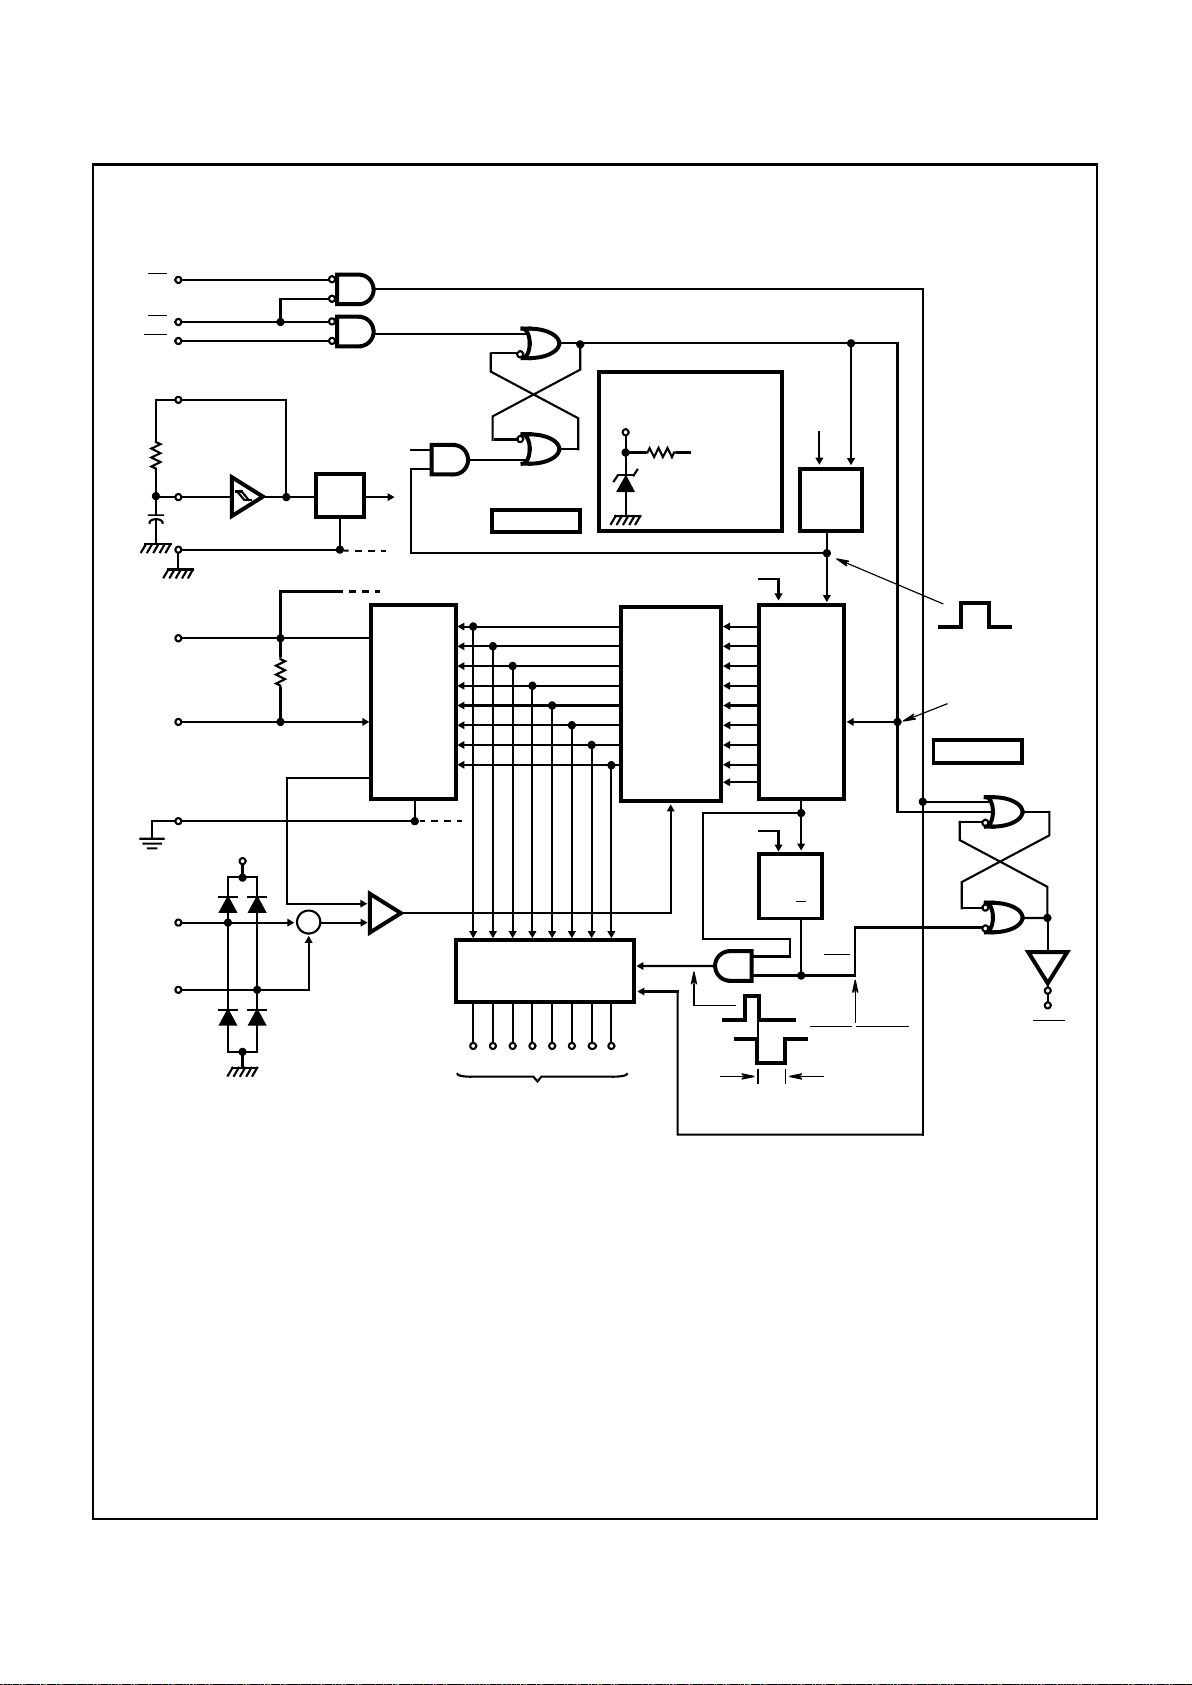
Functional Diagram
1211 151413 181716
WR
RD
CS
INTR
CLK OSC
CLK R
V+
V
IN
(-)
V
IN
(+)
DGND
V
REF
/2
AGND
(V
REF
)
DAC
V
OUT
COMP
CLK
GEN
CLKS
CLK A
RESET
START F/F
LADDER
AND
DECODER
SUCCESSIVE
APPROX.
REGISTER
AND LATCH
8-BIT
SHIFT
REGISTER
D
RESET
SET
CONV. COMPL.
THREE-STATE
OUTPUT LATCHES
DIGITAL OUTPUTS
THREE-STATE CONTROL
“1” = OUTPUT ENABLE
DFF2
CLK A
XFER
G2
Q
8 X 1/f
R
Q
INTR F/F
IF RESET = “0”
D
DFF1
Q
D
Q
CLK B
START
CONVERSION
MSB
LSB
Q
“1” = RESET SHIFT REGISTER
“0” = BUSY AND RESET STATE
RESET
READ
SET
3
2
1
5
7
6
10
9
8
4
19
20
CLK IN
MSB
G1
CLK
-
+
LSB
INPUT PROTECTION
FOR ALL LOGIC INPUTS
INPUT
TO INTERNAL
BV = 30V
CIRCUITS
∑
V+
+
-
ADC0802, ADC0803, ADC0804
Page 3
6-7
Absolute Maximum Ratings Thermal Information
Supply Voltage . . . . . . . . . . . . . . . . . . . . . . . . . . . . . . . . . . . . . .6.5V
Voltage at Any Input . . . . . . . . . . . . . . . . . . . . . . -0.3V to (V+ +0.3V)
Operating Conditions
Temperature Range
ADC0802/03LD. . . . . . . . . . . . . . . . . . . . . . . . . . . -55oC to 125oC
ADC0802/03/04LCD. . . . . . . . . . . . . . . . . . . . . . . .-40oC to 85oC
ADC0802/03/04LCN. . . . . . . . . . . . . . . . . . . . . . . . . .0oC to 70oC
ADC0803/04LCWM . . . . . . . . . . . . . . . . . . . . . . . . -40oC to 85oC
Thermal Resistance (Typical, Note 1) θJA (oC/W) θJC (oC/W)
PDIP Package. . . . . . . . . . . . . . . . . . . . . 125 N/A
CERDIP Package . . . . . . . . . . . . . . . . . . 80 20
SOIC Package. . . . . . . . . . . . . . . . . . . . . 120 N/A
Maximum Junction Temperature
Hermetic Package. . . . . . . . . . . . . . . . . . . . . . . . . . . . . . . .175oC
Plastic Package. . . . . . . . . . . . . . . . . . . . . . . . . . . . . . . . . . 150oC
Maximum Storage Temperature Range . . . . . . . . . .-65oC to 150oC
Maximum Lead Temperature (Soldering, 10s) . . . . . . . . . . . . 300oC
(SOIC - Lead Tips Only)
CAUTION: Stresses above those listed in “Absolute Maximum Ratings” may cause permanent damage to the device. This is a stress only rating and operation
of the device at these or any other conditions above those indicated in the operational sections of this specification is not implied.
NOTE:
1. θJA is measured with the component mounted on an evaluation PC board in free air.
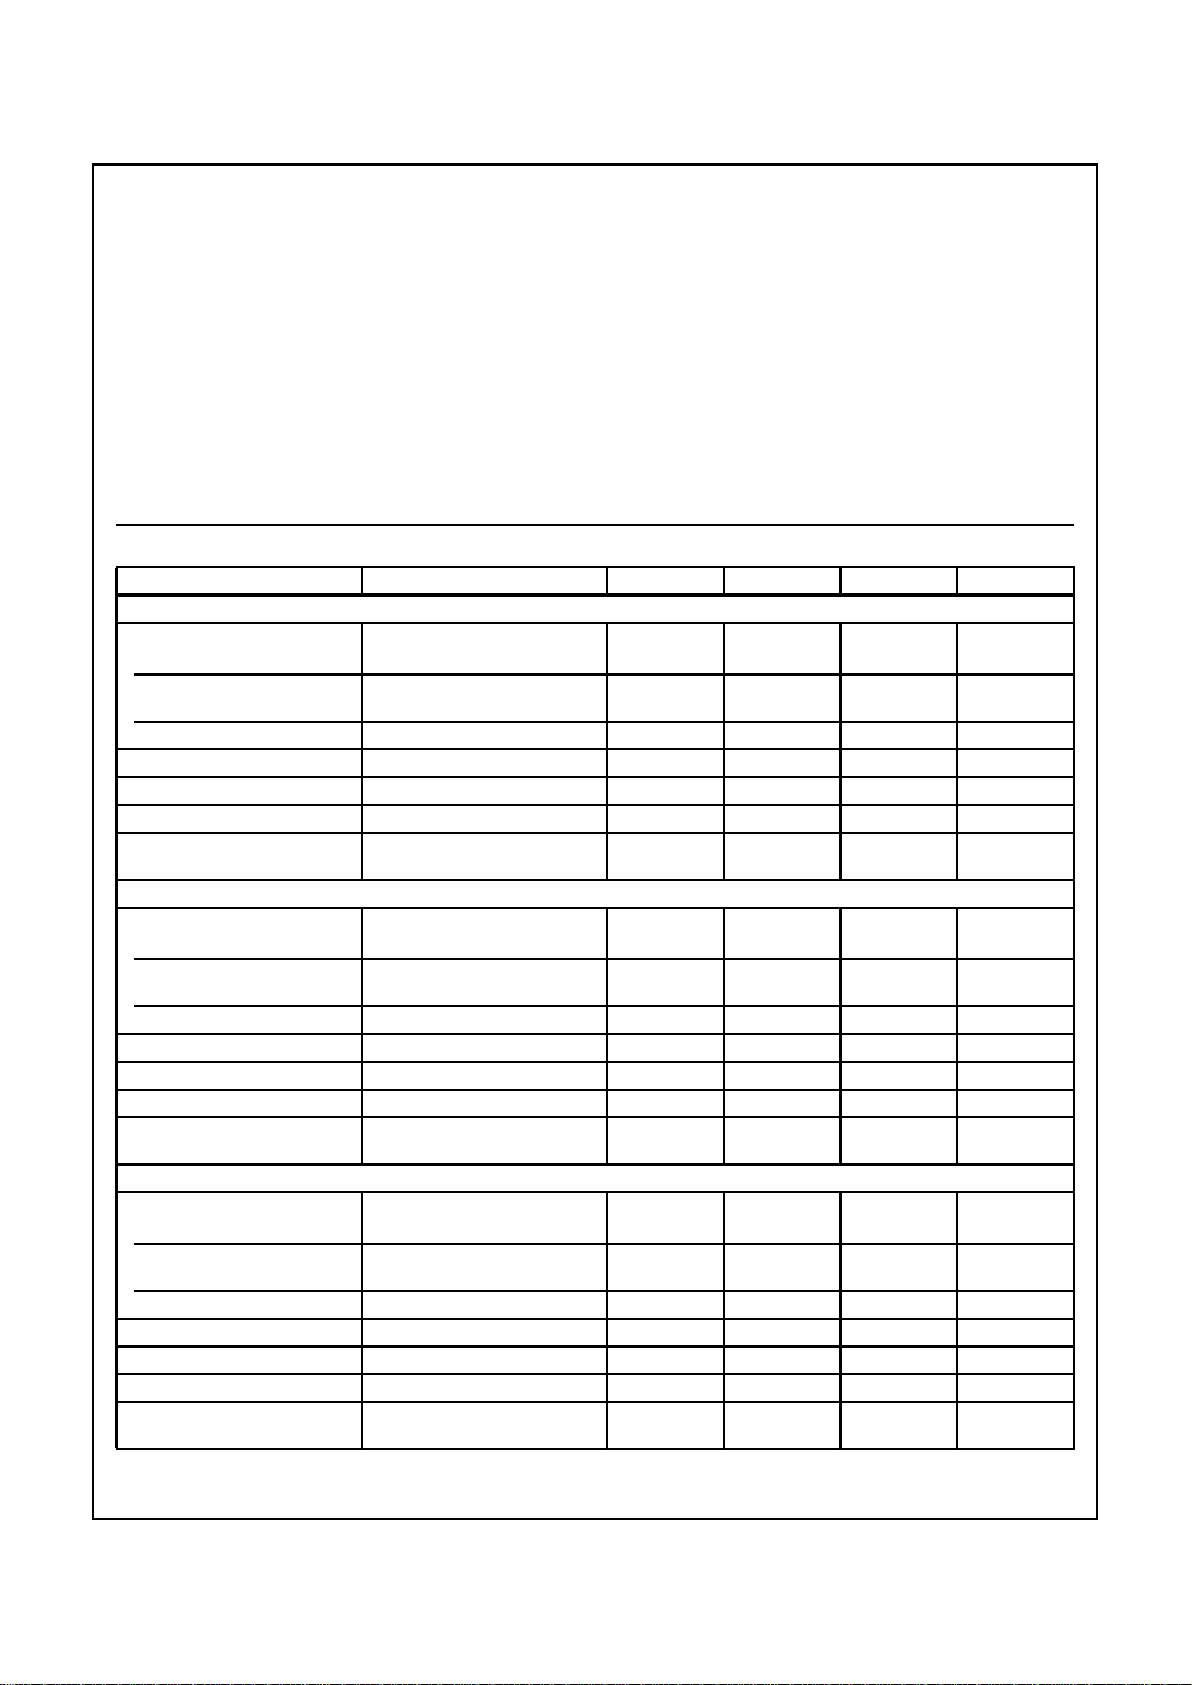
Electrical Specifications (Notes 1, 7)
PARAMETER TEST CONDITIONS MIN TYP MAX UNITS
CONVERTER SPECIFICATIONS V+ = 5V, TA = 25oC and f
CLK
= 640kHz, Unless Otherwise Specified
Total Unadjusted Error
ADC0802 V
REF
/2 = 2.500V - - ±1/
2
LSB
ADC0803 V
REF
/2 Adjusted for Correct Full
Scale Reading
--±1/
2
LSB
ADC0804 V
REF
/2 = 2.500V - - ±1 LSB
V
REF
/2 Input Resistance Input Resistance at Pin 9 1.0 1.3 - kΩ
Analog Input Voltage Range (Note 2) GND-0.05 - (V+) + 0.05 V
DC Common-Mode Rejection Over Analog Input Voltage Range -
±
1
/
16
±
1
/
8
LSB
Power Supply Sensitivity V+ = 5V ±10% Over Allowed Input
Voltage Range
-
±
1
/
16
±
1
/
8
LSB
CONVERTER SPECIFICATIONS V+ = 5V, 0
o
C to 70oC and f
CLK
= 640kHz, Unless Otherwise Specified
Total Unadjusted Error
ADC0802 V
REF
/2 = 2.500V - - ±1/
2
LSB
ADC0803 V
REF
/2 Adjusted for Correct Full
Scale Reading
--±1/
2
LSB
ADC0804 V
REF
/2 = 2.500V - - ±1 LSB
V
REF
/2 Input Resistance Input Resistance at Pin 9 1.0 1.3 - kΩ
Analog Input Voltage Range (Note 2) GND-0.05 - (V+) + 0.05 V
DC Common-Mode Rejection Over Analog Input Voltage Range -
±
1
/
8
±
1
/
4
LSB
Power Supply Sensitivity V+ = 5V±10% Over Allowed Input
Voltage Range
-
±
1
/
16
±
1
/
8
LSB
CONVERTER SPECIFICATIONS V+ = 5V, -25
o
C to 85oC and f
CLK
= 640kHz, Unless Otherwise Specified
Total Unadjusted Error
ADC0802 V
REF
/2 = 2.500V - - ±3/
4
LSB
ADC0803 V
REF
/2 Adjusted for Correct Full
Scale Reading
--±3/
4
LSB
ADC0804 V
REF
/2 = 2.500V - - ±1 LSB
V
REF
/2 Input Resistance Input Resistance at Pin 9 1.0 1.3 - kΩ
Analog Input Voltage Range (Note 2) GND-0.05 - (V+) + 0.05 V
DC Common-Mode Rejection Over Analog Input Voltage Range -
±
1
/
8
±
1
/
4
LSB
Power Supply Sensitivity V+ = 5V±10% Over Allowed Input
Voltage Range
-
±
1
/
16
±
1
/
8
LSB
ADC0802, ADC0803, ADC0804
Page 4
6-8
CONVERTER SPECIFICATIONS V+ = 5V, -55oC to 125oC and f
CLK
= 640kHz, Unless Otherwise Specified
Total Unadjusted Error
ADC0802 V
REF
/2 = 2.500V - - ±1 LSB
ADC0803 V
REF
/2 Adjusted for Correct Full
Scale Reading
--±1 LSB
V
REF
/2 Input Resistance Input Resistance at Pin 9 1.0 1.3 - kΩ
Analog Input Voltage Range (Note 2) GND-0.05 - (V+) + 0.05 V
DC Common-Mode Rejection Over Analog Input Voltage Range -
±
1
/
8
±
1
/
4
LSB
Power Supply Sensitivity V+ = 5V±10% Over Allowed Input
Voltage Range
-
±
1
/
8
±
1
/
4
LSB
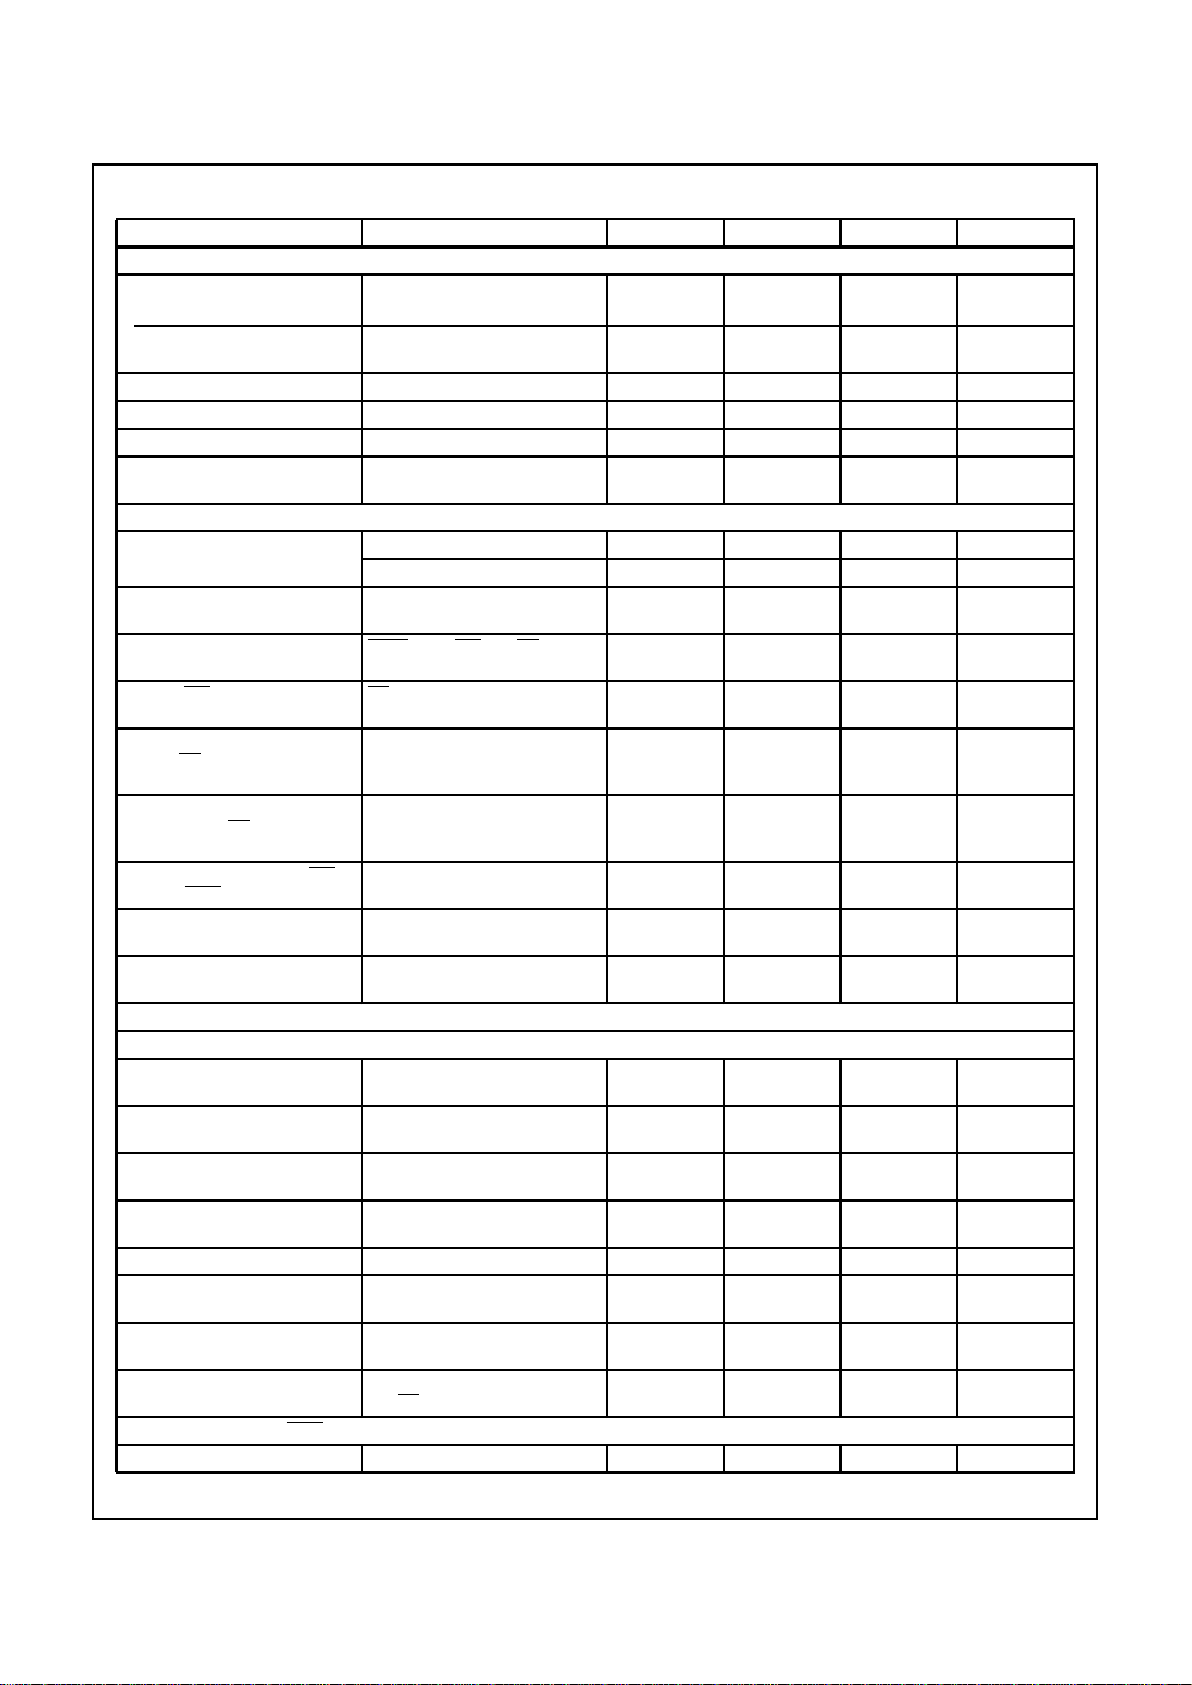
AC TIMING SPECIFICATIONS V+ = 5V, and T
A
= 25oC, Unless Otherwise Specified
Clock Frequency, f
CLK
V+ = 6V (Note 3) 100 640 1280 kHz
V+ = 5V 100 640 800 kHz
Clock Periods per Conversion
(Note 4), t
CONV
62 - 73 Clocks/Conv
Conversion Rate In Free-Running
Mode, CR
INTR tied to WR with CS = 0V,
f
CLK
= 640kHz
- - 8888 Conv/s
Width of
WR Input (Start Pulse
Width), t
W(WR)I
CS = 0V (Note 5) 100 - - ns
Access Time (Delay from Falling
Edge of
RD to Output Data Valid),
t
ACC
CL = 100pF (Use Bus Driver IC for
Larger C
L)
- 135 200 ns
Three-State Control (Delay from
Rising Edge of
RD to Hl-Z State),
t1H, t
0H
CL = 10pF, RL= 10K
(See Three-State Test Circuits)
- 125 250 ns
Delay from Falling Edge of
WR to
Reset of INTR, tWI, t
RI
- 300 450 ns
Input Capacitance of Logic
Control Inputs, C
IN
-5-pF
Three-State Output Capacitance
(Data Buffers), C
OUT
-5-pF
DC DIGITAL LEVELS AND DC SPECIFICATIONS V+ = 5V, and T
MIN
to T
MAX
, Unless Otherwise Specified
CONTROL INPUTS (Note 6)
Logic “1“ Input Voltage (Except
Pin 4 CLK IN), V
INH
V+ = 5.25V 2.0 - V+ V
Logic “0“ Input Voltage (Except
Pin 4 CLK IN), V
INL
V+ = 4.75V - - 0.8 V
CLK IN (Pin 4) Positive Going
Threshold Voltage, V+
CLK
2.7 3.1 3.5 V
CLK IN (Pin 4) Negative Going
Threshold Voltage, V-
CLK
1.5 1.8 2.1 V
CLK IN (Pin 4) Hysteresis, V
H
0.6 1.3 2.0 V
Logic “1” Input Current
(All Inputs), I
INHI
VlN = 5V - 0.005 1 µΑ
Logic “0” Input Current
(All Inputs), I
INLO
VlN = 0V -1 -0.005 - µA
Supply Current (Includes Ladder
Current), I+
f
CLK
= 640kHz,TA = 25oC
and CS = Hl
- 1.3 2.5 mA
DATA OUTPUTS AND
INTR
Logic “0” Output Voltage, V
OL
lO= 1.6mA, V+ = 4.75V - - 0.4 V
Electrical Specifications (Notes 1, 7) (Continued)
PARAMETER TEST CONDITIONS MIN TYP MAX UNITS
ADC0802, ADC0803, ADC0804
Page 5
6-9
Logic “1” Output Voltage, V
OH
lO= -360µA, V+ = 4.75V 2.4 - - V
Three-State Disabled Output
Leakage (All Data Buffers)
, I
LO
V
OUT
= 0V -3 - - µA
V
OUT
= 5V - - 3 µA
Output Short Circuit Current,
I
SOURCE
V
OUT
Short to Gnd TA = 25oC 4.5 6 - mA
Output Short Circuit Current,
I
SINK
V
OUT
Short to V+ TA = 25oC 9.0 16 - mA
NOTES:
1. All voltages are measured with respect to GND , unless otherwise specified. The separate AGND point should always be wired to the
DGND, being careful to avoid ground loops.
2. For V
IN(-)
≥ V
IN(+)
the digital output code will be 0000 0000. Two on-chip diodes are tied to each analog input (see Block Diagram) which
will forward conduct for analog input voltages one diode drop below ground or one diode drop greater than the V+ supply. Be careful,
during testing at low V+ levels (4.5V), as high level analog inputs (5V) can cause this input diode to conduct - especially at elevated temperatures, and cause errors for analog inputs near full scale. As long as the analog VIN does not exceed the supply voltage by more than
50mV, the output code will be correct. To achieve an absolute 0V to 5V input voltage range will therefore require a minimum supply voltage of 4.950V over temperature variations, initial tolerance and loading.
3. With V+ = 6V, the digital logic interfaces are no longer TTL compatible.
4. With an asynchronous start pulse, up to 8 clock periods may be required before the internal clock phases are proper to start the conversion
process.
5. The CS input is assumed to bracket the WR strobe input so that timing is dependent on the WR pulse width. An arbitrarily wide pulse
width will hold the converter in a reset mode and the start of conversion is initiated by the low to high transition of the WR pulse (see
Timing Diagrams).
6. CLK IN (pin 4) is the input of a Schmitt trigger circuit and is therefore specified separately.
7. None of these A/Ds requires a zero-adjust. Howe ver , if an all zero code is desired f or an analog input other than 0V, or if a narrow full scale span
exists (for e xample: 0.5V to 4V full scale) the V
IN(-)
input can be adjusted to achieve this. See the Zero Error description in this data sheet.
Electrical Specifications (Notes 1, 7) (Continued)
PARAMETER TEST CONDITIONS MIN TYP MAX UNITS
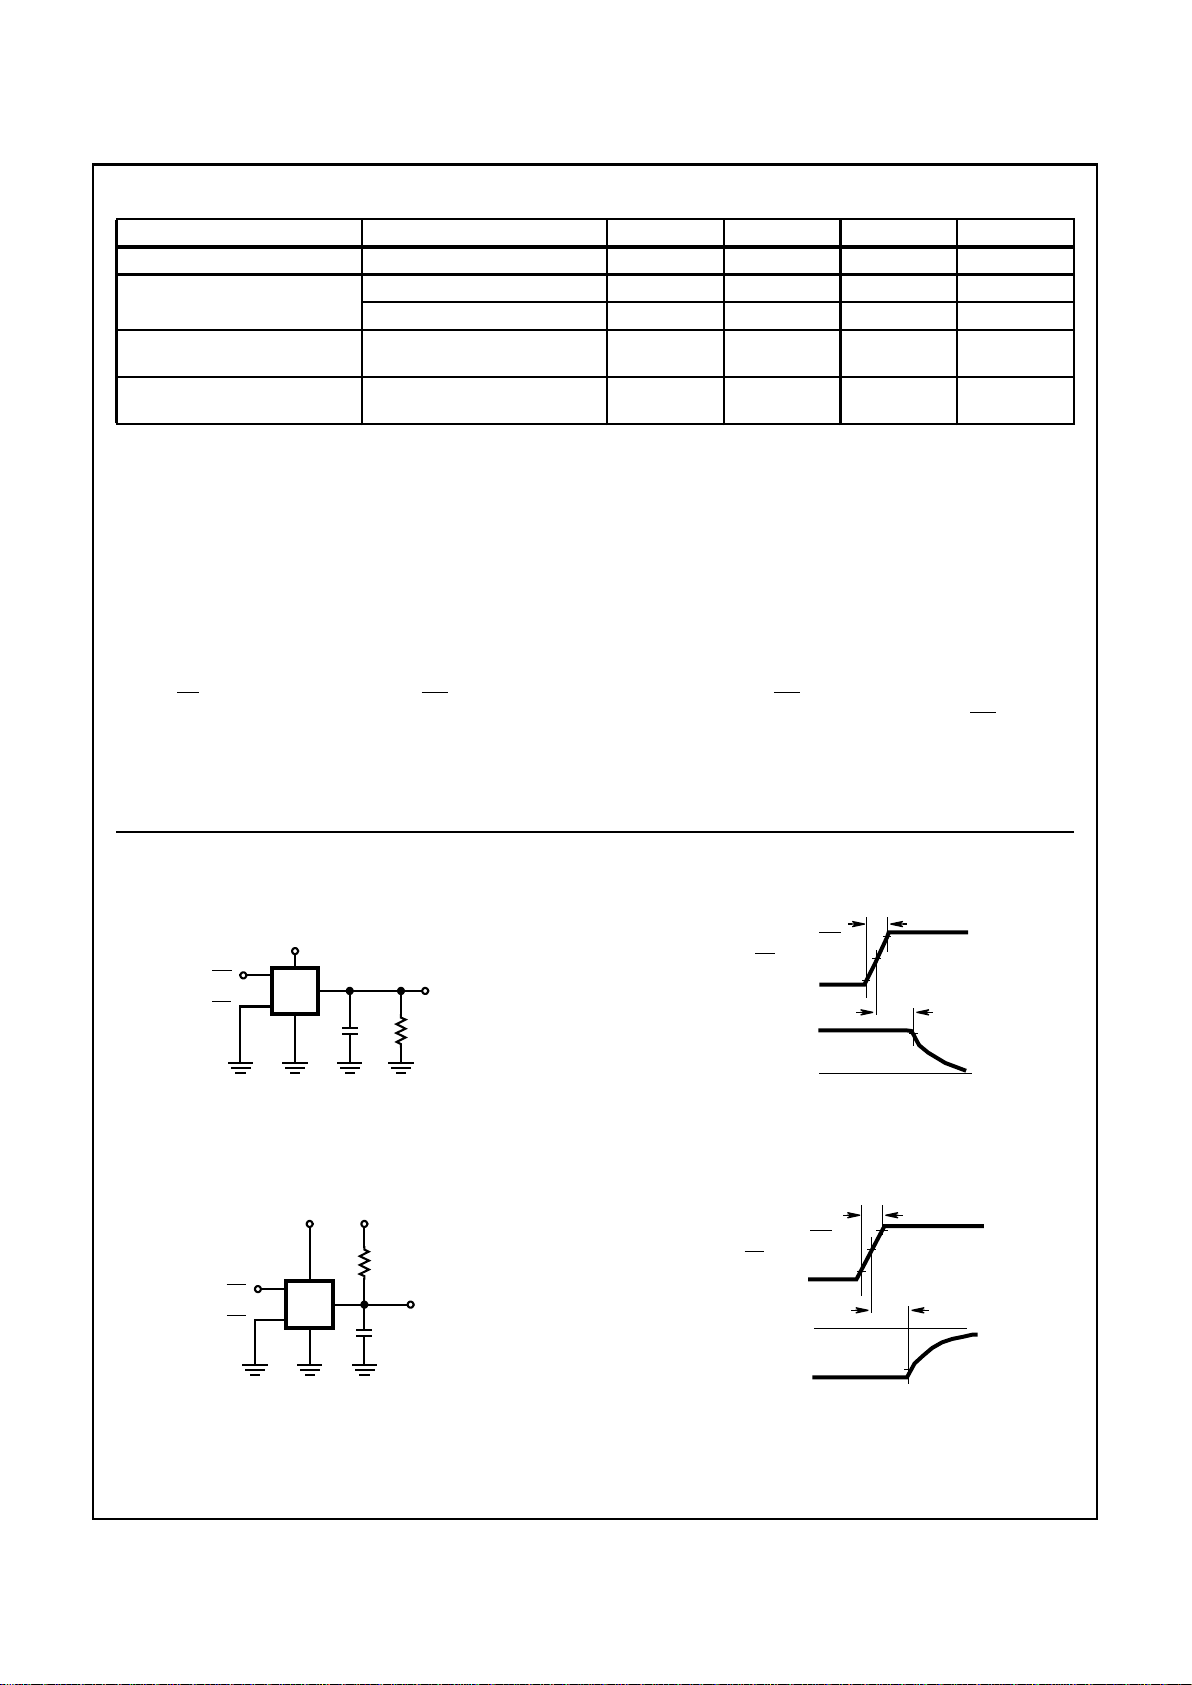
Timing Waveforms
FIGURE 1A. t
1H
FIGURE 1B. t1H, CL = 10pF
FIGURE 1C. t
0H
FIGURE 1D. t0H, CL = 10pF
FIGURE 1. THREE-STATE CIRCUITS AND WAVEFORMS
10K
V+
RD
CS
C
L
DATA
OUTPUT
RD
2.4V
t
r
90%
50%
10%
t
1H
0.8V
DAT A
OUTPUTS
GND
t
r
= 20ns
V
OH
90%
10K
V+
RD
CS
C
L
DATA
OUTPUT
V+
RD
2.4V
t
r
90%
50%
10%
t
0H
0.8V
DAT A
OUTPUTS
V
OI
tr = 20ns
V+
10%
ADC0802, ADC0803, ADC0804
Page 6

6-10
Typical Performance Curves
FIGURE 2. LOGIC INPUT THRESHOLD VOLT AGE vs SUPPLY
VOLTAGE
FIGURE 3. DELA Y FR OM FALLING EDGE OF RD TO OUTPUT
DATA VALID vs LOAD CAPACITANCE
FIGURE 4. CLK IN SCHMITT TRIP LEVELS vs SUPPLY VOLTAGE FIGURE 5. f
CLK
vs CLOCK CAPACITOR
FIGURE 6. FULL SCALE ERROR vs f
CLK
FIGURE 7. EFFECT OF UNADJUSTED OFFSET ERROR
-55oC TO 125oC
1.8
1.7
1.6
1.5
1.4
1.3
4.754.50 5.00 5.25 5.50
V+ SUPPLY VOLTAGE (V)
LOGIC INPUT THRESHOLD VOLTAGE (V)
DELAY (ns)
500
400
300
200
100
0
LOAD CAPACITANCE (pF)
200 400 600 800 1000
CLK IN THRESHOLD VOLTAGE (V)
3.5
3.1
2.7
2.3
1.9
1.5
4.50
V+ SUPPLY VOLTAGE (V)
-55oC TO 125oC
V
T(-)
V
T(+)
4.75 5.00 5.25 5.50
1000
CLOCK CAPACITOR (pF)
f
CLK
(kHz)
100
10010 1000
R = 10K
R = 50K
R = 20K
FULL SCALE ERROR (LSBs)
7
6
5
4
3
2
1
0
f
CLK
(kHz)
0 400 800 1200 1600 2000
V+ = 4.5V
V+ = 5V
V+ = 6V
V
IN(+)
= V
IN(-)
= 0V
ASSUMES V
OS
= 2mV
THIS SHOWS THE NEED
FOR A ZERO ADJUSTMENT
IF THE SPAN IS REDUCED
OFFSET ERROR (LSBs)
16
14
12
10
8
6
4
2
V
REF
/2 (V)
0
0.01 0.1 1.0 5
ADC0802, ADC0803, ADC0804
Page 7

6-11
FIGURE 8. OUTPUT CURRENT vs TEMPERATURE FIGURE 9. POWER SUPPLY CURRENT vs TEMPERATURE
Timing Diagrams
FIGURE 10A. START CONVERSION
FIGURE 10B. OUTPUT ENABLE AND RESET
INTR
Typical Performance Curves (Continued)
OUTPUT CURRENT (mA)
8
7
6
5
4
3
2
-50
T
A
AMBIENT TEMPERATURE (oC)
-I
SINK
V
OUT
= 0.4V
I
SOURCE
V
OUT
= 2.4V
DATA OUTPUT
BUFFERS
V+ = 5V
-25 0 25 50 75 100 125
POWER SUPPLY CURRENT (mA)
TA AMBIENT TEMPERATURE (oC)
-50 -25 0 25 50 75 100 125
1.6
1.5
1.4
1.3
1.2
1.1
1.0
f
CLK
= 640kHz
V+ = 5.5V
V+ = 5.0V
V+ = 4.5V
t
WI
t
W(WR)I
1 TO 8 x 1/f
CLK
INTERNAL T
C
CS
WR
ACTUAL INTERNAL
STATUS OF THE
CONVERTER
INTR
(LAST DATA READ)
(LAST DATA NOT READ)
“NOT BUSY”
“BUSY”
DATA IS VALID IN
OUTPUT LATCHES
INTR
ASSERTED
t
VI
1
/2 f
CLK
VALID
DATA
VALID
DATA
INTR RESET
INTR
CS
RD
DAT A
OUTPUTS
THREE-STATE
(HI-Z)
t
RI
t
ACC
t1H, t
0H
ADC0802, ADC0803, ADC0804
Page 8

6-12
Understanding A/D Error Specs
A perfect A/D transfer characteristic (staircase wave-form) is
shown in Figure 11A. The horizontal scale is analog input voltage and the particular points labeled are in steps of 1 LSB
(19.53mV with 2.5V tied to the V
REF
/2 pin). The digital output
codes which correspond to these inputs are shown as D-1, D,
and D+1. For the perfect A/D, not only will center-value (A - 1,
A, A + 1, . . .) analog inputs produce the correct output digital
codes, but also each riser (the transitions between adjacent
output codes) will be located ±
1
/2 LSB away from each centervalue. As shown, the risers are ideal and hav e no width. Correct
digital output codes will be provided for a range of analog input
voltages which extend ±
1
/2 LSB from the ideal center-values.
Each tread (the range of analog input voltage which provides
the same digital output code) is therefore 1 LSB wide.
The error curve of Figure 11B shows the worst case transfer
function for the ADC0802. Here the specification guarantees
that if we apply an analog input equal to the LSB analog voltage center-value, the A/D will produce the correct digital code.
Next to each transfer function is shown the corresponding error
plot. Notice that the error includes the quantization uncertainty of
the A/D. For example, the error at point 1 of Figure 11A is
+
1
/2LSB because the digital code appeared1/2 LSB in advance
of the center-value of the tread. The error plots always have a
constant negative slope and the abrupt upside steps are always
1 LSB in magnitude, unless the device has missing codes.
Detailed Description
The functional diagram of the ADC0802 series of A/D
converters operates on the successive approximation principle (see Application Notes AN016 and AN020 for a more
detailed description of this principle). Analog switches are
closed sequentially by successive-approximation logic until
the analog differential input voltage [V
lN(+)
- V
lN(-)
] matches
a voltage derived from a tapped resistor string across the
reference voltage. The most significant bit is tested first and
after 8 comparisons (64 clock cycles), an 8-bit binary code
(1111 1111 = full scale) is transferred to an output latch.
The normal operation proceeds as follows. On the high-to-low
transition of the WR input, the internal SAR latches and the
shift-register stages are reset, and the INTR output will be set
high. As long as the CS input and WR input remain low, the
A/D will remain in a reset state. Conversion will start from 1 to
8 clock periods after at least one of these inputs makes a lowto-high transition. After the requisite number of clock pulses to
complete the conversion, the INTR pin will make a high-to-lo w
transition. This can be used to interrupt a processor, or
otherwise signal the availability of a new conversion. A RD
operation (with CS low) will clear the INTR line high again.
TRANSFER FUNCTION ERROR PLOT
FIGURE 11A. ACCURACY =±0 LSB; PERFECT A/D
TRANSFER FUNCTION ERROR PLOT
FIGURE 11B. ACCURACY =±1/2 LSB
FIGURE 11. CLARIFYING THE ERROR SPECS OF AN A/D CONVERTER
ANALOG INPUT (VIN)
DIGITAL OUTPUT CODE
D + 1
D
D - 1
A + 1
A
A - 1
3
21
56
4
3
2
15
64
ERROR
0
+1 LSB
-1 LSB
-
1
/2 LSB
+
1
/2 LSB
*
QUANTIZATION ERROR
A
ANALOG INPUT (V
IN
)
A + 1A - 1
ANALOG INPUT (VIN)
DIGITAL OUTPUT CODE
D + 1
D
D - 1
A + 1
A
A - 1
3
2
1
5
6
4
*
0
+1 LSB
-1 LSB
QUANTIZATION
ERROR
3
2
1
6
4
ANALOG INPUT (V
IN
)
A + 1AA - 1
ERROR
ADC0802, ADC0803, ADC0804
Page 9

6-13
The device may be operated in the free-running mode b y connecting INTR to the WR input with CS = 0. To ensure start-up
under all possible conditions, an external WR pulse is
required during the first power-up cycle. A conversion-in-process can be interrupted by issuing a second start command.
Digital Operation
The converter is started by having CS and WR simultaneously
low. This sets the start flip-flop (F/F) and the resulting “1” level
resets the 8-bit shift register, resets the Interrupt (INTR) F/F
and inputs a “1” to the D flip-flop, DFF1, which is at the input
end of the 8-bit shift register. Internal clock signals then transfer this “1” to the Q output of DFF1. The AND gate, G1, combines this “1” output with a clock signal to provide a reset
signal to the start F/F. If the set signal is no longer present
(either WR or CS is a “1”), the start F/F is reset and the 8-bit
shift register then can have the “1” clock ed in, which starts the
conversion process. If the set signal were to still be present,
this reset pulse would have no effect (both outputs of the start
F/F would be at a “1” level) and the 8-bit shift register would
continue to be held in the reset mode. This allows for asynchronous or wide CS and WR signals.
After the “1” is clocked through the 8-bit shift register (which
completes the SAR operation) it appears as the input to
DFF2. As soon as this “1” is output from the shift register, the
AND gate, G2, causes the new digital word to transfer to the
Three-State output latches. When DFF2 is subsequently
clocked, the
Q output makes a high-to-low transition which
causes the INTR F/F to set. An inverting buffer then supplies
the
INTR output signal.
When data is to be read, the combination of both
CS and RD
being low will cause the INTR F/F to be reset and the threestate output latches will be enabled to provide the 8-bit digital
outputs.
Digital Control Inputs
The digital control inputs (CS, RD, and WR) meet standard
TTL logic voltage lev els. These signals are essentially equivalent to the standard A/D Start and Output Enable control signals, and are active low to allow an easy interface to
microprocessor control busses. For non-microprocessor
based applications, the CS input (pin 1) can be grounded and
the standard A/D Start function obtained by an active low
pulse at the WR input (pin 3). The Output Enable function is
achieved by an active low pulse at the RD input (pin 2).
Analog Operation
The analog comparisons are performed by a capacitive
charge summing circuit. Three capacitors (with precise
ratioed values) share a common node with the input to an
auto-zeroed comparator. The input capacitor is switched
between V
lN(+)
and V
lN(-)
, while two ratioed reference capacitors are switched between taps on the reference voltage
divider string. The net charge corresponds to the weighted difference between the input and the current total value set by
the successive approximation register. A correction is made to
offset the comparison by
1
/2 LSB (see Figure 11A).
Analog Differential Voltage Inputs and Common-Mode
Rejection
This A/D gains considerable applications flexibility from the analog differential voltage input. The V
lN(-)
input (pin 7) can be used
to automatically subtract a fixed voltage value from the input
reading (tare correction). This is also useful in 4mA - 20mA current loop conversion. In addition, common-mode noise can be
reduced by use of the differential input.
The time interval between sampling V
IN(+)
and V
lN(-)
is 41/
2
clock periods. The maximum error voltage due to this slight
time difference between the input voltage samples is giv en b y:
where:
∆V
E
is the error voltage due to sampling delay,
V
PEAK
is the peak value of the common-mode voltage,
f
CM
is the common-mode frequency.
For example, with a 60Hz common-mode frequency, f
CM
,
and a 640kHz A/D clock, f
CLK
, keeping this error to1/4 LSB
(~5mV) would allow a common-mode voltage, V
PEAK
, given
by:
,
or
.
The allowed range of analog input voltage usually places
more severe restrictions on input common-mode voltage
levels than this.
An analog input voltage with a reduced span and a relatively
large zero offset can be easily handled by making use of the
differential input (see Reference Voltage Span Adjust).
Analog Input Current
The internal switching action causes displacement currents to
flow at the analog inputs. The voltage on the on-chip capacitance to ground is switched through the analog differential
input voltage, resulting in proportional currents entering the
V
IN(+)
input and leaving the V
IN(-)
input. These current transients occur at the leading edge of the internal clocks. They
rapidly decay and do not inherently cause errors as the onchip comparator is strobed at the end of the clock perIod.
Input Bypass Capacitors
Bypass capacitors at the inputs will average these charges
and cause a DC current to flow through the output resistances
of the analog signal sources. This charge pumping action is
worse for continuous conv ersions with the V
IN(+)
input voltage
at full scale. For a 640kHz clock frequency with the V
IN(+)
input at 5V, this DC current is at a maximum of approximately
5µA. Therefore, bypass capacitors should not be used at
the analog inputs or the V
REF
/2 pin for high resistance
sources (>1kΩ). If input bypass capacitors are necessary for
noise filtering and high source resistance is desirable to minimize capacitor size, the effects of the voltage drop across this
input resistance, due to the average value of the input current,
can be compensated by a full scale adjustment while the
given source resistor and input bypass capacitor are both in
place. This is possible because the average value of the input
current is a precise linear function of the differential input
voltage at a constant conversion r ate .
VEMAX()∆ V
PEAK
()2πfCM()
4.5
f
CLK
------------
=
V
PEAK
∆V
E MAX()f
CLK
()
2πfCM()4.5()
--------------------------------------------------=
V
PEAK
510
3–
×()640 103×()
6.28()60()4.5()
----------------------------------------------------------
1.9V≅=
ADC0802, ADC0803, ADC0804
Page 10

6-14
Input Source Resistance
Large values of source resistance where an input bypass
capacitor is not used will not cause errors since the input
currents settle out prior to the comparison time. If a lowpass filter is required in the system, use a low-value series
resistor (≤1kΩ) for a passive RC section or add an op amp
RC active low-pass filter. For low-source-resistance
applications (≤1kΩ), a 0.1µF bypass capacitor at the inputs
will minimize EMI due to the series lead inductance of a long
wire. A 100Ω series resistor can be used to isolate this
capacitor (both the R and C are placed outside the feedback
loop) from the output of an op amp, if used.
Stray Pickup
The leads to the analog inputs (pins 6 and 7) should be kept
as short as possible to minimize stray signal pickup (EMI).
Both EMI and undesired digital-clock coupling to these inputs
can cause system errors. The source resistance for these
inputs should, in general, be kept below 5kΩ. Larger values of
source resistance can cause undesired signal pickup. Input
bypass capacitors, placed from the analog inputs to ground,
will eliminate this pickup but can create analog scale errors as
these capacitors will average the transient input switching currents of the A/D (see Analog Input Current). This scale error
depends on both a large source resistance and the use of an
input bypass capacitor. This error can be compensated by a
full scale adjustment of the A/D (see Full Scale Adjustment)
with the source resistance and input bypass capacitor in
place, and the desired conversion rate .
Reference Voltage Span Adjust
For maximum application flexibility, these A/Ds have been
designed to accommodate a 5V, 2.5V or an adjusted voltage
reference. This has been achieved in the design of the IC as
shown in Figure 12.
Notice that the reference voltage f or the IC is either
1
/2 of the
voltage which is applied to the V+ supply pin, or is equal to
the voltage which is externally forced at the V
REF
/2 pin. This
allows for a pseudo-ratiometric voltage reference using, for
the V+ supply, a 5V reference voltage. Alternatively, a voltage less than 2.5V can be applied to the V
REF
/2 input. The
internal gain to the V
REF
/2 input is 2 to allow this factor of 2
reduction in the reference voltage.
Such an adjusted reference voltage can accommodate a
reduced span or dynamic voltage range of the analog input
voltage. If the analog input voltage w ere to r ange from 0.5V to
3.5V, instead of 0V to 5V, the span would be 3V. With 0.5V
applied to the V
lN(-)
pin to absorb the offset, the reference
voltage can be made equal to
1
/2 of the 3V span or 1.5V. The
A/D now will encode the V
lN(+)
signal from 0.5V to 3.5V with
the 0.5V input corresponding to zero and the 3.5V input corresponding to full scale. The full 8 bits of resolution are therefore
applied over this reduced analog input voltage r ange. The requisite connections are shown in Figure 13. For expanded
scale inputs, the circuits of Figures 14 and 15 can be used.
FIGURE 12. THE V
REFERENCE
DESIGN ON THE IC
FIGURE 13. OFFSETTING THE ZERO OF THE ADC0802 AND
PERFORMING AN INPUT RANGE (SPAN)
ADJUSTMENT
FIGURE 14. HANDLING ±10V ANALOG INPUT RANGE
V+
DGND
V
REF
/2
AGND
(V
REF
)
R
R
DIGITAL
CIRCUITS
ANALOG
CIRCUITS
9
810
20
DECODE
300
TO V
REF
/2
TO V
IN(-)
ZERO SHIFT VOLTAGE
0.1µF
5V
-
+
V
REF
(5V)
FS
ADJ.
“SPAN”/2
ICL7611
V
IN(-)
2R
5V
2R
V
IN
± 10V
R
V
IN(+)
(V
REF
)
V+
20
10µF
6
7
+
ADC0802-
ADC0804
ADC0802, ADC0803, ADC0804
Page 11

6-15
Reference Accuracy Requirements
The converter can be operated in a pseudo-ratiometric
mode or an absolute mode. In ratiometric converter applications, the magnitude of the reference voltage is a factor in
both the output of the source transducer and the output of
the A/D converter and therefore cancels out in the final digital output code. In absolute conversion applicatIons , both the
initial value and the temperature stability of the reference
voltage are important accuracy factors in the operation of the
A/D converter. For V
REF
/2 voltages of 2.5V nominal value,
initial errors of ±10mV will cause conversion errors of ±1
LSB due to the gain of 2 of the V
REF
/2 input. In reduced
span applications, the initial value and the stability of the
V
REF
/2 input voltage become even more important. For
example, if the span is reduced to 2.5V, the analog input LSB
voltage value is correspondingly reduced from 20mV (5V
span) to 10mV and 1 LSB at the V
REF
/2 input becomes
5mV. As can be seen, this reduces the allowed initial tolerance of the reference voltage and requires correspondingly
less absolute change with temperature variations. Note that
spans smaller than 2.5V place even tighter requirements on
the initial accuracy and stability of the reference source.
In general, the reference voltage will require an initial
adjustment. Errors due to an improper value of reference
voltage appear as full scale errors in the A/D transfer function. IC voltage regulators may be used for references if the
ambient temperature changes are not excessive.
Zero Error
The zero of the A/D does not require adjustment. If the
minimum analog input voltage value, V
lN(MlN)
, is not ground, a
zero offset can be done. The converter can be made to output
0000 0000 digital code for this minimum input voltage by biasing the A/D V
IN(-)
input at this V
lN(MlN)
value (see Applications
section). This utilizes the differential mode operation of the A/D.
The zero error of the A/D converter relates to the location of
the first riser of the transfer function and can be measured by
grounding the V
IN(-)
input and applying a small magnitude
positive voltage to the V
IN(+)
input. Zero error is the difference
between the actual DC input voltage which is necessary to
just cause an output digital code transition from 0000 0000 to
0000 0001 and the ideal
1
/2 LSB value (1/2 LSB = 9.8mV for
V
REF
/2 = 2.500V).
Full Scale Adjust
The full scale adjustment can be made by applying a
differential input voltage which is 1
1
/2 LSB down from the
desired analog full scale voltage range and then adjusting
the magnitude of the V
REF
/2 input (pin 9) for a digital output
code which is just changing from 1111 1110 to 1111 1111.
When offsetting the zero and using a span-adjusted V
REF
/2
voltage, the full scale adjustment is made by inputting V
MlN
to the V
IN(-)
input of the A/D and applying a voltage to the
V
IN(+)
input which is given by:
,
where:
V
MAX
= the high end of the analog input range,
and
V
MIN
= the low end (the offset zero) of the analog range.
(Both are ground referenced.)
Clocking Option
The clock for the A/D can be derived from an e xternal source
such as the CPU clock or an external RC network can be
added to provIde self-clocking. The CLK IN (pin 4) makes
use of a Schmitt trigger as shown in Figure 16.
Heavy capacitive or DC loading of the CLK R pin should be
avoided as this will disturb normal converter operation.
Loads less than 50pF, such as driving up to 7 A/D converter
clock inputs from a single CLK R pin of 1 converter, are
allowed. For larger clock line loading, a CMOS or low power
TTL buffer or PNP input logic should be used to minimize the
loading on the CLK R pin (do not use a standard TTL buffer).
Restart During a Conversion
If the A/D is restarted (
CS and WR go low and return high)
during a conversion, the converter is reset and a new conversion is started. The output data latch is not updated if the
conversion in progress is not completed. The data from the
previous conversion remain in this latch.
Continuous Conversions
In this application, the
CS input is grounded and the WR
input is tied to the
INTR output. This WR and INTR node
should be momentarily forced to logic low following a powerup cycle to insure circuit operation. See Figure 17 for details.
FIGURE 15. HANDLING ±5V ANALOG INPUT RANGE
V
IN(-)
R
5V
VIN±5V
R
V
IN(+)
(V
REF
)
V+
20
10µF
6
7
+
ADC0802-
ADC0804
V
IN +()fSADJVMAX
1.5
V
MAXVMIN
–()
256
-----------------------------------------
–=
CLK R
4
CLK IN
CLK
ADC0802-
ADC0804
f
CLK
≅
19
R
C
1
1.1 RC
R
≅10kΩ
FIGURE 16. SELF-CLOCKING THE A/D
ADC0802, ADC0803, ADC0804
Page 12

6-16
Driving the Data Bus
This CMOS A/D, like MOS microprocessors and memories,
will require a bus driver when the total capacitance of the
data bus gets large. Other circuItry, which is tied to the data
bus, will add to the total capacitive loading, even in threestate (high-impedance mode). Back plane busing also
greatly adds to the stray capacitance of the data bus.
There are some alternatives available to the designer to handle this problem. Basically, the capacitive loading of the data
bus slows down the response time, even though DC specifications are still met. For systems operating with a relatively
slow CPU clock frequency, more time is available in which to
establish proper logic levels on the bus and therefore higher
capacitive loads can be driven (see Typical Performance
Curves).
At higher CPU clock frequencies time can be extended for
I/O reads (and/or writes) by inserting wait states (8080) or
using clock-extending circuits (6800).
Finally, if time is short and capacitive loading is high,
external bus drivers must be used. These can be three-state
buffers (low power Schottky is recommended, such as the
74LS240 series) or special higher-drive-current products
which are designed as bus drivers. High-current bipolar bus
drivers with PNP inputs are recommended.
Power Supplies
Noise spikes on the V+ supply line can cause conversion
errors as the comparator will respond to this noise. A
low-inductance tantalum filter capacitor should be used
close to the converter V+ pin, and values of 1µF or greater
are recommended. If an unregulated voltage is available in
the system, a separate 5V voltage regulator for the con v erter
(and other analog circuitry) will greatly reduce digital noise
on the V+ supply. An lCL7663 can be used to regulate such
a supply from an input as low as 5.2V.
Wiring and Hook-Up Precautions
Standard digital wire-wrap sockets are not satisfactory for
breadboarding with this A/D converter. Sockets on PC
boards can be used. All logic signal wires and leads should
be grouped and kept as far a way as possible from the analog
signal leads. Exposed leads to the analog inputs can cause
undesired digital noise and hum pickup; therefore, shielded
leads may be necessary in many applications.
A single-point analog ground should be used which is separate
from the logic ground points. The power supply bypass capacitor and the self-clockIng capacitor (if used) should both be
returned to digital ground. Any V
REF
/2 bypass capacitors, analog input filter capacitors, or input signal shielding should be
returned to the analog ground point. A test for proper grounding
is to measure the zero error of the A/D converter. Zero errors in
excess of
1
/4 LSB can usually be traced to improper board
layout and wiring (see Zero Error for measurement). Further
information can be found in Application Note AN018.
Testing the A/D Converter
There are many degrees of complexity associated with testing
an A/D converter. One of the simplest tests is to apply a
known analog input voltage to the converter and use LEDs to
display the resulting digital output code as shown in Figure 18.
For ease of testing, the V
REF
/2 (pin 9) should be supplied
with 2.560V and a V+ supply voltage of 5.12V should be
used. This provides an LSB value of 20mV.
If a full scale adjustment is to be made, an analog input voltage of 5.090V (5.120 - 1
1
/2 LSB) should be applied to the
V
IN(+)
pin with the V
IN(-)
pin grounded. The value of the
V
REF
/2 input voltage should be adjusted until the digital output code is just changing from 1111 1110 to 1111 1111. This
value of V
REF
/2 should then be used for all the tests.
The digital-output LED display can be decoded by dividing the 8
bits into 2 hex characters, one with the 4 most-significant bits
(MS) and one with the 4 least-significant bits (LS). The output is
then interpreted as a sum of fractions times the full scale voltage:
.
For example, for an output LED display of 1011 0110, the
MS character is hex B (decimal 11) and the LS character is
hex (and decimal) 6, so:
.
11
12
13
14
15
16
17
18
20
19
10
9
8
7
6
5
4
3
2
1
ADC0802 - ADC0804
WR
RD
CS
INTR
CLK IN
V
IN
(-)
V
IN
(+)
DGND
V
REF
/2
AGND
DB
1
DB
0
DB
4
DB
3
DB
2
DB
7
DB
6
DB
5
CLK R
V+
10K
5V (V
REF
)
10µF
+
DAT A
START
ANALOG
INPUTS
150pF
OUTPUTS
N.O.
MSB
LSB
FIGURE 17. FREE-RUNNING CONNECTION
V
OUT
MS
16
-------- -
LS
256
--------- -+
5.12()V=
START
VIN (+)
DGND
2.560V
AGND
10µF
150pF
N.O.
0.1µF
0.1µF
TANTALUM
5.120V
5V
1.3kΩ
LEDs
(8)
(8)
MSB
LSB
10kΩ
V
REF
/2
+
11
12
13
14
15
16
17
18
20
19
10
9
8
7
6
5
4
3
2
1
ADC0802-
ADC0804
FIGURE 18. BASIC TESTER FOR THE A/D
V
OUT
11
16
------
6
256
--------- -+
5.12()3.64V==
ADC0802, ADC0803, ADC0804
Page 13

6-17
Figures 19 and 20 show more sophisticated test circuits.
Typical Applications
Interfacing 8080/85 or Z-80 Microprocessors
This converter has been designed to directly interface with
8080/85 or Z-80 Microprocessors. The three-state output
capability of the A/D eliminates the need for a peripheral
interface device, although address decoding is still required
to generate the appropriate
CS for the converter. The A/D
can be mapped into memory space (using standard memory-address decoding for
CS and the MEMR and MEMW
strobes) or it can be controlled as an I/O device by using the
I/OR and I/OW strobes and decoding the address bits A0 →
A7 (or address bits A8 → A15, since they will contain the
same 8-bit address information) to obtain the
CS input.
Using the I/O space provides 256 additional addresses and
may allow a simpler 8-bit address decoder, but the data can
only be input to the accumulator. To make use of the additional memory reference instructions, the A/D should be
mapped into memory space. See AN020 for more discussion of memory-mapped vs I/O-mapped interfaces. An
example of an A/D in I/O space is shown in Figure 21.
The standard control-bus signals of the 8080 (
CS, RD and
WR) can be directly wired to the digital control inputs of the
A/D, since the b us timing requirements , to allo w both starting
the converter, and outputting the data onto the data bus, are
met. A bus driver should be used for larger microprocessor
systems where the data bus leaves the PC board and/or
must drive capacitive loads larger than 100pF.
It is useful to note that in systems where the A/D converter is
1 of 8 or fewer I/O-mapped devices, no address-decoding
circuitry is necessary. Each of the 8 address bits (A0 to A7)
can be directly used as
CS inputs, one for each I/O device.
Interfacing the Z-80 and 8085
The Z-80 and 8085 control buses are slightly different from
that of the 8080. General
RD and WR strobes are provided
and separate memory request,
MREQ, and I/O request,
IORQ, signals have to be combined with the generalized
strobes to provide the appropriate signals. An advantage of
operating the A/D in I/O space with the Z-80 is that the CPU
will automatically insert one wait state (the
RD and WR
strobes are extended one clock period) to allow more time
for the I/O devices to respond. Logic to map the A/D in I/O
space is shown in Figure 22. By using
MREQ in place of
IORQ, a memory-mapped configuration results.
Additional I/O advantages exist as software DMA routines are
available and use can be made of the output data transfer
which exists on the upper 8 address lines (A8 to A15) during
I/O input instructions. For example, MUX channel selection for
the A/D can be accomplished with this operating mode.
The 8085 also provides a generalized
RD and WR strobe, with
an IO/
M line to distinguish I/O and memory requests. The cir-
cuit of Figure 22 can again be used, with IO/
M in place of IORQ
for a memory-mapped interface, and an extra inverter (or the
logic equivalent) to provide
IO/M for an I/O-mapped connection.
Interfacing 6800 Microprocessor Derivatives (6502, etc.)
The control bus for the 6800 microprocessor derivatives does
not use the RD and WR strobe signals. Instead it employs a
single R/W line and additional timing, if needed, can be derived
from the φ2 clock. All I/O devices are memory-mapped in the
6800 system, and a special signal, VMA, indicates that the current address is valid. Figure 23 shows an interface schematic
where the A/D is memory-mapped in the 6800 system. For simplicity, the CS decoding is shown using
1
/2 DM8092. Note that
in many 6800 systems, an already decoded
4/5 line is brought
out to the common bus at pin 21. This can be tied directly to the
CS pin of the A/D, provided that no other devices are
addressed at HEX ADDR: 4XXX or 5XXX.
In Figure 24 the ADC0802 series is interfaced to the MC6800
microprocessor through (the arbitrarily chosen) Port B of the
MC6820 or MC6821 Peripheral Interface Adapter (PlA). Here
the CS pin of the A/D is grounded since the PlA is already
memory-mapped in the MC6800 system and no CS decoding
is necessary. Also notice that the A/D output data lines are connected to the microprocessor bus under program control
through the PlA and therefore the A/D RD pin can be grounded.
Application Notes
ANALOG
INPUTS
“A”
R
“B”
R
R
R
“C”
100R
-
+
A2
8-BIT
A/D UNDER
TEST
10-BIT
DAC
V
ANALOG OUTPUT
100X ANALOG
-
+
A1
ERROR VOLTAGE
FIGURE 19. A/D TESTER WITH ANALOG ERROR OUTPUT . THIS
CIRCUIT CAN BE USED TO GENERATE “ERROR
PLOTS” OF FIGURE 11.
A/D UNDER
TEST
10-BIT
DAC
DIGITAL
V
ANALOG
INPUTS
DIGITAL
OUTPUTS
FIGURE 20. BASIC “DIGITAL” A/D TESTER
NOTE # DESCRIPTION
AnswerFAX
DOC. #
AN016 “Selecting A/D Converters” 9016
AN018 “Do’s and Don’ts of Applying A/D
Converters”
9018
AN020 “A Cookbook Approach to High Speed
Data Acquisition and Microprocessor
Interfacing”
9020
AN030 “The ICL7104 - A Binary Output A/D
Converter for Microprocessors”
9030
ADC0802, ADC0803, ADC0804
Page 14

6-18
NOTE: Pin numbers for 8228 System Controller: Others are 8080A.
FIGURE 21. ADC0802 TO 8080A CPU INTERFACE
11
12
13
14
15
16
17
18
20
19
10
9
8
7
6
5
4
3
2
1
ADC0802 - ADC0804
WR
RD
CS
INTR
CLK IN
V
IN
(-)
V
IN
(+)
DGND
V
REF
/2
AGND
DB
1
DB
0
DB
4
DB
3
DB
2
DB
7
DB
6
DB
5
CLK R
V+
10K
5V
10µF
+
ANALOG
INPUTS
150pF
MSB
LSB
DB1(16) (NOTE)
DB0(13) (NOTE)
DB
4
(5) (NOTE)
DB
3
(9) (NOTE)
DB
2
(11) (NOTE)
DB
7
(7) (NOTE)
DB
6
(20) (NOTE)
DB
5
(18) (NOTE)
5V
AD15(36)
AD
14
(39)
AD
13
(38)
AD
12
(37)
AD
11
(40)
AD
10
(1)
8131
BUS
COMPARATOR
INT (14)
I/O RD (25) (NOTE)
I/O WR (27) (NOTE)
T
5
T
4
T
3
T
2
T
1
T
0
B
5
B
4
B
3
B
2
B
1
B
0
V+OUT
ADC0802, ADC0803, ADC0804
Page 15

6-19
FIGURE 22. MAPPING THE A/D AS AN
I/O DEVICE FOR USE
WITH THE Z-80 CPU
FIGURE 23. ADC0802 TO MC6800 CPU INTERFACE
FIGURE 24. ADC0802 TO MC6820 PIA INTERFACE
WR
RD
IORQ
RD
WR
74C32
ADC0802-
ADC0804
3
2
11
12
13
14
15
16
17
18
20
19
10
9
8
7
6
5
4
3
2
1
ADC0802 - ADC0804
WR
RD
CS
INTR
CLK IN
V
IN
(-)
V
IN
(+)
DGND
V
REF
/2
AGND
DB
1
DB
0
DB
4
DB
3
DB
2
DB
7
DB
6
DB
5
CLK R
V+
10K
5V (8)
10µF
+
ANALOG
INPUTS
150pF
MSB
LSB
D1(32) [29]
D
0
(33) [31]
D
4
(29) [32]
D
3
(30) [H]
D
2
(31) [K]
D
7
(26) [J]
D6(27) [L]
D
5
(28) [30]
A12(22) [34]
A
13
(23) [N]
A
14
(24) [M]
A
15
(25) [33]
VMA (5) [F]
IRQ (4)† [D]††
R/W (34) [6]
1
2
3
4
5
6
1
/2 DM8092
A B C
1 2 3
† Numbers in parentheses refer to MC6800 CPU Pinout.
†† Numbers or letters in brackets refer to standard MC6800 System Common Bus Code.
11
12
13
14
15
16
17
18
20
19
10
9
8
7
6
5
4
3
2
1
ADC0802 - ADC0804
WR
RD
CS
INTR
CLK IN
V
IN
(-)
V
IN
(+)
DGND
V
REF
/2
AGND
DB
1
DB
0
DB
4
DB
3
DB
2
DB
7
DB
6
DB
5
CLK R
V+
10K
5V
ANALOG
INPUTS
150pF
MSB
LSB
11
10
14
13
12
17
16
15
PB
1
PB
0
PB
4
PB
3
PB
2
PB
7
PB
6
PB
5
MC6820
(MCS6520)
PIA
CB
2
CB
1
19
18
ADC0802, ADC0803, ADC0804
Page 16

6-20
Die Characteristics
DIE DIMENSIONS:
(101 mils x 93 mils) x 525µm x 25µm
METALLIZATION:
Type: Al
Thickness: 10k
Å ±1kÅ
PASSIVATION:
Type: Nitride over Silox
Nitride Thickness: 8k
Å
Silox Thickness: 7kÅ
Metallization Mask Layout
ADC0802, ADC0803, ADC0804
WR
RD
CS
CLK IN
INTRVIN (-) VIN (+)
DGND
V
REF
/2
AGND
V+ OR V
REF
CLK R
DB
0
DB
1
DB
2
DB
3
DB
4
DB
5
DB
6
DB
7 (MSB)
V+ OR V
REF
ADC0802, ADC0803, ADC0804
All Intersil semiconductor products are manufactured, assembled and tested under ISO9000 quality systems certification.
Intersil products are sold by description only. Intersil Corporation reserves the right to make changes in circuit design and/or specifications at any time without
notice. Accordingly, the reader is cautioned to verify that data sheets are current before placing orders. Information furnished by Intersil is believed to be accurate
and reliable. However, no responsibility is assumed by Intersil or its subsidiaries for its use; nor for any infringements of patents or other rights of third parties which
may result from its use. No license is granted by implication or otherwise under an y patent or patent rights of Intersil or its subsidiaries.
For information regarding Intersil Corporation and its products, see web site http://www.intersil.com
 Loading...