

Page 1
REV. 0
Information furnished by Analog Devices is believed to be accurate and
reliable. However, no responsibility is assumed by Analog Devices for its
use, nor for any infringements of patents or other rights of third parties that
may result from its use. No license is granted by implication or otherwise
under any patent or patent rights of Analog Devices.
a
AD9887
One Technology Way, P.O. Box 9106, Norwood, MA 02062-9106, U.S.A.
Tel: 781/329-4700 www.analog.com
Fax: 781/326-8703 © Analog Devices, Inc., 2001
Dual Interface for
Flat Panel Displays
FEATURES
Analog Interface
140 MSPS Maximum Conversion Rate
330 MHz Analog Bandwidth
0.5 V to 1.0 V Analog Input Range
500 ps p-p PLL Clock Jitter at 140 MSPS
3.3 V Power Supply
Full Sync Processing
Midscale Clamp
4:2:2 Output Format Mode
Digital (DVI 1.0 Compatible) Interface
112 MHz Operation (1 Pixel/Clock Mode)
High Skew Tolerance of One Full Input Clock
Sync Detect for “Hot Plugging”
APPLICATIONS
RGB Graphics Processing
LCD Monitors and Projectors
Plasma Display Panels
Scan Converters
Micro Displays
Digital TV
GENERAL DESCRIPTION
The AD9887 offers designers the flexibility of a dual analog and
digital interface for flat panel displays (FPDs) on a single chip.
Both interfaces are optimized for excellent image quality supporting
display resolutions up to SXGA (1280 × 1024 at 75 Hz). Either the
analog or the digital interface can be selected by the user.
Analog Interface
For ease of design and to minimize cost, the AD9887 is a fully
integrated interface solution for FPDs. The AD9887 includes an
analog interface with a 140 MHz triple ADC with internal 1.25 V
reference, PLL to generate a pixel clock from HSYNC, programmable gain, offset, and clamp control. The user provides only a
3.3 V power supply, analog input, and HSYNC. Three-state
CMOS outputs may be powered from 2.5 V to 3.3 V.
The AD9887’s on-chip PLL generates a pixel clock from HSYNC.
Pixel clock output frequencies range from 12 MHz to 140 MHz.
PLL clock jitter is 500 ps p-p typical at 140 MSPS. When a
COAST signal is presented, the PLL maintains its output frequency in the absence of HSYNC. A sampling phase adjustment is
provided. Data, HSYNC and Clock output phase relationships are
maintained. The PLL can be disabled and an external clock input
provided as the pixel clock. The AD9887 also offers full sync processing for composite sync and sync-on-green applications.
A clamp signal is generated internally or may be provided by
the user through the CLAMP input pin. The analog interface
is fully programmable via a 2-wire serial interface.
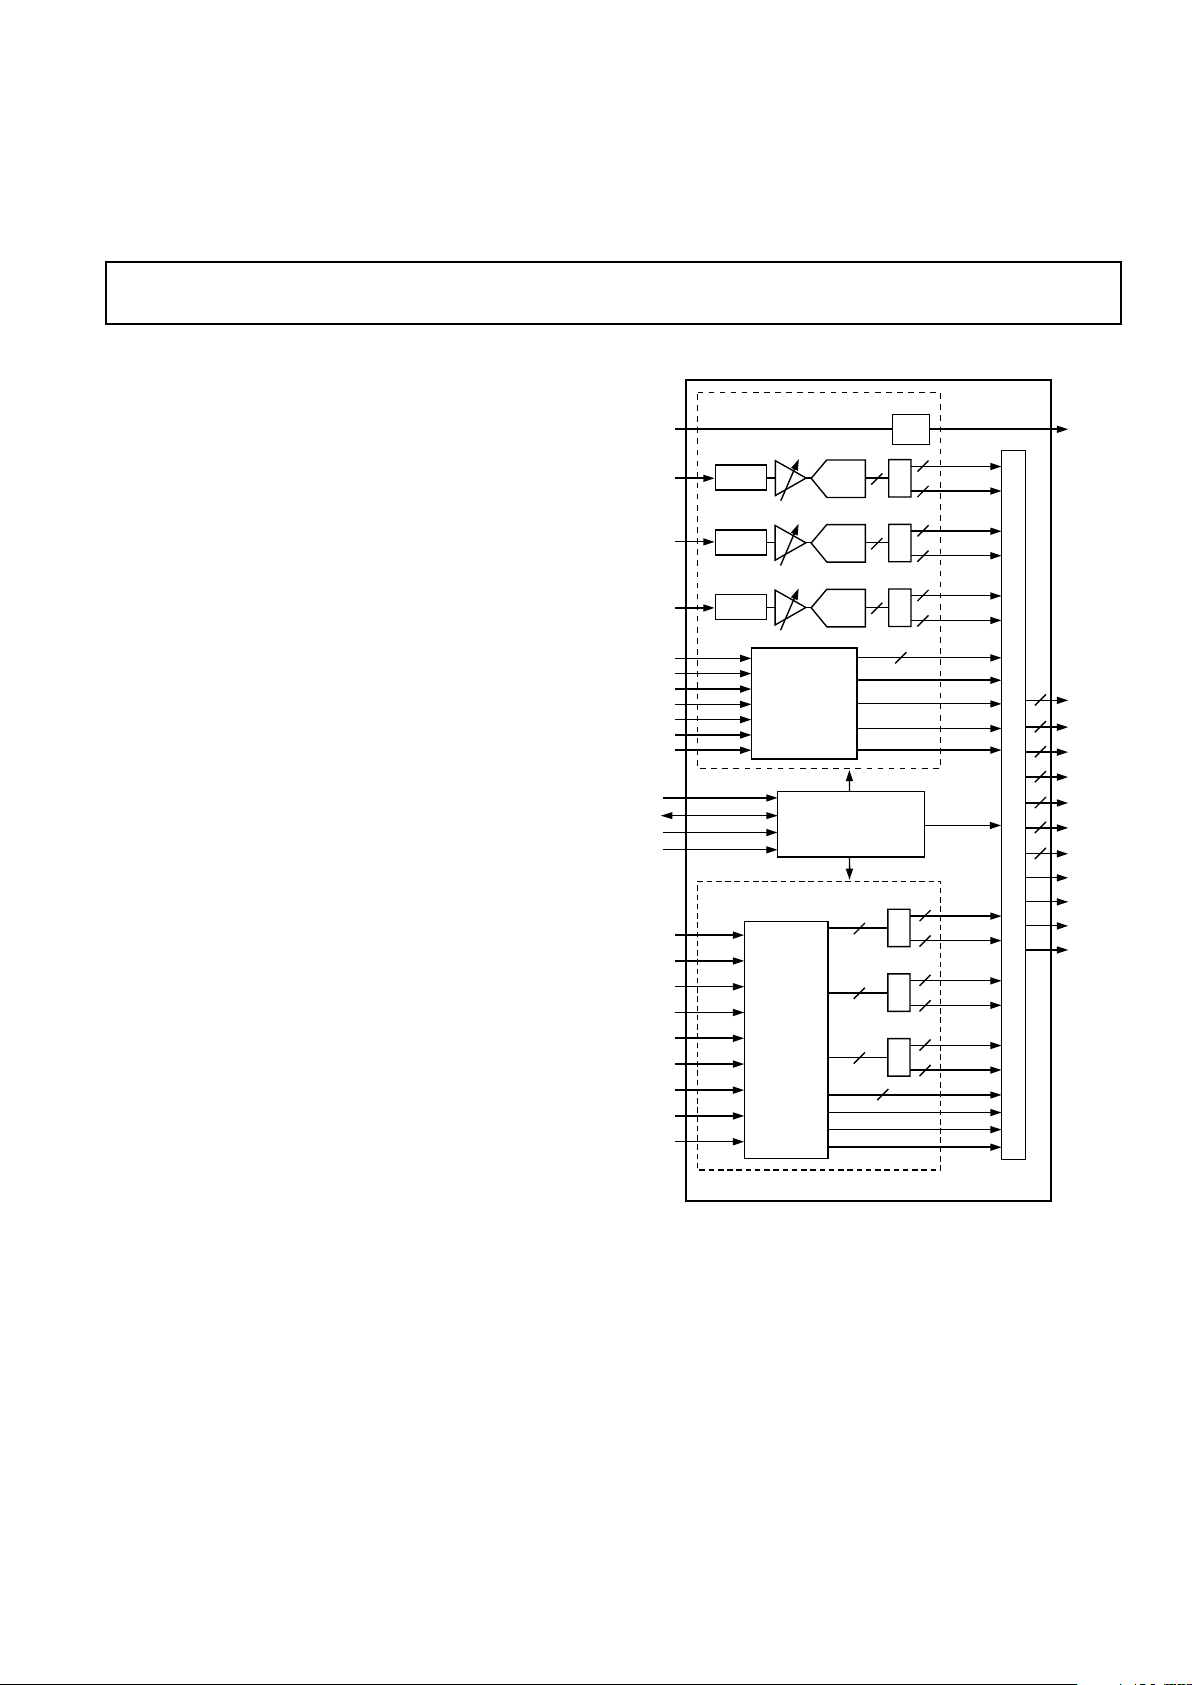
FUNCTIONAL BLOCK DIAGRAM
SERIAL REGISTER
AND
POWER MANAGEMENT
SCL
SDA
A
1
A
0
2
DATAC K
HSOUT
VSOUT
SOGOUT
Rx0+
Rx0–
Rx1+
Rx1–
Rx2+
Rx2–
RxC+
RxC–
R
TERM
DVI
RECEIVER
8
8
8
R
OUTA
R
OUTB
8
8
8
G
OUTA
G
OUTB
8
8
8
B
OUTA
B
OUTB
2
DATAC K
DE
HSYNC
VSYNC
AD9887
DIGITAL
INTERFACE
R
OUTA
R
OUTB
G
OUTA
G
OUTB
B
OUTA
B
OUTB
HSOUT
VSOUT
SOGOUT
DE
DATAC K
8
8
8
8
8
8
2
SYNC
PROCESSING
AND CLOCK
GENERATION
HSYNC
COAST
CLAMP
CKINV
CKEXT
FILT
CLAMP
R
AIN
CLAMP
G
AIN
CLAMP
B
AIN
A/D
8
8
8
R
OUTA
R
OUTB
A/D
8
8
8
G
OUTA
G
OUTB
A/D
8
8
8
B
OUTA
B
OUTB
ANALOG
INTERFACE
M
U
X
E
S
VSYNC
S
CDT
REFIN
REF
REFOUT
Digital Interface
The AD9887 contains a Digital Video Interface (DVI 1.0) compatible receiver. This receiver supports displays ranging from VGA
to SXGA (25 MHz to 112 MHz). The receiver operates with
true color (24-bit) panels in 1 or 2 pixel(s)/clock mode, and also
features an intrapair skew tolerance up to one full clock cycle.
Fabricated in an advanced CMOS process, the AD9887 is provided in a 160-lead MQFP surface mount plastic package and is
specified over the 0°C to 70°C temperature range.
Page 2
REV. 0
–2–
AD9887–SPECIFICATIONS
ANALOG INTERFACE
Test AD9887KS-100 AD9887KS-140
Parameter Temp Level Min Typ Max Min Typ Max Unit
RESOLUTION 8 8 Bits
DC ACCURACY
Differential Nonlinearity 25°CI ± 0.5 +1.15/–1.0 ±0.5 +1.25/–1.0 LSB
Full VI +1.15/–1.0 +1.25/–1.0 LSB
Integral Nonlinearity 25°CI ± 0.5 ± 1.40 ± 0.5 ± 1.4 LSB
Full VI ± 1.75 ± 2.5 LSB
No Missing Codes Full VI Guaranteed Guaranteed
ANALOG INPUT
Input Voltage Range
Minimum Full VI 0.5 0.5 V p-p
Maximum Full VI 1.0 1.0 V p-p
Gain Tempco 25°C V 135 150 ppm/°C
Input Bias Current 25°CIV 1 1 µA
Full IV 1 1 µA
Input Offset Voltage Full VI 7 50 7 50 mV
Input Full-Scale Matching Full VI 8.0 8.0 % FS
Offset Adjustment Range Full VI 44 50 56 44 50 56 % FS
REFERENCE OUTPUT
Output Voltage Full VI 1.20 1.25 1.30 1.20 1.25 1.30 V
Temperature Coefficient Full V ±50 ± 50 ppm/°C
SWITCHING PERFORMANCE
1
Maximum Conversion Rate Full VI 100 140 MSPS
Minimum Conversion Rate Full IV 10 10 MSPS
Clock to Data Skew, t
SKEW
Full IV –0.5 +2.0 –0.5 +2.0 ns
t
BUFF
Full VI 4.7 4.7 µs
t
STAH
Full VI 4.0 4.0 µs
t
DHO
Full VI 0 0 µs
t
DAL
Full VI 4.7 4.7 µs
t
DAH
Full VI 4.0 4.0 µs
t
DSU
Full VI 250 250 ns
t
STASU
Full VI 4.7 4.7 µs
t
STOSU
Full VI 4.0 4.0 µs
HSYNC Input Frequency Full IV 15 110 15 110 kHz
Maximum PLL Clock Rate Full VI 100 140 MHz
Minimum PLL Clock Rate Full IV 12 12 MHz
PLL Jitter 25°C IV 400 700
2
400 700
3
ps p-p
Full IV 1000
2
1000
3
ps p-p
Sampling Phase Tempco Full IV
15 15 ps/°C
DIGITAL INPUTS
Input Voltage, High (V
IH
) Full VI 2.6 2.6 V
Input Voltage, Low (V
IL
) Full VI 0.8 0.8 V
Input Current, High (V
IH
) Full IV –1.0 –1.0 µA
Input Current, Low (V
IL
) Full IV 1.0 1.0 µA
Input Capacitance 25°CV 3 3 pF
DIGITAL OUTPUTS
Output Voltage, High (VOH) Full VI 2.4 2.4 V
Output Voltage, Low (V
OL
) Full VI 0.4 0.4 V
Duty Cycle
DATACK, DATACK Full IV 45 50 55 45 50 55 %
Output Coding Binary Binary
(VD = 3.3 V, VDD = 3.3 V, ADC Clock = Maximum Conversion Rate, unless otherwise noted.)
Page 3

REV. 0
–3–
AD9887
Test AD9887KS-100 AD9887KS-140
Parameter Temp Level Min Typ Max Min Typ Max Unit
POWER SUPPLY
VD Supply Voltage Full IV 3.0 3.3 3.6 3.0 3.3 3.6 V
V
DD
Supply Voltage Full IV 2.2 3.3 3.6 2.2 3.3 3.6 V
P
VD
Supply Voltage Full IV 3.0 3.3 3.6 3.0 3.3 3.6 V
I
D
Supply Current (VD)25°C V 140 155 mA
I
DD
Supply Current (VDD)
4
25°C V 34 48 mA
IP
VD
Supply Current (PVD)25°C V 15 16 mA
Total Supply Current
4
Full VI 170 258 215 258 mA
Power-Down Supply Current Full VI 18 25 18 25 mA
DYNAMIC PERFORMANCE
Analog Bandwidth, Full Power 25°C V 330 330 MHz
Transient Response 25°CV 2 2 ns
Overvoltage Recovery Time 25° C V 1.5 1.5 ns
Signal-to-Noise Ratio (SNR)
5
25°C V 46 46 dB
(Without Harmonics) Full V 45 45 dB
fIN = 40.7 MHz
Crosstalk Full V 60 60 dBc
THERMAL CHARACTERISTICS
θJA Junction-to-Ambient
6
V30 30 °C/W
Thermal Resistance
NOTES
1
Drive Strength = 11.
2
VCO Range = 01, Charge Pump Current = 001, PLL Divider = 1693.
3
VCO Range = 10, Charge Pump Current = 110, PLL Divider = 1600.
4
DEMUX = 1, DATACK and DATACK Load = 10 pF, Data Load = 5 pF.
5
Using external pixel clock.
6
Simulated typical performance with package mounted to a 4-layer board.
Specifications subject to change without notice.
Page 4

REV. 0
–4–
AD9887–SPECIFICATIONS
DIGITAL INTERFACE
Test AD9887KS
Parameter Conditions Level Min Typ Max Unit
RESOLUTION 8 Bits
DC DIGITAL I/O SPECIFICATIONS
High-Level Input Voltage, (V
IH
) VI 2.6 V
Low-Level Input Voltage, (V
IL
) VI 0.8 V
High-Level Output Voltage, (V
OH
) VI 2.4 V
Low-Level Output Voltage, (V
OL
) VI 0.4 V
Input Clamp Voltage, (V
CINL
)(I
CL
= –18 mA) IV GND – 0.8 V
Input Clamp Voltage, (V
CIPL
)(I
CL
= +18 mA) IV VDD + 0.8 V
Output Clamp Voltage, (V
CONL
)(I
CL
= –18 mA) IV GND – 0.8 V
Output Clamp Voltage, (V
COPL
)(I
CL
= +18 mA) IV VDD + 0.8 V
Output Leakage Current, (IOL) (High Impedance) IV –10 +10 µA
DC SPECIFICATIONS
Output High Drive Output Drive = High IV 13 mA
(I
OHD
) (V
OUT
= VOH) Output Drive = Med IV 8 mA
Output Drive = Low IV 5 mA
Output Drive = High IV –9 mA
(I
OLD
) (V
OUT
= VOL) Output Drive = Med IV –7 mA
Output Drive = Low IV –5 mA
Output Drive = High IV 25 mA
(V
OHC
) (V
OUT
= VOH) Output Drive = Med IV 12 mA
Output Drive = Low IV 8 mA
DATACK Low Drive Output Drive = High IV –25 mA
(V
OLC
) (V
OUT
= VOL) Output Drive = Med IV –19 mA
Output Drive = Low IV –8 mA
Differential Input Voltage Single-Ended Amplitude IV 75 800 mV
POWER SUPPLY
V
D
Supply Voltage IV 3.0 3.3 3.6 V
V
DD
Supply Voltage Minimum Value for 2 Pixels per
Clock Mode IV 2.2 3.3 3.6 V
P
VD
Supply Voltage IV 3.0 3.3 3.6 V
V
D
Supply Current (Typical Pattern)
1
V 274 mA
VDD Supply Current (Typical Pattern)
1, 4
V38 mA
P
VD
Supply Current (Typical Pattern)
1
V21 mA
Total Supply Current (Typical Pattern)
1, 4
VI 362 mA
V
D
Supply Current (Worst-Case Pattern)
2
V 280 mA
V
DD
Supply Current (Worst-Case Pattern)
2, 4
V75 mA
P
VD
Supply Current (Worst-Case Pattern)
2
V21 mA
Total Supply Current (Worst-Case Pattern)
2, 4
VI 400 mA
Power-Down Supply Current (IPD)VI1325mA
AC SPECIFICATIONS
Intrapair (+ to –) Differential Input Skew (T
DPS
) IV 360 ps
Channel-to-Channel Differential Input Skew (T
CCS
) IV 1.0 Clock
Period
Low-to-High Transition Time for Data and Output Drive = High; CL = 10 pF IV 2.0 ns
Controls (D
LHT
) Output Drive = Med; CL = 7 pF IV 3.0 ns
Output Drive = Low; C
L
= 5 pF IV 3.4 ns
Low-to-High Transition Time for DATACK (D
LHT
) Output Drive = High; CL = 10 pF IV 1.3 ns
Output Drive = Med; C
L
= 7 pF IV 1.9 ns
Output Drive = Low; C
L
= 5 pF IV 2.5 ns
High-to-Low Transition Time for Data and Output Drive = High; C
L
= 10 pF IV 2.7 ns
Controls (D
HLT
) Output Drive = Med; CL = 7 pF IV 3.0 ns
Output Drive = Low; CL = 5 pF IV 3.3 ns
(VD = 3.3 V, VDD = 3 V, Clock = Maximum)
Page 5
REV. 0
–5–
AD9887
Test AD9887KS
Parameter Conditions Level Min Typ Max Unit
AC SPECIFICATIONS (continued)
High-to-Low Transition Time for DATACK (D
HLT
) Output Drive = High; CL =10 pF IV 1.4 ns
Output Drive = Med; C
L
= 7 pF IV 1.7 ns
Output Drive = Low; C
L
= 5 pF IV 2.1 ns
Clock to Data Skew, t
SKEW
IV –0.5 +2.0 ns
Duty Cycle, t
DCYCLE
IV 45 55 % of
Period
High
DATACK Frequency (F
CIP
) (1 Pixel/Clock) VI 20 112 MHz
DATACK Frequency (F
CIP
) (2 Pixels/Clock) IV 10 56 MHz
NOTES
1
The typical pattern contains a gray scale area, Output Drive = High.
2
The worst-case pattern contains a black and white checkerboard pattern, Output Drive = High.
3
The setup and hold times with respect to the DATACK rising edge are the same as the falling edge.
4
1 Pixel/clock mode, DATACK and DATACK Load = 10 pF, Data Load = 5 pF.
CAUTION
ESD (electrostatic discharge) sensitive device. Electrostatic charges as high as 4000 V readily
accumulate on the human body and test equipment and can discharge without detection. Although
the AD9887 features proprietary ESD protection circuitry, permanent damage may occur on
devices subjected to high-energy electrostatic discharges. Therefore, proper ESD precautions are
recommended to avoid performance degradation or loss of functionality.
WARNING!
ESD SENSITIVE DEVICE
ABSOLUTE MAXIMUM RATINGS
*
VD . . . . . . . . . . . . . . . . . . . . . . . . . . . . . . . . . . . . . . . . . 3.6 V
V
DD
. . . . . . . . . . . . . . . . . . . . . . . . . . . . . . . . . . . . . . . . 3.6 V
Analog Inputs . . . . . . . . . . . . . . . . . . . . . . . . . . . V
D
to 0.0 V
VREF IN . . . . . . . . . . . . . . . . . . . . . . . . . . . . . . . V
D
to 0.0 V
Digital Inputs . . . . . . . . . . . . . . . . . . . . . . . . . . . 5 V to 0.0 V
Digital Output Current . . . . . . . . . . . . . . . . . . . . . . . . 20 mA
Operating Temperature . . . . . . . . . . . . . . . . . –25°C to +85°C
Storage Temperature . . . . . . . . . . . . . . . . . . –65°C to +150°C
Maximum Junction Temperature . . . . . . . . . . . . . . . . 150°C
Maximum Case Temperature . . . . . . . . . . . . . . . . . . . 150°C
*Stresses above those listed under Absolute Maximum Ratings may cause perma-
nent damage to the device. This is a stress rating only; functional operation of the
device at these or any other conditions outside of those indicated in the operation
sections of this specification is not implied. Exposure to absolute maximum ratings
for extended periods may affect device reliability.
EXPLANATION OF TEST LEVELS
Test Level Explanation
I 100% production tested.
II 100% production tested at 25°C and sample
tested at specified temperatures.
III Sample tested only.
IV Parameter is guaranteed by design and charac-
terization testing.
V Parameter is a typical value only.
VI 100% production tested at 25°C; guaranteed
by design and characterization testing.
ORDERING GUIDE
Temperature Package Package
Model Range Description Option
AD9887KS-140 0°C to 70°C Plastic Quad Flatpack S-160
AD9887KS-100 0°C to 70°C Plastic Quad Flatpack S-160
AD9887/PCB 25°C Evaluation Board
Page 6
REV. 0
–6–
AD9887
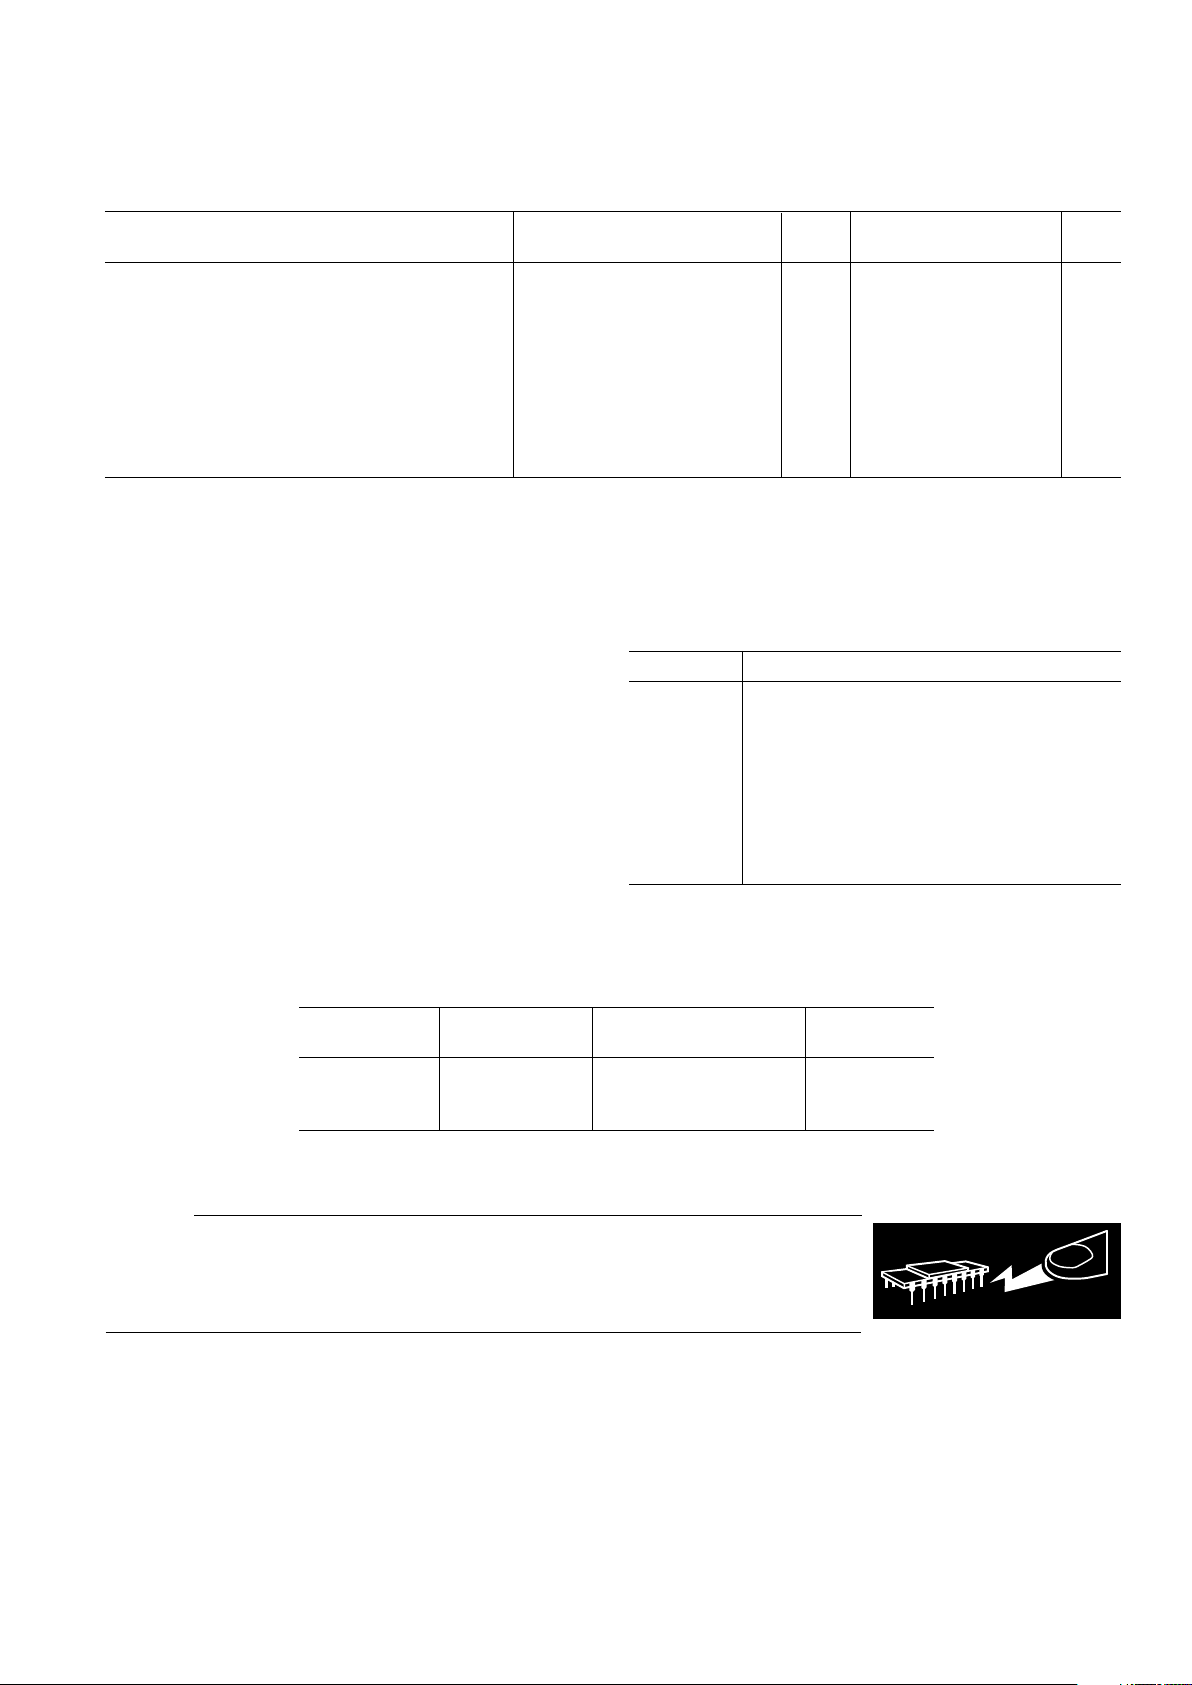
PIN CONFIGURATION
RED B<0>
RED B<1>
RED B<2>
RED B<3>
RED B<4>
RED B<5>
RED B<6>
RED B<7>
GND
VDDRED A<0>
RED A<1>
RED A<2>
RED A<3>
RED A<4>
RED A<5>
RED A<6>
RED A<7>
GND
VDDSOGOUT
HSOUT
VSOUTDES
CDT
DATACK
DATACK
GND
VDDGND
GND
SCANINGND
VDREF
OUT
REFINVDVDGND
GND
160
159
158
157
156
155
154
153
152
151
150
149
147
146
145
144
143
142
141
140
139
138
148
137
136
135
133
132
131
130
129
128
134
127
126
125
123
122
121
124
GND
GND
V
DD
GND
SCAN
OUT
CTL0
CTL1
CTL2
CTL3
SCAN
CLK
V
D
GND
R
TERM
VDV
D
Rx2+
Rx2–
GND
Rx1+
Rx1–
GND
Rx0+
Rx0–
GND
RxC+
RxC–
V
DVD
GND
V
D
NCNCNC
GND
PV
D
GND
PV
D
FILT
PV
D
GND
535455565758596061
62
4142434445464748495051
52
6364656668697071726773747576787980
77
5
4
3
2
7
6
9
8
1
14
13
12
11
16
15
17
10
19
18
23
22
21
20
25
24
27
26
29
28
32
31
30
34
33
36
35
40
39
38
37
V
DD
GND
GREEN A<7>
GREEN A<6>
GREEN A<5>
GREEN A<4>
GREEN A<3>
GREEN A<2>
GREEN A<1>
GREEN A<0>
V
DD
GND
GREEN B<7>
GREEN B<6>
GREEN B<5>
GREEN B<4>
GREEN B<3>
GREEN B<2>
GREEN B<1>
GREEN B<0>
V
DD
GND
BLUE A<7>
BLUE A<6>
BLUE A<5>
BLUE A<4>
BLUE A<3>
BLUE A<2>
BLUE A<1>
BLUE A<0>
V
DD
GND
BLUE B<7>
BLUE B<6>
BLUE B<5>
BLUE B<4>
BLUE B<3>
BLUE B<2>
BLUE B<1>
BLUE B<0>
R
MIDSC
V
R
AIN
R
CLAMP
V
V
D
GND
V
D
V
D
GND
GND
G
MIDSC
V
G
AIN
G
CLAMP
V
SOGIN
V
D
GND
V
D
V
D
GND
GND
B
MIDSC
V
B
AIN
B
CLAMP
V
V
D
GND
V
D
GND
CKINV
CLAMP
SDA
SCL
A0
A1
PV
D
PV
D
GND
GND
COAST
CKEXT
HSYNC
VSYNC
104
119
120
114
115
116
117
112
113
111
118
109
110
105
106
107
108
102
103
100
101
98
99
95
96
97
93
94
91
92
90
87
88
89
86
84
85
82
83
81
PIN 1
IDENTIFIER
TOP VIEW
(Not to Scale)
AD9887
NC = NO CONNECT
Page 7
REV. 0
AD9887
–7–
Table I. Complete Pinout List
P
in Pin Pin
Type Name Function Value Number Interface
Analog Video R
AIN
Analog Input for Converter R 0.0 V to 1.0 V 119 Analog
Inputs G
AIN
Analog Input for Converter G 0.0 V to 1.0 V 110 Analog
B
AIN
Analog Input for Converter B 0.0 V to 1.0 V 100 Analog
External HSYNC Horizontal SYNC Input 3.3 V CMOS 82 Analog
Sync/Clock VSYNC Vertical SYNC Input 3.3 V CMOS 81 Analog
Inputs SOGIN Input for Sync-on-Green 0.0 V to 1.0 V 108 Analog
CLAMP Clamp Input (External CLAMP Signal) 3.3 V CMOS 93 Analog
COAST PLL COAST Signal Input 3.3 V CMOS 84 Analog
CKEXT External Pixel Clock Input (to Bypass the PLL) to V
DD
or Ground 3.3 V CMOS 83 Analog
CKINV ADC Sampling Clock Invert 3.3 V CMOS 94 Analog
Sync Outputs HSOUT HSYNC Output Clock (Phase-Aligned with DATACK) 3.3 V CMOS 139 Both
VSOUT VSYNC Output Clock (Phase-Aligned with DATACK) 3.3 V CMOS 138 Both
SOGOUT Sync on Green Slicer Output 3.3 V CMOS 140 Analog
Voltage REFOUT Internal Reference Output (Bypass with 0.1 µF to Ground) 1.25 V 126 Analog
Reference REFIN Reference Input (1.25 V ± 10%) 1.25 V ± 10% 125 Analog
Clamp Voltages R
MIDSC
V Red Channel Midscale Clamp Voltage Output 120 Analog
R
CLAMP
V Red Channel Midscale Clamp Voltage Input 0.0 V to 0.75 V 118 Analog
G
MIDSC
V Green Channel Midscale Clamp Voltage Output 111 Analog
G
CLAMP
V Green Channel Midscale Clamp Voltage Input 0.0 V to 0.75 V 109 Analog
B
MIDSC
V Blue Channel Midscale Clamp Voltage Output 101 Analog
B
CLAMP
V Blue Channel Midscale Clamp Voltage Input 0.0 V to 0.75 V 99 Analog
PLL Filter FILT Connection for External Filter Components for Internal PLL 78 Analog
Power Supply V
D
Analog Power Supply 3.3 V ± 10% Both
V
DD
Output Power Supply 3.3 V ± 10% Both
PV
D
PLL Power Supply 3.3 V ± 10% Both
GND Ground 0 V Both
Serial Port SDA Serial Port Data I/O 3.3 V CMOS 92 Both
(2-Wire SCL Serial Port Data Clock (100 kHz Max) 3.3 V CMOS 91 Both
Serial Interface) A0 Serial Port Address Input 1 3.3 V CMOS 90 Both
A1 Serial Port Address Input 2 3.3 V CMOS 89 Both
Data Outputs Red B[7:0] Port B/Odd Outputs of Converter “Red,” Bit 7 Is the MSB 3.3 V CMOS 153–160 Both
Green B[7:0] Port B/Odd Outputs of Converter “Green,” Bit 7 Is the MSB 3.3 V CMOS 13–20 Both
Blue B[7:0] Port B/Odd Outputs of Converter “Blue,” Bit 7 Is the MSB 3.3 V CMOS 33–40 Both
Red A[7:0] Port A/Even Outputs of Converter “Red,” Bit 7 Is the MSB 3.3 V CMOS 143–150 Both
Green A[7:0] Port A/Even Outputs of Converter “Green,” Bit 7 Is the MSB 3.3 V CMOS 3–10 Both
Blue A[7:0] Port A/Even Outputs of Converter “Blue,” Bit 7 Is the MSB 3.3 V CMOS 23–30 Both
Data Clock DATACK Data Output Clock for the Analog and Digital Interface 3.3 V CMOS 134 Both
Outputs DATACK Data Output Clock Complement for the Analog Interface Only 3.3 V CMOS 135 Both
Sync Detect S
CDT
Sync Detect Output 3.3 V CMOS 136 Both
Scan Function SCAN
IN
Input for SCAN Function 3.3 V CMOS 129 Both
SCAN
OUT
Output for SCAN Function 3.3 V CMOS 45 Both
SCAN
CLK
Clock for SCAN Function 3.3 V CMOS 50 Both
No Connect NC These Pins Should be Left Unconnected 71–73 Both
Digital Video R
x0
+ Digital Input Channel 0 True 62 Digital
Data Inputs R
x0
– Digital Input Channel 0 Complement 63 Digital
R
x1
+ Digital Input Channel 1 True 59 Digital
R
x1
– Digital Input Channel 1 Complement 60 Digital
R
x2
+ Digital Input Channel 2 True 56 Digital
Rx2– Digital Input Channel 2 Complement 57 Digital
Digital Video R
xc
+ Digital Data Clock True 65 Digital
Clock Inputs Rxc– Digital Data Clock Complement 66 Digital
Data Enable DE Data Enable 3.3 V CMOS 137 Digital
Control Bits CTL[0:3] Decoded Control Bits 3.3 V CMOS 46–49 Digital
R
TERM
R
TERM
Sets Internal Termination Resistance 53 Digital
Page 8

REV. 0
–8–
AD9887
DESCRIPTIONS OF PINS SHARED BETWEEN ANALOG
AND DIGITAL INTERFACES
HSOUT Horizontal Sync Output
A reconstructed and phase-aligned version of
the video HSYNC. The polarity of this output
can be controlled via a serial bus bit. In analog
interface mode the placement and duration
are variable. In digital interface mode the
placement and duration are set by the graphics
transmitter.
VSOUT Vertical Sync Output
The separated VSYNC from a composite
signal or a direct pass through of the VSYNC
input. The polarity of this output can be controlled via a serial bus bit. The placement and
duration in all modes is set by the graphics
transmitter.
Serial Port (2-Wire)
SDA Serial Port Data I/O
SCL Serial Port Data Clock
A0 Serial Port Address Input 1
A1 Serial Port Address Input 2
For a full description of the 2-wire serial register and how it works, refer to the Control
Register section.
Data Outputs
RED A Data Output, Red Channel, Port A/Even
RED B Data Output, Red Channel, Port B/Odd
GREEN A Data Output, Green Channel, Port A/Even
GREEN B Data Output, Green Channel, Port B/Odd
BLUE A Data Output, Blue Channel, Port A/Even
BLUE B Data Output, Blue Channel, Port B/Odd
The main data outputs. Bit 7 is the MSB.
These outputs are shared between the two
interfaces and behave according to which
interface is active. Refer to the sections on the
two interfaces for more information on how
these outputs behave.
Data Clock Outputs
DATACK Data Output Clock
DATACK Data Output Clock Complement
Just like the data outputs, the data clock outputs are shared between the two interfaces.
They also behave differently depending on
which interface is active. Refer to the sections
on the two interfaces to determine how these
pins behave.
Various
S
CDT
Chip Active/Inactive Detect Output
The logic for the S
CDT
pin is [analog interface
HSYNC detection] OR [digital interface DE
detection]. So, the S
CDT
pin will switch to
logic LOW under two conditions, when neither interface is active or when the chip is in
full chip power-down mode. The data outputs
are automatically three-stated when S
CDT
is
LOW. This pin can be read by a controller in
order to determine periods of inactivity.
SCAN Function
SCAN
IN
Data Input for SCAN Function
Data can be loaded serially into the 48-bit
SCAN register through this pin, clocking it in
with the SCAN
CLK
pin. It then comes out of
the 48 data outputs in parallel. This function
is useful for loading known data into a graphics controller chip for testing purposes.
SCAN
OUT
Data Output for SCAN Function
The data in the 48-bit SCAN register can be
read through this pin. Data is read on a FIFO
basis and is clocked via the SCAN
CLK
pin.
SCAN
CLK
Data Clock for SCAN Function
This pin clocks the data through the SCAN
register. It controls both data input and data
output.
Page 9
REV. 0
AD9887
–9–
Table II. Analog Interface Pin List
Pin Type Pin Name Function Value Pin No.
Analog Video Inputs R
AIN
Analog Input for Converter R 0.0 V to 1.0 V 119
G
AIN
Analog Input for Converter G 0.0 V to 1.0 V 110
B
AIN
Analog Input for Converter B 0.0 V to 1.0 V 100
External HSYNC Horizontal SYNC Input 3.3 V CMOS 82
VSYNC Vertical SYNC Input 3.3 V CMOS 81
Sync/Clock SOGIN Sync-on-Green Input 0.0 V to 1.0 V 108
Inputs CLAMP Clamp Input (External CLAMP Signal) 3.3 V CMOS 93
COAST PLL COAST Signal Input 3.3 V CMOS 84
CKEXT External Pixel Clock Input (to Bypass Internal PLL) 3.3 V CMOS 83
or 10 kΩ to V
DD
CKINV ADC Sampling Clock Invert 3.3 V CMOS 94
Sync Outputs HSOUT HSYNC Output (Phase-Aligned with DATACK and DATACK) 3.3 V CMOS 139
VSOUT VSYNC Output (Asynchronous) 3.3 V CMOS 138
SOGOUT Sync-on-Green Slicer Output or Raw HSYNC Output 3.3 V CMOS 140
Voltage Reference REFOUT Internal Reference Output (bypass with 0.1 µF to ground) 1.25 V 126
REFIN Reference Input (1.25 V ± 10%) 1.25 V ± 10% 125
Clamp Voltages R
MIDSC
V Voltage output equal to the RED converter midscale voltage. 0.5 V ± 50% 120
R
CLAMP
V During midscale clamping, the RED Input is clamped to this pin. 0.0 V to 0.75 V 118
G
MIDSC
V Voltage output equal to the GREEN converter midscale voltage. 0.5 V ± 50% 111
G
CLAMP
V During midscale clamping, the GREEN Input is clamped to this pin. 0.0 V to 0.75 V 109
B
MIDSC
V Voltage output equal to the BLUE converter midscale voltage. 0.5 V ± 50% 101
B
CLAMP
V During midscale clamping, the BLUE Input is clamped to this pin. 0.0 V to 0.75 V 99
PLL Filter FILT Connection for External Filter Components for Internal PLL 78
Power Supply V
D
Main Power Supply 3.3 V ± 5%
PV
D
PLL Power Supply (Nominally 3.3 V) 3.3 V ± 5%
V
DD
Output Power Supply 3.3 V or 2.5 V ± 5%
GND Ground 0 V
PIN FUNCTION DETAILS (ANALOG INTERFACE)
Inputs
R
AIN
Analog Input for RED Channel
G
AIN
Analog Input for GREEN Channel
B
AIN
Analog Input for BLUE Channel
High-impedance inputs that accept the RED,
GREEN, and BLUE channel graphics signals,
respectively. For RGB, the three channels
are
identical and can be used for any colors, but
colors are assigned for convenient reference.
For proper 4:2:2 formatting in a YUV
appli-
cation, the Y channel must be connected
to
the G
AIN
input, U must be connected to the
B
AIN
input, and V must be connected to the
R
AIN
input.
They accommodate input signals ranging
from 0.5 V to 1.0 V full scale. Signals should
be ac-coupled to these pins to support clamp
operation.
HSYNC Horizontal Sync Input
This input receives a logic signal that establishes the horizontal timing reference and
provides the frequency reference for pixel
clock generation.
The logic sense of this pin is controlled by
serial register 0Fh Bit 7 (HSYNC Polarity).
Only the leading edge of HSYNC is active,
the trailing edge is ignored. When HSYNC
Polarity = 0, the falling edge of HSYNC is
used. When HSYNC Polarity = 1, the rising
edge is active.
The input includes a Schmitt trigger for noise
immunity, with a nominal input threshold
of 1.5 V.
Electrostatic Discharge (ESD) protection
diodes will conduct heavily if this pin is driven
more than 0.5 V above the maximum tolerance voltage (3.3 V), or more than 0.5 V
below ground.
VSYNC Vertical Sync Input
This is the input for vertical sync.
SOGIN Sync-on-Green Input
This input is provided to assist with processing
signals with embedded sync, typically on the
GREEN channel. The pin is connected to a
high-speed comparator with an internally
generated threshold, which is set to 0.15 V
above the negative peak of the input signal.
When connected to an ac-coupled graphics
signal with embedded sync, it will produce a
noninverting digital output on SOGOUT.
When not used, this input should be left
unconnected. For more details on this function and how it should be configured, refer to
the Sync-on-Green section.
Page 10

REV. 0
–10–
AD9887
CLAMP External Clamp Input (Optional)
This logic input may be used to define the
time during which the input signal is clamped
to the reference dc level, (ground for RGB or
midscale for YUV). It should be exercised
when the reference dc level is known to be
present on the analog input channels, typically
during the back porch of the graphics signal.
The CLAMP pin is enabled by setting control
bit EXTCLMP to 1, (the default power-up is 0).
When disabled, this pin is ignored and the
clamp timing is determined internally by
counting a delay and duration from the trailing
edge of the HSYNC input. The logic sense of
this pin is controlled by CLAMPOL. When
not used, this pin must be grounded and
EXTCLMP programmed to 0.
COAST Clock Generator Coast Input (Optional)
This input may be used to cause the pixel clock
generator to stop synchronizing with HSYNC
and continue producing a clock at its current
frequency and phase. This is useful when
processing signals from sources that fail to
produce horizontal sync pulses when in the
vertical interval. The COAST signal is generally
not required for PC-generated signals. Applications requiring COAST can do so through
the internal COAST found in the SYNC
processing engine.
The logic sense of this pin is controlled by
COAST Polarity.
When not used, this pin may be grounded and
COAST Polarity programmed to 1, or tied
HIGH and COAST Polarity programmed to 0.
COAST Polarity defaults to 1 at power-up.
CKEXT External Clock Input (Optional)
This pin may be used to provide an external
clock to the AD9887, in place of the clock
internally generated from HSYNC.
It is enabled by programming EXTCLK to 1.
When an external clock is used, all other internal
functions operate normally. When unused, this
pin should be tied to V
DD
or to GROUND, and
EXTCLK programmed to 0. The clock
phase
adjustment still operates when an external
clock
source is used.
CKINV Sampling Clock Inversion (Optional)
This pin may be used to invert the pixel
sampling clock, which has the effect of
shifting the sampling phase 180°. This is in
support of Alternate Pixel Sampling mode,
wherein higher-frequency input signals (up
to 280 Mpps) may be captured by first sampling the odd pixels, then capturing the even
pixels on the subsequent frame.
This pin should be exercised only during blanking
intervals (typically vertical blanking) as it may
produce several samples of corrupted data during
the phase shift.
CKINV should be grounded when not used.
Outputs
DRA
7-0
Data Output, Red Channel, Port A
D
RB7-0
Data Output, Red Channel, Port B
D
GA7-0
Data Output, Green Channel, Port A
D
GB7-0
Data Output, Green Channel, Port B
D
BA7-0
Data Output, Blue Channel, Port A
D
BB7-0
Data Output, Blue Channel, Port B
These are the main data outputs. Bit 7 is the MSB.
Each channel has two ports. When the part is
operated in single-channel mode (DEMUX = 0),
all data are presented to Port A, and Port B is
placed in a high-impedance state.
Programming DEMUX to 1 established dualchannel mode, wherein alternate pixels are
presented to Port A and Port B of each channel. These will appear simultaneously, two
pixels presented at the time of every second
input pixel, when PAR is set to 1 (parallel
mode). When PAR = 0, pixel data appear
alternately on the two ports, one new sample
with each incoming pixel (interleaved mode).
In dual channel mode, the first pixel after
HSYNC is routed to Port A. The second pixel
goes to Port B, the third to A, etc.
The delay from pixel sampling time to output is
fixed. When the sampling time is changed by
adjusting the PHASE register, the output timing is
shifted as well. The DATACK, DATACK, and
HSOUT outputs are also moved, so the timing
relationship among the signals is maintained.
DATACK Data Output Clock
DATACK Data Output Clock Complement
Differential data clock output signals to be
used to strobe the output data and HSOUT
into external logic.
They are produced by the internal clock generator and are synchronous with the internal
pixel sampling clock.
When the AD9887 is operated in single-channel mode, the output frequency is equal to the
pixel sampling frequency. When operating in
dual channel mode, the clock frequency is onehalf the pixel frequency.
When the sampling time is changed by adjusting
the PHASE register, the output timing is
shifted
as well. The Data, DATACK,
DATACK, and
HSOUT outputs are all moved, so the timing
relationship among the signals is maintained.
Page 11

REV. 0
AD9887
–11–
Either or both signals may be used, depending on the timing mode and interface design
employed.
HSOUT Horizontal Sync Output
A reconstructed and phase-aligned version of
the Hsync input. Both the polarity and duration of this output can be programmed via
serial bus registers.
By maintaining alignment with DATACK,
DATACK, and Data, data timing with
respect to horizontal sync can always be
determined.
SOGOUT Sync-On-Green Slicer Output
This pin can be programmed to output
either the output from the Sync-On-Green
slicer comparator or an unprocessed but
delayed version of the HSYNC input. See
the Sync Block Diagram to view how this
pin is connected.
(Note: The output from this pin is the sliced
SOG, without additional processing from the
AD9887.)
Analog Interface
REFOUT Internal Reference Output
Output from the internal 1.25 V bandgap reference. This output is intended to drive relatively
light loads. It can drive the AD9887 Reference
Input directly, but should be externally buffered if it is used to drive other loads as well.
The absolute accuracy of this output is ±4%,
and the temperature coefficient is ±50 ppm,
which is adequate for most AD9887 applications. If higher accuracy is required, an
external reference may be employed instead.
If an external reference is used, connect this
pin to ground through a 0.1 µF capacitor.
REFIN Reference Input
The reference input accepts the master reference voltage for all AD9887 internal circuitry
(1.25 V ± 10%). It may be driven directly by
the REFOUT pin. Its high impedance presents a very light load to the reference source.
This pin should always be bypassed to Ground
with a 0.1 µF capacitor.
FILT External Filter Connection
For proper operation, the pixel clock generator PLL requires an external filter. Connect
the filter shown Figure 7 to this pin. For
optimal performance, minimize noise and
parasitics on this node.
Power Supply
V
D
Main Power Supply
These pins supply power to the main elements
of the circuit. It should be filtered
to be
as
quiet
as possible.
V
DD
Digital Output Power Supply
These supply pins are identified separately
from the V
D
pins so special care can be taken
to minimize output noise transferred into the
sensitive analog circuitry.
If the AD9887 is interfacing with lowervoltage logic, V
DD
may be connected to a
lower supply voltage (as low as 2.2 V) for
compatibility.
PV
D
Clock Generator Power Supply
The most sensitive portion of the AD9887 is
the clock generation circuitry. These pins
provide power to the clock PLL and help the
user design for optimal performance. The
designer should provide noise-free power to
these pins.
GND Ground
The ground return for all circuitry on chip.
It is recommended that the application circuit
board have a single, solid ground plane.
THEORY OF OPERATION (INTERFACE DETECTION)
Active Interface Detection and Selection
The AD9887 includes circuitry to detect whether or not an
interface is active.
For detecting the analog interface, the circuitry monitors the
presence of HSYNC, VSYNC, and Sync-on-Green. The result of
the detection circuitry can be read from the 2-wire serial interface bus at address 11H Bits 7, 6, and 5 respectively. If one of
these sync signals disappears, the maximum time it takes for the
circuitry to detect it is 100 ms.
There are two stages for detecting the digital interface. The first
stage searches for the presence of the digital interface clock.
The circuitry for detecting the digital interface clock is active
even when the digital interface is powered down. The result of
this detection stage can be read from the 2-wire serial interface
bus at address 11H Bit 4. If the clock disappears, the maximum
time it takes for the circuitry to detect it is 100 ms. The second
stage attempts to detect DE on the digital interface. Detection is
accomplished when 32 DEs have been counted. DE can only be
detected when the digital interface is powered up, so it is not
always active. The DE detection circuitry is one of the logic
inputs used to set the SyncDT output pin (Pin 136). The logic
for the SyncDT pin is [DE detect] OR [HSYNC detect].
There is an override for the automatic interface selection. It is
the AIO bit (Active Interface Override). When the AIO bit is set
to Logic 0, the automatic circuitry will be used. When the AIO
bit is set to Logic 1, the AIS bit will be used to determine the
active interface rather than the automatic circuitry.
Page 12
REV. 0
–12–
AD9887
Table III. Interface Selection Controls
Analog Digital Active
AIO Interface Detect Interface Detect AIS Interface Description
1 X X 0 Analog Force the analog interface active.
1 Digital Force the digital interface active.
0 0 0 X None Neither interface was detected. Both interfaces are
powered down and the SyncDT pin gets set to Logic 0.
0 1 X Digital The digital interface was detected. Power down the
analog interface.
1 0 X Analog The analog interface was detected. Power down the
digital interface.
1 0 X Analog Both interfaces were detected. The analog interface has
priority.
1 Digital Both interfaces were detected. The digital interface has
priority.
Table IV. Power-Down Mode Descriptions
Inputs
Analog Digital Active Active
Power- Interface Interface Interface Interface
Mode Down1Detect2Detect3Override Select Powered On or Comments
Soft Power-Down (Seek Mode) 1 0 0 0 X Serial Bus, Digital Interface Clock Detect,
Analog Interface Activity Detect, SOG,
Bandgap Reference
Digital Interface On 1 0 1 0 X Serial Bus, Digital Interface, Analog Interface
Activity Detect, SOG, Outputs, Bandgap
Reference
Analog Interface On 1 1 0 0 X Serial Bus, Analog Interface, Digital Interface
Clock Detect, SOG, Outputs, Bandgap
Reference
Serial Bus Arbitrated Interface 1 1 1 0 0 Same as Analog Interface On Mode
Serial Bus Arbitrated Interface 1 1 1 0 1 Same as Digital Interface On Mode
Override to Analog Interface 1 X X 1 0 Same as Analog Interface On Mode
Override to Digital Interface 1 X X 1 1 Same as Digital Interface On Mode
Absolute Power-Down 0 X X X X Serial Bus
NOTES
1
Power-down is controlled via bit 0 in serial bus Register 12h.
2
Analog Interface Detect is determined by OR-ing Bits 7, 6, and 5 in serial bus Register 11h.
3
Digital Interface Detect is determined by Bit 4 in serial bus Register 11h.
Power Management
The AD9887 is a dual interface device with shared outputs.
Only one interface can be used at a time. For this reason, the
chip automatically powers down the unused interface. When
the analog interface is being used, most of the digital interface
circuitry is powered down and vice-versa. This helps to minimize
the AD9887 total power dissipation. In addition, if neither interface has activity on it, the chip powers down both interfaces.
The AD9887 uses the activity detect circuits, the active interface bits in the serial registers, the active interface override bits,
and the power-down bit to determine the correct power state.
In a given power mode not all circuitry in the inactive interface
is powered down completely. When the digital interface is
active, the bandgap reference and HSYNC detect circuitry is not
powered down. When the analog interface is active, the digital
interface clock detect circuit is not powered down. Table IV
summarizes how the AD9887 determines which power mode to
be in and what circuitry is powered on/off in each of these
modes. The power-down command has priority, followed by the
active interface override, and then the automatic circuitry.
Page 13

REV. 0
AD9887
–13–
THEORY OF OPERATION AND DESIGN GUIDE
(ANALOG INTERFACE)
General Description
The AD9887 is a fully integrated solution for capturing analog
RGB signals and digitizing them for display on flat panel monitors
or projectors. The device is ideal for implementing a computer
interface in HDTV monitors or as the front end to highperformance video scan converters.
Implemented in a high-performance CMOS process, the interface can capture signals with pixel rates of up to 140 MHz and,
with an Alternate Pixel Sampling mode, up to 280 MHz.
The AD9887 includes all necessary input buffering, signal dc
restoration (clamping), offset and gain (brightness and contrast)
adjustment, pixel clock generation, sampling phase control,
and output data formatting. All controls are programmable via
a 2-wire serial interface. Full integration of these sensitive analog
functions makes system design straightforward and less sensitive to the physical and electrical environment.
With a typical power dissipation of less than 725 mW and an
operating temperature range of 0°C to 70°C, the device requires
no special environmental considerations.
Input Signal Handling
The AD9887 has three high-impedance analog input pins for
the Red, Green, and Blue channels. They will accommodate
signals ranging from 0.5 V to 1.0 V p-p.
Signals are typically brought onto the interface board via a
DVI-I connector, a 15-lead D connector, or BNC connectors.
The AD9887 should be located as close as practical to the
input connector. Signals should be routed via matched-impedance
traces (normally 75 Ω) to the IC input pins.
At that point the signal should be resistively terminated (75 Ω
to the signal ground return) and capacitively coupled to the
AD9887 inputs through 47 nF capacitors. These capacitors
form part of the dc restoration circuit.
In an ideal world of perfectly matched impedances, the best performance can be obtained with the widest possible signal bandwidth.
The wide bandwidth inputs of the AD9887 (330 MHz) can
track the input signal continuously as it moves from one pixel
level to the next, and digitize the pixel during a long, flat pixel
time. In many systems, however, there are mismatches, reflections, and noise, which can result in excessive ringing and
distortion of the input waveform. This makes it more difficult
to establish a sampling phase that provides good image quality.
It has been shown that a small inductor in series with the input
is effective in rolling off the input bandwidth slightly, and providing a high quality signal over a wider range of conditions.
Using a Fair-Rite #2508051217Z0 High-Speed Signal Chip
Bead inductor in the circuit of Figure 1 gives good results in
most applications.
RGB
INPUT
R
AIN
G
AIN
B
AIN
47nF
75⍀
Figure 1. Analog Input Interface Circuit
HSYNC, VSYNC Inputs
The AD9887 receives a horizontal sync signal and uses it to
generate the pixel clock and clamp timing. It is possible to operate
the AD9887 without applying HSYNC (using an external clock,
external clamp) but a number of features of the chip will be
unavailable, so it is recommended that HSYNC be provided.
This can be either a sync signal directly from the graphics
source, or a preprocessed TTL or CMOS level signal.
The HSYNC input includes a Schmitt trigger buffer and is capable
of handling signals with long rise times, with superior noise
immunity. In typical PC-based graphic systems, the sync signals
are simply TTL-level drivers feeding unshielded wires in the
monitor cable. As such, no termination is required or desired.
When the VSYNC input is selected as the source for V
SYNC
, it is
used for COAST generation and is passed through to the
VSOUT pin.
Serial Control Port
The serial control port is designed for 3.3 V logic. If there are
5 V drivers on the bus, these pins should be protected with
150 Ω series resistors placed between the pull-up resistors and
the input pins.
Output Signal Handling
The digital outputs are designed and specified to operate from a
3.3 V power supply (V
DD
). They can also work with a VDD as
low as 2.5 V for compatibility with other 2.5 V logic.
Clamping
RGB Clamping
To digitize the incoming signal properly, the dc offset of the
input must be adjusted to fit the range of the on-board A/D
converters.
Most graphics systems produce RGB signals with black at
ground and white at approximately 0.75 V. However, if sync
signals are embedded in the graphics, the sync tip is often at
ground and black is at 300 mV. The white level will then be
approximately 1.0 V. Some common RGB line amplifier boxes
use emitter-follower buffers to split signals and increase drive
capability. This introduces a 700 mV dc offset to the signal, which
is removed by clamping for proper capture by the AD9887.
The key to clamping is to identify a portion (time) of the signal
when the graphic system is known to be producing black. Originating
from CRT displays, the electron beam is “blanked” by sending a
black level during horizontal retrace to prevent disturbing the
image. Most graphics systems maintain this format of sending a
black level between active video lines.
An offset is then introduced which results in the A/D converters
producing a black output (code 00h) when the known black
input is present. The offset then remains in place when other
signal levels are processed, and the entire signal is shifted to
eliminate offset errors.
In systems with embedded sync, a blacker-than-black signal
(HSYNC) is produced briefly to signal the CRT that it is time
to begin a retrace. For obvious reasons, it is important to avoid
Page 14

REV. 0
–14–
AD9887
clamping on the tip of HSYNC. Fortunately, there is virtually
always a period following HSYNC called the back porch where
a good black reference is provided. This is the time when clamping should be done.
The clamp timing can be established by exercising the CLAMP
pin at the appropriate time (with EXTCLMP = 1). The polarity
of this signal is set by the Clamp Polarity bit.
An easier method of clamp timing employs the AD9887 internal
clamp timing generator. The Clamp Placement register is programmed with the number of pixel clocks that should pass after
the trailing edge of HSYNC before clamping starts. A second
register (Clamp Duration) sets the duration of the clamp.
These are both 8-bit values, providing considerable flexibility in
clamp generation. The clamp timing is referenced to the trailing
edge of HSYNC,
the back porch (black reference) always follows
HSYNC.
A good starting point for establishing clamping is to
set the clamp placement to 08h (providing eight pixel periods
for the
graphics signal to stabilize after sync) and set the clamp
duration
to 14h (giving the clamp 20 pixel periods to reestablish
the black reference).
The value of the external input coupling capacitor affects the performance of the clamp. If the value is too small, there can be an
amplitude change during a horizontal line time (between clamping
intervals). If the capacitor is too large, it will take excessively long
for
the clamp to recover from a large change in incoming
signal offset.
The recommended value (47 nF) results in recovery
from a step error
of 100 mV to within 1/2 LSB in 10 lines using a clamp duration of
20 pixel periods on a 60 Hz SXGA signal.
YUV Clamping
YUV signals are slightly different from RGB signals in that the
dc reference level (black level in RGB signals) will be at the
midpoint of the U and V video signal. For these signals it can
be necessary to clamp to the midscale range of the A/D converter range (80h) rather than bottom of the A/D converter
range (00h).
Clamping to midscale rather than ground can be accomplished
by setting the clamp select bits in the serial bus register. Each of
the three converters has its own selection bit so that they can be
clamped to either midscale or ground independently. These bits
are located in Register 0Fh and are Bits 0–2.
The midscale reference voltage that each A/D converter clamps
to is provided independently on the R
MIDSC
V, G
MIDSC
V, and
B
MIDSC
V pins. Each converter must have its own midscale reference because both offset adjustment and gain adjustment for
each converter will affect the dc level of midscale.
During clamping, the Y and V converters are clamped to their
respective midscale reference input. These inputs are pins
B
CLAMP
V, and R
CLAMP
V for the U and V converters respectively.
The typical connections for both RGB and YUV clamping are
shown below in Figure 2. Note: if midscale clamping is not
required, all of the midscale voltage outputs should still be connected to ground through a 0.1 µF capacitor.
R
MIDSC
V
R
CLAMP
V
G
MIDSC
V
G
CLAMP
V
B
MIDSC
V
B
CLAMP
V
0.1F
0.1F
0.1F
Figure 2. Typical Clamp Configuration for RBG/YUV
Applications
Gain and Offset Control
The AD9887 can accommodate input signals with inputs ranging from 0.5 V to 1.0 V full scale. The full-scale range is set in
three 8-bit registers (Red Gain, Green Gain, and Blue Gain).
A code of 0 establishes a minimum input range of 0.5 V; 255
corresponds with the maximum range of 1.0 V. Note that
increasing the gain setting results in an image with less contrast.
The offset control shifts the entire input range, resulting in a
change in image brightness. Three 7-bit registers (Red Offset,
Green Offset, Blue Offset) provide independent settings for
each channel.
The offset controls provide a ±63 LSB adjustment range. This
range is connected with the full-scale range, so if the input range
is doubled (from 0.5 V to 1.0 V) then the offset step size is also
doubled (from 2 mV per step to 4 mV per step).
Figure 3 illustrates the interaction of gain and offset controls.
The magnitude of an LSB in offset adjustment is proportional
to the full-scale range, so changing the full-scale range also
changes the offset. The change is minimal if the offset setting is
near midscale. When changing the offset, the full-scale range is
not affected, but the full-scale level is shifted by the same amount
as the zero-scale level.
GAIN
1.0
0.0
00h FFh
INPUT RANGE – V
0.5
OFFSET = 00h
OFFSET = 3Fh
OFFSET = 7Fh
OFFSET = 00h
OFFSET = 7Fh
OFFSET = 3Fh
Figure 3. Gain and Offset Control
Page 15

REV. 0
AD9887
–15–
Sync-on-Green
The Sync-on-Green input operates in two steps. First, it sets a
baseline clamp level from the incoming video signal with a
negative peak detector. Second, it sets the Sync trigger level
(nominally 150 mV above the negative peak). The exact trigger
level is variable and can be programmed via register 11H. The
Sync-on-Green input must be ac-coupled to the green analog
input through its own capacitor as shown in Figure 4. The value
of the capacitor must be 1 nF ±20%. If Sync-on-Green is not
used, this connection is not required and SOGIN should be left
unconnected. (Note: The Sync-on-Green signal is always negative polarity.) Please refer to the Sync Processing section for more
information.
G
AIN
SOGIN
47nF
1nF
R
AIN
47nF
B
AIN
47nF
Figure 4. Typical Clamp Configuration for RGB/YUV
Applications
Clock Generation
A Phase Locked Loop (PLL) is employed to generate the pixel
clock. The HSYNC input provides a reference frequency for the
PLL. A Voltage Controlled Oscillator (VCO) generates a much
higher pixel clock frequency. This pixel clock is divided by the
PLL divide value (Registers 01H and 02H) and phase compared
with the Hsync input. Any error is used to shift the VCO frequency and maintain lock between the two signals.
The stability of this clock is a very important element in providing the clearest and most stable image. During each pixel time,
there is a period when the signal is slewing from the old pixel
amplitude and settling at its new value. Then there is a time
when the input voltage is stable, before the signal must slew to a
new value (see Figure 5). The ratio of the slewing time to the
stable time is a function of the bandwidth of the graphics DAC
and the bandwidth of the transmission system (cable and termination). It is also a function of the overall pixel rate. Clearly, if the
dynamic characteristics of the system remain fixed, the slewing
and settling times are likewise fixed. This time must be subtracted from the total pixel period, leaving the stable period. At
higher pixel frequencies, the total cycle time is shorter, and the
stable pixel time becomes shorter as well.
PIXEL CLOCK – MHz
14
12
0
0
JITTER (p-p) – %
10
8
6
4
2
135.0
25.2
31.5
36.0
40.0
50.0
56.3
65.0
75.0
78.8
85.5
94.5
108.0
Figure 6. Pixel Clock Jitter vs. Frequency
PIXEL CLOCK
INVALID SAMPLE TIMES
Figure 5. Pixel Sampling Times
Any jitter in the clock reduces the precision with which the
sampling time can be determined, and must also be subtracted
from the stable pixel time.
Considerable care has been taken in the design of the AD9887’s
clock generation circuit to minimize jitter. As indicated in Figure 6, the clock jitter of the AD9887 is less than 6% of the total
pixel time in all operating modes, making the reduction in the
valid sampling time due to jitter negligible.
The PLL characteristics are determined by the loop filter
design, by the PLL charge pump current and by the VCO range
setting. The loop filter design is illustrated in Figure 7. Recommended settings of VCO range and charge pump current for
VESA standard display modes are listed in Table VII.
CP 0.0039F
C
Z
0.039F
R
Z
3.3k⍀
FILT
PV
D
Figure 7. PLL Loop Filter Detail
Four programmable registers are provided to optimize the performance of the PLL. These registers are:
1. The 12-Bit Divisor Register. The input Hsync frequencies
range from 15 kHz to 110 kHz. The PLL multiplies the
frequency of the Hsync signal, producing pixel clock frequencies in the range of 12 MHz to 140 MHz. The Divisor
Register controls the exact multiplication factor. This register
may be set to any value between 221 and 4095. (The divide
ratio that is actually used is the programmed divide ratio
plus one.)
2. The 2-Bit VCO Range Register. To lower the sensitivity of
the output frequency to noise on the control signal, the VCO
operating frequency range is divided into four overlapping
regions. The VCO Range register sets this operating range.
Because there are only four possible regions, only the two
least-significant bits of the VCO Range register are used.
The frequency ranges for the lowest and highest regions
are shown in Table V.
Page 16

REV. 0
–16–
AD9887
Table V. VCO Frequency Ranges
Pixel Clock K
VCO
Gain
PV1 PV0 Range (MHz) (MHz/V)
0 0 12–35 150
0 1 35–70 150
1 0 70–110 150
1 1 110–140 180
Table VI. Charge Pump Current/Control Bits
Ip2 Ip1 Ip0 Current (A)
00050
0 0 1 100
0 1 0 150
0 1 1 250
1 0 0 350
1 0 1 500
1 1 0 750
1 1 1 1500
3. The 3-Bit Charge Pump Current Register. This register
allows the current that drives the low pass loop filter to be
varied. The possible current values are listed in Table VI.
provides 32 phase-shift steps of 11.25° each. The Hsync
signal with an identical phase shift is available through the
HSOUT pin. Phase adjustment is still available if the pixel
clock is being provided externally.
4. The 5-Bit Phase Adjust Register. The phase of the generated
sampling clock may be shifted to locate an optimum sampling point within a clock cycle. The Phase Adjust register
The COAST allows the PLL to continue to run at the same
frequency, in the absence of the incoming Hsync signal. This
may be used during the vertical sync period, or any other
time that the Hsync signal is unavailable. The polarity of
the COAST signal may be set through the Coast Polarity Bit.
Also, the polarity of the Hsync signal may be set through the
HSYNC polarity Bit. If not using automatic polarity
detection, the HSYNC and COAST polarity bits should
be set to match the Polarity of their respective signals.
Table VII. Recommended VCO Range and Charge Pump Current Settings for Standard Display Formats
Horizontal
Refresh Frequency Pixel Rate
Standard Resolution Rate (Hz) (kHz) (MHz) VCORNGE CURRENT
VGA 640 × 480 60 31.5 25.175 00 101
72 37.7 31.500 00 101
75 37.5 31.500 00 110
85 43.3 36.000 00 110
SVGA 800 × 600 56 35.1 36.000 00 101
60 37.9 40.000 01 101
72 48.1 50.000 01 101
75 46.9 49.500 01 101
85 53.7 56.250 01 110
XGA 1024 × 768 60 48.4 65.000 01 110
70 56.5 75.000 10 101
75 60.0 78.750 10 101
80 64.0 85.500 10 101
85 68.3 94.500 10 101
SXGA 1280 × 1024 60 64.0 108.000 10 110
75 80.0 135.000 11 110
85 91.1 157.500* 10 110
UXGA 1600 × 1200 60 75.0 162.000* 10 110
65 81.3 175.500* 10 110
70 87.5 189.000* 10 110
75 93.8 202.500* 10 110
85 106.3 229.500* 11 110
*Graphics sampled at one-half the incoming pixel rate using Alternate Pixel Sampling mode.
Page 17

REV. 0
AD9887
–17–
ADC
DAC DAC
7
8
OFFSET GAIN
REF
x1.2
IN
CLAMP
V
OFF
8
Figure 8. ADC Block Diagram (Single Channel Output)
1V
INPUT RANGE
V
OFF
(128 CODES)
INPUT RANGE
0.5V
V
OFF
(128 CODES)
OFFSET
RANGE
0V
0V
OFFSET RANGE
Figure 9. Relationship of Offset Range to Input Range
SCAN Function
The SCAN function is intended as a pseudo JTAG function for
manufacturing test of the board. The ordinary operation of the
AD9887 is disabled during SCAN.
To enable the SCAN function, set register 14h, bit 2 to 1. To
SCAN in data to all 48 digital outputs, apply 48 serial bits of
data and 48 clocks (typically 5 MHz, max of 20 MHz) to the
SCAN
IN
and SCAN
CLK
pins respectively. The data is shifted
in on the rising edge of SCAN
CLK
. The first serial bit shifted
in will appear at the RED A<7> output after one clock cycle.
After 48 clocks, the first bit is shifted all the way to the BLU
B<0>. The 48th bit will now be at the RED A<7> output. If
SCAN
CLK
continues after 48 cycles, the data will continue to be
shifted from RED A<7> to BLU B<0> and will come out of the
SCAN
OUT
pin as serial data on the falling edge of SCAN
CLK
.
This is illustrated in Figure 10. A setup time (t
SU
) of 3 ns
should be plenty and no hold time (t
HOLD
) is required (≥ 0 ns).
This is illustrated in Figure 11.
t
SU
= 3ns
t
HOLD
= 0ns
SCANCLK
SCANIN
Figure 11. SCAN Setup and Hold
Alternate Pixel Sampling Mode
A Logic 1 input on Clock Invert (CKINV, Pin 94) inverts the
nominal ADC clock. CKINV can be switched between frames
to implement the alternate pixel sampling mode. This allows
higher effective image resolution to be achieved at lower pixel
rates but with lower frame rates.
On one frame, only even pixels are digitized. On the subsequent
frame, odd pixels are sampled. By reconstructing the entire
frame in the graphics controller, a complete image can be reconstructed. This is very similar to the interlacing process that is
employed in broadcast television systems, but the interlacing is
vertical instead of horizontal. The frame data is still presented to
the display at the full desired refresh rate (usually 60 Hz) so no
flicker artifacts are added.
OEOEOEOEOEOE
OEOEOEOEOEOE
OEOEOEOEOEOE
OEOEOEOEOEOE
OEOEOEOEOEOE
OEOEOEOEOEOE
OEOEOEOEOEOE
OEOEOEOEOEOE
OEOEOEOEOEOE
OEOEOEOEOEOE
OEOEOEOEOEOE
Figure 12. Odd and Even Pixels in a Frame
O1 O1 O1 O1 O1 O1
O1 O1 O1 O1 O1 O1
O1 O1 O1 O1 O1 O1
O1 O1 O1 O1 O1 O1
O1 O1 O1 O1 O1 O1
O1 O1 O1 O1 O1 O1
O1 O1 O1 O1 O1 O1
O1 O1 O1 O1 O1 O1
O1 O1 O1 O1 O1 O1
O1 O1 O1 O1 O1 O1
O1 O1 O1 O1 O1 O1
Figure 13. Odd Pixels from Frame 1
X BIT 1 BIT 2X
X X BIT 1 BIT 2
BIT 47 BIT 48 X
BIT 46 BIT 47 BIT 48 X
SCANCLK
RED A<7>
BLUE B<0>
SCANOUT
SCANIN BIT 1 BIT 2 BIT 3
BIT 1 BIT 2 BIT 3
XXX
XXX
Figure 10. SCAN Timing
Page 18

REV. 0
–18–
AD9887
E2 E2 E2 E2 E2 E2
E2 E2 E2 E2 E2 E2
E2 E2 E2 E2 E2 E2
E2 E2 E2 E2 E2 E2
E2 E2 E2 E2 E2 E2
E2 E2 E2 E2 E2 E2
E2 E2 E2 E2 E2 E2
E2 E2 E2 E2 E2 E2
E2 E2 E2 E2 E2 E2
E2 E2 E2 E2 E2 E2
Figure 14. Even Pixels from Frame 2
O1E2O1E2O1E2O1E2O1E2O1E2
O1E2O1E2O1E2O1E2O1E2O1E2
O1E2O1E2O1E2O1E2O1E2O1E2
O1E2O1E2O1E2O1E2O1E2O1E2
O1E2O1E2O1E2O1E2O1E2O1E2
O1E2O1E2O1E2O1E2O1E2O1E2
O1E2O1E2O1E2O1E2O1E2O1E2
O1E2O1E2O1E2O1E2O1E2O1E2
O1E2O1E2O1E2O1E2O1E2O1E2
O1E2O1E2O1E2O1E2O1E2O1E2
O1E2O1E2O1E2O1E2O1E2O1E2
Figure 15. Combine Frame Output from Graphics Controller
O3E2O3E2O3E2O3E2O3E2O3E2
O3E2O3E2O3E2O3E2O3E2O3E2
O3E2O3E2O3E2O3E2O3E2O3E2
O3E2O3E2O3E2O3E2O3E2O3E2
O3E2O3E2O3E2O3E2O3E2O3E2
O3E2O3E2O3E2O3E2O3E2O3E2
O3E2O3E2O3E2O3E2O3E2O3E2
O3E2O3E2O3E2O3E2O3E2O3E2
O3E2O3E2O3E2O3E2O3E2O3E2
O3E2O3E2O3E2O3E2O3E2O3E2
O3E2O3E2O3E2O3E2O3E2O3E2
Figure 16. Subsequent Frame from Controller
Timing (Analog Interface)
The following timing diagrams show the operation of the
AD9887 analog interface in all clock modes. The part establishes timing by having the sample that corresponds to the pixel
digitized when the leading edge of HSYNC occurs sent to the
“A” data port. In Dual Channel Mode, the next sample is sent
to the “B” port. Future samples are alternated between the “A”
and “B” data ports. In Single Channel Mode, data is only sent
to the “A” data port, and the “B” port is placed in a high
impedance state.
The Output Data Clock signal is created so that its rising edge
always occurs between “A” data transitions, and can be used to
latch the output data externally.
PXLCLK
ANY OUTPUT
SIGNAL
DATAC K
(OUTPUT)
t
SKEW
t
DCYCLE
t
PER
DATA OUT
Figure 17. Analog Output Timing
Hsync Timing
Horizontal sync is processed in the AD9887 to eliminate
ambiguity in the timing of the leading edge with respect to the
phase-delayed pixel clock and data.
The Hsync input is used as a reference to generate the pixel
sampling clock. The sampling phase can be adjusted, with respect
to Hsync, through a full 360° in 32 steps via the Phase Adjust
register (to optimize the pixel sampling time). Display systems use
Hsync to align memory and display write cycles, so it is important
to have a stable timing relationship between Hsync output
(HSOUT) and data clock (DATACK).
Three things happen to Horizontal Sync in the AD9887. First,
the polarity of Hsync input is determined and will thus have a
known output polarity. The known output polarity can be programmed either active high or active low (Register 04H, Bit 4).
Second, HSOUT is aligned with DATACK and data outputs.
Third, the duration of HSOUT (in pixel clocks) is set via Register 07H. HSOUT is the sync signal that should be used to drive
the rest of the display system.
Coast Timing
In most computer systems, the Hsync signal is provided continuously on a dedicated wire. In these systems, the COAST
input and function are unnecessary, and should not be used.
In some systems, however, Hsync is disturbed during the Vertical Sync period (Vsync). In some cases, Hsync pulses disappear.
In other systems, such as those that employ Composite Sync
(Csync) signals or embed Sync-On-Green (SOG), Hsync includes
equalization pulses or other distortions during Vsync. To avoid
upsetting the clock generator during Vsync, it is important to
ignore these distortions. If the pixel clock PLL sees extraneous
pulses, it will attempt to lock to this new frequency, and will
have changed frequency by the end of the Vsync period. It will
then take a few lines of correct Hsync timing to recover at the
beginning of a new frame, resulting in a “tearing” of the image
at the top of the display.
The COAST input is provided to eliminate this problem. It is
an asynchronous input that disables the PLL input and allows
the clock to free-run at its then-current frequency. The PLL can
free-run for several lines without significant frequency drift.
Coast can be provided by the graphics controller or it can be
internally generated by the AD9887 Sync processing engine.
Page 19

REV. 0
AD9887
–19–
P0 P1 P2 P3 P4 P5 P6 P7
5-PIPE DELAY
D0 D1 D2 D3 D4 D5 D6 D7
RGB
IN
HSYNC
PxCK
HS
ADCCK
DATACK
D
OUTA
HSOUT
Figure 18. Single Channel Mode (Analog Interface)
5-PIPE DELAY
D0 D2 D4 D6
P0 P1 P2 P3 P4 P5 P6 P7
RGB
IN
HSYNC
PxCK
HS
ADCCK
DATACK
D
OUTA
HSOUT
Figure 19. Single Channel Mode, 2 Pixels/Clock (Even Pixels) (Analog Interface)
5.5-PIPE DELAY
D1 D3 D5 D7
P0 P1 P2 P3 P4 P5 P6 P7
RGB
IN
HSYNC
PxCK
HS
ADCCK
DATACK
D
OUTA
HSOUT
Figure 20. Single Channel Mode, 2 Pixels/Clock (Odd Pixels) (Analog Interface)
Page 20

REV. 0
–20–
AD9887
P0 P1 P2 P3 P4 P5 P6 P7
3-PIPE DELAY
D0 D2 D4 D6
D1 D3 D5
RGB
IN
HSYNC
PxCK
HS
ADCCK
DATACK
D
OUTA
HSOUT
D
OUTB
D7
Figure 21. Dual Channel Mode, Interleaved Outputs (Analog Interface), Outphase = 1
P0 P1 P2 P3 P4 P5 P6 P7
7-PIPE DELAY
D0
D2 D4 D6
RGB
IN
HSYNC
PxCK
HS
ADCCK
DATACK
D
OUTA
HSOUT
D
OUTB
D1
D3 D5 D7
Figure 22. Dual Channel Mode, Parallel Outputs (Analog Interface), Outphase = 1
3-PIPE DELAY
P0 P1 P2 P3 P4 P5 P6 P7
D4
D2 D6
RGB
IN
HSYNC
PxCK
HS
ADCCK
DATACK
D
OUTA
HSOUT
D
OUTB
D0
Figure 23. Dual Channel Mode, Interleaved Outputs, 2 Pixels/Clock (Even Pixels) (Analog Interface), Outphase = 1
Page 21

REV. 0
AD9887
–21–
5-PIPE DELAY
D1 D5
D3 D7
P0 P1 P2 P3 P4 P5 P6 P7
RGB
IN
HSYNC
PxCK
HS
ADCCK
DATACK
D
OUTA
HSOUT
D
OUTB
Figure 24. Dual Channel Mode, Interleaved Outputs, 2 Pixels/Clock (Odd Pixels) (Analog Interface), Outphase = 1
7-PIPE DELAY
P0 P1 P2 P3 P4 P5 P6 P7
D0 D4
D2 D6
RGB
IN
HSYNC
PxCK
HS
ADCCK
DATACK
D
OUTA
D
OUTB
HSOUT
Figure 25. Dual Channel Mode, Parallel Outputs, 2 Pixels/Clock (Even Pixels) (Analog Interface), Outphase = 1
7.5-PIPE DELAY
P0 P1 P2 P3 P4 P5 P6 P7
D1 D5
D3 D7
RGB
IN
HSYNC
PxCK
HS
ADCCK
DATACK
D
OUTA
D
OUTB
HSOUT
Figure 26. Dual Channel Mode, Parallel Outputs, 2 Pixels/Clock (Odd Pixels) (Analog Interface), Outphase = 1
Page 22

REV. 0
–22–
AD9887
6-PIPE DELAY
P0 P1 P2 P3 P4 P5 P6 P7
U0 V2 U4 V4 U6
RGBIN
HSYNC
PXCK
HS
ADCCK
DATACK
ROUTA
HSOUT
Y0 Y1 Y2 Y3 Y4 Y5 Y6
GOUTA
V0 U2 V6
Figure 27. 4:2:2 Output Mode
Table VIII. Digital Interface Pin List
Pin Type Pin Name Function Value Pin No.
Digital Video Data Inputs Rx0+ Digital Input Channel 0 True 62
Rx0– Digital Input Channel 0 Complement 63
Rx1+ Digital Input Channel 1 True 59
Rx1– Digital Input Channel 1 Complement 60
Rx2+ Digital Input Channel 2 True 56
Rx2– Digital Input Channel Two’s Complement 57
Digital Video Clock Inputs RxC+ Digital Data Clock True 65
RxC– Digital Data Clock Complement 66
Termination Control R
TERM
Control Pin for Setting the Internal 53
Termination Resistance
Outputs DE Data Enable 3.3 V CMOS 137
HSYNC HSYNC Output 3.3 V CMOS 139
VSYNC VSYNC Output 3.3 V CMOS 138
CTL0, CTL1, Decoded Control Bit Outputs 3.3 V CMOS 46–49
CTL2, CTL3
Power Supply V
D
Main Power Supply 3.3 V ± 5%
PV
D
PLL Power Supply 3.3 V ± 5%
V
DD
Output Power Supply 3.3 V or 2.5 V ± 5%
GND Ground Supply 0 V
GND Ground Supply 0 V
Page 23

REV. 0
AD9887
–23–
DIGITAL INTERFACE PIN DESCRIPTIONS
Digital Video Data Inputs
Rx0+ Positive Differential Input Video Data (Channel 0)
Rx0– Negative Differential Input Video Data (Channel 0)
Rx1+ Positive Differential Input Video Data (Channel 1)
Rx1– Negative Differential Input Video Data (Channel 1)
Rx2+ Positive Differential Input Video Data (Channel 2)
Rx2– Negative Differential Input Video Data (Channel 2)
These six pins receive three pairs of differential,
low voltage swing input pixel data from a digital
graphics transmitter.
Digital Video Clock Inputs
RxC+ Positive Differential Input Video Clock
RxC– Negative Differential Input Video Clock
These two pins receive the differential, low voltage
swing input pixel clock from a digital graphics
transmitter.
Termination Control
R
TERM
Internal Termination Set Pin
This pin is used to set the termination resistance
for all of the digital interface high-speed inputs. To
set, place a resistor of value equal to 10× the desired
input termination resistance between this pin (Pin
53) and ground supply. Typically, the value of this
resistor should be 500 Ω.
Outputs
DE Data Enable Output
This pin outputs the state of data enable, (DE).
The AD9887 decodes DE from the incoming
stream of data. The DE signal will be HIGH during active video and will be LOW while there is no
active video.
Power Supply
V
D
Main Power Supply
It should be as quiet and as filtered as possible.
PV
D
PLL Power Supply
It should be as quiet and as filtered as possible.
V
DD
Outputs Power Supply
The power for the data and clock outputs. It can
run at 3.3 V or 2.5 V.
THEORY OF OPERATION (DIGITAL INTERFACE)
Capturing of the Encoded Data
The first step in recovering the encoded data is to capture the
raw data. To accomplish this, the AD9887 employs a high-speed
Phase Locked Loop (PLL), to generate clocks capable of
oversampling the data at the correct frequencies. The data
capture circuitry continuously monitors the incoming data during
horizontal and vertical blanking times (when DE is low), and
independently selects the best sampling phase for each data
channel. The phase information is stored and used until the next
blanking
period (one video line).
Data Frames
The digital interface data is captured in groups of 10 bits each,
called a data frame. During the active data period, each frame is
made up the nine encoded video data bits and one dc balancing
bit. The data capture block receives this data serially, but outputs each frame in parallel 10-bit words.
Special Characters
During periods of horizontal or vertical blanking time (when
DE is low), the digital transmitter will transmit special characters.
The AD9887 will receive these characters and use them to set the
video frame boundaries and the phase recovery loop for each
channel. There are four special characters that can be received.
They are used to identify the top, bottom, left side, and right side
of each video frame. The data receiver can differentiate these
special characters from active data because the special characters
have a different number of transitions per data frame.
Channel Resynchronization
The purpose of the channel resynchronization block is to resynchronize the three data channels to a single internal data clock.
Coming into this block, all three data channels can be on different phases of the three times oversampling PLL clock (0°, 120°,
and 240°). This block can resynchronize the channels from a
worst-case skew of one full input period (8.93 ns at 112 MHz).
Data Decoder
The data decoder receives frames of data and sync signals from
the data capture block (in 10-bit parallel words), and decodes
them into groups of eight RGB/YUV bits, two control bits, and
a data enable bit (DE).
Page 24

REV. 0
–24–
AD9887
GENERAL TIMING DIAGRAMS (DIGITAL INTERFACE)
80%
80%
20%
20%
D
LHT
D
LHT
Figure 28. Digital Output Rise and Fall Time
T
CIH
, R
CIH
T
CIP
, R
CIP
T
CIL
, R
CIL
Figure 29. Clock Cycle/High/Low Times
V
DIFF
= 0V
T
CCS
V
DIFF
= 0V
R
X0
R
X1
R
X2
Figure 30. Channel-to-Channel Skew Timing
DATAC K
(INTERNAL)
DATAC K
(PIN)
t
SKEW
DATA OUT
Figure 31. DVI Output Timing
TIMING MODE DIAGRAMS (DIGITAL INTERFACE)
FIRST
PIXEL
SECOND
PIXEL
THIRD
PIXEL
FOURTH
PIXEL
INTERNAL
ODCLK
DATACK
DE
QE[23:0]
QO[23:0]
T
ST
Figure 32. 1 Pixel per Clock (DATACK Inverted)
FIRST
PIXEL
SECOND
PIXEL
THIRD
PIXEL
FOURTH
PIXEL
INTERNAL
ODCLK
DATACK
DE
QE[23:0]
QO[23:0]
T
ST
Figure 33. 1 Pixels per Clock (DATACK Inverted)
FIRST PIXEL
SECOND PIXEL
THIRD PIXEL
FOURTH PIXEL
INTERNAL
ODCLK
DATACK
DE
QE[23:0]
QO[23:0]
T
ST
Figure 34. 2 Pixel per Clock
FIRST PIXEL
SECOND PIXEL
THIRD PIXEL
FOURTH PIXEL
INTERNAL
ODCLK
DATACK
DE
QE[23:0]
QO[23:0]
T
ST
Figure 35. 2 Pixels per Clock (DATACK Inverted)
Page 25

REV. 0
AD9887
–25–
2-Wire Serial Register Map
The AD9887 is initialized and controlled by a set of registers, which determine the operating modes. An external controller is
employed to write and read the Control Registers through the 2-line serial interface port.
Table IX. Control Register Map
Read and
Hex Write or Default Register
Address Read Only Bits Value Name Function
00H RO 7:0 Chip Revision Bits 7 through 4 represent functional revisions to the analog interface.
Bits 3 through 0 represent nonfunctional related revisions.
Revision 0 = 0000 0000
01H R/W 7:0 01101001 PLL Div MSB This register is for Bits [11:4] of the PLL divider. Larger values mean
the PLL operates at a faster rate. This register should be loaded first
whenever a change is needed. (This will give the PLL more time to
lock.) See Note 1.
02H R/W 7:4 1101**** PLL Div LSB Bits [7:4] LSBs of the PLL divider word. See Note 1.
03H R/W 7:2 1******* VCO/CPMP Bit 7—Must be set to 1 for proper device operation.
*01***** Bits [6:5] VCO Range. Selects VCO frequency range. (See PLL
description.)
***001** Bits [4:2] Charge Pump Current. Varies the current that drives the
low-pass filter. (See PLL description.)
04H R/W 7:3 10000*** Phase Adjust ADC Clock phase adjustment. Larger values mean more delay.
(1 LSB = T/32)
05H R/W 7:0 10000000 Clamp Places the Clamp signal an integer number of clock periods after the trail-
Placement ing edge of the Hsync signal.
06H R/W 7:0 10000000 Clamp Number of clock periods that the Clamp signal is actively clamping.
Duration
07H R/W 7:0 00100000 Hsync Output Sets the number of pixel clocks that HSOUT will remain active.
Pulsewidth
08H R/W 7:0 10000000 Red Gain Controls ADC input range (Contrast) of each respective channel.
Bigger values give less contrast.
09H R/W 7:0 10000000 Green Gain
0AH R/W 7:0 10000000 Blue Gain
0BH R/W 7:1 1000000* Red Offset Controls dc offset (Brightness) of each respective channel. Bigger
values decrease brightness.
0CH R/W 7:1 1000000* Green Offset
0DH R/W 7:1 1000000* Blue Offset
0EH R/W 7:3 1******* Mode Bit 7—Channel Mode. Determines Single Channel or Dual Channel
Control 1 Output Mode. (Logic 0 = Single Channel Mode, Logic 1 = Dual
Channel Mode.)
*1****** Bit 6—Output Mode. Determine Interleaved or Parallel Output Mode.
(Logic 0 = Interleaved Mode, Logic 1 = Parallel Mode.)
**0***** Bit 5—OUTPHASE. Determines which port outputs the first data byte
after Hsync. (Logic 0 = B Port, Logic 1 = A Port.)
***0**** Bit 4—Hsync Output polarity. (Logic 0 = Logic High Sync, Logic 1 =
Logic Low Sync.)
****0*** Bit 3—Vsync Output Invert. (Logic 0 = Invert, Logic 1 = No Invert.)
Page 26

REV. 0
–26–
AD9887
Table IX. Control Register Map (continued)
Read and
Hex Write or Default Register
Address Read Only Bits Value Name Function
0FH R/W 7:0 1******* PLL and Bit 7—HSYNC Polarity. Indicates the polarity of incoming HSYNC
Clamp Control signal to the PLL. (Logic 0 = Active Low, Logic 1 = Active High.)
*1****** Bit 6—Coast Polarity. Changes polarity of external COAST signal.
(Logic 0 = Active Low, Logic 1 = Active High.)
**0***** Bit 5—Clamp Function. Chooses between HSYNC for Clamp signal
or another external signal to be used for clamping. (Lo gic 0 = HSYNC,
Logic 1 = Clamp.)
***1**** Bit 4—Clamp Polarity. Valid only with external CLAMP signal. (Logic 0 =
Active Low, Logic 1 selects Active High.)
****0***
Bit 3—EXTCLK. Shuts down the PLL and allows the use of an external
clock to drive the part. (Logic 0 = use internal PLL, Logic 1 = bypassing of the internal PLL.)
*****0** Bit 2—Red Clamp Select—Logic 0 selects clamp to ground. Logic 1
selects clamp to midscale (voltage at Pin 120).
******0* Bit 1—Green Clamp Select—Logic 0 selects clamp to ground. Logic 1
selects clamp to midscale (voltage at Pin 111).
*******0 Bit 0—Blue Clamp Select—Logic 0 selects clamp to ground. Logic 1
selects clamp to midscale (voltage at Pin 101).
10H R/W 7:2 0******* Mode Bit 7—Clk Inv: Data clock output invert. (Logic 0 = Not Inverted,
Control 2 Logic 1 = Inverted.) (Digital Interface Only.)
*0****** Bit 6—Pix Select: Selects either 1 or 2 pixels per clock mode.
(Logic 0 = 1 pixel/clock, Logic 1 = 2 pixels/clock.) (Digital Interface
Only.)
**11**** Bit 5, 4—Output Drive: Selects between high, medium, and low
output drive strength. (Logic 11 or 10 = High, 01 = Medium, and
00 = Low.)
****0*** Bit 3—P
DO
: High Impedance Outputs. (Logic 0 = Normal, Logic
1 = High Impedance.)
*****1** Bit 2—Sync Detect (SyncDT) Polarity. This bit sets the polarity
for the SyncDT output pin. (Logic 1 = Active High, Logic 0 =
Active Low.)
11H RO 7:1 Sync Detect/ Bit 7—Analog Interface Hsync Detect. It is set to Logic 1 if Hsync
Active is present on the analog interface; otherwise it is set to Logic 0.
Interface Bit 6—Analog Interface Sync-on-Green Detect. It is set to Logic 1
if sync is present on the green video input; otherwise it is set to 0.
Bit 5—Analog Interface Vsync Detect. It is set to Logic 1 if Vsync
is present on the analog interface; otherwise it is set to Logic 0.
Bit 4—Digital Interface Clock Detect. It is set to Logic 1 if the
clock is present on the digital interface; otherwise it is set to Logic 0.
Bit 3—AI: Active Interface. This bit indicates which interface is
active. (Logic 0 = Analog Interface, Logic 1 = Digital Interface.)
Bit 2—AHS: Active Hsync. This bit indicates which analog HSYNC
is being used. (Logic 0 = HSYNC Input Pin, Logic 1 = HSYNC
from Sync-on-Green.)
Bit 1—AVS: Active Vsync. This bit indicates which analog VSYNC
is being used. (Logic 0 = VSYNC input pin, Logic 1 = VSYNC from
sync separator.)
Page 27

REV. 0
AD9887
–27–
Table IX. Control Register Map (continued)
Read and
Hex Write or Default Register
Address Read Only Bits Value Name Function
12H
R/W
7:0 0******* Active Bit 7—AIO: Active Interface Override. If set to Logic 1, the user
Interface can select the active interface via Bit 6. If set to Logic 0, the active
interface is selected via Bit 3 in Register 11H.
*0****** Bit 6—AIS: Active Interface Select. Logic 0 selects the analog inter-
face as active. Logic 1 selects the digital interface as active. Note:
The indicated interface will be active only if Bit 7 is set to Logic 1
or if both interfaces are active (Bits 6 or 7 and 4 = Logic 1 in
Register 11H.)
**0***** Bit 5—Active Hsync Override. If set to Logic 1, the user can select
the Hsync to be used via Bit 4. If set to Logic 0, the active interface
is selected via Bit 2 in Register 11H.
***0**** Bit 4—Active Hsync Select. Logic 0 selects Hsync as the active
sync. Logic 1 selects Sync-on-Green as the active sync. Note: The
indicated Hsync will be used only if Bit 5 is set to Logic 1 or if
both syncs are active (Bits 6, 7 = Logic 1 in Register 11H.)
****0*** Bit 3—Active Vsync Override. If set to Logic 1, the user can select
the Vsync to be used via Bit 2. If set to Logic 0, the active interface
is selected via Bit 1 in Register 11H.
*****0** Bit 2—Active Vsync Select. Logic 0 selects Raw Vsync as the
output Vsync. Logic 1 selects Sync Separated Vsync as the output
Vsync. Note: The indicated Vsync will be used only if Bit 3 is set
to Logic 1.
******0* Bit 1—Coast Select. Logic 0 selects the coast input pin to be used for
the PLL coast. Logic 1 selects Vsync to be used for the PLL coast.
*******1 Bit 0—PWRDN. Full Chip Power-Down, active low. (Logic 0 =
Full Chip Power-Down, Logic 1 = Normal.)
13H
R/W
7:0 00100000 Sync Sync Separator Threshold—Sets the number of clocks the sync
Separator separator will count to before toggling high or low. This should be
Threshold set to some number greater than the maximum Hsync or equaliza-
tion pulsewidth.
14H
R/W
7:0 ***1**** Control Bits Bit 4—Must be set to 1 for proper operation.
****0*** Bit 3—Must be set to 0 for proper operation.
*****0** Bit 2—Scan Enable. (Logic 0 = Not Enabled, Logic 1 = Enabled.)
******0* Bit 1—Coast Polarity Override. (Logic 0 = Polarity determined by
chip, Logic 1 = Polarity set by Bit 6 in Register 0Fh.)
*******0 Bit 0—Hsync Polarity Override. (Logic 0 = Polarity determined by
chip, Logic 1 = Polarity set by Bit 7 in Register 0Fh.)
15H RO 7:5 Polarity Status Bit 7—Hsync Input Polarity Status. (Logic 1 = Active High,
Logic 0 = Active Low.)
Bit 6—Vsync Output Polarity Status. (Logic 0 = Active High,
Logic 1 = Active Low.)
Bit 5—Coast Input Polarity Status. (Logic 1 = Active High,
Logic 0 = Active Low.)
16H
R/W
7:2 10111*** Control Bits 2 Bits [7:3]—Sync-On-Green Slicer Threshold
******1* Bit 1—Must be set to 0 for proper operation.
17H
R/W
7:0 00000000 Pre-Coast Sets the number of Hsyncs that coast goes active prior to Vsync.
18H
R/W
7:0 00000000 Post-Coast Sets the number of Hsyncs that coast goes active following Vsync.
19H
R/W
7:0 00000000 Test Register Must be set to default for proper operation.
1AH
R/W
7:0 11111111 Test Register Must be set to 01000001 for proper operation.
Page 28

REV. 0
–28–
AD9887
Read and
Hex Write or Default Register
Address Read Only Bits Value Name Function
1BH R/W 7:0 00000000 Test Register Must be set to 00010000 for proper operation.
1CH
R/W
7:0 000001** 4:2:2 Control Bits [7:2]—Must be set to 011011** for proper operation.
******1* Bit 1—Must be set to default for proper operation.
*******1 Bit 0—Output Format Mode Select
Logic 1 = 4:4:4 mode
Logic 0 = 4:2:2 mode
1DH RO 7:0 Test Register Reserved for future use.
1EH RO 7:0 Test Register Reserved for future use.
1FH RO 7:0 Test Register Reserved for future use.
NOTE
1
The AD9887 only updates the PLL divide ratio when the LSBs are written to (Register 02h).
Table IX. Control Register Map (continued)
Page 29

REV. 0
AD9887
–29–
2-WIRE SERIAL CONTROL REGISTER DETAIL
CHIP IDENTIFICATION
00 7–0 Chip Revision
Bits 7 through 4 represent functional revisions to the
analog interface. Changes in these bits will generally
indicate that software and/or hardware changes will be
required for the chip to work properly. Bits 3 through 0
represent nonfunctional related revisions and are reset to
0000 whenever the MSBs are changed. Changes in these
bits are considered transparent to the user.
PLL DIVIDER CONTROL
01 7–0 PLL Divide Ratio MSBs
The eight most significant bits of the 12-bit PLL divide ratio
PLLDIV. (The operational divide ratio is PLLDIV + 1.)
The PLL derives a pixel clock from the incoming Hsync
signal. The pixel clock frequency is then divided by an
integer value, such that the output is phase-locked to
Hsync. This PLLDIV value determines the number of
pixel times (pixels plus horizontal blanking overhead) per
line. This is typically 20% to 30% more than the number
of active pixels in the display.
The 12-bit value of the PLL divider supports divide ratios
from 221 to 4095. The higher the value loaded in this
register, the higher the resulting clock frequency with
respect to a fixed Hsync frequency.
VESA has established some standard timing specifications,
which will assist in determining the value for PLLDIV as
a function of horizontal and vertical display resolution
and frame rate (Table VII).
However, many computer systems do not conform precisely to the recommendations, and these numbers should
be used only as a guide. The display system manufacturer
should provide automatic or manual means for optimizing
PLLDIV. An incorrectly set PLLDIV will usually produce
one or more vertical noise bars on the display. The greater
the error, the greater the number of bars produced.
The power-up default value of PLLDIV is 1693
(PLLDIVM = 69h, PLLDIVL = Dxh).
The AD9887 updates the full divide ratio only when the
LSBs are changed. Writing to this register by itself will not
trigger an update.
02 7–4 PLL Divide Ratio LSBs
The four least significant bits of the 12-bit PLL divide ratio
PLLDIV. The operational divide ratio is PLLDIV + 1.
The power-up default value of PLLDIV is 1693
(PLLDIVM = 69h, PLLDIVL = Dxh).
The AD9887 updates the full divide ratio only when this
register is written.
CLOCK GENERATOR CONTROL
03 7 TEST Set to One
03 6–5 VCO Range Select
Two bits that establish the operating range of the clock
generator.
VCORNGE must be set to correspond with the desired
operating frequency (incoming pixel rate).
The PLL gives the best jitter performance at high frequencies. For this reason, in order to output low pixel
rates and still get good jitter performance, the PLL actually operates at a higher frequency but then divides down
the clock rate afterwards. Table X shows the pixel rates
for each VCO range setting. The PLL output divisor is
automatically selected with the VCO range setting.
Table X. VCO Ranges
VCORNGE Pixel Rate Range
00 12–35
01 35–70
10 70–110
11 110–140
The power-up default value is = 01.
03 4–2 CURRENT Charge Pump Current
Three bits that establish the current driving the loop filter
in the clock generator.
Table XI. Charge Pump Currents
CURRENT Current (A)
000 50
001 100
010 150
011 250
100 350
101 500
110 750
111 1500
See Table VII for the recommended CURRENT settings.
The power-up default value is CURRENT = 001.
04 7–3 Clock Phase Adjust
A five-bit value that adjusts the sampling phase in 32 steps
across one pixel time. Each step represents an 11.25° shift
in sampling phase.
The power-up default value is 16.
CLAMP TIMING
05 7–0 Clamp Placement
An eight-bit register that sets the position of the internally
generated clamp.
When EXTCLMP = 0, a clamp signal is generated internally, at a position established by the clamp placement and
for a duration set by the clamp duration. Clamping is
started (Clamp Placement) pixel periods after the trailing
edge of Hsync. The clamp placement may be programmed
to any value between 1 and 255. A value of 0 is not
supported.
The clamp should be placed during a time that the input
signal presents a stable black-level reference, usually the
back porch period between Hsync and the image.
When EXTCLMP = 1, this register is ignored.
Page 30

REV. 0
–30–
AD9887
06 7–0 Clamp Duration
An 8-bit register that sets the duration of the internally
generated clamp.
When EXTCLMP = 0, a clamp signal is generated internally, at a position established by the clamp placement
and for a duration set by the clamp duration. Clamping is
started (clamp placement) pixel periods after the trailing
edge of Hsync, and continues for (clamp duration) pixel
periods. The clamp duration may be programmed to any
value between 1 and 255. A value of 0 is not supported.
For the best results, the clamp duration should be set to
include the majority of the black reference signal time that
follows the Hsync signal trailing edge. Insufficient clamping time can produce brightness changes at the top of the
screen, and a slow recovery from large changes in the
Average Picture Level (APL), or brightness.
When EXTCLMP = 1, this register is ignored.
Hsync Pulsewidth
07 7–0 Hsync Output Pulsewidth
An 8-bit register that sets the duration of the Hsync
output pulse.
The leading edge of the Hsync output is triggered by the
internally generated, phase-adjusted PLL feedback clock.
The AD9887 then counts a number of pixel clocks equal
to the value in this register. This triggers the trailing edge
of the Hsync output, which is also phase-adjusted.
INPUT GAIN
08 7–0 Red Channel Gain Adjust
An 8-bit word that sets the gain of the RED channel.
The AD9887 can accommodate input signals with a
full-scale range of between 0.5 V and 1.5 V p-p. Setting
REDGAIN to 255 corresponds to an input range of 1.0 V.
A REDGAIN of 0 establishes an input range of 0.5 V.
Note that INCREASING REDGAIN results in the picture
having LESS CONTRAST (the input signal uses fewer
of the available converter codes). See Figure 3.
09 7–0 Green Channel Gain Adjust
An 8-bit word that sets the gain of the GREEN channel.
See REDGAIN (08).
0A 7–0 Blue Channel Gain Adjust
An 8-bit word that sets the gain of the BLUE channel.
See REDGAIN (08).
INPUT OFFSET
0B 7–1 Red Channel Offset Adjust
A 7-bit offset binary word that sets the dc offset of the RED
channel. One LSB of offset adjustment equals approximately
one LSB change in the ADC offset. Therefore, the absolute
magnitude of the offset adjustment scales as the gain of the
channel is changed. A nominal setting of 63 results in the
channel nominally clamping the back porch (during the
clamping interval) to Code 00. An offset setting of 127
results in the channel clamping to Code 63 of the ADC. An
offset setting of 0 clamps to code –63 (off the bottom of
the range). Increasing the value of Red Offset DECREASES
the brightness of the channel.
0C 7–1 Green Channel Offset Adjust
A 7-bit offset binary word that sets the dc offset of the
GREEN channel. See REDOFST (0B).
0D 7–1 Blue Channel Offset Adjust
A 7-bit offset binary word that sets the dc offset of the
GREEN channel. See REDOFST (0B).
MODE CONTROL 1
0E 7 Channel Mode
A bit that determines whether all pixels are presented to a
single port (A), or alternating pixels are demultiplexed to
Ports A and B.
Table XII. Channel Mode Settings
DEMUX Function
0 All Data Goes to Port A
1 Alternate Pixels Go to Port A and Port B
When DEMUX = 0, Port B outputs are in a high-impedance
state. The maximum data rate for single port mode is
100 MHz. The timing diagrams show the effects of this option.
The power-up default value is 1.
0E 6 Output Mode
A bit that determines whether all pixels are presented to
Port A and Port B simultaneously on every second
DATACK rising edge, or alternately on port A and Port B
on successive DATACK rising edges.
Table XIII. Output Mode Settings
PARALLEL Function
0 Data Is Interleaved
1 Data Is Simultaneous On Every Other
Data Clock
When in single port mode (DEMUX = 0), this bit is ignored. The timing diagrams show the effects of this option.
The power-up default value is PARALLEL = 1.
0E 5 Output Port Phase
One bit that determines whether even pixels or odd pixels
go to Port A.
Table XIV. Output Port Phase Settings
OUTPHASE First Pixel After Hsync
0 Port B
1 Port A
In normal operation (OUTPHASE = 1), when operating
in dual-port output mode (DEMUX = 1), the first sample
after the Hsync leading edge is presented at Port A. Every
subsequent ODD sample appears at Port A. All EVEN
samples go to Port B.
When OUTPHASE = 0, these ports are reversed and the
first sample goes to Port B.
Page 31

REV. 0
AD9887
–31–
When DEMUX = 0, this bit is ignored as data always
comes out of only Port A.
0E 4 HSYNC Output Polarity
One bit that determines the polarity of the HSYNC output and the SOG output. Table XV shows the effect of
this option. SYNC indicates the logic state of the sync pulse.
Table XV. HSYNC Output Polarity Settings
Setting SYNC
0 Logic 1 (Positive Polarity)
1 Logic 0 (Negative Polarity)
The default setting for this register is 1. (This option
works on both the analog and digital interfaces.)
0E 3 VSYNC Output Invert
One bit that inverts the polarity of the VSYNC output.
Table XVI shows the effect of this option.
Table XVI. VSYNC Output Polarity Settings
Setting VSYNC Output
0 Invert
1 No Invert
The default setting for this register is 1. (This option
works on both the analog and digital interfaces.)
0F 7 HSYNC Input Polarity
A bit that must be set to indicate the polarity of the HSYNC
signal that is applied to the PLL HSYNC input.
Table XVII. HSYNC Input Polarity Settings
HSPOL Function
0 Active LOW
1 Active HIGH
Active LOW is the traditional negative-going Hsync pulse.
All timing is based on the leading edge of Hsync, which is
the FALLING edge. The rising edge has no effect.
Active HIGH is inverted from the traditional Hsync, with a
positive-going pulse. This means that timing will be based on
the leading edge of Hsync, which is now the RISING edge.
The device will operate if this bit is set incorrectly, but the
internally generated clamp position, as established by
CLPOS, will not be placed as expected, which may generate clamping errors.
The power-up default value is HSPOL = 1.
0F 6 COAST Input Polarity
A bit to indicate the polarity of the COAST signal that is
applied to the PLL COAST input.
Table XVIII. COAST Input Polarity Settings
CSTPOL Function
0 Active LOW
1 Active HIGH
Active LOW means that the clock generator will ignore Hsync
inputs when COAST is LOW, and continue operating at the
same nominal frequency until COAST goes HIGH.
Active HIGH means that the clock generator will ignore
Hsync inputs when COAST is HIGH, and continue operating at the same nominal frequency until COAST goes LOW.
This function needs to be used along with the COAST
polarity override bit (Register 14, Bit 1).
The power-up default value is CSTPOL = 1.
0F 5 Clamp Input Signal Source
A bit that determines the source of clamp timing.
Table XIX. Clamp Input Signal Source Settings
EXTCLMP Function
0 Internally-Generated Clamp
1 Externally-Provided Clamp Signal
A 0 enables the clamp timing circuitry controlled by
CLPLACE and CLDUR. The clamp position and duration is counted from the leading edge of Hsync.
A 1 enables the external CLAMP input pin. The three
channels are clamped when the CLAMP signal is
active. The polarity of CLAMP is determined by the
CLAMPOL bit.
The power-up default value is EXTCLMP = 0.
0F 4 CLAMP Input Signal Polarity
A bit that determines the polarity of the externally provided CLAMP signal.
Table XX. CLAMP Input Signal Polarity Settings
EXTCLMP Function
0 Active LOW
1 Active HIGH
A Logic 0 means that the circuit will clamp when CLAMP
is HIGH, and it will pass the signal to the ADC when
CLAMP is LOW.
A Logic 1 means that the circuit will clamp when CLAMP
is LOW, and it will pass the signal to the ADC when
CLAMP is HIGH.
The power-up default value is CLAMPOL = 1.
0F 3 External Clock Select
A bit that determines the source of the pixel clock.
Table XXI. External Clock Select Settings
EXTCLK Function
0 Internally Generated Clock
1 Externally Provided Clock Signal
A Logic 0 enables the internal PLL that generates the
pixel clock from an externally provided Hsync.
Page 32

REV. 0
–32–
AD9887
A Logic 1 enables the external CKEXT input pin. In this
mode, the PLL Divide Ratio (PLLDIV) is ignored. The
clock phase adjust (PHASE) is still functional.
The power-up default value is EXTCLK = 0.
0F 2 Red Clamp Select
A bit that determines whether the red channel is clamped
to ground or to midscale. For RGB video, all three channels are referenced to ground. For YcbCr (or YUV), the
Y channel is referenced to ground, but the CbCr channels
are referenced to midscale. Clamping to midscale actually
clamps to Pin 118, R
CLAMP
V.
Table XXII. Red Clamp Select Settings
Clamp Function
0 Clamp to Ground
1 Clamp to Midscale (Pin 118)
The default setting for this register is 0.
0F 1 Green Clamp Select
A bit that determines whether the green channel is clamped
to ground or to midscale.
Table XXIII. Green Clamp Select Settings
Clamp Function
0 Clamp to Ground
1 Clamp to Midscale (Pin 109)
The default setting for this register is 0.
0F 0 Blue Clamp Select
A bit that determines whether the blue channel is clamped
to ground or to midscale.
Table XXIV. Blue Clamp Select Settings
Clamp Function
0 Clamp to Ground
1 Clamp to Midscale (Pin 99)
The default setting for this register is 0.
MODE CONTROL 2
10 7 Clk Inv Data Output Clock Invert
A control bit for the inversion of the output data clocks,
(Pins 134, 135). This function works only for the digital
interface. When not inverted, data is output on the rising
edge of the data clock. See timing diagrams to see how
this affects timing.
Table XXV. Clock Output Invert Settings
Clk Inv Function
0 Not Inverted
1 Inverted
The default for this register is 0, not inverted.
10 6 Pix Select
This bit selects either 1 or 2 pixels per clock mode for the
digital interface. It determines whether the data comes out
of a single port (even port only), at the full data rate or
out of two ports (both even and odd ports), at one-half
the full data rate per port. A Logic 0 selects 1 pixel per
clock (even port only). A Logic 1 selects 2 pixels per clock
(both ports). See the Digital Interface Timing Diagrams,
Figures 29 to 32, for a visual representation of this function.
Note: This function operates exactly like the DEMUX
function on the analog interface.
Table XXVI. Pix Select Settings
Pix Select Function
0 1 Pixel per Clock
1 2 Pixels per Clock
The default for this register is 0, 1 pixel per clock.
10 5, 4 Output Drive
These two bits select the drive strength for the high-speed
digital outputs (all data output and clock output pins).
Higher drive strength results in faster rise/fall times and in
general makes it easier to capture data. Lower drive strength
results in slower rise/fall times and helps to reduce EMI
and digitally generated power supply noise. The exact
timing specifications for each of these modes are specified
in Table VII.
Table XXVII. Output Drive Strength Settings
Bit 5 Bit 4 Result
1 1 High Drive Strength
1 0 Medium Drive Strength
0 X Low Drive Strength
The default for this register is 11, high drive strength. (This
option works on both the analog and digital interfaces.)
10 3 PDO—Power-Down Outputs
A bit that can put the outputs in a high impedance mode.
This applies only to the 48 data output pins and the two
data clock output pins.
Table XXVIII. Power-Down Output Settings
CKINV Function
0 Normal Operation
1 Three-State
The default for this register is 0. (This option works on
both the analog and digital interfaces.)
10 2 Sync Detect Polarity
This pin controls the polarity of the Sync Detect output
pin (Pin 136).
Table XXIX. Sync Detect Polarity Settings
Polarity Function
0 Activity = Logic 1 Output
1 Activity = Logic 0 Output
The default for this register is 0. (This option works on
both the analog and digital interfaces.)
Page 33

REV. 0
AD9887
–33–
SYNC DETECTION AND CONTROL
11 7 Analog Interface HSYNC Detect
This bit is used to indicate when activity is detected on
the HSYNC input pin (Pin 82). If HSYNC is held high or
low, activity will not be detected.
Table XXX. HSYNC Detection Results
Detect Function
0 No Activity Detected
1 Activity Detected
Figure 38 shows where this function is implemented.
11 6 Analog Interface Sync-on-Green Detect
This bit is used to indicate when sync activity is detected
on the Sync-on-Green input pin (Pin 108).
Table XXXI. Sync-on-Green Detection Results
Detect Function
0 No Activity Detected
1 Activity Detected
Figure 38 shows where this function is implemented.
Warning: If no sync is present on the green video input,
normal video may still trigger activity.
11 5 Analog Interface VSYNC Detect
This bit is used to indicate when activity is detected on
the VSYNC input pin (Pin 81). If VSYNC is held high or
low, activity will not be detected.
Table XXXII. VSYNC Detection Results
Detect Function
0 No Activity Detected
1 Activity Detected
Figure 38 shows where this function is implemented.
11 4 Digital Interface Clock Detect
This bit is used to indicate when activity is detected on
the digital interface clock input.
Table XXXIII. Digital Interface Clock Detection Results
Detect Function
0 No Activity Detected
1 Activity Detected
The sync processing block diagram shows where this
function is implemented.
11 3 Active Interface
This bit is used to indicate which interface should be
active, analog, or digital. It checks for activity on the
analog interface and for activity on the digital interface,
then determines which should be active according to
Table XXXIV. Specifically, analog interface detection
is determined by OR-ing Bits 7, 6, and 5 in this register.
Digital interface detection is determined by Bit 4 in this
register. If both interfaces are detected, the user can
determine which has priority via Bit 6 in register 12H.
The user can override this function via Bit 7 in Register 12H.
If the override bit is set to Logic 1, then this bit will be
forced to whatever the state of Bit 6 in Register 12H is set to.
Table XXXIV. Active Interface Results
Bits 7, 6,
or 5 Bit 4
(Analog (Digital
Detection) Detection) Override AI
000Soft
Power-Down
(Seek Mode)
0101
1000
1 1 0 Bit 6 in 12H
X X 1 Bit 6 in 12H
AI = 0 means Analog Interface.
AI = 1 means Digital Interface.
The override bit is in Register 12H, Bit 7.
11 2 AHS—Active HSYNC
This bit is used to determine which HSYNC should be
used for the analog interface, the HSYNC input or Syncon-Green. It uses Bits 7 and 6 in this register for inputs
in determining which should be active. Similar to the previous bit, if both HSYNC and SOG are detected the user
can determine which has priority via Bit 4 in Register
12H. The user can override this function via Bit 5 in
Register 12H. If the override bit is set to Logic 1, this
bit will be forced to whatever the state of Bit 4 in Register
12H is set to.
Table XXXV. Active HSYNC Results
Bit 7 Bit 6
(HSYNC (SOG
Detect) Detect) Override AHS
0 0 0 Bit 4 in 12H
0 101
1 000
1 1 0 Bit 4 in 12H
X X 1 Bit 4 in 12H
AHS = 0 means use the HSYNC pin input for HSYNC.
AHS = 1 means use the SOG pin input for HSYNC.
The override bit is in Register 12H, Bit 5.
11 1 AVS—Active VSYNC
This bit is used to determine which VSYNC should be
used for the analog interface; the VSYNC input or output
from the sync separator. If both VSYNC and composite
SOG are detected, VSYNC will be selected. The user can
override this function via Bit 3 in Register 12H. If the
override bit is set to Logic 1, this bit will be forced to whatever the state of Bit 2 in Register 12H is set to.
Page 34

REV. 0
–34–
AD9887
Table XXXVI. Active VSYNC Results
Bit 5
(VSYNC
Detect) Override AVS
00 0
10 1
X 1 Bit 2 in 12H
AVS = 1 means Sync separator.
AVS = 0 means VSYNC input.
The override bit is in Register 12H, Bit 3.
12 7 AIO—Active Interface Override
This bit is used to override the automatic interface selection (Bit 3 in Register 11H). To override, set this bit to
Logic 1. When overriding, the active interface is set via
Bit 6 in this register.
Table XXXVII. Active Interface Override Settings
AIO Result
0 Autodetermines the Active Interface
1 Override, Bit 6 Determines the Active Interface
The default for this register is 0.
12 6 AIS—Active Interface Select
This bit is used under two conditions. It is used to select
the active interface when the override bit is set (Bit 7).
Alternately, it is used to determine the active interface
when not overriding but both interfaces are detected.
Table XXXVIII. Active Interface Select Settings
AIS Result
0 Analog Interface
1 Digital Interface
The default for this register is 0.
12 5 Active Hsync Override
This bit is used to override the automatic Hsync selection
(Bit 2 in Register 11H). To override, set this bit to Logic
1. When overriding, the active Hsync is set via Bit 4 in
this register.
Table XXXIX. Active Hsync Override Settings
Override Result
0 Autodetermines the Active Interface
1 Override, Bit 4 Determines the Active Interface
The default for this register is 0.
12 4 Active Hsync Select
This bit is used under two conditions. It is used to select
the active Hsync when the override bit is set (Bit 5). Alternately, it is used to determine the active Hsync when not
overriding but both Hsyncs are detected.
Table XL. Active HSYNC Select Settings
Select Result
0 HSYNC Input
1 Sync-on-Green Input
The default for this register is 0.
12 3 Active VSYNC Override
This bit is used to override the automatic VSYNC selection
(Bit 1 in Register 11H). To override, set this bit to Logic 1.
When overriding, the active interface is set via Bit 2 in
this register.
Table XLI. Active VSYNC Override Settings
Override Result
0 Autodetermines the Active VSYNC
1 Override, Bit 2 Determines the Active VSYNC
The default for this register is 0.
12 2 Active VSYNC Select
This bit is used to select the active VSYNC when the
override bit is set (Bit 3).
Table XLII. Active VSYNC Select Settings
Select Result
0 VSYNC Input
1 Sync Separator Output
The default for this register is 0.
12 1 COAST Select
This bit is used to select the active COAST source. The
choices are the COAST input pin or VSYNC. If VSYNC
is selected, the additional decision of using the VSYNC
input pin or the output from the sync separator needs to
be made (Bits 3, 2).
Table XLIII. COAST Select Settings
Select Result
0 COAST Input Pin
1 VSYNC (See Above Text)
The default for this register is 0.
12 0 PWRDN
This bit is used to put the chip in full power-down. This
powers down both interfaces. See the section on Power
Management for details of which blocks are actually
powered down. Note, the chip will be unable to detect
incoming activity while fully powered-down.
Table XLIV. Power-Down Settings
Select Result
0 Power-Down
1 Normal Operation
The default for this register is 1.
Page 35

REV. 0
AD9887
–35–
DIGITAL CONTROL
13 7:0 Sync Separator Threshold
This register is used to set the responsiveness of the sync
separator. It sets how many pixel clock pulses the sync
separator must count to before toggling high or low. It
works like a low-pass filter to ignore Hsync pulses in order
to extract the Vsync signal. This register should be set to
some number greater than the maximum Hsync pulsewidth.
The default for this register is 32.
CONTROL BITS
14 2 Scan Enable
This register is used to enable the scan function. When
enabled, data can be loaded into the AD9887 outputs
serially with the scan function. The scan function utilizes
three pins (SCAN
IN
, SCAN
OUT
, and SCAN
CLK
). These
pins are described in Table I.
Table XLV. Scan Enable Settings
Scan Enable Result
0 Scan Function Disabled
1 Scan Function Enabled
The default for scan enable is 0 (disabled).
14 1 Coast Input Polarity Override
This register is used to override the internal circuitry that
determines the polarity of the coast signal going into
the PLL.
Table XLVI. Coast Input Polarity Override Settings
Override Bit Result
0 Coast Polarity Determined by Chip
1 Coast Polarity Determined by User
The default for coast polarity override is 0 (polarity
determined by chip).
14 0 HSYNC Input Polarity Override
This register is used to override the internal circuitry that
determines the polarity of the Hsync signal going into
the PLL.
Table XLVII. HSYNC Input Polarity Override Settings
Override Bit Result
0 Hsync Polarity Determined by Chip
1 Hsync Polarity Determined by User
The default for Hsync polarity override is 0 (polarity
determined by chip).
15 7 HSYNC Input Polarity Status
This bit reports the status of the Hsync input polarity
detection circuit. It can be used to determine the polarity
of the Hsync input. The detection circuit’s location is
shown in the Sync Processing Block Diagram (Figure 38).
Table XLVIII. Detected HSYNC Input Polarity Status
Hsync Polarity
Status Result
0 Hsync Polarity is Negative.
1 Hsync Polarity is Positive.
15 6 VSYNC Output Polarity Status
This bit reports the status of the Vsync output polarity
detection circuit. It can be used to determine the polarity
of the Vsync input. The detection circuit’s location is
shown in the Sync Processing Block Diagram (Figure 38).
Table XLIX. Detected VSYNC Input Polarity Status
Vsync Polarity
Status Result
0 Vsync Polarity is Active Low.
1 Vsync Polarity is Active High.
15 5 Coast Input Polarity Status
This bit reports the status of the coast input polarity
detection circuit. It can be used to determine the polarity of the coast input. The detection circuit’s location is
shown in the Sync Processing Block Diagram (Figure 38).
Table L. Detected Coast Input Polarity Status
Coast Polarity
Status Result
0 Coast Polarity is Negative.
1 Coast Polarity is Positive.
16 7–3 Sync-on-Green Slicer Threshold
This register allows the comparator threshold of the
Sync-on-Green slicer to be adjusted. This register adjusts
the comparator threshold in steps of 10 mV. A setting of zero
results in a 330 mV threshold. The setting of 31 results in
a 10 mV threshold.
The default setting is 23 and corresponds to a threshold
value of 70 mV.
17 7–0 Pre-Coast
This register allows the Coast signal to be applied prior
to the Vsync signal. This is necessary in cases where preequalization pulses are present. The step size for this
control is one Hsync period.
The default is 0.
18 7–0 Post-Coast
This register allows the coast signal to be applied following to the Vsync signal. This is necessary in cases where
post-equalization pulses are present. The step size for this
control is one Hsync period.
The default is 0.
19 7–0 Test Register
Must be set to default.
1A 7–0 Test Register
Must be set to 41H for proper operation.
Page 36

REV. 0
–36–
AD9887
1B 7–0 Test Register
Must be set to 10H for proper operation.
1C 7–2 Test Bits
Must be set to 6FH for proper operation.
1C 1 Output Format Mode Select
A bit that configures the output data in 4:2:2 mode. This
mode can be used to reduce the number of data lines used
from 24 down to 16 for applications using YUV, YCbCr,
or YPbPr graphics signals. A timing diagram for this mode is
shown on page 22. Recommended input and output configurations are shown in Table LI. In 4:2:2 mode, the red
and blue channels can be interchanged to help satisfy
board layout or timing requirements, but the green channel
must be configured for Y.
Table LI. 4:2:2 Output Mode Select
Select Output Mode
1 4:4:4
1 4:2:2
Table LII. 4:2:2 Input/Output Configuration
Input Output
Channel Connection Format
Red V U/V
Green Y Y
Blue U High Impedance
1C 1–0 Test Bits
Must be set to default.
2-WIRE SERIAL CONTROL PORT
A 2-wire serial interface control interface is provided. Up to four
AD9887 devices may be connected to the 2-wire serial interface,
with each device having a unique address.
The 2-wire serial interface comprises a clock (SCL) and a bidirectional data (SDA) pin. The Analog Flat Panel Interface acts
as a slave for receiving and transmitting data over the serial
interface. When the serial interface is not active, the logic levels
on SCL and SDA are pulled HIGH by external pull-up resistors.
Data received or transmitted on the SDA line must be stable for
the duration of the positive-going SCL pulse. Data on SDA must
change only when SCL is LOW. If SDA changes state while SCL
is HIGH, the serial interface interprets that action as a start or
stop sequence.
There are five components to serial bus operation:
• Start Signal
• Slave Address Byte
• Base Register Address Byte
• Data Byte to Read or Write
• Stop Signal
When the serial interface is inactive (SCL and SDA are HIGH)
communications are initiated by sending a start signal. The start
signal is a HIGH-to-LOW transition on SDA while SCL is
HIGH. This signal alerts all slaved devices that a data transfer
sequence is coming.
The first eight bits of data transferred after a start signal comprising
a 7-bit slave address (the first seven bits) and a single R/W bit (the
eighth bit). The R/W bit indicates the direction of data transfer,
read from (1) or write to (0) the slave device. If the transmitted
slave address matches the address of the device (set by the state of
the SA
1-0
input pins in Table LIII, the AD9887 acknowledges
by
bringing SDA LOW on the 9th SCL pulse. If the addresses do not
match, the AD9887 does not acknowledge.
Table LIII. Serial Port Addresses
Bit 7 Bit 6 Bit 5 Bit 4 Bit 3 Bit 2 Bit 1
A
6
A
5
A
4
A
3
A
2
A
1
A
0
(MSB)
1 001100
1 001101
1 001110
1 001111
Data Transfer via Serial Interface
For each byte of data read or written, the MSB is the first bit of
the sequence.
If the AD9887 does not acknowledge the master device during a
write sequence, the SDA remains HIGH so the master can
generate a stop signal. If the master device does not acknowledge
the AD9887 during a read sequence, the AD9887 interprets this
as “end of data.” The SDA remains HIGH so the master can
generate a stop signal.
Writing data to specific control registers of the AD9887 requires
that the 8-bit address of the control register of interest be written
after the slave address has been established. This control register
address is the base address for subsequent write operations. The
base address autoincrements by one for each byte of data written
after the data byte intended for the base address. If more bytes
are transferred than there are available addresses, the address will
not increment and remain at its maximum value of 1Dh. Any base
address higher than 1Dh will not produce an acknowledge signal.
Data is read from the control registers of the AD9887 in a similar
manner. Reading requires two data transfer operations:
The base address must be written with the R/W bit of the slave
address byte LOW to set up a sequential read operation.
Reading (the R/W bit of the slave address byte HIGH) begins at
the previously established base address. The address of the read
register autoincrements after each byte is transferred.
To terminate a read/write sequence to the AD9887, a stop signal must be sent. A stop signal comprises a LOW-to-HIGH
transition of SDA while SCL is HIGH.
A repeated start signal occurs when the master device driving
the serial interface generates a start signal without first generating a stop signal to terminate the current communication. This
is used to change the mode of communication (read, write)
between the slave and master without releasing the serial interface lines.
Serial Interface Read/Write Examples
Write to one control register
➥ Start signal
➥ Slave Address byte (R/W bit = LOW)
➥ Base Address byte
➥ Data byte to base address
➥ Stop signal
Page 37

REV. 0
AD9887
–37–
Write to four consecutive control registers
➥ Start signal
➥Slave Address byte (R/W bit = LOW)
➥Base Address byte
➥Data byte to base address
➥Data byte to (base address + 1)
➥Data byte to (base address + 2)
➥Data byte to (base address + 3)
➥Stop signal
Read from one control register
➥ Start signal
➥ Slave Address byte (R/W bit = LOW)
➥ Base Address byte
➥ Start signal
➥ Slave Address byte (R/W bit = HIGH)
➥ Data byte from base address
➥ Stop signal
Read from four consecutive control registers
➥ Start signal
➥ Slave Address byte (R/W bit = LOW)
➥ Base Address byte
➥ Start signal
➥ Slave Address byte (R/W bit = HIGH)
➥ Data byte from base address
➥ Data byte from (base address + 1)
➥ Data byte from (base address + 2)
➥ Data byte from (base address + 3)
➥Stop signal
BIT 7SDA
SCL
ACKBIT 6 BIT 5 BIT 4 BIT 3 BIT 2 BIT 1 BIT 0
Figure 37. Serial Interface—Typical Byte Transfer
Table LIV. Control of the Sync Block Muxes via the
Serial Register
Control
Mux Serial Bus Bit
Nos. Control Bit State Result
1 and 2 12H: Bit 4 0 Pass Hsync
1 Pass Sync-on-Green
3 12H: Bit 1 0 Pass Coast
1 Pass Vsync
4 12H: Bit 2 0 Pass Vsync
1 Pass Sync Separator Signal
5, 6, and 7 11H: Bit 3 0 Pass Digital Interface Signals
1 Pass Analog Interface Signals
THEORY OF OPERATION (SYNC PROCESSING)
This section is devoted to the basic operation of the sync pro
cess-
ing engine (refer to Figure 37 Sync Processing Block Diagram).
Sync Slicer
The purpose of the sync slicer is to extract the sync signal from
the green graphics channel. A sync signal is not present on all
graphics systems, only those with “sync-on-green.” The sync
signal is extracted from the green channel in a two step process.
First, the SOG input is clamped to its negative peak (typically
0.3 V below the black level). Next, the signal goes to a comparator with a trigger level that is 0.15 V above the clamped level.
The “sliced” sync is typically a composite sync signal containing
both Hsync and Vsync.
Sync Separator
A sync separator extracts the Vsync signal from a composite
sync signal. It does this through a low-pass filter-like or integratorlike operation. It works on the idea that the Vsync signal stays
active for a much longer time than the Hsync signal, so it rejects
any signal shorter than a threshold value, which is somewhere
between an Hsync pulsewidth and a Vsync pulsewidth.
The sync separator on the AD9887 is simply an 8-bit digital
counter with a 5 MHz clock. It works independently of the
polarity of the composite sync signal. (Polarities are determined
elsewhere on the chip.) The basic idea is that the counter counts
up when Hsync pulses are present. But since Hsync pulses are
relatively short in width, the counter only reaches a value of N
before the pulse ends. It then starts counting down eventually
reaching 0 before the next Hsync pulse arrives. The specific
value of N will vary for different video modes, but will always be
less than 255. For example with a 1 µs width Hsync, the counter
will only reach 5 (1 µs/200 ns = 5). Now, when Vsync is present
on the composite sync the counter will also count up. However,
since the Vsync signal is much longer, it will count to a higher
number M. For most video modes, M will be at least 255. So,
Vsync can be detected on the composite sync signal by detecting
when the counter counts to higher than N. The specific count
that triggers detection (T) can be programmed through the
serial register (0fh).
Once Vsync has been detected, there is a similar process to detect
when it goes inactive. At detection, the counter first resets to 0,
then starts counting up when Vsync goes away. Similar to the
previous case, it will detect the absence of Vsync when the
counter reaches the threshold count (T). In this way, it will
reject noise and/or serration pulses. Once Vsync is detected to
be absent, the counter resets to 0 and begins the cycle again.
SDA
SCL
t
BUFF
t
STAH
t
DHO
t
DSU
t
DAL
t
DAH
t
STASU
t
STOSU
Figure 36. Serial Port Read/
Write
Timing
Page 38

REV. 0
–38–
AD9887
PCB LAYOUT RECOMMENDATIONS
The AD9887 is a high-performance, high-speed analog device.
As such, to get the maximum performance out of the part it is
important to have a well laid-out board. The following is a guide
for designing a board using the AD9887.
Analog Interface Inputs
Using the following layout techniques on the graphics inputs is
extremely important:
Minimize the trace length running into the graphics inputs. This
is accomplished by placing the AD9887 as close as possible to
the graphics VGA connector. Long input trace lengths are undesirable because they will pick up more noise from the board and
other external sources.
Place the 75 Ω termination resistors as close to the AD9887
chip as possible. Any additional trace length between the termination resistors and the input of the AD9887 increases the
magnitude of reflections, which will corrupt the graphics signal.
Use 75 Ω matched impedance traces. Trace impedances other
than 75 Ω will also increase the chance of reflections.
The AD9887 has very high input bandwidth, (330 MHz). While
this is desirable for acquiring a high resolution PC graphics
signal with fast edges, it means that it will also capture any high
frequency noise present. Therefore, it is important to reduce the
amount of noise that gets coupled to the inputs. Avoid running
any digital traces near the analog inputs.
Due to the high bandwidth of the AD9887, sometimes low-pass
filtering the analog inputs can help to reduce noise. (For many
applications, filtering is unnecessary.) Experiments have shown
that placing a series ferrite bead prior to the 75 Ω termination
resistor is helpful in filtering out excess noise. Specifically, the
part used was the # 2508051217Z0 from Fair-Rite, but each
application may work best with a different bead value. Alternately,
placing a 100 Ω to 120 Ω resistor between the 75 Ω termination
resistor and the input coupling capacitor can also be beneficial.
Digital Interface Inputs
Each differential input pair (RXO+, RXO–, RXC+, RXC–, etc.)
should be routed together using 50 Ω strip line routing techniques and should be kept as short as possible. No other
components should be placed on these inputs; for example, no
clamping diodes. Every effort should also be made to route
these signals on a single layer (component layer) with no vias.
Power Supply Bypassing
It is recommended to bypass each power supply pin with a
0.1 µF capacitor. The exception is in the case where two or
more supply pins are adjacent to each other. For these groupings of powers/grounds, it is only necessary to have one bypass
capacitor. The fundamental idea is to have a bypass capacitor
within about 0.5 cm of each power pin. Also, avoid placing the
capacitor on the opposite side of the PC board from the AD9887,
as that interposes resistive vias in the path.
The bypass capacitors should be physically located between the
power plane and the power pin. Current should flow from the
power plane to the capacitor to the power pin. Do not make the
power connection between the capacitor and the power pin.
Placing a via underneath the capacitor pads, down to the power
plane, is generally the best approach.
SYNC STRIPPER
ACTIVITY
DETECT
NEGATIVE PEAK
CLAMP
COMP
SYNC
SOG
HSYNC IN
ACTIVITY
DETECT
MUX 2
HSYNC OUT
PIXEL CLOCK
MUX 1
SYNC SEPARATOR
INTEGRATOR
VSYNC
SOG OUT
HSYNC OUT
VSYNC OUT
MUX 4
VSYNC IN
1/S
PLL
HSYNC
ACTIVITY
DETECT
AD9887
CLOCK
GENERATOR
POLARITY
DETECT
POLARITY
DETECT
POLARITY
DETECT
MUX 3
COAST
COAST
Figure 38. Sync Processing Block Diagram
Page 39

REV. 0
AD9887
–39–
It is particularly important to maintain low noise and good
stability of PV
D
(the clock generator supply). Abrupt changes in
PV
D
can result in similarly abrupt changes in sampling clock
phase and frequency. This can be avoided by careful attention
to regulation, filtering, and bypassing. It is highly desirable to
provide separate regulated supplies for each of the analog circuitry groups (V
D
and PVD).
Some graphic controllers use substantially different levels of
power when active (during active picture time) and when idle
(during horizontal and vertical sync periods). This can result in
a measurable change in the voltage supplied to the analog
supply regulator, which can in turn produce changes in the
regulated analog supply voltage. This can be mitigated by regulating the analog supply, or at least PV
D
, from a different, cleaner
power source (for example, from a 12 V supply).
It is also recommended to use a single ground plane for the
entire board. Experience has repeatedly shown that the noise
performance is the same or better with a single ground plane.
Using multiple ground planes can be detrimental because each
separate ground plane is smaller, and long ground loops can result.
In some cases, using separate ground planes is unavoidable. For
those cases, it is recommended to at least place a single ground
plane under the AD9887. The location of the split should be at
the receiver of the digital outputs. For this case it is even more
important to place components wisely because the current loops
will be much longer (current takes the path of least resistance).
An example of a current loop:
P
O
W
E
R
P
L
A
N
E
A
D
9
8
8
7
D
I
G
I
T
A
L
O
U
T
P
U
T
T
R
A
C
E
A
N
A
L
O
G
G
R
O
U
N
D
P
L
A
N
E
D
I
G
I
T
A
L
G
R
O
U
N
D
P
L
A
N
E
D
I
G
I
T
A
L
D
A
T
A
R
E
C
E
I
V
E
R
Figure 39. Example of a Current Loop
PLL
Place the PLL loop filter components as close to the FILT pin
as possible.
Do not place any digital or other high-frequency traces near
these components.
Use the values suggested in the data sheet with 10% tolerances
or less.
Outputs (Both Data and Clocks)
Try to minimize the trace length that the digital outputs have to
drive. Longer traces have higher capacitance, which require
more current that causes more internal digital noise.
Shorter traces reduce the possibility of reflections.
Adding a series resistor of value 50 Ω–200 Ω can suppress reflections, reduce EMI, and reduce the current spikes inside of the
AD9887. If series resistors are used, place them as close to the
AD9887 pins as possible (try not to add vias or extra length to
the output trace in order to get the resistors closer).
If possible, limit the capacitance that each of the digital outputs
drives to less than 10 pF. This can easily be accomplished by
keeping traces short and by connecting the outputs to only one
device. Loading the outputs with excessive capacitance will
increase the current transients inside of the AD9887 creating
more digital noise on its power supplies.
Digital Inputs
The digital inputs on the AD9887 were designed to work with
3.3 V signals.
Any noise that gets onto the Hsync input trace will add jitter to
the system. Therefore, minimize the trace length and do not run
any digital or other high-frequency traces near it.
Voltage Reference
Bypass with a 0.1 µF capacitor. Place as close to the AD9887
pin as possible. Make the ground connection as short as possible.
REFOUT is easily connected to REFIN with a short trace. Avoid
making this trace any longer than it needs to be.
When using an external reference, the REFOUT output, while
unused, still needs to be bypassed with a 0.1 µF capacitor in
order to avoid ringing.
Page 40

REV. 0
–40–
C01026–0-10/01(0)
PRINTED IN U.S.A.
AD9887
160-Lead MQFP
(S-160)
1.238 (31.45)
1.228 (31.20) SQ
1.219 (30.95)
0.026 (0.65)
BSC
*
LEAD PITCH
1.106 (28.10)
1.102 (28.00) SQ
1.098 (27.90)
0.998
(25.35)
BSC SQ
0.015 (0.38)
0.012 (0.30) LEAD WIDTH
0.009 (0.22)
121
160
1
120
40
80
81
TOP VIEW
(PINS DOWN)
PIN 1
41
0.160 (4.07)
MAX
0.041 (1.03)
0.035 (0.88)
0.029 (0.73)
0.010 (0.25)
MIN
0.145 (3.67)
0.135 (3.42)
0.125 (3.17)
SEATING
PLANE
0.004 (0.10)
MAX
*THE ACTUAL POSITION OF EACH LEAD IS WITHIN 0.0047 (0.12) FROM ITS
IDEAL POSITION WHEN MEASURED IN THE LATERAL DIRECTION.
CENTER FIGURES ARE TYPICAL UNLESS OTHERWISE NOTED.
CONTROLLING DIMENSIONS ARE IN MILLIMETERS. INCH DIMENSIONS
ARE ROUNDED-OFF MILLIMETER EQUIVALENTS FOR REFERENCE
ONLY AND ARE NOT APPROPRIATE FOR USE IN DESIGN.
OUTLINE DIMENSIONS
Dimensions shown in inches and (mm).
 Loading...