

Page 1

380 MHz, 25 mA,
a
FEATURES
Fully Buffered Inputs and Outputs
Fast Channel-to-Channel Switching: 15 ns
High Speed
380 MHz Bandwidth (–3 dB) 200 mV p-p
310 MHz Bandwidth (–3 dB) 2 V p-p
1000 V/s Slew Rate G = +1, 2 V Step
1150 V/s Slew Rate G = +2, 2 V Step
Fast Settling Time of 15 ns to 0.1%
Low Power: 25 mA
Excellent Video Specifications (R
Gain Flatness of 0.1 dB to 90 MHz
0.01% Differential Gain Error
0.02ⴗ Differential Phase Error
Low All-Hostile Crosstalk –84 dB @ 5 MHz
–54 dB @ 50 MHz
Low Channel-to-Channel Crosstalk –56 dB @ 100 MHz
High “OFF” Isolation of –100 dB @ 10 MHz
Low Cost
Fast High Impedance Output Disable Feature for
Connecting Multiple Devices
= 150 ⍀)
L
Triple 2:1 Multiplexers
AD8183/AD8185*
FUNCTIONAL BLOCK DIAGRAM
IN0A
DGND
IN1A
GND
IN2A
V
V
IN2B
GND
IN1B
GND
IN0B
1
2
3
4
5
6
CC
7
EE
8
9
10
11
12
AD8183/AD8185
SELECT
DISABLE
0
1
2
24
23
22
21
20
19
18
17
16
15
14
13
V
OE
SEL A/B
V
OUT0
V
OUT1
V
OUT2
V
DVCC
V
CC
CC
EE
CC
EE
CC
APPLICATIONS
Pixel Switching for “Picture-In-Picture”
Switching RGB in LCD and Plasma Displays
RGB Video Switchers and Routers
PRODUCT DESCRIPTION
The AD8183 (G = +1) and AD8185 (G = +2) are high speed
triple 2:1 multiplexers. They offer –3 dB signal bandwidth up to
380 MHz, along with slew rate of 1000 V/µs. With better than
–90 dB of channel-to-channel crosstalk and isolation at 10 MHz,
they are useful in many high-speed applications. The differential
gain and differential phase errors of 0.01% and 0.02° respectively,
along with 0.1 dB flatness to 90 MHz make the AD8183 and
AD8185 ideal for professional video and RGB multiplexing. They
offer 15 n s channel-to-channel switching time, making them
an excellent choice for switching video signals, while consuming
less than 25 mA on ±5 V supply voltages.
Both devices offer a high speed disable feature that can set the
output into a high impedance state. This allows the building of
larger input arrays while minimizing “OFF” channel output
loading. They operate on voltage supplies of ±5 V and are offered
in a 24-lead TSSOP package.
Table I. Truth Table
SEL A/B OE OUT
0 0 INA
1 0 INB
0 1 High Z
1 1 High Z
VO = 1.4V STEP
1.4V
= 150V
R
L
1.2V
1.0V
0.8V
0.6V
0.4V
0.2V
0.0V
200mV
2ns
Figure 1. AD8185 Pulse Response; RL = 150
Ω
*Patents pending.
REV. 0
Information furnished by Analog Devices is believed to be accurate and
reliable. However, no responsibility is assumed by Analog Devices for its
use, nor for any infringements of patents or other rights of third parties
which may result from its use. No license is granted by implication or
otherwise under any patent or patent rights of Analog Devices.
One Technology Way, P.O. Box 9106, Norwood, MA 02062-9106, U.S.A.
Tel: 781/329-4700 World Wide Web Site: http://www.analog.com
Fax: 781/326-8703 © Analog Devices, Inc., 1999
Page 2

AD8183/AD8185–SPECIFICATIONS
(TA = 25ⴗC, VS = ⴞ5 V, RL = 1 k⍀ unless otherwise noted)
Parameter Condition Min Typ Max Unit
DYNAMIC PERFORMANCE
–3 dB Bandwidth (Small Signal) V
–3 dB Bandwidth (Small Signal) V
–3 dB Bandwidth (Large Signal) V
–3 dB Bandwidth (Large Si V
0.1 dB Bandwidth V
= 200 mV p-p 250/300 590/360 MHz
OUT
= 200 mV p-p, R
OUT
= 2 V p-p 250/300 530/350 MHz
OUT
= 2 V p-p, R
OUT
= 200 mV p-p 90/60 MHz
OUT
= 200 mV p-p, R
V
OUT
= 150 Ω 200/250 380/320 MHz
L
= 150 Ω 200/250 310/300 MHz
L
= 150 Ω 100/160 MHz
L
Slew Rate 2 V Step 1000/1150 V/µs
Settling Time to 0.1% 2 V Step, R
= 150 Ω 15 ns
L
NOISE/DISTORTION PERFORMANCE
Differential Gain NTSC or PAL, 150 Ω 0.01 %
Differential Phase NTSC or PAL, 150 Ω 0.02 Degrees
All-Hostile Crosstalk, RTI ƒ = 5 MHz, AD8185: R
ƒ = 50 MHz, AD8185: R
Channel-to-Channel Crosstalk, RTI ƒ = 100 MHz, AD8185: R
OFF Isolation ƒ = 10 MHz, R
= 150 Ω –100 dB
L
= 150 Ω –84/–72 dB
L
= 150 Ω –54/–50 dB
L
= 150 Ω –56/–54 dB
L
Voltage Noise, RTI ƒ = 10 kHz to 30 MHz 28/15 nV/√Hz
DC PERFORMANCE
Voltage Gain Error No Load 0.20 0.25/0.85 %
Input Offset Voltage, RTI 5 25/40 mV
to T
T
MIN
MAX
10 mV
Input Offset Voltage Matching, RTI Channel-to-Channel 1 25/40 mV
Input Offset Drift, RTI 15 µV/°C
Input Bias Current 6/10 10/15 µA
INPUT CHARACTERISTICS
Input Resistance 4/1 8/5 MΩ
Input Capacitance Channel Enabled 1 pF
Channel Disabled 1.5 pF
Input Voltage Range ±3.0/±1.5 V
OUTPUT CHARACTERISTICS
Output Voltage Swing R
= 1 kΩ±2.90 ±3.25 V
L
= 150 Ω±2.65 ±2.95 V
R
L
Short Circuit Current 60 mA
Output Resistance Enabled 0.3 Ω
Disabled 4/1 8/3 MΩ
Output Capacitance Disabled 4/6.5 pF
POWER SUPPLY
Operating Range ±4.5 ±5.5 V
Power Supply Rejection Ratio +PSRR +V
Power Supply Rejection Ratio –PSRR –V
= +4.5 V to +5.5 V, –VS = –5 V 58/62 66/72 dB
S
= –4.5 V to –5.5 V, +VS = +5 V 52/60 56/68 dB
S
Quiescent Current All Channels “ON” 25 30 mA
All Channels “OFF” 3/7 5/10 mA
T
MIN
to T
; All Channels “ON” 25 mA
MAX
SWITCHING CHARACTERISTICS
Switch Time Channel-to-Channel
50% Logic to 50% Output Settling IN0 = +1 V, IN1 = –1 V 15 ns
ENABLE to Channel ON Time
50% Logic to 50% Output Settling INPUT = 1 V 20 ns
ENABLE to Channel OFF Time
50% Logic to 50% Output Settling INPUT = 1 V 45 ns
Channel Switching Transient (Glitch) All Inputs Grounded 50/70 mV
DIGITAL INPUTS
Logic “1” Voltage SEL A/B and OE Inputs 2.0 V
Logic “0” Voltage SEL A/B and OE Inputs 0.8 V
Logic “1” Input Current SEL A/B and OE = 4 V 10 nA
Logic “0” Input Current SEL A/B and OE = 0.4 V 0.5 µA
OPERATING TEMPERATURE RANGE
Temperature Range Operating (Still Air) –40 +85 °C
θ
JA
θ
JC
Specifications subject to change without notice.
Operating (Still Air) 128 °C/W
Operating 42 °C/W
–2–
REV. 0
Page 3
AD8183/AD8185
WARNING!
ESD SENSITIVE DEVICE
AMBIENT TEMPERATURE – 8C
2.0
–50
MAXIMUM POWER DISSIPATION – Watts
–40 –30 –20 –10 0 10 20 30 40 50 60 70 80 90
1.5
1.0
0
TJ = 1508C
0.5
ABSOLUTE MAXIMUM RATINGS
1
Supply Voltage . . . . . . . . . . . . . . . . . . . . . . . . . . . . . . . . . 12.0 V
DVCC to V
Internal Power Dissipation
. . . . . . . . . . . . . . . . . . . . . . . . . . . . . . . . . . ±0.2 V
CC
2, 3
AD8183/AD8185 24-Lead TSSOP (RU) . . . . . . . . . . . . . 1 W
Input Voltage
IN0A, IN0B, IN1A, IN1B, IN2A, IN2B . . . . . V
SELECT A/B, OE . . . . . . . . . . . . . . . . . . DGND ≤ VIN ≤ V
Output Short Circuit Duration . . . . . . . . . . . . . . . . . . . Indefinite
≤ VIN ≤ V
EE
CC
CC
3
Storage Temperature Range . . . . . . . . . . . . . . . –65°C to +150°C
Lead Temperature Range (Soldering 10 sec) . . . . . . . . . . . 300°C
NOTES
1
Stresses above those listed under Absolute Maximum Ratings may cause permanent damage to the device. This is a stress rating only; functional operation of the
device at these or any other conditions above those indicated in the operational
section of this specification is not implied. Exposure to absolute maximum rating
conditions for extended periods may affect device reliability.
2
Specification is for device in free air (T
3
24-lead plastic TSSOP; θJA = 128°C/W. Maximum internal power dissipation (P
should be derated for ambient temperature (TA) such that P
= 25°C).
A
< (150°C–TA)/θ
D
)
D
.
JA
ORDERING GUIDE
Temperature Package Package
Model Range Description Option
AD8183ARU –40°C to +85°C 24-Lead Plastic TSSOP RU-24
AD8185ARU –40°C to +85°C 24-Lead Plastic TSSOP RU-24
AD8183-EVAL Evaluation Board
AD8185-EVAL Evaluation Board
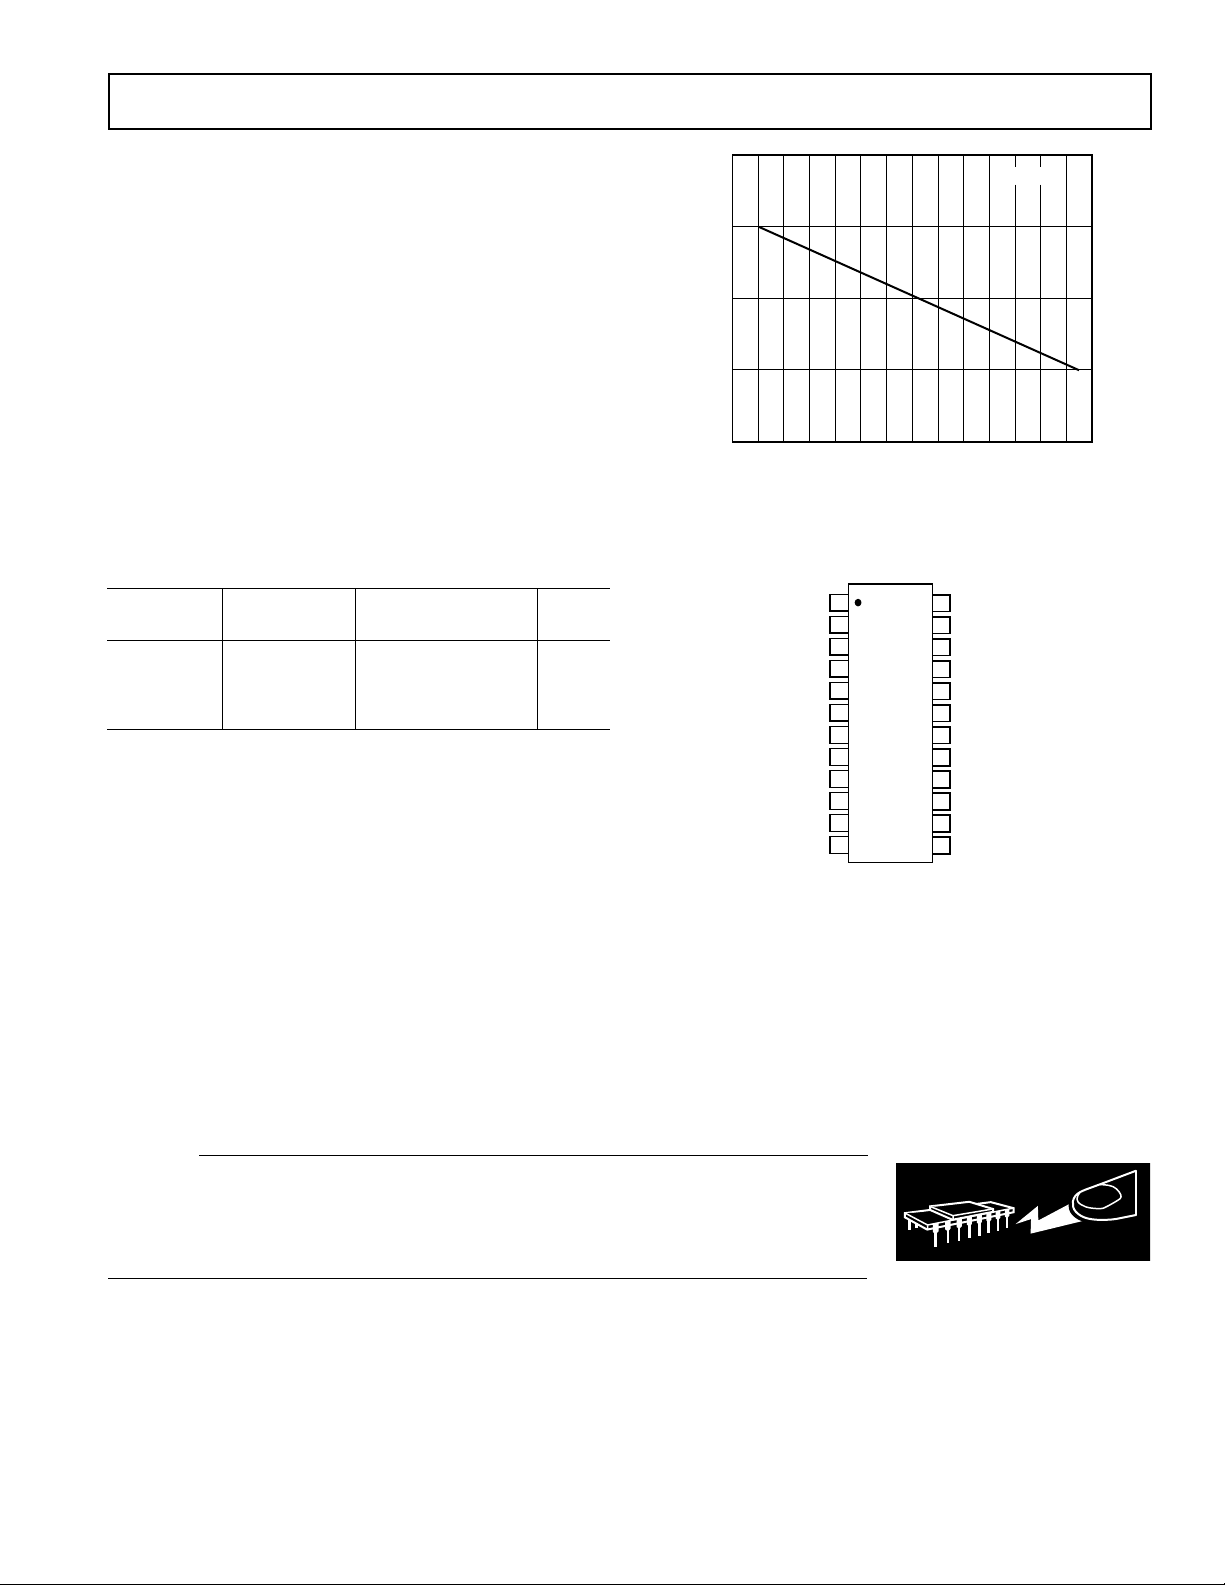
MAXIMUM POWER DISSIPATION
The maximum power that can be safely dissipated by the AD8183/
AD8185 is limited by the associated rise in junction temperature.
The maximum safe junction temperature for plastic encapsulated
devices is determined by the glass transition temperature of the
plastic, approximately 150°C. Temporarily exceeding this
limit may cause a shift in parametric performance due to a
change in the stresses exerted on the die by the package. Exceeding
a junction temperature of 175°C for an extended period can
result in device failure.
While the AD8183/AD8185 is internally short circuit protected,
this may not be sufficient to guarantee that the maximum junction
temperature (150°C) is not exceeded under all conditions. To
ensure proper operation, it is necessary to observe the maximum
power derating curves shown in Figure 2.
Figure 2. Maximum Power Dissipation vs. Temperature
PIN CONFIGURATION
1
IN0A V
2
DGND
3
IN1A
4
GND V
IN2A OUT0
V
V
IN2B V
GND OUT2
IN1B V
GND DVCC
IN0B V
CC
EE
AD8183/
5
AD8185
6
TOP VIEW
(Not to Scale)
7
8
9
10
11
12
24
23
22
21
20
19
18
17
16
15
14
13
CC
OE
SEL A/B
CC
V
EE
OUT1
CC
EE
CC
CAUTION
ESD (electrostatic discharge) sensitive device. Electrostatic charges as high as 4000 V readily
accumulate on the human body and test equipment and can discharge without detection.
Although the AD8183/AD8185 features proprietary ESD protection circuitry, permanent damage
may occur on devices subjected to high energy electrostatic discharges. Therefore, proper ESD
precautions are recommended to avoid performance degradation or loss of functionality.
REV. 0
–3–
Page 4
AD8183/AD8185
FREQUENCY – MHz
2
0.1
NORMALIZED GAIN – dB
1
0
–1
–2
–3
–4
–5
–6
–7
–8
1 10 100 1k
GAIN
FLATNESS
V
O
AS SHOWN
R
L
= 1kV
200mV p-p
2V p-p
200mV p-p
2V p-p
0.1
0
–0.1
–0.2
–0.3
–0.4
–0.5
–0.6
NORMALIZED FLATNESS – dB
0.2
0.3
FREQUENCY – MHz
4
0.1
NORMALIZED GAIN – dB
3
2
1
0
–1
–2
–3
–4
–5
–6
1 10 100 1k
VO = 200mV p-p
R
L
= 150V
C
L
= 5pF
TEMPERATURE AS SHOWN
+85 C
+25 C
–40 C
1
0
–1
–2
–3
–4
GAIN – dB
–5
V
–6
R
–7
–8
–9
0.1
AS SHOWN
O
= 150V
L
GAIN
FLATNESS
200mV p-p
2V p-p
1 10 100 1k
FREQUENCY – MHz
200mV p-p
2V p-p
0.1
0
–0.1
–0.2
–0.3
–0.4
–0.5
–0.6
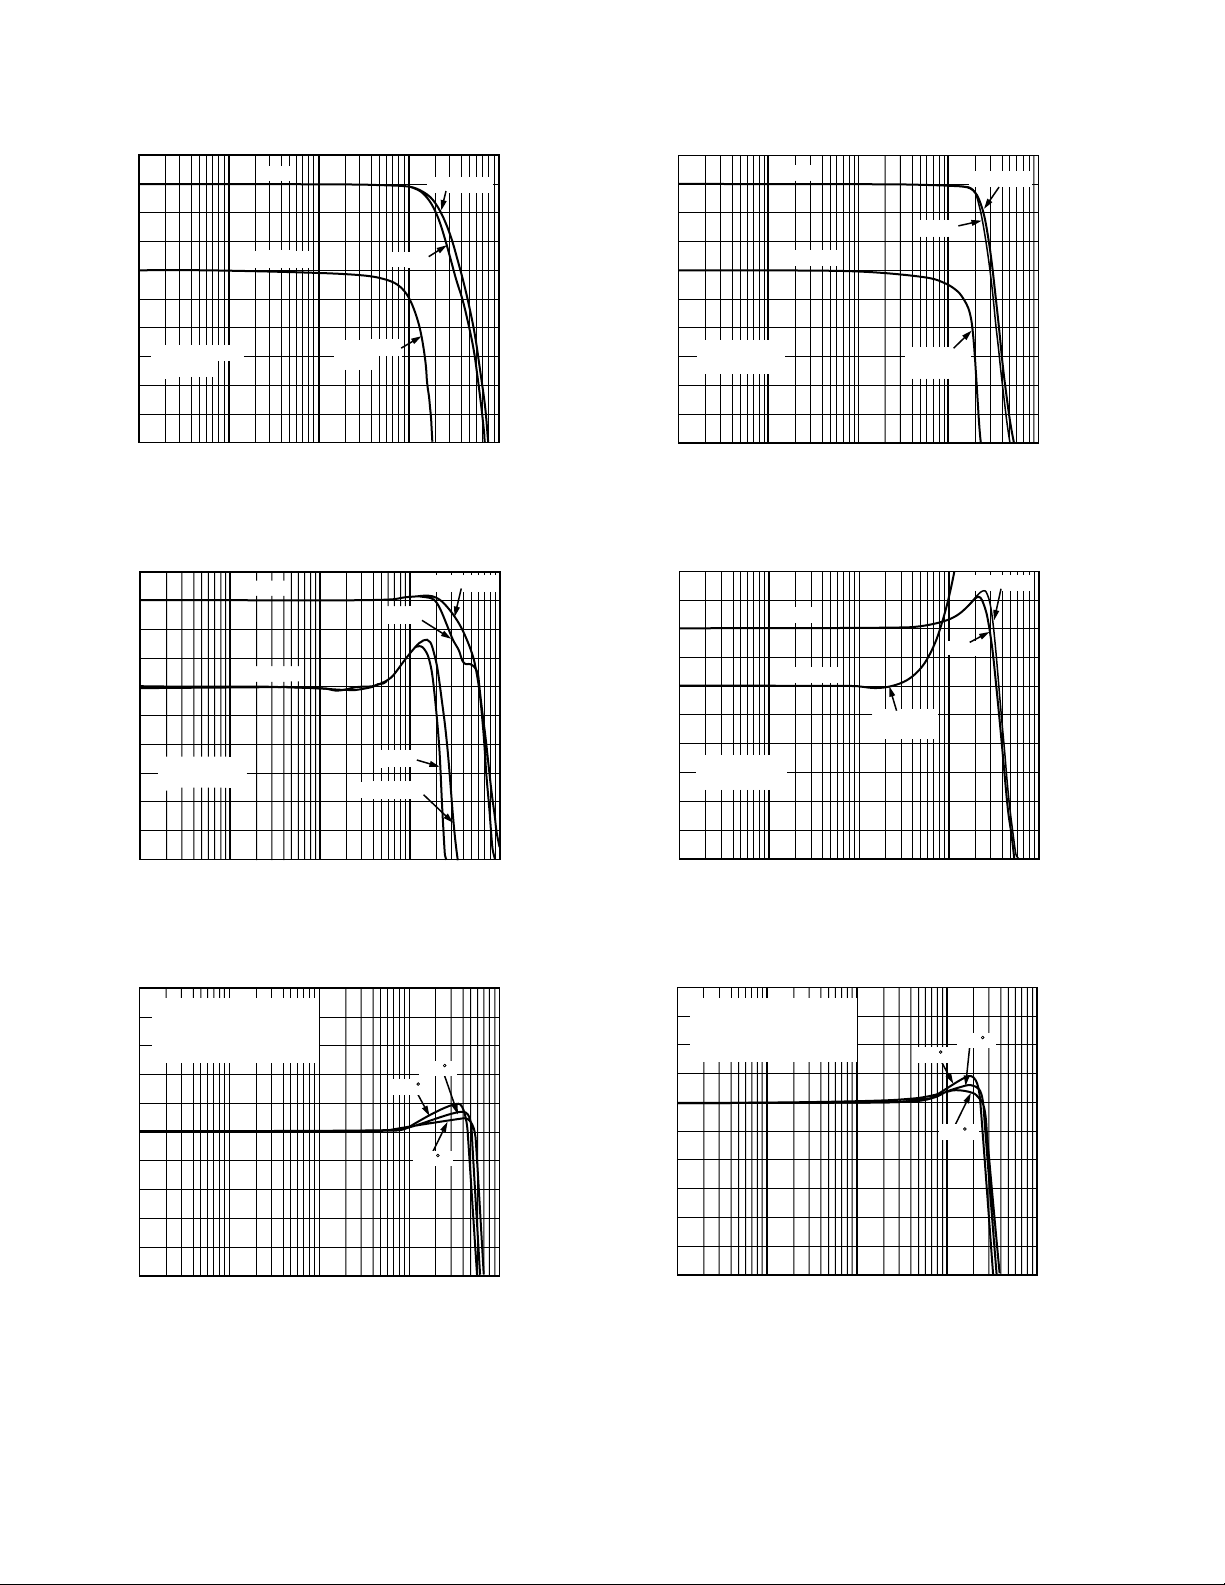
Figure 3. AD8183 Frequency Response; RL = 150
1
0
–1
–2
–3
–4
GAIN – dB
–5
–6
–7
–8
–9
0.1
V
AS SHOWN
O
= 1kV
R
L
GAIN
FLATNESS
200mV p-p
1 10 100 1k
FREQUENCY – MHz
2V p-p
2V p-p
200mV p-p
0.3
0.2
0.1
0
–0.1
–0.2
–0.3
–0.4
–0.5
–0.6
Figure 4. AD8183 Frequency Response; RL = 1 k
FLATNESS – dB
Ω
FLATNESS – dB
Ω
1
0
–1
–2
–3
–4
–5
AS SHOWN
V
O
–6
= 150V
R
NORMALIZED GAIN – dB
L
–7
–8
–9
0.1
GAIN
FLATNESS
200mV p-p
2V p-p
1 10 100 1k
FREQUENCY – MHz
200mV p-p
2V p-p
0.1
0
–0.1
–0.2
–0.3
–0.4
–0.5
–0.6
Figure 6. AD8185 Frequency Response; RL = 150
Figure 7. AD8185 Frequency Response; RL = 1 k
NORMALIZED FLATNESS – dB
Ω
Ω
5
4
3
2
1
0
GAIN – dB
–1
–2
–3
–4
–5
0.1
Figure 5. AD8183 Frequency Response vs. Temperature
VO = 200mV p-p
= 1kV
R
L
= 5pF
C
L
TEMPERATURE AS SHOWN
1 10 100 1k
FREQUENCY – MHz
+25 C
+85 C
–40 C
Figure 8. AD8185 Frequency Response vs. Temperature
–4–
REV. 0
Page 5
–10
FREQUENCY – MHz
–10
1
CROSSTALK – dB
–20
–30
–40
–50
–60
–70
–80
–90
–100
–110
10 100 1k
R
L
= 150V
R
T
= 37.5V
RTI MEASURED
ALL-HOSTILE
ADJACENT
FREQUENCY – MHz
–10
1
CHANNEL-TO-CHANNEL CROSSTALK – dB
–20
–30
–40
–50
–60
–70
–80
–90
–100
–110
10 100 1k
RL = 150V
R
T
= 37.5V
RTI MEASURED
DRIVE A, LISTEN B
DRIVE B, LISTEN A
FUNDAMENTAL FREQUENCY – MHz
0
1
DISTORTION – dBc
–10
–20
–30
–40
–50
–60
–70
–80
–90
–100
10 100
VO = 2V p-p
R
L
= 150V
SECOND HARMONIC
THIRD HARMONIC
= 1kV
R
L
–20
= 37.5V
R
T
–30
–40
–50
–60
–70
CROSSTALK – dB
–80
–90
–100
–110
1
ALL-HOSTILE
ADJACENT
10 100 1k
FREQUENCY – MHz
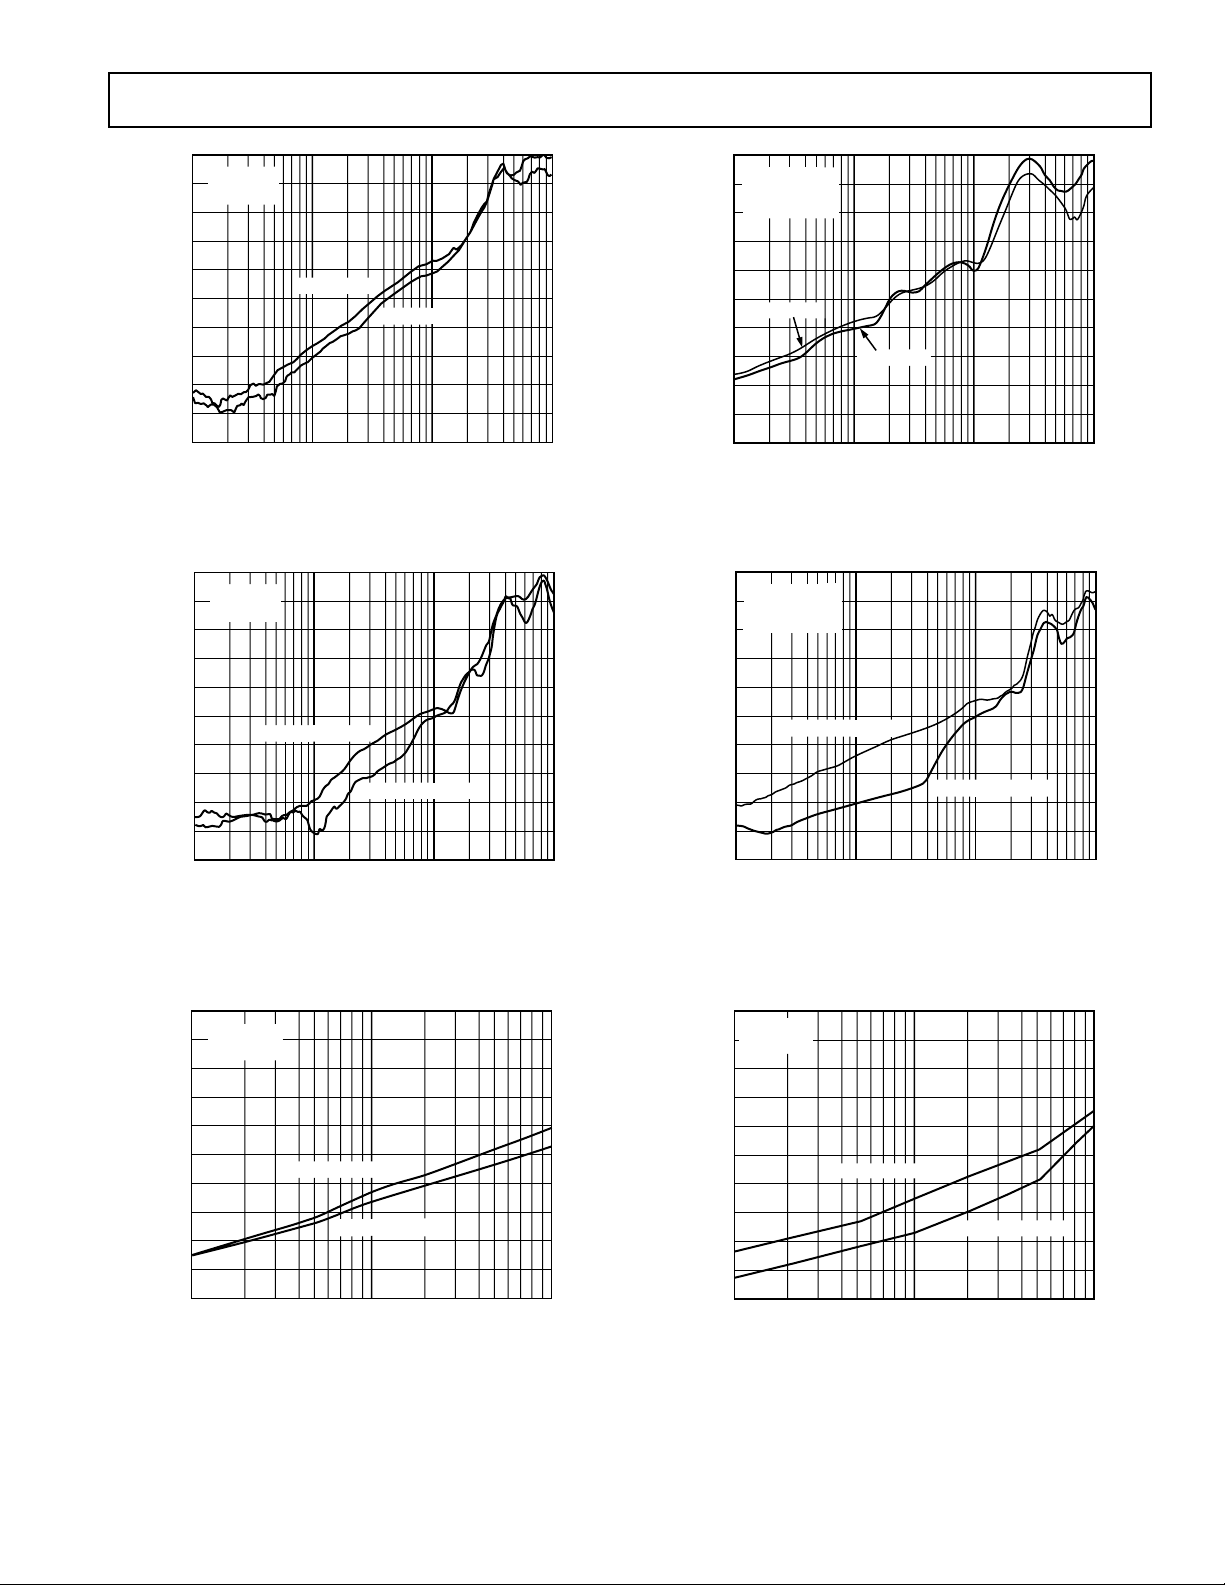
Figure 9. AD8183 Crosstalk vs. Frequency
–10
= 1kV
R
L
–20
–30
–40
–50
–60
–70
–80
–90
–100
CHANNEL-TO-CHANNELCROSSTALK – dB
–110
= 37.5V
R
T
DRIVE B, LISTEN A
DRIVE A, LISTEN B
1
10 100 1k
FREQUENCY – MHz
Figure 10. AD8183 Channel-to-Channel Crosstalk vs.
Frequency
AD8183/AD8185
Figure 12. AD8185 Crosstalk vs. Frequency
Figure 13. AD8185 Channel-to-Channel Crosstalk vs.
Frequency
0
= 2V p-p
V
O
–10
= 150V
R
L
–20
–30
–40
–50
–60
DISTORTION – dBc
–70
–80
–90
–100
1
Figure 11. AD8183 Distortion vs. Frequency
REV. 0
SECOND HARMONIC
THIRD HARMONIC
FUNDAMENTAL FREQUENCY – MHz
10 100
Figure 14. AD8185 Distortion vs. Frequency
–5–
Page 6

AD8183/AD8185
FREQUENCY – MHz
0.1
INPUT IMPEDANCE – V
1M
100k
10k
1k
100
1 10 100 1k
1M
FREQUENCY – MHz
0.1
OUTPUT IMPEDANCE – V
1M
100k
10k
1k
100
1 10 100 1k
10
0
1M
100k
10k
1k
INPUT IMPEDANCE – V
100
0.1
1 10 100 1k
FREQUENCY – MHz
Figure 15. AD8183 Input Impedance vs. Frequency
1k
100
10
1
OUTPUT IMPEDANCE – V
0.1
0.1
1 10 100 1k
FREQUENCY – MHz
Figure 16. AD8183 Output Impedance vs. Frequency;
Enabled
1M
Figure 18. AD8185 Input Impedance vs. Frequency
1k
1k
100
10
1
OUTPUT IMPEDANCE – V
0.1
0.1
1 10 100 1k
FREQUENCY – MHz
Figure 19. AD8185 Output Impedance vs. Frequency;
Enabled
100k
10k
1k
OUTPUT IMPEDANCE – V
100
10
0.1
Figure 17. AD8183 Output Impedance, vs. Frequency;
Disabled
1 10 100 1k
FREQUENCY – MHz
Figure 20. AD8185 Output Impedance vs. Frequency;
Disabled
–6–
REV. 0
Page 7

–40
FREQUENCY – MHz
–40
0.1
OFF ISOLATION – dB
–50
–60
–70
–80
–90
–100
–110
–120
–130
–140
1 10 100 500
FREQUENCY – MHz
–10
0.1
PSRR – dB
0
10
20
30
40
50
60
70
80
1 10 100
+PSRR
–PSRR
10 1k 10k 100k 1M 10M100
FREQUENCY – Hz
170
VOLTAGE NOISE – nV/ Hz
150
130
110
90
70
50
30
10
–50
–60
–70
–80
–90
–100
OFF ISOLATION – dB
–110
–120
–130
–140
0.1
1 10 100 500
FREQUENCY – MHz
Figure 21. AD8183 Off Isolation, Input–Output
–10
0
10
20
30
40
PSRR – dB
50
60
70
80
0.1
–PSRR
+PSRR
1 10 100
FREQUENCY – MHz
Figure 22. AD8183 PSRR vs. Frequency
AD8183/AD8185
Figure 24. AD8185 Off Isolation, Input–Output
Figure 25. AD8185 PSRR vs. Frequency
Figure 23. AD8183 Voltage Noise vs. Frequency
REV. 0
170
150
130
110
90
70
VOLTAGE NOISE – nV/ Hz
50
30
10
100
10
1k 10k 100k 1M 10M
FREQUENCY – Hz
Figure 26. AD8185 RTI Voltage Noise vs. Frequency
–7–
Page 8

AD8183/AD8185
VO = 2V STEP
R
L
= 150V
0.1%/DIV
0 5 10 15 20 25 30 35 40
5ns/DIV
10ns
100
90
10
0%
SEL A /B
IN0A AT
+0.5V
IN0B AT
–0.5V
V
OUT
–1.0V
0V
+1.0V
+1.0V
+1.8V
10ns
SEL A /B
100
90
10
0%
–0.05V
0V
+0.05V
+1.0V
+1.8V
0.1%/DIV
VO = 2V STEP
= 150V
R
L
0 5 10 15 20 25 30 35 40
5ns/DIV
Figure 27. AD8183 0.1% Settling Time
100
90
10
0%
AT –1V
IN0B
SEL A /B
IN0A AT +1V
V
OUT
10ns
+1.8V
+1.0V
+1.0V
0V
–1.0V
Figure 28. AD8183 Channel-to-Channel Switching Time
100
90
SEL A /B
+1.8V
+1.0V
Figure 30. AD8185 0.1% Settling Time
Figure 31. AD8185 Channel-to-Channel Switching Time
10
0%
Figure 29. AD8183 Channel-to-Channel Switching
Transient (Glitch)
10ns
+0.05V
0V
–0.05V
Figure 32. AD8185 Channel-to-Channel Switching
Transient (Glitch)
–8–
REV. 0
Page 9

0.10V
25mV
2ns
VO = 200mV STEP
R
L
= 150V
0.1V
0.05V
0.0V
–0.05V
–0.1V
250mV
2ns
VO = 2V STEP
R
L
= 150V
1.0V
0.5V
0.0V
–0.5V
–1.0V
0.05V
0.0V
–0.05V
VO = 200mV STEP
= 1kV
R
L
AD8183/AD8185
–0.10V
25mV
2ns
Figure 33. AD8183 Small Signal Pulse Response;
R
= 1 k
Ω
L
VO = 0.7V STEP
0.7V
= 1kV
R
L
0.6V
0.5V
0.4V
0.3V
0.2V
0.1V
0.0V
100mV
2ns
Figure 34. AD8183 Video Amplitude Pulse Response;
R
= 1 k
Ω
L
VO = 2V STEP
1.0V
= 1kV
R
L
Figure 36. AD8185 Small Signal Pulse Response;
R
= 150
L
Ω
1.4V
1.2V
1.0V
0.8V
0.6V
0.4V
0.2V
0.0V
VO = 1.4V STEP
= 150V
R
L
200mV
2ns
Figure 37. AD8185 Video Amplitude Pulse Response;
R
= 150
L
Ω
REV. 0
0.5V
0.0V
–0.5V
–1.0V
250mV
2ns
Figure 35. AD8183 Large Signal Pulse Response;
R
= 1 k
Ω
L
Figure 38. AD8185 Large Signal Pulse Response;
R
= 150
L
Ω
–9–
Page 10

5ns
0.5V
0.0V
–0.5V
250mV
RS = 0V, CL = 5pF
RS = 15V, CL = 20pF
RS = 20V, CL = 20pF
CL1kV
V
IN
V
OUT
R
S
75V
AD8183/AD8185
THEORY OF OPERATION
The AD8183 (G = +1) and AD8185 (G = +2) are triple-output,
2:1 multiplexers with TTL-compatible global input switching
and output enable control. Optimized for selecting between two
RGB (red, green, blue) video sources, the devices have high
peak slew rates, maintaining their bandwidth for large signals.
Additionally, the multiplexers are compensated for high phase
margin, minimizing overshoot for good pixel resolution. The
multiplexers also have video specifications that are suitable for
switching NTSC or PAL composite signals.
The multiplexers are organized as three independent channels,
each with two input transconductance stages and one output
transimpedance stage. The appropriate input transconductance
stages are selected via one logic pin (SELECT A/B), such that
all three outputs switch input connections simultaneously. The
unused input stages are disabled with a “t-switch” scheme to
provide excellent crosstalk isolation between “on” and “off”
inputs. No additional input buffering is necessary, resulting in
low input capacitance and high input impedance without additional signal degradation.
The transconductance stages, NPN differential pairs, source
signal current into the folded cascode output stages. Each output stage contains a compensating network and emitter follower
output buffer. Internal voltage feedback sets the gain with the
AD8183 being configured as a unity gain follower, and the
AD8185 as a gain-of-two amplifier with a feedback network.
This architecture provides drive for a reverse-terminated video
load (150 Ω) with low differential gain and phase error for
relatively low power consumption. Careful chip design and
layout allow excellent crosstalk isolation between channels.
One logic pin OE controls whether the three outputs are
enabled, or disabled to a high-impedance state. The high
impedance disable allows larger matrices to be built when
busing the outputs together. Also, when not in use the outputs
can be disabled to reduce power consumption. In the case of
the AD8185 (G = +2), a feedback isolation scheme is used so
that the impedance of the gain-of-two feedback network does
not load the output.
Note that full power bandwidth for an undistorted sinusoidal
signal is often calculated using peak slew rate from the equation:
Full Power Bandwidth
=
Peak slew rate is not the same as average slew rate (25% to 75%)
as typically specified. For a natural response, peak slew rate
may be 2.7 times larger than average slew rate. Therefore, calculating a full power bandwidth with a specified average slew rate
will give a pessimistic result.
APPLICATIONS
Driving Capacitive Loads
When driving a large capacitive load, most amplifiers will exhibit
peaking/ringing in pulse response. To minimize peaking, and to
ensure stability for larger values of capacitive loads, a small
resistor, R
capacitor, C
, can be added between the output and the load
S
. This is shown in Figure 39.
L
Peak Slew Rate
××()2 π
Sinusoid Amplitude
–10–
Figure 39. Pulse Responses Driving Capacitive Loads
Power Supply and Layout Considerations
The AD8183 and AD8185 are very high performance muxes
that require attention to several important design details to realize their specified performance. Good high-frequency layout
rules must be carefully observed.
A good design will start with a solid ground plane. All the GND
pins of the part(s) should be directly connected to it. In addition, bypass capacitors should be connected from each supply
pin (V
and VEE) to the ground plane. It is suggested to use
CC
0.01 µF surface-mount chip capacitors as close to the IC as
possible to provide high-frequency bypassing.
For lower frequency bypassing, higher value tantalum capacitors—
at least 10 µF—should be provided from both V
and VEE to
CC
ground. These do not have to be as close to the IC pins, because
parasitic inductance is not as big a factor at low frequencies.
Please refer to AD8183/AD8185 Evaluation Board Operation
Guide for further information.
Crosstalk
In normal operation the AD8183 and AD8185 will have signals
at some of the input pins that are not switched to appear at the
output. In addition, several signal paths will in general be active
at one time. In any system that has high-frequency signals that
are brought together in close proximity, there will be inevitable
crosstalk, whereby some fraction of the undesired signals will
appear at the outputs. This can result, for example, in ghost images
in an RGB monitor muxing application.
The AD8183 and AD8185 are capable of excellent lowcrosstalk performance. However, in order to realize the best
possible crosstalk performance, certain design details should be
followed. Most of the low-crosstalk specification is inherent in
the part and will result from observing the power supply and
layout consideration discussed above. This is because each of
the input and output pins are separated by at least either a
supply pin or a ground pin.
This package architecture helps the crosstalk performance in at
least three ways. First, the supply and ground pins provide extra
physical separation between the input- and output-signal pins.
Physical separation is a very effective technique for reducing
crosstalk.
Second, the supply and ground pins are at ac ground, and therefore provide a degree of shielding between the signals. This
works for both capacitive crosstalk, which is due to voltages on
the signals, and inductive crosstalk, which is due to currents that
flow through the signal paths.
REV. 0
Page 11

AD8183/AD8185
TOP LAYER
75V
SIGNAL LAYER
POWER
LAYER
50V
SIGNAL LAYER
0.005" (127mm)
0.0026" (66mm)
0.0038" (96.5mm)
0.0176" (447mm)
0.028" (711mm)
0.005" (127mm)
Third, the additional power and ground pins also yield lower
impedance on the power and ground lines, and therefore minimize
the effects of shared impedances on crosstalk.
Signal routing is also important for keeping crosstalk low.
Shielding and separation should be used for signals that must
run parallel over some length on the PC board. If signals must
cross, the trace widths should be kept narrow, and the signals
should cross at right angles to minimize the capacitance between
the traces.
4:1 RGB Multiplexer
For selecting among four RGB sources to drive a monitor, two
AD8185s can be combined to make a 4:1 RGB multiplexer. A
circuit for this is shown in Figure 40. Each RGB source is connected to either the three “A” or “B” inputs of one of the
AD8185s. In addition, all R signals are tied to “0” inputs, all
G signals are tied to “1” inputs, and all B signals are tied to “2”
inputs. All of these input signals should be terminated with the
standard 75 Ω to ground very close to the IC pins.
Each of the outputs of the AD8185 has a series 75 Ω resistor to
provide a back termination for the monitor load. Whichever
device is selected will drive the output signal through its three
termination resistors. When terminated by the monitor, the
voltage of these signals will be attenuated by a factor of two.
This is normalized by the gain-of-two of the AD8185.
Unlike many gain-of-two circuits, the impedance of the AD8185
is very high when it is disabled. This is due to a proprietary
circuit that disconnects the feedback network from a low impedance when the part is disabled.
75V
IN0A
IN0B
IN1A
IN1B
IN2A
IN2B
SEL A/B
IN0A
IN0B
IN1A
IN1B
IN2A
IN2B
SEL A/B
OE
OE
OE
OUT0
OE
OUT1
OE
OUT2
OE
OUT0
OE
OUT1
OE
OUT2
75V
RED
75V
GREEN
TO
MONITOR
75V BLUE
75V
75V
75V
–11–
75V
R
SEL 0
SEL 1
G
B
SOURCE 0
R
G
B
SOURCE 1
200V
R
G
B
SOURCE 2
R
G
B
SOURCE 3
75V
75V
75V
75V
100pF
75V
75V
75V
75V
75V
75V
200V
100pF
Figure 40. 4:1 RGB Multiplexer
Two control bits are required to select the input source for the
RGB signals. One is applied to each of the SEL A/B inputs of
each device to select between the two input sources for that
device. The other bit controls the OE inputs of the two devices.
REV. 0
A delay circuit is provided for each device to ensure that the
outputs of one device are disabled before the outputs of the
other are enabled.
If the RGB signals contain the sync information, such as a syncon-Green, this circuit is all that is necessary for the full 4:1 RGB
mux. However, if sync is carried on separate signals, such as in
PCs, the sync signals can be multiplexed through a digital multiplexer that operates from the same SEL signals.
The RC in the OE circuit is to ensure “Break-Before-Make”
operation. Using the values shown, a 20 ns time constant is
created. This will delay the enabling of the outputs of the new
selection until after the other devices’ outputs are disabled. This
time can be shortened or eliminated if the system can tolerate
the glitches caused by simultaneously enabled outputs.
EVALUATION BOARD
POWER AND GROUND
There are three power supply pins on the board. “VCC” is +5 V
analog, “V
” is –5 V analog, and “DVCC” is +5 V digital.
EE
These three power supply pins should be connected to good
quality, low noise supplies. If the same ±5 V power supply is
used for both analog and digital, separate cables should be run
from the power supply to the evaluation board’s analog and digital
power supply pins.
Three 10 µF tantalum capacitors (C1–C3) are located under the
power connector to decouple the power supplies as they first
enter the board. As the three supplies get close to the part, they
are again decoupled with 0.1 µF ceramic capacitors (C4–C6).
Finally, each power pin of the device is locally decoupled with a
0.01 µF ceramic capacitor (C7–C15).
The board has a separate analog and digital ground plane. With
the jumper at W5 installed, these two ground planes are tied
together on the board. Generally, this jumper should remain
installed.
INPUTS AND OUTPUTS
The evaluation board has been carefully laid out to demonstrate
the high speed performance of the device. Optimized for video
applications, all signal inputs are terminated with 75 Ω resistors
to ground (R1–R6). The three outputs are backterminated with
75 Ω series resistors (R12–R14). Stripline techniques are used
to achieve a 75 Ω characteristic impedance on the input and
output lines. See Figure 41 for the arrangement of the PCB
layers.
Figure 41. PCB Dimensions
In addition, 75 Ω BNC connectors are used on the six inputs
(J1–J6) and three outputs (J7–J9). The connectors are arranged
in a crescent around the device. This results in all the input and
output signal traces having the same length. Unused regions of
the multilayer board are filled up with ground planes. As a
Page 12

AD8183/AD8185
result, the input and output traces, in addition to having a controlled impedance, are well shielded.
SEL A/B AND OE
SEL A/B (Pin 22 of the device) allows the A or B inputs to be
selected.
When SEL A/B is at logic low, (equal to or less than 0.8 V),
inputs 0A, 1A and 2A are directed to OUTPUTs 0, 1, and 2,
respectively. When SEL A/B is at logic high, (equal to or greater
than 2.0 V), inputs 0B, 1B, and 2B are directed to OUTPUTs
0, 1, and 2, respectively.
There are two ways to provide SEL A/B to the device: using a
jumper or a BNC connection. With the jumper in the W4 position, SEL A/B is tied to ground. This selects the A inputs.
With the jumper in the W3 position, SEL A/B is tied to 5 V,
through pull up resistor R15. This selects the B inputs.
If faster use of SEL A/B is desired, the 50 Ω BNC connector at
J10 can be used. If J10 is used, there must NOT be a jumper on
W3 and W4. Microstrip line techniques provide a 50 Ω charac-
teristic impedance from J10 to the device. Please refer to Figure
DVCC
P1
1
DGND
P1
2
V
P1
4
EE
AGND
P1
5
V
CC
R16
20kV
W1
C8
0.01mF
W2
DGND
DGND
AGND
AGND
AGND
OE
J11
OE
75V
AGND
75V
AGND
75V
AGND
75V
AGND
75V
AGND
75V
AGND
R1
R2
R3
R4
R5
R6
75V STRIPLINE
75V STRIPLINE
75V STRIPLINE
V
CC
V
EE
75V STRIPLINE
75V STRIPLINE
75V STRIPLINE
C7
0.01mF
AGND
AGND
J1IN0A
J2IN1A
J3IN2A
J4IN2B
J5IN1B
J6IN0B
V
P1
CC
50V MICROSTRIP LINE
V
CC
DUT
1
IN0A
2
DGND
3
IN1A
4
AGND
5
IN2A
6
AD8183/
V
CC
7
AD8185
V
EE
8
IN2B
9
AGND
10
IN1B
11
AGND
12
IN0B
W5
AGND
6
R11
50V
OPTIONAL
DGND
C15
0.01mF
AGND
V
SEL A/B
V
OUT0
V
OUT1
V
OUT2
V
DVCC
V
DGND
Figure 42.␣ Evaluation Board Schematic
–12–
41 for the arrangement of the PCB layers. If J10 is used, the
user may wish to install a 50 Ω termination resistor at R10.
OE (Pin 23 of the device) allows the three outputs to be enabled
or disabled. When OE is at logic low, (equal to or less than
0.8 V), Outputs 0, 1, and 2 are enabled. When OE is at logic
high, (equal to or greater than 2.0 V), Outputs 0, 1, and 2 are
disabled (placed into a high impedance state).
Once again, there are two different ways to provide OE to the
device: using a jumper or a BNC connection. With the jumper
in the W2 position, OE is tied to ground. This enables the outputs.
With the jumper in the W1 position, OE is tied to 5 V, through
pull-up resistor R16. This selects “Hi Z,” or high impedance,
and the outputs are disabled.
If faster use of OE is desired, the 50 Ω BNC connector at J11
can be used. If J11 is used, there must NOT be a jumper on W1
and W2. Microstrip line techniques provide a 50 Ω characteris-
tic impedance from J11 to the device. Please refer to Figure 41
for the arrangement of the PCB layers. If J11 is used, the user
may wish to install a 50 Ω termination resistor at R11.
DVCC
C6
0.1mF
DGND
C5
0.1mF
AGND
C4
0.1mF
AGND
C10
0.01mF
DGND
DVCC
DGND
V
EE
AGND
V
CC
50V MICROSTRIP LINE
R10
50V
OPTIONAL
DGND
C14
0.01mF
AGND
C13
0.01mF
AGND
C12
0.01mF
AGND
C11
0.01mF
AGND
V
CC
V
EE
V
CC
V
EE
DVCC
V
CC
R14
75V
R13
75V
R12
75V
V
CC
R15
20kV
W3
W4
DGND
75V STRIPLINE
75V STRIPLINE
75V STRIPLINE
SEL A/B
J10
SEL A/B
J9 OUT0
J8 OUT1
J7 OUT2
+
C3
10mF
DGND
DGND
V
EE
C2
+
10mF
AGND
AGND
V
CC
+
C1
10mF
AGND
24
CC
23
OE
22
21
CC
20
19
EE
18
17
CC
16
15
EE
14
13
CC
C9
0.01mF
AGND
REV. 0
Page 13

AD8183/AD8185
Figure 43. Component Side Silkscreen
REV. 0
Figure 44. Board Layout (Component Side)
–13–
Page 14

AD8183/AD8185
Figure 45. Board Layout (75 Ω Signal Layer)
Figure 46. Board Layout (Ground Plane)
–14–
REV. 0
Page 15

AD8183/AD8185
Figure 47. Board Layout (Circuit Side;) 50 Ω Signal Layer
REV. 0
Figure 48. Circuit Side Silkscreen
–15–
Page 16

AD8183/AD8185
OUTLINE DIMENSIONS
Dimensions shown in inches and (mm).
24-Lead Plastic TSSOP
(RU-24)
0.311 (7.90)
0.303 (7.70)
PIN 1
0.006 (0.15)
0.002 (0.05)
SEATING
PLANE
24
0.0256 (0.65)
BSC
13
121
0.0433 (1.10)
MAX
0.0118 (0.30)
0.0075 (0.19)
0.177 (4.50)
0.169 (4.30)
0.256 (6.50)
0.246 (6.25)
0.0079 (0.20)
0.0035 (0.090)
C3689–5–10/99
88
08
0.028 (0.70)
0.020 (0.50)
–16–
PRINTED IN U.S.A.
REV. 0
 Loading...